#MIGHT delete later depending on how many people do it
Explore tagged Tumblr posts
Text
send me your anonymous soccer confessions please🙏
#Asks#Ask game#Soccer#Football#sports#text#reposts are DEEPLY appreciated#literally say whatever you want idc#MIGHT delete later depending on how many people do it#cuz if only one person does it than I'll know who it is...#give me your strength fanfic oomfie cuz idk how to survive awkward situations ugh🙏#confessions#soccerconfessions2k
2 notes
·
View notes
Text
Yknow what, I might as well see what happens
Gonna do the notes game, just gonna see what happens I dunno (I have a lot of stuff I need to do and no motivation so I’ll use the internet to force me to)
25 notes - I’ll finish reading Good Omens
50 notes - I’ll finish pulp musicals (I started it and got distracted, came back an hour later so damn confused I HAD MY EARBUDS IN AND EVERYTHING)
100 notes - I’ll draw more (both traditionally and digitally, I want to improve)
150 notes - I’ll continue writing a coffee shop au I started last October and never finished (it was like 75 pages and I just stopped :()
200 notes - I’ll listen to Starry
250 notes - I’ll try to get at least a 70% in Spanish this quarter
300 notes - I’ll clean my room
350 notes - I’ll work on eating healthier
500 notes - I’ll spend more time with my friends outside of school
750 notes - I’ll finish listening to all the musicals on my musical watch list (there are so many of them…)
1000 notes - I’ll get back to doing taekwondo
1500 notes - I’ll take a walk every day
2000 notes - I’ll spend more time with my family
2500 notes - I’ll rewrite my really bad Xehaqus fic from 2 years ago and try my hardest not to just delete all of it (I’d be rewriting 183 pages, I dunno I wanna see how I’d write it now without changing the entire plot)
3000 notes - I’ll actually start to study for school and not just wing it
4000 notes - I’ll stop being such an asshole to my parents Jesus Christ how do they deal with me
5000 notes - I’ll come out to my mom as trans
Try and reach the goal before uhhhhh I dunno April 16th
I may add more later, depends on how fast yall go through the goals, I have a lot of things I need to do (mainly because I need to start caring about my health and how I treat other people). I dunno, let’s see how this goes
Edit kinda did the “come out to my mom” thing soooooo idk I’ll figure something out for 5000 (maybe)
#note game#Yall im so bored#And I need motivation#And also I need to start being like… a decent person#Idk man#I probably shouldn’t be needed to do some of these things but also peer pressure is a wonderful thing#And I’m just kinda a mess rn#Hopefully 4th quarter for school goes well#Fingers crossed?
153 notes
·
View notes
Text
God imagine how funny history would be if we got some early european explorers showing up in the Americas and trying to settle down and do things the way they did back in Europe and immediately finding that nothing worked the way they expected but instead of just brute forcing the square peg through a round hole into the eternal torment nexus nightmare that is colonialism they just said "you know what? actually fuck this!" and just gave the fuck up. and it just became a funny little blip in history textbooks like "wow europeans tried to colonize america but sucked at it so badly that they just gave up and went home/joined up with the locals/died badly". but no we fucking live in the bad timeline where we somehow threaded the camel through god damn needle and not only survived but nearly annihilated everyone and everything else in the process, and that fucking fluke still affects and harms all of us every single day of our lives HUNDREDS OF YEARS LATER

(finally catching up on my history class)
The line between recognizing the power of native societies and appreciating the cool parts of their cultures and being weirdly fetishizing like native americans are funny little nature fairies is Very thin, and I'm consciously avoiding it because I know that ultimately does more harm than good, but man it is hard to not fall into the trap of just reducing it to "America Good. Europe Bad" sometimes when learning about this stuff. Some of the things native cultures were doing before colonists showed up is just so obviously . an objectively better way of doing things . And it's absolutely dumbfounding that colonists just did not see that until we started thinking of native americans as little nature fairies that have the Magical Nature Wisdom. I can't believe more early settlers didn't just immediately bail on the shitty disease-riddled deadly freezing cold colonies and go live with the people who actually seemed to know what they were doing and were thriving in the really complicated environment of what is now known as New England
#I can't rewrite the past though. No matter how much I scream they will not hear me. They're dead!#And wasting my breath screaming at ghosts is awfully convenient for the people with vested interests in keeping colonialism alive#So while it is sometimes a little cathartic indulge in What Ifs and calling dead people idiots. I know that won't fix anything#I keep trying to word my feelings on this subject but it all ends up sounding very white savior#and/or i am the one guy who is going to fix everythint#When that is Not what I feel. I know I am just one voice of rage in many and my volume should be used to amplify the voices of the actual#victims wherever it can#But it's also like. destroying colonialism shouldn't just be left up to the people hurt most by it#And sometimes I think white people use the whole 'listening and learning uwu' thing as like. an excuse to not say or do anything#like 'omg my voice is useless so i better not say anything at all uwu'#But like. You don't charge the victim of an assault with bettering their assaulters. That's not how any of this actually works#I think there's a sign somewhere on my college campus that says. Something like#Destroying racism is white people's work#it's been a while so idr the exact verbiage but. Yeah!!!#sorry i took adderall and testosterone and got really mad#i might delete these posts later depending on how retroactively embarassing I find them#sometimes I just need to declutter my mind tho fndjjdndb I should just write a journal#BUT also when it comes to topics like this I really do appreciate the feedback also. So.
30 notes
·
View notes
Text
Compiling some questions and information regarding indigo park from unique geese's live streams.
Some clips might not be long enough for the full answer due to YouTube only being 60 seconds so just keep that in mind.
A bit of the older ones could contain stuff that aren't up to date that I forgot to remove because I was making this in my notes for like 3-5 weeks so lets uh. ignore those!! (ill delete them later maybe)
IF I SCREAM THE STREAM ENDS
'I think comparing Issac to fucking Willam afton is such a sad comparison'
Credits to @lunozapp for the clip
INDIGO Q&A
“Will there be any boss fights?”
‘That’s a hard thing to say. I’m gonna say no.’
“How old are Rambley and his friends?”
'They’re all over 18. Probably around there early 20s at oldest. They’re younger but I don’t really have set ages for them.'
“Would Indigo park be rated M?”
'I would argue indigo park chapter 1 could get away as teen but I’d like to rate it up as a M by chapter 2.'
“Is chapter 2 going to take place under the park?”
'No. There might be parts under but chapter 2 won’t.'
“Rambley has been left alone since the park closed. Has he practically sat alone for that long?”
'In all technicality, he was sitting there alone and abandoned for many years. He’s not fully aware of what’s going on, but he is you know?”
“Do you have any plans for future chapters?”
'The entire greater story has been set in stone for months and we don’t have any plans to change it.'
'There’s stuff in chapter 1 that people won’t realize are important to the plot until chapter 5.'
“Is mollie macaw an antagonist?”
'Depends what you’re saying when you say mollie macaw. Antagonist is a strong word.'
LAUNCH STREAM
“Is the raccoon evil?”
'No. You guys just buckle up. you’ll see.'
REACTING TO YOUTUBERS
“Did you expect for Rambley to be popular with the furries?”
‘I made a joke that it would be popular within it but nothing in the game was designed to be furry. It was just like “hey we need parody’s of Mickey Mouse and Disney characters” ending up creating characters I really liked.'
“Do you know that there’s already NFSW art of Rambley?”
'It’s the internet sorry. If you make NFSW stuff I just ask you don’t send it to me or inject it to the rest of the community. Keep it separate, these are like my children.'
“How many versions of the railroad did u go through?”
'It took quite a while. We would get to a point where we kind of liked it and then be like “oh I don’t really like this it doesn’t flow really well.” I think the great thing going into chapter 2 we have a better understanding of what we want the game to look. Chapter 2s going to be mainly a lot of the rides. It was kind a deal where I wanted you to feel claustrophobic but it was hard to deal with those open environments. I’m not gonna announce anything crazy but chapter 2 will start in the queue and lobby for oceanic oddesy'
“How many chapters will there be?”
'The game plan is five.'
“Is this the last time we will see Mollie? Her death screen mentions she can copy voices but that wasn’t shown. Will be shown again to do that mechanic?”
'The voices were less of a mechanic and more of showing going on when she’s talking throughout the game. All the dialogue is something she’s heard during game,behind the scenes of the park or something that a guest has said.'
“Is Rambley the bad guy?”
'What part of the game made you think Rambleys the bad guy? No.'
“I trust Rambley with my life. If he betrays us I’ve already forgiven him.”
'Yeah, you don’t need to worry about that.'
“Whys the main character so jacked?”
'It’s just the character model I had I was using. We might change it.'
Critter cuff
'I was big against the idea of having one mechanic. They saw poppy playtime and instantly thought “every mascot horror needs a mechanic.” The critter cuffs important but I also want different fun mechanics that can be worked into it.'
“Do you plan to add more characters?”
'There will be more characters added into chapter 2. There may some returning characters. Obviously Rambley will be the focus of every chapter he’s ur buddy through ur journey. We do have a new set of characters.'
“Will there be another credits song in chapter 2?”
'We don’t want to start planning stuff until we know for sure how much money is there budget wise.'
“Where’s the cat?”
'There originally was just a regular ass cat that was in the and was in the game for quite a while. The model we had didn’t look like it fit the world and the animation looked stiff. Maybe we bring it back.'
“What were the stealth things in the files for?”
'Originally there was a section where Lloyd would follow you and you’d hide. I definitely want to do some stealth stuff where you have to hide under stuff I think that’d be a lot of fun.'
“Will Mollie return?”
'Do you think Mollie will return?'
“Is Rambley sentient?”
'He’s fully aware of everything around him but he’s programmed to behave a certain way. The best comparison would be GLaDOS or Wheatley from portal. Programmed to act a certain way, but also aware and able to see stuff around them and react.'
“How long will chapter 2 be?”
'We’re aiming chapter 2 to be just a little bit longer then chapter 1. We want each chapter to be a bit longer than before. I’d say for chapter 2, two and a half
'The only character that won’t have much influence is clearly Mollie.'
“What about Lloyd?”
'Lloyd’s cool and Lloyd will be important. That is all I can say.'
“Will there be other AI companions?”
'No. It’s just Rambley the main mascot.'
“Is there a possibility of a major overhaul of chapter 1?”
'There’s room to improve it a bit. In the future, I can see us doing a full on remaster of chapter 1.'
“Never make Rambley a creep I will not forgive you for it”
'You got it.'
“What’s the estimated gap between the chapters?”
'Year to Year and a half, maybe two. Chapter 2 is definitely 2025.'
“Don’t be fooled?”
'There was a lot more potential do something with that. If we had more budget then it would be really cool where you’re running through the pipes and you have to listen for Rambleys voice through the pipes and sometimes it would be mollies voice. It would be Rambley guiding you and then you hear Mollie trying to sound like Rambley.'
“It hurts Lloyd”
'That’s the funny thing. I don’t wanna get TOO deep into it but this was kinda just random text. I’ve seen 5 or 6 different interpretations of what people think it says.'
'Without spoiling anything I do think multiple ending’s for the final chapter would be kinda cool.'
REACTING TO MATPAT
“A lot of sexual tension between these guys”
'Shout out to the furries because I’ve seen every combination of characters being shipped and it wasn’t until today that a single female character was involved that all. Not mollie not Nonbinary with Salem it was literally just the 3 men'
“Does Rambley canonically sing Rambley review?”
'Yes he actually does. It’s in between chapter whenever ur going into chapter 2. The player could turn around and find a way out now but he actively wants to keep going with Rambley.'
TALKING ABOUT INDIGO PARK,FNF AND MORE
“The voice and creator of indigo park”
'I don’t voice anyone expect for Jackson and another character that no ones found yet.'
“Are you ever going to get a console support?”
'So we will eventually but to be honest with you I don’t want to do that until we have like chapter 3 out. At earliest if chapter 2 becomes massive then maybe as a bundle, but I don’t know.'
“Is chapter 2 free?”
'No it won’t be.'
FUNKAST THEN FNAF
'Other then a few minor tweaks we have the first few minutes of Rambleys dialogue at the beginning of chapter 2 written out.'
'I don’t think we’ll ever do a fox character. We were brainstorming some of the characters in chapter 2 and thought “oh maybe a fox would be cool” but we were looking at the role that this character would have to play if they were a fox and thought “at some point we’re just making knock off foxy from fnaf”'
“What the species”
'I cant disclose that sorry chief. There are other animal based cartoon characters in chapter 2 if that satisfies you. Furries rejoice I guess? I feel like it’d be harder to do a human villain.'
“How hard is it to make an idea of a character?”
'All of the characters we make need a purpose. It’s layers of talking through stuff and ideas to get stuff we like. The designs for them aren’t done but the idea for them is there and i am in love with them.'
“So the character design isn’t finished but have you made actual development of the game?”
'No. We’re working on chapter 1 right now. Again we’re looking at a year and a half or two years until chapter 2 cuz I’m not gonna rush it or my team. We’ll have little animations stuff and between yeah we’re not gonna do anything with that.
“Update is bug fixes, trying to get controller support working,revamping some of the environments and I’m bringing on a new modeler for some of the monster designs. Not confirming but i think Finley is going to get a full on redesign for chapter 2.”
“What chapter are you most excited for?”
'To be honest with you, i think chapter 3 is where we’re going to start doing the crazy shit possible and then chapter 4 is planned to be the most bad ass chapter i could ever think of. The story gets moving chapter 4.'
NEW FNAF GAME + INDIGO PARK NEWS
'It turned out that jakeneutron who’s my head animator, was going to Disney at the same time I’m at Orlando. We met up and we took so many pictures for reference. We went to universal studios and it was my first time we ever went to universal so I took so many pictures'
“Refs for what?”
'For indigo park bro. Dude I needed anything theme park and I got so many ideas for the future of indigo and stuff.'
“Salem news or I’m not here”
'Do I wanna put out Salem news..Salem is important 👍'
'I’ve kind of teased it a bit but we are working on some minor chapter 1 before chapter 2 just so there’s a bit of a quality jump so it’s a little bit more in the realm of where we want it to be.'
'We are working on some environmental updates. Working on some new assets to put into chapter 1. Which should make stuff feel cooler in my opinion? '
'To accompany that one thing we didn’t have a lot of is that environmental music in regards to what they would have in a real theme park. Like if ur waiting in a queue in a theme park there’s a lot of music and stuff that they play that is custom to that. Let’s say you were waiting for Rambleys railroads, what would that sound like? So maybe a little bit of new music?'
New potential song in clip link
FINISHING INTO THE PIT & NEW INDIGO PARK PLUSH LAUNCH PARTY
“Character hints?”
'I think you will be soft introduced or at least see the character designs before chapter 2s out. Right now at this point of development there are four new characters planned.'
“Is there gonna have a obby theme?”
‘Probably not really. I’ve talked about a little about a mechanic that we started to workshop and figuring out how it’ll work in the lore and gameplay elements but I probably won’t talk about it again.'
“Will there be a haunted house ride or a dark ride?”
'I want to do a haunted mansion parody hopefully chapter 4 or 5. Not in chapter 2 it wouldn’t fit.'
“Space mountain?”
'I have ideas for a space mountain and I can’t tell you what chapter that one will be in.'
'It’s funny cuz I’m reworking all of the chapter 1 environments and I’ve been thinking about it. There’s a fair enough of stuff that theorists haven’t caught onto yet that I hope will be super obvious in the future. I’m super excited to see what people do with chapter 2.'
HORROR GAME NIGHT & TALKING INDIGO PARK
“Will you be selling art prints maybe with posters?”
'We might do posters. There’s some new poster art coming for chapter 2 and I’m gonna leak, the (chap 1) update.'
“Now will they all have villain roles?”
'I dunno. I’ve already told you guys about some of them actually you guys just haven’t figured it out yet'
Talking about the 4 new characters
'I will say the chapter 1 update will have new secrets for you to find and some of it will help you figure out stuff in chapter 2. We are cooking is all I can say.'
“Whats ur favorite out of the 4 originals we know about since u said 4 new characters”
'Yeah let me just reveal one of the characters. No. You guys won’t- actually? You guys will know about some of the characters WAY before chapter 2 comes out.'
BACK FROM PAX! - WATCHING JACKSEPTICEYE PLAY INDIGO PARK & CATCHING UP ON FNF MODS
'there’s a little bit of the new queue! A little bit of a step up. I mean hot take but. Looks a lot better I think.'
Queue in clip
'We’re still working on it but this is what Mollies landing pad looks like now. This feels more themed.'
New mollies landing pad in clip
“Can you make an update trailer for the indigo park update so people know it exists?”
'Yea we will. We’ll change it.'
Extra notes worth mentioning:
it’s been said that there will be a meme ending for chapter 3 though I’m not able to find the clip at the moment so if anyone somehow has it u should tots send it my way
When he's talking about the 'Other character he voices that no ones found yet' it might be possible he’s yapping about the reverse Llyods Limos line Context:
youtube
Video is from forgottenstudios1987 on YT
The cat been brought back!

Another part of the new rambleys railroad queue song.
More of the New Rambleys Railroad Third link is just a very subtle railroads gift shop but it counts i think
Other landing pad clip
FEEL FREE TO ADD ANY OTHER CLIPS I MIGHTVE MISSED!
#indigo park#uniquegeese#indigo park mollie macaw#mollie macaw#mollie indigo park#rambley indigo park#rambley raccoon#rambley the raccoon#indigo park finley#finley the sea serpent#lloyd the lion#indigo park rambley#lloyd indigo park#lloydford l lion#he hurts lloyd#indigo park lloyd#indigo park salem#salem#salem indigo park#salem the skunk#issac indigo#indigo park Issac indigo#Issac indigo park#Youtube#yappingon
53 notes
·
View notes
Text
A quick story of my most recent experience about how this image literally JUST repeats itself infinitely.
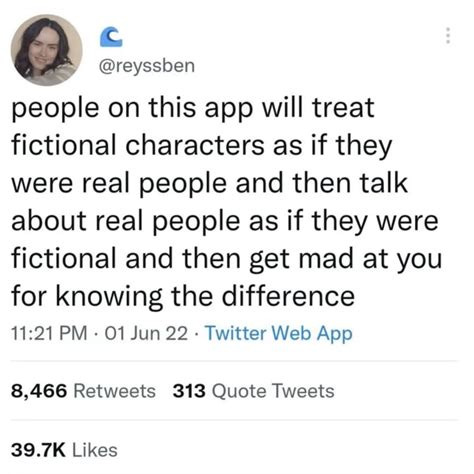
Long time ago I read this cool Kazuha smut where he was drunk and was absolutely in-love with reader’s pussy. Ok, right? Yeah, it was fine with me, that’s why I opened the comments to leave my own opinion and read others’ too, until I found this person questioning the validity of that fanfiction, arguing that Kazuha couldn’t have consented because he was drunk.
Totally fine argument… if we were talking about a non/dub-con fic or a real actuation.
The fanfiction was literally just Kazuha praising reader over and over. The tags didn’t imply assault, the fic didn’t imply it too. It was just fluff. The author even argued that they never had the intention of making an assault fic too. After all, I personally didn’t see anything malicious in it until this person pointed, and you probably didn’t see it too until I mentioned it.
I responded that person and we begun arguing because she got mad at me when I said drunk people can still make conscious (or good) choices in the early stages of being drunk, but that person (who I later found out to be a minor, which explains her lack of experience) just… told me this in response:

Yes, an accusation of me being a potential assaulter because I defended an author.
If it isn’t enough that she’s treating Kazuha like a real person who genuinely went through a traumatic experience, she also treated me like a fictional character. How, you may ask? By straight ironizing with what would be a scenario of me being assaulted.

It is soooo disgusting that people go this far to defend a fictional character but also so interesting to see how that tweet above is so… real.
We basically went over and over the argument and they eventually got mad enough and blocked me because they couldn’t understand what I was trying to tell them the entire time.
I couldn’t print it but they also mentioned that the person liking it doesn’t make less abusive but personally (and probably you too) I’ve never seen a victim of assault treat their experiences like it wasn’t a trauma or something that they liked, like “Yeah I was drunk and he abused me but I was ok with it but I reported them to the police.” Like no? There are so many more layers in assault, consent is just the tip of the iceberg.
People like this are soooo funny to watch. They try making a point about assault, but minutes later are ironizing with what would be a scenario of it just because she doesn’t like the person she’s arguing with.
Remember! You can’t solve war with more war, folks!
And to clarify myself in case my argument isn’t really clear, I don’t think having sex with drunk is overall something “ok”. I personally wouldn’t do it with anyone unless I was drunk too and I think it might be a red flag depending on the situation and person, but that fanfiction was literally the fluffiest thing ever and I never said anything harmful to that person that could’ve triggered them into saying those to me (nor did I say anything harmful back to them after it). I don’t think it’s anywhere ok to ironize with someone’s possible experience of assault at any point of an argument. It is genuinely dehumanizing and in this case it was literally useless because Kazuha is totally ok.
Anyway, the author already deleted it all and thanked me for trying to reason with that person, so you can’t go and look at it yourself, but I had to share this somewhere, it was just too funny lol. 😭
Hope this feels like a lecture or a funny story too in a way.
See you soon ❤️
39 notes
·
View notes
Text
How I Make Gifs ~ For Anon ❤️
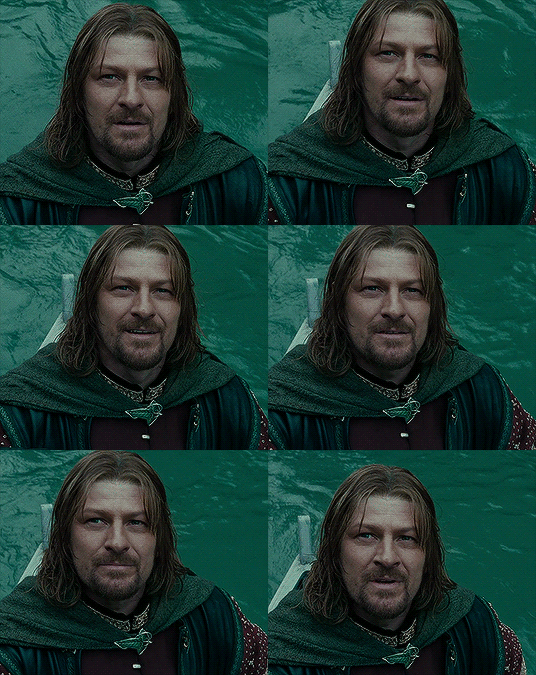

An anon asked me if I would ever consider doing a tutorial for how I make gifs! It's very flattering that you like my gifs enough to want to know exactly how I make them, so here is a little tutorial using my favourite character from my favourite movie ❤️
I might also make a separate tutorial for giffing dark scenes later 😌
Here's a download of my gif in PSD form if you'd like to get a better look at the settings I used.
Programs used: PotPlayer, Photoshop.
First, you need to get your screencaps. I would suggest using a high quality recording of whatever movie/TV show/video you want to make gifs of. My recording of Fellowship is in 1080p, and the quality looks incredible!
I use PotPlayer to get my screencaps. To do this, open the video file in the program and find the moment you want to gif. It's probably best to go back to just before that particular moment, and then press Ctrl + G. This will bring up the consecutive image capturer window. Below are the settings I use to get my screencaps:
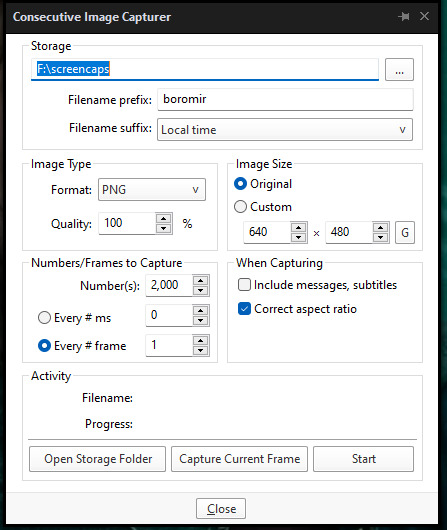
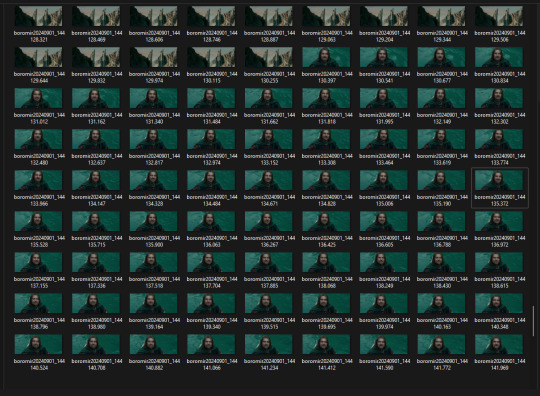
Then, press start and wait for your moment to be captured! Once you've got everything you need, press stop and navigate to the folder that you indicated under storage. Here you will find all of your screencaps! You probably ended up with way more than you need (I know I certainly did 😅). Now, delete all of the screencaps that you don't want in your gif.
For the actual gif making, I use a cracked version of Photoshop. I don't exactly remember where I found it unfortunately, but I'm sure that there's people out there who might have some links handy if you look around! Once you've got PS open, navigate to File > Scripts > Load Files Into Stack... and click on it! That will open the Load Layers window.
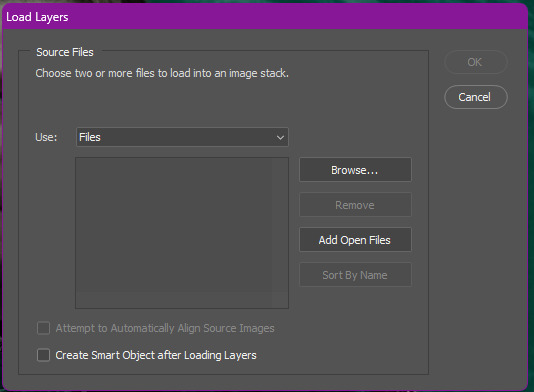
Now, change Use to Folder. Then, click browse and navigate to the folder that contains your screencaps. Click select folder, and after a few moments of loading your window should look more like this.
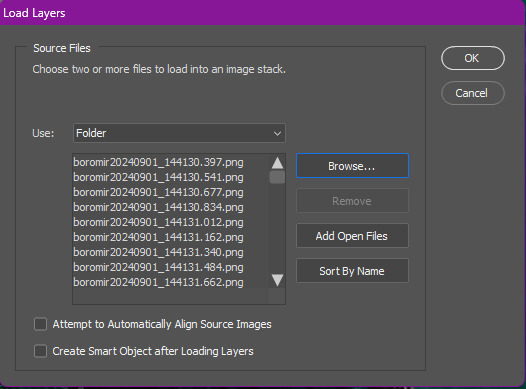
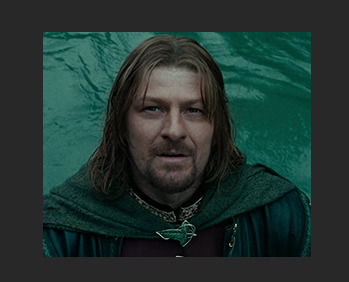
Then, press OK, and wait for your layers to load. Depending on how many caps you have, it could take longer. Once it's finished loading, you need to decide on your gif dimensions! For this, I decided on 268px x 225px. Once you've chosen your size, use the crop tool to get your gif to that size. Now, you should have a smaller image, like this:
The next step I do is to use this Photoshop action by @maziekeen. They have a little tutorial on how to use this action there, so I'll just say that once you've loaded it into your program, use part 1 / load into stack. Press the play button, and then the OK button on the two windows that pop up. Now, your gif will be nice and sharpened, and you'll be able to see it move for the first time! Here's what mine currently looks like, without any other edits:

Now, it's time to start on colouring. Every gif (or scene, sometimes you can reuse the same colouring if you're giffing an entire scene) is different, so it will have different needs. However, I tend to always use the same layers in the same order for all of my gifs — it's just the settings that change. I think the colouring of this particular scene is lovely, so I don't want to change it drastically, I just want to enhance it.
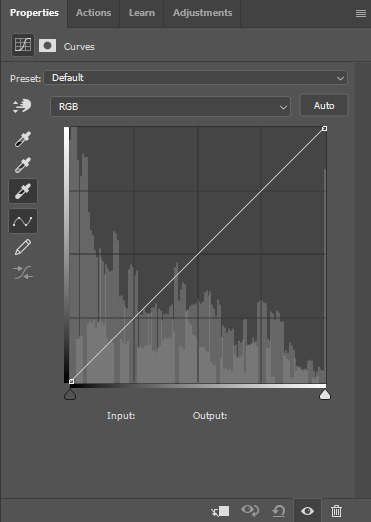
First, I create a Curves layer. At this point, I also like to make a group to hold all of my adjustment layers. This makes it easier for you to switch your adjustment layers on and off if you want to compare with the original colouring!
Going back to your curves layer, pick the little white eyedropper tool in the Properties tab. You want to find and click on the whitest area in the gif and make it a bit brighter! I picked the white in one of Boromir's eyes.
This is what my gif looks like now with the Curves layer:

Next, I use Levels. It's a very subtle change, but you can notice a slight darkening of the blacks in the image. Here's my settings for this layer:
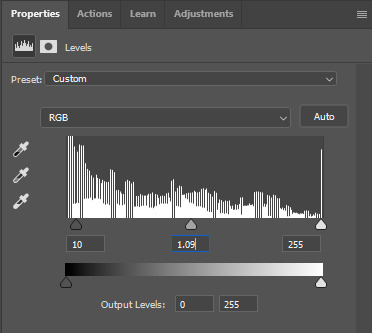
And here's the gif with this step applied. Like I said, it's a very subtle change:
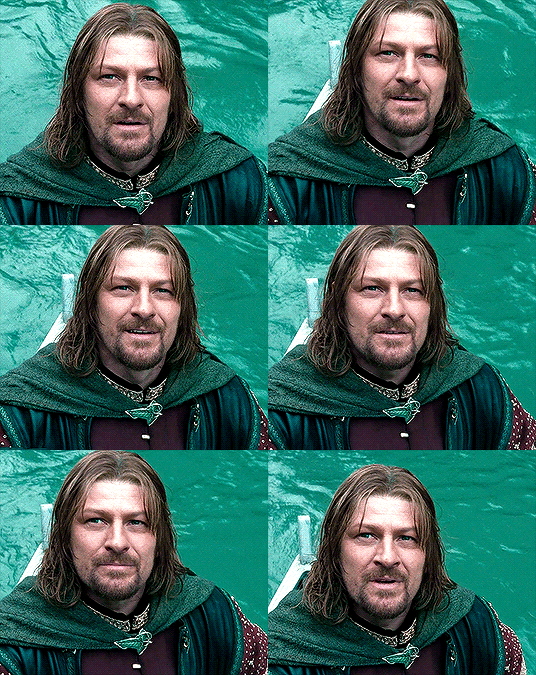
Up next is Brightness & Contrast. This layer is just a case of messing around with the settings until it looks right for you. You don't want to make it look too bright or too contrasted, though, because it will make the colouring look weird.
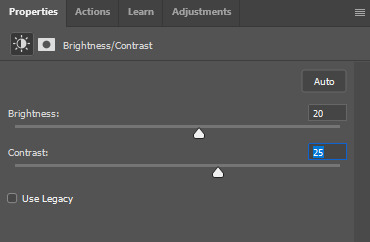
A bit more of a change this time! We're getting there:

Next, I like to do Colour Balance. Sometimes I wait and do the Selective Colour layer first (it'll still be above Colour Balance though), but with this gif, I decided to do it first. I want Boromir in the foreground to contrast more with the watery background, so I upped the Red in the Midtones. I think Midtones is the most important part of Colour Balance, so the Highlights and Shadows are more minor adjustments here.
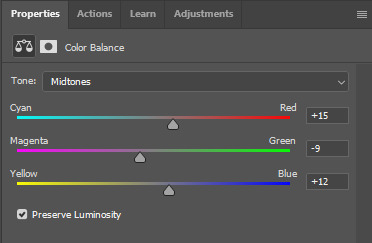
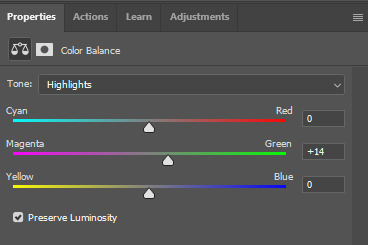
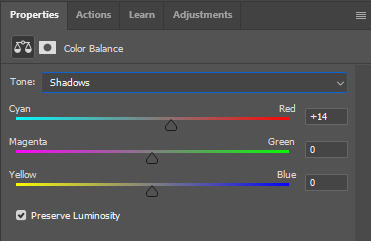
Here's the gif with the Colour Balance layer!

Now, we have Selective Colour. Like I said before, I sometimes like to do this layer and then go back to the Colour Balance to make minor adjustments. For this gif I mainly focused on slightly reducing the cyan in the reds and yellows to add a little more colour to Boromir's tunic and hair.

I'm a big fan of bright, vibrant gifs, so I like to use the Vibrance layer copiously.
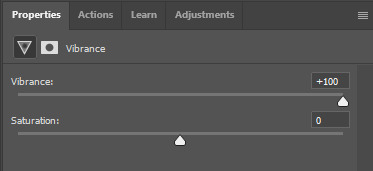
I upped the vibrance to max, but it's left Boromir's face looking a bit too red and his neck is a little pink, so I went back and did some minor adjustments to the Colour Balance and Selective Colour layers to fix that. Then, voila!

Now that we're done with colouring, go back to the beginning of the timeline at the bottom the screen. Then, go back to Actions and scroll down to the bottom, and look for the action called part 2 / finishing. Just like with the first action, press the Play button and it will work its magic!
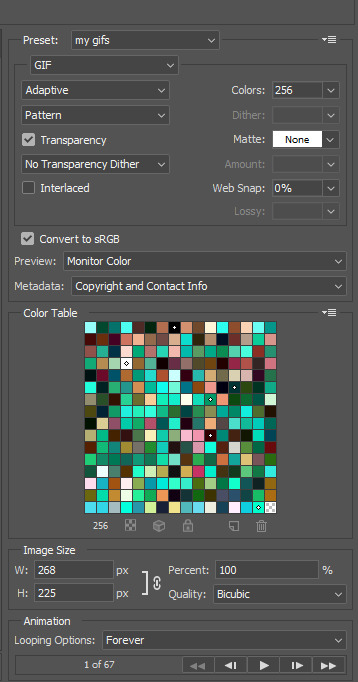
Press Ctrl + Shift + Alt + C, and try playing your gif from there. Sometimes, the gif will be too fast and you'll need to slow it down, and you can't always tell until you play it in the 'Save for Web' window. I ended up slowing mine down from 0.05 to 0.07.
Once your gif is looking just right, press Ctrl + Shift + Alt + C again. These are the settings I use to save my gifs, and I think it makes them look really nice! Then click Save, and save your gif wherever you want.
Now, once you've saved your gif, you can post it to Tumblr (if that's what you're wanting to do) or simply keep it to yourself! But I'm sure that others would love to see your creations :D
***
A little extra info - this gif doesn't have text because there's no dialogue, but these are the settings I use for gifs with text (the text size depends on the dimensions of the gif):

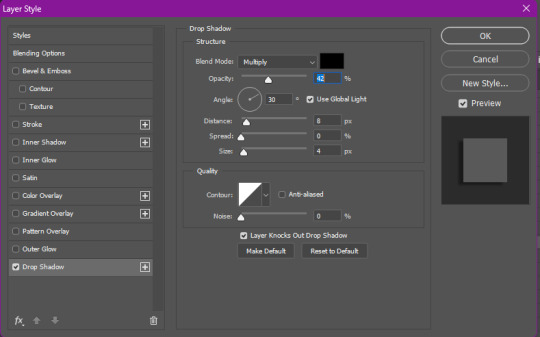
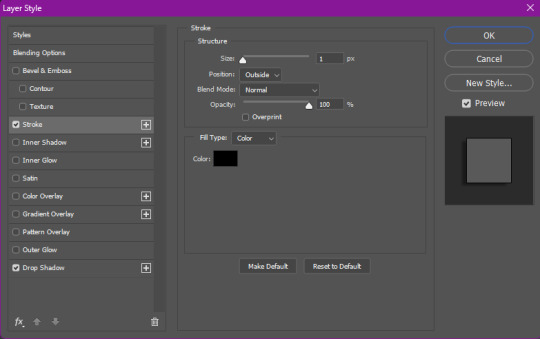
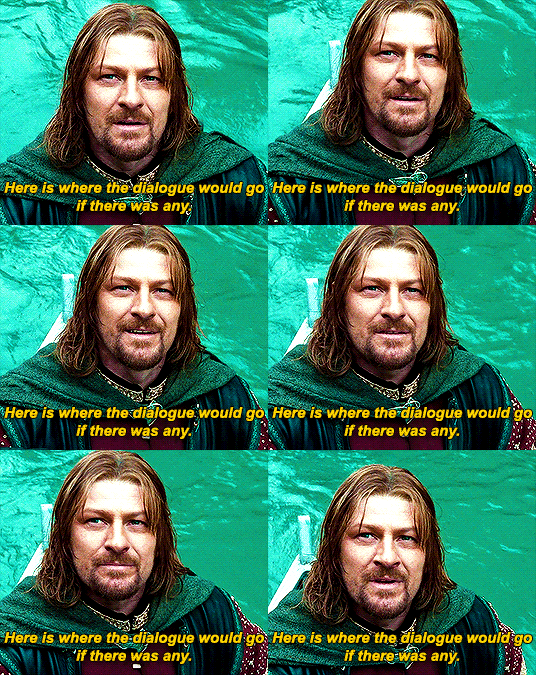
Sometimes I use white text, sometimes I use yellow. And if there's more than one person talking I use both!
I hope that this tutorial was helpful, and if you have any more questions, feel free to ask!
#gif making#gif making tutorial#gif tutorial#psd tutorial#gif coloring tutorial#gif colouring tutorial#mari speaks#mari’s stuff
39 notes
·
View notes
Note
Hi!
I was just wondering if you have a tutorial on how you created this effect in your gifset, it's something I'd like to try but have no idea where to start. Your set is so pretty! Any helps appreciated x
https://www.tumblr.com/tawaifeddiediaz/712911415428743168/ill-take-you-with-me-then-well-both-die-you?source=share
Hey Nonnie, thank you! This is super late, but I don't actually have the psd for this set anymore (I delete them as soon as I post them), so we're just gonna wing it with a gif I made the other day. I think this ask is about the text, but if it's anything else, just drop me another line and I'll get to it when I can!
I'm pretty sure I got this tutorial from the wonderful @eddiediaaz but I then turned it into Lazy Girl Hours :)) anywho, here we go!
We’ll be making this gif:
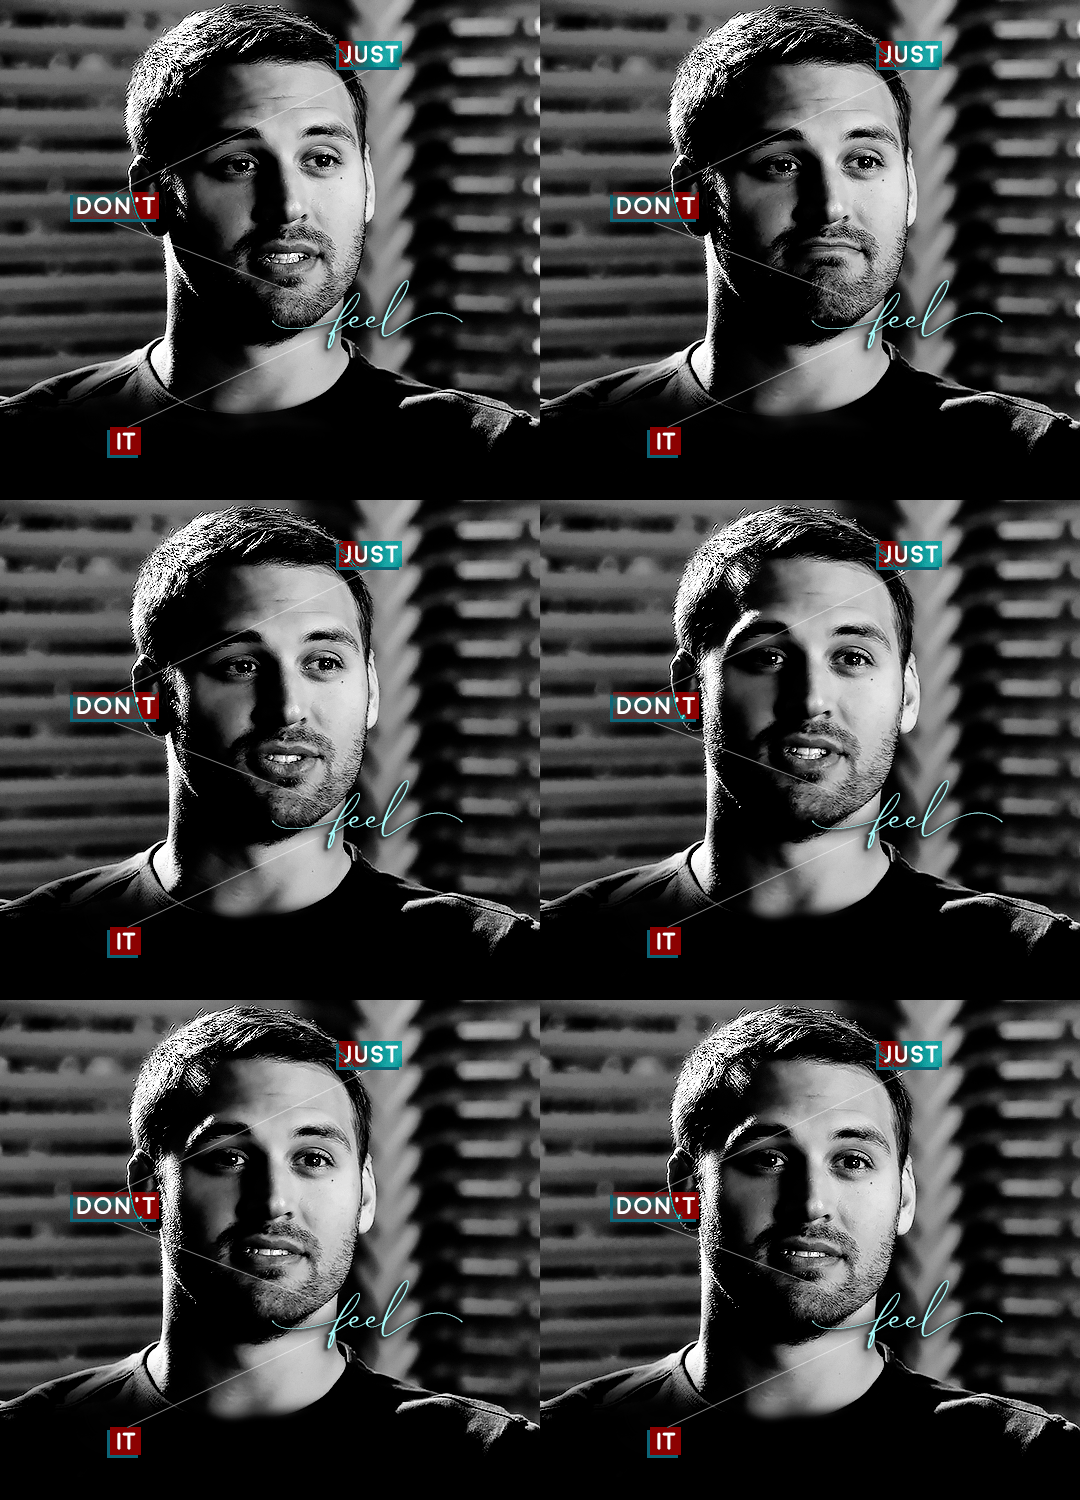
This tutorial assumes basic knowledge of gif-making, Photoshop, and coloring. I’ve only described the typography tutorial in this, but you can reach out if you have any questions.
Tutorial under the cut:
Couple things to note beforehand:
There is a lot of trial and error involved when doing any sort of effect, and this is no exception! You might have to play around with the colors and the settings before you find something that looks good and readable and that fits your set!
This text effect works better on big gifs (540px width).
For this, I find that a simple font works better than a fully-cursive one, but play around with what you like. The boxes may need some adjusting if you use a font with too many tall or tail letters (i.e. text where all the letters aren't on one uniform line - that's why capital letters work so well.)
Movement works really well with effects like these, but again, it depends on your gif + readability. If you have a blended gif, it may take a little more trial and error.
I work in frame animation for all my text effects, but this works just as well in timeline as well.
We’re going to start with this gif:
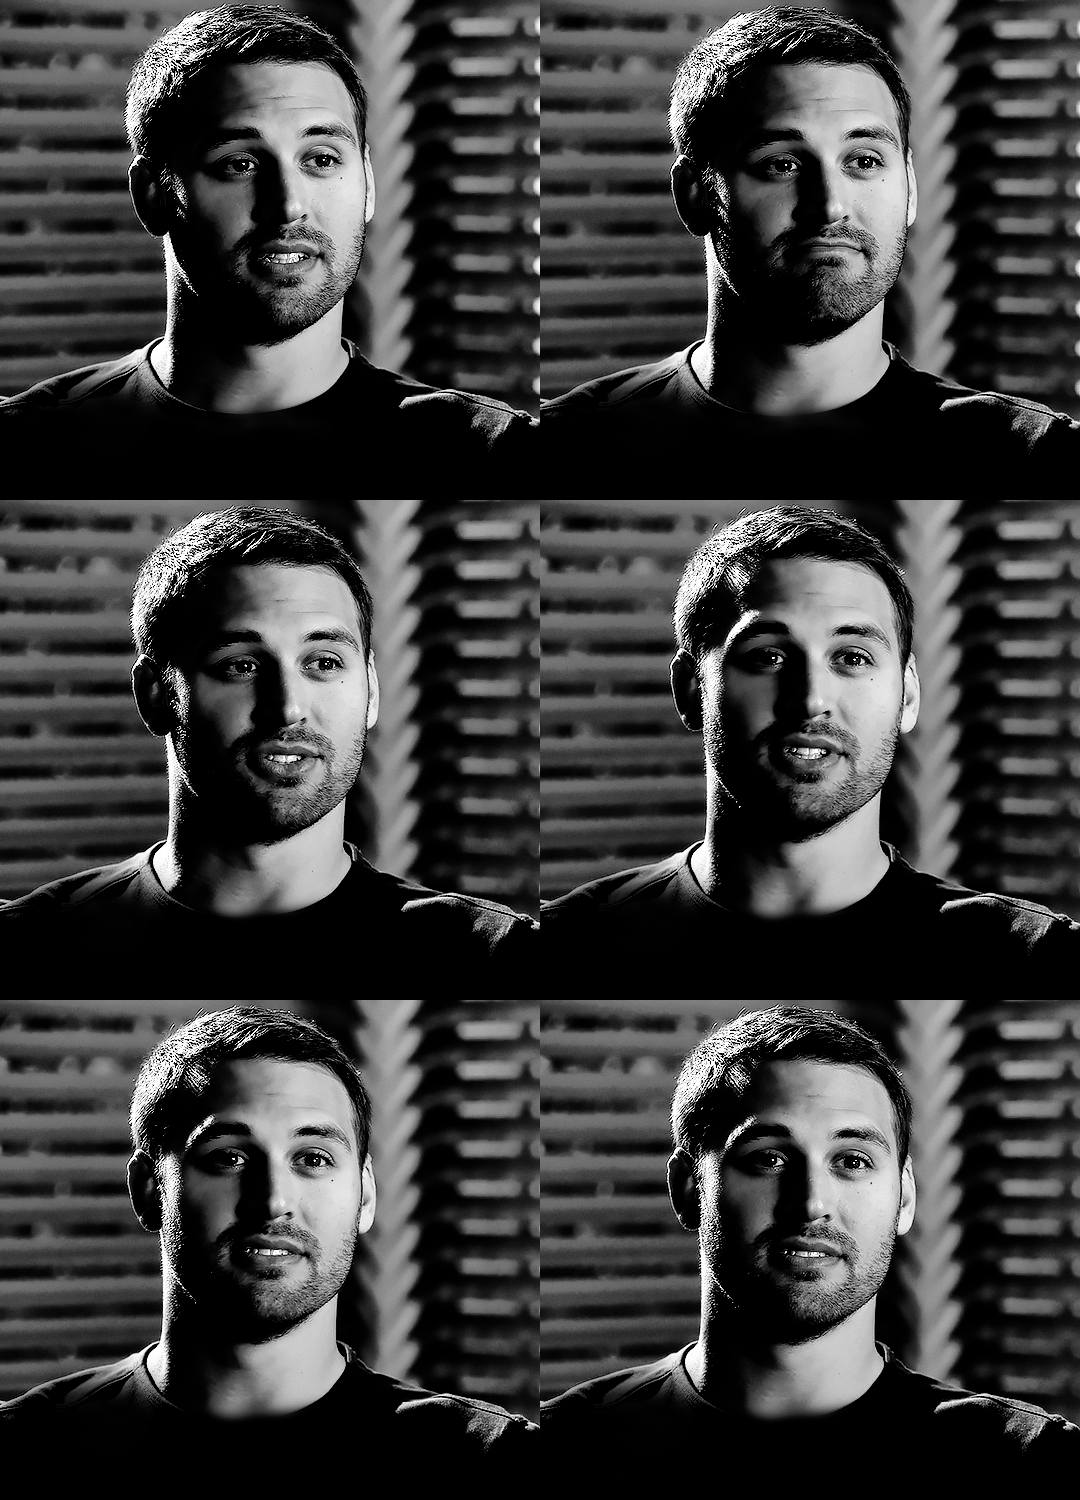
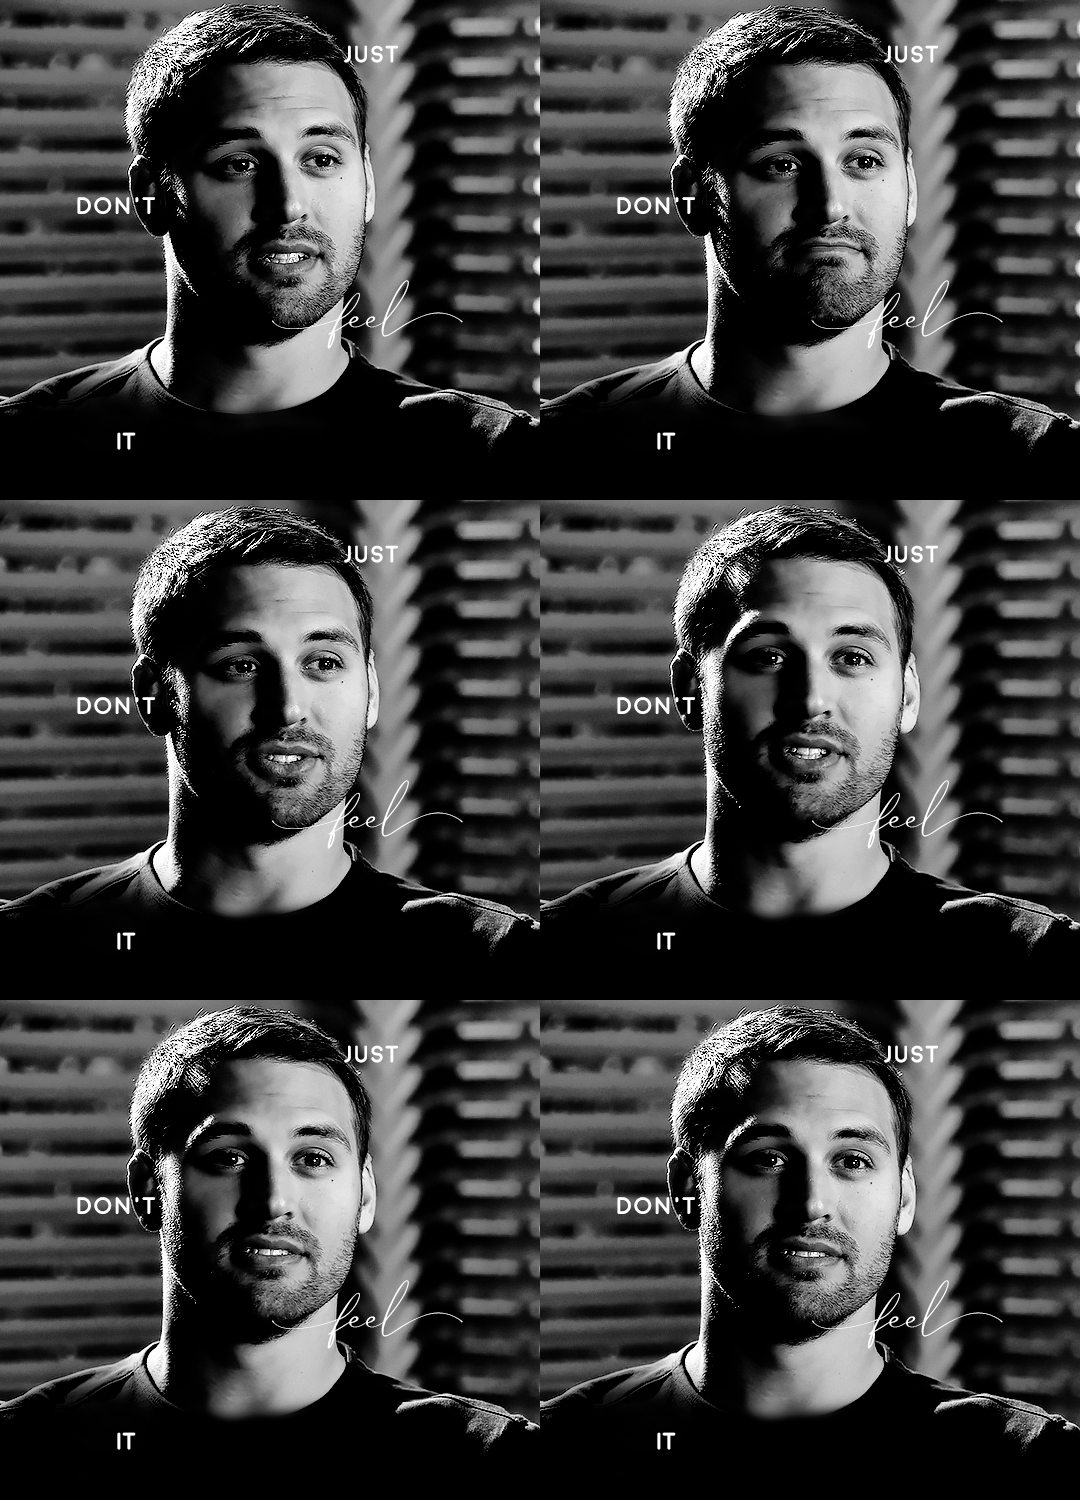
First, I like to put my text on the gif. You can obviously move this around later so don't worry too much about how it looks right now.
The dialogue is "Just don't feel it." "Feel" is one of those Big Words for this quote, so I'm going to emphasize it with cursive text.
I am using Moon for the sans serif text, and Santa Fe Spring for the cursive text. Keep both of these in white for now:
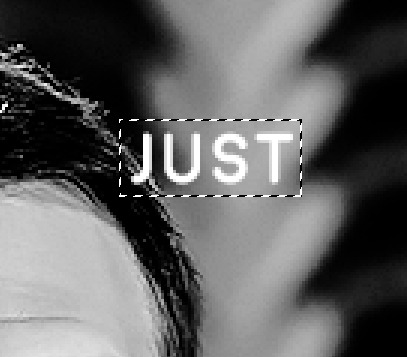
Next, we're going to use the rectangular marquee tool to draw our rectangles around the capital letters (we're not touching the cursive text right now). I just eyeball this, and then try to center it as much as possible.
(The rectangular marquee tool has a keyboard shortcut of M, and it's the second tool in that little toolbar on the left of most people's Photoshop.)
This is what that'll look like:
Next, we're going to go down to the icons at the bottom right of the layers panel and select the half-black half-white circle > Color Fill.... You should get a color dialogue box. Choose your color - I'm using #8d0000. Then, we're going to move that layer below the corresponding text layer, and set its blending mode to Difference. This is what that looks like (click the image for better quality):
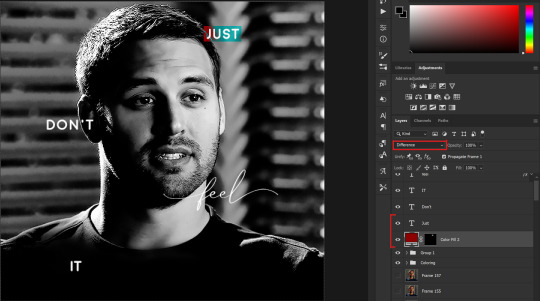
I'm going to repeat that with the other two boxes as well, using the same color. The boxes will look different with the Difference blending mode because of the shadows underneath.
For example, the box with "it" looks like a solid red square because it's against a completely black background, while the other two have some blue shading to them since there are some highlights behind them.
This is what my gif looks like now:
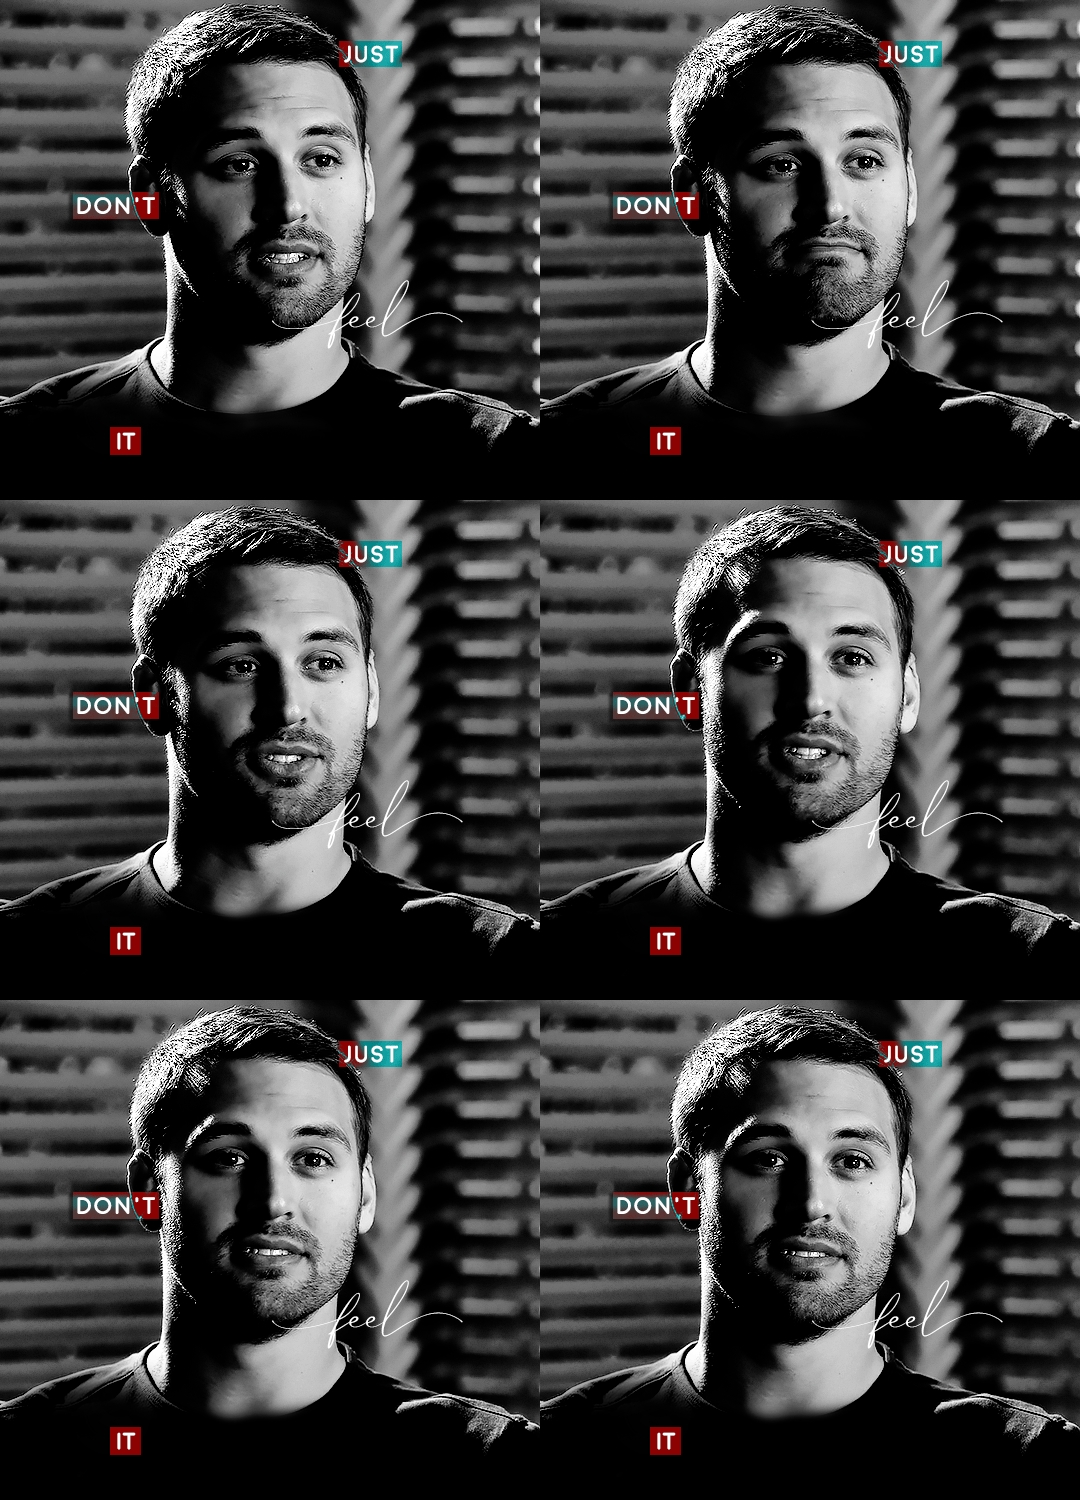
Next, I like to go The Lazy Girl™ route and put all three color-fill layers into one group underneath all the text layers. This just lets me edit the drop shadow of all three of them at the same time.
Right-click the group and open up the Blending Options. In Drop Shadow, these are the settings I'm using. The drop shadow color is #0c6477:
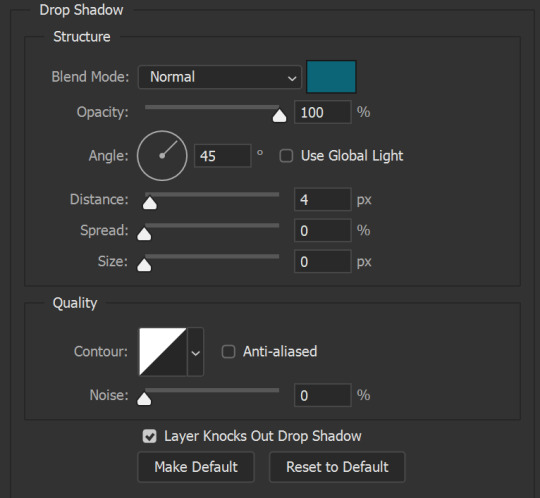
(Note: uncheck "Use Global Light" especially if you're working in frame animation to make sure all the drop shadow has the same angle on all frames.)
This is what my gif looks like now:
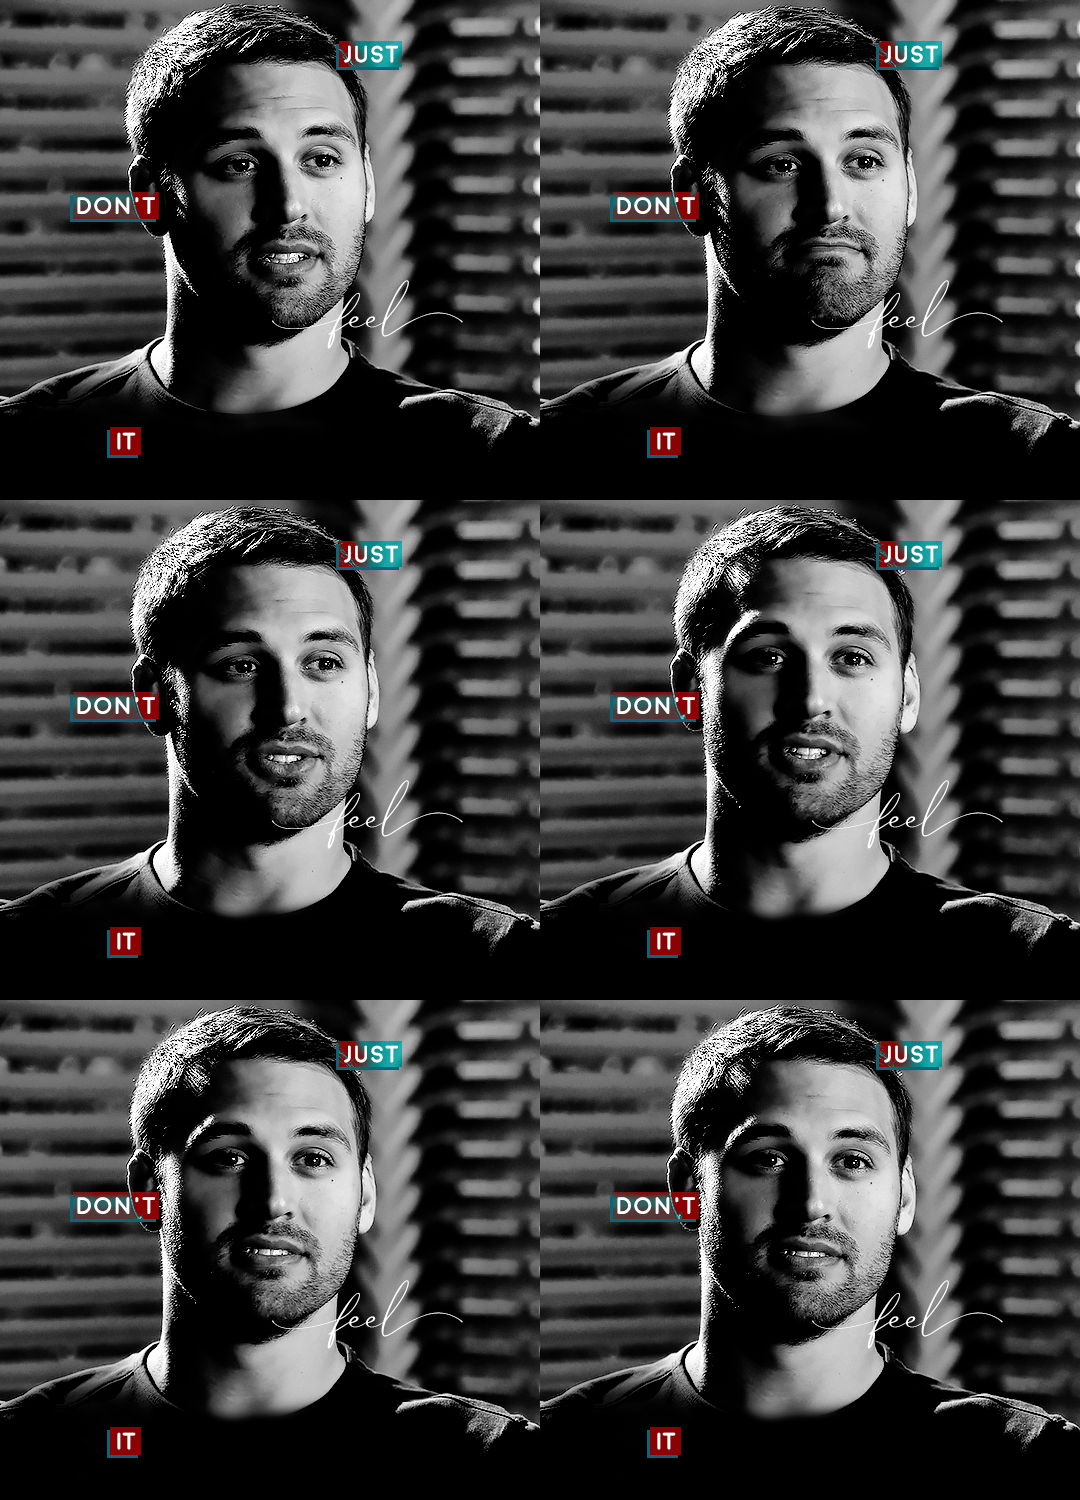
Now that we've finished that, time to move on to the cursive text.
I usually match the cursive text to the palette of the rest of the text, and since the drop shadow is our "accent" color, so to speak, I'm going to use a lighter version of that color. I am also going to add a drop shadow for readability.
The color I used for the text is #acfffe and I actually ended up adding two drop shadows, just because I needed something subtle that doesn't overwhelm the text, especially since it's a delicate font. Here are the settings for both layers:
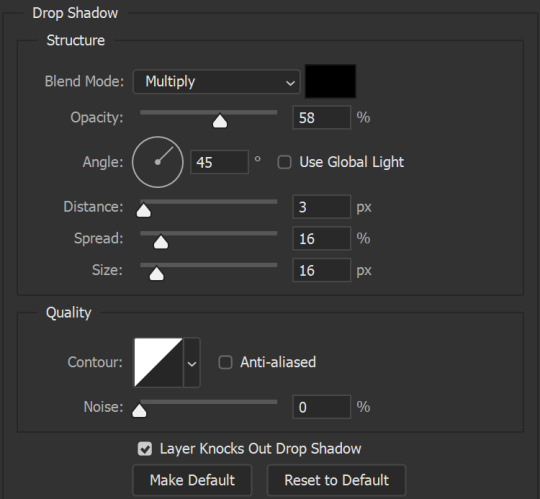
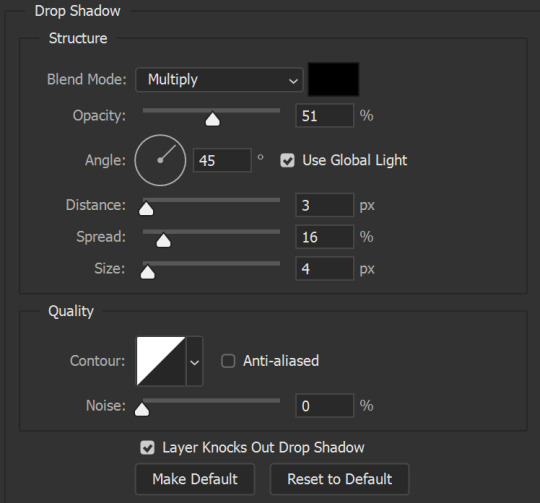
And here's what my gif looks like now:
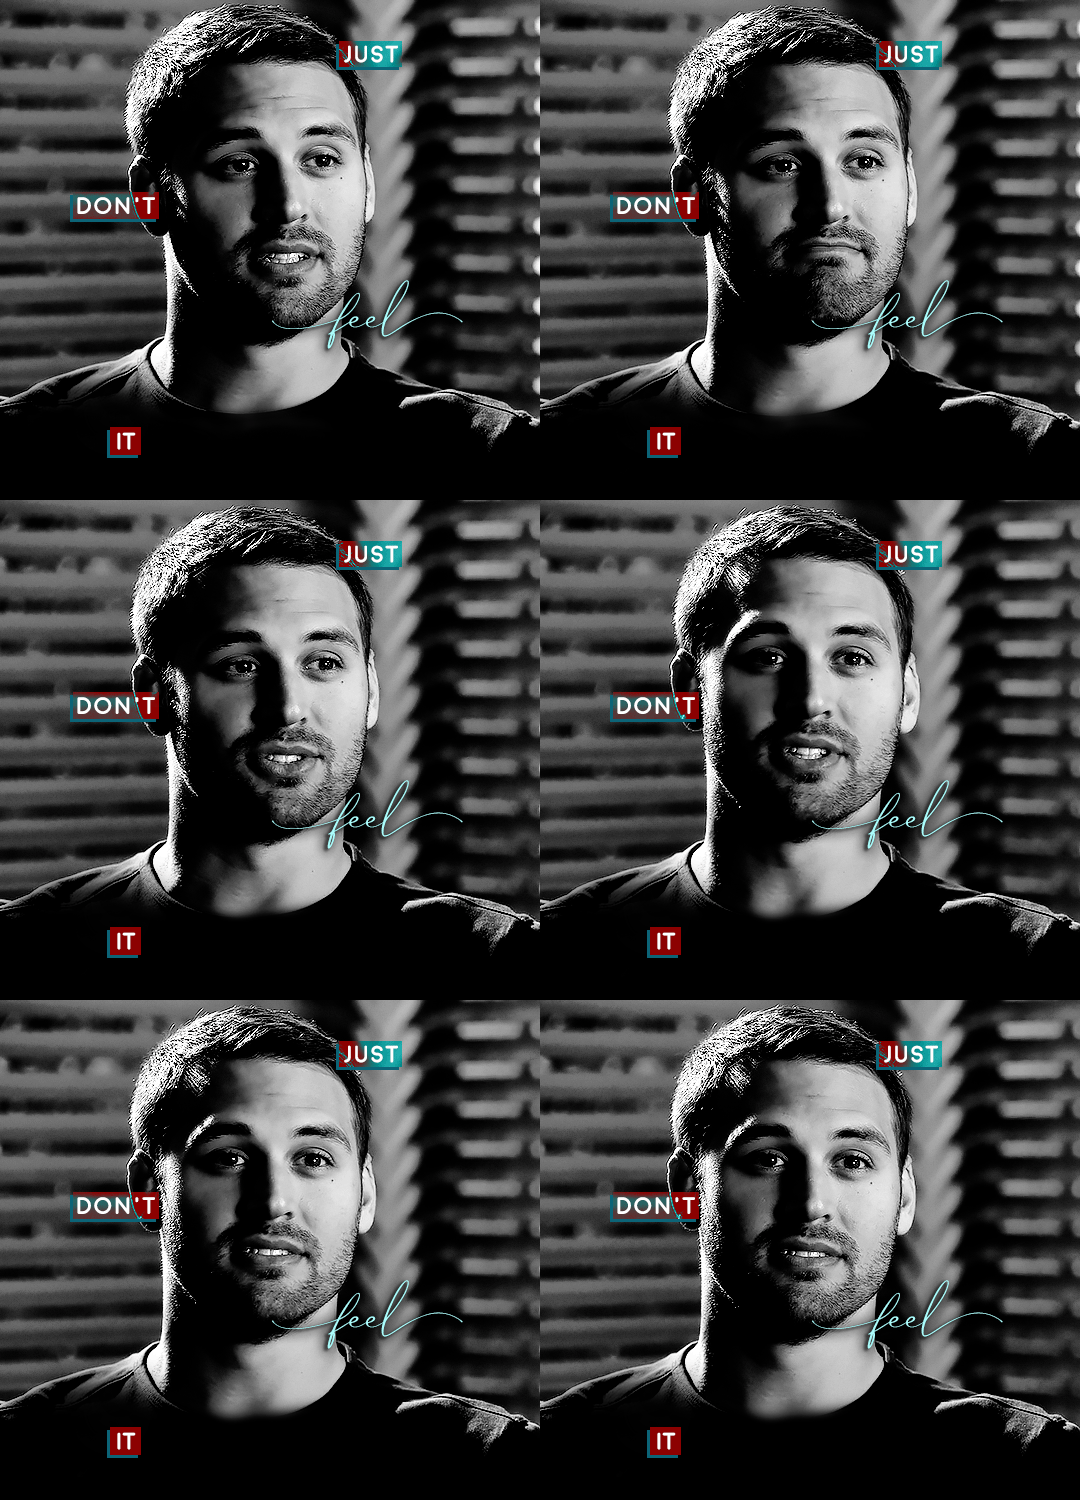
Now, before we move on to the lines, just check the adjustment of all these text layers, see if there's anything you want to change. It's easier to change now than after the lines are added, since you'll most likely have to redraw them if you move the boxes after the fact.
To draw the lines, we're going to use the Line Tool. I just freehand all of this, and I try to go from center to center of the boxes when I can. It all depends on your angles.
My lines are 2px thick, but you can change these depending on your preference. Here's what mine look like right now:
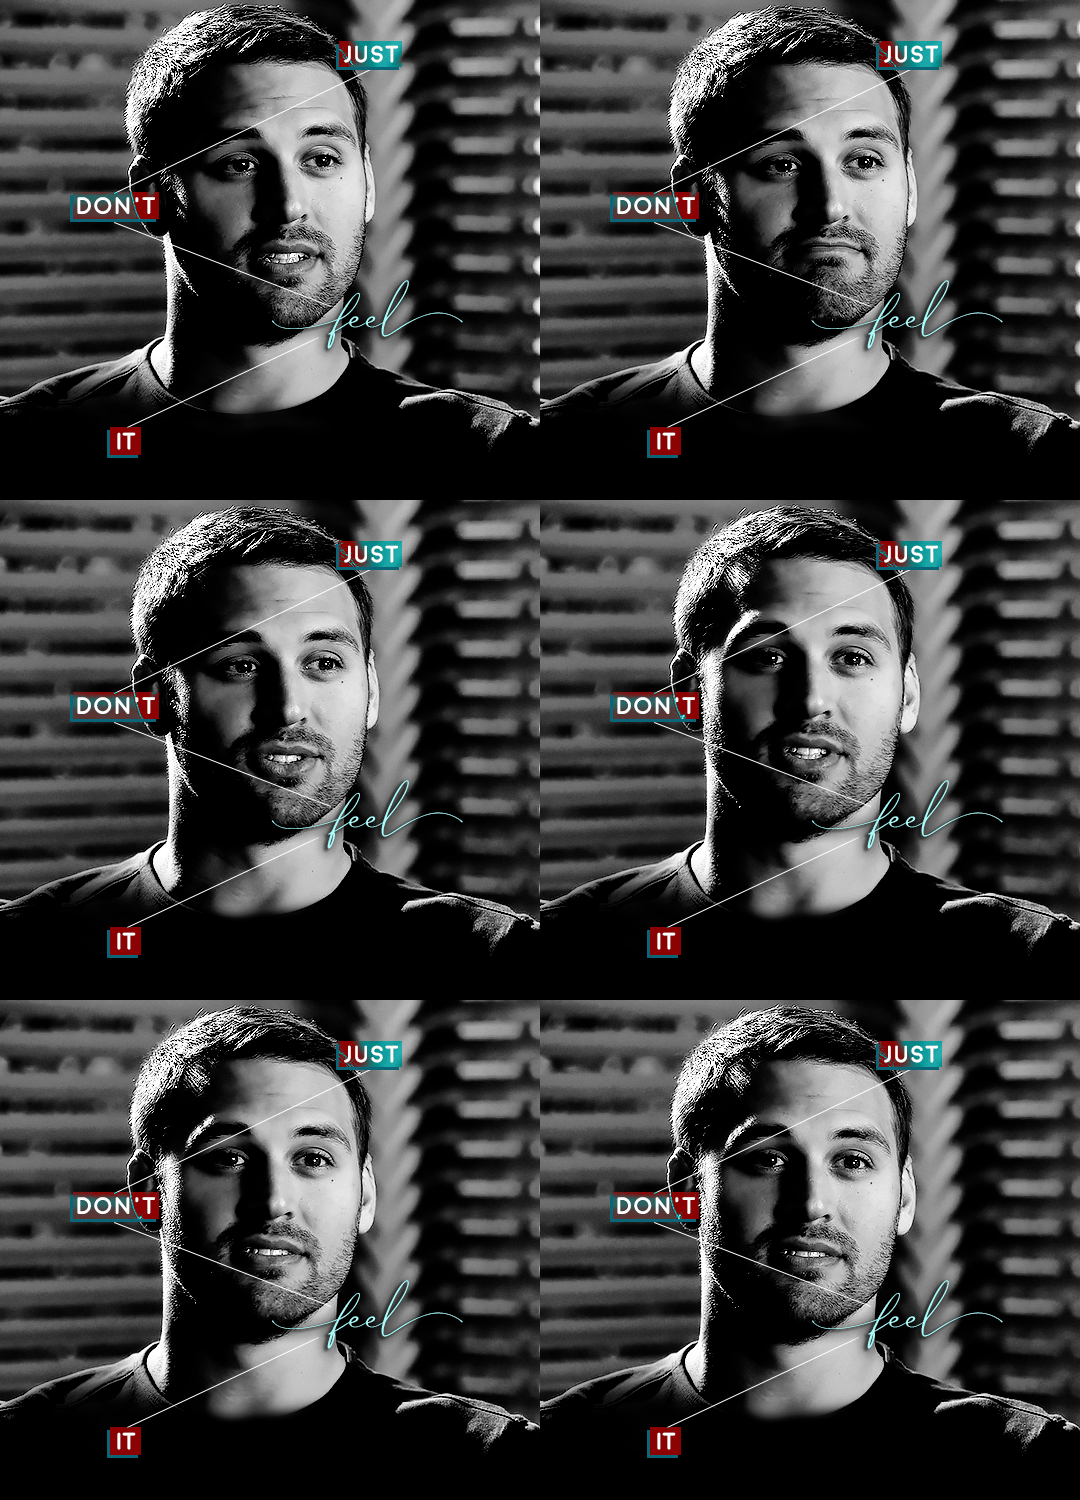
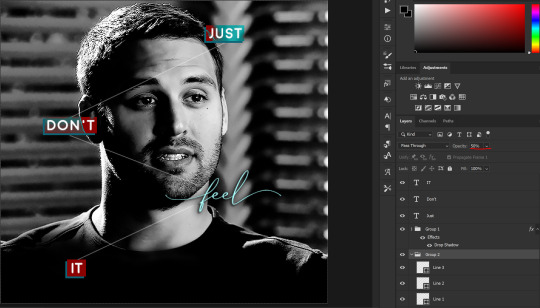
We're going to do the same lazy hack that we did for the color fill, and put all three line layers into a group. Move this group below the text layer and the color fill layers. The reason for this is so that the lines look like they're coming seamlessly from the box, rather than from on top of them or something.
Then, set the group to opacity 50%. I like more subtle, simple looks in my gifs, so I don't like super high opacities.
And that's it! This is our final gif:

Some final notes:
Absolutely play around with the blending modes of the color fill layers for this effect. These two gifs are the exact same color we've been using, just two different blending modes. You can see how drastically different they look. The first one is Linear Dodge (Add) and the second one is Vivid Light:
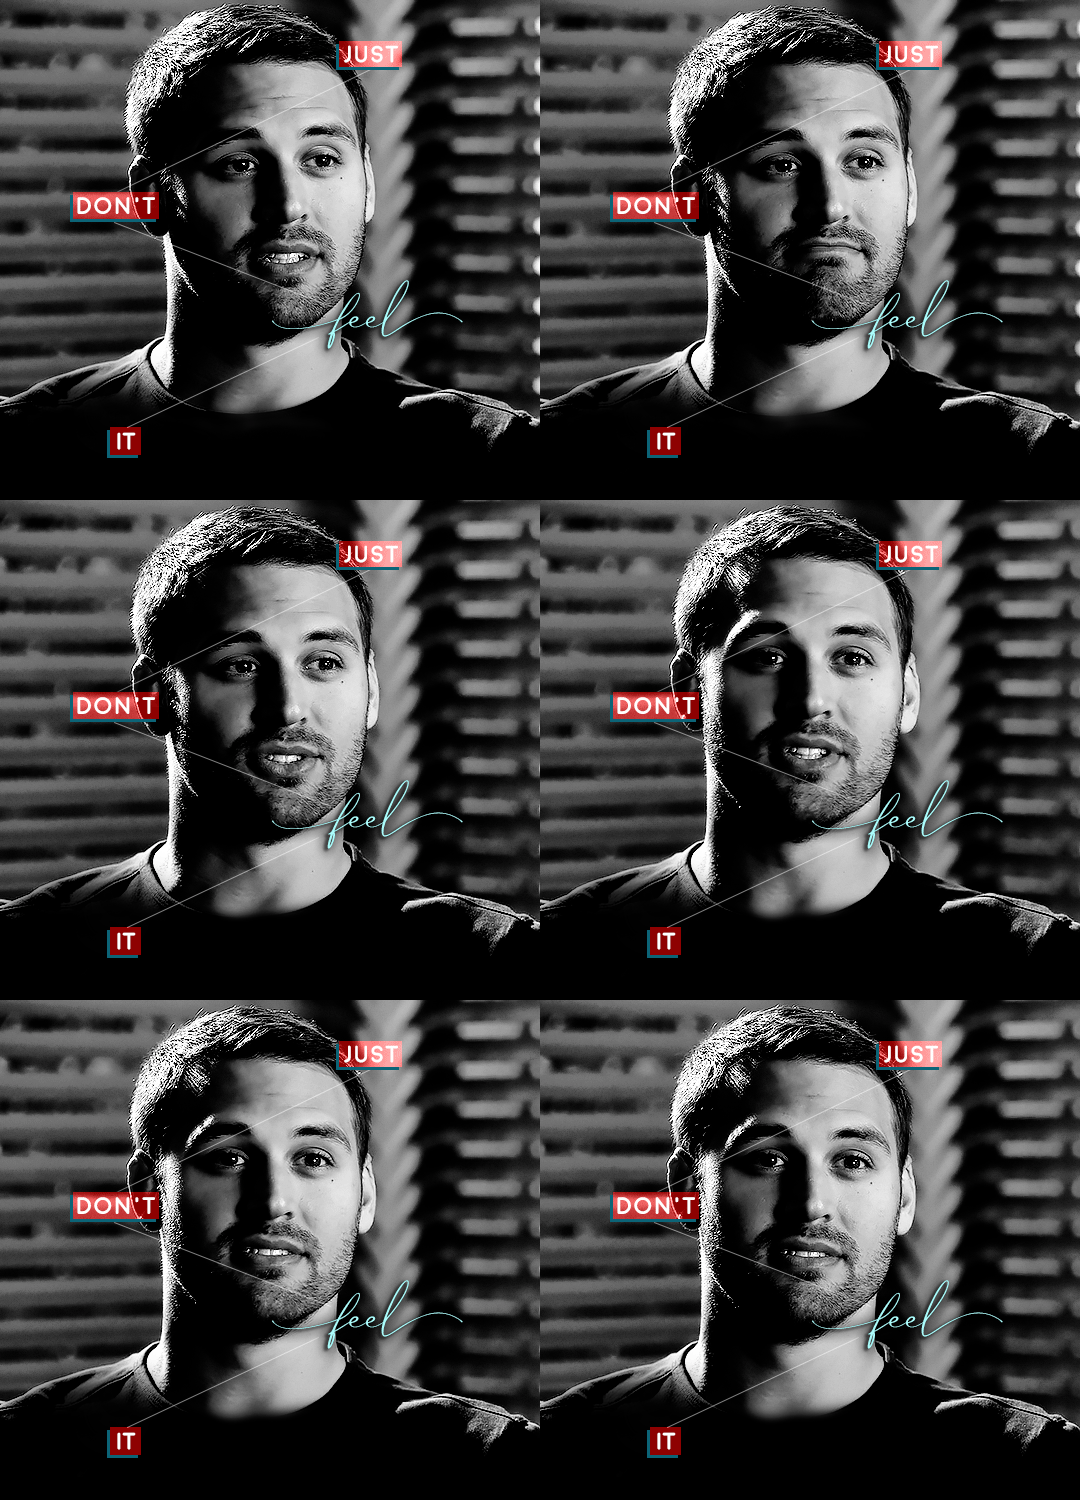
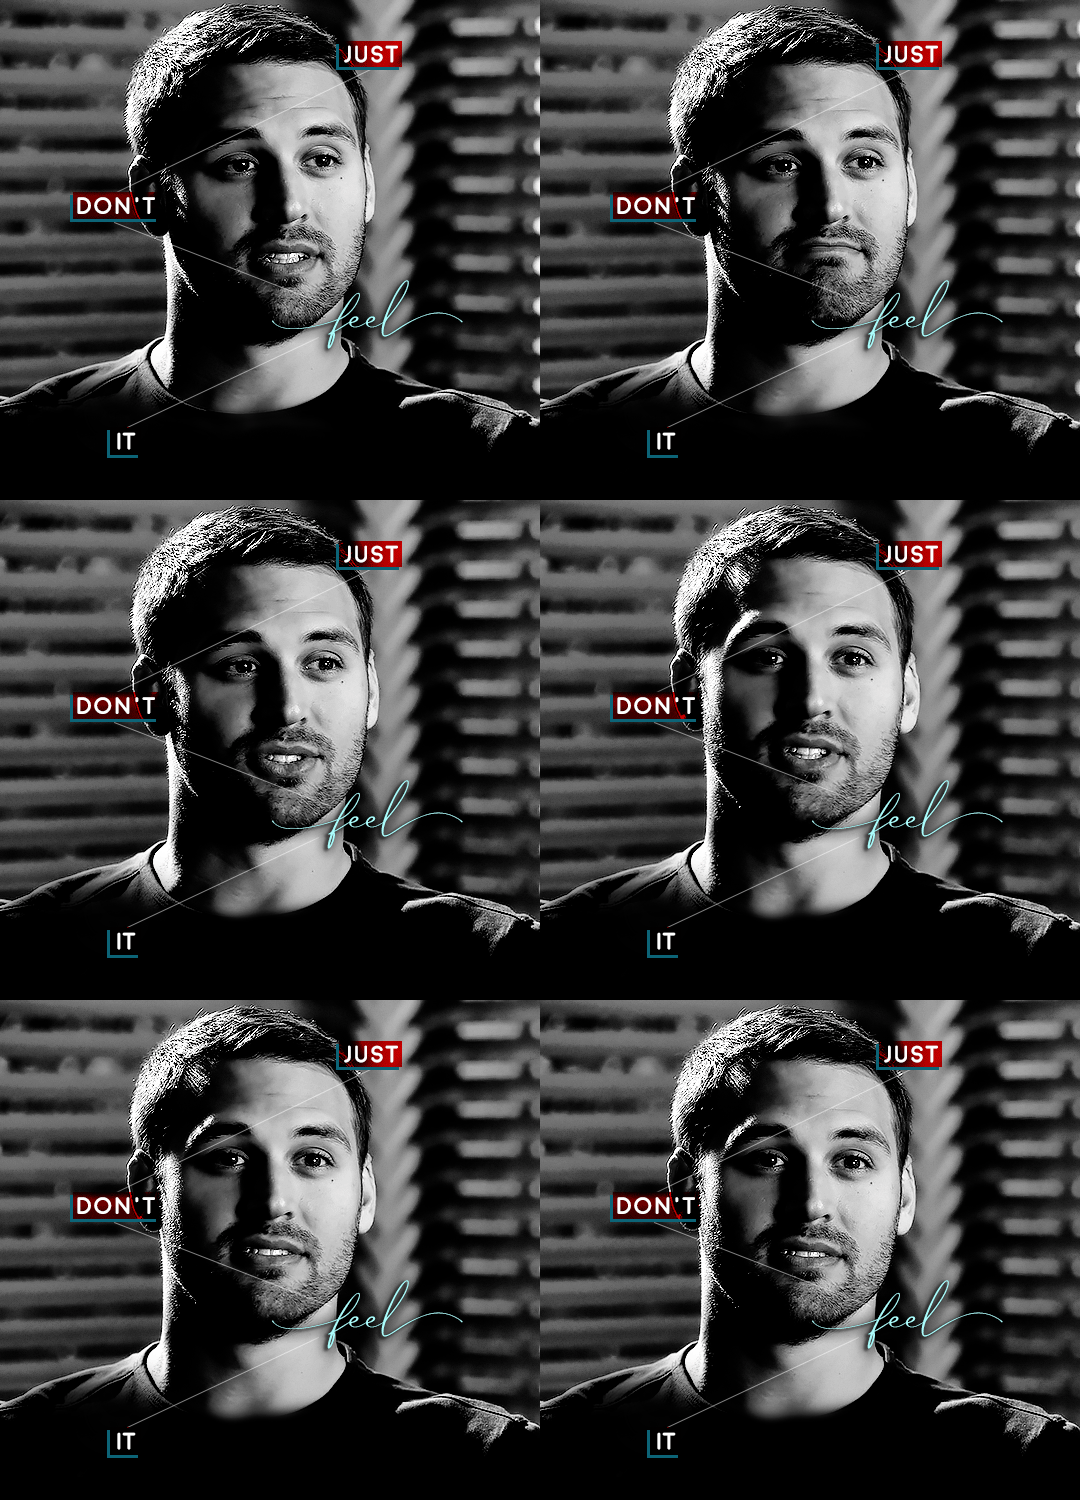
It can change how your gif looks in a BIG way, so play around with it, see what you like, especially if you don't really like the "two toned" thing going on.
Sometimes, I also like playing with the width and height of the text in the font settings, making it shorter and wider, or making it taller and more compact. You can play with the letter spacing as well. The world is your oyster, etc etc.
One other thing I've started doing is erasing the lines with a big brush, just to fade them from his face a little, like this:
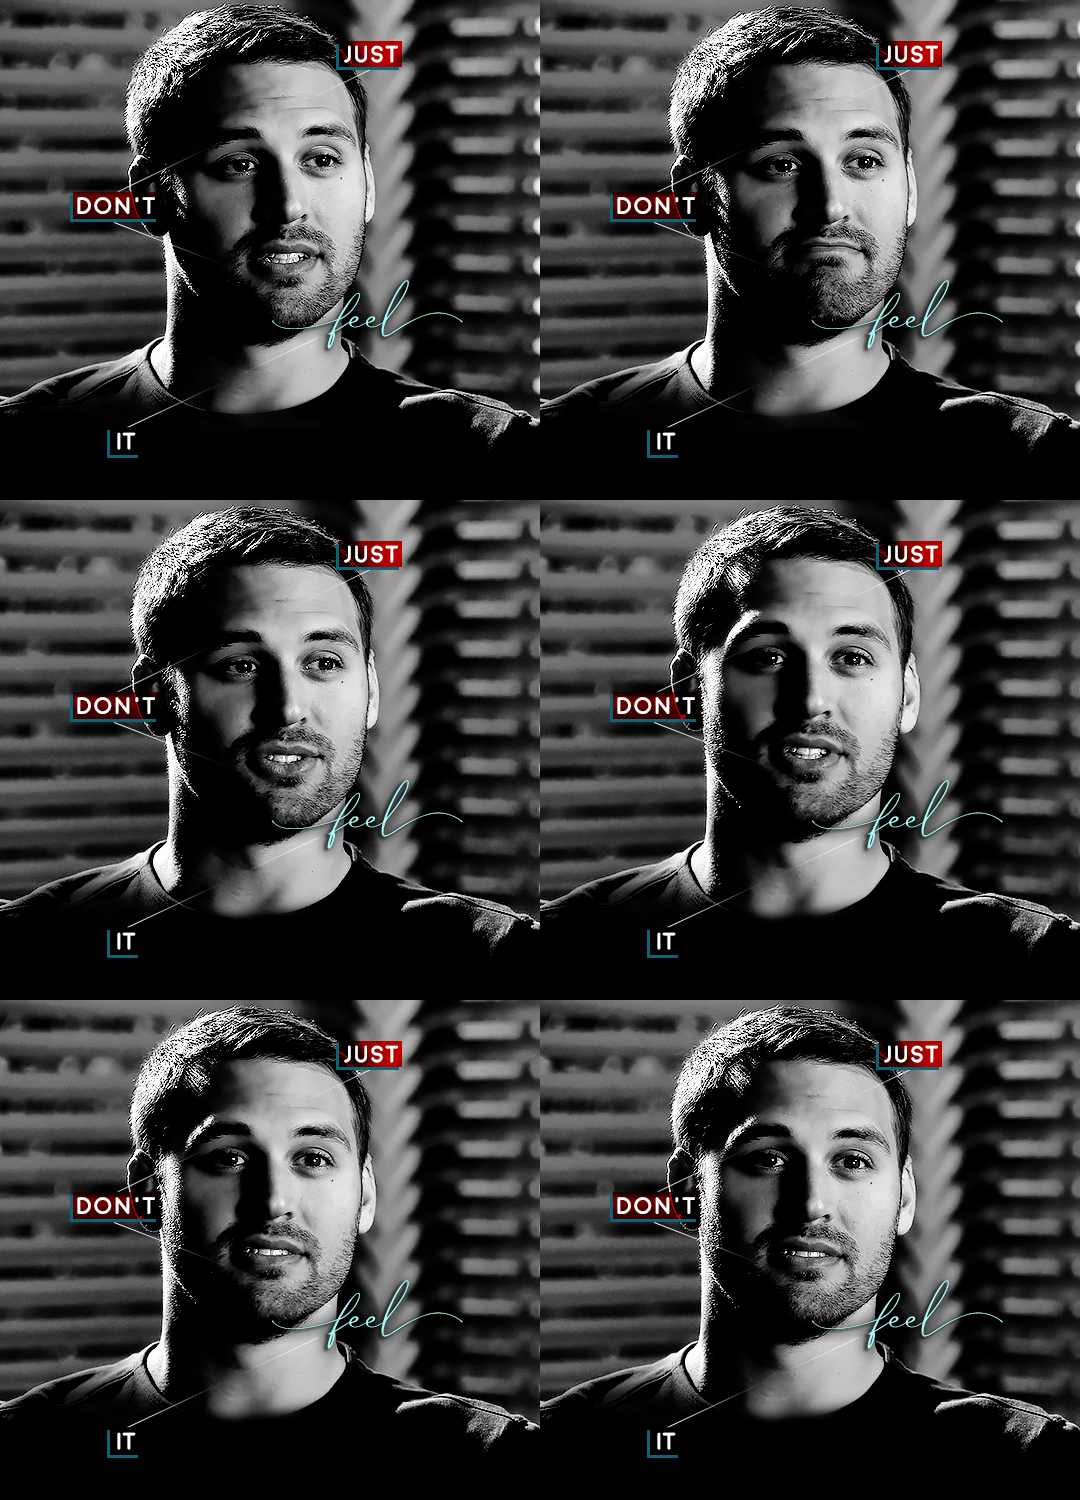
To do that, use a layer mask on the line layer folder, and a brush that's 0% hardness, and at least 200px big. For this gif, I also changed the opacity of the lines back to 100% so the fading effect is a little more pronounced:
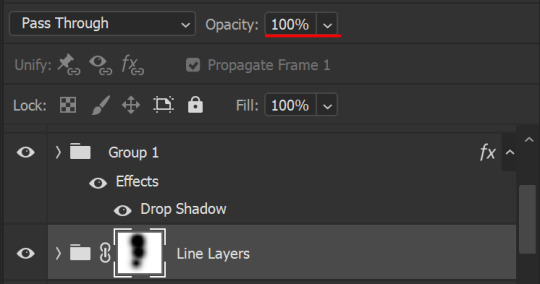
(this gif isn't the best example for this, but oh well. Anywho, hope this helps, Nonnie! Let me know if you have any questions.
Enjoy!
#zee's tutorials#tutorials#gif tutorial#photoshop tutorial#resources#dailyresources#completeresources#itsphotoshop#allresources#dailypsd#userisha#userdahlias#alielook#userabs#tuserheidi#userelio#userjaelyn#userisaiah#usermorgan#usergert#zee answers#im so pissed at myself for losing the tutorial the first time like you do not know how mad i am right now#i didn't even do anything tumblr just hates us all
202 notes
·
View notes
Text
Trembling Essence:💙Choice exploration + finished scenes💙

Hello and welcome new followers, here's an update on how things are going with the game! Firstly a big thank you to the sudden influx of support I got this week, I'm happy knowing people liked the little meme video I did! :,]
This post might be a little long since I had to rewrite a few things, I was trying to upload a picture of one of the new areas you can go in but I got an error and couldn't save what I wrote. :,S
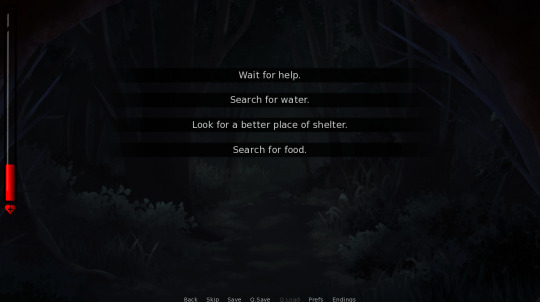
Anywho, I mainly focused on quality of life changes and continued working with the one of the endings you can get at the start of the game.
I don't really know where to start but this ending took a lot longer than expected to really hit what I've been trying to go for. At first, it was going to have two different endings. I took out one of them because I didn't have much of a connection with it and I liked the idea of it being straightforward instead. When I went back over it, everything happened too quickly for my liking. To fix this I went back and added a few choices to at least give you an idea of what the area is like and how it effects the player(Y/N) while making sure the dialog transitioned correctly with what you see on the screen. It's nothing too wordy but I do like it a lot more than I did before. Even though this is still considered one ending there is a alternate version you can get depending on a certain choice. Towards the end I fixed up all the spelling errors I could find and happily enough, there wasn't many. For right now I'd say this ending is finished! Yay! x]
Here's one of my favorite CG's I drew for it:
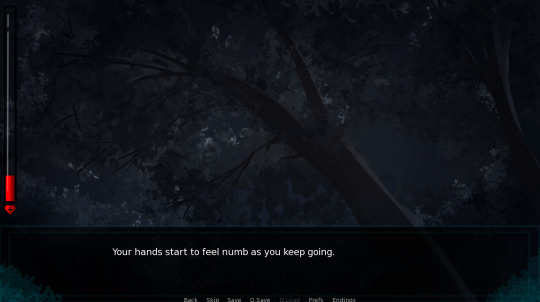
I love how it turned out because I really want to do different angles and perspective through the terrain, I think this one is my favorite so far! :,,]
Here's a evening time version of it:
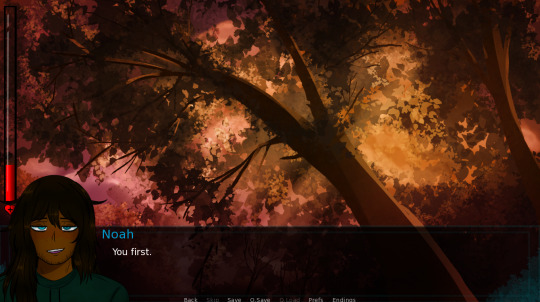
It's suppose to be raining in this image but I still need to practice getting the angle correct. :,,]
I'm also fixing/brainstorming up the second/third ending. This one will have two different areas you can navigate through to get an idea of where you are and a few hints of lore that will be referenced later on in the game. Those that have played the [Extended Demo] you probably know which ones I'm talking about. >;]
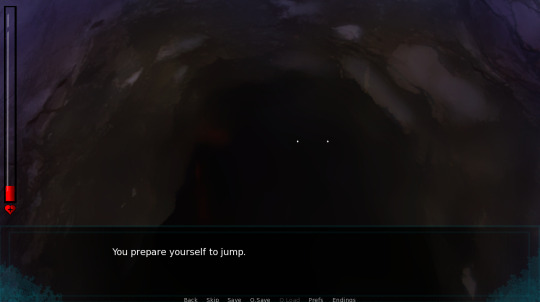
I already like the idea of them but for one of the paths, I didn't have enough time to branch it out and make backgrounds for it in the [Extended Demo] so here's a peek of a placeholder since I'm still sketching stuff out, nothing is finalized yet. :[]
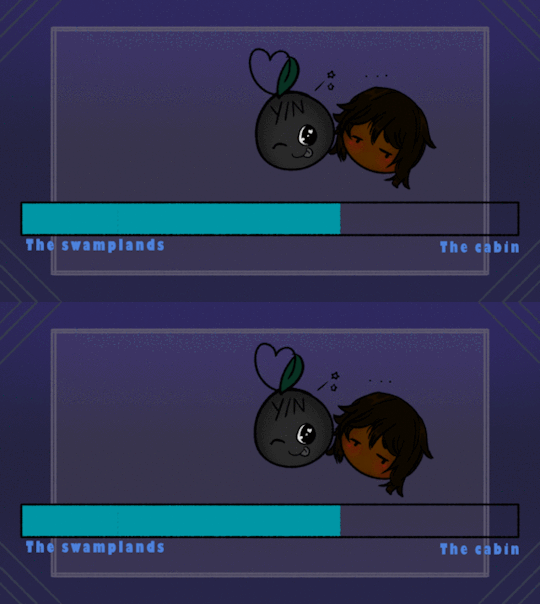
Super close to the cabin section, yay! I actually miss writing/drawing out the segments in the cabin a whole bunch so I really can't wait to fix up that part once I'm done with the swamplands. :,,]
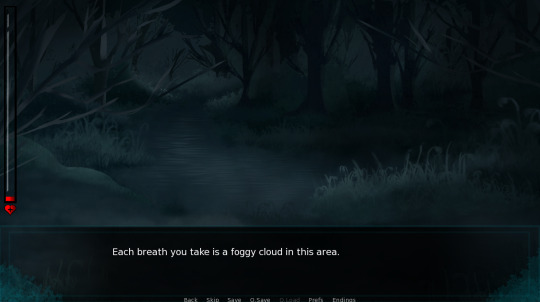
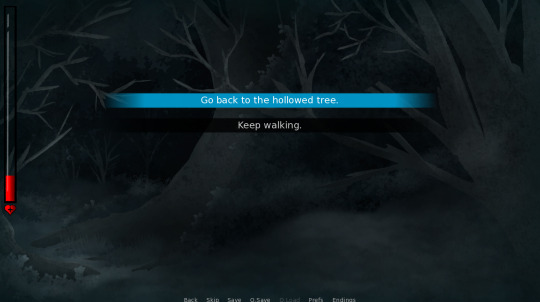
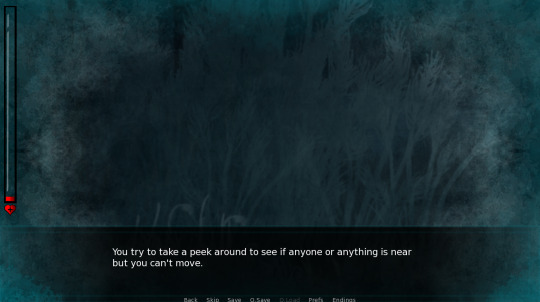
I said last week I'd post some of the new backgrounds/areas so here you go:
Kofi update:
I also had a small talk with my play testers and one of the things they brought up is that I should be promoting my ko-fi better so from now on I'll have little mini doodles doing so at the end of every game development post as a way to promote it! :] All donations and tips help tremendously while I work on the game. If you like what I create, please consider supporting what I do here! I was able to use previous tips to get a new wrist support brace when I'm drawing so a very big thank you to everyone who gave a tip! :,,]
Q&A / Ask box is open:
If you have any questions about Trembling Essence/Noah feel free to ask here or on itch.io please. This makes it easier for me to see and answer accordingly! I would really like to hear from you guys!
I enjoyed answering the asks I got recently this week! I'm trying to finish the rest when I can including the ones I remember that got deleted. There were some I genuinely couldn't answer because it would require me to mention major spoilers/the questions have spoilers in them. :,]
This post is getting really long now so that's all I have to discuss, thank you guys very much for all of the encouraging support this past week, I appreciate it a whole bunch! :,,]
#male yandere#visual novel#dating sim#yandere#itch.io#interactive fiction#illustration#digital art#te updates#yandere vn#vndev#anime drawing#renpy#gamedev#anime artist#indie game#otome#artists on tumblr#vn#digital painting
48 notes
·
View notes
Text
20 Questions for Fic Writers
tagged by @neverevan @made-ofmemories and @diazsdimples thank you!
How many works do you have on ao3?
6! I only started writing a little over a year ago and I am a very, very slow writer.
2. What's your total ao3 word count?
68,008
3. What fandoms do you write for?
9-1-1 only at the moment.
4. Top 5 fics by kudos:
I got a bed but I’d rather be in ours tonight (6.7k, Buddie, Explicit) Thighs and Eyes (3.7k, Buddie, Explicit) Kiss your lips blue (7k, Buddie, Explicit) I'll Be Your Gift, Give You Something Good To Celebrate (6.4k, Buddie, Explicit) Sweet Nothing (37.8k, Buddie, Teen and up)
5. Do you respond to comments?
Yes!!! Every time, comments absolutely make my day and I don't feel like my responses ever do justice to just how giddy I am when I get a nice comment!
6. What is the fic you wrote with the angstiest ending?
I don't think any of my fics are even remotely angsty (though maybe some in the near future might be idk idk) but I don't think I could ever write something with an angsty ending. Happy endings only over here.
7. What's the fic you wrote with the happiest ending?
I think all of my fics have very happy endings but I'll go with Sweet Nothing maybe, as it's super happy with also hints at even more happiness in their future too. :)
8. Do you get hate on fics?
So far no, thank god.
9. Do you write smut?
Most definitely, four of the six fics I have up are smut but I always like to put a lot of plot in there too!
10. Craziest crossover?
I don't write crossovers, it's just not my thing personally.
11. Have you ever had a fic stolen?
Not that I know of, I really hope not.
12. Have you ever had a fic translated?
No, put people are welcome to as long as they link my fic :)
13. Have you co-written a fic before?
No but I hope to soon!
14. All time favorite ship?
Buddie buddie buddie buddie buddie
15. What's a wip you want to finish, but doubt you ever will?
I have a few I started when I first got into 911 that would need some crazy reworking to still make sense but I'm still hopeful lol. The hangover au is really hanging on by a thread because the 911 writers blatantly stole my idea to steal the hangover movie's idea (jk) I'll definitely still write it but it's kinda been put on hold.
16. What are your writing strengths?
I think I'm good at writing descriptively? I also get some lovely comments on how I write emotions which makes me very happy :)
17. What are your writing weaknesses?
I think my pacing could use a lot of work. Sometimes things feel a little too fast and other times I go on for too long. My dialogue can also be hit or miss depending on the character.
18. Thoughts on dialogue in another language?
I can't speak any language other than English and like super basic Irish so I just don't trust myself to write in another language well. If I had someone's help I would be open to it though.
19. First fandom you wrote in?
I think I wrote one direction fics back when I was like 12-15 but I only actually posted one fic before I started writing for 911 and that was destiel about a decade ago (and it was deleted like 6 months later)
20. Favorite fic you've written?
Ahhhh I'm not sure, I have things I both love and hate about all of them, but I think I have to pick Sweet Nothing because I put my heart and soul into that fic for months and it inspired me to keep writing longer fics.
I feel like most people have already been tagged so sorry if you've already done this, but tagging: @wikiangela @watchyourbuck @spagheddiediaz @thewolvesof1998 @rogerzsteven
@jesuisici33 @sunshinediaz @daffi-990 @rainbow-nerdss @theotherbuckley
+ whoever else wants to do it!
20 notes
·
View notes
Note
hi thanks for your explainer posts on the legal stuff, they're super interesting! i'm currently studying for the exam you have to take to get into US law schools (since theyre graduate programs here unlike in most places where law is an undergraduate degree) so its really interesting to learn a bit about how the law functions differently in other places!
one thing i'm curious about -- when i first saw the info about cellbit being able to get the twitter info for these accounts, i assumed that he wasn't actually going to go through with suing ALL of them, and it would be more likely that most of them would simply get some sort of cease-and-desist letter instead, with maybe just a couple having full legal processes to use them as examples. However, I saw people on twitter saying that the process is actually a lot more simple than i had assumed and also takes place mostly online, so suing all of them would actually be more realistic than it sounds. do you know anything about that? how likely do you think it is that he actually sues all of these people (and also the other batches of accounts that probably just aren't public yet that hes also gonna go after later lol)
hi anon!!! good luck on your exam, i really really hope you get in!!!! law is So Cool.
yes it is a LOT more simple than that. he wouldn’t need to sue them individually, and in brazil nowadays we do a LOT if not almost all of court/lawsuit work through the internet. mediation meetings are done through zoom. oral sustentation as well. it’s preeeetty chill
if he wants to, i’m absolutely sure he can sue all of them at once pretty easily. it depends on what his strategy is tho. i think sending cease-and-desist letters could also be a good call and probably way easier than suing hundreds of people, because even tho it’s simpler than it sounds, it’s still fucking hard /lh
even tho the crimes committed are basically the same, the degree of fucked up shit said throughout the many accounts and tweets varies quite a bit, so even tho he could sue everyone in the same lawsuit, it would still be 😭😭😭 a MESS and the judge might think the situations are too different bc of that varying degree and ask him to do different lawsuits anyway. so, like, how worth it would it be?
i don’t know how likely it is for him to sue everyone because that depends on him and his lawyer and what they think will work best, but i think he did the most important bit already — which was getting twitter to delete all the tweets, which they already have (they actually turned in to court with all the proof that they deleted everything like, this week, iirc). if he wants to sue everyone, he can, but i think he also can just sue the worst ones and that’d be wayyy easier. there’s also the whole discussion on whether or not he can sue the foreigners. so while he technically could sue everyone, can he sue the non-brazilians? the judge still has to decide that
so yes like technically he can and if he really wants to drive home the point of “you’re not free of consequences for what you say on the internet” he def should, but i think it depends on his strategy here.
21 notes
·
View notes
Text
Scars (part 8)
first previous masterlist
Has: platonic co-sleeping, texting, pizza, nightmares, scar reveal, torture mention, trial mention, fluff
James and his family belongs to @starliight-whump
~
James awoke after a night with no nightmares to find Henry climbing over him to get out of his bed.
"Hey," Henry said when their eyes met. "You're awake. I'm sorry I'm leaving, I have to get to work. Do you want me to come back later?"
James nodded, not yet fully awake. He stayed in bed for a while after Henry left, staring at the ceiling, taking in just how calm he felt. When was the last time he had slept like that?
He sat up and found his phone that he had turned off however many days ago. When he tried to turn it on it was out of power, so he plugged it in and waited for it to power up. When it did, the screen filled with missed calls from Julia, and messages from Henry.
Good morning :-)
Someone brought a service dog to the library today! A very good boy!
We got another penguin book today :-)
A picture of the penguin book.
Is everything okay?
Let me know if I'm bothering you.
I'm getting a bit worried. Did something happen?
Did I do something?
Met this little guy on my way to work.
A picture of a grey tabby cat.
Seriously, James, are you okay?
I'll give you some space if that's what you need.
Please text me so I know you're alive.
Henry had really worried about him. It made him feel guilty that he hadn't even taken the time to look at his phone.
Sorry, he texted.
It only took a minute for Henry to reply.
No worries! Thanks for talking to me.
James typed out several replies and deleted them before settling on a simple, Thank you.
-
Taking advantage of this unusual calm, James took a shower and washed his hair, shaved, and brushed his teeth for the first time in too long. It made him cringe to think how bad his breath must have been when Henry was there.
He went downstairs to find his mom in the kitchen, cleaning up after breakfast.
"James! You're up!"
She opened her arms in offer, and he let her give him a hug.
"You need to eat, sweetie. What do you want?"
James didn't really feel like eating, but he asked for cereal to make his mom happy. She sat at the table with him, looking hopeful and worried in equal amounts. He stirred his cereal with the spoon.
"Um, Mom?"
"Yes, sweetie?"
"Can we call the lawyer? I have to ask something."
Mom texted the lawyer, who called them not long after for a fifteen minute chat. At the end of it, James was exhausted, but less worried about the trial. The lawyer had promised Harrison wouldn't be there, and said James could record most of his testimony beforehand, so he would barely have to talk in front of people. It was still a lot, that he would have to talk through everything on video, but nowhere near as bad as if he'd had to do it in front of people, especially in front of Harrison.
He went back to bed after the call ended and stared at the wall for a few hours.
-
There was a knock on the door, and before James could answer, Henry let himself in. He was holding a pizza box in his hands.
"Hey," he said, and did a double take at James's cleaner appearance. "Wow, you look nice. I thought you might be hungry, so I brought food."
James sat up, and Henry placed the box between them on the bed and opened it.
"Does this count as more or less adult than frozen pizza?" James asked, taking a slice after Henry did.
"More," Henry said. "You need adult money to pay for takeout."
"I'm pretty sure you can buy a pizza with kid money too."
Henry shrugged. "Depends on the kid, I guess."
They ate together--Henry ate half a pizza and James managed two slices--and as it got late, James started worrying that Henry would leave. Would it be too much to ask him to stay over again? It would. But … he did say he wanted to help.
"Could you … could you stay? Tonight?"
"Of course I'll stay." Henry didn't even hesitate. "Just tonight? Or should I think about bringing a toothbrush and some extra clothes next time?"
James blushed. "Um. It's just … I didn't have any nightmares. Last night. It helped. You don't have to, if--"
"I'm not making fun of you," Henry said. "I'm happy to stay. I just like to be able to brush my teeth in the morning."
"I think we have extra toothbrushes."
-
When Henry came back the next day, he brought a bag with clothes and toiletries, and for the next few weeks, he was always there when James went to bed. Sometimes they spent the day together, and sometimes Henry was gone until the evening, but he always made sure to be there when James went to sleep and when he woke up.
James started going to therapy again, and gradually he spent more time out of bed. His nightmares weren't completely gone, but diminished enough that he usually woke up feeling like he had gotten some rest. The exception was the week he recorded his testimony, when he woke up every night kicking and screaming, trying to climb out of a too deep grave while Harrison filled it with dirt, trying to break out of the coffin, trying to get away while Harrison broke his bones and cut his skin and burned him.
"James."
"No, no, please! No more, stop, please!" James twisted, trying to break loose from the ropes holding him.
"James! Wake up, you're home!"
James flinched when the room filled with light, and squinted in confusion as the room turned out to be his bedroom, and not Harrison's basement. The person talking to him wasn't Harrison, it was Henry.
He didn't let Henry touch him at first, just sat on the edge of the bed staring at his shaking hands while he tried to remember how to breathe.
"Do you want to talk about it?" Henry asked.
James shook his head. He closed his hand around the point on his right arm where, under his clothes, Harrison's initials were burned into his skin. He didn't know if he could talk about it. There was too much to tell. Henry hadn't even seen his scars, always hidden under long sleeves and high necklines.
After a while, the shaking calmed, and Henry was able to sit next to him and put an arm around his shoulders. James leaned against him, letting himself feel safe and protected.
"Can I show you?" The thought was out of his mouth before he could decide if it was a good idea or not.
"If you want."
Without giving himself time to change his mind, James pulled off his sweater. He could feel Henry go tense beside him, could hear the quiet gasp.
"James--"
"He liked knives." James ran his fingers over the scars covering his chest. "They were his favorite. He kept comparing it to me being a surgeon operating on people." He turned his arm so Henry could see the brand. "This is where he burned his initials, so everyone who saw it would--would know who I belonged to. And these," he pointed to the dark scars ringing his wrists, "are from when he decided to destroy my hands. He would tie them up too tight for hours, and then he made me play the piano, to see how much less I was able to do with each time. He broke my fingers too, but that didn't scar." He had scars on his back, too, but didn't point them out. Henry could see them well enough on his own. "A lot of it didn't leave scars." He didn't look at Henry. Wasn't sure he could handle seeing the pity on Henry's face.
"Shit, James." Henry moved as if he was going to touch James, but then thought better of it. He pulled up his own sleeve instead. "It's not the same, but … I started getting my tattoos to cover these." He showed James a series of small, puckered marks on his underarm. "My dad used to put out cigarettes on me when he was drunk. I kept doing it myself too, just so I could pretend it was no big deal."
James glanced up to meet Henry's eyes, then reached out to run his fingers over the colorful skin. The scars were old and faded, and with the limited sensation in his fingers, James could barely feel them at all. It made him angry to think of someone doing that to Henry. "How old were you?"
"Ten," Henry said. "At least I think that's when it started, after my mom died. He kept doing it until I came out at eighteen, and he threw me out."
Eight years. James had only had to get through one month. And when it was over, he had his entire family to take care of him. "That's horrible," he said.
Henry shrugged. "It was a long time ago. I didn't mean to make this about me, just that, you know. You choose what happens from here." He looked at the brand on James's arm. "It's your body, not his. You don't have to keep them like that if you don't want to."
James hadn't really thought about covering his scars in other ways than clothes. It wasn't as if a tattoo could hide the massive amount of scars he had. Laser treatments were an option, but again, he was covered in them. It was too much to ever get rid of completely. Still, doing something about the brand with Harrison's initials wouldn't be a bad idea. He didn't belong to him, so he shouldn't have a mark saying he did.
"Did it hurt?"
"Getting the tattoos? Yeah," Henry said, pulling his sleeve back down. "But it was worth it."
-
Henry came with him on the day of the trial, along with Julia and James's parents. They waited outside the courtroom until the videos were done playing, and then they went in, so James could tell the jury about his lasting injuries, and how he was unlikely to ever recover enough to go back to his job.
It went better than he had expected, and while he was a bit shaky at the end, he didn't feel the need to spend the rest of the day in bed. They wouldn't know the result of the trial for a few days yet, but the lawyer was confident Harrison would be found guilty.
That night before they went to bed, James took Henry's hand.
"Thank you for being here," he said. "I don't know how I would have managed without you these past few weeks."
Henry smiled. "I think you would've found a way even if I wasn't," he said. "You're stronger than you think. But I'm glad you chose to let it be me."
"Can I ask why? I mean … you have to have better things to spend your time on, right?"
"Because you're cute."
James's eyes flew to Henry's, surprised by such an open admission.
"I mean, that's not why I stayed. We're friends, and I like to help my friends. But at first? You were cute, and I had fun texting you, and I haven't figured out how to meet people without alcohol being involved."
"Oh," James said, not sure how to respond. Henry thought he was cute. And he thought Henry was … cute wasn't quite the right word for it. Hot, more like it. Fascinating, funny and attractive, and he made James feel safe in a way no one else did. "I … huh."
"Don't worry, I'm not trying to pressure you into anything. I'm happy staying as friends with platonic benefits, if that's what you want."
What did he want? James's eyes flitted around Henry's face, down to his lips, back up to his eyes. It felt like forever ago that he decided he wanted to do something about his crush, before the letter came and the trial took over his life. Now that the trial was over, he might actually be able to think about other things going forward. And Henry was very nice to think about.
"I think … that's not what I want," he said, testing out the truth of it as he spoke. "I like you. Like that. But … maybe we can take it slow?"
"Yeah?" The look on Henry's face was a mix of hopeful and happy that James had never seen before. "How slow are we talking?"
"Um … is it okay if we keep doing what we've been doing? For a while longer?"
"Yeah," Henry said. "Of course." He threw an arm around James's shoulders and pulled him close.
James closed his eyes and soaked in Henry's warmth, that solid body and unquestioning acceptance. Henry nuzzled his face against James's hair.
"Not that I mind waiting," Henry said after a minute, his voice almost too-casual. "But how long, do you think, before I get to kiss you?"
"Oh." James looked up. He didn't mind the thought of that at all. "I think … kissing is okay."
Henry's face broke into a grin. He cupped James's cheek in his hand "Yeah?"
James couldn't help but smile too. "Yeah."
#mira writes#story: Scars#writing#hurt/comfort#aftermath of whump#Character: James Kennedy#Character: Julia#OC: Henry Baker#I hope you like it!!#comments make me happy#last chapter!#a long one to end it all#nice and fluffy#because that's what James deserves
8 notes
·
View notes
Text
20 Questions for Fic Writers
I've been tagged by @totallysilvergirl and @calaisreno TYSM!!
1. How many works do you have on A03?
51 in total
12 "real" fics and 21 ficlets and 18 covers (I didn't know how to embed on AO3 back then)
2. What's your total A03 word count?
271.977
3. What fandoms do you write for?
Sherlock BBC
4. What are your top five fics by kudos?
Mutual Attraction , Learn My Scars, The toe that didn´t belong, The embers still glow when I´m sober , Gravity is missing from everything
The last three are in fact a series called Here I Am
5. Do you respond to comments? Why or why not?
Of course! Always and quickly. I love comments, they make my day and fill me with happiness for hours. Not kidding!
6. What's the fic you wrote with the angstiest ending?
None of my fics end angsty. Some of my ficlets might, possibly Time
7. What's the fic you wrote with the happiest ending?
They all end happily.
8. Do you get hate on fics?
There had been a few very weird comments on "Mutual Attraction" that were rude or offensive. Some had been deleted by the cowards who posted them later.
9. Do you write smut?
Yes, I have written porn and enjoyed it. I also write gen and everything in between. Depends on the story.
10. Do you write crossovers?
No, because I define "crossover" as a mix of two existing universes, like Sherlock x Star Trek for example. I have written several AUs though. Alternate Universes with the same characters of my show but placed somewhere else.
11. Have you ever had a fic stolen?
Not that I know of.
12. Have you ever had a fic translated?
I have been offered three times but declined because I personally am not comfortable with it.
13. Have you ever co-written a fic before?
No.
14. What's your all-time favourite ship?
Johnlock
15. What's the WIP you want to finish but doubt you ever will?
I have this fairy tale AU sitting in my drafts for literal years. 20k written and several attempts to take it up again, it is mostly plotted but just resists being finished. *sigh*
16. What are your writing strengths?
Learning by doing, I guess? I think of myself that I am versatile. Maybe writing movie-like action scenes. I remember that's been said in comments.
17. What are your writing weaknesses?
I honestly do not know. (Which is not me saying I can do everything perfectly!! I just try whatever I want.) Finishing the above mentioned fic possibly.
18. Thoughts on writing dialogue in another language for a fic?
If it fits the story, why not? I write in English which is not my native language, so I could do German and some French and Italian, too.
19. First fandom you wrote for?
Sherlock BBC.
I've actually never written anything before I started with Sherlock fanfic. I got this idea and it grew and I began to write it down just for me so that I would not forget it. Then I thought, why not write it into a fic? I've been reading a lot fanfic already. Over the course of two years (writing on and off) the idea had turned into a 94k fic. I only started posting "Mutual Attraction" when it was completed on AO3.
I still think it's funny because just imagine this. Never wrote a word of fiction before, not even in my native language. Then, first thing I produced is a novel-length fic written directly in English. Still seems surreal to me.
20. Favourite fic you've ever written?
I love all of my babies and will not choose a fave one. There are only faves in categories.
"Mutual Attraction" was my first and longest fic.
"Wretched and Divine" was the one that made me find my dear friend and beta @peageetibbs
Technically, I am most proud of pulling off "Learn My Scars" because it is 38k written under a huge amount of pressure due to daily posting for Whumptober 2022. Five weeks of intense writing madness but very rewarding, too.
AU and plot-twist wise it would be "The 13th Book ".
---------
So many people have done this but I think @shiplocks-of-love @shelleysprometheus @cumbercurlygirl have not been tagged yet. And anybody else who wants to share, please.
22 notes
·
View notes
Note
I would like to know what your boundaries are when it comes to interacting with you.
are you ok with requests or questions that don’t have to do with your works
are you ok with receiving headcanons that are not relevant to or may contradict with what you already have
how many asks are you comfortable with receiving at one time.
Are there other things that you want us to know about fan interaction that I didn’t think to ask about
hmm oh man no one has really asked this before... i think as a disclaimer i need to say that im pretty bad at replying to asks, and half of them get ignored and deleted because i either forget about them and get too anxious to reply, or just don't know how to reply and never do.
i dont really do art requests, so if anyone sends one it will most likely be ignored, and if its not related to what im posting it'll be ignored 100%. there are some exceptions of it, but i still don't appreciate people asking me to draw anything for free. i suppose i don't mind questions about stuff outside of my work! no one really asks anything so i don't have a good example of it, plus it all really depends on the context, but if its good I'll reply and if its something i dont like I'll just ignore it. so, same as with everything i guess, so those are okay 👍
about headcanons hmmm... not sure? i dont know how to properly reply to them if its not something im into apart from "oh thats interesting" and "nice". like, i don't really wanna say stuff like "that cool but i personally think that you're wrong and here are the reasons--" and take someone's headcanon apart? it just feels rude? even if i do process the headcanon in my brain and there's a thought process of how it fits or doesn't fit into my beliefs, i don't really want to say it out lound to not upset anyone? but saying all this, it is still nice to see headcanons from different people and different perspectives, to have some variety of views and opinions and more diversity. because you never know what you might like. so, i think all headcanons are good, if i know how to reply to them i will, and if i don't then i won't!
how many asks am i comfortable receiving umm, well, i don't have an exact number picked hsghd. i guess as many as you want if you really have a lot to ask? i do appreciate it when people keep asks topical tho. so, if you're asking about one particular thing, it'd be nice if it was all in one ask that is easy to reply to. and if you're asking about multiple different things it's better to send multiple short asks instead of a big one. because its hard to reply to billion unrelated questions in one post. so for example your ask is good because all the questions are on the same subject, but if you asked me about the weather halfway through and then swithed to an ask about jrwi, that i wouldn't reply to, yknow?
for other things... i already said about the art requests, which are like the main thing i really don't like. i guess some things are better asked in dm's than asks, if that's anything? especially if it's something more personal to you or requires an actual dialog, but i can see why it might be easier to send an ask first and move to dm's later, so its not a problem. hmmmm and i suppose just the general stuff, like don't send suggestive asks if i don't know you or you weren't clearly prompted to, don't be mean to me or others, even as a joke it doesn't feel good, remember that im just a random guy on the internet, im not a robot i have feelings, so talk to me like a person, don't spam the same question if i didn't answer it, etc.
i think that's it? thank you for asking!!
25 notes
·
View notes
Note
Have you ever talked about your process for writing? Like how you start a story/outline it? And things you do to get in the headspace to put those ideas into an actual cohesive story? I’ve always wanted to sit down and write and have so many ideas but my adhd seems to make it impossible to do anything with them 🙃😅
hmmm I might've talked a little bit about it if you search through the #azsazz writing tips filter on my blog but i can answer this here as well!
to be honest...it depends. when i first started this blog, don't really do anything to plan, i was just deeply fixated on the books and i wrote and posts 3 times a week consistently for a long time...and then lives changes, you move, get a new job, and there isn't as much time anymore.
for my one-shots, i really don't have a process, and i know this is the most unhelpful thing ever. i just think of it as i go, let the words flow, don't think about it too much. or, if i don't have the full idea, i write the parts that i can come up with ideas for and go back and fill in the blanks/connect the pieces later.
midnight muse (the fanfic version) didn't exactly have a plan either it really was one of those fixation moments as well which was why some people didn't like how things went within the story, but now i've revised and updated it and it's becoming something that i love again and i can't wait to share it.
but, for the second book and future books i plan on writing, i am planning them out. i was recommended to read this book called romancing the beat. it's essentially a "guide/formula" or how to write a romance novel. it has helped me a lot with figuring out plot lines and you obviously don't have to follow the thing perfectly but it's helped me get good bases for my stories so far. I'd recommend that for long fics/stories...
i'm always thinking of random ideas and one-liners and stuff and most of the time they don't even get used, but i write them all in a note on my phone as soon as they come to mind! then i can use them later, stew on them, or delete them if they aren't working.
sometimes, i don't want to write at all and i feel lazy. sometimes i force myself into writing a few sentences and if i get into i get into it and if i don't, i stop, go read or watch something or chill. i don't force myself to do it because i know if i do that i will lose my love/interest in it.
i would maybe just start with making a list. then, go back and categorize it somehow. by character, by if you think you can actually make them connect somehow to form a story, etc. maybe that might help!!
thank you for sending this question, i hope my answer helps you at least a little bit!! 💙💙
3 notes
·
View notes
Note
Hi AUfriend <3
Excuse me marching in here unannounced. I sent some asks to Mareena and Para, and well, I thought that perhaps you might also like these questions. (Feel free to do it in your own time or ignore as spoons allow. <3)
I know we love to talk about breaking the rules in writing and obviously, that not every piece of advice is one-size-fits all, but there is a lot to say about being able to speak with each other about what we have learned during our journey. I was wondering if you wouldn't share. (I also plan on poking some of the others to see what more we can shake out. The more the merrier, no?)
What is the most useful/helpful pieces of advice you ever received during your education in relation to writing?
Once you started to write, what was the most important thing that you learned about writing or its process?
Has your real life had any influence on your writing? If so, how?
What advice would you give to aspiring writers (be it fanfiction or original)?
I would, in fact, like these questions. Give me all the questions. I broke my own advice and deleted a paragraph of this and started over. Then I left and came back a few hours later.
1.) The most useful advice?
Your job is to tell a story. (Stop trying to push multiple things in a narrative, stop trying to impress people, stop wondering what the audience wants, you have one goal- anything extra is extra.) Motivation will not support you, but discipline will. (I wrote everyday, two days off a week. I did this for a year. That year has given me more stamina in terms of writing than any amount of inspiration ever has. Its the reason some stories can exist at all.) The job of a first draft is to exist. (It can't be good until its bad, it can't be bad if it doesn't exist.)
2.) Once you started to write, what was the most important thing you learned?
<Trying to remember when I started writing> Start small? I started a lot of big projects before I got comfortable doing small projects, and that hurt me in the long run, I think. It isn't a lack of discipline or ability on your part, don't get offended. Its just, small things are a huge confidence builder. I have so many unfinished works on my laptop, that it made me feel like a failure. Having several small completed works helped me have the confidence and know-how to look at a big project and go "no big deal." Also, contrary to popular belief, people do actually like small bits of fanfiction, gen fanfiction even. Short stories do have a market. Those small prompts are really helpful in boosting confidence and practicing in a non-stressful environment. Also, it helps work maintain an even amount of skill. My skills at the beginning of a story are much better than at my endings.
Technical stuff: Warming up will save me time and stress.. I can spend two hours looking at a blank screen or I can spend five minutes on typing exercises and ten minutes free writing. Sitting at a desk is more productive and better than sitting on my bed. I need to have some sort of caffeine and or water next to me. Walking beforehand eases out the jitters. I do better when I am not posting everytime I hit 1 or 5k.
Brand new information: Having a group of writers talking to you and encouraging you about your project makes writing a LOT easier. They give me a positive word and suddenly things start getting accomplished. Its magical. Being dependent on other people for motivation is not healthy, but it IS normal to need affirmation- my mind thinks of it as a really good dose of speed.
3.) Has your real life had any influence on your writing?
I had two immediate responses to this. One was, "I hope so" the other was "Damn, I hope not." A few things that have probably gotten into my writing: 1.) My relationship with disability 2.) Sometimes people have to live in unhealthy and uncomfortable situations. They live and their lives are still WORTH living, even if things aren't perfect. 3.) Sometimes life changes directions completely and you aren't you you thought you would be by the end. 4.) Some of my favorite fic authors 5.) My family history
There is also a Screwtape Letter's quote that really put my writing into perspective, or really any skilled labor. It eases a lot of insecurity, if this is what I am striving towards. > “The Enemy wants to bring the man to a state of mind in which he could design the best cathedral in the world, and know it to be the best, and rejoice in the fact, without being any more (or less) or otherwise glad at having done it than he would be if it had been done by another. The Enemy wants him, in the end, to be so free from any bias in his own favour that he can rejoice in his own talents as frankly and gratefully as in his neighbour's talents--or in a sunrise, an elephant, or a waterfall.”
4.) What advice would I give?
You have to let yourself suck. You have to let it be bad. You get good by being bad. Writing is an imperfect craft, and if you spend your time trying be perfect- its just going to add a layer of misery to what should be a joy. My friends and family have to drag me away from writing these days. I get irritable if I don't write, because the last little thing that was keeping me from writing- what was filling me with dread- was that need for perfection.
Stop hiding your work. You have nothing to be ashamed of.
Do your time letting yourself work through it feeling like a chore. That is a normal part of the journey, feeling like each word is coming at a crawl and "I have no idea why I do this" and "This isn't good." I would compare it to doing scales or running laps. Its hard, repetitive, useless work- but after you've built up the skill and endurance, you can focus on the story you are writing- not if you can do it at all.
12 notes
·
View notes
Note
Question: How do you feel that you have explained enough when writing? When your words are flowing like water from your pen, and the rush is so fast at times you feel like before you stop to ink those details in, the direction, that careful context that brings your readers along for the ride, you end up being swept away onto the next part in your fervour.
And you revise it, yeah, course you do, but how can you tell when you have sufficiently written the right bridges and smoothed out the crinkles in your writing form?
Please, share.
Ok, so, I've been thinking about how to answer this. I think maybe the answer is that I'm not that kind of writer?
The moments when I am being swept along to the next big thing are vanishingly rare. I need to get this scene right before I can go write that scene. This is not a strength. It has taken me years to get comfortable leaving myself something like [some transition] at the end of a scene to come back to it later and moving on to the next bit I can write rather than getting completely stuck.
scrolling back up to revise now: I think also part of not getting swept along to the next bit is knowing that I can always get to that next bit. It's not going anywhere. I'll get there when I get there and the scene will have had time to mature in my head in the meanwhile. But then, I am less at mercy of the whims of hyperfocus than many a writer who is diagnoseable with ADHD or the like. I am not. I don't have to get it done Right Now Immediately or it'll never get done, you know?
I am also not that analytical of a writer. I don't really think logically about if I've written the right bridges and smoothed out the crinkles? It's all vibes up in here. It's right when it feels right. If it feels sparse and incomplete, I add more. Sometimes it feels overstuffed and the pacing is off, and I have to delete some (that one is much harder. I am very proud of the fact that I am now able to take the axe to some of my words sometimes. It is not my strength, but something I'm working on).
Getting a feel for that kind of thing comes with practice. I know a decade ago I didn't think in satisfying narrative arcs when coming up with characters? I was spitballing with a friend fleshing out their OC the other day and found myself going 'ok, if the beginning of their arc is realizing that these people are depending on them and they need to step up, then the satisfying conclusion should be realizing that they can depend on these people in turn'. It's something I might have done instinctively earlier in my writing? But now I have the experience and tools to think about more intentionally.
I am also not that analytical of a writer in the fact that I just write functional words. I greatly admire authors who can think deeply about individual word choices through the entirety of a work, picking them like a poet so every sentence is perfect. They're out there building the literary equivalent of towering aqueducts, stone by stone and word by word. That's not me. I'm just standing in the word fields digging a trench one small shovelful at a time, and eventually I've dug a ditch that the water pretty much flows through to get where I wanted it to go, and that's good enough.
The story is never going to be the story it was in my head. In my head, a story is all unspecified vibes, powerful images, and the occasional good snippet of prose. The story in my head doesn't have to have grammar and punctuation. It's never going to be what it was in my head, but if I can get the main emotions across that's good enough for me. And again, I can't tell you how to know when you have gotten the emotions across. That's something you have to figure out yourself with time and practice (and also by the reactions of the people who read your story. it's hard to do in a vacuum.)
Thank you for this ask! It has been interesting to think about my writing process this morning. But I'm also very sorry I don't have a better answer for you. It's all done by feel over here.
7 notes
·
View notes