#Looking for more fabric scraps and another sewing project now!!
Explore tagged Tumblr posts
Text

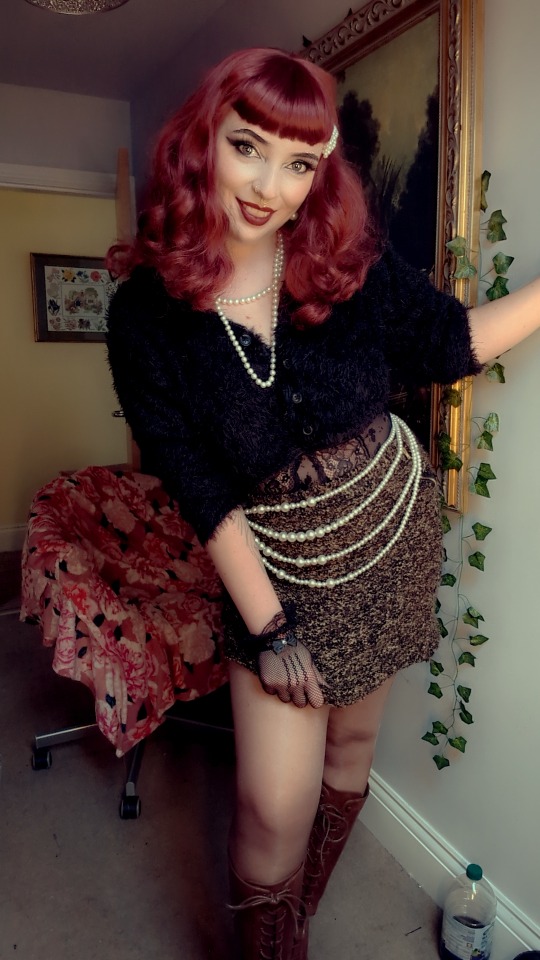


Cute 'fit featuring the skirt I made 😍
Treat me ~ Tip Me ~ More of me
#So proud of myself!!!! 😍😍😍🥰🥰🥰#Delightful achievement!! And this look is a sweet one!!#satans knitwear#alt pinup#pinup girl#Ootd#Feelin this!!#Looking for more fabric scraps and another sewing project now!!#bi girl#uk girl#wlw
323 notes
·
View notes
Text
[Completed] First Time Cosplay Journey: Peppino and Noise Full Body Cosplay

As the title states, this is literally the first time making a full fledged costume. @skyrider3217artz and I started this back at the beginning of July and we wanted to share our experience with making them for the upcoming convention my sister and I be heading to around December close to our birthday.
I'm used to doing custom plushies with my sister with our latest one being a custom 4-foot Mizutsune plush (https://www.reddit.com/r/MonsterHunter/s/jD17gT3R0O) plus a mushroom toppin for a friend and a pineapple toppin for another commission. Honestly, this is a really big jump from making custom plushies but I am feeling optimistic about this project. It has been a long and grueling month working a full-time job plus working on this cosplay with the weather and workspace not being favorable at our location. This is what we have so far in the project:
Last Updated: 10/20/2024 (Updates Highlighted in Blue)
More details below:
Noise Cosplay
The cosplay is fully completed, here is the post showcasing the costume.
Props
NTV Microphone: Fully completed
Noise Bomb Plush: Fully completed [post] Created by SkyRider
Noisey Plush: Not started.
Jetpack Backpack: Not started.
Plush Knife: Scrapped
Clothes

Devilish Imp: We are almost complete with the costume, we mostly need some wings, the horned hat, and attaching the zippers for the ankles.

Poise: Not Started

Critic: The costume is almost complete. We are reusing the Devilish Imp costume in red with some green fabric for the cape. Work smarter, not harder.

Roise: Basically Critic, but with normal Noise's cape. Just resuing parts. It's not completed yet.
Peppino Cosplay
The cosplay is fully completed, here is the post showcasing the costume.
Props
“Peppino Pizza” Pizza Box: Fully Complete [pizza box Post] [Plush post]
6" Toppin Plushies:
~Mushroom: Pattern completed via previous commission, needs to be scaled down.
~Cheese: Not Started
~Tomato: Not started
~Sausage: We have tested the pattern and will need to figure out how to properly sew the ends of the sausage without it looking funky.
~Pineapple: Pattern completed via previous commission, needs to be scaled down.
Clothes

Candy Wrapper: We have bought fabric for the costume and will assemble it soon.

Blood Red: We have bought fabric for the costume and will assemble it soon.

TV Purple: We have bought fabric for the costume and will assemble it soon.
With the main project completed, any updates will be small "bonus" updates. (Mainly for posting the final props or costumes as they get completed)
#pizza tower#cosplay#pizza tower cosplay#peppino pizza tower#the noise pizza tower#the noise#peppino spaghetti
43 notes
·
View notes
Note
hi! if you're comfortable with sharing, i'm curious to know what shops that send lbs of fabric for the cost of shipping you were referring to in your contribution to the sustainable lifestyle post. or were these shops local to you? i'm getting into sewing and textiles to make clothes for myself and to give away to others and i feel this could be a very useful and affordable resource if you believe it possible to share!
A lot are local to me! Many small fabric shops will sell you their remnants in small quantities, sure, but many are also willing to simply sell you that scrap as a random assortment by weight! If they don't say so online, it never hurts to ask in person while you're checking their one-off remannt bins.
That said, more and more companies that have their own internal manufacture "remnant resale" process! So online shops like Quilt N Things, FabCycle, FabScrap, and MuuMuu Outlet will often carry "scrap by weight" purchase options in their shops! Your best bet is going to be finding where the local quilting community shops. These are people who are QUITE accustomed to purchasing fabric in wholesaler quantities with home-maker budgets, and they'll be able to direct you towards the best deals on this stuff.
I will say that it pays to learn how to identify fabrics when you do this, because random means random. I've received freight with scraps of brocade silk, embroidered and beaded fabric, raw muslin, pleather, oilcloth, wool, and so much more. You never know what might find its way into your box, and different fabrics do different things when incorporated into a garment. You can get more or less specific, but generally my biggest questions are always "is this an all-natural fabric or does it include polyester and other synthetic blends?" Because these I'm more likely to use outside as upholstry, garden fabric, or decor. That synthetic ingredient allows it to endure weather and moisture with less degredation, and makes it a worse option (for me due to medical issues) to use close to the skin, although it can be useful as an outer layer on raincoats and pants. Meanwhile, natural fibers like flax or cotton are extremely useful to me as lining fabric for garments, and fibers like wool are great for thermal regulation. My next question is usually about identifying the drape of a fabric, a mixture of understanding fiber content and weave and how that will look in the garment itself. Depending on what you're trying to do, you may have more questions you need to be able to answer, but it's all about your project needs.
Honestly, though, if you're an experimental sewer of any kind (e.g. a beginner still practicing stitching and construction techniques, or a tailor looking to drape a garment), these random assortments are a great way of always having enough fabric on hand that you don't mind sacrificing to the cause. I've found that one of the best ways to really get good at fiber craft is to lower the stakes of perceived failure. If I'm afraid to try something new, I try it on old moth eaten bedsheets I got for a dollar at the thrift shop, or on a 1000yd bundle of the cheapest imagineable yarn. Makes it easier to laugh off the cost of materials if it all goes lopsided. I'm able to get a lot more practice and test out a lot more approaches when it doesn't feel like an expensive waste of resources every time practice turns out....well. like practice!
Another really good option for you might be looking for free clothes being given away on Craigslist. These are most likely going to be mostly clothes not in shape for wearing, or they'd be sold or given to a thrift shop (although gems are always a possibility!). But given a good washing at the laundromat, they're a treasure trove of fabric scrap, and if there are any you like you can deconstruct them for patterning first before deconstructing for fabric purposes after! Voila, now you have 5-15lbs of fabric scrap and new patterns to boot, all for the cost of a laundromat and stock paper for pattern cutting.
Best of luck getting into your sewing! It's great fun, and when you start to get the hang of it, often you open up a whole world of possibilities you may bot otherwise have noticed!
7 notes
·
View notes
Text
Blaidd Cosplay project I worked on during May 2022
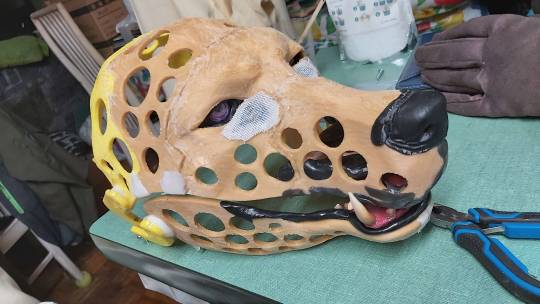
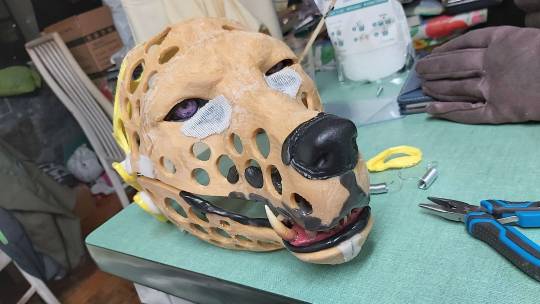
Elden Ring was the hype, I wanted to be a good turtle. I originally wanted to get this cosplay ready by Otakuthon 2022, but I never did finish it. I do want to finish this cosplay one day!
Now let ramble about my progress on it! :readmore:
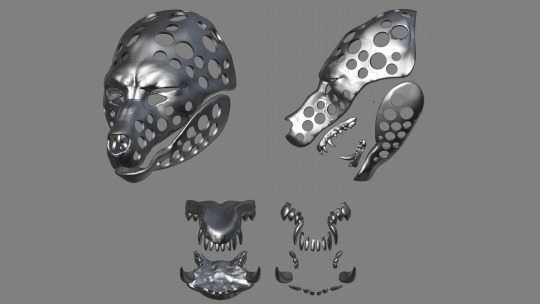
When it comes to video game cosplay, I take the easier route and rip models from the game, then modify them for cosplay. I 3D modelled a few Kamen Rider suits before and all that was a pain in general. For my sanity's sake, I plan to model as little as possible for future cosplays.
Lucky, the in-game model was well made, so I didn't have to make a lot of modifications. I had to separate some pieces, subdivide and give it some volume.
The head was given a lot of holes, so it would be lighter to wear. I had to separate the teeth and the gums because I will paint them individually.
I let my 3D printer work. Meanwhile....
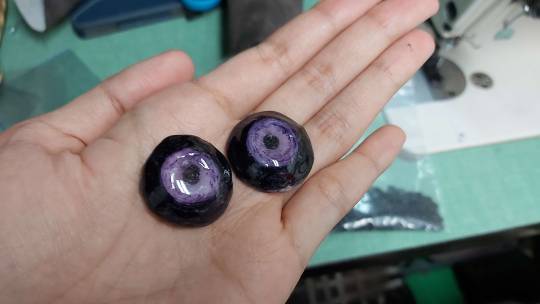
Eyeballs! Molded with moldable plastic pellets. The iris part of the eye hollows inwards for a bit of that 3D look. The whole thing then got covered in 2-part epoxy to fill the cavity and make the eye shiny.
There's usually a few steps involved when it comes to painting. That is priming and then taking your time to paint something with the medium of your choice. Well, I skipped all that and decided to draw on the eye with sharpie and markers. Results were... satisfactory enough.
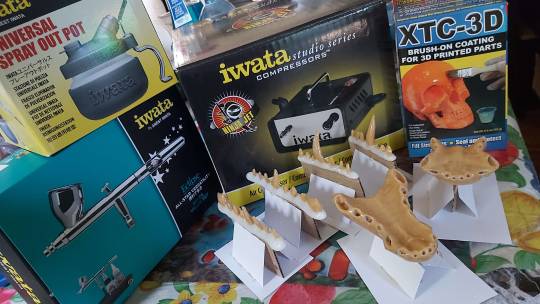
Time to work on the gummy teethies! I've been saving up for years on an airbrush set and I got really excited to try them for the first time.
FDM 3D prints don't come out perfect usually, so I brushed some XTC-3D (fancier 2-part epoxy) on them, and let it cure first.
With a bit of filler primer and airbrushing magic...
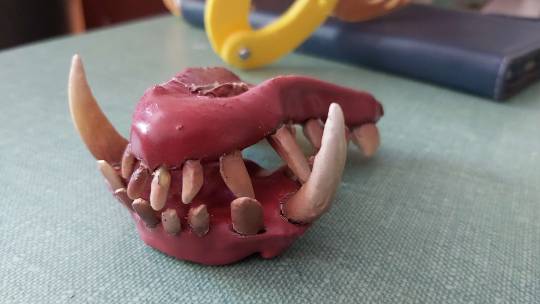
Teeth! Dentists in the Lands Between will make a KILLING if they ever move there.
Pretty happy with the process! I didn't bother to shade the gums because we won't see a lot of that anyway.
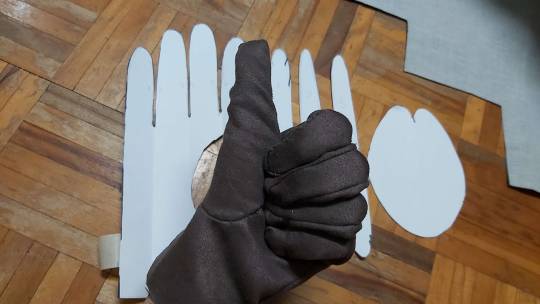
Did I ever tell you sewing is my least favorite part of cosplay? My specialty is more on props and armor. This image should've been flipped upside-down!
I tried to sew gloves using a free-to-use pattern I found on the internet (forgot where I got them). First one was too tight, second on was better, but still feel weird to wear. I will get these right one day!!
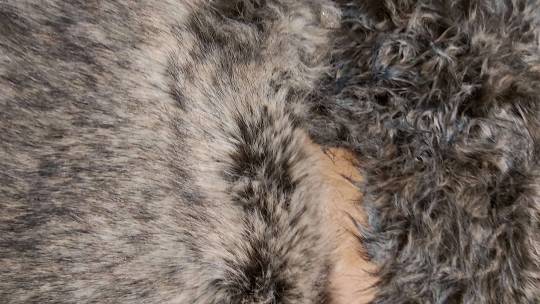
I bought some FUR! I shopped for a WHOLE hour at the fabric store for the right faux fur, and none of them felt like a match to Blaidd's fur. His fur was darker (than the fur in the picture, left side), with a hint of blue.
I tried to dye the fur a little bit to darken it, but not too much because I didn't want the white part of the fur to turn too dark. I used a dye for synthetic fibers. Right side of the image the the fur after soaking in hot dye solution for a few minutes (still wet)
Results? I there was only a subtle difference between then non-dyed and dyed furs! I either didn't let it bathe in the solution long enough, or I did not put enough dye in the solution.
ANYWAY I decided to just used the furs as is and airbrush the details at the end.
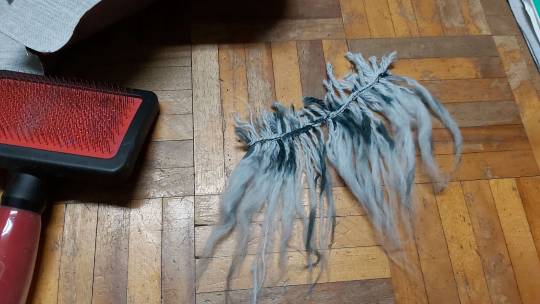
Now for the cloak? I was planning on tying some crochet threads together, then separate the ends with a fur brush, resulting in some fluffy ends the add on to the cape.
However, after re-examining Blaidd's cloak, I'm considering on scrapping this process because I feel like there's better materials to give out the look I want.
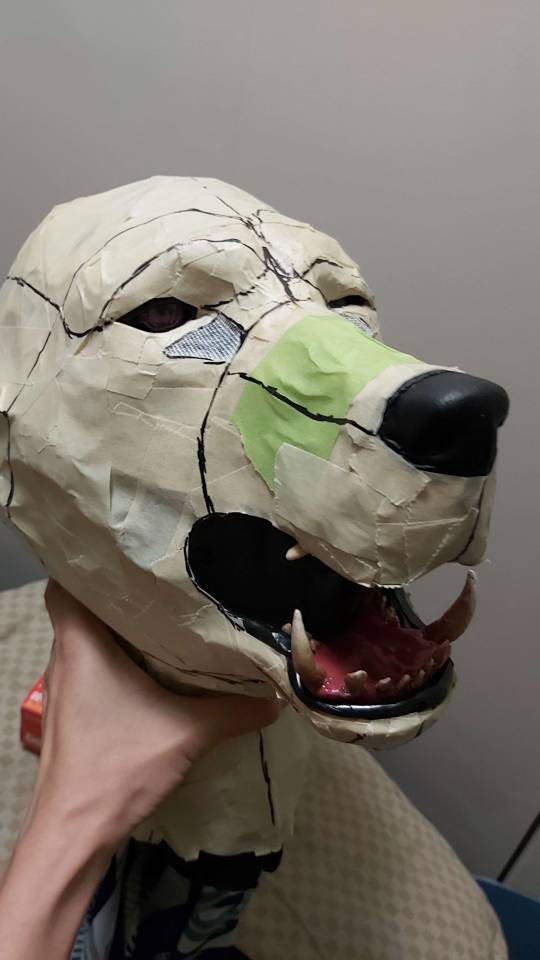
After assembling the mouth parts/eyes/nose, adding the lips with black moldable plastic and adding the hinge (to make the mouth movable), it's off to furring the head!
With the help of masking tape and sharpie, I went to pattern the fur. I then cut the appropriate shapes to sew.
I knew I had to cut the fabrics a bit bigger to make things fit and all, so I did that. My mistake? I realized after finishing the snout part, that I've cut the shapes TOO BIG! It did not fit the print!
So that's another thing I have to redo. Sewing is my passion (sarcasm).
This concludes part 1 of my Blaidd cosplay journal. Will there be a part 2? I don't know. It started snowing a few days ago and Winter is generally not a good time for cosplay-making. I'll have to see about this when Spring/Summer comes!
#cosplay#cosplay journal#okay well the readmore didnt work but got expand instead but ill just leave it there anyway
55 notes
·
View notes
Text
Why Hobie disappears
Not very long, just a little thing I wrote! Features/warnings:
Hobie is protrayed as very much being genderqueer in some way, shape or form, and is referred with he/they/she throughout the story + one instance of the reader calling him "girly" which Hobie explicitly enjoys and is implied to have talked about beforehand.
Reader is implied to also be genderqueer, and Hobie refers to them as "big man" once, they also stim when they get excited. Other than that, gender neutral reader and no warnings, just silly fluff!
It's widely understood that Hobie in himself is a wild sort of enigma. This is why no one really seems to question where he's going or why, what he plans to do. Hobie is just... Hobie, and he Hobies around until he leaves and presumably Hobies around some more wherever he trotted off to. Gwen and Pav wonder about this, because after every mission (or, at least, the few that Hobie bothers with), he just sort of magically slips off and reappears sometime later. It's Pav that suggests tracking him down, but Gwen would be a liar to say she's not also curious.
------------------------------------------------------------------------------
You sit on the floor, cross-legged with a punk at your side and a sewing machine in front of you. Tartan weave rubs against your fingers as you sew darts into the fabric, ensuring it would fit just a bit more snugly at the waist, because Hobie really liked that sort of thing in clothes. "Y'want a cinch, right? Nothin' too far off your usual?" Just in case, you double check. Hobie looks up from his guitar, and nods. You don't really note that he's smiling, and he knows you aren't, but the corners of his lips twitch up anyway. "Yeah. Thanks again, bruv, couldn't ever do that shit like you." There's something in his voice that makes you smile, nod a little firmer than normal. Hobie knows that. "Yeah, yeah, 'nuff with the flattery, I'm on it." Truth be told, this little symbiosis of Hobie giving you projects to work on and you giving him much better clothing in return has grown into something much more significant. Friendship. Even when you weren't working on anything, taking a rare break to clear your head, Hobie would let you sit near him (regardless of if you were in a talking mood or just wanted to be quiet for a few hours), sometimes talk about what he was doing, sometimes teach you a little tidbit about his universe's idea of how punk works. It was similar, for the most part, but you liked to learn new things anyway, so it never hurt. Your skilled fingers thread the machine before you as Hobie continues plucking at quiet chords with the guitar. ------------------------------------------------------------------------------
Gwen and Pav felt like this search was endless. For at least an hour, they had found a grand total of nothing, like Hobie really had vanished into thin air. He wasn't at his place Gwen had checked, so he was probably somewhere at the Spider Society, but tracking down someone so rebellious that no one bothered to ask where he was going was proving to be ridiculously difficult. It takes another half hour to find one of the smaller rooms of the Spider Society, a little sort of craft-haven and quiet space. Pav cracks the door, and gasps a little. "Gwen, Gwen, look at this." ------------------------------------------------------------------------------ When you take the now-fitted shirt off the machine (with a slight skirt you'd added made of scrap fabrics), you grin, and toss it to Hobie. "Try it on, fucker, should be perfect." Your confidence isn't misplaced, it seems, because when Hobie taps your shoulder to signal that it's good to turn back around, they're a fucking vision. Smudged eyeliner, torn pants, and the little suspenders, all the same, but with your work, cinching at the middle and showing off the wonderful lines of form, tracing down their hips until the skirt cuts off mid-thigh, Hobie looks so much more at home in it. "Fuck yeah!" Hobie smiles when you jump up and flap your hands a little, lets you circle them like a hungry shark as you rave about the new thing you'd tried, a different stitch or something. Hobie couldn't care less what you did. It was something you had made, and that was enough. "Beautiful, can't believe you're lookin' so good, girly." The tender, feminine nickname makes Hobie's chest thrum a little with satisfaction. She knows you know that she loves it when you do that, when you use other pronouns just to show her that you know and care for her preferences. "Thanks, big man. 'Preciate it." Now its your turn to grin, and wrap the punk up in a tight hug from behind, stupidly happy and content. Hobie is nonchalant. You are not. It works well. The lanky Brit smiles, and pats your hand around their waist. ------------------------------------------------------------------------------ Gwen and Pavitr had stood stock still as they watched this exchange. It was deeply shocking to them. Hobie, who was hanging out and being nice with some random, excitable spider that neither of them had met before. And this other spider seemingly knew things they didn't if Hobie's little smile was anything to go by. Gwen, however, softens. Hobie had his confidants, and she has hers. Maybe that's why she gently pulls Pav back, and smiles at him. "C'mon. Let's get lunch. Hobie's doing his own thing."
#spider punk#across the spiderverse#hobie brown#astv hobie#pavitr prabhakar#gwen atsv#spiderpunk x reader#could be platonic or romantic#fluff#playful#banter#fashion
17 notes
·
View notes
Text
Baby's first alteration!
So, I got my old sewing machine fixed and serviced, and I set up a sewing table! So of course I've been going through and happily mending holes in pajama pants and backpacks and sheets and what have you. And because I've also been sucked into the whole "visible mending" thing, I took a bag of not-so-great clothes that I was going to scrap, and started reevaluating them as potential patches for visible mending projects.
Which is when I came across this shirt:

The reason I was going to get rid of it is because of the turtleneck. The very, very, VERY small turtleneck, that made me feel like it was going to strangle me every time I wore it. And then I started thinking that having a sewing machine means that you can change things about clothes that you don't like....oh no, I'm going to start learning alterations and tailoring, aren't I? Oh. No.
So I came across this very excellent tutorial:
youtube
And I figured, I was going to get rid of that shirt anyway....what if I tried to take off the strangle-neck and make it into something wearable?
And then I got intimidated. I've never done anything like this before.
And then I remembered another turtleneck in my scrap pile, that was there because it doesn't really fit me very well:
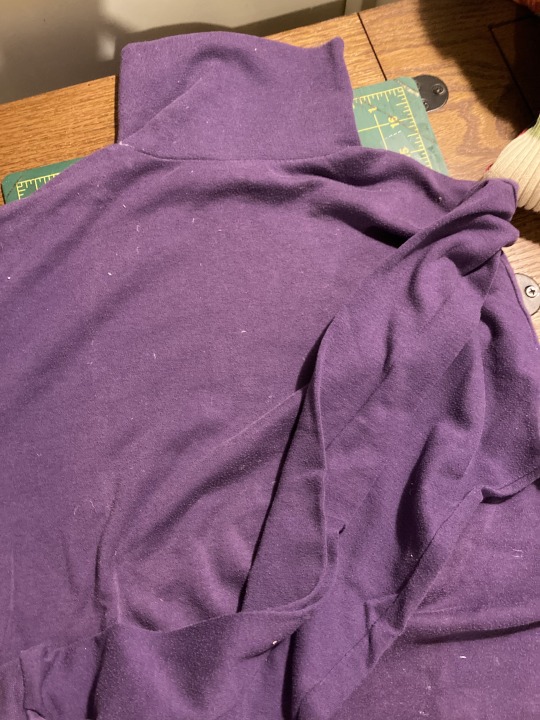
I figured I could use this as a practice piece, because there's a lot more cloth in case I screw up (it's always been very baggy on me), and there's basically no way I would be wearing it again anyway.
So I started going through the tutorial:
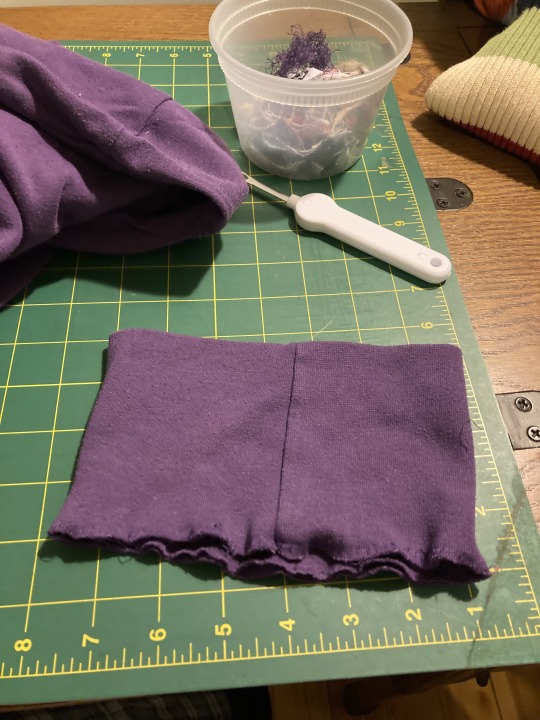

I removed the turtleneck part and picked it apart
(Look at how much longer the purple turtleneck was compared to the blue!)

The tutorial was for a scoop-neck, but I always look better in a boat neck, so I marked the fabric with soap and cut a boat-neck neckline into the shirt (which was scary, but I was pleased with how it turned out!)
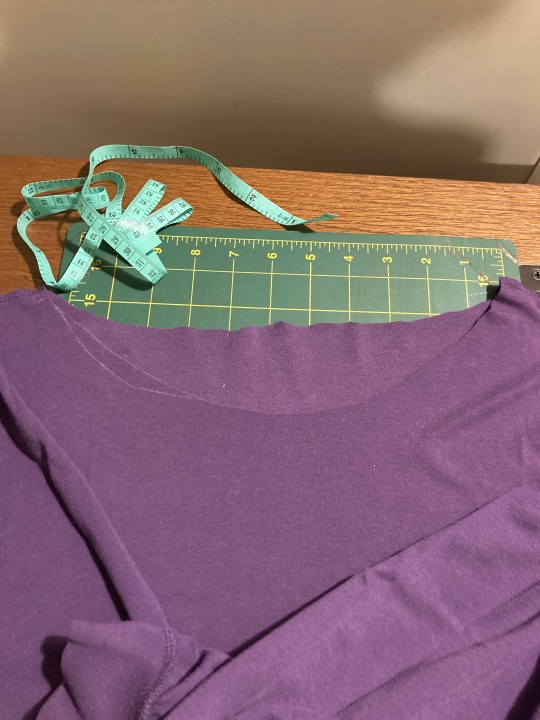
Then I followed the tutorial for how to measure and estimate the lengths of the strips for the front neckline and the back neckline seams:

Then I sewed them together

Panicked because one of the seam attempts caught in the sewing machine and was drawn UNDER THE FEED DOG PLATE which caused all kinds of problems including a broken needle! And I was worried that the fabric of the seam was so chewed up that I'd have to start over......
But then realized that the chewed-up part was going to be folded up and oversewn with the seam. So I pinned it up:
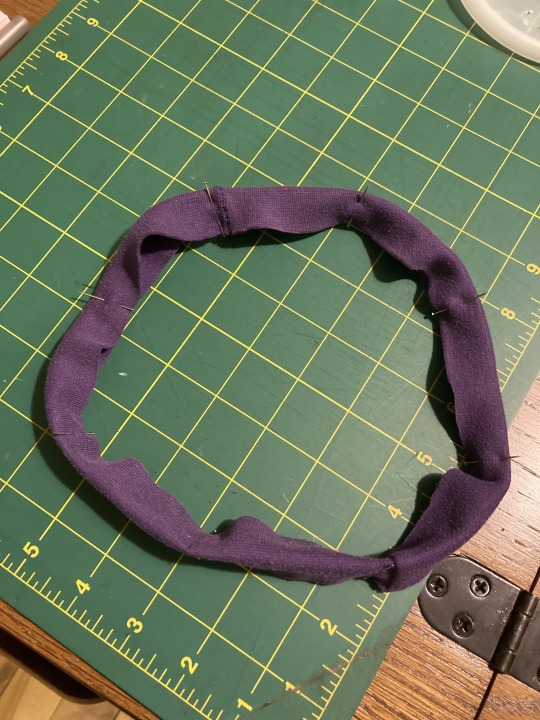
then got scared and added more pins
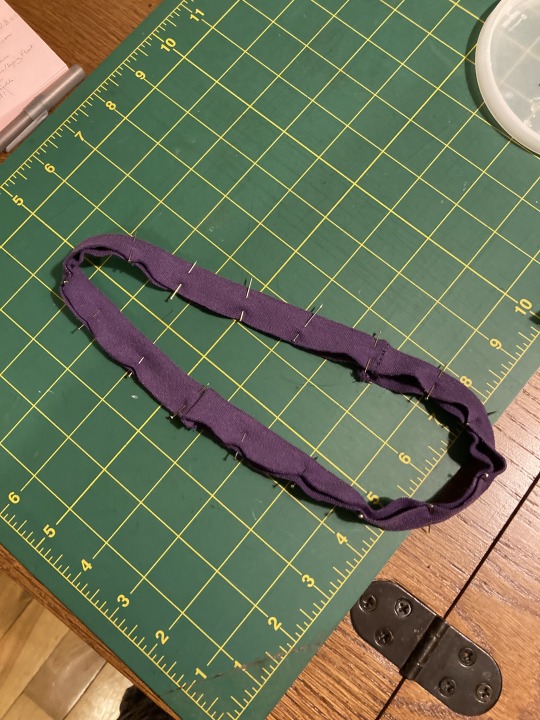
Matched it up to the shirt

And then I SEWED IT ON!

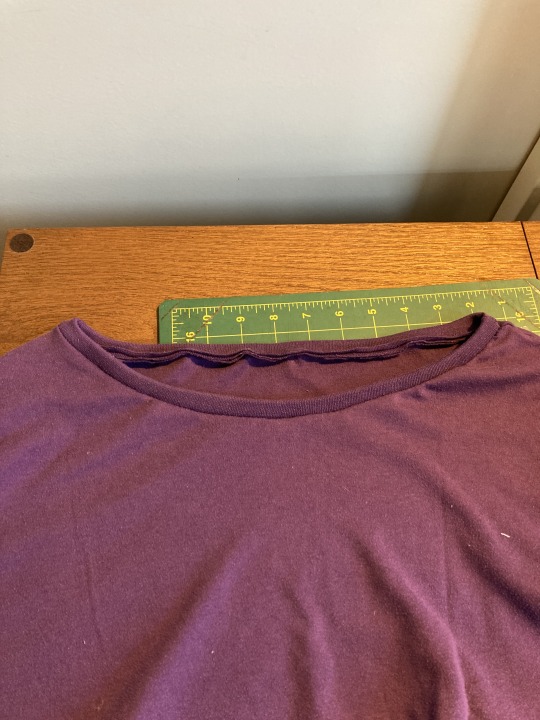
The shirt still doesn't fit at all, but I'm pretty pleased with the neckline now! (Oh no....does that mean I'm going to have to learn how to tailor an overly-baggy shirt?)
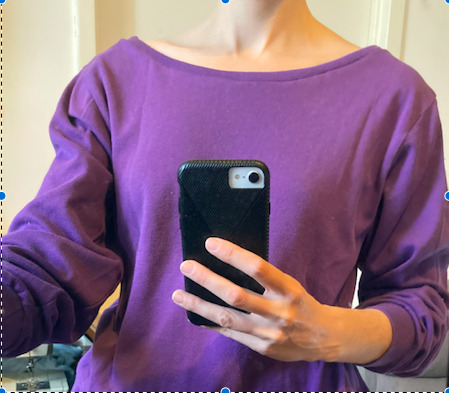
(Side note: Starting off new with super-stretchy fabric made some interesting problems. But! I now know how to replace a broken needle, pick a new foot that's better suited to the fabric, fight with stretchy fabric without a serger, etc etc etc. Good learning project, all in all. :D )
#sewing#mending#upcycle#sewing machine#new skills#first time#newbie#turtleneck#boatneck#tutorial#alterations
44 notes
·
View notes
Text
A list of things I sewed in 2023, mostly in order
I guess this is going to be a yearly thing now?
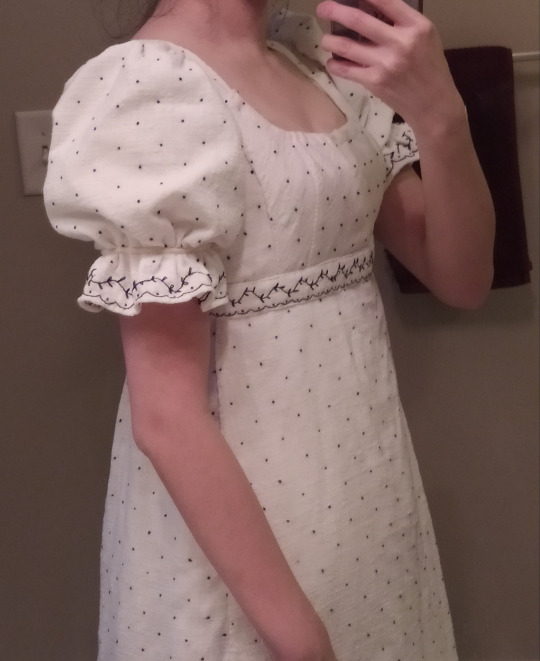
I started the year off by finishing the regency gown, for which I'd made the bodice in December 2022. It's made from an ivory cotton gauze with a pre-embroidered edge, but I took the time to hand-embroider the dots and vines. I wish I'd gotten an extra yard of the fabric though, because the skirt hem is only 2 yards in circumference and could have used a little more width. I also regret using such an open-weave fabric for the dress, even though it seemed to match the fabric of the extant dress, because it was awful to embroider on. (The original dress is decorated with thousands of tiny metal staples, not embroidered.) In total, not counting the time taken for patterning, the bodice took about 30 hours to construct, and the embroidery and skirt construction took another 72 hours, which was spread out over the span of about 2-3 months.
After that, I revisited the floral Vicwardian historybounding skirt I'd made the previous summer. I still had a small amount of fabric scraps left from that project, so I used it to make a set of removable suspenders that could be used to convert the skirt into a jumper dress.

After that, I made an actual pinafore out of some cotton flannel. I don't love the fit on this thing because the back tends to gape (I didn't pattern the darts correctly), so I'm thinking about taking it apart and adjusting it in the future.

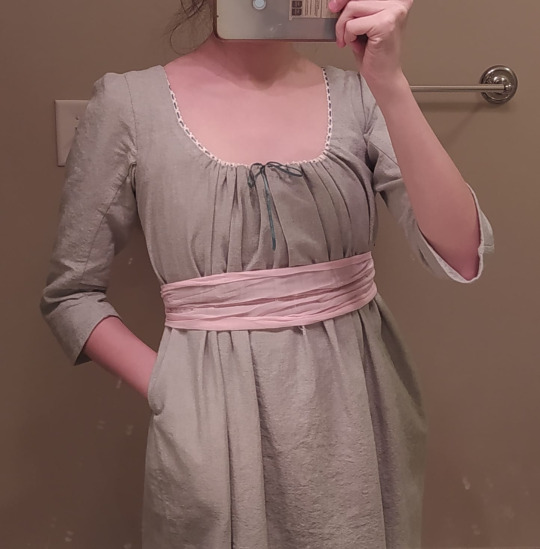
After that, I made a shorter, historybounding version of a dress that has been on my to-make list forever. It's based on the green round gown that Lizzy Bennet wears to the Meryton assembly in Pride and Prejudice (2005). The movie was edited so that the dress appears to be an emerald green, but photos of the actual costume show that it's a light sage green, so that was what I went with. I like the subtle "secret daily cosplay" vibes it gives with the shortened hem and the pink sash (I haven't had a chance to source some dark green silk taffeta to make a more accurate sash yet). My only regret is that the fabric I used is a slightly heavier weight than I would have liked, so this is more of a spring dress than a summer one. Overall very happy with this one and am looking forward to tweaking the pattern just slightly and making a floor length darker green version.
Then I got really into embroidery, and I made this detachable Peter Pan collar to go with one of my not-made-by-me dresses.

It was fun and easy, so I added embroidery and a ruffle to the Peter Pan collar blouse I made last year, and now I love it way more. I also re-did the collar on the lace-insertion shirtwaist from last summer and liked it way less, so I reworked it again and never took a picture.
In April, I made a baby dress for a coworker using this free pattern.

I also took some time to finish the set of Edwardian underpinnings I'd started last year, by making a hip pad (not pictured) and a ruffly c0rset cover. I liked the c0rset cover, but I didn't like how it looked with the c0rset and bust padding (it was just too much), so it became more of an alternative to wearing my Edwardian c0rset than an addition to it. I don't mind though. The Edwardian period is one of those eras where you can get away with not wearing a c0rset, since the bodices are not skin-tight, and I'm very very short-waisted and not-squishy, so I'm actually larger in the waist in a c0rset than out of one. I think I'm going to use the c0rset for evening gowns but only go with the c0rset cover (with no c0rset underneath) if I'm going for a daytime costume.

Then I did some more historybounding and made a back-closing blouse with a V-shaped yoke. It's made from my blouse block pattern, which I got from tracing a modern button-down I already own. I like the resulting shirtwaist (not pictured), but I think going forward I'm going to try to make a new block pattern because I never liked how the original shirt fit around my shoulders, and all the blouses I've made so far from this pattern also fit me weirdly in the shoulders.
Then in May, I made a wrap skirt that I patterned myself, inspired by Wildflower's Coquelicot Skirt. I regretted using such a limp, slippery fabric, and I don't love the skirt I got as a result (not pictured). I may attempt it another time out of a fabric with more body to it, but I have no plans to do that in the next year.
Also in May, I made a Victorian/Edwardian petticoat. It's floor-length and delightfully swooshy, and I love it, but I didn't get a picture of it because I don't own a floor-length mirror.
In June, another coworker had a baby, so I made another baby dress.

Then I finished residency and had more free time, so I bought 3 yards of strawberry-printed quilting cotton from Joann and made a modernized version of an 18th century dress inspired by the ones I've seen made by Bernadette Banner, Mariah Pattie, Sewstine, and Lina Piprek. I call this my 18th century strawberry dress, and it is one of my absolute favorite things I've ever made, even if it's not very practical or wearable for everyday situations.

In July, I got back into historical costuming and made another Edwardian bustle pad to add a little extra kick to the back pleats of my skirts. No pictures were taken, but I used BlackSnails' free pattern.
Then I made an empire-waist top out of 1 yard of rayon challis that I've had in my stash forever. I don't love the result, and I didn't get pictures.
In August, I was still slowly working on my Edwardian lace-insertion dress, so I took a little detour and made a dip-waist belt (photo unavailable) using Ora Lin's pattern and the last remaining scraps of the dark blue silk satin from making this dress.
I also finally finished the Edwardian lace-insertion dress in August but didn't get any photos of it for the same reason I didn't get a photo of the petticoat. Maybe next year? Here's a photo of what it looked like before I ripped out and re-sewed the ruffle of the blouse to be positioned lower.

Also in August, I made another project that's been on my to-make list since 2020: a ruffly vintage-inspired apron. I hated the fabric because it was so hard to sew through, but at least the print (by debtrevitt) is cute.

In September, I used the pattern I made for the 18th century strawberry dress to make a slightly more HA-looking version out of a red and white floral quilting cotton from Joann. The plan was to sew skirt hikes to the inside so that the skirt could be polonaised, but I never got around to that. I also never got around to making the contrasting petticoat to go with it, so that's a project for next year.
Also in September, I found myself wanting to try my hand at broderie anglaise. As mentioned above, I liked my ruffly Edwardian c0rset cover, but I didn't like that I couldn't wear it over my blue silk c0rset without looking too top-heavy. I still needed something to hide the blue of the c0rset, so I patterned out an Edwardian princess slip and started hand-embroidering the lace in the neckline...before I had to pack all my belongings and prepare to move back in temporarily with my parents, so everything had to be put on hold.
I was able to squeeze in one more project before the move, though, and made a regency chemisette out of cotton batiste scraps. No photos were taken because my regency dress and underpinnings are still packed away.
Then I spent October and November not doing much sewing because I had a bunch of paperwork to do in preparation for my new job. I did, however, repair a bunch of moth-eaten sweaters that my mom didn't know how to fix. And I did make a witch hat and a pair of witch legs I made out of recycled umbrella fabric and a pair of PVC pipes, since my parents had zero (0) Halloween decorations out.

In December, I dug out the princess slip project I'd started in September and properly assembled the slip. It still needs to be hemmed, but I can't do that until I move again and am able to dig out all of the rest of my Edwardian underpinnings, so it's still not finished.
What I did manage to finish was an 18th century hand-embroidered fichu to go with the slightly more HA-looking red and white floral gown, even though I still need to make the split rump and petticoat and cap...

While I didn't make as many things as I had last year, owing to a 2-3 month hiatus necessitated by the move, and I'm not as happy with some of the projects I completed this year, I'm still proud of myself for pushing myself out of my comfort zone and attempting some more ambitious projects.
With the combined efforts of 2022 and 2023, I now have a full set of Regency underpinnings and Edwardian underpinnings, except for the princess slip which is still in-progress.
In the coming year, I'd like to make a Regency bonnet, reticule, and spencer to go with the 1810s gown. I already have the fabric and pattern for the bonnet, but I'm waiting to make it until after I move somewhere more permanent, to avoid damaging it in the move (I guess I should add a hatbox to the list of things I'll need to make). I also have the reticule pattern ready to go, but I'm planning to hand-embroider it and don't have access to the thread colors I need yet. And the spencer is still up in the air because I don't have the fabric for it yet.
I'd also like to make a proper pair of 18th century stays (both 18th century gowns I've made this year have a structured lining layer that acts like built-in stays, so I already have a working pattern), an 18th century split rump, an embroidered pocket, and a linen cap to complete the set.
14 notes
·
View notes
Text
From Scraps to Quilt :: what to do with the overflowing leftover fabric pile
From cut offs of clothing taken in, to left overs from sewing kits I make, to off-cuts from a local sewing supply shop there are lots of colors and textures populating my scrap basket.
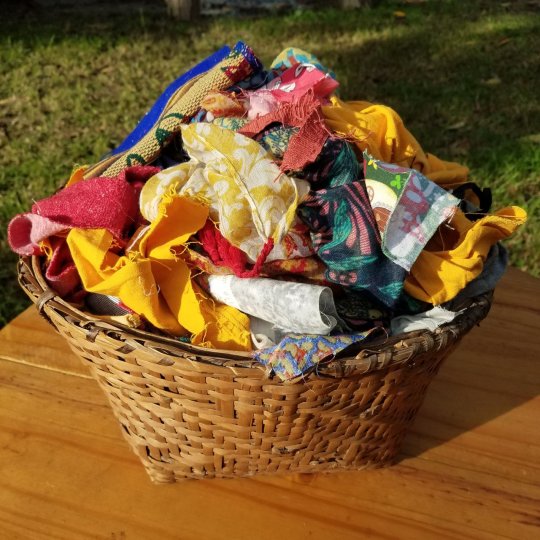
And of course, the pile is ever growing as I upcycle and makes so I wanted to do something to showcase the diversity of fabric I have acquired over the years.
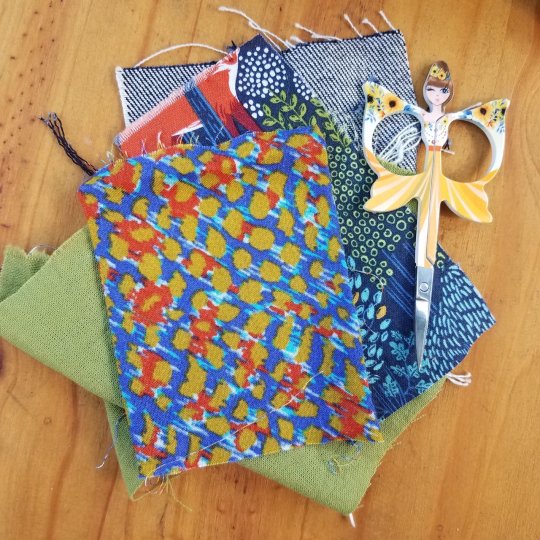
As a child I admired the quilts passed down to my mom and the new quilts she and my sister made and always wanted to try making one myself. At the moment, more than a blanket, my greatest need is to update chair cushions that are worse for the wear with permanent stains from idk what.
So, a quilted cushion it is!

Let's begin - Lay flat the base fabric you will be quilting over. In my case it is a pillow case though you may use a square or rectangle fabric to make a blanket or table mat.
Then, start to plan the patched layout. I wanted to highlight the natural shapes of the patches and the eclectic theme of our kitchen, so I used a variety of shapes and patterns right out of my scrap baskets. With the help of an iron I then pinned down the patches, being sure that they overlap with now raw edges showing.
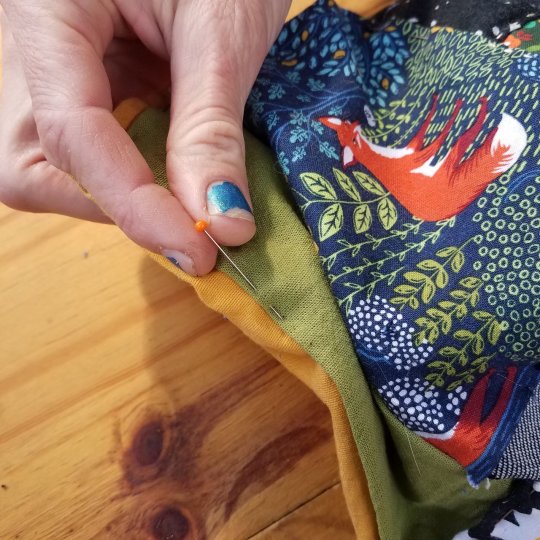
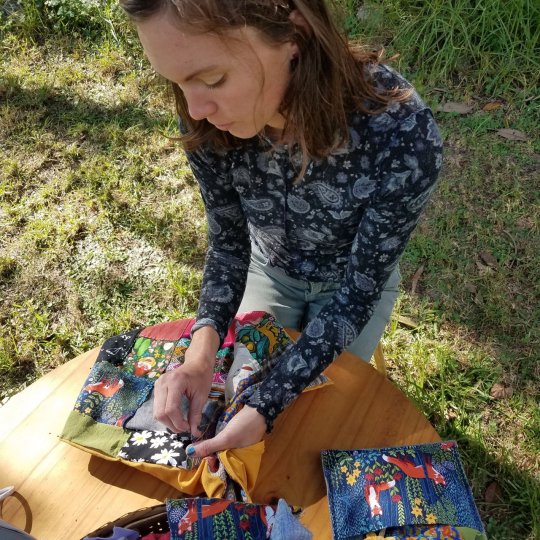
The first pillow I made I put together with a sewing machine which was fine but for the second pillow I wanted a more rustic look at secured the patches by hand with embroidery floss. For a large project, like a quilt, sewing with the machine would be most practical though hand sewing adds a lot of character.

An important note about embroidery floss - in many projects you will need to split the floss for it to actually fit through the eye of the needle and through tighter fabrics. For this quilt I used three strands, in other words half the floss.
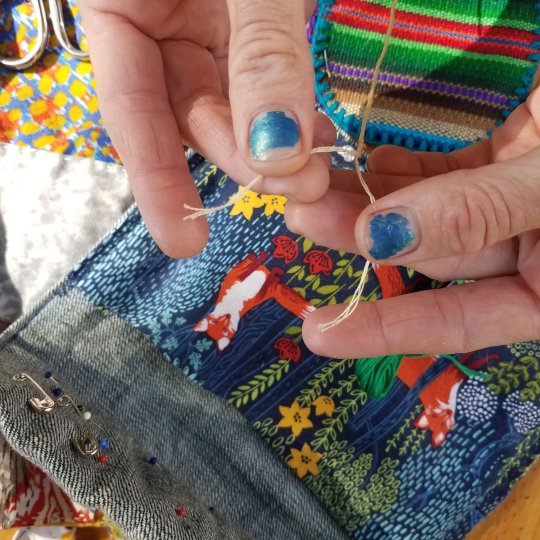
And then, simply, sew! This is such a relaxing project to do outside on a sunny day or by the fire on a rainy night.
In the end I am so happy with the resulting and glad to have found a use for my collection of scraps before they outgrew the basket. And for those long, thin fabric scraps, not to worry, I have another scrap-cyling project coming soon! Happy Crafting <3
#cottagecore#scrap busting#scraps#upcycled fashion#upcylcing#DIY#Sewing 101#slow stitch#cottage core#cottage crafts#slow fashion#handmade#quilts#quilting#sewing projects#fiber art#fibre art
29 notes
·
View notes
Text
Warden Ingo Cosplay Build Log
Hey Legends Arceus / Submas / Pokémon fans ! I spent two months last year making a Warden Ingo costume because the game made me fall in love with the franchise all over again (and because I love sad amnesia uncle, of course). I'm pretty proud of it, so I thought it'd be fun to share the process here in painstaking details. I've been cosplaying for over a decade now and I learned a bunch from so many defunct cosplay tutorials on this website, so I thought I'd give back. This isn't a guide, persay, but rather a dive into the methods and decisions I picked to complete this project. Any pre-made items or patterns that are available online will be linked! I'll be splitting down each piece of the costume into its own section for easier reading. This is gonna be a long one with a bunch of pictures, so I'd suggest viewing on the blog directly! Without further ado, all aboard!
Station 0: The Guidelines
Before getting into the build itself, I wanted to preface this wall of text with the guidelines I set myself for this project.These core pillars inform a lot of the decision-making, and some people might feel like using this log as reference for their own cosplays, so I thought it'd be good to put them here to explain why I did some stuff the way I did. Comfort first: I knew I was gonna wear it in the summer, and stand around all day at a convention, so it needed to be lightweight and comfortable. (well, as much as a cosplay can be, anyways.) Realism: Ok, that's kinda weird to associate "realism" to a Pokémon costume (unless you're Detective Pikachu I guess), but I wanted to look more natural instead of translating a shiny fancy 3D model straight to real life (nothing against that, it just wasn't my goal). This meant adapting certain elements that only really worked in stylized Pokémon graphics. Be a huge cheapskate: I didn't wanna break the bank with this one, so if I could save money thrifting or reusing stuff I had lying around, I was going to do it. Whenever you see me pull some material out of my ass that wasn't entirely fit for the job, that's why. After putting these down, jotted down a battle plan for the project (basically just a huge compartmentalized list of all the material I expected to need and the steps to complete the costume), and then it was time to get to work.
Station 1: Thrift Shop Pit Stop

I like starting every project with a quick trip to the local thrift stores to see what I can find. I hate sewing pants with a passion, so my priority was to grab some navy suit pants to match the coat's fabric to later. I also found a long sleeve black shirt for Ingo's undershirt, a belt I ended up not using, and lucked out with some excellent clown shoes with removeable insoles. After slapping in my own insoles, replacing the shoelaces and fixing up the pants' button, we were good to go on every element that could be done without any extra work on my end. Moving on.
Station 2: Three Refined Metals For A Hat
I'll be honest here: when I initially planned out the entire project in my notebook, the hat was scary as hell. I had no clear idea how I was going to do it; I didn't really want to buy a similar pre-made hat cause roughing it up would've been stupid hard to get to look right. I figured I could probably make it out of EVA Foam (a certified cosplay classic), but I've never patterned a shape this complex before. Turns out Kamui Cosplay made a foam pattern for the same kinda hat. Score! I purchased the pattern and assembled the hat using 6mm EVA Foam and Contact Cement according to the instructions. I then destroyed some poor polyester cord trim from the bottom of my scrap bin and glued it into the base for the... sticky-outies? The damaged bits. Y'know.

With the base finished, I drafted a pattern for the fabric covering, cut my pieces out of navy twill, sewed it up and slid it over the hat. I did the same for the inside with some cheap black muslin leftovers from another project, glued it all to the base in strategic spots, and then patterned, sewed and glued the band on. Finally, I took my seam ripper and scissors and opened up the seams where the little piles of sad polyester scraps were lining up to free them. With the main part of the hat complete, I cut up a disc of 10mm EVA foam for the insignia, scored the design on with a hobby knife and heated it up to form a bit of a curve. It was then sealed with flexbond, painted and sealed with a clear coat, and glued on! All that was left after this was weathering the hat. It's a little hard to photograph this piece properly, so I'll show the weathering process when we get to the coat.

I apologize for basically pulling a "rest of the fucking owl" here, but honestly a lot of the process was improvising and somehow not destroying the entirety of my progress, so I have no pictures of the hat building process beyond this.
Station 3: Sneasels Ripped My Coat
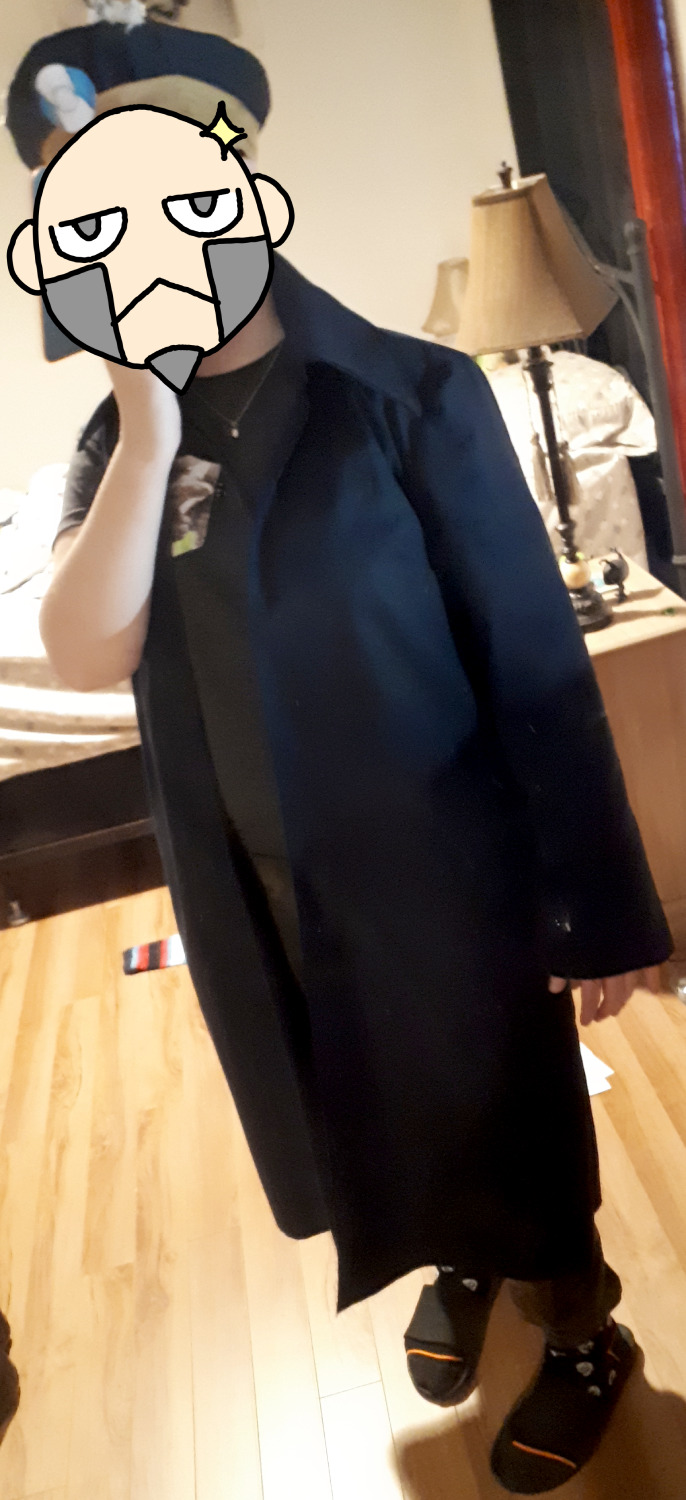
Ingo's coat started with a heavily modified version of a commercial pattern. Specifically, it's the D Coat from Simplicity's 4789. I could've probably found a pattern closer to the Subway Bosses' coat design, but this one had already been in my pile of "patterns I bought for an abandonned project and will totally use someday, I swear" and it was close enough, so I used it. Modifications included extending the collar, making the coat a little longer in proportion to my body, the sleeves wider at the ends, and adding inner pockets (a cosplayer's best friend). Oh, and the white bias tape on the edges and the orange stripes, of course. You may have noticed I'm not showing the pattern with all the modifications here. That's because as part of the Cheapskate Protocol, I really wanted to use this old Simplicity pattern to save money. A pattern I bought when I was a teen way back when. the misses sized pattern enveloppe. So I had to size up the entire damn thing. The biggest size on this pattern was like 7 inches off my measurements. It's a paper Frankenstein golem. It looks godawful. The actual adjustments to make the pattern Submas-ready are incomprehensible in there. But hey, I saved like 10 dollars! I started by assembling the base coat (undamaged) out of navy twill. I added heavy interfacing in the collar to help it stay up. I considered adding a lining to it to really sell the fact this used to be a modern machine-assembled piece of clothing, but it wouldn't have looked as good with the rips and tears later on. As a bonus, it's one layer less in the fight against heat exhaustion! However, if I were to make this coat for Pre-Eeby-Deebied Ingo, I'd definitively do a lining.
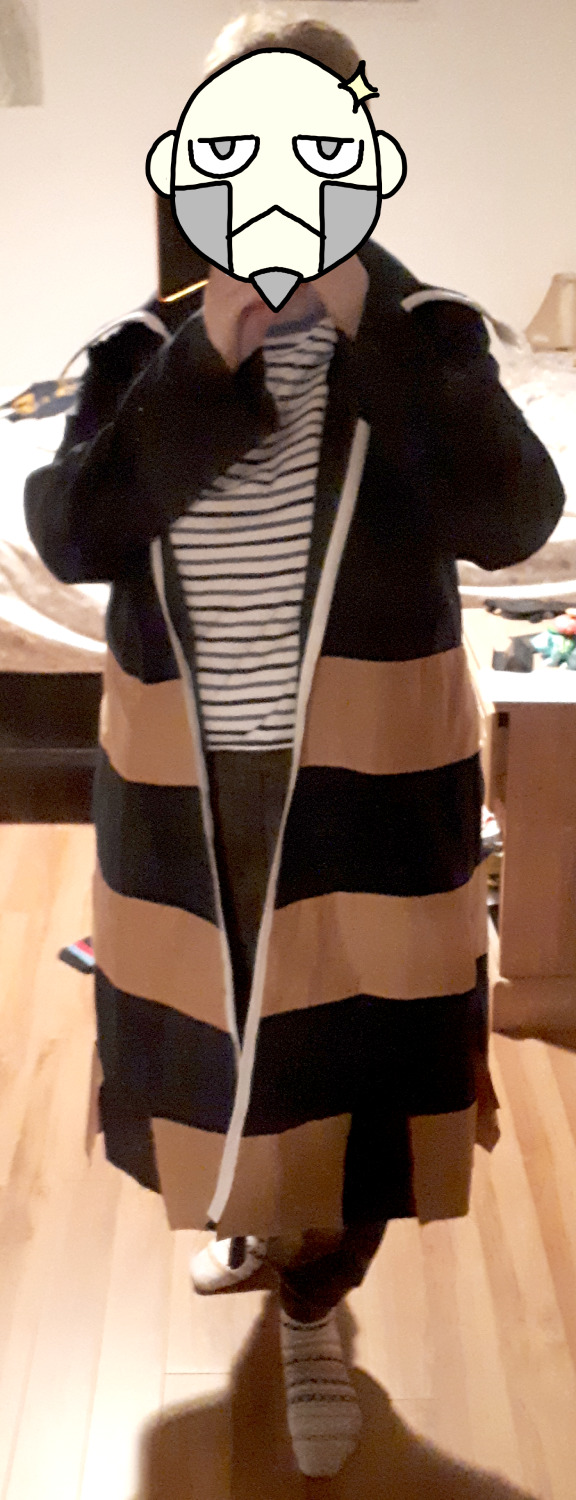
Next step was the stripes! I used some double fold white bias tape to finish the edges of the coat and topstitched the ones on the back of the coat on. I then used the same orange cotton as the hat band for the three orange stripes,which were topstitched on. Cheapskate Protocol made me buy barely enough orange cotton this time around because I was tired of building up the pile in the fabric scrap bin, so I had to improvise to make it work by snipping the bands in strategic spots in order to cover to whole coat properly. It's not like the parts that would be cut off later for the damage would need them, anyways. ✨Optimization✨
After rolling my rock up the hill of a Hell of my own creation, I booted up the game, dragged my avatar to the Ingo enclosure and marveled at the magnificent creature to see where the coat was ripped. I traced a loose guide of the tear designs with washable fabric chalk and crudely cut up the bottom edge, sleeves and collar to have the basic shape down.
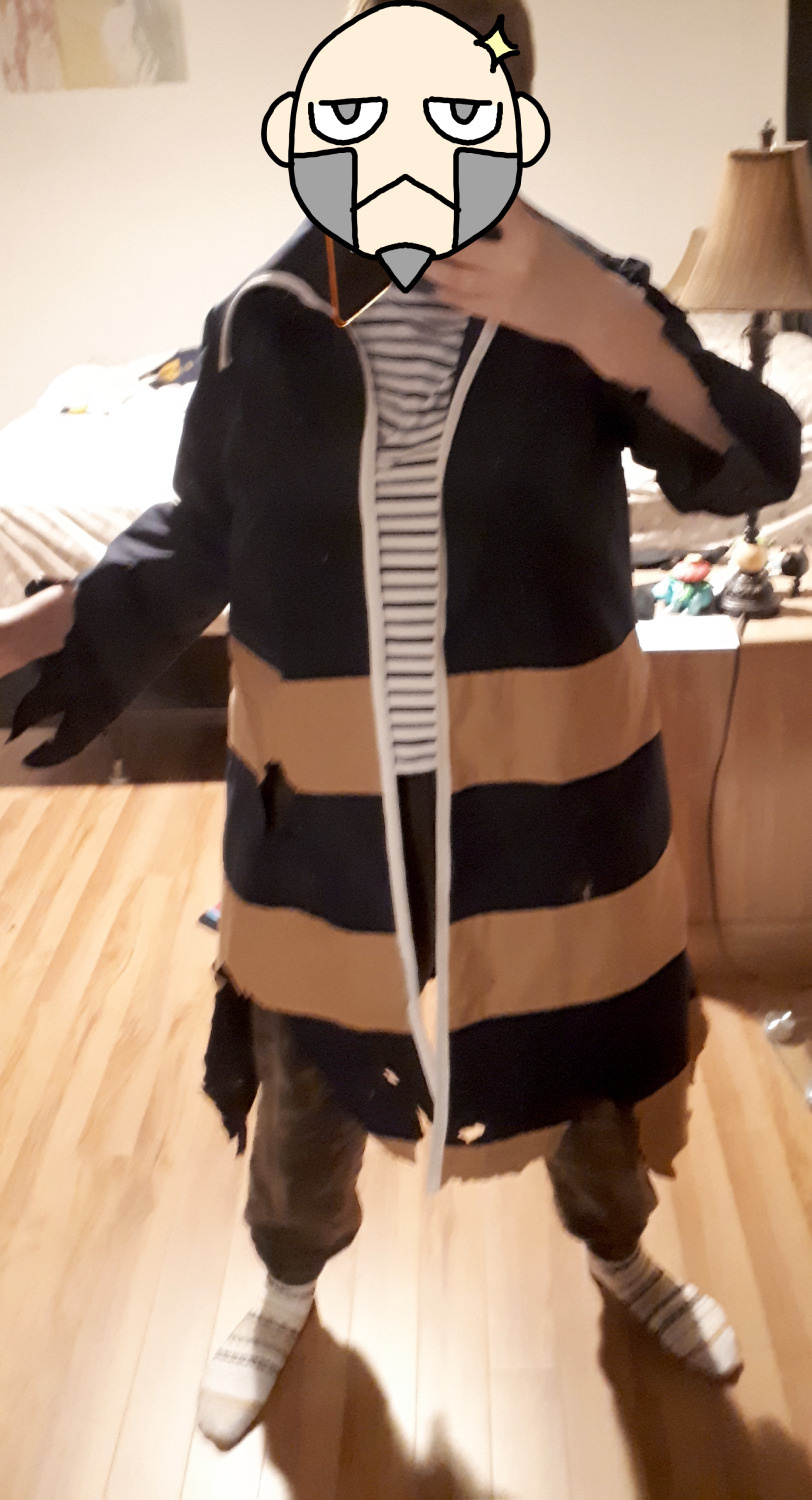
All that was left was to add the armband and the buttons. Turns out the only metal buttonsI could find that were big enough were those buttons kits to cover with fabric. Since I wanted to go for realism here (and be able to throw the whole thing in the wash after sweating in it all day), I wanted to avoid crafting them myself. With the main construction done, it was time to do the weathering! ... ... ... OH GOD I FORGOT TO ADD POCKETS
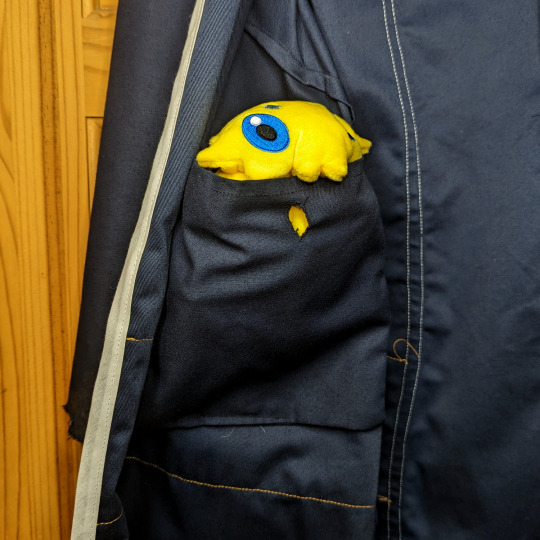
Behold, the world's most awful pockets. Two stupid little bags sewn in such a way you hopefully can't tell from the outside that I completely forgot that I wanted these. They literally only exist so I can have my phone handy at a convention. There's a buttonhole to close it too, I guess. They're shamefully hidden with all my lining-less, raw seam sins. Ok now we can destroy the coat
Station 4: Stinky And Dirty
I mentionned earlier during the hat section that I was going to get back to the weathering process. This is happening now. For the sake of Realism™️, I wanted the damage to look natural in real life, so I had to make it look believable. Luckily this wasn't my first rodeo with the Dirt, so I had plenty of weathering experience under my belt. To break up the awkward scissor cuts from earlier on the edges and fray everything up, I pulled out the sandpaper and started... Sanding the fabric. Might sound weird to some, but a lot of costume makers swear by it. It's also great for ripped jeans (if those are still popular today) and general natural wear. I also refined the shape along the way with scissor to break up any long straight cuts before fraying the edges. I took care to reinforce any newly destroyed seams with a sneaky staystitch so it doesn't unravel in the future. I then mixed up a bunch of different shades of brownish grime with fabric paints (I had black, brown, yellow, orange and green on hand) to dirty the whole thing up. This doesn't look as realistic as some other methods like weathering powders and Just Using Real Dirt, but as mentionned earlier I wanted to be able to just throw it in the washing machine at the end of the day to sanitize it. (If you're interested in actually learning how to weather a costume, this guide is where I started my journey.) I prioritized the ripped edges and any spots where grime would realistically accumulate in over time, like under the edge of the hat band. Paint was dabbed, stippled and rubbed on with whatever garbage tools I could find, which in my case were some old crusty brushes, sponges and toothbrushes I could get really violent with. (brushes were harmed in the making of this costume, but not my good brushes.)
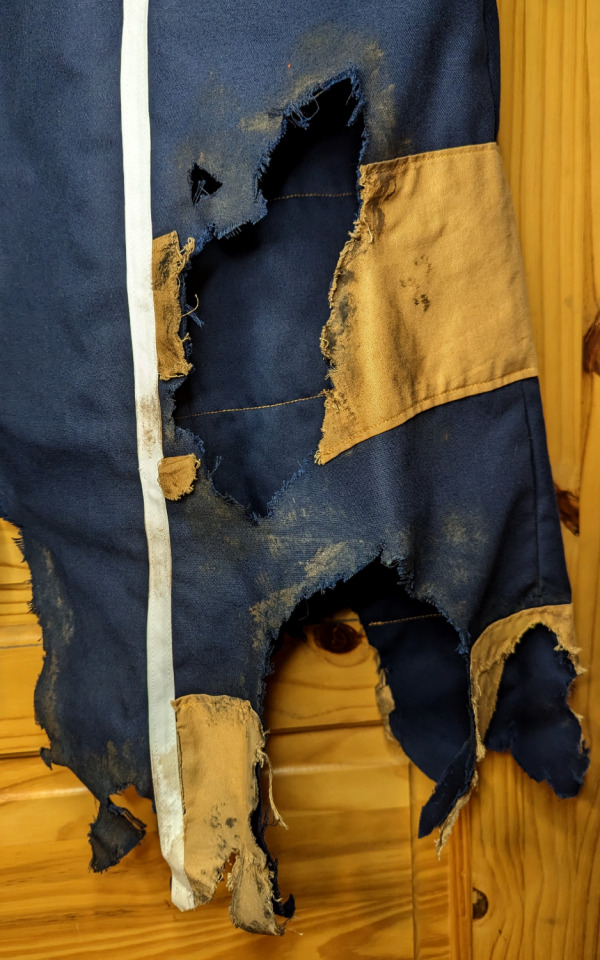
The whole thing was then sealed with heat using a flat iron as per the fabric paint instructions. With the coat done, all of Ingo's old Subway Boss uniform was complete!

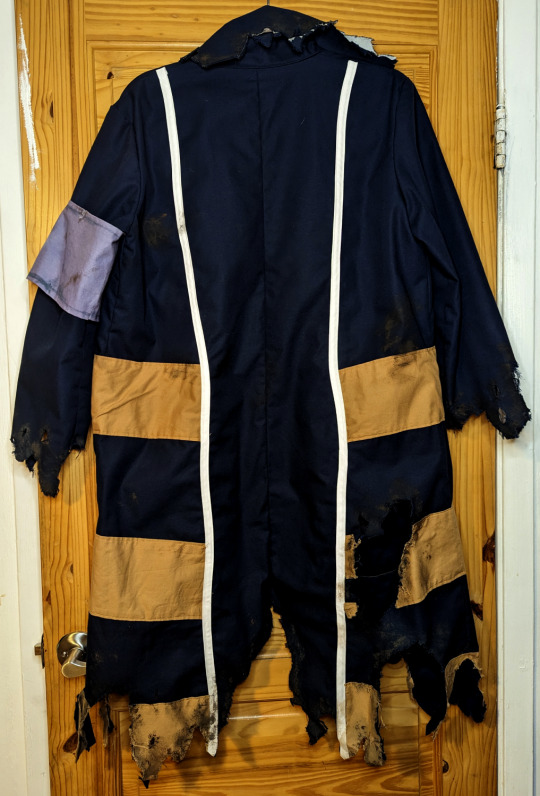
Station 5: A Warden's Garb
Next step on the list was making the Pearl Clan uniform. Thankfully, there's a fun little piece of concept art that shows Ingo without his signature coat, so from it we can confirm that his clan outfit has short sleeves (good for the comfort goal) and consists of two pieces: a tunic and some kind of hip sash. I omitted the hood on the tunic because I was realistically never going to wear it up and it would have just bunched up under the coat anyways. Now you'll be painfully aware of that terrible corner cutting truth whenever you scroll down and see photos of the costume. Sorry. I drafted out a quick pattern for both pieces of the clan garb through the power of math for the sash (a couple half circles with another piece for the border) and tracing over a tunic in my wardrobe for the shirt. I assembled a test version out of scrap muslin to make sure it worked properly, then set the pattern aside so I could prepare the fabric. In order to have all of the tunic elements match together, I picked up a bunch of white stretch knit fabric and a bottle of purple synthetic dye so I could reach the shade of dusty lavender I wanted. I measured out two squares of fabric based on the pattern. One square was for the darker border on the waist sash, while the rest was the lighter color for the whole outfit. I boiled water according to the dye instruction and worked on my Fabric Soup.
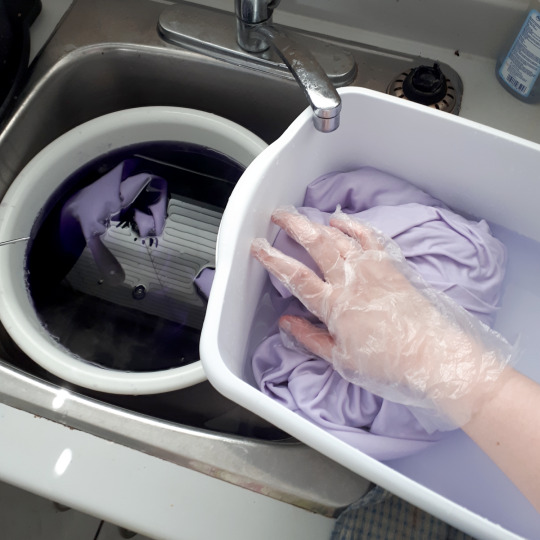
With the fabric dyed and washed, I cut my pattern pieces out and assembled everything together. Nothing special happened there since the pattern had been tested and adjusted prior to sewing the real deal. Ok, one thing happened actually. My sewing machine absolutely hated how thin this fabric was and kept trying to eat my costume. By the end I was about ready to throw the machine out the window, but things worked out.
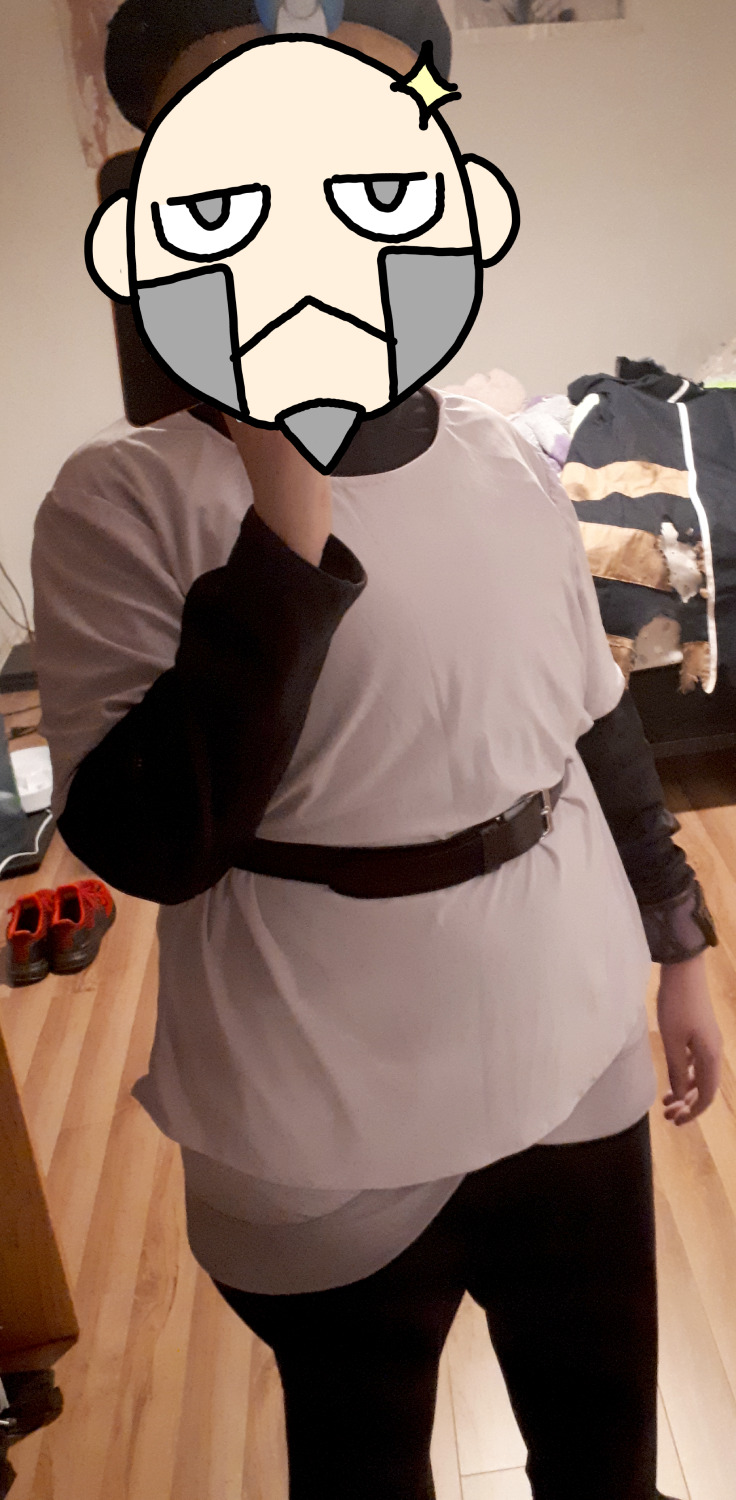
It's pretty sneaky and totally not visible on the outside, but the sash is held closed with two snap buttons on the front. It's easily the single jankiest piece of the costume due to the aforementioned attempt by my sewing machine to have fabric dinner. But hey, it works and the jank isn't visible so who caaaares (I care)

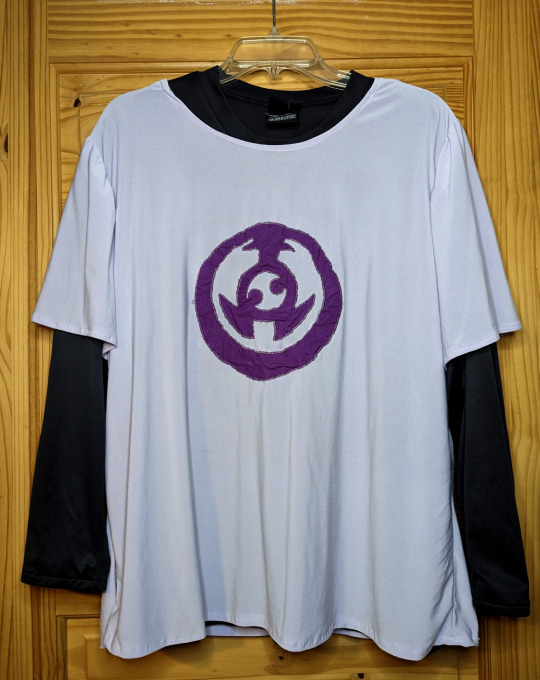
Final step for the Pearl Clan outfit was adding the logo on the front. I wasn't sure how I wanted to do this, at first, but to keep the fabric's stretch and keep with the idea that this is a hand-sewn garment from old Hisui, I decided to go with hand embroidery. I grabbed some scrap white cotton, dyed it purple, then cut it out in the shape of the logo. It was then painstakingly applique'd to the tunic by hand with embroidery floss.
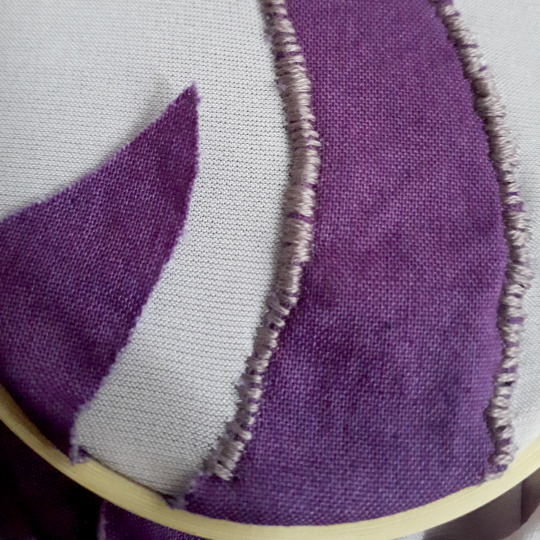
With that done, the tunic was completed! It looks absolutely depressing on a coat hanger, but when worn with a belt it's all nice and cozy. As a bonus, it layers with the coat well enough that I don't have to wear a binder under everything to hide obvious boob shapes. Another win for the Comfort team! 👏 With all the sewing done, all that's left is the Warden bracelet and the hair.
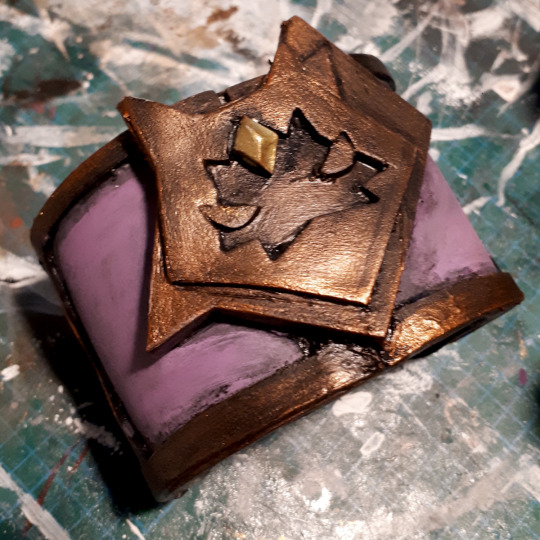
Station 6: Noble Sneasler's Cool Bling
Ingo's got a bestie bracelet of his best pal Sneasler, so we gotta make that. The build should be pretty standard to anyone that's made anything out of EVA Foam for a cosplay. I drafted the pieces by referencing the in-game model, cut them out of different thicknesses of the material to create some depth, and glued everything together with contact cement and hot glue. (The main bracelet is 6mm foam, the details are 2mm foam and the black parts for the base of the head and the gem are 4mm foam.) I added an elastic on the wrist to keep the bangle secured to my arm while still being able to easily slip it on and off.

The whole thing was then sealed with flexbond, painted and then sealed with a spray clear coat. Honestly, it was the simplest part of the build and it actually went without a hitch this time around.
With the accessories done, it was now time to get to what I am convinced is every Submas cosplayer's worst nightmare: The Goddamn Hair.
Station 7: The Goddamn Hair
There's a lot of artists credited as character designers in the credits of Pokémon Black & White (2010). This means I can't figure out who to blame for Ingo and Emmet's stupid sideburns that make absolutely no sense in the real world. Instead we're just going to scream at the heavens and find a solution to the geometric flaps. Another fun fact: I'm awful at wigs. Like absolutely awful. I understand the methods involved, but I'm stupid bad at applying that knowledge on an expensive mop of plastic hair I don't want to ruin. So I did some research to figure out how people were making the twins' hair on their own cosplay. Everyone did a great job, but it wasn't really the effect I was looking for, so I decided to start from scratch. Because, you see, I was going to completely avoid styling a wig. I've always interpreted the art as them having some sick sideburns/muttonchops. (This art piece by waltias on twitter was posted like a week after I finished my cosplay and I felt so so validated in my interpretation) I also love Makeup FXs, so I thought "hey, I can look up beard makeup tutorials." I ended up with two ideas: either I could buy crepe wool hair in grey and glue the fibers to my face individually every time I put the costume on, or I could make a reuseable prosthetic. I'm a lazy piece of garbage that likes doing things once so prosthetic it was. I mean, I know how to ventilate wig lace. It'll be reusable and take 4 minutes to apply. Smart! I got the Jett in Light Grey from Arda Wigs, a ventilating hook, matching wefts and the lace. I had a plan, I was ready, it was going to look great. And then I spent 40 hours tying individual strands of plastic hair on a wig lace mesh. For a total surface area of maybe 3 square inch.
(Pictured above: A Fool.) It was hell. I might've incurred a stress injury from the process and then had to let it rest for a week because I did it all over a couple days. Would I recommend doing it? If you're patient, sure. I love the result. But this was, by far, the worst part of the entire project. 40 hours. The entire coat took me like 6 hours. 40 fucking hours.
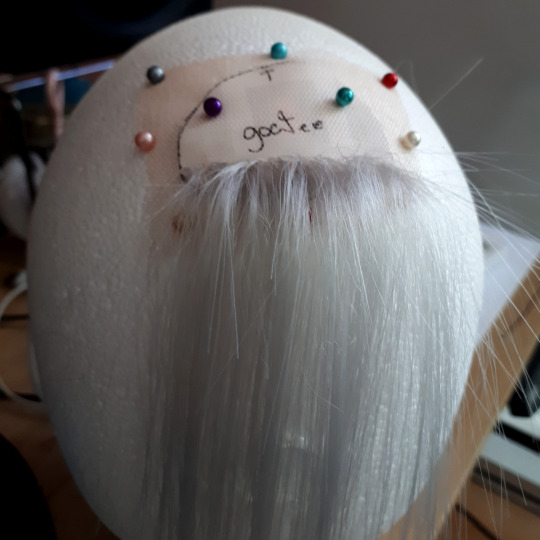
After painstakingly tying individual hairs to a mesh and realizing I might've reached the Ninth Circle of Hell along the way, I took my couple squares of ventilated wefts and trimmed them to the proper length. The result was awesome, and I don't regret it at all. It looks exactly how I pictured the idea of sideburns would look like. But it also took 40 hours of me just tying some fucking hair to a mesh. Maybe there was a better solution, but there's so little ressources about the process online that I just went with the methods I could find, really. I pray someone starts offering squares of pre-ventilated wig lace someday so no one else has to suffer like I did. As a sidenote, I didn't even bother with the balding hair since I wasn't gonna go through all the effort of heavily modifying a wig and wearing a bald cap if I wasn't even gonna take the hat off.
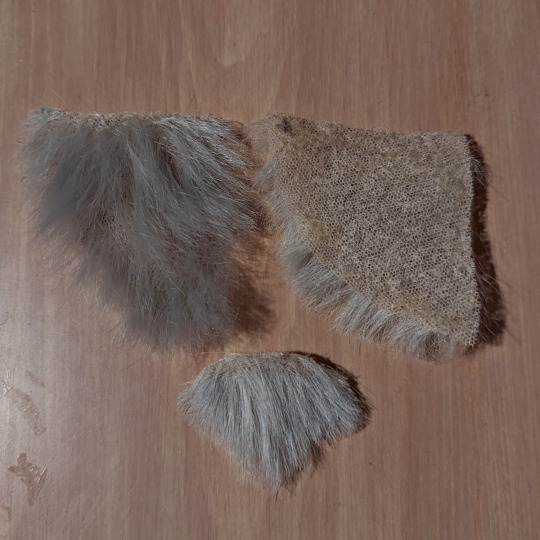
40 hours.
Station 8: Bits And Bobs From Under the Subway Bench
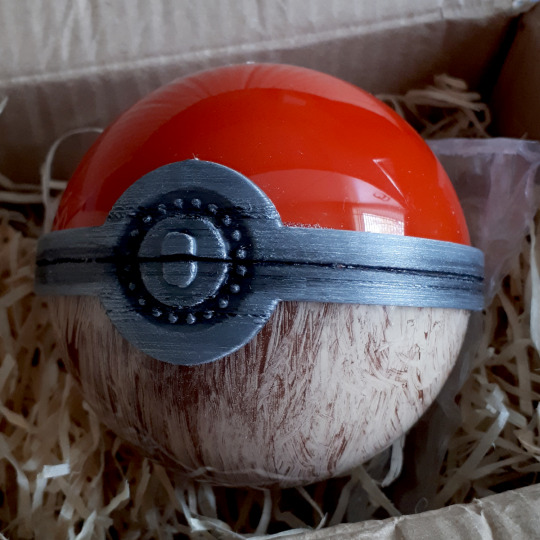
Honestly, after the absolute nightmare I went through making the sideburns and goatee, The final touches were a cakewalk. After all, the costume is complete! What's next? Warden Ingo uses Pokéballs like a cool guy, so I wanted one. I usually make pretty much everything myself for costumes because it's fun, but after the ventilating adventure I just wanted to rest. I'd been following NisuzCraft's work for a while now, and I loved the wood grain effect on their Hisuian Pokéballs. I wholeheartedly recommend them, their work is awesome.
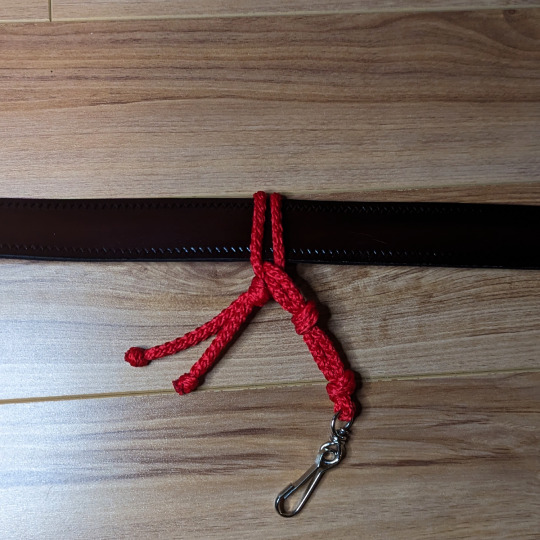
As a final touch, I grabbed some red cord I had lying around from a previous project to craft a little loop to hook my convention badge onto. I don't really like having the badge show up on photos, so it was a clean way to have it easily accessible while having it be easy to slide out of sight. I based the idea off of the knotted ropes the Galaxy Team member hang their Pokéballs from on their uniforms.
Lastly, though it's not necessarily part of the costume itself, I made an overly indulgent ita bag panel for the first con I took Warden Ingo out to. The collection's grown since then, but here it is:

Chandelure: JellyBearDesigns Ingo & Lady Sneasler: AstroTeenyArts Warden Ingo, Emmet&Ingo Duo: Cynniarts Ingo & Emmet with fingers crossed, Hanging Ingo, Emmet & Warden Ingo: Zhampip Rubber Straps: Official Pokémon Mate Merch Go show them some love!
Terminus: You Have Reached Hisui Station
So, first con wearing Warden Ingo came and went. What's the verdict? Pretty great experience, honestly. It was relatively comfortable to wear despite record heat in the middle of summer. The only real issue was that having a wig and a hat together trapped heat real bad, therefore some wig breaks were needed. I also initially used spirit gum to stick the facial hair on, and I struggled to remove the residue afterwards from the lace mesh, so now I just use body tape to keep it on. Nothing broke, nothing hurt, so I'd say it was a success! I haven't had to modify or repair anything for the future, so I'm very proud of the results. To anyone who read this Build Log to the very end, thank you so, so much for your interest. I hope this may have given you some insight into the process; especially if this helps your in future cosplay projects! If you don't cosplay, I hope it was still an entertaining read.
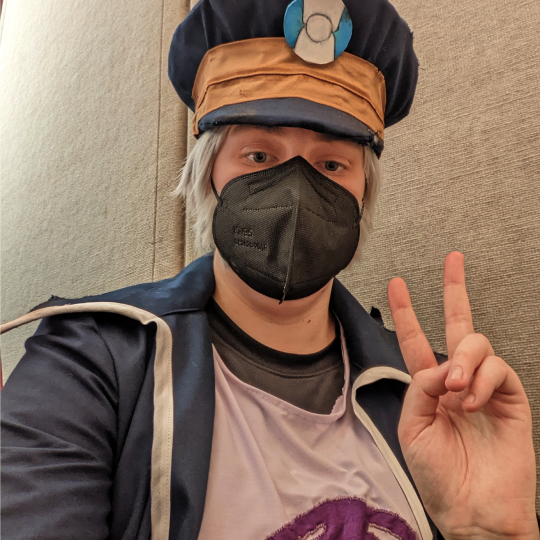
Hoping to see more wonderful Submas cosplays in the future!
#Cosplay Build Log#cosplay tutorial#pokemon cosplay#submas#warden ingo#ingo#pokemon ingo#subway bosses#original content#40 hours
71 notes
·
View notes
Text
ALRIGHT MY FRIENDS ARE WE READY FOR
A BIG CROCHET PROJECT UPDATE!!!!
I keep putting off posting about everything on here and instead of making a bunch of separate posts, I figured I might as well just get it all done in one shot!!
So first off, an update on the baby blanket I had been making!! As a refresher, my coworker and his fiance had a baby a few months ago in July, and I was asked to make a baby blanket for the lil one even though it was late into the pregnancy at the time. I took on this task with DEDICATION and it is NOW DONE
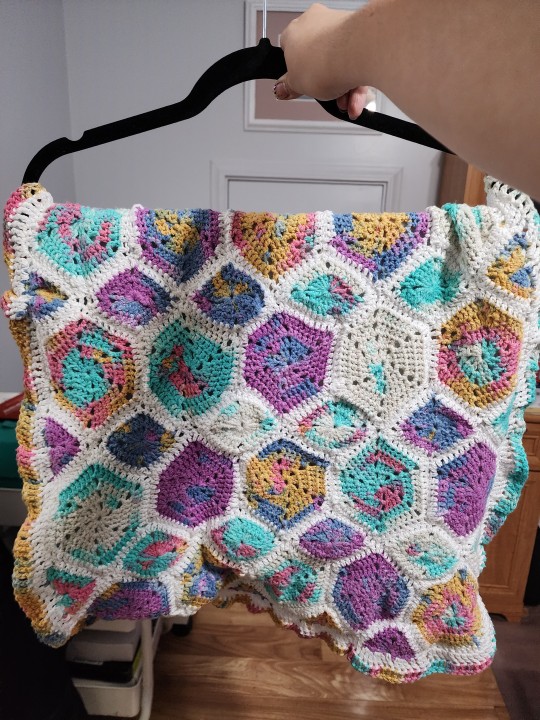
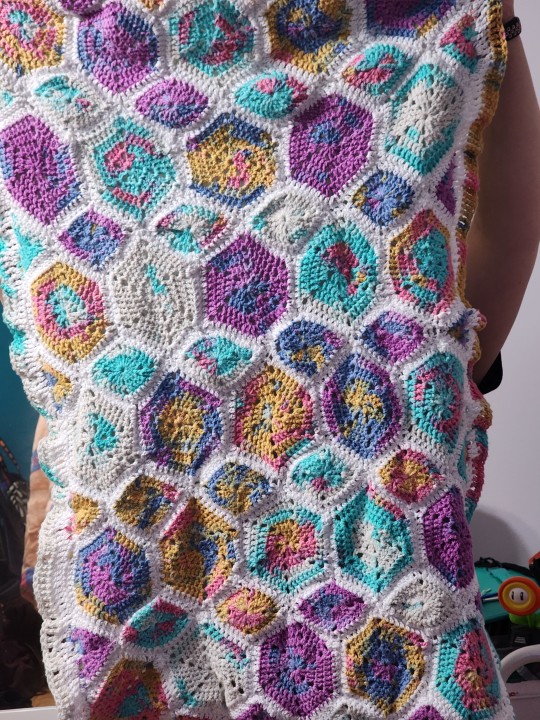
I used TL Yarn Crafts' Hexis in Springtime blanket pattern and Hobbii's Frutta + Lion Brand's 24/7 Cotton and I'm very very pleased with how VIBRANT it ended up being. I was initially afraid that the white borders would really wash everything out, but I think the Frutta yarn matched its energy and held its own. and it's all 100% cotton, so it should hold up over time and many washes!! I also made my own ruffly edges rather than using the pattern's, and I also sewed on a standard baby blanket fabric on the "wrong" side of the crochet (with my mom's help!)
honest to God I'm so proud of this one, and even though it's not perfect I am sooooo excited to have done it!! it's a blankie a baby can grow up with and I'm so happy to give them that 😭 I can't wait for the baby pictures I've been promised
AND THEN
this one is a bit of an oldie, but I made my best friend Madison a mushroom purse for her birthday gift this year!! I hadn't posted about it on here because she follows me on umblr and it was supposed to be a surprise, but she's now had it for a few months so it's free real estate
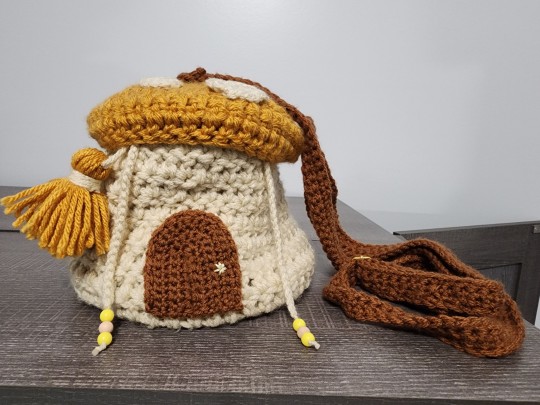
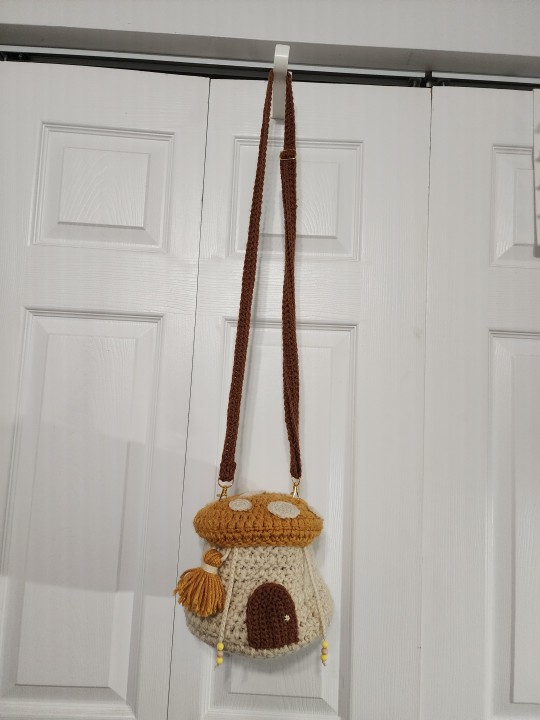
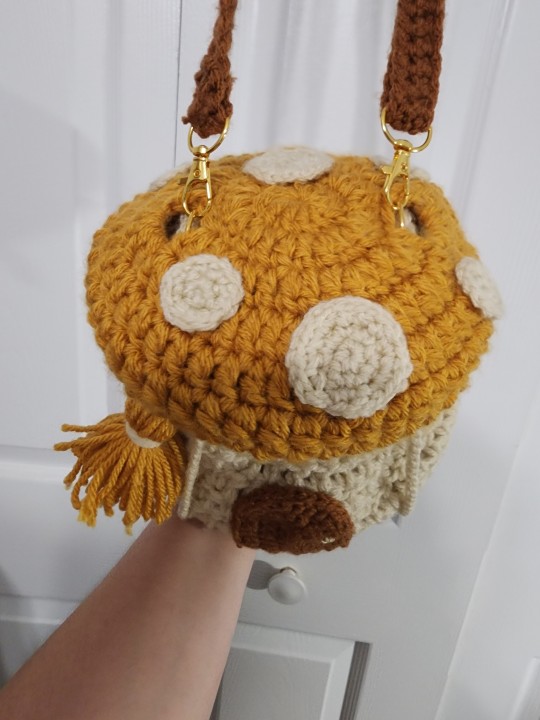
the pattern is this one from Bayou Self Creations on etsy, and I used Big Twist Value yarn in the colors cream, mustard, and toffee!! this pattern was SO fantastic and well detailed, and I found that I was comfortable enough w it to make some adjustments, so I did! For one, I bought purse hardware and introduced lobster clasps and a strap adjuster ring so that the bag can be easily taken off the strap, and the strap adjusted. I made a little tassel for some extra decoration and used a bead to create the little door knob, and I even lined the inside of the bag with white liner to make sure it can hold anything without the item slipping through the holes always created in crochet
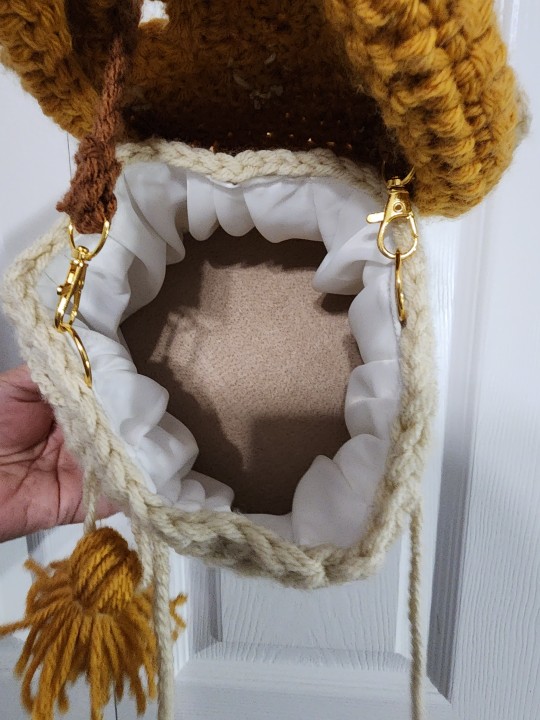
this pattern was SO much fun to make and it really worked up so fast since most of it was done with worsted weight yarn held double. highly recommend!!
BUT WAIT, THERE'S MORE
one of my dear coworkers has always caught me crocheting and asked if I'd be willing to make him something small. after some pestering, he said he'd like mushroom boy keychains, and I delivered!!
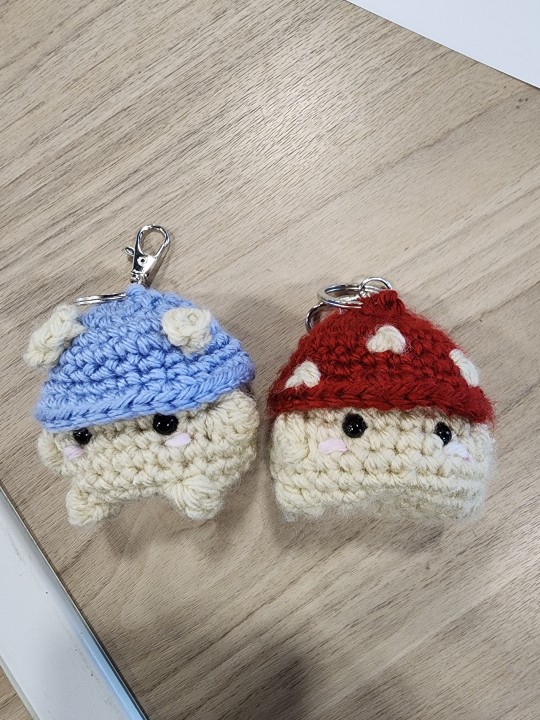
I used the Chonky Mushroom Boi pattern by Chonky.Crochet on ribblr (which, tangentially related, is quite honestly the WORST app I've ever used ui/ux related. It is so HORRID). the pattern is super thorough and these little guys worked up very quickly and were a great way to use up some scrap yarn! unfortunately, they did get a little damaged already and I have to find a better way to fasten them to the keychain thing. I WILL though
AND LAST BUT NOT LEAST
another baby crochet project!! this time for my very sweet neighbor who is 6 months along. I really wanted to make her something without committing to the scope of something like another baby blanket, so I did some digging around until I found this pattern for baby loveys by theodoreandrose (hosted on the Bella Coco Crochet website). I made some adjustments (see: packing in more crochet stitches towards the last few rows in order to make the bottom ruffley, adding two extra rows otherwise, crocheting extra ear details), but otherwise the pattern itself was incredible (ESPECIALLY considering it's free!) and I managed to knock this one out in about half a month working on it here and there. It was also the first time I had completely 100% freehand embroidered a face onto a plushie I've made, and I kinda thing I killed it tbh. it looks so much like an old school toy and I love it!!
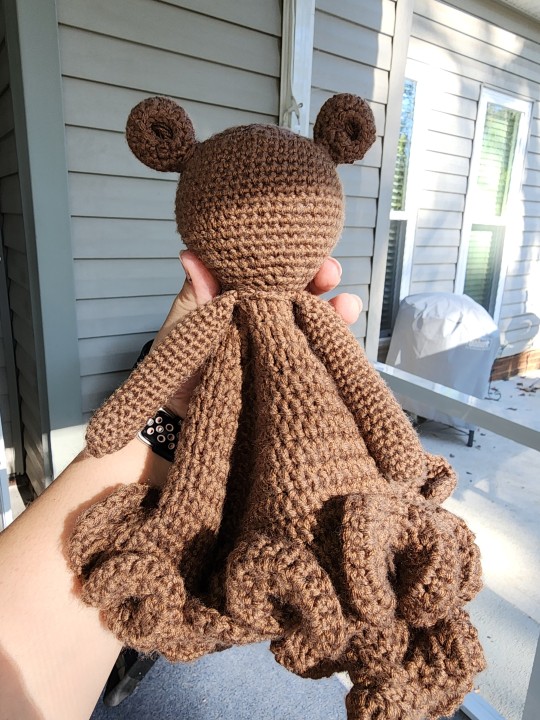
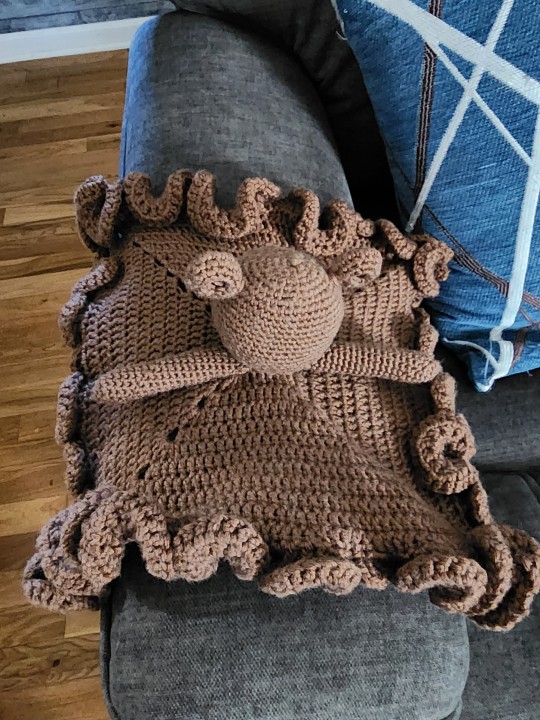
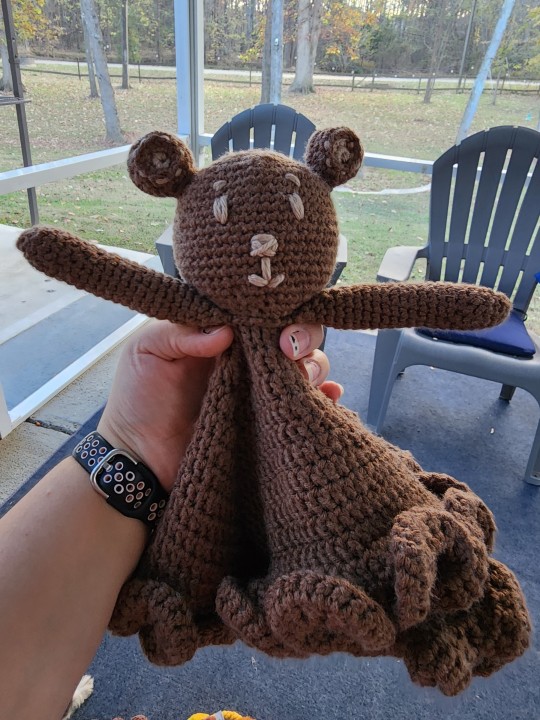
I used Berroco's Comfort yarn in the color Falseberry Heather. I wish I could have gone for something a lil more colorful, but the baby nursery follows a forest theme and I didn't want to stray from it. in any case, I think the tan yarn (scraps from WeCrochet's Comfy yarn, throwback to that monkey amigurumi I posted about ages ago) did a good enough job of breaking things up!!
And now we're all caught up!! I've got a few projects I wanna get done as Christmas gifts and I've already started on my next one, so 👀 I'll see y'all again soon!!
3 notes
·
View notes
Text
Like I mentioned at the end of my last post, besides making a few alterations to my shirt and vest for my Batuu Bound outfit, I also got started on a new sewing project over the last two weeks, something which might also make an appearance if/when we're able to go to Batuu again, but until then will also be a nicely functional piece just around the house.
To back up a bit, I ordered a lightsaber for my birthday -- as you do when you're an adult going through a resurgence of your childhood love for Star Wars, lol -- but the one I bought on Amazon ended up being not quite what I was hoping for. I returned it and spent some more time researching exactly what I wanted for my purposes (spinning and flow arts) and what would fit my small hands and short stature the best.
I ended up ordering from an excellent small business called Vire Sabers that lets you assemble your own lightsaber from the 'variable hilt component' system of pieces that all fit together. I spent a lot of time looking through all the various pieces and combinations, including putting them all together in a photo editor until I had something that I was happy with, that is just mine, and no one else's.
The saber really deserves a post all of its own, but first I want to do some weathering on the hilt and get some video of the flow skills I've been building up over the last week and a half since it arrived. I'll post something about it eventually.
And anyway, this post is really more about sewing a padded sheath for the saber.
It's another stash-busting project, like everything else in my Batuu Bound set, for which I only bought ~$4 of cotton batting -- which is handy because when I started on it, I wasn't sure when Jack and I would be working next. The contract work situation has resolved now, but even without that, it's always nice to move fabric and crafting supplies out of my stash and into a finished, useful item.
With consideration to possibly wearing this on my back with my Batuu Bounding outfit in the (near?) future, I decided to go with a brown color palette. From my stash I pulled out:
some yardage of non-stretchy faux suede that I probably bought more than 10 years ago for a project I can no longer remember, that has kind of a grippy texture to the suede surface
wool scraps left over from the screen-accurate Jedi robe I sewed for Jack in 2012
the tan cotton canvas I bought in January when I was thinking about covering the zippers of my Moment vest rather than sewing a completely new one
brown RIT dye that again I have no idea when or why I bought it, along with a little pink and violet RIT dyes probably left over from Hit Girl in 2010
brown velcro left over from an ill-fated attempt at building disability-friendly pillows for my couch nest
~34" of 1" wide twill tape left over from my steampunk corset I sewed in 2011
rock climbing-rated seamless aluminum O rings left over from the tensegrity stand and tent I built for Wasteland Weekend 2018
dark maroon thread that came in a set of thread that I bought online when I sewed my Oswin Oswald cosplay in 2020 and couldn't go to a store to buy just one color of thread, lol
The cotton canvas was perfect for the exterior of the case/sheath/bag thing, but the color wasn't a great match for the rest of my Batuu Bounding outfit. I had used a bit of the canvas to make a collar stand for Jack's jacket late last month, so I zigzag stitched the cut edges and threw it in the washing machine with a bunch of nearly boiling water, salt, and the brown, pink, and violet RIT dyes. I had more of the brown than the pink and the violet together, but my hope was to bring the "dark brown" RIT color plus the slightly greenish tan of the cotton towards a warmer brown. I let it agitate for about half an hour, and ended up really loving the final color.
With the exterior in progress, it was time to figure out the interior. I knew I wanted to make this case/sheath padded to give the saber a bit of cushioning while being carried around, but I also didn't want to buy more than I would use (or spend a ton of money, given that I was buying this while we were in between work contracts), so most quilt batting was out, as was most foam. I ended up buying half a yard (18") of 90" long cotton batting, then cutting it into four 9" x 45" pieces and layering those on top of each other. It's not a huge amount of loft, but it is a good amount of squish, and hopefully reasonable padding for the circumstances I expect to use the case in.
I sandwiched the cotton batting between one layer of the brown (Jedi robe!) wool and one layer of the non-stretch faux suede. In the picture below, the darkest brown is the wool, and just to the left of that is the dyed canvas.
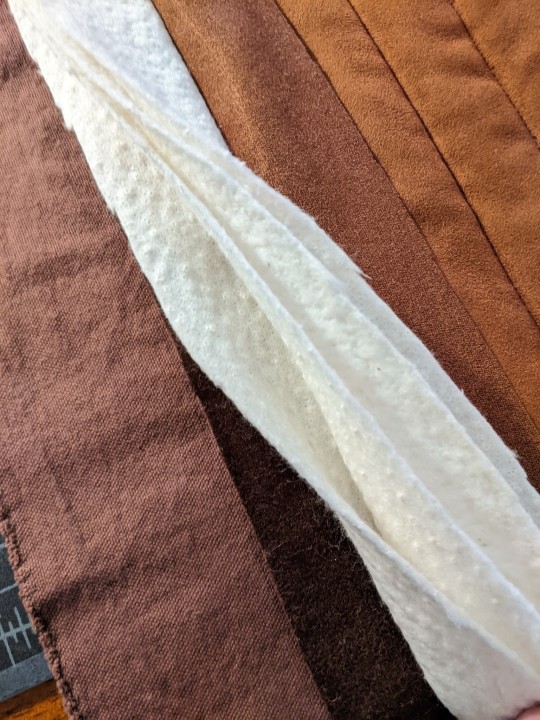
The wool won't be visible at all once this is all sewn together, and the faux suede only slightly visible at the top opening, but I like how the colors all coordinate without matching exactly.
Since the cotton batting is pretty solid, quilting wasn't entirely necessary, but I did want to make sure the layers stayed together without shifting around too much, and also give the thick layers specific places to bend to form a nice round tube shape. I ended up quilting it into six narrow panels that run the whole length of the sheath, with the outer two panels each 1 cm wider for seam allowance when I sew this into a tube.
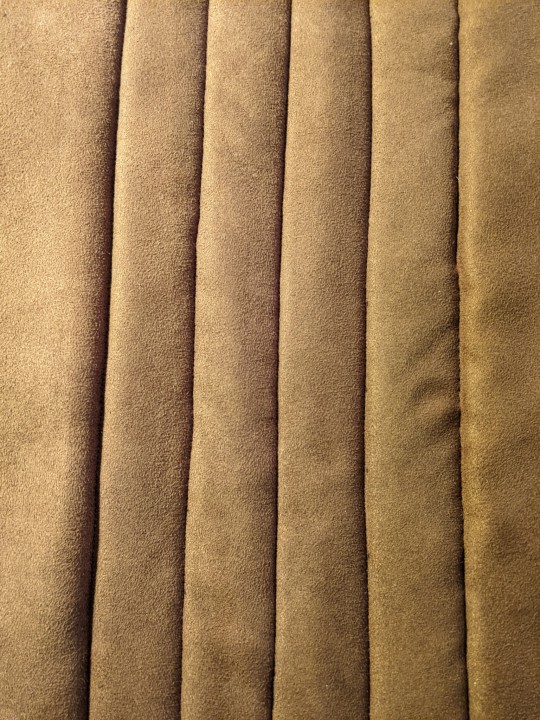
I also narrowed the entire interior from 9" (measured flat) to 8", so that it hugs the saber better, and so that I can fit the narrow portion of the canvas around the bulk of the interior + saber.
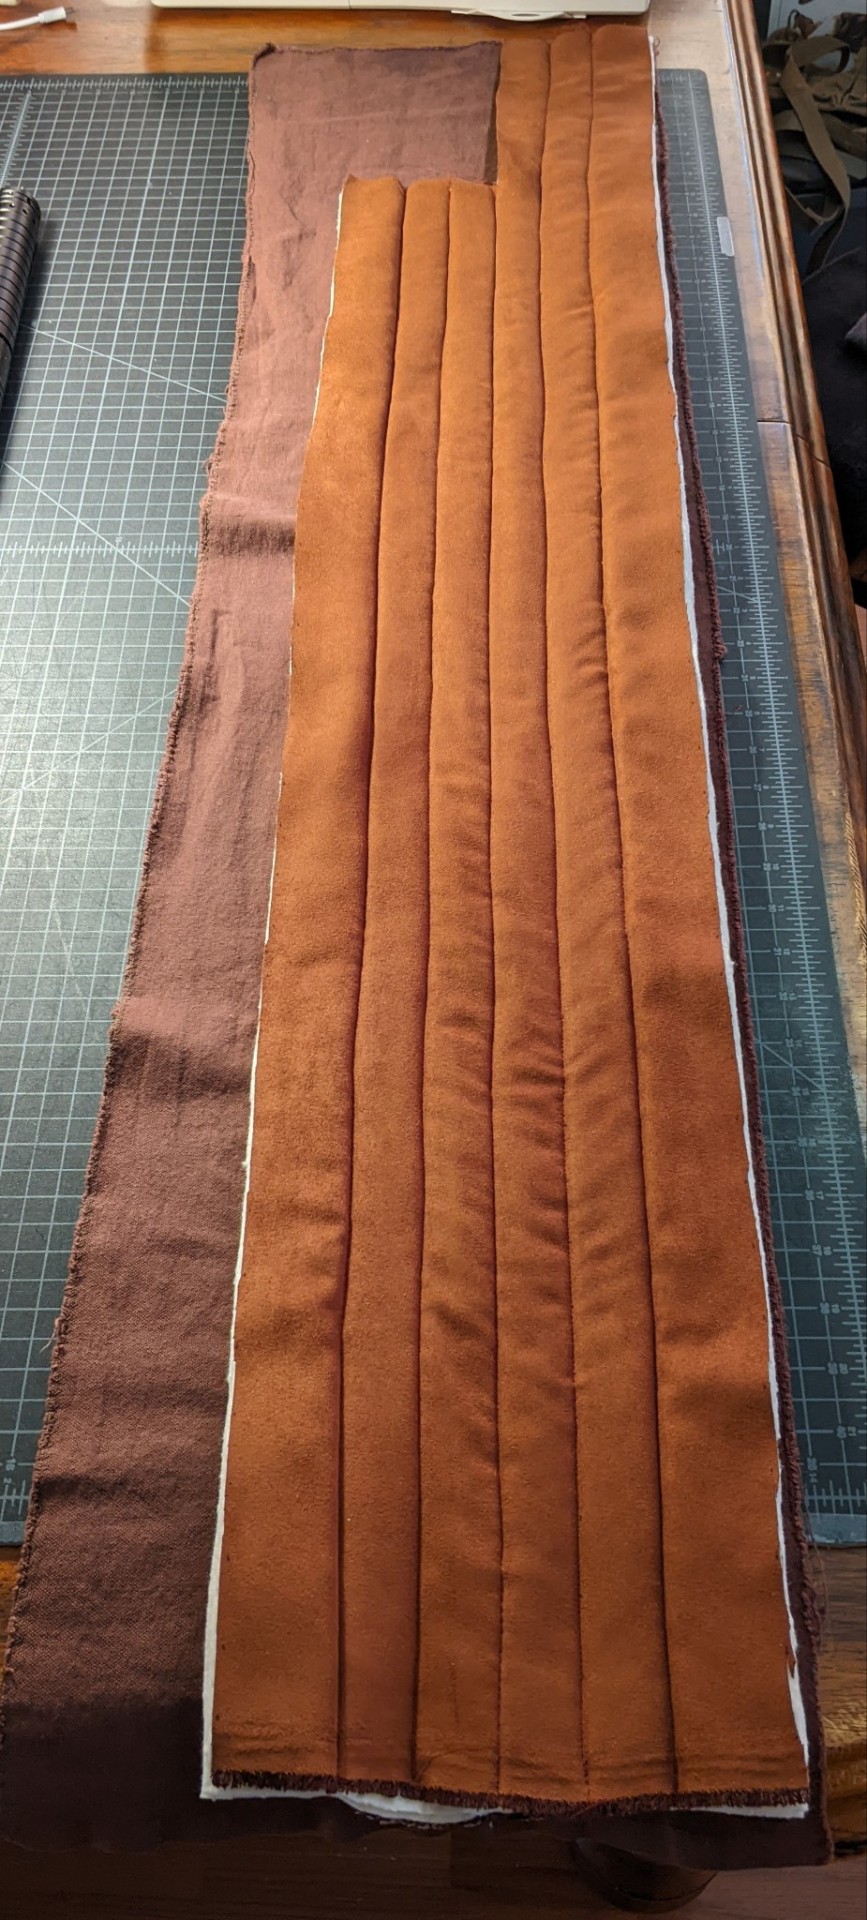
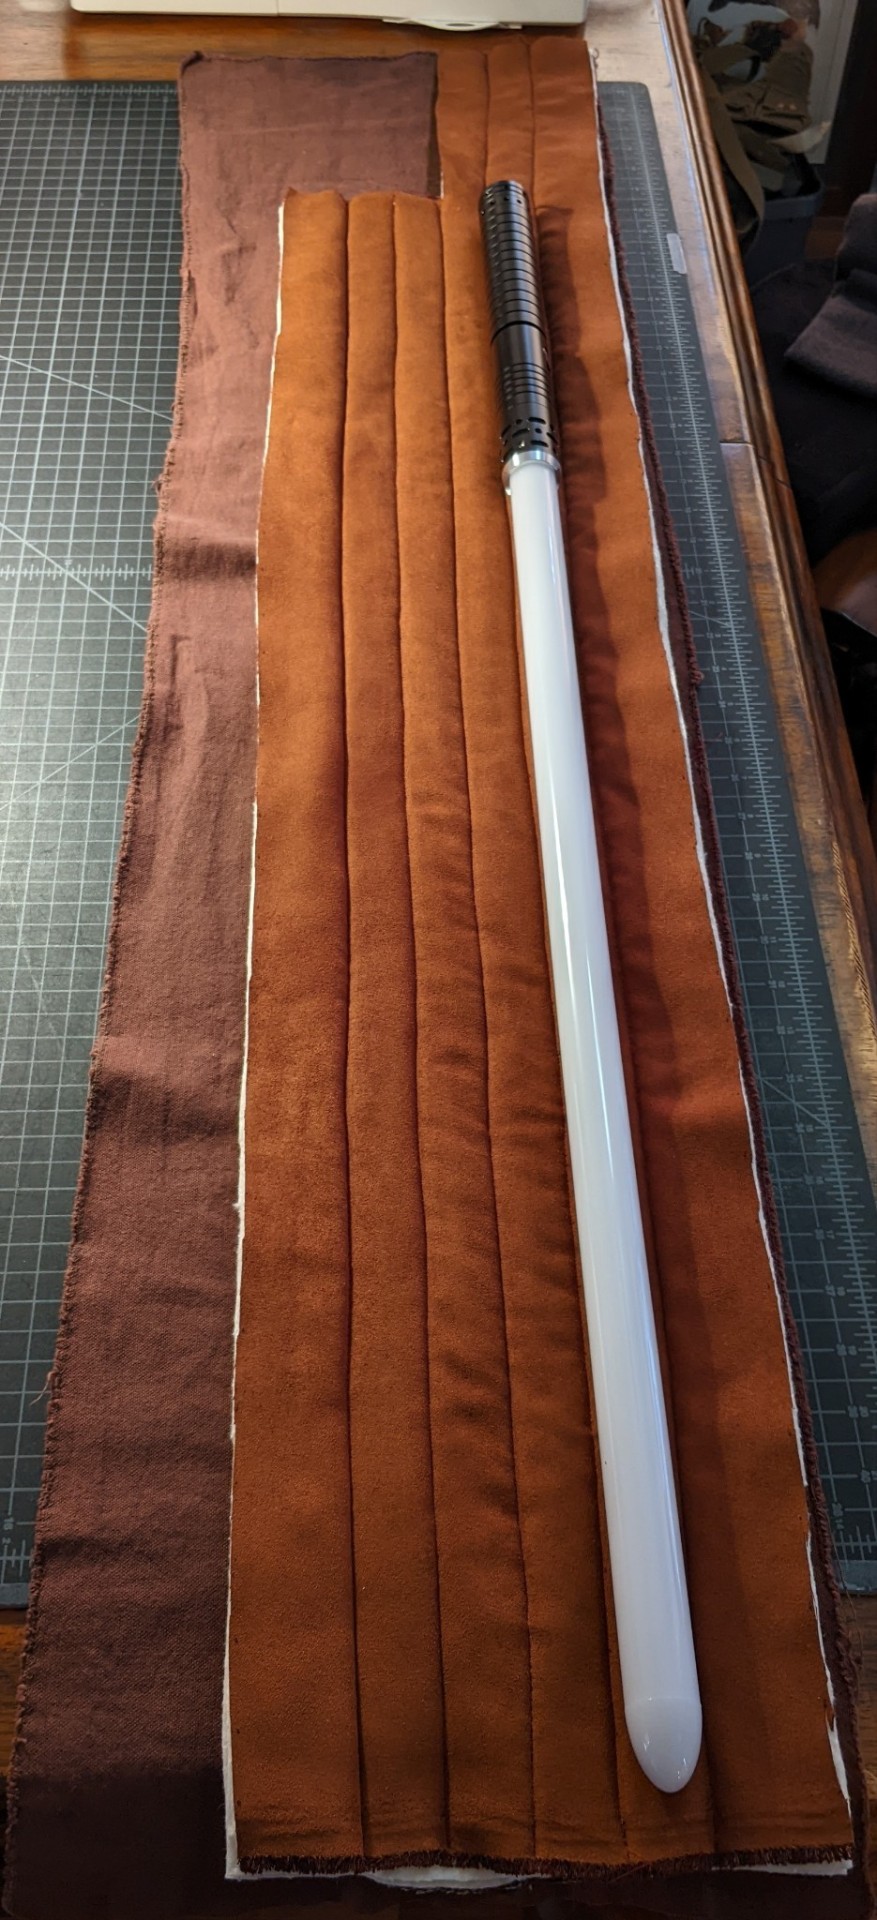
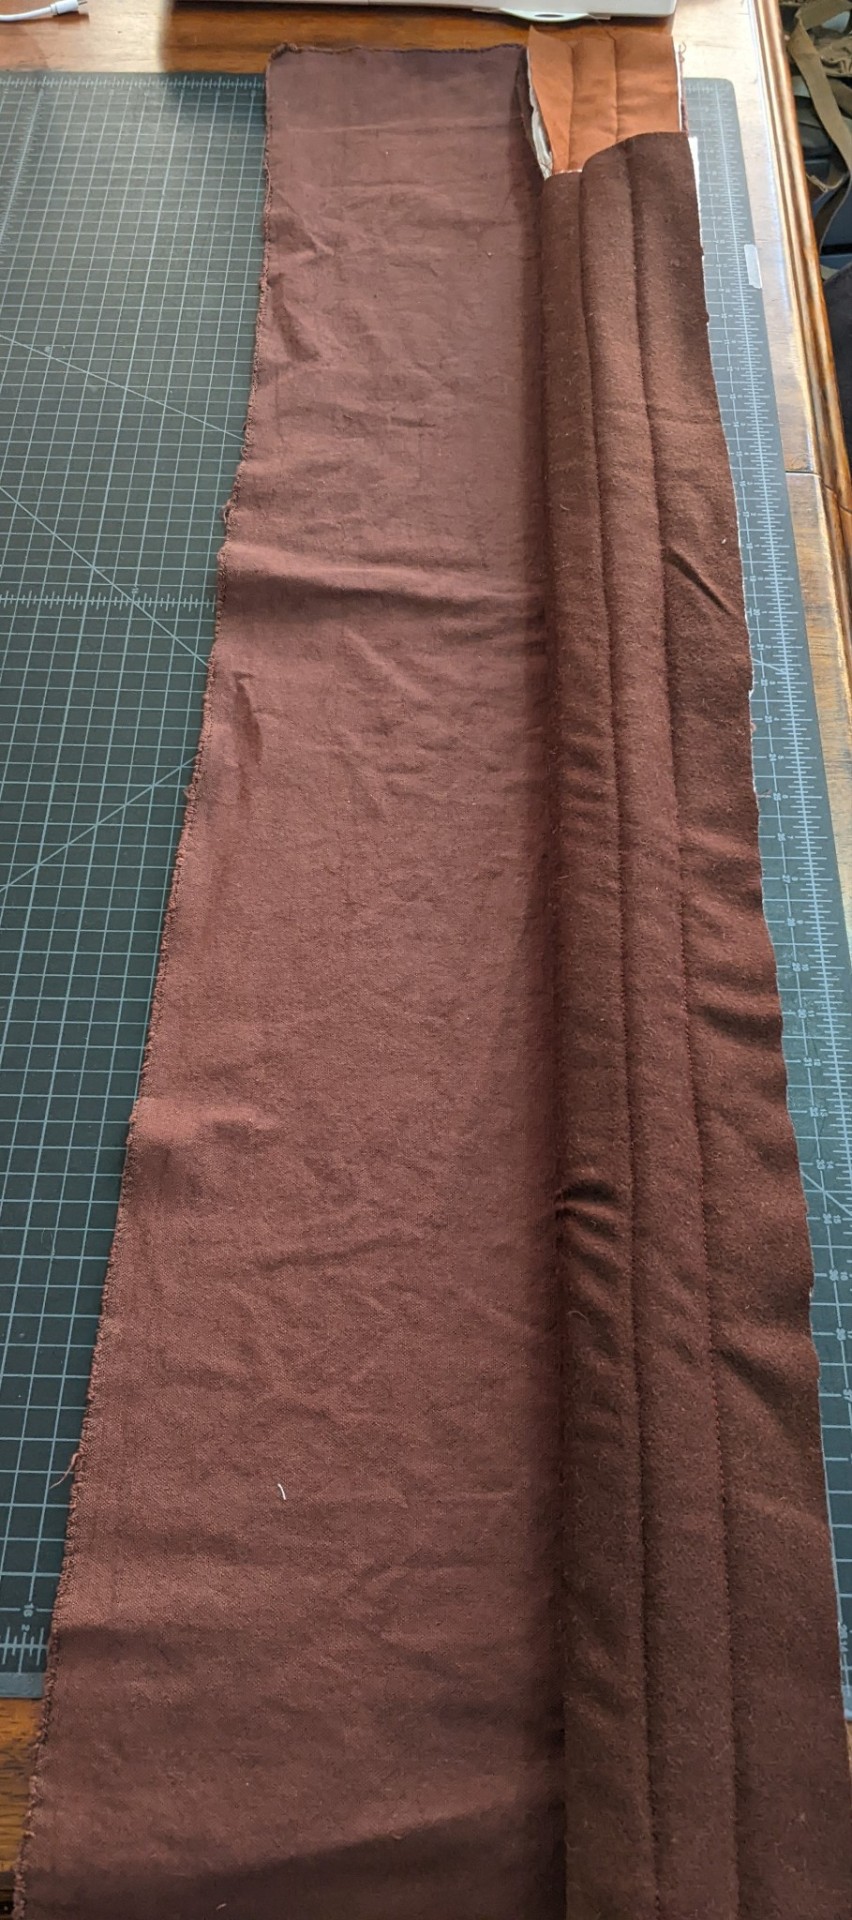
The notch cut out of the upper left corner of the interior is there to create a flap that will fold over the open end of the bag/case and secure in place with velcro. I may try to find ways to sneak a few velcro attachment points into the exterior, so that it can be closed at various lengths (ie with or without the hilt).
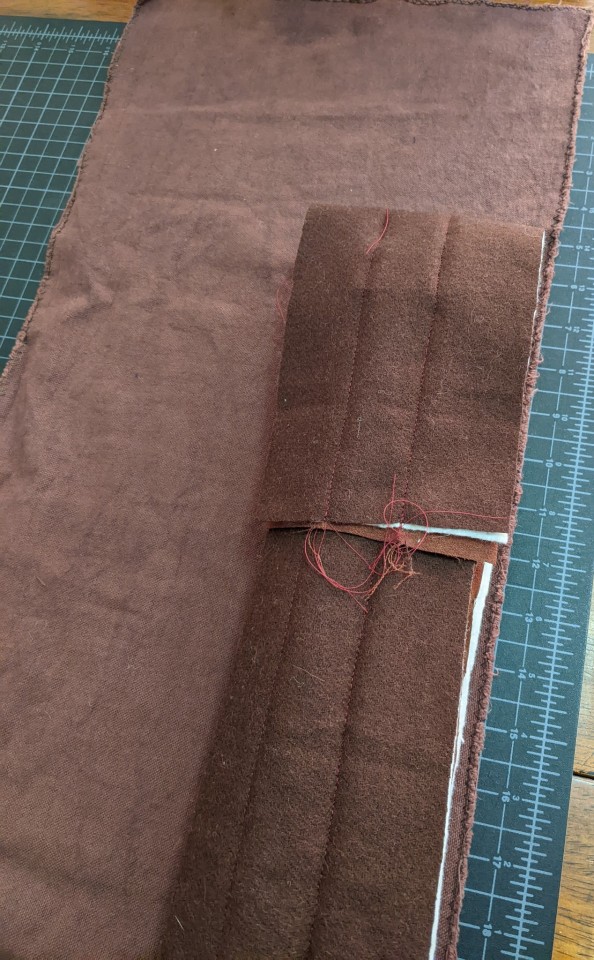
The dyed cotton canvas will eventually get a matching notch cut out of it, and the right sides of the interior and exterior sewn together before the interior is stuffed into the exterior, at which point it will look somewhat like this:

Before I sew the exterior into a tube, I'm going to sew a pocket or two for carrying small essentials like blade tension screws. I'll also sew the twill tape into place, set slightly in from the top and bottom, and put those aluminum rings onto the twill tape when I do. That way the carrying strap will be gripping the whole case, all the way around, rather than have all the stress in one place. The lightsaber is only about two and a half pounds, and I can't imagine the case will weigh any more than that, but still, I want to be sure that there's nice firm support that won't give out and end up dropping the saber on the ground.
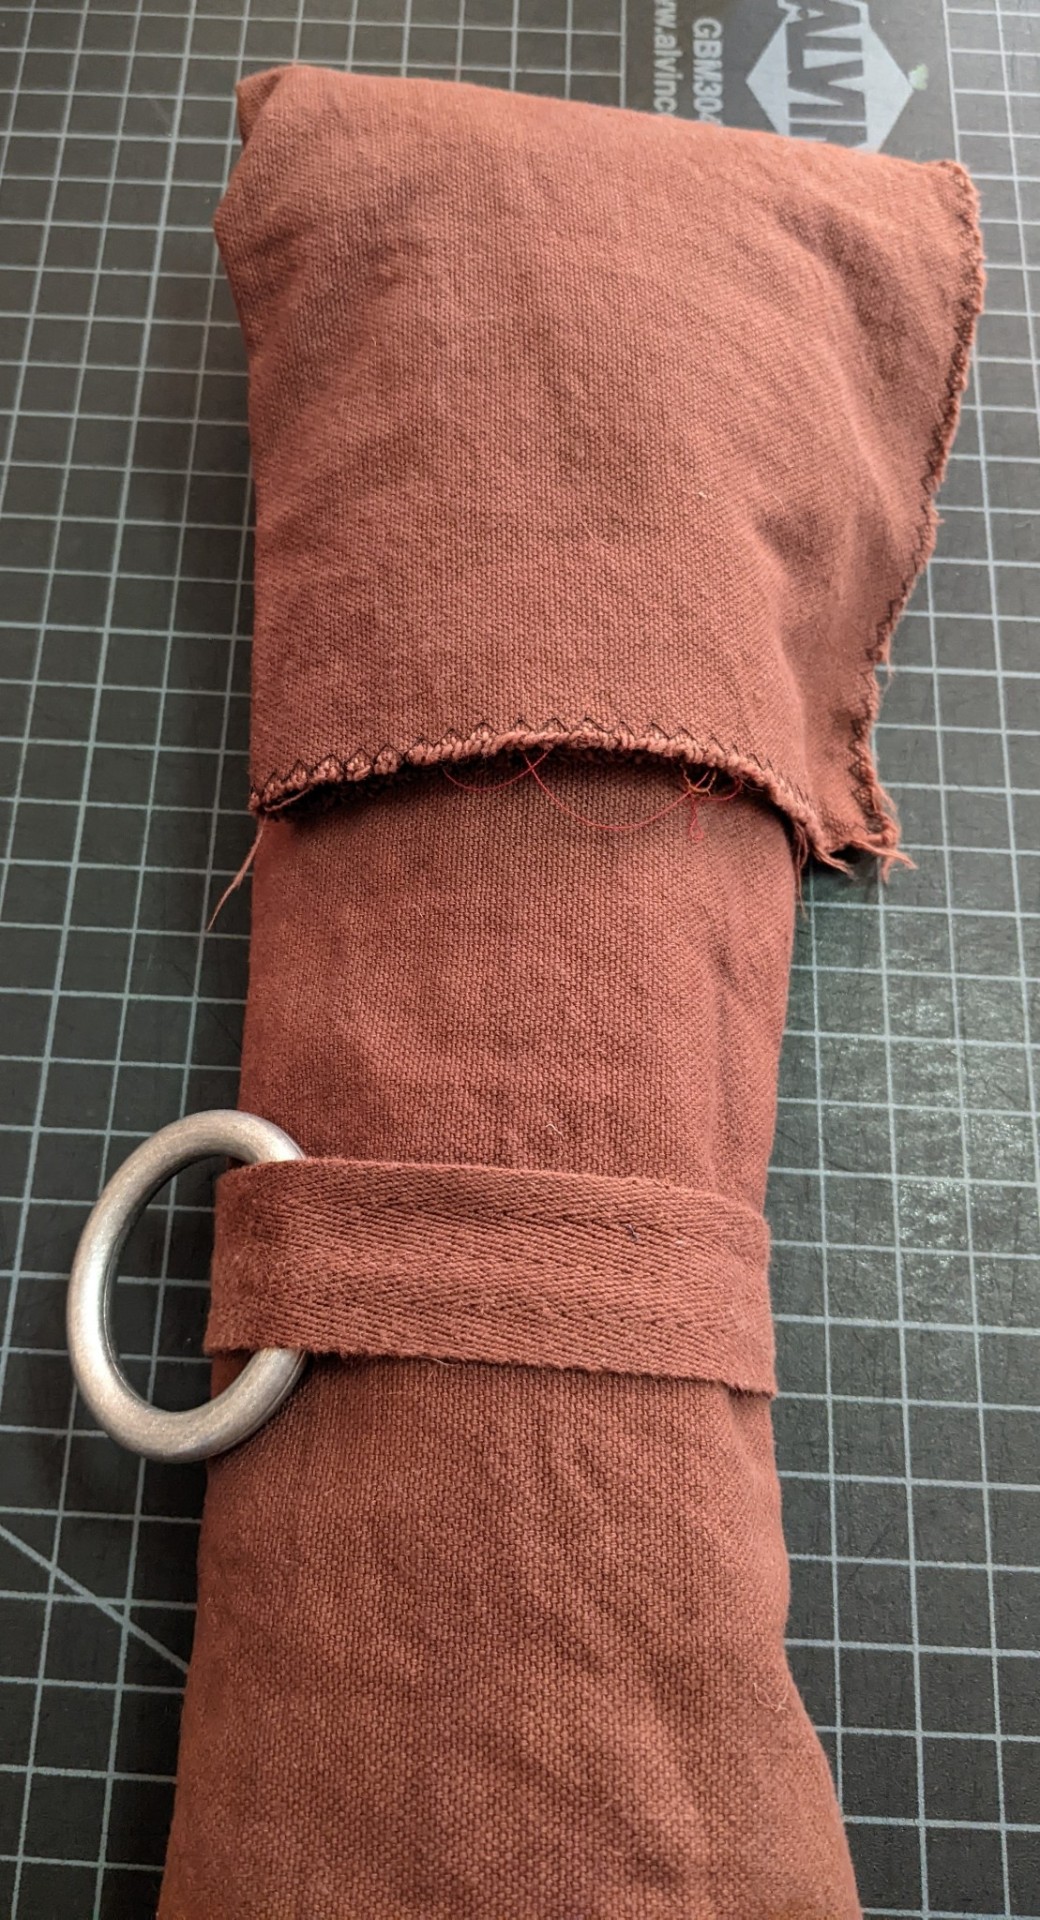
Also, can I just point out the color match between the dyed canvas and the old left over piece of twill ribbon? I wasn't aiming for that! I wanted a warm brown, which is why I added the pink and violet dyes (and would have added red if I had any on hand), but I didn't even pull the twill tape from my stash until after I was done dyeing the canvas. It matches so well it looks like I bought them as a pair, but they were bought more than a decade apart and didn't match before I just chucked whatever dyes I had on hand into the washer, lol. I would have been fine with a bit of a color mismatch, but this works too!
At this point, I think I'm ready to sew the interior into a tube, with the grippy faux-suede on the inside, and the wool on the outside where it will eventually be sandwiched next to the canvas. I have squares of the cotton batting from where I cut out the notch for the flap, so I think I'm going to try to sew those to the outside of the seam along the narrow bottom edge, to give that even more padding. That's a lot of layers to put through my sewing machine, so we'll see if it'll cooperate or if I'll end up doing that bit by hand.
After that, I'm going to turn my attention to the exterior. I have some smaller pieces of dyed canvas that aren't in the above pictures, that I'm going to use to make a crossbody strap that connects to the those rings, along with a pocket or two. The pockets, some of the velcro closures, and the twill tape and rings need to be sewn down before I can turn the canvas into a tube, so all of that will be the next major step in this project.
I think I also want to paint (or sharpie) some Aurebesh on the exterior canvas, something along the lines of 'fragile antique - handle with care'. The character I put together for my Batuu adventures isn't a Jedi (or a Sith), but rather makes a living finding antiques and oddities on outer rim worlds and transporting them to the inner rim and core worlds to sell at a profit. Not many people can read Aurebesh, but it'll add a bit of visual texture and storytelling all the same. And then if I have another run in with Kylo Ren, I can state for certain that I'm not a Jedi sympathizer, just an antiques dealer looking to turn a profit, lol.
If we do end up going to a Star Wars Nite at Disneyland, I think it could be fun to take my saber along, participate in the lightsaber meetup in front of the Falcon, and maybe even get some photos or videos of my spinning skills while I'm there. But even if this case is only ever used to store my saber here at home, it'll give it a place to live that's not my sewing table, where it's been living since it arrived, and the rings will let me hang it from a hook on the wall rather that take up any horizontal surface space. It'll be nice to look at while also keeping my saber easily accessible and ready to spin.
We don't have tickets for a Star Wars Nite event yet, but the first one is on April 16th, so I'm giving myself just under a month to finish this. I don't think I'll need that long -- but with the new work situation starting up tomorrow, it's really hard to say. I could have it finished by this time next week, or be hurrying to finish it the last weekend before we go back to Batuu, we'll just have to see how this next month works out.
Either way, I'll post more pictures here as it comes together.
2 notes
·
View notes
Text
Stop Motion Puppet Piece

To make a stop motion animation we were taught to make a puppet. We worked with a woman called Ali who was part of our course. She taught us how to make a puppet using metal wires to form a skeleton by making an outline and twisting parts with drills. We then put them together and sculpted a head around the “skull” using tin foil and skulpy. After this we were told to put miliput on the skeleton to make bones and foam around the skeleton to make the body shape. I was not in for this lesson, so I stuck the foam my friend gave me with super glue. I then sewed some fabric I had gained from a charity shop to make his skin. I’m not great at sewing so it came apart a lot and it took me a long time to get it together again when it did. I also gave him little shoes instead of bird feet so that he could have magnets put in his feet and he could stand on magnetic floor.

Though after I had finally made the torso, I realized I had made a mistake. The super glue I used wasn’t the best adhesive I could have used because it had made parts of the foam hard and not bendable, so when I moved the arm of my character upwards while my family and I were sitting at the table we heard a snap noise and now his arm wasn’t moving and staying in place. The bone in the arm had snapped at the shoulder where a large amount of glue had gone hard and so we had to undo everything. We removed the fabric and foam from the area around the arm and looked to see what could be done about it. My sister suggested adding another wire round the torso and adding more miliput but this wouldn’t stay nor would it look right so instead I got my dad. He drilled two holes in the miliput that was in the torso, and we glued a skeleton arm that we had made using new wire in case the original arm was damaged, into the miliput using superglue. This time using it was correct. We then cut away parts of the foam that were hard to make sure the same problem couldn’t happen and reglued the foam back together with Uhu adhesive glue instead. I then restitched the skin over the top, added white skin and feathers over the top using adhesive and stitched on a fanny pack to the front of his design to make him look more distinct. I was going to give him a backpack made of sticks and other parts, but after making a story board for the animation and placing the puppet in the room I had made for him we realized it was hard enough getting him to balance and move around the area without knocking things or breaking parts of the set, so we decided not to add it.

The set was made using grey cardboard that we had cut into shape and stuck together using tape on the outside of where it could be seen on camera. The objects were mostly things I had found around the house except the tools which I made using clay. We also made the hammock out of tinfoil surrounded by scraps of paper, leaves and sticks which my sister collected on a walk. We then went to animate but we realized that Stork (the name of my puppet) wouldn’t stand up.

We had aluminium plates under the cardboard wood floor we gave him, but it wasn’t strong enough to hold him through it so we removed them and painted a wood texture over the top of the plates and placed them directly under him during the animation.
My dad borrowed some flash equipment that’s used in photo shoots from one of his work friends and we used it to get the lighting for the scene as well as my dad’s camera to take the pictures since he is a photographer and has a lot of equipment for it. This way I didn’t have to worry about bringing all my work to school since it would have broken on the train and on its way into the school building.

I used blue lighting at the start of the scene to show the cold and loneliness of the room while Stork is just waking up to show a contrast when the scene turns more of a bright yellow after the light is let in and he starts to work on his projects in which he is happy about. I then edited the scene together with the right frames and added sounds I had found free on the internet. I also had to edit a green screen through the hole that he looks out of during the animation using photoshop since I couldn't record outside and I’m very proud of how it looks. It may not be as good as some professional pieces, but I think I did very well for my first attempt.

0 notes
Text
More Regency Reticules
January 19, 2022

[Image ID: four drawstring bags on a dark background. The top left one is light blue with white embroidery, the top right is blue with a faint silver paisley pattern, the bottom left is thin with a brown and blue brocade, and the bottom right is a bright red floral brocade.]
When I went through my fabric stash at the end of 2020, I rediscovered two pieces of polyester brocade - one in a blue/brown pattern and one in red, both of which I've had since grade school. They're not large pieces, but I realized they'd be the perfect size to make reticules out of!
Up until now I've only had one reticule, which I embroidered and made a few years ago, but now I have three more!
"Reversible" Reticule
I made this reticule during a slump in February 2021 while working on my 1890s corset and procrastinating on two other projects. I was in desperate need of an immediate gratification project, so I dug out this poly brocade, grabbed some scrap cotton for the lining, and got to work.
My pattern was based mostly off this reticule from the Met, this bag from LACMA (whose dimensions I used as a starting point), and this fashion plate. The pattern is really just a rectangle with a triangle on one end, repeated four times. The dimensions of each panel are 4"x10", plus a 0.5" seam allowance on the sides and bottom and full 1" at the top for the drawstring casing.
Things went downhill basically as soon as I started cutting out the four panels - the back of the fabric was just as lovely as the front! I'd better make the reticule reversible! (And Instagram agreed.) So I decided to sew up the seams and then roll the seam allowances to look like piping. Easy, right?
Unfortunately, my fabric and thread disagreed, so I decided to do french seams. I trimmed down the seam allowances, turned the bag, and started sewing. But I didn't make those seam allowances wide enough, and the raw edges poked out of the seam. So I essentially re-did the french seam two more times (instead of just unpicking that seam) to get properly encased seams. That shaved off an extra half inch on each side of my panel, so the resulting panels were only 3" wide. It's still wide enough to be functional, but it throws off the proportions pretty significantly.
With that finally done, I could do the drawstring casing! I had, by this point given up on clean reversibility, and just did a normal drawstring channel, so the blue back of the fabric is visible on the more brown side of the reticule. Finally, I was able to thread a ribbon through for the handle (just some stash ribbon for now, but I may switch it out in the future) and the reversible reticule was done!
Now, one thing I did realize about my pattern was that having a 2" long triangle at the bottom of a 4" wide bag didn't give me the point I was looking for - it just created a flat bottom for the bag. It looks fine in use, but to get the point I wanted, I should have gone for a 3" or so long triangle. Basically, it needs to be more than half the width of the panel, and it should not come to a right angle.
All in all, this is an ugly, poorly constructed bag that will likely get little use. Oh well!
Red & Blue Brocade Reticules
The new year (and the fact that I was in quarantine and not working) gave me a new burst of motivation, so these two reticules were constructed at the same time - right at the beginning of January 2022.
This red reticule was another four-panel design, with each panel being 8" at the widest point and 9" tall (plus seam allowances), with the side points falling about 5" from the bottom. I cut four panels each from the brocade and some scrap muslin, and prepped some cream and gold cording (just shy of a yard?) for the drawstring.
The blue reticule, made from what was left of the brocade I made the reversible bag out of, is only two panels, 8" plus seam allowances in both directions. I chose to use the "wong" side of the brocade for the outer fabric, plus scrap muslin (this was from an old bodice mock-up) for the lining, and some silvery-grey cord for the drawstring (about 2/3 of a yard).
Both were constructed the same way.
I started by seaming the panels of the outer and lining fabric by machine. The outer fabrics were then turned right-side-out and the lining was placed inside, so that the wrong sides of the outer and lining fabrics were together.
I used a small running back stitch about an inch from the top of the reticules to hold the outer and linings together and form the bottom of the drawstring channel. After securing the ends of the cord together to form a loop, I sandwiched the cord between the fabric, turned the seam allowances in, and whip-stitched the fabric together to finish the drawstring casing. I was very careful to reinforce my stitches around the opening I left for the cord to form a handle since that area will get a lot of heavy wear.
As a bonus, I cut a length of the silvery cord and tied a knot in the middle, forming a sort of tassel which I then attached to the bottom point on the blue reticule.
The red reticule is VERY spacious, and might work well as a project bag for small sewing or crochet projects in the future!
I'm MUCH happier with the second two reticules than I am with the "reversible" one, and I'm sure they'll be very useful!
Stay warm. Stay safe. Stay healthy.

[Image ID: a red drawstring bag with white lining, open and shown from the top, with Alex's left hand next to it for scale.]
0 notes
Text
HELL YEAHH
first: better pic of the bag
front

back

now: materials i used
- old jean shorts that didnt fit (the flap thing)
- a hood off of a hoodie (the camo fabric, the part that actually holds stuff)
- straps off of a tote bag i got at a local pride event (blue strap)
- hoodie fabric that was previously cut up for another project (the shoulder rest)
- stuffing from a busted pillow (the shoulder rest)
- floss as thread
- a thick embroidery needle
- pliers (you’re gonna need em for sewing through the denim)
- knowledge of how to do a whipstich and a running stich. if a project uses more than these stitches the i dont fw it.
okay so step one: the strap
i just used a seam ripper and snatched both straps off of this tote bag i got for free and never used. i sewed both of the straps together to make one longer strap.
after the strap is longer, i used the hoodie fabric to make a kind of tube thing for the shoulder rest. make sure it can fit around your strap and have a bit of extra room to fit stuffing.
DONT SEW THIS ONTO THE STRAP YET
it will be so much easier to make it in the right place when the straps are actually sewn on the bag.
STEP TWO: the actual holding part
okay so the important part. cut the hood off of your least favorite hoodie. i got mine bc it was on my battle jacket but the hood not only looked weird it covered any design i put on the back so i ditched it.
you just need to sew up the side you cut off. heres what the inside of my bag looks like if that helps
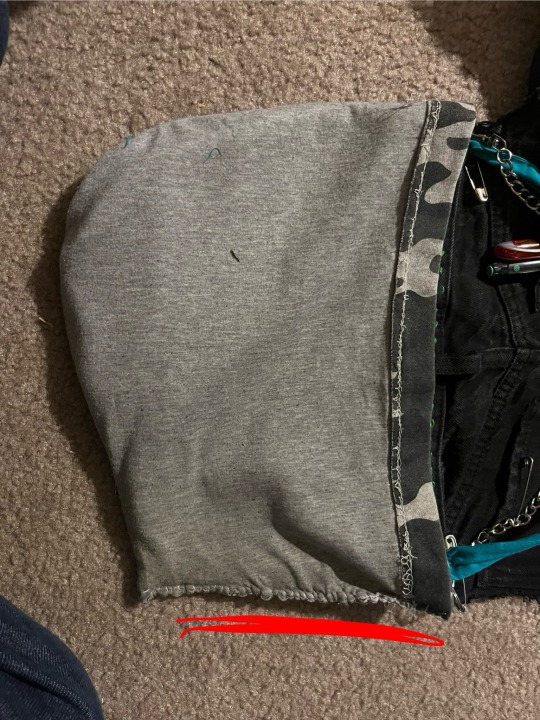
sew the part next to the red line
STEP THREE: attach straps to bag
um pretty self explanatory tbh. i safety pinned mine in place before sewing so i could see is the strap was long enough or too long. just play around with the length of the strap until you like it basically.
i sewed it like this so the strap was pretty secure

not the cleanest but eh who cares
STEP FOUR: put on shoulder rest
(idk if its called a shoulder rest who cares anymore language is made up anyways and you know what i mean)
anyways just safety pin it on, fuck around with the positioning like you did with the strap and sew it on ONE side
we use the other side to shove fluff in there, use a pencil to push it to the other side. god knows how much to put in but this is how much i put in mine

bada bing bada boom you got a perfectly functional bag. if you’re like me you can stop here and procrastinate actually putting the flap on because “oh well it worksss its fine” knowing damn well your floppy bag kinda sucks and you dont take it anywhere.
oh you actually want to add the flap? cool
STEP FIVE: the flap
calling it the flap sounds weird but idc its the flap.
take some old jeans and choose weather or not you want the front or back pockets. i choose back because idk aesthetics? i genuinely dont remember why back was the better option for me.
anyways cut the back out in a way that covers the hood well and keeps the pocket in tact. you can leave room to hem the edges so they dont fray or you can be a loser like me who didnt feel like doing that.
make sure to leave notches like this so the strap can have room to sit or wtv

the red marks are where i left notches btw.
and then take a second to pray to whatever you believe in to give you strength. arm yourself with a thick ass embroidery needle and pliers because we are sewing through the thickest part of both the denim and the bag. i believe in you.
i just sewed it like the picture above, i didnt have floss so i just took embroidery thread and rubbed it on a candle to get waxed embroidery thread.
now your punk ass has a bag made of fabric scraps and a solid 3 ish hours of your time
and maybe some blood sweat and tears from sewing through that denim.
ask me questions if you’re confused ive never name a tutorial before
have fun :]


i made this bag out of basically fabric scraps follow your dreams kids
37 notes
·
View notes
Text
The Flesh Dress


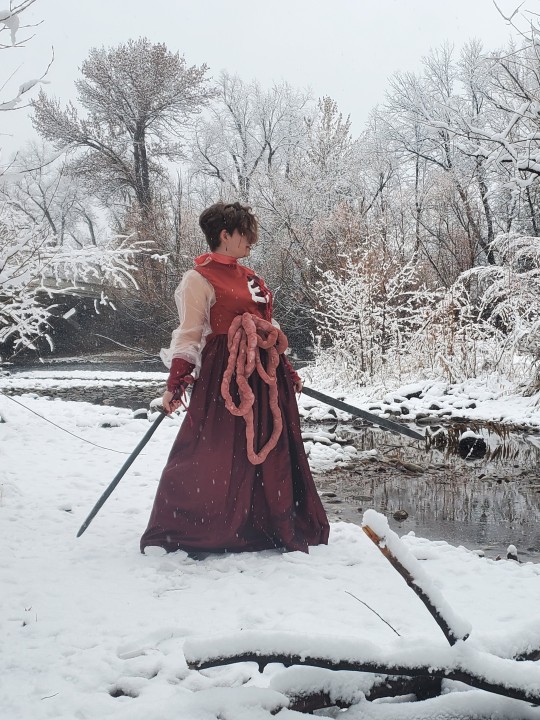
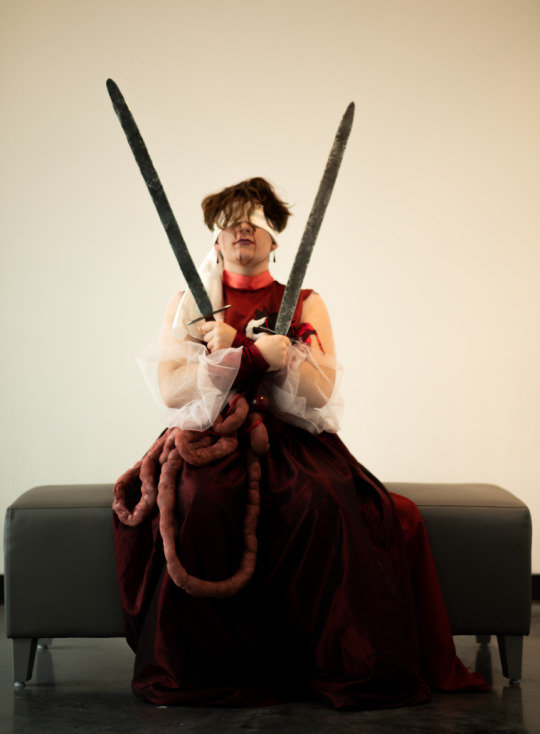
All of the fabric for this was reclaimed from curtains, scraps, tights, discarded tule from a local highschool prom that I snatched up like a horrible little vulture. The boning in the bodice was done with huge zip-ties but I’m not convinced getting real sewable boning wouldn’t have been worth it. The channels on the reinforcement were a bit of a bitch. The swords I also forged myself, but this ain’t about them. A lot of (mostly fake) blood, sweat and tears went into this one and I’m super pleased with the results. Huge shout out to @spoonbendersanonymous who was kind enough to lend me the fake blood, their anatomical text book, and had me sit down to watch Bride of Reanimator for inspiration.
Process photos and bonus photoshoot pictures below the cut!
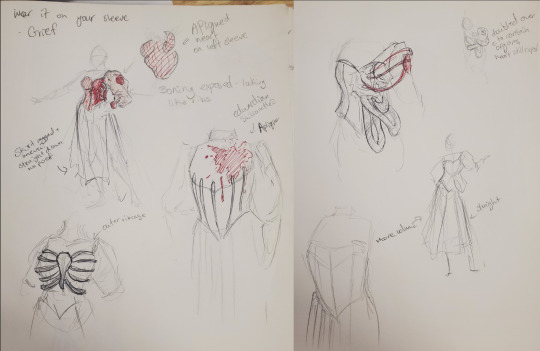
Original sketches! A lot of me trying to figure out how to make boning look like bones while maintaining a classic shape. I said edwardian on the sketch but it honestly might be Victorian I'm really not sure. This was a combined art project for one of my classes, the idea was using old fashioned mourning traditions and clothes in a modern and campy way, to complain about how much capitalism erodes our time to mourn. At least that’s what I told the professor, It’s really about making a weird and off putting dress first and foremost.

Tape pattern and paper pattern! This was my first time doing this so don't take thus as any sort of guide.
It worked though, as shown by the world’s worst corset fitting - the pink thing on my arm was where I was planning on putting the upper sleeve, I was trying to see if my poof was good since my sleeves were a lot thinner and a lot longer than what would have been optimal for the amount of poof I wanted, I had to do some work around with the fabric I had

Now I’m just bragging about getting eyelets to look clean and good for once in my life. If I was going to do anything different about this though, I would ad more eases in the back, because I need to contort horribly to get out of the bodice, I fit it too well

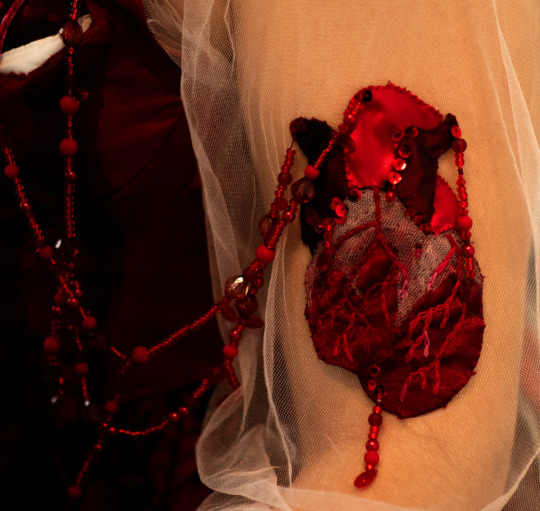
This bad boy was really the crux of the whole project. The entire thing was a pun so I could applique an anatomically accurate heart on a sheer sleeve.

This was was it’s intermediary stage, where I was suddenly very much out of time for the first deadline and had to put off adding all of the gore I wanted to, so the simple applique heart had to do. The skirt itself was way less poofy than I would have liked, and didn’t quite give the silhouette I wanted. I ended up going with the train because the under skirt isn’t actually connected in the back. Thus is the nature of working with weird panels of curtains you’ve already cut into for a few other projects. God bless the thrift store curtain section.

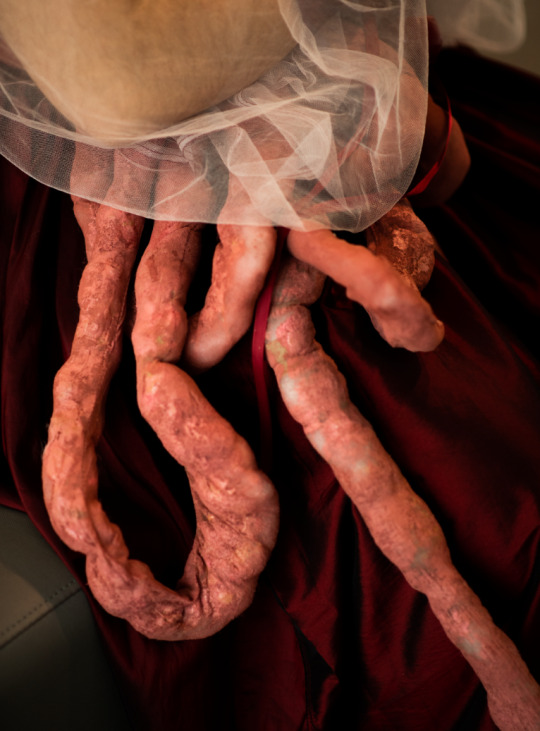
The guts were made by sewing together sheer tights, and filling them with polyfill. Here they are, before they were stippled with liquid flesh colored latex and soaked in fabric paint - and after where you can see all that extra TEXTURE

I was able to use it for another project though, and I was very happy with the beading work here, although I did end up losing my biggest strand at some point.

Here’s my makeup test! I played around with doing some blood red lips but decided the blueish corpse look was better. Fun fact! I drove home wearing a sweatshirt that says “I heart corpse desecration” on it through the snow storm, and pulled over to offer some guy a hand with his car, forgetting I still looked like this. He turned me down.

The face of someone who can definitely be trusted for road side assistance. - Also I was posing as the two of swords tarot illustration for the final gallery exhibit.
#art#fashion#sewing#I'm finally getting around to putting this out there so I can find it again#I have so many pictures but I'm afraid tumbler won't let me show them all#Maybe I'll make another post about the swords#but those are decidedly less well made#turns out forging is very hard and I never tempered them or sharpened them properly#I lost one of my pomels in the forge and gave up which is why the hilts are resin cast#but I made a couple of shitty ass swords though! Which I think is more swords than most people have ever made so I'll take it#This dress also specificly got me told that I couldn't come to a wedding as a reanimated corpse#which is very funny and only slightly homophobic
69 notes
·
View notes
Text
The Sound of Falling Sand Pt. 1
You sigh as you take inventory of your stock on the shelves. There were plenty of hats on manikins and pegs long the walls, but the metal racks were almost barren at this point. A quick survey of the shelves gives you the impression that you could probably fit everything on one maybe two racks. Your father wasn’t kidding when he joked that we needed another seamstress in the shop. His laugh tried to discredit the statement, but the reality was that you’ve been struggling ever since the death of your mother.
At first, it was an emotional journey trying to recuperate. Your father had taken it pretty hard, refusing food or water for days at a time whilst insisting he was perfectly fine. He would stick to the hat shop like it would disappear if left unsupervised, sometimes going as far as to sleep overnight there. You struggled yourself with getting out of bed those days, but the fear of losing bother parents kept you moving when your mind stalled. In a way, you did loose your father for a bit, but soon the dying light in his eyes steadied. He started going for walks in town, ignoring the whispers of the village. The quiet of the house became comfortable instead of unbearable and scary.
No matter how well things got emotionally though, you were still one person and people needed more than one outfit rather than several hats. Your father never seemed to pick up the skill of anything aside from leatherwork, and hat making, so you were left with the task of clothes. Your mother was so nimble with a needle, able to whip out skirt after beautiful skirt. She liked leaving the more creative tasks to you, like seeing the artwork you created gave her more life than she had left. Now, it was all you could bring yourself to do.
Finishing stock of the shelves and spare fabric, you passed the sheet off to your father in the front and headed back to your special room. The sewing machine law with scraps around it and loose particles of frayed clothing. Everything was messy, unkempt, from rushing order after order. Your specialty rack for wedding dresses and other uncommon clothing was overflowing. You figured you would have to spend the night finishing orders if you planned to be able to get some basic wears made for the shelves outside, but first the rest of the work day would have to conclude before you can make plans. You would hate to get started on one project just to get another you were unprepared and unready for. You went about moving manakins around in anticipation of closing time when a knock sounded at your door, proving your previous thought true. Another order was on its way.
Sheepish, that was your first impression of him. Bruno Madrigal fiddled nervously as your father introduced him with noticiable hesitation. Your father was nervous as well it seemed, that or protective. You weren’t sure yet.
You dismissed your father , saying you had it all handled and to keep an eye on the shop. Bruno visibly gulps as your father eyes him down on his way out. Surely, Bruno could not attempt to make himself seem smaller as he turns his attention from your papá to you. His gaze lingers though, looking about your form and your parlor, which is clearly well-used. Covered top to bottom in vibrant colors and shapes, it almost looks like you have purposely tried to reclaim every color in the rainbow as your own. It almost gives him a headache, but Bruno can’t stop looking at the mannikins strewn throughout with varying degrees of fabric covering them. Finally, you clear your throat in attempt to reclaim his attention. Startled, his eyes widen and fall back to you before he shifts nervously again and sticks the basket in his arms out again. Shaking your head with a slight chuckle, you grab onto the basket and place it onto the table.
“I don’t bite, you know. “ You turn back to Bruno and gesture him over to a scrap piece of paper have waiting to fill his order out on. “Tell me what you’re looking for.”
“My mamá wants to see if you’re as talented as they say. She was hoping you could mend a few of these pieces, including this shawl. He grabs the black shawl from the basket. It is very heavily frayed. The lace looks as if someone had purposefully plucked at every single thread in it and unraveled it over the course of a century. You can’t help but look at the poor thing with a sense of pity. Clearly, it was well-loved, but, as love and time often do, the shawl had been worn away like sand.
“This shawl has been heavily worn. I may be able to repair it, but it will take a few days. This is no simple fix. I’ll have to get started on a similar lace pattern and match as best as I can to sew in the torn patches. “ You take the shawl into your hands and observe it. “I’ll gladly do the work, but don’t expect a timeframe. I’ll summon you when I am ready.” Bruno nods and looks around once again. “I’ll let my mamá know. The rest of the clothes just have a few simple tears or stubborn stains. My mamá wanted to ask that you add flourish wherever you see fit.” He shuffles his feet idly, twiddling his fingers as you observe the pieces. His eyes settle on a dress styled for a matured, older women, yet still holds plenty of color and life. “She loves your work, you know.“
The complement warms your cheeks immediately. You love that dress too. It makes you think of yourself, older, wisened by life, but clever enough not to let life take the joy from you. “I’m a fan too. It’s endearing to see someone with such a passion for their work. It makes me wish I held the same joy for my craft.” Bruno looks away at that last line, a blush settling on his face as he looks out the window. You look at him again, curious for just a moment what thoughts live in his head.
“I would’ve thought you loved giving visions with how many you give.” You keep your gaze on Bruno steadfast, trying to imagine yourself in his shoes. Seeing the world through many eyes, many possibilities. It seems like such a dream that it’s hard to truly fathom it. “It’s hard to love a gift that only gives bad news,” Bruno says honestly. He briefly meets your eyes again before looking away once more, keeping his attention on a stray hat that seems to have made its way into your studio and onto a manikin.
“There is beauty in even sad news.” You slowly walk a pace closer, looking to catch his attention once more. He meets your gaze apprehensively as you pose your question, “Could you give me one? In trade for my services?”
He first looks mildly annoyed, but his furrowed brows melt into a look of understanding. He is asking for a favor from you, it seems only fair. “You won’t like it, but I suppose I am bringing a rather hopeless case to your door.” He motions towards the shawl as he finishes his words. Looking around, he suspects this room will be wide enough, “Perdón, señorita. We’ll have to move a few things around first.”
Once the furniture had been set aside, bringing the attention of her father, Bruno sets up for the vision. He assures you and your father that the sand will dissipate at the end of the vision, but your father’s displeased look never leaves his face. Only when Bruno settles into the circle and motions for you to do the same does your father decide he would rather not know what the future has in store.
Bruno meets your eyes once more and you see him glance up and down your frame for the smallest second. He notices you watching him and turns away blushing. He offers his hand reluctantly, “You’re gonna want to hold on. The wind is pretty strong.”
You hold onto his wrists tightly, almost apprehensive with his words. Surely, his visions are safe to observe or he wouldn’t do them. Still, you can’t help but imagine seeing the future must not be a calming event. The wind rustles your hair mercilessly, and you find yourself meeting his eyes almost immediately. They are glowing an unnatural jade green, but the shade is almost breathtaking with how strongly it resonates across his features. It’s almost haunting in a beautiful, but sad way. The sand forms a tunnel as it envelopes the two of you in breeze and green light. You look around tentatively. Why can’t you see anything? Is he the only one that gets to see the images? You scan the tunnel of sand hopefully, relieved to find the images being portrayed right above your head. You see yourself standing in your busy parlor, only for the orders piled around you to drop off quickly - leaving a barren room. You see Bruno walk through the parlor, fabric gliding through his fingers as he passes, and it becomes clear that the closer he gets to you the more your work disappears.
“I-I’m sorry. “ Just as quickly as the images appear do they leave, revealing a guilt ridden Bruno in their wake. A tablet falls to his lap, but he leaves it there. “I don’t mean to drive away business. I can talk to my mamá about getting our clothes tailored elsewhere.”
“Nonsense.”
The word startles Bruno. He looks at reader incredulously, raising his eyebrows in disbelief. “But your shop! I-“
“We’ve been swamped for a while now. A break honestly might do us some good, besides, it’s not like you are the one causing business to fail. People will choose what they will choose regardless of if you warn me ahead of time or not. “ You give him a slight smile, “Though payment might be a welcome gift in light of recent events.”
He nods slowly, gears visibly turning in his head and he reaches in his bag for the change. “It was really beautiful, you know. I can’t see how you hold so little pride in such a magnificent show of talent. Green really is your color.”
His face erupts in a boiling red that envelopes his face. He takes a few steps back, making you question whether or not you’ve scared him off. Finally, he speaks in a whisper, “I don’t see it, but I appreciate the sentiment.” Before turning to leave, he offers a hopeful look, still stained with red, “See you soon, I suppose.” You barely have time to say goodbye yourself when he closes the door. Leaving you to think over the wonder that is Bruno Madrigal. Good thing you have lots of work to do, thoughts and mindless work always go hand in hand.
21 notes
·
View notes