#Linksys wifi extender setup
Explore tagged Tumblr posts
Visit Tumblr Blog
Explore Tumblr blogs with no restrictions, modern design and the best experience.
Last Seen Tumblr Blogs


Fun Fact
There are dozens of funny blogs to kill time on Tumblr.
Text
The Linksys extender setup can be done using the WPS button, first, make sure that the networking device is powered on. Next, locate the WPS button on the extender and the router as well. Now, push down the WPS button on the extender and the router within 2 minutes until the LED begins blinking. For more details, approach us!
0 notes
Text
Boost your internet speed with Linksys wifi extender setup! Don't let slow connections hold you back. 🚀 Connect seamlessly by clicking the link in bio. Upgrade your browsing experience today! #TechGuru #WiFiMagic #LinksysLife #TechInnovation #ViralTech #SmoothSailing
0 notes
Text
Linksys velop setup
A Linksys Velop setup can greatly enhance the coverage of your home network. To get started, make sure you have the extender, an Ethernet wire, and a computer or mobile device with a web browser. The extender should first be connected to a power source, then you should wait for the LED indicator to turn solid blue. Then, join your device to the Velop extender's Wi-Fi network or create a wired connection using the Ethernet cable. After that, launch a web browser and type "extender.linksys.com" or the standard IP address listed in the user manual. To finish the configuration procedure, choose your current Wi-Fi network and input the network password as directed on the screen.
How do I setup the Linksys Velop extender manually?
Here are simple step-by-step instructions for the Linksys Velop setup manually:
Start by placing the extender in a central location within range of your existing Wi-Fi router. Make sure the extender is powered on and the LED indicator is solid blue.
On your device (laptop, smartphone, or tablet), go to the Wi-Fi settings and connect to the "Linksys Extender Setup" network. This network should be visible in the list of available networks.
Once connected to the extender's network, open a web browser and enter "extender.linksys.com" in the address bar. If that doesn't work, you can try entering the default IP address, which is usually "192.168.1.1" or "192.168.0.1".
You will be directed to the Linksys Velop extender setup page. Click on "Start Setup" or a similar button to begin the setup process.
Select your preferred language and click "Next" to proceed.
The extender will search for available Wi-Fi networks. Select your existing Wi-Fi network from the list and click "Next".
Enter the password for your Wi-Fi network and click "Next" to continue.
You will have the option to create a new network name (SSID) and password for the extender's network. If you prefer, you can keep the same network name and password as your existing Wi-Fi network. Make your selection and click "Next".
The extender will apply the settings and connect to your existing Wi-Fi network. This process may take a few minutes.
Once the setup is complete, you will see a confirmation message. You can now disconnect from the extender's network and connect back to your regular Wi-Fi network.
Note:- If you need any help regarding your Linksys velop extender so contact our technician or visit the official website that is 192.168.1.1.
Linksys WiFi Mesh Setup via Linksys App
During the unboxing process, you receive a few products that must be purchased for the Linksys Velop setup. The Velop setup, an instruction book, some ethernet cables, and a power cable are included. As soon as you have an Ethernet cable and the Velop setup, continue with the remaining instructions below.
Place the Linksys Velop next to the main router.
Put one end of the ethernet cable into the router's port and the other end into the ethernet port on the Velop to complete the connection.
The Velop setup should then be connected to the power connector by inserting the power line.
When hooked into a power outlet, the LED indicator turns blue to show that everything is ready.
Don't create the connection until the main router has finished booting.
After a few minutes, the Velop's LED will turn solid purple, signaling that it is ready for use.
Installing and utilizing the Linksys app on your device will then allow you to launch the Linksys Velop Setup.
Make sure the app is using the most recent release. Update your device's version if it is out of date.
Enter your email address and password after marking the terms as accepted.
Then a website will appear on your computer screen asking you where the internet comes from.
After choosing your internet connection, launch the Linksys app and pick the WiFi list.
The network name for Velop Setup will appear in the list.
Firmware Upgrade Linksys Velop extender
Updates to the Linksys Velop firmware are simple to do and solve many performance problems. Therefore, always enable the auto-update firmware feature in the Linksys app. You mostly have two options if you choose to do it manually. The first one entails going to a certain URL, whereas the second one requires signing into CA. Take these two actions independently.
Before utilizing this method, ensure that your node is setup or set to its factory default settings. The node's IP address is 192.168.1.1, so note it down. Read the printed instructions for further details.
Download your product's firmware file first onto a computer or laptop.
If the node has been setup, launch any web browser and type IP addressfupdate.html into the search bar. use the IP address of the node.
If the node is still using its factory default settings, look for IPaddressfupdate.html.
The screen will then display a sign-in page. To sign in, enter your username and password and then click "Sign In."
After viewing the firmware upgrade page, choose and upload the firmware file, then click Update.
Wait till the upgrade is finished.
Following the update, the designated node will power on and show a solid blue light.
However, when the factory default settings node is ready for setup, it will show a solid purple light.
The Linksys Velop Setup process should be repeated.
0 notes
Text
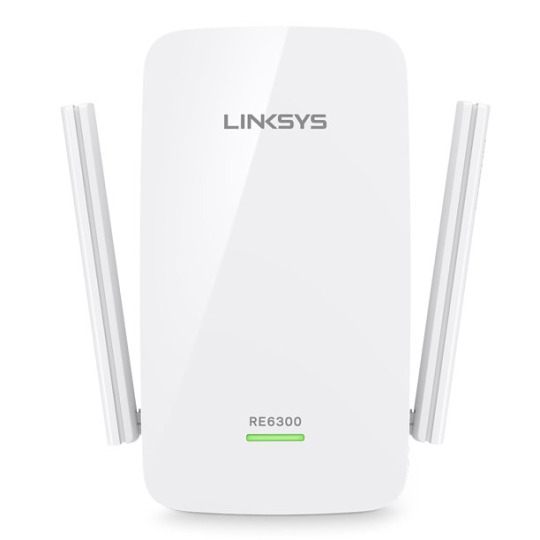
How to Setup Linksys RE6300
The Linksys RE6300 is a powerful Wi-Fi range extender that can significantly boost wireless coverage in your home or office. It is designed to work with any router and can provide a reliable connection to all of your wireless devices. In this blog, we’ll go through the step-by-step process of Linksys RE6300 Setup manually.

Step 1: Connect the RE6300 to a Power Outlet
To start the setup process, connect the RE6300 to a power outlet using the power cord that comes with the device. Wait for the device to power up and the LED indicator light to blink orange.
Step 2: Connect Your Device to the Extender’s Wi-Fi Network
Next, connect your device (such as a laptop or smartphone) to the Wi-Fi network broadcasted by the RE6300. This network should appear as “Linksys Extender Setup – xxx” (with xxx representing the last three digits of the extender’s MAC address).
Step 3: Access the Setup Page
Open your web browser and type “http://extender.linksys.com” or “http://192.168.1.1” in the address bar. This will take you to the RE6300 setup page.
Step 4: Follow the On-Screen Instructions
Once you’re on the setup page, follow the on-screen instructions to configure your RE6300. The setup wizard will guide you through the process of selecting your language, setting up your connection type, and entering your network’s Wi-Fi name and password.
Step 5: Connect the Extender to Your Wi-Fi Network
After entering your network’s information, the extender will prompt you to connect to your Wi-Fi network. Once you’ve successfully connected, the RE6300 will start broadcasting the same Wi-Fi network name as your router. This will allow your devices to seamlessly switch between your router and extender as you move around your home or office.
Step 6: Test the Connection
Finally, it’s important to test your connection to ensure that the extender is working properly. Try connecting to the internet from various locations in your home or office to ensure that the connection is strong and reliable.
In conclusion, manually setting up the Linksys RE6300 can be a straightforward process. By following the above steps, you can ensure that your RE6300 is properly configured and providing a strong Wi-Fi signal throughout your home or office. If facing an issue with this Linksys re6300 setup then you can contact our expert team. They will assist you.
1 note
·
View note
Text
0 notes
Text
Guide to Linksys WIFI Extender Setup
The Linksys Wi-Fi extender is another magnificent Wi-Fi repeater with a high-speed internet connection. If you wish to extend your current network’s WiFi range, this device is perfect. With the help of the extender, you can say goodbye to all the dead zones in your house. To start using this extender, you need to proceed with the Linksys WiFi Extender Setup.
You can easily set up the Linksys extender with the help of the correct instructions. That’s why we are here with this post to help users with the setup. This post will consist of the setup along with the crucial procedures you must know. Also, we’ll cover the issues you could face with the setup along with the troubleshooting methods.
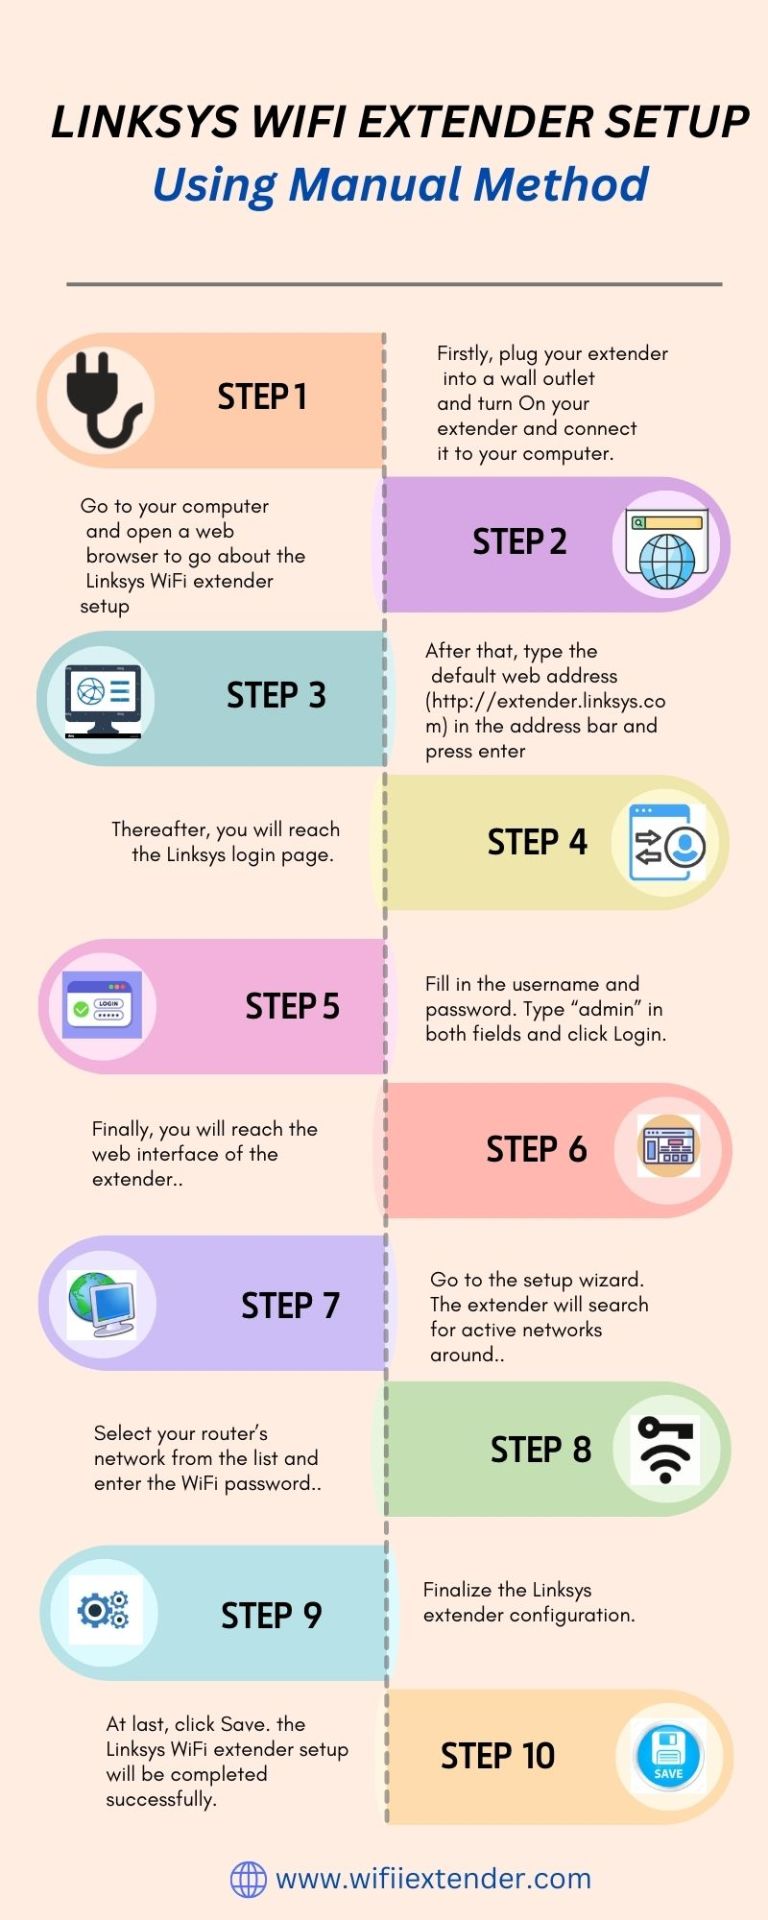
Steps To Set Up the Linksys WiFi Extender
In this section, we will walk you through the complete procedure for the setup. You should know there are two methods you can use to set up the extender correctly.
Firstly, keep the extender and the router in the same room and power them on.
Now, connect your device to the router’s network to access the login page.
You can use an Ethernet cable to connect the PC to the router’s network.
On the device connected to the extender, open a web browser of your choice.
Hereon enter "extender.linksys.com" in the address bar to access the login page.
When the login page appears, enter the default username and password in the fields.
The home page of the extender will appear on the screen you can initiate the setup.
Now, the extender’s user interface will scan for all the nearby available WiFi networks.
After that, you need to select your WiFi network and enter the correct password.
Give the extender some time to form a connection successfully with the router.
When the connection is successful, you can configure the extender’s settings accurately.
In the end, relocate the extender and connect your devices to the extender’s network.
These are the methods you can use for the Linksys WiFi extender setup. When the setup is complete you can place the extender somewhere else. Just ensure to place the extender inside the router’s range, as the connection will break if the router is too far.
Conclusion
This blog post includes the complete process for you to set up your Linksys extender through a reliable web browser on your device. But if you are unable to set up your extender or facing issues during the process, chat with our technical experts. They will efficiently guide you through the complete setup process.
0 notes
Text
How to setup Linksys RE6300 Extender?
Linksys RE6300 is a wireless range extender that is designed to boost your Wi-Fi coverage area. The device is easy to set up and offers a hassle-free way to extend your Wi-Fi network to hard-to-reach areas in your home or office. Linksys RE6300 extender Setup is simple and quick if you are tech savvy; in this article, we will walk you through the setup process of your RE6300 wifi extender. This Linksys extender has dual band wifi range and can cover up to 7500 Sq Ft of area for good wifi signal and strength.
Linksys RE6300 extender Manual Setup
Follow these steps for Linksys RE6300 extender setup via manual method:
Plug the range extender into an electrical outlet near your router and wait for the power light to turn on.
Connect your device to the Linksys RE6300 Extender Setup network.
You can find the network name and password on the label attached to the range extender.
Open a web browser and type extender.linksys.com or 192.168.1.1 into the address bar.
Click on "Start Setup" and follow the on-screen instructions to complete the setup process.
If you want to connect the range extender to your router using an Ethernet cable, connect the cable to the Ethernet port on the range extender and the other end to an available Ethernet port on your router.
Once the setup is complete, you can connect your devices to the range extender Wi-Fi network.
How to configure Linksys RE6300 via WPS?
WPS is the simplest and quickest for Linksys RE6300 extender setup. Additionally, it supports Wi-Fi Protected Setup (WPS), allowing the extender and router to connect without requiring a password.
Follow these steps for Linksys RE6300 extender setup using WPS:
Press the WPS button on the range extender until the light flashes.
Within two minutes, press the WPS button on your router.
Wait for the range extender's light to turn solid green, indicating that it is connected to your router.
Once connected, you can move the range extender to a new location within range of your router's Wi-Fi signal.
Common Issues During Linksys Wifi Extender Installation
The extender has not enabled extender.linksys.com.
The web-based Linksys RE6300 Extender setup page is inoperable.
The default Linksys extender IP address is missing.
There are no visible flaws in the Linksys RE6300 Extender.
insufficient performance The Linksys RE6300 reset WiFi extender is connected, but there is no internet access.
Logging into Linksys RE6300 extender setup fails.
My password for my Linksys extender has been forgotten.
It is not possible to configure a Linksys RE6300 Extender.
An orange light error on a Linksys RE6300 Extender
Linksys extender firmware cannot be updated.
Troubleshooting tip for Linksys RE6300 Extender configuration issues
The troubleshooting procedures forLinksys RE6300 Extender are as follows:
Keep your Linksys RE6300 Extender away from metal objects, aluminium studs, microwaves, fish tanks, walls, room corners, cordless phones, Bluetooth devices, and other potential interference sources.
Check that the extender is receiving enough power from the wall outlet.
Examine the wiring connections to ensure their functionality. It is not advisable to use any damaged cables.
Take advantage of your smart device's fast internet connection.
Check the URL in the address bar if you're having trouble logging into your Linksys extender.
There should be no damage or short circuits in the wall outlet you're using.
start the most recent web browser version.
How to Update Firmware on Linksys RE6300 range extender?
A Linksys RE6300 extender firmware update is a piece of software that enhances the functionality of the device or fixes bugs. The web-based setup page for the Linksys RE6300 extender allows users to download and install firmware updates.
Follow these steps to update the firmware on your Linksys RE6300:
Open a web browser and type extender.linksys.com into the address bar.
Enter the range extender's login credentials. The default username and password are "admin."
Click on "Administration" and then "Firmware Upgrade."
Click on "Check for Updates" and wait for the range extender to search for new firmware.
If a new firmware version is available, click on "Update" to begin the installation process.
Wait for the installation to complete, and do not turn off or unplug the range extender during the update.
Linksys RE6300 range extender Factory Reset
A Linksys RE6300 extender reset involves returning the device to its original factory settings. The extender's reset button must be pressed and held for a short period of time until the LED light flashes in order to complete this procedure. Following the reset, all customised settings and configurations will be lost, and the device will return to its original settings.
Follow these steps to reset your range extender:
Locate the reset button on the range extender. It is usually located on the bottom or back of the device.
Press and hold the reset button for about 10 seconds or until the power light blinks.
Release the reset button and wait for the range extender to reboot.
Once the power light is solid, the reset process is complete, and you can begin the setup process again.
#Linksys RE6300 extender Manual Setup#How to configure Linksys RE6300 via WPS?#Common Issues During Linksys Wifi Extender Installation#Troubleshooting tip for Linksys RE6300 Extender configuration issues#How to Update Firmware on Linksys RE6300 range extender?#Linksys RE6300 range extender Factory Reset
0 notes
Text
Quick And Easy Setup Process For All Linksys Extenders
Do you want to enjoy full connectivity throughout your home or office space but your router isn't allowing you to do so? If yes, then it is a clear indication to buy a Wi-Fi range extender. A good quality Wi-Fi range extender will remove all your connectivity issues and will provide you with full signals, fast internet speed and seamless connectivity. One of the best networking brands that makes high-performing range extenders is Linksys. They have vast options for every need, so you can select the one that fits your preferences, budget and network needs. So, if you choose to buy from them, here's the common easy and simple setup process for you to get started. We will provide three options for the setup process, so you can choose the one, which is easier and more convenient for you.
Before you begin, the first and foremost step which is common for all methods is to place the range extender in a central location of your home which should be near to your existing router. Connect the router and extender with the help of an Ethernet cable. Plug the range extender into an electrical outlet with the provided power adaptor and switch on the entire setup. Wait for a few minutes, so that all the devices are stable and ready for further setup. Now let's see the different methods.
Method 1: Setup With Linksys App
✓ First open the Wi-Fi settings of your device, and connect to the extender's wifi network.
✓ The next step is to download and install the Linksys App. If you are an Android user then download from the Play Store and if you are an iOS user then download from the App Store.
✓ Open the app, create your Linksys account or if you already use the app then login using the set username and password.
✓ Once you log in just follow the instructions to set up and configure the extender. The app will guide you through selecting your Wi-Fi network and entering the necessary details.
And that's all for the app-based setup. Wasn't it super easy and quick?
Method 2: Web Browser Based Setup
We will use extender.linksys.com for this setup method.
✓ Choose any device, and go to its Wi-Fi settings. In the list of all the available networks look for a network named Linksys, upon finding click on Connect. If there is no name as such then refresh the page and the name will appear automatically.
✓ Now, on the same device open a browser. You can use any browser like Google Chrome, Edge, Safari or any other of your choice.
✓ In the address bar of the browser enter extender.linksys.com and press enter. This will take you to the login page. If extender.linksys.com doesn't work then try adding http:// in front or you can also use the default IP address which is 192.168.1.1.
✓ Once you enter the login page, you have to enter the default login details. The username and password are both admin or sometimes it's admin for username and password for password. So if one doesn't work try the other combination. For accurate details always check the user manual that came along with your specific Linksys Extender model.
✓ Once you log in successfully, you have to select the name of your current network whose reach you want to extend and enter its password. Now the screen will guide you to complete the whole process, so keep following all the instructions carefully.
✓ Once done, you can now change the extender's settings as per your wish.
That's all for web browser-based setup. We hope you found it easy and straightforward.
Method 3: WPS Method
One of the easiest and quickest methods to set up Linksys Extenders is using the WPS method. So here's how you can perform this method:
✓ Firstly you need to ensure that your router supports WPS (Wi-Fi Protected Setup).
✓ Now, locate the WPS button on your router and press it. Usually, the WPS button can be found by moving the router upside down.
✓ Within two minutes, press the WPS button on your Linksys Extender.
✓ As soon as you press the button on the extender the light on it will start blinking to indicate that it is connecting to the router. Once it stabilizes, it means the setup is successfully done.
Bonus Points To Enhance The Working Of Your Linksys Extenders
Choose a less crowded Wi-Fi channel by visiting the settings of your extender for a better experience.
Regularly check for firmware updates, if found install them immediately for improved performance and better security.
Make sure the place where you have kept the range extender doesn't have any electronic devices or any metal objects as it can disturb the signals of your extender.
Consider changing the default username and password to something difficult and unique so that your network is protected from hackers.
Use Qos settings for Prioritizing bandwidth for critical applications.
1 note
·
View note
Video
youtube
Linksys RE7000 AC1900 Dual band WIFi Range Extender setup | Linksys re70...
0 notes
Text
Linksys RE6500 Setup
Linksys RE6500 AC1200 Dual-Band Wireless Range Extender duplicates the wireless signal of any access point or router to offer internet connectivity in challenging-to-reach locations. The extender provides up to 10,000 square feet of wireless coverage. A Linksys RE6500 setup without the use of an installation CD.
With its high-speed AC technology, you may play online games and stream HD videos wirelessly without any lag or delays. With speeds 10x faster than Fast Ethernet, the RE6500's 4 Gigabit Ethernet ports enable speedy and dependable wired connections to computers and other Internet-capable devices.
Linksys RE6500 Wifi Setup via manual method
When you buy a new AC1200 extender, a Linksys RE6500 manual is packaged with it. From start to finish, this manual offers a variety of setup procedures.You can quickly get your Linksys RE6500 extender up and running by following these basic setup instructions.
For many users, it can be hard to follow the steps for setting up in the Linksys RE6500 manual. Contacting our experts via live chat or email will help you install your Linksys AC1200 RE6500 WiFi range extender quickly and easily.They will correctly configure your extender and guide you through each step.
Consider the following procedures for Linksys RE6500 extender setup:
Connecting your RE6500 range extender into a power outlet will first turn it on.
Your PC or laptop has to be turned on and connected to the internet.
You'll see a new window open and be asked for the WiFi password.
After that, enter the password to continue.
Open any web browser on your laptop or computer.
visit the website extender.linksys.com.
You will now be given the default range extender login page.
Fill up the correct boxes with the user ID and password.
After that, click the bottom-side login button.
There will be a number of on-screen instructions. Just carefully follow them.
Note: If you need any assistance regarding your Linksys RE6500 AC1200 so contact our technician or visit the official website that is linksys extender setup.
Linksys RE6500 Range Extender Setup with the WPS button?
Follow these directions to configure your Linksys RE6500 using WPS:
The Linksys RE6500 AC1200 must first be turned on.
Put the RE6500 in the same location as the router.
The WPS button on the extender needs to be depressed.
Check to see if the LED lights on the RE6500 extender are blinking as they should.
The Linksys AC1200 extender is in a great place.
Finally prepared for wireless device synchronisation is the Linksys RE6500 WIFI Extender.
HOW DO I INSTALL MY LINKSYS RE6500 WIFI EXTENDER?
Installing the Linksys RE6500 comes after connecting the repeater to the power source.
the moment the extender's light begins to flash.
Connect your booster's cat5 or ethernet cable to the main router.
Open a browser on your laptop and type extender.linksys.com.
You are now on the WiFi booster installation page. Click "Start Setup" to begin.
Follow the directions to connect your AC1200 to the main network or modem.
Linksys AC1200 Troubleshooting Steps
Here are some suggestions for resolving Linksys RE6500 range Setup issues:
Use your laptop to connect to an installed AC1200 repeater.
Make sure that the Linksys RE6500 extender is connected to the power outlet properly.
The Linksys AC1200 Extender's firmware needs to be updated.
Avoid placing your extender near doors, aluminium studs, and other access points.
Check to see if each wire is operational.
To configure the RE6500, simply utilise the most recent version of your web browser.
Reset your extender first, then the power of the booster.
If you've forgotten or lost your default login credentials, consult the handbook.
Linksys RE6500 Extender Firmware Upgrade
To update the firmware on your Linksys RE6500 AC1200 extender,follow these steps:
Start by making sure the Linksys RE6500 is plugged into a power source.
Visit the extender.linksys.com website immediately.
Thank you; this is the repeater login page. Enter your login details.
After logging in, look for the Administration option, and then select Firmware Upgrade.
Click "Update Now" after selecting the most recent upgrade.
Before selecting "download," verify the version of your AC1200.
Download the latest recent version, then launch the file.
Your repeater has now received the most current security patch.
How do I reset the Linksys RE6500 extender?
Have issues with irregular wireless connections even after setting up your Linksys extender RE6500? The extender.linksys.com RE6500 web-based setup page is not accessible. If so, reset the factory settings on your Linksys extender. There is a Linksys RE6500 reset that can fix any technical issues with your range extender.
Using the Reset button and the initial Linksys range extender setup, the RE6500 web page can be used to reset the Linksys RE6500.
To reset your Linksys RE6500 extender, follow these steps:
Upon your Linksys RE6500 AC1200 dual-band range extender, locate the Reset button.
Your extender can have a Reset button on the bottom panel or the back.
Continue to hold down the reset button.
To finish the reset of the Linksys RE6500, restart your WiFi range extender.
Linksys RE6500 Extender Reset with using web browser
Here's how to use the web-based interface to reset your Linksys extender RE6500:
Launch the most commonly used web browser.
Visit the RE6500 web-based setup page at extender.linksys.com.
Once you've logged in to your extender, select Factory Defaults.
The Restore Factory Defaults button should be clicked.
Power cycle your extender once more to complete the Linksys RE6500 reset procedure.
#linksys RE6500 setup#linksys re6500 extender setup#extender.linksys.com#linksys wifi extender setup
0 notes
Text
#linksys wifi extender setup#linksys setup#linksys range extender setup#linksys velop red light#linksys extender setup#linksys#li
0 notes
Text
How to Fix Linksys WiFi Extender Blinking Orange?
Unlike other routers, Linksys router has several LED lights. Each light indicates a specific meaning. Once you notice the status LED on your Linksys device, you can determine its performance easily. If you are experiencing a Linksys WiFi extender blinking orange light issue, you need not worry at all.
Once you delve into the information given in this blog post, you can be able to familiar with the factors responsible for these issues. Apart from this, you will also know about the most helpful troubleshooting tips to resolve the Linksys extender showing an orange light issue. So, let’s move ahead and go through the key details given.
Why is Linksys Extender Flashing Orange Light?
There are a few key factors that are accountable for the Linksys extender flashing orange error. All of them have been given below. Let’s have a glance at them.
Improper placement of your extender
Damaged Ethernet cables
Outdated firmware of your extender
Excessive distance between your router and extender
Incorrectly establish a connection between your router and modem
Defective wall socket
Incomplete hardware setup
Resolving the Flashing Orange Light on Linksys Extender
To enable you to fix the Linksys extender flashing orange light issue, we have given a few troubleshooting tips. Let’s have an overview of each tip carefully.
Check power supply
To ensure a stable internet connection, contact your internet service provider if the current connection is unstable, as it may cause an orange light issue with your extender.
Stable internet connection
For confirming a stable internet connection, contact your internet service provider if the current connection is unstable, as it may cause an orange light issue with your extender.
Install the latest version firmware
In some cases, outdated firmware on your networking device can cause the LED lights on your extender to display orange lights, indicating the need for a firmware update.
Locate the extender at a central location
For fixing an orange light issue with your Linksys extender, locate it halfway to your workplace and avoid metal appliances near it, as improper placement can cause issues.
Power cycling
To power cycle your Linksys extender, remove all cables, press the power button, remove the power plug, and plug it back into the wall socket to fix the orange light issue.
Linksys Extender reset
For resolving an orange light issue with your extender, press and hold the reset button for 15 seconds, release when LED lights flash, and wait patiently.
Wrapping-up,
Hopefully, after taking a deep dive into the information given in this blog post, you will come to know about the reasons and key fixes related to Linksys WiFi extender blinking orange light issue.
Are you experiencing an orange light issue with your Linksys extender? It will be best for you to get in touch with our expert team members, who will guide you for your every query!
#Linksys Extender Blinking Orange#Linksys WiFi Extender Flashing Orange Light#Linksys Flashing Orange#Linksys#Extender#WiFi#Internet#USA#Canada#Australia#florida
0 notes
Text
0 notes