#LetsEncrypt
Explore tagged Tumblr posts
Text
Install Lets Encrypt Certificate on Windows with Certbot
Install Lets Encrypt Certificate on Windows with Certbot
Install Lets Encrypt Certificate on Windows with Certbot Let’s Encrypt provides free, trusted SSL certificates, widely accepted by many authorities and browsers. The certificates are signed by the Internet Security Research Group (ISRG) Root X1, ensuring a high level of trust. Certbot, a command-line tool developed in Python, makes it easy to request and renew these certificates from Let’s…
#Certificates#Import certificates#Let&039;s Encrypt#Lets Encrypt#Lets&039;s Encrypt#LetsEncrypt#Microsoft Windows#ssl certificate#Windows#Windows 10#Windows 11#Windows Server#Windows Server 2012#Windows Server 2016#Windows Server 2019#Windows Server 2022#Windows Server 2025#X.509 certificates
0 notes
Photo
WordPress: 6 Step Setting Up a Secure and Optimized Website on Nginx
0 notes
Text
Unlocking the Power of SSL Wildcard Certificates: How to Use WSL and Ubuntu Image to Secure Your Synology DSM
In the realm of web security, SSL (Secure Sockets Layer) certificates play a pivotal role. They provide an encrypted link between a web server and a browser, ensuring all data passing between the two remains private and secure. Within the family of SSL certificates, a powerhouse stands out – the SSL Wildcard Certificate. As the name suggests, this certificate covers not only a single domain but all its subdomains too, making it a versatile and cost-effective solution for businesses with a wide web presence.
The SSL Wildcard Certificate is represented by an asterisk () before the domain name. This wildcard notation allows the certificate to secure unlimited subdomains under the primary domain. For instance, if a certificate is issued to ".domain.com," it will secure "mail.domain.com," "login.domain.com," "blog.domain.com," and so forth without needing separate certificates for each.
But what happens when you want to secure your Synology DiskStation Manager (DSM)? This is where the power of an SSL Wildcard Certificate shines. By integrating it with your Synology DSM, you can ensure comprehensive security across all your Synology services.
Why SSL Wildcard Certificates are Important for Securing Synology DSM
Synology DSM is a robust and versatile operating system for Synology NAS (Network Attached Storage) devices, allowing users to manage and protect their data efficiently. However, like all systems connected to the internet, it is vulnerable to cyber threats. This is why securing your Synology DSM with an SSL Wildcard Certificate is essential.
When you use an SSL Wildcard Certificate, you're not just securing one service or domain; you're securing all your subdomains under one umbrella. This means that whether you're accessing your files via FileStation, managing emails through MailPlus, or sharing photos via Moments, your connection is secure. This universal coverage reduces the risk of cyberattacks, data breaches, and identity theft.
Moreover, an SSL Wildcard Certificate helps in building trust with your users. It validates your identity, proving to your users that they are indeed interacting with a secure, authentic Synology DSM. This boosts user confidence and can lead to increased user engagement.
Understanding the Basics of Let's Encrypt and Synology Let's Encrypt
To create an SSL Wildcard Certificate, we turn to Let's Encrypt, a free, automated, and open Certificate Authority (CA). The magic of Let's Encrypt lies in its simplicity and automation. It provides domain-validated certificates, including wildcard certificates, using an automated process designed to eliminate the current complex process of manual creation, validation, signing, and installation of certificates for secure websites.
Synology DSM supports Let's Encrypt natively. This means that you can request, renew, and manage your SSL certificates from Let's Encrypt directly within the DSM interface. However, for wildcard certificates, the process is slightly more complicated as it requires DNS validation. This is where the Windows Subsystem for Linux (WSL) and Ubuntu Image come into play.
Step-by-step Guide to Creating a Wildcard Certificate with Let's Encrypt
Creating a wildcard certificate with Let's Encrypt involves a few steps. First, you need to set up the Windows Subsystem for Linux (WSL) on your Windows machine. This requires a few steps, including enabling the WSL feature, downloading a Linux distribution (like Ubuntu) from the Microsoft Store, and setting up a new Linux instance.
Once you have WSL and Ubuntu set up, you can proceed to install Certbot, a tool designed to simplify the process of obtaining and managing Let's Encrypt certificates. With a few commands in the Ubuntu terminal, you can install Certbot and its DNS plugin for your DNS provider, which will be used to automate the DNS validation process required for issuing a wildcard certificate.
After setting up Certbot, the final step is to generate your wildcard certificate. This involves running a command that tells Certbot to request a wildcard certificate for your domain, using the DNS plugin to handle the required validation. Upon successful validation, Let's Encrypt will issue your wildcard certificate, which you can then find in the specified directory on your Linux instance.
Using WSL (Windows Subsystem for Linux) and Ubuntu Image for Certificate Creation
Using WSL and Ubuntu Image is a powerful way to create an SSL wildcard certificate. WSL allows you to run a Linux environment directly on Windows, without the need for a dual-boot setup or virtual machine. This means you can use Linux tools, like Certbot, on your Windows machine, making the process of creating a wildcard certificate much simpler and more efficient.
On the other hand, the Ubuntu Image provides a full-fledged Ubuntu environment, complete with a command-line interface. This means you can run Ubuntu commands directly on your Windows machine, providing further flexibility and efficiency when it comes to creating your wildcard certificate.
Together, WSL and Ubuntu Image provides a powerful, streamlined platform for creating SSL wildcard certificates. They provide all the tools and capabilities you need, all within a familiar Windows environment, reducing the complexity and time required to secure your Synology DSM.
Configuring Your Synology DSM for SSL Wildcard Certificate Installation
Once you've created your wildcard certificate using WSL and Ubuntu Image, the next step is to configure your Synology DSM for its installation. This involves uploading the certificate to your DSM and assigning it to your services.
First, you need to log into your DSM and navigate to the Control Panel, then to Security, and finally to the Certificate tab. Here, you can upload your new wildcard certificate, which consists of the certificate itself, its private key, and the chain of trust.
After uploading the certificate, you need to assign it to your services. This means telling your DSM which services should use the new wildcard certificate. By assigning the wildcard certificate to all your services, you ensure that they are all secured with the same, consistent level of encryption.
Testing and Verifying the SSL Wildcard Certificate
After installing the SSL wildcard certificate on your Synology DSM, it's important to test and verify that it's working correctly. This involves checking that all your services are accessible via HTTPS and that no security warnings are shown when accessing them.
To test your certificate, simply try accessing your services using their HTTPS URLs. For example, if you have a service at "mail.domain.com," try accessing "https://mail.domain.com." If the page loads without any security warnings, then your wildcard certificate is working correctly.
Additionally, you can use online SSL checkers to verify your certificate. These tools will check the validity of your certificate and its chain of trust, ensuring that it's correctly installed and trusted by browsers.
Troubleshooting Common Issues During the Certificate Installation Process
Despite the simplicity and automation provided by Let's Encrypt, WSL, and Ubuntu Image, you may still encounter issues during the certificate installation process. The most common issues include validation failures, certificate upload problems, and certificate assignment errors.
Validation failures occur when Let's Encrypt is unable to verify your domain ownership. This usually happens due to incorrect DNS settings. To resolve this issue, double-check your DNS settings and make sure that they match what's required by Let's Encrypt for DNS validation.
Certificate upload problems, on the other hand, occur when you're unable to upload your certificate to your Synology DSM. This can happen due to incorrect file formats or permissions. To resolve this issue, ensure that your certificate files are in the correct format (PEM) and that they have the correct permissions (readable by the DSM).
Finally, certificate assignment errors occur when you're unable to assign your certificate to your services. This usually happens due to incorrect service settings. To resolve this issue, double-check your service settings and make sure that they allow for custom SSL certificates.
Benefits and Advantages of Using SSL Wildcard Certificates for Synology DSM
The benefits and advantages of using SSL Wildcard Certificates for Synology DSM are numerous. First and foremost, they provide a high level of security. By securing all your subdomains with a single certificate, you ensure that all your services are protected with the same level of encryption, reducing the risk of cyberattacks and data breaches.
Second, SSL Wildcard Certificates are cost-effective. Instead of purchasing individual certificates for each of your subdomains, you can secure all of them with a single certificate, saving money and reducing administrative overhead.
Finally, SSL Wildcard Certificates are versatile. They can be used with any service on your Synology DSM, providing a flexible and scalable solution for securing your data and services.
Final Thoughts
In conclusion, securing your Synology DSM with an SSL Wildcard Certificate is a powerful and efficient way to protect your data and services. By leveraging the power of Let's Encrypt, WSL, and Ubuntu Image, you can create and install your wildcard certificate, ensuring a high level of security across all your subdomains.
While the process may seem complex at first, the benefits and advantages of using SSL Wildcard Certificates for Synology DSM far outweigh the initial learning curve. They provide a high level of security, are cost-effective, and offer unmatched versatility, making them an ideal solution for any Synology DSM user.
So, don't wait. Harness the power of SSL Wildcard Certificates today and protect your Synology DSM with the security it deserves.
John
0 notes
Text
ok since i've been sharing some piracy stuff i'll talk a bit about how my personal music streaming server is set up. the basic idea is: i either buy my music on bandcamp or download it on soulseek. all of my music is stored on an external hard drive connected to a donated laptop that's next to my house's internet router. this laptop is always on, and runs software that lets me access and stream my any song in my collection to my phone or to other computers. here's the detailed setup:
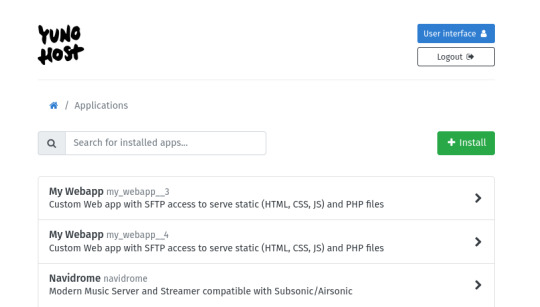
my home server is an old thinkpad laptop with a broken keyboard that was donated to me by a friend. it runs yunohost, a linux distribution that makes it simpler to reuse old computers as servers in this way: it gives you a nice control panel to install and manage all kinds of apps you might want to run on your home server, + it handles the security part by having a user login page & helping you install an https certificate with letsencrypt.
***
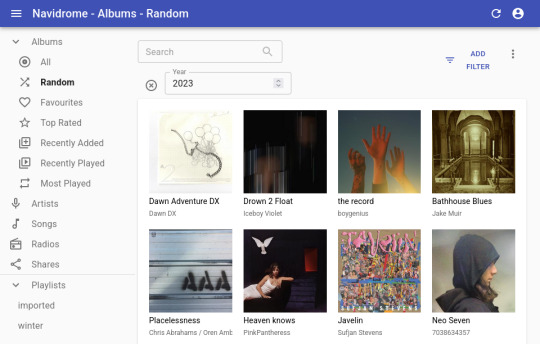
to stream my music collection, i use navidrome. this software is available to install from the yunohost control panel, so it's straightforward to install. what it does is take a folder with all your music and lets you browse and stream it, either via its web interface or through a bunch of apps for android, ios, etc.. it uses the subsonic protocol, so any app that says it works with subsonic should work with navidrome too.
***
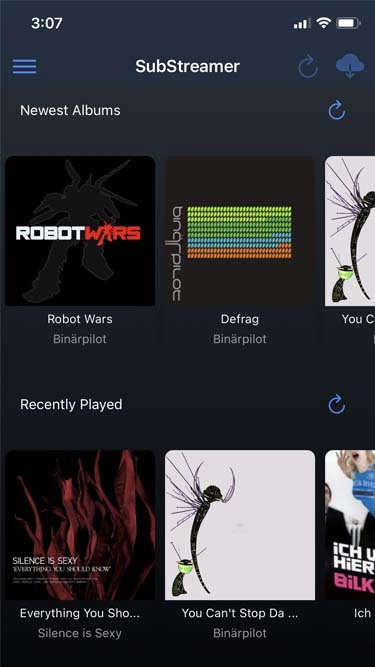
to listen to my music on my phone, i use DSub. It's an app that connects to any server that follows the subsonic API, including navidrome. you just have to give it the address of your home server, and your username and password, and it fetches your music and allows you to stream it. as mentionned previously, there's a bunch of alternative apps for android, ios, etc. so go take a look and make your pick. i've personally also used and enjoyed substreamer in the past. here are screenshots of both:

***
to listen to my music on my computer, i use tauon music box. i was a big fan of clementine music player years ago, but it got abandoned, and the replacement (strawberry music player) looks super dated now. tauon is very new to me, so i'm still figuring it out, but it connects to subsonic servers and it looks pretty so it's fitting the bill for me.

***
to download new music onto my server, i use slskd which is a soulseek client made to run on a web server. soulseek is a peer-to-peer software that's found a niche with music lovers, so for anything you'd want to listen there's a good chance that someone on soulseek has the file and will share it with you. the official soulseek client is available from the website, but i'm using a different software that can run on my server and that i can access anywhere via a webpage, slskd. this way, anytime i want to add music to my collection, i can just go to my server's slskd page, download the files, and they directly go into the folder that's served by navidrome.
slskd does not have a yunohost package, so the trick to make it work on the server is to use yunohost's reverse proxy app, and point it to the http port of slskd 127.0.0.1:5030, with the path /slskd and with forced user authentification. then, run slskd on your server with the --url-base slskd, --no-auth (it breaks otherwise, so it's best to just use yunohost's user auth on the reverse proxy) and --no-https (which has no downsides since the https is given by the reverse proxy anyway)

***
to keep my music collection organized, i use beets. this is a command line software that checks that all of the tags on your music are correct and puts the file in the correct folder (e.g. artist/album/01 trackname.mp3). it's a pretty complex program with a ton of features and settings, i like it to make sure i don't have two copies of the same album in different folders, and to automatically download the album art and the lyrics to most tracks, etc. i'm currently re-working my config file for beets, but i'd be happy to share if someone is interested.
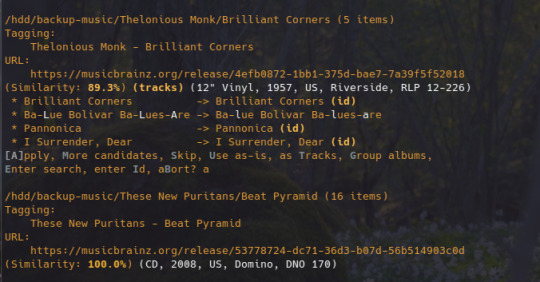
that's my little system :) i hope it gives the inspiration to someone to ditch spotify for the new year and start having a personal mp3 collection of their own.
28 notes
·
View notes
Link
For $5 you can get your own domain name. You can get a free certificate from letsencrypt. There are many dynamic DNS updaters that are functionally free, I use zoneedit. From there you can install your own email and simple file servers for pretty much all your real world needs.
This is by no means easy, I don't have any guides to help you, but it is possible and worth it. If you don't have a computer permanently connected to the internet you can get a cheap $10 single board computer (like an old Raspberry Pi) and set that up instead.
Writer tries to use the internet without relying on Amazon, Facebook, Google, Microsoft, or Apple. Writer struggles. A lot. Not because she can’t stop googling things, but because Google is integrated with everything, and anything it isn’t is hooked into is partnered with at least one of the other four.
For an example, she details the long process of figuring out how to send a large file without relying on the Google iCloud or Amazon Web Services:
My Gmail alternatives—ProtonMail and Riseup—tell me the file is too large; they tap out at 25 MB. Google Drive and Dropbox aren’t options, Dropbox because it’s hosted by Amazon’s AWS and relies on Google for sign-in. Other file-sharing sites also rely on the tech giants for web hosting services.
…O’Brien directs me first to Send.Firefox.com, an encrypted file-sharing service operated by Mozilla. But… it uses the Google Cloud, so it won’t load. O’Brien then sends me to Share.Riseup.net, a file-sharing service from the same radical tech collective that is hosting my personal email, but it only works for files up to 50 MB.
O’Brien’s last suggestion is Onionshare, a tool for sharing files privately via the “dark web,” i.e. the part of the web that’s not crawled by Google and requires the Tor browser to get to. I know this one actually. My friend Micah Lee, a technologist for the Intercept, made it. Unfortunately, when I go to Onionshare.org to download it, the website won’t load.
“Hah, yes,” emails Micah when I ask about it. “Right now it’s hosted by AWS.”
The troubling implications of tech monopolies on our private data are discussed, as well as potential solutions that don’t sound very appealing at all:
An uncomfortable idea I keep coming up against this week is that, if we want to get away from monopolies and surveillance economies, we might need to rethink the assumption that everything on the internet should be free.
So when I try to create a fourth folder in ProtonMail to organize my email and it tells me that I need to upgrade from a free to a premium account to do so, I decide to fork over 48 euros (about $50) for the year. In return, I get a 5 GB email account that doesn’t have its contents scanned and monetized.
However, I’m well aware that not everyone has $50 dollars to spare for something that they can easily get for “free,” so if that’s the way things go, the rich will have privacy online and the poor (and most vulnerable) will have their data exploited.
32K notes
·
View notes
Text
Bảo Mật Website Với Chứng Chỉ SSL Miễn Phí – An Toàn & Tiết Kiệm!
Chứng chỉ SSL giúp bảo mật dữ liệu người dùng, tăng độ tin cậy và c��i thiện SEO cho website. Nếu bạn muốn bảo mật website mà không tốn kém, SSL miễn phí là lựa chọn hoàn hảo!
✅ Lợi ích SSL miễn phí:
Mã hóa dữ liệu, bảo vệ thông tin người dùng.
Cải thiện thứ hạng SEO.
Xây dựng lòng tin với người truy cập.
Miễn phí, dễ dàng cài đặt.
📌 Nhà cung cấp uy tín: Let’s Encrypt, Cloudflare, ZeroSSL.
👉 Xem bài viết đầy đủ tại đây: https://hostmastercom.wordpress.com/2024/11/26/tong-quan-ve-chung-chi-ssl-mien-phi-nhung-dieu-ban-can-biet/
#SSL #BaoMatWebsite #HTTPS #LetsEncrypt #Cloudflare #WebsiteSecurity
0 notes
Video
youtube
How to install PHP 8.4 + Nginx in Ubuntu 24 with SSL via Letsencrypt
0 notes
Text
Traefik with ACME in Kubernetes with LetsEncrypt Certificates
Traefik with ACME in Kubernetes with LetsEncrypt Certificates @vexpert #vmwarecommunities #traefik #kubernetes #acmessl #acmeprotocol #automatedcertificates #cloudflare #homelab #homeserver
One of the very cool things you can do with your Kubernetes cluster is have automated SSL certificates on your services. This makes managing SSL certificates extremely easy compared to manual methods using other means. However, setup in Kubernetes can be a little intimidating. Let’s take a look at how you can deploy Traefik with ACME in Kubernetes so that you can have automated SSL…
0 notes
Photo


See photos, news stories and more on my website at GlamGirlX.com (via Glam Girl X)
#django#html#javascript#css#python#beauty#https#letsencrypt#glamour#makeup#barcodescanner#bras#trans#transgirl
1 note
·
View note
Text
LetsEncrypt SSL Installation and Renewal for cPanel DNSOnly
The post LetsEncrypt SSL Installation and Renewal for cPanel DNSOnly first appeared on VPS Hosting Blog | Dedicated Servers | Reseller Hosting. The post LetsEncrypt SSL Installation and Renewal for cPanel DNSOnly first appeared on PressRelease.cc.
0 notes
Text
lol i lost my LetsEncrypt cert in September and had no idea until today..... thanks Obama
0 notes
Text
AWS LetsEncrypt Lambda or Why I Wrote a Custom TLS Provider for AWS Using OpenTofu and Go
http://securitytc.com/TDwNvf
0 notes
Text
Dehydrated: Letsencrypt/acme client implemented as a shell-script
https://github.com/dehydrated-io/dehydrated
0 notes
Text
theres literally a web server that will fetch down an ssl cert for you from letsencrypt if you have the DNS set up properly without any extra effort on your part so i find it extremely funny that tumblr talks about free SSL certificates there like it's a big deal. i have free ssl certificates bitch
0 notes