#LEDcontrollers
Explore tagged Tumblr posts
Text
BIG BIG rainbows on "Sparkle motion" WLED driver board 🌈💡
We got our WLED-friend PCBs
https://blog.adafruit.com/2024/12/02/leftovers-layout-wled-board-revision-a-completed/
and are testing it with various LED grids. First, we tried out a 16x16 NeoPixel grid that runs on 5V. Since that worked well, we're now onto a much bigger 60 x 60 grid - that's 3,600 LEDs! These are some NeoPixel pebble
netting samples we're also testing at the same time; each one has 20 x 60 pixels and uses 12V power, so it's a good test of the DC pass-through for higher voltages. Since WLED has a limit of 2000 pixels per output, this demo uses the three output ports that are then 'merged' together in memory to make a single large grid. We have more to test soon: the onboard IR receiver, USB PD, I2S microphone, extra I/O pins, and I2C, so watch for those videos as they come together. Coming soon -
#wled#neopixels#ledart#rgbleds#adafruit#electronics#makers#diyprojects#ledgrid#smartlighting#rainboweffects#ledcontroller#sparklemotion#leddisplay#electronicsprojects#makercommunity#ledsetup#custompcb#lightdesign#ledlife#ledtechnology#ledlighting#hobbyelectronics#technerd#creativeelectronics#ledmatrix#neopixelgrid#ledprojects#smartleds#techinnovation
64 notes
·
View notes
Text
youtube
Get Lollipop Flange Sign for your corporate offices and restaurant, shops, clinics, and other business.
Contact +91 92135 85333
https://slimsignage.com/service/sign-board-lollipop-flange/
#signage#LEDDisplay#ledsignage#signageanimator#animator#ledcontroller#neonsings#neonlights#rgblights#timer#pixel#bluetooth#dimmer#1stTimeInINDIA#ledboard#ledanimator#ledsignboard#glowsign#glowsignboard#leddisplayboard#ledflasher#signageflasher#signagecontroller#signageboard#ledmodule#animation#Youtube
0 notes
Text
16x16 LED Matrix am Arduino UNO

In diesem Beitrag möchte ich dir erläutern, wie du eine 16x16 LED Matrix an den Arduino UNO anschließt und programmierst.

16x16 LED Matrix am Arduino UNO Die LED Matrix mit MAX7219 Treiberchip habe ich dir bereits in einigen Beiträgen vorgestellt, hier soll es nun speziell um die 16x16 Version gehen. - Arduino Projekt: Temperaturanzeige auf einer 8x8 LED Matrix - Arduino Lektion 8: Max7219 8x8 LED Shield Das hier verwende Modul verfügt über 4 Stück von 8x8 LED Matrix Modulen, welche im Quadrat angeordnet sind.


Bezug der 16x16 LED Matrix
Das mir vorliegende Modul habe ich recht günstig über aliexpress.com gekauft, die Lieferzeit war hier wie bei diesem Shop bekannt recht lange. Du bekommst dieses Modul aber auch auf ebay.de. Zu dem Zeitpunkt wo ich den Beitrag schreibe ist dieses Modul leider nicht auf ebay.de erhältlich, daher kann ich dir keinen genauen Preis nennen.
Anschluss des 16x16 LED Matrix Moduls an den Arduino
Bevor ich dieses Modul anschließen konnte, musste ich zunächst eine 5polige Stiftleiste an die Platine löten. Auf der Platine gibt es diverse Stellen, wo man theoretisch diese Stiftleiste anlöten könnte, ABER es gibt für diese nur eine richtige Position. Um diese richtige Position zu bestimmen, müssen wir nur schauen, wo auf der Platine ein Pfeil mit "IN" steht. Problem hierbei, das auf der linken Seite des Moduls zwei Anschlüsse mit "IN" gibt, in meinem Fall habe ich den oberen der beiden verwenden müssen. Die Pins der LED Matrix werden wie nachfolgend aufgeführt mit dem Arduino verbunden: 16x16 LED MatrixArduino UNOVCC5 VGNDGNDDIND11CSD7CLKD13

Anordnung der LED Matrix Module
In der nachfolgenden Grafik habe ich einmal die LED Matrix Module nummeriert. Diese Anordnung benötigen wir für die Programmierung der gesamten Matrix!

Programmieren der 16x16 LED Matrix in der Arduino IDE 2.0
Kommen wir nun dazu, diese LED Matrix in der neuen Arduino IDE 2.0 zu programmieren. Installieren der benötigten Bibliothek Für das Ansteuern der LED Matrix Module benötigen wir eine Bibliothek. Diese können wir recht einfach über den Bibliotheksverwalter der Arduino IDE installieren. Wir müssen lediglich nach "ledControl" suchen und gleich der erste Eintrag "LedControl by Eberhard Fahle" ist die korrekte, welche wir installieren.


Wenn diese Bibliothek installiert wurde, erscheint der kleine Hinweis "INSTALLED" und wir können mit der Programmierung beginnen.
Beispielprogramm
Nachfolgend möchte ich dir ein kleines Beispielprogramm zeigen. Die Arrays mit den Daten kannst du mit meinem 16x16 LED Matrix - Generator recht einfach erstellen und hast somit keine Mühe diese zu erstellen. //Bibliothek zum ansteuern der LED Matrix //mit MAX7219 Treiberchip #include //Anschluss der LED Matrix an den Arduino int DIN = 11; int CS = 7; int CLK = 13; //Initialisieren eines Objektes vom Typ //LedControl mit den Pins und der Anzahl 4 //für die angeschlossenen LED Matrix Module LedControl lc = LedControl(DIN, CLK, CS, 4); //Konstante mit den maximalen Zeilen pro LED Matrix const int MAX_ROWS = 8; //Arrays mit den Daten pro Zeile byte matrixModul1 = { B01000001, B10000001, B00000010, B00000010, B11100100, B00001000, B00110000, B11000000 }; byte matrixModul2 = { B10000010, B10000001, B01000000, B01000000, B00100111, B00010000, B00001100, B00000011 }; byte matrixModul3 = { B11000000, B00110000, B00011000, B00000100, B00110010, B00110010, B00000001, B00000001 }; byte matrixModul4 = { B00000011, B00001100, B00011000, B00100000, B01001100, B01001100, B10000000, B10000000 }; void setup() { lc.shutdown(0, false); lc.shutdown(1, false); lc.shutdown(2, false); lc.shutdown(3, false); //setzen der Lichtintensität der LEDs lc.setIntensity(0, 6); lc.setIntensity(1, 6); lc.setIntensity(2, 6); lc.setIntensity(3, 6); //leeren der LED Matrix Module lc.clearDisplay(0); lc.clearDisplay(1); lc.clearDisplay(2); lc.clearDisplay(3); } //Funktion zum aktivieren der LEDs an //einem LED Matrix Modul void drawLine(int matrix, byte data) { for (int row = 0; row < MAX_ROWS; row++) { lc.setRow(matrix, row, data); } } void loop() { drawLine(0, matrixModul1); drawLine(1, matrixModul2); drawLine(2, matrixModul3); drawLine(3, matrixModul4); delay(5000); lc.clearDisplay(0); lc.clearDisplay(1); lc.clearDisplay(2); lc.clearDisplay(3); } Read the full article
0 notes
Video
youtube
led step stair controller US Canada Inventory #led #light #ledcontroller...
0 notes
Text

The Novastar VX600 all in one controller. A perfect partner for your LED screen can manage up to 3.9 million pixels. For queries, contact Jona LED [email protected] www.jonaled.com
#ledcontroller#ledcontrollers#controller#controllers#ledindoor#ledoutdoor#leddisplay#leddisplayscreen#ledwall#ledpanel#jonaled#novastar#delhi
3 notes
·
View notes
Text
Alles over LED Controllers en hun voordelen
LED Controller is nodig om meerkleurige LED-lampen en -strips te bedienen. Met deze controllers kun je eenvoudig schakelen tussen led-voeding en ledstrips en moeiteloos de lichtkleur kiezen of wijzigen al naar gelang je omgeving of behoefte.

Het is moeilijk om kleuren te beheren zonder uw andere werk te beïnvloeden, maar een LED-controller maakt deze moeilijke taak gemakkelijk en soepel. U kunt de kleur van uw LED-verlichting eenvoudig beheren zonder uw huidige werk te belemmeren.
LED Controllers bieden de mogelijkheid om de gewenste kleur nauwkeurig af te stemmen, kleurverlopen te genereren en de helderheid en schakelstatus van de verlichting te beheren.
Wat is een LED Controller en hoe kunt u hiervan profiteren?
Met de LED controller beheer je instellingen op de lichtbron via wifi of Bluetooth. Afhankelijk van de led-lichtbron kun je het licht dimmen of de fotonen schakelen naar donker of sprankelend om je omgeving rustig en gezellig te maken. Bovendien kan je de lichtkleur aanpassen aan de gelegenheid en festivals.
Met lichtkleur betekende het dat je het licht van warm naar wit kon schakelen; zoals u weet, kan warme verlichting u 's avonds een natuurlijk gevoel geven en ontspanning bevorderen. Als onderdeel van het natuurlijke circadiane ritme van de mens kan warm licht de omgeving kalmeren en ontspannen om u te ondersteunen bij het tot rust komen van de dag en u klaar te maken om te gaan slapen.
Daarnaast kunt u uw LED-kleur ook omschakelen naar koud wit, waardoor u dichter bij het daglicht komt dan een warm witte lamp. Deze felle kleur is het meest geschikt voor de drukkere en levendigere thuisomgeving, waar je iets fleurigers nodig hebt. Deze lampen zijn beroemd in keukens, bijkeukens, badkamers, kantoren en andere werkomgevingen.
De mogelijkheid om de meerkleurenfunctie te gebruiken, vereist een RGB LED-systeem, wat betekent dat je een RGB LED-controller nodig hebt om de kleuren te regelen. Bij het kiezen van een RGB LED controller word je overweldigd door alle beschikbare opties.
Om ervoor te zorgen dat u moeiteloos kunt bepalen welke RGB LED-controller het beste bij u past, volgen hieronder enkele basistypen RGB LED-controllers:
Soorten RGB LED controllers:
Standaard draadloze RGB LED-controllers - Met de meeste standaard RGB LED controllers kunt u de kleuren van uw RGB-LED's en hun helderheid aanpassen. Daarnaast kun je ook de snelheid waarmee de kleuren veranderen beheren in de dynamische modi die je hebt voorgeprogrammeerd.
Afstandsbediening met kleurenwiel - If you prefer to have proper remote access over your RGB LEDs, then you should look for a controller that has a color wheel. The color wheel is the most impressive controller part that will help you switch colors effortlessly. A color wheel makes it more accessible and quicker to select the color of your RGB LEDs since you can do so at the tip of your finger.
App afstandsbediening - Met sommige afstandsbedieningen kunt u de instellingen van uw RGB-LED's beheren via een app op uw smartphone. En deze functie biedt veel meer flexibiliteit en de mogelijkheid om controle te geven over uw RGB-LED's.
U moet onder de indruk zijn van de functies van LED controllers en u wilt ze zeker een keer proberen. Zo kun je terecht bij LEDw@re, de beste site om alle soorten LED's tegen redelijke prijzen aan te schaffen. U kunt deze site gemakkelijk vertrouwen, aangezien ze al vele jaren hun beste producten serveren.
0 notes
Video
youtube
LED controller with touch LCD
0 notes
Photo

LTECH TR-9-150-500-G1T CC flicker free dimmable driver supports triac leading edge and ELV trailing edge phase cut dimming. Equipped with soft-on and fade in function for a better visual experience.
#LIGHTDOCTOR#LTECHINDIA#LTECH#Triac#LedLight#homedecor#intelligentdriver#leddriver#ledcontroller#lightingsolutions
0 notes
Text

At QuartzComponents.com, our waterproof rope lights are designed to elevate your spaces with style and functionality. Whether you're looking to enhance your home's decor or create captivating atmospheres in hotels, offices, shopping malls, and restaurants, our versatile lights are the perfect choice. Don't miss out on the opportunity to add brilliance to your surroundings – shop now and let your creativity shine!
#ledstriplights#rgblighting#diyprojects#homedecor#partylights#festivaldecor#roomlighting#leds#electronicprojects#colorfullights#smartlighting#explorepage#lightingdesign#newproduct#homeimprovement#techprojects#interiordesign#creativelighting#ledcontrollers#customlighting#moodlighting#glowup#ledstripideas#lightingsolutions#ledtechnology#partydecor#ledinnovation#colorchanginglights#ledstripsforsale
1 note
·
View note
Text

mini Sparkle Motion prototype - a tiny, fully-featured WLED board ✨🔌📏💡🌈
We're doing a lot of serious testing with our WLED mega-board, code-name Sparkle Motion .
While doing some holiday lighting projects, we also wanted something slim enough to slip into any design. It still uses an ESP32 for the best support, with USB-serial programming, 5A fuse, 5V level shifting + 100 ohm series resistors for pixel drivers, user/reset buttons, a user LED and onboard neopixel, JST SH analog/digital connector, QT I2C connector, 4 GPIO plus power/ground breakouts, and USB type C power/data input.
However, this version is made simpler and less expensive by dropping the DC jack and USB PD support: it's only for 5V strips if you want to power them directly (you could still drive 12V or 24V pixels, but you'll need separate power for them). Instead of a full set of terminal blocks for 3 signals, we only have two outputs, and they have to share the power and ground pins. It could also be used for a single two-pin dotstar LED setup. We kept the built-in I2S mic but dropped the on-board IR sensor - if you want an IR sensor, you'll be able to plug it into the JST SH port with a simple cable or solder it into the breakout pads.
The trade-off is that it's much smaller and slimmer, especially when no terminal blocks are soldered in by default: only 1.2" long x 0.785" wide (~1 sq in) x 0.3" thick vs. the original's 2" x 1.3" (2.6 sq in) x 0.55". To get it that small, we went 4-layer to give us a nice big ground and 5V plane in the middle and double-sided assembly. Coming soon.
#sparklemotion#wled#esp32#neopixel#holidaylighting#ledprojects#makers#electronics#prototyping#hardwaredesign#usbtypec#qtconnector#gpio#micromaker#slimdesign#techinnovation#ledcontroller#openhardware#adafruit#diylighting#iotprojects#esp32projects#compactdesign#ledenthusiast#holidaydecor#iotmaker#makercommunity#hardwarehacks#tinytech#ledlights
30 notes
·
View notes
Photo

Testing with the #bromptonledsystem #bromptontechnoloy #R2receivercard #ledcontrol #ledscreencontrol #leddisplay #doitvision #leddisplayboard #rentalandfixed #indoor #outdoorscreen www.doitvision.com https://www.instagram.com/p/B-Pa5nzHQ8H/?igshid=89vzqpn8g44u
#bromptonledsystem#bromptontechnoloy#r2receivercard#ledcontrol#ledscreencontrol#leddisplay#doitvision#leddisplayboard
0 notes
Text
Bewegungen mit 16x16 LED Matrix am Arduino UNO
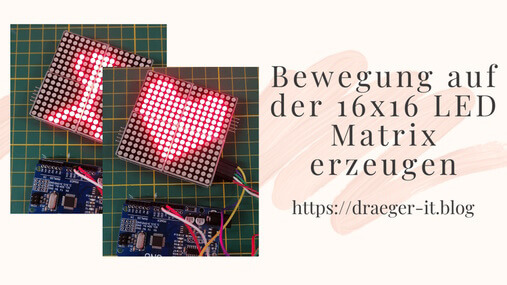
In diesem Beitrag möchte ich dir zeigen, wie du einfache Bewegungen auf einer 16x16 LED Matrix mit dem Arduino UNO programmierst.
Bewegungen mit 16x16 LED Matrix am Arduino UNO Im letzten Beitrag zur hier verwendeten LED Matrix habe ich dir bereits gezeigt, wie diese an den Arduino UNO angeschlossen und programmiert wird. Hier soll es nun darum gehen, wie du einfache Bewegungen auf der Matrix anzeigst. Vorweg, richtige Videos werden sich auf der Matrix nicht anzeigen lassen. Aber man kann mit meinem Generator kleine "Daumenkino" Bilder erzeugen, welche mit dem richtigen Intervall in Bewegung umgesetzt werden können.
Benötigte Ressourcen für den Aufbau
Um die nachfolgenden Beispiele nachzubauen, benötigst du: - einen Mikrocontroller Bsp Arduino UNO, - ein passendes USB-Datenkabel, - eine 16x16 LED Matrix, - fünf Breadboardkabel, männlich - weiblich, 20 cm
Anschluss der 16x16 LED Matrix an den Arduino UNO
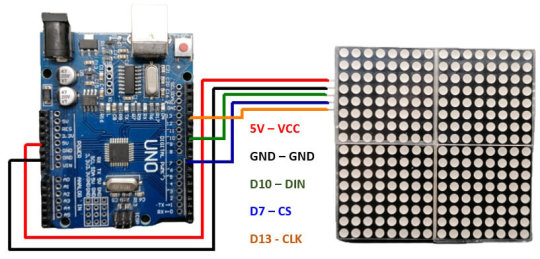
Hier die Grafik, wie du die LED Matrix an den Arduino anschließen kannst.
16x16 LED Matrix Generator
Der kleine Generator ist sehr einfach gehalten, du hast die vier LED Matrix Module mit den entsprechenden LEDs, welche du mit der Maus anklicken kannst, die Farbe ändert sich dann von Rot auf Grau. Du kannst einstellen, ob du nur die Arrays erzeugen lassen möchtest, oder das komplette Programm.

Mit der Schaltfläche "CODE GENERIEREN" wird, wie es sich erahnen lässt, der Code erzeugt, die Schaltfläche "LÖSCHEN" setzt alle LEDs auf den default / deaktiviert.
Programm für ein Daumenkino
Da nicht jede kleine Animation gleich viel Bilder hat, habe ich das Programm sehr dynamisch aufgebaut. #include const int DIN = 11; const int CS = 7; const int CLK = 13; const int NUM_MATRIX_MODULE = 4; LedControl matrix = LedControl(DIN, CLK, CS, NUM_MATRIX_MODULE); const int BRIGHTNESS = 6; const int NUM_IMAGES = 3; const int MAX_ROWS = 8; byte data = { { //Arrays mit den Bildern }; void setupMatrixModul(int modulIndex) { matrix.shutdown(modulIndex, false); matrix.setIntensity(modulIndex, BRIGHTNESS); matrix.clearDisplay(modulIndex); } void setup() { for (int i = 0; i < NUM_MATRIX_MODULE; i++) { matrix.shutdown(i, false); matrix.setIntensity(i, BRIGHTNESS); matrix.clearDisplay(i); } } void drawMatrix(int modul, byte data) { for (int row = 0; row < MAX_ROWS; row++) { matrix.setRow(modul, row, data); } } void loop() { for (int image = 0; image < NUM_IMAGES; image++) { for (int i = 0; i < NUM_MATRIX_MODULE; i++) { drawMatrix(i, data); } delay(250); } for (int image = NUM_IMAGES-1; image >= 0; image--) { for (int i = 0; i < NUM_MATRIX_MODULE; i++) { drawMatrix(i, data); } delay(250); } }
Erzeugen eines pulsierenden Herzens mit dem Generator
Wie erwähnt, kann man mit dem Generator kleine Bilder erzeugen bzw. Arrays für das Programm. Hier meine Lösung zu den Herzen.

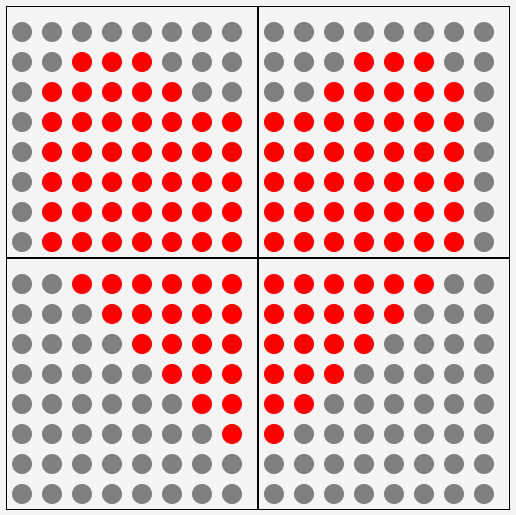
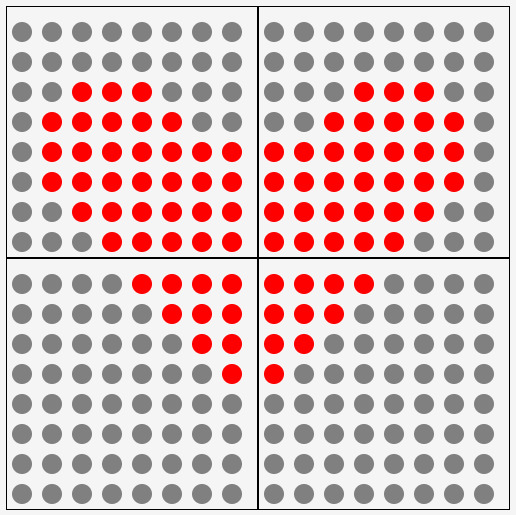
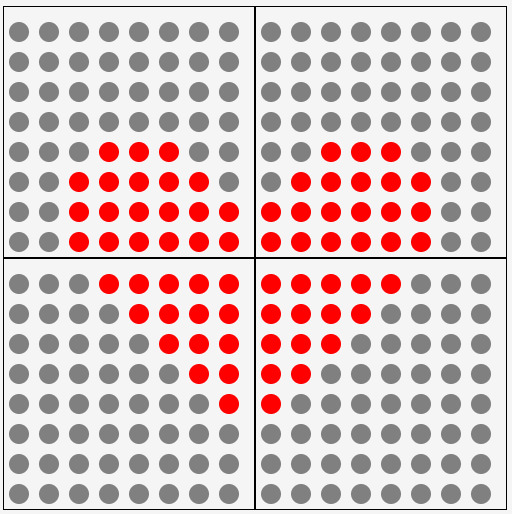

Die Arrays für die Bilder sind folgendermaßen: // Bild - 1 byte matrixModul1 = {B11111110,B11111100,B11111000,B11110000,B11100000,B11000000,B10000000,B00000000}; byte matrixModul2 = {B01111111,B00111111,B00011111,B00001111,B00000111,B00000011,B00000001,B00000000}; byte matrixModul3 = {B00111000,B01111100,B11111110,B11111111,B11111111,B11111111,B11111111,B11111111}; byte matrixModul4 = {B00011100,B00111110,B01111111,B11111111,B11111111,B11111111,B11111111,B11111111}; // Bild - 2 byte matrixModul1 = {B11111100,B11111000,B11110000,B11100000,B11000000,B10000000,B00000000,B00000000}; byte matrixModul2 = {B00111111,B00011111,B00001111,B00000111,B00000011,B00000001,B00000000,B00000000}; byte matrixModul3 = {B00000000,B00011100,B00111110,B11111110,B11111110,B11111110,B11111110,B11111110}; byte matrixModul4 = {B00000000,B00111000,B01111100,B01111111,B01111111,B01111111,B01111111,B01111111}; // Bild - 3 byte matrixModul1 = {B11110000,B11100000,B11000000,B10000000,B00000000,B00000000,B00000000,B00000000}; byte matrixModul2 = {B00001111,B00000111,B00000011,B00000001,B00000000,B00000000,B00000000,B00000000}; byte matrixModul3 = {B00000000,B00000000,B00011100,B00111110,B11111110,B11111110,B11111100,B11111000}; byte matrixModul4 = {B00000000,B00000000,B00111000,B01111100,B01111111,B01111111,B00111111,B00011111}; // Bild - 4 byte matrixModul1 = {B11111000,B11110000,B11100000,B11000000,B10000000,B00000000,B00000000,B00000000}; byte matrixModul2 = {B00011111,B00001111,B00000111,B00000011,B00000001,B00000000,B00000000,B00000000}; byte matrixModul3 = {B00000000,B00000000,B00000000,B00000000,B00111000,B01111100,B11111100,B11111100}; byte matrixModul4 = {B00000000,B00000000,B00000000,B00000000,B00011100,B00111110,B00111111,B00111111}; // Bild - 5 byte matrixModul1 = {B11111100,B11111000,B11110000,B11100000,B11000000,B10000000,B00000000,B00000000}; byte matrixModul2 = {B00111111,B00011111,B00001111,B00000111,B00000011,B00000001,B00000000,B00000000}; byte matrixModul3 = {B00000000,B00000000,B00000000,B00000000,B00000000,B00111000,B01111100,B11111100}; byte matrixModul4 = {B00000000,B00000000,B00000000,B00000000,B00000000,B00011100,B00111110,B00111111}; Download Damit du den Code nicht abtippen / kopieren musst, hier der Code zum einfachen Download. 16x16 LED Matrix - pulsierendes HerzHerunterladen
Erzeugen eines Hampelmanns mit dem Generator
Als weitere Animation kann man einen kleinen Hampelmann erzeugen. Hierzu erzeuge ich eine kleine Animation mit 3 Bildern.
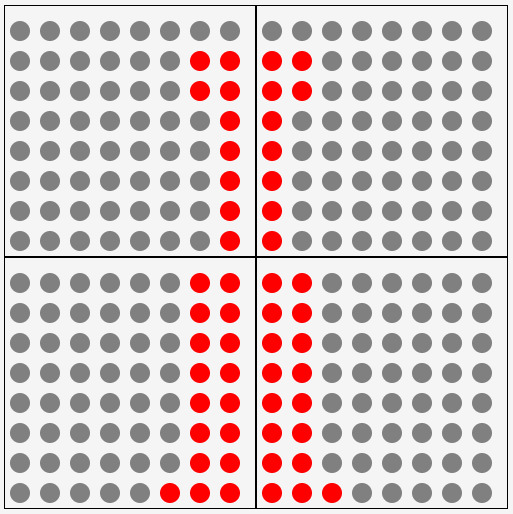

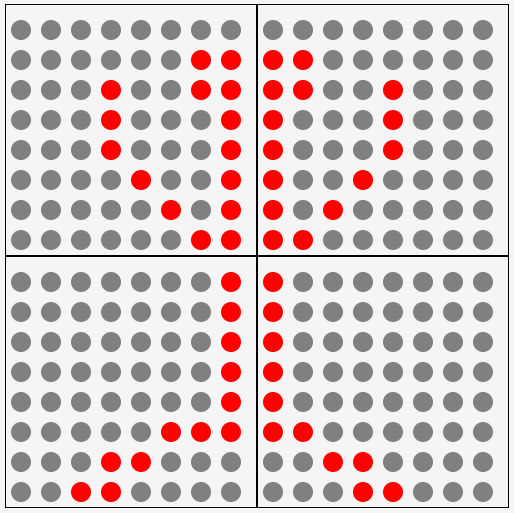
Der Code für die Bilder ist wie folgt: byte matrixModul1 = {B11000000,B11000000,B11000000,B11000000,B11000000,B11000000,B11000000,B11100000}; byte matrixModul2 = {B00000011,B00000011,B00000011,B00000011,B00000011,B00000011,B00000011,B00000111}; byte matrixModul3 = {B00000000,B11000000,B11000000,B10000000,B10000000,B10000000,B10000000,B10000000}; byte matrixModul4 = {B00000000,B00000011,B00000011,B00000001,B00000001,B00000001,B00000001,B00000001}; //Bild - 2 byte matrixModul1 = {B10100000,B10010000,B10001000,B10000100,B10000000,B11000000,B01100000,B00110000}; byte matrixModul2 = {B00000101,B00001001,B00010001,B00100001,B00000001,B00000011,B00000110,B00001100}; byte matrixModul3 = {B00000000,B11000000,B11000000,B10000000,B10000000,B10000000,B10000000,B11000000}; byte matrixModul4 = {B00000000,B00000011,B00000011,B00000001,B00000001,B00000001,B00000001,B00000011}; //Bild - 3 byte matrixModul1 = {B10000000,B10000000,B10000000,B10000000,B10000000,B11000000,B00110000,B00011000}; byte matrixModul2 = {B00000001,B00000001,B00000001,B00000001,B00000001,B00000111,B00011000,B00110000}; byte matrixModul3 = {B00000000,B11000000,B11001000,B10001000,B10001000,B10010000,B10100000,B11000000}; byte matrixModul4 = {B00000000,B00000011,B00010011,B00010001,B00010001,B00001001,B00000101,B00000011}; Download Damit du den Code nicht abtippen / kopieren musst, hier der Code zum einfachen Download. 16x16 LED Matrix - HampelmannHerunterladen Read the full article
0 notes
Text

Novastar VX1000, the most liked all in one controller will be available for demo at Palm Expo 2022. Visit for the exclusive products by Novastar and Jona LED.
Booth No. D 45 26 - 28 May 2022 Bombay Exhibition Centre, Goregaon(E), Mumbai, India
www.jonaled.com
#novastar#vx1000#led#ledscreencontroller#controller#ledcontroller#ledcontrollers#bestcontroller#controllerplayer#leddisplay#leddisplays#leddisplayscreen#ledpanel#ledscreen#ledscreens#display#displaydesign#displays#screen#displaysolutions#jonaled#screensolutions#ledsolutions#displaypanel#ledvideowall
0 notes
Text
Redenen om LED Spot Verlichting als uw Eerste Keuze te Kiezen!
LED spot verlichting is een belangrijk onderdeel van elk huis. Of je nu glamour wilt toevoegen, je inrichting wilt bijwerken of je kamer groter wilt laten lijken, vertrouw ons; schijnwerpers kunnen het allemaal! Van dof witte gloeilampen tot van kleur veranderende LED-panelen, deze armaturen bieden voor elk wat wils tegen betaalbare prijzen. Ze schitteren in een regenboogspectrum over muren en plafonds.
Stel dat u graag risico's neemt met trends, maar hulp wilt bij het kiezen van kleuren voor het opknappen van uw kantoor, woninginrichting, enz. In dat geval zijn er ook RGB-afstandsbedieningen op de markt waarmee gebruikers van stemming kunnen veranderen door simpelweg op knoppen te drukken. Het lijkt alsof de gebruiker thuis DJ speelt - een leuk element om thuis met kinderen te hebben.
Afhankelijk van de gebruikersvereisten, varieert het productgebruik van LED-spots. Voor wie zijn eettafel mooi verlicht wil hebben, is het aan te raden om voor de vorm van een elektrische kroonluchter te gaan. Dit komt omdat ze meestal zijn uitgerust met slechts één type, maar met meerdere bronnen waaruit u kunt kiezen. Bovendien zijn ze verstelbaar, het maakt niet uit hoeveel ruimte er is tussen de couverts van elk diner! Bezoek Hier: - https://ledverlichtingspots.blogspot.com/2022/11/redenen-om-led-spot-verlichting-als-uw.html
0 notes
Photo


Для вас открыт наш шоу-рум!💡✨ Вы можете прийти в нам в гости, пообщаться с нашими менеджерами, посмотреть и выбрать освещение, которое соответствует Вашим критериям! ☑Мы бесплатно проведем подбор и расчёт стоимости оборудования для любого проекта. 📌г. Москва, Ибрагимова д.12, офис №3 📍По всем интересующим вас вопросам, обращайтесь к нашим менеджерам: 8 (800) 222 02 34 или пишите на почту: [email protected] #светодиодноеоборудование #длядизайнера #освещение #подсветка #светильники #design #light #москва #лампы #arilght #led #светильники #светодизайн #arlightmoscow #арлайтмосква #ledcontrol
1 note
·
View note
Text
The Recursive LedControl Counter

2 weeks ago I posted a small clip on my Instagram which showed a MAX7219 counter demo. Using this 8 digit, 7 segment display is pretty straight forward, but some people asked me how I printed the incremetal counter, since the MAX7219 LedControl library only allows you to print one digit at a time ...
Displaying a counter is probably the first task you want to try out if you get your hands on the MAX7219 displays. I must admit I was pretty surprised that the LedControl library did not support this by default.
I was even more surprised that they showed a 30 line example to display a 3 digit number:
void printNumber(int v) { int ones; int tens; int hundreds; boolean negative; if(v < -999 || v > 999) return; if(v<0) { negative=true; v=v*-1; } ones=v%10; v=v/10; tens=v%10; v=v/10; hundreds=v; if(negative) { //print character '-' in the leftmost column lc.setChar(0,3,'-',false); } else { //print a blank in the sign column lc.setChar(0,3,' ',false); } //Now print the number digit by digit lc.setDigit(0,2,(byte)hundreds,false); lc.setDigit(0,1,(byte)tens,false); lc.setDigit(0,0,(byte)ones,false); }
Time to come up with a better solution!
Of course there are countless (no pun intended) ways to accomplish the desired effect: printing a multiple digit number by calling one function.
The approach I choose, uses recursion: a method where the solution to a problem depends on solutions to smaller instances of the same problem.
If you are a beginner in the Arduino (or programming) world, this might sound a bit overwhelming, but in this case it simply means that the function calls itself until the main task (printing the full number) is completed.
Let's walk through the full code to see how I managed to print this number using a function of 7 lines.
First, we need to include all necessary libraries:
#include <Arduino.h> #include <LedControl.h> // Available here: https://github.com/wayoda/LedControl
In most cases, you don't need to include the Arduino.h file, but since I'm using Platform.IO in stead of the horrible Arduino IDE, this is required. And while we're at that subject: take some time to make this switch. Platform.IO is SO much better than the Arduino IDE.
Next, we need to create an LedControl instance, which controls our MAX7219 display:
LedControl lc = LedControl(3, 4, 5, 1); // dataPin, clockPin, csPin, numDevices
Additionally, let's create a variable to use as the counter. Since we want to use all 8 digits, this variable should go up to 99,999,999. Since an int will only go up to 32,768 (and an unsigned int: 65,535), we will use a long. This will allow us to count up to 2,147,483,647.
long num = 0;
Now, on to the real magic: we need to define the function to display the number.
void showNumber(long number, byte pos = 0) { // all magic goes here }
This means we can call this function with the desired number as it's argument. As a second argument, we define the position to start from. The digits are numbered right to left, from 0 to 7. So we want to start with 0, increasing it's position for every next digit. Since we define a default value of 0, we can omit this argument when calling this function.
Of course, this still doesn't do any real magic, so it's time to add some code to this function:
byte digit = number % 10;
By calculating the modulo (%) of the number using 10 as the divisor, we get the last digit of the number we want to print. For example: if the number is 123, the variable digit will contain 3.
Using the setDigit method, we can now put this number on the display:
lc.setDigit(0, pos, digit, false);
The first argument (0) tells the method we want to use device 0. Note that we currently only have one device configured, so you can ignore this 0 for now.
The second argument (pos) defines the position on the display. If no specific position is defined when our function is called, this pos will be 0.
The third argument (digit) defines the number we want to display. This is the number we've just calculated on the previous line using the modulo operator.
The fourth argument (false) tells the display if it needs to turn on the deciaml point. To keep things simple, we will just keep this turned off.
Ok, so now are able to display one digit on our display, how about the rest of the numbers? Great question! Let's continue to extend our function:
long remainingDigits = number / 10;
By dividing the number by 10, we get all the remaining digits we need to display.
if (remainingDigits > 0) { showNumber(remainingDigits, pos + 1); }
And there it is ... the real magic! The recursion I talked about! Above lines will do the following:
If the remainingDigits variable is greater than 0, there still are digit's left to display, and so we need to perform the recursive action.
Recursion: let the function call it self using two calculated arguments: remainingDigits and pos + 1
And that's all there is to this magic recursion approach! The full function is as follows:
void showNumber(long number, byte pos = 0) { byte digit = number % 10; lc.setDigit(0, pos, digit, false); long remainingDigits = number / 10; if (remainingDigits > 0) { showNumber(remainingDigits, pos + 1); } }
To make it's effect more clear, consider the following: if we call this function with 12345 as it's first argument, the following function calls will be performed:
showNumber(12345); // shows a 5 on position 0
showNuber(1234, 1); // shows a 4 on position 1
showNuber(123, 2); // shows a 3 on position 2
showNuber(12, 3); // shows a 2 on position 3
showNuber(1, 4); // shows a 1 on position 4
And that's all it needs to do!
Now, of course, to finish up our full sketch we need a setup and loop function:
void setup() { lc.shutdown(0,false); // Disable the display's power save mode lc.setIntensity(0,15); // Set the display to full brightness lc.clearDisplay(0); // Clear the display }
void loop() { showNumber(num); // Show the number using our function num++; // Increase the number }
And with these two methods. Our full sketch is completed!
#include <Arduino.h> #include <LedControl.h> LedControl lc=LedControl(3, 4, 5, 1); long num = 0; void showNumber(long number, byte pos = 0) { byte digit = number % 10; lc.setDigit(0,pos,digit,false); long remainingDigits = number / 10; if (remainingDigits > 0) { showNumber(remainingDigits, pos + 1); } } void setup() { lc.shutdown(0,false); lc.setIntensity(0,15); lc.clearDisplay(0); } void loop() { showNumber(num); num++; }
Of course, the showNumber function currently doesn't work for negative numbers or floats. But it does give you a good idea on how a recursive function can help you to make life a little bit easier when writing your code.
As you can see in the example video, I've also added a small spinner. Check out this GitHub Gist to see how it accomplished that ...
If you have any questions or suggestions about the code above, feel free to leave a comment down below.
Happy coding!
9 notes
·
View notes