#Internal door
Text
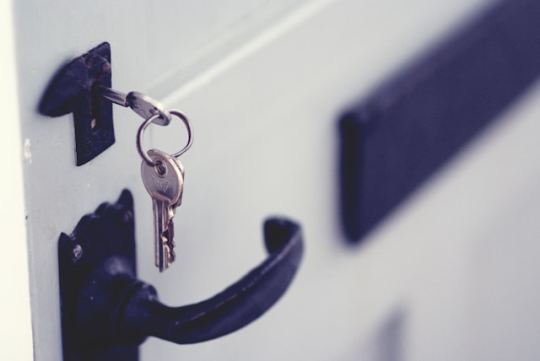
Transform Your Interiors With Our Internal Doors

Transform your interiors with elegant internal doors from Mount Waverly Building Supply. Explore our range of designs, including glass, routed/flush, raised moulding, and wood veneer/laminate. Perfect for any style and space!
0 notes
Text
A Detailed Guide About Steps to Fit an Internal Door
Internal doors play a crucial role in defining spaces within buildings, offering privacy rather than security against external elements. They come in various materials and designs, such as wood, glass, or composites, catering to different aesthetic preferences and functional requirements. Whether in residential homes, offices, or commercial buildings, the installation of internal door fittings is a rewarding home improvement project that can elevate both the appearance and functionality of a space. This detailed guide outlines the step-by-step process of fitting an internal door, making it accessible to DIY enthusiasts with basic carpentry skills and essential tools.
Step 1: Take Accurate Measurements
The first step in fitting an internal door is to measure the dimensions of the door frame accurately. Measure the width and height of the existing frame, taking multiple measurements at various points to accommodate any irregularities. Once you have determined the dimensions, procure a door that fits within the existing frame. Standard door sizes typically have a height of 80 inches with various widths. You can opt for prehung doors with attached frames and hinges or install the hinges yourself.
Step 2: Remove the Old Door
If you're replacing an existing door, start by removing it from the frame. Unscrew the old hinges from both the door and the frame, then carefully remove the door. Take note of the hinge locations on the frame, as you will need this information when fitting the new door. This step may require assistance, especially if the door is heavy.
Step 3: Trim the Door to Fit
Place the new door on sawhorses or workbenches and lay it flat. If the door is too large for the frame, you may need to trim it down to size. Measure and mark the areas that need to be cut, ensuring an even gap on all sides of the door. Use a straightedge and pencil to trace the cutting lines, then trim the door using a wood plane or circular saw. Remember to wear safety goggles to protect your eyes from dust, and use sandpaper to smooth any rough edges.
Step 4: Mark Hinge Locations

While the door is still on the sawhorses, mark the locations for the hinges. Measure and mark where the hinge plates will be placed on the edge of the door, ensuring proper alignment with the hinges on the door frame. Use a chisel and hammer to create shallow mortises for the hinges on the door's edge, with the depth equal to the thickness of the hinge plates. Install the hinges to test their fit into the mortises.
Step 5: Install the Hinges
Secure the hinges to the door using screws, ensuring they are flush with the edge. Attach the hinges to the door frame using the existing hinge locations or the marks made earlier. Double-check that the hinges are correctly aligned and securely fastened.
Step 6: Hang the Door
With the hinges installed, lift the door and align it with the door frame. Carefully lower the door into place, ensuring even spacing around all sides. Have someone hold the door in position as you insert the hinge pins. Test the door to ensure it opens and closes smoothly, making any necessary adjustments to ensure proper alignment.
Step 7: Install the Door Handle and Latch
Once the door is hung, mark the height for the door handle and latch on both the door and the frame. Drill the necessary holes for the handle and latch according to the manufacturer's guidelines. Install the handle and latch using the supplied screws and hardware, following the manufacturer's instructions. Test the door to ensure that it closes and latches securely, making any adjustments as needed.
Maintenance Tips for Internal Doors
To keep your internal doors looking great and functioning smoothly, follow these maintenance tips:
Regularly clean the door surfaces with a soft cloth, sponge, and mild cleaning solution to remove dust, dirt, and marks.
Check the hinges and screws regularly to ensure they are firmly tightened, and lubricate them with a silicone-based lubricant for smooth operation.
Repair any scratches, dents, or chips promptly, touching up the paint or using appropriate wood sealers as needed.
Avoid slamming the door, as this can strain the hinges and cause misalignment. Handle the door gently to prolong its lifespan.
Conclusion
Fitting an internal door may seem intimidating, but with the right tools and guidance, it is entirely feasible for DIY enthusiasts. This comprehensive guide walks you through each step of the process, from taking accurate measurements to installing the door handle and latch. By following these steps and incorporating proper maintenance practices, you can ensure that your internal doors remain both functional and aesthetically pleasing for years to come.
0 notes
Text
How Wooden Internal Doors Can Transform Your Home

Immerse your home in a transformative journey with the addition of wooden internal doors, where elegance meets functionality to redefine your living spaces. Wooden doors, particularly for interior spaces, offer a range of advantages that extend beyond mere aesthetics.
Wooden internal doors have the unique ability to enhance the ambiance of each room. With a variety of wood types, finishes, and designs available, these doors can be tailored to complement the overall décor, creating a harmonious flow between spaces. Whether you prefer the warmth of oak, the sophistication of mahogany, or the versatility of pine, wooden internal doors provide a timeless and versatile choice.
In addition to their aesthetic appeal, wooden internal doors contribute to the functionality of your home. Their natural insulating properties help regulate temperatures within rooms, promoting energy efficiency. Furthermore, the solid construction of wooden doors enhances privacy and sound insulation.
For the seamless integration of wooden internal doors into your home, it is essential to enlist health and safety qualified professionals specializing in joinery fitting services. Their expertise ensures precise installation, meeting both aesthetic expectations and stringent safety standards. Elevate the character of your living spaces with the transformative beauty and functionality of wooden internal doors, expertly installed by skilled professionals through a reputable joinery fitting service.
0 notes
Text
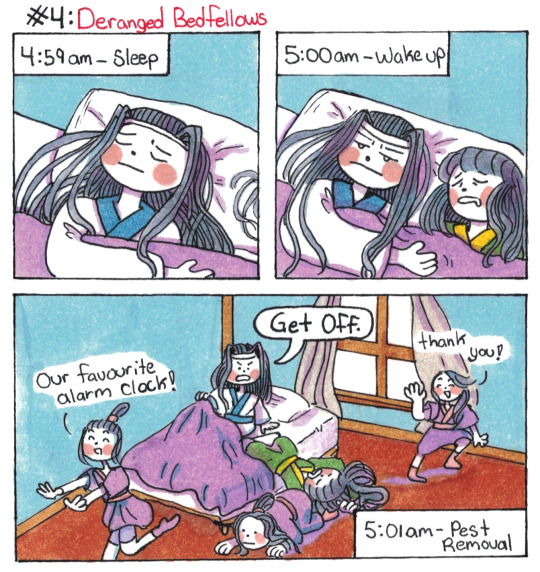
Lan Wangji Goes To Lotus Pier AU: Part 4: Deranged Bedfellows
(Part 1, Part 2, Part 3, Part 4.5)
#poorly drawn mdzs#mdzs#mdzs au#lan wangji#nie huaisang#Yungmeng Jiang training arc AU#This is the *first* part of what was supposed to be a much longer comic (LWJ's morning routine in full).#I'll finish the remaining part as a reblog to this post! I just think this is the funnier chunk.#Lan Wangji absolutely is the kind of person who has a perfect internal alarm clock for when it is time to get up.#He already has a dedicated sleep schedule. He is accurate within 10 seconds of 5am every day.#I think the Jiang disciples are most likely used to waking up around 6:00-7:00am#But the allure of having a guaranteed time keeper getting you up in the morning is worth the earlier hour.#I imagine they started outside lwj's door and slowly moved closer as the weeks went on.#Now LWJ has to cope with being way too warm in the night from all the extra body heat.#LWJ is not a fan of this but they scamper off immediately after he wakes up and they at least show initiative to follow routine.#NHS joins in only because he is a chronically heavy sleeper and needs this level of intervention to get up early.#His boldness would be a death sentence in the cloud recesses but here? Whole new game.#Yungmeng Jiang isn't a lawless land. It's just a land with different laws.#And one of those laws is to forcefully domesticate the catboy coded Lan boy through any means necessary.#Completely different tangent: I drew the thumbnail for this before I did comic 134. I then realized they had the same visual gag.#So I had to space this one out so it didn't seem like I repeated the waking up joke. That's my secret and all of you have to keep it.#And in my land the law is that snitches get itches (telepathically transfers hives onto your body)
1K notes
·
View notes
Text
Internal Pine Doors | Steel River Doors
Get the Best Quality Internal Pine Doors

At Steelriverdoors.co.uk, we offer a carefully selected range of internal pine doors for home installation.
You can take a look at the most stunning choices available and order online today!
1 note
·
View note
Text


MISANA recreating kuromi & melody's pictures (x)🩷🖤
#dailytwice#fortwice#femaldiol#femaleidolsedit#userdahyun#sourcetwice#twicecreations#twice#sana#mina#twice*#sana*#mina*#gifs#*#i refuse to name them sami no matter how many times the jyp intern knocks at my door#2wice's date
260 notes
·
View notes
Text
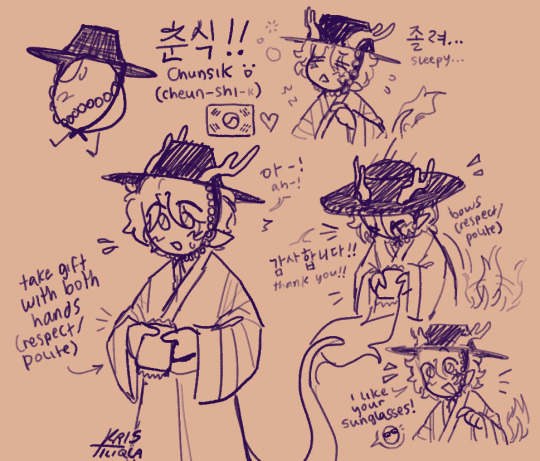
CHUNSIK MY BELOVEDDDDDD
#im korean american and BRO#when i tell you that i was so fucking excited and happy#i actually cried bc i got emotional thinking about it all 😭#the language i hear everyday being shown to an international audience n shit :((( waaaahhh its so cool man#my culture as well :(( i was so fuckin happy (i shared so much random korean shit on my twt LOL)#i died when q said he had a surprise for acau and mentioned the eggs bro#like holy shit YES A KOREAN EGG 😭😭😭 ITS ALL I’VE EVER WANTED BRO#I USED TO PRAY 😭😭😭#i love chunsik sm he’s such a polite lil gentleman :(((#he dug tina n her horse out when she fell in a hole …#placed blocks when she missed a jump to a ladder …#and opened a fucking door for her 😭😭 he’s such a sweetheart#i love him sm u actually dont understand#anyway normal tags now LOL#qsmp#qsmp fanart#qsmp chunsik#chunsik fanart#chunsik the egg#qsmp korea#he is my everything 😭🫶#my art
613 notes
·
View notes
Text

I think they’re crushing on each other your honor
#localgardenweed#the weed is rambling#hetalia#hws#hetalia america#hetalia russia#hws america#hws russia#rusame#amerus#hetalia england#hetalia france#hws england#hws france#fruk#ukfr#hetalia x codename: kids next door#hws x cknd#hetalia au#they’re way too silly i needed to let it out okay#Alfred doesn’t wanna admit he kinda likes Ivan just a teeny weeny bit#Ivan is all over him he wants him to like him even just as friends#Francis and Arthur are totally like dating or smth but they dont know it yet#on and off relationship and they’re like barely in the 5th grade or smth dawg#they grow up to be that couple in school who’ve been dating for like years and air their laundry in the hallway#Alfred has internal homophobia he’s going thru it#WHY WAS THIS ON MATURE HELLO????#SORRY ABOUT THAT
287 notes
·
View notes
Text
Howdy's rainbow suspenders.
thank you for coming to my Ted Talk-
#im so mad i didnt notice On Stream hnggggg#characters who have rainbows associated with them: eddie / frank / sally / now howdy as well#please refer to eddie's tie. the butterfly on frank's door. sally's house. howdy's suspenders. thankyew#HE'S FRUITY! I SWEAR TO GOD#listen . Listen.#'oh the filters/light is just affecting the black-'#okay then why is frank wearing black thats entirely unaffected. why is barnaby's nose unaffected. why is howdy's BELT unaffected#why are the colors on his suspenders in Blatant Rainbow Order.#huh. explain it to me. make it make sense other than HE'S QUEER? HOWDY PILLAR LOVES MEN I WILL DIE ON THIS HILL#AND YOU'RE DYING ON IT WITH ME-#ok ok. sorry. normal. im Normal#godddd i just. That Image. from the commercial comp#the way he has a bit of a prominent blush. the way he's leaning towards barn. the rainbow suspenders#absolutely unprompted#howdy pillar#the way that the only times we've gotten something of howdy Without barn making an appearance was#the howdy-sally / howdy-eddie / howdy-poppy / that one makeship ad#laughingstock is so real. oh its so real-#(probably one-sided or barn just has some internalized issues to work through - or they both do - but. But.)#hey! put the gun away! i dont need to be put down! i swear im mentally stable!#im So mentally stable? ive been in the trenches since day one?#wh. what do you mean thats... huh? shhh dont worry about it im fine we're fine and i called it months ago- PUT THE GUN DOWN#anyway no i havent just been staring at that housewarming image. no i havent. Swearsies
149 notes
·
View notes
Text
youtube
most distracting knd video of all time
#knd#codename kids next door#kids next door#transmission.txt#video#19-2000 TURN IT UPPPPPP#this is just like those international promos that use songs like hey ya AND gorillaz music
58 notes
·
View notes
Text

missed these biches. loki's pose is based on of @jookpubstock's ref pics
#loki#odin#norse gods#norse mythology#sketches#i was going to see how long i could go without drawing#and how that would make me feel#turns out i cant do that for very long bc it makes me feel so bad#haha...#put odin in a hood and my internal eomer went he walks here and there they say#as an old man#hooded and cloaked#on a loop#anyway im off to sand all the doors and all the window frames in our new house now bye
187 notes
·
View notes
Text
Hey guys, for those who will see the special episode of Cellbit's RPG with the qsmp players and never watched any of the other episodes of ordem, I recommend you guys do it with the chat close!!! The chat during ordem episodes is not the same during a normal stream!!!
This chat is filled with a bunch of toxic fans who are literally the worst people you can have on cellbits chat. Most of them don't like qsmp. And even tho, normally, the mods put the chat on sub mod, but it doesn't make it better. For you guys to have any idea how toxic the chat is a player once cried mid play because people were sending her hate and they managed to kill a beloved character because they were purposely sending the wrong answer on chat
After Cellbit's announcement yesterday, most of these so-called "fans" were sending him a LOT of hate because they didn't like it the idea of this new episode. This was his response to all the hate

So I'm saying this, especially for the Hispanic communities, because we all saw it how excited and how cute you guys were on Twitter, for putting "we proud of you cellbit" on tt.
We thank you guys enormously for the love and excitement ❤️
(Also important to say that during those streams we say a lot of swear words to cellbit, like hairy motherfucker, don't worry. This is actually a normal thing, and it's just us getting angry because he is the one who controls the villains and the world around the players lol)
#saying this especially to the guapitos because you guys are probably the best chat ever and i dont want them to get a bad experience#seriously the amount of hate this man got was unreal and im really glad the Hispanics communities were so excited#because this is a new opportunity for ordem to get international and open new doors and the 'true' fans dont see that#qsmp#cellbit#ordem paranormal
317 notes
·
View notes
Text
my heart says gojo is a closeted shoujo manga lover but he was definitely more of a jump kid wasn’t he……………
#kept thinking of him flipping through skip beat or something in a corner of his room only for sugu to knock on his door#and he just . SHOOTS up and throws the magazine under his bed before opening it#shoko asks what his favorite manga is and he’s internally like . ”don’t say tokyo mew mew don’t say tokyo mew mew DON’T SAY TOKYO M#he’s … a cutie . a sweetie even#sugushoko look under his bed all mischievously expecting to find bikini mags and it’s just. shoujo magazine issues .#SNIFFLEEE i want them to be loser kids…….#ari noises ✩
67 notes
·
View notes
Text

Yay, I don't need another subscription!! @absolutebl !! More Gaga wins!
#monster next door#upcoming bl#bl drama#bl series#thai bl#thai drama#thai series#thaibl#asianlgbtqdramas#asian lgbtq dramas#thai bl series#thai bl drama#gagaoolala#yay international premiere
50 notes
·
View notes
Text

CELIA: (to herself) Yes! Okay, phone in the pocket works.
Seems like Celia might be a perpetual sleepwalker (and/or, something is moving her while she sleeps)...
I like her strategy that this has happened enough that she's starting to try and sleep with stuff in her pockets, so she's got options when she wakes up, like a phone.
Time to get some tips from the king of Do Not Open Joshua: put ice around the doorknobs?
#tmagp#tmagp spoilers#the magnus protocol#celia ripley#I was going to say get a second internal lock for the door and freeze the key to that#but then it makes it very hard to get out of your own place quickly and that's no good
120 notes
·
View notes
Text


Writer Rule Nº 1: When in doubt cry tell them you didn't write anything
#warlin “hey bitch remember that book you wrote?” door#alan “haha no fam *screaming internally*” wake#alan wake 2#alan wake#warlin door#ilkka villi#david harewood#remedy#remedyverse
139 notes
·
View notes
Last Seen Blogs