#I put me and a model I found on Pinterest in a blender and when I pour it out it’s my Jon HC
Explore tagged Tumblr posts
Text
Hey Tumblr! It's been a hot minute, but I wanted to hop on today and share a project I just finished for my digital media class!
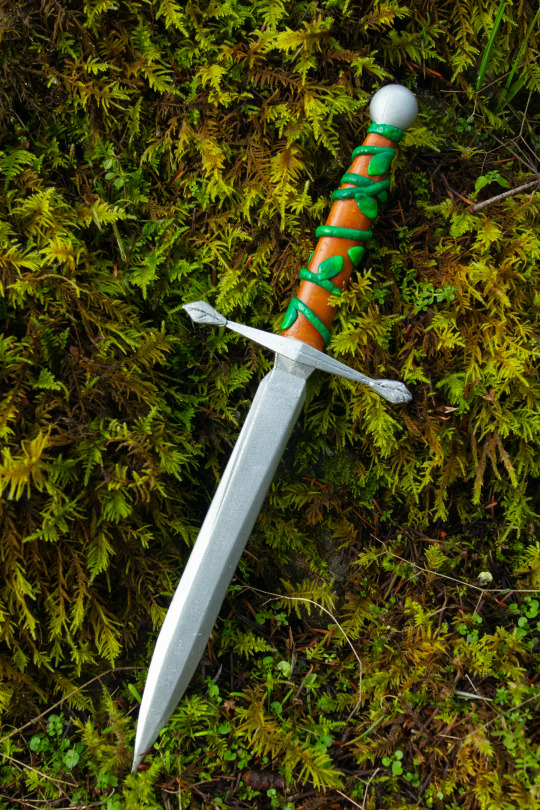
Keep reading to see my process of making this dagger!
Our assignment was super open ended, with the prompt just being "Make a project that involves Blender in some way", so I thought doing something mixed media would be a lot of fun. I'm on a mission this semester to start making art for classes that I WANT TO MAKE, and not just tailor to what I think will get me a good grade and what my profs would like. Honestly, could make a whole post about that mission as it is actually more challenging than I had anticipated, but I digress.
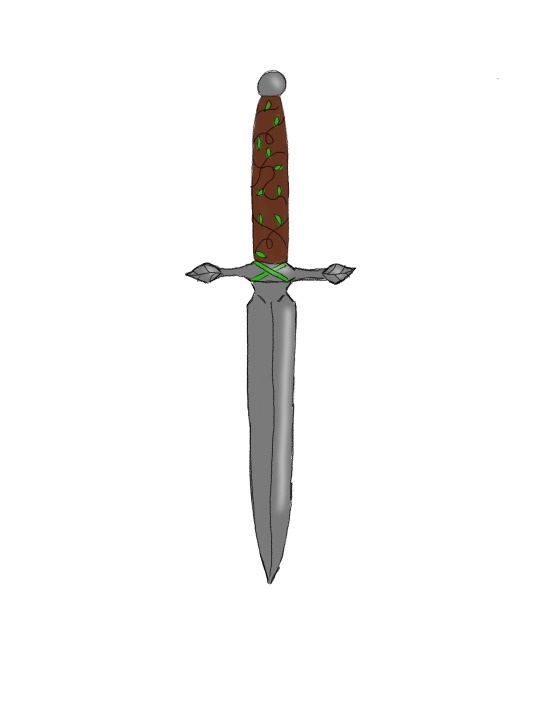
For my dagger, I started by making a quick sketch in Procreate to get an idea of what I wanted my model to look like. I got some inspo off of Pinterest, but tired to make the design my own, and something I could feasibly make.
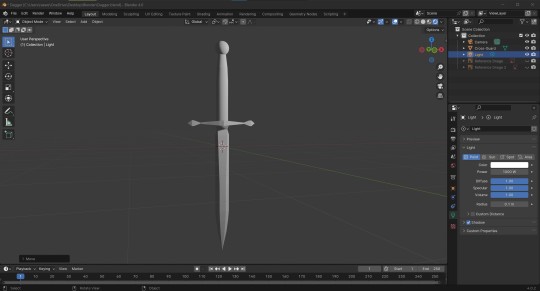
Since I was making this project for a digital media class, and the assignment was supposed to revolve around using Blender, I made a base 3D model for the dagger, which I would then send off to get printed.
I originally tried to model the vines and leaves in Blender, but I had a really hard time with it, since I am still re-learning how to use Blender (haven't used it since high school). So I decided to make it a mixed media project, since the prof said this assignment was very open ended. Plus, doing mixed media would give me a chance to try out foam clay, which I've been wanting to experiment with for a while.
I then sent my 3D model off to my good friend David, who 3D printed it for me. He was even kind enough to send me a time lapse of it printing!
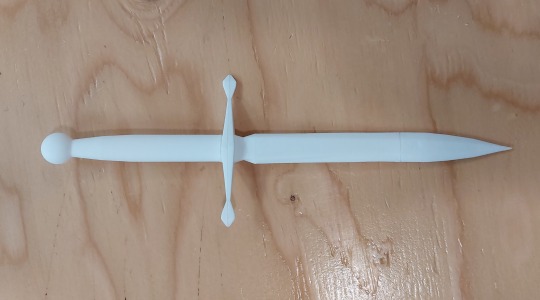
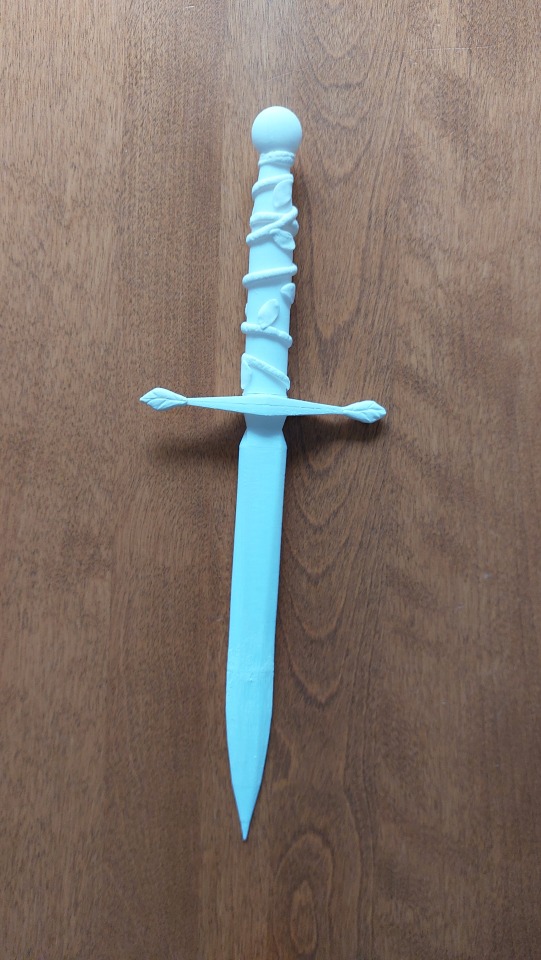
After printing, David also assembled the base for me, but I put glue in all the seams, followed by filler once that dried, and sanded the whole thing down. It definitely could have used more sanding since you can still see print lines in some places, but I was on a strict time crunch to get this assignment in on time.
Then I went in with my foam clay and started adding the leaves and vines on the handle, as well as the leaf details on the cross-guard. I had never used foam clay before (I know... what kind of cosplayer am I?), but I really enjoyed working with it. I had a bit of a hard time getting it to stick to the plastic, but I found that wetting it and then letting it get a bit tacky really helped with that.
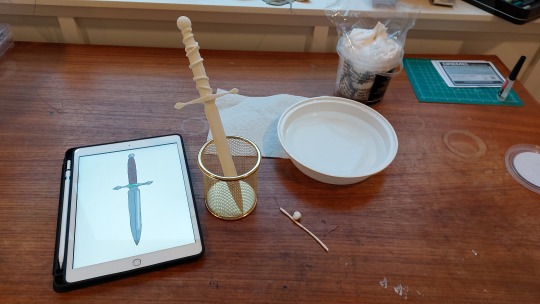
The foam clay I bought was from Michaels, and was technically labeled "Modelling Foam", so I have no idea how it compares to the nice foam clay that most cosplayers use. I would have ordered that, but I decided to do the modelling by hand rather last minute, so I needed to buy what was available in store. Overall I enjoyed working with it, but I would still be interested to try the real stuff some time (assuming it's actually different from this).
After letting the foam clay dry overnight, I started painting it. I primed everything with a silver spray primer, then went over just the blade, pommel, and cross-guard with a more metallic silver spray paint. Thankfully, I had enough paint and primer left over from the two angel blades I made in the summer, so I didn't need to buy more paint for this project. I then painted the handle by hand, which was one of the most tedious paint processes I've ever done, but I'm quite happy with the results.
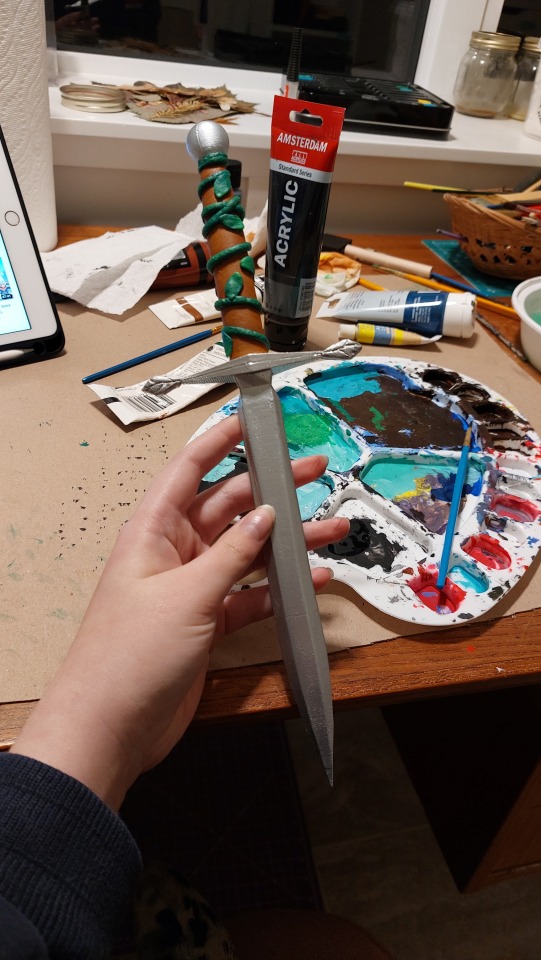
Last up was some clear coat, as I didn't want to risk any of the paint chipping off. I'm also hoping the clear coat will help seal the foam a bit, as I have no idea how foam clay holds up when used on props. I let the sealant dry overnight last night and this morning it was done! And today I took some pictures of it outside to submit to my prof for grading, and to use during our class critique tonight. Considering I was rushing these last steps after 3D printing, it is a miracle I got it done by the deadline. I'm quite happy with how it turned out!!!
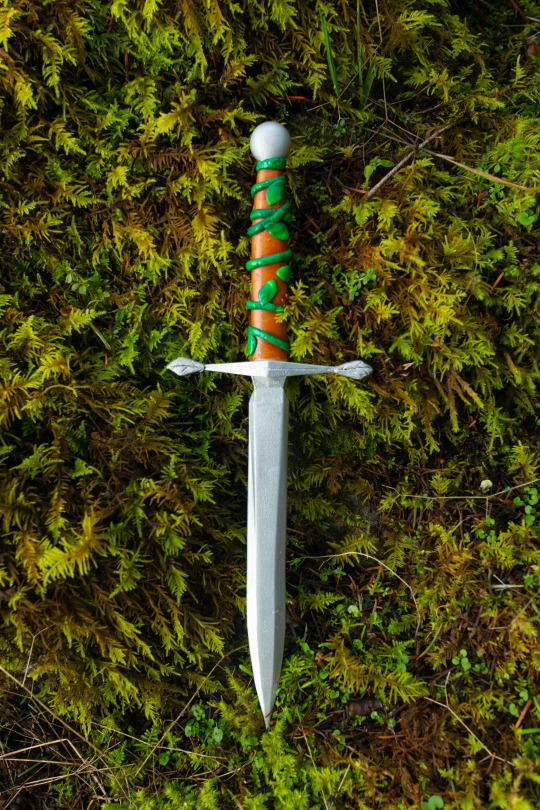
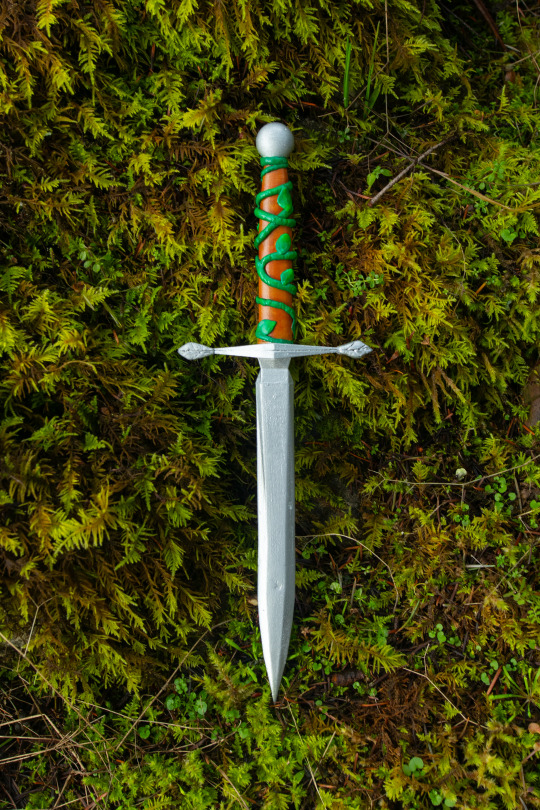
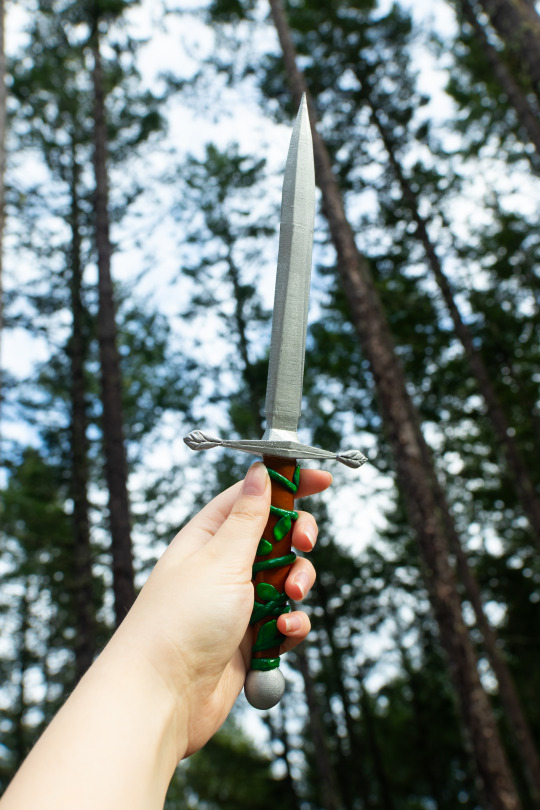
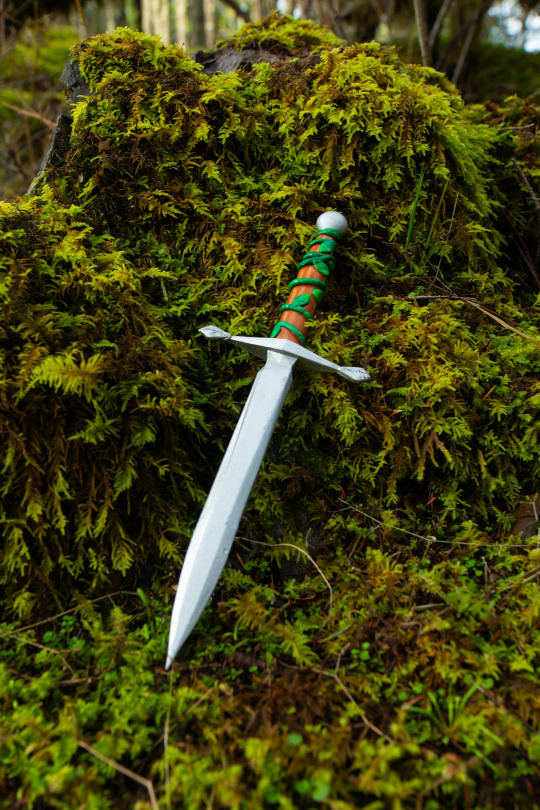
Now I'm just hoping that crit goes well tonight! We'll see if my prof thinks this is too much mixed media for a digital media class...
Anyways, hope you enjoyed seeing my process! I know I haven't posted in ages... I have done and made so many cool things this past month, but I've been too stressed and busy to make posts about them. Hopefully I'll have more time to share stuff with you guys soon!
4 notes
·
View notes
Text
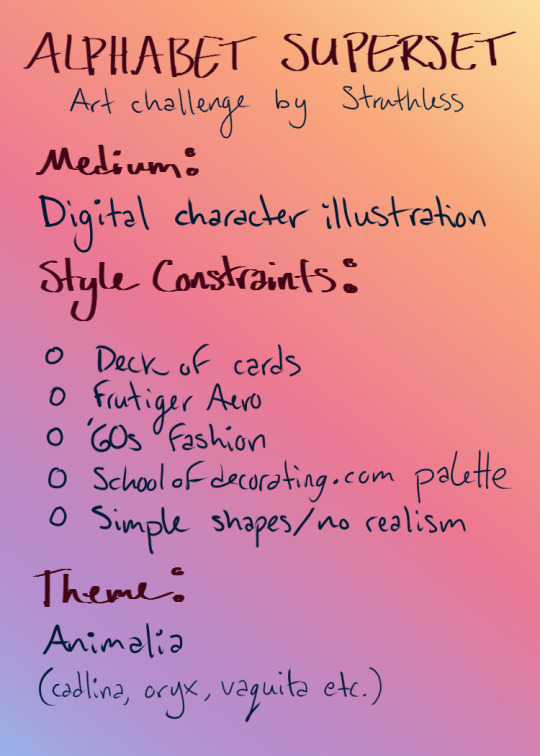
I’m doing the Alphabet Superset challenge by Struthless on Youtube. It’s roughly 30 weeks long, with a week dedicated to each letter of the alphabet. The point is to share your art for other people to see. The challenge involves setting parameters and restrictions for yourself so you end up with a cohesive group of works. I really like the way Struthless designed the challenge. It’s actually a lot easier to make art when you put yourself in a stylish box instead of saying, “Just make something! Anything!” Plus it gives you room to try out a medium or style for a while with a clear end date so you can say, “I tried it and it’s not for me, but it was fun” or “I want to do this forever! I’m so glad I tried it!” I found the style constraint section of the worksheet to be the easiest part. I love clear rules and expectations and have some aesthetics I’ve been wanting to try out. As for the theme (this is where you get your words for each letter of the alphabet)… In high school, I scoured wikipedia for every species of animal that had an article with a picture. I collected roughly 3000 images to use as references for a world building project I was ravenous about at the time. I also considered doing plants (desert plants in particular) because I’ve “collected” a bunch of those as well. Really, I just wanted an excuse to reference sea slugs. Picking the medium was a whole other matter. It took me nearly the whole week to decide what the heck I was going to make. The challenge is very flexible on the definition of art. It’s not just drawing or painting. There will be people baking, making podcasts… Yesterday I saw a wooden automaton/kinetic sculpture! So cool! I’m what is known as a “hobby hopper,” although I’d like to stick to one long enough to master it or at least finish something. I whittled my options down to “something I am comfortable doing/know how to do-” enough to know that I could do one a week. Basically, digital illustration or 3D modeling. I almost chose to do 3D modeling to make renders of collectible figurines. Thing is, I don’t know jack about lighting or textures in Blender. I went to the bookstore to find my mom a birthday present and saw a pack of Alice in Wonderland playing cards. Thank goodness! Turns out I like putting myself into smaller and smaller boxes until I can fit into a pack of cards. So that’s what I’m doing. Each week, I’m going to illustrate a character based on an animal. The format will resemble a playing card. They will be rendered in a frutiger aero style, wearing 1960s inspired fashion. The guide I’m using to pick my palette is actually for home decor. I’m so excited about this challenge! I’m looking forward to April so I can start all over again with something completely different.
~If you see what I make and like it, I will be posting on Tumblr, Instagram, Pinterest, and the Struthless Discord under Spentimental. Follow me wherever you like to spend time.
3 notes
·
View notes
Text
It was like a year ago I read it but the TMA fic that haunts me the most is the one that said Jon’s grandmother was NI catholic and hated Georgie because she was protestant like I’m sorry what. Also the implication that she moved to England to escape the troubles... bro that’s where they keep the English!! Don’t be surprised when they’re there what?? Like I have to assume it wasn’t a northern Irish person writing it because that fact would occur to them so why did someone decide “yeah new HC Jon’s grandmother was big into sectarianism”
#My Post#IT WAS JUST BIZARRE#To see a HC I would normally be all over (half NI Jon) but to have it be?? LIKE THAT???#I’m gonna start HCing him that out of spite now#Northern Irish / Sri Lankan Jon#it’s my HC I get to choose the projection#I put me and a model I found on Pinterest in a blender and when I pour it out it’s my Jon HC
22 notes
·
View notes
Text
Artist Resources (Part 1?)
This is basically just going to be a bunch of resources I have found to be useful. I can’t say that I’ve used all of them, but I’m sure they’re all worth checking out.
I’m also gonna try to put a detailed description for most of the links so you have a better idea of what you’re getting. I apologize in advance if some of them are redundant lol
(I put “Part 1″ if in the case I make another one)
~Links to Tutorials, Tips, Resources, etc~
Another Resource List -- Leads to another Tumblr post. Apparently, the post isn’t mobile-friendly, so it’s suggested to view this on Tumblr browser. Has a bunch of other links. I’ve checked out a few of them (mainly the copyright stuff lol), and it seems that some of the links may be a bit outdated. Still, it doesn’t hurt to check out the links.
Arms and Legs -- Leads to another Tumblr post. A handy tutorial on elbow and knee placement.
Art & Game Dev -- This leads to my personal playlist of a bunch of YouTube videos. Has a bunch of tutorials and interesting videos that I’ve collected over the course of a few years lol.
Blamblot -- A website that contains resources and tutorials on comic lettering. This is primarily in reference to western comics, but it doesn’t help to take a looksie.
Commission Calculator -- Leads to another Tumblr post. Helps artists to stop selling themselves short.
Comparing Heights (hikaku-sitatter) -- A height comparer for centimeters.
Comparing Heights -- A height comparer for feet and inches.
Mouth Shapes and Lip-Syncing -- Leads to another Tumblr post. Useful for... drawing mouth shapes.
Reference Angle -- Useful for when you’re trying to map out a face from an odd angle.
Soft Proofing for Printing -- Leads to another Tumblr post. Helps when you’re trying to make prints of your artwork.
Textures -- A website full of different and mostly free textures. While this website is made for 3D texturing, it can also be useful for 2D drawings. Signing up gives you 15 free credits everyday, and you can use those credits to download some textures for free.
The Models Resource -- A website of models ripped from a wide array of games.
The Spriters Resource -- A website of sprites ripped from a wide array of games.
The Textures Resource -- A websites of textures ripped from a wide array of games.
~Links to Stock Images~
Please check out whatever policies they may have for their images before using them!
(not sure if any of them are active anymore as I followed some of these accounts a long time ago when I used to be more active on Deviant Art lol)
adorkastock (formerly senshistock)
anatoref -- Leads to another Tumblr post. Has a bunch of hand photo references
charligal-stock
HumanAnatomy4Artist -- Does contain nudity
null-entity
PhelanDavion
RobynRose
~Links to Other Artists~
Akihito Yoshitomi -- Yoshitomi is a mangaka who has tutorials on manga making. He also has an insightful series in which he drafts and draws a 30-page manga in 18 days. Remember that every artist works differently and his process may be different from another’s.
Drawfee -- Drawfee is an improv drawing show of four artists: Nathan Yaffe, Jacob Andrews, Julia Lepetit, and Karina Farek. While they don’t have tutorials in a sense, their videos explain the different processes they go through as they draw. They also occasionally provide tips, tricks, and resources in their videos. They do have another channel and a Twitch channel where they host drawing classes in addition to other fun shenanigans.
EtheringtonBrothers -- Has a bunch of useful and eye-catching tutorials called “How to Think When You Draw”.
Mark Crilley -- Mark is a comic artist, specializing in manga, who has a bunch of tutorials about anatomy, perspective, comic making, and other things.
Miyuli -- Miyuli is an artist who posts tutorials on their Twitter. Their tutorials range from anatomy to clothing to other things. They even have a few books of art tips. Currently (as of the time of posting this), their 2018 version is free for download, so I highly recommend you download that. Some tips may be outdated, but they should still be helpful.
Whyt Manga (Twitter/YouTube) -- Odunze is a comic artist, specializing in manga, that has a bunch of tutorials on manga making and drawing characters of color.
~Links to Free Programs~
Blender -- A free 3D program if you’re into 3D modeling and such. I also personally haven’t used Blender (I use Maya lol), but I know it’s a respectable program.
Krita -- A free painting program if you can’t afford Photoshop or Clip Studio Paint. I personally haven’t used Krita, but I have recommended it to a few friends and they have positive reviews about it.
Paint Tool SAI -- Okay, this one isn’t free, but it’s a significantly cheaper painting program where you don’t have to pay a subscription. It’s 5,500JPY (~50 USD). I’m not sure how well it still works on modern computers (the last update was 2016), but I still use it here and there because I love the pen tool feature it has, and it still works like a charm for me.
~General Tips From Raine~
Raine admits that she’s guilty of not following her own advice, but Raine hopes that the tips that she does know will be beneficial to someone who will follow them. She’s also going to keep all her tips under the cut so as to not make this post a huge wall of text (even though it technically already is lol)
Also, if you have some resources, tutorials, tips yourself, please feel free to send them to me and maybe I’ll make a part 2 to this post!
ALWAYS LOOK FOR REFERENCE. This should really go without saying. You can’t draw from life if you refuse to observe life itself.
If you can’t find the exact thing you need, MAKE YOUR OWN REFERENCE. Time and time again, I can’t find something exactly that I need. So instead, what I do is that I take pictures of my own reference. Sometimes I even grab a friend and take pictures of them doing whatever it is I need.
Have a mirror handy when you’re drawing. Sometimes what you need is actually right there in front of you.
Having trouble drawing something? Do some studies. Take the time to understand what it is you’re drawing. I can’t remember the exact story, but I heard that the people who were working on Tarzan were having a hard time drawing his hands. So, what they did was spend a few hours looking at hands to try and understand how they work.
IT’S OKAY TO STUDY THE ART OF OTHER ARTISTS. Just as we look to the old masters as a reference, it’s definitely okay to look at modern-day artists for reference. Just don’t go copying exactly everything that they do, or worse, trace what they do. Just don’t do it... at all.
Not every line needs to be realized. The viewer of your work will automatically connect the dots.
DO NOT TRASH YOUR OLD DRAWINGS. Please, never ever do this. Your old drawings have value to them, even if they look terrible to you. Old drawings may hold ideas for things you could do for the future. They also serve as a way to see how far you’ve come as an artist.
GETTING BETTER AT DRAWING TAKES TIME AND EFFORT. You’re not gonna get better overnight. It’ll take months, or even years, to feel like you’re a competent artist, and even then, you’ll still have room for improvement.
DON’T LOOK DOWN ON YOURSELF IF YOU’RE TAKING A LONG TIME TO GET BETTER. It’ll be better for your mental health in the long run.
Alternatively, DON'T LOOK DOWN ON OTHER ARTISTS EITHER, ESPECIALLY TO MAKE YOURSELF FEEL BETTER. You know the struggles it took for you to get where you are, so don’t go putting down other people when you’ve been in their shoes once.
KEEP DRAWING. If you’re not making an effort to get better, then you’re not going to be better. I get that it’s hard to find the inspiration to draw (I’m very guilty of this), but just keep trying. It doesn’t have to be big or spectacular. You don’t even have to post it if you’re the type who likes to post their art stuff.
Try to find references from real-life. It’ll help you better understand form, lighting, shadows, etc., especially if you’re going for a more realistic kind of art style. Otherwise, finding reference from things like cartoons, anime, comics, etc. are just as good.
Try new things. Try new art mediums. Try a different art style. Switch up the way you do things. Maybe you’ll hate it, maybe you’ll like it. Who knows if you don’t try.
Watch time-lapses (or speed draws/speed paints) of other artists!
Pinterest and Google are your friends if you need tutorials or references or whatever.
If you’re offering commissions, DO NOT WORK UNDER YOUR LOCAL MINIMUM WAGE. You are literally devaluing the work you actually put into a piece.
I like to think I’m an aficionado of Photoshop, so feel free to ask me questions on how to achieve something! I’ve used Photoshop for about 11 years now and know my way around the program. On another note, I do recommend setting custom keyboard shortcuts in Photoshop because the default shortcuts are terrible (in my opinion), and because having custom shortcuts increases the speed of your workflow.
Because I’ve been seeing this a lot lately in Twitter, you’re never too old to start in art. Art is just one of those things that anyone can pick up at any age because the only thing you really need to get good in art is time, diligence, and patience.
Try not to post hi-res images of your artwork to prevent art stealers from selling your artwork in high resolution.
Always, always, always add your signature and watermark on your artwork. I like to add my signatures and watermarks in places that’ll be hard to erase or crop out. I’ve also seen people add their signatures and watermarks in creative ways (ex. on a character’s shirt). You need to protect your work in an era where people will just blatantly steal it and make profit off your work.
Tag List
@reality-is-often-disappointing
#artists#artists on tumblr#artist tips#artist resources#art resources#artists of tumblr#art tips#art tutorial#raine rambles and muses#raine can art
173 notes
·
View notes
Text
Evaluation
My project has changed a lot throughout the course- my final outcome has differed greatly from what I set out to make at the beginning, mainly due to the fact that I was trying a lot of new things and they didn’t all work as expected. But i’m glad that my project evolved.
The social issue I decided to choose for this project is the Environment and Climate Change- I wanted to make a game concept that would encourage people to fix the planet before it’s too late. There are many issues that are affecting and changing our planet currently, most of which are direct result of human activity. We are responsible (directly or at least for the majority of) for the Earth’s changing in climate- we release too many greenhouse gases through various means such as transport, factory farming and deforestation.
One of the things that has remained consistent in this project is that the social issue being a key part of the game - I haven’t diverged much. The character design and game themes definitely incorporate some fantasy themes (such as the main character) but the underlying issue about the world being uninhabitable and ruined is still a very obvious feature. I would have created a project that more subtly related to climate change, but it’s something i’m very interested in so I thought it would be a good idea. I was aware that a game based very obviously on a social issue may not attract a lot of attention as people tend to avoid things that are ‘politcal’ but I think it works - I tried to make the character design and magical elements very visually appealing so the game so that it would appear more interesting and attractive to play upon a first glance.
The work I have created - Echo - is for a game concept. I created some concept art for the character and landscape, made some pixel animations to show how the game could potentially look, and made a model of the main character’s head. The model was created so I could get a better idea of how the character could look from all angles, thus making it easier to draw. I am also very interested in modelling so I thought making a model would be a lot more interesting than just two dimensional artwork.
The Character Design/Concept
I wanted to create a concept for the game’s main character. At the start of the project I envisioned them to be a cute & brightly coloured animal - to try and contrast with the bleak reality in which the game is set. I made a pinterest board to try and establish the kind of look I wanted it to have, and came up with some concepts. At the time I was also really inspired by Kitsune & their magical connotations in Japan so I wanted it to look somewhat fox like.
I jumped straight into the character design without really considering the rest of the work I wanted to do which would involve it - which is where I started to make some questionable choices. I decided to give Echo four ears to make them look very unique and otherworldly - but didn’t really consider the practicality of having these, nor did I think ahead to when i’d actually have to make them later. I also have a tendency to design the character’s appearance first before coming up with their personality - which also meant that the second set of ears didn’t really have a purpose of being there. Alongside this I also gave them an enormous mane and extravagant tail to help them stand out - this was also annoying to animate. However, despite the impracticality of their design, I really like how the final appearance turned out - it definitely looks aesthetically appealing and different compared to something you’d expect to find on Earth.
Another problem I had when drawing the character was trying to establish their anatomy and keep it consistent when creating the concept sketches for them. I wanted to make Echo walk on two legs yet still have an animalistic appearance so I made them anthropomorphic with shorter digitigrade legs than those of a human - this made a lot of poses quite difficult to draw as his body proportions were very different than the references I used - so in some sketches his legs are far too long.
I created several pieces of game art featuring Echo although I’m not totally happy with any of them- this is due to my experimentation with new programs and different techniques. All four of the artworks were created outside of my comfort zone - 3 of which were created using Procreate and a shading style which I am not as proficient in - and the final one was created in Paint Tool Sai with a wacom intuos (which was a vastly more complicated task than using my Cintiq). I felt that some of the work just didn’t have atmosphere I was trying to create- some of the pieces looked flat, and using the iPad to paint meant that I didn’t have access to my usual tools for painting. To improve next time, I will practice more both with procreate and the Intuos tablet, but also try and create some artwork that i’m actually happy with by spending a lot of time on it rather than giving up after 2 hours - which was very common with a lot of my work in this project as I felt like the deadline was approaching too fast.
I really like Echo’s overall character design but I think that it could have been developed a lot better if I had spent more time on it, and used more realistic animals as reference material. My favourite parts about their design are the glowing colourful ears and tail, as well as the mask, which I think gives them a very mysterious and ethereal appearance (which I think it suitable considering they’re meant to be a space deity). If I could design them again I would have also created a wider range of concepts before creating the final design so fast, as I ended up having some really cool ideas later on. I would have also reduced the number of ears and made the tail/mane smaller to try and make this character actually easily reproducible.
I did also design Radio and Pix, the other two main characters, but these were done very quickly near the end of the project so they are also not as developed as i’d like them to be. I think my target for next time would definitely be to not try and rush my projects as much and actually put thought and consideration into them. It would have also been nice to do more environment design as this was something I was really keen to explore at the start of the project but didn’t have enough time to explore - I would have rather put more time into this than trying to create finished artwork of Echo.
Pixel Art/Animation
For this aspect of my project I aimed to design some animations and sprites/environments to show what the actual game would look like if it was made. This was one of my first experiences with pixel animation and sprite artwork which made it quite a challenge for me, especially in the beginning.
Animating in pixel art is a really different experience, as I found that almost every pixel had to be placed perfectly to make the movement look smooth - quite often I found that just by changing a few pixels on one frame completely changed the shape of the head in another - but this paid off as I got used to it. Overall, i’m really happy with the way my weapon summoning animation turned out - I think the movement looks really fluid and even though it’s small and pixelated, you can still make out the individual parts of the character.
Some parts I should have done differently were definitely the smoke animation and effect - I made the smoke and staff Glow using an overlay layer on Photoshop - which messed up the transparencies of the finished sprite. When I tried to export it as a gif with no background, there were white pixels surrounding the body due to the partially filled in pixels from the glow layer, which the PNG could not interpret properly. To fix this, I added a grey background to the animation when exporting it so that it would display correctly on my blog - but this was only a temporary fix, as It would have had to be transparent to import into Unity, for example. I think that the glow could have worked if it was added afterwards once imported into the games engine rather than as part of the animation, but it worked to show my ideas.
Another problem I had was with the animation cycle itself - this was another project which I rushed into a bit - as I ended up not being able to loop it due to Echo taking a step forward midway through, so ending up in a different location to where they started off. I should have also made the overall pixel sprite smaller I think and maybe tried a lineless style - as the 120ish pixel height of the character meant that it took a while to replicate for each frame.
In term of success though i’m happy with the actual artwork of the pixels - I also really like how the icon of Echo and the dialogue box turned out, as they fit together well and match the aesthetic of the game. As well as this, the text animation I created also looks really cool I think - there isn’t anything I would change about that. The pixel art backgrounds I created also turned out pretty well, but I think it would have been nice to create a more refined and clean, lined background rather than the sketchy lineless style it ended up having.
Model/Mask Attempt
This was the project I had the most difficulty with out of all three I attempted. I started off wanting to make a super sculpey model of Echo, which soon changed into a wearable mask of his head, and then finally changed into a small model.
The first thing I tried was making the mask in Blender - which I have no experience with - which may have been the cause of some of the difficulties I had. I first sculpted the shape of the mask and decided to try and print it out as a pepakura file - which didn’t work initially due to the high number of polygons. if I was to make another pepakura mask I would instead work with a very low number of polygons instead to start with rather than trying to retopologise the model later which was also rather tedious.
After retopologising the model, the option to 3D print it was available - unfortunately since I hadn’t planned this from the start my model also was not suitable for this. I think that all of these attempts didn’t work properly since I hadn’t researched them enough and built them with these results in mind - I had to strongly rework my model again to get it to work in a 3D printer. Despite this difficult stage though I do really love the look and anatomy of the model I made - it actually looks how I intended it to and has the perfect cartoony/realistic mix I was going for. The 3D print had to be split up into sections and then printed one at a time. This process had some flaws which I would execute differently if I had more time - I didn’t realise how difficult it would be to make the 3D model look presentable (sanding and filling etc) so I should have printed it in a higher resolution to start with, as it was too low res to make a smooth model out of. On top of this, there were some scaling issues which meant that several pieces were very slightly different sizes to each other. To fix this, I should have kept each piece on the same document and scaled them all up together rather than each one individually. That being said, the mask I did 3D print did end up fitting my face which I consider a definite win, as I measured it all beforehand in the hopes that it would not be too small or big for my head. I should have done a lot more research into 3D printing before rushing into it.
Unfortunately due to the quality and mishaps with the 3D print (the hollow surface meant it could not be properly sanded, and one corner was missing due to the supports collapsing during the printing process - causing it to droop down and break off), I had to move to a different method. My main regret during this stage was my time management - I tried out 3 different techniques during 3 days and none of them worked to my standard so I scrapped all of them. The first was the EVA foam patterned model. I really like how all of the edges are crisp and fit together really well but unfortunately the pattern was not able to capture the exact head shape, which ended up looking a bit weird. I think this could have been remedied if i’d kept working on it and made manual adjustments. The foam I used was also far too thin (5mm) which caused the model to be very weak as it kept squashing and changing shape. It would have worked a lot better if i’d used 10mm foam I think.
The two upholstery foam attempts were actually probably fixable, again if i’d spent more time on them. The carved block head especially, I think it would have worked a lot better if my electric knife had been sharpened. I like the way which they started to turn out but I got a little too ambitious and removed too much material too fast. These two attempts were another case of me not doing enough prior research into them beforehand, and could have turned out a lot better if I watched more than one tutorial for each.
The last thing I resorted to was a super sculpey model, which has turned into one of my final outcomes. While it is unfinished, I am really really pleased with how it looks for the most part. I used my original 3D sculpt as a reference to model the head out of super sculpey, then sealed and painted it with acrylics. I’m really happy that I used sculpey as the material as it keeps its shape well and was very smooth - although I think it could have been smoother if I had used some sculpting tools or turpentine to help even out the surface.
0 notes
Text
Blueberry Chèvre Cheesecake Popsicles
When you need cheesecake but it’s too hot to bake, these creamy chèvre cheesecake popsicles marbled with fresh blueberry compote and topped with graham cracker crumbles satisfy on the warmest of days. Thanks to Vermont Creamery for sponsoring this post!
When I was nineteen, I spent a few delicious days in the Loire Valley touring castles, fawning over the scenery, and falling in love…
…with cheese.
After each meal, a cart laden with local delicacies would be wheeled to the table. The regional specialty was aged goat cheese the likes of which I’d never before tasted. They came in different shapes and sizes, each geometric beauty boasting a center of crumbly chèvre, an aged outer rind sometimes rolled in ash to give it a blue-gray hue, and in the middle of the two, a gooey layer similar to baked brie. I was smitten.
Back in the US I looked in vain for something similar, eventually giving up and making do with cheddars, bries, and goudas (did I mention I really like cheese?) It wasn’t until a friend brought a Vermont Creamery Bonne Bouche home from the fancy food show a few years ago that I discovered my cheese soul mate.
It should have been no surprise that the co-founder of Vermont Creamery, Allison Hooper, also had a torrid love affair with the cheeses of France. She modeled hers after those traditional gems when she founded the creamery in the mid-80’s. Since then, Vermont Creamery has accrued over 100 awards for their dairy, and when you taste it, you’ll know why. Their butter is cultured, European-style, full of rich flavor and boasting a golden hue. Their crème fraiche is thick enough to stand a spoon up in; the vanilla bean version is worthy of eating straight from the carton. And their aged cheeses – Cremant, Coupole, Bijou, and St. Albans – rival my taste memory of that summer in France. No small feat.
In addition to aged cheeses, Vermont Creamery sells award-winning fresh goat cheese that boasts a clean, bright flavor and creamy-crumbly texture. I’ve used their classic chèvre in mac and cheese, pizza, pasta, and salads, and I also love it in sweet applications. Vermont Creamery recently released versions flavored with smoky pepper jelly, clover blossom honey, and blueberry lemon & thyme, the latter of which inspired these popsicles.
Adding chèvre to cheesecake plays up the savory-sweet notes inherent in the dessert, and this frozen version keeps your kitchen and yourself cool on a hot day. Blueberries simmered with a bit of sugar and lemon and pureed into a simple compote offset a creamy base of chèvre, cream cheese, and milk flavored with lemon and vanilla. Swirl those together and top the pops with crumbled graham crackers (the recipe for the homemade GF grahams shown here is coming soon!) The grahams soften in the freezer but maintain their toasty sweet flavor, making the pop taste like the most sophisticated cheesecake, frozen.
Last fall I had the pleasure of attending Cheese Camp – three blissful days spent with some of my favorite foodie friends (Sarah M, Sarah F, Michelle, Lily, Amanda, Judy, and Carey) exploring Vermont, enjoying local sips and bites, and (naturally!) gorging ourselves on cheese.
In addition to making delicious dairy, Vermont Creamery has been a certified B Corp since 2014 and continually develops new ways of supporting their employees, community, and the environment as best they can. They source their cow and goat dairy from small, local farms where the goats and cows are given plenty of space, fresh air, and good stuff to eat. The freshness of the milk translates into cheeses that boast clean, bright flavor, and by buying local, Vermont Creamery strengthens their community and saves on fossil fuels. A sustainability committee monitors water and energy usage, developing new ways of conserving both. 50% of the management roles in the company are filled by women, and employees are paid to volunteer at local organizations during work hours if they wish.
Do you love chèvre forevre? Let me know your favorite ways to use it in the comments below! And do yourself a favor – pick up some Vermont Creamery goodness at a store near you and make a batch of these blueberry chèvre cheesecake popsicles while fresh blueberries are in season. You won’t be sorry.
*Bojon appétit! For more Bojon Gourmet in your life, follow along on Instagram, Facebook, or Pinterest, purchase my gluten-free cookbook Alternative Baker, or subscribe to receive new posts via email. And if you make these blueberry chèvre cheesecake popsicles, I’d love to see. Tag your Instagram snaps @The_Bojon_Gourmet and #bojongourmet.*
Blueberry Chèvre Cheesecake Popsicles
Yields: 10 (3-ounce) popsicles
Bright berries, a hint of lemon and vanilla, creamy fresh goat cheese, and a crumble of graham crackers make these popsicles little addicting treats on a warm day. Feel free to swap the blueberries for any fresh summer berry you like.
1 ½ cups (215 g) fresh (or frozen, thawed) blueberries
zest of ½ medium lemon
2 tablespoons (30 ml) lemon juice
3 tablespoons (37g) organic granulated sugar sugar (more if your berries are on the tart side)
⅓ cup (78 ml) water
3 ounces (6 tablespoons or 85 g) Vermont Creamery fresh goat cheese, softened
3 ounces (6 tablespoons or 85 g) cream cheese, softened
1 cup whole milk
½ teaspoon vanilla paste or extract (or seeds from ½ vanilla bean)
zest of ½ medium lemon
1 tablespoon (15 ml) lemon juice
6 tablespoons (75 g) organic granulated sugar
⅓ cup crumbled GF graham crackers (~35 g)
Combine the blueberries, lemon zest, lemon juice, sugar, and water in a medium saucepan. Bring the mixture to a simmer over medium heat and cook, stirring occasionally, until the juices are reduced by half and bubbling thickly, 5–10 more minutes. Let cool to room temperature, then puree smooth. You should have about 1 scant cup.
In the pitcher of a blender, combine the goat cheese, cream cheese, milk, vanilla, lemon zest and juice, and sugar and puree smooth.
Divide the blueberry puree among 10 (3-ounce) popsicle molds. Gently pour the cheesecake layer over the blueberry layer, leaving a scant half-inch of space at the top. Use a chopstick to swirl the layers together slightly. Crumble the graham crackers on top of the cheesecake layer and press the crumbles into the mixture so they stay put when frozen. Place popsicles sticks in the molds and freeze until solid, several hours or overnight. Remove from the molds and serve, or store airtight for up to a week or two.
Source: https://bojongourmet.com/2018/08/blueberry-chevre-cheesecake-popsicles/

0 notes
Text
Our interview with the Groo Gadgets Team, The creators of Spiraloid
Are you – just like us – captivated by Spiraloid? A dizzyingly beautiful 3D adventure… If so today we’ve got an interview you simply can’t miss!
If you’d like to check out our review of Spiraloid, you can also do that here.
Today we’d like to share with you our interview with the Groo Gadgets Team, the developer of Spiraloid!
Before we start, we’d like to thank the Groo Gadgets Team for participating in our interview, and for spending some of his valuable time answering our questions. Thanks!
Now without any further ado, our interview begins.
The Interview
Ok first up, why did you decide to make Spiraloid?
I’ve been learning the art of game development for over 10 years and have started (and stopped) development on around 10 games. Since I’ve always been a “team of one” I had to whittle down the grandiose ideas into something that I knew I could complete on my own.
In early 2016 I put my foot down and said to myself “I have to FINALLY finish a game!” so I started researching and playing casual games from the likes of Boombit and Ketchapp. I found a game called Spike Dash which was quite fun but ultimately a bit boring.
It’s a 2D game where the player is a cube that rotates around a circle. Spikes start popping up so the player taps the screen to perform a single jump. I started thinking how I could take such a simple concept and put my own “twist” on it.
The eureka moment came when I had the idea to extrude that gameplay idea into 3D and when I thought of a spiral (or more accurately a helix) everything just came together quite quickly. A prototype was playable within 2 days, from then I knew this would be the first game I would finally finish!
Here comes the obvious next question, how on earth did you manage to create such immersive 3D graphics? (To be completely honest, Spiraloid looks so good, it almost looks wrong on a mobile device!)
Thank you so much for your praise! My professional background has been in 3D animation and motion graphics for film and TV so my strength has always been my design skills.
I really admire games like Monument Valley and Chameleon Run for their simple yet beautiful low poly style. The best thing about low poly graphics is that not only do they look amazing if done well but they are also much quicker to produce than more textured 3D games.
My tool of choice is a free 3D software package called Blender. I have used other commercial software packages before but none of them struck a chord with me like Blender has, especially since most other packages cost around $3,000 or more! Almost all of the 3D elements in Spiraloid have no textures at all, the colours are embedded into the 3D models by a technique called “Vertex Colouring”.
To be honest creating the graphics was the easiest aspect of creating Spiraloid. It would take me an average of one and a half days to create a new level from scratch which I did find surprising myself. You will be happy to know I have many more levels planned including an underwater level with giant whales that swim by the spiral and an outer space level where you travel through space stations and asteroids. The best is yet to come! 😃
The next question is a little less obvious.
At first, Spiraloid seems like it is going to turn out to be an impossible game, but as you progress throughout the game, you’ll soon realize that Spiraloid is hard, but still very achievable.
How did you manage difficult levels when developing Spiraloid?
It’s great that you’ve raised this point since balancing the difficulty has been a real challenge. When I watch people play I can see them struggle with the difficulty, they don’t jump quick enough to avoid spikes or they don’t time their double jumps properly. Soon after I got the prototype working I had the idea that the player should jump to the beat of the soundtrack so I designed the game around that mechanic.
You can still play the game without audio but if you can tap your foot to the beat of a song you should be able to tap your screen to the beat of the game! Each music track in Spiraloid has exactly the same tempo: 120 BPM so the speed of the gameplay never changes, even when the whole world starts to spin. I have designed the game so that most spikes and obstacles need to be jumped on the second beat (typically when you hear a snare hit in the music). To help the player I have also made the hitbox of the spikes much smaller than the spikes themselves so there is a slight margin for error when you jump a spike and when you land on the other side.
Even with all the tweaks I made to help the player, I find that most people struggle to get a score of 10 (for the record my wife has an average score of around 500 on each level). As you have pointed out with a little practice and some trial and error you can master the game and play for many minutes if you follow the beat and observe the spike patterns. Once you have mastered the first two levels (Amethyst and Silicon) you will find the challenge ramps up significantly when you first play the Obsidian level (fun fact: Obsidian is my tribute to the brilliant TV show Stranger Things!). Instead of spikes that pop up, you encounter mines that float up and down to the beat. Where spikes are always below you mines can be above or below you and explode on contact. This is where upgrading the shield power-up is vital so you can learn how to navigate mines without exploding!
Now for some extra geeky questions. What programming language and or software did you use when making Spiraloid?
Since I have a background in design I had very little experience with programming. I started making games in the early 2000’s with a program called Blitz Basic. While I never completed any games it did give me a good grounding in the basics of programming.
When the first iPhone was released I knew I had to get on board and start developing mobile games. That’s when I discovered Unity 3D and have been using it ever since. At first, it was daunting since I had never used the C# scripting language before and I was determined to create games on my own. I then found a tool which would be the best asset I have ever downloaded for Unity; PlayMaker. PlayMaker is a visual scripting tool that lets you program visually with nodes.
Instead of writing your own code it uses code snippets called “actions”. The actions are simple functions like moving 3D objects, detecting button presses, etc. Since I already had an intermediate understanding of programming the learning curve was very shallow and I had prototypes up and running within days.
If anyone reading this has been dreaming of getting into game development but doesn’t know where to start I would highly recommend a combination of Unity and PlayMaker. I should mention that I wouldn’t have been able to complete the game without the help of assets from the Unity’s Asset Store. When I had the idea to sync the game to the music the first thing I did was search the Asset Store and I found a brilliant tool called Koreographer by Sonic Bloom. Not only did it do exactly what I wanted but it also included PlayMaker actions so I had it running in my game within a couple of hours.
Ok, here is a difficult question. What was the hardest problem you needed to overcome when developing Spiraloid?
Well, I can start by telling you that the easiest part was creating the gameplay itself, once I knew what I needed to do I just did it with next to no real issues. The hardest part was integrating all the systems that needed to be in there to form a fully functional game.
Implementing things like language localization, in-app purchases, leaderboards, etc was a real challenge and completely broke the game a few times. The lesson I have learned is to start implementing those systems soon after a good prototype is working.
There isn’t all that much text in the game but since I added localization after I had all the menus in the game it was very time consuming to set everything up to work with multiple languages. Other than those issues it has been a reasonably smooth experience. I started prototyping around May 2016 in my spare time then I went full time from October to the start of January this year so for just one person it has been a reasonably quick process.
Last question. Where do you get your inspiration or ideas from?
I play a lot of games! I have all the current consoles and I download and play around 3 games every week from the App Store. I do tend to gravitate to obscure indie titles since they usually are in line with the kind of games I like to make.
I am mainly inspired by games that bring new ideas or fresh takes on tried and tested gameplay mechanics; this inspires me to come up with my own ideas that push the boundaries. I knew from the first prototype that Spiraloid would be a visual feast so I started doing research on visuals made for electronic dance music.
One of my inspirations has been the work of Beeple (Mike Winkelmann), the visuals he creates in sync with EDM are amazing. I also have a Pinterest board that contains loads of images I have found on the web that have inspired me to create the visuals in Spiraloid.
A few words to Spiraloid fans on Edamame Reviews.
I have a couple of projects in the works but haven’t locked anything in yet. One thing that I can tell you is that I plan to team up with another developer for my next game, solo game development is REALLY time-consuming since I have to do every single aspect of the game myself.
Before I start anything new I have to prepare the Android version for release which should be out soon. Another thing I have considered with Spiraloid is creating a version for VR. I actually spent a lot of time in the early stages of development creating a version of Spiraloid for Google Daydream and Gear VR. Can you imagine what Spiraloid feels like in VR when the world starts to spin? I can tell you a strong stomach is highly recommended😃
Lastly a few words on how you feel about Edamame Reviews and our service.
I’ve been following Edamame via Twitter for a while now and more often than not click through to read the reviews. I really enjoy the articles and interviews as I always like getting an insight into the minds of fellow developers, I hope your readers find this interview insightful as well!
There are a lot of gaming sites out there but not so many mobile-only gaming sites, this site fills the void very nicely indeed!
This slideshow requires JavaScript.
Thanks for the incredibly detailed interview! Want to give Spiraloid a try? The download link is just below😉
Let us know what you thought in the comments section below and as always thanks for following edamame.club
Interview with the Groo Gadgets Team, The creators of Spiraloid Our interview with the Groo Gadgets Team, The creators of Spiraloid
0 notes