#I keep resizing changing and just going through different colors for hours
Explore tagged Tumblr posts
Text
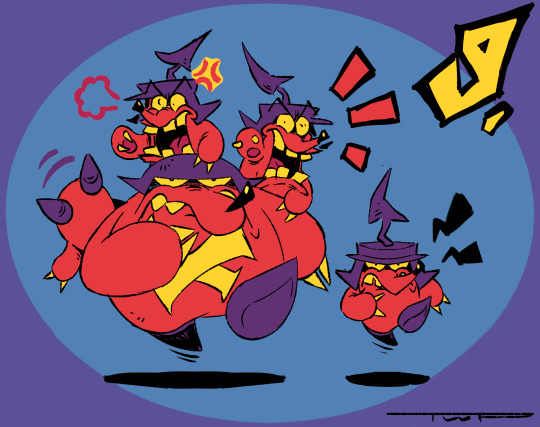
Day 9: Ballbuster Bash
POV: your alcohol is about to be stolen
#antonblast#antober#ball busters#AGAIN#To be honest Im not so proud of this one#I keep resizing changing and just going through different colors for hours#And I'm still not entirely satisfied with it
79 notes
·
View notes
Note
Hello! I hope you don't mind me asking, but how do you come up with your gif compositions? They're always so pretty and they fit together perfectly! They never look messy even when you incorporate a lot of things into them.
Hello dear one 🥺 this is so sweet of you to say, i don't know if you realize how huge of a compliment this is for me sdgsd- i'm pretty self conscious about my blending but the thing is, there's no right way to do it! i actually like it more messy right now than i did a few years ago, if you scroll back through my edit tag you'll see how much it changed as i experimented more with different styles.
Most of it is just about choosing the right scenes and that'll come with experience. Once you get the basics down (eg. it's usually easier to blend two scenes that have similar lighting, or that at least are both dark/both light even tho a white background is a bitch to work with, that you can manipulate some of this shadow/light balance through curves etc.) it's really just a matter of training the eye to put together things you think would work well!
Don't think I don't spend time, sometimes hours, on this when I gif! Sometimes it's easier, I think visually so when I get an idea for a gifset I usually already know more or less which scenes i want to blend but the grunt of the work is done mid-photoshopping. When it's something like TUA, which i'll admit i basically know scene-by-scene so it's almost like scrolling through a pictures album, I can speed up the process, other times it takes a little more trial and error.
In my latest gifset for example, I knew I wanted the 6th gif to have that one scene of Allison and Viktor and I knew I wanted to pair it with Klaus and Ben. But I didn't know which one would work better since I had to manipulate colors quite a bit to create enough space for the blending not to look ugly. I tried a few ones out and then decided a wider shot would work better because I wouldn't need to worry about faces becoming indistinct. For the 9th gif I made the decision to use that Klaus, Diego, Five scene even if it doesn't look really good and it was difficult to color purely because I wanted the parallel with the words to work that way. Here on the other end, i created all my black spaces just using shapes that were already in the gifs, enhancing the shadows and painting over the lighter points.
Always remember you can also experiment with perspective! I almost never keep the scenes at the same size, depending on where I want the attention to go first. So play around! Resize them, put them upside down, look at the shadows, can they work as a frame for my second/third gif? And if not who says I can't take a black brush and create those spaces myself? So really, it's just about practice as everything else is but also if you're just starting and want to focus on the technical part without spending time looking up scenes, it's not a bad idea to write them down as you watch them, if they caught your attention! I used to do this all the time, i have tons of journals with just lists upon lists of scene I liked and gif ideas lmao
As I always say, this should be fun but it's also a creative outlet, at least for me! So treat it as such, with the passion and the lightness it deserves ♥
#replies#anonymous#text#this was honestly really emotional for me to read!!#composition is the thing i enjoy the most to work on#and it's also the first thing i notice in people's gifsets!#such a fun experience all around
2 notes
·
View notes
Text
Tu... torial? Pt. 5.
Final part of my tutorial! This is a little all over the place, because that’s how I am in this stage of editing. Also I didn’t proofread this...
Open this in dashboard for best view of the screenshots.
Disclaimer: I have no formal training for any kind of graphics stuff, I work in an office as a receptionist - I serve coffee for a living. I am absolutely self taught and while I consider myself pretty comfortable with photoshop, that doesn’t mean that there isn’t about a gazillion of other things that can be done that I have no idea about. There are people far superior than me in the Sims community. This is just how I do it, with techniques I have picked up through the years. Some things I go over in these will be pretty basic, some things a little more unorthodox. Disclaimer 2: My edits take time. This is what I do to relax, one edit takes several hours for me. Sometimes days :))) Disclaimer 3: My photoshop is in Swedish, which is my first language. I tried my best to find the English translations for every step that I do.
Tools used: The Sims 4, Adobe Photoshop 2020, One by Wacom Pen Tablet (very basic and unfancy).
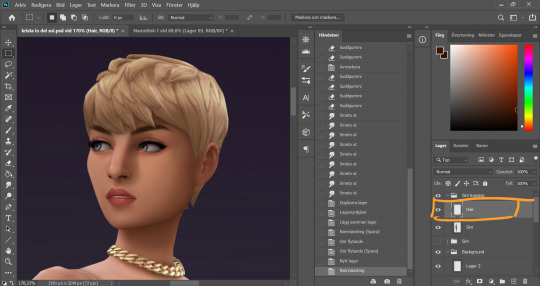
It´s hair time baby! I very much enjoy drawing hair on sims. I make a new empty layer on top of my base Sim layer.
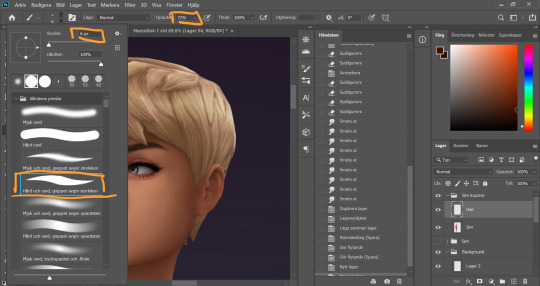
This is where having a drawing tablet makes a huge difference. We need the brush to be sensitive to pressure to get the effect of hair strands. I chose a hard brush, small small size (how small depends on the picture size of course, but I usually land somewhere 6-9 px)
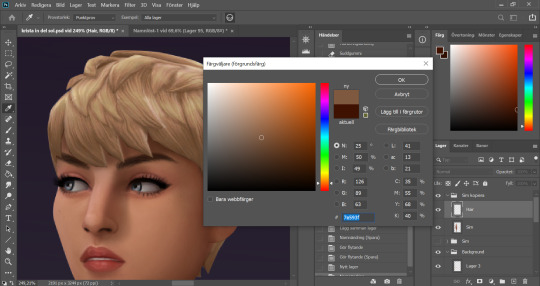
I pick up a color from the hair, I usually starts with a medium light color.
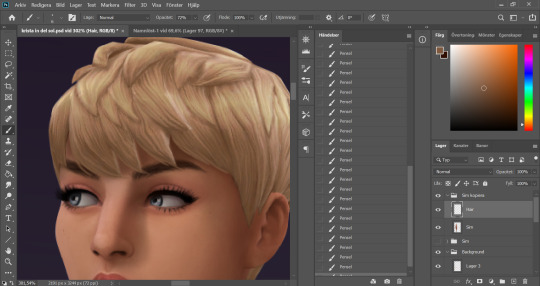
I start by drawing strands around any tips of the hair so they don't look quite so solid. I do this part with both short and long hairs. Hot lazy tip: straight unlayered hairs is the absolute easiest. This is a layered hair so I start with the bottom and work my way up. I pick up different colors from the hair as I go along, to add dept.
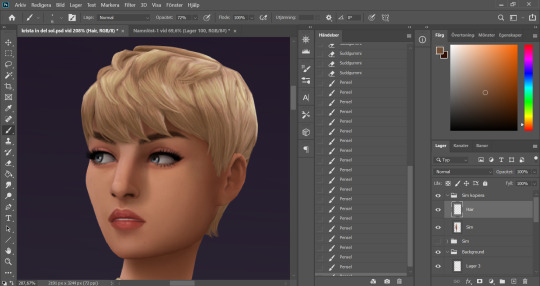
Continuing up in the hair and add strands to the pointy bits.
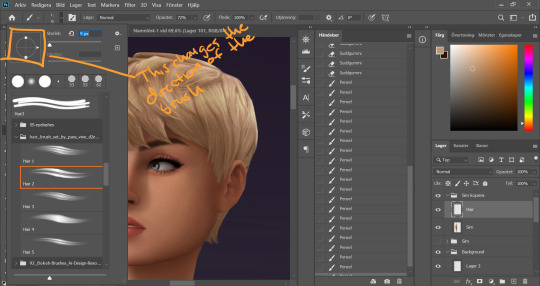
When I feel like the pointy bits have been softened I select one of my hair brushes. I use these ones by Para Vine.
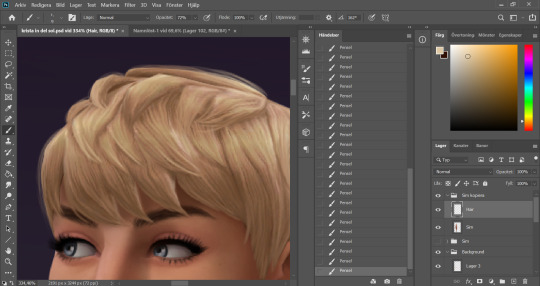
I start painting "around" the hair with one of the lighter colors picked up from the hair, changing the direction of the brush every once in a while for a more natural result.
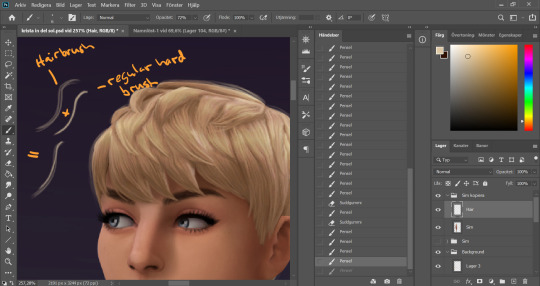
After this the hair is looking a little fuzzy, so I'm going to go back with my small harder brush to fill these parts out.
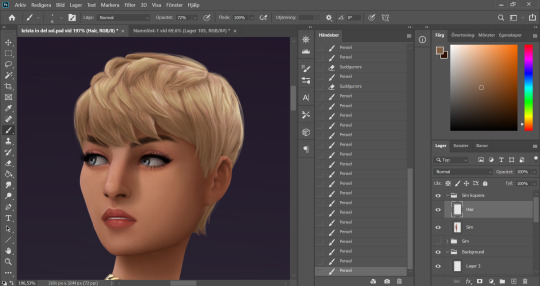
I don't add a lot of them, just small bits here and there for filling.
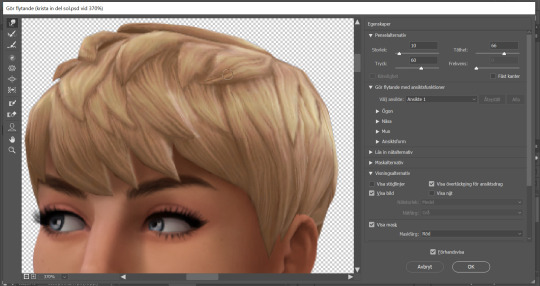
This is a little overkill but... now we have some of that "squary" thing going on in the hair as well that are still showing through our painted layer. Now we could paint over these, but painting can actually be overdone and I wan't to keep the hair recognizeable because the creator put a lot of work into it! So I go into liquify and smooth over any wonky lines still showing, just slightly.
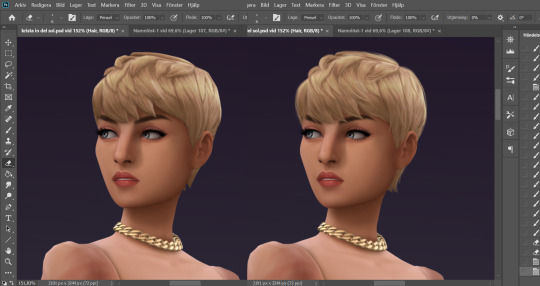
A comparison of before and after hair. Still recognizeable, but softer.
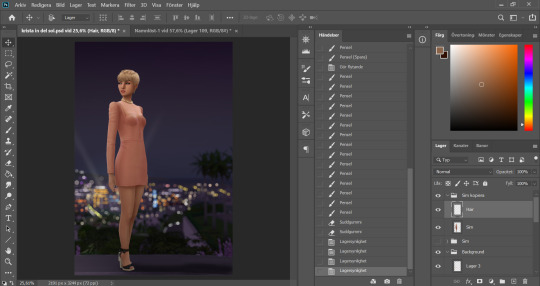
This is our result so far. We've come a long way, but we're not done.
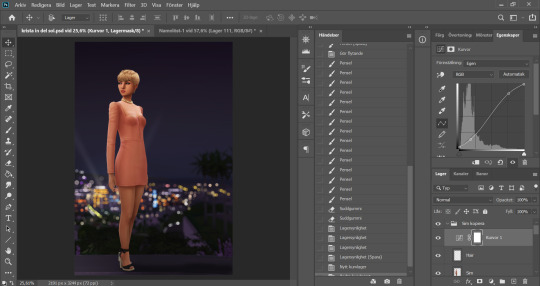
At this point (or actually sometimes sooner) I add an adjustment Curves layer, this will not end up in the finished image, this is just to give me an idea of what the image might look like with more contrast (which we will add later). I keep this at the very top of the layer panel and turn this on and off as I go. Very important to have it turned off if we are going to eyedrop a color and use that to paint, since it would pick up the wrong hue if we have it turned on.
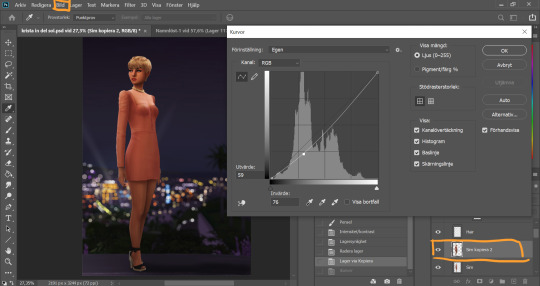
Now I still want the front of my sim to be a little darker to fit my lighting, but I don't want to go over with any more shadow. So I duplicate my Sim layer, and go to Layer -> Adjustments -> Curves. This will only change the active layer, as opposed to creating an adjustment layer down in the Layer panel that will change all layers below it. I drag the curve down a bit to make my new Sim layer darker.
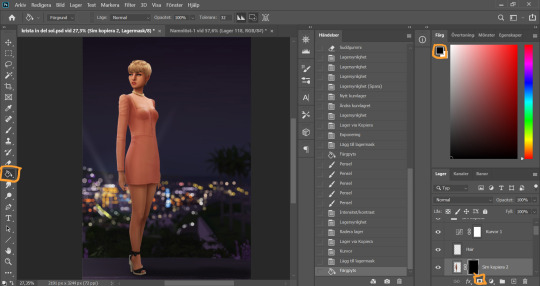
I add a layer mask to my new Sim layer, and bucket fill it with black color so the new layer gets hidden.
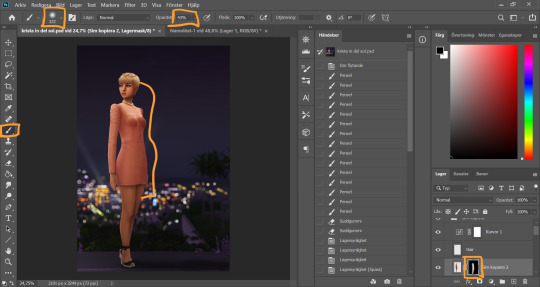
I chose an absolutely HUGE soft brush, with medium opacity, and starts painting white on the areas where I want the new darker layer to be showing. And blend by going back with black where the line is to harsh.
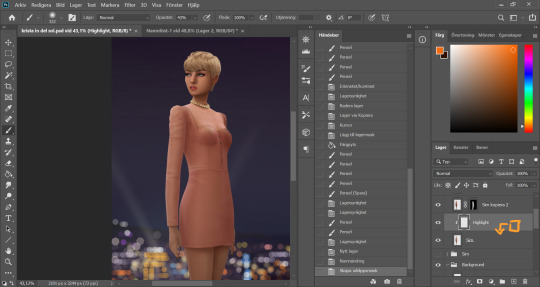
Time to add some highlights. I create a new empty layer between my two Sim layers, and add a clipping mask by holding Alt and hovering on the line between the new layer and my bottom sim layer, until the little square with the arrow symbol comes up and then click. This will make whatever I do on my new highlight layer, only show up on the areas where the layer underneath is filled.
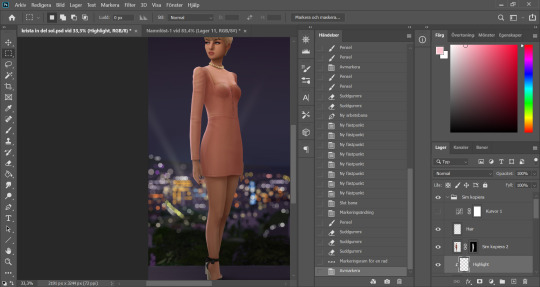
Time to paint. I disable the curve adjustment layer for this. I choose a bright color, in this case a light pink because I didn't want a contrasting color for this picture. I go with a big soft brush around the edges where I want my highlight to hit. In this case, the arm, the hand, the arch of the back and the calf. I didn't add anything to the face in this picture because I didn't like the way it looked, but usually a little highlight to one of the cheeks is just *chef's kiss*
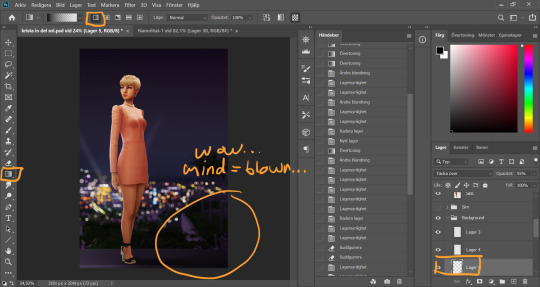
And somewhere around here I got really stuck and really struggled to follow with this tutorial. I felt the picture was lacking something and I tried several different things. I added light rays, tried creating different light sources, there was a moon at some point. But I ended up with just a simple additional gradient shadow down in the right corner (on a new layer down in the Background layer group). Life changing…
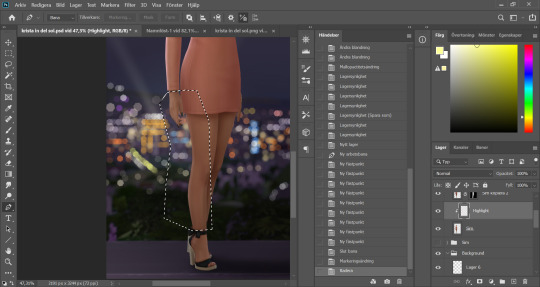
And then I didn't like the pink highlight on the skin (sigh, this is how I work, but it’s not recommended to be this indecisive) so I removed that and added a more beige-yellowee highlight instead. And forgot to take a picture after the highlight was added....
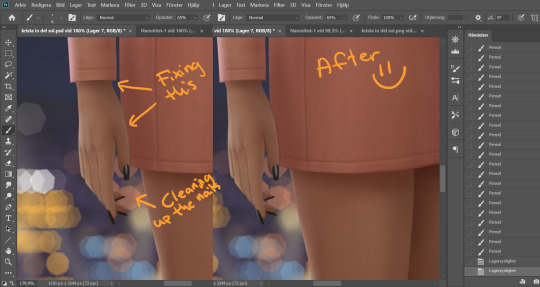
And now I go into nitpicking mode. I add a new empty layer on top of my Sim layer, I add it under the highlight layer so it automatically takes on the clipping mask of the Sim layer, I name it Clean-up Crew and go in to refine anything slightly wonky. Picking up colors with the eyedrop tool and going over flaws with a tiny brush.
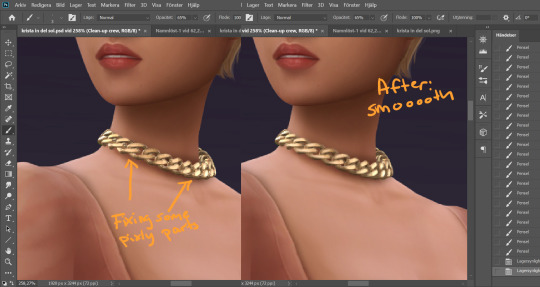
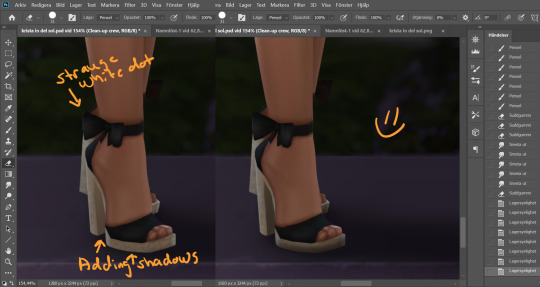
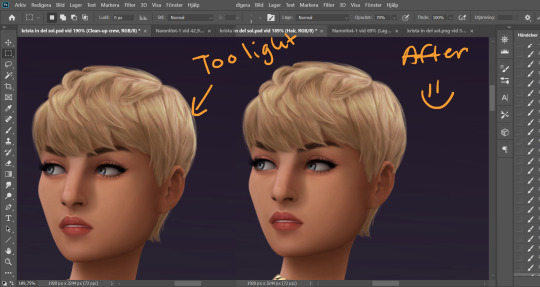
When I fixed this little light area on the back of her head I left the Clean-up Crew layer and went to my Hair layer instead, because I still have that separate and it's above all the other layers.
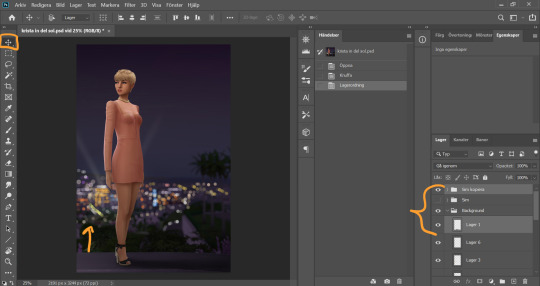
I thought my sim was a little too far down in the picture so I moved her up by selecting my whole Sim layer group and the layer on which I have her ground shadow, chosing the move tool and pushing them up. This will move all the layers in the Sim layer group as well as the ground shadow layer equally.
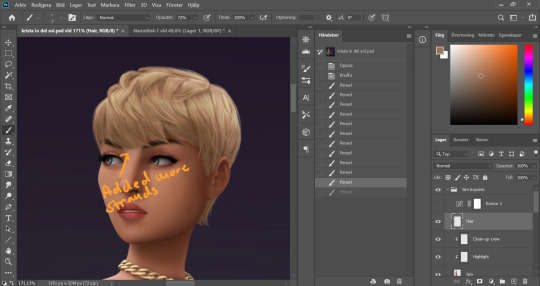
I'm telling y'all, nitpicking mode could go on forever. Added more strands to the bangs.
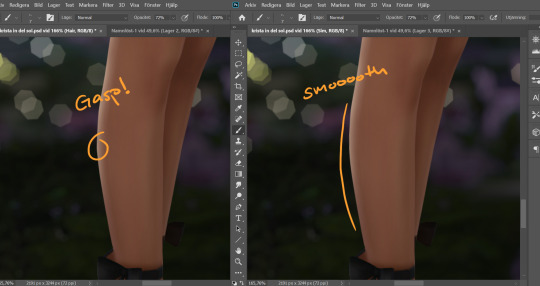
Noticed a little pointy part on the calf, so I wen't into Liquify on the base Sim layer and smoothed that out. Since the highlight layer has a Clipping Mask corresponding to the Sim layer, the highlight stayed in place.
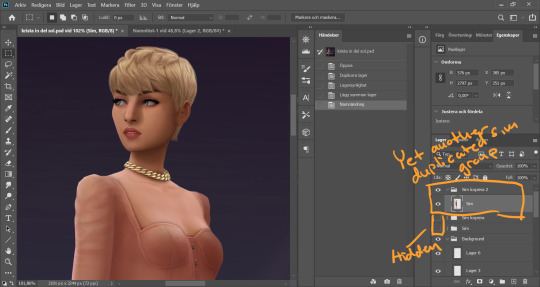
I duplicate my Sim layer group once more, and merge the layers within this group. So now the Hair, Highlight and Clean-up Crew is all merged onto the Sim layer. I hide the previous Sim groups.
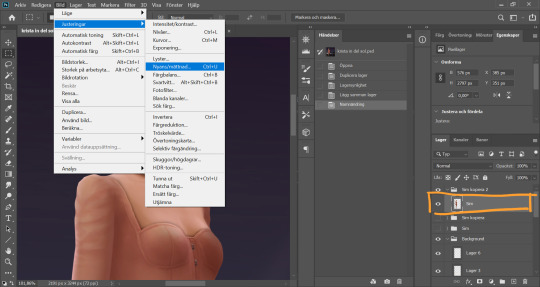
With my new Sim layer selected, I go to Image -> Adjustments -> Hue/Saturation. I want to make my Sim a little less bright so it will match the background a bit better.
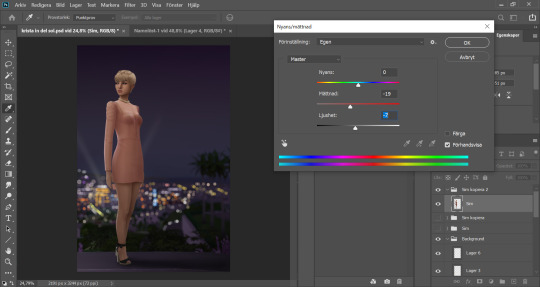
I drag down the Saturation and Brightness slider a bit until I like what I see. After this I save my whole image as a PNG-file because from now on I want to edit the whole picture but still want to keep this psd-file as it is for anxiety purposes. Important: I disable my curves layer before saving this as a picture, I don’t want that brought with me into the next steps because I will be adding new curves there.
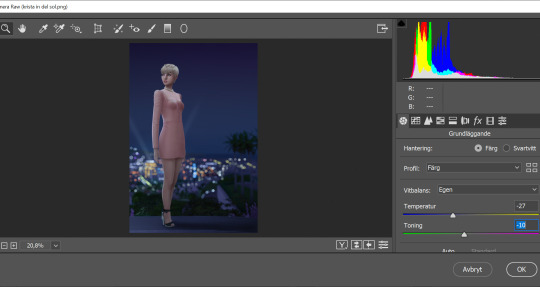
I open my new saved PNG-file. I go to Filter -> Convert for Smart filters. This will allow us to go back and change any filters we add to this layer. I go to Filter -> Camera Raw Filter and for some reason this window opens up humongus. I start by dragging down the temperature. How much depends on the picture, usually more if it's nighttime.
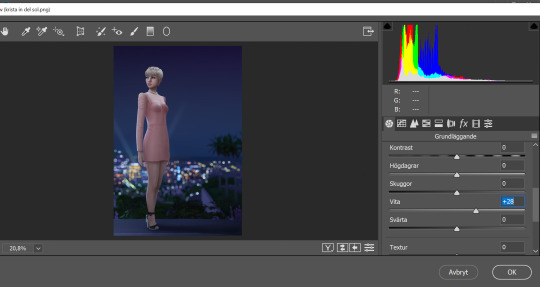
I pull up the Whites a bit for a cleaner look.
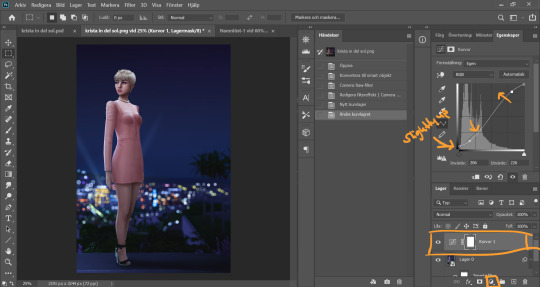
Now I add a Curve Adjustment Layer. Now you can add Contrast in the Camera Raw Filter as well, but I prefer the curve layer because I like to control the different levels. This way I can make my darkest parts a little brighter, giving just a little washed out flair to it all.
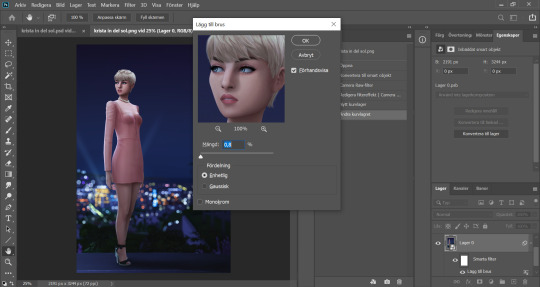
I select my background layer again and go to Filter -> Noise -> Add Noise and choose a level that I think looks good. This just brings the picture together a bit more. Also vintage vibes :)))
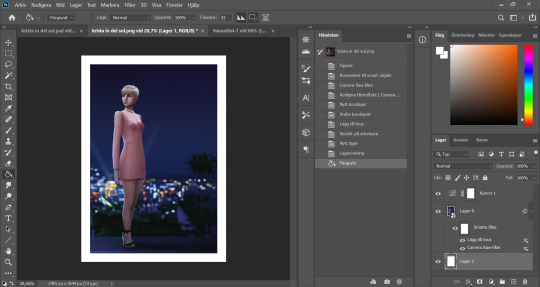
I add my frame (because it´s my aestethic and I think it looks cool on tumblr) by resizing my workspace and adding a filled white layer underneath the background layer.
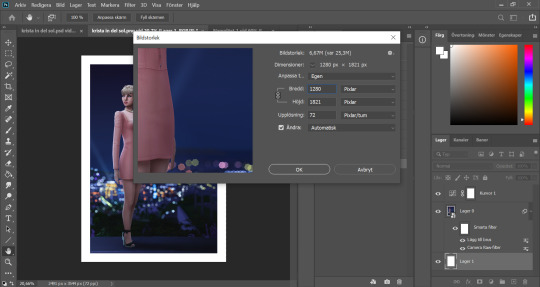
I resize my picture (Image -> Image Size) because we don't need it to be huge.
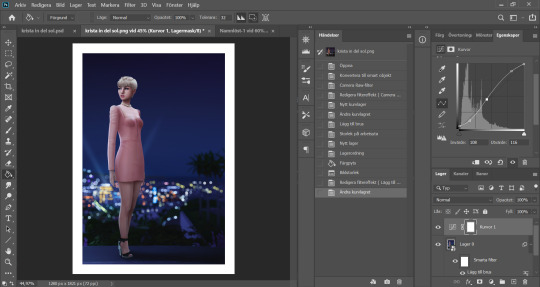
And they I just fine tune the Filters and Curves until the end of time :’)))
And that is that my friends! That’s the end of the tutorial! I hope you could follow somewheat and that someone found it useful. Thank you for reading and never be afraid of contacting me if you have any questions :) I’m very friendly.
65 notes
·
View notes
Text
Take it Slow - Part Thirty-Nine
a/n: okay this is my first shot at a harry:y/n fic, and it will be multiple parts. y/n had a bad experience with an ex over a year ago, and finally accepts her coworker and good friend Niall’s invitation to go on a blind date with his friend Harry.
Warnings: TW - Mentions of past abuse! Angst.
Masterpost (all previous parts can be found in the masterpost)
You follow Harry and wait for him to finish peeing, as he really needed to go before he could elaborate further. He sits on the bed next to you.
“So…what about marriage exactly?”
“Lou’s gettin’ ready to propose to El soon.” The color comes back into your face. “Why, what did you think I meant?”
“I…don’t know. Um, so when’s he going to do it?”
“That’s what we were talkin’ about. Said he wanted me there to take pictures without her knowin’. Soon, I think. He still needs to buy the ring. They’ve been together a long time, seems like the next best step.”
“They really love each other.”
“I think they wanna start growin’ their family more, but he knows she wants to be married first. He doesn’t personally care about the order of things. But he’d do anythin’ t’make her happy because she does so much t’make him happy.”
It warmed your heart to hear him talk about them like that. And it made you so happy to know he would want to be involved in such a special moment.
“Being an adult is wild sometimes.”
“What do you mean?”
“I don’t know, it’s like all of a sudden you and everyone around you starts checkin’ off these societal boxes, and sometimes you don’t even realize you’re doin’ it.” He sighs. “I barely see him as it is, once they really settle down…” He twiddles his thumbs in his lap. “I don’t know, it’s stupid.” You put your hand on his shoulder.
“It’s not stupid honey, I know how much you care about Louis. I felt the same way when Kate got married, well maybe not the same exact way. I don’t think I’ve ever seen a stronger friendship like the one you and Louis have.”
“He’s a couple year’s older than I am, he did the university thing a little later. I just always sort of looked up to him, for whatever reason. He had more life experience, I could ask him anythin’. He was always there f’me, and f’Niall too. He’s like the big brother I never had.” He looks at you. “Sometimes you don’t realize that some of the best years of your life are happenin’, you know?”
“Yeah, I get it.” You give him a comforting smile.
“But then again, some of the best are ahead.” He kisses your cheek. “I’ve never felt this way before…about another person. I know next week it’ll only have been five months between us, and I know it looks like we moved fast in some cases, but I…just needed to have you in my life, as my own.” His words burn into you in the best possible way. “I’m so glad we’re doin’ all this, no one else I’d rather be livin’ with.”
“Other than Louis or Niall.” You giggle.
“Yeah, other than them.” He giggles too. “Seriously though, I love you so much.”
“I love you, Harry.” You kiss him. He looks down at his hands and twists the rose shaped ring on his ring finger.
“You mentioned that this was your favorite ring of mine.”
“Mhm.”
“Would you…like to have it?”
“Oh Harry, I couldn’t take your jewelry from you.”
“Please, just try it on, I’d like you to have it.” He takes it off and smirks. “M’actually not sure what finger this would even fit on, your fingers are so much smaller than mine.”
“Here try the middle.” You hold out your right middle finger.
The only other ring you wore was on your right ring finger. It was just a simple clatter ring, which you were more than happy to flip over when you and Harry made things official months ago.
“It’s a tad loose.” You giggle. “But I don’t mind, I don’t like when rings are super tight.”
“Yeah, but you might lose it. What size do you wear, I could have it resized.”
“But then it wouldn’t really be yours anymore. You wouldn’t be able to wear it when you wanted.”
“I’d only want you to wear it.”
“Well, I know my ring finger is a seven, so my middle is probably an eight. Let me see how it goes wearing it like this in the office tomorrow. If it comes off a bunch we can get it resized.” He smiles.
“Alright.” You hold out your hand to look at it.
“It really is a gorgeous ring.”
“Gorgeous ring for a gorgeous girl.”
“Are you sure you won’t miss it?”
“Just gives me an excuse to buy another one.” You scrunch your face. “What?”
“Nothing, my nails are just super chipped. I think I’m gonna paint them.” You get up and grab your polish remover, and a few different colors. “Care to join me in the living room? We can get set up on the coffee table.”
“We?”
“Sure. I have a nail kit, I’ll do both of ours.”
“Deal.”
You both go out to the living room. You start with Harry’s nails first. You trim his cuticles and file his nails after removing the polish.
“Do ya have any pastels love? I really like that peach color.”
“Sure!” You go through your bag of polish and find the one he’s looking for. “This one right?”
“Yup.”
You carefully put the color on his nails. You work on your own nails next.
“What color are you goin’ with?”
“You’ve inspired me to do a pastel as well, I think this purple?”
“Ohh, I like that color a lot.”
You paint your nails, and put them out in front of you to look at. You’re happy with your work.
“Who needs to go to a salon?” You laugh.
“I personally enjoy the hand massage you get at the end, but this was nice too.” He turns the TV on, and you blow on your nails. “Do mine.”
“You’re such a baby, blow on your own nails.” You giggle.
“Awww c’mon.” You roll your eyes, and bring his hands up to your face. You blow cool air on his nails.
“It’s quick drying polish, should be dry enough soon.” You put his arm around you, and lean into him. “Ugh, I do not want to go to work tomorrow.”
“Same here. Back to reality. M’gonna really miss bein’ able to fuck you at any hour of the day. I’ll have t’come to your office on your lunch breaks.” You look up at him and scoff.
“Very funny.”
“M’serious, I’ll do it.”
“There’s no way in hell I’d ever have sex in my office. That kind of stuff only happens on TV or in a movie.”
“Sure it does.”
“Harry!”
“What?”
“Have you had sex where you work before?”
“Not where I work, no.”
“You’re a deviant.” He laughs.
“Are you going to tell me you never had sex where you shouldn’t have?” Your cheeks heat up.
“Why do we always talk about our past hookups?”
“It’s not a big deal.”
“Yes it is, I don’t want to discuss that kind of stuff anymore.”
“Just when you’re drunk.”
“Excuse me?”
“The other night, several of us revealed we’ve had threesomes, including yourself.” You groan and cover your ears. “Why are getting so shy about it all of a sudden?”
“Because I…I really don’t want to think about anyone else I’ve slept with. You’re the only person I want to think about in that way, alright?” He kisses the top of your head.
“Alright.” You both turn your attention back to the TV. “So…that was a no on fooling around at your office.”
“A big no.”
“Probably for the best, don’t think you’d be able to keep yourself quiet.”
“Me?!” You scoff. “Have you heard yourself when you really get going?”
“Maybe we should record it sometime and then we can see who’s louder.” You roll your eyes so hard you feel like they’re going to roll right out of your head.
“You’re a little stinker today, aren’t you?”
“What’s a matter? You don’t wanna make a sex tape that could potentially be leaked to everyone we know?” He asks sarcastically. “Pity.”
“You’re an idiot.” You laugh.
He tackles you down on the couch, and tickles you, making you laugh harder.
“Take it back.”
“Please! It’s too much!” Your eyes start to water. “I take it back!” He stays hovering over you. He gives you a second to catch your breath.
“That was easier than I thought.” He chuckles.
“I hate being tickled.” He kisses your cheek and then just under your earlobe. Your breathing hitches when he sinks his teeth in.
“Can I ask you something?” He sits up, and helps you sit up too.
“Sure.”
“Um…it’s about going in from behind.”
“Harry.”
“Can ya just tell me what about that position frightens you? Maybe there’s somethin’ I could do to-“
“No!” You stand up immediately. “I don’t have to explain anything to you if I don’t want to.”
“You don’t need to get upset, let’s just talk about it.”
“I don’t want to talk about it! This is the third time you’ve asked me about this, you should just take no for an answer. You’re lucky we’re even having sex at all, you know that right?”
“You know what? Just fucking drop it, okay? Forget I said anythin’.” You were riled up now, you couldn’t just drop it.
You mumble something under your breath and walk towards the bedroom. You slam the door closed. Harry sighs and puts his head in his hands. Before he can get up to go check on you, you’re coming back out, completely changed into your gym clothes, searching for your keys.
“Where are you goin’?”
“Where the fuck do you think?” His face falls.
“Don’t talk to me like that, please.” You roll your eyes and he stands up. “I swear to god, if you roll your eyes at me one more time.” You slip your sneakers on and get in his face.
“You’ll do what Harry?” He looks at you, jaw clenched. “That’s what I thought.” You brush by him and grab your jacket. Just as you’re about to leave, you sigh, and turn around to look at him. You were never one that liked to leave angry. “I’ll be back in a little while. I just need to cool off, okay?”
“Okay.”
//
While running on the treadmill, you try to wrack your brain on how your day did a complete 180. You had a nice lunch with his friends, and he even gave you one of his rings! You had a nice time doing his nails, and then…he just had to bring that up. You turn the speed up to run faster. How could you possibly look at him and explain that that was the position you were assaulted in. You knew he’d be gentle with you. Maybe you’d have a flash or two, and then maybe you’d feel better. You were looking forward to your next appointment with Dr. Mara now more than ever. Luckily, you planned to see her during your lunchbreak tomorrow, so you wouldn’t have to wait too much longer.
It wasn’t Harry’s fault, you were just mad that he brought it up again. You thought he understood that was a no go for now. Maybe you’d be able to work up to it, but right now the thought was just too scary. And what was it about that specific position that he wanted to do it so bad? You gave him everything else you possibly could. To be fair, you both had stuck to pretty basic positions. He was either on top, or you were. You used to like doing it from behind, you knew he’d be able to get in much deeper that way. The thought sends a shiver up your sweaty back.
Harry didn’t know what to do with himself while you were gone. He thought he might go to the gym too, but he also wanted to be home when you got back so he could apologize for setting you off. He was sort of annoyed with you. You could really act like a brat sometimes. He hated when you’d roll your eyes during an argument. It was something you did a lot, and it went right up his ass. He groans, and grabs his keys. To the gym he goes. He kept his gloves and bag in the trunk of his car.
The punching bag was the perfect thing to take his mind off your fight. He only stayed for about forty-five minutes. He didn’t like the idea of you coming back to an empty apartment. He was sitting on the couch shirtless, hair half up in a little pony on the top of his head, taking the tape off from around his wrists when you walked in. Usually he’d take the tape off at the gym, but he was in a rush. You were a sweaty mess. After running two miles, almost three, you did a few different strength sets. You furrow your brows at him. You had never actually seen Harry after a workout.
“You go to the gym too?” You ask quietly.
“Yeah.”
“That’s good.” He had so much power over you, and you had no idea if he knew it or not. He looked good enough to eat. “Your hair looks cute like that.” The smallest smile creeping on your lips, looking at the little hair tree on his head.
“Gotta keep it off of m’forehead somehow.” He shrugs, finishing with the tape. He gets up to throw it away. He leans against the island and looks at you while you guzzle down some water. “I need to go rinse off. Did you wanna go first, or can I?” Both of your eyebrows raise.
“Um, you can go first if you want.”
“Thanks.”
He turns and goes into the bathroom. You go into the bedroom once you hear the bathroom door click. You strip yourself of your sweaty clothes, and wrap a towel around yourself, waiting for your turn in the bathroom. He was in and out quick since the two of you showered earlier today. His towel hangs low on his waist when he comes out. You swallow hard.
“Left the water on for ya.” He says without looking at you. This sets you off again.
Why the fuck was he mad? You roll your eyes again and suck your teeth. He catches this. Before he’s able to grab you, you slam the bathroom door shut and lock it. He groans and puts on a pair of sweatpants. He goes out to his desk, and puts his earbuds in.
You scrub yourself angrily. You were seething with rage. Your workout having done shit for you. Maybe you were feeling hungry from having such a light lunch. You remember you need to meal prep your lunches and you sigh. You dry off, and throw nothing but a t-shirt and underwear on. If he was going to act like an asshole, you were going to make him miserable. He didn’t acknowledge you when you came out, which was just fine with you.
He looked over his shoulder and saw you taking a ton of things out of the fridge. Were you going to make dinner? He sees you grab your Tupperware. Nope, you were meal prepping. You had said you would do it for the both of you, he wondered if you still would.
You were being a brat, but you weren’t going to be a jerk and not make his lunches, especially after you told him you would. You filled a pot with water, and put it on the burner to boil. You were going to make a veggie stirfry with the black bean pasta Harry likes so much. As the water was boiling, and the pan was heating up, you chopped up all of the veggies. You rummaged through the cupboards for your second set of Tupperware.
Whatever you’re making makes Harry’s stomach growl. It smelled so good. When you were done you put everything away, and stacked it all in the fridge. You took a sticky note and labeled which ones were yours and which were his. Yes, it mattered. You cleaned everything up and sighed. You were starving now, and you knew he had to be too. You walk over to him and tap him on the shoulder, and put a hand on your hip. He just realizes now you’re barely wearing clothes. He takes his earbuds out. He wonders what you’re going to say.
“I just made all our lunches for the week. Could you make something for dinner? I don’t really care what.”
“Thanks…um sure.” He saves what he’s working on and gets up. You plop down on the couch.
Harry decides on some tofu curry. It was pretty quick and easy to throw together. It was also something you could have for leftovers tomorrow night. About twenty minutes later it’s done. He sets up the plates at the island.
“Babe?” You look over at him. “Dinner’s ready.” You pad over to the stool.
“Smells good, thanks.”
You clean your plate. It really was delicious. You help him clean up the pans, and run the dishwasher.
“I’m tired, I think I’m gonna turn in early tonight.” He says. It was nearly 8:30. “Might read for a bit.”
“Alright.” Were you two really not going to talk about this? He’s about halfway down the hall when he turns around. Your arms were crossed and your foot was tapping.
“You’re infuriating sometimes, you know that?” You snap your head to look at him.
“Excuse me?”
“No, I’m not excusing you. You’re so fucking stubborn. All I did was ask a simple question, and you blew up at me for no reason.”
“It’s a sensitive subject, Harry.”
“I understand that, but as your boyfriend and the person you’re sleeping with, it would be nice to have some clear communication about why I can do something one way, but can’t the other way.” You bite the inside of your cheek, not wanting to cry. He walks closer to you.
“I don’t want to talk about it.”
“Can’t you at least try?”
“No!” The tears form, and come rushing out of you, staining your cheeks. “It’s too much!” Your breathing quickens, and you feel like your heart is going to beat out of your chest. Flashes come through your head. Your breathing gets worse and your entire body starts to shake. You start sobbing uncontrollably. You were having a panic attack.
“Shit, Y/N, what…I’m sorry.” He pulls you into his chest. “You’re okay.” He brings you both to the floor, and he continues to hold you against him. He rocks you gently as you cry into him. “I’m right here, you’re okay baby.”
“You…” Your breathing slows down a bit. “You just couldn’t let it go, could you?” You look up at him, eyes red and puffy. “I’m not fucking around Harry, drop this one.”
“Okay.” He kisses the top of your head. “I’m so sorry, I won’t bring it up again.”
He’s thought it before, but now more than ever, if he ever ran into Jake again, he would fucking strangle him without hesitation.
“We can get up now.” You say to him. He helps you to your feet, and you wipe your eyes on your shirt.
You both do your nightly routines, and get into bed. Harry puts his glasses on and reads from his book, like he said he was going to do. You find something to read on your phone. You didn’t need much help getting tired, you felt tired enough as it was. You turn over so you don’t have to face him. Eventually he turns his light off, and moves to cuddle you.
“Harry, I don’t really feel like that tonight.” His mouth opens to say something, but instead he just sighs and turns over the other way.
This was the first time since you two started spending nights together, that you didn’t cuddle or even touch. You fell asleep just from pure exhaustion.
//
When your alarm went off the next morning, Harry’s eyes were completely blood shot. He had cried quietly for a little while, but mostly he just stayed awake all night. He couldn’t turn his brain off. He felt terrible for working you up the way he did, but never did he think that you’d be so mad that you wouldn’t want him to touch you. He hears the bed creak as you get up. You rub your eyes and go into the bathroom.
You wash your face and brush your teeth. You run your brush through your hair and you’re happy with how it looks. You decide on a pair of navy slacks, a white blouse, and your blush pink blazer. You go back to the bathroom to put your makeup on. You adjust your earrings, making sure they’re properly secured. You knew some of the ladies at work would ask you about them. Next you put your rings on. You hold the rose in your hand and sigh. You slide it onto your middle finger and look over at Harry. You think he’s asleep, and he pretends to be when you walk over to him. You press a long kiss to his forehead and leave the bedroom.
You had calmed down significantly after getting some sleep. You make a quick smoothie, grab your lunch, and head out the door. Your morning at work consisted of lots of people catching up in the breakroom. News about both yours and Niall’s promotions had gotten out, and everyone congratulated the both of you. He follows you to your office after everyone dispersed.
“Nice ring.” He smirks.
“Thanks.” You sigh, sitting down.
“What’s wrong?” He frowns. “He suffocatin’ ya already?”
“No…we just had a little fight yesterday.”
“’Bout what?” He sits down in front of your desk.
“Niall…no offense, but I really don’t wanna talk about it.” He furrows his brows at you. As long as he’s known you, you never not wanted to talk about it. You always wanted to talk about it.
“Are you okay?”
“I will be.” You say snappily. He also knew you hated being asked about something after you’ve basically said to drop it.
“Look, if he did anythin’-“
“He didn’t do anything! It’s not that big a deal, we had a fight, okay? Couples fight sometimes. You’re going to tell me you and Sarah don’t argue?”
“We have. But I doubt our arguments are nearly as serious as whatever you’re holdin’ onto here.”
“It’s not appropriate to talk about here.”
“Bullshit, we’ve talked about a lot of things here.”
“I said I don’t want to talk about it.”
“Fine.” He stands up to leave. “Lunch later?”
“Can’t, I’m seeing Dr. Mara during lunch today. Harry and I are looking at that apartment after work. Shit, I need to text him that I’ll just meet him there.”
“You didn’t talk about it yesterday?”
“Couldn’t, we weren’t really talking to each other.” You say taking your phone out to text him.
“What?” You look up at him.
“It’s fine. Just drop it, okay?”
Niall sighs heavily and leaves your office. You head out around 11:30 to get to Dr. Mara’s on time. What you didn’t know was that Harry was coming to your office to surprise you for lunch. When you weren’t in your office he went down the hall to Niall’s.
“Hey mate.” Niall looks up from his sandwich.
“Hey, what are yeh doin’ here?”
“Came to see Y/N, know where she is?”
“At therapy, she changed her appointment so she could look at the apartment with you this afternoon. She didn’t mention it?”
“Um…no.”
“Close the door.” He gestures to it. Harry does as he says and sits down. “What the hell happened yesterday? She wouldn’t tell me anythin’.”
“Did she seem mad?”
“No, more like neutral? She was expressionless. Noticed your ring on her finger.”
“Yeah, I gave it to her yesterday. We had a nice day and then it went to shit.”
“Why?”
“If she didn’t want to tell you, she’d probably be mad if I told you.”
“Mate please, maybe I can help.” Harry runs a hand through his hair.
“Well, a couple of times I’ve asked her about tryin’ a different position.”
“You two just started doin’ it, do ya have to get fancy with it so soon?”
“S’not fancy. Just wanna take her from behind.” Niall’s jaw tightens. “She got mad because this wasn’t the first time I’ve mentioned it. And when I asked her calmly to talk to me about it, she blew up at me. She went to the gym to cool off, and so did I. Thought it was better when we both got back, but I did somethin’ that set her off again. We barely spoke the rest of the evenin’. We ate dinner, she even made my lunches. Then we started fighting again before bed because I couldn’t take the passiveness anymore.” He groans. “Then she had a panic attack. It was awful, and when I tried to hold her when we went to bed she told me no.” He starts tearing up. “I didn’t get any sleep.”
“Good.”
“What?”
“You don’t deserve sleep after that.”
“Care to enlighten me?”
“Harry, when Y/N was assaulted, Jake fucked her from behind.”
“Fuck.” He puts his face in his hands. “I didn’t even think of that cause she’s let me do other stuff from that angle.”
“You have no idea what that did to her, mate.” Niall thinks back to the blood from your sheets. “It…well it wasn’t good.” He sighs. “She had a panic attack?”
“Yeah, I was petrified. Her whole body was shakin’ and she couldn’t breathe. I sat us on the floor and held her to me so I could rock her. I got her to calm down.”
“She probably didn’t want ya spoonin’ her last night because she didn’t want to feel anyone’ touchin’ her.”
“How am I gonna fix this?”
“You’re gonna have to wait for her to come ‘round.”
“It’s gonna be so awkward tonight.” He groans. “Hopefully she has a good therapy session.”
#take it slow#harry styles#harry styles x reader#harry styles y/n#harry styles imagine#harry styles fluff#harry styles angst#harry styles smut#harry styles fluff fic#harry styles angst fic#harry stlyes smut fic#she mad#he sad
278 notes
·
View notes
Text
How to gif without photoshop (second method)
Hello! A couple months ago I made a tutorial on how to gif without photoshop using the website ezgif. I got a really great response for it and received some requests for the other giffing program I use when I don’t have access to photoshop. The program is called instagiffer; this is a software so it needs to be downloaded but I have never had any trouble with my version.
Warning that this is VERY text and image heavy because I know how frustrating it can be when a tutorial feels like it’s skipping steps and I want this to be as clear as possible. Also please read this on desktop, tumblr mobile kills the quality of gifs inside text posts.
Please reblog if you found this helpful!
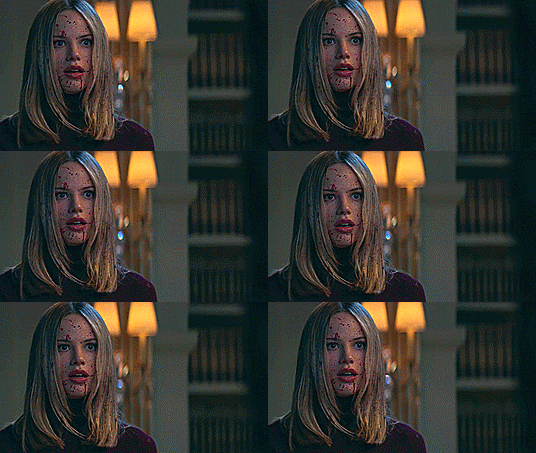
This is the video I will be giffing and here is the gif I will be making!
What you need:
Instagiffer
This program has been around since 2013 and I have used it since 2016. Unfortunately, it hasn’t been updated since 2016 and the download link on the official website is broken. That being said, there are a few other websites that still have a working download, which is what I linked to above.
ezgif
Although we aren’t going to use this website to make the gif, we are going to use it to add more color and brightness to the gif.
A video downloader
This is the video downloader I use but basically any youtube/video download website works. There are two ways to gif on instagiffer; using a video and using the built in screen recorder. I will show you how to use both.
A video to gif
This program is a lot more forgiving about video quality than ezgif is, but for best results 720p or 1080p is still the standard. Scenes with good lighting and bright colors turn out the best, but you can still make good looking gifs from darker or unsaturated scenes if you know what you’re doing.
1. Making a gif with a downloaded video
Step One: Getting the frames
First, you download the video you want to gif. Then you open up instagiffer and click on “load video.” Scroll down until you find the video you want to gif and click on it.
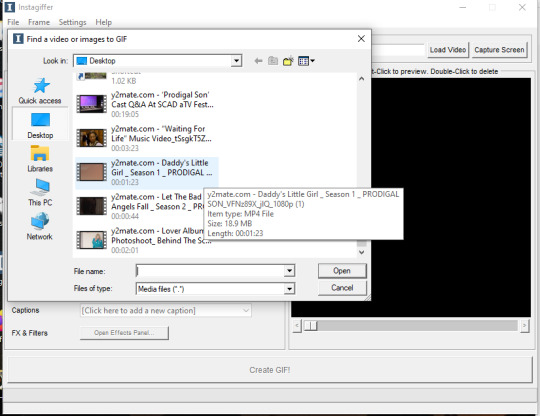
The video will appear on the screen in the right hand side. Go ahead and put “smoothness” up as high as it can go. This increases the frames per second and makes the gif look smoother. It also makes the gif longer, so you may have to bring it down later so it doesn’t go over tumblr’s size limit, but I always start as high as possible then work down.
Next, find the moment in the video you want to gif. You can either use the sliding bar or just type in the start time (you can use hours, minutes, seconds, and millisecond). You also want to put how long the clip you want to gif is. 3 seconds is the default but I usually bump it up to at least 4 (unless I know it’s a really short clip) just because it’s a lot easier to delete frames than add them.
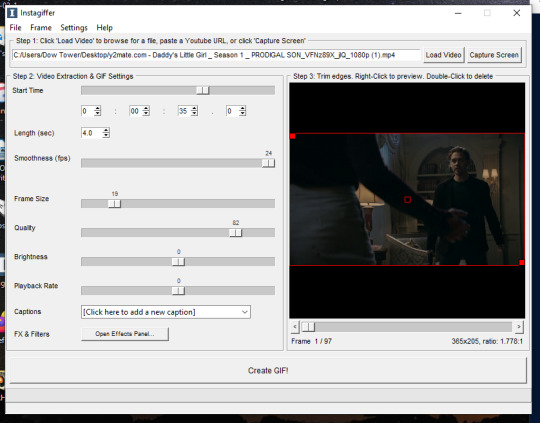
If you do this, you’ll quickly realize your gif has extra frames that appear slightly before and slightly after the moment you want to gif. It’s really easy to get rid of those frames; just click on them until you only see the frames you want in the gif. Use the scroll bar at the bottom of the gif to move around the frames, and use it to make sure the only thing on screen is the clip you want included in the gif.
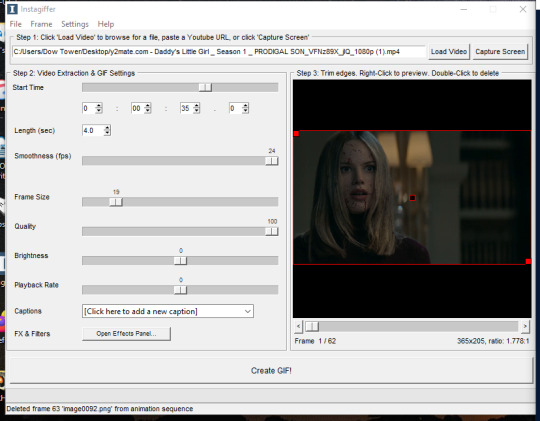
Step Two: Resize the gif, brighten the gif, change the speed and add captions
Now, it’s time to size, brighten, and color your gif! First look at the “frame size” option. Using the correct gif size for tumblr is one of the easiest ways to make sure the gif looks good. For gifs that take up a whole row, the size should be 540p wide. For two gifs in one row, the size is 268p each. For three gifs in one row, the sizes are 177p, 178p, and 177p in that order. Here is a visual of it. You can see what the width/height of the gif is in the bottom right hand corner of the gif screen. I am making this gif 268p. Get the frame size as close to the width you want as possible; right now, it is 269x151. To get it down to 268 exactly, go up to the top of the program, click on “frame” > “manual crop”. This little box will pop up. Just set the width to 268 and make sure the size is listed as 268 under the gif as well. The height can stay the same.

Keep quality up to 100 obviously. I almost always brighten by 2. Unless you’re giffing something with a huge spot of light, 2 is basically standard. Going up any higher usually makes the gif just look grainy, but if the scene is REALLY badly lit, you can go up to 3. Playback rate is usually -1, just to make the gif look smoother. Unless it’s a super long gif or a super short gif, I don’t mess with it further.
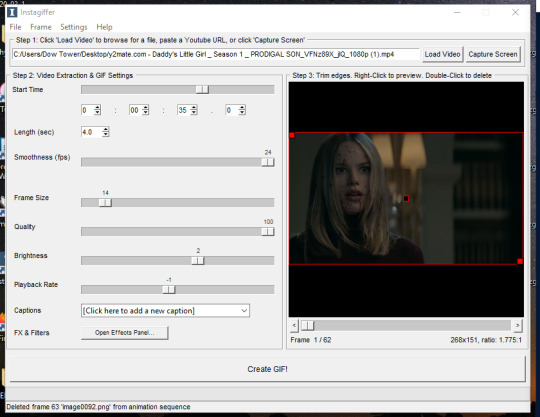
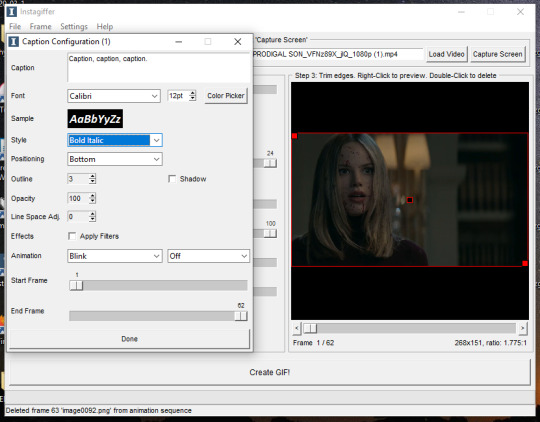
Captions are obviously optional but if you want to add one, click on “click here to add a new caption.” A box will pop up with options of how you want the text to look. I only use this to “caption” gifs (aka add dialogue). The settings I use are 12pt font, calibri, white, bold italic, bottom of gif, outline up to 3. You can also chose what frame you want the caption to start/end on if you want. Since this gif doesn’t have talking, I’m not going to include the caption in the final gif, but I wanted to show how to use this function.
Step Three: Color the gif
There are two parts to this. The first place I color the gif is on instagiffer, and then I use ezgif to add more effects. The second part is totally optional but they have more choices for coloring there.
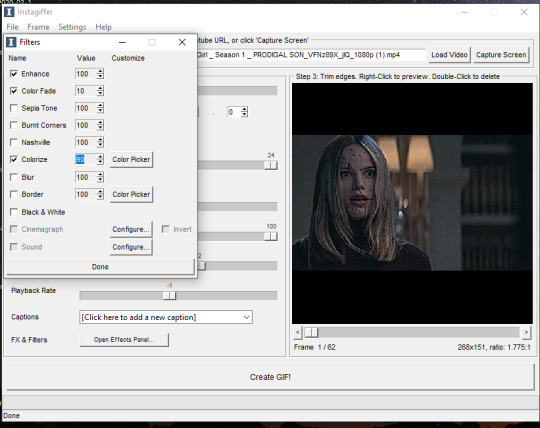
Click on the “open effects panel”. A window will open showing what the gif currently looks like, along with a variety of filters you can use. Ignore how grainy it looks, it won’t look that way when it’s finished.

First thing is keep “enhance” up to 100. This is basically a sharpening function and without it the gif will get super blurry. There are a ton of filters you can play around with, but the only two I focus on usually are “color fade” and “colorize.” For color fade, I click it on and set it at 10. Obviously, if you’re trying to make a desaturated gifset, you can raise it up for a faded color effect, but I use it more for color balance than desaturation. Next click on colorize, and then color picker.
I almost always pick a light shade of blue, purple or pink; it brings out the color in the gif and tends to keep skin tones from being washed out. This is usually my default:
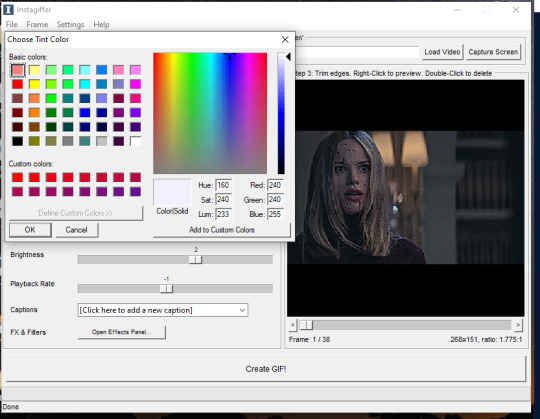
Then, I bring the “colorize” option down to 90 to increase the effects of shadows.
Last thing to do is click create gif! It’ll take a few seconds, especially for longer gifs, so be patient. ALSO there is a good chance you’re going to get a message saying something to the effect of “this gif is too big for tumblr’s photo limit.” Feel free to ignore that; the software being old means it still has the photo limit as 2gb when now it is 5-6gb so almost any gif you make will be considered “too big.”
Your gif now shows up in a preview tab! It should also show up as a file labeled “insta” on your desktop.
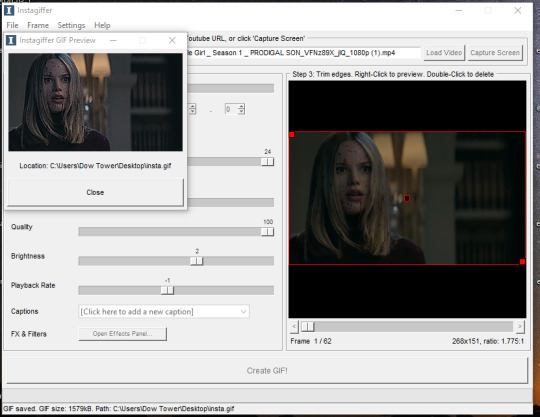
Here is the gif so far.
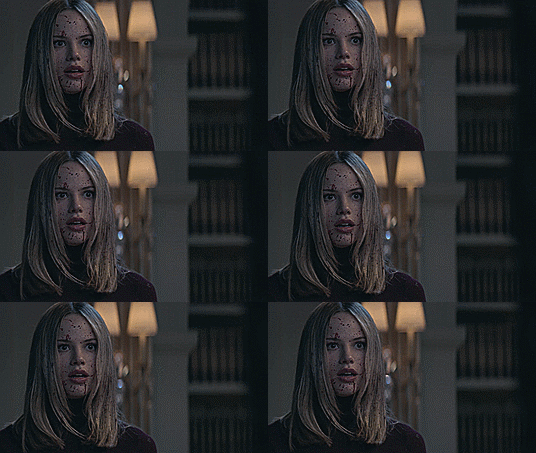
You can end here if you want. But when using instagiffer, I always go to ezgif to brighten up the colors further.
This part is basically the same as how you would color a gif you made in ezgif (see this tutorial) but I’ll quickly walk through what I do.
Go to ezgif.com/effects. Click chose file and upload your gif. First, you’re going to want to up the saturation, brightness, and contrast. You have to play around with these functions a lot because every scene is different, but in general, I have my saturation up pretty high and my brightness and contrast at at least 8. For a scene as dark and desaturated as this, I put saturation at 200, brightness at 12, and contrast at 16.
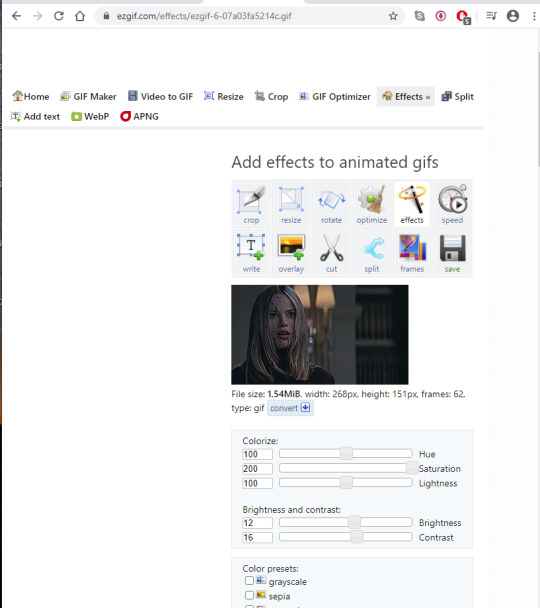
Afterwards, you want to go down to “color presets” and select “tint.” In my other tutorial, I recommended tinting with a light red or light blue, but for gifs made on instagiffer, I tend to use a light yellow/gold. I already tinted the gif purple in instagiffer so adding yellow in ezgif tends to balance it out. The shade I used for this gif is #fffcf0.
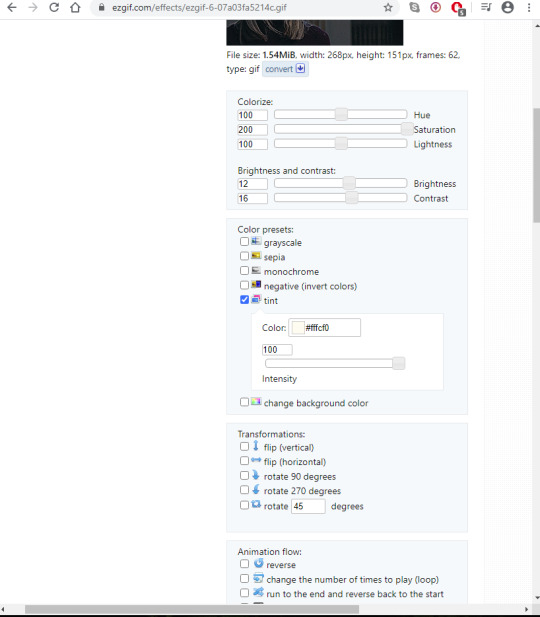
If the gif ends up looking too yellow, either decrease saturation, or click the “effects” button under the gif and add a layer of light purple to balance the colors more.
Your final gif should look like this.

2. Making a gif with the “capture screen” feature
This only changes the method of how you get gif frames. Everything related to resizing, coloring/effects, and adding captions is the same as above.
What if you don’t have a download of the thing you want to gif? The great thing about instagiffer is it has a built in screen recorder so you can gif any video you want, even if you can’t download it (or if you’re like me and don’t want to deal with downloading a 45 minute episode of something just to gif one scene).
To use this tool, click on the “capture screen” button on the top right corner next to “load video.” Then this screen will pop up.
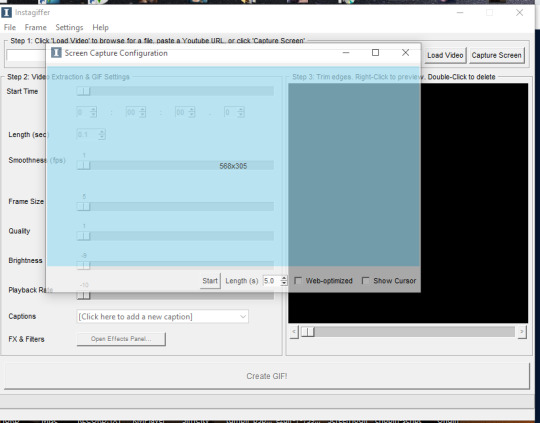
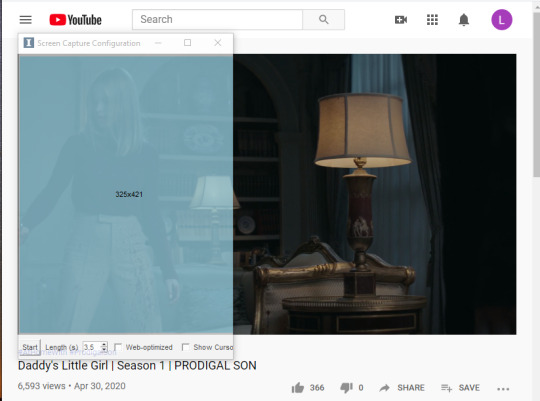
You’re going to want to take this blue screen over to the screen you want to capture. I’m going to put it over the youtube video I am giffing. Adjust it so the only thing it’s focused on is the video and set the length in seconds. I usually set it for longer than the clip is just because it’s easier to remove extra frames than rerecord a scene. There is also sometimes a lag so starting it right before the scene you want to gif helps with that. For example, if the clip I’m giffing is 3 seconds long, I set it to 3.5. Then start running the video and click “start” on the screen!
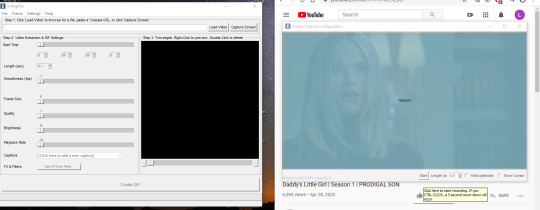
Your frames will now show up on instagiffer. Everything is the same, except you can’t change the frame rate or timing. Go ahead and delete frames that you don’t need by clicking on them. After that, just use the same resizing, and coloring method I outlined above.
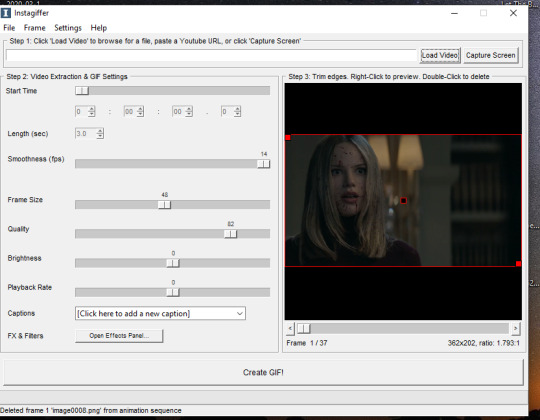
Some notes:
When using the video download option, the effects you use will save, as will the size of the gif. So if you gif one part of a video, then move the time stamp to another part, it will stay in whatever size you put the gif as. However, when using screen capture, you have to resize the gif and go to the effects menu each time because they reset after each use of the screen recorder.
You can also just paste a youtube link into the white bar at the top of instagiffer to gif it, but I’ve found that the quality is much better if you download or use the capture screen.
To crop a gif, move the red box around (just make sure it stays the right width size!)
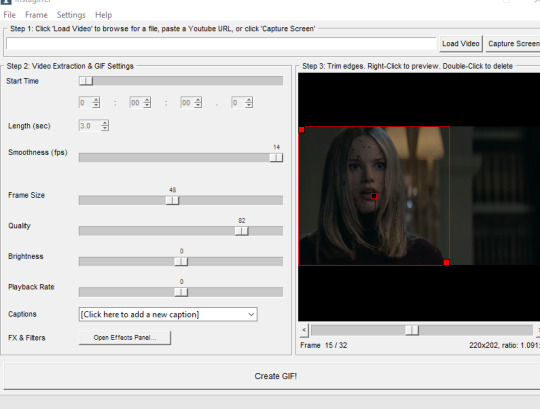
If you are using the screen recorder and only want to record part of the video (like just a characters outfit) size the gif recorder so it’s just surrounding the part of the video you want to see.
I hope this made sense lol, it took me a few days to write it all so please let me know if you have questions or need anything clarified! Support me on Ko-Fi if you’d like and are able 💕💕💕
#gif tutorial#giffing tutorial#giffing#gifmaking#mine#my gifs#blood //#long post#@ anon hope this helps!
84 notes
·
View notes
Text
Silent Night
Pairing: 40s!Bucky x Reader Word Count: 1266 Warnings: Soft Bucky, a concerned Winnifred Barnes. Steve annoying Bucky with his talk about the serum again. Summary: Twas the night before Christmas...and Bucky has the perfect gift for you.
A/N: I couldn’t control myself and wrote a third installment of 40s!Bucky. Again, it’s not necessary to read the first two, but they all compliment each other. But I’m not about to tell you what to do. Enjoy! Oh, and this wasn’t edited prior to posting so....sorry!
Read Part One & Party Two | 2019 Christmas Masterlist

Bucky had never seen anything so beautiful. You were curled to his side, head resting on his chest while your fists held onto his uniform coat like your life depended on it. And, as far as he knew, it did. Because you were his whole world, and he was darn sure he was yours.
Across the small sitting room, situated by the dying embers of the fireplace, Beccas was sitting on the floor in front of Bucky’s ma, who was sat in her favorite reading chair combing through her daughter’s curls with her fingers. Steve was standing by the bay window watching as large snowflakes fell to the earth. Bucky thought he would never enjoy the sight of the snow again, but it was different when he was home. Different when he was with you.
“Did it hurt?” Becca asks. Bucky chuckles because it’s one of the first things he’d asked Steve too.
The rumble in his chest causes you to stir, but just slightly. As much as he wishes you were awake; that he could see your pretty eyes light up when he calls you one of his pet names; to hear you say his name, he’s glad you’re getting some rest. Beck and his ma had told him of the countless sleepless nights at the Barnes household, you hauled up in his sister’s bed as you both cried and yearned for his return. He understood the pain, the longing of being reunited and the inability to sleep out of worry. If he could do one thing while he’s home, it would be to make sure you at least rested.
Bucky waits until your breathing even outs again before he returns his attention to his family. Steve is blabbing on about Dr. Erskine and his serum, how he’s no longer sick and can see color. As much as he loved Steve, he didn’t want to listen to the recounting of his transformation again. So Bucky draws the attention from Steve in the best way he can.
“Gee, it’s mighty late,” Bucky says as he gives a dramatic yawn. It wasn’t fake - he was tired - it’s just he could probably stand staying up another hour or two if it meant extra time with his family. Bus desperate times…
“You’re right. Becky, you need to head to sleep,” Mrs. Barnes says as she drops her daughter now-braided hair. “We’re still going to Christmas Mass tomorrow morning.”
The young girl - well not as young as Bucky had left her, a woman of 21 now - grumbles as she stands. “Fine,” she says bending down to kiss her mother on the cheek. After she makes her rounds, she heads off down the hall.
Steve is already setting up the sheets Mrs. Barnes had brought out for him when they returned to the Barnes’ home, and Bucky is trying to rouse you long enough to get you to his bed. Somehow, with the help of Bucky and his ma he knows, your parents had agreed to let you stay the night. With a quick kiss to both their cheeks and a promise to be respectable, you were bounding out the front door, changed from that wonderful number you’d been wearing earlier and a bag gently packed with a dress for church in the morning in hand.
“Why don’t you just leave her, darling,” Winnifred says as she watches her son have no luck with waking you. “I haven’t seen her this deep in sleep for so long. You deserve your bed, anyway.”
Bucky looks down at you and sighs. If his ma was saying it was okay for you to sleep on the two-seater, it should be fine. But he wasn’t about to sleep in his own bed with you on the old lumpy thing.
“Nah, I’ll stay out here. The bed would probably be too soft anyway,” Bucky replies as he shifts and shimmies his way from under your sleeping body. He grabs the afghan his mother kept thrown over the back of the sofa and tucked it around your sleeping form.
“Let me grab you some blankets, then,” his mother says, but Bucky stops her.
“Let me help.”
He follows her down the short hallway to the linen closet. He isn’t much help since Winnifred keeps shooing him away when he goes to grab a pillow or blanket. Let me take care of you. You deserve it she keeps saying, and it makes Bucky feel guilty.
“Hey Ma,” Bucky finally says as he manages to grab the quilt from his mother’s arms. “Can I ask ya somethin’?”
“Of course, darling,” she almost laughs but stops when she turns to see the look in Bucky’s eyes. Gone is the light-heartedness she’s used to seeing, that she’d been seeing all night. His blues, identical to hers and Becca’s, are clouded over, an unavoidable storm brewing under the surface. “James? What is it?”
Bucky wrings his hands in the thick cotton fabric and looks away from his mother’s gaze. The entire trip home he’d been thinking about this moment, and the moments that would follow - the happiness that comes with being a man and wife, gold rings on their left hands symbolizing their commitment to forever.
“Remember Grandma’s ring? The one she gave to Pa to give to you to give to me?” He can feel himself starting to ramble, so he shuts his mouth tight.
“Yes?” Winnie asks. There’s a slight bit of excitement in her tone, maybe a lot of fear as well.
“I think I’m ready, Ma. I gotta ask Y/N to marry me before I leave again.”
Winnie nearly drops the sheets she’d been gripping. Although she’s not shocked by her son’s revelation, the timing is less than ideal. “James...Are you sure? She’s waited an awfully long time for you, didn’t even know if there was still a you to wait for there for a while. Are you sure you want to do that to her?”
Bucky sighs. Of course, his mother would bring up the one thing he’s fretted about since deciding he was going to ask you to marry him. He knew it was unfair to ask you to wait for him, to commit to him and him only when he was thousands of miles away. He didn’t know how much longer he’d be gone or if he’d come back. But he didn’t think he could leave again with making you officially his.
“Ma, this is the only thing that’s been keeping me going. Knowing that Y/N is here, safe and waiting for me. It’s not fair, I know, and she deserves someone who will be here for her and treat her right. But I’ve seen these boys, these men around here and none of ‘em deserve her. I don’t deserve her. But somehow the good God above gave me her and I’m not letting that go.”
Bucky stops to take a breath, try to figure out what his mother is thinking. Those eyes of her, always so good at keeping secrets, give nothing away. “Please, Ma. Please.” He whispers, almost begs.
A moment passes before Winnie gently smiles. She returns the sheets to their place on the shelf in the closet and motions towards her bedroom door.
“Well come on, then. I’ve got to show you how to properly care for it before I go turning it over.”
His mother continues on as she opens her jewelry box - something about resizing, cleaning, the such - but honestly, Bucky isn’t listening. All he can think of is giving you forever, just like you deserve.
#40s!Bucky x reader#40s!Bucky#1940s!Bucky#1940s!Bucky x you#1940s!Bucky x reader#Bucky Barnes#Bucky Barnes x reader#Bucky Barnes x you#marvel#marvel x reader#marvel x you#christmas oneshot#marvel christmas#marvel holiday#holiday oneshot#Bucky Barnes Fanfic#Bucky Barnes fan fiction#marvel fan fiction#marvel fan fic#captain america#the winter soldier
165 notes
·
View notes
Photo
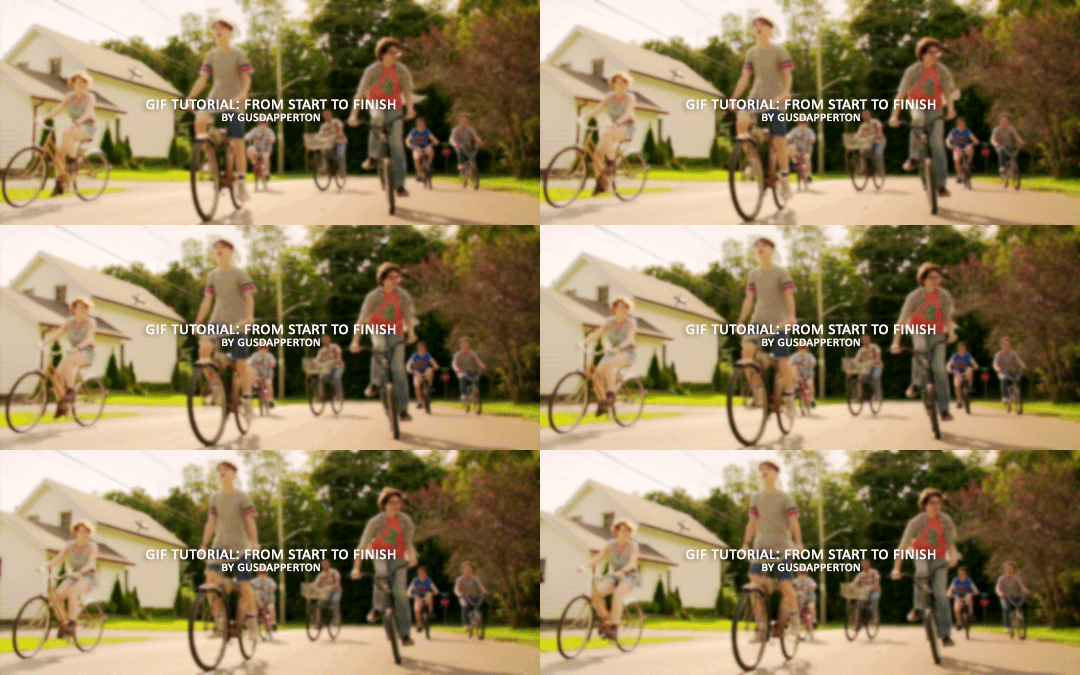
Recently someone asked if I would do a gif making tutorial, so here I am! I’m going to make this as in depth as I can, but if you have remaining questions or problems, feel free to send me them and I will try to help you to the best of my abilities.
Disclaimer: There are many ways to make a gif, but this is the method I’ve been using for years. This tutorial is very long and may make the process seem tedious, but I assure you, once you get the hang of making gifs you could do it in just under a few minutes!
This tutorial includes:
links to all of the sites and programs I use
lots of rambling (w/ pictures)
a short masterlist of my favorite photoshop sources at the end
Links:
Adobe Photoshop CC 2017
PotPlayer (64 bit)
uTorrent
4K Video Download
Photoshop, PotPlayer and uTorrent are the three programs you MUST have for this tutorial. The 4K Downloader is for YouTube/Instagram, which there are other sites you can use for that, but I prefer 4K to make sure I’m getting the best quality I can get. Best part, they’re all free :)
Torrent sites:
PirateBay
yts.lT (favorite)
Nyaa (anime)
These aren’t the only sites that offer torrents (nor are they the only ones I use). When you download torrents, try to be careful; if you think it’s sketchy, go ahead and try to find another. It’s not as scary as it seems, just be aware of what you’re clicking. Some are total duds but I usually have a pretty smooth time finding what I need unless it’s something unpopular or obscure. Whatever site you’re on, try to use the latest links (past hour/day/week) if it’s for a new movie or ongoing show. Also, if there’s the option, download magnet.
PirateBay gives me an ongoing issue with their links, so I try to avoid getting torrents from there if I think I can find it elsewhere. YTS is my favorite site for movies; they’re trustworthy and I’ve never had an issue :)
HD/1080p torrents often start popping up when the BluRay comes out, so don’t depend on any site to have it the day something premieres. Usually you’ll have to wait a few weeks/months. Until then it’ll just be CAMs which no one likes!
For this tutorial I’m going to be making a gif from IT: Chapter Two (link- click 1080p.WEB). Once you’ve gotten your torrent, open up uTorrent. It’ll ask you where you want your download stored, which I always just choose my Downloads folder.

It’s normal for it to take a while. It doesn’t take all day, but 40 min-2 hrs is usually what I have to wait. My laptop is pretty slow, RIP.
After it says it’s downloaded, you’ll have the .mp4 sitting in your Downloads folder (or whatever destination you chose, but Downloads is the default).
Before you close uTorrent, press the torrent file and then delete it (trash can icon above) so you can delete it from your Downloads folder. Otherwise, your computer will tell you the torrent is still open in the program and won’t let you. You won’t need it after you’ve gotten the .mp4.
So now we have the movie! Go ahead and open it up in PotPlayer. Right click > Open file(s) and select the movie. It will start playing automatically.
Note: You need to make folders for the frames to be held in. Its been so long since I’ve set up PotPlayer, I can’t remember if the program made the capture folder that’s in Desktop or if I did... if not, go ahead and make sure you have designated folders. (If you’re making 4 gifs, you need 4 separate folders, and so on.)
Go to the scene you’d like to gif. The scene I chose in this movie is one of the end scenes of the young Losers Club on their bikes (2hr43min).
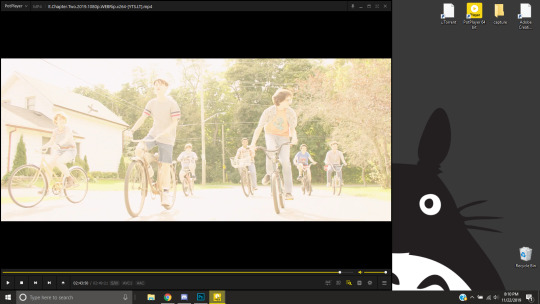
Slide the edge of the program in to minimize the screen a little for the next step.
Now, right click > Video > Video Capture > Capture Consecutive Images
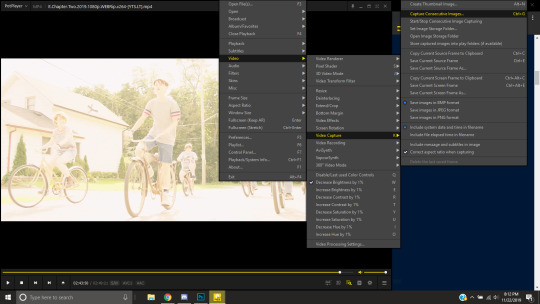
This will pop up:
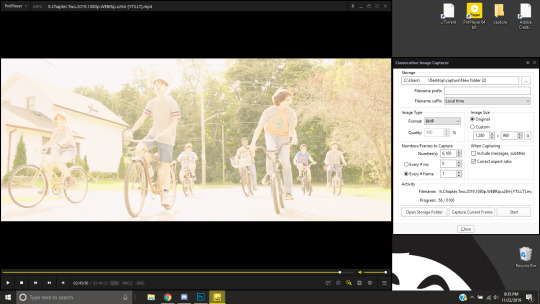
Here is a closer look at the settings:
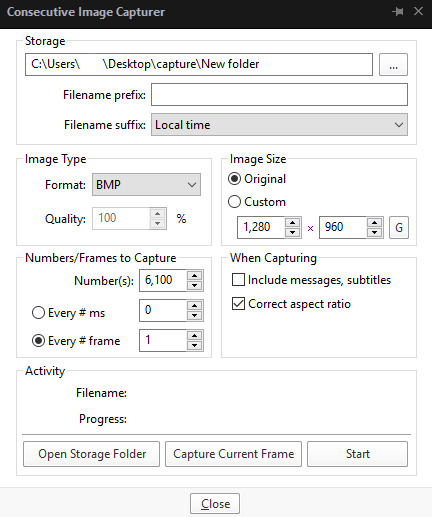
The key things to look at are the Image Type, Image Size, and Numbers/Frame to capture. And of course, make sure you have the right destination chosen in the Storage box because that’s where your frames are going to be. PNG and BMP are the best quality for the type of image. Always choose the original size of the frames. And, make sure you’re saving every frame (Every # frame must be kept at 1).
Make sure to start a few seconds before where you actually want to make a gif. Sometimes (every time lol) the start will lag and you won’t get every single frame you want or thought you were getting. In my case, the screen is fading from white, so I’m going to capture a few frames where the white can still be seen before the full color appears. This way I know I’m getting the most frames I can, and I don’t have to redo it later when I think my gif is too short because I’m missing frames.
While the movie is still paused, press Start in the smaller window, then press Play on your movie. Keep your mouse over the Pause button and end it when you’ve gotten all the frames you wanted. Then, Stop back in the small window.
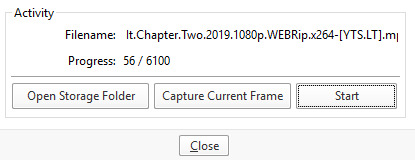
I’ve saved 56 frames to my folder.
The size of the gif you want to make dictates how many frames you’ll be using. Remember the file size needs to be under 3MB. Recently Tumblr increased that size to 8MB, but the quality of the gif will drop drastically, so I ignore it now. (Although, it probably won’t look too different if it’s at like 3.1MB and barely goes over that limit.
540px wide- ~30 frames and under. Because these gifs are so wide, naturally, they’re already going to be a large file.
268px wide- ~50 frames
177px- ~70 & up
These numbers aren’t concrete, though. The taller and/or more contrasting colors in a gif, the bigger the file will be. The shorter and less contrast in colors, the smaller, and more likely you will be able to fit more frames into your gif. These are just what I find to be the case most of the time.
For the gif I’m making now, I’m going to keep it at 30 frames, so I know I’ll be deleting ~26 out of the 56 I saved to that folder.
Tip: I rarely make big changes to the coloring of my gif if I really like the way it looks. If my gif exceeds 3MB, I’d rather delete frames. IMO, nice coloring comes before fitting in as many frames as I can.
Moving on, now that we have the frames we want, go ahead and open up Photoshop. Go to File > Scripts > Load Files into Stack. The drop down that says ‘Files’ I change to ‘Folder’ and simply select wherever your frames are held. For me, they’re here:
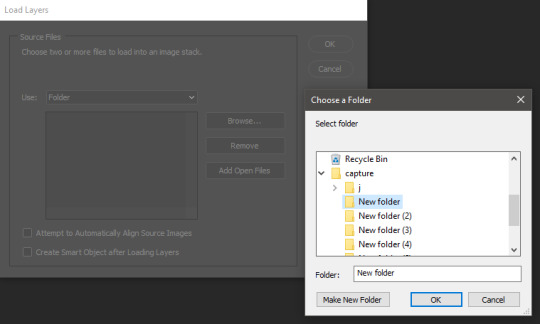
Press OK, let them all load up, then you’ll press OK again in that grey window.
It takes a minute for all of the frames to load up in photoshop. The more you have, the longer it’ll take. Again, my laptop is slow as hell, so maybe it will be really fast for you.
When they’re done loading, go to Window > Animation.
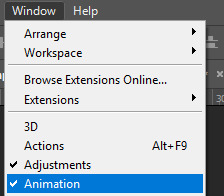
Then, inside the Animation tab, make sure you have Create Frame Animation selected:

Then once you’ve pressed it Create Frame Animation, your first frame will appear. But we need them all, so look over to that four bar icon to the right of the tab and press Make Frames From Layers.
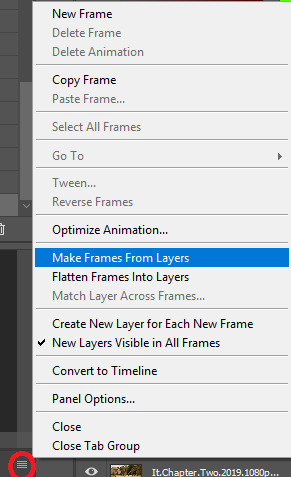
They’ll load all at once, but the gif is backwards. To fix that, simply go back to the same four bar icon and click Reverse Frames.
I’m going to go ahead and delete the frames I don’t want. For me, the beginning frames are unusable because there’s that white fade out in the start of the scene I chose. I’m going to delete those, then go ahead and delete any frame that comes after frame 30.
Here’s where I’m at now:
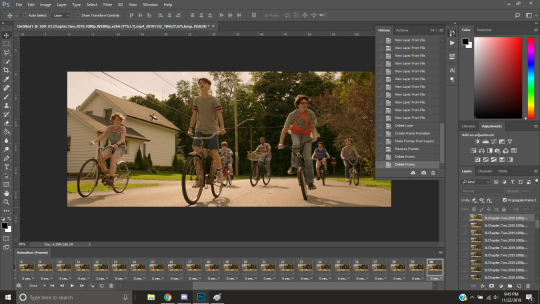
Now to resize it. I like the dimensions it currently has, so I’m not going to use the crop tool at the moment. But once you’ve cropped it to where you like, go to Image > Image Size and a new window will pop up. The widest a gif should be is 540px. How tall it is is up to you. Since I’m keeping the dimensions currently, my gif will resize to 540x225.
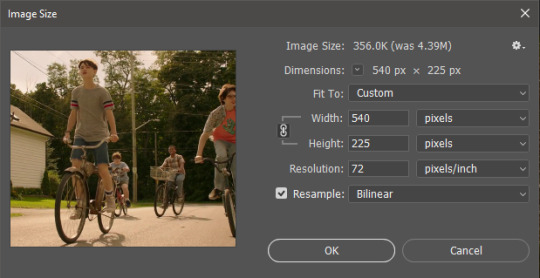
It’s VERY important to note, where it says ‘Resample:’ you need to have Bilinear selected. This effects the borders of your gif. Also, don’t make the mistake of resizing it in centimeters instead of pixels.
Now that it’s resized, you need to set the the frame delay. I choose either .05, .06, or .07. Anything outside of that looks to fast/slow to me (but I know a lot of people who like the way .03 or .04 look. It’s all preference.)
To select all of your frames at once, select the first frame, hold shift, then select your last frame. Then press where it says ‘0 sec.’ > Other > type in however fast you’d like your gif to be. I’m going to use .06. Double check every frame says .06, otherwise it’ll stay at 0 and be way too fast.
Now, again, click that four bar icon and select Convert to Timeline. The Animation tab looks like this now:

For now, look at our Layers Tab, so we can delete every frame that doesn’t show an eye icon next to it (as you can see, my first 5 frames):
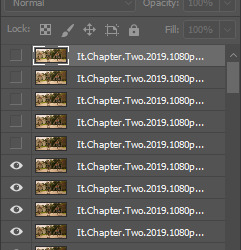
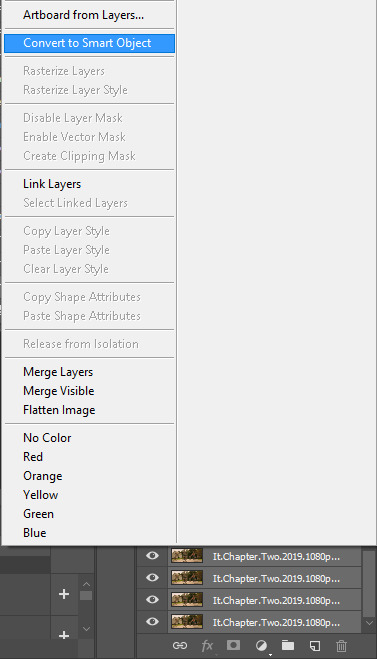
With all of the excess frames gone, select all of the frames you have left (hold shift again) and then right click > Convert to Smart Object
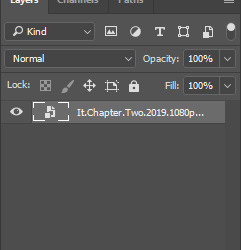
Now, we see this left:

And, technically we’re done with the very basics of making a gif. But you definitely should sharpen and color it for it to look ‘nice’ and aesthetic. I’m going to color my gif now. Personally, I rarely use psds. It takes way too long for me to look through millions of psds, so I make coloring my own for each gif I make. I have two of my own psds, if you’d like to use either of those.
PSD01- this is a super basic psd I use to make any gif look brighter and more vibrant. There are more details in the post on how I use it.
PSD02- I included this psd within another tutorial for how I do color edits.
Both of these are my base psds, but if anyone wants me to do a separate tutorial for how I color gifs on a regular basis, I’ll gladly make one of those too!
Once you’re happy with how the colors look, it’s time to sharpen. Select your gif layer and go up to Filter > Sharpen > Unsharp Mask.
Here are my settings:
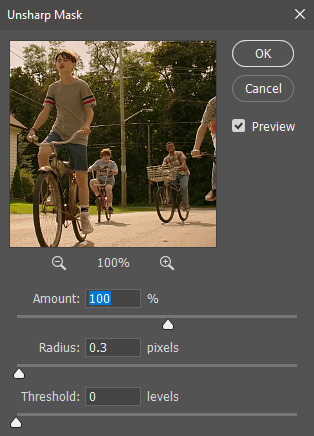
(Amount: 100%, Radius: 0.3px, Threshold: 0 levels)
Now sharpened and colored, here is my final result ready to post:
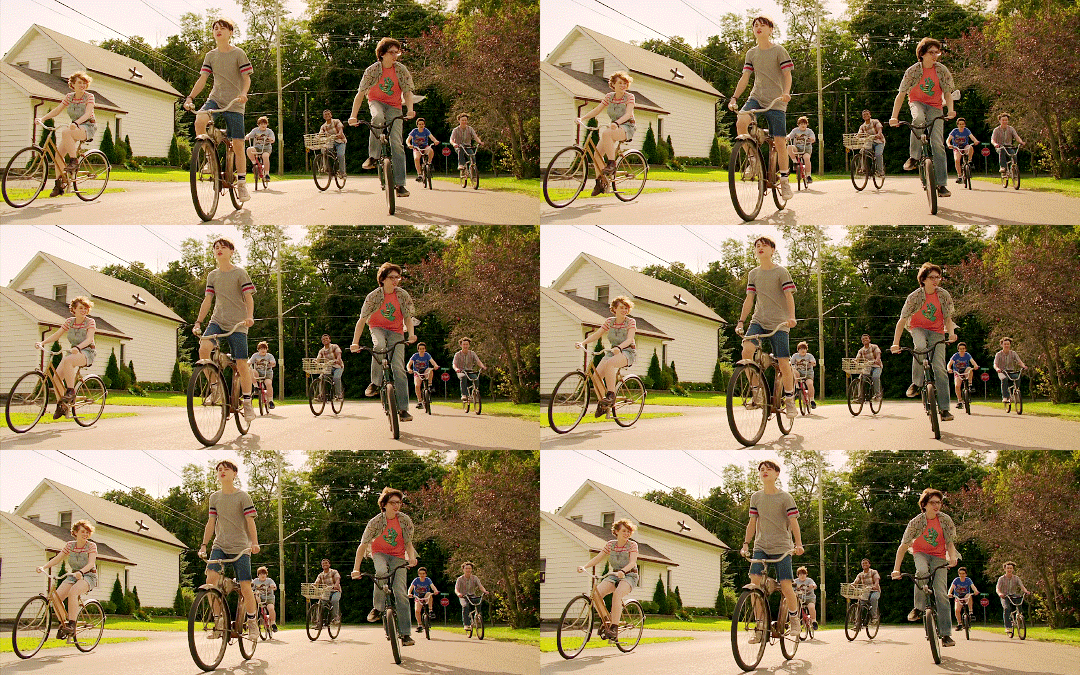
If you’re wondering, this gif is 2.42MB, so I could still make it brighter/more vibrant if I wanted to!
To save, go to File > Export > Save for Web.
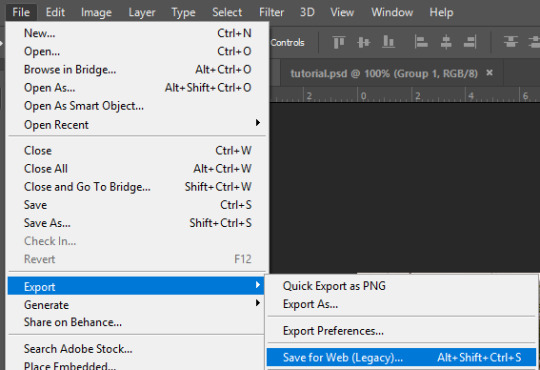
A new window will pop up. There are more settings that you should check to make sure your gif looks as nice as possible, but they’re also up to preference and can range from creator. This is what I prefer:
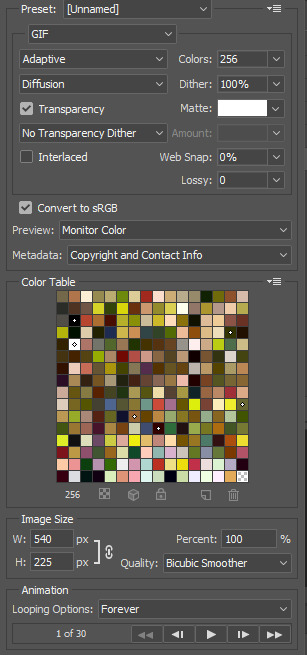
Diffusion is good for bright and/or colorful gifs, but if the gif is dark, I’ll change it to Noise to see if I like that better. Also, always double check you have the loop set to forever, otherwise your gif will only loop once.
And you’re all done!
Here is a short masterlist of resources I recommend checking out and use often:
allscallie (DeviantArt)
Their psds are beautiful, especially if you’re into making moodboards. Everything is very aesthetic!
sttoneds (DeviantArt)
More psds, especially if you’re into gifsets/photosets that are color focused.
BEAPANDA (DeviantArt)
Literally everything they publish is gold. From brushes, textures, psds, renders; they have it all. Their packs are extremely well made, too. I highly recommend bookmarking them. (The renders and brushes look beautiful when you use them in your headers!)
allresources (Tumblr)
There are so many photoshop resource blogs here on tumblr, so to make it easy on you, theirs is the one I recommend the most! The tutorials and resources she makes herself are really great too.
Thank you for reading, and good luck +.゚(*´∀`)b゚+.゚イィ
144 notes
·
View notes
Text
Tony Stark x Chubby Self Conscious reader.
One Shot.
Requested.
Warnings- Slight Language, Slight NSFW so slight if you blink you'll miss it, Tony Stark might be more OC than some may like, insecurities, and light bullying.
(Also I don't own any of these pictures I just made the collages.)
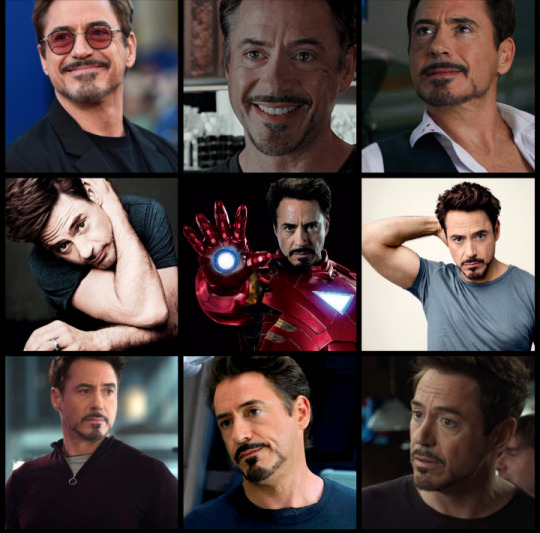

Tony decided today instead of staying in the tower and relaxing, maybe having a movie marathon or something that we should go shopping to get me some more clothes since I keep telling him that I only have a few outfits to wear that are comfortable when he asks why I'm wearing the same outfits again and again.
The outfits are mostly my old sweats and sweatshirts along with a couple of baggy dress shirts and dress pants that I feel comfortable lounging around the tower or going out in, because they cover me completely and hide my plushness from the prying and judging eyes of other people.
I've been wearing the same outfits on rotation for the past month or two instead of wearing the new dresses or skirts I said I loved and fit good when he bought them for me, even when they were a bit snugger and showed more skin than I'd like them to. But at the time they seemed like a great idea to get because while they were a bit snug, they were beautiful, soft, and lovely material that highlighted my figure and bust. But lately I haven't been as confident as I was when I first got those outfits and wore them around and out and about.
But now looking at myself in these dresses, skirts, and tight shirts they just show to much of me and dont look right on my body anymore, they show too many of my rolls and plushness. "You need more than a measly few outfits to wear love and you know it. If those clothes we bought didn't fit comfortably you should have just said something and we could have gotten a different style or size for you that would have been more comfortable."
He says with a sigh not budging about going shopping and seemingly pouting that I didn't tell him about the clothes not fitting comfortably until now especially since some of the ones I'm refusing to wear are his personal favorites. "I don't think they have any bigger sizes." I muttered. "Hmm what was that?" "Nothing give me a minute to get ready and we can go." I said heading to our shared bedroom to put some light makeup on, tame my hair, and change out of my sweats.
Once I'm finished I walk out and over hear Tony talking to someone so I stay behind the corner to eavesdrop. "Yeah Y/n and I are planning on going on a quick shopping spree but I'll see if she wants to go to afterwards and meet up with everyone and maybe I can talk her into getting a new bikini while we're out to wear to the beach."
"Okay we'll see you there but don't try to trick her into wearing anything she isn't comfortable with Tony." I think that was Steve he was talking to and said "we'll" see you there so is the whole team going to be there? If it's just us that could be fun but last time the "private" beach we went to was anything but. Luckily I had my one piece on and could cover up with my towel. Tony takes any opportunity and turns it into a party. "Me!?! Trick her! Never!" He said sounding appalled making me giggle and reveal my hiding spot.
Knowing very well that he's always up to something and trying to get me to do all kinds of crazy things from experiments in the lab, to getting me drunk from the expensive alcohols that he loves but I can't really stand the taste of. Knowing I was busted I walked around the corner and kissed Tony on the cheek from behind. "Oh there you are Y/n! Are you ready to go sweetheart?" He asks smirking at me with playful look for catching my eavesdropping. "Yeah I'm ready."
(Small timeskip to the shopping center.)
"Oooh I like this one!" Tony says swinging around showing me a nearly see threw black button up shirt with a plunging neckline. "Tony that's basically see threw I can't wear that!" I said embarrassed cheeks heating up at the thought of anybody seeing me in something like that. "Yes you can, if you only wear it for me!" He says with a cheeky grin. I sigh and continue look it through the rack of clothes in front of me.
Most if not all of these clothes are way to small for me. I sigh and continue down the isle looking for cute but comfy clothes that won't hug my body. Which is proving to be more and more difficult with nothing being in my size, and with Tony only picking out provocative clothing. I'm feeling more discouraged and upset by the minute deciding to give up on finding anything today I turn to tell Tony let's just go to the bathing suit store to pick out a new bathing suit for the "not a party at the beach" he managed to convince me into going to.
Until I see Tony with an armful of clothes that upon further investigation are a bunch of outfits I wanted to get but were way to small for me to wear there must be 20 something outfits in his arms while he's talking to the sales associate. "Hi, yes I need all of these 3-4 sizes bigger." He says dumping the clothes into her arms. Looking closer it looks like he got the biggest ones of each outfit which would only need to be 2-3 sizes bigger to fit me well. "I'm sorry sir but these are as big as we carry and besides these would just be a waste on someone like her if that's who their meant for. I mean no offense but they wouldn't even fit like they were made to on someone of her size." She spat sounding irritated and disgusted not apologetic by any means.
"The way they fit, or look, are up to her to decide. Not you or anyone else and say something like that again and I'll have your job by the end of the hour. So again I would like all of these 3-4 sizes bigger so they are comfortable for my girl over there." He motions to me with his head looking as pissed off as he sounds, and the way he said 'my girl' was very possessive. My eyes widen and my face heats up from embarrassment from what she said and the confrontation in general but I'm touched and happy with how he's defending me.
"And if you don't have any bigger sizes then custom tailor it to fit. If you need her measurements I'll send them to you. Here's my card and I expect to be contacted by the end of the day with all of these resized and ready for pickup." The women looks deathly pale after taking and reading the card realising she just offended Tony Stark. Knowing that his threat to her job moments ago was in fact real and emanate if she didn't comply. Seeing her so petrified makes a part of me smug knowing next time she'll think before she speaks at least.
"Yes! Right away, I'm so sorry sir they will be ready by the end of the day! You can pay for them then. I'll be right back." She squeaks out and runs off with the clothes with her head down and tail tucked between her legs hopefully feeling as embarassed and upset as am from her comments. I wrap my arms around my self with head down now that she's gone I feel tears pricking the edges of my eyes hearing her say that just proved what I've been thinking about myself is true that I'm so big that it's repulsive to be this size, hell I can't even fit into a single thing in this entire store without it being tailored to fit, that should say something.
"Hey don't listen to her sweetheart she's just jealous I'm with you and not her. Everything she said was just a spiteful lie trying to get under your skin." He says lifting my head up and wiping under my eyes where a few silent tears slipped past without me knowing. He kisses me softly and hugs me tucking me under his chin while his hands rub up and down my back. I snuggle closer with my eyes closed holding him tight. "C'mon Y/n let's go pick out that swim suit!" He says sounding excited and let's go of me grabbing my hand and dragging me out of the store and down to the next trying to get my mind off of the rude sales associate.
(Another small time skip where we just arrived at the beach.)
"Hey you guys made it!" Steve runs up in just his swim trunks, hair wet, and sand sticking to him like someone pushed him down onto the sandy shore of the beach just moments before. "Yeah we're just gonna go set up our stuff then we'll join you guys in the water." Tony replies with his arm wrapped around me. Steve smiles and nods then runs off down the beach. I'm not sure about getting into the water looking around there's a lot of strangers here all swarming the infamous Avengers wanting to get pictures with them or of them.
The beach isn't packed but it defiantly isn't as dead as it should be if just the team was here, and I don't want a rerun of what happened earlier especially now that Tony talked me into a bikini after all. Though I picked it out and hid it from his view until I changed into it. When I put it on and it actually fit really well supporting me and being snug but not tight when I wasn't expecting it to fit at all with just how small it looked, I couldn't just put it back and pick out a different one. (It's the bikini in the pic above.)
But thinking about it now I should have picked a much less revealing bikini, but I knew Tony would appreciate the colors if you know what I mean. So I put it on in the changing room and put my clothes back on over it, only taking the price tags up to the cashier so I could pay for it and said I wouldn't let him see it until we got here because I was worried I would loose my nerve and pick out another one piece bathing suit after all. Plus I knew that if I let him see me in it that we would never make it to the beach and would more than likely be banned from the store. So he's been rushing to get here and to get me out of my dress shirt and knee high shorts since I checked out at the store. "Hurry Y/n I can't wait to get into the water!" Tony yells twenty or so feet away and winks at me suggestively, dropping our things onto the sand not bothering to actually set anything up.
"Don't lie Stark you only want to see her in her new bikini! You don't really care about getting in the water!" Natasha yells back at him from a ways down the beach playing volleyball with Wanda and few other people I don't recognize against the boys. Both of them wearing their own bikinis. 'That's probably how Steve got covered in sand.' "How did you know about that?" He yelled back pouting harder than he would willingly admit, because she's seen me in my new bikini but he hasn't been aloud to. Natasha stopped playing and said something to a couple of the people I didn't recognize that were on her team and walked up with Wanda right behind her.
"Oh don't get your panties in a twist Stark she sent me and Wanda a few photos wanting some feed back before deciding which swim suit to get." She grumped at him. "But trust me you'll like what she picked out." Wanda said with a knowing smirk. My face heats up when his gaze locks with mine. "Oh I never doubted that I wouldn't like it. Now come on let's get into the water that's the whole point of going to the beach." He said pulling on my hand. "Fine but I have to take these clothes off and I'm not comfortable just stripping on the beach and you have get changed to."
I say holding my towel close to me nervous about showing so much of myself in front of everyone, especially in front of strangers. Tony not needing me to tell him twice took off to the changing rooms with his swim trunks yelling for me join him. "No way or I won't get to swim today! I'll change and be out in a few." I say while walking towards an empty room. I strip out of my clothes and look at myself in the full length mirror they had in the changing room. Feeling insecure and like this was a very bad idea all of a sudden.
Seeing all of my rolls and stretch marks in plain sight is making me feel ugly and disgusted with my self. I'm about to say hell with it all and put my clothes back on and say I'm feeling sick and that I want to go home even though Tony will know its a lie and will be worried about me, I can't handle this, I'm not ready, this is to much. That's when Tony's voice comes through the door. "Almost done in their my beautiful girl? You aren't going to keep me waiting all day are you? I could just come in there and get you if you'd prefer?" He purrs out but sounds worried.
I hurriedly wrap my towel around myself and unlock the door but I don't make a move to come out. "I'm not sure I can do this Tony. This is a bad idea I wanna go home." I'm hugging myself again degrading and upsetting thoughts are rushing through my head making me so overwhelmed that I don't notice Tony's in the changing room with me until he wraps his arms around me from behind making me jump. "Where's all of this coming from? Is it because of what that lady said earlier because she's wrong, so so wrong baby girl your beautiful in everyway!" I cringe trying not to cry knowing what he's saying is true but I can't help but let what she said and what I've been thinking lately get to me anyways.
I whimper and turn around in his arms letting him hold me again. "I'm sorry I don't know what's going on I've been more and more insecure lately for no real reason. That's why I don't wear those clothes you bought me anymore, they fit but they show to much of everything I hate and I wanted to cover up by wearing my old baggy clothes." I pull back looking up at him. Tony's silent for a moment looking at me with a thoughtful expression. "Well we'll just have to fix that now won't we?" He smiles softly grabbing my hand and leaning towards the door.
"Tony no I really don't want to go out there not like this at least." I say pulling back and looking down. "Like what? Your all covered up by your towel. I cant even see that little swim suit you bought earlier that I've been dying to see since we left the store. I love every single part of your body but if you don't want to go out there we don't have to. We can go home or stay right here in this changing room. Hell I bet if I text Capsicle he'll bring us something eat and drink then we can stay in here all day." I giggled at that imagining a confused and flustered Steve coming to the changing room bringing food and water.
"There's my girl." Tony coo's running his hands up my sides trying to tickle me. "Hey hey, No, Tony, Dont you dare!" I squeaked out jumping back hitting the wall of the changing room realizing I'm trapped my eyes widen and I'm about to yell at him again when he launches at me tickling me and I don't feel my towel falling while trying to squirm away laughing until I feel Tony's bare hands on my hips and he stops tickling me. I look up worried about the sudden stop in his "attack" and his silence until I see the desire in his eyes.
"As much as I absolutely love this." He leans close to my ear his grip tightening on my hips. "I'd love even more to see it off and on the floor." He kissed my neck once he finished. Making me gasp as heat floods my cheeks. He mumbles into my neck. "How about I show you just how beautiful you really are." Pressing his body up against mine nipping the sweet spot on my neck.
Let's just say I never got to go swimming in my new swim suit and Steve got more than just an eyeful when he came to check on us because we forgot to lock the door.
@lilacprincessofrecovery
132 notes
·
View notes
Text
DirThenera's Rotoscoping Tutorial Pt 2: Color
Once the line work looks good to you, it's time for color! Flat colors look bad with my sketchy style, so I use a more painterly coloring technique. It's important to keep the levels consistent per frame, so flipping back and forth between frames to check the levels helps a lot. (Here's an example of flat color with my style. It's not great. With another style it would be great, just not mine.)
So for color, it's time to add another layer! In procreate, grouping them will create your frames. Now again, working in sections, do one color at a time. I have a timelapse here - I did hair first, then realized how much the hair was wobbling, so I flipped through each frame and liquefied the frames that were off until it ran smooth. In procreate, I think this much easier but I haven't actually tried that in photoshop- I just selected the group instead of the layers to liquefy.
Then changed the background color, eyebrows on both, and her skin, then lips. I always try to pick a different base tone for the shadows. Thenera's is pink based and Solas' is more ochre. Don't pick too complicated of shadows. Or if you do, split it into smaller sections.
Finally! Vallaslin!

So first off, find the frame that shows the most of the Vallaslin, and paint it. Then copy it and add it to each frame, and liquefy /resize / rotate it into place. Don't copy the liquefied versions - they'll distort too much. Expect it'll wobble a little, but finding anchor points helps. Like- on Mythal's here - the point on the nose goes to the bottom of Thenera's slight bump, and the point under the cheek hits the top of the cheekbone under the iris. These anchor points will help immensely to keep it running smoothly.
This also works for freckles!
Now it's time to add a watermark and see if you're happy with it! I always wind up fidgeting with a couple more things at this point - in this case I added more shadows on Solas’ head.
Finished! This animation took about… 12 hours total I think? Now go forth and have fun!
Part One
29 notes
·
View notes
Text
I saw that ask meme with questions for gif makers going around, but I felt like answering them all on my own lmao
1. What are your top 3 favorite sets you’ve made
This one, this one (if the timing works lmao), and this one (I’m so proud of my AU gifsets... where did all that creativity go??)
2. What is your least favorite set you’ve made
I honestly don’t know... I don’t think I hate anything I’ve posted though. If I don’t like how it’s turning out, I just won’t post it lol
3. Which of your sets has the most notes
The most notes ever is this one I think
4. A set that flopped but deserved better
I don’t know... there’s a bunch, but I’m fine if a gifset flops
5. What is your favorite movie/TV show to gif
DOCTOR WHO
6. What is your least favorite movie/TV show to gif
I really don’t gif anything else lmao...
7. Who are your top 3 gif makers
I’ll just pick 3 people off the top of my head :) @shatner, @melodyspond, @stupidape
8. What gif trend do you hate
The pale/black and white gifs that are so hard to see.......
9. What/who inspired you to start making gifs
I wanted to gif my favourite parts of DW that I didn’t see anyone else doing, so I was like alrighty, time to learn how to do this!! I think the people that inspired me are long gone from tumblr, or I’m no longer following them because they’ve moved blogs (Natasha aka lumos-maxima... wherever you are, I MISS YOU... also Courtney aka needlebug I MISS YOU TOO)
10. What was the first gif you ever posted
THIS ONE! I remember being so happy about posting it, haha. Also, I still love that Confidential episode so much. I miss my space hipsters...
11. What is that one set you made that just won’t die
The Zoboomafoo one
12. What is the most embarrassing thing you’ve ever giffed
Everything I’ve ever posted
13. Where or from whom did you learn how to gif
Various tutorials on here and just by experimenting. I don’t even think I used Photoshop to begin with, since back in my Neopets days I used Paint Shop Pro to make graphics so I think that’s what I used first to try making gifs of videos.
14. How long does it usually take you to make a set
45 minutes to an hour or so?? It’s been taking longer and longer because the screencaps are so huge though and my poor laptop can’t handle it.
15. Have you ever had gifs stolen and reposted
Yes, and don’t think that I can’t tell when those are my gifs, even without a watermark!!
16. How long have you been making gifs
Since 2011...... my god
17. 10 sets, 8 sets, 6 sets? How many gifs to you prefer in a set
As many as it takes!!!!! But usually between 6-8
18. For the aesthetic, for the laughs, or for the feels what your preference
For FUN!
19. What is your gifting process like
Open video, find scene, screencap, load screencaps in Photoshop, resize to gif dimensions, add colouring, curse myself for picking a hard-to-colour scene, continue adjusting colouring and become increasingly frustrated because it’s not turning out the way I want it to, give up, add text, save gif, POST!
20. Mac or PC
PC
21. PSDs or original coloring for each gif
Original colouring. PSD who???
22. What fandom/movie/show/person etc do you gif the most
DOCTOR WHO and more specifically, David Tennant... I think his tag has the most :’)
23. What is the thing you gif when you don’t have anything else you want to gif
Any episode with Ten and Donna, or The Eleventh Hour, or the Day of the Doctor, or Blink
24. 480p 720p 1080p? What is the minimum quality you’ll gif from
I used to be all good with giffing 480p back in the day, but I guess now it’s 720p since the gif limits have gone way up.
25. Old dimensions or new dimensions and why
New dimensions because they look nicer on the dashboard.
26. How many un posted sets are in your drafts right now
ZERO.
27. Have you ever made a set, decided you hated it and deleted it? What was it
Probably at least one or twice, but I don’t remember.
28. Have you ever posted a set, regretted it and immediately deleted it
No, I don’t think so. I’m leaving my mistakes there for all to see!
29. Have you ever posted a set, realized you made a mistake later but it was already too late
Yes, I did this just the other day with that Missy, Bill and Nardole set. I got the dialogue slightly wrong lmao..... shh
30. How frequently do you like to post
I try to do at least one gifset a day if I can!
31. Do you schedule/queue posts or do you post right after you’re done
Right away. These gifsets are fresh off the grill.
32. What is your favorite tool/adjustment layer in Photoshop
Selective Color or Color Balance
33. Do you like to/can you make edits and graphics too or only gifs
Yes, I can do both but gifs are way more fun imo
34. A set that took you a long time/was really hard but you’re really proud of how it came out
I’m gonna say this one again because I was so proud of it when I made it, and I can’t believe I used to put that much effort into my gifs.
35. Do you change your giffing style a lot or do you have a set routine
I have a routine, as described above. My gifs are pretty much all made the same way as I describe in my colouring tutorial too.
36. Do you gif with something specific in mind or do you just wing it
Usually a mixture of both. I like to try to gif a different Doctor each day, so I’ll know who I have in mind but I’m not planning on a specific episode. I’ll just open up one of their series and go from there!
37. What sets if any do you have planned to make in the future
Idk, I was thinking of doing yet another gifset with Donna in it since I just finished her Big Finish series... but maybe I’ll do one with Eleven and the Ponds??? We’ll see.
38. What are you really excited to gif that isn’t out yet
The next Doctor Who holiday special?? :D
39. How often, if ever, do you delete old sets that you don’t like anymore
Never!! I love seeing how my gifs have slowly changed and improved over time.
40. Why do you make gifs
Because it’s fun, and it’s a way for me to relax after a long and busy day at work.
41. What is your least favorite part about your gif making process
When it takes forever for my screencaps to load, and when it takes forever for my gifs to save sometimes
42. How is your gif folder organized? Is it organized at all?
Lol nope.
43. Do you keep videos forever or delete them once you’re done giffing
I keep the episodes forever, but honestly I think I keep everything forever because I forget about getting rid of the other stuff like trailers and interviews... I should go through my downloads folder.
44. Ever had a gif become a meme? Would you like that if you haven't
I’ve had people use my gifs as reaction gifs and it is a weird feeling, especially seeing the gifs being used on websites other than tumblr. I remember seeing one of my gifs used in someone’s book review on Goodreads and I was like “WAIT THAT LOOKS FAMILIAR!!”
45. Ever gotten hate over a set
Not really hate, but I do get a lot people that are like “WHERE IS ______?” in their tags. And sometimes I just want to be like “Make your own gifs if you think they should be there!!!”
46. Ever gotten a really sweet compliment over a set
Yes :’)
47. Any advice for novice gif makers/people who want to start making gifs
Don’t give up!! Make gifs of whatever makes you happy, don’t worry about the notes too much, and use your tags! KEEP PRACTICING!
48. How would you describe your giffing style
I don’t know??? If someone else has a way to describe my style, then please let me know haha
49. How much would you say you’ve improved since you first started giffing
It’s been almost 9 years since I’ve started, so I hope I’ve improved quite a bit! :P
Well, that was fun. Congrats on making it to the end of this post!!! Now I will go make a gifset.
6 notes
·
View notes
Text
Photoshop CC for Beginners : Adobe Photoshop Course
This Adobe Photoshop CC course will teach you the basics of Photoshop for web design, graphic design, photography & more. Photoshop CC for Beginners : Adobe Photoshop Course What you’ll learn: You will have expert level knowledge of Adobe Photoshop CC in this course, whether you are a beginner, intermediate or have no previous knowledge of Photoshop. You will create a real world project to give you a general understanding of Photoshop and the different functions that you can do with it.You will be given a major overview of all of Photoshop's tools, filters, features, and workspace so that you can quickly begin working on your next project.You will achieve the experience and knowledge to take your Photoshop skills into your career, job, or freelance lifestyle at your own pace.Graphic designers, web designers, photographers, marketers, and whatever other industry you are in will be able to find useful information in this course.You will learn Photoshop's workspace and how you can edit it to your own workflow.You will learn how to work with images in Photoshop and edit them appropriately to your project.You will learn all of Photoshop's selection tools and how they can assist you as you edit.You will learn about layers and how they have revolutionized the way you can work in Photoshop.You will learn every type of tool available in Photoshop and how to use the most common tools.You will learn about type, fonts, and typography inside of Photoshop and how they function.You will learn the importance of color and even be given a brief lesson on color design theory.You will learn how to use alignment, guides, and grids inside of Photoshop.You will learn about all of Photoshop's many filters and features available to you.When you are finished, you will have a solid understanding of the Adobe Photoshop CC software. Requirements: This course is for beginners or anyone who does not have experience with Adobe Photoshop CC and wants to learn how to use the program. This course is not intended for advanced users of Photoshop, though the course can be used as a reference guide to find the exact information on any feature that you'd like.You will need to have an active Adobe CC subscription and the newest version of Photoshop installed on your computer. This course does not go over the installation of Adobe Photoshop CC. (Photoshop CC 2018 is used in the teaching of this course.)You will need to have a Mac or PC with at least the minimum requirements for Adobe Photoshop CC. Information can be found on the Adobe website.You will need to have a working keyboard, mouse, and/or tablet to use Photoshop. Touch screens and other pressure sensitive devices will work, but are not covered in this course.Project files are available for download for each lecture. Make sure you download the appropriate files if you would like to follow alongside the course. Photoshop CC for Beginners : Adobe Photoshop Course Description: Learn Adobe Photoshop CC in this New Course! Many people try to learn Photoshop but struggle because the program is so vast. Most quit before they even get started. :( That's because they've never been taught the program in a step-by-step, easy to learn manner. But that isn't you now, is it? You have found the perfect course for learning Photoshop. It doesn't matter if you have no experience at all, this course was designed to teach you Photoshop in the most effective means necessary. With over 15 hours of video and over 100 project files, this Photoshop course is JAM PACKED with information to help you learn this awesome program! The videos build on one another so that as you work through this course, you will understand more and more! Pretty sweet, huh? :) Not only that, but this course is also designed so that if you already know some Photoshop and just need help with a specific tool or feature, you can skip directly to that topic! So who can benefit from using Photoshop? Adobe Photoshop CC is useful for a lot of careers, industries, and hobbies. It doesn't matter if it's photography, graphic design, web design, social media, user interface design, advertising, painting, printing, or video/animation. This course will cover tools that can be used in any niche! Each section goes into specific detail of the feature or tool being shown so that you will feel comfortable using them on your own. This course will cover: The Basics Photoshop's Workspace Images Editing Selecting Layers Masks Tools Type Color Alignment Filters and much, much more! Don't forget all of those juicey project files! This course has over 100 project files for each individual lecture for you to use and follow along with. From the basic to the advanced, these files will at least help get you started so that as you watch each video, you can work alongside the instructor. What are OTHERS saying about this instructor's courses? "This course is amazing. Learning photoshop with this guy is easy ;-) Thank you so much. " 5/5 Stars - Robert Fersti "Great course that outlines several fundamentals of Graphic Design. Coming from a web designing background, I found a lot of the basics applied here as well. But, the course builds on that and gives you so many pointers on how to capture, guide and hold your audience's attention. I think, in addition to promotional graphics, the ideas explained can be readily applied to designing hero image layouts for landing pages of your websites as well." 5/5 Stars - Ravi KT (on Canva : Graphic Design Theory course) "This course is really informative, up to date, and engaging. Phil and Jeremy keep up to take with the posting of their students and provide reliable feedback. They have inspired me to keep pushing myself forward with my art, and graphic design. I would tell anyone (from beginner to advance) who uses photoshop / or would like to know more about it, to take this course. Its worth it!" 5/5 Stars - Betheny Powell (on Photoshop for Entrepreneurs course) People from around the world are learning valuable skills and applying them to their everyday lives. Don't be the one left out. You can absolutely learn this program and by taking this course the instructor will be with you every step of the way. Other great stuff you might want to know.. Not only will you get over 15 hours of video content and lessons, 100 project files, and a new life skill, you will also have direct communication with the instructor to help you along. This includes direct messages, discussions, and specialized projects in the course that will allow you to interact with the instructor and others. Feeling lost? Don't worry, we are here for you! As they say, "Come for the course, stay for the community." Well, that's not the exact phrase, but you get what I mean. :) What else is there to know? What else? What else?! Well there is that little 30 day money back guarantee thing. That basically means that if you don't enjoy this course for any reason at all, you can get a full refund up to thirty days since the time you purchase it. It's a win-win situation! and I applaud winners. So what are you waiting for?! The time is now to stop procrastinating and begin learning Photoshop so that you can take full advantage of everything that it has to offer! Enroll now in this course and get started! Who this course is for: This course is specifically designed for beginners or anyone else who doesn't know how to use Adobe Photoshop CC but would like to learn. This course can be viewed one video after another, or you can skip around to the sections that you need. Advanced features, special projects, and design theory WILL NOT be taught in this course. Graphic Designers Web Designers Game Designers Photographers Marketers Social Media Experts UI / UX Designers Product Designers Architects 3D Artists Beauty Artists Paint Artists Entrepreneurs and anyone else who wants to learn Photoshop. THAT'S YOU! :) Who is the target audience? This course is specifically designed for beginners or anyone else who doesn't know how to use Adobe Photoshop CC but would like to learn. This course can be viewed one video after another, or you can skip around to the sections that you need. Advanced features, special projects, and design theory WILL NOT be taught in this course.Graphic DesignersWeb DesignersGame DesignersPhotographersMarketersSocial Media ExpertsUI / UX DesignersProduct DesignersArchitects3D ArtistsBeauty ArtistsPaint ArtistsEntrepreneursand anyone else who wants to learn Photoshop. THAT'S YOU! :) Course content of Photoshop CC for Beginners : Adobe Photoshop Course: Total Lecture:140 Introduction How to Create a Polaroid Effect in Adobe Photoshop CC 2018 Upload Your Polaroid Photograph! Welcome to This Section on the Basics of Adobe Photoshop CC 2018 Getting Started with Photoshop Overview of the Photoshop Interface Changing the Photoshop Workspace Navigating the Document Window Using the Tools Panel in Photoshop Undo, Redo and the History Panel Understanding How Layers Work in Photoshop Saving Your Files in Photoshop Resizing an Image in Photoshop Making Selections with Photoshop Using Brushes inside Photoshop Creating Shapes and the Pen Tool Transforming Selections, Shapes and Images Text and Typography in Photoshop Working with Color inside Photoshop Other Cool Features of Adobe Photoshop Resources for You to Use in Your Projects Welcome to This Section on Understanding the Photoshop Workspace Resetting Photoshop to the Factory Default Setting Preferences with Photoshop Creating a Custom Workspace Starting with a New Document Using a Photoshop Template Opening Files in Photoshop Closing and Saving Files Common File Types Exporting Files from Photoshop Welcome to This Section on Working with Images in Photoshop Image Modes and Channels Changing the Image Size Adjusting the Canvas Size Cropping an Image in Photoshop How to Trim an Image with Photoshop Rotating an Image in Photoshop Straighten an Image with the Ruler Adjusting Brightness and Contrast Using Levels with Your Images How Curves Work in Photoshop Changing the Image Exposure Adding and Removing Vibrance Hue and Saturation Adjustments Having Proper Color Balance Black and White Imagery Applying Photo Filters in Photoshop Invert, Desaturate and Equalize Adjusting the Threshold of Your Image Overlaying Gradient Maps Selecting Specific Colors Working with Shadows and Highlights Replacing Colors in Photoshop Welcome to This Section on Making Edits in Photoshop Projects and Documents Fixing Mistakes in Photoshop Cut, Copy, Paste and Clear Fill and Stroke Selections Transform and Free Transform Content-Aware Scale Puppet Warp Perspective Warp Welcome to This Section on Selection Options in Adobe Photoshop CC Select All, Deselect, and Reselect Selecting the Inverse of an Image Using a Color Range for Selection Selecting by a Focus Area Subject Selecting Quick Mask Mode and Mask Selecting Modifying a Selection Saving and Loading Selections Welcome to This Section on Photoshop Layers Understanding How Layers Work in Photoshop Creating and Deleting Layers How to Select Layers in Photoshop Layer Groups and Why They Are Important Merging and Flattening Layers Adding Layer Styles in Photoshop Using Masks with Layers Clipping Masks Working with Layer Adjustments Blending Modes with Photoshop Additional Layer Options Exporting Layers in Photoshops Converting Layers to Smart Objects Artboards and Layers Welcome to This Section on the Many Adobe Photoshop Tools Working with Tools in Photoshop The Move Tool The Artboard Tool The Marquee Tools The Lasso Tools Quick Selection and the Magic Wand The Crop Tools The Slice Tools Eyedropper and Color Sampler Tools Ruler, Note, and Count Tools The Healing Brush Tools The Patch Tool The Content Aware Move Tool The Red Eye Tool The Brush Tool The Pencil Tool Color Replacement and Mixer Brush Tools The Stamp Tools The History Brush Tools The Eraser Tools The Gradient Tool The Paint Bucket Tool Blur, Sharpen, and Smudge Tools Dodge, Burn, and Sponge Tools The Pen Tool and Selection Tools The Type Tools The Shape Tools The Hand, Rotate, and Zoom Tools Welcome to This Section on Creating Typography and Using Fonts in Photoshop Using Type and Fonts in Photoshop Adding Type inside of Photoshop Working with Text Layers Characters and Fonts in Photoshop Creating Paragraphs and Content Character and Paragraph Styles Glyphs and How You Can Use Them Extruding Type to 3D Text and Work Paths Convert Text to a Shape Warping Text in Photoshop Match Fonts from Photographs Other Type Options in Photoshop Welcome to This Section on Understanding the Importance of Color Working with Color in Photoshop Color and Swatches Using Gradients inside Photoshop Adobe Color Themes A Little Bit About Color Theory 3 more sections Photoshop CC for Beginners : Adobe Photoshop Course course Read the full article
2 notes
·
View notes
Text
Happier New Year!
So. It’s 2019. Huh.
That’s kind of depressing in that I didn’t get nearly as much done in 2018 as I’d hoped... but on the other hand it’s kind of encouraging in that I have higher hopes for 2019.
This isn’t just the result of desperate optimism. I actually have some firm reasons for thinking 2019 is likely to go better than 2018. For one thing... well, 2018 was a real struggle for me financially—and the constant stress about money made it hard to focus on creative projects. In 2017, I left teaching in the classroom to become a full-time studio teacher, working with underage actors on film sets. I wanted to do this partly because it would put me on film sets and interacting with people in the industry, and because I thought it would be more interesting for me than teaching in the classroom, but mostly because it would leave me a more flexible schedule for pursuing acting and other interests. And in the long run, it had the potential to pay better than classroom teaching. But in the short run, well... I was getting some work by word of mouth and by answering what few ads I found looking for studio teachers, but it wasn’t steady work, and it didn’t pay well. That changed this last summer when I found a manager who works with studio teachers, and who agreed to take me on. She’s been getting me much more work and much better-paying work than I’d been getting on my own. The only reason things are still a bit tough for me financially right now is because I accrued a lot of debt during the last year or two when I wasn’t making much money... but as soon as that debt’s paid off, I’ll actually be better off financially than I was as a classroom teacher if this keeps up. Plus, I’ve got a number of projects in the works for this year that have the potential for significant payoffs, so... yes. I am hoping for good things from 2019.
I don’t generally make official New Year’s Resolutions. In fact, I don’t think I’ve ever made official New Year’s Resolutions. I have, however, occasionally made resolutions that coincidentally happened to coincide with the New Year, and I think I’ll do that again. There are a lot of things I intend to do during 2019, but in this post I’m just going to focus on the ones that have to do with art and animation, since that’s what this blog is about. So here goes...
I’m going to post a new Teras Terrace character every Monday. Yes, I said I’d start doing that again about a month ago, and only got through two weeks before I stopped again. But I’ll do it for real this time.
I’m going to finally finish the site design for my daily 24-hour comic project, d24, and start updating it again. (Come to think of it, I still have two 24-hour comics from the last 24-Hour Comics Day that I haven’t put online yet—I need to do that too. I’ve already scanned them; I just need to clean them up in Photoshop and resize them, and put their entries in the database so they’ll show up on the site.)
I’m going to get my old webcomic, Soup, back online and start updating that again, too. (If you’re reading this the day I posted it—or realistically probably the month I posted it—that’s going to be a broken link in that last sentence. But hopefully it won’t be for too long.) I’d hoped to do this in 2017, but it... didn’t happen. The reason that 2017 would have been good is because it happened that August 20, the day I first launched the comic, fell on a Sunday again that year, so I could keep the comics with their original dates and the larger Sunday comics would still fall on the right days. That’s not the case in 2019 (and won’t be the case again until 2023, and I don’t want to wait that long), which means I’ll have to either start them on a different day, or have the Sunday comics fall on Tuesdays. I think I’m going to do the latter. It’s on the web, not in a printed comics page; there’s no reason I have to have the big color comics fall on Sundays, after all. (Actually, there’s no reason I had to follow newspaper comic format in the first place, but I basically did, and I guess since I started it that way I may as well keep going.)
Speaking of Soup, I’d had plans to make an adventure game set in the world of the comic, and incorporating three of its characters. This is the year I’ll finally do it. Or at least start it, though I may not finish it before 2020.
I’m going to get some animation done! I call myself an animator (sometimes), but I don’t really have any animation to show. I’ll change that. I’ve got several animated projects I want to do, and I’ll be sure to get at least one of them done this year.
Speaking of animated projects, I also have a few animated series ideas I want to pitch. And this isn’t entirely a pie-in-the-sky idea; I do have some connections in mind I can pitch them through. So that’s another goal for this year (and hopefully early this year)—I’m going to pitch one adult animated series, and one children’s animated series. Whether either or both of them get picked up is another matter, but at least I’m going to make the effort.
I’m going to participate in Hourly Comics Day, and Inktober (and do every day in Inktober, not peter out before the end like I did the last two times), and perhaps some other similar art challenges that I find out about.
I’m going to make an Instagram account. Been meaning to do that for some time.
Speaking of social media, I ought to make more use of Twitter too. Let’s see, my last tweet was, uh... October 2, 2016. (If you want to follow me, I’m @alunclewe, though like I said my last tweet was on October 2, 2016, so you haven’t missed much so far.)
And also speaking of social media, I ought to be more consistent in my posting on Tumblr too. I don’t know that I can necessarily commit to posting every day, but... let’s say at least every other day. No, what the heck. I’m going to try to post every day. I probably will miss some days, but we’ll see how it goes.
I’m going to participate in 24-Hour Comics Day again, but that’s a given. I’ve done that every year since 2006, many years twice.
Huh. When I started this post, I honestly thought that was going to be a shorter list. Guess I’ve got my work cut out for me. (And like I said, this is just the art- and animation-related resolutions; there’s a lot more I plan to do this year, too.) Well, one way or another, I expect it’s going to be an interesting year.
Happy 2019, everybody!
1 note
·
View note
Text
LENOVO THINKPAD X1 FOLD REVIEW: A FOLDING SCREEN FILLED WITH POTENTIAL
The Lenovo ThinkPad X1 Fold is awesome… as a concept.
Come on, it’s a display that folds in half. You can carry it around like a tablet. You can prop it up and use it like a Surface Pro. You can fold it halfway and use it like a clamshell laptop. You can fold it slightly and hold it like a hardcover book. And everyone who sees you whip it out of your briefcase will ask “Wow, what’s that?” And you can tell them “Oh, nothing. Just the world’s first foldable PC.” Picture it. There’s no way you won’t feel like the coolest person in your meeting.
So should you buy it?
I mean, no. Before we get into this: definitely not. It’s a whopping $2,499, not including the stylus and keyboard. (Bundles with both accessories start at $2,749 on Lenovo’s website.) That’s more than anyone needs to spend even to get a very good laptop — and there are a few too many problems with the X1 Fold for me to put it in that category.
But! I do like the idea. The folding form factor certainly makes life easier, and I have no doubt that we’ll see more devices like this in the future — assuming manufacturers can work out some of the kinks.
A TRAVEL PRO
Here’s how a day with the X1 Fold went for me. In the morning, before signing on for work, I lay on the couch and used the Fold as a mini clamshell (that is, folded at 90 degrees with the keyboard on the bottom half of the screen) to catch up on emails. Someone had sent me an interesting YouTube video overnight. I unfolded the laptop into a 13.3-inch tablet, setting the keyboard aside, and watched it fullscreen.
Then, work time. I popped out the built-in kickstand and propped the unfolded ThinkPad up on my kitchen table, laying the keyboard out in front of it. I used multiple windows in split-screen, with Slack and Spotify over top, the way I’d use any standard 13-inch laptop. In the early afternoon, I had an hour-long Zoom meeting, so I headed back over to the couch and folded the thing into a book shape, with Zoom on one side and Slack on the other. After that, back to work — but I didn’t feel like going back to the table, so I folded the ThinkPad back into mini-clamshell mode and used it that way on the couch for the rest of the day.
This is all just to illustrate how many different uses there are for this form factor. I can’t say that a folding screen has ever been at the top of my “Laptop Features I Need” list — but after using the X1 Fold for a week, I would love to own one of these.
There’s no laptop I’d rather bring on a business trip than the X1 Fold, and that’s due to a couple of design choices in addition to the versatile form factor. For one: it’s really, really nice. The device is clad in an authentic black leather cover with a sturdy kickstand integrated into it. The ThinkPad logo adds a sleek splash of red. It all looked very out of place in my drab apartment. The only parts that look a tiny bit cheap are the bezels, which are large and rubber. Those are necessary to protect the sides of the display from clinking against each other, and they also give you something to hold while you’re using the Fold as a tablet.
A folding display also makes for a great travel companion. Folded in half, this ThinkPad is about the size of a hardcover book: 9.3 x 6.23 x 1.09 inches and 2.2 pounds (299.4 x 236 x 11.5 mm and 999g). The keyboard fits inside the folded device (magnets keep it secure), and it has a snug sleeve for the stylus on its side. I easily slipped the whole affair into my purse and would have loved carrying it around a trade show or conference under my arm. Any time I brought this somewhere, I thought, “Man, I wish I’d had this in college.”
And with the leather cover, I was never worried about bumping or scratching the Fold — something that can be stressful with devices this expensive. (Lenovo says its product underwent MIL-STD 810H testing and is resistant to conditions including humidity, dust, sand, extreme temperatures, and mechanical shock. This certainly promises a much higher level of durability than we’ve seen from folding phones thus far.)
THE FOLD
With foldable devices, there’s always one big question. The answer to that question is no: you can’t see the crease while you’re using the Fold (though it’s visible when the device is turned off). The exception is when it’s partially folded like a book. The lighting in the middle and the lighting on the sides is a bit uneven in that case. But credit where credit is due: when you’re using the Fold flat, there is no crease to be seen.
The hinge itself, which Lenovo says it spent years developing, is quite sturdy and didn’t give me any problems. The ThinkPad requires two hands and a bit of a firm tug to open. But on the plus side, it always stayed exactly in the position I put it in without any slips or wobbles.
Flat, the display is a 13.3-inch OLED with 2048 x 1536 resolution. That’s a 4:3 aspect ratio, which is unusual for a laptop but feels quite roomy compared to a traditional 16:9. I could easily stack two or even three Chrome windows side by side, often with Slack, Zoom, or another app over top, without having to zoom out. And I didn’t notice any jelly scroll (where one side of the screen is able to change pixels faster than the other side), which was a problem with some early foldable phones.
The viewing experience is a luxury. The panel reproduces 100 percent of the sRGB color gamut, 100 percent of Adobe RGB, and 95 percent of DCI-P3. It’s great for watching videos and movies; even the dock icons pop with color.
On the downside, good luck using this thing outside. Not only is it quite glossy, but it only reached 289 nits at maximum brightness. That’s not a problem for indoor work, but it’s still a bit of a letdown for the price since some premium business laptops offer 1,000-nit options for less.
PERFORMANCE AND SOFTWARE
Lenovo has come up with some neat software tricks to improve the Fold experience. There’s an app called Pen Settings where you can map the buttons on Lenovo’s stylus: they can do everything from copy / pasting to erasing, toggling music and volume, and pulling up various applications.
You can also use Lenovo’s Mode Switcher (which pops up whenever you fold or unfold the device) to split the screen in half, essentially creating two separate displays on either side of the crease. This is most useful in the mini-clamshell form if you want to have one application running up top and one on the bottom. But you can also use it when the Fold is flat, the same way you’d use the Windows split-screen feature. And if you split the screen in Mode Switcher, the Fold preserves that layout when you move between portrait and landscape orientations, whereas elaborate arrangements of tabs and apps sometimes get scattered everywhere otherwise.
These are nice touches, and they show that Lenovo has really thought through the potential this form factor has, rather than just slapping a hinge onto a Surface Pro. But when it comes to performance, there are signs that this product is still in an early stage.
There’s a lot to commend Lenovo for here. I get stressed out just thinking about the tasks this computer has. Not only does it need to know whether it’s in portrait or landscape mode (like any regular tablet), but it also has to detect whether it’s folded, how much it’s folded, and where the keyboard is — and then resize its interface accordingly. Given all that, I’m quite impressed that this thing (mostly) works.
Mostly. But it’s not seamless, and there are some areas where the Fold and Windows 10 aren’t quite seeing eye to eye yet.
For example: every so often when I had the Mini Keyboard connected, the Fold forgot it was there and sent up the on-screen keyboard anyway when I selected a textbox with the stylus. You can turn the on-screen keyboard off in Settings if this annoys you, but it’s still a glitch that’s disappointing to see. On the other hand, occasionally, the on-screen keyboard didn’t come up immediately when I wanted it to, and I’d have to prod the text box a few times before the Fold got the hint. And the little writing box, which is supposed to pop up whenever you tap a text field with the stylus, seemed to come somewhat randomly: it didn’t appear at some times when I wanted it, and it did pop up at some times when I didn’t (like if I had just highlighted something in a Google Doc).
There were two occasions, both after a restart, where the Fold didn’t realize it was in mini-laptop mode and tried to expand across the whole screen. I had to remove and replace the keyboard before the Fold detected it. (Lenovo is aware of that issue and says it’s working on a fix.)
Most annoyingly, I wasn’t able to video chat in Zoom or WebEx using mini-laptop mode because my video feed (like the tablet’s camera) was sideways. That’s not a Lenovo-specific problem — some other Windows convertibles also don’t properly rotate their cameras if you flip them around during video calls. But it’s still something I hope Zoom and WebEx are able to fix. Were it not for this issue, mini-laptop mode would be the ideal form factor for remote meetings (WebEx on the top half, notes on the bottom).
I have faith that Lenovo will iron out these kinks as time goes on. But at present, they are here.
The X1 Fold doesn’t have as heavy-duty of a processor as you’ll find in some other ThinkPads. It’s powered by the Intel Core i5-L16G7, one of Intel’s “Lakefield” CPUs. These are “hybrid” processors, efficient chips designed for small and light devices. They’re Intel’s answer to the Arm chips in phones, tablets, and now MacBooks. (Microsoft’s dual-screen Surface Neo is supposed to be getting one, too.)
Occasional glitches aside, I was pleasantly surprised by the performance here. Multitasking in a dozen apps and Chrome tabs was no problem, and I could do some scrolling and browsing during a long Zoom call without anything freezing up. Of course, that’s also true for plenty of devices you can get for a few hundred bucks.
And the Fold also dragged its feet on some tasks where other premium business laptops (not to mention high-end consumer laptops that are half this price) do better. It takes a good few seconds to boot up, for example, and I sometimes got impatient waiting for it to find things in File Explorer and send windows to fullscreen. Webpages were a bit slower than I’m used to. The ThinkPad also takes a few seconds to rearrange itself between modes — and mini-clamshell mode, in particular — but I’m willing to forgive that since it’s a brand-new use case for Windows 10.
Battery life, though, was quite disappointing. Running the X1 Fold through my sustained workload (around 12 Chrome tabs and apps, occasional Spotify and YouTube streaming and Zoom calls, 200 nits of brightness), I averaged four hours and 50 minutes on the Better Battery profile and five hours and 35 minutes on the Battery Saver profile (with Intel’s battery-saving features enabled). That’s not necessarily unexpected for a laptop with an OLED display and only a 50Whr battery. But it’s not good for a $2,500 device, especially one that’s meant to be used on the go. The Surface Pro 7, which has a higher-resolution screen, got seven to eight hours in our testing.
The final thing worth mentioning here is that Windows 10 is still a “meh” operating system for tablets. If you’ve never used a Windows tablet before, it’s quite different from using an iPad. Gesture controls are still fairly basic, especially compared to Apple’s shortcut offerings. Moreover, most Microsoft apps aren’t designed to be used on a tablet the way that iPad apps are, so you’ll be doing a lot of struggling to tap boxes and icons that are much smaller than your fingertip. And actions like rearranging tabs and dragging / dropping windows that are second-nature with a touchpad are difficult to do with your fingers.
Switching to Windows Tablet Mode helps with this a bit, but you have to dig into the Action Center to turn that on manually. The Fold doesn’t swap to it automatically when you disconnect the keyboard the way Surface Books do. (Again, it’s not a Fold-specific problem — in general, disconnecting Bluetooth keyboards from Windows convertibles doesn’t trigger Tablet Mode — but it’s inconvenient nonetheless.) And of course, Windows 10 doesn’t have any unique features that take advantage of the dual-screen setup; Microsoft is working on an operating system optimized for dual-screen hardware (including its own Surface Neo), but we don’t expect that to arrive until next spring.
The running theme here is that most of these issues are Microsoft’s fault, not Lenovo’s. The convertible laptops Microsoft makes use the same operating system. But the lack of tablet functionality makes more sense on Surface Books and Surface Pros, which can serve as tablets where needed but are still meant to function primarily as computers. The problem with the Fold is that it’s at its best as a tablet. The ideal X1 Fold customer will be using it as a tablet most of the time. Because there are two major reasons I don’t recommend this device as a primary laptop. Those reasons are...
THE KEYBOARD AND TOUCHPAD
The X1 Fold is beautiful to look at and, as a tablet, a marvel to use. But I still dreaded having to drive it for my actual work every day. That’s because the keyboard and touchpad are tiny.
Now, I understand why they’re tiny. Lenovo wanted to make a keyboard small enough to fit inside the folded device so it wouldn’t be an extra thing to carry around. And it certainly succeeded in making a keyboard that fits perfectly into the folded-up tablet. I was never concerned that it would fall out.
But I hate typing on it. The keys actually feel quite sturdy and have a satisfying click to them, but Lenovo essentially had to combine a number of keys to achieve its desired size. For example: the apostrophe / quotation key, usually to the left of Enter on a US keyboard, has been moved to the far right side of the keyboard above Enter. (It’s a half key, sharing a slot with colon / semicolon). Every time I needed to type an apostrophe, I had to consciously stretch my hand far to the right. Approximately 50 percent of my apostrophe attempts resulted in instinctively slamming Enter instead (as my colleagues who received numerous incomplete Slack messages can attest). I assume you’ll adjust to this after a while of using the Fold, but boy is there a learning curve.
It gets worse: Lenovo had to cram some keys that were already dual-purpose together, meaning that some buttons accommodate as many as four different symbols. Question mark / forward slash has been combined with period / greater than, so typing a question mark requires hitting all three of Shift, Fn, and period at the same time. Dash has been relegated to Fn+9, which also tripped me up. I had to go through this review and delete a bunch of accidental 9s I’d typed before I filed it. And backslash requires Fn+8, which would make the X1 Fold a huge pain for people in STEM fields who needs to use LaTeX and some other programming languages.
Again, I understand why the keyboard needed to be small. But I would rather carry the keyboard separately than have to press three keys to make a question mark. Lenovo could make a nice carrying case that fits the Fold, the keyboard, and the stylus, and I would be totally fine with that. The company could also create some more space by removing the touchpad — which it might as well because the touchpad is basically useless.
To put in context how tiny this thing is: if I place two fingers on it (and my fingers are quite small) there is almost no room above or below them. So as you can probably imagine, scrolling is a pain (you hit the plastic frame immediately) as is clicking / dragging, highlighting, and anything else that requires two moving fingers. (There’s nowhere close to enough room.) Laying out a big article, which involves copy-pasting text and moving a bunch of images around, was quite a struggle.
The touchpad also didn’t do what I needed it to as often as I wanted. It sometimes thought I was holding it down when I had let go, meaning I’d unintentionally move tabs around. And highlighting a segment of text or getting my cursor to land in an exact spot was often a trial-and-error process. Even with the touchpad on its lowest sensitivity, I rarely got the right location on the first go.
I don’t use third-party peripherals with laptops I review, but this touchpad pushed that principle to its limit: I have never been closer to saying “Screw it” and plugging in a mouse to give myself a break. I ended up using the stylus for most of my navigation, but that’s suboptimal for some actions (rearranging tabs, doing anything in Google Docs).
Overall, the X1 Fold is a spectacular device in a lot of ways. It’s good at the one thing it’s advertised for (folding). It’s beautiful, both to look at and to use. It’s sturdy. And the form factor is useful. It’s not a gimmick. I would love to own a tablet like this.
The key word there is “tablet.” The X1 Fold isn’t a tablet. It has a laptop operating system and — more importantly — it’s priced like a laptop. It’s priced like a very expensive laptop.
And it’s not ready to fill that role yet. The battery life isn’t there yet. The keyboard and touchpad aren’t there yet. The software integration, while commendable, isn’t there yet.
The key word there is “yet.” Because with all that being said, I can’t wait for the second generation. Samsung’s first foldable phones were riddled with issues — but just over a year and several iterations later, the company is selling a folding device that’s very usable (albeit pretty expensive). I’m sure that’s going to be the case with foldable laptops as well. Lenovo has a groundbreaking idea, with a strong foundation to build on. I really hope it’s able to patch the Fold’s glitches without compromising on the components that are already exceptional. That would be a breathtaking device, one that would earn my unambiguous recommendation.
AGREE TO CONTINUE: LENOVO THINKPAD X1 FOLD
Every smart device now requires you to agree to a series of terms and conditions before you can use it — contracts that no one actually reads. It’s impossible for us to read and analyze every single one of these agreements. But we started counting exactly how many times you have to hit “agree” to use devices when we review them since these are agreements most people don’t read and definitely can’t negotiate.
To start using the Lenovo ThinkPad X1 Fold, you’ll need to agree to the following:
A request for your region and keyboard layout
Windows 10 license agreement, Lenovo privacy statement, and Lenovo limited warranty
PIN
You can also say yes or no to the following:
Wi-Fi
Microsoft account (can be bypassed if you stay offline)
Privacy settings (speech recognition, location, Find My Device, sharing diagnostic data, inking and typing, tailored experience, advertising ID)
Customize your device for gaming, schoolwork, entertainment, creativity, family, or business
Sync an Android phone
OneDrive backup
Office 365
Allow Microsoft to collect personal information for Cortana, including location and location history, contacts, voice input, speech and handwriting patterns, typing history, search history, calendar details, content and communication history from Microsoft services, messages, and apps.
Add a Lenovo ID profile
That’s six mandatory agreements and 15 optional agreements to use the ThinkPad X1 Fold.
0 notes
Text
Here’s What You Should Be Grilling This Labor Day Weekend

Beef up your hanger steak with a tangy red wine marinade and sauce, courtesy of chef Floyd Cardoz.
If you’ve experienced late-summer culinary fatigue and you haven’t gone near your barbecue in a while, now is the time to brush up on your skills, because Labor Day weekend is your last chance to make the ultimate grilling feast before the season is over. We encourage you to wear all the white clothing you have before you need to stash it away (we don’t make the rules, we just enforce them) and take no responsibility for stains, spots and/or smears.
Recipe: Floyd Cardoz’s Grilled Hanger Steak
This recipe requires some advance planning, since hanger steak is best when it is marinated before cooking. A bold marinade complements the assertively flavored meat and tenderizes it a bit as well. Here I use a red wine with big flavor both to marinate the meat and in a reduced sauce — which incorporates the marinade after the meat is grilled. This way nothing — including all that great flavor — goes to waste.

Crisp, smoky wings with a sauce that’s cooling and spicy all at once. Tandoori wings are the total package. (Photos: Gabi Porter.)
Recipe: Grilled Tandoori Chicken Wings With Coriander Yogurt
Indians don’t glorify chicken wings the way Americans do, so I’m stepping in to bridge that inexplicable gap. When faced with chicken and the possibility of high-heat smoky cooking, such as any ol’ charcoal grill, there’s only one preparation on my mind. I’ve tandoorified and char-grilled everything from pork loin and tofu steaks to more traditional fare like shrimp and lamb chops. Brine and baste all you want, but tandoorification (my word for marinating overnight in heavily spiced yogurt) is the way to go if your end game is “juicy and flavorful.”

Slow-roasted glazed sweet potatoes, spicy chorizo and lots of cheese make these stuffed peppers sing on the grill. (Photos: Gabi Porter.)
Recipe: Chorizo And Cheese Grilled Stuffed Bell Peppers
We’re going to pop open and clear out the peppers, grill them up a bit, fill them with goodies and then throw them back on the grill to finish up. The result is a smoky, charred exterior on a completely cooked pepper that’s just oozing cheese, meat and other great stuff. After you make these, you will never look at a skewer filled with pepper slices the same way again.

Packed with Thai flavors such as coriander, lemongrass, galangal and coconut milk, these aren’t your typical grilled prawns. (Photo: Gabi Porter.)
Recipe: Harold Dieterle’s Grilled Prawns, Thai Style
Grilled prawns are grilled prawns. If you buy a nice, plump, fresh product from your favorite guy at the fish counter, you’re going to have a good time — even if you scorch the thing. But please don’t. Oftentimes grilled prawns (and shrimp for that matter) can be straightforward. Salt and pepper, a burst of acid. Done. New York City chef Harold Dieterle does the opposite, brushing the little guys with a spread made with some of Thailand’s most iconic flavors: coriander, lemongrass, galangal and lots of coconut milk. It’s as if you were sipping a bottle of Chang on a beach in Ko Samui. And when cooking with prawns, always leave the head on. That’s where the flavor is.
A bold, colorful, garlic-spiked recipe to make you yearn for grilling season all year round.
Recipe: Kevin Gillespie’s Grilled Pork Tenderloin With Spanish-Style Garlic Shrimp
It’s like Spanish surf and turf with shrimp and pork. The idea came from a Brazilian steakhouse in Atlanta, Fogo de Chao. They roast whole pork loins and carve them for you tableside. It’s good, but I always thought it would be better with some surf to go with the turf.

The island seasonings make this chicken truly unforgettable.
Recipe: Grilled Chicken With Spicy West Indian Salsa Verde
This has to be our best-loved chicken dish. The well-seasoned chicken also gets a “post-cooking” marinade; it is tossed in a bit of West Indian salsa verde and put in the oven for a few minutes so the salsa verde flavors can be absorbed into the chicken. The combo of the chargrill, the island seasonings and the kick of the West Indian salsa verde is truly unforgettable.

Update your fajita routine with this porky dish.
Recipe: Oaxacan Grilled Pork Fajitas
In Oaxaca, they use thinly sliced pork shoulder, which is loaded with fat, so it stays moist on the grill. If you have the patience, thinly slice boneless pork shoulder (we’re talking poker chip thin here), or bribe your butcher to do it. Otherwise, use pork loin or tenderloin thinly sliced across the grain. It helps if you partially freeze it first.

Photo: Ed Anderson
Recipe: Grilled Coriander-Crusted Fish Steaks With Gazpacho Relish
Chef Chris Schlesinger and Cook’s Illustrated executive editor John Willoughby have combined their forces once more with their new cookbook, The Big-Flavor Grill. These truly simple and delicious recipes don’t take a lot of time or effort but are (as they say) big-flavor dishes. Try this easy spice-rubbed fish steak recipe on for size. The gazpacho relish takes about five minutes to make and adds a burst of bright flavor to the hearty fish.

Keep it light and meatless with these mushroom tacos.
Recipe: Grilled Portobello Mushroom Tacos
Anyone who’s ever loved a taco should hit L.A.’s Pink Taco with an empty belly and a fierce craving. In honor of Food Republic Grilling Month, we borrowed a meatless recipe from chef Sam Anguiano. ��Mushroom tacos are perfect for the food lover who wants a good taco but doesn’t eat meat. Grilling them over live mesquite will give you optimum flavor. The portobello should be grilled through but still have some bite to create different layers of texture. Carnivore or not, you will love this taco.” Agreed.

Recipe: Grilled Pork T-Bones With BBQ Butter
Just like beef T-bones, pork T-bones contain a lower piece of the loin (the strip loin section of a beef T-bone) and a section of the tenderloin (the fillet of the pig). I treat this simply: well seasoned, grilled to medium, and then topped with a thick pat of my BBQ Butter. Delish! The BBQ Butter can be made ahead and frozen. Just pull out a portion a couple of hours before needed. I also love to use it to top steaks, chops, and even breads for a nifty treat.

Source: http://www.foodrepublic.com/2018/08/30/labor-day-feast-inspiration-what-were-grilling/
0 notes
Text
steph’s guide to roleplaying
Heyo! Bare with me, for this is a long post.
So, within various fandoms, I have seen a common trend that rubs me the wrong way. People asking, either their followers or blogs they follow, why they aren’t popular/roleplayed with. Or, they ask for advice and do not apply it, for one reason or another.
I have been in the indie Tumblr roleplaying community for over three years now, across three big fandoms (Marvel, Harry Potter, and Fire Emblem) as well as smaller fandoms. I have seen many trends come and go, many popular roleplayers come and go, and more.
It’s hard to get your foot in the RP door on Tumblr. I was there. Your favorite blog that you cry about being so good was there. Everyone was there. It’s a BIG pond, with many fish. Things are ever changing on Tumblr, so this will be reference guide to what you need to get started on your RP blog!
When it comes to edits, whether they are icons, themes, or promos, they are very important to RP blogs. Icons are a staple within the RP community, across fandoms, indie, and group. It may seem hard to get and make graphics without Photoshop, a very expensive program, but there are ways around it. Your graphics do not have to be fancy or hand drawn, but cleanly sized and cropped. There are many image editors out there, but these are my personal favorites.
GIMP- a free and downloadable image editor. it works very similarly to Photoshop, and will work for basic things like cropping, coloring, and resizing images. It does not have all the features of Photoshop, but will work fine for simple things.
Pixlr- a free image editing site that requires no download. Again, it works similarly to Photoshop and Gimp, but more on the basic side. I recommend this if your version of GIMP or Photoshop is acting wonky or broken. If you are iffy about downloading programs, this will be perfect for you.
Photoshop Torrents- While stealing, pirating, and torrenting is wrong and illegal, Photoshop is expensive. You can get older versions of Photoshop through various torrents on the internet (I found mine through tumblr). I like using CS5 because it is a well known version with plenty of tutorials online. I recommend downloading Photoshop Portable, as it can easily be stored on your flash drive.
As for what is actually on the blog and what people like to see on a roleplay blog, there is a few things that people prefer not to see. The number one thing most followers want from a roleplay blog is writing. They may want that through interaction with you as a partner, or they just like reading it as a personal or follower. As for the things that people do not like to see, there are the top few things.
6 Pages of Memes- It is okay to reblog memes. It is how interactions between partners start, and can serve as good ice breakers between new mutuals. However, as someone who has gone through many blogs, six pages of memes with a few RP post in between is not appealing. Just because you may not be getting responses right away, does not mean you should spam your blog and the dash with memes every half hour. People may not be online or interested in that meme. If you like all these memes, queue or schedule them for when people are online more. Also, send some to the people on your dash and focus on making new threads from them.
Short Replies- Before I start, yes, one liners are fun. They are quick, easy, and light, but they should not be the only thing on your blog. Many people like to expand to paragraphs because they are writers. Paragraph responses also show potential followers how you write and if it will click with their style. They may seem intimidating, but take your time on them. Save part of your responses to the drafts and come back to it later. Roleplaying is not about how fast you can respond, but the quality of your writing. This is especially true when you do not use icons. If a blog doesn’t use icons, I look for description in shorter replies rather than dialogue.
Negativity- This monster comes in many shapes or forms. Negativity/guilt tripping, drama with other blogs, and personal posts do not belong on a roleplay blog, though. Instead of guilt tripping and vague posting, talk it out with a friend for a confidence booster or take a tiny 1-hour break from blogging. Keep whatever beef you have with someone private, as well as your personal/political beliefs about an issue. That’s why personal blogs are things.
Lack of Pages- Pages about your blog are very important! It serves as your personal anchor on your blog, as well as people’s knowledge to your and your character prior to following and interacting. If someone does not see pages about your blog on it, they are more than likely to brush your blog aside. A rules page is the first thing people look for. They want to know how you are as a person, and how to interact with you. Besides the general “do not be a jerk” rule that everyone has, many people elaborate on how interaction with them work. An about page also helps people know your character. Do not just link a wiki page, especially if play as a canon divergent canon character. A well thought out about page helps both OCs and canon characters. It gives a personality and base for your muse and sets it apart from others.
Make it this far? Hella! You are almost through that metaphorical door! Now that the basic and bare bones of your blog is out of the way, let’s talk about trends, or what it is more commonly called aesthetics. They constantly change in the rp community. GIFs used to be the common thing, now it is still icons. While the trends may change, the basics of tumblr rp stays the same.
Themes- Right now, as I write this long essay of a post, container themes are all the rage. They were not always, nor are they required of an RP blog. As long as a blog does not have the basic preloaded themes that tumblr offers, most people don’t care too much about what it looks like. A few good theme blogs for RPers are soldierholiic, theme-hunter, and octomoosey. Don’t like any of those? Look at someone’s blog. There is usually a small icon in the bottom corner that links to the theme maker’s blog. My personal favorite is soldierholiic’s sora theme.
Formatting- You do not have to format your post to be considered quality! You do not have to hate formatting to be considered quality! As long as you can use basic grammar and spelling, you are good. Many people use small text because it looks a bit cleaner. The shortcut for small text is ctrl+shift+ -, if that helps. Also, many people expect your posts to be cut, meaning the latest two replies on a post. If you do not want or cannot download x-kit or other extensions, just politely ask your partners either through talking OOC or in your rules, to cut your post for you.
Function>Aesthetics- While having a nice looking blog is...well, nice, if someone can’t read or navigate through it, then they most likely will avoid you. Many experienced blogs are guilty of this too, not just over zealous newer blogs. Make your posts readable, both on the dash and the blog. Make your pages easy and accessible to find, especially for mobile users. Use colors that won’t kill my eyes because I’m reading your reply on your blog.
Graphics pt 2- While many blogs have personalized or hand drawn icons and promos, it’s not a requirement. You can use the icons you find in the tags. You can have icons that don’t match your theme. As long as they are sized correctly (100x100px is the norm), they do not have to be super edited. For promos, many fandoms accept the casual promo, containing an icon and a bit of info about your blog. It’s easy to spread around and learn a bit about the mun/muse. A fancy photoshopped graphic designed promo is not 100% necessary in most fandoms right now.
I know this post is getting very long and boring, but I swear I am almost done. Your blog is set up. You know the basics of roleplaying on tumblr. But everyone seems so scary with their rules, friends, and mains, etc. Many people on here are shy when it comes to new people. You probably are too. This is how you talk to people who seem intimidating.
Be Casual- There is no need to call everyone senpai or quality or perf. That just makes things awkward. Just be casual with people you want to interact with. Talk about your fandom, scream headcanons with them, ask for their name. You do not have to go in with ‘HI DO YOU WANT TO RP WITH ME, [muse name here]-MUN-SENPAI?!!’ That comes off a bit strong and off-putting.
Be Respectful- First off, don’t be a jerk to people. Secondly, just read someone’s rules before messaging them with questions about something. While many are open to answering any questions a follower may have about them, if it something already stated in the rules of that blog, just save you all some trouble by reading them. Also, do not hate on their interpretation of a character. Each blog is different, even if there are 100 duplicates for that character.
Don’t Be Afraid To Ask For Help- Is there something in the reply you don’t understand? Something about their character you don’t understand? Questions about the universe? Feel free to ask a partner for help! They won’t bite if you are respectful about it. Also, if you are close to your partners, they will often be open to help you with graphics if they have experience/time. Just don’t strut into their IMs expecting a theme done before you get there. Ask first! Be okay with their answer, even if you do not like it.
Lastly, roleplaying is a hobby. Do not let it consume your life or stress you out. If that does happen, it is okay to take a break and come back. It is okay to restart your blog from scratch. It is okay to follow new and different people. Just have fun and be yourself.
#long post#reblog okay#tumblr rp#tumblr rp help#indie rp#rp meme#reference#rp reference#make me tumblr famous
136 notes
·
View notes
Text
Best photo editor for beginners to edit images
Download here free this best photo editor for beginners for speedy and smart colorize pictures
Taking wonderful photographs for your photo album down to something and this is method. Call to produce four photographs every single hour no matter when you're out and also about or house parked on the sofa reading. Best photo editor for beginners does have some of the functions is prominent for, which happens very handy when you have actually decided on you've like to attempt your hand on something even more high-end than scaling photo and cutting out a part from the background. Best photo editor for beginners can similarly import freeze frames coming from video clip clips, together with various reports. As well as when you are actually really feeling a bit careless or even it is actually only plain uninformed about just how to make use of a number of the tools, a helper can easily support you adjust the basics just as lighting fixtures, concentration, color, and also sharpening of photos. For them that like their pictures in different screen editions, the program function supports you beautifully set up pictures to produce a scenic picture.
As well as if it is actually time to reveal off your digital photography skills, you can choose among the photo program design layouts to instantly print them in a particular size.
Best photo editor for beginners free download or software edit photo to enhance an image
Download best photo editor for beginners and edit an image software to resize images or perspective distortion
This photo editing software is actually best for fired up learners along with a great deal of opportunity in their hands to learn the as well technological features that would certainly scare initial chance photo editing consumers. It similarly happens complete with a full circle scenic view course. Probably the shiniest treasure in the bunch will be the lovely skin layer outcome, which removes reddish spots and evens out the skin layer tone. As there's no automatic different colors repair choice somewhat important to repair the bad lighting most digital cameras drawback, there are actually still the conventional attributes of insert objects into another photo. One of the most misconstrued components of electronic photography is what occurs after you take the photograph in reality editing your images. We are going to be cover some ideas for modifying your pictures, from the essentials like warp photos and cropping photos, through much more challenging activities.
The cut out device permits you to change the dimension of your picture, as well as also to transform the facet ratio. For example, you can cut out a photo from a rectangle-shaped form to a square form. There are several factors you would certainly intend to cut out, including for publishing in different styles and element ratios. Contrasted to the original, I have cropped the photo with best photo editor for beginners to remove the colored component of the right-hand side of the photo shot and recomposed making use of the guideline of thirds. This makes the coloring bolt a lot more the emphasis of the shot. When making the picture, you may question why I didn't simply compose appropriately. Well, in this instance, I was performing a long direct exposure photo shot with no a cam stand, so had actually the electronic camera balanced on the edge of the sidewalk for security. That quite minimal my capability to flawlessly frame the moment, so I just shot wider, recognizing I had the ability to crop the picture properly as a result of the fact. In the two situations, cropping is extremely basic and also it is simply involves you picking the cut out tool and afterwards choosing the area you wish to keep with your mouse. You apply the modifications and your new chopped picture is finished. A lot of people are frequently searching in the internet for the best photo editor for beginners to resize a photo free download. Read all to crop photos with this photo editing software download or great best photo editor for beginners for Computer for amateurs for simple invert images and professional insert people into another photo. Best photo editor for beginners and edit a picture software to enhance photos or change the size of an image. Free download best photo editor for beginners for amateurs and edit a photo software to scale photos or change the size of an image.
Invert an image or softening photos is uncomplicated with the best photo editor for beginners and edit an image software download
Download best photo editor for beginners or edit image software to blur pictures or photos sharpening
Get this photo editing software free download for trainees and pros with many powerful features or brand-new best photo editor for beginners for PC with many nice options to comfortable scale pictures. Easy edit images with a best photo editor for beginners for pros to photo batch processing. Download for free the best photo editor for beginners for speedy and intelligent flip a picture. Whenever the horizon band in an image is not even level, a particular of my individual casual aggravations in photography is. Often if we are captured up in the moment, this standard guideline is neglected however fortunately is that modifying your images with the best photo editor for beginners to make them level is additionally extremely easily done.
Adjusting the cam within the side of the pier meant that the picture was uneven this is especially obvious to the eye anytime the image has a clearly described perspective line, just like the ocean. The level tool becomes part of the cut out technique, and you may simply just turn the picture to fit. When you use the level technique, a grid will turn up to help you get the positioning correct.
Focusing a picture is a really simple task that will certainly get simply a few minutes, resulting in a far more aesthetically hitting the spot photo.
Often times when we make a photograph, components of the photo might just finish up being actually brighter than we like. I refer to the brighter parts of the photo as shadows, and also the brilliant areas of the photo as highlights. Contrast has to do with accentuating the difference in between the brightness and dark areas of the image. Raising the comparison of a photograph can dramatically improve the visible effect in which had, by making the boundaries between these dark and light parts clearer. Shade correction is one other crucial part of the photo editing software. You can readjust picture coloring in every type of methods, from transforming the entire warmth of the photo just like just how yellow and blue it shows up, to individually transforming the tone as well as saturation of details shades inside of a photo. We simply wish to go over some really useful color scheme corrections anyone are able to make use of to help to make your photography just a bit extra aesthetically amazing. The best method to change the different colors in regard to a photo is with the saturation gadget from the best photo editor for beginners. This modifies the look of every single color scheme inside a photo to produce it basically condensed. Just like lots of modify, the trick is actually to discover a good evenness as well much coloring the images often tends to seem rather abnormal. Hue photos can be really helpful, and also certainly black and also bright white is an amazing option for every type of situations, in particular, architecture, and also certain garden scenes.
Often there certainly may be a single thing within a photograph that you definitely do not really intend to exist, like an inconvenient beauty spot on somebody's forehead. This is very simple to remove in almost all the leading best photo editor for beginners. It is definitely quite easy to erase any things out of a picture but the best photo editor for beginners performs best on distinct, smaller items that are certainly closed in by the same color schemes. This is due to the fact that the heal tool needs to replace the area you wish to erase with something else, as well as this functions finest when it has a location nearby that looks comparable. For example, dark point on a face is surrounded by a lot of likewise tinted skin, so the heal tool can conveniently determine what to change the bright spot based on the bordering location.
This is actually since the photo editing software needs to switch the location you wish to remove along with something else, and that runs optimal if it gets a field close by that seems much the same.
Best photo editor for beginners has ended up being extremely complicated and helpful and it is usually possible to adjust photograph and so they come to be completely different from the original. There actually are definitely loads of photo editing software as well as wide ranges of ways of getting the exact same or comparable final results.
My purpose most when it comes to a lot of pictures I upload process is normally to produce them appear as natural as you possibly can. I believe this is a great point to make a beginning, also if you wish to continue on and also create more surreal appearing photos. Shade range in a photo shot is generally one of the primary concerns. Your eyes are able to generally see a broader series of tone than your cam can record. The significance of photo editing and enhancing is the act of reshaping an image, put simply. Yet that is simplifying a problem that is very complex.
You can usually perform simple picture editing strategies just like photomontage relatively quickly and swiftly but complex techniques and also digital modifying may require photo editing software and more practice.
Best photo editor for beginners is a helper that anyone can easily work with to control and also increase images. Due to the fact that pictures come with an enhancing amount of usages, even more businesses are discovering methods to reuse pictures and make use of them on larger number of media. Check this best photo editor for beginners download for starters and pros with a lot of awesome features and new photo editing software for PC to practical scaling photo and professional scale photos. Best photo editor for beginners to convenient fisheye effect or functional flip images. Download here free this photo editing software for quick and easy crop pictures.
0 notes