#I have like size 36 in length but my feet are pretty wide at the front
Explore tagged Tumblr posts
Text
Oh to have short feet that are also narrow, so they would fit into shoes that are the correct length. Oh to have feet that are the same fucking size. Yes I'm talking to you, left foot, what the fuck is wrong with you?
#I have like size 36 in length but my feet are pretty wide at the front#why are shoes made for fucking barbie proportions????#personal
11 notes
·
View notes
Note
Hello! I was wondering what sort of requirements pigeons would have and the whole breeds thing. (Sorry long ask) How much room would a pidge need? Like cage size and also, how would one go about excersizing them? Do you reccomend letting them fly free for the day and come back at night? Would they possibly get hurt or catch a disease/parasites out there? Are they expensive to keep? And what breeds are the most friendly/affectionate? Thank you :) 1/2
You know how some dogs have been bred to look nice but have a multitude of health problems (ie pug, chihuahua, great dane ,dachshund ect) does that happen in pigeons too? And if so, how does one know which might be genetically predisposed to getting problems later on or just generally wont have the best quality of life? 2/2
Whuf!
These are really broad questions. I’ll have to break them down and answer ne at a time, so I apologize in advance for the length of time it will take me to get this ask out.
“How much room would a pidge need? Like cage size...”
Pigeon breeds range in size from the tiny Valencian Figurita and Portuguese tumblers (vying constantly to be the worlds smallest breed) to the literally chicken sized Giant Runt.
So the amount of space required depends on the breed’s size and energy level.
Homers are about the average.
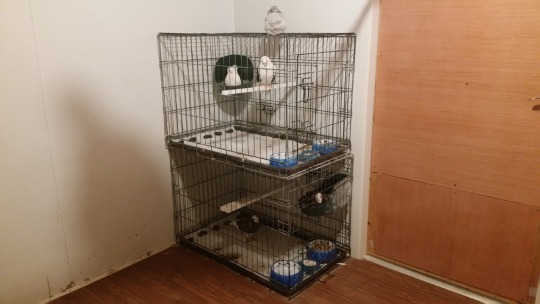
Here is an old picture from before the loft’s redesign of two of my breeding pair in their pens.
These are labrador sized dog crates, outfitted with a rabbit’s corner litter pan as a nest box and a garden stake cut to length as a perch.
Pigeons need flat perches because they are cliff nesters. Round ones like branches or dowels hurt their feet.
If yours is going to be a house pet, the cage should be what a crate is for dogs: A safe place to sleep or wait for you to get home until it learns the house rules.
Pigeons are intensely social birds that are happiest with the freedom of motion to come see you when they want, and go occupy themselves when they don’t want company.
The nice thing about pigeons is that they don;t need to be all over you all the time. They are independent enough to go do their own thing, but want to be able to come check on or spend time with you.
Which dovetails nicely into your next question: “how would one go about exercising them?”
A pigeon allowed to free range indoors will exercise themself plenty.
If you cannot let them free range the entire house, letting them out in your bedroom while you are home will be fine for most breeds.
“Do you reccomend letting them fly free for the day and come back at night?”
Absolutely not!
“Would they possibly get hurt or catch a disease/parasites out there?”
That possibly could be turned all the way up to a guarantee.
Performance breeds like racers, rollers, and tumblers are over bred to make up for the losses during training flights from inclement weather getting a bird lost, hawks snatching them out of the air, and diseases picked up from wild birds and brought back.
“Are they expensive to keep?”
After the initial cost for set up and the vet check to make sure they don’t have parasites and aren’t ill, the upkeep for a few is shockingly cheap.
You can get a lab sized kennel for $50-70. If you want an even bigger space, Great Dane kennels are about $80.
You can buy a wooden garden stake from pretty much any hardware store for about $5.
The bunny corner box is not required if you aren’t breeding. Pigeons will just as happily use a dollar store dog bowl to nest in.
My vet bill for a new bird is $70: $35 for the exotics wellness exam, $20 for a throat swab, and $15 for a fecal test.
I expected feral and lost birds to have lice, worms, parasites, and infections, but was floored when every single show bird I ever purchased from breeders did too!
You’re better off in the long run assuming something needs to be healed, cleaned out, or cleared up and just finding out from the vet as soon as they get there what needs treating.
Clear it out then, and an inside bird is pretty well set.
You can buy 50lbs of feed for $20 at Tractor supply.
And 50lbs of calcium supplements for $11.
I have 36 pigeons and 2 ringneck doves right now, so 50lbs lasts me a little over a week.
But a single bird will eat off of that for over half a year.
“And what breeds are the most friendly/affectionate?”
Most of the Exhibition breeds are pretty friendly, but from most to least kennel space, here are the ones I have enjoyed the most hands on:
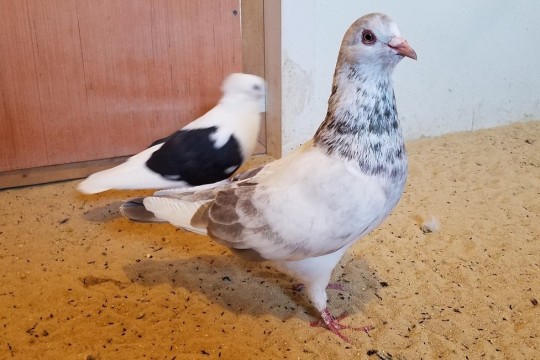
Utility kings
These are the size of chickens and will need a LOT of flight time.
They are a meat breed, so they are genetically predisposed to docility, but also obesity.
They do best free roaming the house full time. It’s really hard to find a cage big enough to comfortably accommodate them.

Giant Homers
Utility kings are a squabbing breed, designed for constant production of big squabs, so they are more bird-shaped than the Giant Homer, which was bred to be eaten as an adult, and then for the aesthetic of a fat round bird.
Like the Utility King, Giant Homers are known for their mellow, gentle temperaments. But after having worked with them for a few years, it seems mostly to be that they are simply too big and heavy to evade effectively, and they know it.
Along with being prone to obesity, their sheer weight puts tremendous pressure on their feet and they can develop huge, painful calluses.
I like my mixes better than their purebred parents, because they inherited the temperament with out the bulk that causes painful or dangerous health issues.
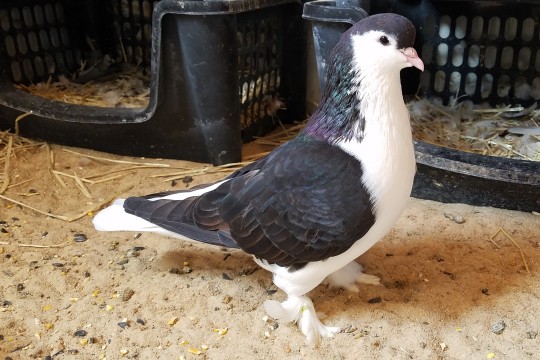
Lahore
Named for the city in Pakistan where they were developed, the Lahore is a huge, gorgeous bird.
Their wing span more then the size of their actual body makes them difficult to cage, so it’s best they have the run of at least a bedroom.
these are laid back and mellow, but not exactly touch me birds. If one gets on your shoulder or in your lap, feel honored.
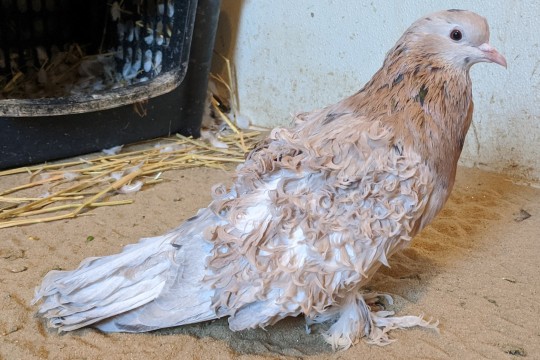
Frillbacks
For the same reason as the Lahore, Frillbacks can be difficult to pen indoors.
An individual can be happy in a Great Dane sized kennel, but frankly won’t fit comfortably into anything smaller.
These are very laid back, not especially flighty, and quite friendly. Young birds are very much cuddle bugs, and the individual pictured still comes up to me to nurse between my fingers.
No known associated health issues, but individuals with especially long muffs can stay especially still because the shaft of the feather under the skin of their feet is bigger around than the bones of their toes, making walking painful.
Show standards require large muffs, so it can be hard to find them with muffs like Bean’s here.
There is one breeder that raises hers with short muffs and entirely clean legged. I’ll be happy to link you.

Voorburg Shield Cropper
These leggy, slender birds are a pain to house because of their height, but the only breed I know of with points taken off in the show standard if they are not friendly enough to try to court the judges.
This sweet flamboyant temperament makes them an absolute delight to work with!
These are the first on the list with no known health issues associated with the breed.
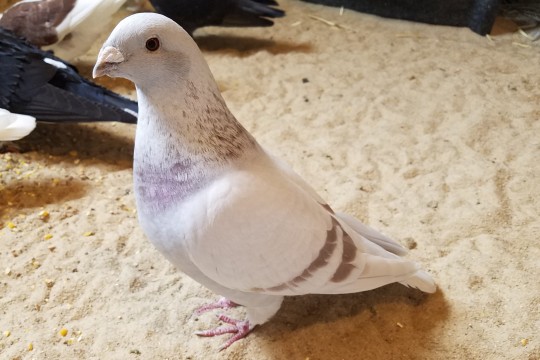
Show Type Racing homer
This is an elegant exhibition breed, easy to house in the example set up we discussed at the beginning of the ask.
They are bulkier than racing homers or flying type show homers, VERY tightly feathered.
This is a wonderfully sweet tempered breed that tends not to be especially flighty.
Some of that is due to the sheer bulk of its musculature, but most of it does genuinely seem to be temperament.

Old Dutch Capuchine
These have a reputation for being docile, but I have found them to be quite flighty.
Mixes incorporating this breed, though, tend to be quite bold and out going.
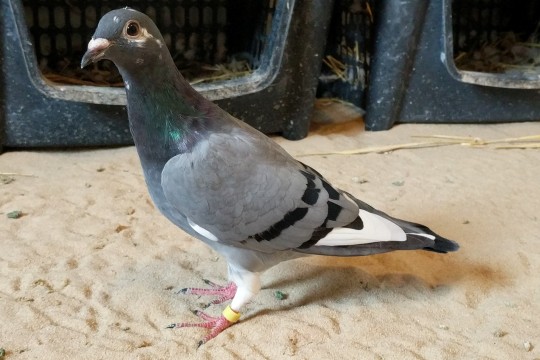
Racing Homer
This is the most commonly available pigeon breed.
Bred for endurance racing, this is a very high energy bird that needs a LOT of time out of the pen to fly.
They have the strongest immune system and highest intelligence of any of the pure breeds.
though some individuals can be hair-trigger flighty, this breed is keenly intelligent and highly curious, and those individuals can learn to overcome their flightiness if their handler can learn to be aware enough of their comfort levels not to startle them with too-quick motion.

Lucerne Peak Crest
Named, like the Lahore, after the city in Switzerland where the breed was developed.
The Lucerne is an extremely temperature hardy breed.
It’s among what are called the Owl Breeds; small, compact breeds with short to mid length beaks, round faces, and large, round eyes.
Most of the owl breeds are mellow and sweet tempered, boldly curious, and not generally prone to be flighty.
Their beaks being a little short makes their nasal slit narrow and the opening to their sinuses wide, so small seeds like Millet can get stuck in the nasal cavity of some individuals.
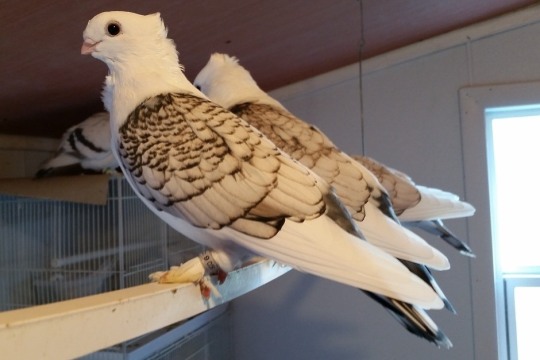
Classic Old Frill
Oh, this is my favorite purebred.
The total pidge package: Small, friendly, shockingly beautiful, devoted parents.

There is absolutely everything to love about this wonderful cuddle bug breed.
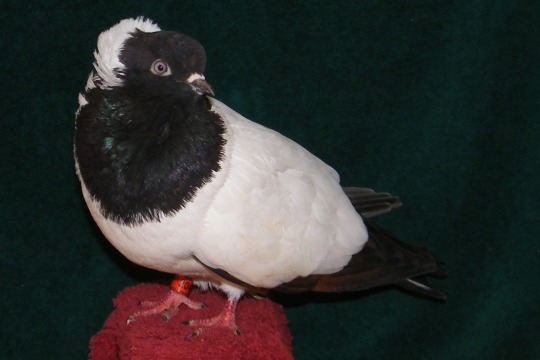
Nun
These are a gorgeous breed, often described as being friendly because they are not smart enough to be wary.
They are unspeakably awful parents, prone to literally treating their eggs like an especially large, uncomfortable poop.
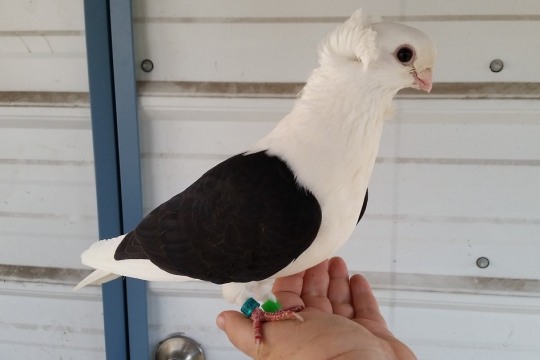
Old German Owl
Another absolute delight of a charming little Owl breed.
These are as stubborn as they are sweet tempered, which can make them a really fun challenge to train.
These are cuddle bugs, for the most part.

Chinese Owl
These are tiny little clouds that range from intensely curious and strongly treat motivated to absolute refusal to have anything to do with anything even remotely human shaped with very little in between.
Small and easy to house.

Portuguese Tumbler
This is a tiny bird, not much taller than a conure.
They are bred purely for aerial performance, so this is a SUPER high energy breed that, like the racing homer, needs a LOT of out time.
They are very bold in their friendliness, eager to check up on you and steal a cheek-smooch before zooming off to resume doing their own thing.
Unfortunately, their breed standard requires their back toe not to touch the ground. They go on tippy toes when they are happy, excited, or relaxed, which makes something like a human hand or shoulder physically difficult to balance on, and there for uncomfortable to stand on.
So trying to pet one throws their balance and stresses them severely.
Mixes with stronger feet are thrilled to have the affectionate attention of human flock mates.

Valencian Figurita
The tiniest owl breed, currently just barely winning out over the Portuguese tumbler.
It’s known for its trapezoidal head shape and upright stance.
This is a bold, plucky little bird that in my experience loves shoulders. ^v^
They are bred a little too small, though, tending to only lay one egg to a clutch, with many dying in the shell with out space for the peep to develop.
Their hatchlings are often given to ringneck doves to foster.
“You know how some dogs have been bred to look nice but have a multitude of health problems (ie pug, chihuahua, great dane ,dachshund ect) does that happen in pigeons too?”
Oh, god, you would not believe the number of pigeon breeds that aren’t even bird shaped!
There are nearly twice as many severely distorted breeds as fit, bird shaped ones.
Check the Modern art Pigeons tag.
“And if so, how does one know which might be genetically predisposed to getting problems later on or just generally wont have the best quality of life?”
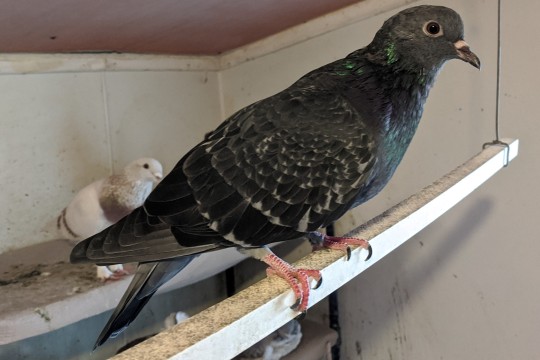
Pippin is a feral pigeon.
This is about the closest you can get to the base line natural shape of the species Columba livia.
The more pigeon-shaped the breed, the better.
Ferals are, genetically, a blend of the homers, rollers, and tumblers that survived getting lost on training tosses or during performances.
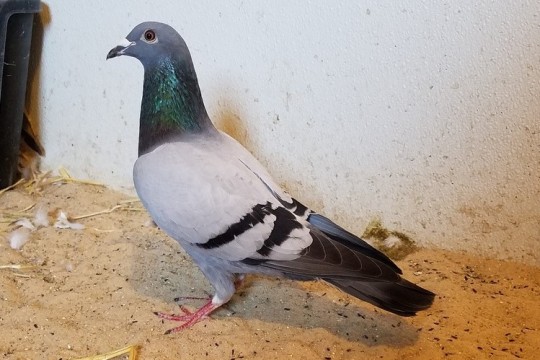
Here is Wilson, another purebred Racing homer.
Because this breed is designed to fly marathons literally hundreds of miles, it’s a lot more compact and muscular than Ferals and genuinely wild Rock Doves, who only need to fly as far as it takes to find enough to eat in a day.
The farther off this base line you go, the less physically fit the breed.

The American Fantail is an especially heinous train wreck.
Its chest is out thrust over its head, its neck curves parallel to its spine, and its head is propped up by its own tail feathers.
youtube
This pitiful creature is not just displaying.
youtube
Their skeleton is permanently stuck in that shape.
Parlor rollers are bred with a combination of neuromuscular defects that throw their balance when ever they flap their wings, sending them into a panic as they flail to right themselves.
youtube
Parlor Tumblers have a less severe version of the same group of deformities:
youtube
We talked about the Old dutch Capuchine above.
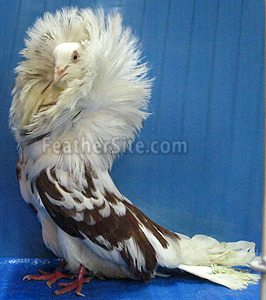
Jacobins are the extreme “modern” version of the ODC.
You could trim their feathers to clear their field of vision
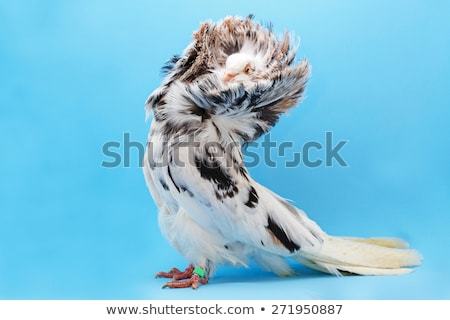
But their very long necks tend to collapse into their shoulders with age.
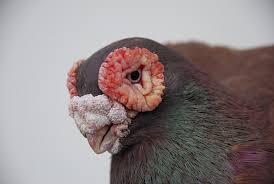
The male Barb’s huge, wrinkled wattle and ceres block off their nasal passages and deform the eyelids so that they may not be able to fully close.
Cocks usually go blind with in three years, but that doesn’t matter to their breeders because their peak show and reproductive performance is between their first and second year of age.
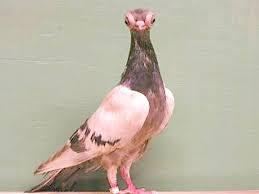
The Short Faced Budapest’s show standard requires its eyes to telescope as much as possible.

Its eyes are literally bigger than its skull, and don;t fit in their sockets.

The eye lid is all that holds them in.
And some can’t fully close their eyes.
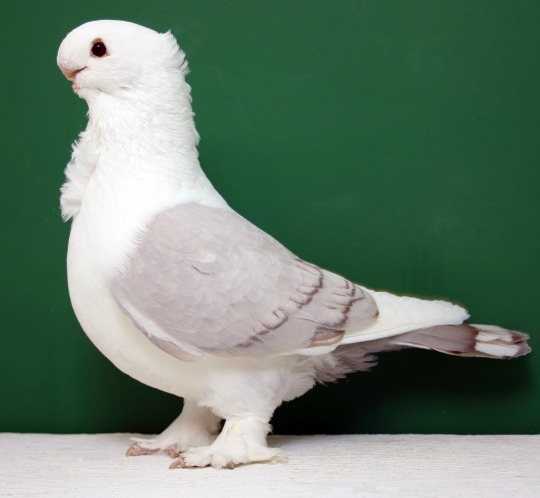
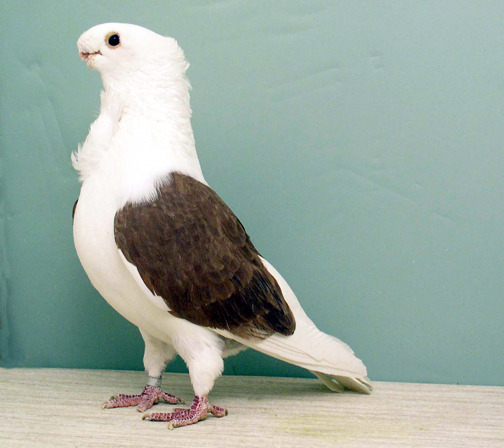
This is the Oriental Frill, also called the Modern Frill.
they have literally no beak.
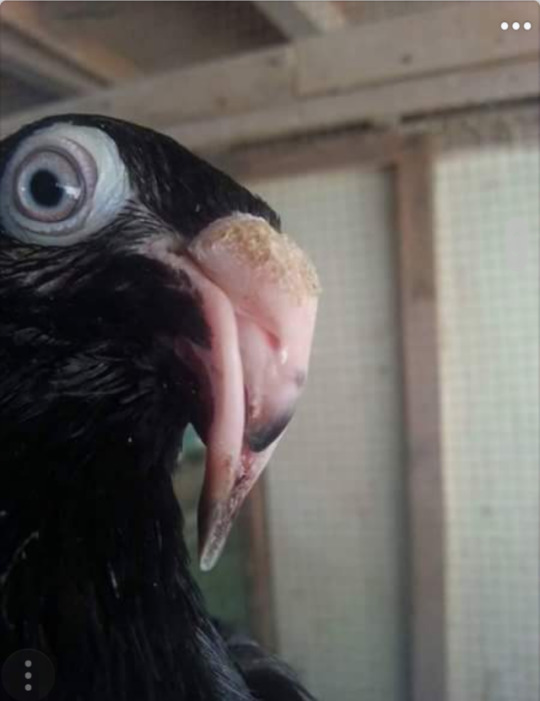
Turbits have a longer head, but a nearly inverted beak.
These birds can;t feed their own young, and struggle to preen themselves.
Aaaand here is the Egyptian Moraslat
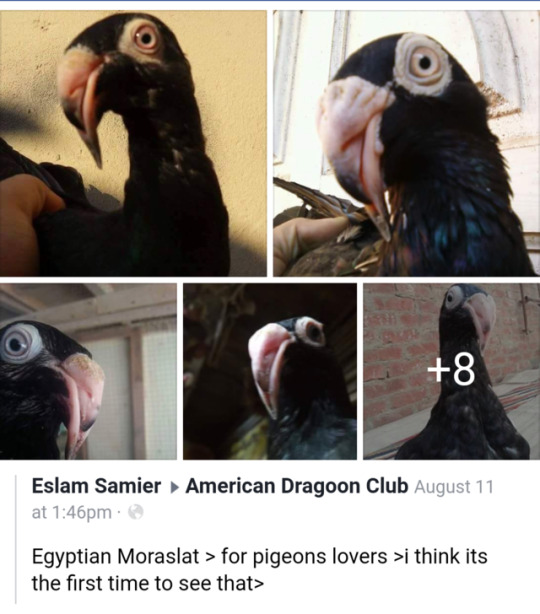
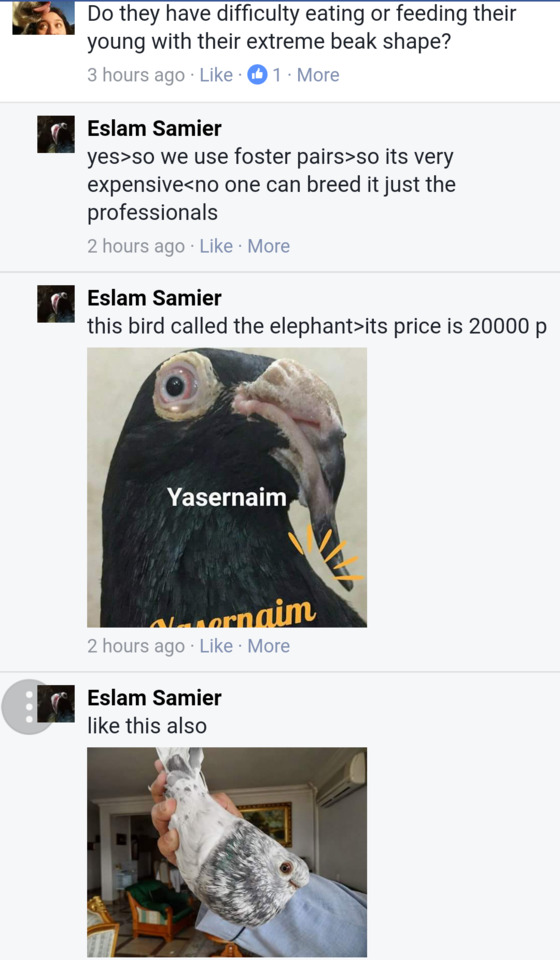
This is a very typical attitude among breeders of these birds with extreme body shapes.
I also have a series on weird, but physically sound breeds, and would be happy to go more into those in another ask.
512 notes
·
View notes
Text
Blue Eyes (4: Shopping & Lunch)
Stevie had told a select few about wanting to adopt, some thought she was insane, given she had just left Betty Ford, and that she was single, while other's, thought it was a brilliant idea, knowing how loving and motherly she was. She told her parents first that she finally adopted a little girl, and they were on their way to L.A. in just a few short days. They wanted to give the girl some time to adjust to Stevie before bombarding her with more.
Today, Stevie has planned on taking Misty shopping for clothes since she only came with a handful of outfits. After breakfast of a fruit salad, toast, and tea, they headed out. Their first stop was at one of Stevie's favorite stores, one she knew also sold children's clothing.
As they stepped inside, Misty looked around in awe. She smiled when she spotted an outfit similar to the one Stevie was wearing. She ran over to a black dress she spotted with fringe and smiled as she played with it.
"Can I ge' 'his one?" she asked.
"You sure can." Stevie smiled.
One of the sales-women, Andy, came over to the two. She was one that knew Stevie well. "Miss Nicks, how can I help you today?"
Misty looked up at the tall, thin woman with dark brown, curly hair, who was dressed in boots and a slightly see-through, white dress.
"I'm here to get this little one some clothes today," Stevie explained as she gestured towards the girl.
"Awe," the woman cooed. "What size is she?"
"I'm not sure really. The clothes she has are all different sizes. Can we get her measured?"
"We sure can," Andy said.
"Misty, is it okay if Andy measures you so we can get you the right size clothes?" Stevie asked.
"Mhm," she nodded.
Stevie took Misty's hand, and they followed the woman to the back of the store where the dressing rooms were. Misty stepped up on a platform and was instructed to extend out her arms.
"How old are you, sweetie?"
"Fouw!" Misty said as she held up three fingers.
"One more finger," Stevie whispered.
Misty blushed as she put up a fourth finger, making Andy chuckle.
"Wow, really? You're pretty tall for four!"
"Mhm," she nodded with a smile.
Any looked toward Stevie. "I haven't seen her with you before, do you mind me asking if she's family?"
"She's actually my daughter. I adopted her." Stevie said proudly.
"Really?" the dark-haired woman asked, raising a brow. "Congrats."
"Thank you."
After a few more measurements were taken, Andy wrote them down on a slip of paper. She then handed it to Stevie. She read it, Size: 3, Length: 36 inches (3 ft.).
"Can I check your feet too?" Andy asked.
"Suwe," Misty sat down on the platform and pulled off her sandals.
She measured the girl's feet and added that to the paper. "Okay, I think we can start getting you dressed up. Did you like that black dress out there?"
"Yes!"
"Okay. If you want, I can do what I usually do for you, Miss Nicks." Andy offered.
"Yes, please."
The woman left the room and soon came back with a small wrack of different clothes and shoes. Misty jumped off the platform and ran over to the wrack. Her small hand glided over the different materials, feeling cotton, lace, satin, and velvet. Her big, blue hues looked at Stevie, and she flashed a big, toothy grin.
After what seemed like hours, Stevie and Misty walked out of the shop with bags in their hands. Stevie couldn't help but buy a few things for herself. They even grabbed a couple matching outfits.
It was soon approaching noon, and Stevie knew her daughter would be hungry if she already wasn't. They got everything into the trunk, and then back into their seats. Stevie started the car and glanced through the rearview mirror to look at Misty.
"Are you hungry?"
"Mhm," the small blonde nodded.
"Do you feel up to meeting someone?"
"Who?"
"Chris... Christine."
Misty gave a slightly confused look as she tilted her head at the name.
"My friend from the band. You know, the keyboardist."
"Oh!" The girl smiled, "Yeah!"
Stevie smiled as she started to drive to the restaurant where she had set up a lunch date with Christine at. She helped Misty out of her car seat and took her hand while they walked inside. She told the hostess that she was to meet with Christine for lunch. The woman guided them over to a table and sat down three menus.
"When Miss McVie arrives, I will show her over." The woman explained.
"Okay, thank you."
Misty looked down at her menu and started to look it over.
Stevie noticed a small smile on the girl's lips. "What do you want to get?"
"Chicken 'nd dumplin's." She answered.
"That sounds really yummy. Maybe I should get that too."
"Ya 'hould!" Misty smiled widely.
As Christine walked through the restaurant, she saw Stevie and the little girl. She noticed the girl's hair, it was exactly like Stevie's some years ago.
Misty heard the footsteps behind her, and glanced back, meeting Chris' gaze on her.
Then, she saw the girl's striking blue hues. They reminded her of Lindsey's eyes. It was as if the child was a product of the two of them, but she knew it was impossible. The girl was far too young, and everyone would have known. She smiled when Stevie stood to hug her.
"Oh, it's been too long, Chris," Stevie said with a sigh before feeling a small peck on her cheek that made her blush.
"Three months isn't too long." The older woman said as she pulled away with a small smile, noticing the blush.
As they sat down, Chris saw the small blonde girl looking at her with a large smile. "And hello to you, little one."
"Hi."
"What is your name?" she asked as she sat across from Misty and next to Stevie.
"Missy."
Stevie leaned closer to the other woman to whisper, "It's Misty."
"That's a beautiful name."
"'Hank ya."
Over the next hour, Christine learned more and more about Misty. How she loved Fleetwood Mac, that she was four, almost five, and something that Stevie didn't even know – she knew some French.
Christine could see how happy Stevie was with Misty, and it made her smile. She hadn't seen Stevie this happy in a long time unless she was high, drunk or both. Now seeing Stevie sober and this happy made her heart swell with joy.
All the while, under the table, occasionally, and out of habit, Stevie and Christine's feet brushed against each other's playfully.
By the end of lunch, Stevie could tell that Misty was getting tired, and was ready for her nap. The three headed outside, and Stevie set Misty in her car seat before turning to Chris, thanking her for lunch. "You can come back to the house if you want." She offered.
"Doesn't Misty need a nap?" the older woman asked, glancing into the car to see the girl half-asleep already.
"Yes, but once I put her down, she'll be asleep for a few hours," Stevie said.
"Okay. I'll drive behind you."
Once they arrived at Stevie's home, she put Misty down for her nap. She gave the girl a kiss on the forehead and made sure she had her teddy bear before leaving her room. She headed back downstairs to find Christine pouring two glasses of wine in the kitchen. It must have been a bottle she had forgotten about.
"Chris..." Stevie said hesitantly as she walked into the room. "I can't drink anymore."
"Shit... right." The keyboardist muttered before pouring the second glass into her own.
"And I'm not letting you drive if you drink all of that."
"Steph, it's one glass. I've driven on a gram of coke and bottle of vodka many times and made it home... I'll be fine, my love." She said.
"I don't care," Stevie said sternly. "I'm not ever letting someone drive after drinking or doing drugs again. Don't you ever remember that night we all nearly died because Mick was higher than a kite, but we thought it was fine because the rest of us were even more fucked up?"
Christine cringed at the memory that played in her head. That night they were nearly hit by a train. "You're right..." she murmured before pouring out the glass of wine into the sink.
Stevie smirked knowingly. "Aren't I always?" she walked over to the counter where Christine stood and pulled herself up onto it.
"How do you like being a mother so far?" Chris asked, completely changing the subject.
"I absolutely love it." She smiled. "She's incredible. I honestly thought I'd be a terrible mother, and horrible at this, but I'm not."
The older woman smiled. She placed her hand on Stevie's knee, softly caressing it. "Of course, you're not. You've always been a very motherly person. I knew you'd have no problem once you had your own child."
"Yeah," Stevie smiled as she looked down at the other's hand. She rested her hand on top of Christine's.
"How is she handling it? The change, I mean."
"Good, good. She hasn't really talked about her birth parents, and she hasn't brought anything up like I thought she might."
"What happened to her parents?" Chris asked as she laced their fingers together.
"They died... the lady I met with the agency, said they were a peaceful cult and were killed at a protest... luckily Misty and some of the other children weren't there."
"A cult?! Stevie, are you fucking insane?!" Christine asked loudly, pulling her hand away momentarily.
"Shh!" Stevie held her hand over the taller woman's mouth. "I don't want her hearing you!"
She soon shrieked when she felt the other woman's tongue against her hand. She quickly pulled her hand away and wiped it off on Christine's cheek.
"Ah, that always gets you!" The keyboardist laughed.
"You're sick," Stevie grumbled.
"What's new, love?"
Stevie shook her head as she hopped off the counter, and the two moved to the living room to carry on their conversation. Stevie pulled off her boots, and sat on the sofa, just a few inches apart from Christine.
"I saw you blush at lunch," Chris said with a small smirk.
Stevie blushed at just the mentioned of the moment. She glanced down at her hands, biting her lip nervously.
"I never said it was a bad thing, now did I?" Chris asked as she placed her hand over Stevie's.
Slowly, brown hues glanced up to blue eyes. "I just—I know... things are over between... us, and I—I didn't want to seem like, well, you know..." she trailed off nervously.
"Well, for starters, things between us were very complicated, and they only stopped because you needed a break from everything to go to Betty Ford, and I went back home. We never even specified what things between us were."
Stevie nodded softly before glancing back down. She sighed before chewing on her lip again.
"What are you so nervous about, Steph?"
At first, she just shrugged. "Well... like you said, you're back home... in England."
Christine sighed as she nodded. "That's true."
"How long are you here?" Stevie asked as she laced her fingers with Chris'.
"Only a few more days. Mick wanted to talk about another album... but I don't know."
"Already?" the younger woman asked.
"Well, love, it has been three years since Mirage."
"And that was a wreck."
"Maybe so... but we've never gone this long without recording or touring," Chris said.
"But... I've got Misty now... you're off in England, and the boys are off doing God knows what." Stevie commented.
"I would move back if we decided on really doing this."
Stevie bit her lip. "Would you? I know you love your little castle of yours, and you have Charlie."
Chris chuckled. "It'll still be there whenever I decide to go back, and I would bring him with me..." she said before thinking. "Is that what you're so nervous about? Me living somewhere else?"
The younger blonde nodded softly.
"Why?"
"It's already hard having this type of relationship, it's even harder when your overseas," Stevie explained.
"This type? Do you mean in the spotlight, being Rockstars, or both of us being... women?" Christine asked, needing more information.
"All of the above," Stevie answered hesitantly. "Chris, I miss you so much, just as my friend. I can't imagine myself missing you even more if we were something more."
Christine's free hand cupped Stevie's cheek, making her look up. "I miss you too, in more than one way." She said before kissing Stevie's lips softly.
"Sewie!" Misty called from upstairs.
Before Stevie even had time to process the lips on her own, she heard Misty's call and had to pull away. "I'll be right back." She said before standing up. She pecked Christine's lips quickly. "We'll talk more when I get back."
"No, I should get going, love," Chris said as she stood.
"Please, Chrissy," Stevie begged as she walked to the stairs.
The older woman sighed before sitting back down. "Fine."
#Stevie Nicks#christine mcvie#Fleetwood Mac#au#alternate universe#misty day#AHS#ahs fanfic#american horror story#coven#ahs coven#american horror story coven#fanfiction#bisexual
3 notes
·
View notes
Text
How to buy the right shoes-measure the size of your feet
Author: shoes supplier - xindesheng
How to measure the dimensions of your feet and make the foremost suitable shoes for you ought to be the highest priority of the industry . The custom shoe last starts with the right measurement of the foot size. during this shoemaking post, i will be able to explain why you wear the incorrect shoe size all of your life and the way to live your foot size correctly. There are many great shoemakers and shoemakers who have spent a few years perfecting these skills, and there must be more parameters in their pedal measurement calculations. I'm talking about custom shoes. To But today, we'll specialise in a basic method to live the dimensions of your feet to order the proper shoe last to customize your shoes. Standard shoes last In order to form shoes professionally, we'd like to use shoe last. it's a reproduction of a person's foot made from plastic in most cases, and there are thousands of various shapes of shoes last. The metric values of shoe last are different. There are two of them. we'll mention these two most vital values during this article. they're length and width. The length will determine the dimensions of the shoe last, and therefore the width will determine its volume. Therefore, once you buy shoes of a particular size, these shoes are made with an equivalent last size. To It is important to know that every shoe last size features a different width. this is often what you and most beginner shoemakers miss.
To For example, shoes last size 38 have different widths. In other words, it are often thinner or wider, but the dimensions (length) is that the same. Generally, there are 8 commonest widths from super narrow to super wide. this suggests that every shoe size may have 8 different widths.
Read more:Bulk Shoes-Wholesale Shoes
Why is that the width of the shoe last different? Because the width of human feet is different. Some people have very wide feet, and a few people have very narrow feet, but their same length means an equivalent size of shoes. Therefore, as a perfect choice, all footwear manufacturers and footwear brands must produce shoes with all existing widths (for example, widths from 1 to 8), but actually , this is often very expensive. Imagine that they have to supply numerous shoes, where the dimensions of every shoe must be multiplied by the amount of pairs required by each brand store multiplied by 8 times! Therefore, they decided to use just one width of shoe last (some orthopedic shoe brands rarely use), this width is between the narrow width and therefore the wide width.
To It is some average width, and therefore the average width of shoe last is standard shoe last. To It has all possible sizes, for instance , women from 36 to 42, but the width is merely 1. All footwear brands have their own standard shoe last, usually a shoe last with a width of 5. This is why you'll buy size 37 in some shoe brands and 38 in other sizes. Not only that, but from experience, i'm pretty sure that the majority of you're wearing the incorrect size of shoes. Wrong foot size or why did you wear the incorrect shoe size? We are all different and our feet are different, except for each of you, the main footwear brands offer shoes of an equivalent width. Now you recognize why this happens, but does it mean that the shoe size you always buy is that the correct shoe size for your feet? Not in 99% of cases. As I even have explained to you, the length of the shoe last determines��the dimensions . an equivalent thing is that the length of the feet. To Based on the length of your feet, you'll know the shoe size you would like . To So, for instance , if your foot is 24 cm long, you would like size 37.5. The problem here is that the width of the feet. If the width of the foot is 6, but most the footwear within the store features a width of 4 or 5, the shoe size 37.5 are going to be smaller for you. This is why you would possibly buy size 38 or 39 shoes, but counting on the length of your foot, your actual size is 37.5. Dear friends, this happens to almost everyone! this is often why many of my new students choose the dimensions of shoes they're wont to wearing once they start making custom shoes, but once they measure the dimensions of their feet consistent with my instructions, they're going to be surprised to seek out the particular size. To Therefore, if you would like to possess shoes that suit you perfectly, you would like to customize shoes.
0 notes
Photo

A new snapshot from https://sagesacre.com/2020/09/29/make-a-diy-bucket-air-conditioner/
Make a DIY Bucket Air Conditioner
Make a portable room air conditioner for about $30 with a couple of buckets and a desk fan
The bucket air conditioner at work
(TL/DR: Click here to skip straight to the instructions)
We have central air conditioning. It’s a big, hulking monster from the early 1980’s that’s loud, doesn’t cool well, and practically forces us to take a second mortgage on the house every time we run it for a couple hours, so we rarely use it. Mostly we sweat it out with fans and shades.
A few days ago, my wife came home from the neighbors to tell me about their portable swamp cooler which kept their house pretty comfortable even though it was almost triple digit heat outside. I investigated and found that it was an “evaporative cooler”, basically a box that blew air across water to cool the temperature of the air. Units for a room the size of my family room ran about $400, which was the same cost as a portable AC, so I figured if I was going to spend $400 on a portable unit, I’d spend it on an AC.
But I didn’t want to spend $400 on anything, so I decided to wander the Internets and see what kind of DIY swamp coolers were out there. Turns out, there’s all kinds, many of which worked the same as commercial evaporative coolers, but cost far less.
A little more research led me to rule out the coolers that called for pumps and trays and evaporative media because I would have to buy all that stuff. Instead I went with the “bucket AC”, which uses a couple of buckets, a fan and some plastic pipe, because, other than a cheap table fan, I had all the stuff.
Most of the bucket AC instructions I came across called for a 5 gallon and 3 gallon bucket and some 1½-inch PVC pipe. The room I wanted to use this in is a little larger and has high ceilings, so I went with a 10 gallon and 5 gallon bucket and 2-inch pipe (also, I already had the buckets and the pipe).
Building the Bucket Air Conditioner
Supplies
2 buckets — one 10 gallon with lid and one 5 gallon (or 5 gallon with lid and a 3 gallon)
2-inch PVC or ABS pipe — I went with the black ABS (used in drain vents) because I had it leftover from a sink project. You need about 36-inches.
1 desk fan — Size will depend on your big bucket’s lid size. Mine was 12-inches in diameter, so I got a cheap 11-inch desk fan from Amazon.com
1 gallon jug of water — Chill it in the fridge or freeze it overnight
Supplies – 10 gal bucket, 5 gal bucket and pipe
Basic 11-inch Desk fan
Tools
Drill
½-inch drill bit
2-inch hole bit
Small hacksaw
Step 1 – mark and drill your holes in the large bucket
Drilling holes in the side of the large bucket
Use a tape measure and pencil to mark the center of three equidistant holes on one side of the large bucket. Use the 2-inch hole bit to cut three holes in the side of the bucket.
Step 2 – drill holes in the smaller bucket
Smaller bucket inside the larger
Using 2 wood blocks to hold the smaller bucket in place
Place your smaller bucket inside the larger one and align it so it’s in the center. Use pieces of wood or piping to keep the smaller bucket centered in the bigger one. With the three holes in the big bucket as guides, use the hole bit to drill three holes in the smaller bucket.
Step 3 – Cut and insert your pipe
Cutting lengths of pipe
Pipes inserted through the bucket holes
Cut three even lengths of pipe and pass them through the holes in the buckets so the ends stick into the inner bucket just a little. I originally cut mine to 8-inches, which was more than long enough to pass through both buckets, but I found slightly longer pipe length of 10-inches distributed the cool air better.
Step 4 – Cut a hole in the big bucket’s lid
Using a drill bit and some string to trace the lid cutout
Drilling the hole for the saw to cutout the lid
Cutting the hole for the fan
You want to cut a hole big enough to allow the fan to blow the most air it can into the bucket without actually falling into the bucket. My 10 gallon bucket’s lid was a little over 13-inches in diameter inside the rim, so I bought a basic 11-inch desk fan from Amazon, which, conveniently, was 12-inches wide with the fan guard.
The easiest way to trace the piece to cutout of the lid is to push a drill bit in the lid then use a piece of string and a pencil like a compass. Once the outline is traced, make a hole at the edge of the line, pop your hacksaw blade through the hole and follow your line with your saw to cut the opening.
Step 5 – Try it out
Two 1 gal jugs of chilled water in the interior bucket
The bucket air conditioner with the fan in place
The bucket AC works best with there are no obstructions in front of the pipe outlets. You can see from the photo I put mine in the center of the family room where the air would distribute freely. (Then I put it up on a plant stand, because one of our dachshunds looked like he really wanted to mark it as his.)
Once it’s in place, put the jugs of chilled water in the center bucket (I can fit two in mine), flip the fan face down on the bucket lid and turn it on. Viola! Conditioned air!
My results
Is it possible to keep the house cool in a triple digit heat wave with a bucket air conditioner?
Yes. Absolutely.
Our usual strategy in a heatwave is to leave with the windows and doors open at night to let in the cool air, then close the house up in the morning before it starts to heat up. With just a couple of circulation fans, we can usually keep the temperature below 80 degrees until noon. By mid-afternoon indoor temps creep into the mid-80s and don’t start coming down again until it cools off at sunset.
(l) Outdoor temperature, (r) indoor temperature
The first day we tested the bucket AC it was around 70 degrees at 7am but it was expected to reach the high 90s by noon. It hit 80 degrees a little after 8am (hello sunshine) and we followed the usual protocol, closing the doors and windows. Then I switched on the bucket and let it run.
As you can see from the nearby photo, 30 minutes before noon the outside temperature was heading for 100 degrees while the indoor temp had moved a mere 2 degrees. Better yet, that weather station is near the front door in the living room, a good 35 feet from the bucket, which meant the whole front section of the house was similarly comfortable.
We managed to ride out the 5 days of that heatwave with the indoor temperature never climbing above 82 degrees, which is pretty good results for an AC unit built out of buckets, water jugs and a desk fan. It definitely works and works well.
Lessons Learned
It’s not so much about the cooling, as it is slowing the heating.
In my system, two gallons of water chilled down to 40 degrees reaches room temperature — whatever that is, 70, 72, or 80 degrees — in a little over 2 hours. The room temperature never falls, so it’s not cooling it, it’s just slowing the rate it gets hotter. Without the bucket AC the indoor temperature rose about 2 degrees an hour. With it, it rises at less than 1 degree every 2 hours. As a result, if I want the room to still be a warm (but comfortable) 78 degrees in the late afternoon, I need to make sure the room is as cool as possible in the morning and be ready to fire up the bucket AC as soon as the outdoor temps start to rise.
The bucket air conditioner chilling in the family room
That said, the $20 I spent on the fan and the afternoon I spent putting the bucket air conditioner together were well worth it. Even if it looks like R2D2 with battleship guns, it does a pretty good job at keeping the family areas of the house comfortable, and it’s way less noisy and expensive than my old beast AC.
0 notes
Note
Not to be scary but I want to know everything abt ur cat
honestly ive done this to so many people it was only a matter of time before someone told me to answer every question so its cool lol
1. Name?: ive got 2 but ill use Smokey for this since i hand picked him as a kitten2. Fur color?: grey with a white patch on his chest, mouth, and feet like little socks. some patches actually turn brown in the sun and when he was a kitten he had stripes3. Any family you know (other than you)?: i met both his parents and he has two siblings however we only have him. and my other cat Princess is his reluctant roommate4. Age?: hes a grandpa now at like 13/145. Favorite toy?: we have these plastic cage balls with tiny bells in them and he absolutely loses his mind when he hears it6. Nicknames?: dumbass, weiner, goober, smoters, buddy, dumb butt, poop machine, my boi, the list goes on man7. Cinnamon roll or problematic fave?: problematic fave for sure. hes a little shit. but i would also die for him8. Length of fluff?: i guess he would be a medium length9. Any funny habits?: literally everything he does. he makes this adorable little noise thats basically the “???” noise and when he drinks out of the toilet he stands on his hind legs and daintily dips his head down. he also looks like a galloping horse when he runs and his tail does this weird curve10. How old were they when you met?: i hand picked him as a kitten when i was like 1111. What does their food bowl look like?: a fuckin mess cause hes a slob. its shallow cause if we put too much food he eats until he throws up, thus the dumbass nickname12. Indoor or outdoor cat?: indoor for the same reason as Princess13. Recent picture?: boop and boop14. Old picture?: precious baby15. Cuddly?: oh hell yes he loves to snuggle up in your lap or on your chest. he would sleep hanging over my dads shoulder as a kitten and loves to be in contact with you16. Ever changed their name?: no i gave them the most stereotypical name since i was 11 and kept it18. Eye color?: a pretty emerald green with a tiny little brown speck in the right one19. How do they express love for you?: hes always licking me. every inch of skin. and he sounds like a motor boat when he snuggles up20. How do you express love for them?: i smother him with kisses and give him the chin scitchies he loves21. Any theories on what breed?: no idea. i honestly dont know much about cat breeds. they are just.. cats22. Do they ever wake you up?: GOD YES every single goddamn morning he is in my face licking me and pawing me cause he wants food23. How much do they meow?: he never used to be very vocal, only making that “???” noise but he meows more now. mostly when hes curious about something and not getting answers or when we come home24. Any hiding spots?: if he can get under it he will be there. the bed, the table, your chair, the china cabinet, you name it25. Do they enjoy guests?: yes and no. hes pretty friendly if theres only one person and theyre quiet but the moment my cousins step in he is gone26. Lofty objects to sit on?: loves to sit on desks and the backs of couches/chairs. we put the ottoman by the window so he can sit there too27. Wear a collar? (and describe collar?): no collar cause they never leave the apartment28. How much shedding?: lots. not as much as Princess and ive managed to clean him up a bit but man for a while there i wanted to fucking shave him29. Do they enjoy brushing?: yes though he is always trying to rub his face on the brush and will not sit still30. Ever drink from the toilet?: yea and he looks so silly doing it31. How do they get your attention?: stares at me for an uncomfortable amount of time, sometimes he meows, most of the time he licks himself cause i hate when they do that right beside me32. Embarrassing thing they’ve done?: i once saw him trip up the stairs cartoon style, back legs went up over his head and i could practically hear the sound effect33. Weirdest thing they try to eat?: cat eats his own fucking vomit man. he is a vile creature who will eat just about anything34. Are they like your siblings, children, or friends?: he is my boi, my son, my precious companion35. What time do they eat breakfast?: before we leave for work so usually 7:30-8ish36. Do you cut their nails?: yes tho he doesnt like it one bit37. Do you think they understand you?: hes done things in the past that suggest he can tell when i need comfort but other than that hes an idiot38. Ever make fun of them?: literally all the time. im doing it right now39. Do you take their picture often?: my computer is filled with cat pictures like you have no idea40. Ever hiss at you?: not that i recall41. Ever try to scratch or bite you?: he goes for the bite all the time but im so used to it i dont care42. If you try to grab their paw, what do they do?: pulls away or tries to lick my hand43. Do they ever eat bugs?: he has a few times if it ended up on the floor. but mostly he just likes to stare at it44. Canned or dry food?: dry food. god help me if he only wanted wet45. Weight?: we used to make fun of him for being fat but honestly he has always been lean and solid. hes mostly heavy cause of his size and build.46. Ever got lost?: not lost per se but there was one instance where he somehow got out of the house without anyone noticing (back when he was with my dad) and suddenly he was just in the window panting from being out and about. im so glad he came back cause we never would have known otherwise47. Do you buy them presents?: not really. we have so many toys as it is48. Do they respond when you call?: most times. if hes hyper and i over the top call him over he comes bolting49. Do they ever see other cats?: he grew up with two cats, one old female and the other a male around his age. now he lives with Princess50. Declawed?: unfortunately yes. i was too young to have any say and it was a long time ago51. Funniest expression?: his wide eyed empty stare52. Favorite place to be pet?: he likes chin and butt scritchies and will always move his head to meet your hand53. Worst thing they’ve destroyed?: nothing really comes to mind but he has ruined some plants by eating them and then the carpet when he threw them back up54. Give them a head kiss.: absolutely55. What time of the year is most exciting for them?: i dont think he can tell the difference56. Are they good at hunting real prey?: i doubt it. hes a little too hyper for his own good57. Do they ever attack nothing?: sometimes yea58. What are they doing right now?: no idea cause hes in the other room. probably cuddling with my mom59. How long have you had them?: his whole life so about 13/14 years60. If you could have them stay as a kitten forever, would you?: honestly he still acts like one so the only difference is the size. but i like him as an adult. more to cuddle61. Ever baby-talk to them?: all the time. certain nicknames i will say in a baby voice62. Favorite napping position?: he likes to curl into a ball and turn his head upside down63. Have you ever stepped on their paw?: yes :(64. Ever tripped you on stairs?: not on the stairs but just about everywhere else cause hes so damn fast65. Any ear hair?: i think? idk i dont really look in his ears66. Favorite view from a window?: he likes to watch birds and cars67. Describe why they are precious.: he has been my baby for so long and i picked him myself and i can tell he is happy with me68. Fit the cat stereotype?: practically to a T69. Chaotic neutral?: chaotic chaotic more like it70. Do they enjoy following/ keeping you company?: yes he follows me around if im home alone and wandering from room to room thinking out loud71. Are you their favorite human?: i like to think so72. Do they like tv?: not so much recently but we used to leave the aquarium channel on for him73. Favorite noise to make?: his “???” noise makes my heart make a “!!!” noise74. If they were a Neko Atsume cat, what would their momento be?: a string with a bell on the end
thanks for the questions!
6 notes
·
View notes
Text
DIY Garden Planters
Want to upgrade the look of your outdoor space without breaking your budget? Love the look of wooden planters but hate the expensive price tag? These DIY planters are the perfect weekend project that can be customized for your exact style and only cost $36 to make.
For this project, I decided I wanted a larger tapered planter for the top of my driveway to add a little color to the front of my house. These plans will build one 24.5″ tall planter that is 14.75″ wide at the top. You can modify this plan to fit your specific needs by scaling up or down. I would recommend that you buy the plastic pot that is going to go inside the planter first to make sure you are building the wooden planter in the right dimensions.
DIY Garden Planter
Active Time: Half a day
Total Time: 2 Days (depending on how you decide to finish your planter)
Materials:
(5) 1″x4″x8′ Common Boards
12″ Plastic Square Pot
1.5″ 18 Gauge Brad Nails
1″ 18 Gauge Brad Nails
Wood Glue
Plasti Dip
Finish of Your Choice
Tools:
Router Saw
Nail Gun
Table Saw
Clamps
Sander
The first step is to cut all the side pieces. Since my planter is 24.5 inches all, I need 7 pieces on each side. Each board is tapered on the side by 5° so I would suggest cutting all 4 pieces for each layer at once to make sure you get a consistent cut. The easiest and quickest way I found to do this was to cut your first piece to the size you want it, then put a stopping block on your router fence to ensure each board was the same size. Then I just made the cut on my router saw at a 5° and flipped the board for the next cut. This made it really easy since you didn’t have to measure between cuts or adjust the saw. Your boards should look like this:
To make the next layer, just line up your wood to the completed board (line up will be easy since the edges should both be 5°) and mark the next cut with a straight edge. Repeat this until all your layers are cut.
Now you need to build each complete layer. For this you just take all 4 side piece and glue them together and secure with a nail gun and 1.5″ 18 gauge brad nails. This part can be slightly frustrating since the slight angle makes it a little difficult to keep the boards steady while nailing but once you do it a couple times it goes pretty quickly.
Now you are ready to stack the layers together.
Once you confirm that it is the height that you want and all the pieces stack together properly, it’s time to glue the layers together. This not only adds stability to the planter but it will make it easier to put the corner pieces on next. I started with the bottom layer on a couple scrap 2x4s to make it easier to clamp the layers together at the end.
While this dries it is time to make the corner pieces. The corner pieces are going to not only make the final product look great, but will also add feet to the planter which will limit the amount of the planter exposed to the ground directly. For the legs I used the same wood as the body of the planter and cut it in half lengthwise on my table saw with the blade at a 45°. I then cut the wood down into (8) 26.5″ pieces.
Once I’ve sanded down the pieces, it is time to put them together. Just take two of the pieces and fit the 45° angles together at the corner. Then add glue and secure with 1″ finishing nails. Repeat this step until all the legs are constructed.
Now, since everything is being cut at and angle you might find that not all of your pieces have a perfect seam where the two pieces meet. This might not be a big deal depending on how you finish your piece, but if you are leaving it unfinished or using stain, that gap may bother you. I know gaps like this will bug me because I know they are there. Here is a quick and easy trick to fix it:
Add a little wood glue to the uneven seam. Sand the wood at the seam, the wood shavings and the glue will mix together to fill the gap. Once the glue has dried completely sand down any excess glue and the gap is gone! (Sometimes you will still have a smaller gap if the original gap was on the larger side, you can just repeat the process until it is completely gone).
Once you are happy with the way your legs look, it’s time to complete the final step of construction. Since the planter’s sides are tapered, the legs need to be cut at an angle at the bottom so they sit on the floor evenly. To do this simply set your table saw at a 5° and with the point of the leg facing up, trim the bottom of the leg. Once you do this with all the legs, make sure they are all the same exact length so the planter has no chance of wobbling once the project is done.
Now that you have the legs and the body of the planter built, it’s time to sand everything before you assemble. Once everything is sanded, you simply line up the top of the planter with the top of the leg (make sure it is the side that doesn’t have the 5° angle) and glue in place, then secure with more finishing nails. Wipe off any excess glue.
While that is drying it’s time at cut the finishing trim for the top of the planter. For this I used the extra scraps from our wood that was 1.5″ wide wood that was 16″ long. I then lined it up on the top of the planter, securing with wood glue and finishing nails. Be careful on this step with the nail gun since the planter is at an angle so you don’t have nails coming through the sides of your planter.
The final step for assembly is to add bracers to the inside of the planter that will hold the plastic pot. I decided I wanted to add smaller supporting bracers to longer pieces of wood that would go across the whole planter length, so when the pot was in there would be no visible gaps. To do this I took 4 pieces of 1.5″ x 8″ wood and installed them 3″ down from the top of the planter. To make sure I was getting it exactly even all the way around I used a scrap piece of 3″ wood. For installation I simply added a little wood glue and secured with finishing nails.
Once this is done I used 1″ x 8″ strips that I nailed into the bracers to make the ledge the planter will sit on. Once this is done you can add the pot into the planter. Keep in mind depending on what pot you picked for your project that the dimensions of the ledge could be different based on what height you want to the pot to be at so make sure to double check the dimensions before you cut.
Once that is completed you are ready to finish the planter however you like. Make sure no matter what you seal the planter with some kind of waterproofing protective finish so you don’t have to worry about the wood rotting over time if they would be exposed to moisture.
For my planter I used 2 coats of Rust-oleum premium indoor/outdoor navy latex paint, then sprayed the planter with Krylon Colormaxx satin bright white indoor/outdoor paint. Once that dried I lightly sanded the planters to have to blue come out, giving it an aged look. I then sealed the planter with 2 coats of Thompson’s WaterSeal multi-surface clear waterproofer. That’s it, now you can enjoy your planter for years to come for a fraction of the retail price!
source https://wickedhandy.net/diy-garden-planters/ source https://wickedhandy1.blogspot.com/2019/02/diy-garden-planters.html
0 notes
Text
DIY Garden Planters
Want to upgrade the look of your outdoor space without breaking your budget? Love the look of wooden planters but hate the expensive price tag? These DIY planters are the perfect weekend project that can be customized for your exact style and only cost $36 to make.
For this project, I decided I wanted a larger tapered planter for the top of my driveway to add a little color to the front of my house. These plans will build one 24.5″ tall planter that is 14.75″ wide at the top. You can modify this plan to fit your specific needs by scaling up or down. I would recommend that you buy the plastic pot that is going to go inside the planter first to make sure you are building the wooden planter in the right dimensions.
DIY Garden Planter
Active Time: Half a day
Total Time: 2 Days (depending on how you decide to finish your planter)
Materials:
(5) 1″x4″x8′ Common Boards
12″ Plastic Square Pot
1.5″ 18 Gauge Brad Nails
1″ 18 Gauge Brad Nails
Wood Glue
Plasti Dip
Finish of Your Choice
Tools:
Router Saw
Nail Gun
Table Saw
Clamps
Sander
The first step is to cut all the side pieces. Since my planter is 24.5 inches all, I need 7 pieces on each side. Each board is tapered on the side by 5° so I would suggest cutting all 4 pieces for each layer at once to make sure you get a consistent cut. The easiest and quickest way I found to do this was to cut your first piece to the size you want it, then put a stopping block on your router fence to ensure each board was the same size. Then I just made the cut on my router saw at a 5° and flipped the board for the next cut. This made it really easy since you didn’t have to measure between cuts or adjust the saw. Your boards should look like this:
To make the next layer, just line up your wood to the completed board (line up will be easy since the edges should both be 5°) and mark the next cut with a straight edge. Repeat this until all your layers are cut.
Now you need to build each complete layer. For this you just take all 4 side piece and glue them together and secure with a nail gun and 1.5″ 18 gauge brad nails. This part can be slightly frustrating since the slight angle makes it a little difficult to keep the boards steady while nailing but once you do it a couple times it goes pretty quickly.
Now you are ready to stack the layers together.
Once you confirm that it is the height that you want and all the pieces stack together properly, it’s time to glue the layers together. This not only adds stability to the planter but it will make it easier to put the corner pieces on next. I started with the bottom layer on a couple scrap 2x4s to make it easier to clamp the layers together at the end.
While this dries it is time to make the corner pieces. The corner pieces are going to not only make the final product look great, but will also add feet to the planter which will limit the amount of the planter exposed to the ground directly. For the legs I used the same wood as the body of the planter and cut it in half lengthwise on my table saw with the blade at a 45°. I then cut the wood down into (8) 26.5″ pieces.
Once I’ve sanded down the pieces, it is time to put them together. Just take two of the pieces and fit the 45° angles together at the corner. Then add glue and secure with 1″ finishing nails. Repeat this step until all the legs are constructed.
Now, since everything is being cut at and angle you might find that not all of your pieces have a perfect seam where the two pieces meet. This might not be a big deal depending on how you finish your piece, but if you are leaving it unfinished or using stain, that gap may bother you. I know gaps like this will bug me because I know they are there. Here is a quick and easy trick to fix it:
Add a little wood glue to the uneven seam. Sand the wood at the seam, the wood shavings and the glue will mix together to fill the gap. Once the glue has dried completely sand down any excess glue and the gap is gone! (Sometimes you will still have a smaller gap if the original gap was on the larger side, you can just repeat the process until it is completely gone).
Once you are happy with the way your legs look, it’s time to complete the final step of construction. Since the planter’s sides are tapered, the legs need to be cut at an angle at the bottom so they sit on the floor evenly. To do this simply set your table saw at a 5° and with the point of the leg facing up, trim the bottom of the leg. Once you do this with all the legs, make sure they are all the same exact length so the planter has no chance of wobbling once the project is done.
Now that you have the legs and the body of the planter built, it’s time to sand everything before you assemble. Once everything is sanded, you simply line up the top of the planter with the top of the leg (make sure it is the side that doesn’t have the 5° angle) and glue in place, then secure with more finishing nails. Wipe off any excess glue.
While that is drying it’s time at cut the finishing trim for the top of the planter. For this I used the extra scraps from our wood that was 1.5″ wide wood that was 16″ long. I then lined it up on the top of the planter, securing with wood glue and finishing nails. Be careful on this step with the nail gun since the planter is at an angle so you don’t have nails coming through the sides of your planter.
The final step for assembly is to add bracers to the inside of the planter that will hold the plastic pot. I decided I wanted to add smaller supporting bracers to longer pieces of wood that would go across the whole planter length, so when the pot was in there would be no visible gaps. To do this I took 4 pieces of 1.5″ x 8″ wood and installed them 3″ down from the top of the planter. To make sure I was getting it exactly even all the way around I used a scrap piece of 3″ wood. For installation I simply added a little wood glue and secured with finishing nails.
Once this is done I used 1″ x 8″ strips that I nailed into the bracers to make the ledge the planter will sit on. Once this is done you can add the pot into the planter. Keep in mind depending on what pot you picked for your project that the dimensions of the ledge could be different based on what height you want to the pot to be at so make sure to double check the dimensions before you cut.
Once that is completed you are ready to finish the planter however you like. Make sure no matter what you seal the planter with some kind of waterproofing protective finish so you don’t have to worry about the wood rotting over time if they would be exposed to moisture.
For my planter I used 2 coats of Rust-oleum premium indoor/outdoor navy latex paint, then sprayed the planter with Krylon Colormaxx satin bright white indoor/outdoor paint. Once that dried I lightly sanded the planters to have to blue come out, giving it an aged look. I then sealed the planter with 2 coats of Thompson’s WaterSeal multi-surface clear waterproofer. That’s it, now you can enjoy your planter for years to come for a fraction of the retail price!
source https://wickedhandy.net/diy-garden-planters/ source https://wickedhandy1.tumblr.com/post/183096175310
0 notes
Text
DIY Garden Planters
Want to upgrade the look of your outdoor space without breaking your budget? Love the look of wooden planters but hate the expensive price tag? These DIY planters are the perfect weekend project that can be customized for your exact style and only cost $36 to make.
For this project, I decided I wanted a larger tapered planter for the top of my driveway to add a little color to the front of my house. These plans will build one 24.5″ tall planter that is 14.75″ wide at the top. You can modify this plan to fit your specific needs by scaling up or down. I would recommend that you buy the plastic pot that is going to go inside the planter first to make sure you are building the wooden planter in the right dimensions.
DIY Garden Planter
Active Time: Half a day
Total Time: 2 Days (depending on how you decide to finish your planter)
Materials:
(5) 1″x4″x8′ Common Boards
12″ Plastic Square Pot
1.5″ 18 Gauge Brad Nails
1″ 18 Gauge Brad Nails
Wood Glue
Plasti Dip
Finish of Your Choice
Tools:
Router Saw
Nail Gun
Table Saw
Clamps
Sander
The first step is to cut all the side pieces. Since my planter is 24.5 inches all, I need 7 pieces on each side. Each board is tapered on the side by 5° so I would suggest cutting all 4 pieces for each layer at once to make sure you get a consistent cut. The easiest and quickest way I found to do this was to cut your first piece to the size you want it, then put a stopping block on your router fence to ensure each board was the same size. Then I just made the cut on my router saw at a 5° and flipped the board for the next cut. This made it really easy since you didn’t have to measure between cuts or adjust the saw. Your boards should look like this:
To make the next layer, just line up your wood to the completed board (line up will be easy since the edges should both be 5°) and mark the next cut with a straight edge. Repeat this until all your layers are cut.
Now you need to build each complete layer. For this you just take all 4 side piece and glue them together and secure with a nail gun and 1.5″ 18 gauge brad nails. This part can be slightly frustrating since the slight angle makes it a little difficult to keep the boards steady while nailing but once you do it a couple times it goes pretty quickly.
Now you are ready to stack the layers together.
Once you confirm that it is the height that you want and all the pieces stack together properly, it’s time to glue the layers together. This not only adds stability to the planter but it will make it easier to put the corner pieces on next. I started with the bottom layer on a couple scrap 2x4s to make it easier to clamp the layers together at the end.
While this dries it is time to make the corner pieces. The corner pieces are going to not only make the final product look great, but will also add feet to the planter which will limit the amount of the planter exposed to the ground directly. For the legs I used the same wood as the body of the planter and cut it in half lengthwise on my table saw with the blade at a 45°. I then cut the wood down into (8) 26.5″ pieces.
Once I’ve sanded down the pieces, it is time to put them together. Just take two of the pieces and fit the 45° angles together at the corner. Then add glue and secure with 1″ finishing nails. Repeat this step until all the legs are constructed.
Now, since everything is being cut at and angle you might find that not all of your pieces have a perfect seam where the two pieces meet. This might not be a big deal depending on how you finish your piece, but if you are leaving it unfinished or using stain, that gap may bother you. I know gaps like this will bug me because I know they are there. Here is a quick and easy trick to fix it:
Add a little wood glue to the uneven seam. Sand the wood at the seam, the wood shavings and the glue will mix together to fill the gap. Once the glue has dried completely sand down any excess glue and the gap is gone! (Sometimes you will still have a smaller gap if the original gap was on the larger side, you can just repeat the process until it is completely gone).
Once you are happy with the way your legs look, it’s time to complete the final step of construction. Since the planter’s sides are tapered, the legs need to be cut at an angle at the bottom so they sit on the floor evenly. To do this simply set your table saw at a 5° and with the point of the leg facing up, trim the bottom of the leg. Once you do this with all the legs, make sure they are all the same exact length so the planter has no chance of wobbling once the project is done.
Now that you have the legs and the body of the planter built, it’s time to sand everything before you assemble. Once everything is sanded, you simply line up the top of the planter with the top of the leg (make sure it is the side that doesn’t have the 5° angle) and glue in place, then secure with more finishing nails. Wipe off any excess glue.
While that is drying it’s time at cut the finishing trim for the top of the planter. For this I used the extra scraps from our wood that was 1.5″ wide wood that was 16″ long. I then lined it up on the top of the planter, securing with wood glue and finishing nails. Be careful on this step with the nail gun since the planter is at an angle so you don’t have nails coming through the sides of your planter.
The final step for assembly is to add bracers to the inside of the planter that will hold the plastic pot. I decided I wanted to add smaller supporting bracers to longer pieces of wood that would go across the whole planter length, so when the pot was in there would be no visible gaps. To do this I took 4 pieces of 1.5″ x 8″ wood and installed them 3″ down from the top of the planter. To make sure I was getting it exactly even all the way around I used a scrap piece of 3″ wood. For installation I simply added a little wood glue and secured with finishing nails.
Once this is done I used 1″ x 8″ strips that I nailed into the bracers to make the ledge the planter will sit on. Once this is done you can add the pot into the planter. Keep in mind depending on what pot you picked for your project that the dimensions of the ledge could be different based on what height you want to the pot to be at so make sure to double check the dimensions before you cut.
Once that is completed you are ready to finish the planter however you like. Make sure no matter what you seal the planter with some kind of waterproofing protective finish so you don’t have to worry about the wood rotting over time if they would be exposed to moisture.
For my planter I used 2 coats of Rust-oleum premium indoor/outdoor navy latex paint, then sprayed the planter with Krylon Colormaxx satin bright white indoor/outdoor paint. Once that dried I lightly sanded the planters to have to blue come out, giving it an aged look. I then sealed the planter with 2 coats of Thompson’s WaterSeal multi-surface clear waterproofer. That’s it, now you can enjoy your planter for years to come for a fraction of the retail price!
source https://wickedhandy.net/diy-garden-planters/
0 notes
Text
DIY Garden Planters
Want to upgrade the look of your outdoor space without breaking your budget? Love the look of wooden planters but hate the expensive price tag? These DIY planters are the perfect weekend project that can be customized for your exact style and only cost $36 to make.
For this project, I decided I wanted a larger tapered planter for the top of my driveway to add a little color to the front of my house. These plans will build one 24.5″ tall planter that is 14.75″ wide at the top. You can modify this plan to fit your specific needs by scaling up or down. I would recommend that you buy the plastic pot that is going to go inside the planter first to make sure you are building the wooden planter in the right dimensions.
DIY Garden Planter
Active Time: Half a day
Total Time: 2 Days (depending on how you decide to finish your planter)
Materials:
(5) 1″x4″x8′ Common Boards
12″ Plastic Square Pot
1.5″ 18 Gauge Brad Nails
1″ 18 Gauge Brad Nails
Wood Glue
Plasti Dip
Finish of Your Choice
Tools:
Router Saw
Nail Gun
Table Saw
Clamps
Sander
The first step is to cut all the side pieces. Since my planter is 24.5 inches all, I need 7 pieces on each side. Each board is tapered on the side by 5° so I would suggest cutting all 4 pieces for each layer at once to make sure you get a consistent cut. The easiest and quickest way I found to do this was to cut your first piece to the size you want it, then put a stopping block on your router fence to ensure each board was the same size. Then I just made the cut on my router saw at a 5° and flipped the board for the next cut. This made it really easy since you didn’t have to measure between cuts or adjust the saw. Your boards should look like this:
To make the next layer, just line up your wood to the completed board (line up will be easy since the edges should both be 5°) and mark the next cut with a straight edge. Repeat this until all your layers are cut.
Now you need to build each complete layer. For this you just take all 4 side piece and glue them together and secure with a nail gun and 1.5″ 18 gauge brad nails. This part can be slightly frustrating since the slight angle makes it a little difficult to keep the boards steady while nailing but once you do it a couple times it goes pretty quickly.
Now you are ready to stack the layers together.
Once you confirm that it is the height that you want and all the pieces stack together properly, it’s time to glue the layers together. This not only adds stability to the planter but it will make it easier to put the corner pieces on next. I started with the bottom layer on a couple scrap 2x4s to make it easier to clamp the layers together at the end.
While this dries it is time to make the corner pieces. The corner pieces are going to not only make the final product look great, but will also add feet to the planter which will limit the amount of the planter exposed to the ground directly. For the legs I used the same wood as the body of the planter and cut it in half lengthwise on my table saw with the blade at a 45°. I then cut the wood down into (8) 26.5″ pieces.
Once I’ve sanded down the pieces, it is time to put them together. Just take two of the pieces and fit the 45° angles together at the corner. Then add glue and secure with 1″ finishing nails. Repeat this step until all the legs are constructed.
Now, since everything is being cut at and angle you might find that not all of your pieces have a perfect seam where the two pieces meet. This might not be a big deal depending on how you finish your piece, but if you are leaving it unfinished or using stain, that gap may bother you. I know gaps like this will bug me because I know they are there. Here is a quick and easy trick to fix it:
Add a little wood glue to the uneven seam. Sand the wood at the seam, the wood shavings and the glue will mix together to fill the gap. Once the glue has dried completely sand down any excess glue and the gap is gone! (Sometimes you will still have a smaller gap if the original gap was on the larger side, you can just repeat the process until it is completely gone).
Once you are happy with the way your legs look, it’s time to complete the final step of construction. Since the planter’s sides are tapered, the legs need to be cut at an angle at the bottom so they sit on the floor evenly. To do this simply set your table saw at a 5° and with the point of the leg facing up, trim the bottom of the leg. Once you do this with all the legs, make sure they are all the same exact length so the planter has no chance of wobbling once the project is done.
Now that you have the legs and the body of the planter built, it’s time to sand everything before you assemble. Once everything is sanded, you simply line up the top of the planter with the top of the leg (make sure it is the side that doesn’t have the 5° angle) and glue in place, then secure with more finishing nails. Wipe off any excess glue.
While that is drying it’s time at cut the finishing trim for the top of the planter. For this I used the extra scraps from our wood that was 1.5″ wide wood that was 16″ long. I then lined it up on the top of the planter, securing with wood glue and finishing nails. Be careful on this step with the nail gun since the planter is at an angle so you don’t have nails coming through the sides of your planter.
The final step for assembly is to add bracers to the inside of the planter that will hold the plastic pot. I decided I wanted to add smaller supporting bracers to longer pieces of wood that would go across the whole planter length, so when the pot was in there would be no visible gaps. To do this I took 4 pieces of 1.5″ x 8″ wood and installed them 3″ down from the top of the planter. To make sure I was getting it exactly even all the way around I used a scrap piece of 3″ wood. For installation I simply added a little wood glue and secured with finishing nails.
Once this is done I used 1″ x 8″ strips that I nailed into the bracers to make the ledge the planter will sit on. Once this is done you can add the pot into the planter. Keep in mind depending on what pot you picked for your project that the dimensions of the ledge could be different based on what height you want to the pot to be at so make sure to double check the dimensions before you cut.
Once that is completed you are ready to finish the planter however you like. Make sure no matter what you seal the planter with some kind of waterproofing protective finish so you don’t have to worry about the wood rotting over time if they would be exposed to moisture.
For my planter I used 2 coats of Rust-oleum premium indoor/outdoor navy latex paint, then sprayed the planter with Krylon Colormaxx satin bright white indoor/outdoor paint. Once that dried I lightly sanded the planters to have to blue come out, giving it an aged look. I then sealed the planter with 2 coats of Thompson’s WaterSeal multi-surface clear waterproofer. That’s it, now you can enjoy your planter for years to come for a fraction of the retail price!
Via https://wickedhandy.net/diy-garden-planters/
source http://wickedhandy1.weebly.com/blog/diy-garden-planters
0 notes
Text
How Long Do Ball Pythons Get? No Need To Be Afraid
If you are new to the snake world, or if you are thinking about getting a snake, you might be a little bit intimidated by the thought of owning a snake and you might hope that it doesn´t get too big. (Trust me, I felt exactly like this as well) Or, completely different, you are absolutely fine with having a huge snake, but you are worried about the space such a snake needs.
No matter what the reason is you are asking yourself how long ball pythons get, you are about to receive an answer. In this article your are going to learn how big ball pythons get and what you can do if you really want to get a ball python, but you´d rather get a smaller one, because you are a beginner and feel initimidated or if you don´t have enough space.
Quick Navigation
How Big Do Ball Pythons Get?
What Kind Of Enclosure Do You Need?
Lee´s Kricket Keeper
What Does Such A Snake Eat?
What You Can Do If You Want A Smaller Ball Python
Conclusion
How Big Do Ball Pythons Get?
Actually, ball pythons do not get too big. While the hatchlings are around 10 inches in length, a full grown ball python can become 5-foot long. They can even become longer, but a 5-foot ball python is already pretty big. So it is likely that your ball python might stay a little bit smaller.
How big your ball python gets and how fast it grows highly depends on how you are feeding and how good your ball python eats. Ball pythons are known for being picky eaters. The size difference between a good eating ball python and a picky eater at the same age can be huge.
However that does not mean that you should "create" your own ball python size by feeding more or less, of course. While the ball python´s head stays rather small, their bodies can get thick, but definitely not as thick as your arm. So, it really is a rather small snake.
What Kind Of Enclosure Do You Need?
You might think now, that ball pythons need a huge enclosure. In my opinion, they need a tank that´s rather small. If you have a very small baby ball python, you can start with a long 10-Gallon tank. Although I would definitely recommend to start with a long 20-Gallon tank as the snake should have some space to stretch. Adult ball pythons need a wide 40-Gallon tank, but I recommend to go with a bigger tank, since most 40-Gallon tanks are only 36 inches in length. 48 inches in length is an okay size in my opinion.
Further you don´t have to get a glass tank. Most ball python owners keep their snake in a plastic box. It doesn´t look as beautiful as a glass tank, but it is cheaper and some think that it is easier to maintain the right humidity in it. Honestly, keeping the right humidity in a glass tank is not that hard, so get what feels better to you. Always make sure that the enclosure is as long as the snake.
Sterilite 41 QT Under Bed Storage Box
This plastic box is a very cheap solution and big enough for most ball pythons.
Check Price
What Does Such A Snake Eat?
If you want to know how big ball pythons get, you might also be worried about the size of their food. It is a little bit weird for beginners to feed mice and rats to a snake. I understand that and I felt the same. You definitely get used to it though.
Baby ball pythons should eat adult mice. Adult ball pythons will eat full grown rats. If this gives you a weird feeling, I recommend to get your ball python as a baby. This way, you will grow with your snake and it won´t be that hard for you to feed a full grown rat to you ball python.
You can still feed your ball python frozen rats, if you don´t want to feed them alive, however it is more natural if you feed them alive.
What You Can Do If You Want A Smaller Ball Python
If you want a ball python that stays rather small, you should definitely take a male python. Female ball pythons get 3 to 5 feet long while males only get around 3 feet long.
There are no guarantees though. There are males that get as big as females. There are females that stay as small as males. You could also get a full grown ball python with a size that you like. As I said, growth depends on how well the python eats.
Conclusion
If you are a beginner and intimidated, don´t worry about it. If you really want this snake, get it and you will see that no matter how big your snake gets, you won´t be afraid of it. It is just a matter of getting used to it. They are not able to kill you and even if they were, they have no interest in doing so as they are pretty calm snakes as adults.
Ball pythons are amazing snakes, so do your research and get one if you really want to!
If you have any questions, just leave a comment in the comment section below and I will get back to you as soon as I can.
Have fun with your ball python!
0 notes
Text
Get to Know Me
1. What is you middle name? It starts with a P.
2. How old are you? 8 days shy of 26! :)
3. When is your birthday? Next Friday.
4. What is your zodiac sign? Virgo.
5. What is your favorite color? Metallic dark blue.
6. What’s your lucky number? I suppose it’s 8.
7. Do you have any pets? I wish...
8. Where are you from? Arizona’s capital.
9. How tall are you? 5’3.5
10. What shoe size are you? My feet can fit in the length of a 7.5, however, since my feet are so wide, I have to go up a size.
11. How many pairs of shoes do you own? 9 pairs.
12. What was your last dream about? I’m really bad at remembering my dreams...
13. What talents do you have? I can massage away pain.
14. Are you psychic in any way? Nope.
15. Favorite song? Uptown Girl will always make me happy.
16. Favorite movie? I don’t know anymore.
17. Who would be your ideal partner? John :)
18. Do you want children? Yeah, but only one, please.
19. Do you want a church wedding? Not anymore.
20. Are you religious? Nope, but I have faith.
21. Have you ever been to the hospital? Yeah. Twice.
22. Have you ever got in trouble with the law? Nope, although a cop turned their lights on right behind me making me think I was in trouble.
23. Have you ever met any celebrities? Yeah! Bear Rinehart, Bo Rineheart, Seth Bolt, Patrick Stump, David Spade and I think that was it. I’ve met a couple YouTube creaters too.
24. Baths or showers? Baths when I can’t sleep, showers to get clean. Showers are better with company :)
25. What color socks are you wearing? My sport socks with the pink toes.
26. Have you ever been famous? Nope. I wouldn’t want to be, either.
27. Would you like to be a big celebrity? NAAAhhh.
28. What type of music do you like? Whatever I’m in the mood for. Lately it’s been folk and coutry.
29. Have you ever been skinny dipping? Definitely.
30. How many pillows do you sleep with? One or two.
31. What position do you usually sleep in? On my stomach, holding my boobs.
32. How big is your house? Two bed, three and a half bath loft style apartment. It’s a great set-up.
33. What do you typically have for breakfast? Whatever got accidently warmed at Starbucks lol.
34. Have you ever fired a gun? Not yet! Next weekend I will, though!
35. Have you ever tried archery? Yeah, a couple times. I’m decent at it.
36. Favorite clean word? Oopsi-poopsi
37. Favorite swear word? Fuck or bitch.
38. What’s the longest you’ve ever gone without sleep? 25 hours….. Don’t recommend lol.
39. Do you have any scars? A bunch.
40. Have you ever had a secret admirer? Once in second grade art class...
41. Are you a good liar? Not at all, hahaha. Which I’m okay with.
42. Are you a good judge of character? Yeah, and I’m getting better with age.
43. Can you do any other accents other than your own? A couple. Valley-girl and southern accents are my go-to.
44. Do you have a strong accent? Probably to some people.
45. What is your favorite accent? Everywhere but America….
46. What is your personality type? The simplest answer is; INFJ
47. What is your most expensive piece of clothing? My 40 dollar sweatshirt….
48. Can you curl your tongue? Yep!
49. Are you an innie or an outie? Innie, but that’s also because I have a big belly.
50. Left or right handed? Unfortunately, I’m a righty.
51. Are you scared of spiders? Nah. I get uneasy around clusters of bugs, but one solo bug doesn’t bother me.
52. Favorite food? Grilled food. I could eat that shit forever.
53. Favorite foreign food? Mexican. Hands down.
54. Are you a clean or messy person? I’m both. Really depends on my mental state.
55. Most used phrased? John or Vanessa would be the best ones to ask...
56. Most used word? The. Just kidding, probably “bitch”.
57. How long does it take for you to get ready? Three minutes if I know where all my shit is. lol.
58. Do you have much of an ego? A healthy amount, I’d say.
59. Do you suck or bite lollipops? I’m definitely a bitter.
60. Do you talk to yourself? All. The. Time.
61. Do you sing to yourself? All. The. Time. Haha.
62. Are you a good singer? I’m not the worse, but you’ll never see me on American Idol.
63. Biggest Fear? Not making a positive impact on those around me….
64. Are you a gossip? I like to be in the know, but don’t like to be involved…
65. Best dramatic movie you’ve seen? The Perks of Being a Wallflower. That was the first film that came to mind, so I’m going with it.
66. Do you like long or short hair? On me? I love having longer hair.
67. Can you name all 50 states of America? Maybe if I had three days to think of them all.
68. Favorite school subject? Anatomy :D
69. Extrovert or Introvert? Introvert 100%.
70. Have you ever been scuba diving? No, but I’ve been snorkeling! Which is way cooler. (in the opinion of someone who doesn't want to rely on a tank to survive)
71. What makes you nervous? John. Life. Socializing. Bills. Money. Life. John.
72. Are you scared of the dark? Nah
73. Do you correct people when they make mistakes? Depends on the mistake, I guess. When they say my name wrong, I do.
74. Are you ticklish? Seldomly.
75. Have you ever started a rumor? Not to my knowledge.
76. Have you ever been in a position of authority? Yep.
77. Have you ever drank underage? Yep. And it was fun, not even going to pretend like it wasn’t.
78. Have you ever done drugs? I took painkillers once.
79. Who was your first real crush? Victor.
80. How many piercings do you have? One in each ear.
81. Can you roll your Rs?“ Sometimes. I get insecure mid roll, so I tend to stop myself….
82. How fast can you type? I use to be able to type over 130 words per minute, but I’m a bit rusty now.
83. How fast can you run? The fastest I let myself run, is at a 3.5 MPH pace.
84. What color is your hair? Dirty blonde, with hues of brown, red, and blonde.
85. What color is your eyes? Green! :)
86. What are you allergic to? Apple juice, cats, some marijuana, and dust.
87. Do you keep a journal? Tumblr tends to be my journal.
88. What do your parents do? My dad’s on SS and I’m not even sure what my mom does. Something with a title agency.
89. Do you like your age? Yeah, it’s pretty dope.
90. What makes you angry? I’m feeling pretty good right now, so I don’t wanna answer this.
91. Do you like your own name? Yeah, especially when people say it right.
92. Have you already thought of baby names, and if so what are they? Melody if it’s a girl, and Benjamin if it’s a boy. Obviously those are subject to change.
93. Do you want a boy a girl for a child? I’d prefer a boy….. ‘Cause we don’t want a teenage daughter.
94. What are you strengths? I’m “progressive”.
95. What are your weaknesses? My emotions get the best of my judgement sometimes.
96. How did you get your name? My mom and dad were on a date to see The Little Mermaid, and my mom really liked how Sebastian said “Ah-re-el”.
97. Were your ancestors royalty? Aside from royal pain in the asses, I doubt it
98. Do you have any scars? You asked this…
99. Color of your bedspread? Red.
100. Color of your room? White walls. Like the Mackelmore song.
0 notes