#I can often take the red slider in an editor and move it to zero without noticing a difference in the picture
Explore tagged Tumblr posts
Text
I see this as orange but then I'm red-green colorblind which makes life fun when the crayons aren't labelled.
I can see all colors but I see red especially poorly (like, a red light will appear considerably dimmer than a green or blue light to me). Cyan (green + blue light) appears nearly white to me.
Basically my color vision makes me a god among dogs but a dog among (wo)men (who are only very rarely colorblind)

#pastel colors are the WORST#I can often take the red slider in an editor and move it to zero without noticing a difference in the picture#this leads me to overwarming photos so they'll look pleasant to me but likely garish to you
2K notes
·
View notes
Note
Hello! I was wondering how you made the videos with the faces layered on top and such? I’ve always wanted to make some.
Putting this under a read more because I ended up severely overexplaining (as I do) and i’m not about to remove all this typing I did. Anon I am so sorry if this is ridiculously long and no help at all.
As a disclaimer, this is meant for pc/laptop. Phones can probably do it, but they’re much less capable in general and most editing apps are paid, watermarked, just plain bad, or a mix of those. Also, it’s entirely possible this is a very unnecessarily tiring and inefficient way do do this. This is just how I personally go about it. If this method gives you the ol’ jangle bones (cause it sure does that to me!) and it doesn’t quite feel right of fulfilling then I strongly recommend asking other people on how they do it.
To get started you’ll need a few things beforehand:
✦ A video editor of some kind (I’m using Lightworks; it’s free, unwatermarked, and autosaves your projects if it ever crashes)
✦ A photo editor (I’m using Pixlr E, it’s, again, free, and you don’t need any installation
✦ The video you want to edit characters onto
✦ A render for the charcter with a transparent background
I’m not sure whether or not installing Lightworks has any oddities i need to mention here, but if you (or anyone else) ever gets stuck, don’t hesitate to dm me or shoot me another ask!
First of all, you’re gonna need a good video. Trust me, once you manage to get into The Zone, this is going to be your only obstacle. And it’s an annoying one. Having a source that reliably uploads these kind of “short but sweet” videos (preferably around 30secs long or less) really is half the battle!
Once you’ve got your video chilling somewhere on your pc, you’re going to need a character render (or two) of some kind. Fandom wikias are often good (or at least decent) sources for this. Of course, you’ll need one that has as little covering/touching the character’s face as possible. Once you’ve got your renders, go to Pixlr E, click the blue “open image” button over over on the left get the pic you need n’ open it. After that, it’ll look like this:

Next, you’ll need the crop tool. Go ahead and crop away everything till the face is the main focus.


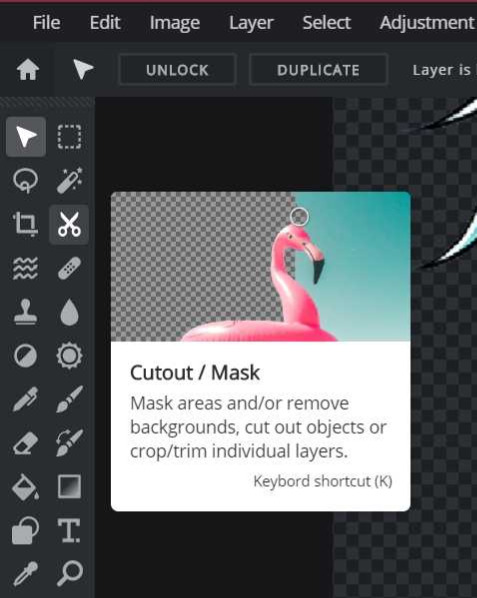
Once you’ve done that, zoom in and select the cutout tool. Then, select the “draw mask” option and reduce it’s softness all the way down to 0.
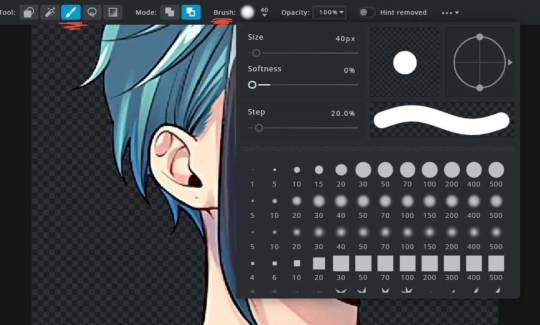
Once you have that going, just draw over the character until everything from their chin down is all gone, like this;
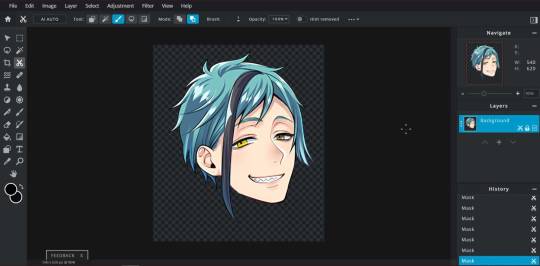
And it’s all done! Click “file” in the upper left corner, then “save” to download it. Make sure you save it as a .png file, otherwise the background won’t be transparent. You can just close the tab from here. I recommend taking a break here, get a drink or maybe a snack!
Next, open Lightworks. If it asks you to log in, do so. Take a tutorial if you feel like it. (I strongly recommend watching the “quick start’” video tutorial they have over at the lightworks forums along with some more in-depth ones; for creating simple videos with characters pasted over it, my guide will be all you need, but it might be useful to know how to mess around with audio, crossfades, greenscreen/chromakey, etc.)
Once you’re all free to do what you want, create a new project, give it a name, and set the framerate. (if you don’t know about this one just set it to “auto”)
Now, it’ll look like this:

Go to the bottom left and select “local files”. From there, select the video and your characters’ faces and import them. (tip: holding ctrl or left shift while clicking allows you to select multiple, don’t remember which one it was www)
Once you have everything, go to the “edit” tab.
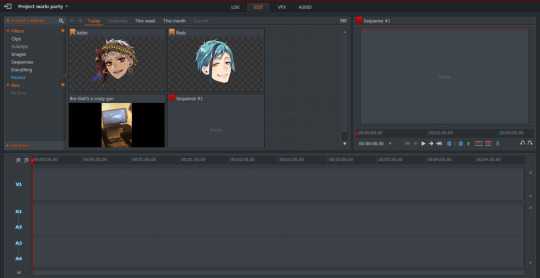
Make sure the long red stick-thing at the bottom is all the way at 0, then double click your video to open the source viewer and press “b” (or click the button labeled ‘replace.). Once it’s in the bars at the bottom, you can get rid of the source viewer. Then, if your clip is anywhere under 5 minutes, you’ll be stuck with this gaping hole next to it:
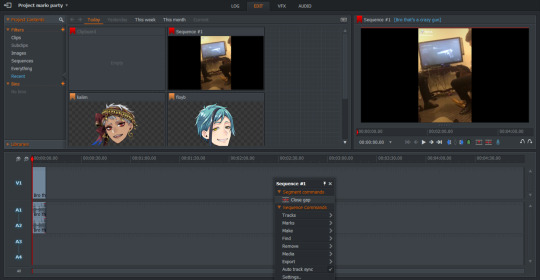
Right click the empty void and click “close gap” to solve the issue. This is somewhat necessary, because if you export the video afterwards without the gap closed there’ll just be a black screen for 4 minutes. Make sure you don’t have any tracks hidden, otherwise closing the gap won’t work (though you probably won’t have anything hidden if you didn’t click anyting else).
Alright, now for the most soul-murdering part of the process (after looking for the video, of course): Image Key, a.k.a where we actually put the characters’ faces on top of the video. Go ahead and click “VFX” at the top, and you’ll have a menu like this:
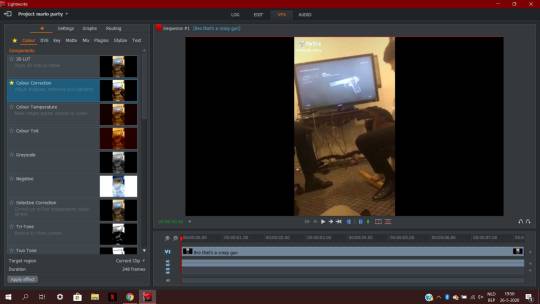
In the effect library to the left, select the “key” category and then double click “Image Key”. You’ll need one of these image key effect for each face you’re using. (Also, you can just minimize the color correction if it’s unfolded, we’re not gonna be messing with it.)
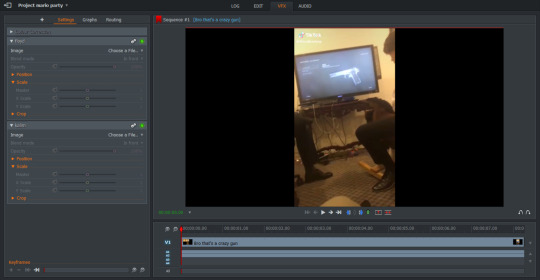
So now, we’ve got this! For the sake of simplicity, you can rename the effects to the characters’ names so you don’t mix them up. Under “choose a file,” select the character faces. If you imported them into your project when you started, they should be easily findable under the “Project” tab. Right now, the characters will be in the center, right under one another. You can move the characters by either using the “Position” sliders on the left or by clicking and dragging them with your mouse in the actual video. For the most part, we’ll be doing the latter, but because the faces are stuck under one another in the exact center, you move both of them at the same time. To fix this, move one face away from the other using the slider one time.
Okay, moving on! This part is important not to skip. Notice the little timer-like icons to the left of the sliders? If you hover over them, it says “Enable/disable keyframes for this parameter.” Click them for every slider under “scale” and “position”. Now, we can start keyframing it; keyframing basically tells the image where it needs to be, when it needs to be in that location, how big, etc. For us, this means that we can make faces move along very fluidly with the video.
By now, we’ve made quite a bit of progress! I recommend taking another break before this to avoid feeling tired. Green tea helps! Once you’ve done that, go ahead and click “Graphs”. Since you enabled the keyframes, your effect should show up with, lo and behold, some graphs to go with ‘em:
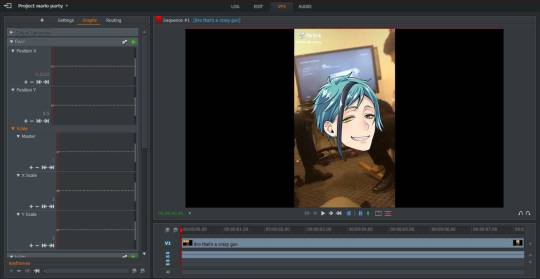
I personally work by keyframing one face at a time. To do this undisturbed, I disable the little green light that says “toggle bypass” when you hover over it for the face i’m not going to be keyframing. It hides that face temporarily until i put it back on again. To decide what face i’ll be keyframing first, I just look at whatever face appears in the video first. Once you have the face that appears first, make absolutely positively sure the red bar is at zero to be able to set where and how the image starts out. Then, drag the face onto the poor human soul whose face we’ll be replacing today. Go back to the “settings” tab and slide with the “Scale: Master” until the character’s face is big or small enough for your liking. Then, if the person we want the second character to portray is not on-screen, we click the green (now gray) lamp on the unused face and drag it off: depending on your video format, either to the black on the side (which we’ll crop off when we’re done) or just off-screen if your video is fullscreen. If the person is on-screen, just drag the face on top of that person and adjust size like we did with the first face. These will be the locations the characters start on. Switch the green light back off for your second character, and move back to Graphs.
This is where the “””””fun””””” begins. So, right now, you have your red bar at 0, and you have your character where you want it. We need to move the character’s face frame-by-frame. Luckily, there’s an easier way to move frames: with your arrow keys. Every press with your left or right arrow key moves the video one frame into that direction. Now remember what i said about using your mouse to drag the images where they need to be? It comes in really handy here. Press your right arrow key thrice to move 3 frames ahead, and then drag the image to wherever the face is on that frame. Lightworks will automatically fill in where the image needs to be on the frames in between those frames so you don’t need to precisely move the image on every frame (though this might be helpful on shorther videos or videos where there is very fast movement.) Do this repeatedly until the video ends or the character disappears off-screen. Every 3-4 or so frames. For the remainder of the video. Entertaining. Very, very entertaining. (In short, it’s just: press arrow keys thrice > reposition image > repeat.)
Adding to this, sometimes the characters go off screen and then come back, but the faces move gradually to the spot leading to them appearing too soon. (sounds incredibly vague, I know, but you’ll know what it means when it happens.) To fix this, you need to go into the graphs labeled “position”. It’ll look something like this:
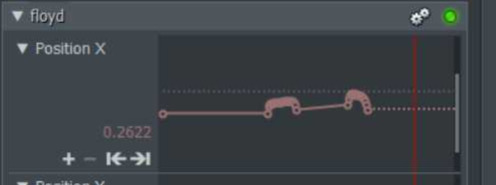
What you need to do here is click somewhere above or below the diagonal line in the middle to move your red line there. Press the arrow with the vertical line to the left to move to the previous keyframe. Copy the numbers that are to the left of the graph, press the arrow with the vertical line to the right, nudge one frame back with your left arrow key, paste the value you just copied over the one that’s already there and then press enter or the plus. That should fix it.
Okay. You have now keyframed all of the faces. It’s all done. Take a break here. I don’t care how determined you are right now. you Gotta. You Just Gotta. get some water, you deserve it.
After getting your water, go back to the “edit” tab at the top, right click your video and select export. Select the format, give it a name, and huzzah! Finally. Unless you have a video format with black edges, then it’ll look somewhat like this. To crop those sides off, we’re going over to Kapwing to crop it off. (You need to register (free) to remove the watermark, and i’m pretty sure Lightworks can also do it, but I haven’t found that option yet and I’m too stubborn to) Once you’re done with that, download it, delete the old version and you’re really done. You deserve a pat on the shoulder now because god fuck if this isn’t one of the most tiring processes to do out of free will (and that times 10 if you’re a slow worker like I am) but honestly making hundreds of people laugh is SO MUCH of a payoff you can’t help but keep wanting to do it wwww
if there’s any more questiong about this or if i forgot something (which i probably did) please shoot me an ask or dm!! all i am physically incapable of doing is simplifying this into less of a wall of text
#not twst#not a meme#ohhhhh my god#ohhhhhhhhhhhhhh#my god#i am never typing again for a week#i need to recharge and i ABSOLUTELY need a nap#i only just finished chapter 2 bc. lazy#i still need to process it#gonna upload the vid i used here in a minute or 2#my brain is just coconut mall mario kart
27 notes
·
View notes