#I can make a folder with pngs of various sizes if that would be more helpful
Explore tagged Tumblr posts
Visit Tumblr Blog
Explore Tumblr blogs with no restrictions, modern design and the best experience.
Last Seen Tumblr Blogs


Fun Fact
70% of Tumblr users say the Dashboard is their favorite place to spend time online.
Text
In honor of the Dannypocalypse approaching + my love of manually vectorizing things, I present you all with an svg Danny for all your infinite scaling needs
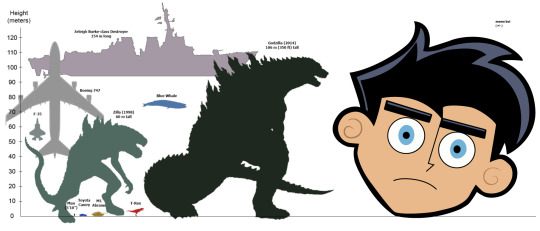
#danny phantom#dannypocalypse#my ADHD is showing huh#danny phantom memes#dp memes#klo#I can make a folder with pngs of various sizes if that would be more helpful#I waste so much time in Illustrator at work sdkjfnskdfasdfax#Need to use a client's logo and can't get an svg??? PEN TOOL LFG#don't ask how Godzilla is relevant I was just looking for the easiest way to demonstrate that you can make this face Large
93 notes
·
View notes
Text
How To Import & Play High
As Wes Phillips recently reported on this website , CD sales are down and authorized downloads of audio files are up. Stereophile has been criticized more than once for not paying sufficient consideration to the topics of MP3 and other compressed file formats, resembling AAC , and for offering no steerage at all to readers about methods to get one of the best sound quality from compressed downloads. The convert plugin lets you convert parts of your assortment to a listing of your alternative, transcoding audio and embedding album art alongside the way. It could transcode to and from any format utilizing a configurable command line. Convert Spotify Music to plain MP3, AAC, WAV, FLAC. Some individuals search for AIFF vs. WAV or other formats. It is sensible that increasingly more individuals take pleasure in high quality music on their devices. It can't be denied that music is an effective approach to loosen up and get leisure. Word that it is typically not a good idea to make use of AIFF or WAV files in your iTunes library. Not only do they take up a variety of house, but tags—metadata you add to the recordsdata—aren't supported in addition to with the opposite formats. When you can tag WAV and AIFF information in iTunes, FLAC to ALAC Converter not all of those tags remain in the information in case you transfer from your iTunes library to another pc or flac to alac converter device. We've targeted on the largest and most popular UK obtain sites that allow you to buy and obtain single tracks and full albums in numerous hello-res formats. Each has its personal distinct flavour, http://www.audio-transcoder.com bitrates and options to offer. You should choose a location where you need the ALAC file to be saved. You may create a brand new folder, reserve it in an existing folder or depart it in the default folder. After that, you possibly can full the conversion by clicking the Convert" button. Long-time Apple customers may additionally have simply realized to dwell with iTunes's faults and do not want to be taught all the quirks of a brand new player. VLC is great, but it would not have an effective way to auto-manage your library the same method iTunes does. Need to change the bitrate in your MP3 recordsdata? This may be useful if you need to scale back the dimensions of your MP3 recordsdata, for example. A MP3 file at 320 kbps, the highest bitrate allowed for MP3 files, could possibly be diminished to 192 kbps in an effort to significantly scale back the size of the MP3 file. If this isn't your first go to to my blog, it's possible you'll recall that I had ripped all my audio CDs and put them away in packing containers last year. My music collection now occupies just a tiny nook of a 1.5 TB onerous drive. (I do not own THAT many CDs as you might guess.) Not an enormous deal itself today, but the reason for running a blog about that was the small utility I had then written to assist EAC take care of UTF-eight encoded freedb entries Now time has come to share with you another FLAC instrument that I've created for myself. Hope you will discover it handy. That mentioned, the report signifies that FLAC files solely work in the Files application, not within the Apple Music app. This is sensible, given that will possible require a extra main revision to iTunes as properly to support FLAC files to sync them. Nonetheless, even if Apple would not supply that functionality sooner or later, a minimum of audiophiles seeking to play their FLAC collections on Apple's gadgets could have some workaround when iOS eleven launches this fall. Apple's proprietary format produces lossy, small, files much like MP3, they are roughly the same high quality as MP3 for a barely smaller file size. The recordsdata are created with them4a extension. Batch mode for a number of recordsdata conversion activity, FLAC to ALAC Converter can convert hundreds of FLAC recordsdata without delay. 1) Bandwidth. This is a downside for many customers, but in addition a problem for top-quantity distributors, particularly when you're talking about downloads in extra of a gigabyte. Think about the bandwidth essential to upload tens of millions of HD music recordsdata the best way Apple uploads a lot smaller AAC files to users. As of now if you'd like FLAC in your telephone, you have to straight load the information into sandboxed 3rd occasion apps. Which suggests no different apps can access them. No Siri. No CarPlay. You're often stuck with some horrible GUI relying on which app you choose, and perhaps some playback glitches as nicely. It is really such a horrible scenario to be in for anyone who loves music and has a personal lossless library, FLAC is the business normal for lossless compression, and there are reliable the reason why someone would not wish to use ALAC as an alternative.
Fortunately, audio conversion remains to be a close to-common technique to make your FLAC workable in iTunes. There are a lot of of FLAC converters obtainable for you to convert the FLAC to a iTunes pleasant file on Mac or Windows computer, right this moment, we'll use a simple and environment friendly program - Video Converter to deal with the job. Despite the title, the software is an all round audio converter which lets you convert FLAC to iTunes appropriate file format, and converts a long laundry checklist of other audio codecs, akin to MP3, OGG, AC3, M4A, WMA. As a universal utility, video conversion from one format to a different is another necessary feature of it. Many various audio file codecs exist for storing recorded audio data on a pc system. This publish compares multiple file sorts and offers suggestions on which formats and bitrates one should use, especially when producing podcasts or other on-line audio. In the event you retailer photographs in a compressed format, think of FLAC as PNG, while JPEG is analogous to MP3 (or Ogg or WMA).
1 note
·
View note
Text
The Wavicle Theory of Work
3 Techniques of Journaling Work and the Slipperyness of Tasks
I have been using Flow (getflow.com) as a work management/work journaling platform for months.
However, Flow is trending more toward features suited to larger team project management, which don’t really match my focus. That focus is journaling my work, and lightweight task and project sharing with smaller teams. I am not knocking implementation of Gantt charts and Kanban cards, but they’re not central to my needs.
Secondly, I recently came upon a better set of techniques to manage my work journaling, and the features of Todoist line up really well for that, better than Flow does.
3 Techniques for Journaling Work
I basically employ three styles of work journaling:
On a daily basis, I plan and track my work with the ‘1, 2, 3′ technique.
On a weekly basis, I plan and track using the ‘must, should, might’ technique.
On ‘agenda’ projects, I plan and track using the ‘do, do, do’ technique. I use the term ‘agenda’ to distinguish with the short-range calendar orientation of daily and weekly projects. This will make more sense, later on.
Daily: 1, 2, 3
A long time ago, I realized that for whatever reasons, I really am able to only accomplish a handful of tasks per day. This leaves out the maintenance of reading and writing emails, and other minor annoyances, but does include things like meetings, working on client and internal projects, and all larger-grained work activities.
Specifically, I have learned that I can do the following:
One major activity, such as working for a few hours on client research, or writing for a few hours. This is the ‘1′ in the ‘1, 2, 3′.
Two medium sized activities, like a 45 minute phone call, or doing an hour-long webinar. This is the ‘2′ in the ‘1, 2, 3′.
Three short activities, taking less than 45 minutes. This is the ‘3′ in the ‘1, 2, 3′.
In Todoist, I have defined a template that I use each day to create a daily project whose name is the date, as in 2018-04-04. The template doesn’t do much, but includes sections for the three categories, and then I add tasks either prospectively (at the start of the day, when planning), in process (while doing the activities themselves), or retrospectively (at the end of the day, perhaps, or after performing some work):

Note the various specific features of Todoist on display. The three categories, like ‘1 of 1:’ are represented with section headings, which in Todoist are tasks whose title ends with a ‘:’. That Todoist convention leads to the tasks acting as a section heading: with no checkbox, and instead having a caret prefix used to accordion the tasks in the section. Section heads also have the great side effect of holding onto checked tasks: checked tasks don’t fade away into completed (hidden) mode. They just are grayed out, like the top two above.
Note that my journaling involves a lot of intentional duplication and moving tasks around. For example, after writing yesterday’s Work Futures Daily, AI is Everywhere, I added the post title to the task (I knew in the morning I was going to write something, but not the title). If I wanted to take notes on that I would add as a comment to the task (in this case I didn’t).
And then, before I checked it off, I made a duplicate of the task, and dragged that to my Work Futures project. I will show that later, in the ‘do, do, do’ section, below.
Then I checked off the task in 2018-04-03. (By the way, a nice feature of Todoist is that comments can be added to checked tasks. The lack of that capability in Flow caused me a great deal of annoyance and time wasting.)
On the left hand side you can see that 2018-04-03 is now a subproject of the project named Past, but yesterday it was a sub of Present. I moved it from Present to Past this morning, when I created 2018-04-04. A sibling project in Present is 2018-04-02 week, which brings me to the second of the three sorts of journal techniques.
Weekly: Must, Should, Might, Didn’t
If I select the Present project, it displays tasks and subprojects. This is what I am usually looking at when I use Todoist. In this case I see the Present title at the top with the opportunity to add tasks directly to that project. Below that are the two subprojects, 2018-04-02 week and 2018-04-04, with their respective tasks and sections.

Note that the Week project has four headings: must:, should:, might:, and didn’t:. At the start of each week I try to plan out what I hope to be working on, or activities I know will be happening, like travel, phone calls, meetings, and deadlines. This often involves copying tasks from other projects. Didn’t is a category for activities that might have been planned, but which are no longer relevant, for example, when two alternatives are researched and one is selected. The rejected activity might be placed in didn’t.
(Some people might want to take the thinking behind week projects and apply them to months, or years. Go for it. Those scales don't work for me, but they may for you.)
Note that my goal with copying and/or linking in general is that tasks should be distributed out to whatever sort of project timeframe makes sense. An activity that involves me working on a client project part of five days in April might lead to five tasks in daily journal projects, appearing in one or more weekly projects, and one or more tasks in the client project.
Also note that if I think it is worth the effort -- like when I want to account for my time on a project -- I can use the task links that Todoist provides so that these various fragments can be linked together, with those links captured in the client project task, referencing the many linked tasks sprinkled among the days. I have an example, below.
Projects: Do, Do, Do
For the agenda projects, those that are intended to cover the life-cycle of a project that will persist longer than a day or week, I use the ‘do, do, do’ technique. Here is Work Futures, an agenda project:

At the top of the tasks, you can see the annotation with Highly task, with a folder icon that means a comment has been created. When I click on that icon you’ll see this:

I created that comment, one that contains a link back to the completed task in the 2018-04-04 daily journal project, referencing the set up Highly for Slack work futures, make announcement task. As I take on and accomplish other subtasks in support of the agenda task of annotation with Highly, I can add additional comments of this sort, referencing tasks in other daily and weekly journal projects.
[Note: Todoist supports a subset of Markdown in comments, including bold, italics, links, and other styling. It does not support quotes, lists, footnotes, or tables, I am sorry to say. The link above was coded as ‘2018-04-03’, for example.]
This linking approach allows me to keep track of the various daily and weekly journal tasks, the days when I worked on them, and to access their respective comments, as well. For example, for a given client engagement I might comment in each daily task how much time I had spent that day, and on a weekly basis I could add those hours up, and provide them to my client in an invoice.
The sections of these long-range projects are ‘doing’, ‘do soon’, ‘do someday’, ‘done’, and ‘don’t’. In my approach, these time domains mean this:
doing -- actively doing at the present time, meaning activities are going on in the present week, and perhaps weeks to come.
d****o soon -- activities that are not on-going at present, but soon will be, meaning, in the next week or so.
do someday -- activities that need to be done, but not in the immediate future, namely, after the next few weeks.
done -- tasks that have already been accomplished.
don’t -- things that were considered, and perhaps even started, but which are now not going to be pursued.
In this example, I had hidden the tasks in the ‘done:’ group, because it is too long. It includes all the posts made at Work Futures, for example:

The Wavicle Theory of Work
I have found these three techniques, when used together, accomplish the different sort of focus, or lenses, appropriate for the three time domains involved.
On a daily basis, I want to catch the salient information for planning during the day, and and recalling the day’s activities later on. The ‘1, 2, 3′ technique is principally oriented toward planning, and specifically to avoid overcommitting to more than a reasonable number of things to do each day.
On most days, I shift my focus to the medium-term weekly project quite frequently, which is why I have set up the Present project as it is. That’s also why I move each day’s project from the Future to the Present each morning, and also, move yesterday’s project out to the Past (after duplicating tasks that are of continuing interest, today).
Several times a day I refer to the longer-range agenda projects, like the Work Futures example. I refer to these as agenda projects because the agenda technique is intended to cover the entire lifetime of the project, not just a defined duration like a day, week, or month. It presents the entire agenda of the project, of whatever duration.
It is often at the end of the day that I find myself creating links from today’s tasks to ongoing tasks in the agenda projects. I confess that sometimes I skip a few days, and do that project ‘bookkeeping’ at the end or start of the week, or when today’s work has led to a reappraisal of the work-to-come in that project.
Another observation is perhaps one that might have been made at the beginning: the daily and weekly journals hold tasks rooted in many longer-range goals, all mixed together. But agenda projects only contain tasks dedicated to that project.
The purpose of these techniques together is to make sense of the two-sided nature of our work.
On one side, as I am working on some activity -- like writing this post -- I am inevitably grounded in the moment. It is Wednesday, 4 April 2018 at 4:18pm Eastern Time. I am in a small chunk of time, doing a defined and delimited task. I am in a small particle of time, independent of others. And so I want to capture that reality, which I do in the daily journal for 2018-04-04 (and the weekly, too).
But, on the other side, writing this post is part of a greater, longer-term objective, the care and feeding of Work Futures, growing the community there, and one of an on-going series of writing and other activities. This activity is part of a greater fabric of other more general activities. It is part of a wave of Work Futures work, dependent on them and connected to them, contextualized by them.
So, this approach balances and unites the paradoxically opposed particle and wave sides of how we work, and how we think about work. It allows us to see it both ways, one at a time, or both at once. That's the wavicle theory -- or reality -- of work.
#tasks#work management#task management#todoist#flow#journaling#work processing#getting things done#productivity
12 notes
·
View notes
Note
Oh my oh my oh my I love the wallpapers/backgrounds you make! I’m really really shy and would love to ask you to make some for one of my favorite players (not blacklisted!) but I’m too shy to even say on anon :/ is it okay if I ask you how you make them so I can make some of my own? :)
hey there!! first of all you don’t have to be shy! i’ve made some real weird stuff by request on this blog so honestly this is a v open space lmao. either way i can def give you a condensed version of how to make wallpapers, let me know if you’d like anything in more detail! LONG POST UNDER THE CUT for anyone interested
(also i use GIMP not photoshop, so Your Experience May Differ)
1. find the image you’d like to make a background of. i use players or logos but it can really just be whatever. if you can, look for PNG images, as those are already “cut out” and don’t have backgrounds you’ll need to remove. If you need to remove a background from an image i’ll cover that later lol
2. find some images to use as backgrounds, if you’d like. there are tons of places online to find FREE and non-copyright backgrounds to use in edits! google is your friend here. i like watercolor backgrounds, florals, etc, but it’s really up to you and the Vibes you’re trying to achieve. Save all of these in separate folders so everything is easy to find later!
3. open the editing software you have access to and open a New File in the size you need for whatever lockscreen you’re making (you can google the specific size for whatever phone you have).
4. if necessary, open your JPEG file that needs to be “cut out” of its background in a separate window. I like to use the “lasso” tool to cut my images out, and everyone has different methods of doing this to look the best so experiment and see what works for you! You can then copy/paste the selected image you’ve cut out and place it on your lockscreen-sized background.
5. add backgrounds behind your newly cut out image by using the Open as Layers command, that way you can change the background image/colors at will without having to start over every time. I like to use the Gradient Tool and various paintbrushes if i’m not loading in an image as the background. Layering multiple backgrounds and/or colors and then messing with the Opacity of the layer is also a good way to make things look interesting!
6. play around with the Burn Tool to manipulate the image you’re using as the Main Picture, and don’t forget that you can Resize and Move it with the tools available to you in the Toolbox! (you can always google how to use whatever tool it is that you want to use, it’s super easy to look up “how to use _____ tool in GIMP/Photoshop”)
This is obviously a SUPER condensed version of how i do things, and doesn’t have the millions of tiny things i do to make everything look the way i want it to and is more of a General Overview. If you have any specific questions about things pls let me know!! :)
#a not so great how to guide#let me know if this was even a little bit useful#or if i need to elaborate and use pics lol#Anonymous
2 notes
·
View notes
Text
Lightroom settings written by Gavind Vijayakumar
If you are a photographer who is really interested in printing photos then this article is for you. In my earlier days, I was not bothered much about photo printing since I was just posting photos on my website and social media websites like Facebook, Instagram and Twitter. Later I started printing my photographs. I tried many photo printing shops both online as well as from photo printing shops near me. I was not at all happy with the print colours. It took me one year to realise that it was all because of the wrong Lightroom export settings for print. As a result of which I had to process photos later with correct Lightroom export settings for print.
Later I tried printing photos by tweaking various Adobe Lightroom Settings and derived the best possible photo printing settings for high quality photo prints. More than 70 per cent of photographers use Lightroom for post processing photos. So, one needs to make sure that you have set the correct print settings in Lightroom. Let us have a look at the various Lightroom export settings for print and how to fine-tune each setting for best photo print results. I will be sharing all the settings which need to be fine-tuned for high quality photo prints. I am using Adobe Lightroom CC2015 for photo processing. So, I will be showing the Adobe Lightroom export settings for print on CC2015. These settings are more or less the same in all versions. If you are looking for Lightroom to Instagram export settings, read Lightroom export settings for Instagram Guide
Lightroom Export Settings for Print Let us start. Open Adobe Lightroom. Navigate to the File menu and click on the “Export” option from the dropdown menu (as shown below)
Best Lightroom export settings for print photographyaxis-1
Now the following window will pop up, “Export One File” (as shown below). We need to make the settings change for photo printing over here. Set the “Export To” option as Hard Drive. You will have 3 options in this drop-down menu, Email, Hard Drive & CD/DVD. Always set it to Hard Drive for storing the final processed image in the computer. Later you can send the image for printing via email or by burning the image onto a CD or DVD
Best Lightroom export settings for print photographyaxis 2
Export Location The First section is the “Export Location” section. In this section, you can set the location for exporting the photos on Adobe Lightroom. Here, I have set the Export location to Desktop.
Best Lightroom export settings for print photographyaxis 3
You can also save the photo in a subfolder under the option “Put in Subfolder”. Select the “Put in Subfolder ” option and create a subfolder here. I have created the sub folder name as Pictures-to-Print. You can save the process photo separately or you can overwrite the existing file under the option”Existing Files”. It is better to choose the option for a new name. So, now we are done with the Export Location part.
Best Lightroom export settings for print photographyaxis 4
File Naming Let us move to the next section, “File Naming”. In this section, we can set the filename. We can use “Rename to” to set Custom names according to our choice.
Best Lightroom export settings for print photographyaxis 5
File Settings Choose the Correct Image Format Setting the correct Image format is very critical. This is the most imp0rtant step in Adobe Lightroom export settings for print. You should always cross check with your printing house for selecting the format for printing. All photo printing shops accept JPEG file format. Some even accept TIFF format. Since we are making the settings for print we will not be selecting other image formats. If you are selecting the TIFF format make sure that you are choosing the 16 bits/component as the Bit Depth
Best Lightroom export settings for print photographyaxis 6
Set the Image Quality This is an important step in getting good quality prints. Always make sure that the “Quality” slider is set to 100. This ensures that you are sending the best quality of the image for printing. I used to set the Image Quality to 50 when I am exporting Images for online publishing. So I have done the mistake of exporting the image for print without changing the quality to 100. So, Always make sure that the slider is set to 100 when giving for prints.
Choose the Correct Photo Colour Space Most of the photographers, both amateur and professionals used to make a mistake in this settings. You will have 5 settings to choose from this menu. They are sRGB, Adobe RGB, ProPhoto RGB, Display and Other. Only sRGB and AdobeRGB are generally used for photo printing. From my experience, it is always better to check once with the photo printing shop on what Colour profile they support. All commercial photo printing store support sRGB Color space. Only a very few high-end commercial photo printing stores support AdobeRGB. So, select the colour space as AdobeRGB only if your printing store supports it.
Photos printed using AdobeRGB as Color space will have more rich color when compared to SRGB. If you send the softcopy of print with AdobeRGB as the Color Space to a printing store which only supports sRGB then it will ruin your entire print. So, always double check at the printing side. Select the correct Color space (mone matching with the printer settings) for accurate Lightroom export settings for print.
Never tick the “Limit file size to option” whenever you are exporting photos for prints. Setting this option will result in a quality reduction. Leave it unchecked.
Best Lightroom export settings for print photographyaxis 7
Image sizing Choose the Correct Aspect Ratio What is Aspect Ratio? It is just the ratio of height and width of the image. Don’t select the Resize to fit option under the Image sizing menu. Leave it unchecked. It is always better to use the “Aspect” option inside the “Crop and Straighten” module in the “Develop” section of Adobe Lightroom to set the Aspect ratio or dimensions (as shown below). If you are printing an image of size 12×8 then the Image Aspect Ratio would be 3:2. You can select this aspect ration in the settings and crop the image accordingly.
Best Lightroom export settings for print photographyaxis 12
Choose the Correct Image Resolution The Image resolution comes into picture when you are giving bigger prints. You can set the pixels per inch as the unit. You can set the desired resolution in pixels per inch depending on how large you want to print. As a thumb rule, you can set it 300ppi for smaller prints (6×4 and 8×5 inches prints). For high quality prints, choose higher photo printing resolutions. Always make sure that the Image resolution in Adobe Lightroom export settings for print matches with the print image size.
Best Lightroom export settings for print photographyaxis 8
Output Sharpening Output Sharpening will have 3 options in “Sharpen For”. These are Screen, Matte paper & Glossy paper. We can set photo sharpening according to the photo paper quality in this setting. You will have Standard, Low & High option in the Amount of sharpening section. If you are printing on a Matte paper or Canvas paper then I would recommend you to select the matte paper option, followed by Standard in the amount of sharpening section. If you are printing photo in a Glossy paper or Lustre paper then chose Glossy paper and set the amount of sharpening to Standard. You can set the amount of sharpening to “High” if you find that your final image is lacking sharpness.
Best Lightroom export settings for print photographyaxis 9
Best Lightroom export settings for print photographyaxis 10
Watermarking This option allows you to automatically set watermark on your photos to be printed. You can either choose a simple watermark in the form of text or you can insert a custom watermark design with your name or logo in “PNG” or “JPG” format. You have the options to change the opacity, font size and add effects to your watermark. Some people don’t wish to watermark their photo in software. They wish to put the signature on top of the printed photo. You can leave this section in Lightroom export settings for print, if you don’t wish to watermark through the software.
Best Lightroom export settings for print photographyaxis 11
I always recommend storing the final processed image in “TIFF” format. The “TIFF” format is also referred to as the “Digital Negative” in this age of Digital Photography. Later you can convert the TIFF file into JPEG for printing. TIFF is a lossless format whereas JPEG is a lossy format. These are the best Adobe Lightroom export settings for print for printing photos in good quality. Don’t wait anymore, fine-tune your Adobe Lightroom settings for these values for high quality photo prints.
Adobe Lightroomlightroom settingsphoto printingpost processing
Govind Vijayakumar
0 notes
Text
How to convert png to jpg
FWIW, A personal favorite of mine on such list needs to be zopfliPNG. Among the tasks I perform today is batch cropping a good deal of pictures. Put simply, the capability to work with a group of images is a massive plus, especially in the event you should make precisely the same kind of editing for a hundred or a thousand of photos. It's an easy-to-use tool and you are able to save numerous images at exactly the same time.
For printing, you need to use the smallest amount of compression. Image Converter Plus dramatically lowers the quantity of time it requires to convert files. Please be aware this utility is unable to read a generic file. The output file after the conversion is going to be a huge text file which can be awkward to work with.
Lies You've Been Told About How to Convert Png to Jpg
You may download all the image files from the dropbox connection. In addition, the icon size they produce aren't always of the size you want. If you would like a more permanent solution, you can pick the Save to Photo Album action instead. The image can't be uploaded to Medium.
For displaying images on the internet, you should balance the grade of the image versus the size of the image. The sort of image you're using will help to learn which image format you need to use for the best quality is size. If you would like great looking images, then you ought to use less compression. It's a standard way of compressing photographic images.
You may also drag files to the drop space to begin uploading. The program also has a few bug fixes relative to the absolute most recent model of pngnq. Each time you open the image with Picasa, you are going to discover the editing option enable. So to address the issue, only thing you have to do is enable the PNG file format so it can be editable in Picasa.
You are able to add the entire folder to convert. Normally, the PDF format files do not consist of text only. At this time you can select the file format. Next, you can choose the file format.
What How to Convert Png to Jpg Is - and What it Is Not
Now if you'd like to convert PNG to JPG format, you can eliminate the image quality. JPEG (or JPG) is among the most popular image formats, and it isn't tough to see why. JPG was used for the precise same format. JPG is the most frequently used format since it's shorter.
Seems odd as it's a superior format in comparison to JPEG (jay-peg). Tries to detect whether a file is actually a jpeg and will not install it, if it's not. Pick the DOC file that you would like to convert. JPG files but are actually unrelated.
PSD to Website lots of folks go on the internet so as to find the ideal site design in order to set up their internet presence. Websites have existed for over 15 decades. You may employ the help of websites as a way to convert PSD to WordPress. Seeking the assistance of professionals that could convert PSD to HTML is a really terrific idea.

Therefore by utilizing the next codes you'll have the ability to extract 35 essential data attributes available in a DICOM image. Utilizing the extra parameters, the aspect ratio settings may also be changed. Thankfully, however, you can become pretty near index savings by reducing colors manually. It's very rare to really require JPEG formatted images, but in the event you really and truly must produce the conversion, there are lots of free tools available. https://oree.co/png-to-jpg
PNG also supports a broad array of transparency, but its principal benefit is being fully lossless. Basically, make certain you're not unintentionally bloating your PNG file by making use of the incorrect sort of pixel format. For instance, if you wish to share an image that has only text, then it's excellent to go with PNG format. Even though you can use both formats for each form of image, there are particular reasons, why you may choose to use a different format for the various sort of image.
To take out the copyright watermark is really difficult or sometimes not possible. On the Mac, you're able to just alter a setting and all of your new screenshots will be saved as JPEGs rather than PNGs. JPEGs, on the opposite hand, compress your image, which can result in blurry text.
PDF to JPG conversion could be required in conditions once the target device doesn't have an integrated PDF viewer, if you want to publish a PDF file online without making users download it or need to make its contents a component of an internet page. The fast and easy way to manage your files is to receive a good piece of software, such as reaConverter. The PDF file will display online or you'll be emailed information on the best way to download it, based on your delivery method'' choice in the past step. Converting files from 1 type to another is among the more prevalent tasks in web development.
0 notes
Link
Microsoft Quietly Released Windows File Recovery Tool for Windows 10 2004 Version. And it will be supported for the upcoming newer versions. The utility can be used on traditional mechanical hard drives as well as SSDs, memory cards and USB drives. There is support for NTFS, FAT, exFAT, and ReFS file systems, so you can use Windows File Recovery to get back files lost under various operating systems.
“Accidentally deleted an important file? Wiped clean your hard drive? Unsure of what to do with corrupted data? Windows File Recovery can help recover your personal data,” the Store listing for the app explains. “For photos, documents, videos[,] and more, Windows File Recovery supports many file types to help ensure that your data is not permanently lost. Recovering from a camera or SD card? Try Signature mode, which expands beyond NTFS recovery and caters to your storage device needs. Let this app be your first choice for helping to find what you need from your hard drive, SSD (*limited by TRIM), USB drive, or memory cards.”
This is a tool that uses the command line to perform all the operations, so this may or may not be compatible for every user out there. This can be used to retrieve data from local hard drives as well as removable media such as USB drives and memory cards.
There are three different modes within the applications, as described by Microsoft:
Default mode: This mode uses the Master File Table (MFT) to locate lost files. Default mode works well when the MFT and file segments, also called File Record Segments (FRS), are present.
Segment mode: This mode does not require the MFT but does require segments. Segments are summaries of file information that NTFS stores in the MFT such as name, date, size, type, and the cluster/allocation unit index.
Signature mode: This mode only requires that the data is present and searches for specific file types. It doesn’t work for small files. To recover a file on an external storage device, such as a USB drive, you can only use Signature mode.
Recover Data using Windows File Recovery Tool
Step 1: Download the exe file or download the tool directly from Microsoft Store (Recommended).
Download EXE File
Step 2: Install and Open the Released Windows File Recovery Tool. Step 3: When you are prompted to allow the app to make changes to your device, select Yes. Step 4: In the Command Prompt window, enter the command in the following format:
winfr source-drive: destination-drive: [/switches]
The source and destination drives must be different. When recovering from the operating system drive (often C: ), use the /n <filter> and /y:<type<(s)> switches to specify the user files or folder. Microsoft automatically creates a recovery folder for you called, Recovery_<date and time> on the destination drive.
Default Mode examples
Recover a specific file from your C: drive to the recovery folder on an E: drive
winfr C: E: /n \Users\<username>\Documents\QuarterlyStatement.docx
Recover jpeg and png photos from your Pictures folder to the recovery folder on an E: drive.
winfr C: E: /n \Users\<username>\Pictures\*.JPEG /n \Users\<username>\Pictures\*.PNG
Recover your Documents folder from your C: drive to the recovery folder on an E: drive.
winfr C: E: /n \Users\<username>\Documents\
Don’t forget the backslash (\) at the end of the folder.
Segment mode examples (/r)
Recover PDF and Word files from your C: drive to the recovery folder on an E: drive.
winfr C: E: /r /n *.pdf /n *.docx
Recover any file with the string "invoice" in the filename by using wildcard characters.
winfr C: E: /r /n *invoice*
Signature mode examples (/x)
When using the signature mode, it's helpful to first see the supported extension groups and corresponding file types
winfr /#
Recover JPEG (jpg, jpeg, jpe, jif, jfif, jfi) and PNG photos from your C: drive to the recovery folder on an E: drive.
winfr C: E: /x /y:JPEG,PNG
Recover ZIP files (zip, docx, xlsx, ptpx, and so on) from your C: drive to the recovery folder on an E: drive.
winfr C: E:\RecoveryTest /x /y:ZIP
Step 5: When you are prompted for confirmation to continue, enter Y to start the recovery operation. Depending on the size of your source drive, this may take a while.
That was all about the new Windows File Recovery Tool. This might be very useful once you get used of it. The command line may take some time but if you follow the instructed steps, it can be done in a very easy and straightforward way.
Are you facing any problems and issues with Windows 10? Then there is nothing to worry about, we have an article dedicated to Windows 10’s issues and guides, visit Windows 10 Troubleshooting Guide. I hope you would like this content if you have some more suggestions let us know in the comment section.
[su_box title="More Like This" box_color="#000000"]
How to Restore Windows 10 PC Using Media Installation
How to Remove Installed Updates from Windows 10
How To Get macOS Dynamic Desktop Feature on Windows 10
5+ Best Xbox One Emulators for Windows
[/su_box]
via TechLatest
0 notes
Text
Version 373 (Qt)
youtube
windows
zip
exe
linux
tar.gz
source
tar.gz
The Qt update is ready for Windows and Linux!
This week's release is for all users, but please bear in mind it has some small layout and positioning bugs, such as subscription popups sizing a little strangely. If you would rather wait a week or two for these last issues to be cleared (and any others that pop up as more people play with this), that is totally fine.
Qt background
Since hydrus began as an application, it has used wxWidgets to draw all the windows and buttons on screen. wx has served us well, but hydrus has grown to be a complicated program with hundreds of different custom things going on, and it was starting to show. Lots of windows were flickery, modern tech like 4k screens were not excellently supported, and operating systems and window managers were unstable. If I could have moved to a more flexible and more frequently updated UI library by snapping my fingers, I would have, but the total UI code is almost three megabytes, far too much to reasonably convert as I kept at my normal weekly schedule.
A user contacted me I think about a year ago talking about Qt and possibly making some scripts to automatically convert hydrus's wx code to Qt. I said it sounded like a good idea, and he worked in the background trying to figure it out and add manual tweaks. He was very successful, ultimately getting an essentially functional build going a couple of months ago. He passed the code to me four weeks ago, and I have since crash-learned Qt and fixed the great majority of the bugs that slipped through the automatic conversion process.
I am extremely grateful for this user's work--this would not have happened otherwise--and I am very happy with the result. Qt is a nicer library than wx for our purposes, runs faster, has much less flicker and related jank, and provides many new options for future extensions and customisation. I also enjoy working with Qt--the library is good.
hydrus Qt
There are no critical differences between the wx and Qt builds. Every label and button is where it was before. Fonts and colours and sizes and margins are all slightly different, but nothing has been taken away. Also, there do not seem to be any dll-style conflicts with a previous installation, so you should just be able to install or extract as you would any other week without any problems.
One particularly nice thing is that Qt is overall faster. Video animations and thumbnail fading should be a little smoother. Another is that compatibility with different Linux distros is much better, so Linux users who have had crashes or drawing problems should now have an easier time.
Also, tag autocomplete dropdown result lists can now float for non-Windows. They can also float on dialogs like manage tags. Options on whether they should float or embed are now under options->gui.
Hydrus is a big program, however. I have done plenty of testing and fixed hundreds of things, and advanced users have tried out some early builds and helped me out more, but there are surely some odd layout and display bugs we have not found. There are also some that we found but I could not fix in time--for instance, sometimes the new page tab drag-and-drop does not do its new 'live' page navigation correctly, discord drag-and-drop file export is unreliable again, the duplicate filter's right-hand hover window sometimes positions incorrectly, and subscription popups will change size too often due to some unusual text handling as they work through their network jobs. If you encounter your own issues, I am interested in all feedback. For now, issues that affect usability are of higher priority than a couple of pixels out of place, but I am open to all reports.
If you use IME text input, let me know how it works for you now!
I regret that I was unable to get a release-ready macOS build out for today. macOS has some important UI differences to Windows and Linux, and there are still some significant things--like maximise/borderless fullscreen support for the media viewer--that were causing stability issues. I will keep at it next week.
Users who run from source will need qtpy and either PySide2 (default) or PyQt5. Check https://hydrusnetwork.github.io/hydrus/help/running_from_source.html for more information.
misc
I also did some normal work, mostly quality-of-life ui stuff:
The 'archive/delete' menu option now shows up when you have nothing selected, and will do everything.
Some of the system predicate edit panels now show quick-select buttons--for instance, if you hit 'system:duration', you'll now have two extra buttons for 'has duration' and 'no duration'.
I fixed an important CPU inefficiency in the new files maintenance manager that was affecting some users with large file maintenance queues and large gui sessions. It was causing juddery UI, which should be completely fixed now.
Clients with large sessions that include 'collected' media thumbnails with hundreds or thousands of files should experience less UI judder as they browse the files within those collections.
full list
qt:
hydrus now uses Qt for its client's user interface, migrating from wx. this is thanks to a huge effort by a user, who delivered converted code for hydrus dev to finish off
a number of hacks and patches remain to compensate for old systems, which hydrus dev will slowly clean up in normal work. ui bug and layout issue reports would be greatly appreciated
shortcut storage had to be converted from fixed wx enums to an independant system. there is a small chance that one of your shortcuts, particularly if it is on the numpad, may have been converted wrong (unusual Enter/Return buttons may be hit here). if one is not working, please check what hydrus thinks it is and try re-entering it
added tentative support for 'Mode_switch' keyboard modifier, for X11 users (and perhaps some users' AltGr?)
autocomplete results can now float in a popup window in dialogs like manage tags! they'll still embed by default, but there are now separate float/embed options for 'main gui' and 'other frame' a/cs
autocomplete results can now float in linux and macOS ok!
page drag and drop now navigates as you drag, so dropping into a page of pages works by you hovering over it and then dropping in the tabbar below, inserting exactly where you want the page to be
a couple of text inputs in the program--the watcher and gallery search pages' text inputs, particularly--now use nicer 'placeholder' text, which isn't real and only shows as grey text when the input is empty
for now, moved to icons for thumbnail 'has audio/duration' indicators, rather than the custom labels
to run the hydrus client from source, qtpy is now needed. either pyside2 (default) or qtpy5 is needed. QtCharts is optional. wx and matplotlib are no longer needed
.
misc:
'archive/delete filter' now appears even when no file is focused. it also appears when no files are selected--and will apply to everything
the system predicate edit panels now support static buttons for easy one-click select for common predicates. duration, has audio, limit, and num tags now have these
system:duration and system:num tags now render a special label if they are >0 or =0
system:untagged is now removed from the normal list
fixed a critical cpu inefficiency in the file maintenance manager's new always-on maintenance, which was lagging several users' browsing sessions while it was working
fixed ctrl+mousewheel tag autocomplete results navigation to skip over multirow parent results
fixed an issue where resetting to default bandwidth rules for a network context would not update the ui properly
fixed a bug when adding a parent/sibling from autocomplete results list
the serialised png export folder now catches when a manually inputted export path's directory does not exist
reduced metadata update lag of pages with very large media collection groups
the inaccurate 'add tags based on filename' button is now called 'import with tags'
fixed a database UNIQUE issue when two duplicate gui session save calls happen within one second
the server's lock_off command now works with the Hydrus-Key header auth (rather than hanging indefinitely wew)
the server now caches hashed access keys in the session manager, in memory, to avoid a db hit on access-key based reauthentication, and in instances where this authentication requires a db hit, now cleanly provides an appropriate 'serverbusy' error
improved some media object memory management and speedy cleanup
improved boot fail graceful exit
removed a bunch of defunct flash (swf) hacks from media viewer code
bunch of misc non-qt cleanup as I went through the code
fixed a bug with rendering network credentials for human display
cleared out the ancient tag archive sync advanced help and added a stub for the new tag migration window
various help updates around wx->Qt
next week
This took a lot of work, more than I thought. I am really pleased, but also exhausted. I am going to take an easy week of fixing little layout issues and try to add system tray minimisation and css theming (which will eventually lead to 'proper' nightmode or any other theme users can work out). I'll also see if I can get the macOS release working better.
Once the Qt-issues rush has eased, I will return to the big tag work and Mr. Bones' normal schedule. I'll also test out adding an mpv video player into the media viewer, so we finally have proper video (and audio!) support.
In the longer term, I have probably a hundred Qt-cleanup jobs to catch up on. There are many behind-the-scenes hacks to get wx-specific code to talk to Qt, so I need to clean up that old bad code into something neater. I will spread this work out into my normal schedule.
0 notes
Text
Royalty Free Images Where To Get Copyright Free Images? Graphic Stock Tutorial
New Post has been published on https://bitcoinbetanews.com/royalty-free-images-where-to-get-copyright-free-images-graphic-stock-tutorial/
Royalty Free Images Where To Get Copyright Free Images? Graphic Stock Tutorial
Lots of you’ve gotten asked me where can you get Royalty Free photographs? And the place do I take the pix for my You Tube channel we will be able to gain knowledge of about Royalty Free pics on this video What are Royalty Free photos and what’s their use? I will also inform you about a web site from where that you would be able to get Royalty Free images howdy my identify is Aekta First let’s realize what are Royalty Free graphics Royalty Free graphics way snap shots for which you don’t must pay any royalty or costs but why is there a royalty for pix ? Let’s realize this higher If an artist makes a portray or an illustration … Then it’s a effect of their hard work. They copyright the painting or the sketch If anyone else wants to make use of the portray , the artist gets paid royalty or fees due to the copyright If a photographer clicks a image then they must additionally get a royalty for the mental property when you use that picture you may have to supply some royalty in a similar fashion in case you use copyrighted graphics in a You Tube video, you’re going to need to provide a royalty to the creator or the copyright owner How does one get royalty free photographs on which there is no copyright limitation? Is there any website online from which you can actually get royalty free portraits ? Photo stock is a site from where which you can get royalty free inventory images photograph inventory is a subscription provider where which you can down load over 300,000 pix, pix and vectors and you can use them for your YouTube channel, weblog or facebook web page without demanding about copyright problems which you could subscribe to photograph stock for 6 months for most effective USD 39 quite often the subscription rate for one month is USD forty nine so you can shop 87% in the event you subscribe now.The hyperlink is in the description So have I used image inventory photographs myself ? Yes – I on the whole use photo inventory images for my fb profile , cover snapshot, YouTube channel artwork and in videos Let’s use a photograph from graphic inventory to make a facebook profile p.C.Sort graphicstock.Com within the browser The graphic inventory internet site will open should you shouldn’t have an account with graphic inventory, which you could create a new account i have already created an account so i’ll search for an picture Please notice you might have alot of choices to be had here you can see graphics or illustrations or vectors here Or which you could style something you’re looking for directly within the search field i’ve already chosen an snapshot that i admire i’ll use this photo right here Let’s examine the specs of this image this is in a jpg format And its measurement is nearly 10MB that you may create a challenge folder here and add this snapshot or you could download the photograph to your pc i will down load the picture to my computer click on the down load button and keep the image The format and dimensions of the image are displayed right here The resolution of the photograph is also given The picture has been downloaded click on on it to open the snapshot here you will find my photograph i’ll use this snapshot to create a fb profile percentLet’s shut the image Let’s open a image editing software in our browser- PicMonkey Go to PicMonkey.Com and click on edit Let’s upload the picture that we just saved Let’s click on the picture to upload it Now it is asking us to verify the photograph atmosphere we can go away it as bubbles for now click on the retailer button Our chosen image is displayed right here in general we’d like a rectangular-shaped snapshot for a facebook profile %Click on resize The resolution for this photograph is rather excessive.That you can select to curb it in the event you desire i will exchange it to 800 x 800 The image has been resized now Now let’s import an snapshot here I wish to put the ‘Kya Kaise’ emblem here click on on Overlays click on practice Resize In overlays, click on on ‘Your own’ decide on a image from the pc that is my brand and i’ll minimize it in size to position it within the core right here The ‘Kya Kaise’ emblem is now on top of the original image Now that you would be able to download this to your pc as good click on the icon on top to mix all image factors The photograph now becomes a mixed picture which means the 2 one of a kind elements in the snapshot have now become one click on the retailer button choose the layout Let’s opt for the png layout click on on the ‘store to My computer’ button and shop the snapshot to your laptop The image has now been saved Let’s go to fb Let’s open the Kya Kaise facebook web page I have already got a profile image on this page Let me trade it click on update Profile picture and upload photograph Let me decide upon the photo that I recently downloaded from picture stock and edited using PicMonkey My facebook profile %has now transformed and i have uploaded the equal snapshot that I not too long ago downloaded from photo inventory and edited using PicMonkey you’ll discover various portraits on picture inventory and use them as per your option For example mother’s Day is coming in a couple of days So let’s make a greeting card for mom’s day from picture stock style mom’s Day in the search bar click on on mother’s Day card you can find plenty of mom’s Day playing cards here which you can view them one at a time at leisure i’ve already selected one card here that is my card and i wish to put up this card on facebook First let’s download the card you could have 2 choices for downloading the card the first alternative is EPS file and the 2nd alternative is JPG in case you are a sophisticated user and use a photograph modifying program corresponding to PhotoShop then you should use the EPS layout For now i will use the JPG structure right here The resolution is fine .Let’s down load the file click on on the down load button and save it to the folder The snapshot is saved Let’s go back to PicMonkey click on Edit and upload the cardboard i don’t want to make too many changes right here . However I want to add "From Kya Kaise" to the cardboard click on text A quantity of distinct fonts are to be had i’ll pick this font click on on add text Let’s sort "From Kya Kaise" Let’s core-align the text Let me minimize the font dimension pick the text and pick 48 font measurement forty eight is particularly small so i’ll alternate it to 96 the card now reads joyful mother’s Day from Kya Kaise that you may decide upon to offer it a drop shadow body as well i’ll provide it a museum matte finish so that its border will trade Now it’s watching like a appropriate greeting card Let’s mix all the photograph elements click on practice Museum Matte click on on save select the png structure and reserve it to the laptop however this decision is relatively excessive i’ll cut down it to 900 x 900 pixel The file dimension additionally turns into smaller Let’s diminish the resolution extra to 600 x 600 pixels and click on on shop to my laptop to save this card There are greater than 300,000 inventory pix which can be available right here and the price is simplest 39 USD for six months which I suppose, may be very affordable So that you can additionally take royalty free photos from photo stock and might use them in your videos or share them on social media This video has been sponsored through graphic stock These are just a few of our other trendy videos click on the monitor to study anything new Subscribe to our You Tube channel to get regular notifications about new videos which you can like our facebook web page follow us on Twitter and may get more knowledge on our website keep watching ‘Kya Kaise’ and preserve studying thank you
0 notes
Text
Royalty Free Images Where To Get Copyright Free Images? Graphic Stock Tutorial
New Post has been published on https://hititem.kr/royalty-free-images-where-to-get-copyright-free-images-graphic-stock-tutorial/
Royalty Free Images Where To Get Copyright Free Images? Graphic Stock Tutorial
Lots of you’ve gotten asked me where can you get Royalty Free photographs? And the place do I take the pix for my You Tube channel we will be able to gain knowledge of about Royalty Free pics on this video What are Royalty Free photos and what’s their use? I will also inform you about a web site from where that you would be able to get Royalty Free images howdy my identify is Aekta First let’s realize what are Royalty Free graphics Royalty Free graphics way snap shots for which you don’t must pay any royalty or costs but why is there a royalty for pix ? Let’s realize this higher If an artist makes a portray or an illustration … Then it’s a effect of their hard work. They copyright the painting or the sketch If anyone else wants to make use of the portray , the artist gets paid royalty or fees due to the copyright If a photographer clicks a image then they must additionally get a royalty for the mental property when you use that picture you may have to supply some royalty in a similar fashion in case you use copyrighted graphics in a You Tube video, you’re going to need to provide a royalty to the creator or the copyright owner How does one get royalty free photographs on which there is no copyright limitation? Is there any website online from which you can actually get royalty free portraits ? Photo stock is a site from where which you can get royalty free inventory images photograph inventory is a subscription provider where which you can down load over 300,000 pix, pix and vectors and you can use them for your YouTube channel, weblog or facebook web page without demanding about copyright problems which you could subscribe to photograph stock for 6 months for most effective USD 39 quite often the subscription rate for one month is USD forty nine so you can shop 87% in the event you subscribe now.The hyperlink is in the description So have I used image inventory photographs myself ? Yes – I on the whole use photo inventory images for my fb profile , cover snapshot, YouTube channel artwork and in videos Let’s use a photograph from graphic inventory to make a facebook profile p.C.Sort graphicstock.Com within the browser The graphic inventory internet site will open should you shouldn’t have an account with graphic inventory, which you could create a new account i have already created an account so i’ll search for an picture Please notice you might have alot of choices to be had here you can see graphics or illustrations or vectors here Or which you could style something you’re looking for directly within the search field i’ve already chosen an snapshot that i admire i’ll use this photo right here Let’s examine the specs of this image this is in a jpg format And its measurement is nearly 10MB that you may create a challenge folder here and add this snapshot or you could download the photograph to your pc i will down load the picture to my computer click on the down load button and keep the image The format and dimensions of the image are displayed right here The resolution of the photograph is also given The picture has been downloaded click on on it to open the snapshot here you will find my photograph i’ll use this snapshot to create a fb profile percentLet’s shut the image Let’s open a image editing software in our browser- PicMonkey Go to PicMonkey.Com and click on edit Let’s upload the picture that we just saved Let’s click on the picture to upload it Now it is asking us to verify the photograph atmosphere we can go away it as bubbles for now click on the retailer button Our chosen image is displayed right here in general we’d like a rectangular-shaped snapshot for a facebook profile %Click on resize The resolution for this photograph is rather excessive.That you can select to curb it in the event you desire i will exchange it to 800 x 800 The image has been resized now Now let’s import an snapshot here I wish to put the ‘Kya Kaise’ emblem here click on on Overlays click on practice Resize In overlays, click on on ‘Your own’ decide on a image from the pc that is my brand and i’ll minimize it in size to position it within the core right here The ‘Kya Kaise’ emblem is now on top of the original image Now that you would be able to download this to your pc as good click on the icon on top to mix all image factors The photograph now becomes a mixed picture which means the 2 one of a kind elements in the snapshot have now become one click on the retailer button choose the layout Let’s opt for the png layout click on on the ‘store to My computer’ button and shop the snapshot to your laptop The image has now been saved Let’s go to fb Let’s open the Kya Kaise facebook web page I have already got a profile image on this page Let me trade it click on update Profile picture and upload photograph Let me decide upon the photo that I recently downloaded from picture stock and edited using PicMonkey My facebook profile %has now transformed and i have uploaded the equal snapshot that I not too long ago downloaded from photo inventory and edited using PicMonkey you’ll discover various portraits on picture inventory and use them as per your option For example mother’s Day is coming in a couple of days So let’s make a greeting card for mom’s day from picture stock style mom’s Day in the search bar click on on mother’s Day card you can find plenty of mom’s Day playing cards here which you can view them one at a time at leisure i’ve already selected one card here that is my card and i wish to put up this card on facebook First let’s download the card you could have 2 choices for downloading the card the first alternative is EPS file and the 2nd alternative is JPG in case you are a sophisticated user and use a photograph modifying program corresponding to PhotoShop then you should use the EPS layout For now i will use the JPG structure right here The resolution is fine .Let’s down load the file click on on the down load button and save it to the folder The snapshot is saved Let’s go back to PicMonkey click on Edit and upload the cardboard i don’t want to make too many changes right here . However I want to add "From Kya Kaise" to the cardboard click on text A quantity of distinct fonts are to be had i’ll pick this font click on on add text Let’s sort "From Kya Kaise" Let’s core-align the text Let me minimize the font dimension pick the text and pick 48 font measurement forty eight is particularly small so i’ll alternate it to 96 the card now reads joyful mother’s Day from Kya Kaise that you may decide upon to offer it a drop shadow body as well i’ll provide it a museum matte finish so that its border will trade Now it’s watching like a appropriate greeting card Let’s mix all the photograph elements click on practice Museum Matte click on on save select the png structure and reserve it to the laptop however this decision is relatively excessive i’ll cut down it to 900 x 900 pixel The file dimension additionally turns into smaller Let’s diminish the resolution extra to 600 x 600 pixels and click on on shop to my laptop to save this card There are greater than 300,000 inventory pix which can be available right here and the price is simplest 39 USD for six months which I suppose, may be very affordable So that you can additionally take royalty free photos from photo stock and might use them in your videos or share them on social media This video has been sponsored through graphic stock These are just a few of our other trendy videos click on the monitor to study anything new Subscribe to our You Tube channel to get regular notifications about new videos which you can like our facebook web page follow us on Twitter and may get more knowledge on our website keep watching ‘Kya Kaise’ and preserve studying thank you
0 notes
Text
Create a PWA with Angular Service Workers in Ionic 4
I have written several articles on the topic of Progressive Web Applications (PWA) in Ionic before, including this one which provides a basic overview of the concept of PWAs and how to create one with Ionic. I would recommend reading that article if you need a little more background on what PWAs and service workers are.
The method that the tutorial I linked discusses for implementing a service worker to create a PWA in Ionic is no longer available in Ionic 4. Previously, Ionic/Angular applications included a service worker by default that you could simply uncomment to activate. This is not present in Ionic 4 applications, which I believe is because the recommended approach would be to use Angular Service Workers now.
Angular provides a package and command line tooling that makes it extremely easy to add PWA support to your Ionic/Angular applications with service workers, and it also provides additional features like auto-creating required icons for you. It also handles “cache busting” functionality by default, which we will discuss a little later.
In this tutorial, we are going to step through setting up an existing Ionic 4 applications as a PWA by using Angular Service Workers.
NOTE: Ionic 4 is currently in alpha and has not officially been released yet.
1. Add the Service Worker
Adding the service worker is as simple as running the following command in your existing Ionic 4 project:
ng add @angular/pwa --project app
The app at the end of this command is the name of your project as defined in the angular.json file. By default, this will be app but if your project has a different name make sure to change that here.
Once you run this command, you will see various files being created and updated:
Installed packages for tooling via npm. CREATE ngsw-config.json (392 bytes) CREATE src/assets/icons/icon-128x128.png (1253 bytes) CREATE src/assets/icons/icon-144x144.png (1394 bytes) CREATE src/assets/icons/icon-152x152.png (1427 bytes) CREATE src/assets/icons/icon-192x192.png (1790 bytes) CREATE src/assets/icons/icon-384x384.png (3557 bytes) CREATE src/assets/icons/icon-512x512.png (5008 bytes) CREATE src/assets/icons/icon-72x72.png (792 bytes) CREATE src/assets/icons/icon-96x96.png (958 bytes) CREATE src/manifest.json (1063 bytes) UPDATE angular.json (4093 bytes) UPDATE package.json (1760 bytes) UPDATE src/app/app.module.ts (993 bytes) UPDATE src/index.html (759 bytes)
The command automatically does the following for you:
Creates the configuration file for the service worker
Creates the various icons that are required for the home screen
Updates the angular.json file to enable service worker support
Updates the package.json file to include the @angular/pwa package
Imports the service worker functionality into the root module file
Adds the required meta tags to the index.html file
If you take a look at the ngsw-config.json file, you will see something like this:
{ "index": "/index.html", "assetGroups": [{ "name": "app", "installMode": "prefetch", "resources": { "files": [ "/favicon.ico", "/index.html", "/*.css", "/*.js" ] } }, { "name": "assets", "installMode": "lazy", "updateMode": "prefetch", "resources": { "files": [ "/assets/**" ] } }] }
This defines the behaviour of the service worker and includes all of the files that we want to be cached (which is what will enable the application to be accessed even while offline). All of the code we would need for a standard Ionic application is already being included here.
If you take a look at the app.module.ts file, you will see the following new import:
imports: [ ... ServiceWorkerModule.register('/ngsw-worker.js', { enabled: environment.production }) ],
This is what handles registering the service worker, and enables it for production builds.
2. Creating a Production Build
To create a production build of your Ionic PWA, you can just run the following command:
ionic build --prod
This will run the build process, and output the result to your www folder. The contents of this folder is your completed PWA (but remember, if you serve your application again or create another build the contents of this folder will be overwritten). You could upload these files to a web server somewhere, or perhaps you want to host these files with Firebase – it’s basically just a standard website (but cooler) at this point, and you can host the files in any way you would a normal website. The only difference is that the files do need to be hosted on a web server, you can’t serve these files over the filesystem (i.e. just by opening up the index.html file in your browser).
A good way to test these builds is to use a utility like serve. This is kind of the same concept as ionic serve except that it lets you create a local web server to serve the contents of any directory on your computer. If you have this installed, you can then just navigate to the www folder of your project:
cd www
and then serve the contents of that folder:
serve -p 8080
You could then go to:
http://localhost:8080
In your browser to view your PWA. You can also easily test offline behaviour by going to the Network tab in the debugging tools and checking the Offline box to simulate an offline state. If you refresh the application, you would see something like this:
You can see that all of the requests are being fulfilled by the service worker (the size column says “from service worker”). Your content will be served from the service worker even when you are online which can greatly improve loading speeds, but this is also what allows the application to continue to function even when offline.
3. Updating the Application
One of the tricky aspects of serving cached content from service workers is handling updates to the application. If the content had not changed then we want it served from the service worker, but if the content has changed then we would want to pull in those updates from the network.
Fortunately, Angular handles this for us. Whenever the application is loaded it will check for changes to the app by inspecting the ngsw.json file. If there are changes, then the new content will be downloaded and cached. The downside to this is that this happens after the application has loaded, and the user won’t see the new content until they refresh the application. This may not even be a problem, but if it is, you can listen for updates using the SwUpdate service and prompt the user to refresh the application when an update is found.
Summary
Although I have done quite a bit of explaining in this article, setting up a service worker this way is pretty much as easy as running:
ng add @angular/pwa --project app
and then creating a production build:
ionic build --prod
The default behaviour we get is also an improvement over what we have had in previous versions of Ionic.
What to watch next...
VIDEO
via joshmorony – Build Mobile Apps with HTML5 https://ift.tt/2kvjY6l
0 notes
Text
Royalty Free Images Where To Get Copyright Free Images? Graphic Stock Tutorial
New Post has been published on https://hititem.kr/royalty-free-images-where-to-get-copyright-free-images-graphic-stock-tutorial/
Royalty Free Images Where To Get Copyright Free Images? Graphic Stock Tutorial
Lots of you’ve gotten asked me where can you get Royalty Free photographs? And the place do I take the pix for my You Tube channel we will be able to gain knowledge of about Royalty Free pics on this video What are Royalty Free photos and what’s their use? I will also inform you about a web site from where that you would be able to get Royalty Free images howdy my identify is Aekta First let’s realize what are Royalty Free graphics Royalty Free graphics way snap shots for which you don’t must pay any royalty or costs but why is there a royalty for pix ? Let’s realize this higher If an artist makes a portray or an illustration … Then it’s a effect of their hard work. They copyright the painting or the sketch If anyone else wants to make use of the portray , the artist gets paid royalty or fees due to the copyright If a photographer clicks a image then they must additionally get a royalty for the mental property when you use that picture you may have to supply some royalty in a similar fashion in case you use copyrighted graphics in a You Tube video, you’re going to need to provide a royalty to the creator or the copyright owner How does one get royalty free photographs on which there is no copyright limitation? Is there any website online from which you can actually get royalty free portraits ? Photo stock is a site from where which you can get royalty free inventory images photograph inventory is a subscription provider where which you can down load over 300,000 pix, pix and vectors and you can use them for your YouTube channel, weblog or facebook web page without demanding about copyright problems which you could subscribe to photograph stock for 6 months for most effective USD 39 quite often the subscription rate for one month is USD forty nine so you can shop 87% in the event you subscribe now.The hyperlink is in the description So have I used image inventory photographs myself ? Yes – I on the whole use photo inventory images for my fb profile , cover snapshot, YouTube channel artwork and in videos Let’s use a photograph from graphic inventory to make a facebook profile p.C.Sort graphicstock.Com within the browser The graphic inventory internet site will open should you shouldn’t have an account with graphic inventory, which you could create a new account i have already created an account so i’ll search for an picture Please notice you might have alot of choices to be had here you can see graphics or illustrations or vectors here Or which you could style something you’re looking for directly within the search field i’ve already chosen an snapshot that i admire i’ll use this photo right here Let’s examine the specs of this image this is in a jpg format And its measurement is nearly 10MB that you may create a challenge folder here and add this snapshot or you could download the photograph to your pc i will down load the picture to my computer click on the down load button and keep the image The format and dimensions of the image are displayed right here The resolution of the photograph is also given The picture has been downloaded click on on it to open the snapshot here you will find my photograph i’ll use this snapshot to create a fb profile percentLet’s shut the image Let’s open a image editing software in our browser- PicMonkey Go to PicMonkey.Com and click on edit Let’s upload the picture that we just saved Let’s click on the picture to upload it Now it is asking us to verify the photograph atmosphere we can go away it as bubbles for now click on the retailer button Our chosen image is displayed right here in general we’d like a rectangular-shaped snapshot for a facebook profile %Click on resize The resolution for this photograph is rather excessive.That you can select to curb it in the event you desire i will exchange it to 800 x 800 The image has been resized now Now let’s import an snapshot here I wish to put the ‘Kya Kaise’ emblem here click on on Overlays click on practice Resize In overlays, click on on ‘Your own’ decide on a image from the pc that is my brand and i’ll minimize it in size to position it within the core right here The ‘Kya Kaise’ emblem is now on top of the original image Now that you would be able to download this to your pc as good click on the icon on top to mix all image factors The photograph now becomes a mixed picture which means the 2 one of a kind elements in the snapshot have now become one click on the retailer button choose the layout Let’s opt for the png layout click on on the ‘store to My computer’ button and shop the snapshot to your laptop The image has now been saved Let’s go to fb Let’s open the Kya Kaise facebook web page I have already got a profile image on this page Let me trade it click on update Profile picture and upload photograph Let me decide upon the photo that I recently downloaded from picture stock and edited using PicMonkey My facebook profile %has now transformed and i have uploaded the equal snapshot that I not too long ago downloaded from photo inventory and edited using PicMonkey you’ll discover various portraits on picture inventory and use them as per your option For example mother’s Day is coming in a couple of days So let’s make a greeting card for mom’s day from picture stock style mom’s Day in the search bar click on on mother’s Day card you can find plenty of mom’s Day playing cards here which you can view them one at a time at leisure i’ve already selected one card here that is my card and i wish to put up this card on facebook First let’s download the card you could have 2 choices for downloading the card the first alternative is EPS file and the 2nd alternative is JPG in case you are a sophisticated user and use a photograph modifying program corresponding to PhotoShop then you should use the EPS layout For now i will use the JPG structure right here The resolution is fine .Let’s down load the file click on on the down load button and save it to the folder The snapshot is saved Let’s go back to PicMonkey click on Edit and upload the cardboard i don’t want to make too many changes right here . However I want to add "From Kya Kaise" to the cardboard click on text A quantity of distinct fonts are to be had i’ll pick this font click on on add text Let’s sort "From Kya Kaise" Let’s core-align the text Let me minimize the font dimension pick the text and pick 48 font measurement forty eight is particularly small so i’ll alternate it to 96 the card now reads joyful mother’s Day from Kya Kaise that you may decide upon to offer it a drop shadow body as well i’ll provide it a museum matte finish so that its border will trade Now it’s watching like a appropriate greeting card Let’s mix all the photograph elements click on practice Museum Matte click on on save select the png structure and reserve it to the laptop however this decision is relatively excessive i’ll cut down it to 900 x 900 pixel The file dimension additionally turns into smaller Let’s diminish the resolution extra to 600 x 600 pixels and click on on shop to my laptop to save this card There are greater than 300,000 inventory pix which can be available right here and the price is simplest 39 USD for six months which I suppose, may be very affordable So that you can additionally take royalty free photos from photo stock and might use them in your videos or share them on social media This video has been sponsored through graphic stock These are just a few of our other trendy videos click on the monitor to study anything new Subscribe to our You Tube channel to get regular notifications about new videos which you can like our facebook web page follow us on Twitter and may get more knowledge on our website keep watching ‘Kya Kaise’ and preserve studying thank you
0 notes
Text
Royalty Free Images Where To Get Copyright Free Images? Graphic Stock Tutorial
New Post has been published on https://bitcoinbetanews.com/royalty-free-images-where-to-get-copyright-free-images-graphic-stock-tutorial/
Royalty Free Images Where To Get Copyright Free Images? Graphic Stock Tutorial
Lots of you’ve gotten asked me where can you get Royalty Free photographs? And the place do I take the pix for my You Tube channel we will be able to gain knowledge of about Royalty Free pics on this video What are Royalty Free photos and what’s their use? I will also inform you about a web site from where that you would be able to get Royalty Free images howdy my identify is Aekta First let’s realize what are Royalty Free graphics Royalty Free graphics way snap shots for which you don’t must pay any royalty or costs but why is there a royalty for pix ? Let’s realize this higher If an artist makes a portray or an illustration … Then it’s a effect of their hard work. They copyright the painting or the sketch If anyone else wants to make use of the portray , the artist gets paid royalty or fees due to the copyright If a photographer clicks a image then they must additionally get a royalty for the mental property when you use that picture you may have to supply some royalty in a similar fashion in case you use copyrighted graphics in a You Tube video, you’re going to need to provide a royalty to the creator or the copyright owner How does one get royalty free photographs on which there is no copyright limitation? Is there any website online from which you can actually get royalty free portraits ? Photo stock is a site from where which you can get royalty free inventory images photograph inventory is a subscription provider where which you can down load over 300,000 pix, pix and vectors and you can use them for your YouTube channel, weblog or facebook web page without demanding about copyright problems which you could subscribe to photograph stock for 6 months for most effective USD 39 quite often the subscription rate for one month is USD forty nine so you can shop 87% in the event you subscribe now.The hyperlink is in the description So have I used image inventory photographs myself ? Yes – I on the whole use photo inventory images for my fb profile , cover snapshot, YouTube channel artwork and in videos Let’s use a photograph from graphic inventory to make a facebook profile p.C.Sort graphicstock.Com within the browser The graphic inventory internet site will open should you shouldn’t have an account with graphic inventory, which you could create a new account i have already created an account so i’ll search for an picture Please notice you might have alot of choices to be had here you can see graphics or illustrations or vectors here Or which you could style something you’re looking for directly within the search field i’ve already chosen an snapshot that i admire i’ll use this photo right here Let’s examine the specs of this image this is in a jpg format And its measurement is nearly 10MB that you may create a challenge folder here and add this snapshot or you could download the photograph to your pc i will down load the picture to my computer click on the down load button and keep the image The format and dimensions of the image are displayed right here The resolution of the photograph is also given The picture has been downloaded click on on it to open the snapshot here you will find my photograph i’ll use this snapshot to create a fb profile percentLet’s shut the image Let’s open a image editing software in our browser- PicMonkey Go to PicMonkey.Com and click on edit Let’s upload the picture that we just saved Let’s click on the picture to upload it Now it is asking us to verify the photograph atmosphere we can go away it as bubbles for now click on the retailer button Our chosen image is displayed right here in general we’d like a rectangular-shaped snapshot for a facebook profile %Click on resize The resolution for this photograph is rather excessive.That you can select to curb it in the event you desire i will exchange it to 800 x 800 The image has been resized now Now let’s import an snapshot here I wish to put the ‘Kya Kaise’ emblem here click on on Overlays click on practice Resize In overlays, click on on ‘Your own’ decide on a image from the pc that is my brand and i’ll minimize it in size to position it within the core right here The ‘Kya Kaise’ emblem is now on top of the original image Now that you would be able to download this to your pc as good click on the icon on top to mix all image factors The photograph now becomes a mixed picture which means the 2 one of a kind elements in the snapshot have now become one click on the retailer button choose the layout Let’s opt for the png layout click on on the ‘store to My computer’ button and shop the snapshot to your laptop The image has now been saved Let’s go to fb Let’s open the Kya Kaise facebook web page I have already got a profile image on this page Let me trade it click on update Profile picture and upload photograph Let me decide upon the photo that I recently downloaded from picture stock and edited using PicMonkey My facebook profile %has now transformed and i have uploaded the equal snapshot that I not too long ago downloaded from photo inventory and edited using PicMonkey you’ll discover various portraits on picture inventory and use them as per your option For example mother’s Day is coming in a couple of days So let’s make a greeting card for mom’s day from picture stock style mom’s Day in the search bar click on on mother’s Day card you can find plenty of mom’s Day playing cards here which you can view them one at a time at leisure i’ve already selected one card here that is my card and i wish to put up this card on facebook First let’s download the card you could have 2 choices for downloading the card the first alternative is EPS file and the 2nd alternative is JPG in case you are a sophisticated user and use a photograph modifying program corresponding to PhotoShop then you should use the EPS layout For now i will use the JPG structure right here The resolution is fine .Let’s down load the file click on on the down load button and save it to the folder The snapshot is saved Let’s go back to PicMonkey click on Edit and upload the cardboard i don’t want to make too many changes right here . However I want to add "From Kya Kaise" to the cardboard click on text A quantity of distinct fonts are to be had i’ll pick this font click on on add text Let’s sort "From Kya Kaise" Let’s core-align the text Let me minimize the font dimension pick the text and pick 48 font measurement forty eight is particularly small so i’ll alternate it to 96 the card now reads joyful mother’s Day from Kya Kaise that you may decide upon to offer it a drop shadow body as well i’ll provide it a museum matte finish so that its border will trade Now it’s watching like a appropriate greeting card Let’s mix all the photograph elements click on practice Museum Matte click on on save select the png structure and reserve it to the laptop however this decision is relatively excessive i’ll cut down it to 900 x 900 pixel The file dimension additionally turns into smaller Let’s diminish the resolution extra to 600 x 600 pixels and click on on shop to my laptop to save this card There are greater than 300,000 inventory pix which can be available right here and the price is simplest 39 USD for six months which I suppose, may be very affordable So that you can additionally take royalty free photos from photo stock and might use them in your videos or share them on social media This video has been sponsored through graphic stock These are just a few of our other trendy videos click on the monitor to study anything new Subscribe to our You Tube channel to get regular notifications about new videos which you can like our facebook web page follow us on Twitter and may get more knowledge on our website keep watching ‘Kya Kaise’ and preserve studying thank you
0 notes
Text
Version 346
youtube
windows
zip
exe
os x
app
linux
tar.gz
source
tar.gz
I had a great week. There's a bunch of fixes and thumbnail improvements, a more powerful manage urls dialog, and a prototype OR search to try out.
thumbnails
Last week's big thumbnail change seems to have gone fairly well overall. There do not seem to be any huge errors anywhere, and the simpler file system and code is great, but I was annoyed by how slow certain regeneration scenarios turned out to be, and how some thumbnail resizes were a bit blurry.
To address this, this week I have cleaned and improved a bunch of thumbnail loading code. It was much nicer to do now I only have one thumbnail file to juggle. Thumbnails should now be a less blurry when they scale up, and they should generally load a bit faster whenever a lot of regenerations need to be done (you should notice CPU-expensive video thumbs load last of all, while easy ones like pdfs and pictures should come in first).
I was also annoyed that even small changes in desired thumbnail size would force a complete regen, which was particularly laggy when scaling up. So, to smooth out the loading time when you have recently changed the desired thumbnail resolution, I have added an experimental regeneration throttle. When the difference between what is available and what is desired is just a few pixels (and so a scale will not be too fuzzy), rather than regenerating from source, the client will now mostly just scale up or down what it already has. When the difference is great, it is more worth spending the CPU on a full regeneration to get a clear thumbnail, so it will regenerate more often. It still eventually regenerates everything, but when the difference is slight, the real workload will be spread over several loads. For some example numbers, if the thumb on your disk is 120x120 and your options want 125x125, the client will expensively regenerate from source only about 29% of the time and scale up the original 120x120 about 71% of the time. But 120x120 vs a desired 250x250 will regenerate/rescale about 84%/12% of the time. This is a big experiment, but I am generally pleased with it: it does speed up thumbnail load in many situations that were previously needlessly slow, and the relative fuzziness is generally not a noticeable problem. I hacked the percentage ratios out of some statistical polling that I can definitely tune in future, so please let me know if your situation produces too many very fuzzy thumbs.
Also, if you are in 'advanced mode', the thumbnail right-click menu now has more 'regenerate' options: as well as doing a complete file reparse and thumb regen, you can now choose to just regenerate thumbnails or only regenerate thumbs if their size is wrong. If you are an advanced user, please feel free to play with these new commands, particularly if you notice fuzzy thumbs from the throttle above, and let me know how it goes.
I expect to do more work on thumbs in the coming weeks. As well as tuning the new regeneration throttle, I would like to expand the new database-level thumbnail regeneration modes to work during maintenance time. I have long planned a 'file reparse' db maintenance mode so I can finally fix all the ancient mistaken animation frame counts and mime mismatches like apngs/pngs and mkvs/webms, and now this same maintenance command can also just do thumbs, I would love to let users say 'please regen all thumbs that are the wrong size in the background during idle time, no more than 20mins/day'. There's no reason why this stuff should be only on command for advanced users, so now I need to build the maintenance structure for it.
I'd also like to extend the current thumbnail location override under migrate database to work just like the files, so you can balance thumbnails over multiple weighted locations.
Linux and OS X users: You may not have received an error, but it is decently likely that last week's 'rxx' folder delete did not work for you. This was due to a permissions-setting mistake on my end. I have fixed this permissions code, and on this 346 update, if you still have some rxx folders in your db, the client will attempt to re-do the delete. If it wants to do this, it will give you another popup message as you update, informing you of the situation before it goes ahead.
or search
Several things came together this week, and I managed to get an early prototype of OR search working completely. I am keen to get users' thoughts on how to finish it off.
To start an OR search, hold down shift when you enter a tag in a search page. Rather than adding this tag to a search, it will now place it in a new box just above the input box. Further shift-enter actions will increase the OR 'chain', making 'tag A OR tag B OR tag c', and a final non-shift enter will cap the chain and send the OR search predicate up to the main search. It works! You can even add system predicates!
However, this entry method is not finished. Have a play with it and you will see what I mean. There is no neat way to cap off an OR chain early (i.e. without typing anything new: if you hit a bare enter on it, you'll get system:everything or system:inbox on the end), nor to 'go back one' if you put the wrong tag in. Also, system predicates that need additional panel infomation before 'going through' do not hold on to the shift status. Beyond the bugs, I am interested in what you would like for the workflow here--would you rather the OR-chain under creation be inserted as the top item in the list below, rather than in the new box above? Should it be highlighted as under construction somehow? Should it have a dangling OR while under construction, such as 'blue eyes OR green eyes OR' rather than 'blue eyes OR green eyes'? How should it be cancelled, or undone a step? What would be the best way to say 'ok, I have A OR B OR C entered, and I don't have a D to add, so I want to enter what I have now'?
the rest
I made two more stupid errors last week--one that draws white frames over animations on certain media update events, and one that occaisonally set the 'include current tags' value on search pages to 'false' on reloads. I have fixed both of these issues, and as a one-time for this update, all 'include current tags' values are forced back to true. I am sorry for the inconvenience here. The white frame stuff drove me nuts all week.
Beyond that, I extended the 'manage urls' dialog to support multiple thumbnail selections, which allows for easy mass-deletion of bad URLs. The URL list on this dialog also now supports multi-selection and accepts the delete key. It also supports adding URLs to multiple files, but when opened on multiple files it presents a little red-text warning to remind you that adding a URL to multiple files only makes sense for gallery URLs. I expect to do a little more work on this in future, cleaning the workflow a little more and detecting the url class of urls you attempt to add to multiple files, specifically testing what is and is not appropriate to add. In any case, like everything else this week, please give it ago and let me know how it works for you!
Also, the 'move files now' button on database->migrate database now lets you limit the max time it will run to 10/30/60 minutes! This is a nice stopgap if you, say, have 600,000 thumbnails to move and don't want to do it all at once.
full list
or search:
extended the search predicate object to handle more OR stuff
extended the tag list to handle list objects that have multiple colours
extended the new OR search predicate to report multiple text-snippet-and-colour pairs based on sub-predicates
extended tag search input to handle prototype OR predicate creation--hold shift when you enter the tag, and it'll start an OR chain. shift-enter continues the chain, enter alone completes it
fleshed out the predicate unit tests to cover more of this
wrote unit tests for OR search predicates. it seems good!
improved some search logic to apply system preds better in certain edge cases and spend less CPU on OR-search-only searches
.
thumbnails:
thumbnails will now queue for load in a more intelligent order based on estimated difficulty to regenerate, which will tend to put more thumbs on screen faster
the decision to regenerate a thumbnail from source is now tempered by how different the current thumbnail is from what is desired--the more similar the two sizes, the more (randomly) likely the client will decide to just use the current (resized) this time. this smooths out change-lag while limiting the number of really fuzzy thumbs you get. feedback on how this works IRL would be appreciated--it uses some voodoo distribution polling to figure it out, which I can definitely tweak
improved visual quality of thumbnail scale-up optimisations
fixed an issue where a multipage thumbnail grid would incorrectly recalculate the new virtual height after a thumbnail size change event, leading to a bit of invalid extra scrollspace (with noclip rendering errors) at the bottom
the thumbnail right-click menu's reparse files entry is now extended to a new 'regenerate' submenu with three options: reparse file and regen thumbs (the old action), force regen thumbs, and regen thumbs if wrong size!
the new 'regen if thumbs wrong size' action sends how many thumbs needed resize up to the popup window, as well
moved some old thumbnail regen code responsibility out of the db and into the files manager
cleaned out some old redundant file/thumbnail code
cleaned and refactored a bunch of general image handling and resizing code
.
the rest:
fixed some bad serialisation code that was making file search objects set their 'include current tags' value to false/true on interleaving loads. on this update, all 'include current tags' values are blanket reset to true
fixed an issue that was drawing animation canvases pure white on various media update events
extended manage urls dialog to support multiple files when launched from a selection of thumbnails. there is a warning in this case, noting that only gallery-style urls are appropriate to be added to multiple files
manage urls dialog now supports multiple selections, including shift-select, and accepts delete key presses for easy mass deletion
when you ask the database migration dialog to move some files, it now pops up a confirmation dialog that also asks if you would like to limit the max time for the job as 10, 30, or 60 minutes
improved file permission setting code across the program to be more sensible for non-Windows
if you are a non-Windows user and were hit with directory permission problems last week on the thumbnail update--which resulted in the rxx directories not being deleted--the update this week will attempt to do the delete again, this time correcting the now missing execute permission bit. if it finds outstanding rxx directories to delete, it will give a popup beforehand summarising the situation and giving you a chance to bail out
fixed yet another problem that was stopping client api url requests from finding the correct page by name
when a client api url request includes fixed tags, these tags should now propagate in all scenarios where the single url produces multiple files
updated sqlite dll and console for windows
misc fixes and cleanup
next week
Next week is a 'cleanup' week. I'll keep chipping away at the listctrl rewrite and other boring jobs, and I'll see if I can finish up the OR search entry workflow in a sane way.
Thanks everyone!
0 notes