#I DO want to experiment with an alt texture/UV that has like my face and pawpads as a decal
Explore tagged Tumblr posts
Visit Tumblr Blog
Explore Tumblr blogs with no restrictions, modern design and the best experience.
Last Seen Tumblr Blogs


Fun Fact
Tumblr was named as a finalist in Lead411’s New York City Hot 125 in Aug 2010.
Text
I have gotten really good at, specifically, this!
I can’t wait to get the script all updated and everything working so other people can use my project. The ultimate flex is being so good at something you make other people better at it also.
#anytaur#I’m SO smart and SO talented yay#Yay for me! Yay <3#Maybe when it’s all finished I can finally rest. Well no then I optimize my personal#I won’t give up until I’m an FBT Excellent taur in the club taking up like 1MB texture memory#ok I probably can’t get it to a mb. But#I DO want to experiment with an alt texture/UV that has like my face and pawpads as a decal#and the rest gradient tiny tiiiiny texture#I might need to learn enough about shaders to put detail normals on a directional map myself—#Other shaders have in-Unity grooming tools that allow you to paint your own directional map right. Well#I can paint my own directional map#and then figure out how to apply it to detail normals#and THEN I think I can pack a whole lot of punch into less than say 10MB texture memory
5 notes
·
View notes
Text
IV. The most useful meshing tools in Blender
(Previous: IIIb. Method II: The sneaky way)
Only in my own, very subjective opinion, of course. I bet many other creators would disagree with me on this selection, but those are the tools I use almost every time when I mesh something new.
This part is going to look a bit different that the previous ones: it won't be a step-by-step guide, but rather a short explanation of different options (some of which I already partially covered) and their possible usefulness, so that you could just implement whichever you want in your own projects.
1. Snap to symmetry
You can find this option in that dropdown (dropup?) menu hidden under the 'Mesh' button, in the bottom bar. It does just what it says on the tin: if a vertex on the left side on your mesh has it's exact equivalent on the right side (so, let's say, vertex A has x = 20, and vertex B has x = -20, and y and z are the same), Blender will recognise them as mirrored.
Make sure to use this option only on parts which really are symetrical! Otherwise you might end up with some of your vertices being symmetrised and others not, and then it'll all become a hot mess. So, in case of our dress, you shouldn't use it on the skirt, but it's perfectly safe to use it on the upper body parts, which are, by default, completely symmetrical – even if Blender doesn't necessarily know it yet. Of course, that applies only if you used the same top as me – I can't speak for others!
2. X mirror
A follow-up to the whole symmetrising process. You can find that option in the toolbar on the left (T), in the 'Options' tab. Just tick it. And now select any vertex of your symmetrised top and move it wildly around. You'll notice that the same happens on the other side of the mesh as well.
3. Proportional editing
I know, I know, we've already used it so many times...! But proportional editing is pure magic and I think it deserves another mention. Depending on the falloff type, you can use it to quickly create a variety of different shapes. Just as a reminder: you turn it on by pressing either O (for all vertices) or alt+O (only for connected vertices) and then select the falloff type in that bottom bar. By default it's set to 'Smooth', which is probably the most universal option. You can make a bigger or smaller area affected by your edits by moving the mouse scroll – by default it's set to VERY big, so probably your whole mesh will be moving. Don't panic and just scroll until you see a white circle – that's exactly the 'affected area'.

Why mention it now? Because combined with the 2 previous tools it's a perfect way to make those 1890s puffs! Let's take a look at it, shall we?
===============================
Practical Application Corner
I think by now I can admit it: the dress I'm trying to make here with you is this 1897 wedding dress:
As you can see, the dress has some shoulder-puffs: moderate in volume and rather roundish, so they shouldn't be hard to make. I already symmetrised the mesh, turned on the x mirror and proportional editing. I'll just change the falloff type to 'Sphere' and I'm ready to go.
Now I'll simply select a vertex on one of the shoulders and move it up. It's probably the best to do it while looking at the mesh from the front (num 1) - that'll make it easier to see what's going on.
Doesn't look bad, but I'm aware that the puff is still very 2D. You can see it very well if you switch to top view (num 7). To solve this problem, I'll select two vertices this time, one on the front of the puff and another on the back, and scale them – still with all the same options. Much better!

If you want to, you can spend some more time fine tuning your puff. Depending on how much you enlarged it, you might also want to select both puffs, turn triangles into quads (alt+j), then subdivide it smooth (W, select from the dropdown menu) and change to tris again (ctrl+t). However, it might be quite difficult to just 'select your puff' now, so maybe wait with it till the next part, where I'll talk about uv maps...? That'd make stuff a lot easier.
===============================
4. Dissolving
That's a very simple and very useful tool, which lets you just dissolve – but not delete – vertices, edges or faces. What it means practically is that if you use it instead of deleting, you won't get a hole in your mesh. Lets say you subdivided your puffs, triangulated them again and discovered some weird lines here and there...
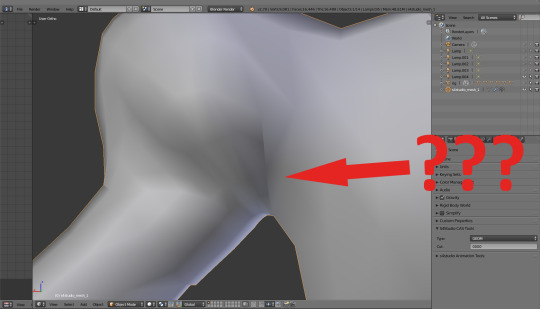
When you switch to edit mode, you immediately see that it's because some of your new vertices aren't proprely connected. At the same time you see that if you let Blender do it automatically, you'll be left with very unpleasant, narrow triangles. It'd be better to get rid of those diagonal lines which I marked in red.
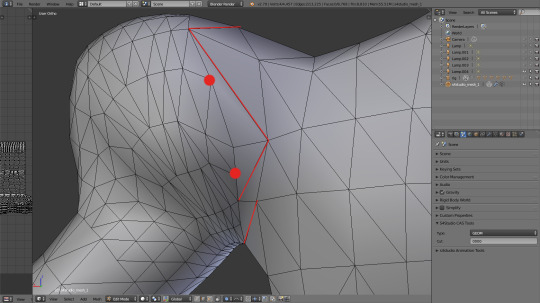
And how do you do it? Very simply: select them and either press x (or delete) and select 'dissolve edges' from the dropdown menu, or – while in edge select mode - simply press ctrl+x.
And how do you change them into sensible triangles? Well, you either triangulate them automatically (ctrl+t), hoping that Blender will be reasonable... Or you can use another simple yet super useful tool.
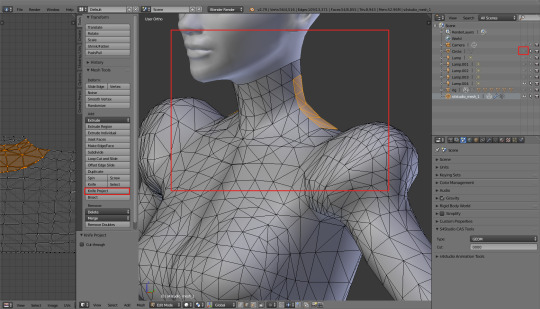
5. Knife
You activate it by pressing k. It's just what it sounds like: a tool which lets you cut your mesh in any way you want. You can use it to manually cut proper triangles (which I'm going to do right now), but also for a variety of other things. Cool feature: it gently snaps to existing vertices, so if you want to connect vertex A and vertex B, you can do it without much struggle. Press enter when you're done.
But why would you want to use it for anything else than correcting triangles? Why would you cut some random shapes in your mesh? Well, because then you could use another cool tool.
6. Extruding
The principle is very simple. You select any vertices, edges or faces you want and then press e – and suddenly new vertices, edges or faces appear. You can freely move them around, or – which is almost always a better idea – right after that 'e' you can press s to scale them, or x/y/z, to limit the movement to only one axis. You used it while making the skirt and way earlier, when you were meshing a cup. But extruding isn't limited only to this; it's also a perfect way to make 3D collars, belts, cuffs, trims, random deco – almost anything, actually.
7. Flip direction
An interesting peculiarity of Blender meshes – no idea how other software deals with it – is that meshes have only one side. In other words, if you extrude something from your main mesh – let's say, I don't know... Wings? - they will be visible from side A, but if you look from the opposite side, it'll be as if they weren't there at all. Perfectly invisible. That's why in case of such parts you have to duplicate them and then flip direction of that copy, to get the texture on both sides.
Select the part you want to duplicate. Chances are the texture is not even all on one side; in such case press ctrl+n or open the left bar (T) and, in the Shading/UV tab, choose 'Recalculate'. Now press shift+d to duplicate, press enter immediately, and from the same tab select 'Flip Direction'. Your mesh should be double-sided now.
===============================
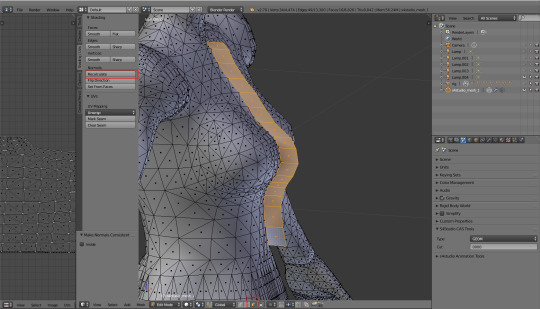
Practical Application Corner
I want to make that weirdly shaped deco piece my dress is supposed to have on the front. I dissolved some edges and recut them, to get a pretty smooth curve, and now I'm going to extrude it. Whoops, I almost forgot to turn off the X mirror!
So I press e and, immediately afterwards, y, to extrude that part to the front.
As expected, the extruded part became a mess. I'll switch to face select, select all the faces and then hit 'Recalculate'.
And here comes the surprise: I won't duplicate it and flip direction immediately. First I'd like to adjust it, so that it sits perfectly; some subdividing, some proportional editing, moving vertices around to get a natural, smooth look. Creating the other side is usually the very last thing I do, just before taking in-game screenshots and posting my CC. Single vertices are easier to deal with, and every piece requires tons of corrections and small adjustments, long after you first think it's already done.
In any case, in some distant future, when I'm sure that this... Frill? What even is this? ...works properly, I'll select those faces again, press shift+d, enter, and then flip direction. Let's just see how it'd look now...
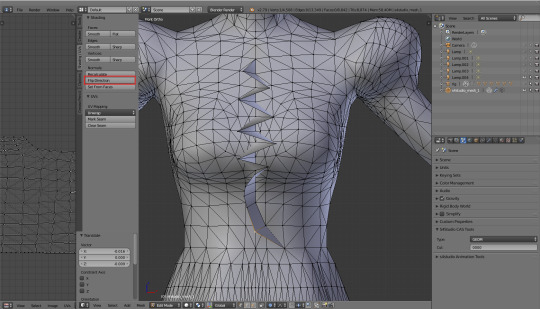
The frill is double-sided. Victory!
===============================
8. Knife project
My absolute favourite tool ever, which I use in almost every second mesh. Similar to knife, but way more sophisticated. It lets you project a shape of one object on another one, cutting it into the mesh. Let me explain...
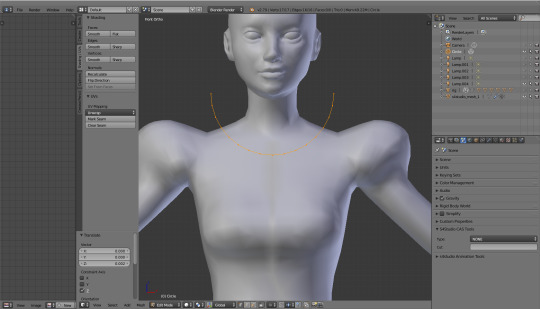
So, let's say your dress is supposed to have a round collar. You could dissolve some edges, make new ones and move already existing vertices, hoping to get that perfect, round shape – but for reasons which we'll discuss next time (uv-1) I would advise against it. So what's the alternative?
Go into object mode and create a new circle (shift+a). Move it around, rotate it, scale it etc. - do whatever you have to to position it exactly in the place where you want your mesh to be cut. Watch out: your viewpoint matters! Knife project is cool, but a bit dumb and will just cut through the first layer it sees on its way. From my experience, it's the best to make two cuts: one exactly from the front, the other from the back. So press num 1 and put the circle (which you can also make into a half-circle btw, that might be easier) in the right place. Let's say we want it here...
Now, go back to object mode. Click the cut called 'Circle' and then, while holding shift, your mesh: s4studio_mesh_1. Go to edit mode. You'll see that you're back to your base mesh, but the red half-circle is still floating in the air right before it.
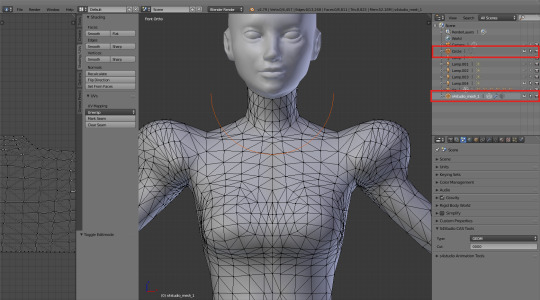
Open that sidebar on the left (T), go to the 'Tools' tab and click 'Knife Project'. Now, before you do anything, go to back view (ctrl+ num 1) and click 'Knife Project' again. Hide the circle by closing that little eye on the right (or just right-click it and choose ‘delete’, if you’re sure you won’t need it anymore) and admire your newly cut collar.
What about all the new vertices? There's so many of them, how to clean them? Again talking from my own experience: merging (alt+m) is safe only in case of vertices which are located very close to each other. Also, if you merge after using knife, always merge at center. However, the rule of the thumb is: it's always better to dissolve and cut new edges than move the existing vertices. Uv-1 can be nasty and trust me, you don't want to deal with it more than necessary. Be extra careful if you're merging or moving anything in the breast area! In there every tiniest mistake is immediately visible.
9. Edge split modifier
The last point on the list is not really a tool, but a modifier. Maybe you remember how Blender Guru was using something called 'Subdivision Surface Modifier' in his tutorial? The one we're going to use can be found in exactly the same place. Go to the little wrench on the right, click 'Add Modifier' and select 'Edge Split' from that menu.
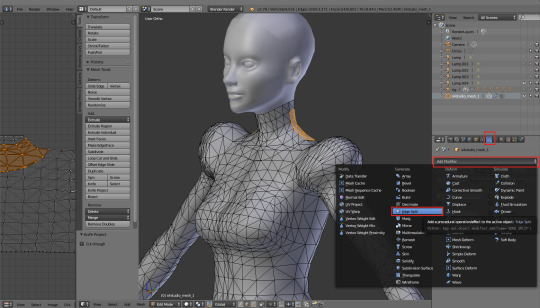
Untick the 'Edge Angle' option, leaving only 'Sharp Edges' selected.
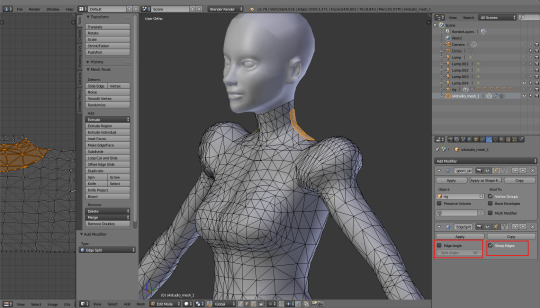
Why would you want your edges to be split in the first place? Because Blender by default smoothes any edges in your mesh. Normally it's a very welcome feature, but sometimes can be annoying. For example, if you 'close' your dress at the bottom – select the lowest row of vertices, extrude and scale them and then merge at center – the bottom edge of your dress will get slightly curved, creating an ugly, dark line:

There are two ways to fix it: either you select that lowest line, press ctrl+e and click 'Edge Split'... Or you choose, from the same list, 'Mark Sharp' and leave the actual splitting to the modifier. The immediate visual result will be the same; however, by only marking edges as sharp you don't actually split them yet, which makes it way easier in case of any future corrections. You don't have to remember to select each vertex twice, as they're not doubled. You can select all and remove doubles, and your edges still will stay marked as sharp. It's super useful and I wish I knew of its existence earlier – it would have saved me SO much work!
Just as a side note: obviously, those closing lines of skirts or sleeves aren't the only places you might want to mark as sharp. The same goes for anything that's layered, so e.g. edges between a shirt and a jacket, edges around a necktie, around a belt etc. If you're not sure what you should mark and what not, just take a close look at your mesh in solid shading. Any weird shadows visible? Mark the edges. The problem should disappear.
And you know what's the best? Even when you apply the modifier – e.g. because you want to be able to quickly select only a certain, separated part of your mesh (with L) – the edges still stay marked as sharp! So you can just do your corrections, select all and remove doubles, and then add the Edge split modifier again. It's so quick and simple.
By the way, you don't even have to click apply for the modifier to work. Even if it's left unapplied, S4S will still recognise it and import your mesh with all the sharp edges being split. Magic!
*** *** ***
I'm sorry it got so long, but I think I really managed to cover every important aspect of meshing. You know all my secrets now :P. Unfortunately, meshing is only a small part of CC making, so there are still many things we'll have to discuss – but hopefully it's somehow comforting to you that at least that part is over. I hope I helped you feel more confident in Blender and saved you some meshing struggles! I know for a fact that not knowing the majority of those things was the reason why meshing my first dress took me two months ;].
Let me know if anything isn't clear and stay tuned! We'll finally talk about uv maps next time.
(Next: V. Adding missing body parts / Frankenmeshing / Finishing touches)
472 notes
·
View notes
Text
VI c. UV_1
(Previous: Changing the texture displayed in Blender)
As mentioned before, the uv_1 map plays a very different role than uv_0: it tells the game where certain parts of your mesh are located, so that the whole thing could move with sliders. It seems many people struggle with it a lot – and to be honest, I have no idea why, as in my experience uv_1 has always been totally unproblematic. Hopefully you'll share my feelings on this!
Let's click once again the little triangle on the right ('Data') and choose 'uv_1' this time.
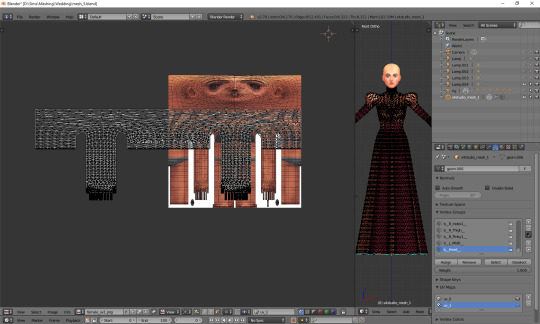
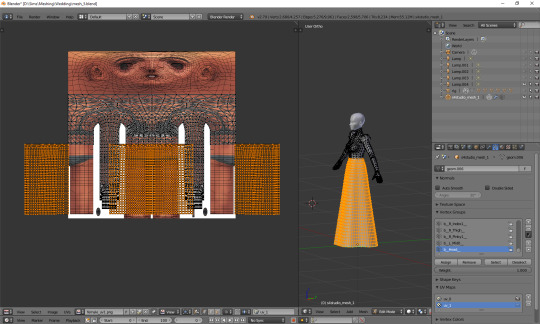
As you can see, the texture on the model turned very weird – and it'll stay this way, as that map is not meant for texturing. You can as well change to solid shading, if you find that craziness spooky or annoying.
If you switch to edit mode, you'll see that the map looks just as crazy:
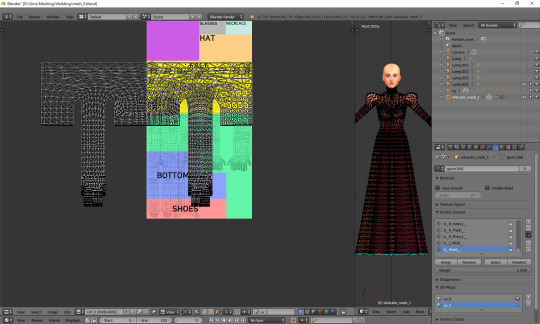
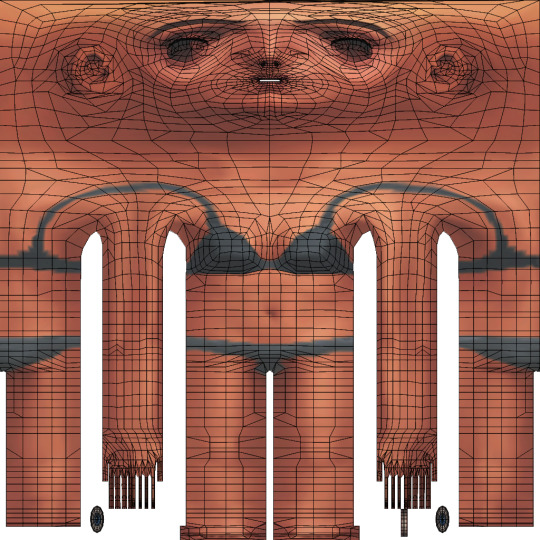
UV_1 uses a completely different type of template. It differs very slightly depending on age and gender of your sim; the adult female one looks like this:
You can download all the versions from S4S forum, in HERE (I highly suggest you make some kind of 'Basics' folder for all those things which you'll keep reusing!)
Once you have downloaded it, click 'Image' and then 'Open image'. It works exactly the same as in case of uv_0. Now it should look like this:
You can see that your vertices are twice wider than the template. I'm not sure why the template has been made in this way instead of getting adjusted to the TS4 requirements, but that's what we have to work with. Select all the vertices (a), press s, then x, then type 0.5 and press enter. Do not move your mouse! Your uv map should be twice narrower now:
We still have to move it, so that it'd align with the template. Select all again, this time press g, x and type 512. That's exactly the number of pixels you need to move your mesh to the right. Now it should finally look correct.
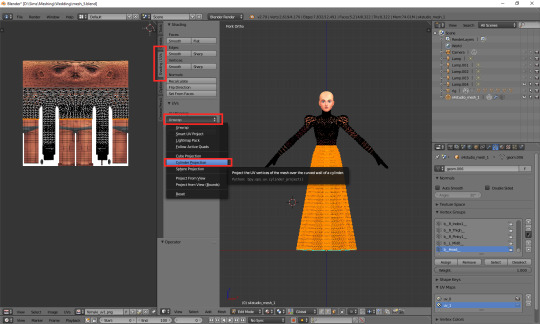
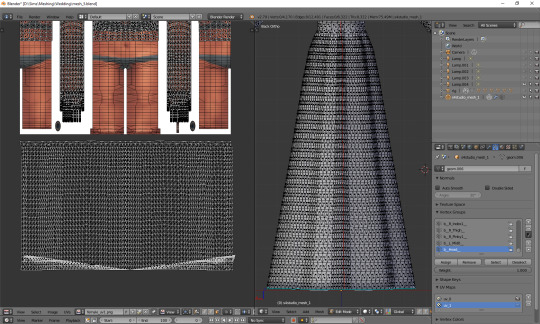
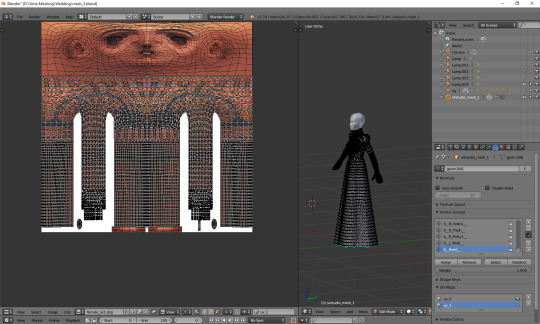
Just like in case of uv_0, the top part is completely done, so the only thing we have to do is unwrap the skirt. This time the only valid methods for doing it are no. 1 and 2 (see: VI a), namely moving the lines manually or using cylinder projection. As at this point making manual adjustments would be too cumbersome, we're going to use option no. 2.
Select the lowest line of vertices to select your whole skirt, go to front view this time (num 1) and choose cylinder projection.
Move the newly unwrapped faces up or down (g, y), to the black area, so that you could properly see them.
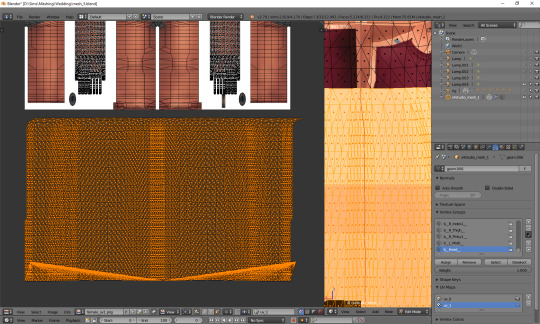
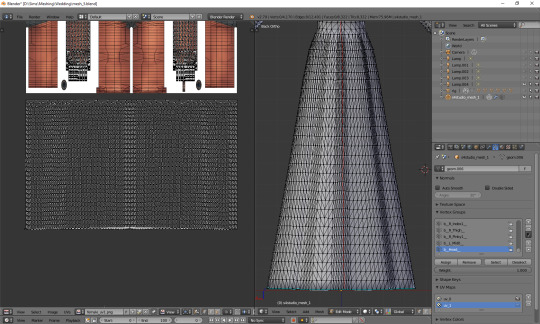
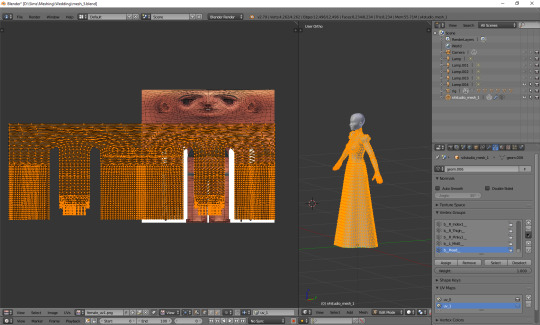
You can see that my dress got unwrapped a bit unevenly – there are small 'steps' on the sides. I highlighted all the faces which should form the left edge. Now I'll move the highlighted parts on the right to the left, and the non-highlighted parts on the left to the right, and then it should all look and work fine.
Tip: you can also move them precisely into the right place by typing g, x, 1024 (to move to the right) or g, x, -1024 (to move to the left)!
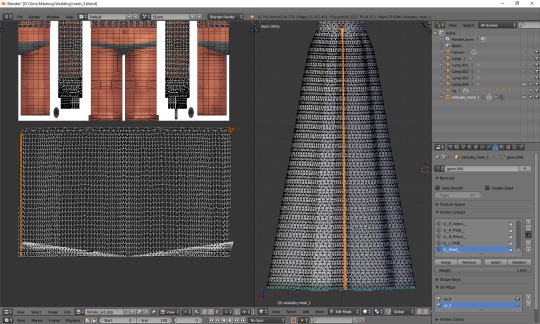
The weird part at the bottom is the closing circle; you can select the central vertex (which is here doubled on the sides), weld it and move it down, to more or less align it with the lowest row. Or simply wait with closing your dress until you're done with uv_1 ;). The bigger problem is that step my dress still has at the top. I'll select all the vertices below it and just very gently move them along the x axis to the left. Now, that looks better:
And now, just as we did before, we have to connect the skirt with the top. It's a bit trickier than in case of uv_0, because you can't do it in one piece: your mesh has to be split along the back and both sides. Take a look at the top mesh. Let's start from the left: click the rightmost face and then, in 3D view, the faces right underneath it. This will tell you where your skirt should be split.
I'll deselect the face of the top, select the whole part of the skirt left from the selection and then move it to the left (g, x), separating it from the central part.
That weird line at the bottom is the closing circle again – I'll delete it and redo it afterwards, it'll really be easier.
Repeat the same steps for the part on the right.
The edges of those three parts should be, if possible, straight. Mine aren't. To be able to adjust them, I'll select the edges and temporarily split them (ctrl + e, in 3D view). Select a vertex or two above as well, or the uppermost one won't get split!
(If you're having problems with selecting edges, it might be smart to select the whole skirt (not the top!) and change it back from tris to quads (alt + j). Then you can easily select edges by clicking them while holding alt).
Split also the top row of vertices, to separate the skirt from the top. Just for a second.
Now select a whole edge, press w and choose 'Align X'
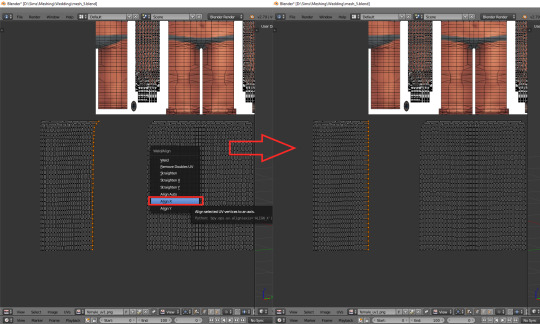
Repeat for the remaining edges. If you want to and feel that it's needed, you can also straighten other lines in your mesh.
Now it's finally the time to put it in the right place. Select the skirt and move it up (g, y).
One can immediately see that it's way too tall. Scale it along the y axis until it looks more reasonable. It should start at the lowest line of the top and end a bit above the feet. Nothing big will happen if it covers them, but it has to fit inside the picture!
And now just scale and move each of the 3 parts individually, along the x axis, to match them with the top.
The only thing left to do is to weld the vertices. It's unlucky that we separated the skirt from the top; now we have to select all, remove doubles and then once again split the side edges to be able to weld everything properly. Just like with uv_0: select a vertex, press w and choose 'weld' from the drop-down menu. Repeat for aaaaaall the vertices connecting the skirt with the top.
Sometimes the vertices can be quite far away from each other. Is it still safe to weld them? I'd say risk it. If you see some weird stuff happening in game when changing your sim's body type, you'll know you have to fine tune it: straighten some lines, make them more regular etc. However, chances are quite high that it won't matter at all.
Select all and remove doubles. Yes, again (I keep doing it all the time, that's probably why I love the edge split modifier so much).
And now a very important, final step that I usually forget about: you have to revert the moving and scaling changes you made at the very beginning. Select all and press g, x, -512 to move it back into position, and then s, x, 2, to make it twice wider again. Otherwise TS4 will get quite perplexed with your mesh (and so will you, seeing everything being weirdly deformed and moving with all the wrong sliders)!
As you see, it's not very difficult and once you get a grip of it, you can do it in no time. To be honest, 90% of the time I don't even do the whole scaling and moving thing; I just open the picture, to know where the feet are, and adjust the rest to the top. UV_1 is really not that bad, at least as long as you don't have to deal with the upper body half.
Here are just a couple of general, closing remarks which I'd like to share:
If you move any vertices of the top, immediately move them on the uv_1 map as well. I try to avoid it at all costs, but sometimes I can't resist making just one teeny tiny adjustment... Arms are usually not a problem, neck can get problematic, and breast area is an absolute nightmare. I already mentioned it once, but honestly, better dissolve vertices and cut new edges with the knife tool than move anything in there.
If you're frankenmeshing, remember to weld any vertices you merged in 3D view! If your mesh is getting split in game when you move any sliders, that probably means you didn't connect those parts on the uv_1 map (or that it's vertex paint... but that's another story).
Of course, if you added any other parts to your mesh than just a skirt – or if you frankenmeshed a thing, but changed its location, e.g. took a hair ribbon and put it on the skirt – you have to put it in the right place as well! In case of frankenmeshing you just have to change its location on the map; if you made it yourself, you'll have to experiment with different types of unwrapping first (pssst, projecting from view usually isn't a bad idea).
There are also certain cases - rarely, but still - when it might be a better idea not to properly unwrap a part of the mesh, but weld it all together to a little dot and put it in the right place on the uv_1. The first example which comes to my mind are 3D buttons. I always weld each button to a single dot, so that it’d be changing its size evenly, without deformations. However, this comes at a prize of an increased risk of clipping.
And finally: if you're having big problems with uv_1 and my method doesn't work for you – or if you made your mesh completely from scratch, so you don't have an unwrapped top – you can always make a data transfer, copying uv_1 data from another mesh. I won't elaborate on this one, because Teanmoon already explained it all in her amazing tutorial, which you can find HERE. Scroll down a bit until you see 'UV-1 Transfers'. I think I used it myself once or twice in the past and I was quite pleased with the results :).
***
Once again, I'm sorry both for how long you had to wait for this tutorial and for its final length. I swear I intended it to be a simple, concise explanation ^^. I hope that at least it's all clear and will help you avoid any problems with uvs. Please tell me if you have any questions or if something doesn't work for you – really, I mean it! Half of my inspiration for this tutorial comes from me watching other simmers struggle with making their first pieces of CC, as it helps me notice what hasn't been explained yet.
From now on we'll be moving into the dangerous territory of clones, cuts, regions, bones and weights, and I need some time to figure out how to divide this whole topic into sensible parts. It's not even that hard, but very interconnected, and that makes it difficult to tackle – as covering it all in one part is absolutely out of the question. Please have some patience with me and stay tuned!
52 notes
·
View notes