#How to download gimp for windows 10
Text
How to download gimp for windows 10

#How to download gimp for windows 10 software
#How to download gimp for windows 10 code
Though users don’t address technical support so often, there are situations when the answer to your question is simply not available in YouTube or forums, so you need to ask for help. This can be a simple adware virus, or a more dangerous one, which over time will “swallow” your system by blocking or deleting most of the necessary files. When you find free GIMP download link on an unofficial site, you must understand that every third torrent file is infected one way or another and is a threat to your PC. Your PC is 60% likely to get infected with viruses Having figured out that the developers officially grant the right to download their product for free, I still want to warn you about some consequences that may arise when downloading and installing the app from an unofficial resource. Why I Don’t Recommend Downloading GIMP from Unofficial Resources? You can find more details about this in my review. GIMP provides a little more than basic functions, and therefore is suitable for beginners and amateurs. Yes, if you are not a professional retoucher or photographer. Can I use GIMP free as the main program for image editing?.
#How to download gimp for windows 10 code
Yes, in accordance with the terms of the general public license of the copyright holder - this is completely legal, only if a seller gives you GIMP source code where the changes were made.
Is it legal to improve the source code and, after, sell the program on third-party sites?.
Though a photo editor GIMP is free, it doesn’t impose any restrictions on the type of work you can do in it.
Can I use GIMP for commercial purposes?.
Yes, this photo enhancer supports almost all file formats, including RAW, TIF, GIF, PNG and many others.
Professional tools for photo retouching.
#How to download gimp for windows 10 software
This photo editing software has an open source, which makes it completely free. GIMP is called the best free alternative to Adobe Photoshop, and you have probably heard about GIMP vs Photoshop competition. Download GIMP free and start using this image manipulation software on any platform you use: will it be Mac OS, Windows or Linux.
0 notes
Text
[sims 3 tutorial] how to make lazy previews of objects with TSRW & GIMP 2.0
bordered, borderless, and borderless with transparency
You can download this tutorial in .docx form here or read it under the cut -->

-->
P.S for all of these, i made the drop shadow invisible in the mesh tab before starting.
Standard borderless previews for objects without special effects

this circle option is the bump map

this option turns the background white, which we need
Take two pictures of your object, one with the bump map on, and one without.


use the 'magic wand' tool to select the black parts of the bump map version
'copy' the entire regular image, and 'paste' 'into selection in place' on the bump map version. copy while the selection is still active, and paste as a new image.

[black to show no background]

How to make a bordered preview of a standard object with no special effects
this option turns the background white, which we need
Take a picture of your object in TSRW at your desired angle.

Open this image in your desired photo editing program. I am using GIMP 2.0.
Use the magic wand tool at threshold level 1.0 to select the white part of the image. you may need to shift select more parts of the image if they are closed off like the area between the prongs.

go to 'select' and 'invert selection'
depending on the image, you may need to use the 'remove holes' tool.
in the 'select' tab 'grow' the selection to your desired thickness. i like anywhere from 5-10.
'copy' your image while the selection is active, and 'paste' as a new image.

All done!
How to make a borderless preview of an object with transperency…

i have this fruit parfait that has 3 groups [drop shadow, glass cup, and the parfait itself. these groups can be hidden in the mash tab by toggling 'true' or 'false'.
im gonna mark these true or false depending on what i want to take a picture of.
this circle option is the bump map
this option turns the background white, which we need
I need a photo of the parfait only, one regular, one with the bump map on. a photo of the glass only, one regular, one with the bump map on. I do this using "windowed mode" with the snipping tool so that my pictures are in the same location.


Open all of these images in your editing program of choice, however i am using GIMP 2.0 so things might be a bit different.
Open a new transparent image 1000x1000
'select' the black bump map image with the magic wand tool, until it is completely outlined

Then copy the entire regular version and 'paste' into 'selection' 'in place'
copy this while the selection is active and paste it in place to your transparent image.
Now for the transparent part, do what we just did and paste it as a new layer on the transparent image. erase parts of the image that do not appear, for me i erased the top part since its actually behind the parfait.


Much better. now lower the opacity and merge this layer with the one below it

All done!
66 notes
·
View notes
Text
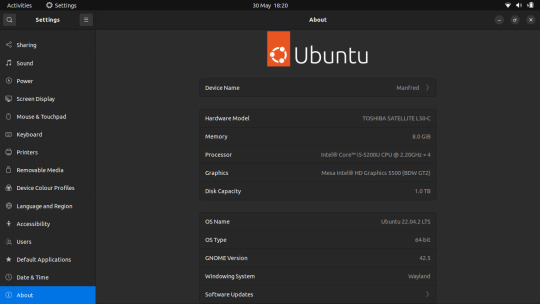
My Reasons to switch to or stay on Linux desktop instead of Windows
Before switching to Linux (When using windows 10 pro N)
Boring windows with no customisation: When I was using windows, I saw my friend using Linux (debian). I felt that 'Linux is looking cool'. Also I liked how he customise his Linux desktop. Also, I like to see some hacking stuffs and doing stuffs with command line. Comparing to that my windows 10 looked flat and boring.
Windows/its famous application is not free: When I was using windows, i was unable to switch to linux because I don't wanted to lose microsoft office. But after an accidental full 'reset my pc', I lost the access to microsoft office. I don't want to pay to get ms office. Don't like browser like Edge and other bloats.
Unnecessary stuffs of Windows: I don't like the windows auto update without my permission (I also don't want to pause every updates). I don't like the 'blue screen error'
Low performance over time in not so great spec PC and high RAM usage: My windows 10 performance was very very poor after 2 years. It only got better after 'reset my pc' but again started messing after months and adding some extra softwars over time. Also, I don't know why it is taking so much Ram (I initially used 4 GB ram and then added another 4GB ram). after it becomes 8 gb ram, the performance was better. but again got slower over time, crashes, hanging etc.,
Fear of Security vulnerability and the abstraction of windows: I always cautious about downloading unnecessary things. but still sometimes things gonna happen in the initial days. Always doubted the presence of malware in windows. After reset pc, it was working fine. but still not satisfied with windows for its security (As it always feels like fully abstracted os).
Complexity of windows in extra things: As long as using normal stuffs it is simple. But when going into control panel, changing environment variables, and several other things, etc,. I didn't have any idea of what I was doing.
The above reasons make me to try Linux. So, I started to try ubuntu 20.04.
Initial Impression of Linux and Easy to use: The Live usb feature of linux impressed me a lot. Easy installation of linux. The gnome DE was looking very good and also simple. Also the GUI settings are simple and easy to understand in ubuntu. As expected, I can do several customization and reading ubuntu's beginner command line tutorials etc., Surprisingly I didn't feel any complication at all. Infact everything felt simpler than windows. Also I felt that the utility apps or system apps of Linux is much better than windows in every aspect. Every Linux distros default pdf viewer >>> bloaty adobe acrobat pdf reader. Default text editor of linux >>> milky white notepad. etc.,
Linux is free and also its ecosystem application: Because Linux is free and open-source, it created an ecosystem for all the free and open-source apps. I automatically find all the fantastic free and powerful featured apps like Libreoffice, gimp, krita, inkscape, blender, kdenlive video editor, obs and several others (Some I already started to know when using windows at the later stage but the feel is different when using it in Linux). And there are no forceful apps like edge. I don't have to go for any pirated things when I already have a fully featured great open-source ecosystem for anything. I can also use apps vlc in linux (that is enough for all the media content for me).
Everything going fine: It just ping me that there are updates with all the package names and its details. It won't force me. I can start update only when I wish. Also the downloading and installation of updates are very quicker. This is such a relief when thinking about windows. Also there are no blue screen errors! I even started to have an idea of how it works inside (like one step deeper).
Very good performance in not so great spec and low RAM usage: The performance is very stable and good even after several months. The rendering in blender is like 20% to 25% faster compared to windows. Every app is performing good and stable in linux. felt like 8GB RAM is very sufficient for all my stuffs!
Security awareness: After I started using linux, I automatically started noticing what I am doing with my computer. started to know about why using this command to install or anything. Whenever installing anything or doing anything weird, I automatically started doing research about that. Came to know about firewall. Also came to realise that our system is not as secure as we think and we have to very careful about it.
Exploring Linux and it simplicity: The existing GUI part of linux is very simple and easy to use. But After using linux for some time, I felt comfortable with commands than GUI. It felt faster and also knowing what exactly is happening under the hood. It is less abstracted! and came to know about several things like IRC.
After using Linux for some time (an year), The things I felt:
I 100% missed games (especially cracked version of games like far cry 3, call of duty: modern warfare older version, nfs hotpursuit 2010 are no more playable in linux). I have to pay in steam to play those which i don't like. But still some free supported games are good in Linux. But I don't like much (as I am not a big gamer). The microsoft store has lot more good free games than Linux supported free games.
microsoft office: Currently I am familiar with Libre office, so no more missing MS office. But the problem is everyone uses ms office. and when I open some docs in Libreoffice which was created by ms office, then it started messing some things slightly.
Missing font: I missed the fonts of windows 10. Eventhough we can install preprietary microsoft fonts in Linux. it still misses some important fonts. Also the ubuntu's default font felt not so good after months. When I look into windows font, it looks great. (Initially I was liking ubuntu desktop font than the windows due to new changes, but when the time goes the windows desktop font is better)
browsers like firefox and chrome is taking some time for the first time launch after the reboot.
So, I switched back to windows by reinstalling (using dual boot with linux):
Some positives: After swictching to windows the only thing felt good is seeing it in my PC again after a long time with fresh installation. It looked polished. The icons looks premium. Edge, google chrome launches very fast in the first time launch at the cost of eating so much RAM. The default fonts of windows looks so premium compared to ubuntu 20.04
Negatives again and no need for windows: All the negatives I listed Initially comes back again with very much awareness since i got familiar with linux. Now I can clearly see the difference of how mess it is! especially interms of RAM usage, simplicity! Felt that there is no reason to continue windows when everything worked perfectly and fluently in Linux. The positives of Linux is very much than the positives of windows.
Not so good development in Windows: The working with gcc, git and other software development things are very much easier to setup in Linux than the windows. Felt like app installation is much easier, faster and simpler in Linux than the windows.
Started to completely switch to linux but also need to overcome negatives of ubuntu 20.04. Which leads to Distro hopping.
I switched to Linux mint: Almost all the negatives of ubuntu is gone. The utilities, default system apps, simplicity, Faster and efficiency of everything is even so great in Linux mint than ubuntu 20.04. The fonts are very good like windows. But the only problem is after some months, the cinnamon DE looks bored and little bit old fashioned. Every other thing is great.
I switched back to ubuntu but ubuntu 22.04. This version is very good than ubuntu 20.04 and I was satisfied with new gnome DE. but still I want change because of somethings. I want to try debian (as that was the one I saw my cool friend was using back then in college).
I switched to debian: Everything went smooth. now my distro is not handled by any company like canonical. I learned a lot while using debian. I was so proud of debian and myself. But after 2 months, I felt that I don't like gnome 3 (why not gnome 4 like ubuntu 22.04). It felt outdated. Also as usual it uses only very stable applications in the repository which is also outdated. Now the disadvantages of ubuntu 20.04 and linux mint is happening in debian.
I tried to swich to several lite distro for like 2 to 3 days: But don't like the DE (desktop environment) because too old fashioned. I couldn't find anything that fully satisfy me. So I agian tried to switch between linux mint, ubuntu 22.04. Until I find the KDE Plasma.
The last distro I switched is Kubuntu 22.04. It felt like having a good water after a long thrist. It satisfied all my requirement and even have its own eco-system of KDE apps which is fantastic. The default font is very good, the performance of apps are very good. The default DE font is very good. The system apps and utilities are very good. The customisation is fantastic at its peak. The features are fantastic! The default apps like text editor, pdf readers, File manager, settings, music player (Elisa) etc,. are the best of all. The options I have here are excellent. It is almost an year with kubuntu. No distro hopping anymore for me. Fully satisfied with Kubuntu (mainly because of KDE plasma DE). I am not a 100% command line user.
This gives an end card to windows. I don't even have it in my PC. I have windows 11 in my company working PC and that is for work only and I don't like windown 11 there. Only games is the positivity in windows.
#linux#windows 10#windows 11#ubuntu#linux mint#debian#kubuntu#pc#computer#operatingsystem#opensource#gnome#kde plasma#kde
28 notes
·
View notes
Text
Pencil/2D Animation Resources Masterpost
5/10/24:
Hello, I broke into my old account so I could make a little masterpost of resources I come across for learning pencil/2D animation. (Free or affordable classes, places to get tools, videos to give insider insight, etc.)
I may not be able to get everything included, so if you think of something, you can reach out and suggest things to add! I will be updating this over time, with notes on when it was last recently updated. And maybe I'll end up giving the old blog a refresh too.
I likely won't be making new masterposts outside of this one any time soon, nor updating any old ones. It's been SEVERAL years, and the internet is a different place. I would assume most of the old links are out of date by now, unfortunately.
I hope that this list is helpful to you as well, and if I'm incorrect in anything I list, I'm learning too! So please be patient with me and feel free to reach out with a correction. It's not finished yet, but Tumblr deletes my posts before I finish them, so I'm starting with posting the skeleton and slowly updating this)
Find a Community to Learn From!
(recommended groups to lurk/join/make connections and ask questions)
What Tools Do I Need?
PDF Guide to Animation Desks, as written by David Nethry
(next line)
Where Do I Get Tools?
(Places where you can buy art supplies, software, etc)
Cartoon Supplies
(Online seller who carries Ingram Bond paper, lightboxes, storyboard pads, blank cels, etc. See also: Lightfoot LTD, which is identical in every way to Cartoon Supplies and for the life of me I'm not sure the difference, though both are equally recommended along side each other.)
Jet Pens
(Ah... I love window-shopping this site. If you love stationary like I do, you'll be on this site for hours adding things to your cart... and inevitably removing them because it's not feasible to spend hundreds on pens and sticky-note pads.)
Dickblick
(I've found they have good prices on name brands, but I haven't purchased from them yet. Often, I'm too overwhelmed by all the choices.)
Improve Your Art/Learn the Basics!
(anatomy classes, starter tools, etc)
Aaron Blaise (Co-Director of Brother Bear)'s Online Classes
He runs very good deals on the classes occasional, but you can also do a year's access to all classes and keep what you download, which is very useful! They're short, quick lessons, and tend to veer into more "helpful tips" than teaching, from what I've personally noticed, but it's well worth the price if you get them at a good deal!
Inside Look at the Industry -- aka: the Special Features:
(behind the scenes stuff, etc)
Books are more useful than you might think!
(Richard Williams Animator's Survival Toolkit, etc) (check out gently used copies of these books on Thriftbooks for a good deal!)
Nifty Free Resources
(Things like height charts, references, color wheels, blog posts, videos, etc)
What Artists Can Learn From Aladdin's Incredible Color by J. Holt [VIDEO]
(spacing for formatting)
The Art of Color Theory: Guide for Animators, Designers, and Artists (Animator Artist Life)
(space for formatting)
Free software!
GIMP
(A classic, GIMP is an old friend of mine. The first software I downloaded for art, I used to use it almost entirely to create animated GIFs for the Warrior Cat forums. Ah, how time has passed. Nowadays I can't even remember how to animate a GIF on there, but such is life. I still use it to this day for digital art, even having Corel Painter. Before GIMP, I animated the old fashioned way -- MS paint and Windows Movie Maker. With determination, I scripted and animated a handful of Warrior Cat characters frame by frame. Each frame of Hollyleaf or whoever it was blinking was the likely source of death for our old computer, may she rest in peace.)
Storyboarder
(Storyboarder is a free software with which you can use to create professional and clean storyboards. It also provides printable storyboard templates so you can do you work traditionally and re-upload it easily into the software! It also works with Wacom tablets. Check it out! It's actually super cool.)
Pencil 2D
(A free, open source software. Simplistic design, switch between raster and vector, and best of all, again, it's free. I haven't used this one much yet, but I've seen it positively talked about by many! I'll update with more research when I have the chance.)
Krita
(I haven't used this one yet, so I can't speak on it either! But it's going on the list so I can come back and research it later. My poor laptop is not going to handle this many downloads lol.)
OpenToonz
(I also haven't tried this, but see above, haha.)
Blender - Grease Pencil
(Blender is well known for 3D animation, but they added a 2D feature called Grease Pencil as well.)
WriterDuet
(Free for up to 3 projects, very simple, but upgrades to a $10 a month plan, which is... eh, I'll keep my Scrivener for now. I used to write scripts in Microsoft Word or the Notepad on PC back in the day, I don't think I personally need the fancy features.)
Trelby
(A free screenwriting software, very basic and simple, good for beginners.)
Keep an eye out for
(Humblebundle occasionally does software deals -- a good art bundle at a discount can give you an easy start!)
#animation#wip#animation resources#art resources#free software#software resources#art tools#animation tools#how to#how to art#how to animate#animators on tumblr#2d animator#animation masterpost#masterpost#masterposts
8 notes
·
View notes
Text
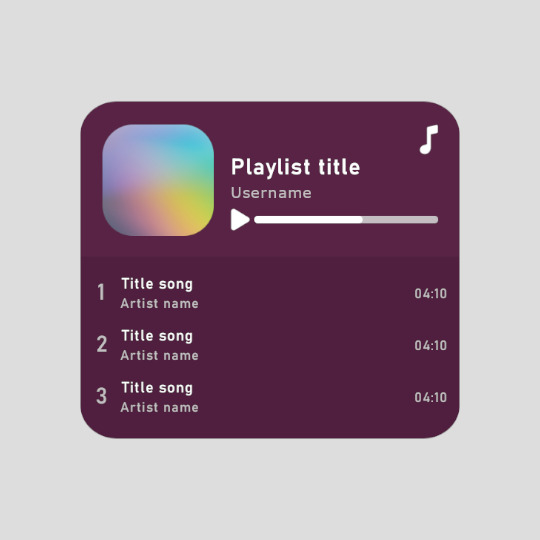
Playlist template for GIMP (XCF) ▬ by Joy from @creativexspirit
Like or reblog if you download. Feel free to add/delete/adjust some layers. Please don’t request as your own, respect my work. Don't hesitate to tag me if you use it! I would love to see your edits.
I made this after falling in love with this template by @danesdehaan and the amazing rolling effect added to it by @eddiediaaz. This template is however based on the look of embed spotify playlist. I have plans to share how I'm using this template to create a rolling playlist effect. Here is the tutorial to have a rolling playlist effect (gif tutorial) using AnimStack: click here.
Font used is Bahnschrift (already installed if you're on Windows 10+).
Icons used here are from icons8. (pls continue crediting them if you use the template!)
download: (x)
More XCFs here: (x)
More instructions under the cut.
This template is intended to be used as a base for a rolling playlist. Tutorial might come later on how I use it to do so, but for now, if you just want a static playlist of three songs: DELETE "GUIDE MASK SONG LIST FOR GIF" and the layers groups "Song 4" and "Song 5" inside the "Song" layers group.
I use GIMP 2.10 and some layers (or groups) are color coded:
Blue mark: change the color layer to another of your liking.
Orange mark: change the picture (here the playlist cover picture) by putting another picture in the layer group specified for this pic. (I created a group so you don't have to change the composite mode of your layer upon adding it to your image).
Red mark: change the text.
You have two options for the small icon in the upper right corner (icons from icons8) either a music note like in the preview or the Spotify logo. Choose either or none by toggling the visibility of the layers. Of course you're free to add your own logo as well, you do you.
If you have any more questions, I am an ask away!
9 notes
·
View notes
Photo
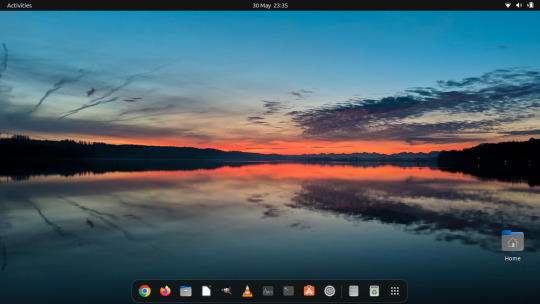


May 2023
Linux Laptop Install 2
Ubuntu 22.04 LTS (Jammy Jellyfish).
Ubuntu wiki link:
https://en.wikipedia.org/wiki/Ubuntu
After it had installed, I checked for any outstanding system updates and then I configured Ubuntu's personalisation as follows:
- Set my theme colour to Blue
- Change the system theme to use the Dark theme
- Changed the default position of the dock ‘left��� to ‘bottom’ of screen.
- Set a desktop background
I have also set the dock to Auto-hide when windows overlap it to save workspace size.
I downloaded and installed Google Chrome and installed a number of apps through the Ubuntu SNAP store, these include:
GIMP
VLC Media Player
For more information on SNAP see:
https://en.wikipedia.org/wiki/Snap_(software)
I will install more apps through the Ubuntu Store as I find out more about what's available.
I found this laptop's performance has dramatically improved compared with Windows 10.
However the Bluetooth and the camera don't work properly due to hardware issues which were there before.
I connected the Epson printer to the Ubuntu laptop and printed a test page successfully.
See the printer session and test page in post below.
Also, the laptop has a maximum display resolution of 1366x768 pixels making it quite restricted when moving and spacing all of the windows on-screen.
The muti-media function keys on the laptop work perfectly with Ubuntu.
These include:
Search, Brightness, project, touchpad, media playback & volume controls.
I really like the 'Eye of GNOME' Image Viewer that comes with this distribution.
Wiki link: https://en.wikipedia.org/wiki/Eye_of_GNOME
I like its simple yet functional user interface, how snappy it feels to use, its support for SVGs (Scalable Vector Graphics) and transparent images.
The file manager is called GNOME Files (previously Nautilus).
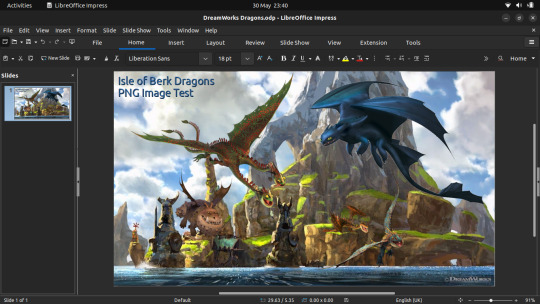
I played with LibreOffice Impress and edited some pictures in GIMP.
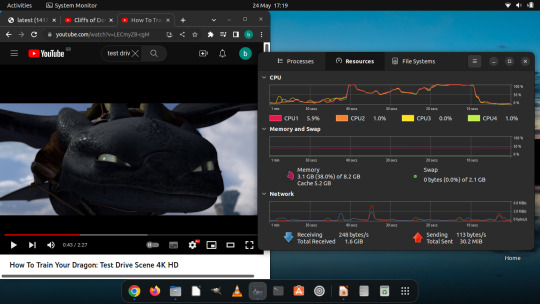
I also tested a 4K YouTube video which played flawlessly on the laptop as shown in the Activity Monitor!
The GNOME Disks utility and File Systems tab.
In the future I might try installing other Linux distributions to test.
4 notes
·
View notes
Text
TOOL TUTORIAL 5
Screencapping Frames On EZgif.com
FRAME BY FRAME SCREENCAPPING METHODS
Tool type: Wed-based GUI
Operating systems: Any
Difficulty: Easy
Input: Video files (supports most video file formats, but file must be 100MB or under).
Very quick and easy here—if you have a video clip you want to turn into a series of frames to make into gifs in a software like PhotoScape X, GIMP, Photopea, etc—if you have a clip of the scene you want to gif that is under 100MB, you can upload it to ezgif.com's Video To PNG Converter and it will render a downloadable zip file of .png clips for you.
There are some limitations given that this is a web-based tool:
The frame rate for the PNG capture maxes out at 20 FPS (which should be fine for TV and movies which are 24 FPS typically)
You are limited to frames 1200 px wide. If your source video frames are larger than that, you can still use this tool, EZgif will simply scale the frames down for you.
You can only grab 10 seconds worth of frames at a time.
NOTE: You can also feed the converter links to video files, but they have to be direct (i.e., the url must end with a .mp4 or other video type extension, which rules out Youtube clips. However, you could download a youtube clip to .mp4 with a tool like 4K Video Downloader then load that into Ezgif).
How To
For this example, I've downloaded a Youtube clip (The Boys season 3 trailer) and I'm going to load that clip into ezgif. After navigating to the file in my file browser and hitting "Open", Ezgif will need a moment to upload my file. When it is finished uploading, this screen will appear. I decided I want a short clip in the middle of this trailer of Kimiko beating the shit out of some dudes.
I just navigate through the video box that ezgif opened for me, and when I get to a little bit before where the scene I want starts, then click the "Use current position" button next to the "Start time (seconds)" dialogue box, it will automatically fill that box with the correct start time. I can do the same for my end time by scrolling through my video clip until after the clip ends.
For best quality in your end result, you probably want to wait to scale down your frames (in the software where you make your frames into a gif instead of here). So select "Original" for the Size. For Frame rate (FPS), select 20 (which is the maximum Ezgif allows).
Click "Convert to PNG!" and Ezgif will begin processing the section of video you selected into .png frames. When it's done, all your frames will load down the window. Rather than download each of these PNG files one by one, scroll all the way to the bottom past all the frames and select "Download frames as ZIP".

After downloading that zip file to your computer, unzipping it will reveal all your PNG frames, named in time sequence.

Woohoo!
4 notes
·
View notes
Text
For Loops
These are commands to do a batch process in a folder in Linux or Windows with a utility that doesn't allow you to glob. File globbing is when you use an asterisk as a wildcard to specify some kind of naming convention. For instance, ImageMagick allows you to glob when you use magick mogrify -path ppm -format ppm *.webp (that is: converting a bunch of Google's WebP into Portable PixMap into a subdirectory called ppm) or, in another example, oxipng allows you glob when you type oxipng -o 1 --strip all *.png (that is: removing EXIF info and colorspace and other metadata from a folder of PNG as fast as possible).
These are the most simple commands so you can understand what works and modify it according to the tool's parameters. For me the most important thing is knowing how to grab the file and then knowing how to copy its name into the output.
I'll use cjxl (or cjxl.exe on windows) from Libjxl as an example.
Linux
for i in *.jpg ; do cjxl $i ${i%.*}.jxl ; done
Windows
for %f in (*.jpg) do cjxl %f %~nf.jxl
alternatively,
forfiles /m *.jpg /c "cmd /c cjxl @file @fname.jxl"
When you do these commands you will quickly find out that you need quotation marks! So the linux command example is actually for i in *.jpg ; do cjxl "$i" "${i%.*}.jxl" ; done and for %f in (*.jpg) do cjxl "%f" "%~nf.jxl" The best workaround is to not use spaces in your filenames and instead use hyphens or underscores. I'm not going to include any more versions with quotation marks because rules vary depending on the tool. It would take a lot of testing.
I will repeat these examples with c44 (or c44.exe on Windows) into a subfolder called iw44 in high quality (such quality explained in the man page), which is a good example for designating output location in the filename as well as an example for using flags or parameters. The cjxl example didn't have an output subfolder designated and it didn't have any parameters specified. Usually you are modifying these for loops to have special parameters.
Linux
for i in *.ppm ; do c44 -slice 72+11+10+10 $i iw44/${i%.*}.djvu ; done
Windows
for %f in (*.ppm) do c44 -slice 72+11+10+10 %f iw44/%~nf.djvu
alternatively,
forfiles /m *.ppm /c "cmd /c c44 -slice 72+11+10+10 @file iw44/@fname.djvu"
I was using JPEG for an input format for the c44 example, but on Windows c44.exe could not read the jpeg with error message *** **Unrecognized DjVu Message: ** Message name: ?GPixmap.unk_PPM *** (GPixmap.cpp:502) *** 'void DJVU::GPixmap::init(DJVU::BtyeStream&)'. I am not sure why that happened. But PPM is better as an in-between format anyway, since it is lossless and you can crop and save it in GIMP or Nomacs. When you are done with the PPM you can delete with rm *.ppm or, on Windows, del *.ppm. You can create the PPM to begin with by magick mogrify -format ppm *.jpg
yay for globbing.
ImageMagick Download page
Libjxl binares on GitHub
DjVu Libre binaries
The Forfiles Command by 0612 TV w/ NERDfirst on Youtube from the playlist ffmpeg and command line
official Windows forfiles documentation
Nomacs for windows as nomacs-setup-x64.msi or the portable zip on Github
Misc notes: the cjxl example was losslessly converting legacy jpeg data into the more modern format jxl, and the c44 example was lossily converting uncompressed ppms into a bunch of single-page DjVu documents. Cjxl has two modes to lossily transform (modular or VarDct) that you can access by checking the documentation (it's a lot to explain but I can explain it, type cjxl -j 0 -d 1 input.jpg output.jxl for VarDCT ooooor cjxl -j 0 input.jpg output.jxl for modular lossless...modular lossless is default in this case.) and the output of c44 can be globbed into a bundle using djvm, a tool in DjVu Libre that DOES support globbing. Ah, and now I realize c44 this whole time can glob. Oh but only on the Linux binary? It won't work on Windows; it is giving me an error when I ask c44 or cpaldjvu to glob with cpaldjvu *.ppm but when i write for %f in (*.ppm) do cpaldjvu -colors 5 %f %~nf_fivecolors.djvu that works. there are reasons to want to write for loop commands with c44 like specifying corresponding pbm with the flag -mask. Lots of fun stuff to write about. Be careful with these commands as they always overwrite without asking your permission. Such tools are built for efficiency and are not programmed to keep their users from destroying their own data. I love destroying things. Oh and ImageMagick on Ubuntu uses the old-fashioned commands. So you say mogrify instead of magick mogrify and instead of magick you say convert.
#text post#tutorial#linux#graphic imaging#for loop#batch processing#command-line#libjxl#djvu libre#nomacs#file globbing#imagemagick#forfiles
0 notes
Text
Image vectorizer app

Image vectorizer app how to#
Image vectorizer app pdf#
Image vectorizer app install#
Image vectorizer app license#
Image vectorizer app windows#
d, -debug n - produce debugging output of type n (n=1,2,3) u, -unit n - quantize output to 1/unit pixels (default 10) O, -opttolerance n - curve optimization tolerance (default 0.2) n, -longcurve - turn off curve optimization a, -alphamax n - corner threshold parameter (default 1) t, -turdsize n - suppress speckles of up to this size (default 2)
Image vectorizer app how to#
z, -turnpolicy policy - how to resolve ambiguities in path decomposition b gimppath - Gimppath backend (GNU Gimp) b dxf - DXF backend (drawing interchange format) b pgm, -g, -pgm - PGM backend (portable greymap) b ps, -p, -postscript - PostScript backend b eps, -e, -eps - EPS backend (encapsulated PostScript) (default)
Image vectorizer app pdf#
b pdf - PDF backend (portable document format) b svg, -s, -svg - SVG backend (scalable vector graphics) b, -backend name - select backend by name end of options 0 or more input filenames follow o, -output filename - write all output to this file
Image vectorizer app license#
l, -license - print license info and exit v, -version - print version info and exit h, -help - print this help message and exit Run "nix-env -i potrace" as root to install. (14) NixOS has centralized package management and users should
Image vectorizer app install#
Run "port install potrace" as root to install. (13) Macports has centralized package management and users should Should run "fink install potrace" as root to install. Fink has centralized package management and users (12) Fink package maintained by Daniel Macks. (11) FreeBSD Packages maintained by Piotr Smyrak. Users should run "pacman -S potrace" as root to install. ArchLinux has centralized package management and (10) ArchLinux package maintained by Damir Perisa. Package management and users should run "dnf install potrace" as root Potrace is available on all Fedora branches. (9) Fedora package maintained by Susi Lehtola. Potrace appears in the official SuSE distribution. (8) SuSE RPMs provided by Stanislav Brabec. Users should run "sudo apt install potrace" to install. Debian has centralized package management and (7) Debian i386 Package maintained by Bartosz Fenski. (4) AROS binaries supplied by Matthias Rustler. (2) Linux for Alpha and Sparc, FreeBSD, and NetBSD binaries (1) Solaris-i386 and x86_64 binaries and packages provided by The downloaded files, you can double-check If you would like to ensure the accuracy of
Image vectorizer app windows#
Additional instructions for Windows users are contained Instructions on how to install Potrace from a binaryĭistribution. Some pre-compiled binary distributionsĪre also available. Generic installation instructions, and theįile README for compile time configuration Potrace is built from sources using the standard configure/makeĬommands. Gieseking for reporting portability issues, and to Agostino Sarubbo The defaultĬompiler is now clang if available. Portability has been improved to encompass C++11. It is now possible to use negative dy in bitmapĭata. The image size is now truncated when the bitmap data ends Thanks to Agostino Sarubbo, Daniel Macks, and Michael Voříšekįor reporting bugs and suggesting improvements.Ī number of bugs triggered by malformed BMP files have been fixed, A new configuration option -enable-local-getopt wasĪdded. A bug triggered by very large bitmaps hasīeen fixed. Some potential buffer overflows and arithmetic overflows were fixed, Henri Salo and Dave Yeo for reporting bugs and suggesting TheĬonfiguration option -enable-local-getopt was renamed as This release consists of bugfixes and minor portability improvements.Ī potential arithmetic overflow was fixed. Trouble using Potrace? Here are the answers to some frequently asked questions.įor changes prior to version 1.14, see the file NEWS.įor a more detailed list of changes, see the ChangeLog. Used to pre-process the input for better tracing behavior on Mkbitmap is a program distributed with Potrace which can be Of pixel-based images), Gimppath, and XFig. SVG, PDF, EPS, PostScript, DXF, GeoJSON, PGM (for easy antialiasing Potrace can currently produce the following output formats: It can then be rendered at any resolution. The resulting image is not "jaggy" like aīitmap, but smooth. A typical use is to create SVG or PDFįiles from scanned data, such as company or university logos, The input is aīitmap (PBM, PGM, PPM, or BMP format), and the output is one of Transforming a bitmap into a smooth, scalable image. Potrace(TM) is a tool for tracing a bitmap, which means, Transforming bitmaps into vector graphics
0 notes
Text
Posterazor print posters at home

#Posterazor print posters at home how to#
#Posterazor print posters at home free#
If in step 2…ĭivide the measurement in pixels by the number of squares. Result: The distance in pixels appears at the bottom of the window.Ĭalculate the width of a square in pixels. When you measure a vertical or horizontal separation, drag a 0° or 90° line. Measure the shortest line between your landmarks.Ĭlick one landmark, press and hold the right mouse button, and then drag to the second landmark.Īs you drag, the angle of your line appears at the bottom of the window. Look for features that can establish a scale.Įxample: If the map includes 10-foot wide halls, the distance between walls can serve as a scale.Įstimate a distance between two landmarks that suits play. Pick two parallel grid lines far apart on the map. To measure the dots-per-square on a map image, do the following: 1įind two landmarks or marks on the map where you know the distance separating them. Measuring the dots-per-square on a map image For now, this procedure refers to 5-foot plots on your map as squares, even if the lines don’t appear yet.
#Posterazor print posters at home how to#
Note: If your map image lacks a grid, I’ll explain how to add one in Adding a grid to a map image. Start by measuring how many dots now span a square on your map. To print your map image so each square spans 1-inch, adjust its scale so the image’s dots-per-inch matches its number of dots-per- square. In the Open Image dialog box, select the graphic file that will become the backdrop for your battle map, and then click Open.īattle maps in Dungeons & Dragons and Pathfinder feature a grid of 1-inch squares. To open your map graphic in GIMP, do the following: 1 PosteRazor splits graphic files too big for a single page into multiple, printable pages, which you can assemble into a poster-sized map. GIMP provides an image editor similar to Adobe Photoshop.
#Posterazor print posters at home free#
You must have the free programs GIMP and PosteRazor installed on your PC. Splitting a graphic file too big for a single page into multiple, tiled pages.Measuring the dots-per-square on a map image.This post includes the following sub-procedures: This post gives procedures for scaling graphic map files so they appear with a 1-inch grid, and then printing the map tiled onto multiple pages. Even when you solve the scaling, the images can’t fit on a single page from your printer. But these computer graphics never come scaled so that they print with a 1-inch grid sized for miniatures. Many of the artists who draw maps for adventures sell downloadable images of those maps. You can play Dungeons & Dragons and Pathfinder battles on a sketch, playing on a colorful, printed map raises your game’s visual appeal.
0 notes
Text
Moving text blocks in gimp

Moving text blocks in gimp how to#
Moving text blocks in gimp install#
Moving text blocks in gimp software#
Moving text blocks in gimp free#
Make it something like 8 or 10 pixels or whatever you prefer.īefore jumping onto the next step, make sure to select the active foreground color to the color with which you want to outline your text. A small dialog box will open up where you can select the grow size. Now, again move to the Select menu and click on the Grow option. Press the OK button after setting up these options.Īfter that, go to the Select menu and tap on the From Path option. And, name layer something like Text Outline or Outline of Text. Here, you need to set the Fill with field to Transparency value. Go to the Layer menu and click on the New Layer option or simply press the Shift+Ctrl+N hotkey to add a new layer.Ī pop-up to configure the layer settings will open up. You can customize the font, size, and color of added text.Īfter adding and customizing the text, right-click on the text, and from the context menu, select the Path from Text option. Now, add your text to the image by using the Text tool present in the Toolbox at the left. For that, just go to the File menu and use the New or Open function. Launch the GIMP application and then simply create a new graphic image or you can import an existing image to which you want to insert outlined text. You can then go ahead with the below steps to outline text in GIMP.
Moving text blocks in gimp install#
Let’s have a look at the above steps in detail!įirstly, you will have to download and install GIMP if you don’t have it already on your Windows 10 PC.
Create a new transparent layer and select from path.
Add your text and copy path from the text.
Launch GIMP and create a new image or open an existing one.
The process to add a border to text in GIMP consists of the following simple steps: How to outline Text or add a Border to Text in GIMP Just follow the steps mentioned in this article and you will be able to outline your text in GIMP without much hassle. You don’t have to do a lot of work for that. In this software, you can also add a border to your text in a graphic. Along with standard image editing operations, you can use it to create animated GIFs, batch resize images, add neon glow effects to text, add shadow to text or image, and much more.
Moving text blocks in gimp software#
GIMP is a feature-rich vector drawing and image editing software for Windows 10. This way you can bring text editing to new level in GIMP.Here is a simple tutorial to add borders to text and simply outline your text in GIMP. The above are the all text editing features in GIMP. Go to Filters > Edge Detect and apply the filters to see the magic. This way you can position your text in any direction and style. Now you can fill any colour to your text with the Tool Box “Bucket fill” tool. Now go to the GIMP paths dialogue and do as follows. Right click on the text and click Text Along Path.ĭelete the layer containing the original text from the layer dialogue box. Now use Text Tool to enter or type text in GIMP. Use the path tool which you can find on the Tool Box to create a path of your style. To do this Enable the following dialogue boxes or windows Another Way to Align Text to Horizontal, Vertical or Your Desired Path.
Moving text blocks in gimp free#
How to Create Animated GIFs from Your Videos with Free Software See the screenshot below to know how Arbitrary Rotation of text editing in GIMP works. This text align feature in GIMP is available under Layer Menu > Transform. How to Transform or Align Text to Vertical, Horizontal, Rotate 90°, Rotate 180° and Arbitrary Rotation in GIMP? Use this dialogue box to align text in GIMP. When you double click you will get Tool Options window or dialogue box. You will get option to change font, font size and font colour as below.ĭouble click on the text tool to get text align option in GIMP. To start entering text on image click on the text tool then click on your image and start typing your text. How to Install Save for Web Plugin for Image Compression on GIMP for WindowsĮnter Text, Change Font, Font Size, Font Colour in GIMPįirst enable the Tool Box, it’s under Windows Menu.
Moving text blocks in gimp how to#
How to use text to path feature in GIMP for align text.
Align text to vertical, horizontal or any other angle in GIMP.
Change font size and font colour in GIMP.
Below is the complete guide to text editing in GIMP photo editor. We can learn the following GIMP text editing features below. Text editing and text align in GIMP is also a must for me to create picture quotes as well. I mostly use GIMP to resize image for my blog posts and especially to use the save for web page option in GIMP.
0 notes
Text
Inkscape tutorials text

INKSCAPE TUTORIALS TEXT HOW TO
INKSCAPE TUTORIALS TEXT FOR WINDOWS 10
INKSCAPE TUTORIALS TEXT SOFTWARE
Most of the options that are available in that dialog can also be found in the horizontal tool controls bar at the top of the canvas: a field with a list of the fonts that are installed on your computer. You can also create PNG files, PDF, DXF, and a bunch of other file types that I do not understand. The Text and Font dialog is ideal for modifying a text’s style.
INKSCAPE TUTORIALS TEXT SOFTWARE
It is a free software that you can download onto your computer and create SVG files. Then, at the top left toolbar, you will find the Select Font Family box. For a result with more impact, use caps for each letter. Click anywhere on the document and begin typing. I started with making Bunco Cards and Planners and for those, I just used PowerPoint, Excel or Publisher. Step 1 - Add and Edit the Text Open Inkscape then click on the icon Create and edit text objects on the left side panel. So I started an Etsy Shop to sell printables.
INKSCAPE TUTORIALS TEXT HOW TO
Tutorial showing how to make a 3D text (relief) in the style of the Google logo. When this pandemic hit and I lost my job, I found myself with a lot of spare time on my hands. howtos and tutorials - GIMP, Inkscape,, Fedora and more. Before quarantine, I couldn’t even tell you what an SVG file was.īut out of boredom comes creativity! I don’t think I have ever been unemployed for more than 5 minutes. Now again navigate to tool panel and take Text tool from the list of tools or hit F8 of keyboard for having this tool active. Inkscape Tutorial: Book Icon Flowed Text - Inkscape Beginners Guide 49 Inkscape for. It totally depends on you which path you want to take. Inkscape Tutorials for Beginners - Part 1 Overview - YouTube. You can draw an ellipse for having curved path of your text. Well here is your first lesson on how to get started using a free software called Inkscape.įear not ! I have zero graphic design skills. Now hold shift and Ctrl key of keyboard for drawing a circle like this. To change font family, style, size, and alignment, open the Text and Font dialog ( Shift+Ctrl+T ). Creating a text object is as simple as switching to the Text tool ( F8 ), clicking somewhere in the document, and typing your text. how can I start making my own cute sayings and text files that I can use on my cutting machine or that I can sell to other crafty mamas out there? This section is a very basic introduction into Inkscape's text capabilities.
INKSCAPE TUTORIALS TEXT FOR WINDOWS 10
Have you been thinking to yourself – Self. For Windows 10 S: the Inkscape app is also available in the Microsoft Store.
0 notes
Text
Lazy nezumi free version

LAZY NEZUMI FREE VERSION FOR FREE
LAZY NEZUMI FREE VERSION HOW TO
LAZY NEZUMI FREE VERSION SERIAL
LAZY NEZUMI FREE VERSION UPDATE
LAZY NEZUMI FREE VERSION FULL
LAZY NEZUMI FREE VERSION FOR FREE
Since, I have Paint Tool Sai & Photoshop CS6 downloaded for free I'll be testing Silky Shark on both of them for you all to see for yourselves. I do believe Silky Shark is compatible with any free art program such as Paint Tool Sai, GIMP, Medibang, FireAlpaca, Adobe Flash 8 (for animation), & many other programs but, with little space left in my laptop storage I can only review very little. There is another alternative BUT, the downfall is that I don't have a Mac PC so I can't download it for you all sadly, one day I hope to download Lazy Nezumi Pro for it's helpful programmer seller cause, I think they deserve more love than hate, I mean $35 for a program isn't a bad price unlike *cough* Photoshop CS6 itself.
LAZY NEZUMI FREE VERSION HOW TO
Like the title of this journal says it's a "free alternative" to Lazy Nezumi Pro for those who can't afford it like me, I'll be doing a YouTube video on how to download & Install it with no hassle.
LAZY NEZUMI FREE VERSION SERIAL
In the Lazy Nezumi Pro iso file you will find in crack folder the Lazy Nezumi Pro Crack, Lazy Nezumi Pro serial and Lazy Nezumi Pro activation. When you create a sketch or draw lines in any image editing software.
LAZY NEZUMI FREE VERSION FULL
It is full installer l for 32/64 Bit independent. Here is the Blog that I found Silky Shark on Lazy Nezumi Pro Download The latest version and fully setup for Windows. The Help/About Lazy Nezumi Pro menu of the app will show you which version you are running. You can also use it on any time frame that suits you best, from the 1 minute through to the 1-month charts.So, earlier this morning I was searching for a free alternative to this program called "Lazy Nezumi" since I won't be able to get paid until at the end of the month I've decided to open up Art Commissions for my Undertale Chibi art, if anyone is interested? If you're running into any trouble with Lazy Nezumi Pro, the first thing you should do is check that you're up to date. If more than one person will be using the software at the same time, such as in a company setting, you should purchase a Multi-User license, by entering more than 1 in the Number of Users box above. System can be used on any Forex currency pair and other assets such as stocks, commodities, cryptos, precious metals, oil, gas, etc. If you are the only person using the software, you can activate your license on up to three (3) machines, for your own personal use. This is helpful as it means you do not need to stare at the charts all day waiting for signals to appear, and you can monitor multiple charts all at once. You can set the LazyHedging indicator to send you a indication by Up and Down with Indication. Lag LazyHedging indicator is a Non-Repaint trading system usually being sold for 199. UDATE:I finally got Lazy Nezumi it was for free but it fully works on my Photoshop CS6.I havent tried it on Adobe Flash 8 but, Im going too for a future video. While traders of all experience levels can use this system, it can be beneficial to practice trading on an MT4 demo account until you become consistent and confident enough to go live. We are uploading EAs Indicators working 100 on real account. There still a few issues reported on the Logitech forums though. G-Hub is now on full release, and the current version seems to be problem free so far for me. I had to do a clean reinstall of Windows 10 to get past that. LazyHedgingindicator can give you trading signals you can take as they are or add your additional chart analysis to filter the signals further, which is recommended. I am pretty sure that an early beta version of Logitech's new G-Hub software stuffed Lazy Nezumi Pro. It catches very fast and profitable price movements and gives you easy BUY/ SELL signals.Įvery trading signal is very carefully verified by the system to produce only the highest probability trades.
LAZY NEZUMI FREE VERSION UPDATE
Just tried it myself and its pretty good so far, with its last update being four days ago, and it works on a couple of programs (Ive tried it with Paint Tool SAI, Photoshop, Clip Studio Paint, and. So, if you want really tight, smooth lineart, or just clean lines in general its pretty great. For anyone that liked Lazy Nezumi but cant drop thirty-five dollars for it, this program is pretty similar to it and its free and open-source. This is the complete offline setup of Lazy Nezumi which has excellent compatibility with all latest and famous 32bit and 64bit operating systems. Its called Lazy Nezumi, and its main function is to help smooth your strokes out when youre drawing. Click on the link given below to download Lazy Nezumi Pro free setup. Hey everyone, just wanted to bring to your attention a plugin that might be useful for you. This free forex indicator analyzes the price behavior on the chart every second and determines the ideal entry points based on the built-in algorithm, informing you when you need to open a deal and close it to take profit. Lazy Nezumi stroke smoothing for Photoshop. Lag LazyHedging indicator is a Non-Repaint trading system usually being sold for $199. We are uploading EAs Indicators working 100% on real account.
0 notes
Text
Auvio usb to hdmi adapter driver windows 10

AUVIO USB TO HDMI ADAPTER DRIVER WINDOWS 10 FOR FREE
AUVIO USB TO HDMI ADAPTER DRIVER WINDOWS 10 HOW TO
AUVIO USB TO HDMI ADAPTER DRIVER WINDOWS 10 FOR MAC
AUVIO USB TO HDMI ADAPTER DRIVER WINDOWS 10 INSTALL
Please feel free to leave a comment below if you have any further questions or ideas. Don’t forget to restart your computer for the changes to take effect even if you’re not asked to. Then select Update driver.Ĥ) Click Search automatically for updated driver software.ĥ) Wait till the download and installation process finishes.ħ) Now your driver has been updated by Windows successfully. Double-click on the Display adapters category to expand its drop-down list.ģ) Right-click on the USB to HDMI adapter you’re using to open its context menu. Then type devmgmt.msc and click OK.Ģ) Here comes the window of Device Manager. Here’re the steps:ġ) Press the Windows Logo Key and R at the same time to invoke the Run dialog box.
AUVIO USB TO HDMI ADAPTER DRIVER WINDOWS 10 HOW TO
Given that the process of searching out your driver differs from person to person, here we’ll simply teach you how to update your driver via Device Manager.
AUVIO USB TO HDMI ADAPTER DRIVER WINDOWS 10 INSTALL
If you need assistance, please contact Driver Easy’s support team at 2 – Download and install the driver manuallyĪlternatively, you can find your USB to HDMI driver online, download it and install it step by step. The Pro version of Driver Easy comes with full technical support.
AUVIO USB TO HDMI ADAPTER DRIVER WINDOWS 10 FOR FREE
Note: you can do it for free if you like, but it’s partly manual. Or if you just want to update your adapter driver for now, simply click the Update button next to it. Are their any available driver for USB3.0 HDMI Display Adapter for windows 10. I am willing to install USB3.0 HDMI Display Adapter for windows 10 in my Surface Pro 4, then I could display two screen, Unfortunately I could not did that because the system did not accepted. Driver Easy will then scan your computer and detect any problem drivers.ģ) Click Update All to automatically download and install the correct version of all the drivers that are missing or out of date on your system (this requires the Pro version – you’ll be prompted to upgrade when you click Update All). ste up USB3.0 HDMI Display Adapter for windows 10. But with the Pro version it takes just 2 clicks:Ģ) Run Driver Easy and click the Scan Now button. You can update your drivers automatically with either the FREE or the Pro version of Driver Easy. You don’t need to know exactly what system your computer is running, you don’t need to risk downloading and installing the wrong driver, and you don’t need to worry about making a mistake when installing. If you don’t have the time, patience or computer skills to update the USB to HDMI adapter driver manually, you can do it automatically with Driver Easy.ĭriver Easy will automatically recognize your system and find the correct drivers for it. Option 1 – Automatically update your driver (Recommended) Option 2 – Manually – You’ll need some computer skills and patience to update your drivers this way, because you need to find exactly the right the driver online, download it and install it step by step. It’s all done with just a couple of mouse clicks – easy even if you’re a computer newbie. Option 1 – Automatically (Recommended) – This is the quickest and easiest option. Generally there are two ways you can update your USB to HDMI adapter driver: Free professional photo editing software for mac.If you’re looking for the latest driver for your USB to HDMI adapter, this post is written for you! Just follow this tutorial and update the driver with your own hands! How can I update my USB to HDMI driver? GIMP 2.10 GIMP stands for GNU Image Manipulation Program and is one of the best free photo editor apps that you'll get.
AUVIO USB TO HDMI ADAPTER DRIVER WINDOWS 10 FOR MAC
Best Free Photo Editing Software for Mac 2020 1. Why we love it: Luminar boasts 60-plus filters for maximum results with minimum time and tinkering. Why we love it: We thought we’d start with the OG of Mac photo editors. Free photo editing software for Mac: 11 of our favorites 1. Verdict: Luminar offers most of the features that a modern amateur photographer needs for photo editing. DOWNLOAD FREE Verdict: The key selling point of Affinity Photo is its ability to split. Top 11 Best Photo Editing Apps for Mac 1. Adobe Photoshop Elements 2020 (Trial link) 7. Photolemur 3 (Free Version with watermark) 4. Best Mac Photo Editing Software - Free/Trial or Cheap 1.
0 notes
Text
Gimp for mac os high sierra
#Gimp for mac os high sierra how to
#Gimp for mac os high sierra mac os
#Gimp for mac os high sierra apk
#Gimp for mac os high sierra install
#Gimp for mac os high sierra update
These magnet/torrent download links are easy to use if you have a good BitTorrent client. APPLIES TO: 2013 2016 2019 SharePoint Online If you want to remove the metadata of an item from the search index or from the search results, you remove. Delete items from the search index or from search results in SharePoint Server.
#Gimp for mac os high sierra how to
How to remove how to remove xf-accm2015.dmg. You can now quit Terminal and eject the volume.
#Gimp for mac os high sierra install
When Terminal says that it's done, the volume will have the same name as the installer you downloaded, such as Install macOS Catalina.
Terminal shows the progress as the bootable installer is created.
When prompted, type Y to confirm that you want to erase the volume, then press Return.
Terminal doesn't show any characters as you type your password.
When prompted, type your administrator password and press Return again.
If it has a different name, replace MyVolume in these commands with the name of your volume. These assume that the installer is still in your Applications folder, and MyVolume is the name of the USB flash drive or other volume you're using.
Type or paste one of the following commands in Terminal.
Open Terminal, which is in the Utilities folder of your Applications folder.
#Gimp for mac os high sierra mac os
Make sure that it has at least 12GB of available storage and is formatted as Mac OS Extended. Connect the USB flash drive or other volume that you're using for the bootable installer.Use the 'createinstallmedia' command in Terminal It installs an app named Install OS X El Capitan into your Applications folder. Open this file and follow the onscreen instructions. OS X El Capitan downloads as a disk image that contains a file named InstallMacOSX.pkg.It installs an app named Install macOS Sierra into your Applications folder. macOS Sierra downloads as a disk image that contains a file named InstallOS.pkg.Enterprise administrators, please download from Apple, not a locally hosted software-update server. To get the required installer, download from a Mac that is using macOS Sierra 10.12.5 or later, or El Capitan 10.11.6. If the installer opens after downloading, quit it without continuing installation. macOS Catalina, macOS Mojave, and macOS High Sierra download directly to your Applications folder as an app named Install macOS Catalina, Install macOS Mojave, or Install macOS High Sierra.
#Gimp for mac os high sierra apk
Up to date 2019 Checklist How to Repair Apex Legends Engine Error 0x887A0006 Working Gimp lnkscape Apk How tó Install Gimp lnkscape on Android report this advertisement report this ad.Find the appropriate download link in the upgrade instructions for each macOS version: Popular Articles How to Delete a Web page in OpenOffice in 8 Various Methods How to make use of Shadowsocks Proxy customer on Google android Free of charge How to Shutdown Home windows Server 2012 Easy to Stick to Guidebook How to Repair Magisk Install Mistake 1 in TWRP Recovery Is certainly safe Virus check report, Fraud Adviser reviews Install Home windows 10 on Android using Limbo Emulator No Main How To Select A Personal computer Case. Required fields are proclaimed Opinion: Title: Email Tackle: Website: Save my name, email, and site in this web browser for the following period I comment. Also Look over: Fix Apex Legends Engine Mistake 0x887A0006 Associated Posts. Now, Launch the Virtual device and then Develop a brand-new machine.Īnd then do the pursuing configurations: Title: macOS 10.13 High Sierra Type: Mac pc OS Back button Version: macOS 10.13 or 10.12 Memory space dimension: 3GB to 6GM ( 65 of your Ram memory) Virtual cd disk document: macOS higher Sierra 10.13.vmdk And today, you have to choose Use an exsting digital hard disc document and Open macOS high Sierra 10.13.vmdk File. How to download MacOS high Sierra If you are usually a Mac user then you can conveniently download the iso installer (dmg document) from the recognized web site of apple.Īds If you are usually not a Mac pc user or you are a home windows user (and would like to set up Sierra in VirtuaIBox, Vmware or ány various other virtual device) then you can download the document from the below link: Download MacOS Great Sierra (from apple web site) How to install MacOS Large Sierra on Virtual Device Initial of all, download and set up VirtualBox or Vmwaré on your computer (Windows or any various other) And after that down load the MacOS higher sierra.Īnd so you require to extract it by using WinRAR or any other tool. It provides improved the dependability of the Microsoft Exchange information sync.
#Gimp for mac os high sierra update
Superduper! High Sierra Update Your Older
Superduper! High Sierra Update Your Older.
0 notes
Text
Deselecting pen in adobe illustrator mac

Deselecting pen in adobe illustrator mac how to#
Deselecting pen in adobe illustrator mac mac os#
Deselecting pen in adobe illustrator mac install#
Deselecting pen in adobe illustrator mac update#
Deselecting pen in adobe illustrator mac driver#
** Edit the video title, subtitle and keep your own set of user notes. Use this app as a "Video referencing library" where you come back to have a refresher lesson or look to find a new function to master.
Deselecting pen in adobe illustrator mac how to#
This collection of MORE THAN 640 tutorial video guides will soon get you up to speed and will teach you how to use many of the features and functions. Each piece of software has its own set of features and functions that take a little mastering. These days many people can create stunning graphics using Photoshop,Indesign and also Illustrator. While the program may be difficult to understand initially, the final product will be well worth the learning curve. So what is Adobe Illustrator used for? It is typically used to create illustrations, charts, graphs, logos, diagrams, cartoons of real photographs, and more. These images will then be used for company logos, promotional uses or even personal work, both in print and digital form. Īdobe Illustrator is used by Professional Designers, Artists and computer users to create Vector Images.
Deselecting pen in adobe illustrator mac mac os#
Шаг 4: You Learn! For Illustrator для Mac OS
How to Set Pen Pressure in Adobe Photoshop.
How to Setup Pen Pressure on Adobe Illustrator.
How to Setup GIMP Pen Pressure on MacOS.
How to Set Up & Use the RaDial mode on Huion Inspiroy Dial Q620M and Mini Keydial KD100?.
Deselecting pen in adobe illustrator mac driver#
Which driver should I download to use Huion Mini Keydial KD100?.
How do I connect the Huion Mini Keydial KD100 to my computer?.
How to Uninstall Version 15 Driver (MacOS).
How to Customize Press Keys and Digital Pen Button Functions for Specific Software.
Deselecting pen in adobe illustrator mac update#
How to Update Your Huion Tablet's Firmware.
Setting Up the Left-hand Mode for Your Huion Tablets.
How to Install/Uninstall Huion V14 Driver on Mac OS (Video).
How to Uninstall Version 15 Driver (Windows 10).
How to Install/Uninstall Huion V14 Driver on Windows (Video).
Deselecting pen in adobe illustrator mac install#
How to Install Huion Drivers on Windows.
Step by Step Driver Installation (Illustrated).
If the steps above don't resolve your issue, please send an email to for further assistance. Create a new calligraphic brush that supports pen pressure. Restart Adobe Illustrator and on the pop-up window, press “OK”. (It will show you have successfully reset the program) Input this command in the Terminal window: “tccutil reset All ” and run (hit Enter on your keyboard). Press the “Command” and “Space” bar on your keyboard and type “Terminal” to open the Terminal window. Find Security & Privacy –> Privacy –> Automation. If, however, you've set your brush with pen pressure but it still doesn't work, please proceed to the steps below: When you have pen pressure in all your drawing software except in Adobe Illustrator, please follow the steps from this article: How to Setup Pen Pressure on Adobe Illustrator.
0 notes
Last Seen Blogs