#How To Grow 2 Inches Taller At 18
Explore tagged Tumblr posts
Visit Tumblr Blog
Explore Tumblr blogs with no restrictions, modern design and the best experience.
Last Seen Tumblr Blogs


Fun Fact
28.6 is the average number of monthly visits per US mobile user.
Text
I think Bruce pretends to be happy when his kids surpass him in height, but deep down he's clenching his fists. Jason at least has the decency to wait until he's 25 to reach 6'4, but Bruce swears he's wearing platform boots and thus, shouldn't count. Damian is exactly 6'2 by 18 but maxes out at 6'3 and a half, which is an inch and a half too many in Bruce's opinion. In both cases he had a nice period of time where they were the exact same height, completely acceptable except for the fact his traitorous sons kept growing. And don't get him started on Duke, the kid already had 2 inches on him before graduating highschool.
It's fine, really, Signal only comes out in the daytime so no one seems to notice how much taller than the Big Bad Bat he is. Bruce knows he's being silly and petty, but he's made a career of intimidating people. You don't need to be tall to be imposing, Cassandra proves that, but that's the way he's always done it!
He silently sulks about it for months until there's some all hands emergency that ends with Clark and Diana nursing a couple of bad bruises with some of Alfred's tea and cookies at the manor. Jason is pretending to not fangirl around Wonder Woman while Duke asked Dick and Clark about the first Robin days with Damian silently listening. It was nice and peaceful, the perfect unwinding after a long day.
"What do you feed them?" Clark asked him while they say their goodbyes, strained smile on his face as he willedMidwestern politeness to mask a very familiar jealousy. Diana pretended not to be bothered while side eying him.
"Yeah, you know how kids are," pride colored his voice again, happy to mess with his friends "they grow up so fast."
#I'm in a mode to make jokes about the batfam's height#batfam#jason todd#bruce wayne#duke thomas#damian wayne#Batfamily#dc trinity
102 notes
·
View notes
Text

What's your fanfic fantasy? part 12
Chapter Contents.
Part 1 // Part 2 // Part 3 // Part 4 // Part 5 // Part 6 // Part 7 // Part 8 // Part 9 // Part 10 // Part 11 // Part 12 // Part 13 // Part 14 //
Premise: fem reader + Chan + Jisung 18+ fanfic. This is an AU story about Chan bringing your fantasies to life... but what happens when boyfriends Chan and Han fall in love with you?
Chapter Summary: Hyunjin visits Minho
a/n: I wanted to explore Minho and Hyunjin a little more. I hope you enjoy.

Warnings: mxm, blow jobs, cum swallowing, anal fingering, unprotected anal sex.
Minho pov.
Minho set two wine glasses and a bottle of red on the kitchen bench. He didn’t even know if Hyunjin liked red wine, but Minho thought he seemed like the type to enjoy a glass of red. He exhaled shakily and ran a hand through his hair. Shit. He was so nervous, his hands trembled. Maybe he should have a glass right now?
He checked his phone 11.35pm. Hyunjin would be there any minute.
Minho didn’t really think Hyunjin would say yes to coming and meeting him here. He couldn’t believe he even had the courage to even text him. They hadn’t spoken to each other since that night at the studio, when he thought Hyunjin was going to kiss him. In Minho’s fantasies he’d imagine that he did actually kiss him. Those sweet, full luscious lips connecting with his. He felt the blood rush to his dick, causing it to start filling out.
When you had helped him bring his Hyunjin fantasy to life and he imagined it was Hyunjin’s ass he was inside, he knew he had it so fucking bad for this man.
“Ping” a text message. Minho’s anxiety surged through his body.
Hyunjin: “I’m at the front door.”
—————————————
Minho tried to slow his heart as walked down the stairs towards the entry hall. The house felt deserted even though he knew somewhere, probably the gym, the others were all having some sort of sex show, and Felix was probably asleep.
He paused at the front door. He had wanted this moment for so long. He couldn’t believe it was finally here, unfolding before him. He shook his head to try and rid himself of his nerves. But it didn’t work, his body felt heavy with anxiety and desire as he opened the big, wooden door.
Minho’s breath caught in his throat at the sight. Hyunjin. Leaning against the brick wall. Denim jeans and a leather jacket. He looked like a fucking model. He was slightly taller than Minho, slender, with long brown hair and he had the most sultry look on his face that he'd had ever seen. Minho’s mouth parted in awe.
Hyunjin met Minho’s eyes and Minho’s mouth hung open even more. He was mesmerized, and he had to blink a few times to snap himself out of the man's spell.
“Um… c-come in.” He stuttered, and the two dancers made their way into the house.
Minho felt Hyunjin’s eyes on him as he lead the way into the kitchen and it made his stomach feel like it was doing somersaults. He could feel the sexual tension between them.
“Umm,” Minho coughed to clear his throat. “Would you like some wine?” he gestured to the glasses and wine bottle.
Hyunjin slinked against the edge of the bench, leaning his back against it, and twiddled a strand of his hair. Minho stole a glance at him and was met with Hyunjin’s curious gaze. He was looking straight at Minho so fucking seductively that it set him on fire. Hyunjin glanced at the wine and back up to Minho.
“You trying to get me drunk, Lee Minho?” he teased. Minho felt his face turn bright red, as he poured the glasses of wine.
“More like calm my nerves.” He whispered, setting the bottle down and placing his hands flat on the counter top to compose himself.
Out of the corner of his eye, Minho could see Hyunjin inching closer to his side. The hairs on his arms stood end, and his veins stood out from the growing tension as he felt the dancer’s energy enter his personal space. Then Minho watched Hyunjin’s hand as it slowly reached for his, placing it on top and squeezing it gently.
Minho stopped breathing entirely. How could he breath when this angel of a man was so close?
Hyunjin leaned in close to Minho’s ear, close enough he could feel the man’s hot breath against his neck. “Don’t be nervous, Minho.” He whispered. “I know we’ve both thought about this moment for a long time.” He brushed his lips against Minho’s neck.
Minho shuddered and slowly turned his head towards Hyunjin, who didn’t make any attempt to step away from him. They were face to face. So close. Hyunjin’s expression needy and flushed, Minho’s expression strained and cautious. Hyunjin bit his lower lip and parted his mouth, trying to encourage Minho to kiss him. Minho stood fixed to the spot. How could he fucking move? This was too intense. This was too scary. Then Hyunjin’s tongue appeared, slipping through his parted mouth and teasing his own lower lip, running it along the plush skin.
Fuck it. Thought Minho and he smashed his mouth hungrily against Hyunjin’s lips.
Hyunjin melted into the kiss immediately, as Minho gave him everything could in that moment. He greedily sought Hyunjin’s tongue sucking it into his mouth then pushing his own back into Hyunjin’s. Hyunjin pulled away panting and threw his head back in a moan, revealing his long, slender neck. Minho took the opportunity to maneuver himself so he was flush against Hyunjin, pushing him hard into the edge of the counter, pressing their erections together. Hyunjin squealed playfully when Minho nipped his neck and delivered kisses up to his ear and bit down gently on his earlobe.
“Fuck. Minho.” Hyunjin exclaimed. “You don’t know how long I’ve wanted to know what this feels like.” Hyunjin’s hands slid around Minho’s waist tugging him in closer so he could grind against his hardness.
“Jinnie,” Minho said low “I need you… I need to feel you…” he pulled away from his neck and held his face in his hands. “Can I feel all of you, Hyunjin?” his voice was gravelly and full of lust. “Can I feel what it’s like to be inside you?”
Hyunjin looked like he was about to come on the spot, just at Minho’s words, and he threw his arms around Minho’s neck and slid his tongue back inside his mouth. Minho moaned and then growled. Suddenly spurred on by Hyunjin’s intrusive tongue, Minho lifted Hyunjin up to sit on the bench, pushing his hips between seated man’s legs. Their hands and their tongues frantically explored one another as they shed their shirts. Their naked torsos writhed together as they made out in the kitchen.
“But… first I need to suck you off?” Minho reached for Hyunjin's belt and paused looking up at Hyunjin for permission.
“Yes, Minho… please…yes!” Hyunjin whined, desperately.
Minho swiftly unbuckled Hyunjin’s belt, undoing his jeans and releasing his length through the fly of his boxer shorts. Minho couldn’t contain his arousal at the sight of his cock. It was just as stunning and ethereal as the rest of him. He couldn’t wait to taste it. He couldn’t wait to taste Hyunjin’s cum.
“Min…” Hyunjin cried out high pitched as Minho’s tongue gently licked the tip of his penis. Minho looked up and chuckled darkly. “You like that, hmm?” he cooed.
“Mmm… yes… ughh! Please..” Hyunjin seemed to be losing himself at the slightest touch, and Minho wondered what he’ll be like once he’s actually fucking him.
The bench height felt a little awkward for Minho as he had to bend down, but he soon realized this angle was allowing him to take almost all of Hyunjin into his mouth. It felt incredible to finally have Hyunjin here with him in this way. The way he had wanted for so long.
Hyunjin’s cock tasted salty, his skin felt so soft and silky, the big veins looked obscenely sexy. Minho had grown rock hard in his pants. Hyunjin was losing it, throwing his head back, whining every time Minho sunk right down to the hilt.
Minho was always a top, but he had always loved to give his lovers earth shattering blow jobs. But right now, in this moment, Minho considered what it would feel like to have this most perfect cock he’d ever laid eyes on, ever held, ever tasted, inside of his own ass. Sweet Jesus what was happening to him?
Minho felt Hyunjin’s fingers in his hair, pressing his head down and holding it in place as he slowly rolled his hips to thrust his cock into Minho’s mouth. Minho’s eyes watered, and saliva ran down his chin, but he was comfortable enough to take him like this.
“No one’s ever taken me in their mouth this good before…” Hyunjin panted. “I didn’t think you’d be such a cock slut… usually it’s me giving the best head.” His head lolled back again as he gyrated against and into Minho’s face and mouth. “Can I come in your mouth?” he whispered, releasing his grip on Minho’s head. Minho looked up at Hyunjin and winked. “Absolutely. I wanna taste your cum, sweetheart.” and sank back down onto Hyunjin.
He used his hand and his mouth to work Hyunjin up into a frenzy. He could feel him on the brink of ejaculating and Minho was in two minds whether to bring him to climax, or slow things right down and make him suffer. But he didn’t have chance to decide because he felt Hyunjin’s cock pulse as ropes of cum spurted into the back of his throat. Hyunjin let out another whiny cry as his orgasm continued for what felt like forever.
“Fuck… Minho.” He looked down at Minho with watery eyes.
Minho stood back up and for long moment they gazed at each other. Hyunjin drank in Minho’s features like he was the most obscure thing in the world and it pleased Minho greatly.
“So,” Minho tilted his head towards the glasses of untouched wine. “Do you wanna take this to my room?”
————————————————
“You’re gonna make me spill the wine, Hyunjin.” Minho playfully scolded the taller man who couldn’t seem to take his hands off Minho as they stumbled into Minho’s room.
“Let’s just down these glasses and then it’s my turn to make you feel good.” Hyunjin flirted. Both men smirked at each other and gulped down their wine, eager to move onto to more pressing activities.
Minho climbed up on the bed to lay on his back near the headboard, and ushered Hyunjin to join him. Hyunjin, slowly and feline like, crept onto the bed to hover over Minho’s bulge. “Let me take this these off you.” He whispered, flicking his eyes up to Minho’s. He nodded and Hyunjin removed Minho’s clothes swiftly.
Minho shuddered at being so naked in front of this angel. His angel. He laid still as the other dancer explored every inch of Minho’s body. The dips and the peaks of his muscles. The smoothness of his skin. Hyunjin took note of how Minho responded to his touch. Where he was sensitive, where he could be firmer. Hyunjin memorized how Minho’s breath would change from soft sighs, to sucking in his breath harshly. It seemed like Hyunjin was lost in the world that was Minho’s body and Minho loved it.
Hyunjin eventually set his sights on Minho’s cock. His eyes grew big as he took it in his hand, eyeing it curiously, hungrily. “Minho,” he sighed “your cock is perfect. Just like the rest of you.” He gazed up at Minho and Minho swallowed hard. Hyunjin’s tongue appeared again, and he licked the precum that was oozing from his tip. “Mmm. So tasty too. You really are scrumptious.” He approved and proceeded to explore and tease Minho’s cock further.
He delivered long strokes with the flat of his tongue from the the underside of the shaft to the tip. “So fucking tasty, Min” he growled taking Minho by surprise. So far Hyunjin had been soft and flirty and airy with his sounds of pleasure. This Hyunjin sounded greedy. Greedy for Minho’s cock. It made him feel good to see this man losing his shit for his dick.
“Mmmm….” Hyunjin mumbled still wrapped around Minho’s shaft. “I can’t wait to have this pretty cock in my ass.” He pulled off and pumped Minho’s cock with his hand, tipping his head to the side and looking at Minho like he was begging him to fuck him right then. “I want you to save your cum for my ass, Minho… I promise I can let you come in my throat another time.” He looked longingly at Minho’s cock. “I do want to know what it tastes like.”
“Lay on the bed.” Minho said coolly. Hyunjin’s eyes lit up and he tried his best to move slow and sexily up the bed, but it was more of a scurry. Hmm. So needy. Thought Minho and he smirked.
Minho straddled Hyunjin, locking his hips to the bed, and leaned down to kiss him sweetly. First his lips. Then he took his kisses to his cheek, then his ear. “Hyunjin, I want to see your perfect, pretty little hole. Will you show me?” He whispered. He felt Hyunjin try to buck his hips, but he couldn’t move. “I want to tease it. Stretch it. I want to fill you up with my cock.” He pulled away from his ear to stare directly into Hyunjin’s eyes. He saw longing in the man’s gaze and it made Minho’s heart melt.
“Minho?” Hyunjin whispered. Minho’s expression turned curious. “I’ve never wanted anyone like I want you. You know that right? This isn’t just a quick fuck for me.” His eyes turned fearful like he’d admitted something terrible to Minho. But Minho’s heart felt full hearing those words from the man underneath him. He didn’t want Hyunjin to be a quick fuck for him either.
“Jinnie.” Minho’s tone was serious. “I have real feelings for you. I need you to know that.” Hyunjin blinked rapidly and nodded. “I’m in love with you.” Confessed Minho. It felt right for him to say it. Hyunjin was being vulnerable and it felt only natural for Minho to be open and honest too.
“Minho… I love you, I wanna be closer to you.” He whispered and closed his eyes.
Minho proceeded to explore Hyunjin’s body, much like Hyunjin had just done to him. He could feel the man relaxing under his touch, and quickly becoming putty in his hands. When he felt Hyunjin was ready, he knelt between the man’s legs and pushed his knees up to give him access to his ass. A surge of desire rushed through Minho, straight to his cock. It had been hard and leaking this entire time, but seeing Hyunjin’s tight rim made his dick twitch. If he didn’t work quickly and cleverly to prep Hyunjin, Minho would probably come untouched.
He leaned over to his bedside table to grab the bottle of lube. He hadn’t brought any of his own, but Jisung helped him out by sparing him a couple of bottles. Unfortunately the lube was strawberry scented and flavored, which was not to Minho’s taste. But now wasn’t the time to complain. Plus, maybe Hyunjin would be into it?
He poured a generous amount of lube onto his finger and pressed his finger to Hyunjin’s rim, who whimpered loudly at the contact. Minho knew he was skilled with his fingers, and it didn’t take him long to build Hyunjin up to three full fingers. Hyunjin, writhed, whimpered, moaned and cried as Minho finger fucked his tight hole.
“Hyunjin, sweetheart… look at you losing your mind from just my fingers.” He said incredulously. “I am not sure you are going to survive my cock.” He chuckled softly.
“Minho… I’m ready.” Hyunjin whined.
Minho removed his fingers slowly as to not shock Hyunjin with a sudden emptiness. He already had the tip of his dick lined up ready to apply pressure as soon as his digits were free. Hyunjin’s hands flew to Minho’s strong biceps in an attempt to ground himself, and they didn’t take their eyes off each other as Minho slowly slipped inside Hyunjin. They both shuddered at this new sensation they were sharing together. They were almost too scared to breath, the feeling was so intense.
“You feel so thick, Minho.” Hyunjin gulped.
Minho smiled, “Maybe you’re just super tight, my love.” Minho gushed.
He slowly inched further inside Hyunjin, feeling his tight walls stretching around his length. Hyunjin let out a low gutteral moan as Minho eventually bottomed out.
“Fuck!” he muttered under his breath, and the pair smiled. Neither of them could believe this was happening.
“Come close to me, Minho… I wanna hold you while you make love to me.”
Minho melted at those words and all he wanted to do was give Hyunjin what he wanted. He leaned down so he was laying on his torso as best he could, his hard erection squashed between their toned stomachs. Minho braced himself with his arms placed on the bed either side of Hyunjin, and Hyunjin’s arms slipped around Minho’s back causing him to shiver.
Minho started moving slowly, rolling his hips in such a way that seemed to be delighting Hyunjin. He’d never seen a man look so turned on before. The noises Hyunjin was making, the way he gazed into Minho’s eyes as he was being fucked, the way his mouth would communicate all sorts of obscene things without having to say any words, was quickly becoming too much for Minho. He wasn’t going to last long.
He repositioned the angle of his thrusts and at the same time reached down between their bodies to grasp Hyunjin’s cock.
“Let’s get there together, Hyunjin. I wanna see you come on my cock.” He started to pump Hyunjin’s length as his thrusts turned unforgiving. Minho had a lot of power in his thighs and hips, and that helped him deliver hard, consistent thrusts. Sweat covered his forehead as he focused on nothing but chasing his and Hyunjin’s releases.
“I’m c-coming, Min..” And Hyunjin choked on his words as cum splattered all over both their stomachs and Minho’s hand.
“That’s it baby,” Minho grunted as he felt Hyunjin clench around him. Minho threw his head back as he felt that tight coil inside him snap and he cried out Hyunjin’s name as he released himself inside of him. “Hyunjin… fuck…!!!”
Minho slumped down on top of Hyunjin. They were both covered in a sheen of sweat and a lot cum. It was only now Minho noticed the mingling scents of sex, sweat, cum and strawberry lube.
“Minho, you made me feel so good. You didn’t make me feel like… like I’m dirty.” Hyunjin whispered.
Hyunjin’s words hit Minho like a punch in the stomach. Why would this make Hyunjin feel dirty? Minho felt angry that someone must have made Hyunjin feel this way, or believe this about himself. “Hyunjin,” Minho soothed. “I’ll never make you feel like this is wrong, or that what you want is… dirty. I mean,” he paused “unless that’s the vibe we’re going for.” He raised his head and smiled at Hyunjin. “But that would only be after we’d talked about it.” He stroked Hyunjin’s cheek. “I want to you to feel safe with me… to explore anything you want. Okay?”
Hyunjin nodded.
“Let’s get us cleaned up, hey. Then we can talk. Or sleep. Whatever you want to do.” And he kissed Hyunjin slowly, letting him know he’s safe.
a/n; What did you think? Pretty sickly sweet for an unhinged blog I know... but I am truly a sucker for fucking with feelings.
Next up (and we're nearly finished the series) Jisung's pov.

@rylea08 @channieandhisgoonsquad @noellllslut @itsseohannbin @weareapackofstrays @3rachasdomesticbanana @palindrome969 @xxkissesforchanniexx @chuuchuu1224 @fun-fanfics @wolfennracha @rhonnie23 @jisunglyricist @strayywayy @rixenluv @piscesrising01 @lunearta @shltsnglggles @lilbabiebunni @jiminssluttyminx @armystay89 @krayzieestay @stellasays45 @hxnnielk @yaorzu-blog @anjian03 @tsunderelino @igetcarriedawaywithyou @mylittleponeypinkrosieposie @privhace @kyunchoni @writhingwrecked @kisses-too-the-moon @justforreaders @melochacco @scenuniverse @oddracha @meilix @ismokeeweed @leftovercigarettes @galaxycatdrawz @grandma143
73 notes
·
View notes
Text
Some more random headcannons no one will care about except most of them are Persey and Elise...so they're basically cannon facts?
-Elise has heterochromia, one eye is green (Edward) and one eye is brown (Amary)
-Elise loves skateboarding and competes professionally at age 18, which is translates well to her (non-professional) surfing competitions
-Persey is too shy to make friends so its usually Elise and Steph(anie Brown) who drag her along to hang out with their friends
-Despite the fact that Edward is greatly annoyed and frustrated by Arthur Brown, he adores Stephanie and all her witty come-back glory, so Edward used to babysit her quite often
-This meant, since Steph's age is in between Persey and Elise, she was the perfect age to play with the both of them when all of them were young
-Persey was completly mute for the first few months after Edward adopted her, and partially mute for the first few years after. She tends to still use her hands to sign to Elise and Edward when she's really overwhelmed and can't talk. Jonathan was kind of glad that he knew how to use sign the first time he saw her like that
-Elise, when overwhelmed, will unintentionally hurt herself. Ex: biting her lip until it bleeds, digging her nails into her arms, scratching at her legs, pulling at her skin
-Edward has many, many counter measures to help his daighters when he's overwhelmed, and in return, Elise and Persey have earned to help him when overwhelmed
-Jonathan was hurt at first when Edward would go to his daughter's for help before him, until one time when Edward was out of town and Jon had a nightmare. Persey and Elise both were in the room trying to wake him up and Jonafhan realized that the two of them had a weird talent for knowing exactly how to help someone when they are in need of help
-Persius is immune to most toxins in high doses, which means that for the average strain of fear toxin to affect her, Jon (or Scarecrow) would have to inject just over ten milliliters of toxin before it would start ti take affect, which is why Persey is safe to watch him making his toxin (though Jon still won't let her handle/make it)
-Elise takes after her father and knows how to code, hack, and make riddles on the fly. She tends to say the same phrase of 'riddle me this' before saying a riddle and it weirds out the Young Justice alot (she's a temporary member here and there, mainly she sticks to the Titans tho)
-Elise and Persey are like that duo of an extrovert and their adopted introvert, with Elise sometimes literally dragging Persey by her collar to go oit and socialize (despite the fact that Persey is 3 and 1/2 inches taller)
-Both girls know how to take apart and rebuild every. single. Riddler. cane within one minute or less, including some of Edward's earliest ones (they had alot of free time growing up since homework was so easy for them and with Edward being in and out of Arkham)
-Edward has managed to evade going to Arkham so many times that people have tried to brube him on how he manages to escape. He's only been sent a handful of times over the ten years he's been the Riddler. (He refuses to specify a number with his daughters and husband being the only people who know the exact number)
That's all, for now. Gonna go work some more of Elise's ref sheet.
#dc#edward nygma#jonathan crane#princeverse#dc oc#scriddler#riddlecrow#elise nygma-crane#persius nygma-crane#headcanon
8 notes
·
View notes
Text

Pairing: Jake "Hangman" Seresin x You (OFC)
Warnings: Swearing, Smut (MDNI 18+ Only), Dirty Talk, Mutual Masturbation, Comeplay
Word Count: 3.7k
Summary: A rainy day and a random board game lets you and Jake to get to know each other better and more intimately.
Masterlist
Truth
"El, I'm bored," Jake whines from the couch where he is stretched out. You're assuming he's still there because the back of the sofa blocks your view from the kitchen. All you can see of your very tall muscular aviator boyfriend is his bare feet kicking, only slightly like a petulant toddler, in the air as he restates his current state of boredom.
"It's one day of rain, Jake. Even in San Diego it happens," you say, advancing out of the kitchen with a beer and a gin and tonic. He rolls over as you approach and perks up when you hand him the beer, an aggressive IPA he's currently obsessed with. He sits up taking the drink from you. You plunk yourself down on the couch and his arm automatically goes around you.
"Enjoy the down time, we're caught up on laundry, worked out this morning, have dinner ready to go in the oven. It's 2 pm on a rainy Sunday and we have no obligations. Let's just chill and enjoy doing nothing," you say.
"Fine, I'll take your offer of cuddling with my smoking hot girlfriend and day drinking," he sighs. You sit contentedly for a few minutes listening to the rain before Jake gets antsy again.
"Let's do something," he pleads.
"How about a board game?" you ask, not entirely sure where that idea came from.
"We have board games?" Jake asks.
You nod and pop off the couch striding towards the guest room.
"In here," you say and point to a cardboard box in the bottom of the closet. Jake pulls it out and opens it up. He pulls out a few classic games and holds them up for you to consider, including Monopoly.
"Nope, last time I played that two people got into a fist fight and we had to find an emergency dentist" you reply and Jake puts it down on the growing pile.
The usual classics like Risk, Life, and few others join the stack.
A devilish and wide smile blooms on his face,
"Oh I think we're going to play this one, El," he says, grinning as he holds up a hot pink box the size of a deck of cards that says,
"Only the Truth, X Rated Edition."
"Oh my god," you groan, "I thought I got rid of that."
You reach for the box but Jake stands up and holds the box up high above your head. He uses every one of the eleven inches he is taller than you to evade your grasp.
Crossing your arms, you give up. The urge to climb him like a tree fading as you try not to pout,
"Lydia got it for me as a gag gift. I can't believe I still have it."
Jake reads the back of the box, in a low sultry voice,
"Get to know everything spicy about your lover or someone you hope will be with this fun and exciting game. Easy setup and clothing optional."
He wags his eyebrows at the last sentence.
Rolling your eyes, you agree,
"Fine, we can play it but you have to make the next round of drinks."
Jake snickers,
"Because making a G&T is sooo hard," he grabs your hand and pulls you to the couch. He rips the box open and peels off the plastic wrap. You pick up the folded paper directions and read them.
"Umm, we can either go through the deck in order increasing 'spiciness' or," the sound of shuffling cards distracts you, "Mix them up."
You look up and Jake is sheepishly neatening up the cards on the table. "Well that decision has been made," you sigh,
"Says everyone has to answer the question, truthfully."
Jake nods and draws a card. He snickers,
"Well that's a doozy to start with. Worst sex partner.”
You take a swig of your drink,
“Second serious boyfriend in college. He was just lazy, only liked missionary and would do this weird horizontal thing every other thrust. It did nothing for me. Once he’d come he was out andI had to take care of myself. We didn’t last long after we started sleeping together. Not the greatest kisser and never gave me oral. My rule is that I have to get oral before I give. So you were a wise man to go down on me right away.”
A smile blooms across Jake's face as he relives the exact moment you're referring to.
"Your turn," you tease in a sing-song voice.
He takes a breath and groans,
“My first one night stand, while I was at Academy. Went home with a local girl and she just kind of laid there despite anything I tried to do, not that I was the most experienced at that point in my life, but I was enthusiastic. When we went doggy style, she moaned so loudly kind of like a donkey every time I pushed into her. It was distracting and weird. When she finally came, she didn’t make a sound and then just got out of bed and left me to my own devices. Yeah, that was definitely the worst.”
You snicker at the thought of a young Jake trying his hand at sleeping around. It's your turn to draw a card and you pull one of the garish pink cards off the deck and read aloud the question,
"Who was your first kiss? Huh, that must have been one of the starter questions."
“Sandra Leonard, 6th grade at a dance. You?” Jake responds.
“Mark Simmons, Homecoming dance, sophomore year of high school," you answer.
“A bit of a late bloomer?” Jake asks.
“Yeah, I didn’t really have time for much social stuff when I was training for the Olympics. Your turn.”
Jake pulls another card,
“What is your favorite genre of porn?"
“Ooh, good one. I’d probably say Gay," you answer, enjoying how Jake’s eyebrows raise.
“One, the guys are always hot and hung,” that earns a hearty laugh from him, “The guys are genuinely aroused and actually get off. There’s no exploiting a woman just for a man’s pleasure. Everyone enjoys themselves.”
He considers your words and nods in agreement. There is a brief gleam of mischief in his eye as takes a swig of beer before answering the question,
"Granny."
You're not smooth enough to school your facial features into a neutral look, whatever thought you're having is on your face making Jake laugh.
“Just kidding, I’m a pretty straight laced guy, usual man/woman couples, lesbian, and solo women.”
“Those are pretty mainstream, although that would have been the time to slip in any weird fetish you’ve been holding back. Not to kink shame you or anything."
Jake laughs,
“I promise you don’t have anything too crazy in the spank bank, just being around you is enough to get me going at an instant.”
He leans over to kiss you, the taste of the IPA heavy on his lips.
"Mmm, you taste like a pine tree. My turn!"
You read the next card aloud,
“Who was your first steady boyfriend/girlfriend?”
“Tiffany Meadows, she was my girlfriend through high school. We broke up when we went away to college. Thanks or no thanks to Facebook, I know she is happily living as a suburban stay at home Mom in Dallas with three kids.”
“Melvin Markham, freshman year of college. He was a fellow gymnast at Notre Dame. He was two years older than me.”
Jake draws the next card,
“Who'd you lose your virginity to and where?”
“Melvin, freshman year, he lived off campus. Couldn't get away with a lot of the dorms at Notre Dame, nuns and other minders everywhere.”
“I’m just laughing at the idea of you sneaking around nuns to get sexed up.”
“The joys of going to a Catholic university.”
“Sounds more strict than the academy. Which is saying something.”
“Your turn.”
“Tiffany, my senior year of high school, in her bedroom when her parents were out of town for the weekend.”
Jake picks up the next card,
"Have you ever slept with someone of the same gender?"
"First of all, what a heteronormative question, but yes I have slept with a woman, once."
Jake perks up,
"Details, please."
You pause, and then tell him,
“You have to swear never to let anyone know, especially the person I’m going to mention and their significant other. Swear you won’t.”
You hold out your pinky for the most solemn of all oaths, Jake laughs at your seriousness and agrees,
“Pinky promise.”
“Lydia and I had sex one time in college," you blurt out, enjoying how Jake's eyes bug out a little as he tries not to spit his poorly timed sip of beer out. After a few coughs his look shifts as he is probably imagining you and Lydia having sex. You give him a mock slap to stop his imagination running away on him.
“I don’t think you know, but Lydia is bisexual. She’s had a few girlfriends here and there but has tended towards men in the past couple years. Well, we were a little tipsy one night in my dorm room and Lydia confided in me she was attracted to girls, but was scared to do anything about it. She was afraid of getting involved with a girl and getting to that stage and realizing that it wasn’t for her. My tipsy brain, plus it almost feels like a rite of cliche passage for college girls now, thought the perfect solution was for Lydia and me to mess around for her to see if she liked it and I was curious too. It was good, a lot different than being with a guy, all soft and smooth versus hard muscles and stubble. I like being penetrated too much to be exclusively a lesbian, good for you.”
“What happened the next morning? Did things get weird?” he asks, his curiosity getting to him.
“It was surprisingly okay the next day. Lydia said thanks for helping her figure out some stuff. I let her know it wasn't my cup of tea, but that I was glad she got to explore that with someone she trusted. I think our friendship is so strong that that bond prevailed rather than a romantic or sexual one.”
You can tell Jake’s mind is blown.
“That’s incredibly…sweet in a way. And yes I’m glad you enjoy dick, specifically my dick.”
"You're welcome, now it's your turn.”
“Nothing quite as poetic as yours, but a few things have happened at sea. It’s really hard to say no to anyone who wants to suck your dick, female or male, when you’ve not had sex for months. You say yes and it feels polite to at least reciprocate a hand job.”
“Makes sense, and seems like a nice thing to do.”
You pull the next card,
"What sex act do you want to try?"
"I really want to watch you get yourself off, the whole thing without any help from me. I know you have some toys, but never seem to bring them out during sex."
"I didn't know you'd be okay with that."
"Want to see how you use them, give me some ideas for later. Plus it'd be like my own personal porn."
"Okay, I think I can do that."
Jake looks at me,
"What do you want to try?"
"I like the idea of some roleplay." He raises an eyebrow,
"What specifically?"
"Like the idea of us meeting up somewhere at a bar as strangers and you picking me up for a one night stand. Maybe fucking in the parking lot."
"I like that idea, we can definitely work that one out,"
The rain starts to come down harder, a dull roar on the roof.
You put your drink down on the table and take Jake's beer to join your glass. Your hands free you move to straddle Jake's strong thighs,
"All this talk of sex stuff has got me going, you want to check?"
Jake's hand slides down under your dress, up your thigh, and to your warm core. His jaw flexes the moment he realizes you forwent underwear. A strong finger ghosts over your clit causing you to gasp and slides into your wet opening.
"Fuck, El, you're soaked."
"Want to try out your idea?"
Jake nods enthusiastically,
"Yes, El, whatever you're comfortable with."
Slowly you stand up and pull Jake up with you. He follows you as you lead him by the hand to the bedroom. You pull the armchair that usually sits in the corner of the room to the foot of the bed and motion for him to sit. He complies and adjusts himself when he sits down, just the initial idea getting him excited and starting to tent his pants.
After arranging the pillows on the bed to your liking you pull out your trusty vibrator. The ridiculous pink and sparkly coloring a bit much in the muted daylight of the bedroom. The lube is fished out of the top drawer of your nightstand and placed on the bed next to the toy. Jake is watching you intently as you go through your preparations; finally you strip the dress you have on, letting it fall to the floor as you slide onto the bed naked.
"You okay, El?" Jake asks, soft concern on his face.
"I'm good, Jake. Enjoy the show," you respond. Leaning back into the pillows, you have your legs modestly together still, knees touching. You know that you wouldn't go through all these motions if it was just you, but that's the fun of the fantasy, everything is just a bit heightened, a bit more production value.
Making sure your supplies are within arms reach you start to caress yourself, long sweeps of your body and curves. Your hands glide over your breasts, down the slope of your stomach, to the outer and inner reaches of your thighs, but you don't touch your pussy yet.
The soothing touch entices you to close your eyes and just enjoy the sensations of skin on skin. On your next round your hands stop on your breasts, cupping them and rolling your nipples between your fingers gently. The action pulls a light moan out of you and for the first time since you started Jake speaks,
"El," he rasps, his voice thick, "Talk to me, tell me what you're thinking about, what you're imagining."
A slight flush creeps on your cheeks, somehow this feels so much more intimate than some of the things you done with Jake and you realize because he's really the first person you've ever let this far into your life, your mind, and your heart. You trust him with all of you, so you take a little settling breath and start to talk, with your hands squeezing your tits and nipples.
"I love how big your hands are, how they feel on me. How you can just cover big parts of my body with one hand, makes me feel protected."
You let one hand slide down to your apex and gently part your folds and your legs finally open to Jake's gaze. A deep groan resonates from the end of the bed when your legs fully part exposing your glistening cunt.
You tease around your pussy, letting your fingers dance on your lips as you hold them open with your other hand.
"The way you eat my pussy like it's your last meal drives me crazy. If it were up to me I'd keep you between my legs all the time. Under my desk at work, here in our bed, anywhere I could get you, because no one, no one, has ever eaten my pussy as good as you do Jake."
You finally give in and let your fingers slide over your clit and down into your wet slit. Gathering some of your slick on your fingers you rub small circles around your clit. A soft sigh of relief escapes from your lips as some of the ache eases with your motions. You take the opportunity to look at Jake and he has slipped his sweats and boxer briefs down releasing his dick. His hard cock is in his hand, precum leaking out the tip. His green eyes look dark and intense as they watch your every move.
Your mouth waters at the thought taking him in your mouth, you begin to speak again, your sex stream of consciousness if you will,
"Love your cock, Jake. The taste. I want it in me all the time, my mouth, my pussy. We should try cockwarming. Think about having me wrapped all around you while we do something, like watch a movie and see how long we can hold out being that close and connected to each other without fucking our brains out." The image of you just being with Jake, perched on his dick gets you going even more and your fingers begin to speed up on your clit. You decide it's time to get the vibrator involved. When you pull your hands away to get the toy and lube, Jake lets out a little whine of disappointment.
You apply some lube to the vibrator and click the cap shut before tossing it to the foot of the bed for Jake. Laying back you hear the click of the lube cap and know Jake has slicked himself up. You click the toy on, and tease it down your body to your pussy. Even then you don't go straight in, enjoying the pleasant vibrations on your clit and swirling it around your hole to heighten the anticipation some more.
"I need to get a bigger vibrator, this one feels small compared to you," you pant out as you tease yourself with the aforementioned toy. Jake huffs out a small laugh at your statement.
"I like how you stretch me when you first slide in," you try to say in a sultry voice as you slide the vibe in, slowly pumping it in and out. The sounds of Jake's breaths speed up.
The satisfaction of knowing how turned on he is spurs you to keep talking,
"I like to think of all the ways you've taken me, how we've fucked, Jake. I always love it when you push me up against a wall and just rail me," you can't help but let out a loud moan at the thought and memory,
"Going as deep as you can, can practically feel your dick in my throat and almost taste it."
A small "fuck me" rumbles from Jake's mouth and you continue to let the dirty talk spill out of your mouth.
"Or when you take me from behind, it lets you slap my ass how I like it. I love seeing your big hand prints on my ass."
With that last verbal volley, everything speeds up. You click the next level on the vibrator, pump it faster, and rub your clit harder on your quest to come undone.
The sounds of slicked up movement mixed with Jake's heavy breathing and muted grunts at the foot of the bed tell you he's getting closer to his own release. You hold your head up long enough to take in the sight of Jake, shirt discarded somewhere along the way, muscles tensed, eyes transfixed on your movements as he slides his hand up and down his cock.
Your own climax is building rapidly and you start to shout as you peak,
"So close, Jake,I'm coming, fuck yes, oh my god."
You finally break into that plane of bliss and the pleasure washes over you as you thrash about on the bed.
Chest heaving, you pull the vibrator out and turn it off. You collapse, boneless, into the softness of the bed.
The bed dips and Jake crawls up to kiss you. It is hard and messy, saliva and tongues as he keeps up his rhythm on his dick, slowly jerking it as he hovers above you.
"El, how you keep getting sexier and sexier I don't know, watching you get yourself off and knowing how much you think about me got me so fucking hard. Can't wait to fuck you after this," he pants against your lips.
You grasp his cock, displacing his hand, as you moan,
"I want you to come," you pause, "Come on me."
"Fuck, El."
You speed up your strokes on his dick, his eyes starting to screw shut as he focuses on you.
Jake lets out a deep moan as his
hands grasp and bunch the comforter on either side of your head.
"El, I'm going to come," he pants, his hips bucking into your hand.
"Want you to feel good. Come for me."
That is the magic set of words that pulls Jake's release from him, warm spurts of come land on your chest as a loud strangled grunt emits from Jake his head pulled back, veins bulging on his neck, chest heaving.
"Holy fuck, El," he groans out as he flops on his back next to you on the bed. He looks your way just in time to watch you drag a finger through the mess on your chest and bring it to your lips to clean.
He groans, almost painfully,
"You're going to kill me, El. Jacob Thomas Seresin dead by sex at age 33."
You laugh and stretch your neck over to him to catch his lips in a sweet kiss. "That was the one of the sexiest things I've ever seen," he says against your lips. You pull back enough to look Jake in the eyes.
"I'm glad you liked it."
He laughs,
"I loved it."
You find Jake's hand with your own and interweave your fingers together.
"I've never done that with anyone," you say into the space between you,
"I didn't really trust any guy enough to give them an all access pass to my brain and body.
Jake raises your intertwined hands and kisses your knuckles softly,
"I'm honored I'm the first and last man who gets this privilege."
You raise an eyebrow,
"The last?"
"Darling, I'm never letting you go."
"Ditto."
"I'm thinking we need to explore that porn shower of yours some more and clean you up," Jake says pulling you up.
"Sounds lovely, lead the way, Jake."
@mygyn
@kmc1989
@starswholistenanddreamsanswered
@mayhemmanaged
@callmemana
@dempy
@hangmanscoming
@lanie-k
@callsign-viper
@senjoritanana
@djs8891
@atarmychick007
@memoriesat30
@midnightmagpiemama
#top gun maverick#hangman#hangman fanfiction#jake seresin fanfiction#top gun fanfiction#top gun smut#hangman x you#jake hangman seresin x reader#jake hangman seresin x you#jake seresin x you
136 notes
·
View notes
Photo

Prominent for their vibrant and long-lasting blooms, Zinnias are annual flowering plants that can be propagated through cuttings or you can grow them from seeds. While both ways of propagation are simple and easy, growing zinnias from cuttings can save lots of time. Apart from improving aesthetics, zinnias attract pollinators to your garden and these daisy-like flowers are extensively used as cut flowers. You can grow zinnias in containers or use them to decorate garden borders. In this write-up, I’ll share how to propagate zinnias from cuttings and seeds. Before that let’s first learn about this annual flowering plant. Growing Requirements of Zinnias Zinnias are sun-loving plants that thrive with minimal care, making them a favorite among both beginner and seasoned gardeners. However, to ensure healthy growth and vibrant blooms, it’s important to understand the basic growing conditions these cheerful flowers need. 1. Sunlight Zinnias flourish in full sunlight. They need at least 6 to 8 hours of direct sun each day. The more sun they receive, the more vigorously they grow and the more profusely they bloom. In shaded areas, they may become leggy and produce fewer flowers. 2. Soil Well-draining soil is crucial for zinnias. They prefer loamy or sandy soil enriched with organic matter. The soil pH should ideally range between 5.5 and 7.5. Poor drainage can lead to root rot and fungal diseases. 3. Watering Zinnias are relatively drought-tolerant once established, but they do best with consistent moisture. Water the plants at the base early in the day to avoid wet foliage, which can attract powdery mildew. Avoid overwatering; allow the top inch of soil to dry out between watering. 4. Temperature These plants love warm weather and are sensitive to frost. The ideal temperature range for growing zinnias is 70°F to 85°F. Avoid planting them too early in the season; wait until after the last frost date in your region. 5. Fertilizer While zinnias aren’t heavy feeders, they benefit from a light application of balanced fertilizer (e.g., 10-10-10 NPK) once every 4–6 weeks during the growing season. Over-fertilizing can result in lush foliage with fewer blooms. Check this: 8 Lilies that Bloom all Summer 6. Spacing Proper spacing ensures good air circulation and reduces the risk of diseases. Depending on the variety, space plants 6 to 18 inches apart. Dwarf varieties can be planted closer together, while taller types need more room to spread. 7. Pests and Diseases Zinnias are generally hardy but can be prone to aphids, spider mites, and whiteflies. Powdery mildew is a common fungal issue, especially in humid conditions or when plants are overcrowded. Regular inspection and removing affected leaves can help maintain plant health. How to Propagate Zinnias? Propagating zinnias is a rewarding process that allows gardeners to multiply their favourite varieties, save on plant costs, and enjoy continuous blooms throughout the growing season. Whether you want to fill your garden beds or share plants with friends, propagation is a simple and efficient way to expand your zinnia collection. There are two common methods to propagate zinnias: from seeds and by stem cuttings. Starting from seeds is the most popular approach, especially for large-scale planting, and zinnias germinate quickly with minimal effort. On the other hand, propagation through stem cuttings is a lesser-known but effective technique that saves time by producing mature plants faster. Both methods are easy, even for beginners, and each has its own set of advantages. How to Grow Zinnias from Seeds? Growing zinnias from seeds is one of the easiest and most cost-effective ways to enjoy these vibrant blooms. Zinnia seeds germinate quickly, making them a great choice for gardeners who want fast results with minimal fuss. Here’s a step-by-step guide to help you grow healthy zinnias from seeds: 1. Choose the Right Seeds Start by selecting the zinnia variety you want to grow. Zinnias come in many colors, heights, and bloom types—ranging from dwarf to tall varieties and single to double flowers. Choose seeds based on your garden’s layout and desired color palette. 2. Start Seeds Indoors (Optional) If you want to get a head start on the growing season, you can sow zinnia seeds indoors about 4–6 weeks before the last expected frost. Fill seed trays or pots with a good quality seed-starting mix. Sow seeds about 1/4 inch deep and lightly cover them with soil. Water gently and place the trays in a warm, bright spot or under grow lights. Seeds usually germinate within 5 to 7 days. 3. Direct Sowing in the Garden Zinnias are also ideal for direct sowing once the danger of frost has passed and the soil has warmed. Prepare the garden bed by loosening the soil and removing weeds. Sow seeds 1/4 inch deep and 4–6 inches apart. Water the area gently but thoroughly. 4. Thinning Seedlings Once the seedlings grow about 2–3 inches tall, thin them to maintain proper spacing based on the variety: Dwarf zinnias: 6–9 inches apart. Tall varieties: 12–18 inches apart.Thinning ensures proper air circulation, reduces disease risk, and allows each plant enough room to thrive. 5. Caring for Seedlings Keep the soil consistently moist but not soggy during the early growth stage. As the plants mature, reduce watering frequency and water only when the top inch of soil feels dry. Apply a balanced liquid fertilizer every few weeks to encourage healthy growth and blooming. 6. Enjoy the Blooms Zinnias typically start blooming 6 to 8 weeks after sowing. Regulardeadheading (removing spent flowers) encourages the plants to produce even more blooms throughout the season. How to Propagate Zinnias from Cuttings? Although zinnias are traditionally grown from seeds, propagating them through stem cuttings offers a faster and equally reliable way to grow new plants. This technique is especially useful when you want to preserve the exact traits of a particular zinnia—such as flower color, size, or petal shape. Since zinnias are hybrids or cultivars in many cases, seed-grown plants may not be true to type, whereas cuttings provide genetic clones of the parent plant. Propagation by cuttings is also ideal for mid-to-late season expansion, when mature zinnias are already blooming and you want to make more without waiting for seeds to germinate and mature. With proper care, stem cuttings can root in as little as one to two weeks, and you’ll enjoy new flowering plants within a short time. Below is a step-by-step guide to successfully propagate zinnias from cuttings: 1. Choose a Healthy Parent Plant To ensure successful propagation, start with a robust, disease-free zinnia plant. A good cutting comes from a stem that is: Green and pliable (not too woody or old) Free of flowers or flower buds Free from visible signs of pests, mildew, or damage Cuttings taken from a healthy plant root faster and establish more easily. You can take multiple cuttings from a single zinnia plant if it is large and vigorous enough. 2. Taking the Cutting Use sterilized garden scissors or pruning shears to snip a stem: Cut a section 4–6 inches long, ideally just below a leaf node, as this is where new roots will emerge. Strip off the bottom 2–3 sets of leaves from the stem, leaving only a few small leaves at the top. If the remaining leaves are large, cut them in half to reduce moisture loss and help the cutting conserve energy during rooting. Pro tip: Always make clean, diagonal cuts to increase the surface area for rooting and prevent rotting. Also Read: 13 Annual Flowers that Bloom All Summer 3. Prepare for Rooting Once you have your cutting: Dip the cut end into rooting hormone powder or gel (optional but recommended). This helps stimulate root growth and increases success rates. Tap off excess powder and prepare to insert the cutting into either water or soil. There are two methods to root your zinnia cutting—in water or in soil. Both work well; choose the method that suits your setup. Also Read: How to Propagate Hibiscus From Cuttings? 4. Method 1: Rooting in Water Water propagation is simple and allows you to monitor root development: Place the prepared cutting in a clear glass or jar filled with clean, room-temperature water. Ensure that the leafless portion of the stem is submerged, but no leaves are in the water (this can cause rot). Place the container in a bright spot with indirect light—such as a sunny windowsill. Change the water every 2–3 days to prevent bacterial growth. You should see small roots developing within 7–10 days. Once the roots are about 1–2 inches long, the cutting is ready for transplanting into soil. Tip: Avoid placing cuttings in direct sunlight, as the heat can cause wilting before roots develop. 5. Method 2: Rooting in Soil Soil propagation is closer to natural conditions and allows the roots to develop in their future growing medium: Use a well-draining potting mix (ideally a blend of peat, perlite, and compost). Fill a small pot or seed tray with this mix and moisten it lightly. Insert the cutting about 1–2 inches deep, ensuring that at least one node is buried under the soil. Firm the soil around the cutting gently for support. To retain humidity, you can cover the pot with a clear plastic bag, leaving some space for airflow (this creates a mini greenhouse effect). Place the pot in a bright, warm area out of direct sun. Roots should begin to develop within 10–14 days. To test for rooting, gently tug the cutting—resistance means roots have formed. 6. Transplanting Rooted Cuttings Once the roots are well-developed (whether from water or soil), your zinnia cutting is ready to be moved into its permanent home: If rooting in water: Gently transplant the cutting into a small pot filled with moist potting soil. If rooting in soil: Allow the plant to grow in the pot for a few more days after roots are established, then harden off the plant before moving it outside. Hardening off involves gradually exposing the plant to outdoor conditions over a week. Start by placing the plant outside for a few hours in partial shade and increase sun exposure gradually. Transplant the cutting into a sunny garden bed or container, spacing it based on its mature size—typically 6–18 inches apart depending on the variety. Also Read: How to Grow Blanket Flower? How to Care Zinnias After Transplanting? Proper care after transplanting is crucial to help zinnias settle in and start growing vigorously. The following tips will ensure healthy plants and a garden full of blooms. Watering Water thoroughly right after transplanting to help the roots settle. Keep the soil evenly moist for the first 1–2 weeks. Let the top inch of soil dry between waterings once established. Always water at the base to avoid wetting the leaves. Sunlight Zinnias need full sun, at least 6 to 8 hours daily, for healthy growth and flowering. Ensure they are not shaded by other plants or structures. Gradually introduce indoor-grown or shaded cuttings to direct sun. Sudden exposure can cause wilting or sunburn. Mulching Apply a light layer of organic mulch around each plant. Mulch helps retain moisture and suppress weeds naturally. Avoid placing mulch directly against the stem to prevent rot and fungal issues. Fertilizing Wait two weeks after transplanting before feeding the plants. This gives roots time to establish. Use a balanced, slow-release fertilizer or diluted liquid feed every 4–6 weeks for steady growth and blooms. Pinching and Deadheading Pinch back the top of young plants when they reach 6–8 inches. This encourages bushier, fuller growth. Deadhead faded flowers regularly to keep zinnias blooming continuously through the season. Pest and Disease Management Watch for pests like aphids, spider mites, and whiteflies. Neem oil or insecticidal soap can control most infestations. To prevent powdery mildew, space plants properly and water only at the base in the morning. Staking (For Tall Varieties) Tall zinnia varieties may need staking to stay upright. Use bamboo sticks or garden stakes early for support. Tie stems loosely with twine to avoid damage during windy or rainy weather. Monitor Growth Zinnias usually start blooming within 3–4 weeks after transplanting. Keep an eye on overall plant health and adjust care as needed. Consistent watering, sun exposure, and light feeding will keep them thriving until the first frost. Also Read: Can Marigold and Zinnias Grow Together? Conclusion Propagating zinnias—whether from seeds or cuttings—is a simple and rewarding way to multiply these vibrant, pollinator-friendly flowers in your garden. Seeds offer variety and abundance, while cuttings provide a faster route to blooming plants that stay true to their parent. With minimal tools and care, you can enjoy a season-long display of colorful blooms. Whether you’re filling garden beds, brightening containers, or sharing with fellow gardeners, propagating zinnias ensures beauty and satisfaction from start to finish. Khaja Moinuddin, a computer science graduate, finds joy in gardening and homesteading. Join him on this blog as he shares his experiences in homesteading, gardening, and composting Source link
1 note
·
View note
Photo

Prominent for their vibrant and long-lasting blooms, Zinnias are annual flowering plants that can be propagated through cuttings or you can grow them from seeds. While both ways of propagation are simple and easy, growing zinnias from cuttings can save lots of time. Apart from improving aesthetics, zinnias attract pollinators to your garden and these daisy-like flowers are extensively used as cut flowers. You can grow zinnias in containers or use them to decorate garden borders. In this write-up, I’ll share how to propagate zinnias from cuttings and seeds. Before that let’s first learn about this annual flowering plant. Growing Requirements of Zinnias Zinnias are sun-loving plants that thrive with minimal care, making them a favorite among both beginner and seasoned gardeners. However, to ensure healthy growth and vibrant blooms, it’s important to understand the basic growing conditions these cheerful flowers need. 1. Sunlight Zinnias flourish in full sunlight. They need at least 6 to 8 hours of direct sun each day. The more sun they receive, the more vigorously they grow and the more profusely they bloom. In shaded areas, they may become leggy and produce fewer flowers. 2. Soil Well-draining soil is crucial for zinnias. They prefer loamy or sandy soil enriched with organic matter. The soil pH should ideally range between 5.5 and 7.5. Poor drainage can lead to root rot and fungal diseases. 3. Watering Zinnias are relatively drought-tolerant once established, but they do best with consistent moisture. Water the plants at the base early in the day to avoid wet foliage, which can attract powdery mildew. Avoid overwatering; allow the top inch of soil to dry out between watering. 4. Temperature These plants love warm weather and are sensitive to frost. The ideal temperature range for growing zinnias is 70°F to 85°F. Avoid planting them too early in the season; wait until after the last frost date in your region. 5. Fertilizer While zinnias aren’t heavy feeders, they benefit from a light application of balanced fertilizer (e.g., 10-10-10 NPK) once every 4–6 weeks during the growing season. Over-fertilizing can result in lush foliage with fewer blooms. Check this: 8 Lilies that Bloom all Summer 6. Spacing Proper spacing ensures good air circulation and reduces the risk of diseases. Depending on the variety, space plants 6 to 18 inches apart. Dwarf varieties can be planted closer together, while taller types need more room to spread. 7. Pests and Diseases Zinnias are generally hardy but can be prone to aphids, spider mites, and whiteflies. Powdery mildew is a common fungal issue, especially in humid conditions or when plants are overcrowded. Regular inspection and removing affected leaves can help maintain plant health. How to Propagate Zinnias? Propagating zinnias is a rewarding process that allows gardeners to multiply their favourite varieties, save on plant costs, and enjoy continuous blooms throughout the growing season. Whether you want to fill your garden beds or share plants with friends, propagation is a simple and efficient way to expand your zinnia collection. There are two common methods to propagate zinnias: from seeds and by stem cuttings. Starting from seeds is the most popular approach, especially for large-scale planting, and zinnias germinate quickly with minimal effort. On the other hand, propagation through stem cuttings is a lesser-known but effective technique that saves time by producing mature plants faster. Both methods are easy, even for beginners, and each has its own set of advantages. How to Grow Zinnias from Seeds? Growing zinnias from seeds is one of the easiest and most cost-effective ways to enjoy these vibrant blooms. Zinnia seeds germinate quickly, making them a great choice for gardeners who want fast results with minimal fuss. Here’s a step-by-step guide to help you grow healthy zinnias from seeds: 1. Choose the Right Seeds Start by selecting the zinnia variety you want to grow. Zinnias come in many colors, heights, and bloom types—ranging from dwarf to tall varieties and single to double flowers. Choose seeds based on your garden’s layout and desired color palette. 2. Start Seeds Indoors (Optional) If you want to get a head start on the growing season, you can sow zinnia seeds indoors about 4–6 weeks before the last expected frost. Fill seed trays or pots with a good quality seed-starting mix. Sow seeds about 1/4 inch deep and lightly cover them with soil. Water gently and place the trays in a warm, bright spot or under grow lights. Seeds usually germinate within 5 to 7 days. 3. Direct Sowing in the Garden Zinnias are also ideal for direct sowing once the danger of frost has passed and the soil has warmed. Prepare the garden bed by loosening the soil and removing weeds. Sow seeds 1/4 inch deep and 4–6 inches apart. Water the area gently but thoroughly. 4. Thinning Seedlings Once the seedlings grow about 2–3 inches tall, thin them to maintain proper spacing based on the variety: Dwarf zinnias: 6–9 inches apart. Tall varieties: 12–18 inches apart.Thinning ensures proper air circulation, reduces disease risk, and allows each plant enough room to thrive. 5. Caring for Seedlings Keep the soil consistently moist but not soggy during the early growth stage. As the plants mature, reduce watering frequency and water only when the top inch of soil feels dry. Apply a balanced liquid fertilizer every few weeks to encourage healthy growth and blooming. 6. Enjoy the Blooms Zinnias typically start blooming 6 to 8 weeks after sowing. Regulardeadheading (removing spent flowers) encourages the plants to produce even more blooms throughout the season. How to Propagate Zinnias from Cuttings? Although zinnias are traditionally grown from seeds, propagating them through stem cuttings offers a faster and equally reliable way to grow new plants. This technique is especially useful when you want to preserve the exact traits of a particular zinnia—such as flower color, size, or petal shape. Since zinnias are hybrids or cultivars in many cases, seed-grown plants may not be true to type, whereas cuttings provide genetic clones of the parent plant. Propagation by cuttings is also ideal for mid-to-late season expansion, when mature zinnias are already blooming and you want to make more without waiting for seeds to germinate and mature. With proper care, stem cuttings can root in as little as one to two weeks, and you’ll enjoy new flowering plants within a short time. Below is a step-by-step guide to successfully propagate zinnias from cuttings: 1. Choose a Healthy Parent Plant To ensure successful propagation, start with a robust, disease-free zinnia plant. A good cutting comes from a stem that is: Green and pliable (not too woody or old) Free of flowers or flower buds Free from visible signs of pests, mildew, or damage Cuttings taken from a healthy plant root faster and establish more easily. You can take multiple cuttings from a single zinnia plant if it is large and vigorous enough. 2. Taking the Cutting Use sterilized garden scissors or pruning shears to snip a stem: Cut a section 4–6 inches long, ideally just below a leaf node, as this is where new roots will emerge. Strip off the bottom 2–3 sets of leaves from the stem, leaving only a few small leaves at the top. If the remaining leaves are large, cut them in half to reduce moisture loss and help the cutting conserve energy during rooting. Pro tip: Always make clean, diagonal cuts to increase the surface area for rooting and prevent rotting. Also Read: 13 Annual Flowers that Bloom All Summer 3. Prepare for Rooting Once you have your cutting: Dip the cut end into rooting hormone powder or gel (optional but recommended). This helps stimulate root growth and increases success rates. Tap off excess powder and prepare to insert the cutting into either water or soil. There are two methods to root your zinnia cutting—in water or in soil. Both work well; choose the method that suits your setup. Also Read: How to Propagate Hibiscus From Cuttings? 4. Method 1: Rooting in Water Water propagation is simple and allows you to monitor root development: Place the prepared cutting in a clear glass or jar filled with clean, room-temperature water. Ensure that the leafless portion of the stem is submerged, but no leaves are in the water (this can cause rot). Place the container in a bright spot with indirect light—such as a sunny windowsill. Change the water every 2–3 days to prevent bacterial growth. You should see small roots developing within 7–10 days. Once the roots are about 1–2 inches long, the cutting is ready for transplanting into soil. Tip: Avoid placing cuttings in direct sunlight, as the heat can cause wilting before roots develop. 5. Method 2: Rooting in Soil Soil propagation is closer to natural conditions and allows the roots to develop in their future growing medium: Use a well-draining potting mix (ideally a blend of peat, perlite, and compost). Fill a small pot or seed tray with this mix and moisten it lightly. Insert the cutting about 1–2 inches deep, ensuring that at least one node is buried under the soil. Firm the soil around the cutting gently for support. To retain humidity, you can cover the pot with a clear plastic bag, leaving some space for airflow (this creates a mini greenhouse effect). Place the pot in a bright, warm area out of direct sun. Roots should begin to develop within 10–14 days. To test for rooting, gently tug the cutting—resistance means roots have formed. 6. Transplanting Rooted Cuttings Once the roots are well-developed (whether from water or soil), your zinnia cutting is ready to be moved into its permanent home: If rooting in water: Gently transplant the cutting into a small pot filled with moist potting soil. If rooting in soil: Allow the plant to grow in the pot for a few more days after roots are established, then harden off the plant before moving it outside. Hardening off involves gradually exposing the plant to outdoor conditions over a week. Start by placing the plant outside for a few hours in partial shade and increase sun exposure gradually. Transplant the cutting into a sunny garden bed or container, spacing it based on its mature size—typically 6–18 inches apart depending on the variety. Also Read: How to Grow Blanket Flower? How to Care Zinnias After Transplanting? Proper care after transplanting is crucial to help zinnias settle in and start growing vigorously. The following tips will ensure healthy plants and a garden full of blooms. Watering Water thoroughly right after transplanting to help the roots settle. Keep the soil evenly moist for the first 1–2 weeks. Let the top inch of soil dry between waterings once established. Always water at the base to avoid wetting the leaves. Sunlight Zinnias need full sun, at least 6 to 8 hours daily, for healthy growth and flowering. Ensure they are not shaded by other plants or structures. Gradually introduce indoor-grown or shaded cuttings to direct sun. Sudden exposure can cause wilting or sunburn. Mulching Apply a light layer of organic mulch around each plant. Mulch helps retain moisture and suppress weeds naturally. Avoid placing mulch directly against the stem to prevent rot and fungal issues. Fertilizing Wait two weeks after transplanting before feeding the plants. This gives roots time to establish. Use a balanced, slow-release fertilizer or diluted liquid feed every 4–6 weeks for steady growth and blooms. Pinching and Deadheading Pinch back the top of young plants when they reach 6–8 inches. This encourages bushier, fuller growth. Deadhead faded flowers regularly to keep zinnias blooming continuously through the season. Pest and Disease Management Watch for pests like aphids, spider mites, and whiteflies. Neem oil or insecticidal soap can control most infestations. To prevent powdery mildew, space plants properly and water only at the base in the morning. Staking (For Tall Varieties) Tall zinnia varieties may need staking to stay upright. Use bamboo sticks or garden stakes early for support. Tie stems loosely with twine to avoid damage during windy or rainy weather. Monitor Growth Zinnias usually start blooming within 3–4 weeks after transplanting. Keep an eye on overall plant health and adjust care as needed. Consistent watering, sun exposure, and light feeding will keep them thriving until the first frost. Also Read: Can Marigold and Zinnias Grow Together? Conclusion Propagating zinnias—whether from seeds or cuttings—is a simple and rewarding way to multiply these vibrant, pollinator-friendly flowers in your garden. Seeds offer variety and abundance, while cuttings provide a faster route to blooming plants that stay true to their parent. With minimal tools and care, you can enjoy a season-long display of colorful blooms. Whether you’re filling garden beds, brightening containers, or sharing with fellow gardeners, propagating zinnias ensures beauty and satisfaction from start to finish. Khaja Moinuddin, a computer science graduate, finds joy in gardening and homesteading. Join him on this blog as he shares his experiences in homesteading, gardening, and composting Source link
0 notes
Photo
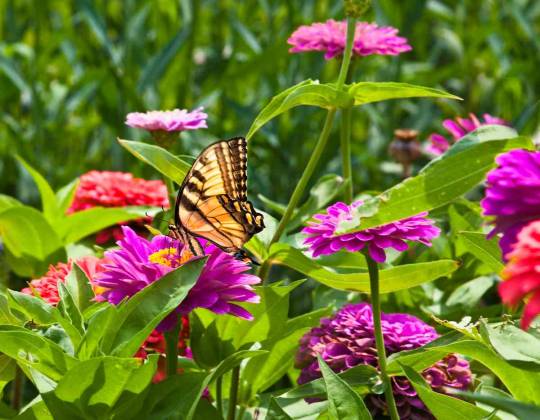
Prominent for their vibrant and long-lasting blooms, Zinnias are annual flowering plants that can be propagated through cuttings or you can grow them from seeds. While both ways of propagation are simple and easy, growing zinnias from cuttings can save lots of time. Apart from improving aesthetics, zinnias attract pollinators to your garden and these daisy-like flowers are extensively used as cut flowers. You can grow zinnias in containers or use them to decorate garden borders. In this write-up, I’ll share how to propagate zinnias from cuttings and seeds. Before that let’s first learn about this annual flowering plant. Growing Requirements of Zinnias Zinnias are sun-loving plants that thrive with minimal care, making them a favorite among both beginner and seasoned gardeners. However, to ensure healthy growth and vibrant blooms, it’s important to understand the basic growing conditions these cheerful flowers need. 1. Sunlight Zinnias flourish in full sunlight. They need at least 6 to 8 hours of direct sun each day. The more sun they receive, the more vigorously they grow and the more profusely they bloom. In shaded areas, they may become leggy and produce fewer flowers. 2. Soil Well-draining soil is crucial for zinnias. They prefer loamy or sandy soil enriched with organic matter. The soil pH should ideally range between 5.5 and 7.5. Poor drainage can lead to root rot and fungal diseases. 3. Watering Zinnias are relatively drought-tolerant once established, but they do best with consistent moisture. Water the plants at the base early in the day to avoid wet foliage, which can attract powdery mildew. Avoid overwatering; allow the top inch of soil to dry out between watering. 4. Temperature These plants love warm weather and are sensitive to frost. The ideal temperature range for growing zinnias is 70°F to 85°F. Avoid planting them too early in the season; wait until after the last frost date in your region. 5. Fertilizer While zinnias aren’t heavy feeders, they benefit from a light application of balanced fertilizer (e.g., 10-10-10 NPK) once every 4–6 weeks during the growing season. Over-fertilizing can result in lush foliage with fewer blooms. Check this: 8 Lilies that Bloom all Summer 6. Spacing Proper spacing ensures good air circulation and reduces the risk of diseases. Depending on the variety, space plants 6 to 18 inches apart. Dwarf varieties can be planted closer together, while taller types need more room to spread. 7. Pests and Diseases Zinnias are generally hardy but can be prone to aphids, spider mites, and whiteflies. Powdery mildew is a common fungal issue, especially in humid conditions or when plants are overcrowded. Regular inspection and removing affected leaves can help maintain plant health. How to Propagate Zinnias? Propagating zinnias is a rewarding process that allows gardeners to multiply their favourite varieties, save on plant costs, and enjoy continuous blooms throughout the growing season. Whether you want to fill your garden beds or share plants with friends, propagation is a simple and efficient way to expand your zinnia collection. There are two common methods to propagate zinnias: from seeds and by stem cuttings. Starting from seeds is the most popular approach, especially for large-scale planting, and zinnias germinate quickly with minimal effort. On the other hand, propagation through stem cuttings is a lesser-known but effective technique that saves time by producing mature plants faster. Both methods are easy, even for beginners, and each has its own set of advantages. How to Grow Zinnias from Seeds? Growing zinnias from seeds is one of the easiest and most cost-effective ways to enjoy these vibrant blooms. Zinnia seeds germinate quickly, making them a great choice for gardeners who want fast results with minimal fuss. Here’s a step-by-step guide to help you grow healthy zinnias from seeds: 1. Choose the Right Seeds Start by selecting the zinnia variety you want to grow. Zinnias come in many colors, heights, and bloom types—ranging from dwarf to tall varieties and single to double flowers. Choose seeds based on your garden’s layout and desired color palette. 2. Start Seeds Indoors (Optional) If you want to get a head start on the growing season, you can sow zinnia seeds indoors about 4–6 weeks before the last expected frost. Fill seed trays or pots with a good quality seed-starting mix. Sow seeds about 1/4 inch deep and lightly cover them with soil. Water gently and place the trays in a warm, bright spot or under grow lights. Seeds usually germinate within 5 to 7 days. 3. Direct Sowing in the Garden Zinnias are also ideal for direct sowing once the danger of frost has passed and the soil has warmed. Prepare the garden bed by loosening the soil and removing weeds. Sow seeds 1/4 inch deep and 4–6 inches apart. Water the area gently but thoroughly. 4. Thinning Seedlings Once the seedlings grow about 2–3 inches tall, thin them to maintain proper spacing based on the variety: Dwarf zinnias: 6–9 inches apart. Tall varieties: 12–18 inches apart.Thinning ensures proper air circulation, reduces disease risk, and allows each plant enough room to thrive. 5. Caring for Seedlings Keep the soil consistently moist but not soggy during the early growth stage. As the plants mature, reduce watering frequency and water only when the top inch of soil feels dry. Apply a balanced liquid fertilizer every few weeks to encourage healthy growth and blooming. 6. Enjoy the Blooms Zinnias typically start blooming 6 to 8 weeks after sowing. Regulardeadheading (removing spent flowers) encourages the plants to produce even more blooms throughout the season. How to Propagate Zinnias from Cuttings? Although zinnias are traditionally grown from seeds, propagating them through stem cuttings offers a faster and equally reliable way to grow new plants. This technique is especially useful when you want to preserve the exact traits of a particular zinnia—such as flower color, size, or petal shape. Since zinnias are hybrids or cultivars in many cases, seed-grown plants may not be true to type, whereas cuttings provide genetic clones of the parent plant. Propagation by cuttings is also ideal for mid-to-late season expansion, when mature zinnias are already blooming and you want to make more without waiting for seeds to germinate and mature. With proper care, stem cuttings can root in as little as one to two weeks, and you’ll enjoy new flowering plants within a short time. Below is a step-by-step guide to successfully propagate zinnias from cuttings: 1. Choose a Healthy Parent Plant To ensure successful propagation, start with a robust, disease-free zinnia plant. A good cutting comes from a stem that is: Green and pliable (not too woody or old) Free of flowers or flower buds Free from visible signs of pests, mildew, or damage Cuttings taken from a healthy plant root faster and establish more easily. You can take multiple cuttings from a single zinnia plant if it is large and vigorous enough. 2. Taking the Cutting Use sterilized garden scissors or pruning shears to snip a stem: Cut a section 4–6 inches long, ideally just below a leaf node, as this is where new roots will emerge. Strip off the bottom 2–3 sets of leaves from the stem, leaving only a few small leaves at the top. If the remaining leaves are large, cut them in half to reduce moisture loss and help the cutting conserve energy during rooting. Pro tip: Always make clean, diagonal cuts to increase the surface area for rooting and prevent rotting. Also Read: 13 Annual Flowers that Bloom All Summer 3. Prepare for Rooting Once you have your cutting: Dip the cut end into rooting hormone powder or gel (optional but recommended). This helps stimulate root growth and increases success rates. Tap off excess powder and prepare to insert the cutting into either water or soil. There are two methods to root your zinnia cutting—in water or in soil. Both work well; choose the method that suits your setup. Also Read: How to Propagate Hibiscus From Cuttings? 4. Method 1: Rooting in Water Water propagation is simple and allows you to monitor root development: Place the prepared cutting in a clear glass or jar filled with clean, room-temperature water. Ensure that the leafless portion of the stem is submerged, but no leaves are in the water (this can cause rot). Place the container in a bright spot with indirect light—such as a sunny windowsill. Change the water every 2–3 days to prevent bacterial growth. You should see small roots developing within 7–10 days. Once the roots are about 1–2 inches long, the cutting is ready for transplanting into soil. Tip: Avoid placing cuttings in direct sunlight, as the heat can cause wilting before roots develop. 5. Method 2: Rooting in Soil Soil propagation is closer to natural conditions and allows the roots to develop in their future growing medium: Use a well-draining potting mix (ideally a blend of peat, perlite, and compost). Fill a small pot or seed tray with this mix and moisten it lightly. Insert the cutting about 1–2 inches deep, ensuring that at least one node is buried under the soil. Firm the soil around the cutting gently for support. To retain humidity, you can cover the pot with a clear plastic bag, leaving some space for airflow (this creates a mini greenhouse effect). Place the pot in a bright, warm area out of direct sun. Roots should begin to develop within 10–14 days. To test for rooting, gently tug the cutting—resistance means roots have formed. 6. Transplanting Rooted Cuttings Once the roots are well-developed (whether from water or soil), your zinnia cutting is ready to be moved into its permanent home: If rooting in water: Gently transplant the cutting into a small pot filled with moist potting soil. If rooting in soil: Allow the plant to grow in the pot for a few more days after roots are established, then harden off the plant before moving it outside. Hardening off involves gradually exposing the plant to outdoor conditions over a week. Start by placing the plant outside for a few hours in partial shade and increase sun exposure gradually. Transplant the cutting into a sunny garden bed or container, spacing it based on its mature size—typically 6–18 inches apart depending on the variety. Also Read: How to Grow Blanket Flower? How to Care Zinnias After Transplanting? Proper care after transplanting is crucial to help zinnias settle in and start growing vigorously. The following tips will ensure healthy plants and a garden full of blooms. Watering Water thoroughly right after transplanting to help the roots settle. Keep the soil evenly moist for the first 1–2 weeks. Let the top inch of soil dry between waterings once established. Always water at the base to avoid wetting the leaves. Sunlight Zinnias need full sun, at least 6 to 8 hours daily, for healthy growth and flowering. Ensure they are not shaded by other plants or structures. Gradually introduce indoor-grown or shaded cuttings to direct sun. Sudden exposure can cause wilting or sunburn. Mulching Apply a light layer of organic mulch around each plant. Mulch helps retain moisture and suppress weeds naturally. Avoid placing mulch directly against the stem to prevent rot and fungal issues. Fertilizing Wait two weeks after transplanting before feeding the plants. This gives roots time to establish. Use a balanced, slow-release fertilizer or diluted liquid feed every 4–6 weeks for steady growth and blooms. Pinching and Deadheading Pinch back the top of young plants when they reach 6–8 inches. This encourages bushier, fuller growth. Deadhead faded flowers regularly to keep zinnias blooming continuously through the season. Pest and Disease Management Watch for pests like aphids, spider mites, and whiteflies. Neem oil or insecticidal soap can control most infestations. To prevent powdery mildew, space plants properly and water only at the base in the morning. Staking (For Tall Varieties) Tall zinnia varieties may need staking to stay upright. Use bamboo sticks or garden stakes early for support. Tie stems loosely with twine to avoid damage during windy or rainy weather. Monitor Growth Zinnias usually start blooming within 3–4 weeks after transplanting. Keep an eye on overall plant health and adjust care as needed. Consistent watering, sun exposure, and light feeding will keep them thriving until the first frost. Also Read: Can Marigold and Zinnias Grow Together? Conclusion Propagating zinnias—whether from seeds or cuttings—is a simple and rewarding way to multiply these vibrant, pollinator-friendly flowers in your garden. Seeds offer variety and abundance, while cuttings provide a faster route to blooming plants that stay true to their parent. With minimal tools and care, you can enjoy a season-long display of colorful blooms. Whether you’re filling garden beds, brightening containers, or sharing with fellow gardeners, propagating zinnias ensures beauty and satisfaction from start to finish. Khaja Moinuddin, a computer science graduate, finds joy in gardening and homesteading. Join him on this blog as he shares his experiences in homesteading, gardening, and composting Source link
0 notes
Photo

Prominent for their vibrant and long-lasting blooms, Zinnias are annual flowering plants that can be propagated through cuttings or you can grow them from seeds. While both ways of propagation are simple and easy, growing zinnias from cuttings can save lots of time. Apart from improving aesthetics, zinnias attract pollinators to your garden and these daisy-like flowers are extensively used as cut flowers. You can grow zinnias in containers or use them to decorate garden borders. In this write-up, I’ll share how to propagate zinnias from cuttings and seeds. Before that let’s first learn about this annual flowering plant. Growing Requirements of Zinnias Zinnias are sun-loving plants that thrive with minimal care, making them a favorite among both beginner and seasoned gardeners. However, to ensure healthy growth and vibrant blooms, it’s important to understand the basic growing conditions these cheerful flowers need. 1. Sunlight Zinnias flourish in full sunlight. They need at least 6 to 8 hours of direct sun each day. The more sun they receive, the more vigorously they grow and the more profusely they bloom. In shaded areas, they may become leggy and produce fewer flowers. 2. Soil Well-draining soil is crucial for zinnias. They prefer loamy or sandy soil enriched with organic matter. The soil pH should ideally range between 5.5 and 7.5. Poor drainage can lead to root rot and fungal diseases. 3. Watering Zinnias are relatively drought-tolerant once established, but they do best with consistent moisture. Water the plants at the base early in the day to avoid wet foliage, which can attract powdery mildew. Avoid overwatering; allow the top inch of soil to dry out between watering. 4. Temperature These plants love warm weather and are sensitive to frost. The ideal temperature range for growing zinnias is 70°F to 85°F. Avoid planting them too early in the season; wait until after the last frost date in your region. 5. Fertilizer While zinnias aren’t heavy feeders, they benefit from a light application of balanced fertilizer (e.g., 10-10-10 NPK) once every 4–6 weeks during the growing season. Over-fertilizing can result in lush foliage with fewer blooms. Check this: 8 Lilies that Bloom all Summer 6. Spacing Proper spacing ensures good air circulation and reduces the risk of diseases. Depending on the variety, space plants 6 to 18 inches apart. Dwarf varieties can be planted closer together, while taller types need more room to spread. 7. Pests and Diseases Zinnias are generally hardy but can be prone to aphids, spider mites, and whiteflies. Powdery mildew is a common fungal issue, especially in humid conditions or when plants are overcrowded. Regular inspection and removing affected leaves can help maintain plant health. How to Propagate Zinnias? Propagating zinnias is a rewarding process that allows gardeners to multiply their favourite varieties, save on plant costs, and enjoy continuous blooms throughout the growing season. Whether you want to fill your garden beds or share plants with friends, propagation is a simple and efficient way to expand your zinnia collection. There are two common methods to propagate zinnias: from seeds and by stem cuttings. Starting from seeds is the most popular approach, especially for large-scale planting, and zinnias germinate quickly with minimal effort. On the other hand, propagation through stem cuttings is a lesser-known but effective technique that saves time by producing mature plants faster. Both methods are easy, even for beginners, and each has its own set of advantages. How to Grow Zinnias from Seeds? Growing zinnias from seeds is one of the easiest and most cost-effective ways to enjoy these vibrant blooms. Zinnia seeds germinate quickly, making them a great choice for gardeners who want fast results with minimal fuss. Here’s a step-by-step guide to help you grow healthy zinnias from seeds: 1. Choose the Right Seeds Start by selecting the zinnia variety you want to grow. Zinnias come in many colors, heights, and bloom types—ranging from dwarf to tall varieties and single to double flowers. Choose seeds based on your garden’s layout and desired color palette. 2. Start Seeds Indoors (Optional) If you want to get a head start on the growing season, you can sow zinnia seeds indoors about 4–6 weeks before the last expected frost. Fill seed trays or pots with a good quality seed-starting mix. Sow seeds about 1/4 inch deep and lightly cover them with soil. Water gently and place the trays in a warm, bright spot or under grow lights. Seeds usually germinate within 5 to 7 days. 3. Direct Sowing in the Garden Zinnias are also ideal for direct sowing once the danger of frost has passed and the soil has warmed. Prepare the garden bed by loosening the soil and removing weeds. Sow seeds 1/4 inch deep and 4–6 inches apart. Water the area gently but thoroughly. 4. Thinning Seedlings Once the seedlings grow about 2–3 inches tall, thin them to maintain proper spacing based on the variety: Dwarf zinnias: 6–9 inches apart. Tall varieties: 12–18 inches apart.Thinning ensures proper air circulation, reduces disease risk, and allows each plant enough room to thrive. 5. Caring for Seedlings Keep the soil consistently moist but not soggy during the early growth stage. As the plants mature, reduce watering frequency and water only when the top inch of soil feels dry. Apply a balanced liquid fertilizer every few weeks to encourage healthy growth and blooming. 6. Enjoy the Blooms Zinnias typically start blooming 6 to 8 weeks after sowing. Regulardeadheading (removing spent flowers) encourages the plants to produce even more blooms throughout the season. How to Propagate Zinnias from Cuttings? Although zinnias are traditionally grown from seeds, propagating them through stem cuttings offers a faster and equally reliable way to grow new plants. This technique is especially useful when you want to preserve the exact traits of a particular zinnia—such as flower color, size, or petal shape. Since zinnias are hybrids or cultivars in many cases, seed-grown plants may not be true to type, whereas cuttings provide genetic clones of the parent plant. Propagation by cuttings is also ideal for mid-to-late season expansion, when mature zinnias are already blooming and you want to make more without waiting for seeds to germinate and mature. With proper care, stem cuttings can root in as little as one to two weeks, and you’ll enjoy new flowering plants within a short time. Below is a step-by-step guide to successfully propagate zinnias from cuttings: 1. Choose a Healthy Parent Plant To ensure successful propagation, start with a robust, disease-free zinnia plant. A good cutting comes from a stem that is: Green and pliable (not too woody or old) Free of flowers or flower buds Free from visible signs of pests, mildew, or damage Cuttings taken from a healthy plant root faster and establish more easily. You can take multiple cuttings from a single zinnia plant if it is large and vigorous enough. 2. Taking the Cutting Use sterilized garden scissors or pruning shears to snip a stem: Cut a section 4–6 inches long, ideally just below a leaf node, as this is where new roots will emerge. Strip off the bottom 2–3 sets of leaves from the stem, leaving only a few small leaves at the top. If the remaining leaves are large, cut them in half to reduce moisture loss and help the cutting conserve energy during rooting. Pro tip: Always make clean, diagonal cuts to increase the surface area for rooting and prevent rotting. Also Read: 13 Annual Flowers that Bloom All Summer 3. Prepare for Rooting Once you have your cutting: Dip the cut end into rooting hormone powder or gel (optional but recommended). This helps stimulate root growth and increases success rates. Tap off excess powder and prepare to insert the cutting into either water or soil. There are two methods to root your zinnia cutting—in water or in soil. Both work well; choose the method that suits your setup. Also Read: How to Propagate Hibiscus From Cuttings? 4. Method 1: Rooting in Water Water propagation is simple and allows you to monitor root development: Place the prepared cutting in a clear glass or jar filled with clean, room-temperature water. Ensure that the leafless portion of the stem is submerged, but no leaves are in the water (this can cause rot). Place the container in a bright spot with indirect light—such as a sunny windowsill. Change the water every 2–3 days to prevent bacterial growth. You should see small roots developing within 7–10 days. Once the roots are about 1–2 inches long, the cutting is ready for transplanting into soil. Tip: Avoid placing cuttings in direct sunlight, as the heat can cause wilting before roots develop. 5. Method 2: Rooting in Soil Soil propagation is closer to natural conditions and allows the roots to develop in their future growing medium: Use a well-draining potting mix (ideally a blend of peat, perlite, and compost). Fill a small pot or seed tray with this mix and moisten it lightly. Insert the cutting about 1–2 inches deep, ensuring that at least one node is buried under the soil. Firm the soil around the cutting gently for support. To retain humidity, you can cover the pot with a clear plastic bag, leaving some space for airflow (this creates a mini greenhouse effect). Place the pot in a bright, warm area out of direct sun. Roots should begin to develop within 10–14 days. To test for rooting, gently tug the cutting—resistance means roots have formed. 6. Transplanting Rooted Cuttings Once the roots are well-developed (whether from water or soil), your zinnia cutting is ready to be moved into its permanent home: If rooting in water: Gently transplant the cutting into a small pot filled with moist potting soil. If rooting in soil: Allow the plant to grow in the pot for a few more days after roots are established, then harden off the plant before moving it outside. Hardening off involves gradually exposing the plant to outdoor conditions over a week. Start by placing the plant outside for a few hours in partial shade and increase sun exposure gradually. Transplant the cutting into a sunny garden bed or container, spacing it based on its mature size—typically 6–18 inches apart depending on the variety. Also Read: How to Grow Blanket Flower? How to Care Zinnias After Transplanting? Proper care after transplanting is crucial to help zinnias settle in and start growing vigorously. The following tips will ensure healthy plants and a garden full of blooms. Watering Water thoroughly right after transplanting to help the roots settle. Keep the soil evenly moist for the first 1–2 weeks. Let the top inch of soil dry between waterings once established. Always water at the base to avoid wetting the leaves. Sunlight Zinnias need full sun, at least 6 to 8 hours daily, for healthy growth and flowering. Ensure they are not shaded by other plants or structures. Gradually introduce indoor-grown or shaded cuttings to direct sun. Sudden exposure can cause wilting or sunburn. Mulching Apply a light layer of organic mulch around each plant. Mulch helps retain moisture and suppress weeds naturally. Avoid placing mulch directly against the stem to prevent rot and fungal issues. Fertilizing Wait two weeks after transplanting before feeding the plants. This gives roots time to establish. Use a balanced, slow-release fertilizer or diluted liquid feed every 4–6 weeks for steady growth and blooms. Pinching and Deadheading Pinch back the top of young plants when they reach 6–8 inches. This encourages bushier, fuller growth. Deadhead faded flowers regularly to keep zinnias blooming continuously through the season. Pest and Disease Management Watch for pests like aphids, spider mites, and whiteflies. Neem oil or insecticidal soap can control most infestations. To prevent powdery mildew, space plants properly and water only at the base in the morning. Staking (For Tall Varieties) Tall zinnia varieties may need staking to stay upright. Use bamboo sticks or garden stakes early for support. Tie stems loosely with twine to avoid damage during windy or rainy weather. Monitor Growth Zinnias usually start blooming within 3–4 weeks after transplanting. Keep an eye on overall plant health and adjust care as needed. Consistent watering, sun exposure, and light feeding will keep them thriving until the first frost. Also Read: Can Marigold and Zinnias Grow Together? Conclusion Propagating zinnias—whether from seeds or cuttings—is a simple and rewarding way to multiply these vibrant, pollinator-friendly flowers in your garden. Seeds offer variety and abundance, while cuttings provide a faster route to blooming plants that stay true to their parent. With minimal tools and care, you can enjoy a season-long display of colorful blooms. Whether you’re filling garden beds, brightening containers, or sharing with fellow gardeners, propagating zinnias ensures beauty and satisfaction from start to finish. Khaja Moinuddin, a computer science graduate, finds joy in gardening and homesteading. Join him on this blog as he shares his experiences in homesteading, gardening, and composting Source link
1 note
·
View note
Photo

Prominent for their vibrant and long-lasting blooms, Zinnias are annual flowering plants that can be propagated through cuttings or you can grow them from seeds. While both ways of propagation are simple and easy, growing zinnias from cuttings can save lots of time. Apart from improving aesthetics, zinnias attract pollinators to your garden and these daisy-like flowers are extensively used as cut flowers. You can grow zinnias in containers or use them to decorate garden borders. In this write-up, I’ll share how to propagate zinnias from cuttings and seeds. Before that let’s first learn about this annual flowering plant. Growing Requirements of Zinnias Zinnias are sun-loving plants that thrive with minimal care, making them a favorite among both beginner and seasoned gardeners. However, to ensure healthy growth and vibrant blooms, it’s important to understand the basic growing conditions these cheerful flowers need. 1. Sunlight Zinnias flourish in full sunlight. They need at least 6 to 8 hours of direct sun each day. The more sun they receive, the more vigorously they grow and the more profusely they bloom. In shaded areas, they may become leggy and produce fewer flowers. 2. Soil Well-draining soil is crucial for zinnias. They prefer loamy or sandy soil enriched with organic matter. The soil pH should ideally range between 5.5 and 7.5. Poor drainage can lead to root rot and fungal diseases. 3. Watering Zinnias are relatively drought-tolerant once established, but they do best with consistent moisture. Water the plants at the base early in the day to avoid wet foliage, which can attract powdery mildew. Avoid overwatering; allow the top inch of soil to dry out between watering. 4. Temperature These plants love warm weather and are sensitive to frost. The ideal temperature range for growing zinnias is 70°F to 85°F. Avoid planting them too early in the season; wait until after the last frost date in your region. 5. Fertilizer While zinnias aren’t heavy feeders, they benefit from a light application of balanced fertilizer (e.g., 10-10-10 NPK) once every 4–6 weeks during the growing season. Over-fertilizing can result in lush foliage with fewer blooms. Check this: 8 Lilies that Bloom all Summer 6. Spacing Proper spacing ensures good air circulation and reduces the risk of diseases. Depending on the variety, space plants 6 to 18 inches apart. Dwarf varieties can be planted closer together, while taller types need more room to spread. 7. Pests and Diseases Zinnias are generally hardy but can be prone to aphids, spider mites, and whiteflies. Powdery mildew is a common fungal issue, especially in humid conditions or when plants are overcrowded. Regular inspection and removing affected leaves can help maintain plant health. How to Propagate Zinnias? Propagating zinnias is a rewarding process that allows gardeners to multiply their favourite varieties, save on plant costs, and enjoy continuous blooms throughout the growing season. Whether you want to fill your garden beds or share plants with friends, propagation is a simple and efficient way to expand your zinnia collection. There are two common methods to propagate zinnias: from seeds and by stem cuttings. Starting from seeds is the most popular approach, especially for large-scale planting, and zinnias germinate quickly with minimal effort. On the other hand, propagation through stem cuttings is a lesser-known but effective technique that saves time by producing mature plants faster. Both methods are easy, even for beginners, and each has its own set of advantages. How to Grow Zinnias from Seeds? Growing zinnias from seeds is one of the easiest and most cost-effective ways to enjoy these vibrant blooms. Zinnia seeds germinate quickly, making them a great choice for gardeners who want fast results with minimal fuss. Here’s a step-by-step guide to help you grow healthy zinnias from seeds: 1. Choose the Right Seeds Start by selecting the zinnia variety you want to grow. Zinnias come in many colors, heights, and bloom types—ranging from dwarf to tall varieties and single to double flowers. Choose seeds based on your garden’s layout and desired color palette. 2. Start Seeds Indoors (Optional) If you want to get a head start on the growing season, you can sow zinnia seeds indoors about 4–6 weeks before the last expected frost. Fill seed trays or pots with a good quality seed-starting mix. Sow seeds about 1/4 inch deep and lightly cover them with soil. Water gently and place the trays in a warm, bright spot or under grow lights. Seeds usually germinate within 5 to 7 days. 3. Direct Sowing in the Garden Zinnias are also ideal for direct sowing once the danger of frost has passed and the soil has warmed. Prepare the garden bed by loosening the soil and removing weeds. Sow seeds 1/4 inch deep and 4–6 inches apart. Water the area gently but thoroughly. 4. Thinning Seedlings Once the seedlings grow about 2–3 inches tall, thin them to maintain proper spacing based on the variety: Dwarf zinnias: 6–9 inches apart. Tall varieties: 12–18 inches apart.Thinning ensures proper air circulation, reduces disease risk, and allows each plant enough room to thrive. 5. Caring for Seedlings Keep the soil consistently moist but not soggy during the early growth stage. As the plants mature, reduce watering frequency and water only when the top inch of soil feels dry. Apply a balanced liquid fertilizer every few weeks to encourage healthy growth and blooming. 6. Enjoy the Blooms Zinnias typically start blooming 6 to 8 weeks after sowing. Regulardeadheading (removing spent flowers) encourages the plants to produce even more blooms throughout the season. How to Propagate Zinnias from Cuttings? Although zinnias are traditionally grown from seeds, propagating them through stem cuttings offers a faster and equally reliable way to grow new plants. This technique is especially useful when you want to preserve the exact traits of a particular zinnia—such as flower color, size, or petal shape. Since zinnias are hybrids or cultivars in many cases, seed-grown plants may not be true to type, whereas cuttings provide genetic clones of the parent plant. Propagation by cuttings is also ideal for mid-to-late season expansion, when mature zinnias are already blooming and you want to make more without waiting for seeds to germinate and mature. With proper care, stem cuttings can root in as little as one to two weeks, and you’ll enjoy new flowering plants within a short time. Below is a step-by-step guide to successfully propagate zinnias from cuttings: 1. Choose a Healthy Parent Plant To ensure successful propagation, start with a robust, disease-free zinnia plant. A good cutting comes from a stem that is: Green and pliable (not too woody or old) Free of flowers or flower buds Free from visible signs of pests, mildew, or damage Cuttings taken from a healthy plant root faster and establish more easily. You can take multiple cuttings from a single zinnia plant if it is large and vigorous enough. 2. Taking the Cutting Use sterilized garden scissors or pruning shears to snip a stem: Cut a section 4–6 inches long, ideally just below a leaf node, as this is where new roots will emerge. Strip off the bottom 2–3 sets of leaves from the stem, leaving only a few small leaves at the top. If the remaining leaves are large, cut them in half to reduce moisture loss and help the cutting conserve energy during rooting. Pro tip: Always make clean, diagonal cuts to increase the surface area for rooting and prevent rotting. Also Read: 13 Annual Flowers that Bloom All Summer 3. Prepare for Rooting Once you have your cutting: Dip the cut end into rooting hormone powder or gel (optional but recommended). This helps stimulate root growth and increases success rates. Tap off excess powder and prepare to insert the cutting into either water or soil. There are two methods to root your zinnia cutting—in water or in soil. Both work well; choose the method that suits your setup. Also Read: How to Propagate Hibiscus From Cuttings? 4. Method 1: Rooting in Water Water propagation is simple and allows you to monitor root development: Place the prepared cutting in a clear glass or jar filled with clean, room-temperature water. Ensure that the leafless portion of the stem is submerged, but no leaves are in the water (this can cause rot). Place the container in a bright spot with indirect light—such as a sunny windowsill. Change the water every 2–3 days to prevent bacterial growth. You should see small roots developing within 7–10 days. Once the roots are about 1–2 inches long, the cutting is ready for transplanting into soil. Tip: Avoid placing cuttings in direct sunlight, as the heat can cause wilting before roots develop. 5. Method 2: Rooting in Soil Soil propagation is closer to natural conditions and allows the roots to develop in their future growing medium: Use a well-draining potting mix (ideally a blend of peat, perlite, and compost). Fill a small pot or seed tray with this mix and moisten it lightly. Insert the cutting about 1–2 inches deep, ensuring that at least one node is buried under the soil. Firm the soil around the cutting gently for support. To retain humidity, you can cover the pot with a clear plastic bag, leaving some space for airflow (this creates a mini greenhouse effect). Place the pot in a bright, warm area out of direct sun. Roots should begin to develop within 10–14 days. To test for rooting, gently tug the cutting—resistance means roots have formed. 6. Transplanting Rooted Cuttings Once the roots are well-developed (whether from water or soil), your zinnia cutting is ready to be moved into its permanent home: If rooting in water: Gently transplant the cutting into a small pot filled with moist potting soil. If rooting in soil: Allow the plant to grow in the pot for a few more days after roots are established, then harden off the plant before moving it outside. Hardening off involves gradually exposing the plant to outdoor conditions over a week. Start by placing the plant outside for a few hours in partial shade and increase sun exposure gradually. Transplant the cutting into a sunny garden bed or container, spacing it based on its mature size—typically 6–18 inches apart depending on the variety. Also Read: How to Grow Blanket Flower? How to Care Zinnias After Transplanting? Proper care after transplanting is crucial to help zinnias settle in and start growing vigorously. The following tips will ensure healthy plants and a garden full of blooms. Watering Water thoroughly right after transplanting to help the roots settle. Keep the soil evenly moist for the first 1–2 weeks. Let the top inch of soil dry between waterings once established. Always water at the base to avoid wetting the leaves. Sunlight Zinnias need full sun, at least 6 to 8 hours daily, for healthy growth and flowering. Ensure they are not shaded by other plants or structures. Gradually introduce indoor-grown or shaded cuttings to direct sun. Sudden exposure can cause wilting or sunburn. Mulching Apply a light layer of organic mulch around each plant. Mulch helps retain moisture and suppress weeds naturally. Avoid placing mulch directly against the stem to prevent rot and fungal issues. Fertilizing Wait two weeks after transplanting before feeding the plants. This gives roots time to establish. Use a balanced, slow-release fertilizer or diluted liquid feed every 4–6 weeks for steady growth and blooms. Pinching and Deadheading Pinch back the top of young plants when they reach 6–8 inches. This encourages bushier, fuller growth. Deadhead faded flowers regularly to keep zinnias blooming continuously through the season. Pest and Disease Management Watch for pests like aphids, spider mites, and whiteflies. Neem oil or insecticidal soap can control most infestations. To prevent powdery mildew, space plants properly and water only at the base in the morning. Staking (For Tall Varieties) Tall zinnia varieties may need staking to stay upright. Use bamboo sticks or garden stakes early for support. Tie stems loosely with twine to avoid damage during windy or rainy weather. Monitor Growth Zinnias usually start blooming within 3–4 weeks after transplanting. Keep an eye on overall plant health and adjust care as needed. Consistent watering, sun exposure, and light feeding will keep them thriving until the first frost. Also Read: Can Marigold and Zinnias Grow Together? Conclusion Propagating zinnias—whether from seeds or cuttings—is a simple and rewarding way to multiply these vibrant, pollinator-friendly flowers in your garden. Seeds offer variety and abundance, while cuttings provide a faster route to blooming plants that stay true to their parent. With minimal tools and care, you can enjoy a season-long display of colorful blooms. Whether you’re filling garden beds, brightening containers, or sharing with fellow gardeners, propagating zinnias ensures beauty and satisfaction from start to finish. Khaja Moinuddin, a computer science graduate, finds joy in gardening and homesteading. Join him on this blog as he shares his experiences in homesteading, gardening, and composting Source link
0 notes
Photo

Prominent for their vibrant and long-lasting blooms, Zinnias are annual flowering plants that can be propagated through cuttings or you can grow them from seeds. While both ways of propagation are simple and easy, growing zinnias from cuttings can save lots of time. Apart from improving aesthetics, zinnias attract pollinators to your garden and these daisy-like flowers are extensively used as cut flowers. You can grow zinnias in containers or use them to decorate garden borders. In this write-up, I’ll share how to propagate zinnias from cuttings and seeds. Before that let’s first learn about this annual flowering plant. Growing Requirements of Zinnias Zinnias are sun-loving plants that thrive with minimal care, making them a favorite among both beginner and seasoned gardeners. However, to ensure healthy growth and vibrant blooms, it’s important to understand the basic growing conditions these cheerful flowers need. 1. Sunlight Zinnias flourish in full sunlight. They need at least 6 to 8 hours of direct sun each day. The more sun they receive, the more vigorously they grow and the more profusely they bloom. In shaded areas, they may become leggy and produce fewer flowers. 2. Soil Well-draining soil is crucial for zinnias. They prefer loamy or sandy soil enriched with organic matter. The soil pH should ideally range between 5.5 and 7.5. Poor drainage can lead to root rot and fungal diseases. 3. Watering Zinnias are relatively drought-tolerant once established, but they do best with consistent moisture. Water the plants at the base early in the day to avoid wet foliage, which can attract powdery mildew. Avoid overwatering; allow the top inch of soil to dry out between watering. 4. Temperature These plants love warm weather and are sensitive to frost. The ideal temperature range for growing zinnias is 70°F to 85°F. Avoid planting them too early in the season; wait until after the last frost date in your region. 5. Fertilizer While zinnias aren’t heavy feeders, they benefit from a light application of balanced fertilizer (e.g., 10-10-10 NPK) once every 4–6 weeks during the growing season. Over-fertilizing can result in lush foliage with fewer blooms. Check this: 8 Lilies that Bloom all Summer 6. Spacing Proper spacing ensures good air circulation and reduces the risk of diseases. Depending on the variety, space plants 6 to 18 inches apart. Dwarf varieties can be planted closer together, while taller types need more room to spread. 7. Pests and Diseases Zinnias are generally hardy but can be prone to aphids, spider mites, and whiteflies. Powdery mildew is a common fungal issue, especially in humid conditions or when plants are overcrowded. Regular inspection and removing affected leaves can help maintain plant health. How to Propagate Zinnias? Propagating zinnias is a rewarding process that allows gardeners to multiply their favourite varieties, save on plant costs, and enjoy continuous blooms throughout the growing season. Whether you want to fill your garden beds or share plants with friends, propagation is a simple and efficient way to expand your zinnia collection. There are two common methods to propagate zinnias: from seeds and by stem cuttings. Starting from seeds is the most popular approach, especially for large-scale planting, and zinnias germinate quickly with minimal effort. On the other hand, propagation through stem cuttings is a lesser-known but effective technique that saves time by producing mature plants faster. Both methods are easy, even for beginners, and each has its own set of advantages. How to Grow Zinnias from Seeds? Growing zinnias from seeds is one of the easiest and most cost-effective ways to enjoy these vibrant blooms. Zinnia seeds germinate quickly, making them a great choice for gardeners who want fast results with minimal fuss. Here’s a step-by-step guide to help you grow healthy zinnias from seeds: 1. Choose the Right Seeds Start by selecting the zinnia variety you want to grow. Zinnias come in many colors, heights, and bloom types—ranging from dwarf to tall varieties and single to double flowers. Choose seeds based on your garden’s layout and desired color palette. 2. Start Seeds Indoors (Optional) If you want to get a head start on the growing season, you can sow zinnia seeds indoors about 4–6 weeks before the last expected frost. Fill seed trays or pots with a good quality seed-starting mix. Sow seeds about 1/4 inch deep and lightly cover them with soil. Water gently and place the trays in a warm, bright spot or under grow lights. Seeds usually germinate within 5 to 7 days. 3. Direct Sowing in the Garden Zinnias are also ideal for direct sowing once the danger of frost has passed and the soil has warmed. Prepare the garden bed by loosening the soil and removing weeds. Sow seeds 1/4 inch deep and 4–6 inches apart. Water the area gently but thoroughly. 4. Thinning Seedlings Once the seedlings grow about 2–3 inches tall, thin them to maintain proper spacing based on the variety: Dwarf zinnias: 6–9 inches apart. Tall varieties: 12–18 inches apart.Thinning ensures proper air circulation, reduces disease risk, and allows each plant enough room to thrive. 5. Caring for Seedlings Keep the soil consistently moist but not soggy during the early growth stage. As the plants mature, reduce watering frequency and water only when the top inch of soil feels dry. Apply a balanced liquid fertilizer every few weeks to encourage healthy growth and blooming. 6. Enjoy the Blooms Zinnias typically start blooming 6 to 8 weeks after sowing. Regulardeadheading (removing spent flowers) encourages the plants to produce even more blooms throughout the season. How to Propagate Zinnias from Cuttings? Although zinnias are traditionally grown from seeds, propagating them through stem cuttings offers a faster and equally reliable way to grow new plants. This technique is especially useful when you want to preserve the exact traits of a particular zinnia—such as flower color, size, or petal shape. Since zinnias are hybrids or cultivars in many cases, seed-grown plants may not be true to type, whereas cuttings provide genetic clones of the parent plant. Propagation by cuttings is also ideal for mid-to-late season expansion, when mature zinnias are already blooming and you want to make more without waiting for seeds to germinate and mature. With proper care, stem cuttings can root in as little as one to two weeks, and you’ll enjoy new flowering plants within a short time. Below is a step-by-step guide to successfully propagate zinnias from cuttings: 1. Choose a Healthy Parent Plant To ensure successful propagation, start with a robust, disease-free zinnia plant. A good cutting comes from a stem that is: Green and pliable (not too woody or old) Free of flowers or flower buds Free from visible signs of pests, mildew, or damage Cuttings taken from a healthy plant root faster and establish more easily. You can take multiple cuttings from a single zinnia plant if it is large and vigorous enough. 2. Taking the Cutting Use sterilized garden scissors or pruning shears to snip a stem: Cut a section 4–6 inches long, ideally just below a leaf node, as this is where new roots will emerge. Strip off the bottom 2–3 sets of leaves from the stem, leaving only a few small leaves at the top. If the remaining leaves are large, cut them in half to reduce moisture loss and help the cutting conserve energy during rooting. Pro tip: Always make clean, diagonal cuts to increase the surface area for rooting and prevent rotting. Also Read: 13 Annual Flowers that Bloom All Summer 3. Prepare for Rooting Once you have your cutting: Dip the cut end into rooting hormone powder or gel (optional but recommended). This helps stimulate root growth and increases success rates. Tap off excess powder and prepare to insert the cutting into either water or soil. There are two methods to root your zinnia cutting—in water or in soil. Both work well; choose the method that suits your setup. Also Read: How to Propagate Hibiscus From Cuttings? 4. Method 1: Rooting in Water Water propagation is simple and allows you to monitor root development: Place the prepared cutting in a clear glass or jar filled with clean, room-temperature water. Ensure that the leafless portion of the stem is submerged, but no leaves are in the water (this can cause rot). Place the container in a bright spot with indirect light—such as a sunny windowsill. Change the water every 2–3 days to prevent bacterial growth. You should see small roots developing within 7–10 days. Once the roots are about 1–2 inches long, the cutting is ready for transplanting into soil. Tip: Avoid placing cuttings in direct sunlight, as the heat can cause wilting before roots develop. 5. Method 2: Rooting in Soil Soil propagation is closer to natural conditions and allows the roots to develop in their future growing medium: Use a well-draining potting mix (ideally a blend of peat, perlite, and compost). Fill a small pot or seed tray with this mix and moisten it lightly. Insert the cutting about 1–2 inches deep, ensuring that at least one node is buried under the soil. Firm the soil around the cutting gently for support. To retain humidity, you can cover the pot with a clear plastic bag, leaving some space for airflow (this creates a mini greenhouse effect). Place the pot in a bright, warm area out of direct sun. Roots should begin to develop within 10–14 days. To test for rooting, gently tug the cutting—resistance means roots have formed. 6. Transplanting Rooted Cuttings Once the roots are well-developed (whether from water or soil), your zinnia cutting is ready to be moved into its permanent home: If rooting in water: Gently transplant the cutting into a small pot filled with moist potting soil. If rooting in soil: Allow the plant to grow in the pot for a few more days after roots are established, then harden off the plant before moving it outside. Hardening off involves gradually exposing the plant to outdoor conditions over a week. Start by placing the plant outside for a few hours in partial shade and increase sun exposure gradually. Transplant the cutting into a sunny garden bed or container, spacing it based on its mature size—typically 6–18 inches apart depending on the variety. Also Read: How to Grow Blanket Flower? How to Care Zinnias After Transplanting? Proper care after transplanting is crucial to help zinnias settle in and start growing vigorously. The following tips will ensure healthy plants and a garden full of blooms. Watering Water thoroughly right after transplanting to help the roots settle. Keep the soil evenly moist for the first 1–2 weeks. Let the top inch of soil dry between waterings once established. Always water at the base to avoid wetting the leaves. Sunlight Zinnias need full sun, at least 6 to 8 hours daily, for healthy growth and flowering. Ensure they are not shaded by other plants or structures. Gradually introduce indoor-grown or shaded cuttings to direct sun. Sudden exposure can cause wilting or sunburn. Mulching Apply a light layer of organic mulch around each plant. Mulch helps retain moisture and suppress weeds naturally. Avoid placing mulch directly against the stem to prevent rot and fungal issues. Fertilizing Wait two weeks after transplanting before feeding the plants. This gives roots time to establish. Use a balanced, slow-release fertilizer or diluted liquid feed every 4–6 weeks for steady growth and blooms. Pinching and Deadheading Pinch back the top of young plants when they reach 6–8 inches. This encourages bushier, fuller growth. Deadhead faded flowers regularly to keep zinnias blooming continuously through the season. Pest and Disease Management Watch for pests like aphids, spider mites, and whiteflies. Neem oil or insecticidal soap can control most infestations. To prevent powdery mildew, space plants properly and water only at the base in the morning. Staking (For Tall Varieties) Tall zinnia varieties may need staking to stay upright. Use bamboo sticks or garden stakes early for support. Tie stems loosely with twine to avoid damage during windy or rainy weather. Monitor Growth Zinnias usually start blooming within 3–4 weeks after transplanting. Keep an eye on overall plant health and adjust care as needed. Consistent watering, sun exposure, and light feeding will keep them thriving until the first frost. Also Read: Can Marigold and Zinnias Grow Together? Conclusion Propagating zinnias—whether from seeds or cuttings—is a simple and rewarding way to multiply these vibrant, pollinator-friendly flowers in your garden. Seeds offer variety and abundance, while cuttings provide a faster route to blooming plants that stay true to their parent. With minimal tools and care, you can enjoy a season-long display of colorful blooms. Whether you’re filling garden beds, brightening containers, or sharing with fellow gardeners, propagating zinnias ensures beauty and satisfaction from start to finish. Khaja Moinuddin, a computer science graduate, finds joy in gardening and homesteading. Join him on this blog as he shares his experiences in homesteading, gardening, and composting Source link
0 notes
Photo

Prominent for their vibrant and long-lasting blooms, Zinnias are annual flowering plants that can be propagated through cuttings or you can grow them from seeds. While both ways of propagation are simple and easy, growing zinnias from cuttings can save lots of time. Apart from improving aesthetics, zinnias attract pollinators to your garden and these daisy-like flowers are extensively used as cut flowers. You can grow zinnias in containers or use them to decorate garden borders. In this write-up, I’ll share how to propagate zinnias from cuttings and seeds. Before that let’s first learn about this annual flowering plant. Growing Requirements of Zinnias Zinnias are sun-loving plants that thrive with minimal care, making them a favorite among both beginner and seasoned gardeners. However, to ensure healthy growth and vibrant blooms, it’s important to understand the basic growing conditions these cheerful flowers need. 1. Sunlight Zinnias flourish in full sunlight. They need at least 6 to 8 hours of direct sun each day. The more sun they receive, the more vigorously they grow and the more profusely they bloom. In shaded areas, they may become leggy and produce fewer flowers. 2. Soil Well-draining soil is crucial for zinnias. They prefer loamy or sandy soil enriched with organic matter. The soil pH should ideally range between 5.5 and 7.5. Poor drainage can lead to root rot and fungal diseases. 3. Watering Zinnias are relatively drought-tolerant once established, but they do best with consistent moisture. Water the plants at the base early in the day to avoid wet foliage, which can attract powdery mildew. Avoid overwatering; allow the top inch of soil to dry out between watering. 4. Temperature These plants love warm weather and are sensitive to frost. The ideal temperature range for growing zinnias is 70°F to 85°F. Avoid planting them too early in the season; wait until after the last frost date in your region. 5. Fertilizer While zinnias aren’t heavy feeders, they benefit from a light application of balanced fertilizer (e.g., 10-10-10 NPK) once every 4–6 weeks during the growing season. Over-fertilizing can result in lush foliage with fewer blooms. Check this: 8 Lilies that Bloom all Summer 6. Spacing Proper spacing ensures good air circulation and reduces the risk of diseases. Depending on the variety, space plants 6 to 18 inches apart. Dwarf varieties can be planted closer together, while taller types need more room to spread. 7. Pests and Diseases Zinnias are generally hardy but can be prone to aphids, spider mites, and whiteflies. Powdery mildew is a common fungal issue, especially in humid conditions or when plants are overcrowded. Regular inspection and removing affected leaves can help maintain plant health. How to Propagate Zinnias? Propagating zinnias is a rewarding process that allows gardeners to multiply their favourite varieties, save on plant costs, and enjoy continuous blooms throughout the growing season. Whether you want to fill your garden beds or share plants with friends, propagation is a simple and efficient way to expand your zinnia collection. There are two common methods to propagate zinnias: from seeds and by stem cuttings. Starting from seeds is the most popular approach, especially for large-scale planting, and zinnias germinate quickly with minimal effort. On the other hand, propagation through stem cuttings is a lesser-known but effective technique that saves time by producing mature plants faster. Both methods are easy, even for beginners, and each has its own set of advantages. How to Grow Zinnias from Seeds? Growing zinnias from seeds is one of the easiest and most cost-effective ways to enjoy these vibrant blooms. Zinnia seeds germinate quickly, making them a great choice for gardeners who want fast results with minimal fuss. Here’s a step-by-step guide to help you grow healthy zinnias from seeds: 1. Choose the Right Seeds Start by selecting the zinnia variety you want to grow. Zinnias come in many colors, heights, and bloom types—ranging from dwarf to tall varieties and single to double flowers. Choose seeds based on your garden’s layout and desired color palette. 2. Start Seeds Indoors (Optional) If you want to get a head start on the growing season, you can sow zinnia seeds indoors about 4–6 weeks before the last expected frost. Fill seed trays or pots with a good quality seed-starting mix. Sow seeds about 1/4 inch deep and lightly cover them with soil. Water gently and place the trays in a warm, bright spot or under grow lights. Seeds usually germinate within 5 to 7 days. 3. Direct Sowing in the Garden Zinnias are also ideal for direct sowing once the danger of frost has passed and the soil has warmed. Prepare the garden bed by loosening the soil and removing weeds. Sow seeds 1/4 inch deep and 4–6 inches apart. Water the area gently but thoroughly. 4. Thinning Seedlings Once the seedlings grow about 2–3 inches tall, thin them to maintain proper spacing based on the variety: Dwarf zinnias: 6–9 inches apart. Tall varieties: 12–18 inches apart.Thinning ensures proper air circulation, reduces disease risk, and allows each plant enough room to thrive. 5. Caring for Seedlings Keep the soil consistently moist but not soggy during the early growth stage. As the plants mature, reduce watering frequency and water only when the top inch of soil feels dry. Apply a balanced liquid fertilizer every few weeks to encourage healthy growth and blooming. 6. Enjoy the Blooms Zinnias typically start blooming 6 to 8 weeks after sowing. Regulardeadheading (removing spent flowers) encourages the plants to produce even more blooms throughout the season. How to Propagate Zinnias from Cuttings? Although zinnias are traditionally grown from seeds, propagating them through stem cuttings offers a faster and equally reliable way to grow new plants. This technique is especially useful when you want to preserve the exact traits of a particular zinnia—such as flower color, size, or petal shape. Since zinnias are hybrids or cultivars in many cases, seed-grown plants may not be true to type, whereas cuttings provide genetic clones of the parent plant. Propagation by cuttings is also ideal for mid-to-late season expansion, when mature zinnias are already blooming and you want to make more without waiting for seeds to germinate and mature. With proper care, stem cuttings can root in as little as one to two weeks, and you’ll enjoy new flowering plants within a short time. Below is a step-by-step guide to successfully propagate zinnias from cuttings: 1. Choose a Healthy Parent Plant To ensure successful propagation, start with a robust, disease-free zinnia plant. A good cutting comes from a stem that is: Green and pliable (not too woody or old) Free of flowers or flower buds Free from visible signs of pests, mildew, or damage Cuttings taken from a healthy plant root faster and establish more easily. You can take multiple cuttings from a single zinnia plant if it is large and vigorous enough. 2. Taking the Cutting Use sterilized garden scissors or pruning shears to snip a stem: Cut a section 4–6 inches long, ideally just below a leaf node, as this is where new roots will emerge. Strip off the bottom 2–3 sets of leaves from the stem, leaving only a few small leaves at the top. If the remaining leaves are large, cut them in half to reduce moisture loss and help the cutting conserve energy during rooting. Pro tip: Always make clean, diagonal cuts to increase the surface area for rooting and prevent rotting. Also Read: 13 Annual Flowers that Bloom All Summer 3. Prepare for Rooting Once you have your cutting: Dip the cut end into rooting hormone powder or gel (optional but recommended). This helps stimulate root growth and increases success rates. Tap off excess powder and prepare to insert the cutting into either water or soil. There are two methods to root your zinnia cutting—in water or in soil. Both work well; choose the method that suits your setup. Also Read: How to Propagate Hibiscus From Cuttings? 4. Method 1: Rooting in Water Water propagation is simple and allows you to monitor root development: Place the prepared cutting in a clear glass or jar filled with clean, room-temperature water. Ensure that the leafless portion of the stem is submerged, but no leaves are in the water (this can cause rot). Place the container in a bright spot with indirect light—such as a sunny windowsill. Change the water every 2–3 days to prevent bacterial growth. You should see small roots developing within 7–10 days. Once the roots are about 1–2 inches long, the cutting is ready for transplanting into soil. Tip: Avoid placing cuttings in direct sunlight, as the heat can cause wilting before roots develop. 5. Method 2: Rooting in Soil Soil propagation is closer to natural conditions and allows the roots to develop in their future growing medium: Use a well-draining potting mix (ideally a blend of peat, perlite, and compost). Fill a small pot or seed tray with this mix and moisten it lightly. Insert the cutting about 1–2 inches deep, ensuring that at least one node is buried under the soil. Firm the soil around the cutting gently for support. To retain humidity, you can cover the pot with a clear plastic bag, leaving some space for airflow (this creates a mini greenhouse effect). Place the pot in a bright, warm area out of direct sun. Roots should begin to develop within 10–14 days. To test for rooting, gently tug the cutting—resistance means roots have formed. 6. Transplanting Rooted Cuttings Once the roots are well-developed (whether from water or soil), your zinnia cutting is ready to be moved into its permanent home: If rooting in water: Gently transplant the cutting into a small pot filled with moist potting soil. If rooting in soil: Allow the plant to grow in the pot for a few more days after roots are established, then harden off the plant before moving it outside. Hardening off involves gradually exposing the plant to outdoor conditions over a week. Start by placing the plant outside for a few hours in partial shade and increase sun exposure gradually. Transplant the cutting into a sunny garden bed or container, spacing it based on its mature size—typically 6–18 inches apart depending on the variety. Also Read: How to Grow Blanket Flower? How to Care Zinnias After Transplanting? Proper care after transplanting is crucial to help zinnias settle in and start growing vigorously. The following tips will ensure healthy plants and a garden full of blooms. Watering Water thoroughly right after transplanting to help the roots settle. Keep the soil evenly moist for the first 1–2 weeks. Let the top inch of soil dry between waterings once established. Always water at the base to avoid wetting the leaves. Sunlight Zinnias need full sun, at least 6 to 8 hours daily, for healthy growth and flowering. Ensure they are not shaded by other plants or structures. Gradually introduce indoor-grown or shaded cuttings to direct sun. Sudden exposure can cause wilting or sunburn. Mulching Apply a light layer of organic mulch around each plant. Mulch helps retain moisture and suppress weeds naturally. Avoid placing mulch directly against the stem to prevent rot and fungal issues. Fertilizing Wait two weeks after transplanting before feeding the plants. This gives roots time to establish. Use a balanced, slow-release fertilizer or diluted liquid feed every 4–6 weeks for steady growth and blooms. Pinching and Deadheading Pinch back the top of young plants when they reach 6–8 inches. This encourages bushier, fuller growth. Deadhead faded flowers regularly to keep zinnias blooming continuously through the season. Pest and Disease Management Watch for pests like aphids, spider mites, and whiteflies. Neem oil or insecticidal soap can control most infestations. To prevent powdery mildew, space plants properly and water only at the base in the morning. Staking (For Tall Varieties) Tall zinnia varieties may need staking to stay upright. Use bamboo sticks or garden stakes early for support. Tie stems loosely with twine to avoid damage during windy or rainy weather. Monitor Growth Zinnias usually start blooming within 3–4 weeks after transplanting. Keep an eye on overall plant health and adjust care as needed. Consistent watering, sun exposure, and light feeding will keep them thriving until the first frost. Also Read: Can Marigold and Zinnias Grow Together? Conclusion Propagating zinnias—whether from seeds or cuttings—is a simple and rewarding way to multiply these vibrant, pollinator-friendly flowers in your garden. Seeds offer variety and abundance, while cuttings provide a faster route to blooming plants that stay true to their parent. With minimal tools and care, you can enjoy a season-long display of colorful blooms. Whether you’re filling garden beds, brightening containers, or sharing with fellow gardeners, propagating zinnias ensures beauty and satisfaction from start to finish. Khaja Moinuddin, a computer science graduate, finds joy in gardening and homesteading. Join him on this blog as he shares his experiences in homesteading, gardening, and composting Source link
0 notes
Text
How to Increase Your Height: A Complete Guide to Surgical and Natural Methods

Height has always been associated with confidence, presence, and personal satisfaction. While genetics plays a crucial role, many people look for ways to grow taller—especially after puberty. Thanks to medical advancements, increasing your height is no longer a distant dream. Whether through limb lengthening surgery or non-surgical approaches, this article provides a detailed roadmap to help you understand your options.
What Is Limb Lengthening Surgery?
Limb lengthening surgery is the only scientifically proven method to increase height permanently in adults. It involves a medical process called distraction osteogenesis, where the bone is surgically cut and slowly pulled apart using specialized devices. New bone tissue forms in the gap, gradually increasing the limb length.
There are different surgical techniques, including:
LON (Lengthening Over Nail): Combines external fixator and internal rod for faster healing.
LATN (Lengthening And Then Nailing): First uses an external fixator and then switches to an internal nail.
PRECICE or STRYDE Nails: Advanced internal devices that work magnetically without external frames.
To learn more about these advanced methods, visit the official site of Height Increase Info, one of India’s most trusted centers for cosmetic limb lengthening.
Why Choose India for Limb Lengthening Surgery?
India is emerging as a global destination for medical tourism, especially for limb lengthening procedures. Here’s why:
Affordable Costs: In the US or Europe, the surgery can cost $80,000 or more. In India, the same surgery costs between INR 6 to 15 lakhs, depending on the technique and hospital.
Experienced Surgeons: India boasts internationally trained orthopedic surgeons with extensive experience.
High-Quality Facilities: Hospitals offer international-standard care with modern equipment and post-op rehabilitation support.
Many international patients have successfully increased their height through procedures offered by Height Increase Info, a clinic based in Gurgaon, India, with years of expertise in both LON and LATN methods.
What to Expect During the Surgery Process
Pre-Surgical Assessment: Includes X-rays, blood tests, and fitness evaluation.
Surgical Procedure: Bone is cut and a device is fitted (internal or external).
Lengthening Phase: The device is adjusted to slowly increase height at a rate of 1 mm per day.
Consolidation Phase: New bone hardens and strengthens.
Physical Therapy: Essential for regaining full mobility, flexibility, and strength.
The entire process from surgery to recovery can take 6–12 months depending on the amount of height gained.
Risks and Recovery
As with any major surgery, limb lengthening has certain risks:
Pin site infections (especially with external fixators)
Joint stiffness or muscle tightness
Nerve or blood vessel irritation
Longer healing time if bone regeneration is slow
However, with the right surgical center and proper physiotherapy, complications are rare and manageable. Indian centers like Height Increase Info offer full rehabilitation programs to ensure long-term success and recovery.
Natural Ways to Enhance Your Height (Or Appear Taller)
While surgical height increase is the only method to physically grow taller in adulthood, certain non-surgical methods can enhance posture and boost perceived height.
1. Posture Correction
Poor posture can reduce visible height. Regular stretching, yoga, and back-strengthening exercises can improve your posture, helping you appear 1–2 inches taller.
2. Nutrition for Growing Teens
If you're under 18, a balanced diet rich in calcium, protein, and vitamin D can support healthy bone growth. Important nutrients include:
Calcium: Milk, cheese, almonds
Protein: Eggs, lean meat, legumes
Vitamin D: Sun exposure, fortified foods
3. Height-Increasing Shoes & Insoles
Wearing hidden heel lifts or elevated insoles is a popular way to instantly gain 2–3 inches without surgery.
4. Stretching and Inversion
While not a permanent solution, regular stretching and inversion therapy may decompress the spine, giving a temporary height boost.
You can find more non-surgical techniques discussed in this helpful Height Increase Guide, which explores various options available in India.
Who Should Consider Surgery?
Limb lengthening is ideal for:
Adults who have completed growth (epiphyseal plates are closed)
Individuals with limb length discrepancies
People with medical or cosmetic reasons to increase height
Important: This is a complex surgery and requires strong mental determination, patience, and commitment to follow through with the entire recovery process.
Real Results: What Height Can You Achieve?
Most patients gain between 5 to 8 cm (2–3 inches) in one procedure. In some cases, femur and tibia surgeries are combined to achieve up to 12–15 cm (4.5–6 inches) over time.
It’s important to set realistic expectations, discuss your goals with a qualified surgeon, and understand the physical and emotional commitment involved.
Final Thoughts
If increasing your height is a lifelong dream, limb lengthening surgery offers a real, proven, and permanent solution. India has quickly become a hub for advanced height increase treatments, offering a combination of affordability, safety, and high surgical success rates.
Before making a decision, always research thoroughly, ask questions, and consult experts. Whether you choose surgery or natural methods, confidence and self-acceptance are the keys to feeling taller in your own life.
#limb lengthening surgery#height increase surgery#best doctor height increasing surgery#height increase info#cosmetic limb lengthening india#limb lengthening surgery cost#cosmetic limb lengthening in gurgaon#cosmetic limb lengthening surgery#limb lengthening in india#cosmetic limb lengthening
0 notes