#Heat transfer vinyl sheets
Explore tagged Tumblr posts
Visit Tumblr Blog
Explore Tumblr blogs with no restrictions, modern design and the best experience.
Last Seen Tumblr Blogs


Fun Fact
US Tumblr user growth rate is estimated to slow down to 4.1%.
Text
DIY Perfection: Vibrant Heat Transfer Vinyl Sheets
Explore a colorful selection of heat transfer vinyl sheets, ideal for DIY enthusiasts. Transform your designs into stunning creations with ease and precision.
0 notes
Text
Get the Most Out of Custom Direct-to-Film Transfers
https://eazydtf.com/ - At EazyDTF, we specialize in delivering top-notch custom Direct-to-Film Transfers, ensuring your designs come to life with unparalleled quality and affordability. Our DTF technology allows for high-resolution prints on various materials like cotton, polyester, leather, and more, offering vivid colors and exceptional durability. With quick turnaround times and low prices for both small and large orders, our process guarantees intricate designs and gradients, making it ideal for any scale of operation. Whether you need same-day DTF printing or want to order DTF transfers, contact us today for exceptional results and efficient service.
#custom-dtf-transfers#best-dtf-transfer-printers#direct-to-film-printing-services#3d-puff-htv-heat-transfer-vinyl#custom-holographic-stickers#dtf-gang-sheet-builder#reflective-htv-heat-transfer-vinyl#glitter-htv-heat-transfer-vinyl#glow-htv-heat-transfer-vinyl
0 notes
Text


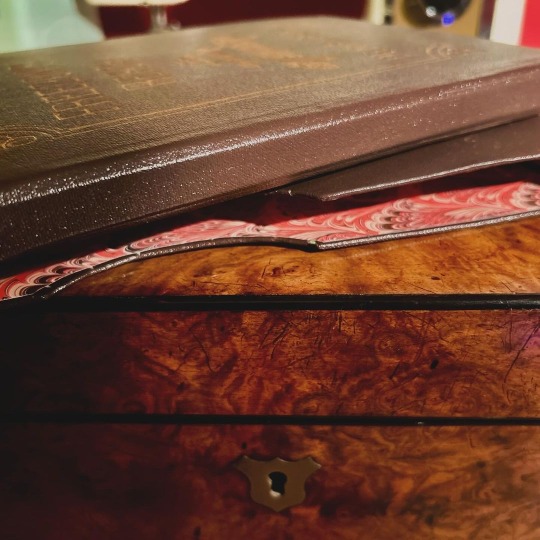
I finally got around to rebinding my copy of the complete Night Angel trilogy by Brent Weeks.
I picked this book up at random at Barnes and Noble years ago to use up a gift card and it ended up being one of my favorites. My paperback had seen better days. The spine was super curved, and coming apart at the corners. I even found sand in the spine glue when I took it apart cause the last time I read it I was at the beach lol


I used a heat gun to loosen the glue on the spine and let it set with weight on it to straighten it back out. Who needs tools when you have books lol.

The spine came out pretty straight once the glue was set back up. I had to loosen it again to get the paper cover to come off cleanly. I reinforced the spine with some new glue as well.


This was my first time doing guilded edges and 2/3 sides came out pretty good! I learned how to sand the edges and I was able to get them to a mirror shine with just manual hand sanding. Then I used heat transfer silver foil.


Once the guilding was done I finished up the text block with the headbands, a bookmark ribbon, and more glue. This book was massive so I had to use two sheets of chip board to get the covers cut out.


I covered the boards with black leather. I used leather repair material so it already had adhesive, and just had to peel and stick. I designed the cover on canva. I tried to match the general vibes of the original cover and other cover versions it's been printed with. Cut out the heat transfer vinyl with my Cricut and ironed it on!

Casing in the text block is always the most stressful part but all went smoothly and I'm really happy with how it turned out!

#bookbinding#rebinding#canva#night angel#brent weeks#Night Angel The Complete Trillogy#cover design#graphic design#cricut#heat transfer
64 notes
·
View notes
Text
Book No. 27
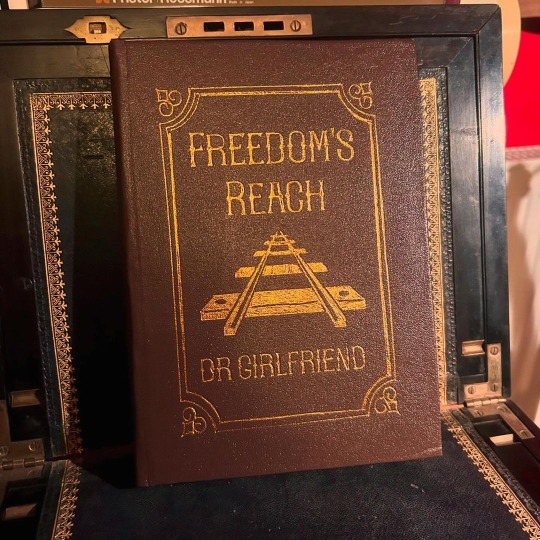
A charity bind for @dr-girlfriend, and coincidentally a fic I adore, which is a lovely bit of fortuitousness.
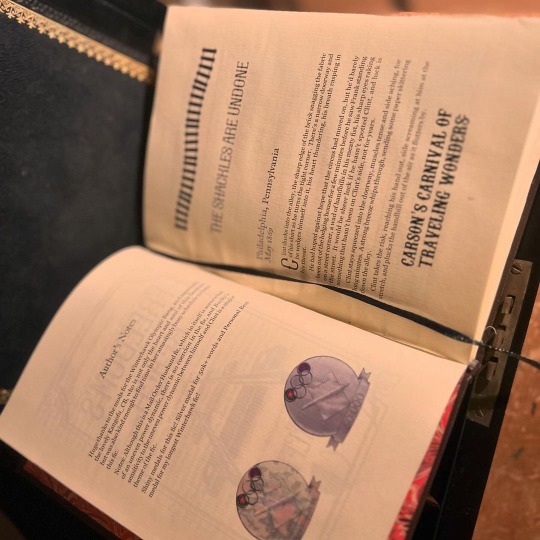
Finished on the 20th of October, according to my binding journal, but only reached the lovely Dr. G today! I was so delighted when she reached out and asked if I would consider binding a copy of this fic for her — it’s a longtime favourite of mine, and it was a fun work to typeset. I wanted to lean into the setting as far as I could without tipping over into outright cheesiness, and while I don’t know that I fully succeeded, it was fun to try.

The foiling on this was a pain, mostly because I wasn’t very clever how I went about it - the sheets of heat-transfer foil I was using weren’t big enough to cover the whole design, and I when I tried to use the cricut, it didn’t take where I used tape to cover the join in strips of foil. Stencil vinyl, my beloved for foiling, also didn’t work as the design was too big to place on the foil without buckling.
I ended up cutting templates out of sticker card and using those on top of the foil, and used a heated pen tool into the crevices of the stencil. It’s still not 100% but it’s better than previous attempts.
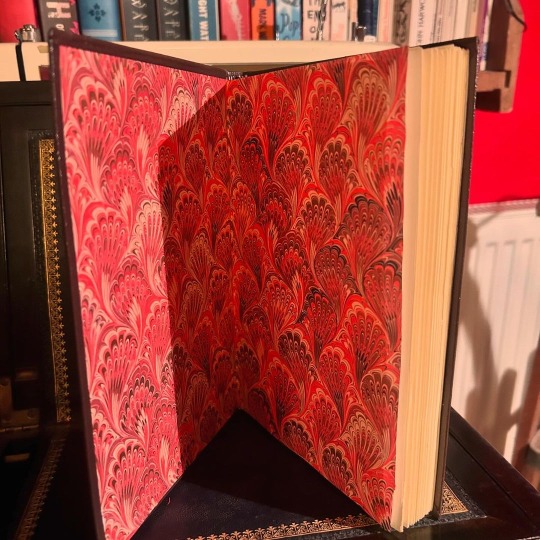
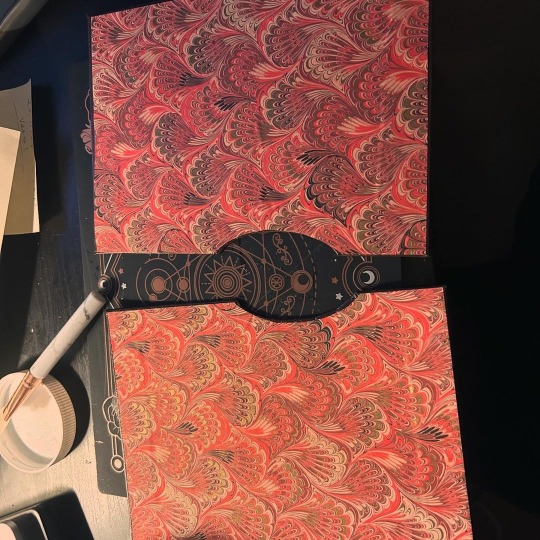
My favourite thing is probably the endpapers — the gold touches in them are really shimmery in person, if not in photos. I also used it to line the slipcase I made, which was a last-minute addition made when I was panicking that the cover was a little too floppy for this book. (The cover ended up firming up compin the press, and the case apparently got a little damaged in transport and is protecting nothing 😅, but I still think it’s a fun touch.)
26 notes
·
View notes
Text
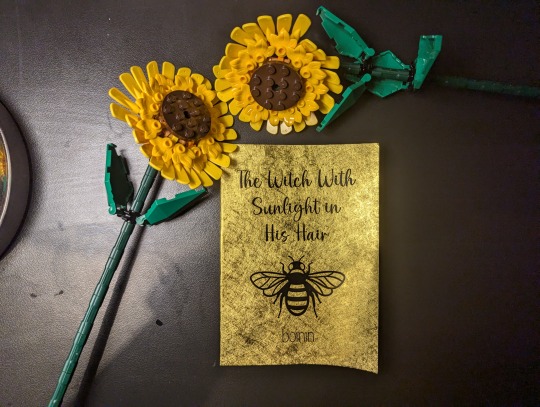
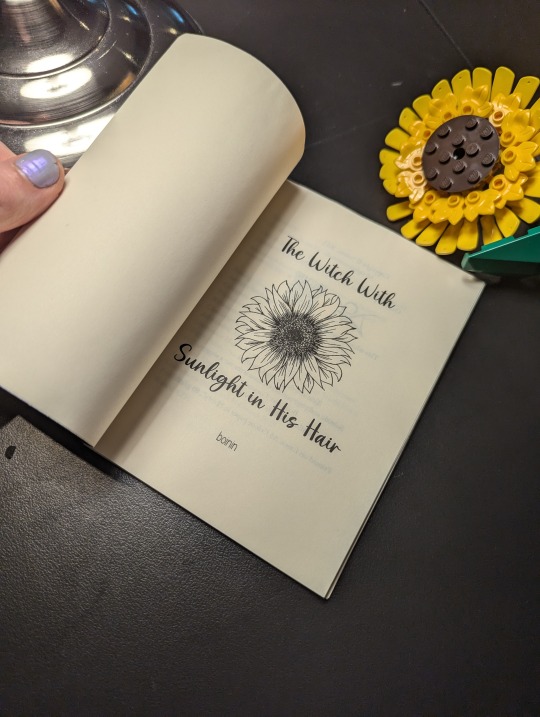
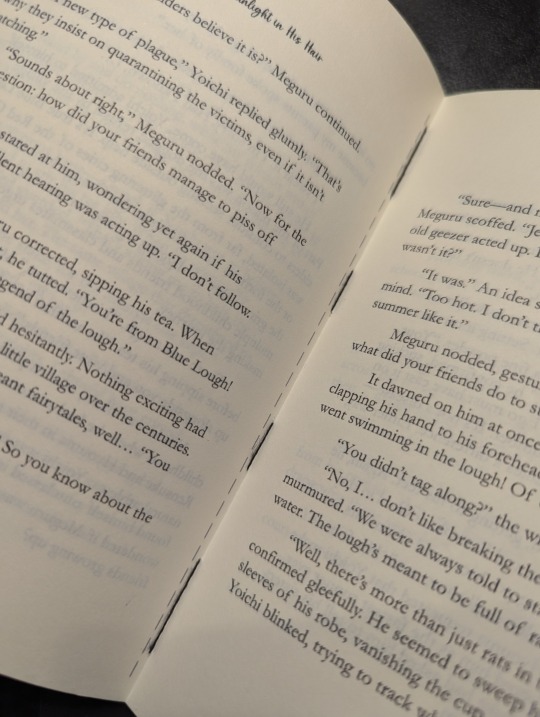
The Witch With Sunlight in His Hair - boinin
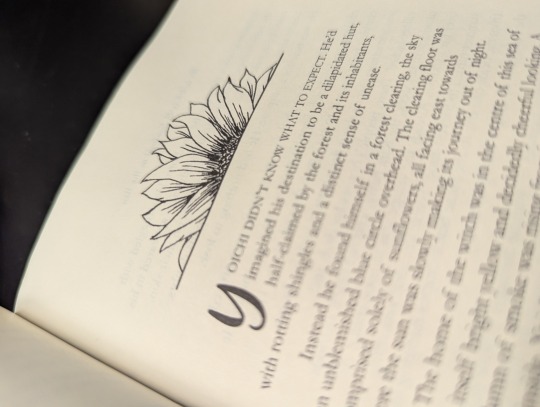
Burned out on casebinding, I decided to give pamphlet binding a shot! I'd picked up this lovely reflective gold paper, but I only had one copy so it was a no-go for endpaper. Still, it was too pretty to let languish in my paper stash—so I decided to print out one of my own fics that features sunflowers and magic.
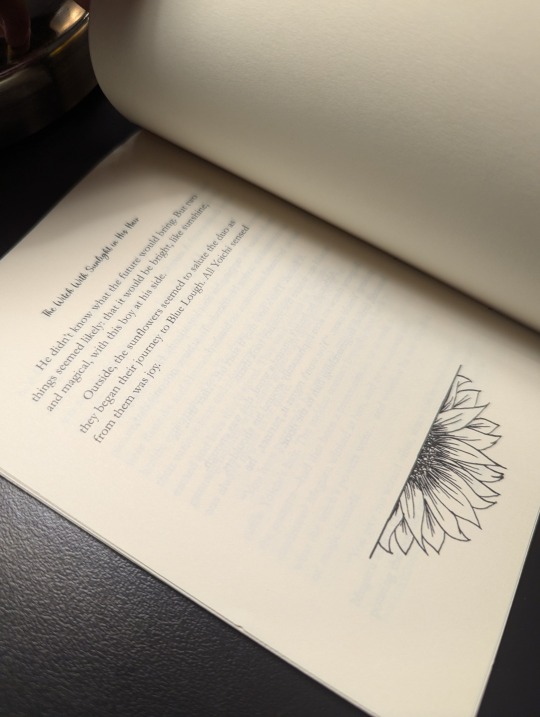
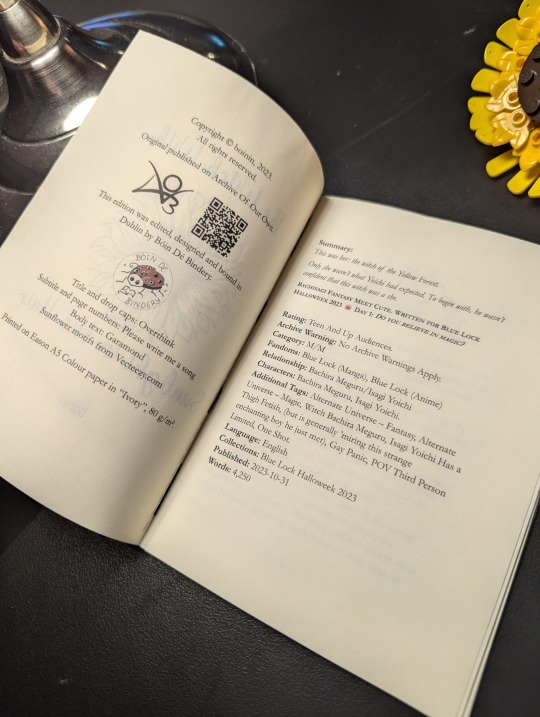
This is a short BachIsagi oneshot that gave me the opportunity to figure out how to format AO3 tags and metadata. I decided to omit the author's notes, but retain the summary information and tags. I printed it as four signatures... why, you ask? Because I'm an idiot. That ended up making this (a) two sheets per signature, a trivial amount to fold and sew given the length of this fic and (b) not a pamphlet bind. I sewed the signatures together with a simple stitch and glued on the cover paper with PVA. So this is closer to a perfect binding overall.
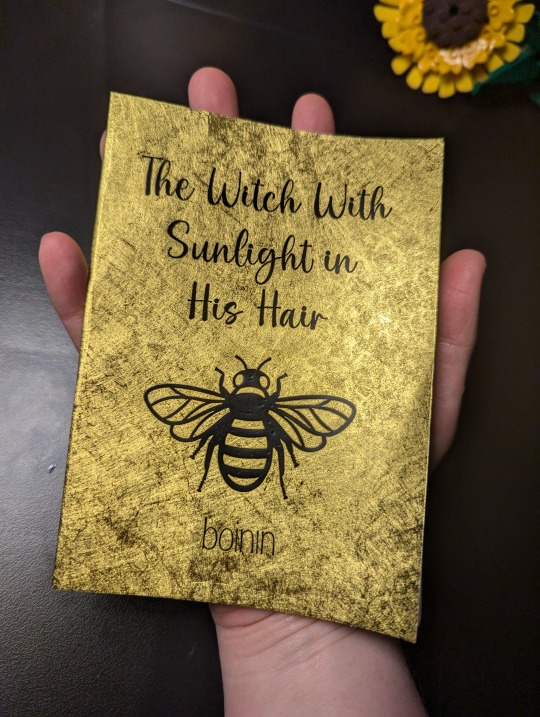
It turned out adorable, at least to me. It's just a lil guy! 🐝 I got along much better with the heat transfer vinyl this time around—I really love the bee graphic, which was one of the freebies on Cricut Design Space. I did mess up the signature imposer by leaving fold lines on, which are visible when you open the pamphlet. Not enough of a reason to reprint everything IMO.
It's nice getting to hold something I've written and published ✨ Though tiny next to my other binds, it adds some welcome sparkle to my shelf.
#my table looks so gross in all these pictures#I swear it's clean! it just shows up every wipe mark in photos apparently#i only noticed after I took all the pics for the last few posts and like. ugh#wasn't restaging all of them again#bookbinding#fanbinding#ficbinding#the witch with sunlight in his hair#bachisagi#boin de bindery
32 notes
·
View notes
Text
Progress so far in bookbinding
So I've never bookbound before, but I decided to give it an ADHD go with greenTeacup's Lionheart series, a Harry Potter Rewrite focusing on Draco, wherein he is in Gryffindor and will eventually end up with Hermione (as it should be).
Had to make an account to ask her a question regarding imagry, so might as well use this Tumblr thing.
XXXX
I have made Vol. I and II and II (sic) into typesets on Google Docs. The 2nd Vol. II is incomplete at this moment, but I worked what I had thus far. Total between the three Volumes is about 700k words, so they are not small, lol.
I've also started gathering material to make the books. 11x17 paper painstakingly chopped to 8 1/2x11, because I live in Hawaii and you can't get shit here without costing an arm and leg, and because every bookbinder firstly raved about ensuring the short grain for your paper.
I also couldn't find any endpaper I liked, except a single sheet from a Michaels' booklet that wouldn't ship here without an absurd shipping cost for a small item. So I made my own.

Made this in Procreate, then had OfficeDepot print and mail like 8 double sided copies to me... still with an absurd shipping cost for what they were, because Hawaii. I'm really happy with how this came out, and I ensured that the Draco constellation was included.
Then, I tried my hand at the cover arts. I have plans to make them from Heat Transfer Vinyl (DTV not HTV, for color choice), then slap it to the covers as it'd be the best option I have IMO. I made them also in Procreate, and will send it to some Esty sketchy seller to print and send to me. Plan to use Leather to bind the books, because I'm extra like that.

This one is Vol. I, gold because it'll be on red leather. I initally tried to mimic the ones provided within fic.... but then I got extra. I did keep to the image and stamp of original. Couldn't find OG script type, so something that fit IMO. I am happy with this one. The fligree is a different style per volume.

This one is the first Vol. II, so designed to be black on yellow. I might swap out the cup to something that matches the sketch style of the other images, and would likely print better. IDK. I did add some color to the filigree, as it seemed dull to be 100% black.

Lastly, thus far, is the 2nd Vol. II. I'm acting under the assumption it's supposed to be Vol. III, but we'll see. This is designed to be on top of blue, so tried to use a bronze color. I might make the owl intentionally white internal, with brown on the back, to show it's Hermione's owl. But might just leave it outline.
Each DTV would be cut to apply in the correct area, and applied. So they don't need to be 100% aligned to print. I'm debating waiting to print these until after the books are printed, so I can get an understanding of how thick the books'll be to size appropriately, but eh. I am deep in my ADHD hyperfixation, so I don't know if I can resist buying the shinies.
XXXX
And that's it so far. I'll be test printing the signatures next, then validating the typeset before printing the lot. I'll try to remember to post progress pics as needed.
11 notes
·
View notes
Text
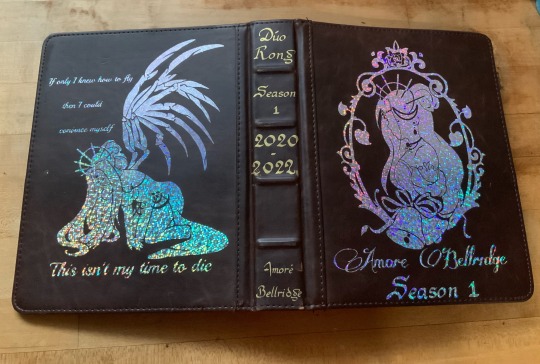
The first batch of pictures for Amoré's character journal are here! Also I have been so super sick that I've literally had nothing to do but to work on this for like almost 2 weeks so...
The cover to cover tour officially starts here. All I can say about the front & back is that I lament my lack of experience with my Cricut when I made these decals. I only had 2 "fun" colors to work with at the time & I was still getting comfortable drawing in Procreate, so my silhouette art leaves a lot to be desired compared to some stuff I've made recently. I also found it's incredibly easy to burn this leather book.
But she's volume one, everything with her is a learning experience, & I realized as much as it helps to have a mini heat press for tight corners & small spaces, the cloth barrier they suggest you use between the vinyl & the iron tends to make things harder to press on this scale. So instead I gotta quickly tap straight on the transfer film & hope I don't burn anything around it :(´◦ω◦`):゚゚
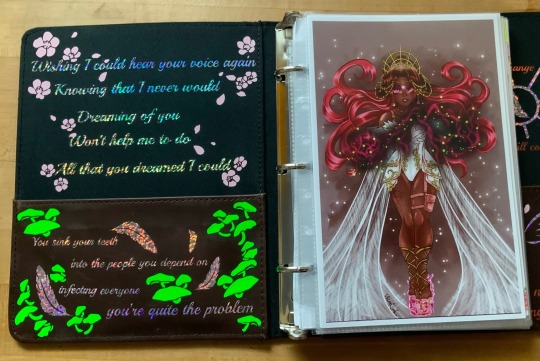
So at the risk of thoroughly exposing my inner theater kid, Amoré set the precedent with how I went forward creating campaign characters. I started off collecting 5 songs to make a mini story arc (almost like a show choir set list 🙃) that helps me figure out an outline for the kind of story I wanna give them.
Somehow Amoré ended up with a truly horrendous blend of rock & theatre. Absolutely incredibe. No wonder she's always such a dramatic bitch.
It was a lot easier to go in & add little decals around these lyrics. I'm definitely cursed with the Too Much™ gene, but I enjoy the little pops of color they give ✨ plus it justifies me hoarding all these vinyl scraps printing stuff this small lol.
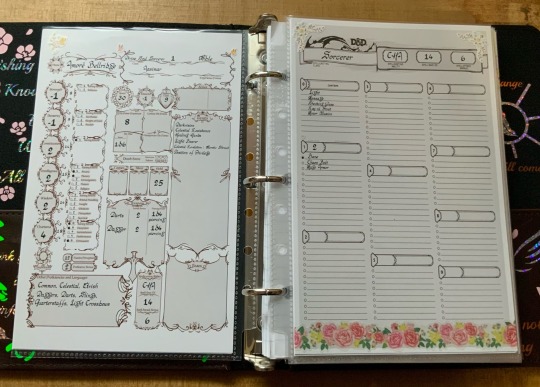
Stat sheet!
In all honesty, as my first character I had no fucking clue what I was doing when I placed these & if I could go back & change one thing I'd probably swap her Intelligence & her Wisdom. She’s definitely more people smart than book smart.
But everything else is...very accurate. She has all the upper body strength of a chicken nugget. Plus on top of the (already) negative I traded disadvantage on everything DEX for magic crystal shoes that can be periodically harvested. Just a way for her to carry around the family fortune without actually having to return to the vault✨
For something that started so average, her CON became a monster & always comes in clutch for her alcohol tolerance. I've played variations of her across a few different one shots & I always manage to roll well for anything alcohol related. The dice do respect a bit 🤣
Spells on the other hand, I floundered with a lot at first because we’re not a combat heavy game, but then I found Chaos Bolt & that was that. It’s essentially Amoré in spell form & I’ve had a ton of fun with it over the years. Also Mage Armor cuz my girl is SO DISTRESSINGLY SQUISHY.
Cantrips were more or less a bit of a toss up. Message was fun for the sheer idea of her using it to talk shit during social events without being caught. But aside from Light serving fun backstory purposes the other 3 are kinda just what looked fun ¯\_(ツ)_/¯ unless you count the idea that she would absolutely delight in zapping handshakes.
From there, I wanted to extend the world map made by our wonderful DM @cappierong into a full scroll. Ya know, for the aesthetic ✨

Our campaign started in Civania, where Amoré's main Estate is. I just wanted a quick mock up to reference, so I edited a preexisting picture I found that checked all the boxes (large, on a plateau, accessible only by bridge) and then absolutely smothered it in flowers.
But anyways... This is primarily where Diana & Amoré grew up together in their decade of backstory ✨
There was probably waaaay to much back & forth trying to keep the continuity between stuff I've already drawn & this big reference. But I think it turned out pretty ok? Not like if I make a mistake anyone will really know lol.
Scaling was also another big issue I had, & I moments where I thought something was too big I just kinda handwaved it away like "ehhhhh she's from a stupid rich family." But now I have a NEED to draw baby Diana & Amoré around like, the statue gardens or something cuz I feel like certain parts of this place are definitely ominous 👀 especially for children...

And lastly we have the back cover & the High Noble political relationship map! I normally have this closer to the front but for layout purposes it'll be here. I kinda feel like I need to do more for the decoration of it but I can’t think of anything else to add at the moment.
Sam if u read that no you didn't.

But now! Other than a family portrait that I've always wanted to draw, I think I'm ready to move onto the art for Season 1 : Arc 2. It's a pretty hefty amount of art in comparison to others, so I gotta get busy. Especially since I think I'm gonna have to draw a few comics *sobs*
If you made it this far, thanks so much for reading! I'm always excited to talk out our little idiots so thanks for indulging me ❀(*´▽`*)❀
#duo rong#dungeons and dragons#dnd character scrapbook#duo chronicles#amore bellridge#diana blackthorn if you squint#dnd#dnd character#dnd pc#dnd oc#character creation#character study(?)#dnd backstory#season 1#dnd art#dnd campaign#campaign art
42 notes
·
View notes
Note
Hi, just wanted to say your binding of "Faces In The Dust" looks gorgeous!!! Could I ask, how did you make the title + decoration and apply it to the front cover? :O
Hello! The cover designs are cut from vinyl with a cricut machine. In this book's case I used permanent vinyl. Which is essentially very sticky vinyl. There is also HTV(heat transfer vinyl) which you cut out and then adhere to the material via heat (such as an iron). I tend to use cricut to design and then cut most of my covers. The cricut is a cutting (and other things) machine that has a digital design space I run on the computer to help me design covers.
I typically like to start by 'making the case' out of colored blocks in the space that are the size of my actual cover so I can know what things will look like when I put it all together. I also color my items to match as close as possible to the colors I plan to cut them from as well. I mostly do this because I have aphantasia so I need the literal imagery in order to see what the design will look like. These steps are by no means necessary and if you can visualize what you want then you can just add the images/text in however you like.
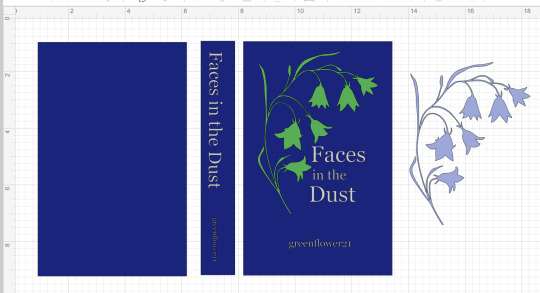
The vinyl is a plastic-y sheet or roll of vinyl in a given color. Because I wanted to have the flowers be one color(lavender) and the stem (green) another I needed to cut two sections and take the parts I wanted from each. I could have also edited the images so that each of the two only had the parts I wanted from it so it would only cut them. But it wasn't that much of a difference and if I just copy pasted a second one of the same image and changed the color then I would know they were the same size and everything would fit together.
Once the design is done I move to the cutting phase. The colors you pick determine which pieces are cut together.
You load each sheet of vinyl in on a mat and it cuts the image out. When it is done you cut out around the section you just cut the image on and then use tweezers to remove the vinyl you aren't using around the image. This is called weeding. In the flowers & stem's case I also then used an exacto blade to cut off the flower heads from each of the cut outs so I could combine the two colors of vinyl to create my final version of the image.
Once it is all weeded you are ready to transfer it to the book case. You do this with transfer tape. It is a clear plastic sticky sheet that you place on your vinyl to 'pick it up' off of the backing it started out on.
Again in this instance to combine the colors I picked up the green vinyl on the tape and then lined up the purple flowers and pressed down to get them stuck to the tape as well. With it all now collected I placed the transfer tape on my book and pressed the vinyl into the case of the book. Smoothing it down with my bonefolder or anything else that helps make sure it is flat so it is really adhered and there are no air bubbles.
I do the same with all the titling and ta-da! A Book!
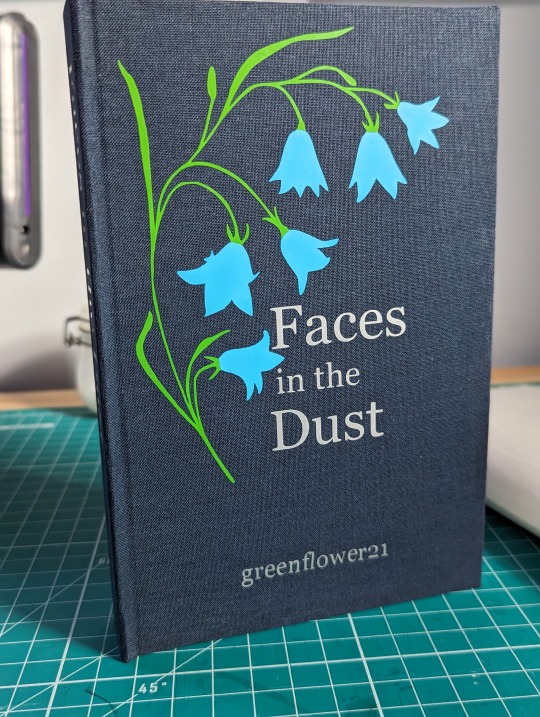
There are tons of ways you can title/design your book covers. I just got my hands on foil quills this past weekend so I hope to try making a cover with them in the not too distance future. Some folks I know use paint pens, or cut out stencils and use regular paint, or just free hand paint if you want to show off your skills of an artist. Hope this was helpful and not too rambling. Sorry I don't have pictures for all the steps, I can make a point to take pictures the next time I make a cover in cricut if that is something folks would want to have. Feel free to reach out if you have any more questions.
45 notes
·
View notes
Text
the name of the brand i use for the sheets of printable heat transfer vinyl is "trans our dream" and I just think thats beautiful 😌
7 notes
·
View notes
Text

In today’s world, where individuality and uniqueness are highly valued, personalized décor has become increasingly popular. From custom-made furniture to bespoke wall art, people are seeking ways to express their personality and style in their living spaces. One innovative solution that has gained traction in the realm of home décor is printable vinyl. In this article, we will explore the power of personalization through the use of Printable Vinyl for creating customized wall décor.
Introduction to the Power of Personalization Personalized décor holds a special place in the hearts of homeowners, as it allows them to infuse their living spaces with elements that reflect their identity and tastes. Whether it’s a family photo collage or a motivational quote displayed prominently on the wall, personalized décor adds warmth and character to any room. At the forefront of this trend is the versatile material known as printable vinyl.
Understanding Printable Vinyl Printable vinyl is a type of material that can be printed on using a standard inkjet or laser printer. It comes in various forms, including adhesive-backed sheets and heat-transfer vinyl. One of the key advantages of printable vinyl is its ability to adhere to a wide range of surfaces, making it ideal for creating custom wall art.
Choosing the Right Printable Vinyl When selecting printable vinyl for wall décor projects, it’s essential to consider factors such as durability, adhesion, and print quality. Opting for high-quality vinyl ensures that your personalized creations stand the test of time and maintain their vibrant colors.
Designing Customized Wall Décor with Printable Vinyl Designing personalized wall art with printable vinyl is a fun and rewarding process. Armed with a printer, vinyl sheets, and a dash of creativity, you can transform any blank wall into a stunning focal point. From custom quotes to intricate designs, the possibilities are endless.
Step-by-Step Guide to Applying Printable Vinyl Applying printable vinyl to your walls is a straightforward process that yields professional-looking results. Begin by preparing the surface and carefully following the instructions provided with your chosen vinyl. With a bit of patience and attention to detail, you can achieve flawless application every time.
Maintenance and Longevity of Printable Vinyl Wall Décor To ensure the longevity of your personalized wall art, it’s essential to properly care for your printable vinyl. Regular cleaning and maintenance will help preserve the integrity of the vinyl and keep your décor looking fresh for years to come.
Conclusion In conclusion, the power of personalization knows no bounds when it comes to home décor. By harnessing the versatility of printable vinyl, you can unleash your creativity and transform your living space into a reflection of your unique personality and style. Whether you’re adorning your walls with family photos, inspirational quotes, or abstract designs, printable vinyl offers endless possibilities for customization.
FAQs (Frequently Asked Questions): Can printable vinyl be used on any surface? Printable vinyl is compatible with a variety of surfaces, including walls, glass, wood, and metal. However, it’s essential to ensure that the surface is clean and smooth for optimal adhesion.
Is printable vinyl easy to remove from walls? While printable vinyl is designed to adhere firmly to surfaces, it can be removed with the proper techniques. Applying heat with a hairdryer or heat gun can help soften the adhesive, making it easier to peel off without damaging the wall.
Can I reposition printable vinyl after it has been applied? Once printable vinyl has been applied to a surface, it may be challenging to reposition without causing damage. It’s best to take care during the application process to achieve the desired placement.
How long does printable vinyl last on walls?
The longevity of printable vinyl on walls depends on various factors, including the quality of the vinyl, environmental conditions, and maintenance practices. With proper care, printable vinyl can last several years without fading or peeling.
Are there any restrictions on the types of images or designs that can be printed on vinyl? Printable vinyl can accommodate a wide range of images and designs, from simple graphics to high-resolution photographs. However, it’s essential to ensure that the images you choose are suitable for printing and won’t infringe on any copyright laws.
#printable vinyl#wall decor#personalized decor#custom wall art#DIY home decor#vinyl decals#creative home decor
3 notes
·
View notes
Text
Colorful Creations: Heat Transfer Vinyl Sheets for DIY Fun
Unlock your creative potential with heat transfer vinyl sheets. Perfect for DIY projects, these sheets come in a variety of vibrant colors, making it simple to bring your designs to life.
0 notes
Note
Hi! Sorry if you've already done this, but could you maybe talk a little bit about how you do titles on covers/spines? They always look fantastic. Do you use something like a cricut machine for the letters?
thank you!! i'd be happy to talk about it especially bc it's been taking up a lot of room in my brain lately.
you're right, i use a cricut. i bought my Cricut Maker secondhand and it works quite well so far. up until now all my titles have been made with "premium vinyl", which requires no ironing and is supposedly permanent. however i've noticed that it comes off quite easily when applied to bookcloth, especially with thinner/smaller letters. i titled 90% of my books within a two-week time period so i didn't realize this would happen until after they were all done. for this reason i don't recommend the permanent vinyl for spines or cloth covers - i don't know how it would work on paper-covered boards. maybe it'd be better without those cloth fibers.
the one other titling method i've used was using a stencil (cut with the cricut) to paint with fabric markers. that worked really well and looks very dramatic (and there's nothing to be in danger of peeling off) but i don't think my hands are steady enough to do very detailed designs.
i have bought a couple sheets of heat-transfer vinyl to try out next - the idea of ironing my books is a little scary but i have heard that htv produces much longer-lasting results on bookcloth. i have some scrap boards covered in cloth that i will use as test pieces and i will post an update after i give it a shot!
maybe more information than you wanted to know, but thank you for asking!! <3
8 notes
·
View notes
Text
Just took delivery of some cheap (albeit probably counterfeit) Nijigasaki merch! I got a dangly little Rina-chan keychain and a bunch of Nijiyon stickers.


The selection of Nijiyon stickers is kind of interesting — there are three of each member except for Kanata, who only gets two, one of Yu in her "Hitori dake nante erabenai yo!" pose, and five assorted groupings. They're roughly the size of postage stamps, so I'll probably slap a few in various places on my synth case. (I've got creepysteeple's "autism creature Rina" sticker on already.)
(I really only got these because I was buying some other stuff from AliExpress and threw them into the order. That other stuff? Some sheets of heat-transfer vinyl in red, two different pinks, and silver that match Setsuna's, Ayumu's, Lanzhu's, and Mia's image colors; I'm planning on making a Nijigasaki T-shirt with each of their logos in the appropriate colors on the back and some appropriate group logo — maybe the Nijigasaki High "N" — in the chest pocket position on the front. I just need to pick up HTV in Kasumi's, Ai's, Kanata's, and Emma's colors to be able to make the thing.)
#love live#nijigasaki#rina tennoji#setsuna yuki#ayumu uehara#mia taylor#emma verde#kanata konoe#karin asaka#ai miyashita#lanzhu zhong#shioriko mifune#kasumi nakasu#shizuku osaka#merch
4 notes
·
View notes
Text
T-Shirt Printing Techniques Used by Leading T-Shirt Manufacturers in Chennai

T-shirt printing has become an essential aspect of branding, fashion, and customization. Whether you're a business, an event organizer, or a fashion enthusiast, understanding the various printing techniques can help you make informed decisions. Leading t shirt manufacturers in Chennai use a variety of innovative printing methods to ensure high-quality, durable, and visually appealing designs.
In this blog, we'll explore the most popular T-shirt printing techniques, their benefits, and how to choose the right one for your needs.
Why Choosing the Right Printing Technique Matters
Selecting the right printing method can significantly impact:
Durability – Ensuring the print lasts through multiple washes.
Design Complexity – Some techniques are better suited for intricate designs.
Cost Efficiency – Choosing the best method for bulk or custom orders.
Fabric Compatibility – Certain prints work best on specific fabrics like cotton or polyester.
Now, let's dive into the most widely used T-shirt printing techniques by t shirt manufacturers in Chennai.
1. Screen Printing
Overview
Screen printing is one of the most traditional and widely used T-shirt printing techniques. It involves creating a stencil (or screen) and using it to apply layers of ink onto the fabric.
Advantages
Long-lasting prints with vibrant colors.
Ideal for bulk orders as it’s cost-effective at high volumes.
Works well on cotton and blended fabrics.
Best For
Corporate T-shirts
Sports team uniforms
Promotional merchandise
Many t shirt manufacturers in Chennai prefer screen printing for large-scale production due to its cost-effectiveness and durability.
2. Direct-to-Garment (DTG) Printing
Overview
DTG printing involves using a specialized inkjet printer to apply ink directly onto the fabric. This method allows for high-detail prints with multiple colors.
Advantages
Full-color printing with intricate details.
Ideal for small orders and custom designs.
No setup costs compared to screen printing.
Best For
Custom T-shirt designs
Fashion brands with unique prints
Limited edition merchandise
Since t shirt manufacturers in Chennai cater to both bulk and personalized orders, DTG is a popular choice for small businesses and startups.
3. Heat Transfer Printing
Overview
Heat transfer printing involves transferring a design onto a T-shirt using heat and pressure. The design is first printed on special transfer paper, which is then pressed onto the fabric using a heat press machine.
Advantages
Great for small batches and detailed designs.
Works well on various fabric types.
Provides a smooth and clean finish.
Best For
Event-based T-shirts (concerts, marathons, etc.)
Personalized gifts and one-off designs
Fashion startups testing new designs
Some t shirt manufacturers in Chennai use heat transfer printing for short-run production and promotional apparel.
4. Sublimation Printing
Overview
Sublimation printing is a process where heat is used to transfer dye into the fabric rather than onto it. This technique works best on polyester and results in high-quality, long-lasting prints.
Advantages
Fade-resistant and durable prints.
Ideal for sportswear and performance fabrics.
Allows for all-over printing (covering entire T-shirt surface).
Best For
Polyester T-shirts
Activewear and sports jerseys
Promotional and fashion T-shirts
T shirt manufacturers in Chennai often use sublimation printing for sports uniforms and trendy full-print designs.
5. Vinyl Cutting and Heat Press
Overview
Vinyl printing involves cutting out designs from a special vinyl sheet and using heat to press them onto the fabric. It’s commonly used for lettering, logos, and numbers.
Advantages
Highly durable and vibrant.
Ideal for bold, single-color designs.
Perfect for sports team jerseys and work uniforms.
Best For
Custom name and number prints
Branded company uniforms
Fashion statement pieces
Several t shirt manufacturers in Chennai use vinyl printing for custom logo designs and workwear.
6. Embroidery Printing
Overview
While embroidery is not exactly a printing technique, it’s a popular alternative for branding. It involves stitching a design directly onto the fabric using colored threads.
Advantages
Premium and professional look.
Extremely durable and long-lasting.
Works well on polo T-shirts and uniforms.
Best For
Corporate and business T-shirts
High-end fashion brands
School and college uniforms
For businesses looking for a sophisticated and premium appearance, t shirt manufacturers in Chennai often recommend embroidery over standard printing techniques.
Choosing the Right Printing Method for Your Needs
With so many options available, how do you choose the right T-shirt printing technique? Consider these factors:
Order Size: Bulk orders? Go for screen printing. Small, custom orders? DTG or heat transfer is ideal.
Fabric Type: Cotton works well with most techniques, while polyester is best for sublimation.
Design Complexity: If you need detailed, multi-color prints, DTG is a great choice. For simple logos, vinyl cutting is perfect.
Durability Requirements: If you need long-lasting prints, embroidery and sublimation printing are excellent choices.
Budget: Screen printing is cost-effective for large batches, while DTG and vinyl printing are better for small orders.
Conclusion: Elevate Your Branding with the Best T-Shirt Printing Techniques
Whether you’re a startup, a corporate business, or a fashion brand, choosing the right printing method is crucial for high-quality T-shirts. Leading t shirt manufacturers in Chennai offer a wide range of printing techniques to meet diverse business needs, ensuring top-notch quality and durability.
Looking for expert T-shirt printing solutions? Connect with the best t shirt manufacturers in Chennai to bring your designs to life with premium-quality prints!
Would you like personalized recommendations for T-shirt printing services in Chennai? Get in touch today!
0 notes
Text
How to Use Heat Transfer Vinyl With Cricut for DIY Projects?

Heat transfer vinyl (HTV) is a material that is used to create designs and text on fabrics and other materials. HTV has a heat-activated adhesive that bonds permanently to the fabric when heat is applied. This step-by-step guide will show you how to use heat transfer vinyl with Cricut. Let’s dive into this write-up and explore what you can make with a Cricut machine. First, collect the materials you need for your crafting project.
Cricut Supplies You Will Need for Your Project
Before you dive into this guide, let’s gather everything you need to complete this project. Read the below list:
An HTV
A blank shirt
A Cricut cutting machine (Here I am using Maker for cutting)
Standard Grip mat
Weeding tool
Cricut EasyPress 2
EasyPress mat
You have gathered all the materials now. Let’s focus on how to use heat transfer vinyl with Cricut. Read ahead to know.
Step 1: Create a Design
Now that you have gathered all the materials, let’s proceed to the main part, which is how to use HTV with your crafting machine. First, open Design Space app and click on New Project to create a design. You can upload an SVG file if you do not want to make a design. From the left toolbar menu, click the Upload option.
Step 2: Prepare Your Design for Cutting
When you are done with your design, which has layers, you need to hit the Attach option in Design Space. This will group the layers together so they all move together when you move or resize the image. To change the color of a layer or an image, select the image and then hit the colored square under the line type menu to choose a new color. When you are done choosing the color, click on the Make It button.
Step 3: Put the Iron-on Vinyl on Mat
On the preview screen, click on the Mirror option. This option is necessary when cutting the heat transfer vinyl. After that, click on the Continue button. Here, I am using Everyday iron-on vinyl for this project. Under the materials settings, choose iron-on. If you are using the Explore machine, you can’t choose this option; instead, you have to set the Smart dial on the top of your machine. Put your HTV on the StandardGrip mat and make sure the shiny side is down. Press down the vinyl to make sure it is stuck properly to the mat. Install the blade on Clamp B and then load it into the machine and press the Load button. After loading the mat, hit the Go button on the machine to start cutting.
Step 4: Cut HTV on a Cricut Machine
Now that you have put the material on your mat and mirrored your design, you have to cut. You can use iron-on vinyl with any of the machines. With the Explore series machine, you can set the dial to iron-on for cutting or on custom and pick from the list in Design Space.
Step 5: Weed Out the Vinyl
After your design is cut, you need to remove all of the excess iron-on vinyl from around the design with the help of your weeding tool. You can trim the excess iron-on vinyl around your design.
Step 6: Apply Heat Transfer Vinyl
Once you have weeded out the extra part from your design, I am going to add this to my shirt. For that, you will have to use the heat press machine to transfer your design. Set the time and temperature on your machine to transfer your vinyl. Before you put the design on the shirt, get ready with your shirt. Preheat your shirt for a few minutes to remove any wrinkles and moisture. Correctly place your design and apply the heat with the machine so your design can be transferred smoothly. Let it cool for a few minutes, then peel off the liner material.
Now, you are ready with your shirt.
Tips for Using a Heat Press With HTV
Above, you read about using heat transfer vinyl with your machine. Now, there are some tips you should remember when using HTV. Follow the below instructions:
When you apply your design to the shirt, use a hard, flat, heat-resistant surface underneath.
Place the parchment paper or a Teflon sheet between the iron-on and the vinyl carrier sheet.
You should wait at least 24 hrs before washing your shirt. Wash it inside out with mild detergent.
Conclusion
In short, with the help of this blog, you learned how to use heat transfer vinyl with Cricut to make customized shirts. You need some other tools and materials for making it. The process is very easy and straightforward if you follow it correctly and stepwise. HTV is a special kind of material that can be used to make designs and text on various fabrics. You can use the press machine to transfer the design to your fabric permanently.
FAQs
Why Do I Need to Mirror the HTV?
You need to mirror your HTV before cutting. Otherwise, your design will appear incorrectly on the base material. When you cut HTV, you cut from the back side of the vinyl. If you do not mirror your design, it will appear backward on the material, and it includes. Most HTV comes with a shiny, clear, heat-resistant liner that protects the design.
What Cricut Settings Should I Use for HTV?
When you use HTV on a Cricut, you will have to choose an iron-on material setting from Design Space. The default pressure setting should work fine for most standard HTVs. You can increase the temperature if necessary and when you are working with intricate designs. Before cutting, always mirror your design. If you are using another type of vinyl, like glitter HTV, you need to change the blade as the glitter vinyl is thicker.
What Is the Difference Between HTV and Iron-On?
Heat transfer vinyl and iron-on are used to transfer images onto the fabric, but they differ in a few ways. HTV is a material that has glue with its backing, whereas iron-on is a design that can be printed using transfer paper. If you use HTV, you need to remove the extra part, while iron-on needs a crafting machine and a heat press machine.
Visit: Cricut.com/setup www.cricut.com/setup login
Source: How to Use Heat Transfer Vinyl With Cricut
#how to use heat transfer vinyl with cricut#cricut eassy press#cricut design space download#cricut design space app#Cricut machine setup#cricut software download
1 note
·
View note
Text

In today’s world, where individuality and uniqueness are highly valued, personalized décor has become increasingly popular. From custom-made furniture to bespoke wall art, people are seeking ways to express their personality and style in their living spaces. One innovative solution that has gained traction in the realm of home décor is printable vinyl. In this article, we will explore the power of personalization through the use of Printable Vinyl for creating customized wall décor.
Introduction to the Power of Personalization Personalized décor holds a special place in the hearts of homeowners, as it allows them to infuse their living spaces with elements that reflect their identity and tastes. Whether it’s a family photo collage or a motivational quote displayed prominently on the wall, personalized décor adds warmth and character to any room. At the forefront of this trend is the versatile material known as printable vinyl.
Understanding Printable Vinyl Printable vinyl is a type of material that can be printed on using a standard inkjet or laser printer. It comes in various forms, including adhesive-backed sheets and heat-transfer vinyl. One of the key advantages of printable vinyl is its ability to adhere to a wide range of surfaces, making it ideal for creating custom wall art.
Choosing the Right Printable Vinyl When selecting printable vinyl for wall décor projects, it’s essential to consider factors such as durability, adhesion, and print quality. Opting for high-quality vinyl ensures that your personalized creations stand the test of time and maintain their vibrant colors.
Designing Customized Wall Décor with Printable Vinyl Designing personalized wall art with printable vinyl is a fun and rewarding process. Armed with a printer, vinyl sheets, and a dash of creativity, you can transform any blank wall into a stunning focal point. From custom quotes to intricate designs, the possibilities are endless.
Step-by-Step Guide to Applying Printable Vinyl Applying printable vinyl to your walls is a straightforward process that yields professional-looking results. Begin by preparing the surface and carefully following the instructions provided with your chosen vinyl. With a bit of patience and attention to detail, you can achieve flawless application every time.
Maintenance and Longevity of Printable Vinyl Wall Décor To ensure the longevity of your personalized wall art, it’s essential to properly care for your printable vinyl. Regular cleaning and maintenance will help preserve the integrity of the vinyl and keep your décor looking fresh for years to come.


Conclusion In conclusion, the power of personalization knows no bounds when it comes to home décor. By harnessing the versatility of printable vinyl, you can unleash your creativity and transform your living space into a reflection of your unique personality and style. Whether you’re adorning your walls with family photos, inspirational quotes, or abstract designs, printable vinyl offers endless possibilities for customization.
FAQs (Frequently Asked Questions): Can printable vinyl be used on any surface? Printable vinyl is compatible with a variety of surfaces, including walls, glass, wood, and metal. However, it’s essential to ensure that the surface is clean and smooth for optimal adhesion.
Is printable vinyl easy to remove from walls? While printable vinyl is designed to adhere firmly to surfaces, it can be removed with the proper techniques. Applying heat with a hairdryer or heat gun can help soften the adhesive, making it easier to peel off without damaging the wall.
Can I reposition printable vinyl after it has been applied? Once printable vinyl has been applied to a surface, it may be challenging to reposition without causing damage. It’s best to take care during the application process to achieve the desired placement.
How long does printable vinyl last on walls?
The longevity of printable vinyl on walls depends on various factors, including the quality of the vinyl, environmental conditions, and maintenance practices. With proper care, printable vinyl can last several years without fading or peeling.
Are there any restrictions on the types of images or designs that can be printed on vinyl? Printable vinyl can accommodate a wide range of images and designs, from simple graphics to high-resolution photographs. However, it’s essential to ensure that the images you choose are suitable for printing and won’t infringe on any copyright laws.
#printable vinyl#wall décor#personalized décor#custom wall art#home décor#vinyl wall art#wall decals#home decor ideas
3 notes
·
View notes