#HTMLForms
Explore tagged Tumblr posts
Visit Tumblr Blog
Explore Tumblr blogs with no restrictions, modern design and the best experience.
Last Seen Tumblr Blogs


Fun Fact
After the announcement of the deal with Yahoo!, there were 170K signatures of unhappy Tumblr users petitioning to prevent the sale in 2013.
Text
HTML (HyperText Markup Language) is the foundation of web development and is used to create and structure web pages. It consists of elements enclosed in tags that define how content is displayed in a web browser.
#HTML#WebDevelopment#FrontendDevelopment#TechEducation#HTML5#TechBooks#HTMLForBeginners#MarkupLanguage#WebDesign#TechLearning#HTMLTags#WebAppDevelopment#WebDesignSkills#HTMLStructure#ResponsiveDesign#HTMLForms#HTMLCSS#WebDevelopmentTutorial#HTMLBestPractices#TechTutorial#WebDesignTips#HTMLElements#MobileFirstDesign#FrontendWebDesign#HTMLSyntax#SEOOptimization
0 notes
Text
How to Create Responsive Forms in Angular with HtmlForms
Creating Responsive Forms in Angular with HtmlForms 1. Introduction 1.1 Brief Explanation and Importance In today’s web development landscape, creating responsive forms is crucial for ensuring a seamless user experience across devices. Angular, being a powerful framework, provides robust tools to build dynamic and responsive forms. This tutorial focuses on using HtmlForms in Angular to create…
0 notes
Text
🌟 Mastering HTML Forms with JavaScript! 🌟
Hey there, Web Dev Enthusiasts! 👋
Are you ready to dive deep into the world of HTML forms and JavaScript? Whether you're a beginner or looking to brush up your skills, we've got some amazing content lined up for you! 🚀
🔗 First up, check out "HTML Forms with JavaScript" - a comprehensive guide that'll take you through the nitty-gritty of creating and managing forms with ease. You won't believe how simple and fun it can be! Click here to start your journey. 📝
But wait, there's more! 🌈
🔗 We've also got the ultimate resource for "JavaScript Form Submission" – perfect for those looking to understand the intricacies of submitting forms with JavaScript. Say goodbye to confusion and hello to clarity! Dive in here.
Why are HTML forms so crucial, you ask? �� They are the backbone of user interaction on the web. From signing up for newsletters to logging into your favorite sites, forms are everywhere! And with JavaScript, you can supercharge these forms to be more dynamic and user-friendly. 💥
👉 Stay tuned for more tips and tricks and make sure to hit that like button if you find these resources helpful. Don't forget to subscribe for more awesome web development content!
Happy Coding! 💻✨
#HTMLForms #JavaScript #WebDevelopment #CodingTutorial #LearnToCode
0 notes
Text
HTML Forms: Dropdown List
<!DOCTYPE html>
<form>
<label for=“lunch”>What’s your lunch?</label>
<select id=“lunch” name=“lunch>
<option value=“pizza”>Pizza</option>
<option value=“pasta”>Pasta</option>
<option value=“salad”>Salad</option>
</select>
</form>
---
I’m doing something wrong, but I don’t know what.
0 notes
Link
How to Create an Inspiring Sign Up & Login Form In HTML And CSS | responsive login and registration form, responsive login and registration form responsive registration form. How to create a signup page with HTML and CSS? How to create a simple signup form in HTML? How to create a login and signup page in HTML and CSS? Does Google have a signup form? How to create a login form?
1 note
·
View note
Text
How to make a simple form with HTML

1)- What is an HTML form?
An HTML form is simply a form used to collect user’s data. It is the same form that we find in websites in the contact page for example, or when we want to subscribe to a website. It looks like this:

Let’s see how we can create one.
2)- How to create an HTML form?
To create an HTML form we use the tag <form></form>.
So let’s go to the body of the index.html file and add this tag:
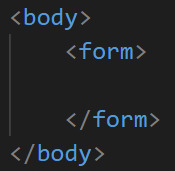
Inside the <form></form> tag is where we will add our <input/> tags.
<input/> tags are simply where the user will enter their information (name, email, phone…).
Depending on the type of information we want the user to enter, we will choose the type of the <input/> tag.
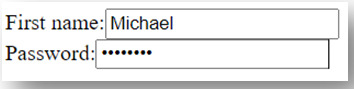
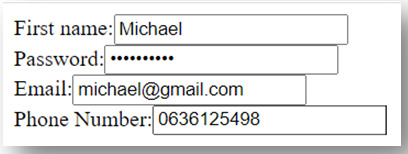
a)- <input> type text
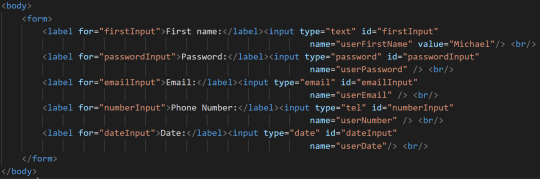
Let’s say that we want the user to enter their first name, or last name. The first name and the last name are text. so the <input/> tag type we will add will be of type text.
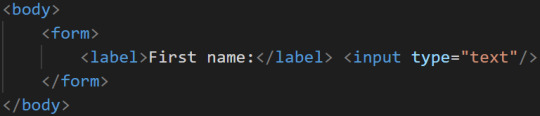
The type attribute is what specifies the type of the <input/> tag.
On the browser we have:

<label></label> tag is here to give more information about what should the user enter as information in this <input/>.
Now if you click on the empty field you can enter your first name. However, let’s say that when you click on the label, you want the input area to be active, like when there is a checkbox for example in certain websites, you don’t have to click on the checkbox itself to be checked, you can just click on the label and it is checked.
to bind the label and the input together there is an attribute for that we add to the <label></label> tag and attribute id that we add to the <input/> tag.

The value of both attributes must be the same.
Now if you click on the label you will see that the caret of the cursor is placed automatically in the text area.
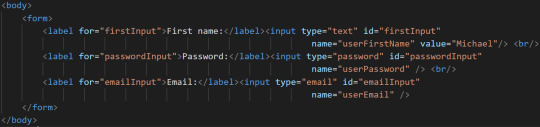
Once the form is completed by the user, all the information will be sent to a server and stored in a database. However, as there will be many <input/> tags, the server will not understand which <input/> tag contains the first name, and which one contains the password and so on…
So to make it easier for the server to understand, we add another attribute which is name and we give it the type of information stored in the <input/>.

So now upon data reception the server will understand that in this input it is the user first name that is stored.
Also we can add value attribute to the <input/> tag. What is the value attribute you would ask?
The value attribute will contain the real value of an <input/> tag.
For example we have a user, his name is Michael, when Michael enters his name in the text field area, this becomes the value of the <input/> that will also be sent to the server.
So in this example we will add a value attribute from the beginning, but when you’re coding a real project, the value will vary depending on the names of different users.

So in the browser we have:

b)- <input> type password
Another type of <input/> tag is password. Let’s add an <input/> of type password.
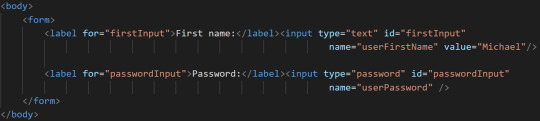
Same thing here, to bind the label and the <input/> password we use the attributes for and id.
So on the browser if you type a password you’ll have:

Now you you might say that both inputs are aligned and wonder how can we make them aligned vertically. For the moment you can add a <br/> tag at the end of each <input/> like this:
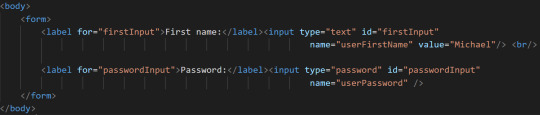
So we’ll have:
Another method is to make them inside a <div></div> tag or just leave them like this and apply the display CSS property.
c)- <input> type email
We can also add an <input/> of type email so that the user can enter their email.
That will look like:
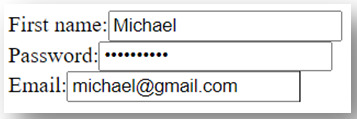
If the user enters numbers in this area or special characters or just letters instead of a correct email, when they will click on the submit button at the end to submit the form they will receive an error message saying that the type of data they entered is not correct, and so the form will not be submitted.
d)- <input> type tel
If we want to ask the user to leave their phone number for example, the type of <input/> we’ll add is tel.
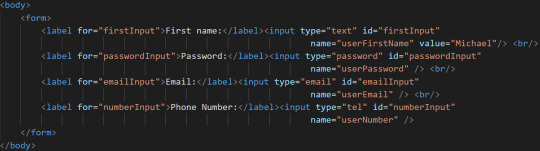
So we’ll have:
Same thing as for type email input, if the user enters anything else but a number, the form will not be submitted.
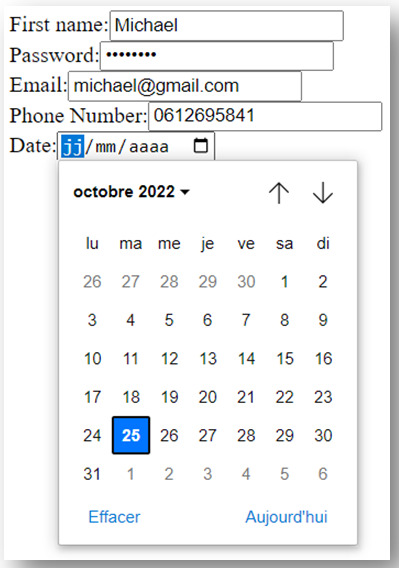
e)- <input> type date
We can also add an <input/> of type date.
And we’ll have:
f)- <input> type color
If you want the user to choose a color you can add an <input/> of type color:
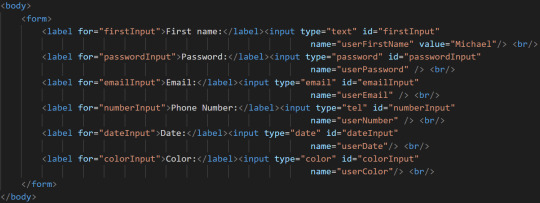
So we’ll have:

g)- <input> type checkbox
You can have a choice selection to offer the user. So for multiple choices you can add a checkbox <input/> type.
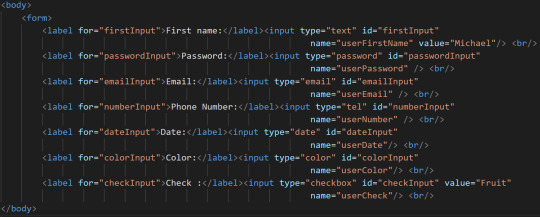
This will look like:
To read more check my blog below:
https://purpose-code.com/make-forms-with-html/
#html5 development#html#html5games#htmlcoding#htmldeveloper#i love html5#html css#htmlform#javascript#css for beginners#css animation tutorial
1 note
·
View note
Photo

Utilizer Login Form Flat Responsive Widget Template #responsivewebdesign #HTML5 #CSS3 #webdesign #ui#uidesign #flatstyle #loginform #htmlform #flatdesigns #responsive #widget #webelement #signinform . . https://w3layouts.com/?p=33199 https://www.instagram.com/p/BvBEzdNFKmU/?utm_source=ig_tumblr_share&igshid=lfpr92n09081
#responsivewebdesign#html5#css3#webdesign#ui#uidesign#flatstyle#loginform#htmlform#flatdesigns#responsive#widget#webelement#signinform
0 notes
Photo

HTML Form
0 notes
Text
Reverting a field value to a previous user entered value
oldVal = $field.attr('data-old_value') if $field.is('input[type="radio"]') $radioButtons = $("""input[name="#{$field.attr('name')}"]""") $($radioButtons.filter("""[value="#{oldVal}"]""")).prop('checked', true) else $field.val(oldVal)
Surely there must be an easier way than this?
0 notes
Text
Floating Labels on focus in HTML form written in HTML, css and JavaScript. Link below
https://code.bydev24.com/snippets/floating-label
#html #css #javascript #htmlform #bydev24 #webdesign #uidesign #websitedesign

0 notes
Text
User Registration with Server-Side Validation using PHP

In this post, we will learn user registration with server side validation. First create a HTML form then validate this form by using PHP functions. You can have also other registration tutorial by clicking here using PHP OOP and Ajax. Registration form User Registration Full name #action_pagephpdownload #checkboxvalidationinphp #checkboxvalidationinphpw3school #clientsidevalidationinphp #contactforminphpwithvalidation #contactformvalidation #emailvalidationinphpcode #emptyfieldvalidationinphp #formprocessingphp #formvalidation #formvalidationcodeinphp #formvalidationhtml #formvalidationinhtml #formvalidationinjavascript #formvalidationinphp #formvalidationinphpexample #formvalidationinphpusingjavascript #formvalidationinphpusingjquery #formvalidationphp #formvalidationphpcode #formvalidationphpscript #formvalidationusingjavascriptcode #formvalidationusingphp #fullnamevalidationinphp #gendervalidationinphp #howcanivalidateanameinphp #howtoconnecthtmlformtophp #howtoconnecthtmlregisterformtomysqldatabasewithphp #howtocreateloginpageinphpandmysqlwithsession #howtocreateregistrationforminphpusingdreamweaver #howtodisplayerrormessageinhtmlformusingphp #howtodisplayerrormessageinhtmlusingphp #howtodoserversidevalidationinphp #howvalidatetextboxinphp #htmlcodeforregistrationformwithvalidation #htmlform #htmlformvalidation #htmlformvalidationexample #htmlformvalidationusingjavascript #htmlformvalidationusingphp #htmlformswithphp #htmlinputvalidation #htmlphpvalidator #htmlregistrationformcode #htmlvalidatorchrome #javascriptformvalidation #javascriptformvalidationexampledownload #javascriptformvalidationlibrary #javascriptonsubmitformvalidation #jqueryformvalidation #linkphptohtmlform #loginandregistrationforminphpusingmysqli #loginandregistrationforminphpusingsession #loginforminphpusingmysqli #loginforminphpwithvalidation #loginformvalidationinphp #loginpageinhtmlwithvalidation #loginpageinphpwithdatabasesourcecodedownload #loginregisterprofilephp #loginvalidationinphp #namevalidationinphp #namevalidationinphpusingregularexpression #numbervalidationinphpform #onlinestudentregistrationsystemusingphpmysql #passwordvalidationclientorserverside #php7formvalidation #phpbuttononclick #phpcheckifformfieldisempty #phpcheckinputtype #phpcodecheckerandfixer #phpcodeforregistrationformwithdatabase #phpcodeforregistrationformwithdatabaseandvalidation #phpcodeforregistrationformwithdatabasedownload #phpcodeforregistrationformwithmysqldatabase #phpcompleteloginandregistrationsystemwithphp&mysqldownload #phpcontactformwithvalidation #phpcreatehtmlform #phpemailformvalidation #phpemailvalidationexample #phpemailvalidationregex #phpform #phpformcode #phpformexample #phpformexamplewithdatabase #phpformgenerator #phpformhandler #phpformhandling #phpformnumbervalidation #phpformposttoself #phpformprocessingexample #phpformscript #phpformsubmit #phpformsubmittoself #phpformtemplate #phpformvalidation #phpformvalidationandsubmittodatabase #phpformvalidationclass #phpformvalidationcode #phpformvalidationcodedownload #phpformvalidationexample #phpformvalidationexamplecode #phpformvalidationexamplecodedownload #phpformvalidationexampledatabase #phpformvalidationlibrary #phpformvalidationmysqldatabase #phpformvalidationondifferentpage #phpformvalidationsamplecode #phpformvalidationtutorial #phpformvalidationtutorialpdf #phpformvalidations #phpformwithvalidation #phpformstutorial #phpgetinputvaluewithoutsubmit #phphtmlforms #phpinputvalidationlibrary #phploginandregistrationscriptdownload #phploginform #phploginformwithmysqldatabaseexample #phploginpagecodewithmysqli #phploginvalidation #phpmysqlregistrationformwithvalidation #phppostwithoutform #phpregistrationform #phpregistrationformdownload #phpregistrationformsourcecodedownload #phpregistrationformvalidationexample #phpself #phpselfprocessingformexample #phpsubmitbutton #phpsubmitformtodatabaseandemail #phptest_input #phpuserregistration #phpvalidate #phpvalidateemail #phpvalidateformbeforesubmit #phpvalidateformdatabeforesubmit #phpvalidateformfields #phpvalidateformthensubmit #phpvalidateinput #phpvalidatepostdata #phpvalidateuserinput #phpvalidation #phpvalidationclasstutorial #phpvalidationform #phpvalidationformexample #phpvalidationformfields #phpvalidationscript #phpvalidator #phpvalidators #php_selfw3schools #processphp #radiobuttonvalidationinphp #registrationandloginforminphpandmysql #registrationandloginforminphpandmysqlwithvalidation #registrationandloginforminphpandmysqlwithvalidationcodefreedownload #registrationandloginforminphpandmysqlwithvalidationgithub #registrationforminphpandmysqlwithjavascriptvalidation #registrationforminphpandmysqlwithvalidation #registrationforminphpusingxampp #registrationforminphpw3schools #registrationforminphpwithvalidation #registrationformvalidationinphp #registrationformwithprofilepictureinphp #registrationformwithvalidationinphpfreedownload #registrationphp #sampleformwithvalidationcodeusingphp #securephpcontactform #securephpform #selfprocessingforminphp #serversideemailvalidationinphp #serversidevalidationexample #serversidevalidationforregistrationforminphp #serversidevalidationinphp #serversidevalidationinphpusingjquery #serversidevalidationinphpwithexample #signuppageinphp #simpleformvalidationinphp #simpleformvalidationusingphp #simplephpemailformwithvalidation #simplephpform #simplephpformvalidation #simplephpformvalidationexample #simpleregistrationforminphpwithvalidation #studentregistrationforminphpcodewithvalidation #studentregistrationsystemprojectinphpsourcecode #studentregistrationsystemsourcecodeinphp #userregistration #userregistrationwithserversidevalidationinphp #userregistrationwithserversidevalidationusingphp #userregistrationwithvalidationinphp #validateformphp #validateuserinputphp #validationformphp #validationinjavascriptforregistrationform #validationinphpregistrationform #w3phpform #w3phpvalidator #w3schoolsphp #whatisformprocessinginphp #whatisserversidevalidationinphp #whyserversidevalidationisrequired Read the full article
0 notes
Link
There is no doubt that web forms play an integral role in our web site or applications. By default, they provide a useful set of elements and features — from legends and fieldsets to native validation and states — but they only get us so far when we start to consider the peculiarities of using them. For example, how can we manipulate the state of a form? How about different forms of validation? Even hooking a form up to post submissions is a daunting effort at times. Component-driven front-end libraries, like React, can ease the task of wiring web forms but can also get verbose and redundant. That’s why I want to introduce you to Formik, a small library that solves the three most annoying parts of writing forms in React:
State manipulation
Form validation (and error messages)
Form submission
We’re going to build a form together in this post. We’ll start with a React component then integrate Formik while demonstrating the way it handles state, validation, and submissions.
Creating a form as a React component
Components live and breathe through their state and prop. What HTML form elements have in common with React components is that they naturally keep some internal state. Their values are also automatically stored in their value attribute. Allowing form elements to manage their own state in React makes them uncontrolled components. That’s just a fancy way of saying the DOM handles the state instead of React. And while that works, it is often easier to use controlled components, where React handles the state and serves as the single source of truth rather than the DOM. The markup for a straightforward HTML form might look something like this:
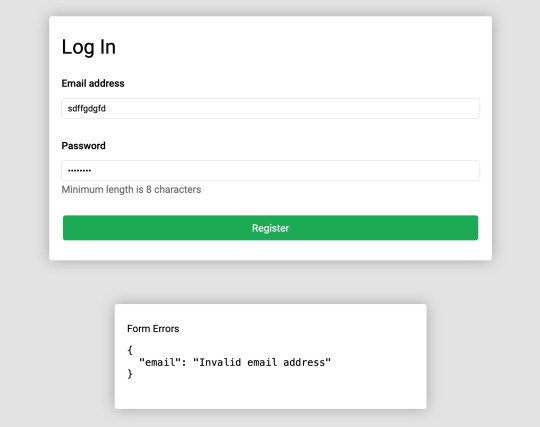
<form> <div className="formRow"> <label htmlFor="email">Email address</label> <input type="email" name="email" className="email" /> </div> <div className="formRow"> <label htmlFor="password">Password</label> <input type="password" name="password" className="password" /> </div> <button type="submit">Submit</button> </form>
We can convert that into a controlled React component like so:
function HTMLForm() { const [email, setEmail] = React.useState(""); const [password, setPassword] = React.useState("");
return ( <form> <div className="formRow"> <label htmlFor="email">Email address</label> <input type="email" name="email" className="email" value={email} onChange={e => setEmail(e.target.value)} /> </div> <div className="formRow"> <label htmlFor="password">Password</label> <input type="password" name="password" className="password" value={password} onChange={e => setPassword(e.target.value)} /> </div> <button type="submit">Submit</button> </form> ); }
This is a bit verbose but it comes with some benefits:
We get a single source of truth for form values in the state.
We can validate the form when and how we want.
We get performance perks by loading what we need and when we need it.
OK, so why Formik again?
As it is with anything JavaScript, there’s already a bevy of form management libraries out there, like React Hook Form and Redux Form, that we can use. But there are several things that make Formik stand out from the pack:
It’s declarative: Formik eliminates redundancy through abstraction and taking responsibility for state, validation and submissions.
It offers an Escape Hatch: Abstraction is good, but forms are peculiar to certain patterns. Formik abstracts for you but also let’s you control it should you need to.
It co-locates form states: Formik keeps everything that has to do with your form within your form components.
It’s adaptable: Formik doesn’t enforce any rules on you. You can use as less or as much Formik as you need.
Easy to use: Formik just works.
Sound good? Let’s implement Formik into our form component.
Going Formik
We will be building a basic login form to get our beaks wet with the fundamentals. We’ll be touching on three different ways to work with Formik:
Using the useFormik hook
Using Formik with React context
Using withFormik as a higher-order component
I’ve created a demo with the packages we need, Formik and Yup.
Method 1: Using the useFormik hook
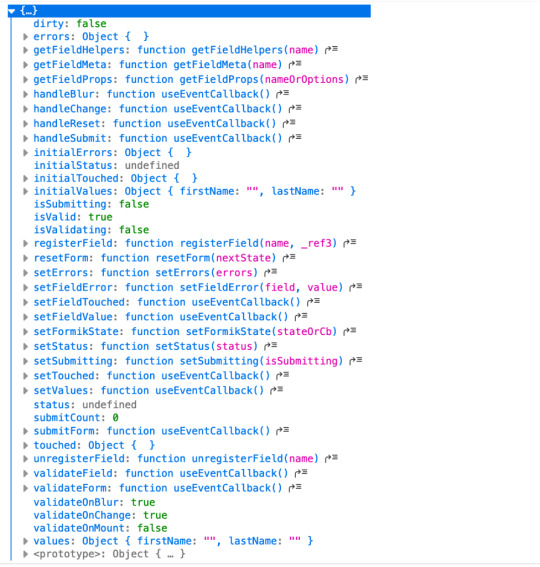
As it is right now, our form does nothing tangible. To start using Formik, we need to import the useFormik hook. When we use the hook, it returns all of the Formik functions and variables that help us manage the form. If we were to log the returned values to the console, we get this:

We’ll call useFormik and pass it initialValues to start. Then, an onSubmit handler fires when a form submission happens. Here’s how that looks:
// This is a React component function BaseFormik() { const formik = useFormik({ initialValues: { email: "", password: "" }, onSubmit(values) { // This will run when the form is submitted } }); // If you're curious, you can run this Effect // useEffect(() => { // console.log({formik}); // }, [])
return ( // Your actual form ) }
Then we’ll bind Formik to our form elements:
// This is a React component function BaseFormik() { const formik = useFormik({ initialValues: { email: "", password: "" }, onSubmit(values) { // This will run when the form is submitted } }); // If you're curious, you can run this Effect // useEffect(() => { // console.log({formik}); // }, [])
return ( // We bind "onSubmit" to "formik.handleSubmit" <form className="baseForm" onSubmit={formik.handleSubmit} noValidate> <input type="email" name="email" id="email" className="email formField" value={formik.values.email} // We also bind our email value onChange={formik.handleChange} // And, we bind our "onChange" event. /> </form> ) }
This is how the binding works:
It handles form submission with onSubmit={formik.handleSubmit}.
It handles the state of inputs with value={formik.values.email} and onChange={formik.handleChange}.
If you take a closer look, we didn’t have to set up our state, nor handle the onChange or onSubmit events as we’d typically do with React. However as you might have noticed, our form contains some redundancy. We had to drill down formik and manually bind the form input’s value and onChange event. That means we should de-structure the returned value and immediately bind the necessary props to a dependent field, like this:
// This is a React component function BaseFormik() { const {getFieldProps, handleSubmit} = useFormik({ initialValues: { email: "", password: "" }, onSubmit(values) { // This will run when the form is submitted } }); // If you're curious, you can run this Effect // useEffect(() => { // console.log({formik}); // }, [])
return ( <form className="baseForm" onSubmit={handleSubmit} noValidate> <input type="email" id="email" className="email formField" {...getFieldProps("email")} // We pass the name of the dependent field /> </form> ) }
Let’s take things even further with the included <Formik/> component.
Method 2: Using Formik with React context
The <Formik/> component exposes various other components that adds more abstraction and sensible defaults. For example, components like <Form/>, <Field/>, and <ErrorMessage/> are ready to go right out of the box. Keep in mind, you don’t have to use these components when working with <Formik/> but they do require <Formik/> (or withFormik) when using them. Using <Formik/> requires an overhaul because it uses the render props pattern as opposed to hooks with useFormik. The render props pattern isn’t something new in React. It is a pattern that enables code re-usability between components — something hooks solve better. Nevertheless, <Formik/> has a bagful of custom components that make working with forms much easier.
import { Formik } from "formik";
function FormikRenderProps() { const initialValues = { email: "", password: "" }; function onSubmit(values) { // Do stuff here... alert(JSON.stringify(values, null, 2)); } return ( <Formik {...{ initialValues, onSubmit }}> {({ getFieldProps, handleSubmit }) => ( <form className="baseForm" onSubmit={handleSubmit} noValidate> <input type="email" id="email" className="email formField" {...getFieldProps("email")} /> </form> )} </Formik> ); }
Notice that initialValues and onSubmit have been completely detached from useFormik. This means we are able to pass the props that <Formik/> needs, specifically initialValues and useFormik. <Formik/> returns a value that’s been de-structured into getFieldProps and handleSubmit. Everything else basically remains the same as the first method using useFormik. Here’s a refresher on React render props if you’re feeling a little rusty. We haven’t actually put any <Formik/> components to use just yet. I’ve done this intentionally to demonstrate Formik’s adaptability. We certainly do want to use those components for our form fields, so let’s rewrite the component so it uses the <Form/> component.
import { Formik, Field, Form } from "formik";
function FormikRenderProps() { const initialValues = { email: "", password: "" }; function onSubmit(values) { // Do stuff here... alert(JSON.stringify(values, null, 2)); } return ( <Formik {...{ initialValues, onSubmit }}> {() => ( <Form className="baseForm" noValidate> <Field type="email" id="email" className="email formField" name="email" /> </Form> )} </Formik> ); }
We replaced <form/> with <Form/> and removed the onSubmit handler since Formik handles that for us. Remember, it takes on all the responsibilities for handling forms. We also replaced <input/> with <Field/> and removed the bindings. Again, Formik handles that. There’s also no need to bother with the returned value from <Formik/> anymore. You guessed it, Formik handles that as well. Formik handles everything for us. We can now focus more on the business logic of our forms rather than things that can essentially be abstracted. We’re pretty much set to go and guess what? We’ve haven’t been concerned with state managements or form submissions! “What about validation?” you may ask. We haven’t touched on that because it’s a whole new level on its own. Let’s touch on that before jumping to the last method.
Form validation with Formik
If you’ve ever worked with forms (and I bet you have), then you’re aware that validation isn’t something to neglect. We want to take control of when and how to validate so new opportunities open up to create better user experiences. Gmail, for example, will not let you input a password unless the email address input is validated and authenticated. We could also do something where we validate on the spot and display messaging without additional interactions or page refreshes. Here are three ways that Formik is able to handle validation:
At the form level
At the field level
With manual triggers
Validation at the form level means validating the form as a whole. Since we have immediate access to form values, we can validate the entire form at once by either:
using validate, or
using a third-party library with validationSchema.
Both validate and validationSchema are functions that return an errors object with key/value pairings that those of initialValues. We can pass those to useFormik, <Formik/> or withFormik. While validate is used for custom validations, validationSchema is used with a third-party library like Yup. Here’s an example using validate:
// Pass the `onSubmit` function that gets called when the form is submitted. const formik = useFormik({ initialValues: { email: "", password: "" }, // We've added a validate function validate() { const errors = {}; // Add the touched to avoid the validator validating all fields at once if (formik.touched.email && !formik.values.email) { errors.email = "Required"; } else if ( !/^[A-Z0-9._%+-]+@[A-Z0-9.-]+\.[A-Z]{2,4}$/i.test(formik.values.email) ) { errors.email = "Invalid email address"; } if (formik.touched.password && !formik.values.password) { errors.password = "Required"; } else if (formik.values.password.length <= 8) { errors.password = "Must be more than 8 characters"; } return errors; }, onSubmit(values) { // Do stuff here... } }); // ...
And here we go with an example using validationSchema instead:
const formik = useFormik({ initialValues: { email: "", password: "" }, // We used Yup here. validationSchema: Yup.object().shape({ email: Yup.string() .email("Invalid email address") .required("Required"), password: Yup.string() .min(8, "Must be more than 8 characters") .required("Required") }), onSubmit(values) { // Do stuff here... } });
Validating at the field level or using manual triggers are fairly simple to understand. Albeit, you’ll likely use form level validation most of the time. It’s also worth checking out the docs to see other use cases.
Method 3: Using withFormik as a higher-order component
withFormik is a higher-order component and be used that way if that’s your thing. Write the form, then expose it through Formik.
A couple of practical examples
So far, we’ve become acquainted with Formik, covered the benefits of using it for creating forms in React, and covered a few methods to implement it as a React component while demonstrating various ways we can use it for validation. What we haven’t done is looked at examples of those key concepts. So, let’s look at a couple of practical applications: displaying error messages and generating a username based on what’s entered in the email input.
Displaying error messages
We’ve built our form and validated it. And we’ve caught some errors that can be found in our errors object. But it’s no use if we aren’t actually displaying those errors. Formik makes this a pretty trivial task. All we need to do is check the errors object returned by any of the methods we’ve looked at — <Formik/>, useFormik or withFormik — and display them:
<label className="formFieldLabel" htmlFor="email"> Email address <span className="errorMessage"> {touched["email"] && errors["email"]} </span> </label> <div className="formFieldWrapInner"> <input type="email" id="email" className="email formField" {...getFieldProps("email")} /> </div>
If there’s an error during validation, {touched["email"] && errors["email"]} will display it to the user. We could do the same with <ErrorMessage/>. With this, we only need to tell it the name of the dependent field to watch:
<ErrorMessage name="email"> {errMsg => <span className="errorMessage">{errMsg}</span>} </ErrorMessage>
Generating a username from an email address
Imagine a form that automatically generates a username for your users based on their email address. In other words, whatever the user types into the email input gets pulled out, stripped of @ and everything after it, and leaves us with a username with what’s left. For example: [email protected] produces @jane. Formik exposes helpers that can “intercept” its functionality and lets us perform some effects.In the case of auto-generating a username, one way will be through Formik’s setValues:
onSubmit(values) { // We added a `username` value for the user which is everything before @ in their email address. setValues({ ...values, username: `@${values.email.split("@")[0]}` }); }
Type in an email address and password, then submit the form to see your new username!
Wrapping up
Wow, we covered a lot of ground in a short amount of space. While this is merely the tip of the iceberg as far as covering all the needs of a form and what Formik is capable of doing, I hope this gives you a new tool to reach for the next time you find yourself tackling forms in a React application. If you’re ready to take Formik to the next level, I’d suggest looking through their resources as a starting point. There are so many goodies in there and it’s a good archive of what Formik can do as well as more tutorials that get into deeper use cases. Good luck with your forms!
0 notes
Text
Using Formik to Handle Forms in React
There is no doubt that web forms play an integral role in our web site or applications. By default, they provide a useful set of elements and features — from legends and fieldsets to native validation and states — but they only get us so far when we start to consider the peculiarities of using them. For example, how can we manipulate the state of a form? How about different forms of validation? Even hooking a form up to post submissions is a daunting effort at times.
Component-driven front-end libraries, like React, can ease the task of wiring web forms but can also get verbose and redundant. That’s why I want to introduce you to Formik, a small library that solves the three most annoying parts of writing forms in React:
State manipulation
Form validation (and error messages)
Form submission
We’re going to build a form together in this post. We’ll start with a React component then integrate Formik while demonstrating the way it handles state, validation, and submissions.
Creating a form as a React component
Components live and breathe through their state and prop. What HTML form elements have in common with React components is that they naturally keep some internal state. Their values are also automatically stored in their value attribute.
Allowing form elements to manage their own state in React makes them uncontrolled components. That’s just a fancy way of saying the DOM handles the state instead of React. And while that works, it is often easier to use controlled components, where React handles the state and serves as the single source of truth rather than the DOM.
The markup for a straightforward HTML form might look something like this:
<form> <div className="formRow"> <label htmlFor="email">Email address</label> <input type="email" name="email" className="email" /> </div> <div className="formRow"> <label htmlFor="password">Password</label> <input type="password" name="password" className="password" /> </div> <button type="submit">Submit</button> </form>
We can convert that into a controlled React component like so:
function HTMLForm() { const [email, setEmail] = React.useState(""); const [password, setPassword] = React.useState("");
return ( <form> <div className="formRow"> <label htmlFor="email">Email address</label> <input type="email" name="email" className="email" value={email} onChange={e => setEmail(e.target.value)} /> </div> <div className="formRow"> <label htmlFor="password">Password</label> <input type="password" name="password" className="password" value={password} onChange={e => setPassword(e.target.value)} /> </div> <button type="submit">Submit</button> </form> ); }
This is a bit verbose but it comes with some benefits:
We get a single source of truth for form values in the state.
We can validate the form when and how we want.
We get performance perks by loading what we need and when we need it.
OK, so why Formik again?
As it is with anything JavaScript, there’s already a bevy of form management libraries out there, like React Hook Form and Redux Form, that we can use. But there are several things that make Formik stand out from the pack:
It’s declarative: Formik eliminates redundancy through abstraction and taking responsibility for state, validation and submissions.
It offers an Escape Hatch: Abstraction is good, but forms are peculiar to certain patterns. Formik abstracts for you but also let’s you control it should you need to.
It co-locates form states: Formik keeps everything that has to do with your form within your form components.
It’s adaptable: Formik doesn’t enforce any rules on you. You can use as less or as much Formik as you need.
Easy to use: Formik just works.
Sound good? Let’s implement Formik into our form component.
Going Formik
We will be building a basic login form to get our beaks wet with the fundamentals. We’ll be touching on three different ways to work with Formik:
Using the useFormik hook
Using Formik with React context
Using withFormik as a higher-order component
I’ve created a demo with the packages we need, Formik and Yup.
Method 1: Using the useFormik hook
As it is right now, our form does nothing tangible. To start using Formik, we need to import the useFormik hook. When we use the hook, it returns all of the Formik functions and variables that help us manage the form. If we were to log the returned values to the console, we get this:

We’ll call useFormik and pass it initialValues to start. Then, an onSubmit handler fires when a form submission happens. Here’s how that looks:
// This is a React component function BaseFormik() { const formik = useFormik({ initialValues: { email: "", password: "" }, onSubmit(values) { // This will run when the form is submitted } }); // If you're curious, you can run this Effect // useEffect(() => { // console.log({formik}); // }, [])
return ( // Your actual form ) }
Then we’ll bind Formik to our form elements:
// This is a React component function BaseFormik() { const formik = useFormik({ initialValues: { email: "", password: "" }, onSubmit(values) { // This will run when the form is submitted } }); // If you're curious, you can run this Effect // useEffect(() => { // console.log({formik}); // }, [])
return ( // We bind "onSubmit" to "formik.handleSubmit" <form className="baseForm" onSubmit={formik.handleSubmit} noValidate> <input type="email" name="email" id="email" className="email formField" value={formik.values.email} // We also bind our email value onChange={formik.handleChange} // And, we bind our "onChange" event. /> </form> ) }
This is how the binding works:
It handles form submission with onSubmit={formik.handleSubmit}.
It handles the state of inputs with value={formik.values.email} and onChange={formik.handleChange}.
If you take a closer look, we didn’t have to set up our state, nor handle the onChange or onSubmit events as we’d typically do with React. The complete change to our form goes:
However as you might have noticed, our form contains some redundancy. We had to drill down formik and manually bind the form input’s value and onChange event. That means we should de-structure the returned value and immediately bind the necessary props to a dependent field, like this:
// This is a React component function BaseFormik() { const {getFieldProps, handleSubmit} = useFormik({ initialValues: { email: "", password: "" }, onSubmit(values) { // This will run when the form is submitted } }); // If you're curious, you can run this Effect // useEffect(() => { // console.log({formik}); // }, [])
return ( <form className="baseForm" onSubmit={handleSubmit} noValidate> <input type="email" id="email" className="email formField" {...getFieldProps("email")} // We pass the name of the dependent field /> </form> ) }
Let’s take things even further with the included <Formik/> component.
Method 2: Using Formik with React context
The <Formik/> component exposes various other components that adds more abstraction and sensible defaults. For example, components like <Form/>, <Field/>, and <ErrorMessage/> are ready to go right out of the box.
Keep in mind, you don’t have to use these components when working with <Formik/> but they do require <Formik/> (or withFormik) when using them.
Using <Formik/> requires an overhaul because it uses the render props pattern as opposed to hooks with useFormik. The render props pattern isn’t something new in React. It is a pattern that enables code re-usability between components — something hooks solve better. Nevertheless, <Formik/> has a bagful of custom components that make working with forms much easier.
import { Formik } from "formik";
function FormikRenderProps() { const initialValues = { email: "", password: "" }; function onSubmit(values) { // Do stuff here... alert(JSON.stringify(values, null, 2)); } return ( <Formik {...{ initialValues, onSubmit }}> {({ getFieldProps, handleSubmit }) => ( <form className="baseForm" onSubmit={handleSubmit} noValidate> <input type="email" id="email" className="email formField" {...getFieldProps("email")} /> </form> )} </Formik> ); }
Notice that initialValues and onSubmit have been completely detached from useFormik. This means we are able to pass the props that <Formik/> needs, specifically initialValues and useFormik.
<Formik/> returns a value that’s been de-structured into getFieldProps and handleSubmit. Everything else basically remains the same as the first method using useFormik.
Here’s a refresher on React render props if you’re feeling a little rusty.
We haven’t actually put any <Formik/> components to use just yet. I’ve done this intentionally to demonstrate Formik’s adaptability. We certainly do want to use those components for our form fields, so let’s rewrite the component so it uses the <Form/> component.
import { Formik, Field, Form } from "formik";
function FormikRenderProps() { const initialValues = { email: "", password: "" }; function onSubmit(values) { // Do stuff here... alert(JSON.stringify(values, null, 2)); } return ( <Formik {...{ initialValues, onSubmit }}> {() => ( <Form className="baseForm" noValidate> <Field type="email" id="email" className="email formField" name="email" /> </Form> )} </Formik> ); }
We replaced <form/> with <Form/> and removed the onSubmit handler since Formik handles that for us. Remember, it takes on all the responsibilities for handling forms.
We also replaced <input/> with <Field/> and removed the bindings. Again, Formik handles that.
There’s also no need to bother with the returned value from <Formik/> anymore. You guessed it, Formik handles that as well.
Formik handles everything for us. We can now focus more on the business logic of our forms rather than things that can essentially be abstracted.
We’re pretty much set to go and guess what? We’ve haven’t been concerned with state managements or form submissions!
“What about validation?” you may ask. We haven’t touched on that because it’s a whole new level on its own. Let’s touch on that before jumping to the last method.
Form validation with Formik
If you’ve ever worked with forms (and I bet you have), then you’re aware that validation isn’t something to neglect.
We want to take control of when and how to validate so new opportunities open up to create better user experiences. Gmail, for example, will not let you input a password unless the email address input is validated and authenticated. We could also do something where we validate on the spot and display messaging without additional interactions or page refreshes.
Here are three ways that Formik is able to handle validation:
At the form level
At the field level
With manual triggers
Validation at the form level means validating the form as a whole. Since we have immediate access to form values, we can validate the entire form at once by either:
using validate, or
using a third-party library with validationSchema.
Both validate and validationSchema are functions that return an errors object with key/value pairings that those of initialValues. We can pass those to useFormik, <Formik/> or withFormik.
While validate is used for custom validations, validationSchema is used with a third-party library like Yup.
Here’s an example using validate:
// Pass the `onSubmit` function that gets called when the form is submitted. const formik = useFormik({ initialValues: { email: "", password: "" }, // We've added a validate function validate() { const errors = {}; // Add the touched to avoid the validator validating all fields at once if (formik.touched.email && !formik.values.email) { errors.email = "Required"; } else if ( !/^[A-Z0-9._%+-]+@[A-Z0-9.-]+\.[A-Z]{2,4}$/i.test(formik.values.email) ) { errors.email = "Invalid email address"; } if (formik.touched.password && !formik.values.password) { errors.password = "Required"; } else if (formik.values.password.length <= 8) { errors.password = "Must be more than 8 characters"; } return errors; }, onSubmit(values) { // Do stuff here... } }); // ...
And here we go with an example using validationSchema instead:
const formik = useFormik({ initialValues: { email: "", password: "" }, // We used Yup here. validationSchema: Yup.object().shape({ email: Yup.string() .email("Invalid email address") .required("Required"), password: Yup.string() .min(8, "Must be more than 8 characters") .required("Required") }), onSubmit(values) { // Do stuff here... } });
Validating at the field level or using manual triggers are fairly simple to understand. Albeit, you’ll likely use form level validation most of the time. It’s also worth checking out the docs to see other use cases.
Method 3: Using withFormik as a higher-order component
withFormik is a higher-order component and be used that way if that’s your thing. Write the form, then expose it through Formik.
A couple of practical examples
So far, we’ve become acquainted with Formik, covered the benefits of using it for creating forms in React, and covered a few methods to implement it as a React component while demonstrating various ways we can use it for validation. What we haven’t done is looked at examples of those key concepts.
So, let’s look at a couple of practical applications: displaying error messages and generating a username based on what’s entered in the email input.
Displaying error messages
We’ve built our form and validated it. And we’ve caught some errors that can be found in our errors object. But it’s no use if we aren’t actually displaying those errors.
Formik makes this a pretty trivial task. All we need to do is check the errors object returned by any of the methods we’ve looked at — <Formik/>, useFormik or withFormik — and display them:
<label className="formFieldLabel" htmlFor="email"> Email address <span className="errorMessage"> {touched["email"] && errors["email"]} </span> </label> <div className="formFieldWrapInner"> <input type="email" id="email" className="email formField" {...getFieldProps("email")} /> </div>
If there’s an error during validation, {touched["email"] && errors["email"]} will display it to the user.
We could do the same with <ErrorMessage/>. With this, we only need to tell it the name of the dependent field to watch:
<ErrorMessage name="email"> {errMsg => <span className="errorMessage">{errMsg}</span>} </ErrorMessage>
Generating a username from an email address
Imagine a form that automatically generates a username for your users based on their email address. In other words, whatever the user types into the email input gets pulled out, stripped of @ and everything after it, and leaves us with a username with what’s left.
For example: [email protected] produces @jane.
Formik exposes helpers that can “intercept” its functionality and lets us perform some effects.In the case of auto-generating a username, one way will be through Formik’s setValues:
onSubmit(values) { // We added a `username` value for the user which is everything before @ in their email address. setValues({ ...values, username: `@${values.email.split("@")[0]}` }); }
Type in an email address and password, then submit the form to see your new username!
Wrapping up
Wow, we covered a lot of ground in a short amount of space. While this is merely the tip of the iceberg as far as covering all the needs of a form and what Formik is capable of doing, I hope this gives you a new tool to reach for the next time you find yourself tackling forms in a React application.
If you’re ready to take Formik to the next level, I’d suggest looking through their resources as a starting point. There are so many goodies in there and it’s a good archive of what Formik can do as well as more tutorials that get into deeper use cases.
Good luck with your forms!
The post Using Formik to Handle Forms in React appeared first on CSS-Tricks.
Using Formik to Handle Forms in React published first on https://deskbysnafu.tumblr.com/
0 notes
Text
Using Formik to Handle Forms in React
There is no doubt that web forms play an integral role in our web site or applications. By default, they provide a useful set of elements and features — from legends and fieldsets to native validation and states — but they only get us so far when we start to consider the peculiarities of using them. For example, how can we manipulate the state of a form? How about different forms of validation? Even hooking a form up to post submissions is a daunting effort at times.
Component-driven front-end libraries, like React, can ease the task of wiring web forms but can also get verbose and redundant. That’s why I want to introduce you to Formik, a small library that solves the three most annoying parts of writing forms in React:
State manipulation
Form validation (and error messages)
Form submission
We’re going to build a form together in this post. We’ll start with a React component then integrate Formik while demonstrating the way it handles state, validation, and submissions.
Creating a form as a React component
Components live and breathe through their state and prop. What HTML form elements have in common with React components is that they naturally keep some internal state. Their values are also automatically stored in their value attribute.
Allowing form elements to manage their own state in React makes them uncontrolled components. That’s just a fancy way of saying the DOM handles the state instead of React. And while that works, it is often easier to use controlled components, where React handles the state and serves as the single source of truth rather than the DOM.
The markup for a straightforward HTML form might look something like this:
<form> <div className="formRow"> <label htmlFor="email">Email address</label> <input type="email" name="email" className="email" /> </div> <div className="formRow"> <label htmlFor="password">Password</label> <input type="password" name="password" className="password" /> </div> <button type="submit">Submit</button> </form>
We can convert that into a controlled React component like so:
function HTMLForm() { const [email, setEmail] = React.useState(""); const [password, setPassword] = React.useState("");
return ( <form> <div className="formRow"> <label htmlFor="email">Email address</label> <input type="email" name="email" className="email" value={email} onChange={e => setEmail(e.target.value)} /> </div> <div className="formRow"> <label htmlFor="password">Password</label> <input type="password" name="password" className="password" value={password} onChange={e => setPassword(e.target.value)} /> </div> <button type="submit">Submit</button> </form> ); }
This is a bit verbose but it comes with some benefits:
We get a single source of truth for form values in the state.
We can validate the form when and how we want.
We get performance perks by loading what we need and when we need it.
OK, so why Formik again?
As it is with anything JavaScript, there’s already a bevy of form management libraries out there, like React Hook Form and Redux Form, that we can use. But there are several things that make Formik stand out from the pack:
It’s declarative: Formik eliminates redundancy through abstraction and taking responsibility for state, validation and submissions.
It offers an Escape Hatch: Abstraction is good, but forms are peculiar to certain patterns. Formik abstracts for you but also let’s you control it should you need to.
It co-locates form states: Formik keeps everything that has to do with your form within your form components.
It’s adaptable: Formik doesn’t enforce any rules on you. You can use as less or as much Formik as you need.
Easy to use: Formik just works.
Sound good? Let’s implement Formik into our form component.
Going Formik
We will be building a basic login form to get our beaks wet with the fundamentals. We’ll be touching on three different ways to work with Formik:
Using the useFormik hook
Using Formik with React context
Using withFormik as a higher-order component
I’ve created a demo with the packages we need, Formik and Yup.
Method 1: Using the useFormik hook
As it is right now, our form does nothing tangible. To start using Formik, we need to import the useFormik hook. When we use the hook, it returns all of the Formik functions and variables that help us manage the form. If we were to log the returned values to the console, we get this:
We’ll call useFormik and pass it initialValues to start. Then, an onSubmit handler fires when a form submission happens. Here’s how that looks:
// This is a React component function BaseFormik() { const formik = useFormik({ initialValues: { email: "", password: "" }, onSubmit(values) { // This will run when the form is submitted } }); // If you're curious, you can run this Effect // useEffect(() => { // console.log({formik}); // }, [])
return ( // Your actual form ) }
Then we’ll bind Formik to our form elements:
// This is a React component function BaseFormik() { const formik = useFormik({ initialValues: { email: "", password: "" }, onSubmit(values) { // This will run when the form is submitted } }); // If you're curious, you can run this Effect // useEffect(() => { // console.log({formik}); // }, [])
return ( // We bind "onSubmit" to "formik.handleSubmit" <form className="baseForm" onSubmit={formik.handleSubmit} noValidate> <input type="email" name="email" id="email" className="email formField" value={formik.values.email} // We also bind our email value onChange={formik.handleChange} // And, we bind our "onChange" event. /> </form> ) }
This is how the binding works:
It handles form submission with onSubmit={formik.handleSubmit}.
It handles the state of inputs with value={formik.values.email} and onChange={formik.handleChange}.
If you take a closer look, we didn’t have to set up our state, nor handle the onChange or onSubmit events as we’d typically do with React. The complete change to our form goes:
However as you might have noticed, our form contains some redundancy. We had to drill down formik and manually bind the form input’s value and onChange event. That means we should de-structure the returned value and immediately bind the necessary props to a dependent field, like this:
// This is a React component function BaseFormik() { const {getFieldProps, handleSubmit} = useFormik({ initialValues: { email: "", password: "" }, onSubmit(values) { // This will run when the form is submitted } }); // If you're curious, you can run this Effect // useEffect(() => { // console.log({formik}); // }, [])
return ( <form className="baseForm" onSubmit={handleSubmit} noValidate> <input type="email" id="email" className="email formField" {...getFieldProps("email")} // We pass the name of the dependent field /> </form> ) }
Let’s take things even further with the included <Formik/> component.
Method 2: Using Formik with React context
The <Formik/> component exposes various other components that adds more abstraction and sensible defaults. For example, components like <Form/>, <Field/>, and <ErrorMessage/> are ready to go right out of the box.
Keep in mind, you don’t have to use these components when working with <Formik/> but they do require <Formik/> (or withFormik) when using them.
Using <Formik/> requires an overhaul because it uses the render props pattern as opposed to hooks with useFormik. The render props pattern isn’t something new in React. It is a pattern that enables code re-usability between components — something hooks solve better. Nevertheless, <Formik/> has a bagful of custom components that make working with forms much easier.
import { Formik } from "formik";
function FormikRenderProps() { const initialValues = { email: "", password: "" }; function onSubmit(values) { // Do stuff here... alert(JSON.stringify(values, null, 2)); } return ( <Formik {...{ initialValues, onSubmit }}> {({ getFieldProps, handleSubmit }) => ( <form className="baseForm" onSubmit={handleSubmit} noValidate> <input type="email" id="email" className="email formField" {...getFieldProps("email")} /> </form> )} </Formik> ); }
Notice that initialValues and onSubmit have been completely detached from useFormik. This means we are able to pass the props that <Formik/> needs, specifically initialValues and useFormik.
<Formik/> returns a value that’s been de-structured into getFieldProps and handleSubmit. Everything else basically remains the same as the first method using useFormik.
Here’s a refresher on React render props if you’re feeling a little rusty.
We haven’t actually put any <Formik/> components to use just yet. I’ve done this intentionally to demonstrate Formik’s adaptability. We certainly do want to use those components for our form fields, so let’s rewrite the component so it uses the <Form/> component.
import { Formik, Field, Form } from "formik";
function FormikRenderProps() { const initialValues = { email: "", password: "" }; function onSubmit(values) { // Do stuff here... alert(JSON.stringify(values, null, 2)); } return ( <Formik {...{ initialValues, onSubmit }}> {() => ( <Form className="baseForm" noValidate> <Field type="email" id="email" className="email formField" name="email" /> </Form> )} </Formik> ); }
We replaced <form/> with <Form/> and removed the onSubmit handler since Formik handles that for us. Remember, it takes on all the responsibilities for handling forms.
We also replaced <input/> with <Field/> and removed the bindings. Again, Formik handles that.
There’s also no need to bother with the returned value from <Formik/> anymore. You guessed it, Formik handles that as well.
Formik handles everything for us. We can now focus more on the business logic of our forms rather than things that can essentially be abstracted.
We’re pretty much set to go and guess what? We’ve haven’t been concerned with state managements or form submissions!
“What about validation?” you may ask. We haven’t touched on that because it’s a whole new level on its own. Let’s touch on that before jumping to the last method.
Form validation with Formik
If you’ve ever worked with forms (and I bet you have), then you’re aware that validation isn’t something to neglect.
We want to take control of when and how to validate so new opportunities open up to create better user experiences. Gmail, for example, will not let you input a password unless the email address input is validated and authenticated. We could also do something where we validate on the spot and display messaging without additional interactions or page refreshes.
Here are three ways that Formik is able to handle validation:
At the form level
At the field level
With manual triggers
Validation at the form level means validating the form as a whole. Since we have immediate access to form values, we can validate the entire form at once by either:
using validate, or
using a third-party library with validationSchema.
Both validate and validationSchema are functions that return an errors object with key/value pairings that those of initialValues. We can pass those to useFormik, <Formik/> or withFormik.
While validate is used for custom validations, validationSchema is used with a third-party library like Yup.
Here’s an example using validate:
// Pass the `onSubmit` function that gets called when the form is submitted. const formik = useFormik({ initialValues: { email: "", password: "" }, // We've added a validate function validate() { const errors = {}; // Add the touched to avoid the validator validating all fields at once if (formik.touched.email && !formik.values.email) { errors.email = "Required"; } else if ( !/^[A-Z0-9._%+-]+@[A-Z0-9.-]+\.[A-Z]{2,4}$/i.test(formik.values.email) ) { errors.email = "Invalid email address"; } if (formik.touched.password && !formik.values.password) { errors.password = "Required"; } else if (formik.values.password.length <= 8) { errors.password = "Must be more than 8 characters"; } return errors; }, onSubmit(values) { // Do stuff here... } }); // ...
And here we go with an example using validationSchema instead:
const formik = useFormik({ initialValues: { email: "", password: "" }, // We used Yup here. validationSchema: Yup.object().shape({ email: Yup.string() .email("Invalid email address") .required("Required"), password: Yup.string() .min(8, "Must be more than 8 characters") .required("Required") }), onSubmit(values) { // Do stuff here... } });
Validating at the field level or using manual triggers are fairly simple to understand. Albeit, you’ll likely use form level validation most of the time. It’s also worth checking out the docs to see other use cases.
Method 3: Using withFormik as a higher-order component
withFormik is a higher-order component and be used that way if that’s your thing. Write the form, then expose it through Formik.
A couple of practical examples
So far, we’ve become acquainted with Formik, covered the benefits of using it for creating forms in React, and covered a few methods to implement it as a React component while demonstrating various ways we can use it for validation. What we haven’t done is looked at examples of those key concepts.
So, let’s look at a couple of practical applications: displaying error messages and generating a username based on what’s entered in the email input.
Displaying error messages
We’ve built our form and validated it. And we’ve caught some errors that can be found in our errors object. But it’s no use if we aren’t actually displaying those errors.
Formik makes this a pretty trivial task. All we need to do is check the errors object returned by any of the methods we’ve looked at — <Formik/>, useFormik or withFormik — and display them:
<label className="formFieldLabel" htmlFor="email"> Email address <span className="errorMessage"> {touched["email"] && errors["email"]} </span> </label> <div className="formFieldWrapInner"> <input type="email" id="email" className="email formField" {...getFieldProps("email")} /> </div>
If there’s an error during validation, {touched["email"] && errors["email"]} will display it to the user.
We could do the same with <ErrorMessage/>. With this, we only need to tell it the name of the dependent field to watch:
<ErrorMessage name="email"> {errMsg => <span className="errorMessage">{errMsg}</span>} </ErrorMessage>
Generating a username from an email address
Imagine a form that automatically generates a username for your users based on their email address. In other words, whatever the user types into the email input gets pulled out, stripped of @ and everything after it, and leaves us with a username with what’s left.
For example: [email protected] produces @jane.
Formik exposes helpers that can “intercept” its functionality and lets us perform some effects.In the case of auto-generating a username, one way will be through Formik’s setValues:
onSubmit(values) { // We added a `username` value for the user which is everything before @ in their email address. setValues({ ...values, username: `@${values.email.split("@")[0]}` }); }
Type in an email address and password, then submit the form to see your new username!
Wrapping up
Wow, we covered a lot of ground in a short amount of space. While this is merely the tip of the iceberg as far as covering all the needs of a form and what Formik is capable of doing, I hope this gives you a new tool to reach for the next time you find yourself tackling forms in a React application.
If you’re ready to take Formik to the next level, I’d suggest looking through their resources as a starting point. There are so many goodies in there and it’s a good archive of what Formik can do as well as more tutorials that get into deeper use cases.
Good luck with your forms!
The post Using Formik to Handle Forms in React appeared first on CSS-Tricks.
source https://css-tricks.com/using-formik-to-handle-forms-in-react/
from WordPress https://ift.tt/2Yemy5K via IFTTT
0 notes
Text
300+ TOP ASP.NET Objective Questions and Answers
ASP.NET Multiple Choice Questions :-
1. Choose the form in which Postback occur A. HTMLForms B. Webforms C. Winforms Ans: Webforms 2. Web.config file is used... A. Configures the time that the server-side codebehind module is called B. To store the global information and variable definitions for the application C. To configure the web server D. To configure the web browser Ans: To store the global information and variable definitions for the application 3. Which of the following object is not an ASP component? A. LinkCounter B. Counter C. AdRotator D. File Access Ans: LinkCounter 4. The first event triggers in an aspx page is. A. Page_Init() B. Page_Load() C. Page_click() Ans: Page_Init() 5. Difference between Response.Write() andResponse.Output.Write(). A. Response.Output.Write() allows you to buffer output B. Response.Output.Write() allows you to write formatted output C. Response.Output.Write() allows you to flush output D. Response.Output.Write() allows you to stream output Ans: Response.Output.Write() allows you to write formatted output 6. Which of the following method must be overridden in a custom control? A. The Paint() method B. The Control_Build() method C. The default constructor D. The Render() method Ans: The Render() method 7. How do we create a FileSystemObject? A. Server.CreateObject("Scripting.FileSystemObject") B. Create("FileSystemObject") C. Create Object:"Scripting.FileSystemObject" D. Server.CreateObject("FileSystemObject") Ans: Server.CreateObject("Scripting.FileSystemObject") 8. Which of the following tool is used to manage the GAC? A. RegSvr.exe B. GacUtil.exe C. GacSvr32.exe D. GacMgr.exe Ans: GacUtil.exe 9. What class does the ASP.NET Web Form class inherit from by default? A. System.Web.UI.Page B. System.Web.UI.Form C. System.Web.GUI.Page D. System.Web.Form Ans: System.Web.UI.Page 10. We can manage states in asp.net application using A. Session Objects B. Application Objects C. Viewstate D. All of the above Ans: All of the above

ASP.NET MCQs 11. Attribute must be set on a validator control for the validation to work. A. ControlToValidate B. ControlToBind C. ValidateControl D. Validate Ans: ControlToValidate 12. Caching type supported by ASP.Net A. Output Caching B. DataCaching C. a and b D. none of the above Ans: a and b 13. What is used to validate complex string patterns like an e-mail address? A. Extended expressions B. Basic expressions C. Regular expressions D. Irregular expressions Ans: Regular expressions 14. File extension used for ASP.NET files. A. .Web B. .ASP C. .ASPX D. None of the above Ans: .ASP 15. An alternative way of displaying text on web page using A. asp:label B. asp:listitem C. asp:button Ans: asp:label 16. Why is Global.asax is used? A. Declare Global variables B. Implement application and session level events C. No use Ans: Implement application and session level events 17. Which of the following is not a member of ADODBCommand object? A. ExecuteScalar B. ExecuteStream C. Open D. ExecuteReader Ans: Open 18. Which DLL translate XML to SQL in IIS? A. SQLISAPI.dll B. SQLXML.dll C. LISXML.dll D. SQLIIS.dll Ans: SQLISAPI.dll 19. Default Session data is stored in ASP.Net. A. StateServer B. Session Object C. InProcess D. all of the above Ans: InProcess 20. Default scripting language in ASP. A. EcmaScript B. VBScript C. PERL D. JavaScript Ans: VBScript 21. How do you get information from a form that is submitted using the "post" method? A. Request.QueryString B. Request.Form C. Response.write D. Response.writeln Ans: Request.Form 22. Which object can help you maintain data across users? A. Application object B. Session object C. Response object D. Server object Ans: Application object 23. Which of the following ASP.NET object encapsulates the state of the client? A. Session object B. Application object C. Response object D. Server object Ans: Session object 24. Which of the following object is used along with application object in order to ensure that only one process accesses a variable at a time? A. Synchronize B. Synchronize() C. ThreadLock D. Lock() Ans: Synchronize() 25. Which of the following control is used to validate that two fields are equal? A. RegularExpressionValidator B. CompareValidator C. equals() method D. RequiredFieldValidator Ans: CompareValidator 26. Mode of storing ASP.NET session A. InProc B. StateServer C. SQL Server D. All of the above Ans: All of the above 27. Which of the following is not the way to maintain state? A. View state B. Cookies C. Hidden fields D. Request object Ans: Request object 28. You can have only one Global.asax file per project. A. Yes B. No Ans: Yes 29. ______________ element in the web.config file to run code using the permissions of a specific user A. element B. element C. element D. element Ans: element 30. __________ is a special subfolder within the windows folder that stores the shared .NET component. A. /bin B. GAC C. Root Ans: GAC 31. Which of the following is the performance attributes of processModel? A. requestQueue limit B. maxWorkerThreads C. maxIdThreads D. All Ans: All 32. Which of the following is faster and consume lesser memory? A. SQLDataReader B. Data Set Ans: SQLDataReader 33. Which of the following is the way to monitor the web application? A. MMC Event viewers B. Performance logs C. Alerts Snap-ins D. ALL Ans: ALL 34. The ________________ property affects how the .Net Framework handles dates, currencies, sorting and formatting issues. A. CurrentUICulture B. CurrentCulture Ans: CurrentCulture 35. Where do we include the user lists for windows authentication? A. B. C. D. Ans: 36. Where do we include the user lists for Form authentication? A. B. C. D. Ans: 37. Which of the following authentication is best suited for a corporate network? A. Windows B. Form C. User D. All Ans: Windows 38. What attributes do you use to hide a public .Net class from COM? A. DLLImport Attributes B. ComVisible attributes C. COM Interop D. All Ans: ComVisible attributes 39. By default, code written with the Debug class is stripped out of release builds. A. Yes B. No Ans: Yes 40. _________ tests make sure that new code does not break existing code. A. Regression tests B. Integration tests C. Unit tests D. Load test Ans: Integration tests 41. The .NET Framework provides a runtime environment called..... ? A. RMT B. CLR C. RCT D. RC Ans: CLR 42. In ASP.NET in form page the object which contains the user name is ______ ? A. Page.User.Identity B. Page.User.IsInRole C. Page.User.Name D. None of the Above Ans: Page.User.Identity 43. Find the term: The .NET framework which provides automatic memory management using a technique called ______________ ? A. Serialization B. Garbage Collection C. Assemblies D. Overriding Ans: Garbage Collection 44. Which of the following denote ways to manage state in an ASP.Net Application? A. Session objects B. Application objects C. ViewState D. All the Above Ans: All the Above 45. What is the base class from which all Web forms inherit? A. Master Page B. Page Class C. Session Class D. None of the Above Ans: Page Class 46. WSDL stands for ___________ ? A. Web Server Description Language B. Web Server Descriptor Language C. Web Services Description Language D. Web Services Descriptor Language Ans: Web Services Description Language 47. Which of the following must be done in order to connect data from some data resource to Repeater control? A. Set the DataSource property B. Call the DataBind method C. Both A. and B. D. None of the Above Ans: Both A. and B. 48. Which of the following is FALSE? A. ASP.NET applications run without a Web Server B. ASP+ and ASP.NET refer to the same thing C. ASP.NET is a major upgrade over ASP D. None of the Above Ans: None of the Above 49. Which of the following transfer execution directly to another page? A. Server.Transfer B. Response.Redirect C. Both A. and B. D. None of the Above Ans: Server.Transfer 50. If one has two different web form controls in a application and if one wanted to know whether the values in the above two different web form control match what control must be used? A. DataList B. GridView C. CompareValidator D. Listview Ans: CompareValidator 51. Which of the following is used to send email message from my ASP.NET page? A. System.Web.Mail.MailMessage B. System.Web.Mail.SmtpMail C. Both A. and B. D. None of the Above Ans: Both A. and B. 52. In my .NET Framework I have threads. Which of the following denote the possible priority level for the threads? A. Normal B. AboveNormal C. Highest D. All the Above Ans: All the Above 53. In .NET the operation of reading metadata and using its contents is known as ______? A. Reflection B. Enumeration C. Binding D. Serialization Ans: Reflection 54. In ASP.NET the section contain which of the following elements? A. B. C. Both A. and B. D. None of the Above Ans: Both A. and B. 55. The type of code found in Code-Behind class is ________ ? A. Server-side code B. Client-side code C. Both A. and B. D. None of the above Ans: Server-side code 56. Common type system is built into which of the following: A. CLR B. RCT C. RCW D. GAC Ans: CLR 57. The actual work process of ASP.NET is taken care by _____________? A. inetinfo.exe B. aspnet_isapi.dll C. aspnet_wp.exe D. None of the Above Ans: aspnet_wp.exe 58. Which of the following allow writing formatted output? A. Response.Write() B. Response.Output.Write() C. Both A. and B. D. None of the Above Ans: Response.Output.Write() 59. Which of the following denote the property in every validation control? A. ControlToValidate property B. Text property C. Both A. and B. D. None of the Above Ans: Both A. and B. 60. How many classes can a single .NET DLL contain? A. One B. Two C. None D. Many Ans: Many 61. Suppose one wants to modify a SOAP message in a SOAP extension then how this can be achieved. Choose the correct option from below: A. One must override the method ReceiveMessage B. One must override the method InitializeMethod C. Both A. and B. D. One must override the method ProcessMessage Ans: One must override the method ReceiveMessage 62. Which of the following can be used to add alternating color scheme in a Repeater control? A. AlternatingItemTemplate B. DataSource C. ColorValidator D. None of the Above Ans: AlternatingItemTemplate 63. Suppose a .NET programmer wants to convert an object into a stream of bytes then the process is called ______________ ? A. Serialization B. Threading C. RCW D. AppDomain Ans: Serialization 64. The technique that allow code to make function calls to .NET applications on other processes and on other machines is A. .NET Threading B. .NET Remoting C. .NET RMT D. None of the above Ans: .NET Threading 65. The namespace within the Microsoft .NET framework which provides the functionality to implement transaction processing is .................... A. System.EnterpriseServices B. System.Security C. System.Diagnostics D. System.Data Ans: A 66. Which of the following method is used to obtain details about information types of assembly? A. GetTypes B. GetType C. Both A. and B. D. None of the Above Ans: Both A. and B. 67. Which of the following is TRUE about Windows Authentication in ASP.NET? A. Automatically determines role membership B. Role membership determined only by user programming C. ASP.NET does not support Windows Authentication D. None of the Above Ans: Automatically determines role membership 68. What tags one need to add within the asp:datagrid tags to bind columns manually? A. Set AutoGenerateColumns Property to false on the datagrid tag B. Set AutoGenerateColumns Property to true on the datagrid tag C. It is not possible to do the operation D. Set AutomaunalColumns Property to true on the datagrid tag Ans: Set AutoGenerateColumns Property to false on the datagrid tag 69. Which method do you invoke on the DataAdapter control to load your generated dataset with data? A. Load ( ) B. Fill( ) C. DataList D. DataBind Ans: Fill( ) 70. In ASP.NET the sessions can be dumped by using A. Session.Dump B. Session.Abandon C. Session.Exit D. None of the Above Ans: Session.Abandon 71. Which of the following languages can be used to write server side scripting in ASP.NET? A. C-sharp B. VB C. C++ D. A and B Ans: D 72. When an .aspx page is requested from the web server, the out put will be rendered to browser in following format. A. HTML B. XML C. WML D. JSP Ans: A 73. The Asp.net server control, which provides an alternative way of displaying text on web page, is A. B. C. Ans: A 74. The first event to be triggered in an aspx page is. A. Page_Load() B. Page_Init() C. Page_click() Ans: B 75. Postback occurs in which of the following forms. A. Winforms B. HTMLForms C. Webforms Ans: C 76. What namespace does the Web page belong in the .NET Framework class hierarchy? A. System.web.UI.Page B. System.Windows.Page C. System.Web.page Ans: A 77. Which method do you invoke on the Data Adapter control to load your generated dataset? A. Fill( ) B. ExecuteQuery( ) C. Read( ) Ans: A 78. How do you register a user control? A. Add Tag prefix, Tag name B. Add Source, Tag prefix C. Add Src, Tagprefix, Tagname Ans: C 79. Which of the following is true? A. User controls are displayed correctly in the Visual Studio .NET Designer B. Custom controls are displayed correctly in VS.Net Designer C. User and Custom controls are displayed correctly in the Visual Studio .NET Designer. Ans: C 80. To add a custom control to a Web form we have to register with. A. TagPrefix B. Name space of the dll that is referenced C. Assemblyname D. All of the above Ans: B 81. Custom Controls are derived from which of the classes A. System.Web.UI.Webcontrol B. System.Web.UI.Customcontrol C. System.Web.UI.Customcontrols.Webcontrol Ans: D 82. How ASP.Net Different from classic ASP? A. Scripting is separated from the HTML, Code is interpreted seperately B. Scripting is separated from the HTML, Code is compiled as a DLL, the DLLs can be executed on server C. Code is separated from the HTML and interpreted Code is interpreted separately Ans: C 83. What's the difference between Response.Write() andResponse.Output.Write()? A. Response.Output.Write() allows you to flush output B. Response.Output.Write() allows you to buffer output C. Response.Output.Write() allows you to write formatted output D. Response.Output.Write() allows you to stream output Ans: B 84. Why is Global.asax is used? A. Implement application and session level events B. Declare Global variables C. No use Ans: C 85. There can be more than 1 machine.config file in a system A. True B. False Ans: A 86. What is the extension of a web user control file? A. .Asmx B. .Ascx C. .Aspx Ans: A 87. Which of the following is true? A. IsPostBack is a method of System.UI.Web.Page class B. IsPostBack is a method of System.Web.UI.Page class C. IsPostBack is a readonly property of System.Web.UI.Page class Ans: B 88. The number of forms that can be added to a aspx page is. A. 1 B. 2 C. 3 D. More than 3 Ans: C 89. How do you manage states in asp.net application A. Session Objects B. Application Objects C. Viewstate D. All of the above Ans: A 90. Which property of the session object is used to set the local identifier? A. SessionId B. LCID C. Item D. Key Ans: D 91. Select the caching type supported by ASP.Net A. Output Caching B. DataCaching C. a and b D. none of the above Ans: B 92. Where is the default Session data is stored in ASP.Net? A. InProcess B. StateServer C. Session Object D. al of the above Ans: C 93. Select the type Processing model that asp.net simulate A. Event-driven B. Static C. Linear D. Topdown Ans: A 94. Does the EnableViewState allows the page to save the users input on a form? A. Yes B. No Ans: A 95. Which DLL translate XML to SQL in IIS? A. SQLISAPI.dll B. SQLXML.dll C. LISXML.dll D. SQLIIS.dll Ans: A 96. What is the maximum number of cookies that can be allowed to a web site? A. 1 B. 10 C. 20 D. More than 30 Ans: A 97. Select the control which does not have any visible interface. A. Datalist B. DropdownList C. Repeater D. Datagrid Ans: C 98. How do you explicitly kill a user session? A. Session.Close( ) B. Session.Discard( ) C. Session.Abandon D. Session.End E. Session.Exit Ans: C 99. Which of the following is not a member of ADODBCommand object? A. ExecuteReader B. ExecuteScalar C. ExecuteStream D. Open E. CommandText Ans: C 100. Which one of the following namespaces contains the definition for IdbConnection? A. System.Data.Interfaces B. System.Data.Common C. System.Data D. System.Data.Connection Ans: D 101. In your ASP.NET web application you want to display a list of clients on a Web page. The client list displays 10 clients at a time, and you require the ability to edit the clients. Which Web control is the best choice for this scenario? A. The DetailsView control B. The Table control C. The GridView control D. The FormView control Ans: The GridView control 102. How to implement authentication via web.config? A. Include the authentication element. B. Include the authorization element. C. Include the identity element. D. Include the deny element. Ans: Include the authorization element. 103. You need to store state data that is accessible to any user who connects to your Web application. Which object should you use? A. Session B. Application C. Response.Cookies D. Response.ViewState Ans: Application 104. Explain the significance of Server .MapPath A. Returns the Virtual Path of the web folder B. Maps the specified virtual path to Physical path C. Returns the physical file path that corresponds to virtual specified path D. All the above Ans: Returns the physical file path that corresponds to virtual specified path 105. ________ element in the web.config file to run code using the permissions of a specific user A. element B. element C. element D. element Ans: element 106. Which of the following is the way to monitor the web application? A. MMC Event viewers B. Performance logs C. Alerts Snap-ins D. ALL Ans: ALL 107. For your ASP.NET web application your graphics designer created elaborate images that show the product lines of your company. Some of graphics of the product line are rectangular, circular, and others are having complex shapes. You need to use these images as a menu on your Web site. What is the best way of incorporating these images into your Web site? A. Use ImageButton and use the x- and y-coordinates that are returned when the user clicks to figure out what product line the user clicked. B. Use the Table, TableRow, and TableCell controls, break the image into pieces that are displayed in the cells, and use the TableCell control’s Click event to identify the product line that was clicked. C. Use the MultiView control and break up the image into pieces that can be displayed in each View control for each product line. Use the Click event of the View to identify the product line that was clicked. D. Use an ImageMap control and define hot spot areas for each of the product lines. Use the PostBackValue to identify the product line that was clicked. Ans: Use an ImageMap control and define hot spot areas for each of the product lines. Use the PostBackValue to identify the product line that was clicked. 108. An ASP.NET page uses a Datagrid displays employee information.The Web application supports a large number of concurrent users, who will be saving data from the grid back to the database. It is important that the Web application doesn't overwhelm the Web Server. A. Disable View State and don't use session state B. Use View State C. Use URL munging D. Disable ViewState and use Session State Ans: Disable View State and don't use session state 109. Which of these data source controls do not implement Caching? A. LinqDataSource B. ObjectDataSource C. SqlDataSource D. XmlDataSource Ans: LinqDataSource 110. Which of the following is the default authentication mode for IIS? A. Anonymous B. Windows C. Basic Authentication D. None Ans: Anonymous 111. When does Garbage collector run? A. When application is running low of memory B. It runs random C. When application is running for more than 15 minutes D. None of the above Ans: When application is running low of memory 112. Which of the following is the way to monitor the web application? A. MMC Event viewers B. Performance logs C. Alerts Snap-ins D. ALL Ans: ALL 113. Which of the following languages are used to write server side scripting in ASP.NET? A. C-sharp B. VB C. Both C-sharp and VB D. C++ Ans: Both C-sharp and VB 114. In which of the following format, output will be rendered to browser When an .aspx page is requested from the web server? A. JSP B. WML C. XML D. HTML Ans: HTML 115. Which of the following is true? A. User controls are displayed correctly in the Visual Studio .NET Designer B. Custom controls are displayed correctly in VS.Net Designer C. User and Custom controls are displayed correctly in the Visual Studio .NET Designer. Ans: Custom controls are displayed correctly in VS.Net Designer 116. How ASP.Net Different from classic ASP? A. Scripting is separated from the HTML, Code is interpreted seperately B. Code is separated from the HTML and interpreted Code is interpreted separately C. Scripting is separated from the HTML, Code is compiled as a DLL, the DLLs can be executed on server Ans: Scripting is separated from the HTML, Code is compiled as a DLL, the DLLs can be executed on server 117. Which property of the session object is used to set the local identifier? A. LCID B. SessionId C. Key D. Item Ans: LCID 118. Which DLL translate XML to SQL in IIS? A. SQLIIS.dll B. SQLXML.dll C. LISXML.dll D. SQLISAPI.dll Ans: SQLISAPI.dll 119. Which of the following does not have any visible interface? A. Datagrid B. Repeater C. DropdownList D. Datalist Ans: Repeater 120. ________ is not a member of ADODBCommand object. A. ExecuteReader B. ExecuteStream C. ExecuteScalar D. CommandText E. Open Ans: Open 121. Which class can be used to create an XML document from scratch? A. XmlConvert B. XmlDocument C. XmlNew D. XmlSettings Ans: XmlDocument 122. Which class can be used to perform data type conversion between .NET data types and XML types? A. XmlType B. XmlCast C. XmlConvert D. XmlSettings Ans: XmlConvert 123. For your ASP.NET web application your graphics designer created elaborate images that show the product lines of your company. Some of graphics of the product line are rectangular, circular, and others are having complex shapes. You need to use these images as a menu on your Web site. What is the best way of incorporating these images into your Web site? A. Use ImageButton and use the x- and y-coordinates that are returned when the user clicks to figure out what product line the user clicked. B. Use the Table, TableRow, and TableCell controls, break the image into pieces that are displayed in the cells, and use the TableCell control’s Click event to identify the product line that was clicked. C. Use the MultiView control and break up the image into pieces that can be displayed in each View control for each product line. Use the Click event of the View to identify the product line that was clicked. D. Use an ImageMap control and define hot spot areas for each of the product lines. Use the PostBackValue to identify the product line that was clicked. Ans: Use an ImageMap control and define hot spot areas for each of the product lines. Use the PostBackValue to identify the product line that was clicked. 124. In your ASP.NET 2.0 web application you want to display an image that is selected from a collection of images. What approach will you use to implementing this? A. Use the ImageMap control and randomly select a HotSpot to show or hide. B. Use the Image control to hold the image and a Calendar control to randomly select a date for each image to be displayed. C. Use the AdServer control and create an XML file with configuration of the control. D. Use an ImageButton control to predict randomness of the image to be loaded based on the clicks of the control. Ans: Use the AdServer control and create an XML file with configuration of the control. 125. Which of the following is a requirement when merging modified data into a DataSet? A. A primary key must be defined on the DataTable objects B. The DataSet schemas must match in order to merge C. The destination DataSet must be empty prior to merging D. A DataSet must be merged into the same DataSet that created it. Ans: A primary key must be defined on the DataTable objects 126. Which Kind Of data we can store in viewstate A. Viewstate can store only serilizable object B. Viewstate can store anything C. Viewstate can store onlys string D. None Ans: Viewstate can store only serilizable object 127. What is/are the predefined TraceListener(s) in ASP.Net A. TextWriterTraceListener B. EventLogTraceListener C. DefaultTraceListener D. All the above 1, 2,3 Ans: All the above 1, 2,3 128. We have defined one page_load event in aspx page and same page_load event in code behind who will run first? A. page_laod event in aspx page B. page_load event in code-behind C. both will run simultaneously D. None Ans: page_load event in code-behind 129. Which of the following represents the best use of the Table, TableRow, and Table-Cell controls? A. To create and populate a Table in Design view B. To create a customized control that needs to display data in a tabular fashion C. To create and populate a Table with images D. To display a tabular result set Ans: To create a customized control that needs to display data in a tabular fashion 130. How to find out what version of ASP.NET I am using on my machine? A. Response.Write(System.Environment.Version.ToString() ); B. Response.Write(Version.ToString() ); C. Response.Write(System.Version.ToString() ); D. not possible Ans: Response.Write(System.Environment.Version.ToString() ); 131. An ASP.NET page uses a Datagrid displays employee information.The Web application supports a large number of concurrent users, who will be saving data from the grid back to the database. It is important that the Web application doesn't overwhelm the Web Server. A. Disable View State and don't use session state B. Use View State C. Use URL munging D. Disable ViewState and use Session State Ans: Disable View State and don't use session state 132. While creating a Web site with the help of Visual Studio 2005 on a remote computer that does not have Front Page Server Extensions installed, which Web site type will you create in Visual Studio 2005? A. HTTP B. File C. FTP D. All of the above Ans: HTTP 133. What’s the difference between Response.Write() and Response.Output.Write()? A. The First one allows you to write formatted output. B. The latter one allows you to write formatted output. C. No Difference D. The latter one allows you to write unformatted output. Ans: The latter one allows you to write formatted output. 134. If I’m developing an application that must accommodate multiple security levels though secure login and my ASP.NET web application is spanned across three web-servers (using round-robin load balancing) what would be the best approach to maintain login-in state for the users? A. Maintain the login state security through a database. B. Maintain the login state security through a Session. C. Maintain the login state security through a View State. D. All of the Above Ans: Maintain the login state security through a database. 135. Where we can assign value to Static read only member variable of a static class? A. Default constructor B. Parameterized constructor C. Global.asax D. On click of button Ans: Default constructor 136. Which of these files takes the web application in offline mode? A. app_offline.html B. app_offline.htm C. appoffline.html D. none of these Ans: app_offline.htm 137. Which of these classes maps to the tag A. HtmlCheckBox B. HtlmInputCheckBox C. HtmlControl D. None Ans: HtlmInputCheckBox 138. In order to prevent a browser from caching a page which of these xstatements should be written? A. Response.Cache.SetNoStore(); B. Response.Cache.SetNoServerCaching(); C. Response.Cache.SetNoCaching(); D. None of these Ans: Response.Cache.SetNoStore(); 139. Which of these data source controls do not implement Caching? A. LinqDataSource B. ObjectDataSource C. SqlDataSource D. XmlDataSource Ans: LinqDataSource 140. By default, ASP.NET store SessionIDs in _________. A. Cookies B. Cache C. Database D. Global variable Ans: Cookies ASP.NET Questions and Answers pdf Download Read the full article
0 notes
Photo

How to Upload YouTube Videos Programmatically https://t.co/SWHZevphmO #lwpuseragent #httppost #youtube #html #video #upload #perl #javascript #firefox #http #wwwmechanize #pageinfo #htmlforms #regularexpressions
0 notes