#HMAS Warrego
Photo

“Scene in Darwin harbor a few days prior to the raid on 19 February 1942. In foreground is HMAS Swan, which survived the raid. In center is USAT Mauna Loa, which was sunk. In background is HMAS Warrego.”
(NHHC: NH 43659)
#Military#History#HMAS Swan#Sloop#USAT Mauna Loa#Transport#HMAS Warrego#Royal Australian Navy#WWII#WW2#Pacific War#World War II
33 notes
·
View notes
Text
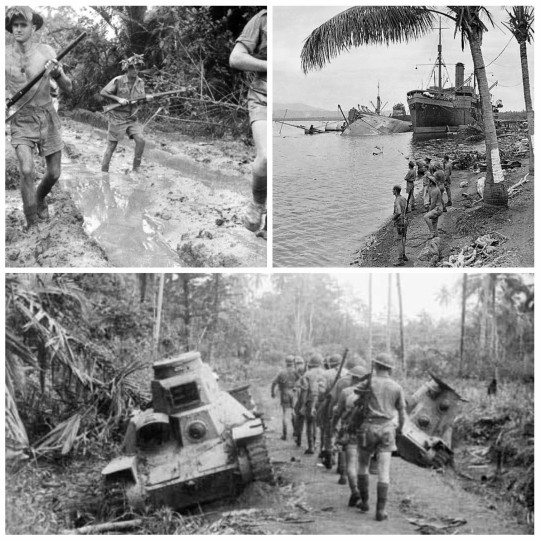
• Battle of Milne Bay
The Battle of Milne Bay, also known as the Battle of Rabi by the Japanese, was a battle of the Pacific campaign of World War II.
Milne Bay is a sheltered 97-square-mile (250 km2) bay at the eastern tip of the Territory of Papua (now part of Papua New Guinea). It is 22 miles (35 km) long and 10 miles (16 km) wide, and is deep enough for large ships to enter. The coastal area is flat with good aerial approaches, and therefore suitable for airstrips, although it is intercut by many tributaries of rivers and mangrove swamps. The first troops arrived at Milne Bay from Port Moresby in the Dutch KPM ships Karsik and Bontekoe, escorted by the sloop HMAS Warrego and the corvette HMAS Ballarat on June 25th. The troops included two and a half companies and a machine gun platoon from the 55th Infantry Battalion of the 14th Infantry Brigade, the 9th Light Anti-Aircraft Battery with eight Bofors 40 mm guns, a platoon of the US 101st Coast Artillery Battalion. On July 11th, troops of the 7th Infantry Brigade, under the command of Brigadier John Field, began arriving to bolster the garrison. The brigade consisted of three Militia battalions from Queensland, the 9th, 25th and 61st Infantry Battalions.
Japanese aircraft soon discovered the Allied presence at Milne Bay, which was appreciated as a clear threat to Japanese plans for another seaborne advance on Port Moresby, which was to start with a landing at Samarai Island in the China Strait, not far from Milne Bay. On July 31st the commander of the Japanese XVII Army, Lieutenant General Harukichi Hyakutake, requested that Vice Admiral Gunichi Mikawa's 8th Fleet capture the new Allied base at Milne Bay instead. Under the misconception that the airfields were defended by only two or three companies of Australian infantry (300–600 men), the initial Japanese assault force consisted of only about 1,250 personnel. The Imperial Japanese Army (IJA) was unwilling to conduct the operation as it feared that landing barges sent to the area would be attacked by Allied aircraft. As a result, the assault force was drawn from the Japanese naval infantry, known as Kaigun Rikusentai (Special Naval Landing Forces). led by Commander Masajiro Hayashi, were scheduled to land on the east coast near a point identified by the Japanese as "Rabi", along with 197 men from the 5th Sasebo SNLF, led by Lieutenant Fujikawa.
Following the battle, the chief of staff of the Japanese Combined Fleet, Vice Admiral Matome Ugaki, assessed that the landing force was not of a high calibre as it contained many 30- to 35-year-old soldiers who were not fully fit and had "inferior fighting spirit". The Japanese enjoyed some initial advantage in the form of possessing two Type-95 light tanks. After an initial attack, however, these tanks became marooned in the mud and abandoned. They also had control of the sea during the night, allowing reinforcement and later evacuation. Over the course of the 23th and 24th of August, aircraft carried out preparatory bombing around the airfield at Rabi. The main Japanese invasion force left Rabaul on August 24th, under Matsuyama's command.
on August 24th, reports of the second Japanese convoy, consisting of seven barges, which had sailed from Buna carrying the force that would land at Taupota were also received at this time. In response to this sighting, after the initially poor weather had cleared, 12 RAAF Kittyhawks were scrambled at midday. The barges were spotted beached near Goodenough Island where the 350 troops of the 5th Sasebo SNLF, led by Commander Tsukioka, had gone ashore to rest. The Australian pilots then proceeded to strafe the barges and, over the course of two hours, destroyed them all. After the initial sighting, the main invasion force, consisting of the heavy naval screening force and the two transports, remained elusive until the morning of August 25th. In an effort to intercept it, US B-17s were dispatched, although they were unable to complete their mission as bad weather closed in. By dawn of August 26th, advancing west along the coast with armoured support, the Japanese had reached the main inland. Japanese force moved through the jungle at the edge of the coastal track, and was headed by two light tanks. Although they lacked anti-armour weapons, the Australians were able to turn back the Japanese attack.At this stage, the Japanese suffered a serious setback when their base area was heavily attacked at daylight by RAAF Kittyhawks and other Allied aircraft.
As a result of the attack, a number of Japanese troops were killed, while a large quantity of supplies was destroyed, as were a number of the landing barges which were beached. The Japanese did not have any air cover as the fighters, which were to patrol over Milne Bay were shot down by Allied fighters shortly after they took off and other aircraft were halted by poor weather. Nevertheless, the Japanese were still pressing on the Australian Battalion's positions throughout the day. The muddy ground meant that the Australians were unable to move anti-tank guns into position; however, as a stop-gap measure quantities of sticky bombs and anti-tank mines were moved up to the forward units. Australians launched a minor attack upon the Japanese forward positions which were located about 600 yards (550 m) away, pushing the Japanese back a further 200 yards (180 m).
Following continued fighting on the 25th, for the next two days there was a lull in the fighting. During this time, the Australians consolidated their defences. The 61st Infantry Battalion, despite being seriously depleted from the previous fighting, were ordered back to the airfield. Later that night the Japanese began forming up along the track at the eastern end of the airstrip by the sea, and at 3:00 am on August 31st they launched their attack. The first Japanese attack was repelled by heavy machine gun and mortar fire from Australian and American troops. A further two banzai charges were attempted only to meet the same fate, with heavy Japanese casualties, including the Japanese commander. after the survivors of the attack had reformed, he led them north of the airstrip in an attempt to outflank the Allied positions on Stephen's Ridge near the airfield. After running into a platoon of Australians who engaged them with Bren light machine guns, the Japanese withdrew just before dawn. Japanese troops who survived this attack were shocked by the heavy firepower the Allied forces had been able to deploy, and the assault force was left in a state of disarray.
On the morning September 1st, the Allied Infantry Battalions went on the offensive, while a force of seven Kittyhawks attacked the Japanese headquarters. By this time, the Japanese had abandoned the objective of reaching the airfields and instead sought only to hold off the Australians long enough to be evacuated. This information was not known by the Allies, however, who were in fact expecting the Japanese to undertake further offensive action. With the Japanese position at Milne Bay close to collapse, on September 2nd, a sent a radio message was sent to the headquarters of the 8th Fleet, "We shall defend our position to our deaths." After further fighting between remaining Japanese forces and Allied forces advancing on their position, The remaining Japanese troops were evacuated by two barges and the light cruiser Tenryū rescued them two days later. Finding themselves heavily outnumbered, lacking supplies and suffering heavy casualties, the Japanese withdrew their forces, with fighting coming to an end on September 7th, 1942. The battle is often described as the first major battle of the war in the Pacific in which Allied troops decisively defeated Japanese land forces.
#military history#second world war#world war 2#world war ii#australian history#american history#imperial japan#japanese history#history#memorial day#long post
26 notes
·
View notes
Text
May 14 1918 in WWI

HMS Phoenix (1911) at 9:18 on 14 May 1918, while patrolling the Otranto Barrage, the Phoenix was torpedoed amidships by the Austro-Hungarian submarine SM U-27, at position 40°12′30″N 18°52′12″E. HMAS Warrego made an unsuccessful attempt to tow her to Valona (now Vlorë in Albania),[15] but she sank within sight of the port at 13:10 in position 40°23.5′N 19°14′ECoordinates: 40°23.5′N 19°14′E. The crew had been taken off before she capsized, and there were only two fatalities; a Leading Stoker and an Engine Room Artificer.
22 notes
·
View notes
Link
PHOTO: Painted black and with splinter mats fixed to her forward superstructure, HMAS Warrego docks at Cockatoo Island on her return from New Guinea in 1915. (Supplied: Sea Power Centre)
6 notes
·
View notes
Text
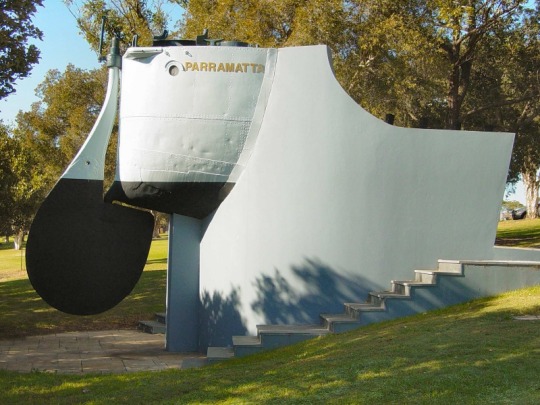
The Wreck of the HMAS Parramatta lies between Bar Point and Milsons Island, with her Stern preserved at Queens Wharf Parramatta Reserve.
HMAS Parramatta (I) was one of six River Class torpedo boat destroyers built for the Royal Australian Navy during the period 1909-16. During World War I they formed the Australian Destroyer Flotilla. Sister ships were HMA Ships Huon (I), Swan (I), Torrens (I), Warrego (I) and Yarra (I).
HMAS Parramatta (I) was laid down by Fairfield Shipbuilding and Engineering Company Limited, at their shipyard in Govan, Scotland on 17 March 1909. She was launched on 9 February 1910 by Mrs Margot Asquith, wife of British Prime Minister Herbert Asquith. Parramatta (I) was the first new ship launched for the Australian Navy followed by her sister ship HMAS Yarra (I).

Launching of HMAS Parramatta (I) on 9 February 1910 by Mrs Asquith, wife of British Prime Minister Herbert Asquith.

The ceremonial axe used to launch HMAS Parramatta (I), now in the collection of the Australian War Memorial.
She was commissioned as HMS Parramatta at Greenock on 10 September 1910 under the command of Captain Frederick Tickell CMG CNF and departed Portsmouth on 19 September 1910 as a Royal Navy ship for the voyage to Australia, and proceeding via Suez in company with her sister ship Yarra and escorted by HMS Gibraltar, arrived at Broome, Western Australia, on 15 November, where the two destroyers passed to the control of the Australian Government.
At the outbreak of World War I, Parramatta (I), with her sister ships Warrego (I) and Yarra (I), formed the destroyer component of the Australian Fleet commanded by Vice Admiral Sir George E Patey, RAN.

The captain and crew of the Australian Destroyer HMAS Parramatta (I) are greeted on her arrival in Fremantle, November 1910.
During the opening phases of the war she operated with the fleet in the search for Von Spee's Pacific Squadron. Later she took part in the capture of the German Colonies in the South West Pacific, and a number of her sailors were landed at Kabakaul (New Britain), under the command of Lieutenant Gerald Hill RNR, of HMAS Yarra (I) to take part in the operations ashore against the Germans. Parramatta (I) was present at the surrender of German New Guinea at Rabaul on 13 September 1914.

HMAS Parramatta (I) leaving harbour, circa 1913-14.
HMAS Parramatta (I) remained in New Guinea waters after the departure of the fleet (HMA Ships Australia (I), Melbourne (I) and Sydney (I) on 17 September 1914, and in company of Yarra (I) and Warrego (I) assisted in the consolidation of the Australian occupation of New Guinea and New Britain.

HMA Ships Parramatta (I) and Warrego (I) navigate the Sepik River New Guinea, December 1914.
In December all three ships proceeded up the Sepik River, and in January 1915 visited Morobe, Finschhafen and other points on the coast, cruising also to neighbouring island groups including the Admiralty Islands. On 5 February 1915 the three destroyers finally left Rabaul to return to Australia.

HMAS Parramatta (I) wearing her early wartime paint scheme.
For several months after her return to Sydney, Parramatta (I) remained on the Australian coast. On 27 April the Flotilla left Port Phillip on a cruise which included visits to Jervis Bay, Port Jackson, Port Stephens and points along the Barrier Reef. By mid-June 1915 the three destroyers reached Cairns and thereon began the return south patrolling and exercising en route. On 23 August they returned to Sydney for refit.
In November 1915 Parramatta (I), Yarra (I) and Warrego (I) proceeded to Sandakan in Borneo and based there, the Flotilla spent the next six months patrolling Malayan, East Indies and Philippine waters. On 17 July 1916 Parramatta (I) returned to Sydney.
HMAS Parramatta (I) spent the period of September 1916 to May 1917 on patrol in Australian waters. On 10 May 1917 she sailed from Sydney in company of Yarra (I) and Warrego (I) for the Mediterranean, being joined en route by Swan, Huon and Torrens to form an Australian Flotilla of six destroyers. Following a period of training the ships were based on Brindisi on the heel of Italy for Adriatic anti-submarine patrols. On this work the destroyers were responsible for blocking the southward passage of submarines through the Adriatic Narrows into the Mediterranean and also the safe transit of Italian transports to and from Albania.

Left: Crew members fitting a warhead to a torpedo in the Mediterranean, 1917. Right: HMAS Parramatta (I) passing through the Corinth Canal, Greece, 1918.
During the early months of these operations a patrol seldom passed without an enemy submarine being discovered and hunted, but as time went on the enemy was more rarely sighted until the patrol became routinely uneventful steaming. Enemy attacks on the strongly escorted troop transports moving in the danger areas were few and far between, but there were some by a few of the more audacious enemy submarine commanders.

HMAS Parramatta (I). Painting by Phil Belbin

A photograph taken from the observation balloon being towed by HMAS Parramatta (I), in the Adriatic Sea on 5 August 1918.
During one such attack, 16 November 1917, the Italian transport Orione had her stern blown off by an enemy torpedo. Parramatta (I) and Yarra (I) stood by to salvage after Warrego (I) and Huon (I) had rescued the survivors. Parramatta (I) took her in tow but the enemy was still lurking beneath the surface and fired a second torpedo while the tow line was being secured. She then broke surface and dived again passing directly under Parramatta (I). Yarra (I) set out to hunt the enemy down but after a long and fruitless search returned to help in towing operations until the damaged ship was handed over to an Italian tug later that day.

HMAS Parramatta (I) alongside the torpedoed transport, Orione.
Adriatic operations ended for Parramatta (I) on 28 September 1918 when she proceeded to Piraeus for refitting. She returned to duty on 21 October, spending a brief period on patrol off Suvla Bay (Gallipoli) and Imbros before passing through the Dardanelles with the fleet to Ismid in the eastern corner of the Sea of Marmora.

HMAS Parramatta (I) crew members with the Australian Flag in Brindisi Harbour, 1918.

The Australian Torpedo Boat Destroyer Flotilla at Brindisi, 1918.
In November she joined an Allied Squadron at Constantinople and on 25 November passed the Bosporus en route to Sebastapol where the Allied group took over some Russian ships on behalf of the anti-Bolshevik forces. Thenceforth Parramatta (I) was used to carry despatches and mails between Sebastapol and Constantinople.

The Australian Flag flying from the bow of HMAS Parramatta (I) on her arrival at Constantinople. The domed building in the background is the Dolmabahce Mosque.
At the end of December 1918 her service in the Black Sea and Sea of Marmora ended. Proceeding via Malta and Gibraltar she reached Devonport on 14 January 1919. En route, in company of other destroyers of the Australian Flotilla, Parramatta (I) was forced by gale force winds to put into Ferrol after sustaining considerable damage from heavy seas off Cape Finisterre.
On 6 March 1919, in company of HMA Ships Melbourne, Huon, Yarra and Warrego, she sailed for Australia, joined by Swan and Torrens at Malta. The flotilla reached Aden on 25 March, Colombo on 2 April, Singapore on 15 April and Darwin on 26 April. On the last day of the voyage Parramatta (I) and Yarra ran out of fuel and had to be towed into Darwin by Warrego.
The remainder of Parramatta's seagoing life was spent in Australian waters. She paid off at Sydney on 22 July 1919, recommissioned for a month (17 May 1920-13 June 1920) on the occasion of the visit of the Prince of Wales in HMS Renown, and thereafter remained in Reserve at Sydney until October 1924. From October 1924 until November 1925 she was based at Westernport as a training ship. On 16 November 1925 she returned to Sydney and remained in port until May 1926, when she proceeded to Adelaide where she was placed in Reserve with a Care and Maintenance Party for Naval Reserve Training. Except for a visit to Melbourne in May 1927, she remained in South Australian waters until April 1928, when she returned to Sydney, finally paying off on 20 April 1928.
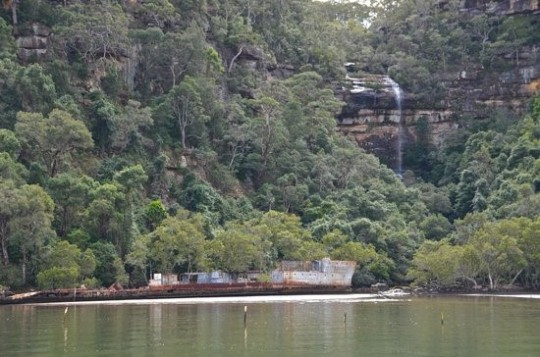
On 17 October 1929 she was handed over to Cockatoo Dockyard for dismantling. Her hull was subsequently used as an accommodation vessel, on the Hawkesbury River, NSW, by the New South Wales Department of Prisons before being sold to Mr George Rhodes of Cowan as scrap. The vessel was moored in the river but broke adrift during a storm and ran aground and her wreck remains there to this day.

The wreck of HMAS Parramatta (I) in the Hawkesbury River.
What remained of Parramatta (I) lay derelict on a mud bank north of Milson Island in the Hawkesbury River until 7 July 1973. On that and the following day the bow and stern sections were salvaged and later transported to a site on the north bank of the Parramatta River, upstream from the Silverwater Bridge. The stern of the ship was later established as a naval memorial at Queens Wharf Reserve. The bow section is mounted at the north end of Garden Island, Sydney, within the grounds of the Naval Cultural and Heritage Centre.

The stern section of Parramatta (I) mounted at Queens Wharf Reserve as a permanent tribute to the ship.
1 note
·
View note
Link
0 notes
Photo

“Scene in Darwin harbor a few days prior to the raid on 19 February 1942. In foreground is HMAS Swan, which survived the raid. In center is USAT Mauna Loa, which was sunk. In background is HMAS Warrego.”
(NHHC: NH 43659)
#Military#History#HMAS Swan#HMAS Warrego#Destroyer#USAT Mauna Loa#Transport#Royal Australian Navy#WWII#WW2#Pacific War#World War II
47 notes
·
View notes
Last Seen Blogs

wigginskarstensen56
The Journey of Miller 587

yeshoseokjin
cosmo

red-pencil
Erin Humiston

100cowsetsy
100 Cows

ossielv
Ossiel V