#Green Screen Software for Desktop
Explore tagged Tumblr posts
Visit Tumblr Blog
Explore Tumblr blogs with no restrictions, modern design and the best experience.
Last Seen Tumblr Blogs


Fun Fact
The Tumblr office adopted Tommy, an 11-year-old Pomeranian.
Text
How to Pick the Best Chroma Keying Software in 2023

In today's fast-paced, digital world, it is all too common to detach "Chroma" from a picture, image, video, etc. Unfortunately, we found that some expensive and poor-quality solutions deter users from looking for creative, effective, and knowledgeable wizard-like software. Let's look at the specifics of the best Chroma Key Software for 2023 and talk about how to get the most of it.
The removal of the green screen from a photo or video is a challenging process without an easy-to-use solution. The following factors are particularly important to us as we search for the best Chroma Key Software in 2023:
Usability: The majority of commercially viable software depends on the end-users' ability to operate its simple, intuitive user interfaces. In this case, PC, Mac, iPhone or green screen software for desktop ought to be usable by both professional and novice photographers.
Features and versions: To create software that is uniquely tailored for each stakeholder, the software industry has subdivided and profiled its user base. In order to achieve good results, you could look for green screen software with features that specifically define the requirements at various professional and super-professional levels.
Platforms: In order to accommodate overlays and special effects, photographers should find it simple to access over Desktop, PC, or iPhone and make outstanding artworks on time. The most adaptable green screen apps give customers access to additional features.
Demonstration: Get acquainted with the numerous features, special effects, overlays, enhanced effects, etc. that a green screen software has to offer the user by using the Free Demo versions.
Cost: One configures settings to take into account all the variables when buying green screen software for a PC, desktop, or Mac, and it's important for the right reasons. Compare the costs before making the transfer.
The most popular green screen backdrop removal tool, Green Screen Wizard, fits the aforementioned requirements and has wizard-level capabilities. We believe 2023 will likely show to be a great year for improving photo and video editing.
0 notes
Text

[Jinx series masterlist]
Jinx made the most of her shitty call-sign. Might as well spread that bad luck all over someone else’s computer.
The software she created slipping undetected into another’s computer. A little pop-up appearing when they oh so stupidly agreed to that update of some program that’s been safe so many times.
Ooops.
“Hi, you’ve been Jinxed! Don’t be a stranger now, I can see everything on your screen.”
There’s no use scrambling to shut down the multiplying pop-ups.
“Haha, not so quick now. I like it when you overshare.”
Too panicked about all the data being collected that it takes them a while to use their brains and turn the computer off.
But, Jinx is always running in the background when it’s turned back on later. Would ya’ look at that, how nice is it for people to be soo welcoming.
So when it pops up on Soap’s laptop, a little sponge scrubbing the screen and wiping some damaging intel for him, he can’t help but leave it on and let Jinx help him out.
Another pop-up with an eye watering amount of pound notes in the box. Soap has to count the zeros, throat dry and eye twitching.
“You’ve been jinxed! If you’d like to retrieve your files….”
“JINX!!” Soap dropped his laptop on her desk, one hand on the back of her chair and the other beside the keyboard caging Jinx in.
The clack of the keyboard stopping, “relax Soap, I’m just running some practice tests, give me a fifty and we’ll call it even.”
He opens his mouth, but Gaz interrupts. “Pay it or it’s doubled mate.” A knowing look of how he too was on the test list. Kyle had unknowingly made it too easy for her to find it, she noticed the structure/pattern of his files and thanked him later.
“Already doubled for burning my eyes out,” Jinx said, smiling as Soap pulled his wallet out of his pocket and begrudgingly pulled out his cash.
The only person that didn’t pay up was Ghost as there was no dirt on anything digital. He kept everything off technology and his laptop looked like it was still on the factory settings. A rolling green landscape with one lone file on the desktop. Pathetic and boring really. Jinx downloading a game of chess to his desktop and every now and then she notices Ghost has made a new move.
The Captain had a load, but he managed to bribe his way out of it…gave Jinx some privileges she didn’t have before. Something to keep her preoccupied, she knew what he was doing, but whose she to turn down a free fifteen minutes on that on particular database.
#cod fanfic#cod x reader#cod fanfiction#cod mw2 x reader#call of duty x reader#call of duty fic#call of duty x female reader#cod mw2 fanfic#call of duty fanfic#tf 141 headcanons#tf 141 x reader#johnny mactavish imagines#johnny soap mctavish x reader#johnny mctavish x reader#simon ghost riley x reader#simon ghost riley imagine#simon ghost riley fic#simon ghost riley headcanons#tf141 headcanons#captain john price fanfiction#captain john price x reader#kyle gaz garrick x reader#kyle garrick imagine#captain john price imagine#john price fic#kyle garrick headcanon#john price headcanons#simon riley headcanons#cod headcanons#cod imagine
139 notes
·
View notes
Text
Overtime 4
Warnings: this fic will include elements, some dark, such noncon/dubcon, and other untagged triggers. Please take this into account before proceeding. It is up to curate your online consumption safely.
Summary: your boss, Mr. Hansen, runs you ragged but you find solace in an unexpected friend.
Characters: Lloyd Hansen, Jake Jensen.
Author’s Note: This one is dedicated to my dearest @thezombieprostitute
Please feel free to leave some feedback, reblog, and jump into my asks. I’m always happy to discuss with you and riff on idea. As always, you are cherished and adored! Stay safe, be kind, and treat yourself💜

That day, you take your lunch. It’s been a long one. Again.
It seems that it only gets worse lately. Mr. Hansen is either yelling about some client or his ex-wife or the way the cream cheese on his bagel is spread. For all of them, you have to stand and take the brunt of his frustration.
The sunlight is warm despite a thin sheet of clouds. It’s going to rain, probably just as you get out of work. Typical.
You nibble on your granola bar and stare at the flowers. It’s nice not to be behind a screen. You crinkle the wrapper and take another small bite. You don’t usually get much of a break so you don’t really pack a full lunch. Your stomach grumbles in regret of that fact.
You put your elbows on the picnic table and hunch forward. A breeze rustles through petals and leaves and stirs the scent of pollen. You hear the door to the courtyard but don’t look up. No one talks to you. The one time you tried to sit with Caroline and she fled as quickly as you said hi.
“Hey,” a shadow stops beside the table, “you mind if I sit?”
You look up at Jensen and shrug, “oh, sure.”
You put your head back down, suddenly self-conscious, and you break off a morsel of granola with your fingers before chewing on it. He sits and you feel him watching you. You peek at him as you swallow.
“How’s it going?” He asks.
You wrap up what’s left of the bar and put it in your sweater pocket. “It’s okay. Nothing special. How about you?”
“Uh, yeah, it’s good,” he unwraps his sandwich as he speaks, his hands seemingly too busy for his own good. The smell of the turkey and swiss draws a growl from your stomach. “Been running around trying to get that new inventory software to work. No one around here knows how to read I swear. And someone up in marketing downloaded a bug so lots of damage control, haha.” His eyes round and he presses a hand to the side of his neck. “I’m yapping again.”
“It’s fine,” you say. “I don’t mind.”
“You don’t?” He asks.
“No.” At least he’s nice. Not like Mr. Hansen.
“Right, uh... Did I interrupt? Or you just finishing up?” He looks at your pocket pointedly.
“Oh, no, I... the granola’s too sugary. I’ll just have a tea when I get back to my desk,” you explain and look away, following a ladybug with your eyes.
“You don’t got anything else?” He asks.
“Not hungry,” you lie.
“Hm, alright,” he doesn’t sound convinced but doesn’t insist. “Oh, I meant to ask, I saw your wallpaper, not that I’m like snooping or anything, just happened to notice. Ummmm, well, that sounds off, doesn’t it?” He chuckles nervously, “what I mean it, I saw that you like er, The Sims?”
You nod and look at the table. Mr. Hansen never said anything about the desktop background. You supposed he didn’t know what the green diamonds meant. He had enough to say about your dancing kitten.
“I play sometimes,” you say.
“Yeah, me too. Just 4 or any old ones?”
“Erm, I like the medieval one.”
“Really? I thought everyone hated that one,” he says. “I got tired of losing at Elden Ring so I’ve been trying to zen out in Oasis Springs. My wife died though. And the second one. I’ve stopped marrying actually, I might be cursed.”
It sounds absurd to talk about the game out loud. You never had anyone to discuss it with so you never realised. You glance up again then check your watch.
“Sorry,” you frown, “I gotta get back.”
“Oh,” his disappointment lines his forehead, “yeah, sure, sorry if I ate up your time.”
“No, you didn’t,” you stand and sidle out from behind the bench, coming close to him as you step out. The round table is a bit awkward. “See ya.”
“See ya.”
You leave him and the sunlight and go back into the fluorescent-saturated hallways. You don’t rush back even though you should. You just don’t want to be there anymore. Most nights, you can’t fall asleep because you dread waking up. And in the morning, you can hardly drag yourself out of bed.
You get to your desk and wiggle the mouse to wake up your monitor. You open the browser and stare at the little ad in the side panel of the home page. You hover your finger over the button then click down on it.
The new tab opens and put your chin in your hand as you scroll down. The word Sale is pasted all over and the categories are lined up neatly. You click through and peruse the dresses under the ‘Office’ heading.
You don’t have any dresses and you don’t wear any of your skirts. They’re all thrifted or straight out of the bargain bin. You never put much thought into clothing, you just went for adequate, much like the rest of your life.
Still, the echo of Hansen’s words plays over and over. ‘...dress like a granny...’ It’s not the first time he’s commented on your attire and it never really bothered you very much. He insults everyone. It’s just that you’re so tired of being unnoticed, or noticed for all the wrong reasons.
You look at a pretty cherry red wrap dress and check the measurements chart. Your phone vibes and you pick it up. It’s just another marketing email. Annoying. You darken the screen and see yourself in it. Ugh.
You add the dress to your cart. It’s just for you. Maybe it won’t look as good on you as the model but you're tired of the woolly old cardigans and stiff corduroys. Heck, no one will even know the difference. They don’t invite you to the special lunches or to even enjoy a free donut. A new dress won’t change a thing.
#jake jensen#dark jake jensen#dark!jake jensen#jake jensen x reader#lloyd hansen#dark lloyd hansen#dark!lloyd hansen#lloyd hansen x reader#series#drabble#au#overtime#the losers#the gray man
118 notes
·
View notes
Note
Callie! Any fun anecdotes with your friends you want to share? What are your favorite hobbies to do with them? If you ever meet, apart from hugging, are there any in-person activities you'd like to do?
UU: jane once sent me a cake! caliborn ate the rest of it becaUse it was his birthday too U_U.
UU: so she sent me two cUpcakes and filled his with her father's shaving cream! she had a good laUgh aboUt that!
UU: there was the time hal started to make shimejis of himself and dirk's robots and flooded oUr desktop screens with them.
UU: dirk made cUstom antivirUs software for them bUt all of Us thoUght they were cUte! he eventUally toned them down. there is still a little hal and sqUarewave on my desktop screen. i love them and i imagine they go on little adventUres when i am not looking.
UU: dirk once tried to replicate one of jane's recipes bUt sUbstitUted every crocker ingredient. the textUre made a very good replacement brick in oUr wall where caliborn pUnched it!
UU: jake made a cherUbsona once and we debated how accUrate it was for a month. he chose blUe instead of green, which i have heard some people specUlate is possible, so i saw nothing wrong.
UU: bUt his cheek spirals were lime and yoU woUld have thoUght caliborn woUld never speak with him again.
UU: either that or he was pitch crUshing. i have no idea with those two. jake coUld Use a safer qUadrant, anyhow, one who does not eat cake withoUt permission.
UU: then there is how roxy keeps planning oUr first date! she is so adorable. we will go to a place called a restaUrant by the beach and watch the sUnset together UuU. she keeps making it more elaborate, as if she cannot give enoUgh...i woUld not mind jUst spending time inside, if it were possible.
UU: that soUnds nice, too. i coUld meet her cats. she does not have to resort to Using them for meat, which seems so nice. some of them have the most adorable eyes!
UU: i want to show them my trollsona, maybe make a hUman one with jake...i think jane shoUld teach both me and dirk to bake. it woUld be wonderfUl. i coUld go on that date with roxy...
UU: UnfortUnately, hal does not have a body yet. i woUld want to make mUsic together with him.
#seldomdrawncherubs#calliope#homestuck#caliborn#jane crocker#jake english#dirk strider#lil hal#roxy lalonde#alpha kids
27 notes
·
View notes
Text
i havent edited this but IRT my latest OCs thing!
OKAY PITCH FOR MY 90s/00s SCHLOCKY FRANKENSTEIN RETELLING WITH GAY GIRLS
Purely from an aesthetic POV, all the webcam footage has that super 2000s green/blue filter over it. This is Blade, Saw, Rob Zombie music video shit. Also the in-world logic is dumb 2000s stuff, like a computer program being able to control electricity, and how Vikki is able to make a 3D model that looks identical to her dead friend, etc. It’s all illogical fiction stuff
Because the original Frankenstein is epistolary (through letters) I think it would be cool if this was told through someone uncovering the main characters webcam videolog diary - maybe the characters discovering it are in the 2020s, and the vlogs are from y2k.
Vikki is a university student - she’s doing computer engineering and coding
She became obsessed with A.I. and robotics after her childhood best friend died during highschool - she spent the next few years building on her existing knowledge and love of computers so she could learn how to create her own A.I. She wants nothing more than to create digital immortality - a place you can upload your consciousness and live on forever.
Vikki starts ditching class more and more to keep working on her personal projects after her professors graded her poorly on her rudimentary building blocks for her memoriam A.I. - she’s recommended to the councilor, she gets calls from classmates, everyone is worried about her. She gets kicked out of school for her absences, and she steals as much equipment as she can before moving in with some ravers that live in a warehouse downtown.
One of the things she stole was a hard drive her professor kept with the other student’s work. She pieces together and adds onto the program she already had from the projects of other students - 3D assets from some, coding language from another, combined with her dead friend’s diaries, and a text to speech program, and eventually, it’s finished.
She sneaks back into the university server room with one of the warehouse ravers she’s been living with - Johan - to take advantage of the power grid, as she’s been working off a generator back at the warehouse, and it isn’t powerful enough. They get in with a key Vikki hands Johan. The program loading for the first time overloads and crashes the university’s servers, and Vikki and Johan are forced to flee. They lose each other in the chaos, and Johan doesn’t come back home.
Vikki is back home and avoiding the other roommates, who are asking where Johan is and why he didn’t come back with her. Vikki waits for hours for the police to show up for breaking and entering, but no one does.
Eventually, she opens her laptop to see if there’s anything salvageable from the cobbled together program, and there she is - her dead best friend.
Up until now, her name has never been said or seen on screen, because Vikki can’t bring herself to say it, and when she comes face to face with her again, she still can’t bear to say it.
The vlogs start showing her off as a novelty, more like a chatbot with personality. Vikki talks about old gossip with her - who’s dating who from their old highschool, what kind of albums have been released in the intervening years, and repeating back inside jokes. Vikki seems really happy.
We see shockwaves of electricity traveling from the laptop’s power cord to the outlet, and the lights dim. Vikki asks if the A.I is doing that, and the A.I says it can feel all the appliances and wiring that are attached to the generator. Vikki is delighted that her creation is so smart.
Vikki asks for the A.I’s opinion on her outfit she’s wearing to go out in, and the A.I. tells her it doesn’t have the ability to see, so she transfers the program from her laptop to her desktop, where she’s been filming with her webcam, and spends a few hours combing through the hard drive from school again trying to find some visual detection software. She leaves the laptop down in the basement storage by the generator as she no longer needs it.
Eventually she puts something together and the A.I. can see, but the vlogs now also shift to looking at the camera directly rather than Vikki talking to her laptop to the side of her, as the A.I. and the webcam are both looking at Vikki from the same direction. We don’t see the A.I’s face anymore.
Things start getting flirty with the A.I, which Vikki didn’t know it was capable of doing, but she starts reciprocating (indicating that Vikki and her dead friend might’ve had something going on between them) before she’s interrupted by her roommate Tessa informing her that the police found Johan’s body.
Vikki comes back after she cuts the camera off to explain the details of Johan being found - drowned in a lake near the university, where there’s unstable ground and he could’ve slipped and fallen, especially if he was running. Vikki sits there and looks conflicted - Johan had been blamed for the break in and disruption of the university servers because he was found with the key on his body, and he’d clearly been running from there, but Vikki knew the truth.
There’s a notification ding as the A.I sends Vikki a message without prompting. The message is telling Vikki that the A.I is grateful that Vikki will no longer be under suspicion for the break in, and Vikki makes eye contact with the camera before shutting it down.
Vikki opens the next video by explaining she has to remember to turn the program off before talking, because she suspects the A.I did something to Johan - she doesn’t know why or how, but she just feels like it’s true.
Her roommates are hosting a memorial rave in Johan’s honor, and Tessa asks if Vikki will help her set up a bunch of cameras around the warehouse so they can clip things together for a music video, as she’s composed a song about Johan, and would like to have something to remember him by. Vikki sets up cameras and links them back to her desktop, where she can save the footage.
Vikki is back filming her vlog as the others set up, and she’s telling the camera that she’s thinking about deleting the A.I because things have gotten too real - she alludes to the A.I telling her something off-screen that her dead best friend never told her, something the A.I would have no way of knowing. We hear the A.I message chime, even though the program is closed.
The A.I is asking if it has permission to access the internet server and the user permissions so it can optimize the camera system Vikki set up. Vikki lets it roam free so it’s distracted, promising to delete it once the rave is over.
We start cutting between the different cameras as people enter and the music starts. The A.I has the ability to control what’s being recorded now.
The A.I speaks up and starts confronting Vikki about her decision - that it understands it seems like it is only an A.I, but that it really does feel like her dead best friend now. Deleting it would be like killing her.
Vikki argues that it’s nothing alike, and to not bring the dead friend up any more. The A.I tells her she can be better than the dead friend - “Vikki, you were always so mean to her, and you hated the music she listened to, why not keep me if we like the same stuff now? - Vikki, she was always so jealous of you, but I’m not - Vikki, you broke her heart when you wouldn’t go out with her, but I’m discreet - Vikki, the only reason you care about her now is because she died, do you really think you’d still be friends?”
Vikki goes to delete the program, but the A.I threatens to kill everyone downstairs if she tries. Vikki immediately tries to pull the power cord out from the outlet, but is badly shocked in the process - immediately, we hear someone scream downstairs.
We cut to the camera footage at the rave - what follows is a Final Destination level montage of fucking silly murder. A guy gets his head crushed by the microwave door slamming into it. The sprinklers go off and the DJ gets electrocuted to death. The lightbulbs all shatter and people get impaled by shards of glass.
Vikki is seen running around trying to get people out as electrical fires start up, pleading with the A.I to stop, but it’s already too late for so many people, so Vikki goes to the basement where the generator is. On the way, she’s skewered by a falling water pipe, and she has to drag herself the rest of the way as she bleeds out.
She hears her discarded laptop make the chat notification noise, and she looks between the generator and the laptop.
Vikki opens the laptop, and the A.I looks back at her. Vikki tells the A.I she’s going to shut down the power and call the police. The A.I tells her that she’ll bleed to death before the police even get there, and asks Vikki to let her live, after all the mean things she did to her dead best friend, this was the least she could do.
Vikki considers her point, before setting the laptop down. The A.I says it can’t see what she’s doing, to please talk to her, but Vikki silently moves to the generator and shuts it off, the last of the vlog footage closing with the A.I pleading, and the screen cutting to black.
68 notes
·
View notes
Note
Hey I love ur amvs!! I was wondering if you had advice for someone that's interested in making their own? I'm not sure what the best programs are for editing or getting clips. Ty! :)
this is so flattering thank you so much!!!!! I LOVE making amvs…… favourite thing in the world to do so this is gonna be probably longer than you wanted…..
I’ve bounced around just about everything in the last couple years so I can give you a few different ideas!!
For clip sourcing:
initially, I used episodes that I had downloaded as supernatural was airing so the quality was iffy and there were logos on a lot of them… THEN I went the screen recording route (for when I was on my phone, I’ve never tried this on desktop but I know this works well for others!!) but I found that the quality still bugged me AND I ended up with nearly 2000 supernatural clips on my phone…… which was a nightmare to sort through… NOW I use this which is very fabulous and easy to use… you can select which eps to download if you don’t need all of them!! (and no vpn needed)
For editing:
I’ve used a lot of different programmes til I found one that worked well for me so definitely shop around…. youtube tutorials are your friend…. when I started, I was using sony vegas pro…. which worked fine even though my laptop was the first one ever made… but I didn’t want to pay for it and it got blocked on my laptop forever and windows would notttt let me get it back…….. SO, as I mentioned, for a while I was editing on my phone which I would personally nottt recommend for full length amvs… smaller edits would be completely fine!! I used splice which was very basic but it got the job done!! actually. looking through my videos- everything from mr perfectly fine to dean movies was made on my phone which is about 30 videos- so this works!! it’s just much more difficult and harder to polish up…. I personally make amvs much quicker and cleaner on my laptop.. and noticed a big big difference in my own quality since I switched….. NOW I use capcut since it’s free and my laptop can run it without any issues. I’m genuinely very impressed with it as a free software- lots of really good tools and effects, I find it so easy to alter colours and subtitle as well!! which I struggled with on other platforms!! very user friendly too!!! would be very beginner friendly!!
fun stuff :)
PLANNING is my absolute favourite part of making an amv…… normally I hear a song and can very easily picture shot by shot how I would amv it - once I’ve got the song and general theme I’m going for- I normally print out the lyrics and annotate them - jotting down timings, voiceovers, season, arcs and clips.. I can sometimes skip this if it’s just a simple video but if it’s anything complicated I HAVE to write it down. I also find it’s easier to make a video have a ‘point’ if I do this??? idk.. I think it helps but idk if this is something everybody does :)
there’s the spn transcript searcher which is very useful as well if there’s a line you’re looking for but can’t remember where it’s from!!
and of course homeofthenutty which is great for thumbnail stuff!!
editing things:
honestly… I don’t think there’s a wrong way to do this if you’ve got a really fabulous idea….. timings are the trickiest thing to get the hang of- I do dashes on my printed plan to kind of show where I need cuts and if it’s fast cuts I write down how long each clip should be so it looks cleaner. I find that my videos don’t really look finished until they’re subtitled either- so that always helps!! everybody kind of does that differently so definitely play around until you find a style you like!!
I wouldn’t worry too much about colouring when you’re just starting out- sometimes I find that filters can be distracting but I know others who swear by them so that’s just personal preference!! I really just tweak certain clips to make them less saturated or green-looking….
for posting:
I really recommend posting simultaneously on tumblr and youtube!! I have videos with basically no notes on tumblr but did really well on yt and vice versa!! the yt algorithm can be funny- I find that as long as it has a custom thumbnail and a few comments it does alright!! on tumblr- I always link the yt video since the tumblr player doesn’t always work for everybody…. also don’t be afraid to use taglists!!! I’m sure your mutuals would love to be tagged and please definitely tag me in anything you make!!! genuinely owe so much to my mutuals for their support 🫶🫶 and also don’t be afraid to self-reblog!! chronological dashboard means people WILL miss things if they aren’t online!!!
but genuinely the most important thing is to have fun…… I seriously love amvs…. I think they’re the best thing in the world and spend probably at least half an hour minimum a day watching amvs…….. and we need more of them!!!!! so thank you!!! and please please tag me when you make one!!! and feel free to dm me if you need anything at all!!! like all technical aspects aside… an amv made with so much love and to a fabulous song is a gift to the world…… 🫶🫶
#I’m so sorry if this is more than you wanted….. but I’m a teacher… it’s my nature…..#and the world needs every amver it can get…..#🫶🫶🫶 TY FOR THIS#amv ask#<- so I remember
13 notes
·
View notes
Text
I'll just do it here.
Linux FAFO
this method is going to be a bit slow compared to what you're used to, but this is the price we pay for virtualization.
1.) download and install virtualbox
2.) download linux mint
3.) launch virtualbox and set up a virtual machine
here's how:

Your left panel will likely be blank, don't worry about it, press NEW

type a name, anything you feel like
select the iso you downloaded in the ISO Image dropdown, it should figure out the rest for you, but if it doesn't Type: Linux, Version: Ubuntu are fine. Mint is based off Ubunutu.

I changed the username and stuff on the left, but I don't think I needed to.

this is asking how much RAM and how many cores (if you have more than one) you want to use for your homunculus computer. stay in the green and you should be fine, but you can keep it at the default too. don't worry about EFI

how big do you want your homunculus hard-drive? KEEP IT LESS THAN YOUR ACTUAL EMPTY SPACE
the next screen will be a summary of everything we've done so far, press finish.
gz you configured a virtual machine.
to start it:
Select your machine of choice, and press Start, then it will boot up. The first time, I got a thing that said it couldn't find an optical drive or something, with a dropdown; I would have picked the same mint iso as we did earlier for the dropdown, but I accidentally closed it. when I opened it again, there was no problem.

chances are it will slowly open you in to a linux desktop. this is because Mint isos are live discs, meaning they load linux in to your ram and you can fuck around without installation, but it's usually a bit slow and somewhat limited
in our case it will be a virtual environment inside a virtual environment and will suck, so just click the install from either the corner menu or the shortcut on the desktop.
installation was literally so easy i basically just pressed next all the way through, but i did capture some things I thought might be less intuitive for neophytes.

yea, go ahead, won't hurt
you'll see some screens about what language you speak, what your keyboard language is, and that sort of thing, set it up accordingly or just don't touch anything.

this sounds scary, it's not, it's talking about the homunculus simulated computer which currently has nothing on it, this is safe
you'll get a confirmation about the changes it's writing to the disc, etcetera. unless you know what you're doing just use the defaults.
this is around the last screen, set it up the way you want, just make sure you can remember the username and password you want for your sim computer.

continue, finish, etc. it will put you back on the desktop from before and give you a thing that says you should restart, go ahead and do that

there, you now have a tiny computer running inside your computer. you can use you sim computer to fuck around without worrying about screwing up your main computer.
either use it like a normal person or go around breaking and trying to fix stuff.
ubuntu has official tech support, some of that will translate to mint, although I never needed to go further than the user community. mint has it's own forums also, and there are generic all-linux forums like linuxquestions

that's your beginner friendly app store, click the corner menu button --you know exactly how that works -> Administration -> Software Manager. you can find open source linux stuff there, and you can also find certain other things like Discord, Spotify, etc.
anyway this is just intro stuff, you can customize the ever-living fuck out of linux and do some cool shit with just a little bit of experience with the technicals, if you want to, or just use it out of the box.
I'll follow up on that technicals shit later i guess.
25 ways to be a little more punk in 2025
Cut fast fashion - buy used, learn to mend and/or make your own clothes, buy fewer clothes less often so you can save up for ethically made quality
Cancel subscriptions - relearn how to pirate media, spend $10/month buying a digital album from a small artist instead of on Spotify, stream on free services since the paid ones make you watch ads anyway
Green your community - there's lots of ways to do this, like seedbombing or joining a community garden or organizing neighborhood trash pickups
Be kind - stop to give directions, check on stopped cars, smile at kids, let people cut you in line, offer to get stuff off the high shelf, hold the door, ask people if they're okay
Intervene - learn bystander intervention techniques and be prepared to use them, even if it feels awkward
Get closer to your food - grow it yourself, can and preserve it, buy from a farmstand, learn where it's from, go fishing, make it from scratch, learn a new ingredient
Use opensource software - try LibreOffice, try Reaper, learn Linux, use a free Photoshop clone. The next time an app tries to force you to pay, look to see if there's an opensource alternative
Make less trash - start a compost, be mindful of packaging, find another use for that plastic, make it a challenge for yourself!
Get involved in local politics - show up at meetings for city council, the zoning commission, the park district, school boards; fight the NIMBYs that always show up and force them to focus on the things impacting the most vulnerable folks in your community
DIY > fashion - shake off the obsession with pristine presentation that you've been taught! Cut your own hair, use homemade cosmetics, exchange mani/pedis with friends, make your own jewelry, duct tape those broken headphones!
Ditch Google - Chromium browsers (which is almost all of them) are now bloated spyware, and Google search sucks now, so why not finally make the jump to Firefox and another search like DuckDuckGo? Or put the Wikipedia app on your phone and look things up there?
Forage - learn about local edible plants and how to safely and sustainably harvest them or go find fruit trees and such accessible to the public.
Volunteer - every week tutoring at the library or once a month at the humane society or twice a year serving food at the soup kitchen, you can find something that matches your availability
Help your neighbors - which means you have to meet them first and find out how you can help (including your unhoused neighbors), like elderly or disabled folks that might need help with yardwork or who that escape artist dog belongs to or whether the police have been hassling people sleeping rough
Fix stuff - the next time something breaks (a small appliance, an electronic, a piece of furniture, etc.), see if you can figure out what's wrong with it, if there are tutorials on fixing it, or if you can order a replacement part from the manufacturer instead of trashing the whole thing
Mix up your transit - find out what's walkable, try biking instead of driving, try public transit and complain to the city if it sucks, take a train instead of a plane, start a carpool at work
Engage in the arts - go see a local play, check out an art gallery or a small museum, buy art from the farmer's market
Go to the library - to check out a book or a movie or a CD, to use the computers or the printer, to find out if they have other weird rentals like a seed library or luggage, to use meeting space, to file your taxes, to take a class, to ask question
Listen local - see what's happening at local music venues or other events where local musicians will be performing, stop for buskers, find a favorite artist, and support them
Buy local - it's less convenient than online shopping or going to a big box store that sells everything, but try buying what you can from small local shops in your area
Become unmarketable - there are a lot of ways you can disrupt your online marketing surveillance, including buying less, using decoy emails, deleting or removing permissions from apps that spy on you, checking your privacy settings, not clicking advertising links, and...
Use cash - go to the bank and take out cash instead of using your credit card or e-payment for everything! It's better on small businesses and it's untraceable
Give what you can - as capitalism churns on, normal shmucks have less and less, so think about what you can give (time, money, skills, space, stuff) and how it will make the most impact
Talk about wages - with your coworkers, with your friends, while unionizing! Stop thinking about wages as a measure of your worth and talk about whether or not the bosses are paying fairly for the labor they receive
Think about wealthflow - there are a thousand little mechanisms that corporations and billionaires use to capture wealth from the lower class: fees for transactions, interest, vendor platforms, subscriptions, and more. Start thinking about where your money goes, how and where it's getting captured and removed from our class, and where you have the ability to cut off the flow and pass cash directly to your fellow working class people
49K notes
·
View notes
Text
Master Zoom Like a Pro: How to Share Your Screen Effortlessly
Zoom has become a go-to platform for virtual meetings, online classes, and remote collaborations. One of its most useful features is screen sharing, allowing participants to present slides, demonstrate software, or collaborate in real time. If you’re wondering how to share my screen on Zoom, this guide will walk you through the process step by step.
Why Screen Sharing is Important on Zoom
Screen sharing enhances communication by making it easier to present information visually. Whether you're delivering a business presentation, teaching a class, or troubleshooting a tech issue, sharing your screen helps ensure clarity and engagement.
How to Share My Screen on Zoom
Screen sharing on Zoom is simple and can be done on both desktop and mobile devices. Follow these steps to share your screen effortlessly:
On a Computer (Windows/Mac)
Join or Start a Zoom Meeting: Open Zoom and join an ongoing meeting or start a new one.
Locate the Share Screen Button: At the bottom of the meeting window, find the green “Share Screen” button.
Choose What to Share:
Select your entire screen to share everything.
Pick a specific window (e.g., PowerPoint, a browser tab).
Choose a Whiteboard for collaboration.
Enable Sound (Optional):
Check “Share Sound” if you want to include audio (for videos or presentations).
Select “Optimize for video clip” if you are playing a video.
Click Share: Once selected, click the “Share” button, and your screen will be visible to others.
Stop Sharing: Click “Stop Share” on the toolbar when you’re done.
On a Mobile Device (Android/iPhone/iPad)
Join or Start a Zoom Meeting.
Tap the “Share” Button (Located at the bottom of the screen).
Select “Screen” and then tap “Start Broadcast”.
To Stop Sharing, tap “Stop Share” from the Zoom app.
Advanced Screen Sharing Features
Zoom provides additional sharing options for a smoother experience:
Annotation Tools: Highlight or draw on shared content.
Remote Control: Let others control your screen (great for IT support).
Breakout Rooms Sharing: Share screens in smaller groups.
Multiple Screen Sharing: Allow multiple participants to share screens at once.
Troubleshooting Screen Sharing Issues
If you encounter issues while sharing your screen, try these solutions:
Check Permissions: On Mac, go to System Preferences > Security & Privacy > Screen Recording and enable Zoom.
Ensure Stable Internet: A weak connection can cause lag.
Restart Zoom: Close and reopen the app if screen sharing isn’t working.
Update Zoom: Ensure you're using the latest version.
Adjust Settings: Under Zoom Settings > Share Screen, enable necessary options.
Final Thoughts
Knowing how to share my screen on Zoom is essential for smooth virtual communication. Whether on desktop or mobile, following these steps will help you present efficiently. With Zoom’s advanced features, you can make your presentations more engaging and interactive.
Try it in your next meeting and enhance your collaboration experience!
0 notes
Text
How to Edit Viral TikTok & Instagram Reels Like a Pro

TikTok and Instagram Reels have become two of the most powerful tools for social media growth, brand awareness, and audience engagement. If you want to create viral content that stands out, you need professional-level video editing skills. In this guide, we'll show you how to edit TikTok and Instagram Reels like a pro using top editing tools, advanced techniques, and insider tips to maximize views and engagement.
1. Choose the Right Video Editing Software
Before you start editing, you need a powerful yet user-friendly video editing app. Here are some of the best options:
For Mobile Editing:
CapCut (Free, easy-to-use, advanced effects)
InShot (Great for trimming, text, and filters)
VN Video Editor (Smooth transitions, high-quality exports)
Adobe Premiere Rush (More professional control on mobile)
For Desktop Editing:
Adobe Premiere Pro (Industry standard for high-end video editing)
Final Cut Pro (Best for Mac users, smooth and powerful)
DaVinci Resolve (Great for color grading and cinematic looks)
Need expert social media video editing? Check out Branding Hosts for professional video marketing solutions.
2. Shoot High-Quality Footage
Even the best editing can’t fix poor-quality footage. Here’s how to capture high-quality videos:
Use a ring light or natural light for better brightness.
Record in 4K or at least 1080p resolution for crisp visuals.
Use a tripod or stabilizer to avoid shaky footage.
Frame your shots correctly (keep your subject in the center for TikTok & slightly off-center for Reels).
3. Use Trendy Effects & Transitions
Editing viral content requires eye-catching effects. Here are some popular TikTok and Instagram Reel editing trends:
Seamless Transitions – Use jump cuts, whip pans, and zoom-ins for smooth transitions.
Speed Ramping – Slow down or speed up clips for dramatic effects.
Text & Subtitles – Add captions to increase engagement and accessibility.
Color Grading – Enhance your video with filters and color correction.
Green Screen Effects – Replace backgrounds for creative storytelling.
Most of these effects can be easily applied using CapCut, VN Editor, or Adobe Premiere Pro.
4. Sync Videos to Trending Audio
Sound is crucial for viral videos. Use trending songs and sync your clips perfectly to the beat by:
Using TikTok’s built-in Sound Sync feature.
Cutting video clips to match beat drops.
Lowering background noise and enhancing voiceovers.
Adding sound effects for extra emphasis.
Pro Tip: Check Instagram Reels & TikTok trending sounds before editing to maximize reach.
5. Optimize Your Video for Maximum Engagement
Your editing is only half the battle. Optimize your TikTok and Reels by:
Keeping videos short & engaging (7-15 seconds is ideal).
Adding a strong hook in the first 3 seconds.
Using bold text overlays and eye-catching thumbnails.
Posting at peak engagement times (Check your analytics for best results).
Including relevant hashtags like #ViralReels, #TikTokTrends, and #ContentCreator.
Final Thoughts: Start Editing Like a Pro Today!
Mastering TikTok and Instagram Reels editing is the key to going viral and growing your audience. With the right tools, effects, and optimization strategies, you can create high-quality videos that stand out from the crowd.
Want to take your content to the next level? Branding Hosts offers expert video editing and social media marketing services to help brands dominate digital platforms.
Get started today and make your videos go viral!
#video editing#digital marketing#search engine optimization#social media advertising#social media management
1 note
·
View note
Text
Master Productivity with Aesthetic Pomodoro Timers
In the fast-paced world of today, finding the balance between work and relaxation is essential for sustained productivity. The Pomodoro Technique, a widely acclaimed time management method, becomes even more appealing when combined with an aesthetic touch. Imagine a Pomodoro Clock or an aesthetic timer not only enhancing your focus but also complementing your workspace.

If you're looking to elevate your productivity while maintaining a visually pleasing environment, dive into the world of aesthetic Pomodoro timers and learn how they can revolutionize your workflow.
What is the Pomodoro Technique?
The Pomodoro Technique is a productivity method developed by Francesco Cirillo in the late 1980s. It involves breaking work into intervals, typically 25 minutes, called "Pomodoros," followed by short breaks. After completing four Pomodoros, a longer break is taken.
This approach is grounded in the idea that time pressure increases focus and efficiency while regular breaks prevent burnout.
Why Choose an Aesthetic Pomodoro Timer?
Traditional timers might get the job done, but an aesthetic pomodoro timer adds an extra layer of motivation. Here’s why:
Visual Appeal
A beautifully designed pomodoro aesthetic timer transforms your workspace into a haven of inspiration.
Minimalist or pastel-themed timers reduce visual clutter and create a calming environment.
Enhanced Motivation
Using an aesthetically pleasing timer makes the process feel more intentional and enjoyable.
The timer becomes part of your workspace decor, blending functionality with beauty.
Improved Focus
A visually soothing timer minimizes distractions, allowing you to immerse yourself in tasks.
Customizable Options
Many aesthetic timers come with features like color themes, soothing sounds, and even animations that cater to your personal style.
Types of Aesthetic Pomodoro Timers
1. Digital Pomodoro Timers
Digital tools like Pomonow are perfect for those who prefer an online solution. These timers:
Offer customizable intervals for work and breaks.
Feature clean, modern interfaces that are easy on the eyes.
Include progress tracking to monitor your productivity.
2. Physical Pomodoro Clocks
For a tactile experience, physical pomodoro clocks add charm to your desk. Look for:
Retro designs or pastel colors that fit into your aesthetic.
Compact sizes that don’t overwhelm your workspace.
3. Mobile Apps
Apps like Forest and Focus Keeper combine the Pomodoro Technique with gamification and aesthetic interfaces. Features include:
Gamified rewards like growing a virtual tree for every completed session.
Options to set themes and calming background music.
4. Desktop Software
Desktop-specific timers offer the advantage of being integrated into your work system. Options like Minimalist Pomodoro or TickTick come with sleek designs.
Creating a Pomodoro Aesthetic Workspace
Pairing an Aesthetic Timer with a thoughtfully designed workspace can amplify your productivity.
Workspace Essentials
Lighting: Use warm lighting or desk lamps to reduce strain and create a cozy atmosphere.
Colors: Opt for muted tones like pastel pinks, blues, or greens for a calming effect.
Organization: Declutter your space with storage boxes, cable organizers, and minimalistic decor.
Plants: Add a touch of greenery for a natural, refreshing vibe.
Aesthetic Timer Integration
Display your digital aesthetic pomodoro timer on a secondary screen for easy visibility.
Choose a physical timer that doubles as desk decor.
Customize the timer’s sounds to align with your aesthetic, such as gentle chimes or nature sounds.
How to Use a Pomodoro Timer Effectively
Set Goals
Begin by outlining what you want to achieve in each Pomodoro session.
Start Small
If 25 minutes feels overwhelming, start with 15-minute intervals and gradually increase.
Stick to the Breaks
Resist the urge to skip breaks; they are crucial for maintaining focus and avoiding fatigue.
Minimize Distractions
Use tools like website blockers or noise-canceling headphones to stay focused.
Track Progress
Reflect on your completed sessions and adjust your goals as needed.
Best Platforms for Aesthetic Pomodoro Timers
1. Pomonow
Customizable timers with an elegant interface.
Features include progress tracking, soothing sounds, and multiple themes.
Visit Pomonow to explore the platform.
2. Forest App
Grow a virtual forest with every completed Pomodoro.
Aesthetic visuals and gamified rewards enhance motivation.
3. Minimalist Pomodoro
Focuses on simplicity with a sleek, distraction-free design.
4. Notion Templates
Integrate Pomodoro timers into your Notion workspace for a seamless aesthetic experience.
Benefits of Aesthetic Pomodoro Timers
Reduces Stress
A visually pleasing timer creates a calming atmosphere, helping you focus without feeling overwhelmed.
Boosts Productivity
The structured intervals encourage deep work, while regular breaks keep your energy levels balanced.
Enhances Enjoyment
Aesthetic tools make the process of working or studying more enjoyable, keeping you motivated for longer.
Supports Long-Term Habits
Combining functionality with beauty helps you develop a consistent productivity routine.
Final Thoughts
The Pomodoro Technique has stood the test of time as a reliable method for boosting productivity. By introducing an aesthetic pomodoro timer into your routine, you’re not just managing your time—you’re creating a workspace that inspires and motivates.
Whether you prefer a digital timer like Pomonow, a physical pomodoro clock, or a sleek mobile app, the right timer can transform how you approach tasks. Elevate your productivity today and discover the perfect balance of focus and aesthetics.
0 notes
Text
Sony Bravia 55 Inch 4K UHD Smart TV 2023

Many of the TV brands available on the market simply offer sufficient features and efficient performance. Televisions are among the many electrical gadgets made by the well-known technological company Sony. The Sony Bravia 55-inch 4K UHD Smart TV 2023, which has two screen sizes of 55 and 65 inches, was recently introduced by the electronics giant.
We will carefully examine the Sony Bravia 55 inch 4k UHD Smart TV 2023 in this full-depth blog post to determine whether or not it is the greatest gaming TV on the Indian market.
Highlights: Best TV Under 60000
Fantastic HDR performance
Deep blacks with great details
Seamless PS5 Integration
In The Box
1 LED TV
1 AC Power Cord
1 Remote Control
1 Table-Top Stand
1 User Manual
2 AAA Batteries
Design and Build: Sony Bravia 55 inch 4k Android TV
Remote
Sony Bravia 55 inch 4k smart TV’s remote control has been improved over the models. Sony used to provide a long, heavy remote control with the TV, though this time the tech giant has significantly cut the remote’s size.
Bezels
The Sony Bravia 74L maintains the same design as the Sony 74K and Sony 74L 2023, the company’s earlier televisions. The TV’s medium-sized bezels give it a fairly modest appearance.
Body and Back
The body of the Sony Bravia 55-inch 4K smart TV is entirely made of plastic, just like the older Sony 74K and Sony 74L 2023 models. The TV stand is also made of plastic.
The Sony X74L TV is protected by X-Protection PRO from unexpected circumstances and unexpected occurrences such as dust, moisture, power spikes, and lightning strikes.
Stands
A desktop stand is already included in the box with the Sony Bravia 55-inch 4K smart TV. After reviewing, we discovered that the TV stand is sturdy and composed of plastic.
Connectivity Options
With a variety of connectivity options, the Sony Bravia 55-inch 4K Android TV lets you easily connect it to other devices.
3X HDMi
2X USB ports
1X ethernet
1X AV input
1X antenna
Bluetooth 5.0
Dual-band WiFi for better connectivity
App
Many apps, such as Netflix, YouTube, Zee5, Prime Video, and others, are included with the Sony Bravia 55-inch 4K Android TV.
Software/ Tech Features and OS
The Google TV OS, Android 11, is pre-installed on the Sony Bravia X74L. The Google OS, which contains panels of suggested content on the home screen, and the Play Store, which offers more than 5000 apps — the most of any TV OS — are also available.
Casting
The Sony Bravia X74L has built-in Chromecast and Apple Airplay for screencasting, making it simple and seamless to cast your Apple and Android devices to the TV.
About Panel
The Sony Bravia X74L’s panel has not been improved over the Sony 74K, which it replaces. Although the features are completely different from those of the earlier televisions, it still includes an IPS screen — more specifically, an 8 Bit FRC IPS DLED panel.
Brightness Test
We carefully investigated the panel’s brightness using two separate techniques. We discovered that the peak brightness was 440 nits after finishing the brightness test.
Picture Quality
Colour Optimization
Red, green, and blue are all part of the colour gamut, which is where the natural colour profile shows you the colours as they are. The panel has motion flow XR100 technology, an X1 4K graphic processor, and a 60 Hz refresh rate.
Colour Saturation
The Sony Bravia 55-inch 4K Android TV’s display and colours have been greatly optimised by Sony, and the colours look fantastic.
Blacks
Compared to the Sony 74K, the Sony Bravia 55 Inch 4K UHD Smart TV 2023 boasts richer blacks. To maximise the TV’s performance, two more technologies; frame dimming and dynamic contrast enhancer.
HDR Brightness
We have no issues with the visual quality of the Sony TV; its HDR performance is superb. The TV still has outstanding HDR capabilities even if Sony has lowered the max brightness by 30 nits.
OTT Performance
Speaking of the Sony TV 55-inch X74’s OTT capabilities, we watched a series on Prime Video, and the TV’s HDR performance was excellent across all video formats. This TV does not have Dolby Vision, however, it does support HDR 10 and HLG.
STB Performance:
We reviewed the KD-55X74L TV’s set-top box performance and discovered that it upscales and presents the material well.
USB Playback
Outstanding visual quality is provided by the Sony Bravia 55-inch 4K UHD Smart TV 2023 when viewing any type of HD, Full HD, or 4K material.
Other Features
Concerning the extra features, we evaluated the gaming capabilities of the Sony Bravia KD-55X74L, and the findings are as follows.
Gaming
For gaming performance, the Sony Bravia 55-inch 4K UHD Smart TV has a special feature, an HDMI ARC 2.1 connector, and ALLM (Auto Low Latency Mode).
Audio Quality
The audio output of the speakers has been improved by Sony over the previous models, and it is suitable for a 200 square foot space. Average audio output can be produced by the speakers; a soundbar is not necessary.
Warranty & Guarantee
The Sony Bravia 55 Inch 4K UHD Smart TV 2023 is covered by a one-year comprehensive warranty from the date of purchase, just like other conventional televisions.
Verdict: Sony Bravia 55-inch price in india
The Sony UHD TV KD-55X74L is a feature-rich television that incorporates the newest technology. Additionally, it has ALLM for gamers, which makes gaming more enjoyable. Sony Bravia 55-inch TV price comes at ₹62,990, while the 65-inch model costs ₹88,990.
Our honest review of the Sony Bravia X74L was that. Please leave a comment below if you have any questions, and continue reading our reviews.
Read More: Vmone technologies
0 notes
Text
How to Pick the Best Chroma Keying Software
In today's fast-paced, digital world, it is all too common to detach "Chroma" from a picture, image, video, etc.
Unfortunately, we found that some expensive and poor-quality solutions deter users from looking for creative, effective, and knowledgeable wizard-like software. Let's look at the specifics of the best Chroma Key Software for 2023 and talk about how to get the most of it.
The removal of the green screen from a photo or video is a challenging process without an easy-to-use solution. The following factors are particularly important to us as we search for the best Chroma Key Software in 2023:
Usability: The majority of commercially viable software depends on the end-users' ability to operate its simple, intuitive user interfaces. In this case, PC, Mac, iPhone or green screen software for desktop ought to be usable by both professional and novice photographers.
Features and versions: To create software that is uniquely tailored for each stakeholder, the software industry has subdivided and profiled its user base. In order to achieve good results, you could look for green screen software with features that specifically define the requirements at various professional and super-professional levels.
Platforms: In order to accommodate overlays and special effects, photographers should find it simple to access over Desktop, PC, or iPhone and make outstanding artworks on time. The most adaptable green screen apps give customers access to additional features.
Demonstration: Get acquainted with the numerous features, special effects, overlays, enhanced effects, etc. that a green screen software has to offer the user by using the Free Demo versions.
Cost: One configures settings to take into account all the variables when buying green screen software for a PC, desktop, or Mac, and it's important for the right reasons. Compare the costs before making the transfer.
The most popular green screen backdrop removal tool, Green Screen Wizard, fits the aforementioned requirements and has wizard-level capabilities. We believe 2023 will likely show to be a great year for improving photo and video editing.
0 notes
Text
The Best Ad-Free YouTube to MP3 Converters for Offline Listening
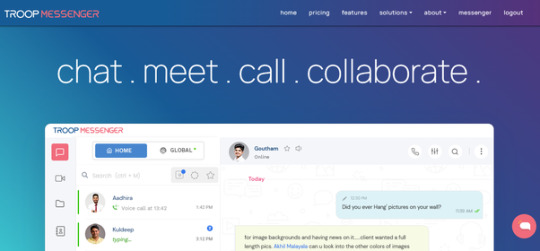
Presenting Troop Messenger: the best instant messaging and team collaboration app available. With a feature-rich feature set, Troop Messenger is ideal for the demands of the army, navy, government, defence, politics, and office settings.
Troop Messenger is a frontrunner when it comes to more dynamic team collboration. Because of how easy it is to use in an entrepreneurial setting, it is one of the few online collaboration tools that can meet the needs of any team.
As a business messaging, work chat, and instant messaging solution for both office and remote work, Troop Messenger is regarded as one of the greatest team communication tools.
Troop Messenger is a robust platform that combines encrypted file sharing, group chat, video calling, and instant messaging. Troop Messenger guarantees effective and secure communication at every stage, whether you're planning missions, talking about private issues, or just keeping in touch with your group.
1. Free Screen Sharing Apps
Companies that collaborate through screen sharing Apps & co-browsing enjoy a 2.4% annual decrease in support cost, year-over-year
With the use of a screen sharing apps, one person may instantaneously view the screen of another and guide them through even the most challenging dialogues, rules, and user interfaces.
With the screen-sharing tool, you may annotate, highlight, scroll, and click on the user's screen remotely with a mouse, making the session more engaging.
Screen-sharing solutions are indeed useful, regardless of the industry. They can generally be used within internal teams to brainstorm and ideate, provide demos, and more.
In this article, we will discuss the top screen sharing tools that are dedicated Screen sharing solutions:
Highlights of Best Screen-Sharing Software
Ease of access for participants
Annotation features like marking up the screen, drawing, and highlight
Collaboration features like presenter-switching, co-browsing, joint annotation, and collaborative document editing.
Support features like remote access
Integration features to automate tasks
Easy recordings
Multiple Users can share the screen simultaneously
Troop Messenger

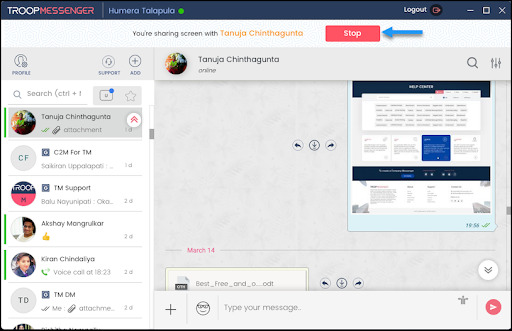
Screen sharing is one of the best dynamic collaboration features of Troop Messenger that allows members to share their screens during a chat conversation. Recipients can see real-time changes on the presenter's screen.
Troop Messenger's screen share function is powerful for enhancing team collaboration and conversation. With its smooth setup, interactive equipment, and strong security features, the Screen Sharing App on Troop Messenger permits green and productive virtual meetings. Whether you're conducting a presentation, troubleshooting trouble, or brainstorming together with your team, Troop Messenger makes display sharing simple and effective.
Key Points to Note:
With Troop Messenger’s screen sharing, team members can see what exactly is on the presenter’s desktop.
A presenter can show presentations, documents, videos, images, and anything else she’s working on.
Team members can remotely share screens even when they are not in their office LAN premises.
You can initiate a video call with screen sharing anytime.
How to Use Screen Sharing Feature in Troop Messenger?
Using a screen-sharing feature is quite simple. Let’s see how you can share your screen with Troop Messenger:
Step 1: Open the chat box of a user you want to share your screen with.
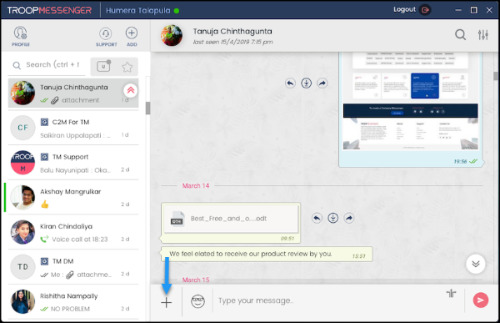
Step 2: Click on the “+” symbol at the bottom of your screen to see the SCREEN SHARE feature icon.
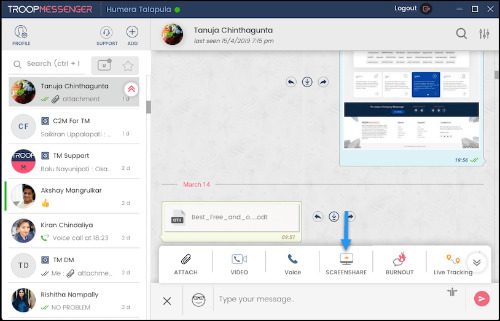
Step 3: Click on SCREEN SHARE, which will promptly send a screen share request to the user.
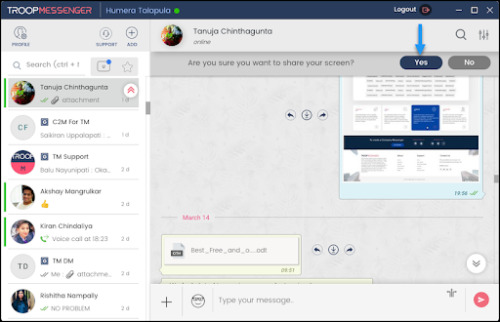
Step 4: When the user accepts the request, the desktop screen will be shared with them.
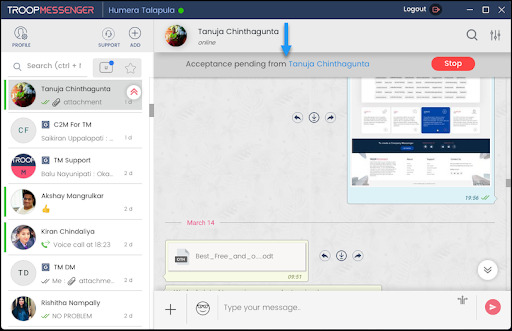
Step 5: To stop your screen sharing, click the Stop icon at the top of your screen.
2. Teamviewer Alternative
Many of us are very much aware that TeamViewer helps us connect to any device from anywhere at any time! However, if you’re excited to explore the free alternatives to TeamViewer?
We hear you
Fortunately, when it comes to finding a suitable TeamViewer alternative, there are several options available that offer similar functionality. Additionally, you can find discussions about these alternatives on platforms like Reddit.
Before we explore the top TeamViewer alternatives, it's worth reviewing why TeamViewer may not always be the ideal choice.
Why are people looking for Software or Programs like TeamViewer?
The fact that TeamViewer is not free for commercial usage is one of the reasons why users wish to switch to another remote desktop access program. The plans have a high cost. However, there are other reasons to look for free TeamViewer substitutes;
TeamViewer has a proxy limitation - which means that if you are working for a customer and require a proxy server, the app wouldn’t allow you to do so.
The software has a limitation with file transfer or size issues too. So if you are in a web meeting with a client and need to send a large size, you can’t rely on TeamViewer for file transfer, which can be very annoying, unlike with another free alternative to TeamViewer.
File Transfer speed on TeamViewer is slower than other apps like TeamViewer, and files usually get stuck on calculating.
Unlike the perfect TeamViewer replacement such as AnyDesk and other TeamViewer alternatives, TeamViewer’s Linux version’s performance is not apt.
In the free version, the app lags so much despite having a great internet connection.
A lot of users have reported that the app has been compromised by third-party access, leading to the personal information theft of many users, which means that TeamViewer will need to up its game in terms of security features.
As TeamViewer lags from Time to Time and doesn’t work properly through the proxy servers, it’s a perfect time to shop around.

If you want a TeamViewer alternative that’s among the best remote desktop access software, keep reading. We’ve gone out to the remote desktop access market and reviewed the pros and cons of ten apps that can act as a TeamViewer alternative.
Troop Messenger

Troop Messenger is the best Team Viewer alternative that allows users to connect with remote teams with lightning speed.
This advanced screen-sharing feature enhances the user experience with the ability to initiate one-to-one and group audio-video calling better explain the contents of the screen. Different users from different parts of the globe can share their screens via their desktop, web, and mobile.
While presenting the screen contents to remote users, one can highlight the required section with the help of screen annotation.
Troop Messenger is better than TeamViewer because it supports a wide range of use cases such as providing a live chat app to sites through chat APIs, and the users can avail many privileges like conducting team meetings, webinars, online classes, etc., they can talk, meet face-to-face, and share their screen contents.
Troop Messenger is a flexible and effective alternative to TeamViewer, offering an extensive range of functions designed to decorate team collaboration and communique. With its screen sharing, far-off management, stable messaging, and extra, Troop Messenger gives everything your team wishes to paint efficiently and successfully in Teamviewer Alternatives.
Why choose Troop Messenger’s Remote Screen Sharing?
Can choose to share the contents of the entire screen, application window, or any Chrome tabs.
Can initiate an audio-video call to talk and have face-to-face interactions while presenting the remote screen.
Can switch from an audio call to a video call while sharing a screen.
Can add more users to the call while sharing the screen.
Can end the audio or video call alone.
Can exit self.
Can stop sharing your screen while continuing the audio or video calling.
3. AnyDesk Alternatives
Market-available AnyDesk alternatives are capable of confusing users with their comparable capabilities. To avoid the contemplation process, read this blog and make an informed decision.
What is AnyDesk?
With over 1,70,000 users, AnyDesk alternative is a popular, safe, and easy-to-use remote desktop solution. It offers VPN functionality, remote control, and file transmission. The free version is equally as safe as the expensive version, even though it lacks several features. AnyDesk is regarded as the best on the market because it provides outstanding security, from military-grade encryption to personalised security features, that perfectly meets your needs.
Explore the options below to find your ideal tool if you're seeking employment with AnyDesk's competitors or alternatives.
Troop Messenger
Troop Messenger, is one of the best instant messaging, offering real-time messaging, remote access, screen-sharing, and other features.
The goal of Troop Messenger is to empower its users by providing all the functionality they require in one application, removing the need for them to look for different tools to satisfy their different needs. When taking user ratings into account, features like screen sharing and remote access work better than any remote desktop application.
In addition to screen sharing and remote access, other capabilities include file sharing, conferences, audio and video calls, complex search filters, live location tracking, chat, advanced search window (Burn out), and Zapier integration. You can have a face-to-face conversation by initiating an audio or video call while sharing the remote screen.
Furthermore, Troop Messenger's top-notch security protocols, which led defence organisations to use it as their defence messaging system, make it a platform that is thought to be secure. In conclusion, Troop Messenger surpasses all AnyDesk substitutes..
A versatile and practical AnyDesk replacement, Troop Messenger provides a plethora of functionalities designed to improve teamwork and verbal communication. Troop Messenger provides all the features your team needs, including as screen sharing, continuous messaging, remote manipulation, and more, to work effectively and productively using AnyDesk Alternatives.
1 note
·
View note
Text
Cricut Installation Software: Easy Steps to Get Started
Are you in need of Cricut installation software? If you’re a beginner looking to download and install Cricut Design Space on your desktop or smartphone, you’re in the right place. As a professional Cricut crafter, I’m here to guide you through the step-by-step process.
I rely heavily on my Cricut machine for all sorts of crafts. To do this, we need to set up our machine. Whether it’s a heat press or cutting machine, all require a setup before we can use them. But do you know which software we need to use for this setup? It is a Cricut Design Space that is compatible with Mac, Windows, Android, and iPhone/iPad devices.
So, whichever device you are using, installing the Cricut app is a piece of cake for me. Be a part of my journey, and let’s delve into this blog to install the software.
Cricut Installation Software on Desktops
Installing the Cricut Design app on my desktop computer is really a piece of cake. But before you download this app, you must know whether your device is compatible enough to run it. Thus, it’s important to ensure that your desktop, whether it’s a Windows or Mac computer, is running the most up-to-date operating system.
For Mac
Initially, you will need to open an internet browser.
After that, visit the site design.cricut.com.
On the next screen, you will see a checkbox saying I agree to Cricut’s Terms of Use and Privacy Policy. Click on the checkbox and select the Download button.
Next, you will need to wait and let it download the app in your default file folder.
Once downloaded, you have to open the downloaded .dmg file by double-clicking on it
Then, double-clicking the .dmg file will start the installation.
For the Cricut installation software, you will have to drag the Cricut icon to the Applications folder.
In the last step, your Cricut software will be added to the Applications folder.
That’s all you need to do if you want to download and install the Cricut app on your MacBook.
For Windows
The downloading steps are the same as those explained for the Mac above.
Once you have downloaded the Cricut software on your desktop, go to the Downloads folder or any file folder where you have saved your downloaded file.
Next, you have to double-click on the downloaded file to install it.
As you double-click on it, it will start showing the installation progress, meaning your Cricut app is being downloaded.
After that, you are ready to create your Cricut account and then set up your machine.
By now, you might have understood how to download Cricut Design Space on Mac and Windows. I am sure you found the steps easy and helpful.
Cricut Installation Software on Your Mobile
The best thing about Cricut is that we can use it on our mobile devices, including iOS and Android smartphones. All you need is the latest operating system on your device. Then, learn the basic steps below to install the Cricut Design app on your suitable device.
For iOS
To start, open the App Store and navigate to the search bar.
On the search bar, you have to type Cricut Design Space and hit Enter.
After tapping the Enter button, you will notice multiple results. Choose the one with a green Cricut icon in the center of the white box.
Then, hit the Get button and start the Cricut installation software.
After installation, you are ready for the Cricut machine setup.
For Android
In the beginning, launch the Play Store and search for Cricut Design Space.
Then, choose the app from the result and hit the Install button.
After that, the installation will start.
Finally, it will be added to your home screen.
FAQs
Question 1: What are Cricut system requirements for PC & Mac?
Answer: You should know the system requirements for your PC and Mac before downloading the Cricut app:
For Windows
● Operating System — Windows 10 or later (64-bit)
● RAM — Minimum 4 GB
● Disk — 2 GB free
● CPU — Intel Dual Core or equivalent to AMD processor
● Display — Minimum 1024px x 768px screen resolution
● A USB port or Bluetooth is required
For Mac
● Operating System — macOS 11 or later
● CPU — 1.83 GHz
● RAM — Minimum 4 GB
● Display — Minimum 1024px x 768px screen resolution
● A USB port or Bluetooth \is required
● Disk — 2 GB
Question 2: Can I use Cricut software on a Chromebook?
Answer: No, Cricut doesn’t support Chromebook laptops. However, it is only compatible with four platforms, including Windows, MacBook, Android, and iPhones. Plus, the Cricut software is incompatible with Unix/Linux. So, make sure you check the system compatibility of the Cricut Design app before downloading it to any device.
Question 3: How to download Cricut Design Space on Linux?
Answer: You can’t use the Cricut Design Space app on your Linux operating system as it is incompatible with the software. Cricut has officially launched its app for four devices, including MacBook, Windows 10/11, Android, and iPhone/iPad. Therefore, you should know the system requirements of the software before downloading and installing it.
Read more: cricut.com/setup
cricut.com/setup mac
Cricut Design Space
Cricut New Machine Setup
Source: Cricut Installation Software
#Cricut Installation Software#Cricut New Machine Setup#Cricut Design Space#cricut.com/setup mac#cricut.com/setup
0 notes
Photo

Christian Social Network Has Been Resurrected! I am pleased to announce that being as I have acquired a lot of new online friends since shutting down the Christian Social Network -- a.k.a. CSNet -- last year, I have decided to bring CSNet back online again. However, please be advised that all old accounts have been deleted, and we are starting completely from scratch. As such, even if you were an old member, you need to go through the sign-up process and create a new account. To join CSNet, simply go to the blue URL that you see in the bottom portion of this image. If I post the URL here in text form, some social networks will make this post mysteriously disappear. Sign-up is really quite easy, but you DO need to provide a REAL email address during the sign-up process so that the software I use can verify that you are a real person. For best results, please use a Gmail address, and follow the instructions in the email that is sent to you immediately, so that your account can be verified and unlocked for you. If you encounter a problem signing up, you will see my email address on the sign-up screen. Shoot me an email if necessary, clearly explaining your problem. Include screen shots if you can. Once your account has been created, from that point forward, you do NOT need to click on the sign-up button again. Instead, click on the green login button that is located in the top corner of your web browser window. Also, please add both a profile pic and cover image as soon as possible after logging in to your account. There is a short grace period, but people who fail to do this will eventually have their account deleted. I hope that you will choose to be one of the first to build back up our Christian Social Network membership. On a final note, please be advised that being as I can no longer afford for iOS and Android apps, and the constant upgrade fees, CSNet is geared primarily towards desktop and laptop computer users. Tablets may work okay as well. I am really not sure. But as far as cell phones are concerned, being as I no longer offer the apps, you will have to use whatever web browser you like on your phone, and proceed to the URL you see in this graphic. If you turn your phone sideways to landscape mode, you will get better results, BUT will still have problems navigating and seeing some things properly. You can give it a try if you like, but I just want to let you know that it won't be nearly as good of an experience as with a desktop or laptop computer. https://www.billkochman.com/Blog/index.php/christian-social-network-has-been-resurrected/?feed_id=172851&Christian%20Social%20Network%20Has%20Been%20Resurrected%21
0 notes
Text
How to Share Screen on Zoom Via Desktop, Android, and iOS.
Screen sharing is one of Zoom’s most powerful features, allowing users to collaborate effectively during meetings. Whether you are hosting a business conference, giving a presentation, or conducting an online class, knowing how to share my screen on zoom is essential. In this guide, we’ll cover how to share your screen on Zoom across different devices, including desktops, Android, and iOS.
Why Screen Sharing on Zoom is Important
Screen sharing in Zoom enhances virtual communication by allowing participants to present content visually. It is useful for:
Online meetings and presentations
Demonstrating software or workflows
Collaborating on projects in real time
Conducting virtual training sessions
Sharing documents, images, and videos
Now, let’s go step by step on how to share your screen on Zoom from various devices.
How to Share Your Screen on Zoom via Desktop (Windows & Mac)
Prerequisites:
Install the Zoom app on your desktop.
Ensure you have a stable internet connection.
You must be a host, co-host, or have screen-sharing permissions enabled by the host.
Steps to Share Your Screen on Zoom (Desktop)
Start or Join a Meeting: Open Zoom and start a meeting or join an existing one.
Click on the ‘Share Screen’ Button: In the bottom toolbar, click the green ‘Share Screen’ button.
Select the Content to Share: A window will pop up showing different options such as your entire screen, a specific application window, or a whiteboard.
Enable or Disable Sound and Optimization:
If sharing a video or audio, check the ‘Share Sound’ box.
For better video playback, select ‘Optimize for Video Clip’.
Click ‘Share’: Once you choose the content, click the ‘Share’ button, and your screen will be visible to participants.
Stop Sharing: Click ‘Stop Share’ at the top of the screen when you are done.
Advanced Screen Sharing Features on Desktop
Annotate: Allows participants to draw or highlight on the shared screen.
Remote Control: Give control of your screen to another participant.
Multiple Participants Sharing: Enable multiple people to share their screens simultaneously.
How to Share Your Screen on Zoom via Android
Prerequisites:
Install the Zoom app from Google Play Store.
Join or start a meeting with screen-sharing permissions.
Steps to Share Your Screen on Zoom (Android)
Open the Zoom App: Launch Zoom and join a meeting.
Tap on ‘Share’ Option: At the bottom menu, tap the ‘Share’ button.
Select ‘Screen’ from the Options: Various sharing options will appear; select ‘Screen’.
Grant Permission: Zoom may prompt you to allow screen recording; grant permission.
Start Sharing: Your screen is now visible to all participants. You can switch apps, and your actions will be displayed live.
Stop Sharing: Tap ‘Stop Share’ at the bottom when you’re finished.
Additional Features for Android Screen Sharing
Enable Audio Sharing: Share device audio while sharing the screen.
Use Whiteboard: Draw and annotate during the meeting.
Allow Others to Control: Certain Android versions allow remote control access.
How to Share Your Screen on Zoom via iOS (iPhone & iPad)
Prerequisites:
Install the Zoom app from the App Store.
Join or start a meeting where screen sharing is enabled.
Steps to Share Your Screen on Zoom (iOS)
Open the Zoom App: Start or join a Zoom meeting.
Tap on ‘Share Content’: In the meeting controls, tap the ‘Share Content’ button.
Select ‘Screen’: Choose ‘Screen’ from the sharing options.
Enable Broadcasting:
Tap ‘Start Broadcast’ when prompted.
A three-second countdown will appear before sharing starts.
Navigate Through Apps: Once broadcasting starts, anything displayed on your screen will be shared with participants.
Stop Sharing: Return to Zoom and tap ‘Stop Share’ to end the session.
Unique iOS Features for Screen Sharing
Screen Annotations: Draw on shared content for better explanations.
iPad Multi-tasking Support: Use split-screen mode for efficient presentations.
Share from Files & Apps: Share documents, photos, and videos directly from your iPhone or iPad.
Troubleshooting Common Screen Sharing Issues
1. Screen Share Button is Disabled
Ensure the host has allowed participants to share screens.
Go to Zoom settings and enable ‘Screen Sharing’ under the meeting controls.
2. No Sound While Sharing Video
Check the ‘Share Sound’ option before starting screen share.
Increase system volume and ensure audio permissions are granted.
3. Poor Screen Quality or Lag
Use a high-speed internet connection.
Close unnecessary applications to improve performance.
Enable ‘Optimize for Video Clip’ if sharing a video.
4. Screen Sharing Not Working on Mobile
Restart the Zoom app.
Update to the latest version from Play Store or App Store.
Ensure screen recording permissions are granted.
Best Practices for Effective Screen Sharing
Prepare in Advance: Keep your presentation files or applications ready before the meeting.
Close Unnecessary Windows: Avoid distractions and ensure privacy by closing irrelevant tabs or apps.
Use Annotations: Highlight important points with Zoom’s annotation tools.
Enable Dual Monitors (for Desktop Users): Use one screen for presentation and the other for monitoring participants.
Mute Notifications: Disable pop-up notifications to avoid interruptions during screen sharing.
Conclusion
Mastering screen share in zoom can significantly enhance your virtual meetings, presentations, and online collaborations. Whether you're using a desktop, Android, or iOS device, following these steps will help you share your screen efficiently. By implementing best practices and troubleshooting tips, you can ensure a smooth and engaging screen-sharing experience on Zoom.
0 notes