#GODOT IS A DARK ELF
Explore tagged Tumblr posts
Visit Tumblr Blog
Explore Tumblr blogs with no restrictions, modern design and the best experience.
Last Seen Tumblr Blogs


Fun Fact
BuzzFeed published a report claiming that Tumblr was utilized as a distribution channel for Russian agents to influence American voting habits during the 2016 presidential election in Feb 2018.
Note
I bet when Dahlia came in to testify pretending to be Iris, Werewolf!Phoenix's hackles instantly raised, and he was barking and growling like crazy. Everyone in the courtroom was confused since Phoenix was usually a sweet guy.

I love that yes thank you
#doctorsiren#ace attorney#ace attorney au#phoenix wright#iris fey#dahlia hawthorne#prosecutor godot#silly little monster au#ace attorney fanart#doodle requests#art#digital art#my art#fanart#procreate#GODOT IS A DARK ELF#Diego was originally a wood elf#but the poison that was supposed to kill him worked against his determination to live and turned him into a drow#WHICH IS ALSO WHY HIS HAIR IS WHITE BC DROW HAVE WHITE HAIR#and also they come from in the Underdark and bro always talks about how he came back from Hell#it’s gone from a monster AU to more a D&D fantasy monster AU and I am Here For It#BUT ALSO WHY DOES GODOT LOOK LIKE GUY FIERI ?!?!? sobbing crying
212 notes
·
View notes
Text
best books read in 2022 by yours truly, in no particular order:
the seven deaths of evelyn hardcastle by stuart turton (technically started in 2021 but finished in early january 2022, so it counts). murder mystery + time loop + redemption themes = perfect mix, 10/10 recommend
this is how you lose the time war by amal el-mohtar & max gladstone: space lesbians but what if they were enemies? lovely, lovely prose. one flaw tho: more of a ~i'm being poetic for the sake of being poetic~ than a character story. still, interesting read.
the plague by albert camus: i couldn't not include him. 5/5 stars, he's easily becoming one of my favorite authors.
hygiène de l'assassin by amélie nothomb: a female journalist succeeds where everyone else fails and interviews an old misanthropic and cynical nobel-winner author. but not everything is as it seems... insane little book, great characterization for the female protagonist. perfect ending. i couldn't put it down, thankfully it's quite short.
carmilla by j. sheridan le fanu: this doesn't need introductions, does it? :)
hedda gabler by henrik ibsen: a play revolving around a woman - daughter of a general, unsatisfied by her current circumstances and marriage. a fascinating female protagonist, especially for the time; the kind of writing you usually get for male characters, and a role every actress would give everything to play at least once.
salomé by oscar wilde: one act only, but it stays with you. particularly incisive adaptation of the biblical story; wilde's writing as usual is stunning.
an oresteia (agamemnon by aeschylus, elektra by sophokles, orestes by euripides) by anne carson: another read that doesn't need introductions.
the hours by michael cunningham: somehow based on mrs dalloway, it is about one day (and the life) of three women in three different time periods; among them, virginia woolf herself. lovely prose.
the cycle of earthsea by ursula k. le guin: series of 5 books (including one of short stories) masterfully written by ms le guin. the first book is a sort of fantasy buldingsroman about a young wizard named ged who, because of his hubris, makes a peculiar sort of enemy... the next books follow ged as he becomes an adult, a middle-aged, and an old man + a varied cast of characters (most importantly tenar, introduced in book 2). original worldbuilding and story (especially for the time - the first novel was published in the 60s), lovely prose and themes (light/dark as yin/yang, necessary to each other's existence - sw wishes it had what earthsea has) + beautiful love story in the last volumes. bonus: most characters in earthsea are very much not white. again, very avant-garde for the 60s, and something all adaptations deliberately ignored.
grendel by john gardner: based on the beowulf poem - the story told by the antagonist's point of view. just striking, and oh my god the themes. couldn't stop thinking about it for days.
in the night garden by catherynne m. valente: a girl trapped in a garden spins a labyrinth of fairy tales for a boy - the only person willing to listen to her - a la scheherazade. told in the usual beautiful prose made in valente, amazing settings and atmospheres.
the sundering duology by jacqueline carey. (thanks for the rec, @queen-zimraphel ❤️) basically a lotr retelling told by the Bad Guys' povs. the inspiration is clear but also it's meant to be a mirror and say 'what if?'. grey morality everywhere, elegant but simple prose + death and the maiden vibes from the local tormented dark lord/the beautiful elf lady. (tho the main love story is not about them specifically... but still.) a great tragedy, but masterfully told - this is how characters who were dead from the beginning and given a role to play in the narrative by a fate larger than them should be written.
honorary mentions to áqua viva by clarice lispector, waiting for godot by samuel beckett, enrico iv by luigi pirandello, and then there were none by agatha christie, sharp objects and gone girl by gillian flynn, in the margins by elena ferrante, ficciones by jorge luis borges, and obviously demons by fyodor dostoeveskij <3
8 notes
·
View notes
Text
Recoloring assets at runtime in elf game
(crossposted from https://paranoodle.itch.io/elf-game/devlog/75412/recoloring-assets-at-runtime-in-elf-game )
intro
first disclaimer: this is just how i decided to do things and i've been using godot for barely a month so there's likely things that could be done better, but it does work. that said if you have suggestions on how to improve feel free to let me know!
when i was trying to decide on ways to handle color choices in the character creator, two implementation options were covered in example/guides and the such:
have every asset image available in every color
have every asset image available once in white, and use modulate/multiply to add color programmatically
the issues with (1) should be pretty obvious: not only do you have to recolor everything manually, but you have to have as many files for each asset as you have colors, so it scales incredibly badly both time-wise (your time) and storage-wise (you need to have all the files included with the game).
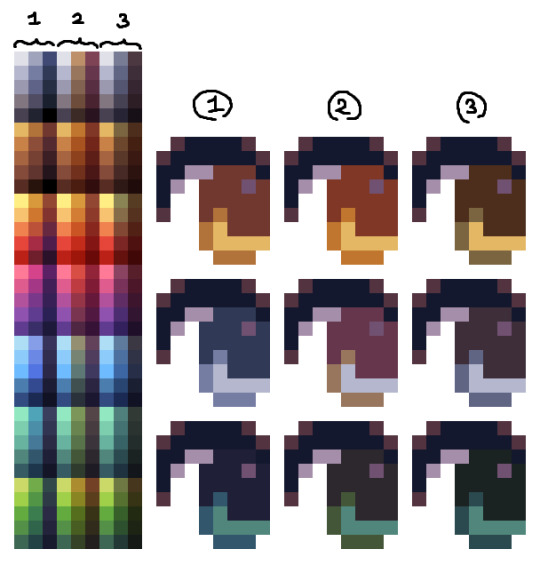
(2) already sounds more reasonable, since it scales well both time-wise and storage-wise, but the way modulate works means that you only use one color to modulate with, instead of having control over every swatch in the image. that's not inherently a bad thing, but i personally like having control over all the colors in an image (doubly so for pixel art). see below for the difference between column 1 (manual palettes) and 2-3 (modulate with different color bases).
so, in comes option 3, which i ended up coding from scratch and is what i decided to implement in this game: have every asset image available once in a pre-determined palette, and use shaders to palette-swap at runtime. it scales as well as (2) because i only need one image per asset, and while setting up the palettes takes a little longer, it's work that only has to be done once and then never needs touching again.
in theory it'd be possible to set up the list of palettes as just using Color objects or hex codes, but i find it a lot more intuitive to make/edit the palette file in an image editor, so i went and coded a script that can read the palette file i give it and translate to Color objects as needed.
so, in practice, on top of the standard asset files, i end up with two other files:
a "reference" file that lists all the colors from the asset files i want to edit (from left to right: hair color, skin color, marking color, eye colors)

a "palette" file that lists all the palettes i want to make available (truncated preview, from left to right: hair colors, skin colors, eye colors)

(note: you can also make one file for each type of palette you want, i just wanted to keep everything in one place because otherwise i get easily confused. it's very slightly simpler code if you have one file for hair colors, one for skin colors, etc)
and using those, i need to code two things: some manner of ui so people can select palettes, and the shaders to actually apply said selection.
palette selection node
the palette selection is reasonably simple to set up, we just need to:
decide what columns in the palette file we're reading from, and which one specifically to display as the selectable swatch
read through all the lines in the palette file, and for each of them, build an array of Color objects corresponding to the palette
fill our grid node with a bunch of buttons that link a swatch to a whole palette
in practice, here's a runthrough of the code for the palette selection node (implemented as a GridContainer, using markings as an example):

3: used to keep track of which part of the character i'm recoloring, edited via the node options 5: signal sent when we click on a swatch, containing the palette info linked to that swatch 7: list of all the swatch buttons in the palette grid 9-11: textures for the buttons (light/dark versions on press to prevent from blending in with the swatch/background) 13: ButtonGroup is necessary to handle toggle functionality on the swatch buttons (we only want one of them selected at any given time) 14: used to prevent sending the recolor signal again if we click on the same button twice in a row
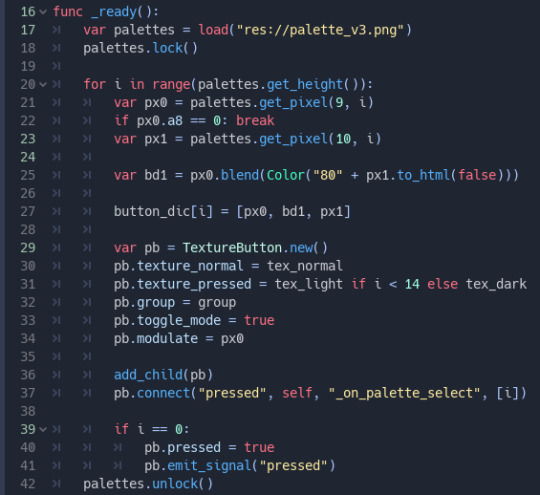
17-18: loads the palette file and locks it so we can read pixel data 21-27: reads the pixels from the palette file and stores them into an array. line 22 stops the loop if we reach a line of transparent pixels (no more colors to read!) and line 25 blends a 50/50 mix of two of the pixels programmatically because it's easier than blending it myself in aseprite 29-34: creates the actual swatch buttons, sets the appropriate light/dark texture, and sets its modulate to the first color in the palette 36-37: adds the button to the grid and links its "pressed" signal to a function later in the file 39-41: "clicks" on the first swatch so we don't get any weird behavior with not having any of the swatches toggled when the menu opens 42: locking the palette file again since we're done using it

as mentioned in line 37 above, this sends a signal with the key defined in line 3 and the palette linked to the swatch that was clicked, but ignores any clicking on the currently selected button
coding the shader
in theory the shader is reasonably simple, since essentially all we need is "here's a file with the target colors, here's another with the new colors" and let it do the replacing, but in practice it's not quite trivial to write, especially for someone like me who's new to shader coding.

in the editor for the parameters, old_palette and new_palette are both the reference file listed earlier (imported as a texture), and palette_size is the width of the reference file. there isn't a ton to comment past that. for every color in the palette, we replace the old one in the image with the new one, keeping opacity intact.
tying everything together
with the shader and buttons coded, all that's left is something to tie the signal to the shader, and it's this little snippet of code here:
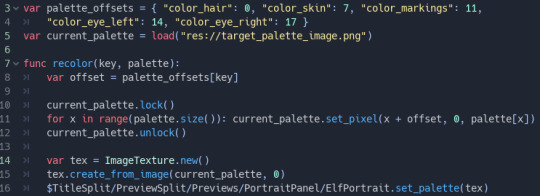
3-4: offsets (with names matching the key variable all the way back up in palette selection) so we know what part of the reference to replace with what colors 5: reference file from earlier, but with a different name because we're importing it as an image. this has to do with how godot reads image/texture data differently 10-12: replace all the pixels in the reference image that correspond to the channel we want to modify 14-16: create a new texture from this reference image (shaders can only take textures as input, not images) and apply it to our material
on line 16, the set_palette method is just a wrapper for get_material().set_shader_param("new_palette", palette)
make sure you make a ShaderMaterial object and assign it to the part you want recolored, and then assign your shader script to it, as well as linking the recolor signal from the palette selection to wherever you want the above code to run.
result, with a couple more bells and whistles:

and that covers most of how the recoloring works! actually changing the image for each option is as simple as having it load a different texture, since the material stays unchanged. the way recoloring works for markings is a tiny bit more complicated as it uses what amounts to improvised masking mixed with the recoloring. i won't be sharing the code for it here since it's a bit more finicky and needs refactoring at the moment. the cool thing with this shader is it means i can also use it with all the npcs in the game, reusing any relevant assets without needing a full-on unique colored copy of their portraits/sprites
i hope this makes sense and explains things to anyone interested! feel free to throw questions at me over any of the implementation :>
7 notes
·
View notes
Text
sniffle-elf replied to your post “Godot is sexy as hecc I want him to snz”
You just brought me back to the days when I was a thirsty snzfucker when the game first came out, and I pined desperately for a sneezy Diego but didn’t even have a community to commiserate with. I’d listen to the jazz version of The Fragrance of Dark Coffee and wish I had fic to read.
the lack of sneezy Diego is an outrage!
1 note
·
View note
Note
au where guts ends up traumatized instead of casca and casca goes and explores and meets people and grows and heals herself pls
Guts has wandered off, again. This isn’t the first time. She knows in her heart that it won’t be the last time. But the panic she feels each time is the same, as raw and fresh as the first time she found him missing.
Thankfully, Casca knows where to look these days. She sets her hand on the hilt of her sword and she listens carefully. Her feet move even before her ears register what she’s heard, her body seeking out the sound in an instant. Guts always seeks out two things when left alone, and there are no monsters here.
There are children, and that’s where she finds him, sitting on the grass and smiling as a little girl shows him her doll.
Casca approaches slowly, trying not to scare either of them. The girl doesn’t seem to even notice Casca, too caught up in telling Guts about her doll. She prattles in the familiar way that children do, rushing through her sentences excitedly, “-and she um, she’s, she’s got a horse and a dog and um, and um, she’s- she! She’s got dresses and they’re white and green-”
Guts looks so happy like this. She can’t remember if he ever smiled that before. He was always so guarded. But there are no guard anymore. He feels wholeheartedly now, everything shining through him like sunlight through an open window. In moments like this, it’s a blessing…
Casca’s boot kicks a pebble as she walks. Guts and the little girl both look up. Guts stops smiling. So does the little girl. Casca’s used to it by now.
“Guts, we need to go.” Casca tells him. He fixes her with an unhappy expression and then gets to his feet, walking off again. The little girl stares at Casca, clutching her doll close. Casca knows there are no words she can say to make her less frightened, so she just passes her by, following after Guts.
Guts still walks faster than she does and he uses those long strides to put space between them. She used to be angrier about this. There was a time when Casca would chase after him and yell, to try make him see reason…
But she’s learned better than that. Instead, she just follows him until he comes to a stop, and she approaches him carefully as he gives her a sullen look. Casca rests her hands behind her back. “Everyone’s waiting on us. We need to go.”
He doesn’t stop glaring at her. But at least when she walks back towards the market, he follows her. That’s better than a few years ago. It’s getting better every day, bit by bit. At least, that’s what she tells herself, and it has to be true. It has to be.
The others are waiting with the donkey. As soon as Jill sees them, she smiles and waves to Guts. He picks up the pace, heading past Casca straight to Jill to see what little treasures she’s gotten her hands on in town. Jerome’s checking their supplies. Pepe’s not smiling for once, and soon as Casca’s in earshot, she leans forward and tells her the news. “Wyndham’s fallen.”
Casca feels a surge of emotions: sorrow, resentment, anger, and… and a tinge of vicious spite. It isn’t good that Wyndham has fallen. But after what that city did to her, to Guts, to the Band… She knows who’s really to blame for everything that happened, but she holds them accountable for their portion.
“Then we should leave immediately, before the ports end up closed off.” War is ugly enough when the Kingdom capital still stands. It’ll get worse without it.
“What about-” Jerome starts to ask and pauses, his eyes going over to Guts before he rephrases his question, “What about Rickert and Erica? Should we try meet up with them?”
“No. It’s likely they’ve already left. We know where to meet up.” Casca can’t think about them, not right now. But she trusts Rickert to do what he thinks is best. If the situation has gotten dangerous, he’ll take Erica and- and the baby and leave. If it’s safe, he’ll stay there. She trusts him.
Jerome makes a face, but he knows better than to challenge her judgement. He carries on. “Some of the locals mentioned a way around the blockades. If we head north, there’s a road that leads straight to the sea. We can get a ship along there.”
A road directly to a port might have been better, but this is safer than any other choice, and there’s sure to be a ship somewhere, so long as there’s sea. “Let’s go.”
They get moving. Casca waits until they’re out of sight of the city, and until her leg is aching, before she finally gives in and climbs on the donkey. She won’t take off the prosthetic until they make camp, but at least this way she can rest a little bit.
Pepe and Jerome chat some as they walk, each sharing the different gossip they heard while getting supplies. Jill holds onto Guts’ hand and just walks with him, keeping him moving forward. He still scans the horizon, still looking for threats. Her brand isn’t burning, so she knows they’re safe… at least, for now. At least while the sun is high.
The night is always a different story. It’s always a struggle, but… less of one now that she no longer spends it alone, or trying to stop Guts from charging off to fight anything that feels like a threat… or trying to find his way back to Godot’s home.
She sneaks a look at Guts. He always smiles so openly at Jill and the others. It makes her heart ache. He used to look at her that way… Now all he knows is that she’s the one who won’t let him be near the baby… be near their baby.
But at this point, the baby isn’t a baby anymore. He must be a child, three years old. Though she tries not to think about it, her mind sometimes wonders what he must look like. His hair was dark when he was a baby, but his skin was lighter, pale like Guts. Did he have her eyes or his? Her nose or his? Did he-
Casca stops her thoughts from going any further. It’s pointless. Her child is safe, and that’s all that matters. The rest is inconsequential. One day, Guts will understand that they left to keep him safe. She’s given up on hoping he forgives her, but if he can understand, then that will be enough.
There’s a gentle jingling from her bag as Puck emerges. He yawns and stretches, twisting around in the air before he comes to a stop in front of her face. “Did we get there yet?”
“We did, and we just left.” Casca snorts and gently flicks his head to spin him right-side up. “You slept through it all.”
“Again.” Jerome rolls his eyes. “So much for Puck the grand guide.”
“We’re going in the right direction. I’ll tell you when we’re not.” The elf flutters over to bother Jerome a little while. Casca rubs her calf idly as she joins Guts in scanning the horizon. The only thing of any interest is the forest, and the land rising steadily upwards. They’ll probably hit the forest before dark, so they’ll need to stop and building a camp. Of course, they’ll also have to prepare. The forest always seems to hold something worth worrying about, some dark secrets or-
Guts laughs and shakes her out of her thoughts. For a moment, she forgets everything else except the sound he’s making, so joyful and open. He sounds so happy.
What you wish for, may not be what he wishes for.
Maybe. Maybe that’s true. But she knows that whatever happens after this, it’s only right that Guts has his mind back. It’s only right that he has a chance to decide for himself if he’ll return to the child she forced him to leave, or follow her when she goes after Griffith.
She knows which one she hopes for. Casca doesn’t feel guilty that Guts is alive, or that she isn’t alone as long as she has him. But maybe she feels a sliver of it when she thinks of his decision and she hopes that he’ll chose to die with her fighting Griffith.
20 notes
·
View notes
Text
Death End Re;Quest Chapter 7 Guide
The post Death End Re;Quest Chapter 7 Guide appeared first on Fextralife.
In this Death End Re;Quest Chapter 7 Guide, I’ll be going over the path to clear the seventh chapter of the game and it’s boss. Death End Re;Quest is a unique RPG game that merges the typical JRPG and allows players to convert it into a fighting game, shooter, or even a slot game. There are other subtle quirks that the game possesses that will be simple to execute but difficult to master.
Death End Re;Quest Chapter 7 Guide
For Chapter 7 of Death End Re;Quest, players will be returning to an area they know well, Rizaria Forest. This area was the location you explored in Chapter 4, and will be the main focus in Chapter 7. Be careful as all the enemies you met previously, have now been leveled up. Use type advantages to avoid being counter action-ed against and to deal a decent amount of damage.
Monsters in Heartis Palace (East & West Wing)
Dias 22,600 HP 50 SP ★ Stars Type
Apochi 7,840 HP 15 SP ☾ Moon Type
Tagrika 12,540 HP 20 SP ☾ Moon Type
Femodas 18,520 HP 10 SP, ★ Stars Type
Miasupa 60,600 HP 25 SP ☀ Sun Type
Bugnus Cube 20 HP 15 SP ☀ Sun Type
Timous 19,270 HP 15 SP ★ Stars Type
Wilarlia 36,480 HP 30 SP ☀ Sun Type
Yapshi 12,235 HP 25 SP ★ Stars Type
Tudei 3,254 HP 10 SP ☾ Moon Type
Doggi 13,965 HP 15 SP ☾ Moon Type
Laforio 25,870 HP 20 SP ☀ Sun Type
Rizaria Forest (Village Entrance)
Warp to the Village Entrance to pick up an obtainable item during our last trip here. From the camp, make a right, cross the long light bridge, then make a left. Lucil’s Specto Search will be needed to reveal a hidden bridge that will allow players to obtain the Bug Wings. Head back to the camp and warp to the Village Depths.
Rizaria Forest (Village Depths)
Exit the camp and interact with both ! to progress the story. Use the save point back at camp and switch to the real world to experience a cutscene with Rin. Afterwards its time to log back into World’s Odyssey to continue your journey.
Cross the bridge, make a right to travel over another bridge, and make a final right to reach the teleporter at the end of the path. Enter it, avoid the enemy that spawns close to you and grab the chest nearby. The chest contains 1 Lethal Bow (200 HP, 155 ATK). To the right of the chest lies 1 Dark Elf’s Guidance. Use Al’s Armo On environmental ability to safely cross the 2 poison bogs to acquire another 1 Dark Elf’s Guidance. Use the newly possessed keys to open the 2 wooden doors that leads to chests and teleporters. There will be 1 Conte Buil (600 HP, 212 ATK) behind the first wooden door and another Dark Elf’s Guidance behind the second wooden door.
Walk back to the first teleporter you passed on your way to the first wooden door and enter it. Bypass the enemy in front of you and obtain the Chaos Phonspear (300 HP, 172 ATK, 80 DEF). Open the wooden door then use Shina’s Spider Rodeo ability to reach the Vincent Magia (184 ATK, 130 DEF, 90 MAT). Jump down and enter the teleporter to the left. Travel straight to enter the next teleporter. Pick up the Dark Elf’s Guidance and take back the light blue teleporter to get back to the area with the locked wooden door and where you used Shina’s ability. Use the save point, obtain the Purple Fang Drive (166 ATK, 50 MAT) enter the teleporter to reach the next area. Take the right teleporter to create a shortcut back to the camp of Village Depths. Use this to heal up your party and save if needed. Head back to the 2 teleporter room and take the left one to create a path that leads to the last Dark Elf’s Guidance. Backtrack to the lone savepoint and open the final gate that leads to a shared graveyard. Get ready to fight 2 bosses back to back, so gear up for the challenge. Players will fight Al Astra, Lone Survivor of the Beast Clan in glitch mode.
Al Astra, Lone Survivor of the Beast Clan in Glitch Mode
Al will absolutely destroy your party if you don’t pay attention to types. Luckily its uncommon for players team to have 2 ★ Stars Types in the lead team. (Lily & Celica) Attacking her with ☾ Moon type characters and skills will cause her to auto counter your attack. Fight Al with ☀ Sun and ★ Star Types skills for the best advantage.
2154 HP 50 SP ☀ Sun Type 100% Corruption
For my party composition I used Shina, Lucil, and Celica. Have Shina use Trally Bloom, Ahewave, Achewave to power up Shina’s magic attack while dealing damage to Al. Celica should use Hone Power, Astate, Astate to power up Celica’s physical attack to deal even more damage to Al. If you want to know more about each characters strengths and weakness check out our Death End Re;Quest All Girls Guide. Defeating Al grants players 24,000 Exp, and 1 Ultra Ogre Brew.
Al Astra Redux
Players will fight Al a second time right after she was defeated first. In this fight she is more aggressive using Sol Lance often so avoid grouping your team in a circle nearby each other. I used Shina, Lucil, and Celica in a triangle-esque formation to avoid Sol Lance from injuring more than 1 girl. Celica’s triple Aster Plaza will decimate Al’s Health. If Al survives your attempts, finish her with Lucil’s triple Phoenix Ray. Defeating Al for the second time grants players 28,800 Exp, and 1 Ultra Ogre Brew.
3054 HP 50 SP ☀ Sun Type 100% Corruption
Rizaria Forest (Village Depths)
After saving Al proceed to the green teleporter and interact with the ! pick up Russian Nesting Doll. Swap to Arata in the real world and travel to the Night Owl to progress the story. Once you finish watching the cut scene, head back to World’s Odyssey. Unlock the wooden door to your left, then enter the teleporter, and interact with the ! to finish the chapter with some cutscenes. Make sure to pick up the Magenta Quartz (300 HP, 190ATK, 60 MAT, 60 MDF) before leaving the forest.
Following this guide you will have successfully saved Al and obtained the Rizaria Forest’s Terminal Stone!
In this chapter you will be able to access new shop wares, below you’ll find the items, their cost and their benefits:
Shop Wares
Patch 1.o
Costs 200 Eni
Heals 100 HP
Patch 2.o
Costs 200 Eni
Heals 300 HP
Patch 3.o
Costs 6,600 Eni
Heals 600 HP
Patch 4.o
Costs 10,000 Eni
Heals 1000 HP
Elf Tonic
Costs 600 Eni
Heals 100 SP
High-Elf Draught
Costs 5,000 Eni
Heals 999 SP
Enolef’s Ether
Costs 12,000 Eni
Heals 999 SP to those in range
Ogre Cold Brew
Costs 420 Eni
Fully revives all units within range
Panacea
Costs 100 Eni
Removes all debuffs and status effects
Bug Tentacles
Costs 50,000 Eni
Bug Wings
Costs 50,000 Eni
Bug Exuvia
Costs 50,000 Eni
Rain Sword
Costs 38,600 Eni
200 ATK, 100 MDF, 60 AGI
Limit Sword
Costs 17,200 Eni
150 ATK, 100 DEF, 60 MAT, 10 MDF
Levon Sword
Costs 12,000 Eni
145 ATK, 50 MAT, 100 MDF
Zirconia Magia
Costs 8,400 Eni
102 ATK, 40 MAT
Spinal Sword
Costs 7600 Eni
87 ATK
Calcolsmagear
Costs 600 Eni
9 ATK, 40 MAT
Petro Wing Bow
Costs 35,400 Eni
133 ATK, 60 AGI
Sister Mana Cross
Costs 36,400 Eni
111 ATK, 30 MAT, 60 MDF
Alpha Wing Bow
Costs 14,800 Eni
77 ATK, 40 AGI
White Fang Drive
Costs 11,000 Eni
100 HP, 66 ATK, 50 MAT
Alba Bow
Costs 7,400 Eni
100 HP, 66 ATK
Green Fang Drive
Costs 6200 Eni
70 HP, 33 ATK, 50 MAT
Bulti Bow
Costs 1000 Eni
150 HP, 22 ATK
Cyan Quartz
Costs 48,000 Eni
200 HP, 170 ATK, 60 MAT, 60 MDF
Grim Horn
Costs 39,000 Eni
200 HP, 166 ATK, 42 AGI
Branch Phonspear
Costs 16,800 Eni
200 HP, 132 ATK, 60 MAT, 60 MDF
Fifty Degrees
Costs 9,400 Eni
150 HP, 117 ATK, 60 DEF
Yellow Quartz
Costs 8,000 Eni
125 HP, 45 ATK, 60 MAT, 60 MDF
Sakuhon Spear
Costs 6200 Eni
50 HP 20 ATK, 60 DEF
Viostar II
Costs 26,000 Eni
150 ATK, 100 DEF, 60 MAT, 10 MDF
Goldfinger
Costs 8,400 Eni
150 SP, 180 ATK
Akari Iron
Costs 5,200
125 SP, 48 ATK
Viostar
Costs 5,200
150 SP, 5 ATK, 5 DEF
ZPS-100
Costs 5,200 Eni
100 SP, 35 ATK, 100 MAT
Passable Enze
Costs 37,000 Eni
50ATK, 110 MAT, 145 MDF, 60 AGI
Stella Evil
Costs 22,000 Eni
500 HP, 172 ATK
Dementation
Costs 19,000
200 HP, 100 ATK
Beast Fang
Costs 70,000 Eni
262 ATK
Proto Infinity
Costs 54,000 Eni
85 HP, 52 SP, 178 ATK, 45 DEF, 62 MAT, 35 MDF
Royal Buster
Costs 36,000 Eni
32 SP, 103 ATK
Magic Bracelet Lv 7
Costs 40,000 Eni
70 DEF, 140 MDF
Magic Bracelet Lv 6
Costs 31,000 Eni
60 DEF, 120 MDF
Magic Bracelet Lv 5
Costs 20,000 Eni
50 DEF, 100 MDF
Magic Bracelet Lv 4
Costs 12,000 Eni
40 DEF, 80 MDF
Magic Bracelet Lv 3
Costs 9,200 Eni
30 DEF, 60 MDF
Magic Bracelet Lv 2
Costs 5,300 Eni
20 DEF, 40 MDF
Magic Bracelet Lv 1
Costs 1,750 Eni
10 DEF, 25 MDF
Guard Bracelet Lv 7
Costs 39,000 Eni
140 DEF, 70 MDF
Guard Bracelet Lv 6
Costs 39,000 Eni
120 DEF, 60 MDF
Guard Bracelet Lv 5
Costs 28,000 Eni
100 DEF, 50 MDF
Guard Bracelet Lv 4
Costs 16,000 Eni
80 DEF, 40 MDF
Guard Bracelet Lv 3
Costs 11,000 Eni
60 DEF, 30 MDF
Guard Bracelet Lv 2
Costs 7,000 Eni
40 DEF, 20 MDF
Guard Bracelet Lv 1
Costs 3,000 Eni
25 DEF, 10 MDF
Brawn Ring
Costs 40,000 Eni
300 HP
Magic Ring
Costs 6,000 Eni
50 SP
Attack Ring
Costs 35,000 Eni
100 ATK
Will Ring
Costs 25,000 Eni
50 MAT
Defense Ring
Costs 25,000 Eni
50 DEF
Mindful Ring
Costs 7,500 Eni
50 MDF
Rapid Ring
Costs 3,000 Eni
50 AGI
Shop Sidequests
Road to Godot
Harvest 2 Godot Relic
Reward is 1 Will Ring
Elf’s Heart
Harvest 2 Elf’s Heart
Reward is 1 Magic Bracelet Level 8
Sanatheus Jewelry
Harvest 2 Sanatheus Jewel
Reward is 1 Guard Bracelet Level 9
Crimson Ash
Harvest 2 Crimson Ash
Reward is 1 Magic Bracelet Level 9
Scale It Back
Harvest 2 Scarlet Dragonscale
Reward is 1 Attack Ring
To see this guide in action see it here:
youtube
If you enjoyed our guide be sure to find out what we thought of the game in our Death End Re;Quest Review. You can also check out further guides with our Death End Re;Quest Starter Guide & Tips as well as our Death End Re;Quest Trophy Guide to learn how to platinum this game! Read our step-by-step chapter guides in Prologue Chapter 1, Chapter 2, Chapter 3, Chapter 4, Chapter 5 and Chapter 6.
The post Death End Re;Quest Chapter 7 Guide appeared first on Fextralife.
Death End Re;Quest Chapter 7 Guide published first on https://juanaframi.tumblr.com/
0 notes
Note
I’m kinda curious about Godot in your monster AU. Is it a situation like Phoenix where he was ostensibly Just A Guy before Dahlia pulled a Dahlia? The people need to know (and by people I mean just me)

Just gonna repeat what I said in the tags of one of the first SLMAU posts
Godot is a dark elf, whereas Diego was originally a wood elf. The poison / potion that was supposed to kill him put him in a coma and worked against his determination to live, turning him into a drow. This also explains why his hair is white bc dark elves have white hair
And also in D&D lore, they come from the Underdark and Godot is always talking about how he came back from Hell, so it fits
Anyways I’m accidentally causing Godot/Diego brainrot in my head and I have to do something with the ideas I have
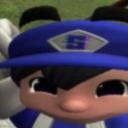
#doctorsiren#ace attorney#ace attorney au#diego armando#prosecutor godot#ace attorney fanart#silly little monster au#art#digital art#my art#fanart#procreate#his vest reminds me of the hershey’s symphony chocolate bar wrappers (i love those sm)
319 notes
·
View notes
Photo


someone reminded me godot exists, and i hadn't looked at it since before i started my previous project, at which point it was... a little young and unfinished for my tastes. but taking a lot at it again, i got the impression it would cover just about everything i needed out of an engine, and that it was worth testing out to see if i could get work done more efficiently than kivy! not that i don't love kivy, but, if it cuts down my hours of work and i can still code what i need to code, then i'm not going to say no u.u
anyway, spent two whole evenings porting assets/code over, and i'm mostly done with the migration!i got distracted along the way and started cleaning up some of the other things i was working on while i was at it, but i think for now, unless i run into issues, i'm going to stick with this engine
main updates since the last post:
palettes indicate the current selection (with two different styles for light/dark colors)
rearranged bits of the ui (probably temporarily until i figure out exactly how many options i have/want)
started cleaning up the palettes
you can find elf game on its itch page!
4 notes
·
View notes
Text
Death End Re;Quest Chapter 4 Guide
The post Death End Re;Quest Chapter 4 Guide appeared first on Fextralife.
In this Death End Re;Quest Chapter 4 Guide, I’ll be going over the path to clear the fourth area of the game and it’s boss. Death End Re;Quest is a unique RPG game that merges the typical JRPG and allows players to convert it into a fighting game, shooter, or even a slot game. There are other subtle quirks that the game possesses that will be simple to execute but difficult to master.
Death End Re;Quest Chapter 4 Guide
Upon reaching Chapter 4 of Death End Re;Quest, players leave the Outskirts and continue to the The Phantom Abyss. It will also take players to the Alhaoi Wilderness and Rizaria Forest Dominium before facing off with bosses Ripuka and Scorpia. Follow our guide to navigate the monster filled journey and not miss out on useful items!
Outskirts (Godot Ruins, The Phantom Abyss)
Upon leaving the Outskirts save point of the Godot Ruins, The Phantom Abyss follow the tree roots to the end and cross the bridge on the top right. There will be a chest tucked behind the fallen log, at the top right location containing 1 Kuwait Manacross (66 ATK, 30 MAT, 60 MDF). At the dead end path, there will be a chest containing 1 Gowen Grass. To the North there will be location where Shina’s environmental ability, Spider Rodeo, will be able to be used. Players should see a wooden scaffold-esque object and a green circle on the ground. A chest containing 1 Amethystomagear (75 ATK, 40 MAT, 80 MDF) will be the reward.
Cross the bridge and head to the left to find 5500 Eni in a chest. On the opposite side will be 1 Godot Relic inside the chest. Head inside the open gate, obtain the Odd Candlelight to the right of the tree root, and then climb up the large tree root. There will be a Beast Clan Scarf at the top of the root’s platform. Grab the key item nearby to trigger a cutscene; afterwards descend the tree root adjacent to the key item.
Make a left at the base of the root and follow the path until the end to find 1 Plas Phonspear (150 HP, 90 ATK, 60 DEF) inside a chest. Proceed back to the base of the root and make your way to the right to find the Beast Clan Coat inside the lone chest.
Head to the real world and enjoy the several cutscenes that will progress the main story further. Once that is done, head back to World’s Odyssey and continue through the large stone opening to reach the next area.
Monsters in Outskirts (Godot Ruins, The Phantom Abyss)
Epilis 2980 HP 10 SP ☾ Moon Type
Fortism 4154 HP 10 SP ☾ Moon Type
Screach 3800 HP 25 SP ★ Stars Type
Rouche 4684 HP 15 SP ☾ Moon Type
Albim 7,420 HP 15 SP ☾ Moon Type
Akamupos 1696 HP 10 SP ☀ Sun Type
Plevrie 4210 HP 10 SP ☾ Moon Type
Leepameal 3999 HP 15 SP ★ Stars Type
Epagogi 6897 HP 20 SP ☀ Sun Type
Keriapuka 3754 HP 10 SP ☾ Moon Type
Alhaoi Wilderness
Follow the path to the first open area to find 2 Patch 4.0 located inside a chest. This place has a tent area, which acts as a save point, and also has a line that will engulf players in cutscenes. There will be a Beast Clan Coat to the left and 1 Divine Elixir to the right after the cutscene area. Travel to the next section and obtain the Enolef’s Ether and the 3 Code Salve in the chests.
Rizaria Forest (Grand Tree) Dominion
In Rizaria Forest, there will be another save point and a tent that can be found to the left of the bridge. Cross the bridge to grab the Code Salve 222.0 before the cutscene. Pick up the High-Elf Tonic after the cutscene and proceed straight. There will be a wooden scaffold-esque object that players will be able to use Shina’s Spider Rodeo to obtain the Garenasnal Magia. To the left of this structure there will be 6,500 Eni and the Elf’s Guidance. Collect the Elven Dust just before the ! then use the Elf’s Guidance to cross the gap. There will be a Beast Clan Coat and ! to receive a cutscene. From there, pick up the Code Salve tucked in the corner and approach the 4 teleporters.
Take the left teleporter to see more cutscenes, then proceed to activate the second teleporter. Don’t miss out on the Japanese Doll, the item inside the chest. Take the teleporter back and enter through the newly activated portal. Use Clea’s Avalanche environmental skill to remove the door blocking passage to the Dark Horn. Investigate the key item to have roots create a bridge to a purple teleporter. Don’t enter it right away as there is a Ancient Branch to be acquired in a chest. Proceed through the teleporter and re-trace your steps to then activate the third teleporter.
Enter through the third teleporter, investigate the key item to cross the newly formed bridge allowing passage through the final teleporter. This will take players just outside Lucil’s village but first head to the real world as Arata.
Monsters in Rizaria Forest
Ilbe Agnortia 6560 HP 20 SP Stars Type
Waylo 3240 HP 15 SP ★ Stars Type
Tudei 3254 HP 15 SP ☾ Moon Type
Enamono 4954 HP 15 SP ★ Stars Type
Lowlowdei 8287 HP 15 SP ★ Stars Type
Eelbauna 5487 HP 15 SP ★ Stars Type
Enabens 8874 20 SP ☾ Moon Type
Treeper 2480 HP 20 SP ☀ Sun Type
Bugrian Sphere 10 HP 20 SP ☀ Sun Type
Omorruffy 12,400 HP 15 SP ★ Stars Type
Rizaria Forest (Village Entrance)
After the cutscenes, enter the village, and be sure to save at this point. Obtain 1 Code Salve before seeing the cutscenes. Follow the only path in the village picking up 1 Code Salve 2.0 and entering the teleporter adjacent. Inside there will be 1 Red Quartz. Pick up the Elf’s Heart outside the blue teleporter and enter it. Grab the Weird Key, then enter the teleporter which will lead you back to the first key item we couldn’t interact with. Now with the Weird Key in hand, a light bridge will appear. 1 Croatation inside the lone chest will appear before the cutscene. After the cutscene has finished, there will be 1 Ancient Branch and 3,333 Eni.
Enter the blue teleporter, turn around to the left to obtain 1 Code Salve 2.0. Follow the path to the next area while picking up the 1 Enolef’s Ether before getting ready to fight Ripuka.
Mini-boss: Ripuka, The Slaughterer
While Ripuka’s stats look weak compared to other bosses found in Deaths End Re;Quest, she is a force to be reckoned with. Her defensive stats seem to be extremely high, or it could be the game is giving her some God like Armor. Regardless, players have 2 choices in this fight: lose on purpose or wait out several turns to fight another boss.
6,666 HP, 20 SP, ★ Stars Type
Ripuka will target Shina so its imperative to have all girls triple guarding. Despite triple guarding Shina, it may not be enough, but the goal is to prolong the amount of turns so the fight can be finished. The better your team fares in the Ripuka fight, the higher chance of success in the next fight.
Ripuka’s Attacks
Execution Hymn (★ Stars Type)
Gravity Smash (★ Stars Type)
Players will fight the Chapter 4 boss, Scorpia right after the fight with Ripuka, so be prepared.
Boss: Scorpia
Scorpia will be an extremely powerful Entoma Queen on Hard Mode since players will have to fight this boss right after fighting surviving Ripuka. Take the first turn to heal your Shina and any other party members. The team role I used was Shina, Clea, and Al. Shina’s and Clea’s type advantage will be able to deal heavy damage to Scorpia and Al’s tanky-ness will help her survive and deal damage. If you want to know more about each characters strengths and weakness check out our Death End Re;Quest All Girls Guide.
Shina’s attacks should consist of:
Lunamispolo
Lunamissimo
Al’s attacks should consist of:
Sol Lance
Sol Spear
Clea’s attacks should consist of:
Moon Laser
Blue Bullet
200,222 HP, 50 SP, ☀ Sun Type
If players use the most powerful attacks I have listed above, it would only be possible for 1-2 turns as those skills require a lot of mana, and/or is combined with low SP pool. We will counter that issue by summoning Ephemera because due to Ephemera’s special effect, the girls’ max SP pool is increased by 30%. It also recovers their SP, something that’s not listed.
Avoid using Lily to deal any damage as Scorpia counter attacks her often. Avoid putting all the girls in a close circular proximity as Scorpia has a tendency to use Scorpia’s Code, which is a wide ☀ Sun Type AOE attack.
Defeating Scorpia grants players 29,760 Exp, 8,000 Eni, and 1 Ultra Ogre Brew.
In this chapter you will be able to access new shop wares, below you’ll find the item, their cost and their benefit:
Shop Wares
Patch 1.o
Costs 200 Eni
Heals 100 HP
Patch 2.o
Costs 200 Eni
Heals 300 HP
Elf Tonic
Costs 600 Eni
Heals 100 SP
High-Elf Draught
Costs 5,000 Eni
Heals 999 SP
Enolef’s Ether
Costs 12,000 Eni
Heals 999 SP to those in range
Ogre Cold Brew
Costs 420 Eni
Fully revives all units within range
Panacea
Costs 100 Eni
Removes all debuffs and status effects
Levon Sword
Costs 12,000 Eni
145 ATK, 50 MAT, 100 MDF
Zirconia Magia
Costs 8,400 Eni
102 ATK, 40 MAT
Spinal Sword
Costs 7600 Eni
87 ATK
Calcolsmagear
Costs 600 Eni
9 ATK, 40 MAT
Alpha Wing Bow
Costs 14,800 Eni
77 ATK, 40 AGI
White Fang Drive
Costs 11,000 Eni
100 HP, 66 ATK, 50 MAT
Alba Bow
Costs 7,400 Eni
100 HP, 66 ATK
Green Fang Drive
Costs 6200 Eni
70 HP, 33 ATK, 50 MAT
Bulti Bow
Costs 1000 Eni
150 HP, 22 ATK
Fifty Degrees
Costs 9,400 Eni
150 HP, 117 ATK, 60 DEF
Yellow Quartz
Costs 8,000 Eni
125 HP, 45 ATK, 60 MAT, 60 MDF
Sakuhon Spear
Costs 6200 Eni
50 HP 20 ATK, 60 DEF
Akari Iron
Costs 5,200
125 SP, 48 ATK
Viostar
Costs 5,200
150 SP, 5 ATK, 5 DEF
ZPS-100
Costs 5,200 Eni
100 SP, 35 ATK, 100 MAT
Dementation
Costs 19,000
200 HP, 100 ATK
Magic Bracelet Lv 4
Costs 12,000 Eni
40 DEF, 80 MDF
Magic Bracelet Lv 3
Costs 9,200 Eni
30 DEF, 60 MDF
Magic Bracelet Lv 2
Costs 5,300 Eni
20 DEF, 40 MDF
Magic Bracelet Lv 1
Costs 1,750 Eni
10 DEF, 25 MDF
Guard Bracelet Lv 4
Costs 16,000 Eni
80 DEF, 40 MDF
Guard Bracelet Lv 3
Costs 11,000 Eni
60 DEF, 30 MDF
Guard Bracelet Lv 2
Costs 7,000 Eni
40 DEF, 20 MDF
Guard Bracelet Lv 1
Costs 3,000 Eni
25 DEF, 10 MDF
Brawn Ring
Costs 40,000 Eni
300 HP
Magic Ring
Costs 6,000 Eni
50 SP
Attack Ring
Costs 35,000 Eni
100 ATK
Will Ring
Costs 25,000 Eni
50 MAT
Defense Ring
Costs 25,000 Eni
50 DEF
Mindful Ring
Costs 7,500 Eni
50 MDF
Rapid Ring
Costs 3,000 Eni
50 AGI
Shop Sidequests
Tale of Triumph IV
Subjugate/destroy 2 Tudei
Reward is 1 Rapid Ring
Dust Reserves
Harvest 1 Elven Dust
Reward is 1 Magic Bracelet Level 3
Sanatheus Stone
Harvest 1 Sanatheus Stone
Reward is 1 Guard Bracelet Level 4
Following this guide you will have successfully defeated Scorpia!
To see this guide in action see it here:
youtube
If you enjoyed our guide be sure to find out what we thought of the game in our Death End Re;Quest Review. You can also check out further guides with our Death End Re;Quest Starter Guide & Tips as well as our Death End Re;Quest Trophy Guide to learn how to platinum this game! Read our step-by-step chapter guides in Prologue Chapter 1, Chapter 2 and Chapter 3.
The post Death End Re;Quest Chapter 4 Guide appeared first on Fextralife.
Death End Re;Quest Chapter 4 Guide published first on https://juanaframi.tumblr.com/
0 notes