#GDS result PDF
Explore tagged Tumblr posts
Text
Updating... The Tattooer (ver. 3.4)!
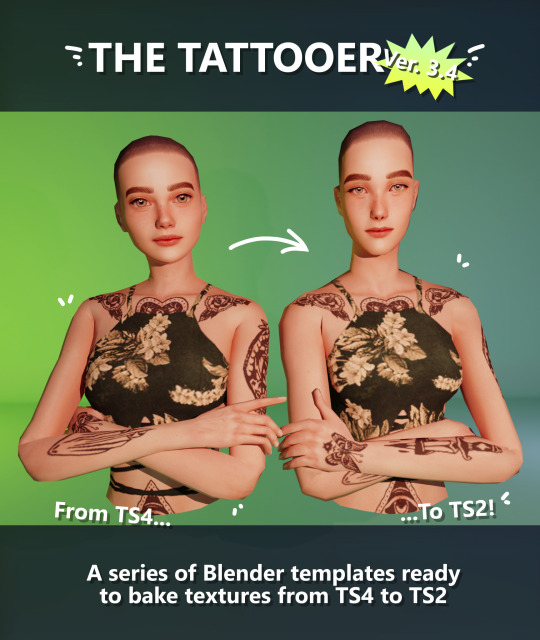
Finally! Took me a while, huh. This is the updated version of the Tattooer project. It skips some steps, making the workflow much, much faster! Huge thanks to @applewatersugar for his suggestion on how to bake textures while preserving the transparency. This is kind of a repost of the original Tattooer post, but it actually has some new stuff and a few changes here and there, so please take a look if you want to learn how to use this new version.
This is a series of Blender template files already set up to quickly bake textures from The Sims 4 to The Sims 2. The different Blender files will allow you to: -Bake body textures from TS4 to TS2 (Female) -Bake body textures from TS4 to TS2 (Male) -Bake body textures from TS4 (Female) to TS2 (Male) -Bake body textures from TS2 (Female) to TS2 (Male) [Bonus!] -New! Bake face textures from TS4 to TS2 (Unisex) [Bonus!] -Bake head textures from TS4 to TS2 (Face + Scalp) (Unisex) [Still experimental] Check the file names to see which one is which, and the resolution of the baked texture it will give. Everything you see in the render above was 100% converted using those Blender files.
Download here! SFS / GD
Update: Version 3.4.1 (27/08/2023) Fixed some issues on the shoulders for the AF-body-4t2-1024 and AF-body-4t2-2048 templates. Now the top straps on most converted underwear/swimwear should look right.
Update: Same version (13/12/2023) As requested, added a new spanish version of the included pdf guide!
These templates were made mainly to bake and convert tattoos, but there’s more you can do with them if you get creative. I have to say, these are NOT perfect. Results may vary depending on what you are trying to convert, so! With that in mind, this is all the stuff you will be able to convert almost seamlessly from TS4 to TS2: -Tattoos. -Other body details such as body hair, scars, freckles, supernatural/occult details… -Body painted underwear and swimwear, as well as some other clothing that’s mostly painted on the body. -Socks, stockings and maybe leggings. -Even skintones! In some areas they will look weird, so I recommend editing and blending them with other existing TS2 skins. -Makeup, eyebrows and beards. In the old version this was just a proof of concept, but now I’ve added a new Face file template which gives some pretty decent results! -Hair scalps. Very useful when converting some hairs! Although keep in mind part of that texture might also need to be baked on the face mesh, you know, that hairline makeup stuff.
Got your attention? Nice! Editing some of the textures from TS4 to match the UV mapping in TS2 using a 2D editing program can be incredibly hard. That’s where texture baking in Blender comes to the rescue!
You will need to download Blender, at least version 3.4, but you could always use a newer version. It is only incompatible with versions older than 3.4. -You can download Blender for free here. -You will also need Sims 4 Studio to extract the original Sims 4 CC textures you want. In the first version of these Blender files, there was a necessary step using Photoshop, but that’s no longer needed. However, there’s still a tiny extra step which requires resizing the newly baked texture on some of the high resolution templates, so you might need a 2D editing program like Photoshop. More on that later.
So, before we begin, let’s clear out some questions you might have. What the heck is this texture baking thing and what does it do? Well, let’s imagine you have a video projector and point an image into a blank wall. Then you pick up some brushes and start painting and copying that projected image in that wall. Texture baking is kinda like that when it comes to 3D models. You align two models and match them as closely as you can in shape and form, and once you adjust some parameters and values, Blender does the rest for you: it will give you a new texture for a new model with a different UV map. These files I’m sharing have everything already set up, so it’s a matter of plopping in that Sims 4 texture and you will get that new texture for TS2 in just a few clicks.
This tutorial assumes you know literally nothing about how to use Blender, so if you feel uncomfortable with it, worry no more! This will guide you with pictures showing where you need to click and explaining what is happening. For Sims 4 Studio and Photoshop the process might be a bit less detailed, but still this should be pretty beginner friendly. For this tutorial, I will use some tattoos as an example (properly credited at the end of the post). Alright, enough with the rambling. Let’s get started!
·EXTRACTING TEXTURES IN SIMS 4 STUDIO: First things first, you will need to extract as pngs all the textures you want to convert from TS4 using Sims 4 Studio. It should be pretty straightforward. Just open the packages and export the Diffuse textures. Keep them organized in a folder for easy access.
·BAKING THE TEXTURES IN BLENDER: PRELIMINARY STEP 1: CONFIGURING BLENDER’S GRAPHICS SETTINGS: Open your preferred Blender file depending on what you’re going to bake and the desired resolution (in this example I’m going to use the AF-body-4t2-1024 file). Before we start messing around in Blender, there’s one thing you should set up. It is a onetime step, and once it’s done, you won’t need to do it again. So, does your computer have a dedicated graphics card? If you don’t know or you’re not sure, just skip to the next step. Configuring Blender so it uses your graphics card instead of your CPU will make the baking render much faster, so it is recommended you set it up correctly. If your computer has a dedicated graphics card, click File (1) > Preferences (2) > and on the window that pops up click System (3) > and select CUDA and make sure your graphics card is there and tick it (4). I have an Nvidia Graphics card but your case may vary. Once you’re done, click on the tiny button on the bottom left corner and Save Preferences (5).
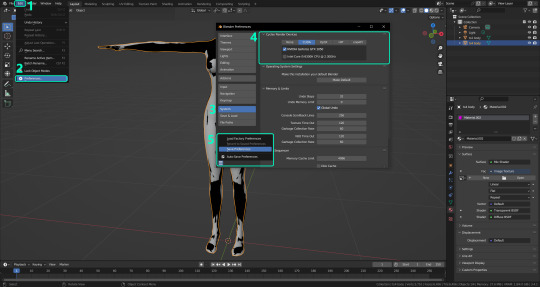
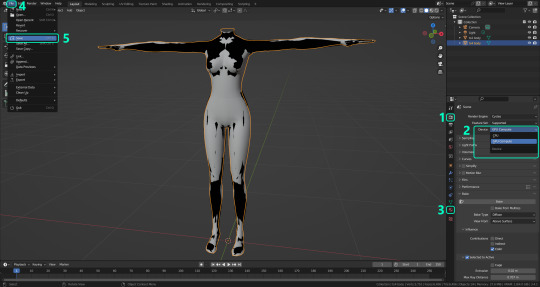
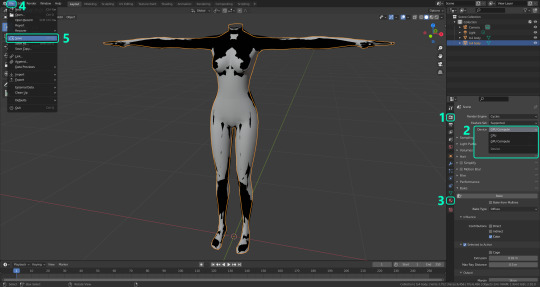
PRELIMINARY STEP 2: CHOOSING THE RENDERING DEVICE: Click on the tiny camera button on the right, called Render Properties (1), and on Device (2) select GPU Compute if it’s not already selected. If you’re not sure if you have a graphics card or not, just select CPU. Then select the Material Properties tab (3) and Save your changes, either by pressing Ctrl + S, or clicking File (4) > Save (5). You might need to do this second step with the other Blender files, but once you have it done and saved, you won’t need to do this again. Okay, time to get into the good stuff!
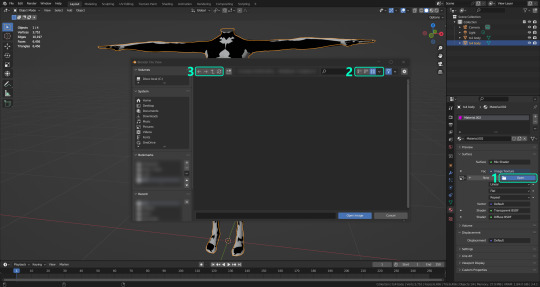
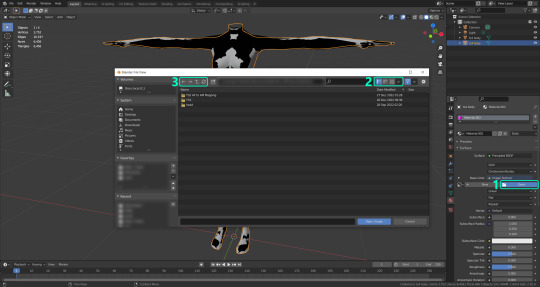
·STEP 1: LOADING YOUR TS4 BASE TEXTURE: In the Material Properties tab, click the folder icon that says Open (1) and on the window that pops up, navigate through your folders and select your first texture. To navigate easily, the 3 buttons on the top right (2) are for the display mode. They will show your files in list mode, vertical and horizontal, and the one on the right will display the file thumbnails, pretty useful if you want to easily preview your textures here. The icons on the left side (3) will let you go one folder back and forward, go to the parent directory, and refresh the folder in case you just dropped something new in there. Double click on the image you need and that will load the texture into the Sims 4 body model, named “ts4 body”.
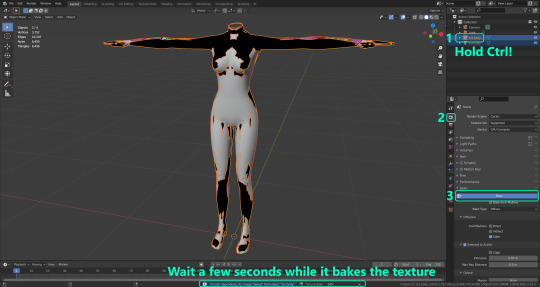
·STEP 2: SETTING UP YOUR SELECTION AND BAKING THE TEXTURE: On the top right of the screen, you will see the names of the 2 models in the scene. Hold the Ctrl key in your keyboard and left click on the “ts2 body” model (1). If you did it correctly, you should see “ts2 body” in a yellowish orange color, and right down below, “ts4 body” should look more like a red orange. If not, try again by clicking first on ts4 body, and then while holding Ctrl click again on ts2 body. Then switch to the Render Properties tab by clicking the tiny camera icon (2) and click Bake (3). Depending on your screen resolution, you might need to scroll down a bit with your mouse to see the Bake button. Wait a few seconds for it to finish. You will see the progress percentage down on the bottom of your screen. Don’t panic if you notice your computer fans start ramping up, that’s completely normal! As I said in the beginning, using your GPU will bake the textures much faster than the CPU.

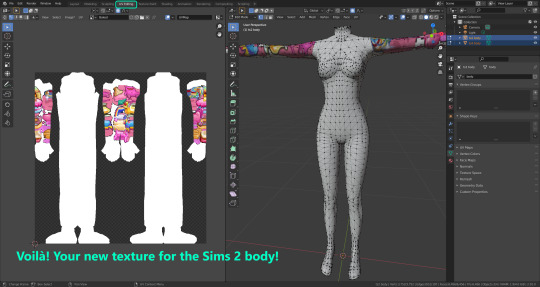
·STEP 3: SAVING YOUR NEW TS2 TEXTURE: Once it’s finished, switch to the UV Editing Mode by clicking “UV Editing” on the top of your screen. And there it is: your new texture! You might have to scroll up your mouse wheel a bit to zoom in and see it in all its glory on the left side of the screen. We’re still not done yet though. You need to save it to yet another new folder (always try to keep your stuff organized!).
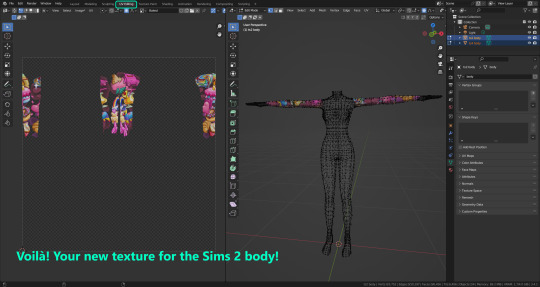
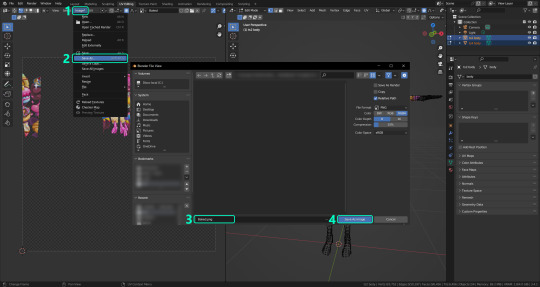
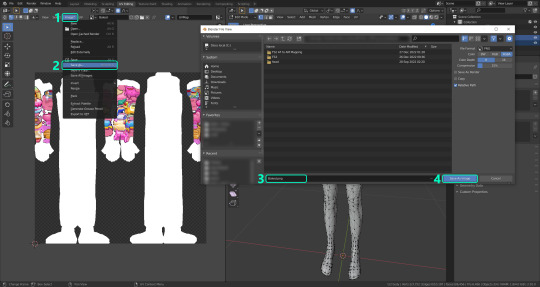
You can save it by pressing Shift + Alt + S, or clicking on Image* (1) and then Save As… (2). That will pop a window where you’ll need to navigate again and save it somewhere. Give it a proper name (3) and hit Enter to save it… well, Enter doesn’t always work for me for some reason, so if that happens just click Save As Image (4). And that’s it! You’ve successfully converted your baked texture. Congrats!
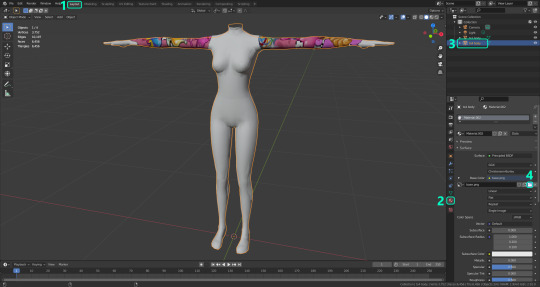
·STEP 4: GOING BACK TO STEP 1: Alright! If you’re done with your textures, you can close Blender without saving and call it a day. But let’s say you want to keep baking other swatches. In order to go back to step 1 and start the process once again, click Layout (1), go back to the Material Properties tab (2), select “ts4 body” (3) and click on the folder icon (4) to open and load your next swatch.
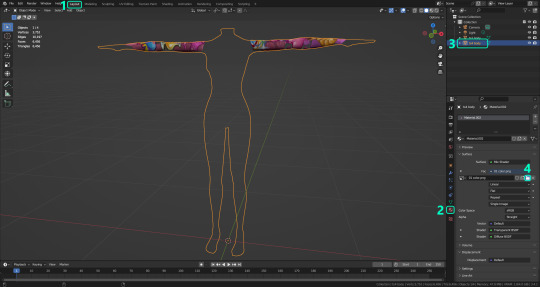
Then it’s just a matter of repeating the process from step 2. When you’re ready to move on, close Blender without saving. If you see a small check telling you it will save some images, make sure you uncheck it, so you will be able to use it again in the future from the starting point with no issues. I don’t think it really matters if you accidentally save your progress in these files, but I like to keep it clean and fresh so I can do the process where I left it from the beginning next time I open it. And in case you mess up and save somewhere, you can always just delete the .blend file and download the template files again.
In case you’d like a video tutorial on how to use these files, the amazing @platinumaspiration recorded this fantastic video showcasing the process! You can watch it here.
One final note: some of the baking .blend files save the textures with a resolution of 2048x2048 pixels, as clearly stated at the end of their file name. That’s way too overkill, because TS2 only properly supports up to 1024x1024 for most of its textures and you should always resize your final product to that max resolution (or lower if needed). I just made those 2048 versions because there might be some really tiny and slim details on some tattoos that might look a little too blurry when baked into a 1024 resolution texture, so for those cases use that if you want and then resize them using your 2D editing software of choice. In Photoshop, in the Resample mode of the Image Size menu, there are a few options to choose. For the fine details, I like the Nearest Neighbor (hard edges) option, which, even if it looks a bit pixelated, it still preserves most of the texture and quality.

For anything else, I would just directly bake them using the 1024 versions in Blender (512 for the face and scalp).
And for the folks who feel comfortable playing around in Blender, this is just the beginning! Texture baking opens a LOT of possibilities, so feel free to move stuff around and edit the models to your liking! If you notice the baked textures look warped or stretched somewhere, or don’t like where some textures are placed in the S2 body, poke around that area moving stuff and then give it another try. The main objective of the baking process is keeping both overlapping models as close in shape as possible. You may also edit and save new copies of the templates, or make new ones from scratch using mine as a reference (keep a close look on those Baking settings and values, I think they work pretty well) and share them if you want to. Go ham, do whatever you want with them! I still have plans on making templates to convert body textures from Sims 3 to Sims 2, but for now it’s not on my priorities, so we’ll see when that happens.
Whew! Hope none of this was too confusing. Need help or have any issues with these? Please ask/message me here and I’ll be glad to help when I’m able to!
Credits for the CC used in the render demonstration: -Skin by Sims3Melancholic. -Eyes by Northern Siberia Winds. -Eyebrows by PeachyFaerie. -Tattoos by xtc. -Top by SerenityCC. And the Tattoo I used for the tutorial can be found here, by ValhallanSim.
Last but not least, a huge thanks to all the people who somehow contributed to make this project and update possible, either by doing initial testing, finding issues to fix, or teaching me new Blender tricks to make the workflow way faster and easier. So thanks again to @elvisgrace @moyokeansimblr and @applewatersugar on Tumblr! <3
And thank you for reading! Hope you have fun playing with this (not so) new toy hehe.
#tattooer project#tattooer update#ts2 tutorial#ts2 resources#ts2 blender#ts2 overlays#ts2 texture baking#4t2 conversion tutorial#this took me so LONG to update#im really sorry for the delay :(
381 notes
·
View notes
Text
Overview of Veterinary Reference Laboratories: Functions and Importance
The veterinary reference laboratory market plays a crucial role in providing accurate and comprehensive diagnostic services for animals. Veterinary reference laboratories are specialized facilities that offer a wide range of diagnostic tests and services to veterinarians, researchers, and livestock producers. These laboratories are equipped with advanced technologies and expert professionals who perform complex tests to identify diseases, monitor animal health, and ensure the quality of animal-derived products.
According to the World Organization for Animal Health (OIE), animal diseases are responsible for significant economic losses and pose risks to human health. The OIE estimates that livestock diseases cause an economic impact of around $300 billion annually. Furthermore, the United States Department of Agriculture (USDA) reports that the global demand for animal products is expected to increase by 70% by 2050, driving the need for robust and reliable diagnostic services to ensure animal health and the quality of food products.
The global veterinary reference laboratory market size is expected to reach USD 10.2 Billion in 2032 and register a revenue CAGR of 9.4% during the forecast period, according to latest analysis by Emergen Research. There are several key drivers contributing to the growth of the veterinary reference laboratory market. Firstly, the increasing prevalence of animal diseases, both infectious and non-infectious, has created a need for accurate and reliable diagnostic services. Veterinary reference laboratories provide specialized testing capabilities, including serology, pathology, microbiology, and molecular diagnostics, which aid in the detection and monitoring of various diseases in animals. Additionally, the growing demand for livestock products and the increasing pet population have resulted in a higher requirement for diagnostic services to ensure the health and well-being of animals.
Get Download Pdf Sample Copy of this Report@ https://www.emergenresearch.com/request-sample/1940
Competitive Terrain:
The global Veterinary Reference Laboratory industry is highly consolidated owing to the presence of renowned companies operating across several international and local segments of the market. These players dominate the industry in terms of their strong geographical reach and a large number of production facilities. The companies are intensely competitive against one another and excel in their individual technological capabilities, as well as product development, innovation, and product pricing strategies.
The leading market contenders listed in the report are:
IDEXX, VCA Animal Hospitals, GD, Greencross Vets, Zoetis Services LLC, Neogen Corporation, Abbott, Siemens Healthcare GmbH, Kansas State University, LABOKLIN GMBH & CO. KG
Key market aspects studied in the report:
Market Scope: The report explains the scope of various commercial possibilities in the global Veterinary Reference Laboratory market over the upcoming years. The estimated revenue build-up over the forecast years has been included in the report. The report analyzes the key market segments and sub-segments and provides deep insights into the market to assist readers with the formulation of lucrative strategies for business expansion.
Competitive Outlook: The leading companies operating in the Veterinary Reference Laboratory market have been enumerated in this report. This section of the report lays emphasis on the geographical reach and production facilities of these companies. To get ahead of their rivals, the leading players are focusing more on offering products at competitive prices, according to our analysts.
Report Objective: The primary objective of this report is to provide the manufacturers, distributors, suppliers, and buyers engaged in this sector with access to a deeper and improved understanding of the global Veterinary Reference Laboratory market.
Emergen Research is Offering Limited Time Discount (Grab a Copy at Discounted Price Now)@ https://www.emergenresearch.com/request-discount/1940
Market Segmentations of the Veterinary Reference Laboratory Market
This market is segmented based on Types, Applications, and Regions. The growth of each segment provides accurate forecasts related to production and sales by Types and Applications, in terms of volume and value for the period between 2022 and 2030. This analysis can help readers looking to expand their business by targeting emerging and niche markets. Market share data is given on both global and regional levels. Regions covered in the report are North America, Europe, Asia Pacific, Latin America, and Middle East & Africa. Research analysts assess the market positions of the leading competitors and provide competitive analysis for each company. For this study, this report segments the global Veterinary Reference Laboratory market on the basis of product, application, and region:
Segments Covered in this report are:
Technology Outlook (Revenue, USD Billion; 2019–2032)
Clinical Chemistry
Hematology
Immunodiagnostics
ELISA
Lateral Flow Rapid Tests
Others
Molecular Diagnostics
PCR
Microarrays
Others
Others
Application Outlook (Revenue, USD Billion; 2019–2032)
Clinical Pathology
Toxicology
Productivity Testing
Others
Animal Type Outlook (Revenue, USD Billion; 2019–2032)
Production Animals
Companion Animals
Browse Full Report Description + Research Methodology + Table of Content + Infographics@ https://www.emergenresearch.com/industry-report/veterinary-reference-laboratory-market
Major Geographies Analyzed in the Report:
North America (U.S., Canada)
Europe (U.K., Italy, Germany, France, Rest of EU)
Asia Pacific (India, Japan, China, South Korea, Australia, Rest of APAC)
Latin America (Chile, Brazil, Argentina, Rest of Latin America)
Middle East & Africa (Saudi Arabia, U.A.E., South Africa, Rest of MEA)
ToC of the report:
Chapter 1: Market overview and scope
Chapter 2: Market outlook
Chapter 3: Impact analysis of COVID-19 pandemic
Chapter 4: Competitive Landscape
Chapter 5: Drivers, Constraints, Opportunities, Limitations
Chapter 6: Key manufacturers of the industry
Chapter 7: Regional analysis
Chapter 8: Market segmentation based on type applications
Chapter 9: Current and Future Trends
Request Customization as per your specific requirement@ https://www.emergenresearch.com/request-for-customization/1940
About Us:
Emergen Research is a market research and consulting company that provides syndicated research reports, customized research reports, and consulting services. Our solutions purely focus on your purpose to locate, target, and analyse consumer behavior shifts across demographics, across industries, and help clients make smarter business decisions. We offer market intelligence studies ensuring relevant and fact-based research across multiple industries, including Healthcare, Touch Points, Chemicals, Types, and Energy. We consistently update our research offerings to ensure our clients are aware of the latest trends existent in the market. Emergen Research has a strong base of experienced analysts from varied areas of expertise. Our industry experience and ability to develop a concrete solution to any research problems provides our clients with the ability to secure an edge over their respective competitors.
Contact Us:
Eric Lee
Corporate Sales Specialist
Emergen Research | Web: www.emergenresearch.com
Direct Line: +1 (604) 757-9756
E-mail: [email protected]
Visit for More Insights: https://www.emergenresearch.com/insights
Explore Our Custom Intelligence services | Growth Consulting Services
Trending Titles: Geocell Market | Pancreatic Cancer Treatment Market
Latest Report: Ceramic Tiles Market | Life Science Analytics Market
0 notes
Text
Rajasthan Police Constable Result 2024 Announced: District-Wise Links Available for All Candidates
Rajasthan Police Constable Result 2024 Announced: District-Wise Links Available for All Candidates: The Rajasthan Police Constable Result 2024 District-Wise has been officially released for the candidates who appeared in the CBT exam held earlier this year. Candidates can now check their results district-wise on the official website of Rajasthan Police. This result is an important step for those who want to join the police force, as it determines the eligibility for further stages like Physical Efficiency Test (PET) and Document Verification (DV).
District-Wise Rajasthan Police Constable Result 2024 Links
The Rajasthan Police Recruitment Exam is one of the most awaited exams for candidates looking to become constables, and the results have been made available online for all districts to ensure a smooth process. Whether you are from Jaipur, Alwar or Udaipur, you can now check your result directly through the district-specific link given below. How to Check Rajasthan Police Constable Result 2024 To make it easy for candidates, the Rajasthan Police Constable Result 2024 has been released on a district-wise basis. Follow these steps to check your result: - Visit the official website of Rajasthan Police: Go to the official website or search for "Rajasthan Police Constable Result 2024" on Google for direct links. - Select your district: The result is organized by district. You’ll need to select the district where you appeared for the exam, such as Ajmer, Alwar, or Jaipur. - Download the result PDF: Once you find your district, click on the result link, which will open a PDF file. Scroll through the list to find your roll number. - Check your result: Ensure that your roll number is present in the list to confirm your selection for the next phase of the recruitment process. Rajasthan Police Constable Result 2024: Important Details Rajasthan Police Constable Exam 2024 was conducted to fill thousands of constable vacancies in various districts of Rajasthan. These vacancies included the posts of General Duty (GD) Constable, Driver and other specialized roles. Candidates who cleared the CBT exam will now proceed to the PET and DV stages. For each district, the result also shows the roll numbers of the qualified candidates as well as details about the next stages, which include the Physical Efficiency Test (PET) and Document Verification (DV). Selected candidates should stay updated on the official website for the latest announcements about these stages. Rajasthan Police Constable District-Wise Result 2024: District-Wise Links Below is a table listing the district-wise links for the Rajasthan Police Constable Result 2024. You can easily click on the link for your district and check your results. DistrictResult LinkAjmerDownload HereAlwarDownload HereBanswaraDownload HereBaranDownload HereBarmerDownload HereBharatpurDownload HereBhilwaraDownload HereBhiwadiDownload HereBikanerDownload HereBundiDownload HereChittorgarhDownload HereCID IBDownload HereDausaDownload HereDholpurDownload HereDungarpurDownload HereGRP AjmerDownload HereHanumangarhDownload HereJaipur CommissionerateDownload HereJaipur RuralDownload HereJaisalmerDownload HereJaloreDownload HereJhalawarDownload HereJhunjhunuDownload HereJodhpur CommissionerateDownload HereKarauliDownload HereKota CityDownload HereKota RuralDownload HereNagaurDownload HerePaliDownload HerePolice TelecommunicationDownload HereRajsamandDownload HereShri GanganagarDownload HereSikarDownload HereSirohiDownload HereTonkDownload HereUdaipurDownload Here
Rajasthan Police Constable Recruitment: Important Links
EventsImportant LinksResultCBT Result 2024CBT Result (04-09-2024)NoticeCBT Hall Ticket (07-06-2024)Click HereCBT Exam Date (20-04-2024)Click HerePET/ PST Result Released (29-02-2024)Click HerePET/ PST Admit Card (20-12-2023)Link 1 | Link 2New PET/ PST Exam Date (12-12-2023)Click HerePET/ PST Exam Date (13-11-2023)Click HerePET/ PST Test Postponed (18-10-2023)Click HerePET/ PST Test Date (04-10-2023)Click HereError Correction Notice (26-08-2023) Click HereApply Online Rajasthan Police (07-08-2023)Click HereNotificationClick HereOfficial WebsiteRajasthan Police Official Website What Happens Next After the Rajasthan Police Constable Result?

Rajasthan Police Constable Result 2024 Announced Candidates who qualify the CBT exam will proceed to the Physical Efficiency Test (PET) and Document Verification (DV). It is important to be prepared for these next stages as the competition is tough. Keep all the necessary documents ready for verification and make sure you meet the physical standards prescribed by the Rajasthan Police Recruitment Board. PET will test the physical ability of the candidates and this will be followed by DV process in which educational certificates, caste certificates and other important documents will be checked. Stay tuned to the Rajasthan Police official website for further updates regarding the PET and DV schedule.
Frequently Asked Questions
1. What is the official website to check the Rajasthan Police Constable Result 2024?The official website to check the result is www.police.rajasthan.gov.in.2. Can I check my result district-wise?Yes, Rajasthan Police Constable Result 2024 is released on a district-wise basis. You can find the links for each district in the table above.3. What are the next steps after clearing the CBT exam? After passing the CBT, candidates will have to proceed to the Physical Efficiency Test (PET) and Document Verification (DV). Make sure to prepare for these next steps. By following this detailed guide, you will have all the necessary information to navigate the result-checking process and prepare for the next steps in Rajasthan Police Constable Recruitment. Read the full article
0 notes
Text
Agniveer Army Book
Prepare for the exam with confidence using our collection of top rated Agniveer Army books. The source for best study materials including textbooks, sample papers, mocktests, guides, free download pdf etc. The best way to pass the Agniveer exam is with the help of Agniveer Coaching classes. We provide latest updates on Agniveer Army recruitment, including results, salary details, and selection process that can help Agniveer GD, Clerk, Tradesman and technical aspirants. Visit our website for all your agniveer scheme recruitment updates!

#agniveer coaching in dehradun#agniveer female recruitment#agniveer scheme#agniveer army#agniveer army salary#agniveer army syllabus
0 notes
Text
India Post GDS Result 2023 Merit List 2 - महाराष्ट्र GDS July Cycle 2023 चा निकाल जाहीर
How to download GDS Result 2023 Merit List 2 निकाल कसा डाउनलोड करावे?
सर्वप्रथम या https://indiapostgdsonline.gov.in/ दिलेल्या लिंक वर जा.
उमेदवाराच्या कोपऱ्यातील मुख्यपृष्ठाच्या डाव्या बाजूला, "शॉर्टलिस्ट केलेल्या उमेदवारांची यादी" शोधा.
तुम्ही ज्या सरकल अर्ज केला आहे ते निवडा.
तुमच्या सरकलसाठी GDS गुणवत्ता यादी 2023 PDF आणि GDS निकाल डाउनलोड करा.
Read more
0 notes
Text
0 notes
Text
SSC GD Result 2023, Final Merit List and Cutoff PDF Download
SSC GD Final Result 2023; Staff Selection Commission (SSC) Declared the Final Result for the Constable (GD) in CAPFs, SSF, Rifleman (GD) in Assam Rifles and Sepoy in Narcotics Control Bureau Examination, 2022 on 20 August 2023. Staff Selection Commission conducted Constable (GD) in CAPFs, SSF, Rifleman (GD) in Assam Rifles and Sepoy in Narcotics Control Bureau Examination, 2022 from 10.01.2023 to…
View On WordPress
0 notes
Text
SSC GD Constable Final Result 2023: Download SSC Constable GD Merit List PDF इतने कम नंबर पर भी सभी का हो गया चयन
SSC GD Constable Final Result 2023: The Staff Selection Commission (SSC) has declared the final result for the SSC GD Constable 2022 examination today, August 20, 2023. Candidates can download the SSC GD Constable Final Result 2023 by visiting the official website of the Commission at ssc.nic.in. The Commission conducted Constable (GD) in CAPFs, SSF, Rifleman (GD) in Assam Rifles and Sepoy in…

View On WordPress
0 notes
Text
Indian Post GDS 5th Merit List 2023 : ગુજરાત પોસ્ટ GDS પાંચમું મેરીટ લીસ્ટ જાહેર, તમારું નામ ચેક કરો અહીંથી
Indian Post GDS 5th Merit List 2023 : pdf ડાઉનલોડ , ગુજરાત પોસ્ટ GDS ભરતી ઉમેદવારોનુ ચોથું મેરીટ લીસ્ટ જાહેર : ગુજરાત ગ્રામીણ ડાક સેવક રીઝલ્ટ 2023 : GDS પરિણામની રાહ જોઈ રહેલા ઉમેદવારો માટે એક મોટું અપડેટ છે. ઈન્ડિયા પોસ્ટ ગ્રામીણ ડાક સેવક (GDS) પોસ્ટ્સની ભરતી માટે 5th મેરિટ લિસ્ટ જાહેર. જો તમે પણ આ ભરતી માટે અરજી કરી છે, Indian Post GDS Result 2023, તો તમે ઈન્ડિયા પોસ્ટની સત્તાવાર વેબસાઈટ પર…

View On WordPress
0 notes
Text
The poll ended, and here are the results and my opinions:
1. "Brandon Urie being hated because of how current P! Music sounds like":
-To be honest, thank god that Y'ALL picked this one.
Brandon does NOT deserve this amount of hate.
You might hate/deslike pry for the wicked and Viva Las vengeance? Yeah, that's fine. BUT BLAME ON HIM, CREATE REASONS TO HATE HIM AND HARASS PEOPLE THAT STILL DEFEND/LIKE HIM??? if you're like this, get the fuck out. Is not his fault that he couldn't make Panic! Become popular again.
2. "INK making a Collab with TX2":
- ALMOST got into first place, but it's so true that alot of people agree with me that this Collab is shit
I fucking love I.N.K but I FUCKING HATE TX2.
AND I FUCKING HATE HOW THEY TRY TO BE "FUNNY" OR SAY "ooh we're problematic 👅👅" like, NO. YOU GUYS ARE JUST FUCKING ANNOYING.
Their vocalist is a total man child, they think their reels, tiktoks and videos are a """good""" propaganda to their music, but guess what? All the people that I know that like this band are annoying 12-14 olds that; are probably a therian, uses one of those Shitty xenogenders or neopronouns (if you use those, DNI please), think they're "emo" or "alternative" but they just looks like those dsmp fans during 2019-2023 and I don't know ANY song of them
While I.N.K has; a lot of memorable songs, I can mention practically ALL of their albums and, guess what? THEY ARE ACTUALLY SUPORTABLE, COOL AND THEIR SONGS ARE UNIC.
3. "Mike Fuentes from PTV":
- Okay, thank god that a lot of people agree this is awful
If you don't know, Mike is... Technically a pdf file... It was confirmed that he sleeped with some PTV that are minors... Yeah this mf sucks and is fucking disgusting.
4. "People thinking that FOB is childish"
- I honestly blame that AM/AP and the anime MVs
5. "Bob/Hank from MCR.":
- We all are probably MCR fans, you know why they are here, don't lie.
6. "GD having less time to perform then Justin Bieber":
- it's one the name.
7. "SOAD literally NEVER created a new album since the 2000's":
- What?
Okay, yeah, I know that SOAD released a single like the start of this year or last year but... No álbum??🥺🥺
8. "FIR becoming a "one men only band" after their first 4 albums/eras":
- Okay, that's actually understable?
I just think it's unfair that Ronnie completely changed the band's genre like, he could do something like Coming home and fashionably late😭😭
Yeah, that's it. Thanks for voting!
#deimos post#gay loser post#metalcore#pop punk#emo#emocore#2000s emo#Green Day#my chemical romance#MCR#ice nine kills#I.N.K#fir#falling in reverse#ptv#pierce the veil#patd#p!atd#panic! at the disco#brandon urie#fall out boy#fob#system of a down#soad#billie joe armstrong
18 notes
·
View notes
Text
SSC GD Result 2023
SSC GD Result 2023SSC GD Result 2023SSCGD का रिजल्ट ऑनलाइन लांच कर दिया है SSCGD का रिजल्ट आपको गए डायरेक्ट लिंक पर मिलेगा Learn moreलिंक पर क्लिक करने के बाद आपको सभी डायरेक्ट लिंक मिलेगी जिसमे सीधे download मिलेगी आपको रिजल्ट pdf में मिलेगा अपना रोल नंबर से रिजल्ट खोजे Please Share This web storyWhite Frame CornerWhite Frame CornerArrowShareOther storiesGreen LeafGreen LeafWavy Line Read the full article
0 notes
Text
Court Vacancy Exam Date
Rajasthan HC Clerk, JA, JJA Exam Date 2022
indian post gds result

The Rajasthan High Court has still not released a notification regarding the date for the examination recruitment. Written Test which is to be conducted for JA, JJA, and Clerk.
haryana ration card download
The authorities have notified regarding the date through the portal of recruitment. The authorities have informed that the candidates will be notified regarding the schedule and also regarding the admit card release date soon.
ssc cgl syllabus pdf
1 note
·
View note
Text
Tamil Nadu GDS Result 2024 Announced For Gramin Das Sevak 1st Merit List

Tamil Nadu GDS Result 2024 has been officially announced, releasing the first merit list for Gramin Dak Sevak (GDS) vacancies. Candidates who have applied for these prestigious postal jobs can now check their selection status through the official portal. This announcement is an important step in the recruitment process, as the merit list determines the candidates who will be considered for final appointments based on their eligibility and academic performance.
Tamil Nadu GDS Result 2024 Announced
For those eagerly waiting for this result, it is important to understand that the Tamil Nadu GDS recruitment is completely based on the merit of the academic record of the candidates. The selection process does not involve any written exam or interview, making the marks obtained in class 10th crucial for securing the post in this cycle. Let's take a deep dive into the process, criteria and what steps you should take next. India Post, Tamil Nadu GDS GDS Result 2024 1st Merit List Published, GDS Online Engagement Schedule, July 2024 Tamil Nadu Circle– List 1, Adv:- 17-03/2024-GDS dated 12.07.2024. 1st Merit List of Tamil Nadu GDS 2024 is Now Available The first merit list of Tamil Nadu GDS 2024 is now available for download. Candidates who have applied for the Gramin Dak Sevak (GDS) posts in Tamil Nadu can easily access the merit list through the official India Post GDS Recruitment portal. This list is important as it contains the names of the candidates who have been shortlisted based on their 10th-class marks, and these candidates are now eligible to move forward in the recruitment process. Important Dates ActivityImportant DatesNotification Release Date15 July 2024Online Registration Starts15 July 2024India Post GDS 2024 Last Date5 August 2024India Post GDS Merit List Released on19.08.2024India Post GDS Document Verification Deadline03.09.2024
Tamil Nadu GDS Recruitment 2024 DV Deadline
Shortlisted candidates will have to get their documents verified by the Divisional Head mentioned against their name before 03/09/2024. Candidates are required to report for verification with their original documents as well as two sets of self-attested photocopies of all the required documents.
Tamil Nadu GDS Vacancy 2024
Circle NameNo. of VacanciesTamil Nadu3,798 Category-wise Tamil Nadu GDS Vacancy 2024 Circle NameLanguage NameUROBCSCSTEWSPWD-APWD-BPWD-CPWD-DETotalTamil NaduTamil179486162137358264240103789
Eligibility Criteria for Tamil Nadu Postal Circle GDS Vacancy
Post NameEducational QualificationWest Bengal Gramin Dak SevakPassed Class 10Other Qualification:Knowledge of computer Knowledge of cycling Adequate means of livelihood Age Limit for Tamil Nadu GDS Vacancy CriteriaDetailsAge Limit18 to 40 years Understanding the Tamil Nadu GDS Recruitment Process The Tamil Nadu Gramin Dak Sevak (GDS) recruitment process is simple yet highly competitive. The entire process is online, from application submission to declaration of merit list. Candidates who have completed class 10th from a recognized board with passing marks in Mathematics and English are eligible to apply. The merit list is prepared based on the academic performance of the candidates, particularly the marks obtained in class 10th. Department of Posts, India, uses an automated system to rank candidates according to the marks and preferences given during the application process. This ensures a fair and transparent selection process. After the merit list is released, the selected candidates are notified through the official website and they have to verify their documents before receiving the appointment letter. How to Check Tamil Nadu GDS Result 2024? Checking the Tamil Nadu GDS Result 2024 is a simple process. Candidates need to visit the official India Post GDS Recruitment portal and log in using their registration details. The first merit list will be available in PDF format, listing the names and registration numbers of the selected candidates. It is advisable to download and print the result for future reference. Candidates whose names appear on the merit list should immediately prepare for the next stage, which includes document verification. It is important to keep all relevant documents, such as educational certificates, caste certificates (if applicable), and other required proofs, ready for verification. Document Verification and Next Steps Once your name appears in the Tamil Nadu GDS 1st Merit List, the next important step is document verification. This step is important as it confirms your eligibility for the post. Candidates must submit their original documents, including educational qualification, proof of age, community certificate and other relevant documents as specified by the Tamil Nadu Postal Circle. Document verification is usually scheduled at the divisional or circle level, where candidates are expected to report in person. After successful verification, candidates will receive their appointment orders, officially making them Gramin Dak Sevaks under the Tamil Nadu Postal Circle. What to Do If You Are Not Selected If your name does not appear in the Tamil Nadu GDS first merit list, do not be disappointed. If vacancies remain after the first round, the merit list may be released later. Keep checking the official website for updates. Additionally, candidates can also look for other opportunities in the postal department or similar government positions where their qualifications may be suitable. It is important to stay informed and continue applying for other positions.
Tamil Nadu GDS Recruitment 2024 Important Links
EventsImportant LinksIndia Post Tamil Nadu GDS Result 2024Download India Post Tamil Nadu GD Result 2024 1st Merit List Here | PDFApplyIndia Post GDS Recruitment Apply OnlineVacancyIndian Post 44228 GDS Vacancy DetailsNotificationIndian Post Recruitment GDS Vacancy PDF NotificationJoin Our WhatsApp ChannelJoin Our WhatsApp ChannelJoin Our Telegram ChannelJoin Our Telegram ChannelWebsiteIndian Post GDS Official Website

Tamil Nadu GDS Result 2024 Merit List Tamil Nadu GDS Result 2024 The Tamil Nadu GDS Result 2024 and the release of the 1st Merit List mark a significant milestone for candidates aspiring to join the postal services. This recruitment process, based on merit, ensures that the most deserving candidates are selected for these essential roles. By following the steps outlined above and staying prepared for the next stages, candidates can enhance their chances of securing a position and embarking on a rewarding career with the Tamil Nadu Postal Circle. Read the full article
0 notes
Link
WB Postal GDS Result 2022 PDF. Check the WB Post Officer GDS Merit List 2021 PDF, Download it and check your details.
1 note
·
View note
Text
Introducing... The Tattooer!
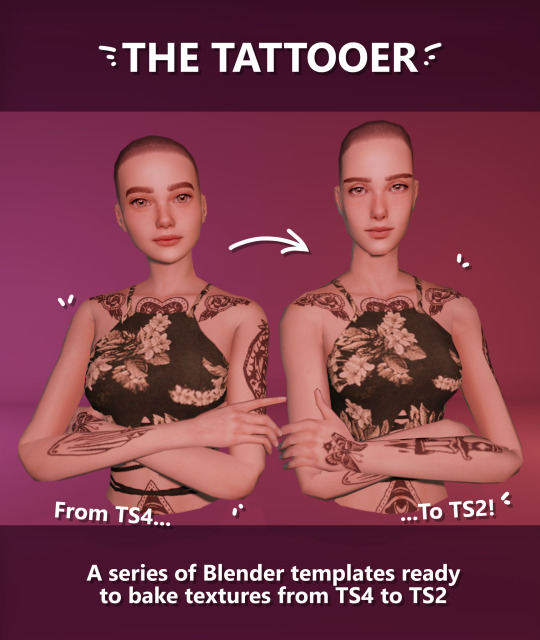
[This version is OUTDATED! Please, check the new version here. I updated the workflow, skipping a lot of unnecessary Photoshop editing. It's way faster! I'll leave this old version and files up though, for archiving purposes. But yeah I still totally recommend you use the new version!]
Finally! I’ve been working on this for so long and I couldn’t wait to share it. This is a series of Blender template files already set up to quickly bake textures from The Sims 4 to The Sims 2. Really neat for cc creators! The different Blender files will allow you to:
-Bake body textures from TS4 to TS2 (Female) -Bake body textures from TS4 to TS2 (Male) -Bake body textures from TS4 (Female) to TS2 (Male) -Bake body textures from TS2 (Female) to TS2 (Male) [Bonus!] -Bake head textures from TS4 to TS2 (Face + Scalp) [Experimental]
Check the file names to see which one is which, and the resolution of the baked texture it will give. Download! SFS / GD
Everything you see in the render above was converted using those Blender files. I only did a couple tiny edits to the eyes and lips to fix them. These templates were made mainly to bake and convert tattoos, but there’s more you can do with them if you get creative. I have to say, these are NOT perfect. Check out the eyebrows on the render above. They look a bit wonky compared to the original, don’t they? I left them as is to keep your expectations with these as realistic as possible. Results may vary depending on what you are trying to convert, so! With that in mind, this is all the stuff you will be able to convert almost seamlessly from TS4 to TS2:
-Tattoos. -Other body details such as body hair, scars, freckles, supernatural/occult details… -Body painted underwear and swimwear, as well as some other clothing that’s mostly painted on the body. -Socks, stockings and maybe leggings. -Even skintones! In some areas they will look weird, so I recommend editing and blending them with other existing TS2 skins. -Makeup. Kinda bad but hey it works! Eyeliner and anything that is around the eyes looks terrible for now, but other stuff like blush may look just okay. -Eyebrows and maybe beards. A bit of hit or miss with those. -Hair scalps. Very useful when converting some hairs! Although keep in mind part of that texture might also need to be baked on the face mesh, you know, that hairline makeup stuff.
Got your attention? Nice! Editing some of the textures from TS4 to match the UV mapping in TS2 using a 2D editing program can be incredibly hard. That’s where texture baking in Blender comes to the rescue!
It is recommended you download Blender version 2.91.0, which is the one I use. Don’t worry, it’s free! There’s also 3 Photoshop actions you will need to set up the textures for baking and then putting them back together, because unfortunately Blender doesn’t support transparencies in that baking process, so that takes a couple extra steps to make it work, but I think it’s still pretty fast and easy. And just in case Tumblr manages to blow up or something, I decided to include a pdf with the upcoming tutorial that will guide you step by step with all this process, so if this post gets deleted somehow (I really hope not!), you will still have that pdf as a backup archived.
You can download Blender here. Personally I recommend picking the fourth option, “blender-2.91.0-windows64.zip”, which is a portable version and doesn’t need to be installed. You will also need Sims 4 Studio to extract the original Sims 4 CC textures you want. As for Photoshop… I’m not going to tell you to buy that subscription service and give Adobe some undeserved money, so… yeah, there might be some other options out there to get it (very legit, yes yes).
So, before we begin, let’s clear out some questions you might have. What the heck is this texture baking thing and what does it do? Well, let’s imagine you have a projector and point an image into a blank wall. Then you pick up some brushes and start painting and copying that projected image in that wall. Texture baking is kinda like that when it comes to 3D models. You align two models and match them as closely as you can in shape and form, and once you adjust some parameters and values, Blender does the rest for you: it will give you a new texture for a new model with a different UV map. These files I’m sharing have everything already set up, so it’s a matter of plopping in that Sims 4 texture and you will get that new texture for TS2 in just a few clicks.
This tutorial assumes you know literally nothing about how to use Blender, so if you feel uncomfortable with it, worry no more! This will guide you with pictures showing where you need to click and explaining what is happening. For Sims 4 Studio and Photoshop the process might be a bit less detailed, but still this should be pretty beginner friendly. For this tutorial, I will use some tattoos as an example. Alright, enough with the rambling. Let’s get started!
·EXTRACTING TEXTURES AND EDITING THEM WITH PHOTOSHOP: First things first, you will need to extract as pngs all the textures you want to convert from TS4 using Sims 4 Studio. Once you’ve done that, open them up one by one in Photoshop and run the “No transparency” action. This will remove the alpha channel from the image, getting rid of all the transparency. Go ahead and save a png copy of it. Then run the “Make Alpha” action on those same swatches (from the beginning, make sure you’re not running the action on an already edited swatch!), which will only show the alpha channel of the image in black and white, and save another copy of that. You should have 2 textures for each tattoo swatch. For the “No transparency” action I like to name it BASE (And your swatch number or name), and for the “Make Alpha” action I usually name it ALPHA (And that same swatch number/name). I recommend saving them in different folders named BASE TS4 and ALPHA TS4 respectively to keep it organized. If you want to make this much faster in Photoshop, there’s an automation option in it that allows you to run an action through a batch of files in a folder and then saves it all. I won’t cover how to do it in this tutorial, but you should be able to find it easily on Google by searching something like “Photoshop automate batch”. It’s really powerful and will make your workflow with actions much faster. Definitely recommend learning about that!
·BAKING THE TEXTURES IN BLENDER: PRELIMINARY STEP 1: CONFIGURING BLENDER’S GRAPHICS SETTINGS: Open your preferred Blender file depending on what you’re going to bake and the desired resolution (in this example I’m going to use the AF-body-4t2-1024 file). Before we start messing around in Blender, there’s one thing you should set up. It is a onetime step, and once it’s done, you won’t need to do it again. So, does your computer have a dedicated graphics card? If you don’t know or you’re not sure, just skip to the next step. Configuring Blender so it uses your graphics card instead of your CPU will make the baking render much faster, so it is recommended you set it correctly. If your computer has a dedicated graphics card, click File (1) > Preferences (2) > and on the window that pops up click System (3) > and select CUDA and make sure your graphics card is there and tick it (4). I have an Nvidia Graphics card but your case may vary. Once you’re done, click on the tiny button on the bottom left corner and Save Preferences (5).
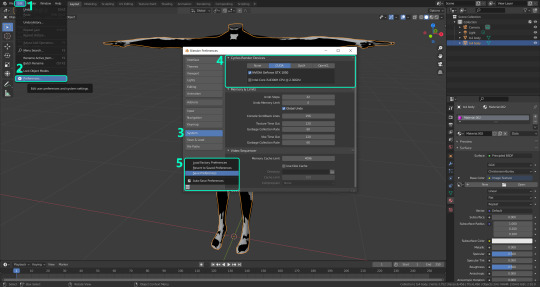
PRELIMINARY STEP 2: CHOOSING THE RENDERING DEVICE: Click on the tiny camera button on the right, called Render Properties (1), and on Device (2) select GPU Compute if it’s not already selected. If you’re not sure if you have a graphics card or not, just select CPU. Then select the Material Properties tab (2) and Save your changes, either by pressing Ctrl + S, or clicking File (4) > Save (5). Okay, time to get into the good stuff!
·STEP 1: LOADING YOUR TS4 BASE TEXTURE: In the Material Properties tab, click the folder icon that says Open (1) and on the window that pops up, navigate through your folders and select your first texture. For now we’re going to bake the BASE texture, so go to that folder where you saved the edited “No transparency” image. To navigate easily, the 3 buttons on the top right (2) are for the display mode. They will show your files in list mode, vertical and horizontal, and the one on the right will display the file thumbnails, pretty useful if you want to easily see your images. And the icons on the left side (3) will let you go one folder back and forward, go to the parent directory, and refresh the folder in case you just dropped something new in there. Double click on the image you need and that will load it into the Sims 4 body model, named “ts4 body”.
·STEP 2: SETTING UP YOUR SELECTION AND BAKING THE TEXTURE: On the top right of the screen, you will see the names of the 2 models in the scene. Hold the Ctrl key in your keyboard and left click on the “ts2 body” model (1). If you did it correctly, you should see “ts2 body” in a yellowish orange color, and right down below, “ts4 body” should look more like a red orange. If not, try again by clicking first on ts4 body, and then while holding Ctrl click again on ts2 body. Then switch to the Render Properties tab by clicking the tiny camera icon (2) and click Bake (3). Depending on your screen resolution, you might need to scroll down a bit with your mouse to see the Bake button. Wait a few seconds for it to finish. You will see the progress percentage down on the bottom of your screen. Don’t panic if you notice your computer fans start ramping up, that’s completely normal! As I said in the beginning, using your GPU will bake the textures much faster than the CPU.
·STEP 3: SAVING YOUR NEW TS2 TEXTURE: Once it’s finished, switch to the UV Editing Mode by clicking “UV Editing” on the top of your screen. And there it is: your new texture! You might have to scroll up your mouse wheel a bit to zoom in and see it in all its glory on the left side of the screen. We’re still not done yet though. You need to save it to yet another new folder (always try to keep your stuff organized!).
You can save it by pressing Shift + Alt + S, or clicking on Image* (1) and then Save As… (2). That will pop a window where you’ll need to navigate again and save it somewhere. Give it a proper name (3) and hit Enter to save it… well, Enter doesn’t always work for me for some reason, so if that happens just click Save As Image (4). In this case, I personally like to call it something like “BASE TS2”.
·STEP 4: GOING BACK TO STEP 1: Alright! So you have your new baked base texture, but we still need to bake the alpha channel to give it its transparency. In order to go back to step 1 and start the process once again, click Layout (1), go back to the Material Properties tab (2), select “ts4 body” (3) and click on the folder icon (4) to open and load the alpha texture you did in the beginning in Photoshop.
Then it’s just a matter of repeating the process from step 2: bake the alpha channel and save it again as a new image (watch out, don’t overwrite your previous image!). This one I like to name “ALPHA TS2”. When you’re ready to move on, close Blender without saving. If you see a small check telling you it will save some images, make sure you uncheck it, so you will be able to use it again in the future from the starting point with no issues. I don’t think it really matters if you accidentally save your progress in these files, but I like to keep it clean and fresh so I can do the process where I left it from the beginning the next time I open it. And in case you mess up and save somewhere, you can always just delete the .blend file and download the template files again.
·FINAL STEP: PUTTING EVERYTHING BACK TOGETHER IN PHOTOSHOP: We’re almost done! Open Photoshop and drop in both your 2 new baked textures, “BASE TS2” and “ALPHA TS2”. Keep both layers on top of each other and aligned. For that you can enable the snapping in View > Snap to… > All. Rename these layers so the Alpha layer is “ALPHA” and the Base is “BASE”, and make sure ALPHA is on top.
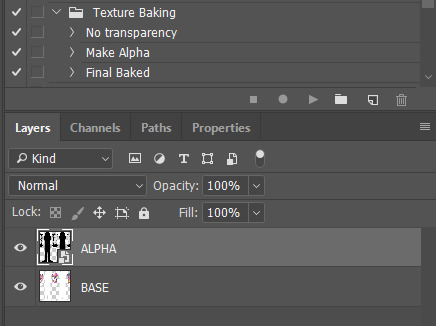
Then run the “Final Baked” action and now for real, it’s finally over! You just fully baked and converted these new textures. Congratulations!
So, to summarize, here’s a small guide with all the steps of the workflow I developed. Once you get the hang of it, baking and converting one swatch of a texture just takes a couple minutes. It really is that easy!

One small note though, some of the baking blend files save the textures with a resolution of 2048x2048 pixels, as clearly stated at the end of their file name. That’s way too overkill, because TS2 only properly supports up to 1024x1024 for most of its textures and you should always resize your final product to that max resolution. I just made those 2048 versions because there might be some really tiny and slim details on some tattoos that may look a little too blurry when baked into a 1024 resolution, so for those cases use that if you want and then resize them in Photoshop. In the Resample mode of the Image Size menu, there are a few options to choose. For the fine details, I like the Nearest Neighbor (hard edges) option, which, even if it looks a bit pixelated, it still preserves most of the texture and quality.

For anything else, I would just directly bake them using the 1024 versions in Blender.
And for the folks who feel comfortable playing around in Blender, this is just the beginning! Texture baking opens a LOT of possibilities, so feel free to move stuff around and edit the models to your liking! If you notice the baked textures look warped or stretched somewhere, or don’t like where some textures are placed in the S2 body, poke around that area moving stuff and then give it another try. The main objective of the baking process is keeping both overlapping models as close in shape as possible. You may also edit and save new copies of the templates, or make new ones from scratch using mine as a reference (keep a close look on those Baking settings and values, I think they work pretty well) and share them if you want to. Go ham, do whatever you want with them! I have plans on making templates to convert body textures from Sims 3 to Sims 2, but for now it’s not on my priorities, so we’ll see when that happens.
Whew! Hope none of this was too confusing. Need help or have any issues with these? Please ask/message me and I’ll be glad to help when I’m able to!
Credits for the CC used in the render demonstration: -Skin by Sims3Melancholic -Eyes by Northern Siberia Winds -Eyebrows by PeachyFaerie -Tattoos by xtc -Top by SerenityCC
And the Tattoo I used for the tutorial can be found here, by ValhallanSim
Last but not least, a huge, special thanks to @elvisgrace for all her help testing this for me. I’ve never shared Blender files, so hopefully everything works as intended and everyone can use them with no weird issues. Fingers crossed! And thank you for reading! Hope you have fun playing with this new toy hehe.
#ts2 tutorial#ts2 resources#ts2 blender#ts2 overlays#ts2 texture baking#4t2 conversion tutorial#i swear blender is the coolest thing ever#yes you can consider this post as blender propaganda
320 notes
·
View notes
Text
SSC GD Constable Result 2023 Out Check Merit List PDF @ssc.nic.in
SSC GD Constable Result 2023 Out Check Merit List PDF: SSC GD Result is one of the most eagerly awaited results among candidates who have appeared for the Staff Selection Commission (SSC) General Duty (GD) Constable Exam. The SSC GD Result determines the fate of thousands of candidates who aspire to join the Central Armed Police Forces (CAPFs), NIA, SSF, and Rifleman (GD) in Assam Rifles. The SSC…
View On WordPress
0 notes