#Fastboot Commands
Explore tagged Tumblr posts
Visit Tumblr Blog
Explore Tumblr blogs with no restrictions, modern design and the best experience.
Last Seen Tumblr Blogs


Fun Fact
The average Tumblr user visits about 67 pages every month.
Text
Mastering ADB Fastboot Commands: Why Every Android User Should Know Them

Introduction
For Android enthusiasts, developers, and power users, ADB (Android Debug Bridge) and Fastboot commands are indispensable tools. These command-line utilities allow users to interact with their Android devices beyond the standard user interface. The importance of ADB Fastboot commands lies in their ability to execute advanced tasks like debugging, unlocking the bootloader, flashing firmware, and performing system modifications without requiring full Android access.
Understanding these commands can significantly enhance Android performance, whether for customization, debugging, or troubleshooting. In this guide, we will explore the importance of ADB Fastboot commands, their role in device management, and how they relate to modern Android app development.
What Are ADB and Fastboot Commands?
Before diving into their importance, let’s understand what ADB and Fastboot are:
ADB (Android Debug Bridge): A versatile command-line tool that allows users to communicate with an Android device via a computer. It is mainly used for debugging, installing apps, and transferring files.
Fastboot: A protocol that enables interaction with the Android bootloader. It is crucial for flashing firmware, unlocking bootloaders, and modifying system partitions.
By utilizing these commands, users and developers can take full control of an Android device, unlocking a world of customization and debugging possibilities.
The Role of ADB Fastboot Commands in Android App Development
One of the primary applications of these commands is in Android app development. Developers use ADB to test applications in real-time, debug issues, and push APK files directly to a device. Fastboot, on the other hand, allows developers to modify boot images and test different system configurations.
Key Benefits for Android App Developers:
Quickly install and uninstall apps for testing.
Capture real-time logs to debug application performance.
Modify system settings without accessing the phone’s UI.
Perform compatibility tests on different Android versions.
For any developer looking to enhance their Android app development workflow, mastering ADB Fastboot commands is essential.
Why ADB Fastboot Commands Are Crucial for Android Users
Many Android users prefer customization over stock functionality. Whether you want to root your device, install a custom ROM, or recover data, the importance of ADB Fastboot commands cannot be overstated.
Common Uses of ADB and Fastboot Commands:
Unlocking Bootloaders: Required for installing custom ROMs.
Flashing Custom Recoveries: Install TWRP or other recoveries.
Sideloading Apps & Updates: Install APKs directly from a computer.
Removing Bloatware: Uninstall pre-installed apps.
Performing System-Level Tweaks: Modify system properties for better performance.
By using ADB Fastboot commands efficiently, users can transform an ordinary Android device into a fully customized powerhouse.
Hybrid App Development Services and ADB Fastboot Commands
With the rise of hybrid app development services, ADB commands play a vital role in testing and optimizing cross-platform applications. Hybrid apps run on multiple operating systems, and debugging them across different devices becomes easier with ADB.
How ADB Helps Hybrid Developers:
Enables remote debugging of hybrid applications.
Provides performance monitoring for multi-platform compatibility.
Facilitates UI testing and responsiveness checks across devices.
Speeds up the testing process by eliminating manual installations.
Given the increasing demand for hybrid app development services, developers must leverage ADB for efficient testing and deployment.
Why the Best Android App Development Company Uses ADB Fastboot Commands
Top software development companies rely on ADB Fastboot commands to deliver high-quality applications. The best Android app development company incorporates these tools into their workflows to ensure their apps are bug-free, secure, and optimized for various devices.
Why Do Companies Rely on ADB?
Automated Testing: ADB simplifies automation scripts for app testing.
Device Compatibility: Ensures smooth performance across different Android devices.
Data Analysis: Provides real-time device logs for performance improvement.
System Optimization: Assists in removing unnecessary system apps and processes.
If you’re looking for the best Android app development company, ensure they utilize ADB Fastboot commands in their development and testing phases.
Mobile App Development and System Optimization Using ADB Fastboot Commands
The influence of ADB Fastboot commands extends beyond developers—it plays a crucial role in overall mobile app development. Whether a user needs to optimize performance, install a new ROM, or debug an issue, these commands provide the flexibility needed to manage devices effectively.
Impact on Mobile App Development:
Enhances device security by identifying vulnerabilities.
Facilitates seamless application testing on various screen sizes.
Helps in modifying system permissions for better resource management.
Improves battery life by detecting background processes draining power.
By integrating ADB Fastboot commands into mobile app development, both users and developers can maintain better control over their Android devices.
How to Use ADB Fastboot Commands Safely
While these commands provide immense power, they should be used responsibly. Incorrect commands can lead to data loss or even bricking your device.
Best Practices for Safe Usage:
Backup Your Data: Always keep a full backup before making system modifications.
Enable Developer Options: Allow USB debugging and OEM unlocking before using ADB or Fastboot.
Use Verified Commands: Double-check commands to avoid unintended system changes.
Keep Drivers Updated: Ensure your computer has the latest ADB and Fastboot drivers installed.
Follow Documentation: Read Android’s official documentation for a better understanding.
Following these safety guidelines ensures that you maximize the importance of ADB Fastboot commands without risking your device.
Conclusion
The importance of ADB Fastboot commands in the Android ecosystem is undeniable. Whether for Android app development, system customization, or troubleshooting, these commands offer unmatched control over Android devices. They empower developers, enthusiasts, and even businesses involved in hybrid app development services and mobile app development.
By mastering these commands, users can unlock new possibilities, enhance device performance, and explore limitless customization. If you’re serious about Android, understanding ADB Fastboot commands is a must. Start using them today and take full control of your Android experience!
0 notes
Text
How to Remove or Disable YouTube on Samsung Devices
If you're looking to remove the YouTube app from your Samsung device, it's important to note that YouTube is often a pre-installed system app, which means it cannot be completely uninstalled through standard methods. However, there are several approaches you can take to disable or remove it from your device.
1. Disable the YouTube App
Disabling the app prevents it from running and removes it from your app drawer.
Open Settings.
Navigate to Apps.
Scroll down and select YouTube.
Tap on Disable.
Confirm by tapping Disable again.
While in the YouTube app settings, tap on Storage.
Select Clear Data and Clear Cache.
This method doesn't uninstall the app but prevents it from running and frees up storage space.
2. Remove YouTube Using ADB (Advanced Users)
For a more permanent solution, you can use Android Debug Bridge (ADB) to uninstall the app. This method requires a computer and some technical knowledge.
Steps:
Enable Developer Options on Your Phone:
Go to Settings > About phone.
Tap on Build number seven times to activate Developer Mode.
Return to Settings and access Developer options.
Enable USB debugging.
Set Up ADB on Your Computer:
Download and install the Minimal ADB and Fastboot tool.
Connect Your Phone to the Computer:
Use a USB cable to connect your device.
When prompted on your phone, allow USB debugging.
Uninstall YouTube via ADB:
Open the ADB command interface on your computer.
Enter the following command to list connected devices: nginxCopyEditadb devices
Once your device is recognized, enter: cssCopyEditadb shell pm uninstall --user 0 com.google.android.youtube
This command removes the YouTube app for the current user. Note that this method doesn't delete the app from the system partition, so a factory reset might restore it.
3. Remove Your YouTube Account
If your goal is to disassociate your account from the YouTube app:
Open the YouTube app.
Tap on your profile icon in the top right corner.
Select Manage your Google Account.
Navigate to the Data & privacy tab.
Scroll down and tap on Delete a Google service.
Enter your password when prompted.
Next to YouTube, click the trash bin icon.
Follow the on-screen instructions to permanently delete your YouTube account.
Be aware that this action will delete all your YouTube data, including playlists, subscriptions, and history.
⚠️ Important Considerations
System Apps: YouTube is often a system app on Samsung devices, meaning it can't be fully uninstalled without rooting your device.
Rooting Risks: Rooting can void your warranty and may lead to security vulnerabilities. Proceed with caution.
Alternative Solutions: If you want to limit YouTube usage without removing it, consider setting up Parental Controls or using Digital Wellbeing features to restrict access.
By following these methods, you can effectively remove or disable the YouTube app on your Samsung device, depending on your needs and technical comfort level.
2 notes
·
View notes
Text
0 notes
Text
QuickADB: Simplifies the Use of ADB and Fastboot Commands for Beginners and Experts
ADB (Android Debug Bridge) and Fastboot are important command line tools used in Android development. They help with various tasks, such as installing factory images, unlocking the bootloader, flashing custom recoveries like TWRP, and installing APK files. These tools also let users boot their devices into different modes, such as Recovery, Fastboot, and EDL Mode. They are very useful for fixing…
0 notes
Text
The Importance of ADB Fastboot Commands for Android

Android devices have become a significant part of our daily lives, offering a wide range of features that enhance functionality and usability. Behind the scenes, however, developers and tech enthusiasts often use various tools to unlock the true potential of these devices. One such tool that plays a crucial role in Android development, troubleshooting, and customization is the ADB (Android Debug Bridge) and Fastboot commands. These powerful commands allow users to interact with Android devices in ways that aren't available through the regular user interface, providing an unparalleled level of control. In this blog, we'll explore the importance of ADB Fastboot commands Android users and developers, and how mastering these commands can take your Android experience to the next level.
What Are ADB and Fastboot Commands?
ADB Fastboot commands are tools used for communicating with Android devices. ADB is a versatile command-line tool that allows users to interact with a device from their computer, enabling various functionalities like installing and debugging apps, accessing the device’s shell, and much more. Fastboot, on the other hand, is used for low-level device management tasks, such as unlocking the bootloader, flashing firmware, or recovery images.
Both of these tools are essential for Android developers, modders, and anyone looking to customize or troubleshoot their devices. Whether you're installing custom ROMs, rooting your device, or simply looking to perform a factory reset, ADB Fastboot commands can help you get the job done efficiently. In this blog, we will cover the key reasons why these commands are indispensable in the Android ecosystem.
Why ADB Fastboot Commands are Crucial
1. Device Debugging and App Development
For developers, ADB commands are an essential part of the development workflow. ADB allows developers to debug apps running on Android devices in real-time. With the adb logcat command, for instance, developers can view detailed logs of what’s happening on the device. This makes it much easier to pinpoint bugs and issues within an app. Additionally, ADB commands like adb install enable developers to directly install APK files on Android devices without needing to go through the Play Store. This is crucial for testing apps during development.
Moreover, ADB Fastboot commands also allow developers to run the Android Emulator, transfer files between the computer and device, and even access the Android shell for deeper system-level access. By facilitating quick debugging and app testing, these commands help improve the development process and ensure the final product is polished and optimized.
2. Custom ROM Installation and Device Modification
For Android enthusiasts and users looking to customize their phones, ADB Fastboot commands open the doors to endless possibilities. One of the most exciting features is the ability to install custom ROMs on your Android device. Custom ROMs allow you to completely overhaul the look and functionality of your device, from changing the user interface to adding features that may not be available in stock Android.
Fastboot commands are essential for flashing custom ROMs onto a device. The fastboot flash command allows you to flash recovery images or entire system images, enabling you to replace the stock Android OS with a custom build. This process is often the first step for users who want to root their devices, remove bloatware, or optimize their phone’s performance.
3. Bootloader Unlocking and Recovery Management
Another key advantage of ADB and Fastboot commands is the ability to unlock the bootloader. By unlocking the bootloader, users gain the ability to root their devices, install custom recoveries, and perform other advanced operations. Fastboot commands, like fastboot oem unlock, are used to unlock the bootloader and enable these options.
Moreover, in the event of system errors, corrupted firmware, or bricked devices, ADB and Fastboot commands are instrumental in repairing or restoring the device. The fastboot flash recovery command can be used to restore the device to a working state by flashing a recovery image. This is particularly useful for users who encounter issues after modifying their devices with custom ROMs or root access.
4. Data Backup and Restoring
Using ADB commands, users can back up important data from their Android devices to their computer. This is especially useful before performing risky operations like rooting or flashing new ROMs. The adb backup command lets users create a backup of app data, system settings, and other crucial information. Similarly, in case of data loss, users can restore the backup to recover lost data.
5. Managing Device Performance
Sometimes, devices can become sluggish or unresponsive due to unnecessary background processes, outdated system files, or bloated apps. ADB Fastboot commands can help with performance management by allowing users to disable system apps, clear cache, and optimize the device. Using the adb shell command, users can remove apps that drain battery life or cause performance issues, ensuring the device operates smoothly.
Mobile App Cost Calculator and ADB Fastboot Commands
For app developers, ADB Fastboot commands can be incredibly useful during the app development lifecycle. A mobile app cost calculator can help developers estimate the costs involved in building, deploying, and maintaining an Android app. By using ADB commands to test app functionality, modify code, or troubleshoot errors during development, developers can ensure the app meets high standards, which, in turn, can affect the app's final cost. The more efficiently an app can be developed and optimized using tools like ADB, the more cost-effective the development process becomes.
If you're interested in exploring the benefits of Adb fastboot commands for your business, we encourage you to book an appointment with our team of experts.
Book an Appointment
Conclusion
In conclusion, ADB Fastboot commands are vital tools for anyone looking to unlock the full potential of their Android device. Whether you are a developer testing an app, a modder customizing your phone, or a user troubleshooting device issues, these commands provide a powerful and efficient way to interact with your device. From installing custom ROMs to debugging applications and even restoring bricked devices, ADB Fastboot commands have proven to be essential for managing Android devices effectively. As the Android ecosystem continues to evolve, mastering these commands will give you an edge in customizing and optimizing your device.
0 notes
Text
Rooting an Android device (commonly referred to as "jailbreaking" on iPhones) is essentially gaining full control over the operating system, including system files, settings, and functions that are otherwise restricted by default. You're right that Android is based on the Linux kernel, but it’s highly customized by Google and device manufacturers, so it’s not the same as a typical Linux distribution you'd find on a desktop. Here's a step-by-step guide on how to root an Android and get shell access, but first, a couple of notes:
Important considerations:
Rooting voids warranties: Rooting will void your device warranty, and it may even brick (render unusable) the device if not done properly.
Security risks: Once rooted, your device becomes more vulnerable to malware and hacking if precautions aren't taken.
Backup data: Rooting could erase all data on your device, so it’s important to back everything up beforehand.
Steps to Root Your Android and Access the Shell
1. Check the Bootloader Status:
The bootloader is what controls what software runs when the device is powered on. Most Android devices have a locked bootloader by default.
Some manufacturers provide a way to unlock the bootloader officially (Google, OnePlus), while others do not (Samsung in the U.S.). Check if your phone has an official way to unlock it. You might need to enable developer options on your device.
Go to Settings → About phone and tap Build number seven times. This unlocks Developer options.
Go to Settings → Developer options and enable OEM unlocking and USB debugging.
2. Unlock the Bootloader:
With OEM unlocking enabled, you can now unlock the bootloader using your computer:
Connect your phone to your computer.
Install ADB and Fastboot on your computer (these tools are part of the Android SDK).
Open a terminal on your PC and run:bashCopy codeadb devices adb reboot bootloader fastboot oem unlock
Your device will prompt you with a confirmation. Use the volume buttons to navigate and the power button to confirm.
Note: Unlocking the bootloader will likely erase all data on your device.
3. Find a Suitable Rooting Method:
Rooting methods depend on your device’s manufacturer and version of Android.
Here are some popular options:
Magisk (most recommended): It allows you to gain root access without modifying the system partition. It also passes Google's SafetyNet checks, which means you can still use apps like Google Pay and Netflix. You'll need a custom recovery to flash Magisk.
SuperSU: An older method that directly modifies system files. It's less safe and can break OTA updates and certain apps.
Flashing Magisk (if you go with Magisk):
Download the Magisk zip file to your phone from Magisk GitHub.
Boot into your custom recovery (like TWRP) using ADB:bashCopy codeadb reboot recovery
In TWRP, go to the Install section and flash the Magisk ZIP file.
Reboot your phone.
4. Install a Terminal Emulator:
Once rooted, you can install a terminal emulator from the Google Play Store (e.g., Termux or Terminal Emulator for Android).
These apps give you direct shell access on the device. Since Android is Linux-based, many typical Linux commands will work out of the box (e.g., ls, cd, cat, etc.).
5. Access the Shell via ADB:
You can also connect to your Android's shell from your computer using ADB:
Open a terminal on your computer:bashCopy codeadb shell
This will give you a shell directly on the device. If you’ve rooted the phone, you can also get root access within the shell:bashCopy codesu
This will elevate your privileges to superuser (root).
Are All Androids Just Linux?
In essence, yes, Android is based on Linux, but it is heavily modified and optimized for mobile devices. Here’s how they compare:
Kernel: Android runs on the Linux kernel, which handles hardware communication, process management, and memory management. But the rest of the operating system is built differently from traditional desktop Linux.
Userland: Android does not use the GNU C Library (glibc) or GNU core utilities by default, which are standard on Linux distributions like Ubuntu. Instead, Android uses Bionic, a lightweight C library designed for mobile use.
File Structure: While Android’s filesystem is similar to Linux’s (you'll see directories like /system, /data, /proc), it is organized differently to support mobile devices and the Android app structure.
Security: Android uses additional security measures like SELinux and a permission-based app model that separates apps from each other and restricts access to system components.
Next Steps for Using Your Android as a "Gizmo"
Once rooted and you have shell access, there are countless projects you could try, such as:
Turning your Android into a Raspberry Pi-like development platform for IoT.
Using it as a network monitoring tool or personal server (with apps like Kali Nethunter).
Repurposing it as a dedicated media player or smart home controller.
If you’re looking to customize and expand the functionality even more, consider looking into custom ROMs (like LineageOS) or building Linux distros specifically for Android devices, like PostmarketOS.
0 notes
Text
KSU Rooting Guide
Read the instructions first then proceed if anything goes wrong we are not responsible for it.
To root with KSU you have to extract the init boot image file from the fastboot rom the HyperOS version which you guys are using.
Step 1.
Copy this file into mobile
( File took from Indian Stable latest )

Step 2.
Install this apk
KSU
Step 3.
Open the app. Click to install
Choose the init_boot image (The file which you copied to mobile earlier)

Step 4.
it will give a new file and name it as patched_boot.img.
Then Copy it back to PC

Step 5.
Connect your mobile to pc/laptop then boot device to fastboot mode
Step 6.
run this command 👇
Fastboot devices (check device is connected or not)
Step 7.
fastboot flash init_boot <file name>

That's it boot your device now.
0 notes
Text
WARNING: Hard boiling Xiaomi/
Yup that's a very controversial title but let me explain. Also it's not COMPLETELY shit you'll see.
So the begining
Basically, my old phone died recently. So rest in peace Samsung Galaxy J6 2018 Custom rommed that did a boot loop he never recover from-
So the thing is I destroyed my wallet and bought a new one. Saw good reviews online, so came to a store and chose it. First mistake.
The first shit
So it's a Xiaomi Redmi Note 13. It's a pretty decent phone in term of specs with cool cpu and 8GB of RAM and 256 of ROM… Like it's OKAY. It came with MiUI. Which is basically their own OS.
I immediately updated to HyperOS, which was the new version of MiUI. After that i just… used it like a normal person UNTIL!
The day i got ads for changing my wallpaper.
I changed. My wallpaper. By the way it was a drawing of Atlas my beloved moth Squidinu i love you kfjddjfdkfjdkf
So like… Opened Google photo, selected it, got "Set as wallpaper" and then SURPRISE M.THER F.CKER. (Was for temu btw)
I was like "bro what" Cause' i thought i had opened something weird or anything well NOPE The app was "Themes". Then it just randomly closed that's an issue too.
So! Opened settings, got in "Themes and look" THEN SURPRISE ANOTHER AD!
Useless to add that, for some reason, THEMES WHERE PAID. EVERYTHING IN THIS (duck) (butt) APP STORE WAS 1€. (Nope it's not made by Electronics Arts.)
I said (duck) off imma made my own one. So downloaded KLWP (which is some cool app to make custom animated wallpapers and stuff) and enabled it. Didn't work. Why? AUTHORIZATION """""refused""""" for my """"""security""""""
We're talking about reading the number of notifications i have.
So yea that didn't work either.
So, duh, imma try to remove the bloatware.
Spoiler i can't it just says "nuh uh" and pops out some random error.
XDA forums.
So! Since this thing was going to kill me! I decided i should install a GSI! (Cause' for some reason no custom roms were out yet you'll see why later)
SO! Unlocked OEM, Check Installed SHIZUKU, Check Downloaded LeafOS, Check Bootloader unlocked, HUH OH! NUH UUH!!
Usually to unlock the bootloader, you have to use a app for Microsoft Windows, which is already a problem since i use linux and i can only imagine what kind of things OSX (Mac) users have to go through, then you plug it in, open fastboot, (Which is an mode on android that allows you to edit partitions using commands) and then "Error! unauthorized!"
Well the issue was easy, i had to open settings and link my developer account to the phone to unlock bootloader!
The result: Nope.
I think you might have expected it but that didn't worked. At all.
The page in settings shows up some error in Chinese. Which apparently translated (Thanks Gemini) says something like "You need to validate your account on community app"
So i tried.
Installed the VERY sketchy "Mi !NEW HOME! Community App" (that's the actual name on the G Play store.) and logged in, settings, "Unlock boot loader".
Yup… Umm…
"You… " erm. "You have to wait until 8/8 (mm/dd) at 00:00 (UTC+8) to try again."
So i did.
"You have to wait until 8/9 (mm/dd) at 00:00 (UTC+8) to try again."
…Seriously?
Waited 2 days. For nothing.
You see why nobody makes custom rom? Cause' xiaomi is so buggy that you can't even unlock boot loader with THEIR OWN TOOLS.
Honestly, i'm not the kind of person to usually roast something like this, but… Seriously. I didn't even mentioned the translation errors everywhere, the app icons, the bloatware… Even the whole OS looks like ripped off Apple iOS!
So yea. Sorry Xiaomi but right now, i hate you.
So i'll try again tonight and check if that works, even if right now i need a tall buff guy to hug me from behind and hold me in place so i dont use PSI Teleport ß into their office and kill everyone using Sharpshooter and Ricoshots. (P rank)
#xiaomi#redmi#redmi note 13#android#customrom#twrp#hate#bootloader#linux#idkhelpme#imgoingtokms#whyareyoureadingthis#help#problem#life#choice#aaaaaaaaa#megalovania tudududududud#was that the bite of 87
0 notes
Text
Steps to Unlock Google Pixel 8 Pro
Unlocking a Google Pixel 8 Pro can refer to different processes, such as unlocking the device from a carrier to use with other networks, unlocking the bootloader for development purposes, or simply unlocking the screen. This article will guide you through the steps for each of these scenarios.
Carrier Unlocking Your Google Pixel 8 Pro
Carrier unlocking allows you to use your Pixel 8 Pro with different network providers besides the one from which you originally purchased your phone.
Step 1: Check Eligibility
Ensure your device is paid off completely.
Your account should be in good standing (no unpaid bills).
The device must have been active on the network for a certain period, as specified by the carrier.
Step 2: Obtain Unlock Code
Contact your carrier's customer service for an unlock code. You may need to provide your account details and the phone's IMEI number (found in Settings > About Phone).
Step 3: Insert New SIM Card
Power off your device, insert the new SIM card from a different carrier, and turn it back on.
Step 4: Enter Unlock Code
Once powered on, the phone may prompt you to enter an unlock code. Input the code provided by your carrier.
Step 5: Confirmation
Your device should now be unlocked. If you encounter issues, contact your carrier for further assistance.
Unlocking the Bootloader on Google Pixel 8 Pro
Unlocking the bootloader is generally sought by users who wish to root their device or install custom ROMs. Warning: This process will erase all data on your device.
Step 1: Enable Developer Options
Go to Settings > About Phone and tap on the Build Number 7 times to enable Developer Options.
Step 2: Enable OEM Unlocking
In Developer Options, toggle on the OEM Unlocking option.
Step 3: Boot into Fastboot Mode
Power off your device. Then, hold the Power and Volume Down buttons simultaneously to enter Fastboot Mode.
Step 4: Connect to Computer
Connect your Pixel 8 Pro to a computer with ADB and Fastboot installed.
Step 5: Unlock Bootloader
Open a command prompt or terminal on your computer and type: fastboot flashing unlock
On your phone, use the volume keys to select "Unlock the bootloader" and confirm with the power button.
Step 6: Reboot
Once the process is complete, reboot your device by selecting "Start" with the power button.
Screen Unlocking
If you're simply looking to unlock your Google Pixel 8 Pro screen (e.g., you've forgotten your PIN, pattern, or password), follow these steps:
Step 1: Use Google's Find My Device
Go to Google's Find My Device service from another device or computer.
Step 2: Select Your Device
Choose your Pixel 8 Pro from the list of devices.
Step 3: Use the "Lock" Option
Choose the "Lock" option to set a new lock screen password, which will replace the one you've forgotten.
Step 4: Unlock Your Phone
Use the new password to unlock your Pixel 8 Pro.
Conclusion
Unlocking your Google Pixel 8 Pro, whether for carrier use, bootloader access, or screen unlocking, is a straightforward process if you follow the steps carefully. Always ensure you understand the implications, especially with bootloader unlocking, as it can void your warranty and erase your data. If you're unsure about any step, consult with a professional or reach out to Google's customer support for assistance.

flickr
1 note
·
View note
Text
Tips and Tricks to fix Fastboot Commands not working
Tips and Tricks to fix Fastboot Commands not working
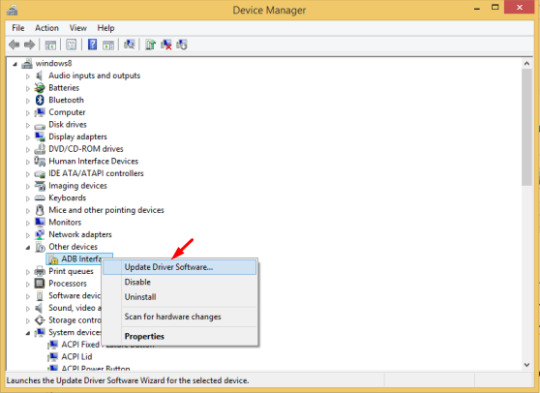
Today in this guide, you will we will learn various ways to resolve the issue of Fastboot Commands not working on the Computer. Resolve the issue Fastboot Commands not working Get Android Bootloader Interface Drivers Firstly, install the Fastboot Drivers on the Computer. Actually, this is required so that the Computer is able to check the connected device in Fastboot Mode. Now just without these…

View On WordPress
#Commands not working#Fastboot Commands#Fastboot Commands not working#fix Fastboot Commands not working
0 notes
Text
Why APKs Are Booming in the Philippines (And How to Use Them)

Introduction
With mobile technology surging and internet access improving across Southeast Asia, the Philippines has become a hotspot for Android users. Many Filipinos are turning to APKs—Android Package Kits—as a way to access apps that are unavailable, geo-restricted, or removed from the Play Store. This APK guide in Philippines helps users understand what APKs are, why they’re growing in popularity, and how to install them safely.
For developers and tech enthusiasts alike, APKs offer an alternative gateway to innovation and control. But they also come with risks—especially for those unfamiliar with safe practices. This blog explores the essentials of handling APKs responsibly in the Philippine mobile landscape.
Understanding APKs and Why They Matter
APK files are the installation packages for Android apps—just like .exe files are for Windows programs. When you install an app via the Google Play Store, it uses the APK behind the scenes. However, downloading APKs directly allows users to bypass Play Store restrictions.
In a country where budget smartphones are common and storage or compatibility issues can arise, APKs enable greater access to tools, games, and services that might otherwise be limited. Whether you're a gamer wanting the latest update early or a professional using beta versions of productivity tools, this APK guide in Philippines ensures you're doing it the right way.
For developers, this also ties closely with Mobile Application Development, as testing APK builds is a crucial step in Android app deployment before final submission to app stores.
Are APKs Legal and Safe?
The short answer: yes, if used wisely and for the right purposes. APKs are legal to download and install when they come from legitimate sources. The risk lies in downloading modified or pirated APKs that may carry malware or violate intellectual property rights.
This is especially relevant in the Philippines, where access to premium apps can be limited due to payment restrictions. However, instead of pirating software, users can explore open-source APKs or apps officially distributed through developer websites.
Whether you’re accessing restricted features or want early updates to the Best Android Apps You Need in Your Phone, APKs offer a flexible path—as long as security precautions are followed.
Book an appointment with our mobile tech team to learn how you can build or manage secure APK distributions for your own Android app.
How to Install APKs on Your Android Device
Installing APKs is simple, but it requires users to allow third-party installations:
Download the APK file from a trusted source.
Go to Settings > Security and enable "Install from Unknown Sources."
Open your file manager and tap on the downloaded APK.
Follow the on-screen instructions to install.
In some cases, you might need to manage permissions or verify that the app is not blocked by your device's security settings. This step is particularly important for apps developed using various tools in the Best Android Frameworks, which may include Flutter, React Native, or Kotlin-based setups.
Tools That Help Manage APKs
Advanced users often go beyond basic installations. Using tools like ADB (Android Debug Bridge) and Fastboot can help in deeper device management, especially when installing system apps or rooting a phone.
Understanding ADB Fast-boot Commands for Android allows you to sideload APKs directly from your computer, manage system resources, or fix broken apps. These tools are especially helpful for developers and tech-savvy users who want complete control over their devices.
It’s important to note, however, that using ADB and Fastboot comes with risks if not executed properly. Always back up your data and double-check commands before proceeding.
APK Usage Trends in the Philippines
The growing reliance on APKs in the Philippines is tied to several factors:
Internet Accessibility: With improving data services, users are more comfortable sideloading apps.
App Restrictions: Some global apps are not available in the local Play Store.
Tech-Savviness: A rising number of Filipino users are exploring customization and beta versions.
Because of this, developers offering apps in the Philippines should consider providing APK versions for direct download—ideally hosted securely and transparently. For businesses, this also links to growing interest in Mobile Application Development targeted at emerging markets like the Philippines.
Final Tips for Safe APK Usage
Use Trusted APK Repositories like APKMirror or the developer’s official site.
Avoid Pirated APKs, which are illegal and often unsafe.
Scan APKs Before Installing using tools like VirusTotal.
Keep Apps Updated—you won’t get automatic updates like on the Play Store.
Be Cautious with Permissions—check what the APK is asking for access to.
Final Thoughts
This APK guide in Philippines shows that APKs offer convenience, flexibility, and access to a wide range of Android apps—but only when used wisely. From personal users exploring new apps to developers running test builds, APKs are opening doors in a mobile-first country like the Philippines.
Always prioritize safety, stay informed, and consider APKs as powerful tools—not shortcuts. With the right knowledge, they can unlock a richer mobile experience for Filipino users and businesses alike.
Want to distribute your app securely through APK? Book an appointment with our experts and take control of your Android app strategy today.
0 notes
Text
Nexus Tools 5.0 is now available!
Nexus Tools is a simple installer for the Android SDK Platform Tools package, which includes ADB, Fastboot, Systrace, and other applications. It's one of my longest-running software projects, since I published the first version in December 2013, and it remains one of the most popular ways to get started with Android development and debugging (especially on Mac). Now I've finished the biggest update yet.
Until now, Nexus Tools was written as a bash script, meaning it's a series of commands that runs on the computer's Bash Shell. This has a few advantages — I don't have to compile anything, it works on all Unix-like computers (Linux, macOS, etc.), and so on. However, it has been extremely difficult for me to maintain a bash script that works across multiple versions of Bash across several different operating systems. Every time I changed something, something else almost always broke.

Nexus Tools 5.0 is completely rewritten in the Dart language, which means I can implement new features and cut back on potential bugs. The bash script now downloads and runs a Dart executable, which in turn does the actual installation process. The best part is that on the surface, it looks and works just like the old Nexus Tools — everything is still done within a few seconds.
The main functional change for all platforms is that Nexus Tools now installs itself to the same folder where all the SDK Tools are found. This means you can update the SDK Tools or delete them without going back to the GitHub page, by simply running "nexustools -i" or "nexustools -r" from the Terminal.

The Dart rewrite also gave me the opportunity to add support for Windows. Nexus Tools on Windows works exactly like the macOS and Linux versions — you paste a command into PowerShell, and Nexus Tools installs the SDK Tools (and itself) to a "NexusTools" folder in your user folder. Since Windows requires additional drivers for detecting ADB/Fastboot devices, Nexus Tools gives you the option of installing the Universal ADB Drivers package by developer Koushik Dutta.
You can try out Nexus Tools from the GitHub page.
3 notes
·
View notes
Text
Why Every Android User Should Learn ADB and Fastboot Commands

In the world of Android smartphones, most users are familiar with basic functions like installing apps, adjusting settings, and browsing the internet. However, if you want to take your Android experience to the next level, you need to get comfortable with ADB and Fastboot commands. These powerful tools allow users to interact with their devices in ways that go beyond what’s possible through the standard user interface. Whether you’re looking to root your device, flash a custom ROM, or perform advanced debugging, understanding ADB Fastboot commands can significantly enhance your Android journey.
What Are ADB and Fastboot?
ADB (Android Debug Bridge) and Fastboot are command-line tools that provide a communication channel between your computer and Android devices. They are often used by developers and advanced users for tasks like system modifications, troubleshooting, and recovery. Though both are part of the Android SDK (Software Development Kit), they serve different purposes.
ADB is primarily used for managing and interacting with your Android device while it’s running. It allows you to send commands to your device via a USB connection, making tasks like installing apps, copying files, or debugging apps much easier.
Fastboot, on the other hand, operates at a lower level. It’s used for tasks that involve your device's bootloader or recovery mode, such as unlocking the bootloader, flashing system partitions, or installing a custom recovery.
Understanding these two tools is essential if you want to fully unlock your device’s potential and make the most out of its capabilities. Whether you’re an enthusiast looking to customize your phone or a developer working on mobile apps, knowing ADB Fastboot commands will give you more control over your device.
Why Should Every Android User Learn ADB and Fastboot Commands?
1. Unlocking Advanced Customization
One of the main reasons to learn ADB and Fastboot commands is the ability to unlock advanced customization options on your Android device. For instance, you can easily root your phone, flash a custom ROM, or install custom kernels, all of which can help you get more out of your device. These commands allow you to bypass the limitations of the stock operating system and experiment with features that may not be available out of the box.
2. Improved Troubleshooting and Debugging
ADB is a great tool for developers or anyone dealing with app-related issues. It allows you to debug apps directly on your Android device and even run commands that can simulate different conditions on your phone. If you’re troubleshooting a problem with your phone, you can use ADB commands to gather logs, reset settings, or even perform a factory reset if needed. This level of control can save you a lot of time and effort, especially if your device is unresponsive or malfunctioning.
3. Flashing and Installing Updates
When it comes to flashing custom ROMs or installing updates manually, Fastboot commands are invaluable. Fastboot can be used to install system images, recoveries, and bootloaders, which are essential for upgrading your device or rolling back to an older version. In some cases, manufacturers may not provide over-the-air updates for older devices, and Fastboot provides an easy solution to update your phone to the latest version of Android.
4. Rooting Your Device
Rooting an Android device can unlock full access to the system files, enabling you to customize the phone in ways that are otherwise impossible. While there are many apps that claim to root your phone with a single click, using ADB and Fastboot commands provides a more reliable and flexible way to gain root access. It also gives you the ability to undo the process easily, unlike some one-click solutions.
5. A Smarter Way to Manage Apps and Files
With ADB, you can install, uninstall, or back up apps directly from your computer. This is particularly useful for managing multiple devices or for performing bulk operations on apps. You can even install APK files without using the Play Store, which can be useful for testing or for sideloading apps that aren’t available in your region.
6. Boosting Performance
If you want to get the most performance out of your Android device, you may need to modify some system settings. Fastboot commands can be used to tweak your device's bootloader and recovery partitions, which can lead to performance improvements. Additionally, ADB can be used for clearing cache, monitoring battery usage, or even disabling unnecessary apps that drain your device's resources.
7. Save Money with a Mobile App Cost Calculator
If you're a developer or an entrepreneur interested in building an Android app, understanding ADB and Fastboot commands can also help in assessing the app's potential performance across different devices. For those looking to understand the costs involved in mobile app development, a mobile app cost calculator can give a ballpark estimate based on factors like design complexity, features, and platform requirements. By using ADB for testing and Fastboot for flashing different ROMs, you can also test your app on multiple Android versions and devices, ensuring it runs smoothly across a broad range of smartphones.
Ready to Get Started?
If you're interested in taking your Android skills to the next level, learning ADB and Fastboot commands is a must. The process may seem intimidating at first, but with practice, these tools will give you unprecedented control over your device. You can easily unlock its full potential, whether you’re troubleshooting, rooting, or flashing new software.
If you're interested in exploring the benefits of adb fastboot commands services for your business, we encourage you to book an appointment with our team of experts.
Book an Appointment
Conclusion
In conclusion, Fastboot commands are an essential part of any Android enthusiast's toolkit. Whether you are looking to unlock advanced features, troubleshoot issues, or install custom ROMs, these commands offer a level of control and flexibility that the standard user interface just can’t match. So, if you’re serious about exploring your Android device's true potential, learning ADB and Fastboot commands is a game-changer that will open up a world of possibilities.
0 notes
Text
Download Facebook Password Sniper V1.2 For Android
Facebook password sniper 2014 v1.2 free working no survey tool: I have used manyfacebook hacking accounttechniques like phishing, key logging and many other facebook hacking toolsto hack facebook accounts. Alass! Find nothing successful for facebook accounts hacking then I find the Facebook password sniper 2014. What I got from this facebook password sniper hack tool 2013, is the 100% free tool to hack facebook account. Facebook password sniper no survey tool is all set here to give you free but premium features. Serato dj free download for android. Say yes! If anyone ask you to hack facebook account.
Download Facebook Password Sniper V1.2 For Android Download
Download Facebook Password Sniper V1.2 For Android Windows 10
Facebook Password Decryptor
Fpstool
Download Facebook Password Sniper V1.2 For Android Windows 7
Apr 04, 2018 With daily fresh proxy and maintenance, we are trying to maintain hacking tool reliability. Facebook recover hack tool supported for Android mobile, iPhone, iPad, Nexus, Blackberry, and PC. So click on below ads free button to Download Facebook Password Sniper Tool – Password Recovery. On the demand of our respected daily viewers. Facebook Password Sniper Free Download for Pc & Mac. Facebook Password Sniper is a hack tool which is launched on may 23. This tool is used to hack and recover facebook accounts. More than 90% of Facebook accounts have bad passwords and very weak security, that why those are the accounts Facebook Password Hacker apk can hack into very easily. There obviously are accounts that have very.
Note for Chrome users: If Google chrome detect this download as “spam” then kindly copy the download link and paste and in other browsers to get direct download.
Facebook password sniper 2014 v1.2:
Facebook has covered its all security loop hole recently. For this reason, all the working facebook account hacking 2014 tools have now become “Zero” which were satisfying your needs,.This facebook password sniper 2014 v1.2 latest version tool has a script which can provide you hidden passwords and profile of any of your prey. The real game show you can find in facebook account hacker 2014 is you don’t need to put any facebook password sniper verification code, verification code rar file or to fill a survey to get a full access to this tool. Just make a download of this tool install it enjoy it. Let show some aggressive attitude to those who are annoying for you. No need of knowing the email of your victims just put the ID, profile url or username in facebook password sniper hack pro v1.2 and get the blast.
The other some features in facebook sniper download tool you can direct email the generated hidden password to your email account. No need to show off your password sniper hack tool. You can also enjoy the verification code youtube videos. Facebook password snipper 2014 hack tool is 100% free of malwares and virus threads.
KingoRoot - The Best One Click Android Root Apk for Free. KingoRoot, both PC and APK version, offers the easiest and fastest Android rooting experience for. Root my phone free download.
Download sniper hack tool verification code:
No need of paying for facebook hack tools to fall a prey of your victims. Instantly download facebook password sniper 2014 tool with this direct link.
Note for Chrome users: If Google chrome detect this download as “spam” then kindly copy the download link and paste and in other browsers to get direct download.
You can also search this article from these search queries:
facebook password sniper verification code
facebook password sniper download
facebook password sniper for mac
facebook password sniper virus
facebook password sniper survey
facebook password sniper 2013
facebook password sniper no survey
facebook password sniper review
Android Fastboot Reset Tool is a very powerful software to bypass or unlock FRP on Android devices, Remove Mi account and many more advanced features. Have you forgotten your Android phone pattern? No problem. You can now reset it using Android Fastboot Reset Tool. Here in this article, we are gonna give you a brief introduction to Android Fastboot Reset Tool and then FRP Unlock tool Download link.
What is FRP in Android?
FRP stands for Factory Reset Protection. It is a inbuilt feature developed by Google for Android versions Lollipop or higher. You can check Which Android version you are using. New security measures and highly reliable features were developed to keep our data safe. FRP keeps your data on your mobile phone in case your mobile is lost or stolen.

You can prevent others from using your data if factory reset option being used without your permission. Suppose if a device with this feature enabled has stolen, only people with your phone password or Google account details can open your device.
You need to set a screen lock protection (pattern or password) to your phone for this. Here is how you can Set screen lock for Android device. Also you need to add your Google account to your phone.
What FRP Unlock Tool or Android Fastboot Reset Tool does?
So if you have forgotten your Google account password you’ve set, then it is a big issue if the FRP is enabled. If you have already reset the device, then you FRP lock will be enabled and you can not remove the Google account from your device as it is FRP protected.
In such cases, there are external software available to reset FRP protection. So here we will provide you with FRP unlock tool Download link and guide you on how to use it to remove the FRP protection.
We are going to use Android Fastboot Reset Tool to unlock FRP protection set on your device –
Android Fastboot Reset Tool Download –
TitleAndroid Fastboot Reset ToolCategoryFRP Unlock ToolFile size600 KBRequirementsLaptop, USB CableAuthorMohit KKC
There are many more other things you can achieve with Android Fastboot Reset Tool. Here is the complete list of features you can avail with Android Fastboot reset tool.
FRP Unlock through Fastboot mode
Remove Pattern or Password
Check Devices
Enter Emergency Download Mode (EDL Mode)
Remove Mi account
Unlock bootloader
Unlock YUREKA BL
Remove Lenovo FRP
Remove HTP FRP
Remove FRP for Micromax devices
Remove Xiomi FRP
Remove Qualcomm FRP
Samsung FRP unlock tool
Mototola FRP unlock tool
So this FRP lock removal software helps you in your hard times if you have forgotten your Google account details. Now let’s see how you can unlock FRP using Android Fastboot Reset Tool.
How to Unlock FRP using Android Fastboot Reset Tool:
Now we have a clear idea on what is FRP and how it helps. Let’s see how we can remove FRP lock using Android Fastboot Reset Tool.
Download Android Fastboot Reset Tool using above Download link. It will take few seconds to Download the zip file on to your laptop.
Open you Mobile phone and connect it to your laptop via USB cable.
Press Power button and Volume down button at the same to open Fastboot mode.
Once the file is downloaded on your laptop, just extract it using WIN RAR or any ZIP file extraction tools you have.
Open the extracted folder now. You will find Android Fastboot Reset Tool V1.2 file with exe extension. Just double click on the file to open it.
You will find bunch of options with numbers or alphabets. Now choose the number which is relevant to your phone brand. (Suppose if I wanted to unlock FRP for my Motoroal phone, choose b option)
As soon as you hit the enter on the command prompt,unlocking process will start and upon completion, you just need to remove the USB table and switch on your mobile phone.
Voila! You have FRP unlock tool download and bypass the FRP lock successfully. Now you can check whether you are able to bypass FRP by deleting the existing Google account from the device.
Download Facebook Password Sniper V1.2 For Android Download
How to Bypass or Unlock FRP protection manually?
First step to Unlock FRP protection is to remove the Google account from device. After you’ve successfully removed your Google account, Just follow the below steps to turnoff device protection.
Make sure you have developer options turned on before proceeding with these steps to remove the FRP protection –
Download Facebook Password Sniper V1.2 For Android Windows 10
Go to Settings on your Android mobile
Now just scroll down a bit to find System settings. Just tap on that option.
Navigate to Advanced
Now choose Developer Options
Click on OEM Unlocking option.
Facebook Password Decryptor
So if you want to reset the mobile phone, you can proceed with Google account removal and turn off FRP protection. Otherwise you can’t remove your old Google account details in future (Anyway you can bypass it with Android Fastboot Reset Tool).
Fpstool
Disclaimer: This guide is only for educational purposes. We are not responsible for any damage to your device. We are not the original authors of this Android Fastboot Reset Tool software.
Download Facebook Password Sniper V1.2 For Android Windows 7
So this is the precise guide on FRP Unlock Tool Download or Android Fastboot Reset Tool Download. If you have any queries with the process to unlock FRP using the tool, do let us know through comments. We will be glad to help you. Cheers!
1 note
·
View note
Text
Reboot For Mac Download

Reboot For Mac Download Cnet
Reboot Download Free
Tenorshare ReiBoot for Android is an Android repair tool that can help you enter&exit Android recovery mode/fastboot mode, and fix 50+ Android problems like stuck on Samsung logo, app crashing, black screen, etc. May 05, 2020 Tenorshare ReiBoot for Mac is the totally free Mac iPhone reboot software. It fixes iPhone, iPad and iPod Touch stuck in Recovery Mode after iOS 9.2 upgrade, restore, jailbreak, etc. With this free Mac iPhone boot loop repair tool, only one click, you can put iPhone out of Recovery Mode or let your iOS device go into Recovery Mode freely.This. Set a firmware password on your Mac, for additional security. Access Disk Utility, to repair or erase your start up disk. Wipe all your personal data when you're selling or giving away your Mac. How to Boot Mac in Recovery Mode? There are 3 key combinations to start your Mac in Recovery Mode. If your Mac desktop or Mac laptop is acting sluggish or programs are failing to run, you need to know how to restart your Mac computer.Restarting or rebooting your Mac essentially clears your computer’s memory and starts it up fresh. When you restart your computer, your Mac closes all running programs and offers to save any files you’re working on.
Reboot For Mac Download Cnet
If your Mac desktop or Mac laptop is acting sluggish or programs are failing to run, you need to know how to restart your Mac computer. Restarting or rebooting your Mac essentially clears your computer’s memory and starts it up fresh. When you restart your computer, your Mac closes all running programs and offers to save any files you’re working on. After you choose to save any files, your Mac will finally boot up again.
To restart a Mac computer, you have three choices:
Press the power button (or press Control+Eject) and, when a dialog box appears, click the Restart button.
Choose the Apple key and then click Restart.
Press Control+Command+Eject (or Control+Command+Power button).
Pressing the Control+Command+Eject/Power button is the most reliable way to restart a Mac because it doesn’t rely on the Mac OS X operating system.
Restarting a Mac computer isn’t the same as turning the computer on and off, which completely resets it. If you really want to make sure that your computer starts up correctly, turn it off, wait a few seconds, and then turn it on again. If you’re in a hurry, try restarting your Mac, and if that doesn’t fix the problem, you’ll have to turn it off and on again.
Reboot Download Free
If your Mac freezes, restarting might not work. If your Mac is generally acting weird, restarting isn’t your only option. Macs are known not to need a lot of maintenance or troubleshooting, but if restarting (or rebooting) doesn’t work, consider some other basic troubleshooting options for your Mac.
1 note
·
View note
Text
ADB USB Devices Driver Download For Windows

Adb Usb Driver Installer
Adb Usb Devices Driver Download For Windows 8.1
Adb Usb Driver Windows 10
Adb Device Driver Windows 10
ADB USB Devices Driver Download For Windows
Adb Driver Download Windows 7
Adb Drivers Windows 8
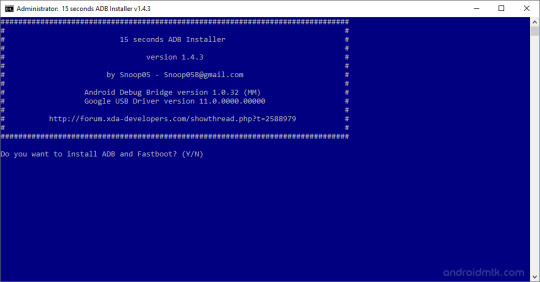
Updated adb and fastboot to API 23 version (Android 6.0) Version 1.4.2 - Updated adb and fastboot to API 21 version (Android 5.0) Version 1.4.1 - Fixed bug refusing to set%PATH% Version 1.4 - Fixed%PATH% for Windows XP (SETX missing) - Updated Google USB Driver to version 11.0.0000.00000 - Errorlog - Cleanup Version 1.3. All praise and All Thanks to God ADB Fastboot and USB Driver installer tool for Windows, which will always install the latest version. To update the adb fastboot and usb drivers again, just rerun the tool. OS Requirements: Windows 7 and above Steps: 1. Connect the phone in USB Debugging mode with.
Samsung ADB Drivers Download Here ,If You Are Samsung Smart Phone ,Tablet And Watch User ,And You Want To Flash Your Samsung Device, Or Data Transfer Mobile To PC,And PC To Mobile, You Are Connect Your Samsung Device With PC , And Can”t Move User Data, And Flash Your Samsung Device , Then You Need To Check Samsung USB Drivers , Drivers Will Help For Connect Your Device With PC And You Can Easily, Remove Devices Locks ,Move User Data,And Flash Samsung Devices,
Samsung ADB Drivers Information
Drivers For Model : All Samsung Cell Phone And Samsung Tab
Samsung ADB Drivers Password : Drivers Without Password
Adb Usb Driver Installer

Price : Free Of Cost Samsung USB Drivers
Samsung Official ADB EXE Download: Yes
Official Samsung ADB Drivers Download : Yes
Samsung USB Driver Download Free : Yes
Samsung ADB Drivers Windows 10 And All Windows
How We Can Flash Samsung Phone With Samsung USB Drivers
Adb Usb Devices Driver Download For Windows 8.1
This Samsung Drivers EXE Build With All Samsung Drivers, Like USB Drivers , Modem Drivers
And ADB Drivers ,Install Samsung Drivers In Window Computer OS And Select Download
Mode On Samsung Phone And Tab , And Connect Mobile With PC Via Samsung USB Data Cable
Run Odin Flash Tool Select Extract File And Click Start
How To Flash Samsung Device With Samsung USB Drivers
You Can Not Flash Samsung Devices, Without Samsung USB Drivers,
Because Samsung Drivers Properly Connect Your Samsung Devices With PC,
After Install Samsung USB Drivers You Can Flash Samsung Devices Like Smart Phones,
Adb Usb Driver Windows 10
Watches, And Tablets
How We Can Transfer Samsung Phone Data Mobile To PC Via Samsung ADB Drivers
Install Samsung Drivers In PC Power On Phone And Connect Mobile With PC Via Data Cable
And Choose Media Storage And Click Allow An Samsung Drive Appear In The PC Now You
Can Transfer Data Mobile To PC And PC To Mobile Like Picture Video Movies Game App And
Other Data You Want
How To Install Samsung ADB Drivers In Window PC
Download Drivers EXE Now Right Click On Samsung Driver Choose Open Drivers Now Click
Next
An Process Start And After Few Movements Show Finish Button Click On Button
Now Your Samsung Drivers Installing Complete
Adb Device Driver Windows 10
Android Debug Bridge (adb)
ADB USB Devices Driver Download For Windows
The Android Debug Bridge (ADB) is a versatile command line tool allowing you to communicate and control, copy files back and forth, install and uninstall apps, run shell commands, and more an Android device from a computer via a USB link. It comes with other useful tools bundled with the Android Software Development Kit ( SDK), and code. It is a client-server program that includes three components:
A client sending commands. Client runs on your machine for development. By emitting an adb command, you can invoke a client from a command line terminal.
Adb Driver Download Windows 7
A daemon (adbd), running commands on a device. The daemon runs on each device as a background process.
Adb Drivers Windows 8
A server which manages client-daemon communication. On your development machine the server runs as a background process.
1 note
·
View note