#Erin renouf mylroie
Explore tagged Tumblr posts
Text

101 Greatest Soups on the Planet by Erin Renouf Mylroie
1 note
·
View note
Text
Cookbook features recipes for two-ingredient dough that anyone can make
When it comes to baking, making a pie crust and recipes requiring yeast intimidate many people, including me. Let’s be honest, at least perception-wise, baking with yeast is more complex and sophisticated than baking methods that are quicker.
But why? Activating the yeast properly could be intricate, and the rising process requires time and patience. And without the exact measuring of ingredients and timing of when ingredients are added, you could end up with not-so-appealing results. Let’s not forget accurate baking time and having a properly calibrated oven.
When it comes to a recipe that lists yeast as an ingredient, many pass right by it. The chemistry behind baking, and the preciseness required for the chemical reactions that must occur to end up with a product that has the right texture and flavor, scares home cooks. This is usually not the case when it comes to other cooking techniques.
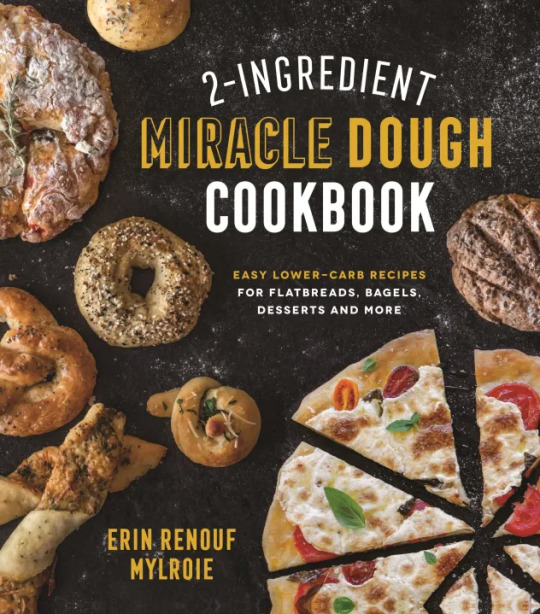
During my interview with author Erin Renouf Mylroie for my recent soup column, she mentioned her previous title, “2-ingredient Miracle Dough Cookbook: Easy Lower-Carb Recipes for Flatbreads, Bagels, Deserts and More” (2019, Page Street Publishing, $21.99). I was determined to get a copy.
She was originally skeptical when she came across two-ingredient dough while browsing online. Considering herself to be an avid baker, and not minding the hours to produce aged pizza dough to perfection, and other quality baked goods, she said: “The idea of a dough that could be ready in minutes with only two ingredients seemed almost like fool’s gold … and probably too good to be true.”
After trying a few recipes, she was sold on this new technique of baking.
“Anyone who can hold a spoon can make two-ingredient dough,” she writes. “Everyone can remember the ingredient list: equal parts Greek yogurt and self-rising flour. There’s no waiting, no rising, no complicated or fussy techniques here.”
Another plus she mentions is this dough is lower in calories and carbs. Why?
“Half of the bulk of the dough comes from protein-rich Greek yogurt,” she said. “You’ll always want to use Greek yogurt for two ingredient dough because of its thick texture. Regular yogurt will be too watery to get the thick and only slightly sticky dough. Greek yogurt is also a better source of protein than regular yogurt, so you’ll get more health benefit from this type.”
When asked about using this technique and the difference in the outcome vs. using yeast, she responded: “The leaveners in the self-rising flour react with the yogurt in the dough to create a light and fluffy baked good. It’s not exactly the flavor of yeast, but it gets the job of done with fantastic results!”
I asked her to pick her two favorite recipes from the book.
“I really love the bagels in the book,” she said. “It was the first two-ingredient recipe I tried, and the one that I return to must often. They make an excellent breakfast sandwich in the morning, a great snack with a schmear of protein, and they slice up nicely to make bagel chips if you’re blessed with any leftovers.
“I also love buttery parmesan and garlic knots. It’s hard not to love anything slathered with garlic butter. One of the sweet treats that I love is the Ginger and Brown Sugar banana cake. It’s a bit of a stretch to call it two- ingredient dough since I throw in a few more things, but it sure is scrumptious!”
What does she hope the reader learns from the book?
“I hope that readers of ‘2-Ingredient Miracle Dough’ will enjoy creating baked goods that are a little healthier, a little faster and a little easier than yeast risen baked goods you would normally make at home,” she said. “I hope it gets some readers back in the kitchen!”
She concludes the book’s introduction with, “Two-ingredient dough might seem a little too good to be true, but that’s the miracle.”
For the recipe for Four Seasons Sheet Pan Pizza—Pizza Quattro Stagioni visit https://bit.ly/4c2u0nY
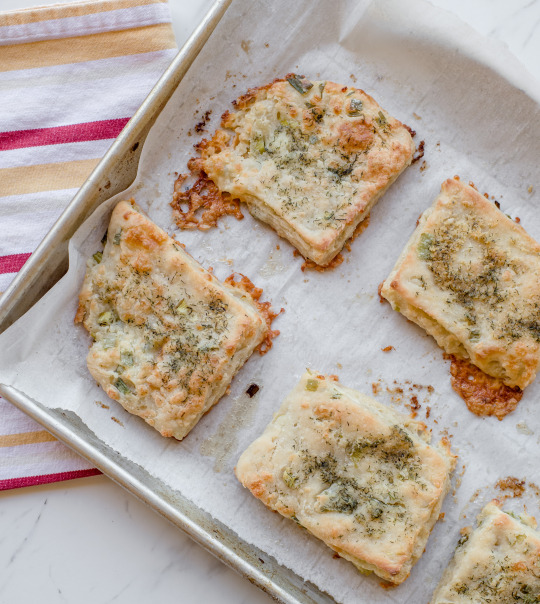
Monterey Jack Cheese, Dill and Scallion Biscuits
The headnotes says: “I love biscuits with barbecue in the summertime and with pot roasts in the winter. Biscuits come together so quickly, but like all warm breads, they make a meal seem almost holiday-special. If you have any leftover biscuits, these make a spectacular sandwich with leftover shredded barbecue meat and a little coleslaw.”
Makes 6 biscuits
Ingredients:
1½ cups self-rising flour, plus more for work surface
1½ cups plain Greek yogurt
3 tablespoons cold butter
½ cup Monterey Jack cheese, shredded
¼ cup sliced scallions
2 tablespoons butter, melted
½ teaspoon garlic powder
1 teaspoon dried dill weed
Directions:
Preheat the oven to 425 degrees and line a baking sheet with parchment paper.
In a medium bowl, mix the flour and yogurt until just combined. Grate the cold butter, using the large holes from a box grater, directly into the bowl with the flour and yogurt. Gently stir together. Stir in the shredded cheese and scallions.
Dust a work surface generously with flour. Transfer the dough to the work surface and knead until smooth, about 30 seconds. Press the dough into a rectangle, about 9 x 6 inches. Using a sharp knife, cut the dough into six equal-shaped square biscuits. Transfer the biscuits to the baking sheet, spacing about 2 inches�� apart.
In a small bowl, combine the melted butter, garlic powder and dill. Brush about half of the butter mixture over the tops of the biscuits. Bake for about 16 minutes, or until they are golden brown. Remove the biscuits from the oven and brush them with the remaining butter mixture. Cool for 5 minutes before eating.
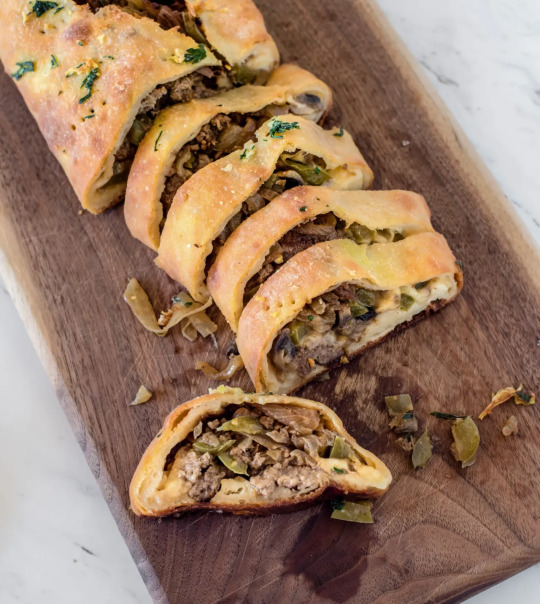
Philadelphia Cheesesteak Strombolipays homage to the two great Philadelphia food favorites: cheesesteak and stromboli. (Courtes of Ken Goodman)
Philadelphia Cheesesteak Stromboli
The headnote says: “This hearty dish pays homage to the two great Philadelphia food favorites: cheesesteak and Stromboli. The debate rages on over what is the proper cheese for a Philly cheesesteak, but I prefer provolone here because it melts beautifully and adds a hint of creamy sweetness. You could swap out the provolone for any cheese you like. One more note: this Stromboli is a Superbowl tradition at my house. Cut it small if you want to serve it as an appetizer.”
Serves 6
Ingredients:
1 tablespoon vegetable oil
1 pound tender beef sandwich steaks, raw, thinly sliced
1 green bell pepper, thinly sliced
1 onion, thinly sliced
6 ounces mushrooms, thinly sliced
1 tablespoon Worcestershire sauce
1¼ cups self-rising flour, plus more for work surface
1¼ cups plain Greek yogurt
8 ounces provolone cheese, sliced, or substitute shredded mozzarella
2 tablespoons butter
1 clove garlic, minced
1 tablespoon minced parsley
Directions:
Heat the oil in a large skillet over medium-high heat. Add the beef and cook about halfway through, about 3 minutes. Add the bell pepper, onion and mushrooms. Cook for about 7 minutes, or until the meat is cooked through and the vegetables are softened. Add the Worcestershire sauce and stir. Turn off the heat and let it cool slightly.
Preheat the oven to 425 degrees and line a standard baking sheet with parchment paper.
In a medium bowl, combine the flour and yogurt with a wooden spoon, stirring until a sticky dough forms. Generously flour a work surface. Turn dough out onto the work surface and knead, adding a dusting of flour from time to time, until the dough is no longer sticky. Roll or press the dough into a rectangle about 15 x 10 inches. Place the cheese in a long line parallel to the long edge of the dough, leaving a 4-inch margin. Cover the cheese with the beef mixture.
Roll up the dough, cinnamon roll style, until you have a tight cylinder, and pinch the edges shut. Transfer the Stromboli to the prepared baking sheet.
In a small microwaveable dish, heat the butter and garlic until the butter is melted and the garlic is fragrant, about 40 seconds. Add the parsley. Brush the dough with half the butter and garlic mixture. Cut a few slits along the top of the dough to allow steam to escape.
Bake the Stromboli for 14 to 18 minutes, or until it’s golden brown. Brush the Stromboli with the remaining butter mixture. Let it cool for 10 minutes before slicing into segments and serving.
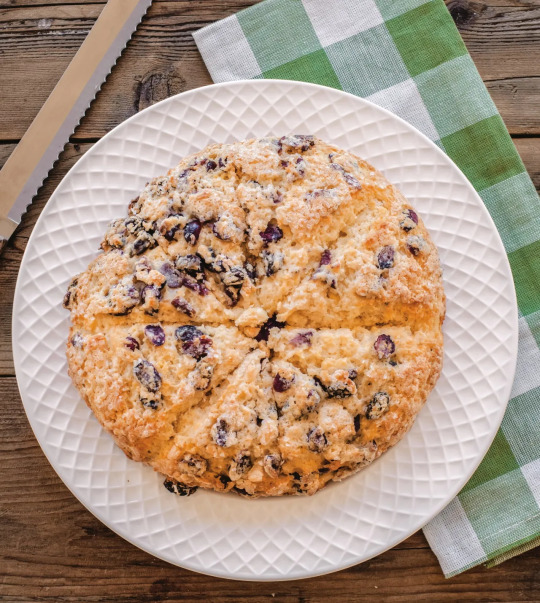
Sweet Irish Soda Bread with Currants and Raisins is perfect for St. Patrick’s Day. Serve it warm with a generous dollop of creamy Irish butter. You can add caraway seeds if you like for an interesting sweet and savory twist, (Courtesy of Ken Goodman)
Sweet Irish Soda Bread With Currants and Raisins
The headnote says: “I’m duty bound to make this special bread for St. Patrick’s Day every year, but it would be wonderful any day, especially if you serve it warm with a generous dollop of creamy Irish butter. You can add caraway seeds if you like for an interesting sweet and savory twist, but I like it best with dried fruit and a crunchy sugar topping. “
Serves 8
Ingredients:
½ cup dried currants or dried cranberries
¼ cup raisins
1½ cups self-rising flour, plus more for work surface
1 cup vanilla-flavored Greek yogurt
4 tablespoons sugar
1 egg
2 tablespoons cold butter, grated
2 tablespoons cream or milk
2 tablespoons turbinado or coarse sugar
Directions:
Place the currants and raisins in a small dish and cover with 1 cup boiling water. Set aside for 10 minutes.
Meanwhile, line a baking sheet with parchment paper and preheat the oven to 425 degrees.
In a medium bowl, combine the flour, yogurt, sugar, egg and butter. Drain the currants and raisins and stir them into the dough.
Generously flour a work surface. Turn out the dough onto the work surface. Knead the dough until a smooth dough forms, about 1 minute. Place the dough on the prepared baking sheet and brush with the cream and sprinkle with the turbinado.
Using a sharp knife, score the bread into eight pieces, cutting pie style into wedges, but not cutting all the way through to the bottom. Bake for 22 to 24 minutes, or until it’s golden brown. Serve in wedges with whipped butter if you like.
Recipes reprinted with permission from “2-Ingredient Miracle Dough Cookbook” by Erin Renouf Mylroie (Page Street Publishing Co., 2019)
Stephen Fries is professor emeritus and former coordinator of the Hospitality Management Programs at Gateway Community College in New Haven, Conn. He has been a food and culinary travel columnist for the past 16 years and is co-founder of and host of “Worth Tasting,” a culinary walking tour of downtown New Haven. He is a board member of the International Association of Culinary Professionals. Email him at [email protected]. For more, go to stephenfries.com.
0 notes
Text
Four Seasons Sheet Pan Pizza—Pizza Quattro Stagioni

The headnote says, "This pizza is a bit of a showstopper, maybe a bit of a show off too. It’s just so pretty to see a sheet pan full of four different pizza choices. If you’re like me, you’ll want a square of all four choices. If you’ve got picky eaters in your group, you could top one quadrant of the pizza with just plain cheese."
Serves 6
Olive oil cooking spray
2 tbsp (25 g) cornmeal
1½ cups (180 g) self-rising flour, plus more for working with the dough
1½ cups (375 g) plain Greek yogurt
1 (14-oz [400-g]) can petite diced tomatoes, drained
3 tbsp (75 g) tomato paste
3 tbsp (45 ml) olive oil, divided
1 tsp garlic powder
½ tsp crushed red pepper flakes, optional
1 tsp dried basil
½ tsp dried oregano
Pinch of sugar
Salt and pepper
3 cups (345 g) mozzarella cheese, shredded
4 oz (115 g) cremini or button mushrooms, thinly sliced
3 oz (90 g) prosciutto, thinly sliced
1 cup (170 g) marinated artichoke hearts, drained and thinly sliced
3 large Roma tomatoes, thinly sliced
10–12 small basil leaves
Preheat the oven to 425°F (220°C). Coat a sheet pan with cooking spray and the cornmeal.
For the dough, in a medium bowl, combine the flour and yogurt until a shaggy dough forms. Knead the dough in the bowl for a few turns, just until the dough forms a smooth ball. Turn out the dough onto the prepared baking sheet. Press the dough into the pan, sprinkling the top of the dough with a bit of flour as needed to prevent sticking, until the dough reaches the edges of the pan.
For the sauce, in a medium bowl, combine the diced tomatoes, tomato paste, 1 tablespoon (15 ml) olive oil, garlic powder, red pepper flakes, basil, oregano and sugar. Season to taste with salt and pepper. Spread the pizza with 1 cup (240 ml) of the sauce, leaving a 1-inch (2.5-cm) border all around. Spread the mozzarella cheese on the pizza.
For the assembly, in a small bowl toss the mushrooms with 1 tablespoon (15 ml) olive oil. Place the mushrooms on one-fourth of the pizza, creating a square area for each of the seasons. Place the prosciutto on one-fourth of the pizza, the artichokes on another one-fourth of the pizza and finally the tomatoes and basil on the remaining quadrant, tucking the basil underneath the sliced tomatoes. Drizzle the tomatoes and basil with the remaining 1 tablespoon (15 ml) of olive oil.
Bake the pizza for about 22 minutes, or until the cheese is melted and beginning to brown. Let the pizza cool for about 5 minutes before serving.
Recipes reprinted with permission from 2-Ingredient Miracle Dough Cookbook by Erin Renouf Mylroie. Page Street Publishing Co. 2019. Photo credit: Ken Goodman.

0 notes
Text
Soup is a welcome winter comfort food
It’s the time of year, at least in the Northeast, where a piping hot bowl of soup, gumbo, broth, chowder or consommé is a welcome comfort food on a cold and blustery, winter day. And don’t forget a slice of hearty crusty bread to go along with it. Perhaps that’s why January is National Soup Month.
Soup is a versatile dish and can be prepared using ingredients that are probably already in the fridge and pantry. Gluten-free, vegetarian, low-salt, dairy-free or vegan recipes can be adjusted to accommodate almost any diet. Soup is an economical meal, using leftovers and inexpensive ingredients. And it is easy to prepare, using just one pot, making cleanup a cinch.
No matter what country, region or culture you choose, there is a quintessential soup to experience. For example: pho is a popular Vietnamese soup, gumbo a traditional Creole dish, borscht from Eastern Europe, bouillabaisse from Marseille, a favorite of mine from Greece, Avgolemono, and of course, in the U.S., New England Clam Chowder.
Whatever soup you enjoy, here are interesting tidbits about one of our favorite dishes: in the U.S., we savor over 10 billion bowls of soup each year; women order a bowl twice as likely as men in a restaurant; soup has been around since 6,000 BC (very surprising ingredient, check it out), and believe it or not (I didn’t believe it at first) bar owners in Nebraska can’t sell beer unless they have a pot of soup on the stove.
Homemade soup is a favorite of mine, especially this time of year. Always looking to add to my repertoire; “101 Greatest Soups on the Planet: Every Savory Soup, Stew, Chili and Chowder You Could Ever Crave” by Erin Renouf Mylroie (2022, Page Street Publishing, $25.99) was added to my collection.
The photography is superb; I could almost smell the aroma of the steaming soup. The creative recipes such as Chicken Parmesan Soup With Mozzarella Croutons; Smoky BLT Tomato Soup With Homemade Croutons; Four Cheese Ravioli Soup; and Pennsylvania Leftover Roast Beef Stew caught my attention.
The author also shares recipes of her twist on more familiar soups: Italian Wedding Soup, French Onion Soup, Minestrone and Chicken Noodle Soup.
It was a delight to chat with the author who grew up in a large Italian family. She remembers as a very young child crawling to the counter to watch mom cook. When she was about 8, mom even let her assist in preparing a few recipes.
When asked what inspired her to write a cookbook (this is her third), she mentioned that she used to write family cookbooks for relatives for the holidays. Mylroie went on to talking about the many recipe contests she entered (National Beef Cook-Off, and the infamous Pillsbury Bake-Off, among many others).
Her appearances on Guy Fieri’s “Ultimate Recipe Showdown” on the Food Network and the “Rachael Ray Show” also inspired her to write cookbooks. The ultimate decision was when during one of Mylroie ‘s monthly cooking segments on Studio 5 Salt Lake, another guest doing a segment asked if she was interested in writing a cookbook. That guest put her in touch with a publisher….the rest is history.
There are many soup cookbooks in the market, so I asked what separates hers from the rest.
“Variety, there’s something for everyone; upscale, ease of prep, budget friendly,” she said.
Mylroie also includes vegetarian and vegan options plus slow cooker and Instant Pot instructions for each recipe. She shares these options only if it works.
Her answer to how she would describe her cooking in three words: “Intuitive, adventurous, celebratory.”
She enjoys engaging with her readers and seeing the photos they send of her recipes that they prepared at home. One even made all 101 recipes from the book. Now that speaks for itself!
Here are a few to get you started. For the recipe for Smoky BLT Tomato Soup With Croutons, go to https://bit.ly/495fLMX.
Bacon Jalapeño Cheeseburger Soup
The headnote says: “Hand this steaming, beefy bowl to anyone who tries to tell you that soup isn’t substantial enough for dinner. With tender potatoes, smoky bacon, juicy ground beef, spicy pickled jalapeños with a drizzle of their puckery juices and melted Cheddar cheese, this soup is filling enough to turn anyone from hungry to happy.”
Makes 6 servings
Ingredients:
1 pound lean ground beef
2 tablespoons butter
1 large onion, diced
2 cloves garlic, minced
1 jalapeño, minced
2 large carrots, peeled and cut into bite-sized pieces
Salt and pepper, as desired
⅓ cup all-purpose flour
3 large potatoes, peeled and cut into bite-sized pieces
2 tablespoons fresh parsley or 1 tablespoons dried, plus more for serving
1 tsp dried oregano
5 cups chicken broth, plus more if needed
1 cup half-and-half
½ cup sour cream
2 cups shredded sharp Cheddar cheese, plus more for serving
2 tablespoons brine from a jar of pickled jalapeños
Pickled jalapeño rings, for serving
½ pound crumbled cooked bacon, for serving
Directions:
In a large pot, brown the ground beef over medium heat, breaking it up with a wooden spoon. When the meat is almost browned, add the butter, onion, garlic, jalapeño and carrots. Season with salt and pepper. Saut�� for 5 minutes, or until the veggies begin to soften. Stir in the flour and cook for 1 minute, or until the flour is no longer white and powdery. Add the potatoes, parsley, oregano and broth. Bring it to a boil, reduce the heat and simmer for 15 minutes, or until the vegetables are tender. Stir in the half-and-half and sour cream.
Bring the soup back to a low simmer and stir in the cheddar and brine. Remove from the heat when the cheese is just melted. Season to taste with salt and pepper, and add a little more broth if the soup seems too thick. To serve, ladle the soup into six bowls. Top with cheese, pickled jalapeño rings, bacon and a little parsley.
Slow cooker instructions: Follow the recipe as instructed through adding the broth. Transfer the mixture to a slow cooker. Cook on high for 2 to 3 hours or on low for 4 to 6 hours. Proceed with the recipe as directed.
Instant Pot instructions: Set the Instant Pot to the simmer mode. Follow the recipe as instructed, using the Instant Pot, through adding the broth. Close the Instant Pot and pressure cook on high for 10 minutes. Use the natural release method. Proceed with the recipe as directed.
Four Cheese Ravioli Soup
The headnote says: “You can make your own cheese ravioli for this gentle, comforting soup, or you can do what I most often do — purchase a package of fresh ravioli in the refrigerated section of the supermarket. If you can’t find fresh ravioli, you can use tortellini or even just plain pasta, but add plenty of mozzarella and Parmesan when serving.”
Makes 4 servings
Ingredients:
1 tablespoon olive oil
1 onion, chopped
3 carrots, chopped
3 celery ribs, chopped
2 cloves garlic, minced
2 tablespoons all-purpose flour
2 tablespoons tomato paste
Pinch of crushed red pepper flakes
5 cups chicken broth, plus more if needed
1 (10-ounce package of fresh four cheese ravioli or any flavor
2 cups coarsely chopped spinach or escarole
2 tablespoons sliced fresh basil
Salt and pepper, to taste
Directions:
Heat olive oil in a large pot over medium-high heat. Add the onion, carrots, celery and garlic. Sauté for 5 minutes, or until the vegetables begin to soften. Add the flour and cook for 1 minute, or until it is no longer white and powdery. Stir in the tomato paste, red pepper flakes and broth.
Bring the soup to a boil, reduce the heat and simmer for 10 minutes. Stir in the ravioli and simmer using the cook times on the package directions as your guide. Add more broth if the soup seems too thick. Just before serving, add the spinach and basil and season to taste with salt and pepper. Ladle into four bowls and serve.
Vegetarian option: Substitute vegetable broth for chicken broth.
Pennsylvania Leftover Roast Beef Stew
The headnote says: “I don’t know if this soup is really Pennsylvania-esque, per se, but the recipe comes from my best college friend, Kimmarie, who is from Pennsylvania. We’ve been trading recipes ever since we moved out of the dorms, too long ago to even mention how many years. Everyone should have a friend like Kimmarie, the kind who can swap stories and laughs as easily as she swaps the best recipes. If you have any leftover pot roast on hand after a big family dinner, make this soup a few days later. Although not part of the original recipe, I add a little shredded provolone on top, almost like a Philly cheese steak—another way this soup earns its inclusion of Pennsylvania in the recipe title.”
Makes 4 servings
Ingredients:
1 tablespoon olive oil
1 medium onion, chopped
2 cloves garlic, minced
2 green bell peppers, chopped
8 ounces button mushrooms, chopped
1 tablespoon Italian seasoning (or use equal parts dried basil and oregano)
2 cups leftover beef pot roast
1 (14 ½ -ounce can stewed tomatoes or petite diced tomatoes, undrained
4 cups beef broth, plus more if needed
Salt and pepper, to taste
1 cup shredded provolone or mozzarella
Basil leaves, for garnish
Directions:
In a large pot, heat the olive oil over medium heat. Add the onion, garlic, bell peppers and mushrooms and sauté for 5 minutes, or until the veggies begin to soften. Add the Italian seasoning and cook for 30 seconds. Stir in the leftover pot roast, tomatoes and broth. Bring it to a boil, reduce the heat and simmer for 20 minutes, or until everything is tender, adding more broth if the soup seems too thick. Season the soup to taste with salt and pepper. To serve, ladle the soup into four bowls, top with the cheese and basil and serve. The recipes is freezer friendly.
Slow cooker instructions: Place the onion, garlic, bell peppers and mushrooms in the bottom of a slow cooker. Drizzle with the olive oil and sprinkle with the Italian seasoning. Add the pot roast, tomatoes and broth. Cover and cook on high for 2 to 3 hours or on low for 4 to 6 hours. Season with salt and pepper and serve as directed.
Instant Pot instructions: Set the Instant Pot to Sauté mode. Follow the recipe as directed, using the Instant Pot, through adding the broth. Close the Instant Pot and pressure cook on high pressure for 10 minutes. Use the natural release method. Proceed with the recipe as directed.
Credit: Recipes reprinted with permission from “101 Greatest Soups on the Planet” by Erin Mylroie, Page Street Publishing Co., 2022.
Stephen Fries is professor emeritus and former coordinator of the Hospitality Management Programs at Gateway Community College in New Haven, Conn. He has been a food and culinary travel columnist for the past 16 years and is co-founder of and host of “Worth Tasting,” a culinary walking tour of downtown New Haven. He is a board member of the International Association of Culinary Professionals. Email him at [email protected]. For more, go to stephenfries.com.
1 note
·
View note
Text
There’s still time to bake those cookies....
Here’s a preview of my column that will publish soon.....

Cinnamon, cloves, nutmeg, ginger, Christmas trees, stars, candy canes, sleighs and snowmen all are popular flavors and/or shapes of holiday cookies. After Thanksgiving, cookie sheets are dusted-off, and heirloom family cookie recipes are dug up so we can begin to bake and share sweet treats with family and friends. Beautiful tins of cookies travel through the mail to those we love, who are not nearby. There are families who bake cookies together virtually, too, especially if they are not around the corner.
Although National Cookie Day was December 4, let’s continue the celebration by learning a “bite” about a favorite treat and adding a few new creations to the cookie repertoire.
My research found that the term “cookie” is derived from “koekje,” the Dutch word for “little cake.” According to culinary history, to test oven temperatures before putting a cake in the oven, a small amount of batter was baked — and voila, the cookie was born.
Wikipedia says, “the earliest examples of Christmas cookies in the United States were brought by the Dutch in the early 17th century. Due to a wide range of cheap imported products from Germany between 1871 and 1906, following a change to importation laws, cookie cutters became available in American markets. These imported cookie cutters often depicted highly stylized images with subjects designed to hang on Christmas trees. Due to the availability of these utensils, recipes began to appear in cookbooks designed to use them. In the early 20th century, U.S. merchants were also importing decorated lebkuchen cookies from Germany to be used as presents.”
Speaking of cookie cutters, did you know there is a National Cookie Cutter Historical Museum in Joplin, Mo.?
According to the cookie Elf www.cookie-elf.com:
· Americans consume over 2 billion cookies a year … about 300 cookies for each person.
· Half the cookies baked in American homes each year are chocolate chip.
· Girl Scouts sells 200 million boxes of cookies a year.
· The largest collection of cookie jars numbers at 2,653 and belongs to Edith Eva Fuchs, a resident of Metamora, Indiana.
· Massachusetts adopted the chocolate chip cookie as its official state cookie in 1997. Chocolate chip cookies were invented in 1930 at the Toll House Restaurant in Whitman, MA.
· Biggest cookie: The biggest recorded cookie was baked on May 17, 2003 in Flat Rock, NC by Immaculate Baking Company. It clocked in at 102 feet wide and weighed over 40,000 pounds. Check out the story here https://bit.ly/2Wc0bOz
· The first commercial cookie to be massed-produced in the U.S. were Animal Crackers, introduced by Nabisco in 1902.
More facts…..
· Most cookies baked in an hour: According to The Guinness Book of World Records, Frank Squeo and Baking Memories 4 Kids of West Nyack, NY, 6,018 cookies were baked in one hour on December 7, 2019
· According to www.statesymbols.com “legislation to adopt a state cookie has been held up for years in Pennsylvania as lawmakers struggled between chocolate chip, Nazareth sugar cookie, and the oatmeal chocolate chip cookie.
So what new cookies will I be baking this year? A few will be from “101 Greatest Cookies on the Planet” by Erin Renouf Mylroie (2020, Page Street Publishing, $22.99). These cookie recipes include many favorite flavors. From New York City Giant Chocolate Chip Walnut Cookies, Nutella Lava Cookies, Peppermint-Dipped Pumpkin Biscotti, Maple- Pecan Shortbread to Hot Cocoa and Marshmallow
Sno-Cap Cookies, the recipes are perfect to make your gift-giving and celebration effortlessly sweet, and, even better, most of the recipes can be prepared in a single bowl to cut down on cleanup.
Now light up the oven, get the kids involved and start baking these cookies from the book! For the recipe for Half-Dipped Peppermint Bark Cookies, visit https://bit.ly/3HESAPm
Dutch Spice Cookies
The author writes, “I’ve been making these Dutch spice cookies since Sailor and West were teeny-tiny. At Christmastime, we like to celebrate the Dutch tradition of Santa Claus. Sailor and West leave their shoes by the fireplace, and ‘Sinter Klaas’ fills their shoes with candy and these Dutch cookies that I bake the night before. It’s also a tradition to get new shoes this night since I don’t like the idea of leaving candy and cookies by used shoes. Ha!”
“You’ll recognize the warm, comforting flavors in these cookies from cookie butter, which has become so popular in the United States. In fact, if you want to make a little cookie butter, just crumble a few of these cookies and puree them with a little butter and condensed milk to form a peanut butter- like consistency. There you go: cookie butter!”
½ cup unsalted butter, softened
1 cup brown sugar, packed
1 egg
¼ teaspoon salt
¾ teaspoon baking powder
¼ teaspoon baking soda
1 teaspoon cinnamon
1 teaspoon ginger
1 teaspoon allspice
½ teaspoon cloves
½ teaspoon nutmeg
1 ½ cups all-purpose flour, plus more for the work surface
In a large bowl, mix the butter and sugar until light and creamy, about 2 minutes. Add the egg and stir to combine. Sprinkle the salt, baking powder, baking soda, cinnamon, ginger, allspice, cloves and nutmeg over the batter. Mix for 2 minutes, or until all the spices and powders are thoroughly combined. Gently stir in the flour. Gather the dough into a ball and wrap in plastic wrap. Chill the dough for at least 2 hours, or up to 1 week. About 15 minutes before you are ready to bake, take the cookie dough out and leave it on the counter. Preheat the oven to 350 degrees. Line two baking sheets with parchment paper. Lightly flour a work surface. Roll the dough to a thickness of ¼ to ½ inch. You can use a special Dutch cookie cutter, but I like to cut the cookies into rectangles. Simple! Bake the cookies on the prepared cookie sheets, leaving about 1 inch of space between cookies, for about 12 to 15 minutes, or until starting to brown on the edges. Makes 40 cookies.

White Chocolate-Dipped Ginger Crinkles
The headnote says, “Do you ever get invited to those Christmas cookie exchange parties? I never know what to bring. Ironic, right? The best thing that ever happened to me at a cookie exchange was getting this gingersnap recipe. The cookies are gorgeous — full of deep crinkles and a sparkly sugar coating — but wait, there’s more! These pretty Christmas treats are dipped in white chocolate and sprinkled with red and green sprinkles — like they’re all wrapped up for Christmas. Look for holly sprinkles if you want to make these extra festive.”
¾ cup vegetable shortening, softened
1 cup granulated sugar, plus more for rolling
¼ teaspoon molasses
½ teaspoon salt
1 egg
1 teaspoon cinnamon
2 teaspoon baking soda
1 tablespoon ginger
2 cups all-purpose flour
8 ounces white chocolate melting discs, or white vanilla-almond bark
Red and green sprinkles
Preheat the oven to 350 degrees. Line three cookie sheets with parchment paper.
In a large bowl, cream the shortening and sugar until light and fluffy. Add molasses, salt and egg, mixing until well combined. There should be no streaks of egg or molasses. Sprinkle the cinnamon, baking soda and ginger over the dough. Stir until well combined. Gently mix in the flour. Shape dough into ¾-inch balls. You should have about 36 balls. Roll each one in sugar and place on the cookie sheets with 2 inches between each cookie. Bake the cookies for 12 to 15 minutes, or until crinkled and puffed. Cool for 5 minutes on the cookie sheets. Transfer to a rack and cool completely.
Melt white chocolate according to package directions. Dip half of each cookie in the chocolate and sprinkle the dipped side with the red and green sprinkles. Return to rack and let the cookies rest until the chocolate is completely set. If you need the chocolate to set quickly, you can put the cookies in the fridge. Makes about 36 cookies.
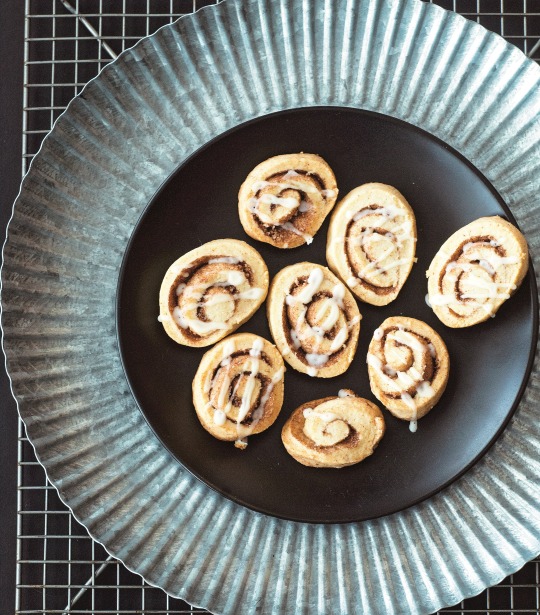
Glazed Cinnamon Roll Cookies
The headnote says, “Don’t let the tiny little bit of yeast in this cookie scare you away. You don’t have to do anything special. You can treat it like any other dry ingredient — just throw it in the dough when you add your salt. The little bit of yeast is going to give these cookies a tiny bit of lift and a little bit of the raised dough flavor that you associate with fluffy, homemade cinnamon rolls. They take a little bit of patience since the dough needs to chill for at least 4 hours. I usually just make them the day before. I love these cookies with a traditional vanilla glaze on top, but I also love them with an orange glaze (just add a teaspoon of orange zest and use orange juice instead of milk), or a maple glaze (trade the vanilla for maple extract). These might be my mom’s favorite cookies in the whole book. She loves to tell her friends about them.”
Cookies
½ cup unsalted butter, softened
½ cup granulated sugar
1 egg
½ teaspoon vanilla extract
¼ teaspoon salt
½ teaspoon active dry or rapid rise yeast
½ teaspoon baking powder
1 1/3 cups all-purpose flour, plus more for the work surface and as needed
¼ cup brown sugar, packed
2 teaspoons cinnamon
Glaze
¾ cup powdered sugar
1 teaspoon vanilla extract
2 tablespoons milk
To make the cookies, in a large bowl, cream the butter and sugar until light and fluffy. Add the egg and vanilla. Sprinkle the salt, yeast, and baking powder over the top. Mix well. Gently stir in the flour. The dough should be the texture of Play-Doh. Add additional flour as necessary, a tablespoon at a time, until the dough is slightly sticky.
On a lightly floured surface, roll out the dough into a 15-inch-by-7-inch rectangle. Sprinkle the dough with the brown sugar and cinnamon. Roll up the dough, starting with the long edge, into a cylinder. The dough might tear a little, but just keep patiently working and rolling. Any little rips will not show up in the final product. Pinch the dough to seal it tightly at the seam. Wrap the dough in waxed paper and place in the fridge. The cylinder of dough usually stretches a little. I notice that it’s usually about 18 inches long by the time I get it to the fridge. Chill the dough for at least 4 hours, or up to 1 week. When ready to bake, preheat the oven to 350 degrees. Line two baking sheets with parchment paper. Slice the dough into ½-inch rounds and place on the baking sheets. Bake until just set and golden brown on the bottom, around 8 to 10 minutes. Prepare the glaze by combining powdered sugar, vanilla and milk until smooth. Dip the top of the cooled cookies in the glaze. Makes about 36 cookies.

New York City Giant Chocolate Chip Walnut Cookies
1 cup unsalted butter, cold1 cup brown sugar, packed
½ cup granulated sugar
2 eggs
1 teaspoon salt
¾ teaspoon baking powder
¼ teaspoon baking soda
¼ cup cornstarch
2 ¾ cups all-purpose flour
2 cups semisweet chocolate chips
2 cups chopped walnuts
Put the butter in a large, microwaveable bowl and microwave on high for about 20 seconds to soften — not melt — the butter. Stir in the brown sugar and granulated sugar. With a wooden spoon or an electric mixer, beat until light and fluffy. Add the eggs and stir until well combined. Sprinkle the salt, baking powder, baking soda and cornstarch over the dough. Stir or beat for 1 minute. Add the flour and stir very gently until just combined. Fold in the chocolate chips and the walnuts. Shape the dough into 8 equal balls. I like to gather the dough into a giant ball and cut it in half, then divide it in half again, and then again to get 8 semi-equal pieces. Place the balls on a plate and chill, uncovered in the fridge, for 2 to 4 hours. If you chill the dough longer it will take just a few more minutes to bake, which is fine, but be ready to adjust your bake time. While the dough is chilling, preheat the oven to 415 degrees. Line two baking sheets with parchment paper. Transfer dough balls to the baking sheets, spacing them out evenly. Bake one tray at a time on the center rack until tops of the cookies are just starting to brown, about 11 to 13 minutes. You can rotate the pan if the cookies are browning unevenly. Let the cookies cool for 10 minutes on the baking sheet before devouring, or before moving them to a rack to cool completely. The cookies are at their best after 10 minutes of rest when the chocolate chips are ooey gooey, but they will still be delicious after a few days. The chips will be set, but the cookies will still be soft and tender inside. Makes 8 giant cookies.
Recipes and images reprinted with permission from 101 Greatest Cookies on the Planet by Erin Mylroie, Page Street Publishing Co. 2020. Photo credit: Ekaterina Smirnova

Stephen Fries, is a newly retired professor and coordinator of the Hospitality Management Programs at Gateway Community College, in New Haven, CT. He has been a food and culinary travel columnist for the past 14 years and is co-founder of and host of “Worth Tasting,” a culinary walking tour of downtown New Haven, CT. He is a board member of the International Association of Culinary Professionals. [email protected] For more, go to stephenfries.com.
0 notes