#Download ADB
Explore tagged Tumblr posts
Visit Tumblr Blog
Explore Tumblr blogs with no restrictions, modern design and the best experience.
Last Seen Tumblr Blogs


Fun Fact
Tumblr’s website traffic is steadily declining.
Text
he is listening 2 my music with me :3
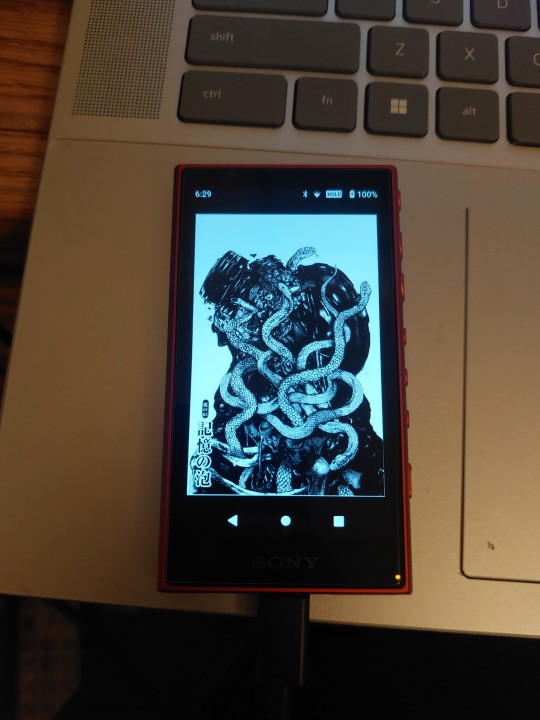
#debloated it (as in used adb to get rid of most google stuff) and streamlined the whole thing a bit#found a decent sized micro sdxc so im no longer running out of space from..167 songs#which means i can add more yippee!#i wanna add the music i have downloaded on my phone but its mostly misc songs from youtube... which means ill have to do most of the#formatting for covers artists etc manually...#the site ive been using for this already has everything but track numbers so its gonna be rlyyy annoying
1 note
·
View note
Text
How to Remove or Disable YouTube on Samsung Devices
If you're looking to remove the YouTube app from your Samsung device, it's important to note that YouTube is often a pre-installed system app, which means it cannot be completely uninstalled through standard methods. However, there are several approaches you can take to disable or remove it from your device.
1. Disable the YouTube App
Disabling the app prevents it from running and removes it from your app drawer.
Open Settings.
Navigate to Apps.
Scroll down and select YouTube.
Tap on Disable.
Confirm by tapping Disable again.
While in the YouTube app settings, tap on Storage.
Select Clear Data and Clear Cache.
This method doesn't uninstall the app but prevents it from running and frees up storage space.
2. Remove YouTube Using ADB (Advanced Users)
For a more permanent solution, you can use Android Debug Bridge (ADB) to uninstall the app. This method requires a computer and some technical knowledge.
Steps:
Enable Developer Options on Your Phone:
Go to Settings > About phone.
Tap on Build number seven times to activate Developer Mode.
Return to Settings and access Developer options.
Enable USB debugging.
Set Up ADB on Your Computer:
Download and install the Minimal ADB and Fastboot tool.
Connect Your Phone to the Computer:
Use a USB cable to connect your device.
When prompted on your phone, allow USB debugging.
Uninstall YouTube via ADB:
Open the ADB command interface on your computer.
Enter the following command to list connected devices: nginxCopyEditadb devices
Once your device is recognized, enter: cssCopyEditadb shell pm uninstall --user 0 com.google.android.youtube
This command removes the YouTube app for the current user. Note that this method doesn't delete the app from the system partition, so a factory reset might restore it.
3. Remove Your YouTube Account
If your goal is to disassociate your account from the YouTube app:
Open the YouTube app.
Tap on your profile icon in the top right corner.
Select Manage your Google Account.
Navigate to the Data & privacy tab.
Scroll down and tap on Delete a Google service.
Enter your password when prompted.
Next to YouTube, click the trash bin icon.
Follow the on-screen instructions to permanently delete your YouTube account.
Be aware that this action will delete all your YouTube data, including playlists, subscriptions, and history.
⚠️ Important Considerations
System Apps: YouTube is often a system app on Samsung devices, meaning it can't be fully uninstalled without rooting your device.
Rooting Risks: Rooting can void your warranty and may lead to security vulnerabilities. Proceed with caution.
Alternative Solutions: If you want to limit YouTube usage without removing it, consider setting up Parental Controls or using Digital Wellbeing features to restrict access.
By following these methods, you can effectively remove or disable the YouTube app on your Samsung device, depending on your needs and technical comfort level.
2 notes
·
View notes
Text
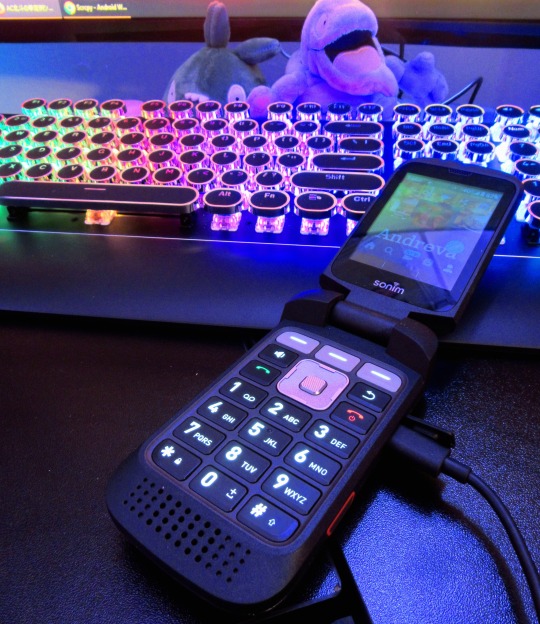
My flip phone came in the mail :) It's a Sonim XP3plus, and it was actually released in 2021 so not super ancient in terms of features
It has an Android OS, but just a really basic version that doesn't have an app store. So I learned how to use ADB to edit code/files on the phone using my computer, and I found a place to download Android apps as APKs, so that I could basically force smartphone apps that require a touchscreen onto this flip phone lol
I like that it's more basic though, being used to desktop PCs all my life has made me not that invested in smartphones anyway. Like I was writing down all the apps from my old phone I absolutely needed to transfer, and it was 1. a two-factor authentication app, and 2. Tumblr, just because there's literally nothing else to do on my break otherwise :P
EDIT: Wait I figured out how to read visual novels on it, maybe I'll just do that instead lol

16 notes
·
View notes
Text
how to make newpipe run on windows links:
android subsystem & adb install walkthru
15 second adb installer link since the article link is broken
newpipe
besides being ad free youtube, newpipe allows you to directly download videos as audio only, which is amazing if you're trying to get away from streaming services
1 note
·
View note
Text
Android Apps are essentially the software designed to increase the efficiency of handsets and get specific needs addressed. The apps enhance the efficiency of the mobile handsets and some handy and amazing features can be enabled on the mobile with the help of apps. If you are reading this article, you may already be convinced that developing for android platform is worth it. Here is a summary of the hand-picked Android apps for web developers to skyrocket their productivity: AIDE - Android Java IDE AIDE helps in developing Android programming on the handset. This app assists in coding the android apps on the phone and it can be compiled into an app for checking them on the handset as well. It is an amazing app which can be used anytime and anywhere. Subdroid Subdroid is useful in tracking the various versions of source files. The free download supports most of the operations and helps managing files more efficiently. The latest version of SVN helps make a local copy of repository without making a working SVN copy. ConnectBot ConnectBot is a freeware and is probably the best app for making SSH tunnels. The app is extremely fast and the critical keyboard issue that existed in the earlier versions has been addressed to make it better. Works excellent with the ConnectBot Keyboard. WebMaster's HTML Editor Lite It’s the portable source code editor with some salient features. Although, a Save button to save files faster would have been more helpful. The Preview option should also be modified to make it better. Moreover, if the Find and Replace buttons are provided for this app, it would be much more user-friendly. AndFTP AndFTP is helpful in managing many FTP configurations. It has several features like download, upload, synchronization and resumes support. It provides options for remote file browsing and also has a local file browser. However, the larger icons would have been a better option along with a menu option. Android-VNC-Viewer Android-VNC-Viewer helps in viewing your computer from anywhere. It connects to several of the VNC servers and works excellent. The refresh option works a little slow though. However, it’s a good solution to view the computer through mobile handsets. This is an excellent app for viewing your computer from any place and can be used to send files of any form to the computer as well. PicsArt - Photo Studio It’s the best app for those who are interested in photography as this free app facilitates creativity on the mobile. PicsArt - Photo Studio truly makes photo editing easier and enjoyable on your mobile. It also provides various options to make the photo artistic. Mockups Lite for Android The app helps in quickly designing the wireframes for websites. It is also handy in experimenting with concepts and drawing visual prototypes. The app assists in creating interactive wireframes which can be shared with others. Mockups Lite, however, is more suitable for tablets than mobile phones. Logcat The app facilitates the collection and viewing of system debug output. The logs from different applications are gathered in a series of circular buffers. This can be filtered or viewed using Logcat. Logcat can be used to view log messages from an ADB Shell as well. Magic Color Picker Magic Color Picker is the appropriate tool for anybody interested in designing. It provides color picking options with color models and is one of the best apps for designing and coloring options. It also enables the selection of color using sliders. The colors are displayed either in hex or decimal, which is very convenient. ASTRO File Manager/Browser It’s the app which organizes the files. Browsing and organizing are easy with this app. It’s also an ideal app for music; photo and video geeks as organizing them is much easier with this app. It has an excellent rating given by users, suggesting it to be a fine app for managing files. The only flaw in this application is the advertisements which keep popping up.
Bookmark Tree Manager This app can be used to manage your bookmarks on the android phone. This allows you to organize your browser bookmarks into folders. Speed Test.net This is a simple connection and network speed testing app on your android device. Devcheats This is an awesome handy cheat sheet application for Android. This can be really useful if you have a tablet. This app contains cheat sheets on various topics and languages including python, ruby on rails, PHP, Jquery, CSS, SEO, apache, regular expressions, svn, bash, c++, Drupal, gcc, gdb, html5, javascript, microformats, MySQL, PostgreSQL, UNIX, WordPress Zipper The zipper is a file managing application on Android. This app helps in managing the files in any way you want, just like on a PC. Zipping, unzipping, copying, moving, pasting and a host of other features are available when you have this app. It is a good app for managing data on an SD card and helps in accessing zipped text easily. These free apps are useful not only for web developers but any software developer. They enable the users to be on the move, as these apps can be accessed on the mobile phone and therefore can be carried wherever the person goes.
0 notes
Text
Unitree Go2 Pro Meets Meta Quest 2
The Unitree Go2 Pro and Meta Quest 2 are cutting-edge devices that push the boundaries of robotics and virtual reality (VR). The Unitree Go2 Pro is a quadruped robot dog known for its AI intelligence, agility, and responsive sensors. Meanwhile, the Meta Quest 2 is a standalone VR headset that delivers immersive experiences. When integrated, these devices create a powerful synergy—where physical robotics and virtual interaction meet, opening the door to futuristic applications in entertainment, education, industrial simulation, and beyond.
Getting Started: Preparation and Requirements
Before diving into the setup, it’s essential to prepare your hardware and software environment. Both devices need to be fully charged and updated to the latest firmware versions. Ensure they’re connected to the same stable Wi-Fi network, as consistent connectivity is vital for real-time interaction.
In terms of hardware and software, here’s what you’ll need:
• Unitree Go2 Pro: Ensure it’s powered on and connected to the same Wi-Fi network as your PC.• Meta Quest 2: A standalone VR headset to get stunning experience.• VR-Capable PC: A computer with sufficient performance to run VR applications and handle robot control.
Software Tools:• Unitree Go2 WebRTC Driver – Enables real-time communication between the robot and your device.• AVP Teleoperate Package – Lets you control the Go 2 Pro remotely with precision.• Cerebro-Control – Seamlessly integrates VR features for Meta Quest 2.
Step-by-Step Setup Guide to connect Unitree Go2 Pro to Meta Quest 2
1. Enable Developer Mode on Meta Quest 2
Install the Meta Quest mobile app on your smartphone.• Connect your Meta Quest 2 headset to the app.• Enable Developer Mode in the headset settings via the app.
2. Install Android Debug Bridge (ADB) on Your PC
Download and install the Android SDK Platform Tools.• Connect your Meta Quest 2 to the PC using a USB cable.• Allow USB debugging when prompted on the headset.
3. Set Up the Unitree Go2 WebRTC Driver
• Clone the Unitree Go2 WebRTC Driver repository to your PC.• Follow the instructions in the repository to install dependencies.• Ensure the driver can communicate with your Go2 Pro.
4. Configure AVP Teleoperate Package
• Clone the AVP Teleoperate repository to your PC.• Set up the image_server.py script to stream video from the Go2 Pro’s camera to your PC.• Adjust settings as needed to match your network configuration and hardware.
5. Integrate with Cerebro-Control for VR Teleoperation
• Clone the Cerebro-Control repository to your PC.• Follow the setup instructions to link the Meta Quest 2 with the robot control interface.• Launch the VR application to begin controlling the Go2 Pro using your headset.
Connecting the Devices
With everything configured, power on the Unitree Go2 Pro and ensure it’s on the same Wi-Fi as your VR setup. On the Meta Quest 2, launch the Cerebro-Control VR app or interface. Use the controllers or hand gestures to initiate a control session.If prompted, confirm the pairing or input the provided code using the Unitree app. Connection issues may be resolved by restarting devices or checking firewall/router port settings.
Optimizing Performance
● Entertainment: Build interactive games or simulations featuring real-time pet control or robot combat.● Education: Use VR + robotics to teach AI concepts, robotics programming, or physics simulations.● Research and Industry: Simulate warehouse operations, disaster response, or robotic telepresence.● Virtual Training: Combine physical robot feedback with VR immersion to learn skills in a safe environment.
Conclusion
Check out META QUEST 3 now - https://www.xboom.in/shop/brands/meta/meta-quest-3/
The integration of Unitree Go 2 Pro and Meta Quest 2 marks a leap forward in immersive technology. With precise setup, careful calibration, and regular updates, you can unlock a highly interactive and futuristic experience that blends the physical and virtual worlds. Whether you’re a developer, researcher, gamer, or educator—this combination offers incredible potential. Explore, experiment, and elevate your interactive experiences with robotics and VR. The future isn’t coming—it’s already here.

0 notes
Text
instead of sleeping last night I updated my phone because I read that by changing my region to a non eea country it would get the update notif so I tried it with Switzerland and it worked and since I was already at it I kept going until I had miui14 which is based on android13 which I've wanted for ages because it has the option to set languages per app (I have all my devices set to English out of habit and for easier troubleshooting, but some apps (especially dating apps because of the prompts) want to have in German)
and after it was done at like 2am I found out that miui didn't really implement that feature (whyyyy???) so I spent some more time trying to see if it can be enabled and it's not impossible but annoying (someone made an app for it, but it needs shizuka to work and for that I need to either keep dev mode and wireless debugging on(annoying), root my device (don't want to because some banking apps get pissy and it's even more work to get around that), or do it via adb (best option since I want to debloat it anyways because some of the system apps suck major ass, but I have to be on the pc for it))
anyways it's interesting that they just decided to no longer publish miui14 for my phone specifically in the eea region? like on the global forums I could still select under rom downloads it but when I switched to Germany like a third of the device models were missing. especially because the rom download was called eeaglobal
#and that was after I spent my entire commute home from work uninstalling spotify then reinstalling from the play store then splitting it to#get the apk (since mirror sites didn't have the newest version yet) and then patching it so I could listen to music again#i spent the entire hour with headphones in but no sound because I only saw it when I left work (it was still working last morning)
1 note
·
View note
Text
How to Modify Boot LOGO and Animation on OK3588-C Android 12 Development Board?
Learn how to modify the boot logo and boot animation on the OK3588-C Android 12 development board, powered by the Rockchip RK3588 SoM. This guide walks you through customizing startup visuals for your embedded device, including both ADB-based and source-level methods.
Modify the boot animation
Method:
1. To prepare a video, you need to select a video with the same resolution as the screen.
2. Copy the video to the development environment and convert it into a picture in PNG format.
(1) If ffmpeg is not installed in the development environment, you need to install ffmpeg first.forlinx@ubuntu20:~/work$ sudo apt-get update forlinx@ubuntu20:~/work$ sudo apt-get install ffmpeg
(2) Create a part0 directory to store the converted pictures.forlinx@ubuntu20:~/work$ mkdir part0

Enter the following command to convert:forlinx@ubuntu20:~/work$ ffmpeg -i animation.mp4 -f image2 -r 1 part0%02d.png
-r means 1 frame per second. If 2 frames are taken per second, the -r parameter can be changed to 2.
After the conversion is completed, there will be a generated picture in PNG format under the part0 directory.

3. Create a new desc. txt films

4. Pack it into bootanimation.zip (only stored, not compressed)forlinx@ubuntu20:~/work$ zip -r -0 bootanimation.zip part0/ desc.txt
Alternative method:
Method 1: use ADB to replace directly
(1) Install adb in the development environmentforlinx@ubuntu20:~/work$ sudo apt-get install adb
(2) Use the USB-type C cable to connect to the typeC0 interface of the board, and the PC end is identified in the virtual machine.
Check whether the connection is successful in the development environment summary.forlinx@ubuntu20:~/work$ adb devices
If the connection is successful, the device ID of the board is returned as follows:

Send the bootanimation. zip you just packed to the board.forlinx@ubuntu20:~/work$ adb root forlinx@ubuntu20:~/work$ adb remount forlinx@ubuntu20:~/work$ adb push bootanimation.zip /system/media
Sync Saveforlinx@ubuntu20:~/work$ adb shell ok3588_c:/ $ sync
Method 2: Replace the boot animation in the source code
1. Replace the OK3588-android-source/device/rockchip/rk3588/ok3588 _ c/bootanimation. zip file in the source code with the packaged bootanimation. zip.Then re-compile and burn update. img files.
Modify the boot LOGO
Replace the logo. bmp and logo _ kernel. bmp in the OK 3588-android-source/kernel-5.10 directory.
Recompile after replacement.
Method for making bmp format picture:
Now take the 7-inch screen as an example. 1. Make a logo. jpg first. Note that the size should be the same as that of the 7-inch screen (1024 * 600). Otherwise, the picture position and effect may not be good;
2. Download the graphics conversion tool in the Ubuntu development environment forlinx@ubuntu20:~/work$ sudo apt-get install netpbm
Make applicable pictures
Create a working directoryforlinx@ubuntu20:~/work$ mkdir uboot-logo forlinx@ubuntu20:~/work$ cd uboot-logo
Copy the image to the uboot-logo directory and write the image conversion script.forlinx@ubuntu20:~/work/uboot-logo$ vi mkbmp.sh #!/bin/sh jpegtopnm $1 | ppmquant 31 | ppmtobmp -bpp 8 > $2
Give the script executable permissionforlinx@ubuntu20:~/work/uboot-logo$ chmod +x mkbmp.sh
Use a script to convert to an image suitable for ubootforlinx@ubuntu20:~/work/uboot-logo$ ./mkbmp.sh logo.jpg logo.bmp
A logo.bmp image is generated
0 notes
Text
0 notes
Text
0 notes
Text
Tronton T4 NEO: Download genuine USB driver for Windows!
## Tronton T4 NEO: Download genuine USB driver for Windows! On this page, we offer the official USB driver for the Tronton T4 Neo device. If you are looking for a USB driver for this device, this is where you need it. We provide 2 USB drivers: Driver MediaTek and Driver ADB. The MediaTek Driver is compatible with all MediaTek Flash Tool software, while the ADB driver is helpful for setting up the…
0 notes
Text
Suppression des Bloatwares : la solution ultime
Pour supprimer facilement les Bloatwares de Android sans Rooter son smartphone, il n'existe pas beaucoup de solution.

Pour rappel : Les smartphones Android sont livrés avec de nombreuses applications préinstallées, dont certaines peuvent être inutiles et consommer des ressources. Ces applications sont souvent appelées "bloatwares". Il est fréquent que les personnes me demandent comment s’en débarrasser car celles-ci sont des applications "systèmes" (donc difficile à supprimer). J��ai déjà expliquer dans ce blog plusieurs solutions (https://labonnedonne.fr/post/189974862782/supprimer-les-applis-syst%C3%A8me-dandroid et plus récemment https://labonnedonne.fr/post/693225374329552896/bloatware). Je vous propose une nouvelle méthode, plus simple, qui permet de supprimer ces applications “systèmes”, sans rooter votre appareil, en utilisant les applications Canta et Shizuku.
Préparer son smartphone Android
Qu'est-ce que Canta ? Canta est une application gratuite et open source qui permet de désinstaller les bloatwares sans avoir besoin d'un accès root. Elle exécute en arrière-plan les commandes ADB (voir mais articles précédents pour plus de détails). Elle permet la suppression des applications préinstallées qui ne peuvent pas être désinstallées normalement. Pour fonctionner, Canta s’appuie sur une autre application : Shizuku
Shizuku est une application qui permet d'accorder des permissions de développement à d'autres applications, comme Canta.
Avant de commencer Activer les options de développeur :
Allez dans les paramètres de votre téléphone, puis dans "À propos du téléphone".
Trouvez le "Numéro de build" (ou "Version MIUI" pour les appareils Xiaomi) et tapez dessus plusieurs fois (généralement 7 fois) jusqu'à ce qu'un message indique que les options de développeur sont activées.
Canta est une application OpenSource, elle est disponible sous github :
Pour l’installer, je vous invite à utiliser F-droid :
Ne lancez pas tout de suite l’application, une fois que celle-ci est installée. On va d’abord installer Shizuku. Le code source est disponible aussi sous Github :
Mais pour installer, allez sous : https://shizuku.rikka.app/
Dans le menu, choisir Download et sélectionnez une source d’installation :

Personnellement je préfère toujours utiliser F-Droid. Le fichier .APK sera téléchargé. Il suffit de lancer l’installation. Il se peut qu’une fenêtre s’affiche :

Il faudra autoriser cette “source” dans les paramètres pour continuer l’installation.
Maintenant lancez l’application Shizuku, vous arrivez sur un écran comme celui-ci :

Si vous avez une version d’Android 11 ou plus; vous aurez la possibilité d’utiliser le débogage sans fil, sinon l’application Shizuku vous proposera que le mode de connexion à un ordinateur. Rassurez-vous nous allons voir dans cet article les 2 méthodes.
Solution pour Android 11 et plus :
Nous allons déjà voir le débogage sans fil, on part du principe que vous êtes sur votre réseau WIFI. Sachez que vous devrez reconfigurer Shizuku après chaque redémarrage si vous utilisez cette méthode.
L’application vous offre un guide, mais voici comment procéder :
Allez dans “Paramètres” puis sous “Système” choisir “Options de développeur” (sur certains smartphone ce menu ce trouve sous “À propos du téléphone”).

Vérifier que les options pour les développeurs est activés, puis trouvez l’option “Débogage sans fil” et activez-la.

Un popup vous demandera l’autorisation du debogage sans fil sur ce réseau : Faites “Autoriser”.
Retournez sur l’application Shizuku et cliquez sur le bouton “Association”. Un message d’avertissement s’affiche :

En effet il est nécessaire d’autoriser Shizuku à envoyer des notifications.
Une fois l’autorisation faite, retournez sous le menu “Système” et taper sur le texte “Utiliser le débogage sans fil” de façon à faire apparaître cette fenêtre :

Choisissez “Associer l’appareil avec un code d’association”.

Le code PIN à six chiffres permettant d’associer l’appareil s’affiche. Pratiquement aussitôt, une notification s’affiche vous informant qu'une association a été trouvée. Il vous suffit de taper “ENTRER LE CODE D’ASSOCIATION” est saisir le code PIN affiché.
Une fois que vous avez saisi le code et confirmé, une notification indique la bonne association.

L’association faite, retournez dans Shizuku et tapez sur "Démarrer".
Vous pouvez avoir une notification de recherche du service de débogage sans fil. Dans ce cas, retournez sur le “Débogage sans fil” puis désactiver et réactiver. Cela va solutionner le problème.
Une fenêtre de commande va s'ouvrir brièvement, et vous devriez voir "Shizuku est en cours de fonctionnement" :

Maintenant vous pouvez lancer l’application Canta :
Généralement vous aurez des messages vous avertissant que la suppression des programmes et applications peuvent bloquer votre appareil.
L’application vous présente toutes les applications installées avec des “badges” ou “étiquettes” pour catégoriser les applications système et vous informer sur les risques potentiels liés à la désinstallation de ces applications. En cliquant sur les 3 petits points en haut à droite, vous trouverez les explications de ces badges. Pour résumer, voici les 3 options intéressantes :
Aucun badge : L’application peut être désinstallé sans utiliser Canta, en utilisant la méthode “traditionnelle”. Il est d’ailleurs recommandé de ne pas utiliser Canta pour les supprimer. Pour éviter qu’elles apparaissent dans Canta, utilisez le filtre en cliquant sur l’entonnoir et cochez l'option "système unique" pour afficher uniquement les applications système.
Recommended : Les applications avec cette étiquette peuvent être désinstallées sans causer de problèmes au système. Il est généralement sûr de désinstaller ces applications.
Advanced : La désinstallation d'applications avec cette étiquette peut entraîner l'arrêt de certaines fonctions ou ressources moins importantes du système. L'utilisation de cette étiquette requiert de la prudence.
Afin d'éviter des problèmes, et si vous n'avez pas les connaissances nécessaires, je vous recommande de vous limiter à ces badges.

Pour avoir des précisions sur une application (si vous avez un doute), il suffit de taper une fois sur celle-ci pour qu’une popup s’affiche.
Comme évoqué dans mes articles précédents, une solution simple pour voir si une application est “impactante”, il suffit de la désactiver, puis de tester votre smartphone.
Par exemple dans mon cas je vais choisir l’application “Agenda” , puis choisir “Infos sur l’application”

La première chose à faire est d’effacer l’espace de stockage. Pour cela choisir cette option.

Puis choisir “EFFACER DU STOCKAGE”. Une popup vous demandera de confirmer. Validez et revenez sur l’application avec la flèche en haut à gauche, puis "SUPPRIMER LES MISES A JOUR".
Enfin, si vous le pouvez "FORCER L'ARRET" de l'application puis choisir “DESACTIVER”, l’application est maintenant désactivée.
Vous pouvez maintenant quitter Canta et tester votre smartphone. Si vous ne constatez aucun problème, relancez Canta. L’application apparaît bien comme désactivée :

Cochez la petite case et une poubelle apparaît en bas de l’écran. A noter que vous pouvez sélectionner plusieurs applications. Une fois votre sélection faite, tapez sur la poubelle.

Une Popup s’affiche demandant la confirmation. Ensuite un autre écran vous demandant d’autoriser Canta à accéder à Shizuku. Donnez l’autorisation pour finaliser la suppression.
Voilà l’application est “virtuellement” supprimée.
Rassurez-vous, si vous désirez réinstaller une application "système" supprimée par Canta, il suffit d’aller sur le 2ème onglet puis de sélectionner l’application à restaurer et de cliquer sur le bouton qui se trouve à la place de la poubelle :

Voilà, c'est aussi simple que cela. Par contre, avec cette méthode, il faut savoir que Shizuku doit être reconfiguré après chaque redémarrage du smartphone mais en principe vous ne faites ces opérations qu'une seule fois.
Solution pour Android 10 et moins :
Maintenant si vous n'avez pas le débogage wifi, il est quand même possible d'utiliser Canta et Shizuku. Il faut évidemment installer ces 2 applications puis activer le mode développeur sur votre smartphone comme vu précédemment. Enfin il faut relier votre smartphone à votre ordinateur. Maintenant installez le logiciel "Android Debug Bridge". Dans mon exemple, j'utilise le système linux sur mon PC mais sachez que ce logiciel est aussi disponible sous d'autres systèmes.
# sudo apt install android-tools-adb
Une fois le logiciel installé, allez dans les options développeur, choisissez la configuration USB par défaut :

Et choisissez le mode "Transfert de fichiers"
Toujours dans les Options développeur, activez le mode Débogage USB, un fenêtre vous demande l'autorisation.

Il suffit de valider. Pour vérifier que la connexion avec votre smartphone est correcte, tapez la ligne :
# adb devices
Vous devez obtenir ce type de message :
List of devices attached * daemon not running; starting now at tcp:5037 * daemon started successfully 31e566ca8d2d unauthorized
A ce moment vous devez avoir sur votre smartphone une demande d'autorisation :

Si vous n'avez pas cet avertissement, tapez :
# adb kill-server
Puis simplement relancer le daemon en tapant :
# adb start-server
En principe cela règle votre problème.
Maintenant lancer l'application Shizuku :

Vous voyez à ce niveau que Shizuku ne fonctionne pas. L'aide vous demande de saisir une commande pour démarrer. Cliquez sur "Voir la commande" puis saisissez sur votre ordinateur cette commande.
Dans mon cas, celle-ci ressemble à :

Une fois la commande saisie puis validée vous pouvez avoir sur votre smartphone un message d'alerte :

Ce message apparaît parce que des "sécurités" supplémentaires sont activées. En lisant l'article vous trouverez certainement la solution. Dans mon cas, s'agissant d'un portable XIAOMI, j'ai une fonction de sécurité à activer également dans les options développeur :

En activant ce type d'autorisation, vous pouvez avoir plusieurs écrans vous rappelant les risques possibles.
Faites les réglages nécessaires et retaper la ligne de commande sur votre ordinateur. Maintenant sur votre smartphone vous aurez une confirmation que Shizuku fonctionne.

A noter, comme vu dans le premier cas, il faudra autoriser l'application CANTA à accéder à cette application. Maintenant on peut utiliser CANTA comme vu précédemment.
Dans mon exemple, je souhaite retirer l'application SMS/MMS, je peux filtrer suivant le nom de l'application :

Il ne me reste plus qu'à sélectionner l'application puis de cliquer sur la poubelle en bas de l'écran et hop l'appli est supprimée. Le fonctionnement reste le même que vu précédemment.
A Retenir :
Soyez prudent : Supprimer des applications critiques, comme celles liées au système Android peut rendre votre appareil instable. Pour rappel, si vous avez un doute, cliquez le nom de l'application sous Canta puis :
Choisir Infos sur l'application
Supprimer les espaces de stockages de cette application
Supprimer toutes les mises à jour
Forcer l'arrêt éventuellement de celle-ci puis désactiver la (si c'est possible).
Il ne reste plus qu'à tester si cela à un impact sur l'utilisation de votre smartphone. En fait, Canta ne supprime pas l'application mais désactive les applications système ; vous pouvez donc les réactiver puis refaire les mises à jour.
Pensez également à désactiver toutes les options de débogage une fois que vous avez fini avec Canta et Shizuku.
Pour moi ce combo (Canta + Shizuku) est devenu ma solution ultime pour tous les Android 11+. L'interface graphique et la possibilité de supprimer/restaurer rapidement une application sans un PC font de cette solution un incontournable quand on me demande de "faire le ménage sur un smartphone".
Par contre pour les Android 10 et moins, j'utilise encore Universal Android Debloater (Next Generation) en complément de ce combo.
Pour aller plus loin :
Comme vous venez de voir ci-dessus, je ne me contente pas de supprimer les "bloatwares". En fait j'essaie de retirer toutes les applications qui ne répondent pas aux besoins de l'utilisateur ou à l'utilisation que je dédie du smartphone.
A titre personnel, mon premier besoin a été de récupérer un vieux smartphone pour mettre une navigation GPS OffLine (comme Organic Maps ou encore MagicEarth) afin de faire de la rando VTT sans craindre d’abîmer mon dernier smartphone. Par la suite, et suite aux demandes des utilisateurs, j'ai étendu les possibilités comme :
Retirer les applications SMS/MMS si on utilise d'autres systèmes de messageries instantanées.
Supprimer l'application "Téléphone" qui, avec les différentes mises à jour, peut occuper plusieurs centaines de Mo au profit d'une application plus légère (voir celles sur Fdroid).
"Dé-googleliser" votre smartphone au profit d'autres applications ( mail, browser chrome, maps, agenda, youtube... ) sans pour autant réinstaller un nouveau système (comme /e/OS).
Retirer un maximum les applis inutiles (wallpaper, thèmes..)
Se servir d'un smartphone comme un assistant à la mode "ALEXIA" ou mieux avec un AGENT IA local (https://github.com/a-ghorbani/pocketpal-ai)
Mais surtout, on peut se servir d''un smartphone comme un petit Raspberry PI. Vous pouvez donc faire de votre smartphone un serveur pour héberger un site wordpress, ou encore mettre docker et avoir accès à de nombreuses applications.... Il convient donc de supprimer les éléments non indispensables. Mais tout cela fera peut-être l'objet d'un prochain article.
0 notes
Text
How to Transfer Files from Android to Mac: A Step-by-Step Guide

Transferring files between an Android device and a Mac can be tricky due to compatibility issues. Unlike Windows, macOS does not support native file transfers for Android devices. However, several reliable methods allow seamless transfer of files such as photos, videos, and documents. This guide will walk you through different ways to transfer files from an Android phone or tablet to a Mac.
Method 1: Using Android File Transfer (AFT)
Android File Transfer is an official tool developed by Google that enables file transfers between macOS and Android devices.
Steps to Use Android File Transfer:
Download and Install: Visit https://www.android-file-transfer-mac.com/ and download the application.
Install the App: Open the downloaded .dmg file and move Android File Transfer to the Applications folder.
Connect Your Android Device: Use a USB cable to connect your phone to the Mac.
Enable File Transfer Mode:
Unlock your Android device.
Pull down the notification bar.
Tap on “Charging this device via USB” → Select “File Transfer” or “MTP” mode.
Open Android File Transfer: If the connection is successful, a window will pop up showing your Android’s file system. You can now drag and drop files between the two devices.
⚠️ Note: Android File Transfer may not work with the latest macOS updates or certain Android devices. If you face issues, try the alternative methods below.
Method 2: Using a Third-Party File Transfer App
If Android File Transfer does not work, several alternative apps provide a stable and feature-rich experience. These allow users to transfer files via MTP and ADB mode and even edit files on the phone directly from Mac’s Finder.
How to Use a Third-Party App:
Download and install a file transfer application on your Mac.
Open the app and connect your Android phone via USB.
Select MTP Mode or ADB Mode for faster transfers.
Once connected, your phone’s storage will appear in Finder, allowing easy drag-and-drop file transfers.
Method 3: Transferring Files via Bluetooth
If you don’t have a USB cable, Bluetooth is another way to send small files between Android and Mac.
Steps to Transfer Files Using Bluetooth:
Enable Bluetooth on Mac: Go to System Settings → Bluetooth and turn it on.
Enable Bluetooth on Android: Open Settings → Connected devices → Bluetooth and toggle it on.
Pair Your Devices: On Mac, locate your Android device and click Pair. Accept the pairing request on your phone.
Send Files:
On Android, open the Files app.
Select a file, tap Share → Bluetooth → Select your Mac.
Accept File on Mac: A prompt will appear on Mac asking you to accept the incoming file. Click Accept to save it.
🔹 Tip: Bluetooth is best for transferring small files, as it is slower than USB or Wi-Fi-based methods.
Method 4: Using Cloud Storage for Wireless Transfers
For a wireless transfer method, cloud storage allows you to store and access files from both Android and Mac.
Steps to Transfer Files via Cloud Storage:
Upload Files from Android:
Open a cloud storage app on your phone.
Tap + → Upload → Select the files you want to transfer.
Access Files on Mac:
Open a browser on your Mac and log in to your cloud storage account.
Download the uploaded files.
✅ Pros: Works without cables, accessible from any device. ❌ Cons: Requires an internet connection and may take longer for large files.
Method 5: Transferring Files via Wi-Fi-Based Apps
If you prefer a Wi-Fi-based transfer, some apps allow fast file sharing between Android and Mac without the need for cables.
How to Use a Wi-Fi Transfer App:
Install a Wi-Fi transfer app on your Android phone.
Open a browser on Mac and access the app’s web interface.
Scan the QR code with your phone.
Drag and drop files between devices.
📌 Tip: These methods work without cables and provide fast transfer speeds.
Final Thoughts
Depending on your needs, you can choose between USB, Bluetooth, cloud storage, or Wi-Fi to transfer files from Android to Mac. Android File Transfer is the most common method, but alternatives like third-party apps, cloud storage, and Wi-Fi-based transfers provide more flexibility and better performance.
🔹 Best for Large Files: USB-based apps 🔹 Best for Small Files: Bluetooth or Wi-Fi 🔹 Best for Wireless Transfers: Cloud storage
1 note
·
View note
Text
FRP bypass
FRP Bypass: A Comprehensive Guide
FRP (Factory Reset Protection) is a built-in security feature on Android devices designed to protect the user's data from unauthorized access in case the device is reset to factory settings. It requires the user to log in with the Google account credentials that were previously used on the device. While this feature adds an essential layer of security, it can sometimes create hurdles when someone legitimately forgets their Google account login details or purchases a used phone locked with FRP. This is where FRP bypass comes in.
What is FRP Bypass?
FRP Bypass is a process that helps users unlock the device without needing the original Google account credentials. Whether you've forgotten your password, bought a second-hand device that’s locked, or encountered a bug preventing access to your device, an FRP bypass method can help you regain access to the phone. By performing an FRP Bypass, the security measure is disabled, allowing users to bypass the Google account verification screen.
Why FRP Bypass Matters
For legitimate users, FRP is generally a safeguard against theft. However, the process can be overly complex or restrictive for users who are locked out of their own devices. Since there are instances where a person might need to reset the phone and forgot their credentials, an FRP bypass is helpful for resetting the phone without knowing the previous Google account.
Moreover, for those buying second-hand devices, the FRP lock can often be a frustrating challenge. If the previous owner did not remove their account from the phone, it may remain locked even after a factory reset. A reliable FRP bypass tool allows new users to quickly and easily get their hands on a functional device without having to go through complex procedures with the previous owner.
How to Perform an FRP Bypass
While bypassing FRP may be a solution for legitimate users, it's essential to note that you should always obtain proper authorization to perform a bypass on any device. Unauthorized access or bypassing for malicious purposes is illegal and can result in serious legal consequences.
Using FRP Bypass Tools: There are several tools available online that help in FRP bypass, such as Tenorshare 4uKey for Android, DroidKit, and iMyFone LockWiper. These software tools allow you to unlock Android phones, and their FRP bypass solutions are widely used due to their ease of use.
Through USB OTG Cable: This method involves connecting a USB OTG (On-the-Go) cable with a USB drive that contains a special file used to bypass the Google verification step. Using this technique often requires the user to follow specific steps in the recovery or safe mode of the device.
Using ADB (Android Debug Bridge): This method is more technical and requires enabling Developer Options on the device before performing the bypass. It's recommended for advanced users or technicians who are familiar with coding and operating systems.
Using Samsung FRP Bypass: For Samsung devices, Samsung provides a specific FRP bypass tool as part of its "Find My Mobile" service, which can allow users to unlock their phone if they've lost access to their Google account.
Caution About FRP Bypass
While these FRP bypass solutions are useful, it’s critical to be careful about where you get them. Many websites and tools claim to offer an easy FRP bypass, but some may come with hidden dangers like malware or theft of personal data. Always download tools from reputable sources, and be cautious about providing any sensitive information.
Conclusion
FRP Bypass can be a lifesaver for users locked out of their devices due to Google account verification, and it's essential to know that the process should always be done legally and responsibly. Whether using bypass tools, a USB OTG cable, or technical methods like ADB, users should carefully consider all options before proceeding to ensure they can safely access their devices without compromising security or privacy. Remember to keep software updated and back up your data to avoid future challenges related to account recovery and FRP lockout.
1 note
·
View note