#Docker Containers on Synology
Explore tagged Tumblr posts
Text
Docker Setup: Monitoring Synology with Prometheus and Grafana
In this article, we will discuss “Docker Setup: Monitoring Synology with Prometheus and Grafana”. We will be utilizing Portainer which is a lightweight/open-source management solution designed to simplify working with Docker containers instead of working with the Container Manager on Synology. Please see How to use Prometheus for Monitoring, how to Install Grafana on Windows and Windows Server,…
#Accessing Grafana and Prometheus#Add Portainer Registries#Configure and Run Prometheus Container#docker#Docker Containers on Synology#Enter5yourownpasswordhere123456#Enter5yourownpasswordhere2345#Grafana monitoring#Grafana/Prometheus Monitoring#How To Install Prometheus And Grafana On Docker#install portainer#Modify Synology Firewall Rules#monitoring solutions for Docker#portainer#portainer server#Prometheus Grafana integration#Prometheus metrics#Pull Docker Images for Grafana and Prometheus#Set Up Grafana Data Source#Synology monitoring setup#Your Portainer instance timed out for Security Purposes
0 notes
Text
youtube
How to Use Container Manager (Docker) on a Synology NAS - Beginners Guide
This step-by-step guide will show you how to install Container Manager on a Synology NAS and implement your own Docker containers! Container Manager is the "new" Docker application in versions of DSM newer than 7.2. While Container Manager is very similar to the old version of Docker, it has some awesome new features like Docker Compose. Learn everything about Container Manager in this full setup guide!
#How to Use Container Manager#docker course#educate yourselves#educate yourself#technology#docker tutorial#tips and tricks#container manager#nas synology#synology#beginners guide#education#free education#youtube#Youtube
3 notes
·
View notes
Text
Docker NFS Mount on Synology and Performance Tweaks
Docker NFS Mount on Synology and Performance Tweaks for Shared Storage
One of the viable solutions for shared storage for running your Docker containers is NFS. Many are running a NAS in their home lab environment that is used for storage. With that said, one of the use cases for a NAS in the realm of home lab is using it for shared storage with your Docker containers. Especially if you are running a Docker Swarm cluster you need shared storage, so this is a…
0 notes
Text
Software of the Week: Stirling PDF
Details:
Purpose: Locally hosted web application that allows you to perform various operations on PDF files (manipulation, conversion, etc.)
OS Supported: Windows, Mac, Linux (anything that can run Docker containers)
Installer Size: ~245 MB-~953 MB depending on the version
Country of Origin: United Kingdom
Languages Supported: 38 languages supported
License: Free and open source
Download Link: https://github.com/Stirling-Tools/Stirling-PDF
Over the last year or so I've been trying to replace online services in my life with offline alternatives for a two reasons.
Privacy. I don't have to worry what a bunch of strangers are doing with the files/information I give them. I try to give people as little data as possible; even if I trust the company providing the service in its current state, there is always the chance it will be sold to others I do NOT trust, and by then it's too late; my data is already out there and I don't have a say over what the new owners do with it
Availability: I don't want to depend on third-party service to always be up and running. The service could be having issues, or worse, the entire service could disappear from the internet (looking at all the YouTube to MP3 websites that Google keeps taking offline).I don't want to have to keep hunting down and vetting new services if my preferred one is down for some reason
The privacy aspect especially comes into play when I need to manipulate PDFs; rotating or removing pages, signing documents, converting from PDFs to Word or vice versa, etc.. Often the PDF is sensitive, and even if it isn't, someone could probably infer a bunch of information about you (or someone at your IP) over time based on what you upload.
Enter Stirling PDF, a self-hosted app that has functionality for just about every PDF manipulation you can imagine.
I'm serious. There are 46 different functions listed in the documentation, ranging from common (merging PDFs) to esoteric (redacting/blacking out specific words or phrases within PDFs). If you need to manipulate a PDF, Stirling PDF probably has you covered.
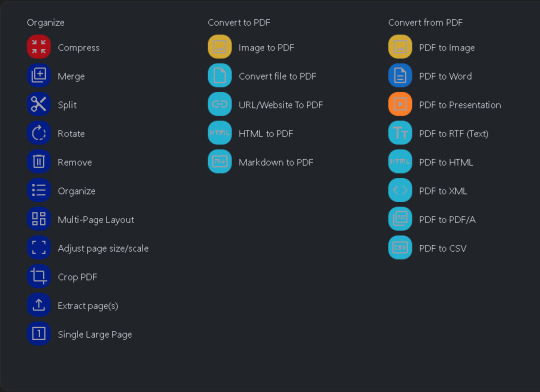
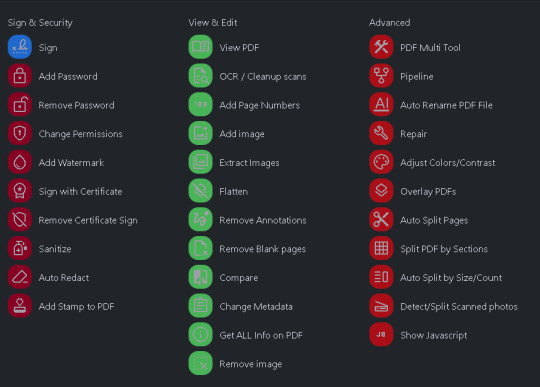
If this intrigues you, I encourage you to spin up an instance of Stirling PDF on your own system. I've linked their GitHub repo above, but if you happen to own a Synology or UGREEN NAS, Marius Bogdan Lixandru (AKA MariusHosting) has written a fantastic guide to getting started here (and also his website is just a nerdy delight all around).
1 note
·
View note
Text
How to Update Docker Synology – A Comprehensive Guide
A virtualization application that makes it easy to access containers created by various developers is called Docker. This blog will provide instructions on how to update Docker on Synology NAS.
0 notes
Text
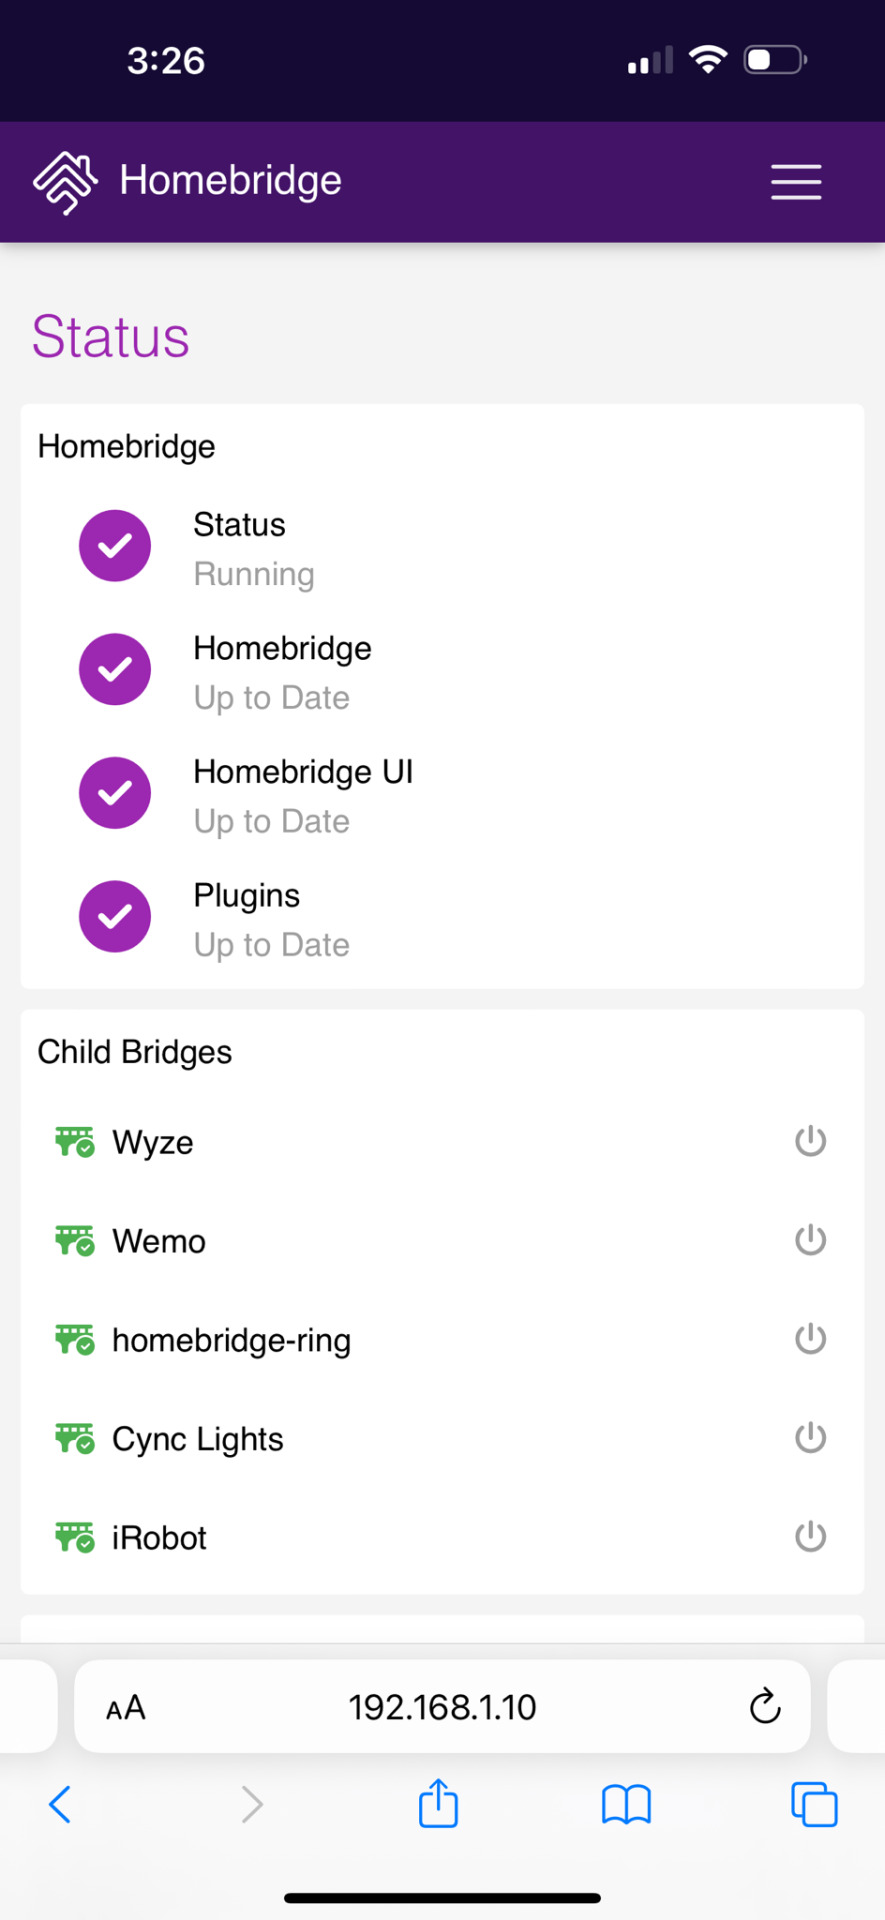
I finally got around to installing HomeBridge on my Synology server. There are many smart home devices that don’t work natively with Apples iPhone Hone app. Homebridge is a program running on a server that bridges that gap. It talks to the devices and also talks to the Home app on my iPhone. 
It was easier than I thought it was going to be. I thought I was going to have to use Docker or some kind of container technology, but it was just an app that took a few clicks to install. The only thing I haven’t been able to get to work is my GE Cync lights. And those basically aren’t very reliable using the official GE app itself. So I’m not surprised. 
0 notes
Text
Tools Rundown: IT-Tools Docker Image!
🔧 Tools Rundown: IT-Tools Docker Image! 🔧 Discover a comprehensive suite of one-off tools and utilities in the IT-Tools docker container. Accessible via a user-friendly web interface, this utility tool is ideal for IT professionals of all backgrounds, from admins to programmers. Learn how to easily set it up in Docker on your *nix system, including Synology, through this step-by-step guide. Just follow the instructions provided in the blog post: [Link to blog post](https://ift.tt/hai0Wye) Once up and running, simply open your browser and navigate to the specified URL to access the IT-Tools page. The web-based interface enables you to conveniently click on any option and use the tool of your choice. It's perfect for daily tasks requiring converters and other utilities. Don't forget to bookmark it for quick access and enjoy the option to switch between light and dark mode. You can also favorite your most frequently used tools, keeping them readily available at the top of the page. Take a few minutes to explore IT-Tools and experience its well-thought-out functionality firsthand. This remarkable app truly stands out in today's digital landscape. Happy tools exploration! John
0 notes
Text
Run datacrow on synology

#Run datacrow on synology android#
#Run datacrow on synology software#
#Run datacrow on synology download#
#Run datacrow on synology windows#
And I had never considered that, in the coming human - robot conflagration, robots might take over simply by expertly manipulating us into letting them win." "It seemed almost cruel to design a robot that could play on a young kid's emotions. The goal is to choreograph movements and expressions that will induce genuine emotions in the toy's owner."
#Run datacrow on synology software#
Their animation software is hooked up directly to sample robots: The animators create new ways to show that Cozmo is, say, frustrated, and play them back through its body to see how people interpret the robot's actions. "Should children form emotional bonds with robots?" "Anki has hired animators from Pixar and DreamWorks to design some 1,200 little movements for the robot to make. I think in 10 or 20 years this will be very common, especially if maintaining and feeding cats and dogs becomes prohibitively expense. I'm yet to determine if that's a good thing or not. Most of the web browsers of late are looking a lot more like Chrome. In the meantime, the Firefox version on my other two PCs will be staying at version 56, until I get that sorted. I've been tempted to swap to Opera again, but I'll wait and see just which addons get updated soon. Instead I removed the addon and continued to use Google Calendar instead. I almost left using Thunderbird at that point, but the alternatives I was perpared to entertain - Evolution, Claws, and The Bat, all had issues. Of course most - in time - will be updated but it's just plain annoying.Ī while back Thunderbird was updated and unlike their usual updates, it automatically added a mandatory calendar addon with the update. Therational behind this is that there's a "budding addon standard" which is all very good, but half the reason I've stayed with Firefox was the useful addons. Apparently everything's changed, and about half of my addons are either gone or no longer work. I never knew there were so many social media thingamies that you can post to before!įirefox has updated to version 57, also known as "Quantum". It also allows you to post a link to: Twitter, Google+, Pinterest, Email, LinkedIn, Reddit, Tumblr, WordPress, Google Gmail, WhatsApp, StumbleUpon, AIM, Amazon Wish List, AOL Mail, Balatarin, BibSonomy, Bitty Browser, Blinklist, Blogger Post, BlogMarks,, Box.net, BuddyMarks, Buffer, Care2 News, CiteULike, Delicious, Design Float, Diary.Ru, Diaspora, Digg, diHITT, Diigo, Douban, Draugiem, DZone, Evernote, Facebook Messenger, Fark, Flipboard, Folkd, Google Bookmarks, Google Classroom, Hacker News, Hatena, Houzz, Instapaper, Jamespot, Kakao, Kik, Kindle It, Known, Line, LiveJournal, Mail.Ru, Mendeley, Meneame, Mixi, MySpace, Netlog, Netvouz, NewsVine, NUjij, Odnoklassniki, Oknotizie,, Papaly, Pinboard, Plurk, Pocket, Polyvore, Print, PrintFriendly, Protopage Bookmarks, Pusha, Qzone, Rediff MyPage, Refind, Renren, Segnalo, Sina Weibo, SiteJot, Skype, Slashdot, StockTwits, Stumpedia, Svejo, Symbaloo Feeds, Telegram, Threema, Trello, Tuenti, Twiddla, TypePad Post, Viadeo, Viber, VK, Wanelo, WeChat, Wykop, XING, Yahoo Bookmarks, Yahoo Mail, Yahoo Messenger, Yoolink, YouMob, and Yummly. A lot simpler for me that way, as I can share serendipity stuff I find, without breaking my focus. Check to make sure the unifi container is running: docker container ls.I've only been posting to Facebook via a Firefox addon called AddtoAny, rather than going to Facebook itself. You'll see a little bit of output in the terminal and see that unifi is starting. Run the Docker container: docker-compose up -d. Press CTRL+O to save the file and then CTRL+X to exit back to the terminal.
You can find a list of TZ timezones here.
#Run datacrow on synology android#
FYI, I can make a connection perfectly between the UDM Pro and Win10 LTSC build 17763, iPhone and Android devices, but any OEM Windows10 build just won't play.
#Run datacrow on synology windows#
I have followed this and dozens of other tutorials for over two days and I have yet to make a L2TP VPN connection connect between a UDM Pro and Windows Pro Build 19043.
Then open File Station and create a folder under docker called. Then go to Synology Control Panel and choose Terminal & SNMP and tick the box to turn on ssh port 22, you can turn this off again later.
#Run datacrow on synology download#
Choose pducharme/ unifi-video- controller and download it. Once installed open Docker and click Registry and type " unifi-video " in search box.I started with just a couple of Ac Pros, running the UniFi software in a docker container on my Synology NAS, using the supplied POE injectors into. Three are the disc APs and two are in-wall APs. Here's the resulting setup and choices I made, as viewed in the UniFi Controller Software: I have the Gateway, the Switch with PoE, and five APs.

0 notes
Text
Synology Video Server and Hyperbackup
Synology Video Server and Hyperbackup
OK, I have a Synology and I have to admit I use about 1% of the applications that are there, you can run docker containers, they have all sorts of dedicated applications, but to reduce the attack surface area for various SmartHome devices, I like to have purpose devices since the cost is relatively low. So for my Homebridge, I use a Raspberry Pi and the Synology is just for storing files. Still,…

View On WordPress
0 notes
Video
youtube
Install Home Assistant on a Synology NAS using Docker Compose (Container Manager)
#youtube#Synology NAS using Docker Compose#synology nas#how to Install Home Assistant on a Synology NAS#synology#container manager#home assistant
0 notes
Text
How to Update Docker Synology – A Comprehensive Guide
A virtualization application that makes it easy to access containers created by various developers is called Docker. This blog will provide instructions on how to update Docker on Synology NAS.
0 notes
Text
Use Portainer to manage your Docker containers on Synology NAS.
Use Portainer to manage your Docker containers on Synology NAS. #Synology #Docker #Portainer
Synology has added the possibility to add Docker containers a couple of years ago. The delivered GUI on Synology is pretty good. But in order to manage images or clean up your old stuff like images, volumes and so on. You need a more advanced GUI. In this small tutorial, we will set up a Portainer container and secure it via SSL using Let’s encrypt. Create a DNS entry pointing to your external…

View On WordPress
0 notes
Text
Synology DS920+ Review: The Best Power User NAS
Synology DS920+
9.00 / 10
Read Reviews
Read More Reviews
Read More Reviews
Read More Reviews
Read More Reviews
Read More Reviews
Read More Reviews
Read More Reviews
Read More Reviews


See on amazon
The DS920+ is an affordable NAS for the power user, capable of breezing through 4K video transcodes, running virtual machines, and Docker containers. The only disappointment is the lack of 2.5Gb Ethernet connectivity.
Specifications
Brand: Synology
CPU: Intel Celeron J4125 Quad-core 2GHz
Memory: 4GB, upgradeable to 8GB via single SO-DIMM slot
Drive Bays: Four (3.5" or 2.5")
Expansion: Five additional bays via eSATA
Ports: Dual Gigabit Ethernet, eSATA, 2 x USB3.0
Caching: Two m.2 SSD NVMe slots
OS: DSM6 (DiskStation Manager)
Pros
Powerful quad-core CPU and RAM upgradeable to 8GB
Great build quality and stylish design, with tool-less disk trays
User-friendly operating system
Great platform for Synology Moments, a Google Photos alternative
Cons
Gigabit LAN only, though at least there are two of them
Buy This Product

Synology DS920+ amazon
Shop
// Bottom var galleryThumbs1 = new Swiper('.gallery-thumbs-1', { spaceBetween: 10, slidesPerView: 10, freeMode: true, watchSlidesVisibility: true, watchSlidesProgress: true, centerInsufficientSlides: true, allowTouchMove: false, preventClicks: false, breakpoints: { 1024: { slidesPerView: 6, } }, }); // Top var galleryTop1 = new Swiper('.gallery-top-1', { spaceBetween: 10, allowTouchMove: false, loop: true, preventClicks: false, breakpoints: { 1024: { allowTouchMove: true, } }, navigation: { nextEl: '.swiper-button-next', prevEl: '.swiper-button-prev', }, thumbs: { swiper: galleryThumbs1 } });
Synology's latest four-bay DS920+ model is a powerhouse NAS designed for the pro user. While entry-level Network Attached Storage systems are great for serving files up and acting as a central backup, the Synology Plus series can do so much more. Especially for those looking to move away from cloud services, the DS920+ offers an affordable, scaleable, local alternative.
It's available without drives for around $550. Join us as we take a closer look at what makes the DS920+ the best NAS for the pro user.
youtube
DS920+ Specifications and Design
The Synology DS920+ is superficially identical to all the recent four-bay Synology devices, with a sleek black plastic exterior and distinctive bevel on all edges. Measuring 8.73 x 7.83 x 6.54 inches (223 x 199 x 166mm), it weighs 5lbs (2.25kg) without drives fitted.
Around the rear, you'll find dual Gigabit Ethernet ports, a USB3.0 port, and an eSATA connection. You'll probably want to save the USB port for use with an uninterruptible power supply. There's another USB3.0 port on the front of the device, useful for quickly plugging in an external disk that you need to pull files from.

The DS920+ uses the same toolless disk caddies that make fitting drives a breeze. But scratch beneath the surface and you'll find a few key differences to other models in the line-up.
Firstly, the internals. Fitted with a powerful quad-core 2GHz J4125 Intel Celeron CPU and 4GB of RAM, the 920+ can handle hardware transcoding of 4K video files, has virtualization support, and provides an AES-NI encryption engine for great performance when using secure folders. Synology states photo indexation as 25% faster than the previous generation DS918+ model.
Secondly, there's a lot of upgrade potential here for when you need to scale up.
On the underside of the device you'll find two m.2 SSD slots for NVMe caching drives. These can be used to significantly speed up random file operations.

Remove the drives and there's a single SO-DIMM memory upgrade slot tucked away just inside on the right. This can officially support up to a 4GB SO-DIMM module, which would give a total system memory potential of 8GB, and it's an inexpensive upgrade. I say "officially support" because many users have found higher memory modules are also recognized. The CPU lists 8GB as the maximum though, so anything beyond this may cause errors later down the line and isn't worth the risk; nor will Synology be able to support you if something goes wrong.

An eSATA port allows for connection to a drive expansion unit, such as the five-bay DX517. This adds potentially 80TB more. However, if you know you'll likely need more drives in the short term (and can afford it), purchasing a system with more built-in drive slots is always a better choice. The Synology NAS selector tool can help there. For most people, four bays is a good compromise. It allows for secure fault tolerance of a single disk, while still letting you take advantage of mixed drive sizes in a flexible Synology Hybrid RAID configuration.
Setting Up the DS920+
As with all of Synology's line-up, hardware installation and system setup are user-friendly and easy.
Starting with the hardware, you don't need any tools to install drives. Just pull out the drives, and pull off the plastic clips at the side. Slot the drive in, then push back the clips, and re-insert.
Once you've powered on the system, give it a moment, then navigate to find.synology.com from any desktop browser. This should find your new NAS, and you'll be guided through the initial set up. From there, you'll be greeted by the DiskStation Manager OS. It's a familiar-looking graphical environment that anyone who used Windows or Mac will feel at home with. You even get a start button in the top left.

Your first step should be to create a storage volume, which you can do using a helpful wizard after launching the Storage Manager. If you're new to Synology, or Networked Attached Storage in general, it's worth taking a moment to explain the Synology Hybrid RAID technology.
Synology Hybrid RAID
Hard drives can and do fail, and one of the biggest reasons to use a storage system with two or more drives is to allow for redundancy; that is, a drive can fail, and you won't lose any data. This called a Redundant Array of Inexpensive Disks (or RAID, for short). Different types of RAID exist, but the one we're usually concerned with is RAID5, in which data blocks are spread across the disks, as well as a parity block. The parity block lets you recover data if any of the actual data blocks are lost.
With standard RAID levels, you need to use disks that are all the same size. This makes it expensive to start, and inflexible when it comes to upgrading. While you can swap out a drive for a larger one, the additional space will be of no benefit. The key difference is that Synology Hybrid RAID offers the same one disk fault tolerance (or two, if you're particularly risk-averse), but you can mix and match drive sizes. Regardless of what disks you're working with, the Synology software will intelligently optimize your array to use your available space most efficiently. Use the RAID calculator to estimate how much more space you'd get in an SHR configuration compared to standard RAID level.
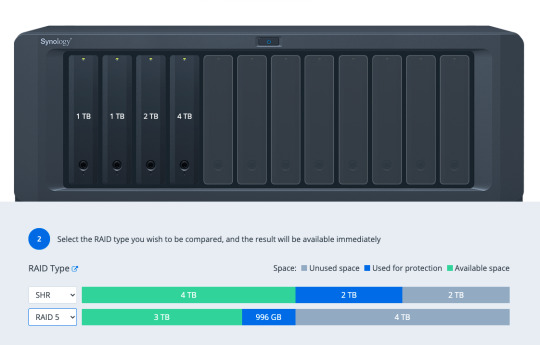
Adding or upgrading a drive is also simple: the only rule is that the drive should be at least as big as the largest drive currently installed in the system. This makes upgrading your storage very budget-friendly.
Once you've created your storage volume, you can begin setting up shared folders from the Control Panel, and install software packages from Package Center.

Virtual Machine and Docker Support
There's a huge range of first and third-party software available, including the incredible Synology Moments, a local photo management solution that offers AI image analysis similar to Google Photos. One quick note is that if you're planning to install Plex, it's best to do so by downloading the latest version directly from Plex, and using the manual install process. The version on Synology Package Center lags behind.
In addition, both Synology's own Virtual Machine Manager hypervisor software and Docker are officially supported on the Plus series, opening up even more virtualized server systems to run on your home NAS.
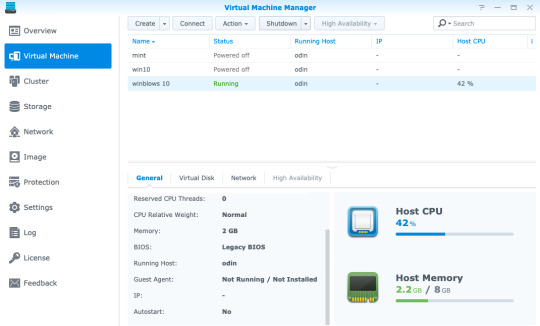
Virtual Machine Manager works with a variety of operating systems—even Windows 10—so if you need a secure test environment for some software you're unsure of, you can simply boot it in a safely contained VM, all from within your browser. Of course, you won't be gaming on this or replacing your regular desktop anytime soon, but it's still useful to have a virtual machine running through a web browser anywhere on your network. Just add the ISO, spin up a new instance, and walk through the usual install process.
Docker is another beast entirely, and far too broad of a topic to delve into in this review if you're unfamiliar. Learn more about Docker in our guide, but the one-sentence summary would be: a Docker image is a virtual application that runs within a completely safe and sandboxed container. All you need to do is set some variables, point it to a data directory, and boot it up. Docker containers don't run an entire operating system, so they use significantly less memory than a full Virtual Machine. While you can typically run a single virtual machine at a time, you can have tens of Docker containers running 24/7 without impacting the performance of your system.
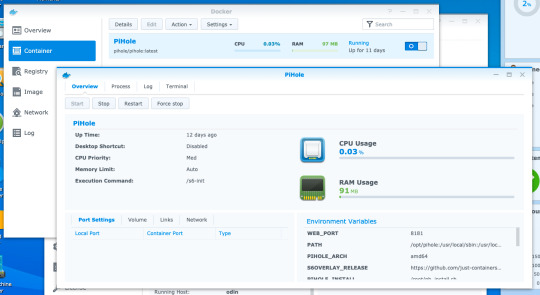
The range of Docker containers available is immense. If you've ever thought "wouldn't it be cool to run a whatever server at home?", chance are someone has made a Docker image already.
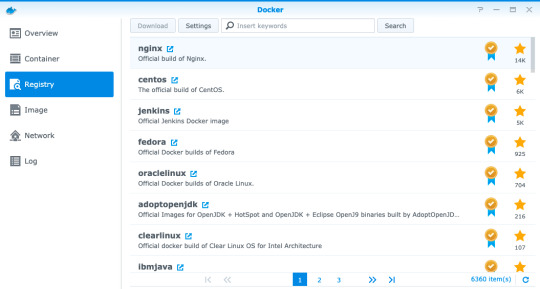
For instance, I had a Dockerized instance of Pi-Hole set up in ten minutes. It's a DNS server with built-in ad-blocking, originally designed to run on a Raspberry Pi. It was trivial to install and uses a minimal amount of memory, requiring only the creation of a few data directories and passing in some variables.
If you're looking at upgrading your home Wi-Fi to a Unifi enterprise system, you might be frustrated at the prospect of having to plug in a hardware dongle to act as the network controller. You'll be pleased to know that a Dockerized Unifi controller can be used instead.
Performance
Official performance figures for the DS920+ put total file throughput available at around 225MB/s read and slightly lower writer speeds, but this is when using the dual-Gigabit Ethernet ports in a link-aggregated configuration. In reality, this means any single Gigabit client device will achieve around 100 to 115MB/s, which our real-world tests confirmed.
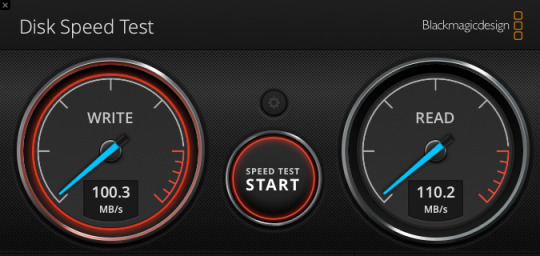
Using faster drives will not improve this, and if you're on Wi-Fi rather than a wired Gigabit Ethernet connection, you may get even slower speeds. Ultimately, your network (and the Gigabit ports on the DS920+) are the limiting factor here when it comes to the performance of file access over the network—not the CPU, RAM, or speed of the drives you put in it.
NVMe Caching
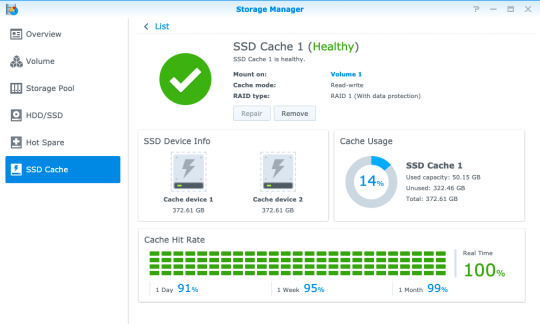
One of the standout upgrade options on the 920+ is the two NVMe drive slots on the underside of the device. NVMe is a new generation of Solid State Drive (SSD) that looks a bit like a memory stick. But don't confuse their existence as yet another place to add storage drives to. The m.2 NVMe slots are limited to use as a caching system, and cannot be used to expand a storage volume.
A single NVMe drive allows you to create a read-only cache, while a pair of drives can be used for read-write caching. This creates a RAID1 array of SSDs to ensure there are no data errors in data being written back to your storage array from the cache.
We should note however that not everything you do on a NAS will benefit from NVMe caching. Specifically, it won't help with large sequential read/write operations, which are one of the main uses of a NAS. This also means it won't help with serving up video files for a Plex server. What they will help with is random read/write operations, such as those in a virtual machine, database, or other server package running on the NAS.
For this reason, it's difficult to measure actual performance gains from NVMe caching: simply copying files to and from the device would show no difference. Instead, if you have an SSD-cache capable device, I'd recommend opening up the Storage Manager -> SSD Cache -> SSD Cache Advisor to see if you might benefit, and what size cache drive is recommended.

There are a few other things you should know about using an SSD cache.
First, don't remove the hardware without removing the cache from the volume first, even when the device is powered off. There's a warning message if you power off from DSM to remind you of this.
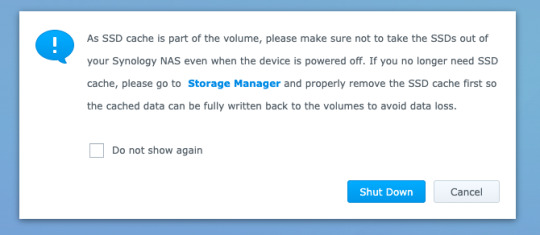
Second, NVMe drives are quite pricey, and considered consumables. The error rate on SSDs increases with age and usage, though DiskStation Manager will warn you when the drives are degraded. Synology's own SNV3400 NVMe drive that we used for testing are rated to 500TBW (TeraBytes Written), which is well above the industry average. While you can fit cheaper NVMe drives from competitors, they will need to be replaced more quickly, or may result in data corruption.
Lastly, caching systems use memory too. This works out to around 50MB for a 128GB SSD.
Should You Buy The DS920+?
The DS920+ is the best, affordable, scaleable NAS for the professional home user that values their data. It's a beast of a machine that will handle everything you throw at it with ease—whether that's running your own server software via Docker containers, handling your home security via Surveillance Station, or keeping decades of family photos safe in Synology Moments. Most importantly, it'll do so within the Synology ecosystem. That means easy-to-use software, reliable hardware, and excellent support if you need it. In fact, Synology guarantees their Plus series devices for three years, compared to two years for other models. In addition, software updates are usually provided for seven years.

Synology isn't the cheapest NAS manufacturer out there. You could certainly get faster hardware at a similar price point elsewhere, but you wouldn't benefit from any of the exclusive technologies such as Synology Hybrid RAID that makes efficient use of mixed disk sizes, nor the fantastic range of first-party software. You could even roll your own budget NAS with open-source software like FreeNAS or unRAID, but I wouldn't recommend putting anything too important on there. I've trusted Synology with my data for many years now, and it's never let me down.
The only real disappointment with the hardware is the lack of Multi-Gigabit Ethernet connectivity. While link-aggregated dual-Gigabit connection means you can have full Gigabit performance to multiple clients, it doesn't help to speed up performance to any single client. This matters if you want to use your NAS for video editing, and we may find multi-gig LAN connections more common in the coming years. For typical users though, Gigabit connectivity is plenty fast enough for things like streaming 4K video.
What Exactly Can You Do with a Synology NAS?
More broadly speaking, you might be wondering what you can actually do with a Network Attached Storage system. A Synology NAS has always been a central part of my home network, and it's one of a few devices that I'd class as essential to my work and family life.
Backup
Synology NAS can be a central point of backup for everything in your home, whether that's your family photos spread across multiple smartphones, that Windows folder with all those important documents, or a Mac OS Time Machine archive.
If you don't have a backup, then you haven't experienced data loss (yet)—it's only a matter of time. Of course, a NAS shouldn't be your only backup point, but if you have a friend or family member with their own NAS too, you can act as an off-site backup point for each other! Synology makes this easy to set up with HyperBackup.
It's not just backups either. Synology Drive can keep files in sync across your devices, so you always have the latest copy of a file to work with.
Shared Folders and Media Management
Having a shared folder or two makes your digital home life a lot easier—I can't remember the last time I had to transfer some files using a USB disk! But this is especially true if you have a large archive of media. Plex is the best media management software around, and it runs natively on a Synology NAS. It'll let you keep all your media files in one place, then play them anywhere with a single unified and rich interface.
Those looking to move away from Google Photos after the recent pricing and policy changes will be delighted to hear about Synology Moments. Offering easy import of photos from your smartphone, browser, or existing photo archive, Moments takes advantage of the fast CPU in the DS920+ to perform AI analysis of your photos. It automatically identifies people and subjects so you can easily browse and locate those special memories.
Your Own Server
Fancy running your own web development server? Perhaps a Calibre server to automatically convert all your eBooks? PiHole to block all ads at a network level? Surveillance Station to record from your IP security cameras?! With hundreds of native software packages and even more available through Docker, the DS920+ can run it all.
Energy Efficiency
The other benefit of running a NAS as opposed to using a spare computer is that of power consumption. Peaking at less than 40W of power, the DS920+ manages to do an awful lot with very little energy impact. This means you can leave it running all day, ready for when you need it and working away in the background to keep your data safe.
Synology DS920+ Review: The Best Power User NAS published first on http://droneseco.tumblr.com/
0 notes
Text
How to use a Raspberry Pi 4 as a Minecraft Java Server
My 14 year old got tired of paying $7.99 for Minecraft Realm so he could host his friends in their world. He was just hosting on his laptop and then forwarding a port but that means his friends can't connect unless he's actively running. I was running a Minecraft Server in a Docker container on my Synology NAS but I thought teaching him how to run Minecraft Server on a Raspberry Pi 4 we had lying around would be a good learning moment.
First, set up your Raspberry Pi. I like NOOBS as it's super easy to setup. If you want to make things faster for setup and possibly set up your Pi without having to connect a monitor, mouse, or keyboard, mount your SSD card and create a new empty file named ssh, without any extension, inside the boot directory to enable ssh on boot. Remember the default user name is pi and the password is raspberry.
SSH over to your Raspberry Pi. You can use Putty, but I like using Windows 10's built-in SSH. Do your standard update stuff, and also install a JDK:
sudo apt update sudo apt upgrade sudo apt install default-jdk
There are other Minecraft 3rd party Java Servers you can use, the most popular being Spigot, but the easiest server you can run is the one from Minecraft themselves.
Go to https://www.minecraft.net/en-us/download/server in a browser. It'll say something like "Download minecraft_server.1.16.2.jar and run it with the following command." That version number and URL will change in the future. Right-click and copy link into your clipboard We are going to PASTE it (right click with your mouse) after the "wget" below. So we'll make a folder, download the server.jar, then run it.
cd ~ mkdir MinecraftServer cd MinecraftServer wget https://launcher.mojang.com/v1/objects/c5f6fb23c3876461d46ec380421e42b289789530/server.jar java -Xmx2500M -Xms2500M -jar server.jar nogui
You'll get a warning that you didn't accept the EULA, so now open "pico eula.txt" and set eula=true, then hit Ctrl-X and Yes to save the new file. Press the up key and run your command again.
java -Xmx2500M -Xms2500M -jar server.jar nogui
You could also make a start.sh text file with pico then chmod +x to make it an easier single command way to start your server. Since I have a Raspberry Pi 4 with 4g gigs of RAM and it'll be doing just this one server, I felt 2500 megs of RAM was a sweet spot. Java ran out of memory at 3 gigs.
You can then run ifconfig at and command line and get your Pi's IP address, or type hostname to get its name. Then you can connect to your world with that name or ip.
Performance Issues with Complex Worlds
With very large Minecraft worlds or worlds like my son's with 500+ Iron Golems and Chickens, you may get an error like
[Server Watchdog/FATAL]: A single server tick took 60.00 seconds (should be max 0.05)
You can workaround this in a few ways. You can gently overclock your Pi4 if it has a fan by adding this to the end of your /boot/config.txt (read articles on overclocking a Pi to be safe)
over_voltage=3 arm_freq=1850
And/or you can disable the Minecraft internal watchdog for ticks by setting max-tick-time to -1 in your server's server.properties file.
We solved our issue by killing about 480+ Iron Golems with
/kill @e[type=minecraft:iron_golem]
but that's up to you. Just be aware that the Pi is fast but not thousands of moving entities in Minecraft fast. For us this works great though and is teaching my kids about the command line, editing text files, and ssh'ing into things.
Sponsor: Never miss a beat with Seq. Live application logs and health checks. Download the Windows installer or pull the Docker image now.
© 2020 Scott Hanselman. All rights reserved.


Bron: Scott Hanselman's Computer Zen https://www.hanselman.com/blog/HowToUseARaspberryPi4AsAMinecraftJavaServer.aspx
0 notes
Text
How to use a Raspberry Pi 4 as a Minecraft Java Server
My 14 year old got tired of paying $7.99 for Minecraft Realm so he could host his friends in their world. He was just hosting on his laptop and then forwarding a port but that means his friends can't connect unless he's actively running. I was running a Minecraft Server in a Docker container on my Synology NAS but I thought teaching him how to run Minecraft Server on a Raspberry Pi 4 we had lying around would be a good learning moment.
First, set up your Raspberry Pi. I like NOOBS as it's super easy to setup. If you want to make things faster for setup and possibly set up your Pi without having to connect a monitor, mouse, or keyboard, mount your SSD card and create a new empty file named ssh, without any extension, inside the boot directory to enable ssh on boot. Remember the default user name is pi and the password is raspberry.
SSH over to your Raspberry Pi. You can use Putty, but I like using Windows 10's built-in SSH. Do your standard update stuff, and also install a JDK:
sudo apt update sudo apt upgrade sudo apt install default-jdk
There are other Minecraft 3rd party Java Servers you can use, the most popular being Spigot, but the easiest server you can run is the one from Minecraft themselves.
Go to https://www.minecraft.net/en-us/download/server in a browser. It'll say something like "Download minecraft_server.1.16.2.jar and run it with the following command." That version number and URL will change in the future. Right-click and copy link into your clipboard We are going to PASTE it (right click with your mouse) after the "wget" below. So we'll make a folder, download the server.jar, then run it.
cd ~ mkdir MinecraftServer cd MinecraftServer wget https://launcher.mojang.com/v1/objects/c5f6fb23c3876461d46ec380421e42b289789530/server.jar java -Xmx2500M -Xms2500M -jar server.jar nogui
You'll get a warning that you didn't accept the EULA, so now open "pico eula.txt" and set eula=true, then hit Ctrl-X and Yes to save the new file. Press the up key and run your command again.
java -Xmx2500M -Xms2500M -jar server.jar nogui
You could also make a start.sh text file with pico then chmod +x to make it an easier single command way to start your server. Since I have a Raspberry Pi 4 with 4g gigs of RAM and it'll be doing just this one server, I felt 2500 megs of RAM was a sweet spot. Java ran out of memory at 3 gigs.
You can then run ifconfig at and command line and get your Pi's IP address, or type hostname to get its name. Then you can connect to your world with that name or ip.
Performance Issues with Complex Worlds
With very large Minecraft worlds or worlds like my son's with 500+ Iron Golems and Chickens, you may get an error like
[Server Watchdog/FATAL]: A single server tick took 60.00 seconds (should be max 0.05)
You can workaround this in a few ways. You can gently overclock your Pi4 if it has a fan by adding this to the end of your /boot/config.txt (read articles on overclocking a Pi to be safe)
over_voltage=3 arm_freq=1850
And/or you can disable the Minecraft internal watchdog for ticks by setting max-tick-time to -1 in your server's server.properties file.
We solved our issue by killing about 480+ Iron Golems with
/kill @e[type=minecraft:iron_golem]
but that's up to you. Just be aware that the Pi is fast but not thousands of moving entities in Minecraft fast. For us this works great though and is teaching my kids about the command line, editing text files, and ssh'ing into things.
Sponsor: Never miss a beat with Seq. Live application logs and health checks. Download the Windows installer or pull the Docker image now.
© 2020 Scott Hanselman. All rights reserved.


How to use a Raspberry Pi 4 as a Minecraft Java Server published first on https://brightcirclepage.tumblr.com/
0 notes
Text
How to use a Raspberry Pi 4 as a Minecraft Java Server
My 14 year old got tired of paying $7.99 for Minecraft Realm so he could host his friends in their world. He was just hosting on his laptop and then forwarding a port but that means his friends can't connect unless he's actively running. I was running a Minecraft Server in a Docker container on my Synology NAS but I thought teaching him how to run Minecraft Server on a Raspberry Pi 4 we had lying around would be a good learning moment.
First, set up your Raspberry Pi. I like NOOBS as it's super easy to setup. If you want to make things faster for setup and possibly set up your Pi without having to connect a monitor, mouse, or keyboard, mount your SSD card and create a new empty file named ssh, without any extension, inside the boot directory to enable ssh on boot. Remember the default user name is pi and the password is raspberry.
SSH over to your Raspberry Pi. You can use Putty, but I like using Windows 10's built-in SSH. Do your standard update stuff, and also install a JDK:
sudo apt update sudo apt upgrade sudo apt install default-jdk
There are other Minecraft 3rd party Java Servers you can use, the most popular being Spigot, but the easiest server you can run is the one from Minecraft themselves.
Go to https://www.minecraft.net/en-us/download/server in a browser. It'll say something like "Download minecraft_server.1.16.2.jar and run it with the following command." That version number and URL will change in the future. Right-click and copy link into your clipboard We are going to PASTE it (right click with your mouse) after the "wget" below. So we'll make a folder, download the server.jar, then run it.
cd ~ mkdir MinecraftServer cd MinecraftServer wget https://launcher.mojang.com/v1/objects/c5f6fb23c3876461d46ec380421e42b289789530/server.jar java -Xmx2500M -Xms2500M -jar server.jar nogui
You'll get a warning that you didn't accept the EULA, so now open "pico eula.txt" and set eula=true, then hit Ctrl-X and Yes to save the new file. Press the up key and run your command again.
java -Xmx2500M -Xms2500M -jar server.jar nogui
You could also make a start.sh text file with pico then chmod +x to make it an easier single command way to start your server. Since I have a Raspberry Pi 4 with 4g gigs of RAM and it'll be doing just this one server, I felt 2500 megs of RAM was a sweet spot. Java ran out of memory at 3 gigs.
You can then run ifconfig at and command line and get your Pi's IP address, or type hostname to get its name. Then you can connect to your world with that name or ip.
Performance Issues with Complex Worlds
With very large Minecraft worlds or worlds like my son's with 500+ Iron Golems and Chickens, you may get an error like
[Server Watchdog/FATAL]: A single server tick took 60.00 seconds (should be max 0.05)
You can workaround this in a few ways. You can gently overclock your Pi4 if it has a fan by adding this to the end of your /boot/config.txt (read articles on overclocking a Pi to be safe)
over_voltage=3 arm_freq=1850
And/or you can disable the Minecraft internal watchdog for ticks by setting max-tick-time to -1 in your server's server.properties file.
We solved our issue by killing about 480+ Iron Golems with
/kill @e[type=minecraft:iron_golem]
but that's up to you. Just be aware that the Pi is fast but not thousands of moving entities in Minecraft fast. For us this works great though and is teaching my kids about the command line, editing text files, and ssh'ing into things.
Sponsor: Never miss a beat with Seq. Live application logs and health checks. Download the Windows installer or pull the Docker image now.
© 2020 Scott Hanselman. All rights reserved.


How to use a Raspberry Pi 4 as a Minecraft Java Server published first on https://deskbysnafu.tumblr.com/
0 notes