#DIY pin display
Explore tagged Tumblr posts
Text

DIY felt banner pin display
If you collect enamel pins or cool old brooches like I do, it’s nice to have a place where they can all live together. This pin display is a tiny lil felt banner made from scrap felt and a chopstick.

Fold a piece of felt top to bottom. Fold the felt in half again and cut the bottom to make the pointed shape.
Make sure the chopstick fits, and trim it down if you need to. Next, I pinned the sides together, folded over the dowel.
Use a simple running stitch to secure the dowel at the top of the banner. Next, sew all around the edges of the banner using a blanket stitch.
Tie a string or twine for hanging on each side of the dowel. Hang it up and you’re all done! It’s ready for all your favorite pins to move on in.

Supplies: - Chopstick - String - Needle & thread - Nice felt - Scissors - Sewing pins
#home stuff and apparel#welcome to craftyland#DIY pin display#felt project#pin collector ideas#enamel pin craft
0 notes
Text
When you can't find a cork board you like so you make one that fits your aesthetics
1 note
·
View note
Text
How it started, versus how it's going...
I grew up in the UK, 30 minutes from Games Workshop's Nottingham headquarters; and my childhood heavily featured their games, miniatures, and routine trips to the local Games Workshop store.
During this time, I developed a particular affection for the work of Jes Goodwin. Initially an artist and sculptor, Jes' work was strongly geometric in nature; and displayed an unusually high degree of consistency (a particularly noteworthy achievement during a period where miniatures were sculpted by hand with ad-hoc tools).
For reference - one of Jes' early sketches of a Space Marine in Mk. VI armor; as featured in the guide that accompanied the very first Space Marine paint set:

I actually had the pleasure of meeting Jes in person at Games Day '94; and one of my treasured possessions is the souvenir program, which he kindly autographed:

During my teenage years, I came to possess a handful of Chaos Champions sculpted by Jes. As was so often the case in those early years, the miniatures had been designed as dual use; combining the sort of medieval aesthetics that would warrant inclusion in the Warhammer Fantasy Battle setting, but also the occasional technological greeble that would justify use in Warhammer: 40,000.
As I generally kept to the latter system, I set about cutting up and remodeling these miniatures, with the aim of making the science-fiction elements more explicit. And I was very happy with the end results, too!... Which makes it all the more unfortunate that these miniatures were lost when I relocated to the US.
Two decades later, and I have taken it upon myself to recreate these miniatures (albeit with the full advantage of the skills I have developed in the interim). The first mini on the chopping block is 021919 from the 1989 Citadel Catalog (frequently referred to by its most obvious physical characteristic, "Nurgle Chaos Champion With Fly Mutation"):

(It feels vaguely sacrilegious, taking a razor saw to what is now technically an antique; but I very much subscribe to the DIY mentality that was so prevalent during the initial Rogue Trader days, and - given that the model originates for the same time period - keeping the old traditions alive seems only appropriate.)
In my original conversion, I removed the haft and blade of the axe; and positioned an old Space Ork plasma cannon over the now unobscured shoulder. I also replaced the sandaled foot and exposed fly-mutated leg with their armored equivalents from a Space Marine Devastator.
This time I around, I opted to angle the right arm, to add a greater sense of movement; and completely reposition the left arm, as if to calling out a target:
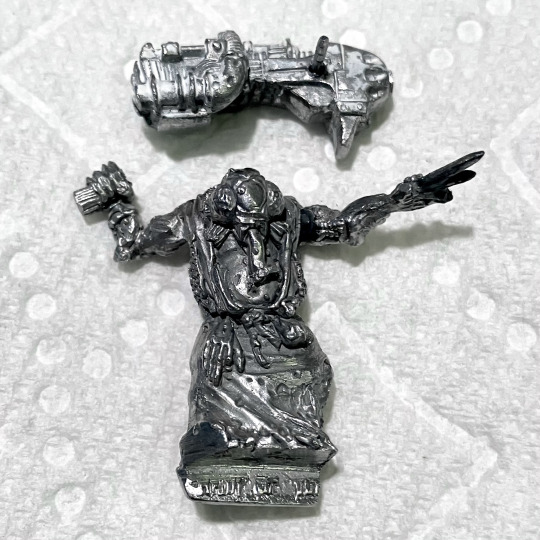
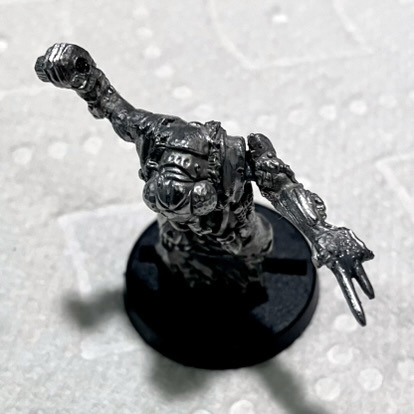
(In doing so, I created a great many headaches for myself: the right hand snapped off at the wrist, and had to be repaired. Cutting the left arm free necessitated cutting through the hand; and the pins I inserted into the remains of the palm broke free, requiring JB Weld to resecure.
I cannot underscore the frustration inherent to these two experiences; at the same time, I'm a great believer in the idea that growth as an artist demands taking risks - up to and including potentially ruining one's art.)
The original version of the conversion also featured an extended barrel (fabricated from the Lord Fuegan's firepike, and a handful of random Genestealer claws). However, I wanted to replace this with something a little more appropriate for a follower of the Lord Of Pestilence; which ended up being the better part of a Plague Spewer:
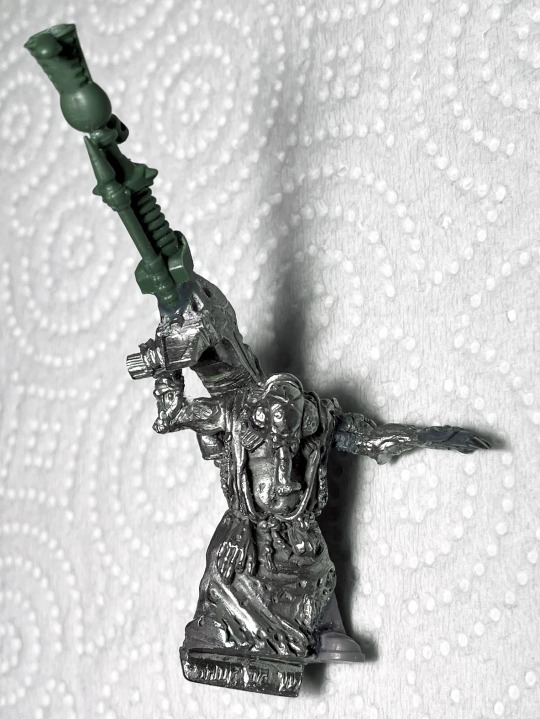
In terms of next steps: I intend to strap a canister of goo-based ammunition to his left side; and continue to add new detailing to hide the various cuts and joins.
39 notes
·
View notes
Text
DIY Tutorial - How to hang an animal skull on your wall

If you collect animal bones like I do, you probably like to display them. Here i will be showing you the simple yet effective way I hang my skulls on my wall.
Supplies:
- the skull you wish to display, im using a partial of a deer skull.
- wire or potentially a form of string, i use 18 or 19 gauge wire but i said about potential being able to use string because you may be able to do this with string, it may just be harder.
- wire cutter/scissors/something to cut the wire or string youre using.
- push pin/hook/screw/nails, this is what you hang the skull on.
Now for the step by steps.
1.) Cut a length of wire big enough to hold the skull, this may depend on the skull youre hanging, i used two feet and then cut more later.
2.) Find the Foramen Magnum (latin for big hole) of your skull. It’ll be on the very back, and itll have other smaller holes.

3.) Bend your wire about in half and feed both ends through from the smaller holes to the larger hole. You may need to do some finagling and bend the wire more to get it through. Theres different spots you can put the wire through to be fair, it may vary from skull to skull.

4.) Twist your wire a few times to reinforce its stability and then loop your wire. This can be done in many ways but i just did it messily bc i personally dont care how it looks lmao

And now to hang it on the wall ! Do it safely please dont hammer your fingers or out it in a way that it could fall

Theres my final product ! (Note, i did not kill any of the animals shown)
#emptym0rgue#diy#tw bones#animal bones#skull#diy tutorial#vulture culture#bone collector#bone collecting
15 notes
·
View notes
Text
DIY: Making A Pwnagotchi
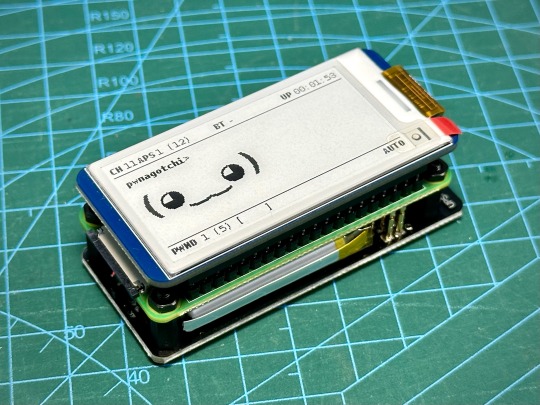

Yes, I know I am very late to the game ... LOL I was meddling with Flipper Zero and war driving, then I came across the Pwnagotchi project. Since I already had the parts to do this lying around in my workshop, I decided to put together my own Pwnagotchi just for fun. Started by hooking up the Waveshare 2.13" Black and White E-Ink Display to a Raspberry Pi running a fresh Raspbian image and downloaded the Waveshare demo code to test the display to make sure it's working properly, since I have not actually used it before. This is a v4 display.

After that, I just followed all the instructions over here to put it all together, including adding a real time clock. I used the DS3231 RTC module designed for Pi, but in order to make it fit into the space between the display and the Pi board, I had to make some modifications. The female header pins on the RTC module was desoldered and short wires were soldered on. The battery also had to be desoldered and resoldered on in a new positionlike below to make the module thin enough. The module was then wrapped in wire tape for insulation. Now, we can just slot the wires into the female header pin holes of the display before we snap it onto the Pi board.
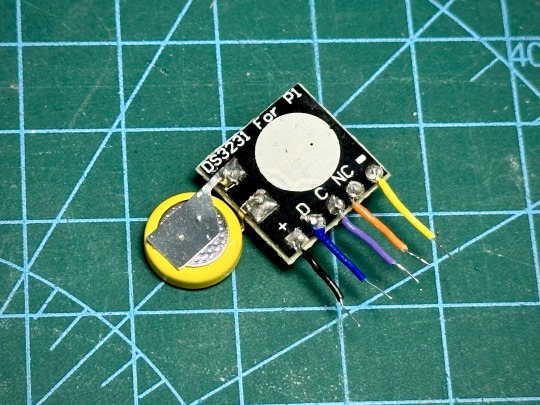
Below, you can see the RTC fits comfortably between the boards. I also attached a UPS Lite v1.2 board. Apparently, the UPS Lite board I had was a clone/knock off. It uses I2C address of 0x32 instead of 0x36 that was used in the original product, so the UPS Lite plugin in Pwnagotchi won't work. Oh well, I will just use it like a normal battery pack.

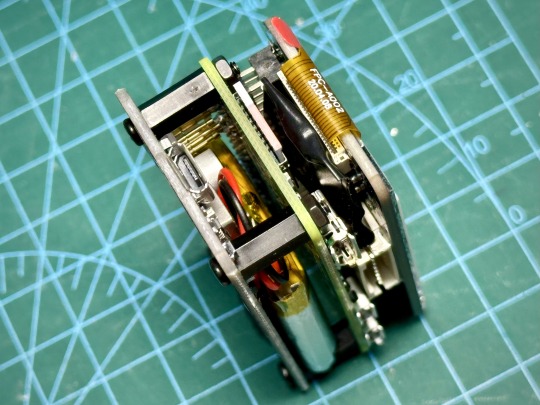
Now, for the software. The original Pwnagotchi project has not had any new updates for over 2 years, so it's kinda out of date and it doesn't support the newer Waveshare displays. Luckily for us, someone had taken the effort to fork the project and released new versions of Pwnagotchi over here. Note that this requires Raspberry Pi Zero 2 W.
The Waveshare 2.13" E-Ink display that I had was v4, but I found that I had to set the display type to "waveshare_3" in Pwnagotchi settings for it to work properly. Next is to 3D print a case for this, but in the mean time, I used some nano bricks to build a temporary case for it.
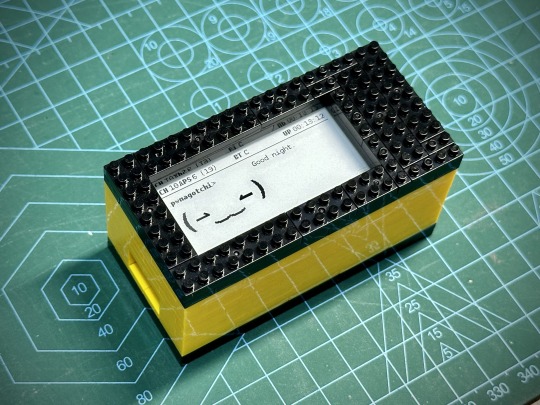
That's it for now. Happy hacking!
37 notes
·
View notes
Text
13/8/24 [5x DIYS today + one package!! // key + significant photos at end.]

woke up at 10 and immediately went outside to see boris. [before taking ages to get out of bed, that is.] he was really excited to see me this morning and layed down on my shoes. i stayed outside with him for at least 30 minutes before i started getting paranoid my prevision would show up. once i got inside i got dressed into my silent hill shirt, dark cargo jorts, and various bracelets consisting of a spiked cuff, my chemical romance/sleeping with sirens/pierce the veil/panic! at the disco band bracelets, and a wooden beaded bracelet. all of which being in the colour scheme of black, white, and dark green. i love matching my outfits.
once i was done getting ready, i made a ‘key’ for my journals and added it to my intro, and started writing this. at 11:10 my dad came into my room and told me that my prevision isn’t even coming round so that’s sort of a relief. with that, i went back outside with boris for about 10 minutes until my eyesight started going weird and i could only see yellow because of how sunny it was on the driveway. upon getting inside, i had a cup of tea and asked my dad to help me out with the start of my can tab bracelet as i’m useless at following youtube tutorials.
he did the first bit of pattern until i caught up onto it and then started doing it myself. like i’ve mentioned before, i know i dont have enough tabs so it ended up being a little off the length around my wrist. which is annoying because i’m so close to it fitting but i sent my aunt a picture of my progress so she remembers to keep on collecting can tabs for me lmaoo 😭 anyway, im glad i’ve finally gotten around to doing something with tabs apart from making smaller jewellery/making diy pins as i’ve been thinking about making a bracelet for years now. i always end up collecting my own and then losing the stash. however that trinket box i made has been helping me keep track without them going anywhere and everywhere. [photos at end.]
i did what i could with the bracelet and finished at 12:20. after writing about it, i decided on starting to add the key to the end of every one of my journals. hopefully it’ll make it easier for people to understand what on earth i speak about. i went upstairs to my sisters room at 1:25 and watched her play fnaf security beach again. she got stuck with what the task was pretty quickly, so i decided to just listen while looking up every now and then and make a collage in my journal. i made one out of the leaflets from the premier inn we stayed in + the car park recipts. after finishing, i decided to make another with various other receipts from the weekend [like the receipt from my green day cd]. [photos at end] my sister got up to the part of the game where you need to find a head and use a party pass or something.
i don’t really like the second collage i made, or either of them actually, but its whatever. i stayed watching her game until 2:30 when i went outside with boris. at some point, someone pulled up on our driveway. usually when people do that, they’re looking for an assisted living home just down the road — for some reason the addresses always get messed up. but, he handed me a package. i’m just glad i wasn’t in my pyjamas. on his way back to the car, boris came up to him and he stroked him which was sweet. i called my mum to ask if the package was hers or mine and she told me to open it anyways.
it sort of felt like some kind of plushie though the packaging, but when i opened it up it was just something wrapped up very thoroughly. i ripped open the bubble wrap and saw my black parade gerard way funko pop!!! i was getting worried because technically only one of my packages from depop had come so i was relieved to receive him. i took a picture of him and then set him up beside my concert tickets because that’s where i put all of my important things. i will display him on my desk’s shelf at one point but it’s too messy at the moment and i don’t want him to get scratched or anyting along those lines.
i went back up to my sister after fussing boris outside at 2:40. i thought i was going upstairs to watch her play more five nights at freddy’s but she started showing me horror-ish game trailers. she made me pick out one for her to buy so i can watch her play it. she knows i already really want to watch her play fnaf4 so that was sort of out of the question. i couldn’t choose between this low graphic game with barely any plays or bendy and the ink machine. after somewhat picking, i went downstairs as my parents came back from an appointment/the town centre. i showed them my gerard figurine and they were shocked by the size of him loll
my dad reused the packaging from my gerard funko pop to package a few cds he was selling so me, him and my mum walked down to the post office through the woods. i only really wanted to go to get my steps up but i quickly regretting it concidered today was the day after the hottest day of the year. we snuck round the back garden door just incase boris followed us from the driveway. upon getting there, i picked out some low cal treats for myself and got my sister some sweets. on the way back home, i decided to walk back by myself the road way because i was sure it’d be quicker and less exhausting as the woods is all up and down. me and my parents split up and i got home 6 minutes before them.
once i got back i gave my sister her sweets and sat outside with boris. my vision started going weird again so i had something to drink and sat in my room for a while until my sister came down to call me up to watch her play bendy and the ink machine. i went up and watched while playing mcr + the used cover of under pressure, two songs off mcr live in valencia [nanana and vampire money] before she told me to turn it off as she doesn’t like mcr. because she’s stinky. her favourite song out of the music i listen to right now is all my life by falling in reverse so i played that and we both sang along to it. she’s starting to learn it off by heart now.
i went back down into my room at 6:30 and wrote more of this journal. i continued doing so up until 7:30 when i copied all of the journals i’ve written so far into my notes app just incase i get logged out of this or something. afterwards i posted asking whoever’s reading this right now to let me know who does/does not want to be tagged when i post [PLEASE LIKE/COMMENT EITHER ON THAT POST OR HERE SO I KNOW!!] and went outside with boris for just a minute to say hi. i didn’t plan on going in immediately but it was really cold and he opened the door himself and went inside. i fed him and then went to living room as my dad had made me a cup of tea. i sorted through a few kandi/bead inspiration photos.
then my mum and sister came back from my sister’s karate lesson. i started asking my mum about what i did yesterday as i hadn’t written anything about it until tonight. she didn’t know much as she was out for the first half of the day so i went outside in the garden to my dads shed and asked him about my day instead. i took notes and then went through them with my mum. after everything was somewhat confirmed i went into my room, put on my green day cd and wrote about yesterday.
at 9:23 i decided to make this star out of bendy wire and tiny beads. i made it in the colours of the gay flag, because that’s my flag, but mainly because i love that colour scheme. i unironically put it everywhere/generally make everything in those colours. i finished at 9:45. afterwards i got out a bottlecap and a few beads i cut off thrifted jewellery from my shed outside. i couldn’t make a hole through it so i went out to my dads hut and asked if he could. he said that he can tomorrow with his drill and also do my shells for the windcharm i’ve been planning to make. i went to check on boris and then i made a gecko out of kandi at 10. i was supposed to make his eyes black but the only black beads i have didn’t fit through the elastic i use. i’m not ecstatic over how he came out, but i don’t hate it as much as my first animal kandi attempt. [photos of diy’s at end, warning their both very funky looking.]
my cd ended at around 10:50. i’ve listened to the album before but i’ve never tracked what my favourite song off it is. id say based off listening to it today, ‘jesus of suburbia’ is my #1. i went upstairs to my parents at 11, wrote a bit of this journal, checked if boris wanted to come back inside, and actually finished asking my questions at 12. i let boris in and my mum and sister got into a huge argument afterwards so i went into the kitchen with him and shut the door to drain some of the noise out. i spoke to him for a while until he started scratching on the dishwasher which means he wants to go outside. i let him out at around 12:20 and kept on going to check if he wanted to come back inside. i checked again at 12:50 and got jumpscared by my dad trying to toast a bagel.
i continued checking while sorting through giphy to find more interest related gifs in advance for future journals up until 1 when boris came back inside. he had something to eat, came into my room, and i said goodnight to him at around the same time he came in, and finished at 2. while talking to him i showed him all of the crafts i’ve done today + my gerard funko pop. i like updating him on what i do throughout the day when i’m not with him. i went to sleep at 2:50 after figuring out the first/last name for my killjoy oc [i haven’t decided whether it’s going to be first or last name because i don’t have two yet.]


🗝️ — boris/my cat, prevision/keyworker i have to see instead of being taken back into mainstream education
have a good day/night O_o
#2000s emo#emo#journal#online diary#diary#alt#metalhead#silent hill#horror#mcr#my chemical romance#gerard way#patd#panic! at the disco#pierce the veil#vic fuentes#trinket#punk#punk diy#green day#fnaf#five nights at freddy's#welcome to the black parade#oc#american idiot#pop punk#concert#kandi#i brought you my bullets you brought me your love#three cheers for sweet revenge
6 notes
·
View notes
Note
del i fear ur untitled rhett fic might just wreck me. im a sucker for friends to lovers, and a whore for soulmates, and hanahaki disease is SO GOOD i dont read nearly enough fics about it!!! im frothing at the mouth climbing up the walls !!!!
You should have seen me while I was drafting the outline 😭 I was crawling through a list of AUs, writing down my favorites, and spent a full hour in misery, trying to narrow it down to just one. Behold, we have three! I hardly see anything with Hanahaki Disease anymore 😔this is my second time taking a swing at it; I had a draft in February, but it was dead in the water from the moment I finished the moodboard lmao.
The running title is currently "Every Storm (Runs Out of Rain)," but don't...don't hold me to that. I've been known to conjure up a new title within minutes of hitting post 😒
Here's another preview for ya 🤍
The last thing you expected was for Rhett to hop out in that unbuttoned flannel, broad chest on full display for all to see. The sleeve falls just far enough from his shoulder that you can see the scar hiding below his left collarbone.
"Quite the festival outfit you've got," you chirp, dragging your eyes away from his bull tattoo and over to a nearby tree, feigning interest. The back of your throat is starting to tickle, lungs tight as you fend off the urge to cough. Not here, not here, not here.
He laughs, "What, y' don't think I look good like this?"
You do, but he doesn't need to know that. Not in the slightest.
"Its...certainly a choice," faking a grimace, you turn your attention back to your car, slowly but surely growing cooler the longer it runs. A pleasure that Rhett and his broken air conditioning unit haven't known since last summer.
You don't mind the idea of it staying broken if he keeps showing up at your house looking like this. Even if that does mean that you become his ride on the hotter days, fearing an onset of heat stroke.
The passenger door is silent as he opens it. No longer squealing due to whatever he and Royal did to it last weekend. Being friends with a family of DIY ranchers has its perks.
Thunk_
"Shit."
You blink. Was that...?
Yeah.
It was.
As if last time wasn't enough of a lesson, Rhett's got his knees pinned up against your glovebox, the seat too far forward for him and his big body to fit. Though this time, he isn't hurriedly pawing at the seat levers like he'll die if he doesn't get any more space. Instead, he's resigned to a frown. More annoyed with himself than anything.
"You alright there?"
Rhett's sigh is so heavy that his shoulders visibly deflate. "Yeah," reaching off to the side, pushing the seat back as far as it can go. "Humbled, but 'm alright."
12 notes
·
View notes
Text
Insect Pinning Tutorial
This is going to be a very surface-level lesson in insect pinning for display. Let's say you have captured an insect you wish to pin. One such as this Spotted Lanternfly (Lycorma delicatula).

The first step is to create a killing jar. This tool dispatches your quarry using toxic fumes, giving you an intact corpse you can display. What you need is an airtight container, nail polish remover, and a tissue. Now, scientifically, the ideal chemical to use is ethyl acetate. But in the absence of that, nail polish remover works. The setup is simple: you make the tissue lightly damp using your dispatching chemical, place it inside the container, add the insect, and close it up. Now, because I am slightly rusty and the opening on this bottle is large, I used more than necessary and the tissue was soaked.

Ideally, you do not want to wait too long to perform the next step as you want your corpse to be fresh and pliable...but also not wait too short, as you want it to be dead and not unconscious. This is when you get out your pinning board and insect pins. The board is optional as long as you have a sheet of styrofoam, but the pins are a little less DIY. You will need to have insect pins ahead of time in order to pin an insect.

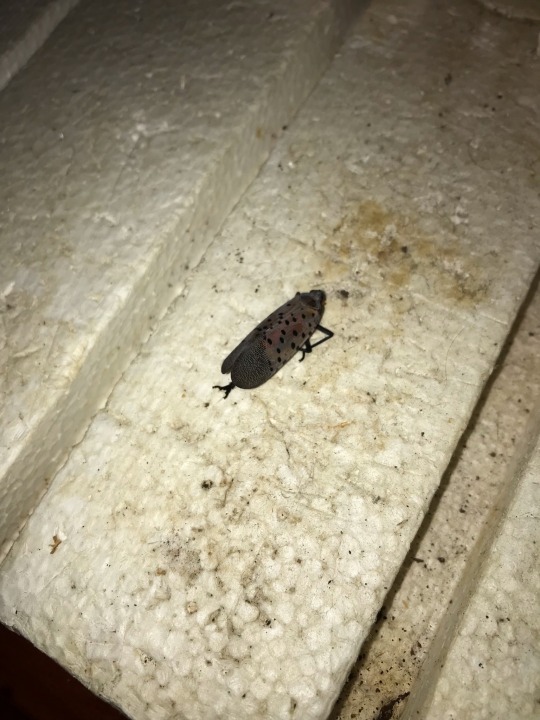
What you want to do here is position your corpse dorsal-side up (belly down) and push a pin through its pronotum, the "shield" behind its head. Traditionally, a hemipteran such as this should be pinned instead through its scutellum, the segment of the thorax after the pronotum which lies between the wings, but as previously stated I am rusty and also it's too late. If I were to re-do it, the hole would bother me. Incidentally, with beetles, the target for pinning is the right elytron (plural elytra), the hardened forewing characteristic of beetles which forms a hard cover over the flying wings.

The next step is to use more pins to pose the insect's limbs. Now, because I had to go to work, I did in fact wait a little long to pin my lanternfly. And as a result, its legs were not as pliable as I would have preferred. But as I said above, this is already imperfect. And perfection is overrated anyway.

Now, something a professional might do is spread its wings which would show off this species' bright red abdomen. However, this is an optional step which requires more precision and patience. And as mentioned, my subject was already becoming rigid. Come morning, it will have finished drying out and remain in this pose without the pins holding its legs.
And that is how you pin an insect. I am by no means a professional and it has been about a decade since I last performed this technique, but hopefully you have learned something.
39 notes
·
View notes
Text

👑 KING 👑
Context: Your baby sister has been feeling down ever since the disastrous trip to the village fair, so you and your co-conspirators decide to surprise her by creating new dresses for an exclusive DIY fashion show.
Bonus: It’s a success and another one of your siblings end up discovering a skill that they are mind-bogglingly good at.
Ft. 5 year old Uzumaki Nana, Nohara Kanna, Kyoko, Ryuu, and Yuji from In Sound Judgement by @negativeaperture
(Character interpretations and scenarios were inspired by the fic. They may not be canon to the version written by the writer and are strictly the artist’s speculations)
I imagine this taking place after the kids had to visit the central village fair for consumable produce, and Nana being an adult stuck in a child’s body got distracted by all the pretty wares and clothes that were being displayed. She had been admiring the dresses, when she was suddenly manhandled by an extremely irate and furious stall owner. A man, who not just a few moments ago had been acting really nice and fondly indulgent towards her.
Nana is saved by Ryuu before the screaming owner can throw her down, and hastily taken away from the gathering crowd. The last thing she sees before Ryuu covers her eyes and ears is the sight of the full-grown adult who had been taking sick satisfaction from her fear rapidly paling in front of a young black-haired child wearing an ANBU mask.
(Ps. The clothes were designed by our dumpster diving legend Kyoko. The expensive fabric scraps and flower pins that they found during their spree may or may not have been left by a concerned ANBU as an apology for being unable to intervene sooner.)
(Ps. Ps. Yes the ANBU was Itachi)
Ps. Ps. Ps. The photo looks blurry because the file size was too big for the post. Desktop users shouldn't face the issue while accessing the file. Apologies to everyone who views the app through the phone (like me).
#naruto#uzumaki naruto#female uzumaki naruto#transfem naruto#fem naruto#fan art#fic fanart#my art#in sound judgement#isj#what ifs#implied child abuse#overthinking canon as usual#canon typical violence#fp20
13 notes
·
View notes
Text


DIY Guillermo Del Toro’s Pinocchio & Interview with the Vampire enamel pin display made out of a picture frame with the glass removed and scrap velvet fabric - before cat hair gets to it
#pinocchio#guillermo del toro#interview with the vampire#Anne rice#enamel pins#enamel pin collection
6 notes
·
View notes
Text
There's a new Schlock Mercenary Kickstarter, which means I should probably get busy figuring out what to do with my merch from the last Kickstarter. Besides the book, I got two pins and three Challenge Coins. I've seen people display pins using what is basically an embroidery hoop, and most of them use just fabric (plain or patterned), but, look . . . I'm am embroidery person now. If I'm going to do a hoop, I'm going to make it cool.
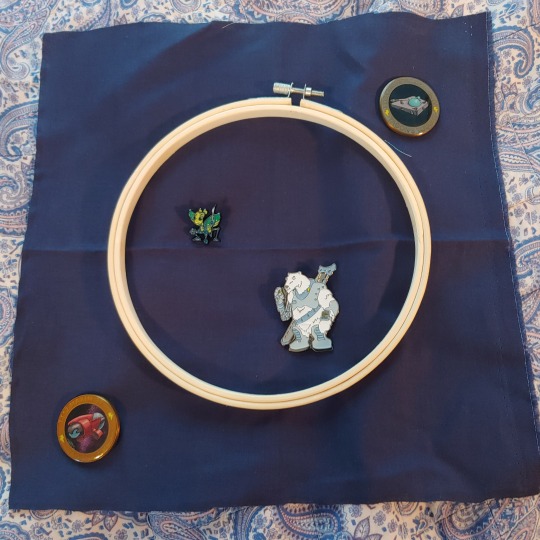
I think this dark blue fabric will be a good choice as far as color — it looks appropriately spacey, and both of my pins show up reasonably well against it. Still trying to decide what embroidery to do, though. I could keep it simple and do constellation patterns, though I'm also possibly doing that with my Cosmere pins, so . . . not sure if I want to repeat that. I could also maybe throw in a planet or two if I went this route? Or Eine-Aifa lineart, though I don't remember if we ever see that in full view.
I could do line art of some of the ships from the comic (probably with the ships on the challenge coins also in the picture). I really enjoy the ship designs in this strip, and this seems like a reasonably straightforward option. Downside: I know one of these characters wasn't on either ship, and I can't remember which ship the other one was on, and I know it'll bug me if I mess it up . . . I could probably resolve this by rereading part of the comic, but then I'll end up rereading the whole comic, and I cannot afford that time right now.
A small, absolutely mad part of me wants to try to do an actual scene of some kind, but the larger part of me that recognizes the limits of my artistic skills is trying to lock the crazy bit in a closet.
I'm also poking at the idea of painting the embroidery hoop, probably in spacey silver and blue. I have paint left over in appropriate colors from when I made a sword and dragon eggs . . .
If anyone has made these before — do you normally use multiple layers of fabric? Fabric and batting? Fabric and felt? I feel like a single layer of fabric isn't enough. (I'm going to look up some DIYs, but I like hearing people's actual experiences.) I have another hoop to finish before I do this one, so I have time to figure out what I'm doing.
Side note — as I said, there's another Kickstarter going on now! They've already met a bunch of the stretch goals, which is exciting. I'm really hoping we can get to 2,000 backers, which would probably blow the minds of the people running the campaign, and I want to see what they come up with as a reward for that. I'll drop a link here if you want to check it out. (You should also go check out the original comics, if you haven't read them. They get so good.)
kickstarter
#taleweaver speaks#this is both a genuine project post#and a little bit of a blatant promo post#but as I have said before#I will shill for authors if I want#and the fact that I am actually spending money on something#that I can EASILY get online for free#should say something about how big a fan I am of this series#embroidery#schlock mercenary#mandatory failure
4 notes
·
View notes
Text

DIY picture frame pin display! 🖼
This great pin display idea is simple - find an old picture frame around the house or at the thrift store, and replacing the glass and image with some cork to stick your pins in.

Take apart your picture frame, set aside the backing for use later. Paint the frame if you’d like, but I just left mine.
Using the cardboard frame backing as a template, trace the shape onto the cork sheet and cut it out. I used a metal ruler and a pair of scissors.
Glue the cardboard onto the piece of cork, evenly spreading it out. I put mine under a book to dry flat.
Put everything (except for the glass) back into the frame, and you’re all done! You can hang it up on the wall or stand it up on your desk or dresser. Keep a small jar nearby for any loose pinbacks.
Supplies: - Thin cork sheet or cork placemat - Thrift store picture frame - Scissors - White glue - Cardboard
#home stuff and apparel#welcome to craftyland#DIY pin display#thrift store crafts#easy pin display#enamel pin collection
1 note
·
View note
Text
I wish there were more video games meant for the deaf-blind community. Like the experience is centered around touch and uses a custom controller that's very sensory stimulating with different haptic feedback/rumble/vibrations and there's lots of different textures and things to twist, push/pull or wiggle like dials, switches and potentiometers and it interacts with you by providing lots of mechanical movement to components. An accelerometer to play with the spatial orientation. Maybe a braille display as well? I just want something to tell an immersive story through touch.
A DIY button box is close to what I have in mind. But more practically would be something similar to a pin art toy and the shape changes.
I'm neither deaf or blind, just an autistic whose eyes and ears need a break sometimes and am sensory seeking.
9 notes
·
View notes
Text
I've had such a good weekend. On Friday my partner and I went to a Gallery that showed a bunch of shirts, posters, pictures and more from a diy punk community run by a bunch of teenagers in Raleigh North Carolina in the 90's. It reminded me of the diy scene in my city a lot. There was a lot of Sonic youth stuff up. On Saturday we went to a queer/trans zine fest! I got a really cool zine and a couple of pins. One says t4t and the other one says tip your barista. I also met another Percy who makes really cool art! Later on we went to a little gallery that showed Providence hardcore history. I enjoyed seeing all the posters of bands that came through back in the day. Today we went to the RISD art museum. It's free on sundays which is pretty cool. I haven't been since 2020. It was really cool to see all the new stuff up. It was also nice to see the stuff that is always on display. I really enjoy the Greek statues and pottery. After that we got vegan chocolate cookies from our favorite bakery. I am very happy I got to do a bunch of fun stuff with my partner :)))) now I'm watching samurai champloo while my partner is playing too many bones with a friend.
2 notes
·
View notes
Text
DIY: Marauder with Screen and GPS For Flipper Zero
Many of you would have seen the humongous ESP32 add-on module with touch screen and GPS for Flipper Zero shared in discussion groups, forums, etc. Well, this tutorial will provide you with all the information you need to build one yourself.
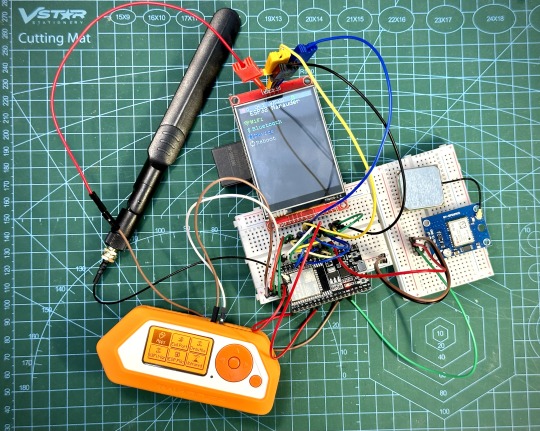
This build consists of mainly 4 parts. The TFT LCD 2.8" 240x320 SPI ILI9341 Touch Display cost me around US$5.50, the ESP32-WROOM-32U module cost around US$3, the NEO-6M GPS module cost around US$2.20 and an 8dbi 2.4GHz Wifi Antenna which cost around US$2. All of these parts can be easily found in online marketplaces like Aliexpress, Amazon, etc. Here is how you need to wire them up together. How you wish to lay this out or mount on a prototyping board is entirely up to you. As long as the connections are correct, you are good to go. The GPS module is optional, and mainly, it's used for the war driving functionality.
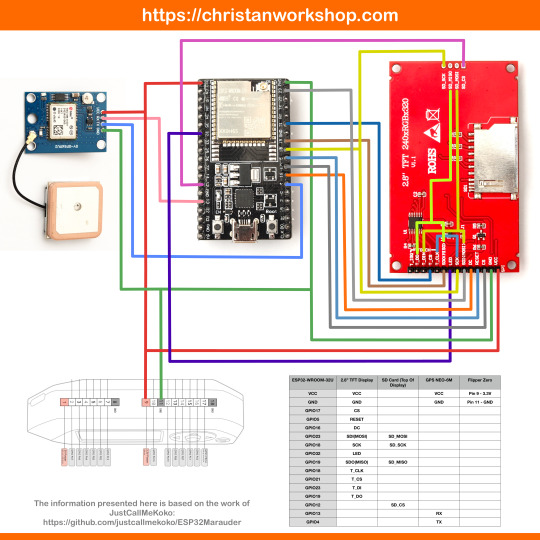
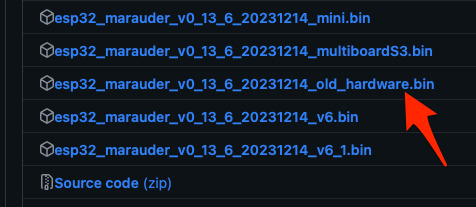
Next, you need to download all the firmware needed from here. Please download the Bootloader, Partitions, Boot App and Firmware files for v4 (Yes, v4 files, not any others) and save it on your computer.
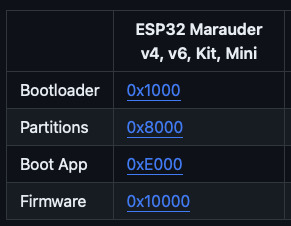
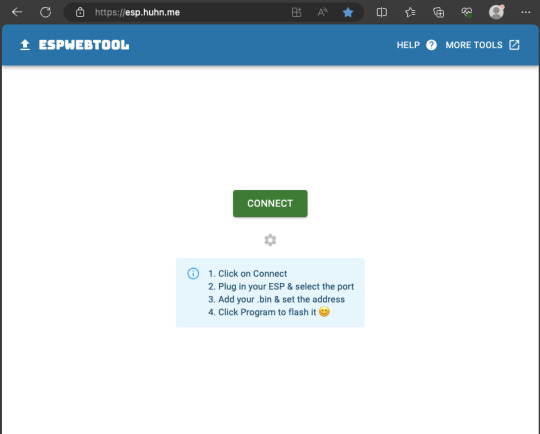
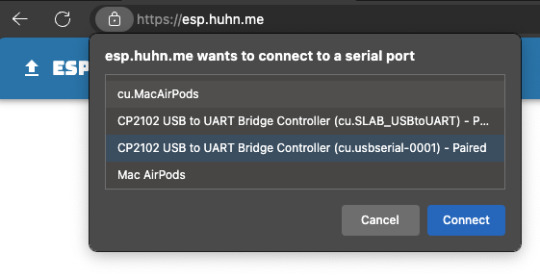
Now, press and hold the BOOT button on your ESP32-WROOM-32U module and connect it to your computer using a data-capable USB cable (some USB cables can only charge), then let go the BOOT button. Open Google Chrome or Microsoft Edge browser and go to ESPWebTool. Click the CONNECT button, then select the ESP32 usb serial connection. It should look something like below but can vary a little between different computers and operating systems.
Select the firmware files for each slot exactly like below (take note of the 0x1000, 0x8000, etc. and their corresponding .bin files), then hit the PROGRAM button.
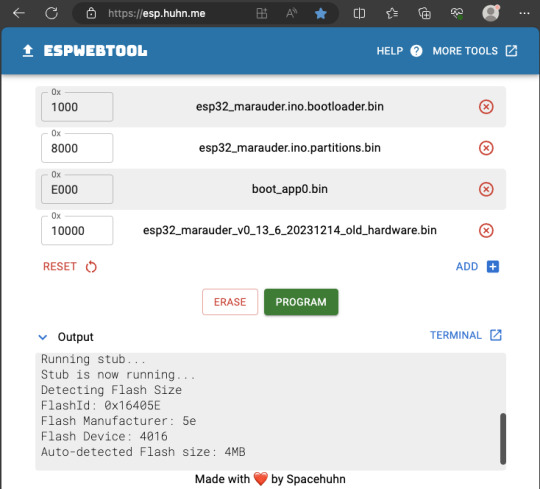
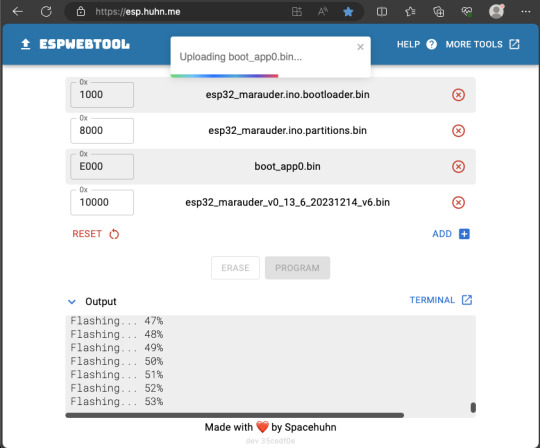
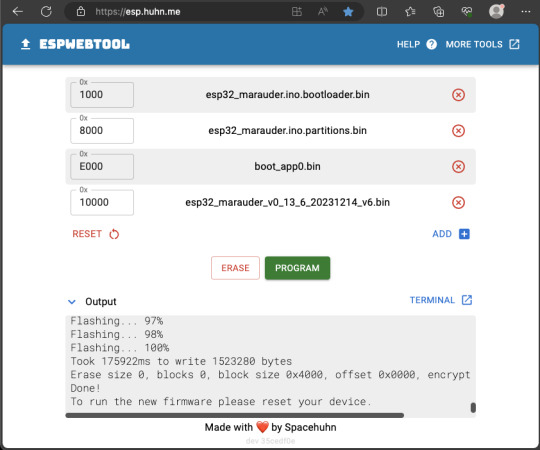
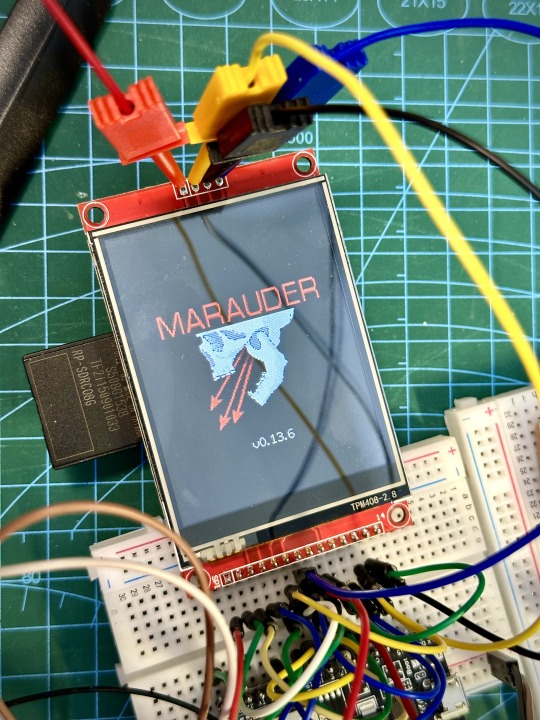
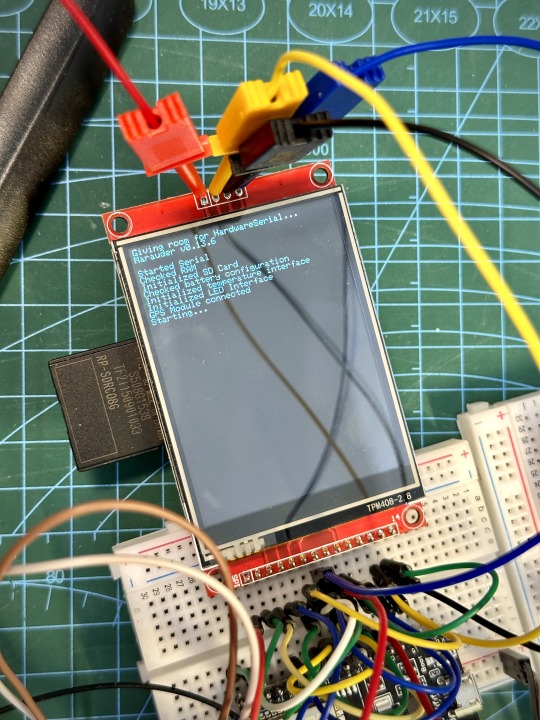
When completed successfully, you can unplug the USB cable from the ESP32 module and now you can connect your Marauder module to your Flipper Zero. Please ensure that your Flipper Zero is turned off before you connect it, and also turn off your Flipper Zero before disconnecting it. The 3.3V pin is also used by your Flipper Zero's SD card reader and connecting/disconnecting external modules that use this pin while the Flipper Zero is on can potentially corrupt the SD card. So, if everything went according to plan, your Marauder module should boot up and everything should look like below.
NOTE: If your Marauder boots up, but when you try to touch the screen and get no response, try tapping around the bottom part of your screen and see if the touch panel seems to be in inverted position from the actual display. Should this happen to you, just flash your ESP32 module again following the steps above, but use the v6 firmware. This should resolve the issue.
In this build, I just prototyped this on breadboard, but you can of course make it permanent by soldering it on to a prototype board and 3D print a case for it. This setup is essentially just using the Flipper Zero as a battery pack, instead of using the Flipper Zero to control Marauder. The large screen does make some things easier to do, compared to the small screen of the Flipper Zero, and there may be some functionality (not much) that is not currently in the Flipper Zero Marauder companion app. Here is a video showing the different menus in Marauder.
Personally, I don't think I will actually want to bring something so big around with me, along with my Flipper Zero. I think what makes Flipper Zero special is just how compact it is and all the different functionality cramped into it. This would probably be better off as a standalone unit by just hooking up a battery, but that's just me. Well, that's it for this tutorial. I hope you found this helpful. If you haven’t already done so, check out my Makers & Hackers Exchange Facebook group to learn more from other Flipper Zero users.
Here's a good intro to Marauder if you are unfamiliar.
youtube
14 notes
·
View notes
Text
Creative Ways to Display Photos at Your Wedding

Displaying photos at your wedding is not only a fun way to honor the past while celebrating your future, but it's also an easy and affordable form of wedding décor. More often than not, you can display your favorite family photos all on your own thanks to a handy big-day DIY project.
There are so many ways to personalize a photo display for your wedding. Take the rustic route and pin pictures onto a string of twine. Throwing a vintage-inspired affair? Try framing multiple generations of black-and-white family wedding photos. Or opt for something totally off the beaten path: Wear these photos around your neck (inside of a precious locket) or top your cake with photo cut-outs. Wedding photos can work as favors, too. For a meaningful keepsake, create a one-of-a-kind charcoal drawing of each guest at this couple's wedding.
If you want to show off a photo series that tells the story of your relationship—and paints your guests a clearer picture of how you met, fell in love, and got engaged—consider adding a legacy element by also displaying photos from your parents' or grandparents' weddings. The further back you go, the more you and your guests will feel embedded into your family history. To inspire your own display, we've rounded up several options that are easy enough to copy or make your own. Whether you want to bring family photographs to the forefront of your celebration or showcase a selection of snapshots of you and your soon-to-be spouse, friends, or even pets, these ideas will make your wedding one to remember.
Ceremony Programs

We love how this couple commemorated the family marriages that came before theirs: They asked their stationer to print photos of each generation's newlyweds onto the back of their ceremony programs with a brief description of how they fell in love.
Wooden Photo Wall

This display proves your favorite song isn't just for the first dance: The couple incorporated the lyrics from the Beatle's "All You Need Is Love" on their photo backdrop.
Table Numbers

Get creative with your table numbers and replace standard numeric options with childhood photos of each of you at the associated age.
Lining Pin

Pin photos of your relatives into the lining of your tuxedo (or dress!) for a hidden homage to your loved ones.
Seating Chart

A seating chart is a unique way to present your meaningful pictures.
Chair Décor

Baby photos are a great way to mark your spot at the head table.
Hanging Bouquet Charms

Tie pictures of your relatives to your bouquet wrap as a way to celebrate your bond. This bride brought two photos of her grandparents down the aisle on her big day. You can also use an heirloom locket and pin to bouquet.
Hoop Display

If you had engagement portraits taken, you'll want to show off the results on the big day. Engagement photos of the bride and groom were secured with white ribbon and displayed in a hoop for this modern piece.
Sentimental Set Up

Think beyond a photo wall when brainstorming ways to display family photos. For meaningful décor, this bride had her grandmother's piano brought to her venue where it was draped with eucalyptus, greenery, and photos of the couple's grandparents and parents.
Boutonnière Photo

Boutonnières get a sweet upgrade when you add a photo of your loved ones to them, as evidenced by this groom's lapel accent.
Swizzle Sticks

Take notes from this crafty bride and embellish your signature drinks with sentimental swizzle sticks.
Guest Book Display

Want to give guests a glimpse at the weddings of your family's past? Make like this couple, who set up old family photos near their guest book station.
Family Tree

Wrap Polaroids around a nearby tree with twine for an unexpected twist on the phrase "family tree."
Bookshelf Photo Display

Prior to the big day, this couple asked their parents for old photos of the couples in each family. At the wedding, the pictures were framed and placed onto a bookshelf. "It was important for us to share where we came from and the love that's existed in our families for generations," said the bride. "It was also really touching to watch our guests, including our family members, look through them and enjoy the history and memories they brought."
4 notes
·
View notes