#Creality Ender 3
Explore tagged Tumblr posts
Text

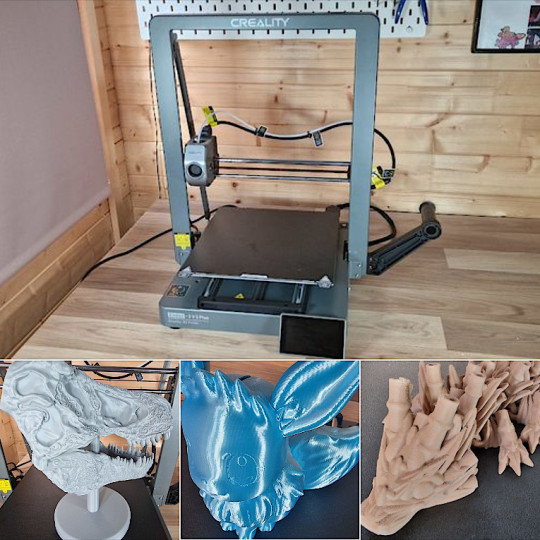
Creality Ender 3 V3 Plus Review: 3D Printer Testing
Phil Macey tested the Creality Ender 3 V3 Plus by printing various complex models for his review. He featured designs from talented artists from STLFlix, Scheettini, and CinderWing3D. Exotic materials such as wood and marble filaments were used for evaluation.
12 notes
·
View notes
Text
A company bought the company that made the Benchy 3d print model and are now trying to enforce the no remixes license and charge for people who make remixes of it. Companies buying something they don't understand insane community with recognition and killing it... sigh...
21 notes
·
View notes
Text
Making a thing. I think putting a heater in the room might have been too much preparation but there doesn't seem to be any bed lift so it must have done something.

Still learning 3d printing (I stopped some years ago) and getting the hang of my Creality ender 3 V3 Plus. It's so much faster than my da Vinci aio! Gotta figure out quality/speed on this thing.
6 notes
·
View notes
Text

Layer separation using the new direct drive. This is a new learning curve and I may have to change some settings.
3 notes
·
View notes
Text
I'm gonna have to get a bigger table

2 notes
·
View notes
Text
Review 3D Printer Creality Ender-3 V3 SE, Murah Cocok Untuk Pemula
Bagi pemula, Creality Ender 3v3 se merupakan printer yang cukup murah namun memiliki performa yang sangat bisa diandalkan. Mesin entry-level ini menawarkan serangkaian fitur sederhana, termasuk antarmuka yang mudah digunakan, ekstruder penggerak langsung, dan layar yang cukup informatif. Meskipun mungkin tidak memiliki fitur-fitur canggih seperti deteksi kehabisan filamen dan kemampuan kamera…
0 notes
Text
What am i doing wrong?!
Im trying to print The Dummy 13 action figure using the Cura software with my Ender 3 v3 se, But the parts especially the crotch doesn't seem to fit. If anyone knows the Ultimaker Cura Settings the print please give me an answer. i don't wanna waste anymore filament.
#blender3d#Dummy 13#creality#Cura#Ultimaker#Ultimaker Cura#please help#3d printing#ender 3#Ender 3 v3 se
0 notes
Text
Got a 3D printer recently

And uhh, made my first print, which is naturally a Benchy

Now I need to figure out what the stringing and holes mean. My best guess is lowering the temp to get rid of the stringing and increasing the extrusion rate to fill in air bubbles.
1 note
·
View note
Text
Lightsaber? Lightsaber!
So, recently I´ve had a task on my ToDo-list that I kept postponing over and over again. The task: getting my 3D printer up and running again! But last weekend, I decided to just do it. Had it running within 5 minutes, which was funny since it appeard to be such a big task before...
Well anyways, I had to think of a project to print when I stumbled upon these amazing & free models by 3Dprintingworld!
I couldn´t help myself but fall in love with the print-in-place lightsaber, so that was quite the quick decision. Anyways, long story short: Here are my results!
I had quite some trouble getting the blade out in the beginning, but soon discovered that breaking off the tips of each blade part did the trick.
Next week I´ll buy some spray paint, sand down the print and then colour it.
Hope I managed to inspire you today!
I´ll go start my jedi education now xx
Printed on Creality Ender 3 with white PLA and the Cura slicer settings reccommended here.
0 notes
Text
1 note
·
View note
Text
0 notes
Text

Next piece of the puzzle is in. Woohoo! lol
1 note
·
View note
Text

All done printing the faceplates!
#amateur radio#ham radio#kf4rws#mine#radio communications#3d printing#meshtastic#creality#ender 3#heltec
0 notes
Text
Here’s my interesting adventure into 3d printing and Bjd modification.

I got a Doll Chateau Charles head (I’m using the body for a project ie. floating head). And my first thoughts for the sculpt was fishy! so I made a pair of koi ear fins and eyes.


I also had a different parts body and though 🤔 Why not make a mermaid??? Soo bam! Found this print on Thingiverse “Bunny Doll Mermaid mod” by Enchanterium. I sized it up a ton.
I printed on my creality ender 3 PLA. I had way too many failures and then some problems sizing it (as I am big stupid).
I sculpted scales onto the prints because t’s helped a ton to enhance the sculpt! Then I use wood filler for the lines (should have done that first instead of the scales)


Sealed it with automotive primer and then air brushed it white.
The koi colors was painted in with acrylic paint through several washes and dry brushing. I also of course used plenty of mica powder to shine this up.

I didn’t suede before hand. But I should have thought that through as the paint immediately scraped 😮💨 Definitely could’ve planned it better.
I want to make them a larger tail (maybe a fabric cover?) because it’s visually small.


Like look at that face! I have yet to do their face up but it’s gonna but full blown koi/traditional East Asian style makeup.
Their look also includes vitiligo white patches. I already painted them on the human body and will continue into the face up.


I really had a great time transforming this doll!
I will make sure to update when the face up/doll is done (in probs like 3 years).
I linked my tiktok of this just in case you want moving visuals instead. 😉
#doll#ball jointed doll#dolls#bjd#artdoll#bjddoll#custom doll#toys#kawaii#koi fish#mermaid#fantasy#3d printing#thingiverse#doll chateau#bjd collector#custom#koi mermaid#1/4 bjd#bjd hobby#bjdphotography#bjd sculpts#ooakdoll#ooakcustom#tiktok
9 notes
·
View notes
Text

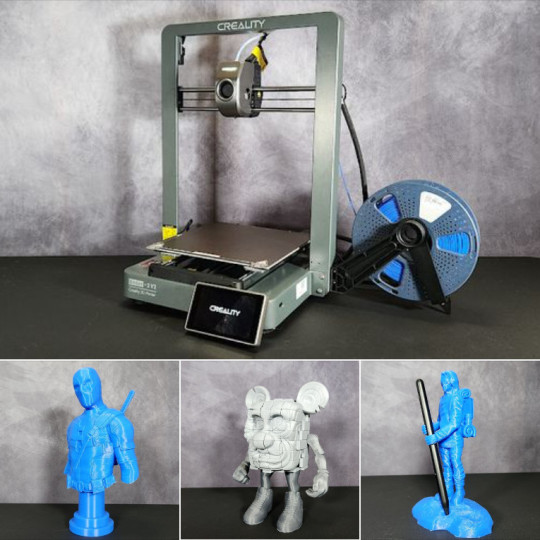
Creality Ender 3 V3 Review: 3D Printer Testing
Will Zoobkoff extensively tested the Creality Ender 3 V3 by printing various complex models for his review. He featured designs from talented artists, including Fotis Mint, Pipe Cox, and others.
8 notes
·
View notes
Text
20% OFF for a double-sided textured PEI plate at only $19.99. One board two side printing.
#3d printing #3d printer #deals #3d printing deals #creality #ender #ender-3 #ender-3 s1 #promotion #diy #printing bed #PEI
2 notes
·
View notes