#Cable Tray Covers
Explore tagged Tumblr posts
Visit Tumblr Blog
Explore Tumblr blogs with no restrictions, modern design and the best experience.
Last Seen Tumblr Blogs


Fun Fact
70% of Tumblr users say the Dashboard is their favorite place to spend time online.
Text
Raceway Cable Tray Manufacturer in Hyderabad
Raceway Cable Tray Manufacturer in Hyderabad – Aparna Rollform
Aparna Rollform is a trusted name in Hyderabad, specializing in manufacturing premium-quality raceway cable trays. Known for their durable designs and superior performance, their cable trays are engineered to support and organize cables in commercial, industrial, and residential spaces.
With a commitment to innovation, Aparna Rollform offers a wide range of cable tray solutions, including perforated, ladder, and raceway designs, tailored to meet diverse wiring needs. These trays are made from high-grade materials, ensuring corrosion resistance and long-lasting performance, even in challenging environments.
As a customer-centric company, Aparna Rollform ensures timely delivery, competitive pricing, and exceptional after-sales support. Their focus on quality and precision makes them a preferred choice for raceway cable trays in Hyderabad.
Visit aparnarollform.com to explore their product range and elevate your cable management system.
#Solid Bottom Type Cable Trays#solid bottom cable trays#solid bottom tray#Cable Tray Manufacturer#cable tray manufacturer in Hyderabad#Cable Tray Covers#cable tray cover types#ladder type cable tray with cover#perforated cable tray cover#ladder cable tray cover#perforated cable tray with cover#cable tray manufacturers#cable tray manufacturers in Hyderabad#Raceway Cable Tray Manufacturer in Hyderabad#raceway cable tray#electrical cable tray#cable tray covers#solar module mounting structures#false ceiling sections#stainless steel grating manufacturers#steel reinforcement manufacturers#false ceiling channels types#Types of Ceiling Channels Used In False Ceiling
1 note
·
View note
Text
GI Ducting, Galvanized Iron Duct, Manufacturer, Exporter, Pune, India
GI Ducting, Galvanized Iron Duct, Cable Trays, Manufacturer, Supplier, Exporter, Pune, India, Japan, South Africa, Russia, Japan, Philippines.
#GI Ducting#Galvanized Iron Duct#Wire Mesh Cable Trays#Wiremesh Cable Trays#Wiremesh Trays#Cable Trays#Cable Tray#SS Ducting#Industrial Cable Trays#Industrial Cable Tray#Perforated Cable Trays#Perforated Cable Tray#Ladder Type Cable Trays#Rectangular GI Duct#Stainless Steel Ducting#Aluminium Ducting#Spiral Ducting#Round Ducting#Pre Insulated Ducts#Waves Flange System#Ladder Type Cable Tray#Cable Tray Accessories#Cable Tray Accessory#Cable Tray Ducts#Cable Tray Duct#Cable Tray Trunking#Cable Tray Covers#Cable Tray Cover#Manufacturer#Supplier
0 notes
Text
Effective Cable Management Systems for Industrial Settings in Qatar

In industrial environments, a well-organized cable management system is essential for safety, operational efficiency, and minimizing downtime. Whether in factories, power plants, or other industrial facilities, keeping cables secure, organized, and easily accessible prevents damage, reduces fire hazards, and enhances the lifespan of electrical infrastructure. As industrial demands continue to grow in Qatar, more businesses are looking to optimize their cable management systems with reliable solutions like cable ladders, trays, and trunking. Let’s explore the key components of an industrial cable management system and why partnering with trusted cable ladder, tray, and trunking suppliers in Qatar can make a significant difference.
Importance of Cable Management in Industrial Settings
Industrial environments often involve complex machinery and equipment that require extensive cabling for power, data, and control signals. In these settings, cables are frequently exposed to challenging conditions such as dust, moisture, and high temperatures, making effective cable management essential. A proper industrial cable management system ensures that cables are safely routed, organized, and protected from potential hazards.
Effective cable management offers several benefits, including:
Enhanced Safety: Cable management reduces the risk of electrical hazards such as short circuits, which could lead to fires or equipment damage.
Reduced Maintenance Time: Organized cables make it easier for maintenance teams to identify and address issues, minimizing downtime.
Extended Cable Lifespan: By securing and protecting cables, a cable management system prevents wear and tear that could lead to costly replacements.
Improved Aesthetics and Organization: Organized cables contribute to a clean and professional workspace, which can also impact productivity positively.
Key Components of an Industrial Cable Management System
A well-designed cable management system includes several components that work together to ensure cables are efficiently organized and protected. Common components include cable ladders, trays, and trunking, each serving a specific purpose. Here’s a closer look at each:
1. Cable Ladders
Cable ladders are an essential part of many industrial cable management systems, especially in environments where large bundles of cables need to be supported over long spans. Cable ladders provide a durable, open-frame structure that allows cables to be laid across the rungs, offering easy access for future adjustments or maintenance.
Benefits of cable ladders:
Ventilation: The open design of cable ladders allows for air circulation, which helps prevent overheating of cables.
Ease of Installation: Cable ladders are easy to install, especially in overhead or vertical applications, and allow easy access to cables.
Flexibility: They are available in various widths and load capacities, accommodating a wide range of cable sizes and quantities.
When looking for cable ladder suppliers Qatar, it’s essential to choose suppliers who offer quality materials that can withstand harsh industrial environments. Reliable suppliers provide durable cable ladders that are corrosion-resistant and capable of handling the load requirements of industrial settings.
2. Cable Trays
Cable trays are widely used in industrial cable management for supporting and organizing cables along horizontal or vertical paths. Unlike cable ladders, cable trays have a continuous base that offers more support, making them ideal for smaller cables that require protection. Cable trays are available in various types, including solid-bottom, perforated, and wire mesh trays, each suited for different cable management needs.
Benefits of cable trays:
Protective Support: The continuous base provides additional protection for cables, especially in high-dust or moisture-prone areas.
Customizable Layouts: Cable trays can be easily adjusted or extended, making them adaptable to changes in cable routing or expansions.
Improved Safety: By securing cables within the tray, risks of tangling or accidental disconnection are minimized.
For industrial projects, cable tray suppliers Qatar play a critical role in providing high-quality trays that are suited to specific applications. Choosing a reliable supplier ensures you receive trays made from robust materials, such as stainless steel or aluminum, to withstand Qatar’s environmental conditions.
3. Cable Trunking
Cable trunking provides an enclosed channel for routing cables, protecting them from dust, debris, and mechanical damage. It is commonly used in industrial environments where cables need extra protection or when aesthetics are important, as trunking conceals cables within a clean, enclosed casing.
Benefits of cable trunking:
Enhanced Protection: Cable trunking protects cables from external damage, making it suitable for harsh industrial environments.
Neat and Organized Look: The enclosed design helps maintain a clean appearance and prevents cable tangling.
Safety Compliance: Cable trunking meets safety standards by providing additional shielding to prevent accidental contact with cables.
When sourcing cable trunking suppliers in Qatar, it’s essential to select suppliers that offer robust and fire-resistant trunking solutions, especially for industrial settings where safety is a priority. High-quality cable trunking systems are designed to withstand heavy-duty applications, ensuring long-term protection for critical cables.
Choosing Reliable Cable Management Suppliers in Qatar
Partnering with reputable suppliers for your industrial cable management needs in Qatar can significantly enhance the efficiency and safety of your installation. Reliable suppliers not only offer quality products but also provide guidance on selecting the most suitable solutions based on the unique requirements of your facility.
When choosing cable ladder, tray, or trunking suppliers in Qatar, consider the following factors:
Material Quality: Industrial cable management products need to withstand challenging environmental conditions. Ensure your supplier offers corrosion-resistant materials, such as stainless steel or aluminum, which are suitable for Qatar’s climate.
Product Range: A supplier with a comprehensive range of cable management solutions can better meet your unique requirements, whether you need heavy-duty ladders, trays for smaller cables, or trunking for additional protection.
Industry Experience: Suppliers with a track record in industrial settings understand the complexities and safety standards involved, making them better equipped to provide reliable products and installation advice.
Compliance with Standards: Quality suppliers provide products that meet industry standards, ensuring your cable management system complies with local and international safety regulations.
Conclusion
An effective industrial cable management system is crucial for ensuring the safety, longevity, and efficiency of your operations. By utilizing the right combination of cable ladders, trays, and trunking, businesses in Qatar can streamline their cable infrastructure, reduce maintenance costs, and enhance overall operational safety. Working with reputable cable ladder, tray, and trunking suppliers in Qatar is essential for obtaining durable, high-quality solutions that meet industrial demands.
Investing in the right cable management system isn’t just about organization—it’s a proactive approach to safety, reliability, and long-term operational success. Whether you're setting up a new industrial facility or upgrading your existing system, make sure to choose suppliers who understand the specific needs of industrial environments in Qatar. With their expertise, you can be confident that your cables are protected, accessible, and ready to support your business’s growth and productivity.
#Cable tray Supplier in Qatar#Cable tray cover#Cable trunking & accessories#MEP Suppliers in Qatar#Cable mesh tray system
0 notes
Text


"to be loved is to be remembered" - a mini series by @cosmicalily. view series masterlist, and outline here
procedural memory | kim seungmin x fem!reader
procedural memory: a type of implicit memory that is categorised as the unconscious guide to the processes and tasks performed on a daily basis.
author's note: this might be one of my favourite seungmin fics i've ever written. and maybe i'm biased because he is my bias and i love strawberry matcha, but i think sometimes it's okay to be self indulgent. enjoy!
There were many things that Seungmin would do without realising, as if he was on autopilot. Actions that were ingrained into his daily routine, little activities that made up his day without his awareness. The way he made his bed, the double knot he always tied on his shoelaces, the route he took to the coffee shop where he worked. He loved his routine; he loved simplicity and consistency.
At work, he thought even less about his actions. He was a quick learner, and had mastered the art of perfect coffee early on. He heard the words ‘latte’ or ‘flat white’ and somehow the completed drink would appear in front of him thirty seconds later.
“Do you do iced strawberry matchas?” a voice asked, snapping Seungmin out of his coffee-scented daze. He looked at the shot he’d started running for a flat white and then at you, cheeks pink from the cold and eyes sparkling. A soft blue scarf was wrapped around your neck, covering your chin, and you wore a cosy navy cable knit sweater, just a little too big at the sleeves.
Seungmin thought intently. “We don’t,” he said truthfully, drumming his fingers on the benchtop. “But give me a second. I’ll try and make something for you.”
You beamed in excitement. “Thank you!”
“It’s no problem,” Seungmin gave a half smile back, digging around for the matcha powder. “Although, I have to say, who orders an iced drink in the middle of winter?”
Your cheeks flushed a little pinker and you rolled your eyes. “Shut up, it’s business for you, isn’t it? And I’ll tip, obviously, because it’s a custom order. They just don’t taste as good warm. I tried it once, and it was awful.”
“Was it?” Seungmin paused, tipping the ice cubes from your cup back into the tray and placing it into the freezer. “I’m going to try and change your mind. Out of confidence as a good barista, but also out of concern for your health, because you’re literally going to freeze as soon as you step outside with ice in your system.”
“And if I don’t like it?”
“It’s on the house.”
“Deal,” you agreed, leaning against the counter and watching as he poured the frothed strawberry milk, creating a little bear design. He leaned to grab a lid, but you knocked his hand away. “It’ll cover the art you did,” you protested, and he shook his head in amusement.
You breathed in the soft, sweet scent and took a sip, thinking hard. Seungmin watched intently, his attention distracted from the three coffee orders he had lined up to complete next. You smiled, and his face softened. “Good?” he asked.
“It’s shit,” you deadpanned, then burst out laughing. “It’s amazing! How much do I owe you for it?”
“Nothing,” Seungmin replied, eyes shining.
You opened your mouth to protest, but he gave you a warning look. “Do you do this often, then?” you asked, taking another long sip of your drink.
“What do you mean?”
“Save girls with silly drink orders from hypothermia.”
“Sure, it’s my favourite pastime,” Seungmin replied seriously, though his eyes twinkled mischievously. “No, not ever before. You’re the first, Strawberry.”
Your smile widened at the nickname. “Even if you’re lying, I feel special. Thank you…” you paused.
“Seungmin,” he finished, handing over a latte to a man behind you.
“Thank you, Seungmin. I’ll be back, I promise!”
He nodded. “I know you will. See you around, Miss Matcha.”
You snorted and walked towards the door, spinning around and blowing him a quick kiss. He winked and you burst into a fit of laughter, and once you were properly out of sight, he let a full smile creep across his face.
By your third visit to the coffee shop, he didn’t even need a prompt to make your order. By the fifth, your drink would be sitting, ready for you, extra hot. Even though you no longer had a reason to wait, you always stayed to talk to him, and he was thankful you did.
Soon, Seungmin became unconsciously aware of your routine, of your timing, of your daily scarf rotation. Once winter ended, he caved and made you your first iced strawberry matcha, which you declared better than any other iced drink you’d ever consumed. He still refused to let you pay, but he was always accepting of your newfound habit of leaning across the counter and giving him a quick kiss before you left for the morning. Initially on the cheek, but by mid spring, on the lips. Your kisses tasted of your mauve lipstick, cinnamon, and of course, strawberry matcha.
After a year of dating, you moved into his apartment. Seungmin, a lover of routine and consistency, found himself mesmerised by your sporadic actions and in the moment decisions. It didn’t frustrate him, the way he worried it would. Your presence was a constant, something dependable that he centred his new, irregular routine around, filled with evening walks and beach day trips. He learnt your habits, and soon, your actions were as familiar to him as his own. He would still make his bed in the morning, and you'd help him, finishing the job off with the two jellycat puppies you'd bought for your six month anniversary. He would tie a double knot in his shoelaces, and wait for you to slip on your ballet flats. Whilst you always had your signature drink at his shop, he knew you loved chamomile before bed, and there was always a mug of it by your bedside after you'd gotten out of the shower.
And of course, you did the same for him, but in your own way. You'd lay on top of him, playing with his hair for hours, explaining every single thing you adored about him. You cooked him dinner, and you'd sit on the counter beside him as he did the dishes. It was routine. You were each other's routines.
He kept working at the coffee shop, but now as a manager, although he always insisted on making your drink himself, and you would visit him, sometimes bringing your laptop and glasses with you to set up in a corner and work, other times bringing whatever book you were currently engrossed in.
“Hi baby,” you smiled up at him, stretching your arms and dog-earing your page.
“You know I hate when you do that,” he groaned, sitting beside you on the bench. Nevertheless, he pressed a kiss against your cheek and you giggled.
“I know, but like, it shows the love I have for my books. The ones that have crumpled pages and tea stains and frayed edges are the ones I read the most.”
Seungmin shook his head. “I’m just teasing. I love you and your broken books.”
“They aren’t broken-” you protested, but he cupped your face in his hands and silenced you with a soft kiss.
“I love you,” he repeated, eyes glossed over.
“I love you too,” you gazed back at him. Your book fell off your lap, but you didn’t move to grab it. The strawberry matcha Seungmin had brought over was probably cooling, but you didn’t care. It was moments like this where everything felt like muscle memory, where nothing felt new or uncomfortable. He was familiar.
He grabbed your hand, entwining your fingers in his. You gently stroked his thumb, then whined when he let go of your hand to reach in his pocket. “What are you doing?” you asked, then you paused.
He’d slotted a ring on your finger.
“You can say no,” he said, looking you directly in the eye. "You can take it off. But it feels right for me. I saw it in the window the other day and I didn’t even think, I just bought it. Which is crazy, because you know I overthink and overplan everything.”
“I know, you’re a dork,” you smiled, but your eyes were glassy. “Why the fuck would I say no? Of course I’ll marry you.”
Seungmin breathed out and pulled you in a tight embrace. He felt warm, he smelled like coffee, and the skin of his neck was soft against your cheek. “I’m glad, because I’ve never been so sure of anything in my life.”
“I’m only doing it for the strawberry matcha, of course,” you quipped, chuckling.
“I’m only doing it out of pity,” he added.
“Dickhead.”
“Asshole.”
You leaned against him, his arms around your waist. He kissed your cheek, your forehead, your shoulder, and you rubbed his back. A buzz went off in his back pocket, a reminder that his break was over.
“So,” he broke the hug, rubbing the back of his neck. “Your drink’s probably cold. So I guess, as a good barista, and now a good fiance, I probably have to make you a new one.”
“I’m gonna make out with you for hours tonight, Kim Seungmin,” you declared. “You’re my dream boy.” You blew him a kiss as he stood up, taking your drink with him, and he winked in return.
You watched his reflection on the steel coffee machine, and saw him smile.
#stray kids#kpop#skz#stray kids x reader#skz fic#stray kids fic#stray kids fluff#seungmin x reader#seungmin stan#seungmin#seungmin fic#seungmin fluff#kim seungmin#kim seungmin x reader#kim seungmin skz#seungmin skz#seungmin stray kids#stray kids seungmin#stray kids scenarios#bangchan#minho#changbin#hyunjin#han jisung#lee felix#jeongin#seungmin fluff fic#seungmin x reader fic#seungmin x you
249 notes
·
View notes
Text

Baby, it's cold outside
Written for the @steddieholidaydrabbles, day 27
Prompt: Coffee shop/bookstore/tattoo studio AU
Rated: M
CW: Alcohol; Implied sex
Tags: Coffee shop owner Steve; Tattoo studio owner Eddie; Christmas fluff; Flirting; Sexual tension; Getting together
Notes: Continued from my December microfic, but can also stand alone

Eddie swivels morosely in his desk chair, stretches until something in his lower back pops. He glances out the window and immediately regrets it. If anything, the snow has gotten worse, the dark street outside near invisible behind the curtain of flakes that's been falling for hours.
The blizzard hit just in time for Christmas, grinding all air traffic and most of the roads to a standstill. Eddie called Wayne to break the news, groaning and grumbling all the way, only to be gruffly told off.
“Ain't nothing to be done about it, kiddo. You be safe and I'll see ya when it clears.”
He was right, of course, the old shit. Eddie is a sensible adult who knows this. And so he holed up at the tattoo studio for some long overdue paperwork. A perfectly reasonable, adult thing to do on a lonely holiday.
Except it's boring as fuck and his back hurts and the cold is creeping in from outside and now he's feeling like a little boy who's had Christmas stolen by the fucking Grinch.
To top things off, he isn't even sure he'll make it back to his apartment with how things are looking outside.
He's just resigning himself to a night on the foldout in his office when there's a sharp rap against the front door. Eddie almost falls out of his chair.
“Jesus fuck-” he mutters, bridging the distance and fumbling to unlock the door. “What the hell are you doing?”
Steve stomps inside, shaking off snow as he goes. Even though it isn't more than a few steps from his door to Eddie’s, he's positively covered in the stuff, hair weighed down and uncharacteristically droopy. Cradled against the chest of his cable-knit sweater is a tray. Eddie spots cookies and two mugs overflowing with copious amounts of whipped cream.
He watches how Steve sets the tray down on the table in his waiting area and runs his hands through his hair to get the residue snowflakes out. It leaves him looking deliciously disheveled, all mussed-up strands, golden skin flushed pink from the cold. Eddie finds his mouth watering for reasons not exclusively related to the scents wafting off the tray.
Steve is looking at him, like he's waiting for an answer, and shit, he said something, didn't he?
“Sorry, what?” Eddie asks.
“I said,” Steve shakes his head, but there's no malice behind it. “Dig in, it's not getting any warmer.”
Eddie crumples down onto the couch, hides his face behind one of the mugs … and blinks in surprise.
“Alcohol?”
“Grand Marnier,” Steve says, settling down beside him and taking the other mug. Eddie has no idea what the fuck that means. Somehow though, the way the words tumble off Steve’s tongue, low and rumbly and distinctly French, really does it for him, so he doesn't complain.
“Cheers,” he says and clanks their mugs together before taking a tentative sip. A firework of flavors bursts across his tongue - bitter coffee and thick, sweet cream and something heady and boozy and orange-flavored?
“Good?”
“So fucking good, dude!”
Behind his own mug, Steve's mouth tugs into a smile. Eddie isn’t quite sure if the heady rush that floods him is entirely due to the coffee.
*
“Soooo,” Eddie slurs. The boozy coffee is long gone, as is the second helping Steve got from his shop. He's brought the entire bottle of the fancy French, orangey stuff though, pretty little genius that he is. Eddie giggles and takes another swig. “How c’me you're even here, huh? No family to visit, no girls to kiss under mistletoes?”
“Have you looked outside?” Steve snorts, swaying into his space to snatch the bottle back. God he is pretty - cheeks flushed from the alcohol, cookie crumbs at the corners of his mouth. All Eddie would need to do is twist his fingers into that preppy sweater of his, yank him closer. Lick them off.
“-not exactly on visiting terms with my folks,” Steve is saying and Eddie jerks back to attention. “Or speaking terms. My best friend was gonna visit, but I think she'd end me if I so much as brought a mistletoe near her. Anyhow, she can't come, what with the blizzard and all…”
“So what?” Eddie grins, tongue loosened by alcohol and sugar and the way the light brings out the gold in Steve’s hair and eyes. “You decided to drop by out of the goodness of your heart and save my holiday like some perfect little Christmas angel?”
Steve blinks. Averts his eyes. Flushes a whole new shade of pink. It blooms on top of the blush that has settled over his nose and cheekbones, like a fresh layer of color on a painting. Eddie thinks of all the other parts of Steve’s body he'd like to paint like this.
“Whatever,” Steve mumbles, “Just thought we'd both feel less alone, if- … It's getting late, I'd better-”
“Go?” Eddie catches the sleeve of his sweater just as he's about to stand. Steve falls back into the couch. “Where? You're not gonna trudge home through that weather, are you?”
Steve licks his lips, pink and glossy. Eddie wonders if they still taste like coffee and cream and oranges. His fingers find the soft skin of Steve's wrist under the hem of the sweater.
“Just stay. You're right, I don't feel like being alone tonight.”
“Stop it,” Steve's eyes are impossibly bright in the low light. “Please, I … I'll put up with your teasing any other day of the year, but not today.”
“Steve …” Eddie rumbles. The heartbeat under his fingers flutters. “Stay … and I'll show you how serious I am.”
He leans in, breathes his next words against the shell of a pink ear. “If you wanna, I'll even call you angel again.”
They do end up using the foldout, the cold quickly forgotten.

All my holiday drabbles
#steddie#steve harrington x eddie munson#steve x eddie#steddie brainrot#steddie fanfic#fanfiction writer#fanfiction#fanfic#my writing#steddie holiday drabbles#steddieholidaydrabbles#hype's holiday drabbles
219 notes
·
View notes
Text
evening notes - dec 19, 2024
TL;DR summary
Still not wearing pants; taking time to rest
Helped dad put away groceries, which barely fit
Rewarded with empty boxes
Cleaned part of my bathroom, put boxes to use
Texted LL-K about scarf measurement
Dug out more yarn; might make a new pumpkin?
Dad will deliver holiday treats tomorrow (Friday) and Saturday
I know I'm long-winded. You get a summary, because I love you.
Another day of sensory issues means most of the day was spent laying down. Dad went grocery shopping by himself today, and he brought back a ton of stuff. I helped put away as much as I could, but I got light-headed.
There was just so much food. Dad stocks up when he goes shopping, because it's such a long drive to these stores. (Military and wholesale discounts, plus better prices in the city, versus rural area stores.)
He brought me more empty product-display boxes from BJ's (a wholesale store like Costco), which included one big enough to hold 3 loaf-shaped cats side-by-side. One seemed like a generic "tray" size. Like for boxes of printer paper, it'd be the same size as the lid for that. A friend gave us a similar box that her canning jars came in.
Once I got upstairs, I had about 20 minutes of ambition and cleaned off one shelf and the the under-the-sink cabinet. The shelves were made with scrap wood to cover some pipes in the back corner, so they are very long and narrow. Basically, they're a pain to use for storage, because things get lost in the back. So I put my most-used items in a long basket (just the right size, too!) and wiped out the dust bunnies.
I combined some things into the same boxes, then threw out the empty ones. A variety pack of bandaids, with only the tiny ones remaining, got combined with the another open box of bandaids. Two sizes of tampons into the same box; same with pads.
The "lavatory library" was set aside. It's mostly magazines with pretty pictures and my dream-symbol dictionary. Wiped out the dust bunnies and trash under the sink. Found a washcloth I forgot about? Found another good hair clip, one of the bigger ones. Most of mine broke over time, and the only ones I can find now are smaller.
Since I wiped everything with a damp sponge, I'm letting it air dry before I reload it and close the cabinet doors. Boxes and books are in the hallway, but I don't think the cats will disturb anything. Wampus might steal some plastic? Moscow is keeping guard, in the big box. ===========
Texted LL-K (library lady K) about her scarf. She said she'll text me back about the measurements later tonight.
To keep myself from adding more to the scarf, I dug into my yarn stash in the living room. There's some pale pink baby yarn that I'm thinking of making into pumpkins, maybe with a cable knit. It's been more than a year since my last pumpkin. (There's still some that never got stuffed, haha.)
While dinner was in the oven, I worked to separate a double-stranded yarn. It's a "fun fur" or "eyelash" novelty yarn, but it has this funky rainbow pom-pom as the other strand. It looks like clown pox; I hate it. Separately, it might make a cute trim or a fun accent to a plush. Not really knit together with something else, maybe just woven between stitches. =====
Checked in with phone-friend tonight. They're cool with skipping holiday gifts. I went on a mushy tangent about how our friendship means more than gifts - that my heart already overflows and I don't feel the need to ask for more. It's true, but the brain fog is the bigger hurdle.
We're skipping our call this week, so they can spend time with family. I think my brain will be in better shape by next weekend. I'm in a good place with everything else. Plus, I'm having fun browsing through the videos my friend recommended to me last week. =====
My brain-word capacity is running low, but I want to make note of ideas for future discussions - whether here on tumblr or with my friend or my counselor.
Different levels of goals I'd like to meet this upcoming year, like tasks or returning to the library.
Something about my long hair?
Revisiting long-abandoned organization tasks
(Counseling) Comparing and contrasting current and past me
Clearing drafts on here and my side blogs
I also need to back up my computer files again. Probably need to cull some files, too. God knows I don't label files with appropriate names.
2 notes
·
View notes
Text
Nihilus Rex Ch. 10: First Move
This chapter took 2 weeks to write. One to hash out what all our intrepid villains would need to do to pull this off, and one to actually write the chapter and make sure all bases are covered.
I and @baelpenrose have taken very few liberties with what this trio is doing, but I want to double-down on his note from the previous chapter: trying this would not only be extremely illegal, but in 2024 it wouldn't even remotely work. Especially not the lien release part: most of those records are digital now, and each bank has maybe four people total with the level of access required to release them. Maybe four.
Cause I am, I am
A little wicked
I am, I am
Hands red, hands red
Just like you said
I am, a little wicked
Valerie Broussard, “A Little Wicked”
After two detours - one to find another thermos, the other to fill both - we managed to make our way to a mall so old and worn-looking that even Spirit Halloween would give it a pass. Nils led us around to a side entrance before holding the door open with a sweeping gesture. I rolled my eyes good naturedly, Bishop groaning behind me as we shouldered past. Pausing to rub the dust from an old map with one sleeve, I found what I was looking for and glanced up. “Please tell me the stairs are in good shape? Best Buy is all the way on the fourth floor.”
“They are, and it is, but we won’t need either.” I suppressed a shiver as he reached past me to tap a location on our same level. “Sears. The television section is down here, and the cable connections are still intact.”
“And we didn’t enter on that side because…?” Bishop asked, seeing how far away it looked on the map.
“Internet is up, power doors are not,” came the dry answer. “And this door was the only one I could get my hands on a key for.”
“How did you - “ I started.
“You don’t want to know, Baklava. Plausible deniability - if anyone gets busted, Nothing did the breaking and entering, we weren’t aware he wasn’t lawfully here.” Hiking his bag further up on his shoulder, Bishop grunted. “Let’s go.”
Walking through the mall gave the eerie impression of being a zombie movie - rustling could be heard constantly, along with voices coming from beyond some of the locked grates covering storefronts. Squatters, I realized. Better use of the space than just leaving it here to rot, I thought approvingly. At least they aren’t freezing to death outside.
“Anyway.” Nils led the way into the employee break room in the Sears, one where he’d clearly helped himself to a few of the beanbags from the small furniture store, and locked the door behind us. “Router is behind the counter. We got wifi, we have a place to sit, we have work to do. Everyone, grab a beanbag or a chair. Local squatters won’t bother us in here - there’s an arrangement. I paid for a generator, they don’t mess with my stuff, and stay out of my way when I need to do a thing.”
I made a mental note to bring food next time, provided I could figure out a way to bring it without Nils or Bishop noticing - last thing I needed was Bishop informing Nils about my stray-cat tendencies. Grabbing a bean bag and an abandoned tray to set my computer on, I nested in and started getting everything connected. Once I was happy with where everything was at, I dug in my bag for some snacks, pulling them out triumphantly before realizing Nils and Bishop were staring at me.
“What? You said we had work to do.”
Nils started snickering. “Not that. Just. Never known anyone who brought chili pistachios to a hack job. That’s all.” He shrugged. “Kind of cool.”
“Creampuff. You and I both know if it was anyone else - like me, or even like Shade, you’d be saying something that would end with everyone either laughing or punching your lights out.” Harvey glanced at him with exasperation.
I offered some of my snack. “Keep the nut jokes to a minimum and I’ll share.”
“Please, Lash. We are not WintermuteWeasel. We come up with classier jokes than that when there is a lady present.” Nils replied, with faux-dignity.
“In that case, I won’t offer you this,” I sighed dramatically, holding up a bag of homemade jerky. “Because god forbid you put my meat in your mouth.”
Bishop leaned past Nils. “I will gladly put your meat and your nuts in my mouth,” he managed to deadpan, making me throw my head back laughing before handing over both pistachios and jerky.
Nils blinked. “Apologies, clearly I misunderstood your sense of humor. My apologies. I’d do this casually, but you now strike me as the type who’d doubtless prefer a bit of begging for the privilege of your tasty, tasty nuts. Please…” He gave me giant puppy dog eyes and fell out of his bean bag chair, doing his best attempt at looking pathetic, not quite topping how he’d looked when bleeding in a torn suit, but much, much funnier.
I surrendered and nodded for Bishop to pass the snacks over. “And don’t worry, I didn’t cook any of these, so they taste really good. Fair warning, the lamb jerky is - “
“Hooooleee crap,” Bishop gasped around a mouthful, grabbing a bottle of water and taking a big swig. “Spicy. Very very spicy. Lots of cilantro spicy, was not prepared.”
“That,” I finished lamely. “So go slow or we’ll never get any work done. Speaking of the Weasel… Any word?”
“Called him, he should be calling back in….” His phone started ringing. “Now. I’ll deal with him, try to keep quiet, both of you. It’s gonna be easier if you two don’t acknowledge that I’m buying for you so he doesn’t hold up the sale for something gross, you know?” He stepped off. “Wintermute, yeah. Best icebreaker. Needs to be less than 30MB. Able to tear through the absolute best encryption out there? Can you do it?”
Something on the other end.
“Need to get a worm and a data bomb through it, and be able to activate the data bomb on the other end after the worm has had time to work. No, you don’t need to know what for. You just need to know the parameters. High end, government encryption. Less than 30MB file size.” Harvey got tense, and began rolling his eyes, held the phone away from his head for a minute. He began doing ducklips - might have picked that up from me.
Eventually he put it back to his head. “Yeah, I get it’ll be expensive. No, no I will not disclose who I’m working with. Cash only payments. Yeah, I can pay that.”
He hung up. “Great. He’ll meet me in a few weeks. He bitched about it, a lot, but after a bit he said he could do it. It’ll ring three thousand. Each of you down to cover a grand?”
I squinted and did some mental math. “Yeah, I can cover that.” I’d have to bite the bullet and work on some more anime commissions, but the money was practically sitting there otherwise. “Richie McWhiteboy, you don’t need to auction off a leather jacket or anything, do you?”
“You know what’s sad? I am so useless in so many ways, but I have the kind of academic credentials where I get paid to research for the university as a grad student as long as I keep helping professors with their research and it covers rent. All my jobs basically just cycle in paying for other jobs and expenses. And I still have money left over to give away. Yeah, I can throw a thousand - probably a little more if it’ll take strain off of you two.”
Bishop winked at me. “Ah, to have rich people problems, right?”
I threw my hands up. “I will totally take financial help in providing snacks and decent coffee. Titties only get me so far.” Belatedly, I realized what I had said and covered my face with both hands. “ART!” I shouted. “ART!”
Nils snickered. “Most artists have drawn big tittied anime girls for money, and most academics who need it have either written Marvel fanfiction for kinks they didn’t want to know about or written someone else’s papers. Don’t think about it too hard.”
Bishop just shook his head as I peeked through my fingers and dragged over a second bean bag to prop his feet on. “Before we get completely derailed by a taco joke, let’s reel it in, children. Our not so friendly neighborhood perv is working on the encryption breaking, do we want to do the worm or databomb first?”
Nils looked to me. “I’d prefer doing the databomb first, since a spore with extra activations is easy enough and just having it done early so all we have left is the hard part means that when we’re done with the hard part we don’t have anything left, but if anyone has any objections to that I’ll hear them?”
“The county records…?” I asked, glancing between the both of them. “You know, the physical liens? With the counties?”
It was completely the opposite of reassuring when Nils went pale and Bishop’s eyes glazed over. With a deadpan, almost contemptuously exhausted tone, Nils grunted, “Fuck. Alright, malware 4 and 5, another encryption breaker, another databomb, let’s go. And find some way of getting those released. And finding which ones we’re looking for…”
“I mean a dial-up bot that just asks after public records isn’t hard, you and I have made like a few dime a dozen ones, that’s easy. Hell, I have a DDoS botnet or two we can repurpose, just collecting dust. Start generating those to get public records on liens, they’re public record. Hard part is the lien releases, that’ll take…some courts and counties take digital copies or faxed copies of the notarized forms, I say we collect the records with that and start sending forged copies out. I mean, we’d need to pay a good forgery guy, but I know one. It takes about thirty days, but we can mill the fucking things once we get all the records and get good fake state seals made.”
“Make sure they are backdated by several months,” I suggested. “Totally Purloined Letter it, act like they’ve had it this entire time and lost their copy. They’ll be too embarrassed to object.”
“Right, add about a month to the process for that and finishing our worm and encryption breaker, county records are easily breakable, we can make our own icebreakers for that but we’re gonna need a lot of computers to launch that many attacks at once…That, plus adequate databombs.”
“Add another twenty five days after we send the fake releases, give time for as many as possible to be recorded,” Bishop added. “They’re less likely to be lumped in with the attack, that way.”
“Okay. That, plus I have to regularly commune with my morons on their “orders” for the “joint operation” about dealing with the “evil shadow government.” Nils sighed. “Okay. We have a lot of work to do but we should be able to manage it. We can’t brag about it after, which kinda sucks because we’re rapidly approaching Inception-timed-to-music levels of bullshit, and if we pull it off any reasonable world would give us bragging rights forever, but there are way worse things.”
“I don’t suppose any of your far right fucknuckle brother uncles are notaries?” I sighed. “We’d never be that lucky.”
“Sadly, no. I do have a relative who is but she’d never get caught up in anything illegal for political reasons, perish the thought,” Nils’ voice took on a note of contempt. “She conveniently forgets that marrying her husband was illegal until around 60 years ago, and that the entire concept of civil disobedience is ‘breaking the law for political reasons’.” He shrugged.
Bishop grunted, snagging a thermos. “Pocket notaries going on Santa’s wishlist in the event we are ever good little boys and girl…. We are now at 55 day lead time, minimum. The thirty days will give us time to come up with hardware without getting too much scrutiny, and we use that time to let bots dig up the information we need on the liens and student debt.” I blinked and he waggled a finger at me. “I didn’t forget that part, don’t worry. Student debt is going to be the least painful, because zero potential damage there, Sallie Mae can just fuck right off.”
He typed for second and tilted his head. “Then we send the faked releases - I don’t know if my guy can do them in bulk, so it would be smart to have a program to mock them up as back-up. Who can code that, because I’ll be too busy.”
I raised my hand. “Digital art en masse is my area of expertise,” I nodded confidently. “I can cobble something together from my animation stuff, no problem.” Would I test it by using it to clear my commissions inbox? Probably, but they didn’t need to know that. I already felt guilty enough about it.
“Okay, so I’ll handle the databombs and the basic icebreakers, Bishop will repurpose his dialup net, and Lash will get the mock-ups ready so we can mill out fake lien releases. I’ll also handle getting the gun nuts ready and primed for when we go. We’ll work together on the worm since that’ll be the hardest part.” Nils was standing, the irritated exhaustion gone, eyes suddenly alight. “We have a little less than two months, and when that’s done, we’ll be paying back the banks for the 2008 crash and all the futures they stole with student loans. And we’ll be stealing a lot of them back. Let’s get to work.”
#writeblr#writers on tumblr#nihilus rex#afterverse#prequel#dystopian#cyberpunk#fiction#my writing#original characters#original fiction
7 notes
·
View notes
Photo
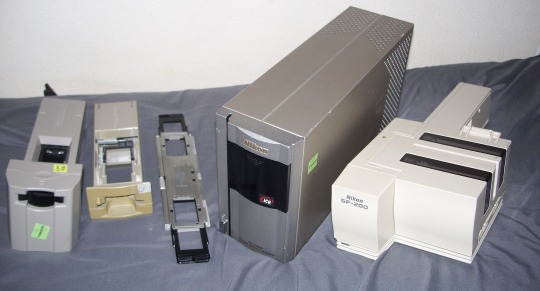
My slide/negative scanner I have been hyperfixating on.
Describing the five pieces above for your education, amusement, or annoyance, your call -- which mercifully I have put on the other side of a page break...
The scanner (Nikon Coolscan 4000 ED, item 4) I got at Goodwill for $10, but you can’t find them for less than $300 online presently. Walmart price is $2,200! They hit the market circa 2001 and came with the drivers for Windows XP, then there was a software update to get it into Vista, but this scanner has such a devoted fanbase -- it’s still considered one of the best scanners ever produced even today -- that an edit to the driver .INF file was written by someone other than Nikon so it could be used in Windows 7 through 10 (I have no idea about 11 as yet). The interface is FireWire, rather than USB, which isn’t an issue to me because I have an IEEE 1394 ExpressCard for my notebook (an eBay purchase cheap from China) and an IEEE1394 PCI Express card in my computer ($2 from a junkshop downtown). The black dust cover slides down so the accessories listed below can be inserted.
The 35mm negative strip adaptor (item 1) came with the scanner but the other two standard accessories listed below did not. It does indeed work with an entire 2-to-20-image strip of negatives at one go, thumbnailing the contents in the Nikon software so it can scroll through the strip to look at whichever image you want.
The single slide adaptor (item 2) I got a comparably good price on, and it’s the thing I’ve been using the most. Especially on what you see on Vintage Slideshow. Insert a slide, and automatically the scanner sucks it in and creates a preview scan. The Nikon software is pretty good at image manipulation and correction, but for simplicity reasons if I have a really lousy slide to fix I’ll use VueScan as the scanning software instead.
The negative adaptor tray (item 3) will accept single 35mm negs as well as other sizes of negatives; I’ve scanned 110, 126, and 127 negatives with this doohickie, which can hold a strip of 4 of the latter two sizes and 6-8 of 110... one just needs to move the slider to put one image into the view frame. This adaptor goes into the 35mm negative strip adaptor, and someone on eBay offers an alternative that they 3D-printed for about half the going price.
The 50-slide magazine (item 5) is the latest addition to the family because it took me several years to locate one at a price less than $400. (Would you believe Walmart is asking $1,500?) It scans one slide at a time, but can crank through a stack in autopilot so you don’t have to keep swapping slides. There’s a known issue with this device [FS-200] and its upgrade [FS-200(S)] jamming because it can try to pull more than one slide into the chamber at a time, but several solutions have been found by the fanbase and the one I like most is taping a cable tie (with the end cut flush) along the wall separating the input from the output, the end about 2mm from the entry passage, so that only the first slide will be in the right position and angle to enter the chamber.
There are other adaptors available which I don’t think I’ll ever need, such as for reading APS film rolls or for magnifying glass microscope slides.
47 notes
·
View notes
Text

Small components, BIG impact! 💡 Discover the benefits of cable tray accessories that take your installations to the next level. Crafted for Resilience. Engineered for Precision. Ready for Action! 📲 Call: +91 91540 88439 🌐 Visit: www.aprrollform.com
#Solid Bottom Type Cable Trays#solid bottom cable trays#solid bottom tray#Cable Tray Manufacturer#cable tray manufacturer in Hyderabad#Cable Tray Covers#cable tray cover types#ladder type cable tray with cover#perforated cable tray cover#ladder cable tray cover#perforated cable tray with cover#cable tray manufacturers#cable tray manufacturers in Hyderabad#Raceway Cable Tray Manufacturer in Hyderabad#raceway cable tray#electrical cable tray#cable tray covers#solar module mounting structures#false ceiling sections#stainless steel grating manufacturers#steel reinforcement manufacturers#false ceiling channels types#Types of Ceiling Channels Used In False Ceiling
1 note
·
View note
Text
GI Threaded Rods and Fastener, GI Junction Boxes, Manufacturer, India
GI Threaded Rods, GI Threaded Fasteners, GI Junction Boxes, Manufacturer, Supplier, Exporter, Pune, Maharashtra, India, Japan, Bahrain, Iraq, South Africa.
GI Threaded Rods, GI Threaded Rod, GI Threaded Rod and Fastener, GI Junction Boxes, GI Junction Box, Cable Trays, Cable Tray, Industrial Cable Trays, Industrial Cable Tray, Perforated Cable Trays, Perforated Cable Tray, Ladder Type Cable Trays, Ladder Type Cable Tray, Cable Tray Accessories, Cable Tray Accessory, Cable Tray Ducts, Cable Tray Duct, Cable Tray Trunking, Cable Tray Covers, Cable Tray Cover, Dome Type Cable Tray Covers, Dome Type Cable Tray Cover, Perforated Cable Tray Covers, Perforated Cable Tray Cover, Plain Cable Tray Covers, Plain Cable Tray Cover, Coupler Plates, Coupler Plate, Fish Plates, Fish Plate, L Type Side Couplers, L Type Side Coupler, Coupler Hardware, GI Earthing Strips, GI Earthing Strip, Copper Earthing Strips, Copper Earthing Strip, C Channels, C Channel, Z Channels, Z Channel, Stainless Steel Cable Trays, Stainless Steel Cable Tray, SS Cable Trays, SS Cable Tray, FRP Cable Trays, FRP Cable Tray, GI Threaded Fasteners, GI Threaded Fastener, Bend Cable Trays, Bend Cable Tray, Vertical Inner Bend Cable Trays, Vertical Inner Bend Cable Tray, Vertical Outer Bend Cable Trays, Vertical Outer Bend Cable Tray, Horizontal Bend Cable Trays, Horizontal Bend Cable Tray, Manufacturer, Supplier, Exporter, Pune, Maharashtra, India, Japan, Bahrain, Iraq, Kuwait, Nigeria, Ethiopia, Egypt, South Africa, Afghanistan, Azerbaijan, Tajikistan, United Arab Emirates, Israel.
#GI Threaded Rods#GI Threaded Rod#GI Threaded Rod and Fastener#GI Junction Boxes#GI Junction Box#Cable Trays#Cable Tray#Industrial Cable Trays#Industrial Cable Tray#Perforated Cable Trays#Perforated Cable Tray#Ladder Type Cable Trays#Ladder Type Cable Tray#Cable Tray Accessories#Cable Tray Accessory#Cable Tray Ducts#Cable Tray Duct#Cable Tray Trunking#Cable Tray Covers#Cable Tray Cover#Dome Type Cable Tray Covers#Dome Type Cable Tray Cover#Perforated Cable Tray Covers#Perforated Cable Tray Cover#Plain Cable Tray Covers#Plain Cable Tray Cover#Coupler Plates#Coupler Plate#Fish Plates#Fish Plate
0 notes
Note
Question for you: how do you go about transporting a kill back to Matilda? I’m curious about how a roo would be quartered/split up, if their hides are any good for leather, what you do with the guts and bones, etc. Basically, what happens after you make a kill? -🐟
So first and foremost, Jack owns the roo ute we use for this. It has a "rack" in the tray what we use for hanging the roos and dressing them. For the sake of this and the fact you mentioned Matilda specifically, I'm going to explain how this works for a non-commercial hunt. Here's a video of how it works commercially if you want to see that.
This is a gambrel.

The hooks on mine are sharpened for better penetration. They go in the hocks and snag at the Achilles' tendon, like this.

So the first thing I do is hunt the roo.
I drive Matilda as close as I can get to the carcass. Sometimes I'm far enough out into the bush that this isn't possible, so I'm stuck lugging ~60kg/130lbs of dead weight through the bush back to Matilda. If I think this is going to take more than an hour, I field-dress the carcass on the spot to avoid any bacteria what might be in him spoiling the meat. Roos weigh a lot less without their guts and stuff, but the downside of field dressing is that I get completely covered in blood dragging it back because I basically piggyback the roo on my shoulders (both front legs go over my shoulders and cross at the wrists over my throat, I tie them with rope and wear the roo like a cape as a I hump it back).
I'm writing this assuming I haven't already field-dressed the roo.
Once at Matilda, I find a good tree that looks sturdy and I set up the gambrel. I snag the gambrel in the roo's hocks and use a pulley system to bring him up off the ground like this.

Once that's done and he's hanging upside-down, it's time to get to work.
I take my KA-BAR and start cutting around his throat. I use a sawing motion (I keep my knives sharp) until I hit the vertebrae. I make my way around the neck until the vertebrae is the only thing keeping his head attached. Once that's done I bring him up so that I'm waist-level with the semi-decapitated head. I get my machete, line it up, and swing. Usually it only takes one swing to either break or cut through the vertebrae. Rarely it takes two. I've never had to make a third.
I grab the head by the ears and chuck it into the bushes. I don't like looking at it. I repeat the same process with the tail. Cut, align, whack. The tail is left for Misty to chew on. Keeps her from trying to get into the viscera.
The machete gets put away for now.
Next I get the hopper choppers--a pair of cable cutters. I dock off the hind legs above the Achilles and the front legs at the elbows.
I use a gutting knife, like this. The hook is important.

I take my gutting knife, start at his knackers or her package, and start cutting in. I keep it shallow so I don't nick the bladder. Once I can get two fingers (right hand) in him and the knackers are removed, I put the blade between my pointer and middle fingers (still right hand) and snag the hook in him and slowly pull down like I'm unzipping him. The viscera comes tumbling out. I lower the roo so the stump of the neck almost touches the ground. I take the machete, align it with the bottom of the sternum, lay my shin over it, and use my body weight to cut downward. This cuts through the sternum and into his throat. Most of the viscera hits the ground at this point and I use the gutting knife to detach the intestines from the anus, then cut through the anus and downward until the cut meets where I've already carved. I make my way down the back wall of the body cavity along the spine, cutting the rest of the intestines, lungs, and heart free. This is the bloodiest part of the whole deal and usually the point when I get splattered.
The insides of bodies smell weird. Raw. I can't describe it.
The skin comes off next. I make a ring along the hocks and cut down, thigh-to-thigh, until I reach the groin. For this I use the tip of my gutting knife, since it's also a skinning knife. I work the skin on both legs free until I reach the arse, and then I pull downward. The skin peels off. It feels like peeling orange and sounds similar. If the roo is a real big bloke with skin that won't separate easily, sometimes I'll use a piece of rope to knot the hide and then tie that onto the hitch of Matilda and floor it.
It should come off in one piece, and I inspect the carcass to make sure it comes off in one piece.
When it comes to a commercial harvest, all I do it dock the legs, head, and field dress. I don't skin. That's the butcher's job. I quarter carcasses the way Jack does, which consists of treating it the same way I would a pig carcass.
I get my esky.
I take his foreleg, stretch it out, and use the KA-BAR to cut through the foreleg, around the shoulder, and separate it from the body. It goes into the esky. I repeat the process with the other leg. Then I take my knife and start under the hindquarters and come down the side, I grab the muscle here, and pull as I cut away along the spine. That's the backstrap. Goes in the esky. Next is the tenderloin. I cut down the inside cavity along the spine, grab the muscle, and cut it free. Goes in the esky. I take the machete, grab the ribs, and start hacking like I'm hammering a nail to separate them from the spine. Goes in the esky. Then I use the KA-BAR to separate the legs from the spine, and they go in the esky. After that I'm done and it's just a matter of cutting individual pieces of meat whenever I'm ready to make dinner. I'll wash off my hands, wash the meat and put it in the fridge/freezer, have a beer and maybe a smoke, and relax for the evening. I usually cook the tenderloins first since that's my favourite piece of meat on a roo. They cook fast and you have to eat them rare. Kangaroo meat doesn't withstand cooking to medium. Sometimes I'll use a skillet but in my experience they're best over a campfire on a grill. The wood smoke adds to the flavour.
The hide, guts, and head gets left behind for scavengers since it's no use to me. Very rarely I'll buy a fuckton of salt and lay the hide out and flesh it (scraping it with the skinning knife to remove any meat). Then I rub salt on it, roll it up, and shove it in a rubbish bag. I give the hides to Jack. Misty gets to chew on any stray bones, and I dock the tip of the tail, skin it, and give it to her as a treat which she loves.
And yes, kangaroo leather is great! It's ten times as strong as cow hide and my hat is actually made of kangaroo leather (except for the band which is 100% crocodile). Misty's lead is also made of braided kangaroo leather for added strength/durability. My vest, boots, most of my sheaths, and my quiver are all made of kangaroo leather.
11 notes
·
View notes
Text
Dismantling and cleaning up my old PS2
my friends came by the other day and we decided to play soul calibur II on my PS2. I think it's been around 3 years since I last booted it up, and when we ejected the disk tray it was BROWN with dust. the poor thing even struggled to get it out, it was pitiful. so I loaned an air duster from one of them and decided to clean it up.


I'm following this tutorial to dismantle the console, and I'm writing this post as I go, mainly for documental purposes (so I can put it back together later) but also for fun. and to get used to writing more; writing is hard.
first thing, I gathered all the tools I was going to need:
some screwdrivers, in different shapes and sizes.
an air duster, loaned from friend.
a container to keep all the screws in (I like using old yogurt glass containers)
tweezers
microfibre cloth
then I started to dismantle it. first thing you do is put it upside down and remove the protectors that cover the screws, and then you remove the screws. I used a flat screwdriver to pry the protectors out, and then I just removed the screws with a phillips. the long screws were quite hard to remove, and they creaked as I turned them and it was ominous. pic so I know how to put them back in:


then I put the console back right side up, removed the cover of the extension bay and tried to pull the plastic case up, but it still had the guarantee seal on, keeping it in place. I peeled it away carefully with a box cutter; I don't think I would get my guarantee even if I kept it intact, but I kind of love that it is still there and I am not above gluing it back in place just for the aesthetics.

after that I could take the upper case off the console, and started seeing its guts: you can now see the disk drive, the cooling system (fan + heat sink), the controller ports and the power cables that feed the power board (it's under the heat sink, so we can't see it yet)

the interior has a very nasty layer of dust, so I take the air duster and start cleaning it up. this is when I make my first mistake: I was careless, my hand slipped and I dropped the case, which snapped the flat bus that connects the reset button with the motherboard... I thought that the console was dead now, but I picked the case up, checked the bus, and I think that maybe it disconnected without getting damaged. so I have hope that, if I just put the bus back in place, the PS2 will still work.
I wasn't planning to completely dismantle the thing, I just wanted to take enough parts to make it presentable. however, to plug the bus back in, I have to strip it down to the motherboard. so, onwards we go. this in now an in-depth cleaning. I don't know if it's broken yet, but I won't make it worse by continuing and there may be a chance I can just plug the bus back in. show must go on.
next thing is unscrewing the controller ports, and the fan:


all of these pieces I'm taking away are still connected by buses and/or cables, so I have to be very careful not to snap these. one nervewracking incident was enough. I take away the controller ports with ease, but the fan seems to be stuck somehow. I know it's unscrewed, but something is still holding it in place and I don't want to pull harder because I know it still connected, and I don't want to damage the cable. so I let the fan and its cover in place for now.
I dust it all again before turning the entire thing upside down again, carefully to not to drop nor damage the loose dangly parts, and I remove the bottom case. this side of the console is composed of the extension bay, and the power board:


this half of the case is also filthy with dust, and now I'm starting to feel glad I decided to dismantle it completely because there's dust absolutely everywhere. I dust the thing yet again, and I unscrew the power board (the green thing with a lot of welding points) and the hardware for the expasion bay before removing them, being very careful with the power board because it is still connected to the socket with two thick cables, that I must disconnect before proceeding. after removing the power board, the thermal protector (the bit of transparent plastic with a blue line) and the extension bay, all it's left is the support hardware that was holding everything.


now, the cable that connects the fan to the motherboard is exposed and I can unplug it carefully with pliers (it's a very thin cable with a very small connector, and in the pics the cable is protected by a bit of white tape, so it's hard to see). after fumbling with the fan again, I manage to take it away. now that it's dismantled I can see that it was wise not to force it earlier, because the cord is taped to its cover in a way that would have snapped the cable if I had pulled hard ;__;

and now that everything is disconnected and unscrewed, I can finally remove the support and uncover the motherboard, and see if the damage I did to the bus was fatal. I carefully unplug the rest of the buses, and compare them to the one I snapped, and I think it looks reasonably intact!


there is one bus (the big one on the left) that I just can't seem to unplug.
at this point I take a small break. rather than keep fighting the thing I take a microfiber cloth and start cleaning the case. I spend a good while using a flat screwdriver to drive the cloth properly into the decorative grooves that this model has, and since it is just plastic I use a bit of windex to really take all the grime off. I clean every cranny like that, inside and outside, and then I clean up the hardware support and the extension bay that I have been leaving aside (they are just metal, so as long as they're dry when I put them back in, it's okay). I go to eat dinner, and then I continue.
I can see that the other side of the motherboard is also dusty, so I do my best to lift if carefully and use the air duster to clean off the worst of it. then, I figure out how to take the motherboar off its hardware support, which looks like this:

it's dusty as all hell, so I dust it off with the air duster and then carefully wipe it with the clean and dry microfiber cloth.
this is how a PS2 looks with almost everything stripped away. the yellow board to the right is the power board, to its right it's the hardware support that goes under the motherboard when the console is not dismantled, and then you have the motherbard itself, with the disk drive under it. I have put a plastic thing under the motherboard because I don't think it's designed to lay unevenly directly atop the disk drive, so it's just there to held it up until I mount it back into the hardware support.

I can carefully lift and clean the underside of the motherboard, and a bit of the CD unit. I am very careful about it, and I am using a dry, clean microfiber cloth to carefully dabble around the worst of the dust. I don't dare trying to disconnect anything else, so I don't have any photos of that because I didn't have enought hands to do that, hold the motherboard and clean around while still keeping everything connected (the controller ports are still hanging to the motherboard by their bus! I didn't disconnect them). I can't completely clean the disk drive like this, but I am very scared of touching anything else, so this'll do.
I mount the motherboard back onto the hardware support, being mindful to put the part with the thermal protectors over the processor, and carefully align them with the disk drive. I immediately disalign everything, since now I have to handle the entire thing to plug the buses back in. I successfull put back all of the buses, included the one I snapped by accident! the blue part of it became unglued, but I just held it against the bus itself and inserted it back in. the hard part now is that I'm going to have to somehow put this entire thing back together while keeping it connected to the upper case, the entire time.

now, this is the moment of the process where I read this post from the bottom up, so I know in which order I have to put things in next.
I re-align the motherboard, and then I take the other hardware support that goes over it. it's been machined to fit perfectly over, so it only has one correct position to fit in. I screw it in place, put back the expansion bay into its place, then immediately take it away again because I have to plug the fan back in before I do that, and I just realised that I haven't cleaned the fan and its case yet. to do so, I have to peel off the tape that keeps its cord down to the casing, for some reason. the thing is absolutely filthy; the first picture is AFTER I had given it already a couple dustings. but now that it's out of the case, I can just clean it up with the cloth, and after going at that with the flat screwdriver to get it in the crannies and going at it a couple more times with the air duster, it looks new!


so now I can plug it back in, and I tape the cable down with new tape (I guess it was taped for a reason). I can now show you how tiny it is! I don't think it measures 5mm, the pic shows my smallest flat screwdriver.

next, I check the photos again in order to connect the power board with the power socker, and mount it back into the support. I actually have to unmount it and mount it again TWO more times, one because I forgot to put the extension bay first and a second one because I realised that I to put forgot the plastic thermal protector under the powerboard. you know, life is about realising you've made a mistake and fixing it before it has the time to become a huge, smoking crisis under your tv.
after putting the thermal proctector, power board and extension bay back together the correct way, I put the bottom case on it, and carefully -I don't want to snap the reset bus again- turn it all over. I somehow manage to do it successfully with all buses in place, and I spend a little bit more time cleaning the ports and the top of the CD unit, which I didn't do earlier.
and then. then.
the upper case slipped from the bolster I had it perched on, and the reset bus snaps out of place.
I want to slam my head against the wall and go to bed, but instead of that. it's fine. just, it's fine. I can take apart the entire thing, it's less scary now. I know all the steps. mostly, I'm just pissed about having to unscrew it all again. and as I do so, I realise that I completely forgot to screw the power board in place, which explains the worrying clicks I heard while turning the thing over. silver linings!
I dismantle everything again, and when I get to unplugging the fan, I realise that the connector is too small and the plastic too old and fragile to unplug it with the tweezers again without significant risk to the cable itself, so I just left it plugged. I'm not going to uncover the entire motherboad; I only need to slide the hardware support a bit, just enough to uncover the bus connectors. I manage to do that withouth putting tension on the fan cable, so I plug the rogue bus back in (with the blue strip and everything), and now I'm going to be very, very careful about keeping these two parts close together.
I slip the support back into place, and screw it again. I put in the plastic thermal protector, the extension bay and the power board, and I screw it in place this time. sliding the bottom case back in feels scarier this time around, but I do it.

and, praying to gods I don't believe in, I hold the bottom part, carefully keeping the controller ports close against it, brace myself, and flip it over.
the way I turn half of a playstation around so that it rotates 180º while keeping one end close to a stationary point at the edge of the desk at all times would have earned me a permanent position as architect in service to the caliphate 2000 years ago.
I actually have to repeat this twirling stravaganza four more times, because something was misaligned and the screws didn't fit. but. I put the bottom case back in place, and screw in place the fan, its cover, and the controller ports.
now, I am almost done again. I'm just going to put the upper case back in, somehow.
it is back in place. I've even glued back in place the guarantee seal.
the case is all put together again, it just needs to be screwed. before that, I've been cleaning it a lit a litte bit more, because this thing was really fucking dusty. then I put the final, external screws (the ones that where hard to pull out are also hard to convince back in), put the screw protectors in place and, well, I think that it does look a lot better than before.


but the thing is, will it turn on? I have to move it to the living room for that.
I plug the power in, and the pilot turns on. first success! I push the power button...

...and there it is! the tv is also displaying the start animation, with the sound and everything.
the disk tray is still a bit dusty, and I can tell the motor is having trouble pushing it out (the sound is truly harrowing), but that's an issue for another day. it's 2:27 AM, I've been at this for over four hours. this inadvisable midweek adventure has gone entirely out of the rails
#DIY#playstation#ps2#isolated thoughts#I can't believe it has survived this entire ordeal#this machine must really love me
3 notes
·
View notes
Text

I got this bad boy last year for 20 bucks and i finally think I have a use for it, the only problem is to connect a screen I need a home made sketchy cable, that plugs into the inside of the server and under the drive tray so I have to have the cover off and the drive tray hanging out. Because I can no longer close the top while the screen is plugged in I also need a piece of cardboard (with a mug to hold it down) to go around the cpu cooler to give it air flow or it overheats 
2 notes
·
View notes
Text
Affordable Electrical BIM Outsourcing Services Provider in Tennessee, USA under $49

CAD Outsourcing Consultants has a wide range of Electrical BIM Outsourcing Services that covers every facet of Electrical Structure, Designing and Engineering that is sorted with the aid of Electrical Building Information Modeling. Within the Electrical BIM, we also offer BIM Engineering, BIM Drafting, BIM Design Solution, BIM Outsourcing and Electrical Building Model.
CAD Outsourcing provides the following Electrical BIM Services:
· Modeling of Power, Data & Communication Systems
· Modeling of Fire Alarm Systems
· Modeling of Cable Trays and Conduits as per the given layout
· BOQ of Electrical Equipment
· Preparation of Lighting & Power Circuit Drawings
· Scheduling panel and circuit board
· Electrical Lighting Fixtures Modeling
· Walk-through of Electrical BIM Model
· Rendering of BIM Model with Lights
· Generator room and electrical room BIM Modeling
We offer our Electrical BIM Services Tennessee and covered other cities: Nashville, Atlanta, Charlotte, South Carolina, Indiana, North Carolina, Virginia, San Antonia and New Mexico.
Visit Us
https://www.cadoutsourcing.net/building-information-modelling/tennessee-cad-bim-services.html
License User
AutoDesk AutoCAD, Revit, Tekla, STAAD.Pro, SOLIDWORKS, ZWCAD, AutoDesk Navisworks, 3Ds Max, Inventor, Showcase, ReCap, Infraworks 360, Civil 3D.
Connect with us today to get quotations for the CAD Services. For More Details Website: https://www.cadoutsourcing.net/building-information-modelling/electrical-bim-services.html
#ElectricalBIMServices#ElectricalEngineeringServices#ElectricalServices#BIMServices#B1M#CadOutsourcing#CadOutsourcingCompany#CADServices#CAD#CADD#CADDrafting#CADDrawings#Engineering#AutoDesk#AutoCAD#SolidWorks#USA
2 notes
·
View notes
Text
Cable Cleats for Electrical Projects: Simplify Installation and Boost Durability

In the world of electrical installations, ensuring the stability and safety of power systems is paramount. Cable cleats play an essential role in managing cables, simplifying installations, and boosting durability in even the most complex projects. From selecting the right cleats to understanding their applications, this guide will explore how they contribute to the efficiency of electrical setups.
Whether you’re choosing the best cable cleats for your electrical projects or seeking ways to simplify cable tray installations, this blog covers it all. Let’s dive into the benefits, types, and technical aspects of cable cleats, including insights on protecting power systems with trefoil cable cleats.
What Are Cable Cleats and Why Are They Important?
Understanding Cable Cleats
Cable cleats are mechanical devices designed to secure cables in fixed installations. They prevent cable movement caused by electrical faults, vibrations, and other external forces.
Key Functions of Cable Cleats
Safety Assurance: Prevents cable damage during short circuits or mechanical stress.
Organization: Keeps cables neatly aligned in trays or conduits.
Durability: Reduces wear and tear caused by movement and environmental factors.
Choosing the Best Cable Cleats for Your Electrical Projects: Tips and Tricks
Factors to Consider When Selecting Cable Cleats
Selecting the right cable cleats is crucial for project success. Here are the key factors to consider:
Material
Metallic Cleats: Ideal for heavy-duty industrial setups.
Non-Metallic Cleats: Lightweight and resistant to corrosion.
Cable Configuration
For cables arranged in a trefoil formation, use trefoil cable cleats to manage electromagnetic forces.
Single-cable configurations require cleats designed for linear arrangements.
Environmental Conditions
Use UV-resistant and corrosion-resistant cleats for outdoor installations.
Compliance with Standards
Ensure the cleats meet international safety standards, such as IEC 61914, for reliable performance.
Ease of Installation
Opt for cleats with simple installation mechanisms to save time and labor costs.
Protecting Power Systems with Trefoil Cable Cleats: A Technical Overview
Why Trefoil Cable Cleats Are Essential
Trefoil cable cleats are specifically designed to secure cables arranged in a triangular formation, often used in high-voltage systems. They are essential for managing:
Electromagnetic Forces (EMFs): Prevent cable movement during electrical surges.
Mechanical Stress: Reduce wear caused by vibrations and external forces.
Advantages of Trefoil Cable Cleats
Enhanced Stability: Keeps cables firmly in place during fault conditions.
Improved Safety: Prevents accidents caused by cable movement.
Longevity: Protects cables from damage, extending their lifespan.
Electrical Cable Cleats for Cable Trays: Simplifying Organized Installations
The Role of Cable Cleats in Cable Trays
Cable trays are widely used in electrical installations to house and organize cables. However, without proper support, cables in trays can sag, move, or become damaged. Cable cleats address these issues by:
Securing Cables: Preventing movement caused by vibrations or load.
Improving Organization: Keeping cables aligned for better aesthetics and maintenance.
Benefits of Using Cable Cleats in Cable Trays
Reduced Maintenance: Organized cables are easier to inspect and maintain.
Enhanced Safety: Prevents overheating or short circuits caused by loose cables.
Time-Saving: Simplifies installation, reducing labor costs and project timelines.
Step-by-Step Guide to Installing Cable Cleats
Simplified Installation Process
Plan Your Layout
Map the cable tray system and determine cleat spacing for optimal support.
Select the Right Cleats
Choose cleats based on cable size, type, and environmental conditions.
Secure the Cleats
Attach cleats to the cable tray or structure using bolts or clamps.
Insert the Cables
Lay the cables into the cleats and fasten them securely.
Inspect the Installation
Ensure all cables are aligned, and cleats are firmly in place.
The Advantages of Using Cable Cleats in Electrical Projects
Boosting Durability and Performance
Cable cleats are a long-term investment in the safety and efficiency of electrical systems. Here’s how they contribute:
Extended Cable Lifespan: Reduces damage caused by movement and environmental stress.
Enhanced System Reliability: Prevents downtime caused by cable faults.
Improved Compliance: Meets industry safety standards, ensuring regulatory adherence.
Conclusion
Cable cleats for electrical projects are more than just a support mechanism—they are a critical component in ensuring safety, durability, and efficiency. Whether you’re working with cable trays or managing high-voltage systems, choosing the right cleats is essential.
From simplifying organized installations to protecting power systems with trefoil cable cleats, investing in high-quality cleats will save time, reduce costs, and boost system reliability. So, when planning your next electrical project, make sure to prioritize cable cleats and reap the long-term benefits they provide.
Start simplifying your installations and enhancing durability with the best cable cleats today!
0 notes
Text
Price: [price_with_discount] (as of [price_update_date] - Details) [ad_1] Introducing the Soko BambooTidy Cable Management Box: Your Solution to Tangled Wires and Cluttered Desks! Tired of untangling a web of wires every time you need to charge your devices or connect appliances? Say goodbye to the chaos with our Cable Management Box! This sleek and versatile organizer is designed to streamline your workspace and enhance your WFH setup or office environment. With its spacious interior, our Cable Management Box provides ample room to neatly store all your cables, chargers, power strips, and accessories. No more tripping hazards or unsightly cords dangling from your desk! Simply place your surge protector, extension board, or Basics router inside the box, and watch as it transforms into a tidy and organized hub for all your electronic essentials. Featuring multiple cable management slots and a convenient tray for easy access, this box ensures that every wire has its place. Whether you're charging your phone, powering up your laptop, or connecting office decoration items, our organizer keeps everything in order while maintaining a clean and clutter-free workspace. But our Cable Management Box isn't just about function—it's also about style. Its sleek design and aesthetic appeal make it a perfect addition to any home or office decor. Plus, its space-saving construction maximizes desk space, allowing you to focus on what matters most without distractions. Constructed with high-quality materials, including durable plastic and a sturdy base, our Soko BambooTidy Cable Management Box is built to last. Its versatile design makes it suitable for use in any environment, from home offices to professional workspaces. Don't let tangled wires and messy cords ruin your productivity. Upgrade to our Soko BambooTidy Cable Management Box today and experience the ultimate improvement in cable organization and space optimization. Say hello to a cleaner, more efficient workspace with our essential cable management solution. Comprehensive Cable Management Solution: This wire organizer box is a versatile cable management organizer designed to declutter your workspace, whether it's your home office desk, study table, or workplace. It efficiently stores and organizes cables, chargers, and other accessories to create a neat and organized environment. Functional Design for Organization: The cable management tray, equipped with cord hider features, provides a tidy solution for managing various cables, surge protectors, and extension boards. It neatly conceals the cords under your desk or table, promoting a clean and efficient setup for your electronic appliances. It accommodates power strips, basics routers, plugs, and other essentials, offering an all-in-one storage solution and for your WFH setup. Durable Bamboo Wood Cover: Crafted from eco-friendly and sturdy bamboo wood, offering a unique texture and modern aesthetic while allowing for easy heat dissipation. Efficient Space-Saving: With its carefully crafted design, this cable organizer box contributes to space-saving by neatly storing cables and accessories. Enhance your office essentials by using the tray as a data storage case, providing an organized space for your gadgets, power supplies, and GM accessories, ensuring improved accessibility and a clutter-free workspace. Product Dimensions: 35.5cm x 13cm x 13cm | Weight: 630 grams [ad_2]
0 notes