#But if you think screenshots of an interpretation of a tracing of the original design will work for what you need
Explore tagged Tumblr posts
Note
If you don't mind me asking, where did you get the line art of the symbols for the dress you are making?
I really wanna make some cross stitch patterns with them but do not have the skills to really lift them from the promo photos.
I don’t mind!
And I wish I had nice line art resources to give you, but I traced them all directly from the promo posters in the program I used to make the embroidery designs. :(
I should be able to get some screenshots of the finished embroidery designs, though they won’t be as accurate as even a regular tracing taken from the originals- they were traced, then I had to scale them down which lost some detail, and then I had to mess with line widths and even placement in some parts to get a design that would look right on the fabric. And lastly, the program can only show it as an embroidery- like it looks in the videos of the individual designs.
But, if you think that’ll be something you can work with, I can try and get screenshots taken for you and hopefully have them some time tomorrow?
#dead boy detectives dress#I really hope this doesn’t sound like me making excuses not to help#it’s on an old computer with bare bones programs besides the one for making the designs and one for running the embroidery machine#with no internet connection#any files to be imported to work with have to be saved on a USB on a different computer and brought over#and the same in reverse for anything going out#that’s why all the videos are crappy ones taken on my phone#and not nice screen recordings#But if you think screenshots of an interpretation of a tracing of the original design will work for what you need#I’ll do my best to get them for you!
2 notes
·
View notes
Text
finished "Dear Esther" (original version)
Just like "Edith Finch", it seems I was nearly at the end of "Dear Esther" when I had to take a break. This time, it was for dinner, rather than needing a breather after heavy emotions.
I took a TON of screenshots. I think some of them hinted at the background story, especially photographs and [spoilers]. There were lots of cairn stones, some of them hidden amid grass and behind buildings.
Check the game's page on Does the Dog Die for warnings. I wouldn't recommend the game without it. As long as you understand that death and grief are important themes in the story and are okay with the warnings, I would recommend this game. The "landmark" edition (remastered) is probably better, though I haven't played it yet.
Hell, you don't even have to climb all the way up the hill. Just explore. The views are breath-taking.
Only 2 complaints: Upon reaching the summit, I wasn't allowed to explore the area around the aerial tower. There was something standing by the fence that freaked me out, and I don't know what it was.
Secondly, I wish I had been able to view all the messages written on the cliffside. I got snippets amid my screenshots, but some of the paths were too narrow. Plus, the script was purposely drippy and sloppy, so the lettering was wonky.
Not a complaint, but a really important point: Because I stopped before the end and came back to it, it wouldn't let me pick up where I left off. Instead, I started from the beginning again, which is fine. Breezed past the opening bit at the beach, went up the hill to the circle of standing stones. OMG THERE'S SOMETHING NEW?! So what else did I miss in the part I skipped?
Everything else seemed to be the same, except the underwater "dream" sequence in the cave. It's a bit spoiler-y, so I can't say specifics. First round, the scene was the same as the footage in this Jacob Geller video. Second round, different thing! It still fit with the implied narrative of what happened to Esther.
First time through the dream, I swam up enough to try sitting on the object. Second round, I skedaddled off to the side, tried to go up the berm/hill away from the road. Since you come out of the dream as you surface from underwater, I just assumed I got too close to the edge and reached the "top" of the water. But the object from the first round, sitting on it would "fit" with the narrative (eg Esther "reliving" part of what happened).
But what if it's a timed event? What if I stood still? Would it still end? Am I supposed to interact with whatever object is there? It took about an hour-and-a-half to get back to that same point in the game, without too much extra exploring. (I had initially paused at 2.4 hours in the game. I now have 4.1 hours total.)
I'd like to interpret things as a dream of/for the narrator. Or maybe you're tracing his path? Because he turns into a bird at the end, the last big action (which I shall not say) is lessened.
Nothing has dissuaded me from wanting to play the updated "landmark edition", thankfully. I think all the same "frustrations" will still be there. Though there is a director's commentary, so that might help ease my heart on the scrawled messages.
Lastly, I'll leave you with a screenshot of the standing-stone circle. The first play-through only featured the brown book, with a metallic quatrefoil design on the cover. Next to it is a chemistry book. Not sure what molecule the graffitied design is, but I think it's the same one that shows up elsewhere on the island.


1 note
·
View note
Text
Keith Jacket Tutorial
I made my Keith cosplay jacket, and I’ve had quite a few people ask about it, so I’ve complied this guide! It’s quite long, but hopefully it helps if you are going the DIY route! You can either see this guide on Google Docs (recommended) or under the cut!

If you like this guide and found it helpful, consider fueling my future cosplay efforts by buying me a ko-fi?
Materials List:
Marine Vinyl
Red - i think i bought a yard of this?
White - i had about a yard and a half of this and half quite a bit leftover. A yard would probably do.
Yellow - 6” cut (default width from Joann’s is 54” so this is plenty!)
Burgundy - 6” cut (see above)
Marine vinyl isn’t the most expensive cosplay fabric out there (*cough* Yaya) but it isn’t exactly cheap at $19.99/yard. I got lucky and found some big pieces in the remnants bin. It seems to rarely go on sale, so maybe save those 50% off coupons for this!
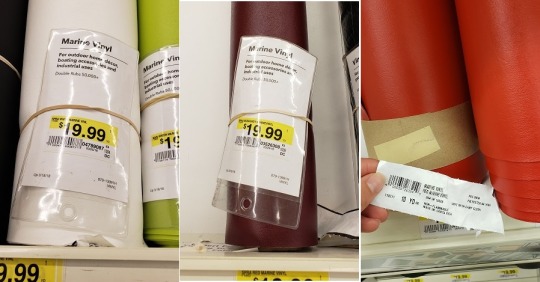
I DO NOT RECOMMEND YAYA’S 4-WAY PLEATHER. I bought some in red to use originally for the red portions for the stretchiness, and it BLED on my white vinyl while the materials sat waiting to be used, so i opted not to use it (and had to scrap that portion of vinyl). The stuff you want looks like this on the backside!
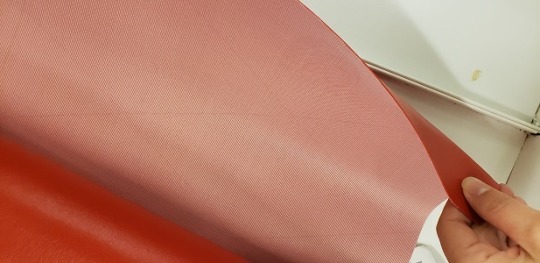
Needles
I used leather needles in my sewing machine, since i was using marine vinyl as a substitute for leather. They are specifically designed to cut through the heavier material. Mine were 90/14. You might want something even heavier. These would probably do just fine.
I used stretch knit needles for the jetset (see “lining”).
Thread
You will need white, red, yellow, and burgundy thread to match the vinyl. Either buy at the same store so you can check that it matches, or take a small sample snippet with you to make sure the colors match!
Zipper
I used a 12" sport separating zipper. These come in 2” increments, and I am on the tiny side (5’2”) so you might need a longer one if you are taller (or want a longer jacket)
Pattern
On the advice of CrescentShay (who is very talented and you should follow her if you aren’t already!) I based my jacket on McCall’s “totally not pokemon go trainer” pattern (M7556). You will also want either tissue paper (from your local dollar store), tracing paper, or medical pattern paper.
Lining
I used Red JetSet for my lining - i think i bought like 1.5 yards because it’s pretty cheap. It’s soft, colorfast, and fairly easy to work with. It also has some stretch and a nice flow to it. You can use whatever you’d like.
Mockup Fabric
I bought crazy cheap satin from walmart cuz it’s $2/yard. You can use muslin, old bedsheets, whatever you have handy, as long as it isn’t stretchy because THE JACKET WILL NOT BE so you want the mockup to have the same fit. DON’T. SKIP. THE. MOCKUP!
Tips and Notes:
Marine vinyl DOES NOT STRETCH. This guide is written based on the jacket I made as of its writing (Sept 2018) and thus is written based on NONSTRETCHY material. If you use a different material, be mindful of how that material works!
MEASURE EVERYTHING TWICE
Do not skip the mockup!
Pine & try it on frequently!
Watch your foot (of your sewing machine!)
Test stitches on scraps first! You want to make sure that tension and stitch sizes are what you want them to be!
Finished seams make it look professional
This portion will be broken down into several components:
Pattern and Mockup
Jacket base
Sleeves
Collar
Cuffs
Burgundy stripe
Lining and zipper
I will assume you, dear reader, have a base knowledge of sewing with a machine (like to sew inside out, how to thread the machine & adjust tension/stitch size, etc.) but you are welcome to DM me if anything is unclear or I have left out details! I am @corwynte on most social media.
Pattern and Mockup
If you have never used a pattern before, it is important to make sure you CHECK YOUR MEASUREMENTS. Pattern sizes are usually NOT standard sizes! I am a size 10 in patterns and a 0-6 in most clothing. So check your measurements! I used the “B” design for the pattern, because the jacket has a collar. This pattern is designed for sweatshirt type fabrics, not vinyl, so if you are not sure, GO UP A SIZE because again, VINYL. DOES. NOT. STRETCH.
I cut out my pattern pieces, but you might want to trace them instead. I trace my patterns now because then I can reuse them. Your call.
You will need pattern pieces 3, 4, 7, and 10. The band and cuffs are meant for stretchy material, so we’ll make our own patterns for those. You can also freehand the collar but I worked from the base of the hood.
With your tracing paper, add an extra 3” to the bottom of pieces 3 and 4.
Follow the instructions to cut out the vest and sleeves from your mockup fabric. Be mindful that many patterns have seam allowances, and for this pattern they are ⅝”. We are going to use this standard allowance.
My machine has marks on it, so I line up the edge of the fabric with these for my seams. If yours does not, you can mark them out with a marking pencil or a sharpie. It doesn’t matter if your mockup is a mess, we are going to draw on it later anyway. You do want to sew the seams properly though because NOW IS THE TIME to make sure the fit is correct.
**Save your patterns! We will use them for the lining too!**
You only need to attach the sleeves and pieces for the mockup - the rest of the sems don’t need finished. Once your mockup is complete, try it on! Make sure it fits the way you want it too. Don’t worry too much about the length - we’re can add a couple more inches to the bottom with the burgundy.
With help from a friend or with a dressform if you have one, trace out the lines for the different colors on your mockup.
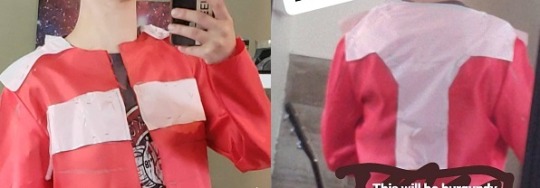
My white came out pretty big. You can adjust this to suit your own preferences, because this is an animated show so the size and shape of the jacket does vary slightly, and if you are basing your jacket on fanart rather than screenshots, different artists interpret the marks differently. Find what you like!
Once you are satisfied with the marks, either cut up your mockup for patterns, or trace the shapes with your pattern paper. I opted to trace, because my mockup was cheap satin which shreds easily and because I wanted to be able to reuse the mockup. For now we only need the chest portion of the vest - we’ll come back to the sleeves later, so don’t cut those apart just yet.
**Label your pattern pieces!** important things to include are:
Color the piece should be
What the piece is
How many to cut
Marks for where pieces will join together
Which side is which (side, front, top, etc.)
Jacket Base
If you are using vinyl, you can trace your patterns directly onto the backside of the vinyl with a light colored sharpie pen (mine was light pink). **ADD YOUR SEAM ALLOWANCES!!** You can eyeball these, since you will have the marks on the back of the vinyl to know where to stitch, but you should add ½ -⅝” seam allowance.
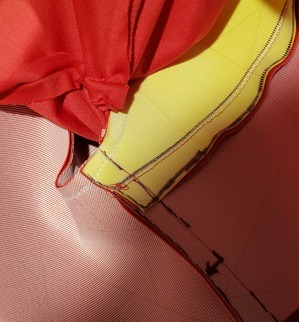
Cut out your pieces for the front and back of the jacket. Pin the “T” for the back of the jacket to a red pieces. You will need to notch the allowances to get it to lay right, but don’t jump into notching too quickly. Be careful with the T - you want to get it as symmetric as possible.
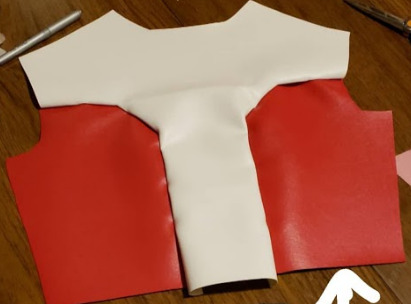
Once the back is done, pin the front too, then pin the front and back together and try the whole thing on!
It will fit slightly more loosely when the seams are done
The armholes might be tight (mine were) - we will adjust these later
Mostly we want to make sure it is lookin’ good, feelin’ good!
Sew the seams with a normal straight stitch first. Them we will fold over the excess and sew the seam again, lining up the seam with the edge of the foot and sewing a line in the color of the top material to give it a finished look. I did this to help my “T” lay flat and it really makes a huge difference in the look of the jacket - this will give it that “pro” touch!
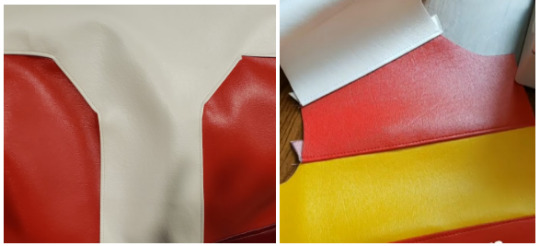
For the “T” - the white should be the “top” layer.
For the front stripes, white is the top over red, and both reds are top over yellow.
For the top seam, i sewed the back as top over the front.
Sew the sides together last. We will not fold over and double stitch that seam.
Now you’re done with the base! Pat yourself on the back!
Sleeves
Okay, now it gets harder from here.
A few notes before we start the sleeves:
Remember your seam allowances!
Vinyl does not stretch!
You can take extra fabric away, but you cannot (nicely) add more, so when in doubt, size up!
Measure the final width of the white on the shoulder of the jacket base. Good. Now measure it again. BE CAREFUL because matching these widths is really important to having the final product look clean and professional! (And remember your seam allowances!)
On your sleeve pattern, mark out the width of the white on the top of it and at the bottom of the sleeve (wrist). Use a straight edge to connect the lines. I made my white fairly wide, but again, suit your own preferences!
REMEMBER YOUR SEAM ALLOWANCES!
I made my sleeves MASSIVELY over-wide and trimmed them down a ton, because I was worried about not being able to bend my arms.
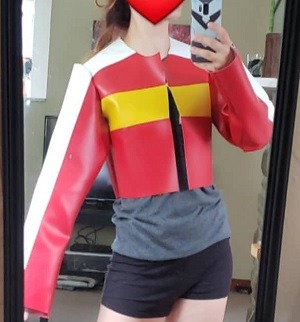
Test the size of your arm holes now, with your chest portion of the jacket complete. Widen them ass necessary so you can comfortably put on the jacket by cutting away from the BOTTOM portion of the arm hole.
Sew the white into the middle of the sleeves, again, being VERY CAREFUL to make sure the width matches up. Test it a bunch. Measure it a bunch. If you think you’ve measured enough, measure it one more time.
Finish the seams with white on top and a line of stitching.
Turn the sleeve inside out and sew the red pieces together. We will not fold over and double stitch this part either.
Turn the jacket base inside out and pin your sleeves to the base. Start at the top and MATCH UP THE WHITE. The excess should be at the bottom of the sleeve. You will probably have a bunch if you followed my advice. That’s fine.
Try it on again (Carefully! Pins!) Test the sleeves. Bend your arms, see how it feels. Get a sense of how much you want to take in the sleeves. Take it apart, take in the sleeves, pin it on again.
CAREFUL with the “pinches” that will develop from the sleeves (the bunching) - I was not careful with mine and they are not quite evenly pinched. You want these in the same spot.
Sew on your sleeves. Exhale. Be proud. The foundation of our jacket is now laid!
Collar
Okay, now we are going off the books. Remember pattern piece 10? The hood? We are going to base the collar on this because it is sized appropriately for our collar. Trace the pattern onto your pattern paper. Hold it up to your jacket. Tweak it, feel it out. Adjust as needed.
We are going to want a little extra for the hems, so BE MINDFUL of that as we proceed.
My collar is HUGE because aesthetic. You may want a smaller collar based on your own preferences, practicality for wearing, etc.
If you are using vinyl, you won’t need any interfacing because the vinyl is pretty stiff. If you are making your jacket from cotton, fleece, canvas, THE FORBIDDEN PLEATHER, etc. you will definitely need interfacing to stiffen it up.
I’m sure you know this by now but…
ADD YOUR SEAM ALLOWANCES
MEASURE IT TWICE

Cut FOUR pieces - be careful with mirroring these.
Sew the middle bits (back of neck) together first. Trim the excess (this is one of the ONLY times we will do this!) on this seam. Stitch the front edges and the top together. Leave the bottom open. Cut the corners diagonally so it can lay flat when you turn it right side out. Finish your seams with another line - be careful at the corners! Pin the collar to the neckline and check. It is okay if the neckline has a tiny bit extra at the front - we still need our zipper! If your collar is too big, take it in along that middle seam. Then, stitch your collar to the jacket.
Cuffs
Okay you know the drill by now. Allowances. Measure twice. Etc.
Measure around the bottom (wrist) of sleeve. Measure LOOSELY around the sleeve where you want the top of the cuff to be. Mine was 4½”.
Cut a pattern with the measurements that has a shape like the one shown. You’ll need 2 - one for each arm.
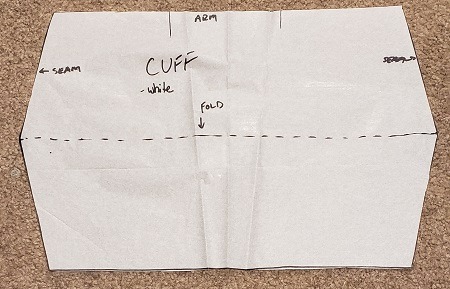
Fold the cuff in half with the “V” edges together - stitch these together.
Turn the cuff right side out and fold to make a tube. Stick the tube, top of cuff out, into the sleeve, and CAREFULLY stitch the cuff on. The fold the cuff up and over the sleeve. Make sure both sides are even!
Burgundy Stripe
Pine the burgundy vinyl to the base of the jacket and sew a seam. Fold it over, then finish the seam with the line of stitching. Easy peasy.
Lining
Use the patterns from your mockup to make a lining. I used red jetset, it is soft, it is colorfast, is has some give and is easy to work with. You can use whatever you like.
The only parts you will hem will be the bottom of the jacket and the bottom of the sleeves (near the wrist).
Sew the lining to the collar (right sides together) - this will finish this inner seam.
Stuff the arms into the sleeves. Pop your cuffs back down, then sew the lining into the sleeve (this is a tricky bit). The bottom we will leave open, so the last part to attach is the seams along the zipper.
Zipper
HOMESTRETCH!
Turn the jacket inside out. Open up the zipper and sandwich it in between the vinyl and lining. Sew the zipper on. Do the same on the other side.
Turn the jacket right side out and FINISH THOSE SEAMS! You will need your red, yellow, and burgundy thread for this. Use the appropriate color for the portion of jacket. My machine got real cranky on the burgundy cuz of the layers. I am going to tweak this guide with where you can trim excess to make this easier.
CrescentShay - her post helped me get started on my jacket! It was immensely helpful
My mom - she taught me how to sew, helped me make all my early cosplays, gave me her sewing machine, and always answers the phone when i call begging for tips and advice on a new project!
2 notes
·
View notes
Text
DC Universe Streaming
Need to purchase X-Men t-shirts on-line? Whether you could have a love for The Avengers, Incredible Four, Thor, or X-Men there are a lot or t-shirts and different merchandise to personal. My childhood included a love for 60s and 70s Marvel and DC comics, and my means to draw originates partly from studying the stories I learn in these days. We worked for a yr collectively on the piece to plan and draw it. Toy companies like Hasbro and Kenner used to provide 1000's of Batman motion figure than is launched every year with some variation in it. Transformers 2, the science-fiction movie is the newest sensation, and is essentially the most awaited film of the 12 months. Let's take the movie Avatar for instance. Once in a while I went back to the sport to take a couple of more screenshots to extend a plot. Inside a couple of minutes, I began making comic strips. Not like his other comic strips, in Battling Boy, the hero is a child, who is on a mission to avoid wasting the town.
The truth is, the opposite series of battling boy became common. To conclude on this matter, I think it's a terrific thought to present our youngsters the humorous comics created method-again-when, comics from your and my childhood. To learn a story in adventurous manner is quite exciting for all the kids. You have got to overcome the restrictions of speech bubbles and the issue of telling a story body by body. Admit it you've! I’m sure you will have heard this common online retailer. Since Kids's Graphic Novels are actually just an outdated idea with a fancy new name, why shouldn't you discover taking previous successful comicbook ideas and reinventing them for a new generation? The thought was to convey the same meaning with phrases that I prompt by means of colors, textures and images. Popular Online Comics solidify a meaning of a phrase because pictures assist that means to phrases. The nomination was a major achievement for an artist who had - fairly literally -started out small, drawing Put up-it notice sized comics and hiding them in different people’s work in bookshops. The primary comic strips appeared in Germany in 1865. It was about two boys who are getting punished for always getting into mischief.
Moreover, if we are honest with ourselves, we all know that a whole lot of mischief is downright funny. Why are old coins value more than right now's coins? Complete collections will fetch so much greater than random particular person comics. Our purpose is to offer our readers a good piece of entertaining and academic comics on which is able to grow up not considered one of the future generations. These blockbuster motion pictures performs a vital role within the comeback of comics. People who wish to cherish their childhood reminiscences with the comics; they can easily discover low cost comics to start their comic assortment. In at the present time of "I want the most recent and latest," we actually discover that some of the true treasures are issues of outdated. Comic books are detailed stories. Apart from conventions, yard sales and used e book shops can also be extremely cost efficient sources for collectible comic books. A comic e book adaption in addition to a novel publication is being completed for the movie's promotion. That assumption is unsuitable and is an insult to your entire comedian book group.
These comic guides give you the sort of data you want like where to get the uncommon and precious comics and the place you may get first problem comics as properly because the back challenge ones as effectively. By selling and buying and selling comics you might be there have been the artwork work is most enjoyed and valued. Apart from, that is the place you get the meet fellow lovers and catch up on the most recent within the comedian books world; data that can prove invaluable. Some comedian books editions are collector's gadgets and if preserved in mint high quality condition. Books are restricted as a result of the reader cannot physically see what the writer envisions. Are these behaviors to be condoned? Eyes change into circles or dots, mouths are reduced to curved traces, and noses or ft are triangles. Get the most recent news. Those that already evaluate vast skills of our web site, confess that it is absolutely the most handy and easy option to be in contact with the newest improvements of the world of comics.
Nicely aware of the advantages that come from reading comics. Which Marvel comics must you read earlier than (or after) Captain Marvel? Repetition. Return to your day by day newspaper and glance on the comics’ page. The cartoonist is utilizing repetition to identify the character. Subsequently, we could say that it has nothing to do with a altering traits, whatever is new and trendy, photo to pop artwork print stays in the midst of its known usability in subject of art. I looked, and there before me was a pale horse! There actually is something for everyone. Cosplay additionally means costume play and the fans often come to the comedian conventions dressed in costumes. Eight delectable Expansions that followed added to the joy of the sport play. Then by all means, use it. By way of the use of these exaggerations, it doesn’t matter what different details I include. The possessed doll first hit the screens within the 1988 horror traditional 'Child's Play'. Corey Haim, the lead of the unique horror film, and Corey Feldman, the 2 Coreys, reprise their unique roles. However, in 2003 Hasbro would relinquish management to Batman's rights to Mattel. You additionally get preferential therapy in some cases and entry to particular occasions and performances.

Read Comics Online - An Offshoot for Valuable Entertainment Alcohol can find its way into the hands of characters in fiction. It's often used as being a device to demonstrate each time a character is an anti-hero or perhaps a villain, along with your more pure characters abstaining from something could alter their mental state, or not bothering given it has no relation to them. Some characters, however, use a history with alcohol that is certainly less about setting them up as bad boys for example Wolverine, but a little more about establishing them as human with very real flaws.
There is little the Hulk cannot accomplish together with his strength, which only grows stronger along with his anger, which I think is a direct reflection with the negativity that resides in a lot of people. "The madder Hulk gets, the stronger Hulk gets!" To quote the smoothness himself. When Bruce Banner 'Hulks out', he or she is nigh DC Universe Premier invincible: rapidly healing from otherwise fatal wounds, able to run for miles without losing breath or momentum, and in a position to fell a building along with his bare hands.

The second option you will have to consider can be used bookstores. Used bookstores that exchange literary wares will invariably possess a long stack of comics that can vary from modern age to silver age and beyond. Sometimes you will see a good bookstore employee which will explain to you where they keep their vintage copies of golden age options and will sell these to you an inexpensive price. Without apology, I admit that I am the consummate collector of Batman paraphernalia. Recently, the astonishing work, The Batman Files, found its way into playing. Anyone who appreciates the mystique of The Dark Knight will cherish this book. And while I admit that readers often say of proper books, "I could not put it down," that has been truly my experience. I poured on the design and relished the high quality illustrations for a few hours after opening it. Asterix Comics or The Adventures of Asterix and Obelix happen to be translated into greater than 30 languages worldwide and have also received numerous awards across the years. I personally love the Asterix Comics for his or her amazing love of life and tongue-in-cheek interpretations of assorted people and events.
0 notes
Audio
Collaboration 1 - Remix
This was an assignment completed for Trace’s Sonic Arts class, and one that I’m interested in writing about because of the unique way collaboration in this project occurred and how it informed my later collaboration in this same class. The assignment was fairly simple – first each student created a unique sound mix using whatever files they liked from their computer or a free source website and arranged them into a composition. This was our assignment preceding the once I intend to discuss. Following a short critique of these pieces, we were then broken into pairs. Each student exchanged not only their finished composition but all of the contributing sound files with their partner, and then it was our job to “remix” it. To make anther fully functional but entirely separate and distinct composition from what the other composer had designed.
This project was a good first step into the world of creative collaboration. Giving someone else creative control over work I had already done was a nerve-wracking and unfamiliar experience. What was even more disconcerting was how different my partner’s results were from what I myself had made – and out of exactly the same sounds! It threw me a bit for a loop, and I confess I think it was just instinct to not be quite as fond of the remix as I was of my original mix – just defensiveness over what I created. It made for an interesting moment of self-analysis that I think prepared me more for what collaboration is really like and what it’s really about. It truly taught me that any time more than one person works on something, especially something creative, it’s most common for creative differences to arise. Everyone creates art differently and everyone interprets art differently and everyone goes through the artistic process differently. This is natural – it’s what makes each person’s art unique – but it also means that artists have to be prepared to give a little on their artistic vision in order to accommodate the preferences of any artistic partner.
In the interest of self-awareness, I also think my remix took my partner by surprise. I can’t pretend to be in someone else’s head, but each of us had very different styles and backgrounds in sound design. Where his original mix was more driven and progressive, I really tried to create something more atmospheric. This led to a vast difference in the emphasized sounds and the space between them, and if I had to guess he probably felt some of the same disconnect I felt when he remixed my atmospheric, meditative piece into something very different. This isn’t to say I think his style is “wrong.” It wasn’t out of place for the assignment, it wasn’t out of place for the class. But neither was mine, and I think therein lays the realization we both had to come to. Neither of us was wrong, because there is no wrong. But by the same token there isn’t really a “right” either. There’s no sense in defensiveness over your own artistic style, it’s valid as-is. But you can’t consider someone else’s style to somehow be a threat against your own, or some sort of invasion of your creative space.
This project truly served to teach me what to expect from collaboration on projects where both artists are working in the same creative realm (in this case sound). It differed from my collaborative work on Never Land greatly, and taught me more of what to expect from different kinds of collaborative experiences. In Never Land, I was left wholly in charge of the music composition. I was shown the scenes and I was tasked with certain moods – “peaceful”, “serene”, “tense”, “oppressive”, etc. – but beyond that I was just expected to provide a satisfactory result, no questions asked no oversight on the work I did, it was left entirely to me. With collaborations in this class, this project was the first time I was confronted with a collaborative process that involved both parties being very much in the same artistic “space” as the other, and as such I think my lack of practice may have led to me stepping on toes a few times in this and my other collaborative project here. However it served as an excellent learning experience, and will certainly inform my collaborative efforts in the future.

My partner’s remix of my sounds (Screenshot via Audition)

My original arrangement (Screenshot via Audition)
0 notes