#Best Indoor Hydroponic grow system
Explore tagged Tumblr posts
Visit Tumblr Blog
Explore Tumblr blogs with no restrictions, modern design and the best experience.
Last Seen Tumblr Blogs


Fun Fact
Tumblr is available in 18 languages.
Text
Find the Best Hydroponic System | Farmsbazaar

The first step to getting started with hydroponic systems is selecting the right setup for your needs. There are a few different options to choose from, depending on the size and type of garden you want to create. For example, an ebb and flow system is best for large plants such as tomatoes and peppers, while a drip system is ideal for smaller plants like herbs and lettuce. Additionally, there are other options such as aeroponics or aquaponics which are more complex but may be suitable for certain applications.
#Hydroponic System Indoor#Hydroponic Systems#Buy Hydroponic Systems#Hydroponic systems for sale#Low maintenance hydroponic systems#Hydroponic System For Home#Best Indoor Hydroponic grow system#Vertical NFT Hydroponic Systems#Vertical nft System#Grow Bucket System#Hydroponic Microgreens System
1 note
·
View note
Text
Find the Best Hydroponic NFT Channel | Inhydro

The Inhydro complete indoor hydroponic grow system is a great way to begin your hydroponic gardening journey. This system utilizes a Hydroponic NFT channel for its nutrient delivery method, ensuring that the plants get all the essential nutrients they need to thrive.
#hydroponic companies in india#Hydroponic Farming India#Hydroponic Farming at Home#Hydroponics Training in Delhi#Hydroponic Training Courses#Hydroponic Farming Equipment#Best Indoor Hydroponic Plants#Hydroponic Plants Indoor#Small Hydroponic System#Hydroponic Home Setup#Hydroponic Hobby Setup#Hydroponic Grow kit#Hydroponic NFT Channel
2 notes
·
View notes
Text
Make your garden enticing with garden pebble stones There are numerous benefits of Garden Decorative Pebble Stones as they aid in retaining moisture and protect the plants from soil erosion. Not only this, it also elevates the look of the plants and the garden. https://falajgarden.com/blog/make-your-garden-enticing-with-garden-pebble-stones/

#Garden decorative pebble stones#Best indoor potting mix#Dutch buckets for hydroponics#Rain Bird irrigation fittings#Pesticides Dubai#Lettuce grow hydroponic garden#Nutrient film hydroponic system#Submersible pumps Dubai
0 notes
Text
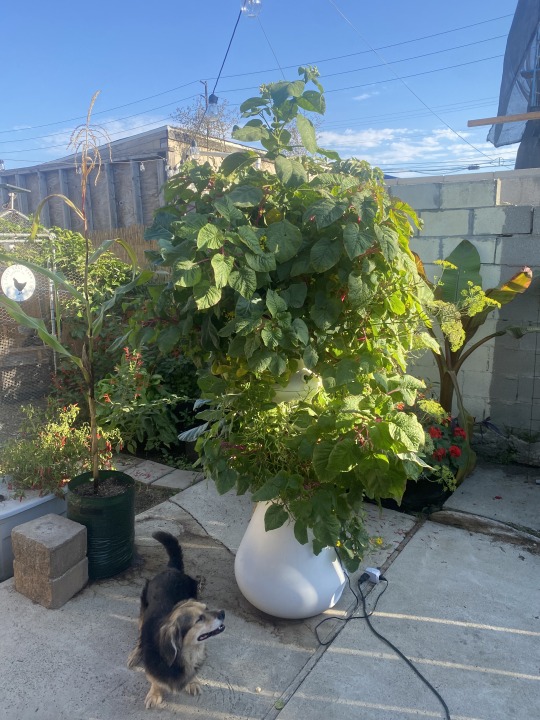
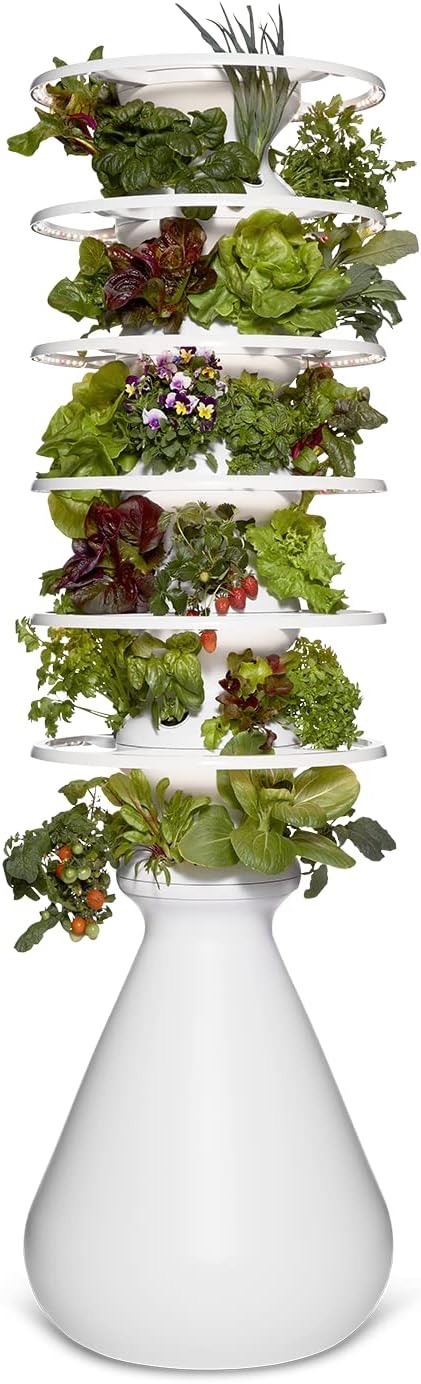
Vertical Hydroponic Growing with the Lettuce Grow Farmstand: My Experience So Far
Back in July, I decided to jump into vertical hydroponics and got my hands on the Lettuce Grow Farmstand. I found it on OfferUp for an amazing deal, and I couldn’t be happier with how it’s been working out. This thing has truly transformed how I grow my veggies.
For those not familiar, the Farmstand is a modular grow tower that allows you to expand your plant capacity from 18 to 36 slots, depending on your household’s needs and cooking frequency. It’s designed to be easy to use, and let me tell you—it is! It’s basically a “set it and forget it” kind of system. Once you set it up, all you need to do is add nutrients as required, and the tower does the rest. I’ve already harvested three times since July, and I’m still blown away by how efficient this system is.
Leafy greens like lettuce and spinach have thrived the most—growing fast and providing multiple harvests. I even tried a cucumber plant, which was a fun experiment. Although it produced cucumbers, the vines ended up trailing onto the ground, so that’s something to keep in mind if you try growing heavier or more vine-prone plants.
Right now, I’ve got tamarillo, pink amaranth, Brussels sprouts, and cauliflower growing in the Farmstand, and it looks fantastic. The tower is definitely an eye-catcher once everything starts filling in. It’s been a hit with neighbors and friends, who are always asking me about it!
One of the best things about the Farmstand is how easy it is to clean and maintain. The design is simple yet effective, and I love that it’s modular—so if I ever need more space, I can easily expand. The company also offers LED Glow Rings for indoor growing, which is great for when the weather turns cold. However, I’ve been toying with the idea of making my own indoor lighting system to avoid buying their LED setup.
I’m currently working on a 3D-printed mount for LED strip grow lights that will fit around the tower, giving me full control over the lighting without the extra expense. It’s a work in progress, but I’m excited about how it will turn out and will definitely update you once I get it dialed in.
For anyone considering vertical hydroponics, I highly recommend the Lettuce Grow Farmstand. It’s a breeze to use, looks great in the garden, and delivers a continuous supply of fresh produce. Plus, it’s got me thinking creatively about how to grow indoors—without missing a beat during the colder months.
Stay tuned for more updates on my indoor growing project!
#gardening#growing#containergrowing#hydroponics#backyard chickens#kratky#girl dad#growth#chickenmath#lettuce#lettuce grow#farmstand
3 notes
·
View notes
Text
aughh also this is just me but hydroponics gives me super "body horror but for plants" vibes. I realize I'm adverse to a lot of technological futurism on the grounds that it doesn't resemble how organisms are "meant to/evolved to function", which I know is a knee-jerk naturalist argument, so instead I try to be objective.
But this idea that you can grow anything in a nutrient solution (like lab-grown meat cultures for "vegan meat!", hydroponics, and even feeding ourselves nutrient solutions like soylent) seems incredibly reductive to me. Growing anything in isolation seems more cost-prohibitive than integrating it within an environment where water and nutrients can be found from sources that play a part in growing not just the crop, but other essential species like trees for canopy, mycorrhizal systems that work with root systems to provide movement of nutrients, decomposers such as insects that naturally turn and enrich soil, animals that provide the nutrients for that enrichment.
I apply this same argument to growing lab meat and feeding ourselves nutrient-dense slop (not to mention the constipation), although those don't have as much of an environmental concern as it is spiritual for me. Removing ourselves from the cycle of life and our part as predators (and eventual decomposing food for other organisms) seems like it will only exacerbate our problems of over-consumption (After all, if we can make enough lab meat to meet demand, why not? It is cruelty free after all). There would be no appreciation for where meat comes from and what it takes to obtain meat. Meat grown in a lab further masks the resources it took to create it. We would be further from knowing where our food comes from.
I think people creating lab-grown meat and indoor greenhouses have the best intentions in mind, and these are fantastic technological advances that would help dense urban areas meet their food goals, *but* I do not think this is the future of all farming because in isolating our food sources, we also isolate ourselves from the rest of the world when I believe we should be integrating ourselves better with our environments.
19 notes
·
View notes
Text
Building a DIY Hydroponic System: Unleash Your Inner Plant Scientist!
In recent years, hydroponics has gained popularity as a modern and efficient way of growing plants without soil. DIY hydroponic systems have become a favorite among gardening enthusiasts who want to take control of their food production and enjoy the benefits of fresh, pesticide-free produce. In this article, we will guide you through the process of building your own DIY hydroponic system, step by step. Whether you're a seasoned gardener or a novice, this guide will help you create a thriving indoor garden.
What is a DIY Hydroponic System?
A DIY hydroponic system is a method of growing plants in a soilless environment, using water, nutrients, and a growing medium. Instead of relying on traditional soil-based cultivation, plants are placed in a nutrient-rich water solution, allowing their roots to directly absorb the necessary elements for growth. This method provides several advantages, including faster growth rates, higher yields, and the ability to grow plants in limited space.
Benefits of a DIY Hydroponic System
Space Efficiency: DIY hydroponic systems are ideal for small spaces, as they can be tailored to fit any area, whether it's a balcony, a basement, or a spare room.
Water Conservation: Hydroponic systems use up to 90% less water compared to traditional soil-based gardening, making them an eco-friendly choice.
Year-Round Cultivation: With a hydroponic system, you can grow plants all year long, regardless of the weather conditions, extending your gardening season.
Pest and Disease Control: By eliminating soil, you reduce the risk of soil-borne pests and diseases, resulting in healthier plants.
Choosing the Right Setup
Before diving into the construction of your DIY hydroponic system, it's essential to consider the setup that suits your needs best. There are various types of hydroponic systems to choose from, including deep water culture (DWC), nutrient film technique (NFT), and drip systems. Each has its own advantages and considerations, such as space requirements, complexity, and the types of plants you can grow. Click here to buy!
Check out this tutorial to learn how to build your ebb and flow hydroponics system! DIY Ebb And Flow Hydroponic System.
Building Your DIY Hydroponic System
To build your own DIY hydroponic system, you'll need some basic materials and tools. Here's a list to get you started:
Reservoir (container to hold the nutrient solution)
Growing tray (where the plants will be placed)
Pump and tubing (to circulate the nutrient solution)
Lighting system (to provide the necessary light for plant growth)
Growing medium (to support the plants)
Nutrient solution (to provide essential plant nutrients)
Step 1: Determine the System Type
Decide on the type of hydroponic system you want to build based on your available space, budget, and personal preferences. Consider factors like ease of maintenance and the types of plants you want to grow.
Step 2: Build the Reservoir
The reservoir is where the nutrient solution will be stored. Choose a container that is large enough to accommodate your plants' needs and ensure it has a lid to prevent evaporation.
Step 3: Construct the Growing Tray
The growing tray will hold the plants and the growing medium. Construct a sturdy tray that fits your chosen system type and has proper drainage to avoid waterlogging.
Step 4: Install the Pump and Tubing
The pump and tubing will circulate the nutrient solution from the reservoir to the plants. Install them properly, ensuring the pump is reliable and the tubing reaches all areas of the growing tray.
Step 5: Set Up the Lighting
Lighting is crucial for plant growth, especially in indoor settings. Choose appropriate grow lights based on the plants you want to grow and position them at the correct height and angle to provide optimal light coverage.
Step 6: Add the Nutrient Solution
Mix the nutrient solution according to the instructions provided by the manufacturer. Fill the reservoir with the solution and monitor its pH and nutrient levels regularly to ensure healthy plant growth.
Step 7: Planting and Maintenance
Plant your chosen seeds or seedlings in the growing medium, ensuring they are properly spaced. Monitor the system regularly, checking pH levels, nutrient concentrations, and water levels. Make adjustments as necessary and prune plants when needed.
Troubleshooting Tips
If plants show signs of nutrient deficiencies or excesses, adjust the nutrient solution accordingly.
Ensure the pH levels are within the appropriate range for your chosen plants.
Keep an eye out for pests or diseases and take prompt action to prevent their spread.
Regularly clean and maintain the system to avoid clogs and blockages.
To learn how to build your vertical hydroponics system, check out this tutorial! Vertical Hydroponics DIY
Conclusion
Building your own DIY hydroponic system opens up a world of possibilities for indoor gardening. With a well-designed setup and the right care, you can enjoy fresh and healthy produce throughout the year. Experiment with different plant varieties and explore the fascinating world of hydroponics. Start your journey towards sustainable and efficient gardening today! Don't forget to choose these tools from Shopbestgoods.com!
FAQs
1. What vegetables can I grow in a DIY hydroponic system?
Leafy greens like lettuce, spinach, and kale, as well as herbs like basil and mint, are popular choices. You can also grow tomatoes, cucumbers, peppers, and strawberries.
2. How often should I change the nutrient solution?
It's recommended to change the nutrient solution every two to three weeks to maintain the proper balance of nutrients. However, monitor the solution's pH and nutrient levels regularly and adjust as needed.
3. Can I use tap water for my hydroponic system?
Tap water can be used in a hydroponic system, but it may contain chemicals like chlorine or high mineral content. It's advisable to filter or treat the tap water before using it to ensure optimal plant health.
4. Do I need to adjust pH levels in a hydroponic system?
Yes, maintaining the correct pH level is crucial for nutrient uptake by the plants. Most plants thrive in a pH range of 5.5 to 6.5. Use a pH testing kit and adjust the pH using pH-up or pH-down solutions if necessary.
5. Can I use a DIY hydroponic system for indoor gardening?
Absolutely! DIY hydroponic systems are particularly well-suited for indoor gardening. With proper lighting and care, you can enjoy the benefits of growing your own fresh produce in the comfort of your home.
#hydroponic#hydropnics#indoor gardening#indoor growing#hydroponic system#hydroponic box#ShopBestGoods#hydroponic garden#hydroponic farming
3 notes
·
View notes
Text
Say goodbye to traditional hydroponic gardening and take your plants to the next level with sliding5galbuckets!

Our hydroponic buckets make it easy to keep plants healthy and growing strong, with a 5-gallon capacity and sliding wheels for smooth maneuvering. Plus, its space-saving design is perfect for tight spaces, giving you the perfect setup for a thriving garden every time! Get everything you need in one package – shop sliding5galbuckets today!
Make indoor gardening easier and more efficient with 5 gallon bucket hydroponic system Our hydroponic buckets are designed with the perfect combination of convenience and quality that make growing your own produce a breeze. With an easy-to-use design, adjustable flow rate, and adjustable water levels, you can grow your favorite vegetables, herbs, and fruits in no time at all! Stop waiting for the perfect growing conditions outdoors create them yourself with sliding5galbuckets!
Get your hands on the best hydroponics bucket for home use! Our sliding5galbuckets are made from durable, food-safe materials and come in a variety of colors
With this DIY hydroponic bucket, you can easily set up your own hydroponic garden at home in no time. Enjoy healthy, pesticide-free plants with ease - now that's something worth bragging about! Plus, with our easy to follow instructions, you'll be growing like a pro in no time. Try sliding5galbuckets today and see how hydroponics can change your gardening game!
Looking for the best plants to grow in Dutch buckets Look no further! sliding5galbuckets has the perfect solution for you. Our sliding 5-gallon buckets are designed specifically to be used as a hydroponic system to help you grow your plants with ease. Not only do they make gardening easy, but they also reduce the risk of overwatering and are great for space saving. Try our sliding 5-gallon buckets today and watch your garden thrive!
Get the most out of your garden with sliding5galbuckets' amazing Dutch bucket system! This revolutionary system helps you optimize space, conserve water, and increase harvest yields with its self-contained irrigation and drainage setup. Its five-gallon buckets make for easy rearranging and repotting of plants, plus its durable construction ensures you'll have reliable plant growth for years to come. Get ready to experience gardening like never before with sliding5galbuckets!
2 notes
·
View notes
Text
Are You Looking for the Best 100% Natural Coco Peat for Your Plants?
For gardeners looking to create lush, vibrant gardens, coco peat soil is an essential ingredient. Whether you’re cultivating flowers, vegetables, or houseplants, 100% natural and organic coco peat online from Nathan Coir is your perfect companion for sustainable gardening. Explore the benefits of this eco-friendly medium and see how it transforms your gardening experience.

Boost Plant Vitality with Coco Peat and Organic Manure Mix
When combined with homemade organic manure, coco peat soil enhances the growth and vitality of your plants. This blend provides superior moisture retention, good aeration, and excellent drainage. While commercial manure and other fertilizers can be added to further enrich the soil, it’s always best to follow the recommended ratios for each specific plant type. For larger plants, consider mixing in a small amount of soil or sand to improve stability and structure.
By choosing eco-friendly coco fiber soil, you're opting for a sustainable solution that promotes healthy plant growth while being mindful of the environment. Coco peat creates an ideal growing environment for a wide range of plants, making it a must-have for every gardener.
Why Coco Peat is Perfect for Hydroponic and Soil-free Gardening
Coco peat soil also serves as an exceptional medium for soil-less farming, especially in hydroponic systems. Whether you’re using tray-based setups or other similar hydroponic methods, coco peat supports strong root development while ensuring proper moisture retention. It’s lightweight, easy to handle, and a great alternative to traditional soil. For hydroponics or soil-free gardening, it’s a perfect choice.
Buy 100% Natural & Organic Coco Peat Online
For the best 100% organic and naturally grown coco peat available online, Nathan Coir is your go-to source.We offer everything from dry coco peat to potting mixes, ensuring that your garden gets the best foundation for growth. Check out our range of products and explore dry coco peat and potting mix on Amazon for the perfect gardening solutions.
Your One-Stop Home Gardening Shop
We offer an extensive selection of gardening products through our online home garden store. From premium-quality organic coco peat online to a wide range of plants and gardening tools, you’ll find everything you need for your garden. Our house plant shop online features a variety of plants that can brighten up any space. Whether you're setting up a new indoor garden or expanding your collection, we have just what you need for home garden online shopping.
Looking to order indoor plants online? You’ll love our wide selection of houseplants, from low-maintenance varieties to tropical beauties.We cater to all of your indoor gardening requirements, providing rapid and dependable delivery straight to your home.
Why Choose Coco Peat for Your Garden?
With its eco-friendly nature and versatile application, coco peat is an excellent choice for any gardener. By choosing organic coco peat online, you provide your plants with the best possible medium for growth. Whether you're potting houseplants, starting a vegetable garden, or setting up a hydroponic system, coco peat ensures your plants have the ideal environment to thrive.
Conclusion
At Nathan Coir, we pride ourselves on offering high-quality products that are both effective and eco-friendly. Browse our selection of organic coco peat soil, potting mixes, and more, and see how we can help you elevate your gardening experience. Whether you're new to gardening or a seasoned expert, our online store makes it easy to find everything you need for a successful garden.
#OnlineHomeGardenStore#Organiccocopeatonline#houseplantshoponline#homegardenonlineshopping#orderindoorplantsonline
0 notes
Text
The Rise of the Cannabis Connoisseur: Exploring the Art of Craft Cannabis Cultivation
In an industry often dominated by large-scale producers, craft cannabis stands out as a testament to quality, sustainability, and the meticulous art of cultivation. Like fine wine or gourmet coffee, craft cannabis reflects the dedication and expertise of its growers, offering a product that’s as much about the journey as the destination.
What Is Craft Cannabis? Craft cannabis refers to cannabis grown in small batches with an emphasis on quality over quantity. These producers prioritize: Hand-Tended Care: From planting to harvest, every step is carefully managed by skilled cultivators. Sustainable Practices: Many craft growers employ organic and eco-friendly methods to minimize their environmental footprint. Unique Strains: Craft growers often focus on developing or preserving rare, boutique strains.
The Craft Cannabis Difference
What sets craft cannabis apart? Flavor and Aroma: Rich terpene profiles create nuanced flavors and aromas you won’t find in mass-produced products. Potency and Effects: Precisely tuned growing conditions ensure consistent cannabinoid content for predictable effects. Transparency: Craft growers often share their cultivation methods, giving consumers confidence in the product’s purity and origin.
The Art of Cultivation
Craft cannabis isn’t just grown; it’s nurtured. Here’s a look at the steps involved:
Selecting the Perfect Strains Craft growers often hunt for unique or heritage strains, focusing on those with exceptional terpene profiles or rare genetics. Many also engage in phenotype selection, choosing plants with the best traits for their growing environment.
Creating the Ideal Environment Indoor Cultivation: Allows for precise control over light, temperature, and humidity. Outdoor and Greenhouse Growing: Leverages natural sunlight, often producing a fuller spectrum of cannabinoids and terpenes. Craft growers often use living soil or hydroponic systems to optimize plant health.
The Harvesting Process Plants are harvested at their peak maturity to maximize potency and flavor. Buds are trimmed by hand, ensuring only the finest product reaches consumers.
Curing and Storing Proper curing is a hallmark of craft cannabis. Slow drying and curing enhance flavor, aroma, and potency. Products are often stored in small, airtight batches to maintain freshness.
Sustainability in Craft Cannabis
Many craft growers are pioneers in sustainability: Organic Practices: Avoiding synthetic pesticides and fertilizers. Water Conservation: Implementing drip irrigation or rainwater collection. Renewable Energy: Using solar or wind power to reduce carbon footprints.
Why Consumers Love Craft Cannabis A Personal Connection: Knowing the story behind the product creates a deeper appreciation. Small Batch Excellence: With fewer plants to tend, growers can focus on maximizing quality. Support for Local Businesses: Craft cannabis is often produced by small, independent growers, contributing to local economies.
Challenges Facing Craft Cannabis Despite its benefits, craft cannabis faces hurdles: Market Competition: Competing with larger, cheaper producers. Regulatory Barriers: Navigating complex and costly licensing requirements. Education: Helping consumers understand why craft cannabis is worth the premium price.
The Future of Craft Cannabis As the cannabis industry evolves, craft cannabis is carving out a niche for those who value quality and sustainability. With growing consumer interest in artisan products, the future looks bright for this burgeoning segment.
0 notes
Text
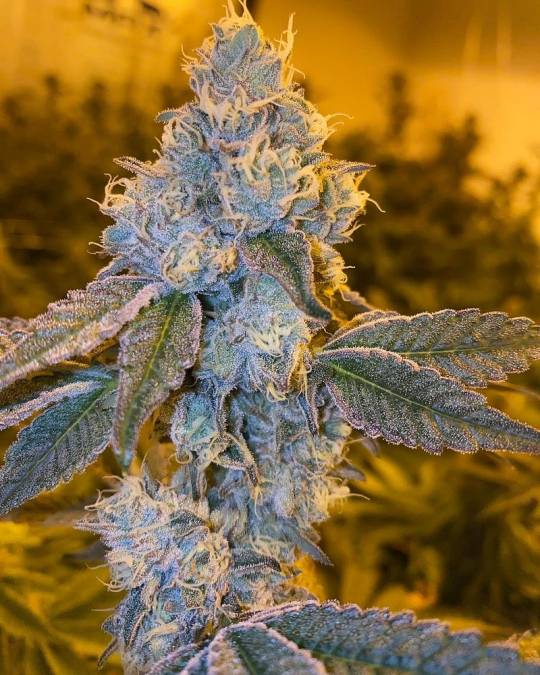
Hard Candy by Ronin Garden: Complete Review
Hard Candy Strain Review: A Sweet Masterpiece by Ronin Garden
Ever heard of a cannabis strain so delightful that its name alone sparks curiosity? That’s Hard Candy by Ronin Garden for you. It’s not just a treat for the senses — it’s a powerhouse blend that has enthusiasts raving. Let’s dive into this strain’s unique characteristics and why it deserves a spot in your garden (spoiler alert: Hard Candy clones are available at Get Seeds Right Here).
What Makes Hard Candy Stand Out?
Hard Candy isn’t just another strain on the shelf. It’s a carefully bred masterpiece by Ronin Garden, designed to balance flavor, potency, and cultivation ease. With its tantalizing aroma and robust effects, this strain is quickly becoming a favorite among both recreational users and medicinal growers.
The Genetics: A Perfect Blend of Sweetness
Ronin Garden’s Hard Candy boasts an impressive lineage, drawing from:
Zkittlez: Renowned for its sweet, fruity flavors and uplifting effects.
Kush Mints (Rabid Hippy Cut): Famous for its minty freshness and relaxing properties.
This combination results in a hybrid that leans slightly [indica/sativa]. Its genetics promise a delightful mix of relaxation and euphoria — perfect for winding down without being completely couch-locked.
Flavor Profile: A Candy Shop in Every Puff
Imagine opening a bag of assorted hard candies. That’s the experience Hard Candy delivers. The primary terpenes contributing to its flavor include:
Myrcene: Adds earthy, herbal notes.
Limonene: Brings a citrusy zing.
Caryophyllene: Offers a hint of spice.
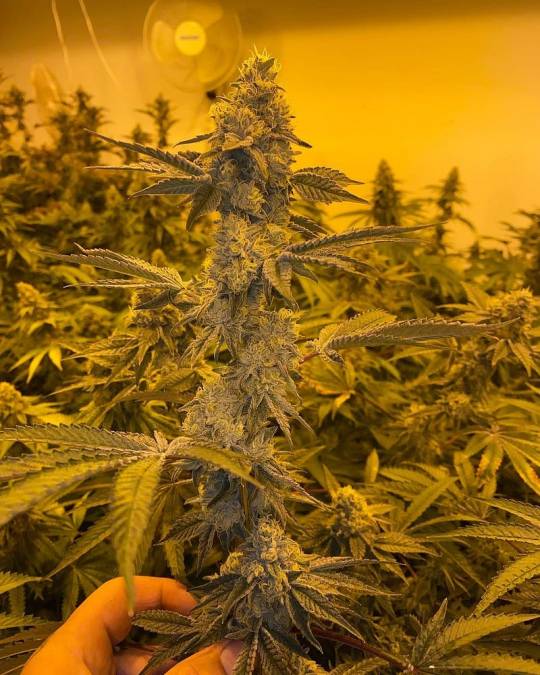
Growing Hard Candy: Tips and Tricks
Hard Candy isn’t just a joy to smoke; it’s also a pleasure to grow. Here’s what you need to know:
Ideal Growing Conditions
Climate: Thrives in a warm, Mediterranean-like environment.
Lighting: Does exceptionally well indoors under LED setups.
Humidity: Prefers lower humidity levels during flowering to prevent mold.
With proper care, growers can expect dense, resin-coated buds that look like they’ve been dipped in sugar.
The Importance of Nutrients
Yield Potential
Indoor: Produces around 400–500 grams per square meter.
Outdoor: Can yield up to 600 grams per plant under optimal conditions.
Consistency is key, and Hard Candy delivers robust yields with relatively low maintenance — a win-win for novice and seasoned growers alike.
Advanced Cultivation Techniques
For growers looking to maximize their yield, consider advanced techniques such as:
Topping: Promotes lateral growth for a bushier plant.
Low-Stress Training (LST): Helps in even light distribution and maximizes bud sites.
Hydroponic Systems: Can further enhance growth rate and yield potential.
These methods require some experience but can significantly improve both quality and quantity.
Common Issues and Solutions
Like all strains, Hard Candy has its quirks. Here’s how to handle them:
Pest Problems: Use organic pest control methods like neem oil or introduce beneficial insects.
Nutrient Deficiencies: Watch for yellowing leaves or stunted growth; adjust feeding schedules as needed.
Temperature Sensitivity: Avoid extreme heat or cold, as this can stress the plant and reduce yield.
Outdoor Cultivation Tips
Hard Candy thrives outdoors in climates that mimic the Mediterranean — think warm days and cool nights. To achieve the best results:
Soil Quality: Use rich, well-draining soil with added organic compost.
The better you grow, the more you get.
Watering Schedule: Avoid overwatering; let the topsoil dry out slightly between waterings.
Pest Control: Install mesh barriers or companion plants like marigolds to deter pests naturally.
Medicinal Benefits: Why It’s More Than Just Sweet
Cannabis isn’t just about recreation. Hard Candy is packed with cannabinoids and terpenes that make it a go-to for therapeutic use. Its primary benefits include:
Stress Relief: The calming effects make it a great evening strain.
Pain Management: Its potent cannabinoids help alleviate chronic pain.
Mood Enhancement: Say goodbye to the blues with its uplifting euphoria.
Exploring Hard Candy for Specific Conditions
Anxiety: Users report significant relief without the heavy sedation associated with some strains.
Insomnia: Its relaxing properties can help improve sleep quality when used in the evening.
Appetite Stimulation: A great choice for those dealing with appetite loss or nausea.
Inflammation: Thanks to caryophyllene, this strain can aid in reducing inflammation.
Chronic Fatigue: The subtle uplifting effects can give a gentle energy boost while still promoting relaxation.
PTSD Symptoms: Many users find its calming properties helpful in managing symptoms of PTSD.
Migraines: The strain’s analgesic effects make it a reliable option for headache sufferers.
Cannabinoid and Terpene Analysis
Hard Candy’s impressive cannabinoid and terpene profile is the secret to its medicinal success. Some highlights include:
THC Levels: Ranging from 18–22%, providing potent effects without overwhelming beginners.
CBD Content: Low but impactful, adding balance to the strain’s psychoactive properties.
Terpene Dominance: Myrcene, limonene, and caryophyllene create a synergistic entourage effect.
Smoking Experience: What to Expect
The Aroma
When you open a jar of Hard Candy, the first thing you’ll notice is its intense aroma. Sweet, citrusy, and a touch spicy, it’s like stepping into a gourmet candy store.
The Effects
Hard Candy hits fast and smooth. Within minutes, you’ll feel a wave of relaxation washing over you, followed by an uplifting euphoria. The balance ensures you’re calm yet functional — perfect for social settings or creative endeavors.
Best Pairings for Hard Candy
Music: Pair it with your favorite playlist to enhance relaxation and euphoria.
Art: Use the creative boost for sketching, painting, or journaling.
Food: Hard Candy pairs wonderfully with sweet treats like chocolate or citrus-based desserts.
Where to Buy the Best Clones
If you’re ready to grow this masterpiece, Hard Candy clones are available at Get Seeds Right Here. Start with elite genetics, and you’re halfway to cannabis greatness.
Final Thoughts: Is Apple Mochi Gelato Worth It?
Absolutely. This strain is a game-changer — whether you’re a grower, a connoisseur, or someone looking for an elevated cannabis experience. Apple Mochi Gelato by Alien Genetics is proof that cannabis can be an art form.
So, grab a clone from Get Seeds Right Here and see for yourself. Because life’s too short for mediocre weed.
0 notes
Text
Find the Best Grow Bucket System in India | Farmsbazaar

The Grow Bucket System is a popular choice for hydroponic gardening, particularly among those who are new to the hobby. This system uses buckets filled with a water-based nutrient solution and mesh pots that contain the plants. The buckets are generally connected with plastic tubing and a pump to keep the nutrient solution moving.
#Hydroponic Systems#Hydroponic System Indoor#Buy Hydroponic Systems#Hydroponic systems for sale#Low maintenance hydroponic systems#Hydroponic System For Home#Best Indoor Hydroponic grow system#Vertical NFT Hydroponic Systems#Vertical nft System#Hydroponic Microgreens System#Grow Bucket System
1 note
·
View note
Text
One of the Best Hydroponic Grow Lights | Inhydro

Hydroponic grow lights are an essential part of indoor farming Inhydro. They provide a source of artificial light to mimic the natural sunlight necessary for plants to grow and thrive. With so many different grow lights available on the market, it can be difficult to know which one is the best option for your indoor farming Inhydro needs. In this blog post, we will discuss the various types of grow lights available, as well as their advantages and disadvantages, so you can make an informed decision when selecting the best grow light for your indoor farming Inhydro.
#Hydroponic Grow light#Hydroponic Nutrients#Grow Light#Net Pots#Dutch Bucket#NFT Channel#Hydroponic Net Pots#Learn Hydroponic#Grow Lights#Hydroponic Companies in India#Hydroponic Farming India#Hydroponic Farming at Home#Hydroponics Training in Delhi#Hydroponic Training Courses#Hydroponic Farming Equipment#Best Indoor Hydroponic Plants#Hydroponic Plants Indoor#Small Hydroponic System
1 note
·
View note
Text

Potting mix Home Depot:- If you want to make your home look more beautiful then why wait when Falaj Garden is already available for all the gardening solutions? We offer multiple product solutions like domestic pest control, agricultural equipment, decorative items, garden sprayers, submersible pumps, lettuce grow hydroponic gardens, etc. Contact us for your green needs. https://falajgarden.com/product-category/potting-mediums/potting-mix/
#Pest control item suppliers in UAE#Hydroponic towers for sale#Best nutrients for NFT systems#Agricultural Equipment suppliers in UAE#Garden decorative pebble stones#Best indoor potting mix#Dutch buckets for hydroponics#Rain Bird irrigation fittings#Pesticides Dubai#Lettuce grow hydroponic garden#Nutrient film hydroponic system
0 notes
Text
Avoiding Cannabis Growing Mistakes in Your Indoor Garden
Growing cannabis indoors can be an incredibly fulfilling hobby, and for many, it's also a way to produce high-quality, homegrown cannabis. However, like any form of cultivation, there is a learning curve. Even seasoned growers can make cannabis growing mistakes that can hinder their success. In this comprehensive guide, we will discuss the common cannabis growing mistakes made during indoor cultivation and provide practical tips on how to avoid them, ensuring a healthier, more productive crop.
The Importance of Understanding Cannabis Growing Mistakes
Cannabis plants, while resilient, have specific needs that must be met for optimal growth. Cannabis growing mistakes can result in poor yields, stressed plants, or even plant death. Some of these mistakes are easy to make, especially for new growers, but with careful attention to detail, you can avoid these pitfalls and set yourself up for success. Knowing how to identify and correct mistakes early on will save you time, effort, and resources.
1. Overwatering and Underwatering
One of the most common cannabis growing mistakes is improper watering. Overwatering can drown the roots and lead to root rot, while underwatering can cause dehydration and stunt plant growth. Both mistakes can severely impact the health of your cannabis plants.
How to Avoid It:
Check soil moisture regularly: Use your finger or a moisture meter to check if the soil is dry before watering. Cannabis plants do not like to stay wet for too long, so it’s essential to let the soil dry out between waterings.
Invest in a good drainage system: Ensure your pots have proper drainage holes to allow excess water to escape, which prevents water from accumulating and causing root rot.
Adjust watering based on plant size and environment: Larger plants in a warmer environment may require more frequent watering than smaller plants in cooler conditions. Adapt your watering schedule accordingly.
2. Incorrect Light Exposure
Light is one of the most critical factors in cannabis growth, and cannabis growing mistakes related to lighting are easy to make, especially when using artificial grow lights. Too much light can burn the plant, while too little can hinder photosynthesis, slowing growth.
How to Avoid It:
Use the right light spectrum: During the vegetative phase, cannabis plants thrive under blue light, while red light is essential during the flowering phase. Choose your grow lights accordingly.
Maintain the proper distance between light and plant: If your grow lights are too close to your cannabis plants, they can get burned. Too far away, and the plants won't receive enough light. Adjust the height of your grow lights based on the type of light you’re using and the size of your plants.
Monitor light cycles: Cannabis is sensitive to its light schedule. During the vegetative stage, 18-24 hours of light per day is ideal. During the flowering stage, a 12-hour light cycle works best.
3. Nutrient Imbalance
Another common cannabis growing mistake is either overfeeding or underfeeding your plants. Cannabis requires different nutrients throughout its growth stages, and an imbalance can lead to nutrient deficiencies or excesses, both of which negatively impact plant health.
How to Avoid It:
Follow a feeding schedule: Nutrient needs change during the growth cycle. During the vegetative stage, your plant needs more nitrogen, while during flowering, it requires more phosphorus and potassium.
Don’t overfeed your plants: Excessive nutrients can cause nutrient burn, where the tips of the leaves turn brown and curl. Follow the manufacturer's instructions on nutrient products to avoid overuse.
Test soil and water pH: The pH of your growing medium (soil or hydroponic) greatly affects nutrient absorption. Ensure that the pH is in the correct range for optimal nutrient uptake: 6.0-7.0 for soil and 5.5-6.5 for hydroponics.
4. Poor Air Circulation and Ventilation
Proper air circulation is essential for healthy cannabis plants. Poor ventilation and stagnant air can lead to increased humidity, which can promote the growth of mold and mildew. Additionally, without fresh air, plants may suffer from stunted growth.
How to Avoid It:
Use fans and exhaust systems: Install oscillating fans and exhaust systems to improve airflow and prevent humidity from building up.
Maintain ideal temperature and humidity: Ensure your indoor garden stays at the optimal temperature range (65-80°F or 18-27°C) and humidity (40-60%) for cannabis. This will not only prevent mold but also support healthy growth.
5. Overcrowding the Grow Space
A common cannabis growing mistake is overcrowding the plants in a small space. When cannabis plants don’t have enough space to grow, they can suffer from poor air circulation, reduced light penetration, and stunted growth. Overcrowding can also lead to increased competition for nutrients and water.
How to Avoid It:
Plan your grow space carefully: Depending on the size of your grow space, only plant as many cannabis plants as will fit comfortably. Typically, each plant needs around 2-3 square feet of space.
Prune regularly: Pruning helps remove excess leaves and branches that aren’t receiving enough light. This allows the plant to focus its energy on the more productive parts, leading to better overall growth.
6. Ignoring pH Levels
Cannabis plants are highly sensitive to changes in pH levels, and an improper pH can hinder nutrient uptake, even if nutrients are present in the soil. Cannabis growing mistakes related to pH imbalance can lead to nutrient deficiencies, such as yellowing leaves and stunted growth.
How to Avoid It:
Test pH regularly: Ensure that the pH of your water and soil is within the ideal range. For soil, the pH should be between 6.0 and 7.0, and for hydroponics, the ideal pH range is between 5.5 and 6.5.
Use pH adjusters if needed: If your pH is off, use pH-up or pH-down solutions to bring the levels back into the optimal range for cannabis.
7. Pest Infestations
Pests are a major concern for indoor cannabis growers. Common pests like spider mites, aphids, and fungus gnats can damage plants, cause stress, and lower yields. Cannabis growing mistakes involving pest control can lead to serious infestations if left unchecked.
How to Avoid It:
Inspect plants regularly: Check for signs of pests, such as discolored, damaged, or deformed leaves. Early detection can prevent a small problem from becoming an infestation.
Use organic pest control: If pests are detected, use natural pest control methods such as neem oil, insecticidal soap, or releasing beneficial insects like ladybugs.
Maintain cleanliness: Keep your grow room clean and free of plant debris, as it can attract pests.
8. Failing to Train Plants Properly
Cannabis plants, especially sativa strains, can grow tall and spindly. Without proper training, your plants may not produce optimal yields. Cannabis growing mistakes related to plant training can result in wasted space and reduced light exposure.
How to Avoid It:
Use low-stress training (LST): LST involves gently bending and tying down branches to promote a more even canopy. This allows more light to reach all parts of the plant, leading to better growth and higher yields.
Top your plants: Topping is the process of cutting off the top of the main stem to encourage branching. This technique results in a bushier plant with multiple colas (flowering tops), leading to a better harvest.
Use support structures: Trellises, stakes, or netting can help support plants as they grow, keeping them upright and allowing for better light distribution.
9. Harvesting at the Wrong Time
Timing your harvest is crucial to ensure your cannabis plants reach their full potential. Harvesting too early or too late can result in a loss of potency and flavor. Cannabis growing mistakes related to harvest timing can affect the final product.
How to Avoid It:
Check the trichomes: The best way to determine if your cannabis is ready for harvest is by inspecting the trichomes. When they are milky white or amber, the plant is at its peak potency.
Look at the pistils: The pistils, or hairs on the buds, should change from white to orange or brown when the plant is ready for harvest.
10. Improper Drying and Curing
Even if you’ve avoided all the previous cannabis growing mistakes, improper drying and curing can ruin the final product. Quick drying or lack of curing can result in harsh, low-quality smoke and diminish the potency of your cannabis.
How to Avoid It:
Dry your cannabis slowly: Hang your cannabis in a cool, dark place with good airflow. Drying should take 7-14 days.
Cure properly: After drying, place your cannabis in glass jars and allow it to cure for at least two weeks. This process enhances the flavor, aroma, and potency of the buds.
Conclusion: Learn from Your Cannabis Growing Mistakes
No matter how much research you do or how many guides you read, cannabis growing mistakes are inevitable, especially when you’re starting out. However, the key to successful indoor cannabis cultivation is to learn from these mistakes and adjust your approach accordingly. By carefully managing water, light, nutrients, pH levels, and pest control, you can avoid common mistakes and ensure your plants thrive. With experience, your cannabis growing skills will improve, leading to a bountiful harvest every time.
0 notes
Text
Coco Coir Blocks or Traditional Soil: Which is Best for Your Plants? - A Detailed Overview

When it comes to nurturing your plants, the choice between coco coir blocks and traditional soil is crucial. Each option has its benefits and specific uses, depending on your gardening needs. Let’s dive into the details to help you make an informed decision.
What are Coco Coir Blocks?
Natural and Sustainable: Coco coir blocks are made from the fibrous husk of coconut shells, making them a byproduct of coconut production. This not only makes them eco-friendly but also highly sustainable.
Water Retention: These blocks are known for their superior water retention capabilities. Once hydrated, they can hold up to ten times their weight in water, ensuring your plants stay hydrated for longer periods.
Aeration: Coco coir is light and airy, providing excellent aeration to plant roots. This helps prevent root rot and promotes healthy growth.
Nutrient-Rich: While coco coir is not naturally rich in nutrients, it offers a neutral pH, making it a perfect medium for adding your preferred nutrients or fertilizers.
Pest Resistance: Unlike traditional soil, coco coir is less likely to harbor pests and diseases, keeping your plants healthier.
Reusable: One of the key advantages of coco coir blocks is their reusability. After harvesting, you can wash and reuse the coco coir for your next planting cycle.
Traditional Soil: The Classic Choice
Nutrient-Dense: Traditional soil is rich in organic matter and naturally occurring nutrients that plants need to thrive. It is a complete growing medium on its own.
Readily Available: Soil is abundant and easy to find, making it the go-to choice for most gardeners.
Cost-Effective: Traditional soil is generally less expensive than coco coir blocks, especially if you have access to high-quality soil in your area.
Support for Larger Plants: The denser structure of soil can provide better support for larger plants and trees that require a stable foundation.
Natural Ecosystem: Soil contains a variety of microorganisms that contribute to plant health by breaking down organic matter and cycling nutrients.
The Verdict: Which is Best?
The choice between coco coir blocks and traditional soil depends on your specific gardening needs:
Best for Water-Loving Plants: If you’re growing plants that require consistent moisture, coco coir blocks are your best bet. Their water retention properties ensure your plants stay hydrated without becoming waterlogged.
Best for Versatility: Coco coir blocks are excellent for a variety of plants, including those in hydroponic systems or container gardening, where soil may not be practical.
Best for Nutrient Control: If you want complete control over the nutrients your plants receive, coco coir blocks, combined with nutrient solutions, give you that flexibility.
Best for Traditional Garden Beds: For large outdoor gardens, especially those with established plants, traditional soil offers a cost-effective and nutrient-rich medium.
Best for Sustainability: If environmental impact is a concern, coco coir blocks are a sustainable choice that repurposes coconut waste and is reusable.
Conclusion
Both coco coir blocks and traditional soil have their unique advantages. For indoor gardening, hydroponics, or if you’re looking for a sustainable option, premium coco coir blocks are an excellent choice. However, for traditional garden beds and nutrient-rich environments, traditional soil remains unbeatable. Whichever you choose, understanding the needs of your plants and the conditions of your growing environment will guide you toward the best option.
Explore quality organic coco coir blocks to give your plants the best start.
Source Link: https://truecoirs.com/blogs/news/coco-coir-blocks-or-traditional-soil-which-is-best-for-your-plants-a-detailed-overview
0 notes
Text
Unlocking Growth Potential with Hydroponic Lighting in Gosford
Hydroponic farming is revolutionizing agriculture, enabling efficient and sustainable plant growth without soil. A crucial aspect of a successful hydroponic system is lighting, as it mimics natural sunlight to promote healthy plant development. In Gosford, where indoor and greenhouse farming is gaining popularity, understanding hydroponic lighting is essential. This guide explores the importance of hydroponic lighting, its types, and tips for selecting the best hydroponic lighting in Gosford.
1. What Is Hydroponic Lighting and Why Is It Important?
Hydroponic lighting is designed to replicate or enhance natural sunlight, providing plants with the energy needed for photosynthesis. Here’s why it’s vital:
Controlled Environment: Ideal for indoor farming where natural light is insufficient.
Extended Growing Seasons: Enables year-round growth regardless of outdoor weather.
Optimized Plant Growth: Specific light spectrums can target growth stages, from germination to flowering.
In Gosford, where indoor gardening is thriving, investing in quality lighting is a game-changer for hydroponic growers.
2. Types of Hydroponic Lighting
Understanding the types of hydroponic lighting can help you choose the best system for your needs:
a. LED Grow Lights
Energy Efficient: Consumes less power compared to traditional lights.
Customizable Spectrum: Tailored light wavelengths for specific plant stages.
Durability: Longer lifespan than other lighting types.
b. High-Intensity Discharge (HID) Lights
Powerful Illumination: Ideal for large-scale setups.
Two Types: Metal Halide (MH) for vegetative growth and High-Pressure Sodium (HPS) for flowering.
c. Fluorescent Lights
Budget-Friendly: Affordable and easy to set up.
Lower Intensity: Best suited for small-scale or beginner growers.
d. Compact Fluorescent Lights (CFLs)
Compact Design: Fits into smaller spaces.
Versatile: Suitable for starting seedlings and herbs.
3. Choosing the Right Hydroponic Lighting in Gosford
Selecting the right lighting depends on factors like the type of plants, growing space, and budget.

Assess Plant Needs: Determine whether your crops require more red or blue light spectrums.
Calculate Space Requirements: Ensure the lighting system covers your entire grow area.
Consider Energy Efficiency: Opt for LED lights to save on electricity costs in the long run.
Budget Wisely: Start with an affordable option like fluorescent lights if you're a beginner.
4. Benefits of Hydroponic Lighting for Gosford Grower
Gosford’s climate makes hydroponic systems a popular choice for local growers. Here’s how hydroponic lighting helps:
Enhanced Crop Yield: Consistent light exposure promotes faster and healthier growth.
Pest Control: Indoor systems reduce the risk of pests and diseases.
Space Utilization: Grow vertically with stacked systems and proper lighting.
Sustainability: Hydroponic systems with efficient lighting use less water and energy.
5. Where to Buy Hydroponic Lighting in Gosford
Gosford is home to several specialty stores catering to hydroponic enthusiasts. Look for:
Local Hydroponic Shops: Expert advice and tailored recommendations.
Online Retailers: Convenient access to a wide range of products.
Garden Supply Stores: Often stock beginner-friendly lighting systems.
Some stores even offer installation services and after-sales support to help you get started.
6. Tips for Maximizing Hydroponic Lighting Efficiency
To get the most out of your hydroponic lighting system, follow these tips:
Use Reflectors: Maximize light distribution to cover all plants.
Maintain Light Distance: Place lights at an optimal height to avoid scorching plants.
Schedule Lighting: Mimic natural day-night cycles with timers for consistent growth.
Regular Cleaning: Keep lights and reflectors clean to maintain their efficiency.
Conclusion
Hydroponic lighting is an indispensable component of indoor and greenhouse farming in Gosford. By selecting the right lighting system and optimizing its use, you can enjoy abundant, year-round harvests. Whether you’re a seasoned grower or a beginner, investing in hydroponic lighting will elevate your farming efforts, ensuring healthy plants and increased yields. Explore your options today and unlock the full potential of hydroponic gardening in Gosford!
0 notes