
Welcome to **Just Facilitating Life**, your go-to blog for all things growth! Here, we delve into the world of cultivating life in various forms. Whether you're passionate about growing plants through hydroponic, organic, and aquaponic methods, or you're interested in the rewarding journey of raising backyard chickens, this blog covers it all. Additionally, I share insights on nurturing my two daughters and my own personal development. Join me as I explore and celebrate the many facets of growth, from the garden to the heart.
Don't wanna be here? Send us removal request.
Statistics
We looked inside some of the posts by justfacilitatinglife and here's what we found interesting.
Average Info
Notes Per Post
32
Likes Per Post
24
Reblog Per Post
6
Reply Per Post
2
Time Between Posts
7 days ago
Number of Posts By Type
Text
16
Last Seen Tumblr Blogs


Fun Fact
130K people were victims of a chain letter scam that affected Tumblr in May 2011.
Text
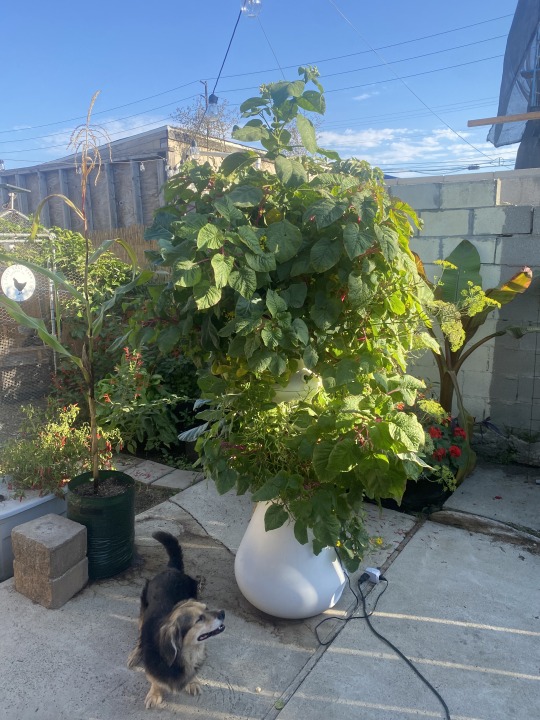
Vertical Hydroponic Growing with the Lettuce Grow Farmstand: My Experience So Far
Back in July, I decided to jump into vertical hydroponics and got my hands on the Lettuce Grow Farmstand. I found it on OfferUp for an amazing deal, and I couldn’t be happier with how it’s been working out. This thing has truly transformed how I grow my veggies.
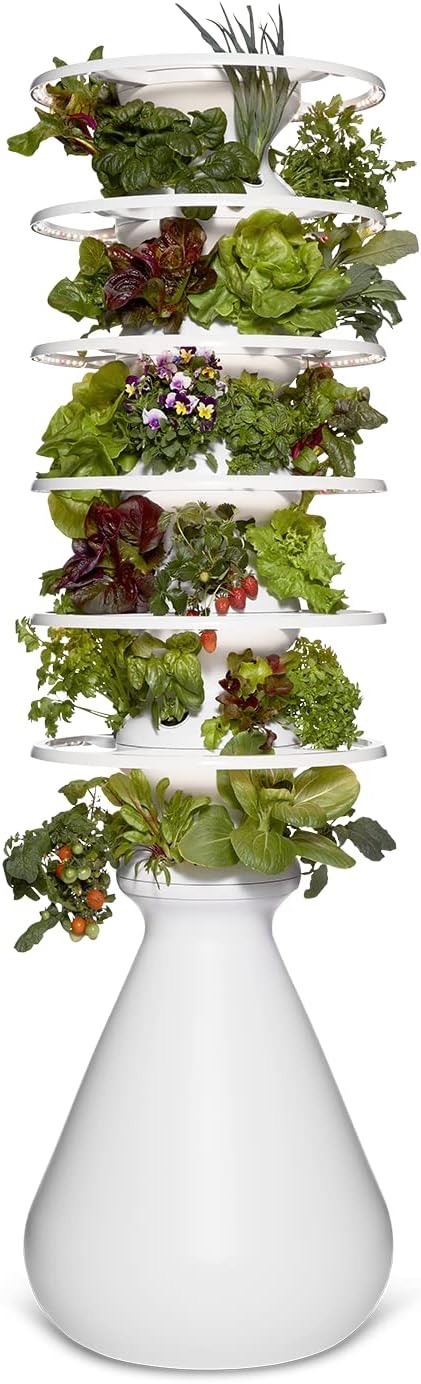
For those not familiar, the Farmstand is a modular grow tower that allows you to expand your plant capacity from 18 to 36 slots, depending on your household’s needs and cooking frequency. It’s designed to be easy to use, and let me tell you—it is! It’s basically a “set it and forget it” kind of system. Once you set it up, all you need to do is add nutrients as required, and the tower does the rest. I’ve already harvested three times since July, and I’m still blown away by how efficient this system is.
Leafy greens like lettuce and spinach have thrived the most—growing fast and providing multiple harvests. I even tried a cucumber plant, which was a fun experiment. Although it produced cucumbers, the vines ended up trailing onto the ground, so that’s something to keep in mind if you try growing heavier or more vine-prone plants.
Right now, I’ve got tamarillo, pink amaranth, Brussels sprouts, and cauliflower growing in the Farmstand, and it looks fantastic. The tower is definitely an eye-catcher once everything starts filling in. It’s been a hit with neighbors and friends, who are always asking me about it!
One of the best things about the Farmstand is how easy it is to clean and maintain. The design is simple yet effective, and I love that it’s modular—so if I ever need more space, I can easily expand. The company also offers LED Glow Rings for indoor growing, which is great for when the weather turns cold. However, I’ve been toying with the idea of making my own indoor lighting system to avoid buying their LED setup.
I’m currently working on a 3D-printed mount for LED strip grow lights that will fit around the tower, giving me full control over the lighting without the extra expense. It’s a work in progress, but I’m excited about how it will turn out and will definitely update you once I get it dialed in.
For anyone considering vertical hydroponics, I highly recommend the Lettuce Grow Farmstand. It’s a breeze to use, looks great in the garden, and delivers a continuous supply of fresh produce. Plus, it’s got me thinking creatively about how to grow indoors—without missing a beat during the colder months.
Stay tuned for more updates on my indoor growing project!
#gardening#growing#containergrowing#hydroponics#backyard chickens#kratky#girl dad#growth#chickenmath#lettuce#lettuce grow#farmstand
3 notes
·
View notes
Text
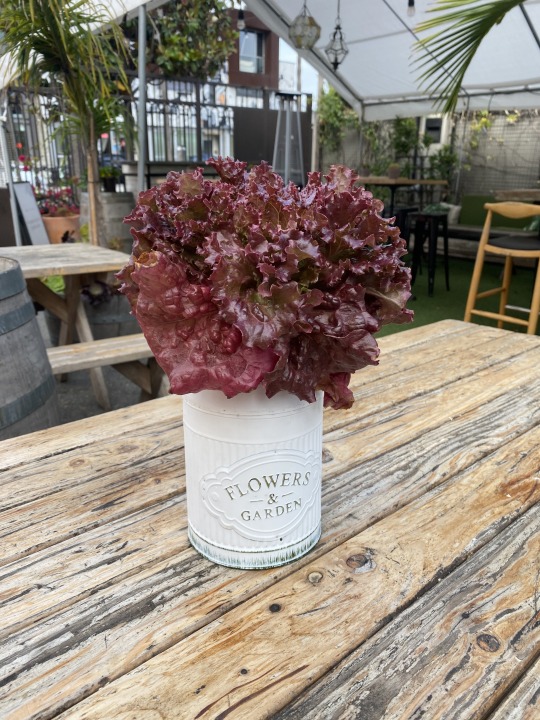
Small Container Veggies for Table Decor – Update: A Burst of Color and Flavor
This time around, I decided to step it up with some vibrant additions to my small container veggies for table decor. I’ve planted pink amaranth, purple mustard, rhubarb, and even white corn. Each of these plants brings a unique pop of color, and their eye appeal has been incredible!
The pink amaranth has this stunning magenta hue that instantly catches the eye. The purple mustard’s rich, deep color adds a bold contrast to the greens on the table, and the rhubarb’s sturdy red stems bring a rustic, earthy charm to the whole arrangement. But the real showstopper has been the white corn—it’s starting to outgrow its container, and now, an ear is forming! I never expected the corn to do so well, but it’s been a wonderful surprise, adding height and a striking visual element to the table.
What’s been really exciting is how well this idea has been received by guests. I've even seen posts about it popping up on social media, with people sharing photos and asking me about how I came up with the idea. It’s great to see others getting inspired by these container-grown veggies—not only do they make beautiful decor, but they’re also functional, giving us fresh produce straight from the table.
I think what makes this idea so appealing is how it blends style and sustainability. Guests love the thought of picking fresh greens or an herb garnish right from the table. It sparks conversation, adds a personal touch, and connects people to the food they’re enjoying in a unique way.


With all the social media buzz, I’m already thinking about what to plant next! Maybe some dwarf tomatoes or colorful peppers to mix things up a bit? We’ll see where this journey takes me, but one thing’s for sure—these veggie-filled tablescapes are here to stay!
4 notes
·
View notes
Text
The Unexpected Windfall of My Pepper Garden: When Life Gives You Broken Branches, Pickle!
My pepper plants have been thriving this year in my ebb and flow system. After weeks of care, they were filling out beautifully, and the fruits were ripening in abundance. I was so excited to see the progress—black cobra peppers, super khi peppers, trinidad’s and carolina reapers, all heavy with fruit. Then, out of nowhere, a windy night swept through, breaking down some of the heavily fruited branches.
I wasn’t sure what to do at first. The peppers were still half-ripened, and while the season was coming to an end, I couldn’t help but feel a pang of frustration. However, as I looked around my garden, I saw the solution right there: cucumbers! My Kratky cucumbers, growing in a 40-gallon trash can setup, had been producing steadily all summer long. With an abundance of cucumbers and now these semi-ripe peppers, the idea struck me—why not pickle them?
Pickling has always been a great way to preserve the harvest, and it’s a technique as old as time. Early civilizations discovered pickling as a way to store food for long periods, particularly during seasons when fresh produce wasn’t available. It’s also incredibly simple—using a basic brine of vinegar, water, and salt, you can pickle just about anything! I added garlic, oregano, and a few spices to bring out the flavors, and before I knew it, I had a batch of pickled cucumbers and peppers.
It’s funny how life works sometimes. You plan, nurture, and hope for everything to go as intended, but nature has its way of reminding you that you’re not in full control. But maybe that’s the beauty of it. That broken branch didn’t mean the end of my pepper harvest. Instead, it pushed me to try something new, to make the most out of what I had.
There’s an old saying, “When life gives you lemons, make lemonade.” But for me, this season, it’s more like, “When life gives you broken pepper branches, make pickles!” It’s a reminder that life’s setbacks can sometimes lead to unexpected joys, and often, the best way forward is to embrace the change and adapt.


#gardening#hydroponics#growing#containergrowing#backyard chickens#kratky#peppers#red hot chili peppers#pickles#pickling#ebb and flow
6 notes
·
View notes
Text
Squash, Seasons, and Skylar: A Family Tradition Through the Years
It feels like just yesterday I was chasing after Skylar as a toddler, and now, here she is—my growing, curious 3rd grader, standing tall next to a display of heirloom squash at the Heirloom Expo in Ventura. Yesterday, I had the chance to take her to the expo with her mom, and it was such a special day exploring rare varieties of fruits and vegetables, along with checking out the impressive poultry exhibit together.

But the moment that really stuck with me was when I snapped a photo of Skylar next to a vibrant squash display. It made me pause and think about how quickly time flies. As summer comes to an end, we find ourselves entering the reflective season of fall—a time of change and harvest. The shifting seasons always get me thinking about what to plant in my growing zone, and squash always finds its way to the top of the list.
It’s funny to look back through the years and realize how many times Skylar has posed next to a squash. It’s become a bit of an unintentional tradition. Each year, she grows taller, and the squash displays get more colorful, yet the joy of being out in nature, learning about the earth’s bounty, and spending time with my family never changes.


Fall has always been one of my favorite times of the year—a season of harvesting and preparing, of making plans for the next growing season. It’s a reminder of the cycles we go through—both in nature and in life. And as Skylar continues to grow, I’m grateful for these little moments that remind me to pause, reflect, and enjoy the harvest, both in my garden and in life.
Here’s to another season of growth and many more photos of Skylar, her mom, and their beloved squash!
#girl dad#gardening#growing#growth#growing up#squash#hydroponics#containergrowing#backyard chickens#chickenmath#eggs#kratky
3 notes
·
View notes
Text
"Raising daughters in this new world is like navigating a stormy sea; the waves of social discourse can be overwhelming, but it's our duty as fathers to guide them, reminding them to stay the course and love themselves fiercely. It's hard to be a dad in these times, watching them face challenges we never imagined, but our love and support are their compass, helping them find their way through." - Just
#my quotes#growing#growth#girl dad#daddy’s babygirl#farmers daughter#gardening#backyard chickens#dads love
0 notes
Text
Growing Passion Fruit: A Journey to Sweet Success


When I built my chicken run back in March, I had a vision of growing a vine around the run doors, connecting the two and providing shade for the chickens. Passion fruit seemed like the perfect choice—not only does it grow quickly, but it also produces fruit with a flavor I absolutely love.
My first attempt was a bit of a letdown. I bought a yellow passion fruit vine from a private nursery, thinking it would be better than going to a big box store. I planted it by the run door and waited. Unfortunately, the leaves slowly turned yellow, and before I knew it, they all fell off. When I pulled it out, I discovered that the nursery had sold me a cutting that wasn’t fully propagated—there was no root ball at all.
Determined not to give up, I went to Home Depot and bought two purple passion fruit vines, which I planted flanking the run door. I set up an automatic irrigation system to water them daily during the summer months and added a potassium fertilizer to give them a boost. Growth was slower than I expected at first, but a few months ago, I saw the first flowers, and soon after, fruit began to form.


Over the past month, the vines have really taken off. They’re now climbing up the chicken run roof, with some reaching about 10 feet long and starting to fill out beautifully. Yesterday, I found the first fruit on the ground—a sign that it was ripe and ready to eat. The inside pulp is delicious, and now I’m brainstorming ways to use it beyond just flavoring iced tea. If you have any suggestions, I’d love to hear them!


I’ll keep you updated on the progress of the vines and any new recipes I come up with using the passion fruit. Until then, here’s to sweet success!
1 note
·
View note
Text
"Keep your mind free and your heart at peace, for true wealth is the tranquility of the soul." - Just
#my quotes#quotes#gardening#hydroponics#containergrowing#growing#backyard chickens#girl dad#chickenmath#quoteoftheday
0 notes
Text
Harvesting My First Ambrosia Melons: A Journey in Outdoor Hydroponics
This week marked a significant milestone in my gardening journey—I harvested my very first Ambrosia melons. Growing melons has always been something I’ve wanted to try, and seeing these beauties come to life has been incredibly rewarding. I decided to grow them using an outdoor hydroponic setup, using Masterblend nutrients in a 35-gallon drum. Here’s a bit about the process and what I learned along the way.
I started with a melon seedling I bought from the nursery. One thing I’ve noticed when buying seedlings is that many times, multiple plants are crowded into a single pot. This can sometimes lead to poor growth when transplanted because the plants end up competing for nutrients. To avoid this, I carefully separated the seedlings into three different net pots, all within the same drum. This setup allowed each vine its own space to grow while sharing the nutrient reservoir.

In traditional melon farming, growers often prune the vines to concentrate the plant’s energy on a single fruit, resulting in larger, sweeter melons. However, I decided to let all three vines do their thing without much pruning. I knew I’d be refilling the drum with nutrients as needed, so I wasn’t too worried about spreading the plant’s energy thin. This approach resulted in about 10 melons forming on the vines. Watching them grow over the weeks was exciting, but figuring out when to harvest was a bit of a guessing game.
Today, I noticed one of the melons had fallen off the vine—a good indication it was ready to be picked. So, I decided to harvest the ones that looked and felt ripe. They had a sweet fragrance, and the skin had a slight give when pressed—signs that they were ready to be enjoyed.
A Bit About Ambrosia Melons
Ambrosia melons are a hybrid variety of cantaloupe known for their exceptionally sweet, aromatic flesh. These melons have a creamy texture and a flavor that’s often described as honey-like. Originating from Japan, Ambrosia melons are prized for their taste and have become a popular choice for home gardeners and specialty growers alike. They’re typically smaller than regular cantaloupes but pack a punch in terms of flavor and sweetness.
Unlike factory-farmed melons, which are often grown for uniformity, size, and durability for shipping, Ambrosia melons are grown for taste. Commercially grown melons are usually bred to withstand long-distance transportation and are often picked before they reach peak ripeness. This can sometimes result in less flavorful fruit by the time it reaches the consumer. Growing my own allowed me to harvest the melons at their absolute best—fully ripe and bursting with flavor.
Lessons Learned
Growing my own melons has been an amazing learning experience. The outdoor hydroponic setup worked beautifully, providing the plants with consistent nutrients and water. Splitting the seedlings into separate net pots helped them thrive without competing for resources, and while I didn’t prune the vines as recommended, I’m happy with the number of melons that developed.
I’m looking forward to cutting into these Ambrosia melons and sharing them with family and friends. There’s something incredibly satisfying about enjoying fruit that you’ve grown yourself. Plus, the flavor is unmatched compared to store-bought melons.
If you’ve ever considered growing your own melons, I highly recommend giving it a try. The process is rewarding, and the taste of a freshly harvested melon makes all the effort worth it.

0 notes
Text
DIY Automatic Chicken Feeder and Waterer with PVC and 3D Prints

One of the more tedious tasks in chicken keeping is feeding and watering your flock daily. While I love my chickens, I wanted to alleviate the constant in and out of the chicken run, not to mention the wasted feed from using a trough. After doing some research online, I found that many people were using PVC to create feeders and waterers, so I decided to give it a try myself.
For the feeder, I went with 4-inch PVC pipe and a Y-channel design. This allows the chickens easy access to the feed, while the pipe acts like a silo. To minimize waste, I 3D-printed a custom cap with a parapet-like opening that prevents the chickens from spilling feed while they eat. It’s a simple setup, and best of all, I only need to refill the feeder every 10 days or so.


For the waterer, I used the same 4-inch PVC, cut to about a foot long. I capped both ends and installed three auto-fill water cups that I found on Amazon for just $2 each. Inside the pipe, I added a float valve, so when I attach the hose, the water fills the pipe and cups automatically, ensuring the chickens always have access to water. The waterer is positioned inside the run, but I can hose off the cups from outside when they get dirty. This makes maintaining it super easy and convenient.

This setup has been a game-changer for me. Not only does it reduce waste and effort, but it also keeps the chickens well-fed and watered without constant intervention. Plus, the peace of mind knowing they’re taken care of is priceless!
#backyard chickens#gardening#chickenmath#pullets#growing#hydroponics#containergrowing#chickenfeeder#chickencoop#chickenrun
0 notes
Text
"The courage to grow lies in facing every challenge with strength, like a seed breaking through the earth to reach the light." -Just
2 notes
·
View notes
Text
Crafting Your Own Fermented Hot Sauce: A Journey from Garden to Bottle
There’s something deeply satisfying about growing your own food, especially when it’s packed with the fiery flavors of homegrown peppers. This season, my hydroponic garden delivered a bountiful mix of peppers and tomatillos, and I decided to channel that harvest into a batch of homemade fermented hot sauce. If you love the idea of turning fresh ingredients into something with a punch, this one’s for you.
The Ingredients
For this batch, I used:
Black Cobra Peppers: These pack a serious punch.
Super Khi Peppers: Another layer of heat with a unique flavor profile.
F1 Mimi Red Peppers: To balance the heat with a touch of sweetness.
Tomatillos: For that tangy base.
Garlic: Because what’s a hot sauce without garlic?
Fresh Italian Oregano: Adds a fragrant, herbal note to the mix.

The Fermentation Process
Fermenting your peppers is what gives hot sauce that complex, deep flavor that you can’t get from a quick blend. Here’s how I did it:
Prepare Your Ingredients:
Chop up the black cobra, super khi, and F1 mimi red peppers, along with the tomatillos and garlic.
Place them into a mason jar, leaving about an inch of space at the top.

Brine Solution:
Mix a basic brine solution using 3% sea salt by weight. Make sure the salt is fully dissolved in water.
Pour the brine over the peppers and tomatillos in the jar, making sure everything is fully submerged.
Airlock Setup:
I used a 3D-printed lid as an airlock for the mason jar. This allows gases to escape during fermentation without letting air in, preventing mold.
Secure the lid and place the jar in a cool, dark place for about two weeks.

Blending and Finishing
After two weeks, the peppers are ready for the next step:
Blending:
Remove the fermented peppers, tomatillos, and garlic from the jar and blend them with some of the brine. Adjust the amount of brine depending on the consistency you prefer for your sauce.
Run the blended mixture through a sieve to separate the liquid from the pulp.
Dry Spicy Pepper Seasoning:
Don’t throw away that pulp! I dehydrated it and then blended it into a fine powder to make a dry, spicy pepper seasoning.
The Result
The hot sauce turned out fantastic—spicy, tangy, with just the right amount of sweetness and depth of flavor. The dried pepper seasoning is a great addition to everything from popcorn to scrambled eggs.
Creating your own hot sauce is a great way to preserve your garden’s bounty and adds a personal touch to your meals. Plus, there’s nothing like the satisfaction of making something from scratch that’s bursting with the flavors you’ve nurtured from seed to sauce.

#gardening#hydroponics#containergrowing#growing#hot sauce#blackcobra#superkhi#f1mimi#fermentation#fermented foods#girl dad#fermented hot sauce
1 note
·
View note
Text
Introducing New Chickens to My Flock
Hello and welcome back to Just Facilitating Life! Today, I'm excited to share my journey of introducing new chickens to my backyard flock. It’s been a fulfilling experience, especially as I’ve found new energy and motivation since quitting drinking.
The Decision to Get Chickens
Back in March, I finally decided to get chickens. The idea of keeping chickens always intrigued me, but I never followed through with it. Years ago, I received a small coop from a friend, but it ended up stored in the garage unused. Eventually, I used the parts to create a window for a food booth I operate annually as a fundraiser for a youth service organization called the Optimist Club.
Getting Started
In March, with newfound energy from quitting drinking, I decided it was time to pursue my wish to keep chickens. I began researching online how to set up a coop and run for my small backyard. My goal was to give the chickens as much space as possible while keeping them safe from predators and allowing my dog to roam freely.
I purchased an aluminum pole run from Amazon, measuring 10x20 feet—plenty of room for a few chickens. Initially, I planned to get four chickens, which seemed manageable in this space.

Setting Up the Coop
I found a used Ecoflex chicken coop on OfferUp for $30—a fantastic deal. The coop is made of resin material, making it easy to move and clean. However, it is small, offering about 12 square feet, which is tight for four chickens (they recommend 4 square feet per chicken). Despite its size, the coop worked out great.
Choosing the Chickens
I got my hens delivered from a hatchery in Montana, which shipped them via US Mail (since FedEx and UPS do not ship livestock). I decided on some heritage breeds based on my research for looks and egg-laying ability. I wanted a mixed-colored egg basket and good chickens to be around my family. Here are the breeds I chose:
White Leghorn: Known for their excellent egg production and friendly nature, White Leghorns lay large white eggs and are very efficient layers.

Buff Orpington: Buff Orpingtons are friendly and good with families. They are reliable layers of brown eggs and have a beautiful golden color.

Ameraucana: These chickens lay blue eggs and are known for their beards and muffs, giving them a distinctive look. They are calm and docile.

Rhode Island Red: Rhode Island Reds are hardy and excellent layers of brown eggs. They have a deep red color and are known for their resilience.

They arrived as pullets, teenage chickens if you will. It took them about three weeks from arriving to start laying. They are great layers and give eggs just about every day.
Chicken Math is Real
Now that I’ve had the girls for about four months, I’ve come to find out the rumors about "chicken math" are true. It’s a form of math that multiplies chickens if you own them. First, it’s four chickens, next you have seven, then twelve, twenty, forty, and so on.
Adding to the Flock
So today, I found on a Facebook post that the semi-local feed barn happened to have some pullets. Since I was in the neighborhood, I thought I’d stop in and check them out. So here I am now, adding three more to my flock, bringing my chicken math total to seven. Here are the new additions:
Barred Plymouth Rock: Known for their black and white striped feathers, Barred Plymouth Rocks are friendly, hardy, and excellent layers of brown eggs.

Cuckoo Maran: These chickens have a similar feather pattern to the Barred Plymouth Rock but lay dark brown eggs, often referred to as "chocolate eggs."

Black Australorp: Black Australorps are known for their glossy black feathers and excellent egg-laying ability. They are calm and good with families.

They are a great addition, though they are trying to fit in with the flock. It will take some time as they are only 15 weeks old, and the older hens are making it known who is on top in the pecking order. It’s fascinating to observe their instincts and behavior.
Chicken Names and Logo Update
My daughter has named all the chickens, and I had to update my logo that I put on the eggs I give away to family and friends. The original flock consisted of:
Bertha the Buff Orpington
Snowy the White Leghorn
Chocolate the Rhode Island Red
America the Ameraucana
The new birds are:
Scorpio the Black Australorp
Oreo the Barred Plymouth Rock
Sky, a play off my daughter Skylar’s name, the baby of the bunch, the Cuckoo Maran

I’ll update once the new young hens have started laying. Until then, happy homesteading!
#backyard chickens#chickens#hens#whiteleghorn#bufforpington#rhodeislandred#blackaustralorp#barredrock#cuckoomaran#fresheggs#chickenmath#growing#gardening#hydroponics#urbanhomestead#citychickens
0 notes
Text


Harvesting Suyo Long Cucumber: From Decor to Delicious Summer Salad
Hello and welcome back to Just Facilitating Life! Today, I’m excited to share a delightful journey from garden to table. We’ll be harvesting a Suyo Long cucumber that has been gracing our restaurant’s decor and turning it into a refreshing cucumber salad, perfect for a hot summer day.
The History of Suyo Long Cucumber
Cucumbers were first domesticated in India over 3,000 years ago from a spined, bitter wild ancestor. The Suyo Long cucumber, believed to have been cultivated in China as early as 100 BCE, retains the spiny skin of its wild progenitor. This resilient variety thrives under heatwave and drought stress, producing multiple rounds of fruits.
Growing the Suyo Long Cucumber
I planted the Suyo Long cucumber about eight weeks ago from seed. Once it sprouted, I moved it into a Kratky jar, and at around four weeks, transferred it to a one-gallon bucket from Daiso, drilling a two-inch hole in the lid and placing the plant in a two-inch net pot. I set the nutrient solution to an EC of 2.3 and a pH of 6.0, ensuring optimal growth. It served as charming decor in our restaurant, perfectly aligning with our farm-to-table ethos.
Harvesting and Creating a Refreshing Salad
Today, I discovered a six-inch cucumber, perfect for a light summer dish. Given the hot weather, a cucumber salad was an ideal choice.
Ingredients:
1 Suyo Long cucumber
Salt
Lemon juice
Julianne watermelon radish (quick pickled)
Fresh cilantro
Asian microgreens
Pomegranate seeds
Instructions:
Prepare the Cucumber: Peel and cut the cucumber into sections, then lightly salt it.
Pickle the Radish: Quick pickle julienned watermelon radish.
Combine Ingredients: Mix the cucumber, pickled radish, and fresh cilantro.
Garnish and Serve: Top with Asian microgreens and pomegranate seeds.
The result is a perfect mix of flavors, ideal for a hot day.
Final Thoughts
Enjoying a dish made from produce you’ve grown yourself is incredibly satisfying. The Suyo Long cucumber adds a refreshing twist to this salad, making it a perfect summer treat. Stay tuned for more stories, tips, and recipes from my hydroponic gardening journey.
Until next time, happy growing and cooking!
1 note
·
View note
Text
Dealing with Failure in Hydroponic Gardening
Hello and welcome back to Just Facilitating Life! Today, I want to talk about something that’s an inevitable part of any journey: dealing with failure. My recent experience in hydroponic gardening has taught me valuable lessons that I want to share with you.
The Joy of Gardening
I've been back at this hobby of hydroponic gardening for about four months now. It’s been an incredible journey of learning new techniques and building systems. Nurturing my plants has become a source of peace and joy for me, especially after a long, exhausting day at work.
The Setback
However, a few days ago, I came home late after a particularly tough day. Lots of call-outs meant my workload had tripled, and I was looking forward to spending some time with my beloved plants. It was the hottest day of the year, and I knew the plants would have consumed a lot of water. But when I went outside, I found my strawberry plant, one of my heirloom tomatoes, okra, and some Swiss chard all wilted and almost dead-looking. I was pissed!
The Morning After
I went to bed upset, telling myself I’d deal with it in the morning. Unfortunately, my grumpy mood carried over. As I pulled the dead plants and tried to salvage what I could, my youngest daughter came outside. She sensed my frustration and asked what happened. I explained that I had messed up and that her favorite strawberry plant might not make it.
A Lesson in Perspective
To my surprise, she said, “Don’t worry, Daddy. You have another strawberry plant that’s still alive, and all the other plants and flowers back here make it look like a tropical island.” Her words cheered me up and made me realize the importance of focusing on progress rather than dwelling on mistakes or failures.
Embracing the Lessons
Failures are a natural part of the learning process, especially in gardening. Here’s what I’ve learned from this experience:
Expect the Unexpected: Plants can be unpredictable, especially in extreme weather. Always be prepared for surprises.
Stay Positive: Focus on what’s thriving rather than what’s not. There’s always something to be grateful for.
Learn and Adapt: Use failures as learning opportunities. Understand what went wrong and how you can prevent it in the future.
Find Joy in the Journey: Remember why you started gardening in the first place. Let the joy of nurturing plants keep you motivated.
Moving Forward
Today, I’m replacing the lost plants and continuing to care for the ones that survived. Gardening, like life, is about resilience and growth. I’m thankful for the lessons learned and the opportunity to share them with you.
Let’s embrace our mistakes, learn from them, and keep pressing on toward greater achievements. Until next time, happy growing!
0 notes
Text
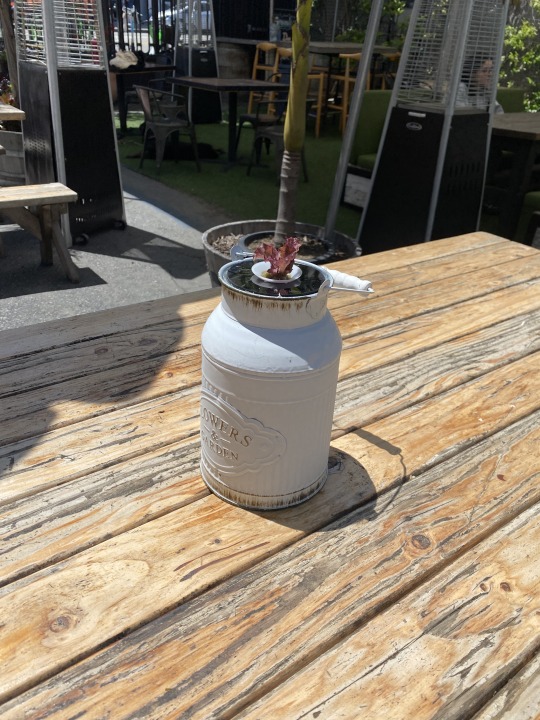
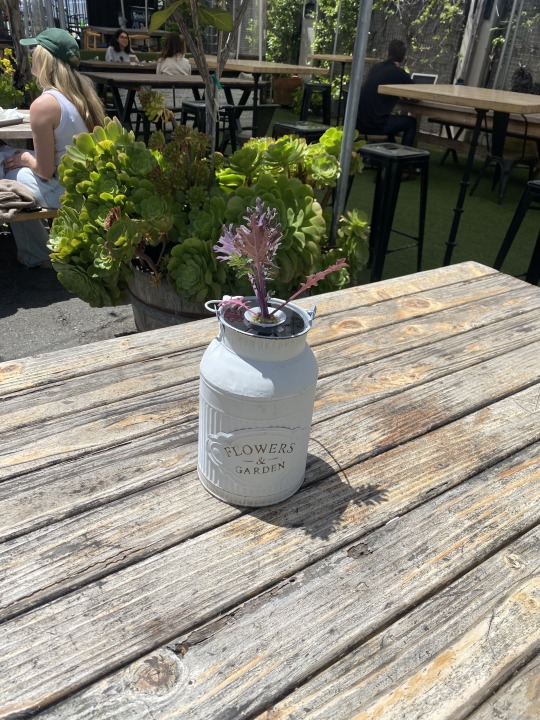
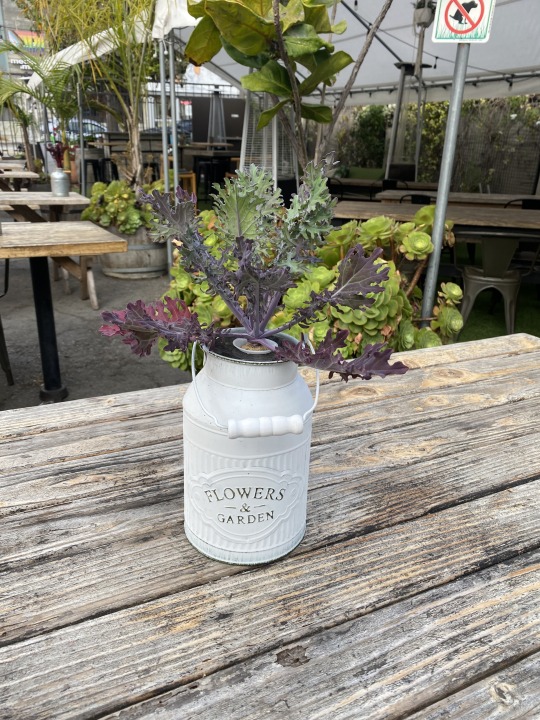
Small Container Veggies for Table Decor
Hello and welcome back to Just Facilitating Life! Today, I’m excited to share a creative and practical idea that blends my passion for gardening with my professional life as a restaurant manager.
Transforming Our Patio Space
Like many businesses, our restaurant had to adapt during the COVID-19 pandemic. One of our most significant changes was setting up a spacious and inviting outdoor patio. It looks fantastic, but I wanted to add a touch of decor that would align with our brand’s emphasis on fresh, healthy, and local food.
The Initial Idea: Flowers
My first thought was to adorn the tables with flowers. They’re beautiful and add a pleasant ambiance, but maintaining fresh flowers can be quite a task. Cut flowers would need replacing every few days, which seemed impractical.
The Epiphany: Edible Decor
Then it hit me—why not grow vegetables as table decor? It would perfectly complement our farm-to-table concept. But the challenge was to do it in small, aesthetically pleasing containers.
Experimenting with Mason Jars
Initially, I considered using mason jars for a hydroponic setup. However, mason jars require a covering to prevent algae growth in the nutrient solution, which didn’t fit the rustic look I envisioned.
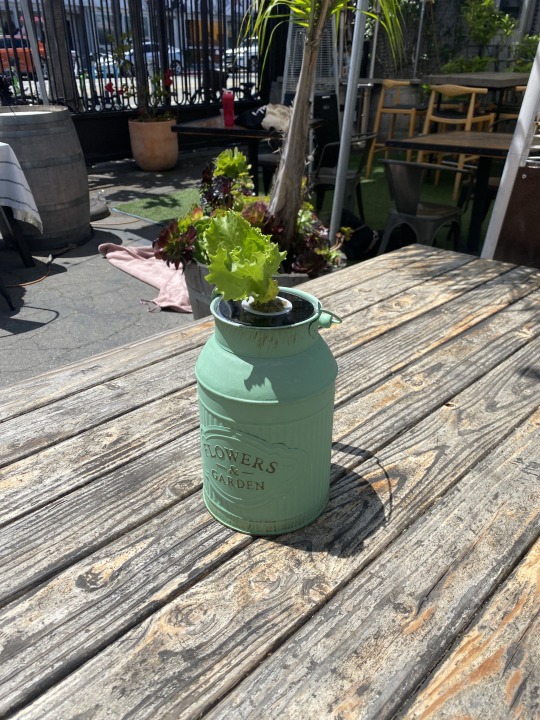
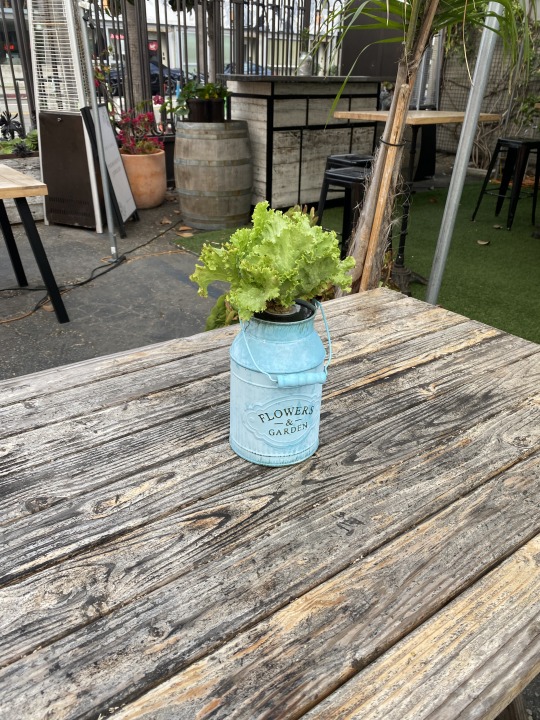
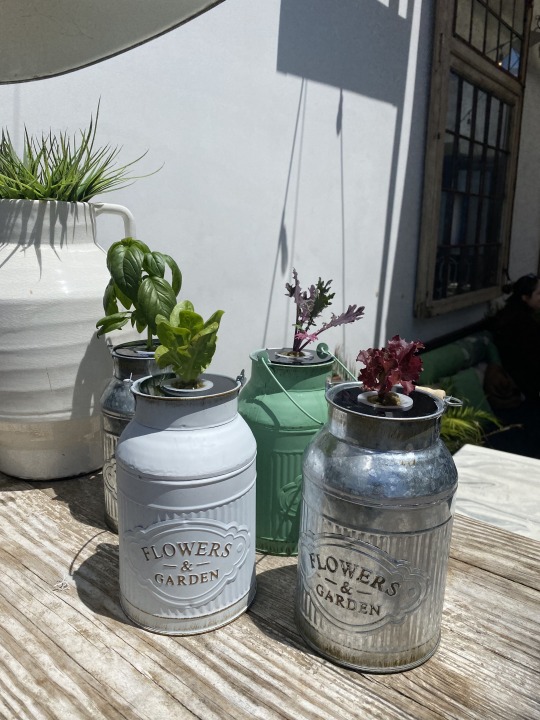
The Perfect Solution: Rustic Metal Milk Containers
A stroke of luck came when I visited a 99 cent store that was closing down. I found charming rustic metal milk containers labeled "Flower and Garden." They were perfect for our decor theme, and they were on sale! I bought every single one.
Overcoming the Leaky Containers
Excitedly, I brought them home, only to find that they leaked. Not ready to give up, I inserted food saver bags inside the containers, securing them with mason jar lid rings. This improvised solution worked perfectly, making the containers watertight.
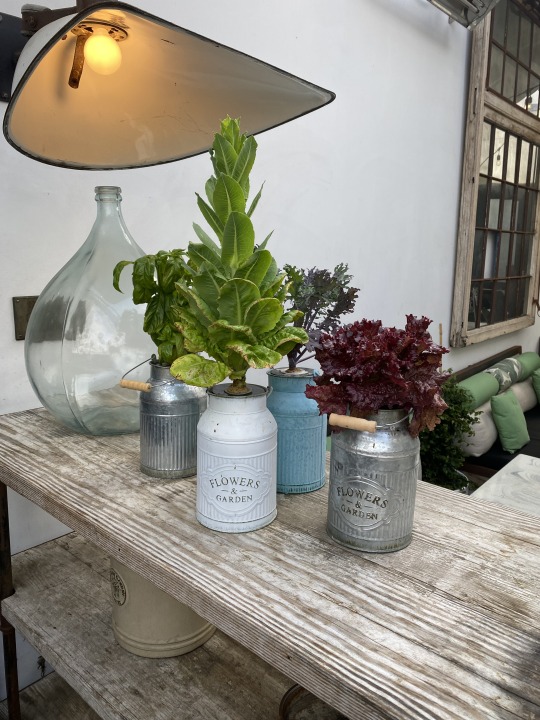
Planting the Seedlings
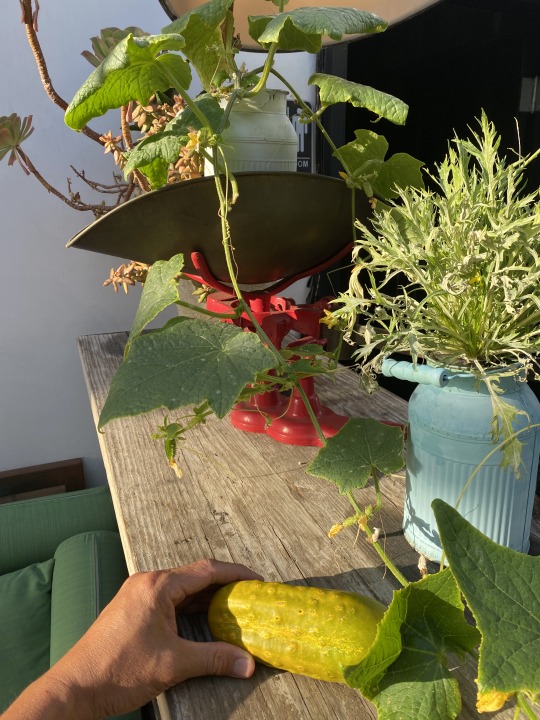
With my containers ready, I planted a mix of lettuce seedlings. The result was adorable table decor that grows right before your eyes. I also planted a cucumber and placed it on a shelf in our patio area. The cucumber thrived, even producing fruit! I left one on the vine a bit too long, and it started to turn yellow, but that just added to the charm.
The Kratky Method: Low Maintenance
For these setups, I used the Kratky method, a simple form of hydroponics that doesn’t require pumps or electricity. Once set up, I didn’t have to refill the nutrient solution for the entire six-week lifecycle of the lettuce. It was incredibly low maintenance.
Rotating the Crops
Today, I’m refreshing our decor by replacing the lettuce with bok choy, dwarf tomatoes, and ornamental Thai chili pepper seedlings. These new plants will not only enhance our patio’s aesthetic but also spark conversation among our guests about our commitment to fresh, local produce.
Final Thoughts
Creating these small container veggie displays has been a rewarding experience. It marries my passion for gardening with our restaurant’s ethos, providing a unique and sustainable touch to our outdoor dining space. I hope this inspires you to think creatively about how you can incorporate plants into your decor, whether at home or in your business.
Stay tuned for more gardening tips and stories from my journey. Until next time, happy growing!
9 notes
·
View notes
Text
Rediscovering the Joy of Growing: My Journey Back to Gardening
Hello and welcome to my very first post on “Just Facilitating Life” I’m thrilled to embark on this journey with you as I dive into the fascinating world of growing plants, raising backyard chickens, and nurturing my family. Today, I want to share the story of how I reignited my passion for gardening at the age of 46.
Childhood Facination
My love for plants began when I was a child. I remember the thrill of planting a seed and eagerly watching it grow through each stage—germination, sprouting, flowering, and fruiting. Every step felt like a tiny miracle. I tinkered with growing garden vegetables, fruits, and even experimented with cannabis, which taught me the technical aspects of cultivation.
The Pause and Rediscovery
Life, as it often does, took me on different paths. As the years went by, I drifted away from gardening. But six months ago, a significant change occurred: I quit drinking. Seeking a constructive way to keep my busy mind occupied, I found myself drawn back to the garden. The sense of peace and purpose I once felt returned with a newfound intensity.
Why Gardening?
Gardening is more than just a hobby for me; it’s a passion that fulfills several aspects of my life:
1. Mental Focus: It keeps my mind busy and engaged.
2. Connection with Nature: It allows me to connect deeply with the natural world.
3. Family Bonding: It provides a wonderful way to bond with my two daughters.
4. Personal Growth: It’s a metaphor for my own journey of growth and transformation.
Diving into Different Methods
I'm excited to explore and share various methods of plant cultivation:
- Hydroponics: Growing plants in water, which fascinates me with its efficiency and innovation.
- Organic Gardening: Embracing natural methods to nurture plants and soil.
- Aquaponics: Combining fish farming with plant cultivation for a sustainable ecosystem.
Growing More Than Plants
Beyond plants, I’m also passionate about raising backyard chickens. They not only provide fresh eggs but also teach my daughters about responsibility and the cycle of life.
My Goals with Just Facilitating Life
Through this blog, I hope to:
- Share Knowledge: Provide tips and insights on various growing techniques.
- Inspire Others: Encourage you to find your own passion for gardening or any other fulfilling activity.
- Document My Journey: Reflect on my progress and the lessons learned along the way.
Gardening has been a transformative experience, helping me grow in many ways. I’m excited to share this journey with you and hope it inspires you to cultivate your own patch of happiness, whether it’s in a garden, with your family, or within yourself.
Thank you for joining me on this adventure. Stay tuned for more posts about the wonders of growing life!
- Justin
2 notes
·
View notes