#Assessment2
Explore tagged Tumblr posts
Visit Tumblr Blog
Explore Tumblr blogs with no restrictions, modern design and the best experience.
Last Seen Tumblr Blogs


Fun Fact
In 2020, Tumblr had 29.4 million users in the US.
Text
Assignment 2
Submissions for assignment 2:


0 notes
Text
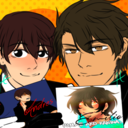
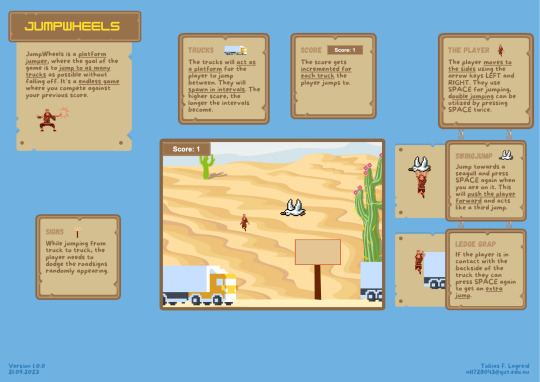
One-Sheet Final Design
I'm excited to share the one-sheet poster for my game, JumpWheels!
This poster is designed to give potential developers, publishers, investors, and other interested parties a quick overview of my game. It includes the title, a brief x-statement, defining details, three unique selling points, game art, and my contact information.
I'm really proud of how this poster turned out, and I think it's a great way to represent my game. Check out the poster below.

0 notes
Text


Assessment2 WIP - Flexible Week
Start modelling assets and consider what textures they could have for final rendering.
0 notes
Text
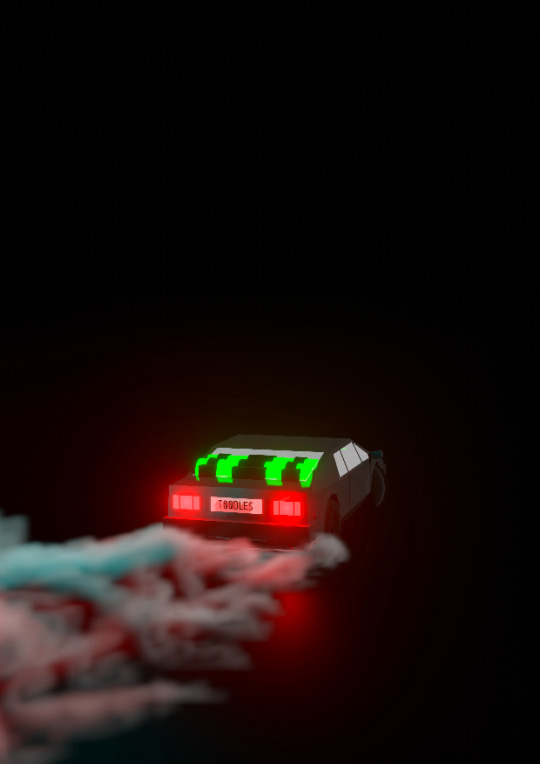
Assessment 2 Progress
Prototype Choice and Alterations
I have decided to use the “Get Gone” prototype as the basis for my Sell Sheet and One Page. I will tweak the idea slightly, however, with the power-up system being changed into a card based system; allowing for a more real world equivalent for the players to draw connections to. Aside from that, the prototype will not change much; with only additional levels and a more in depth difficulty curve being possible additions.
Progress on Overall Content
So far I have created a 3D Render to place in the background and planned out all of the content for the Sell Sheet and One Page and sketched out basic design ideas.
Here is the 3D Render:
1 note
·
View note
Photo


This reductionist artwork began at home with the assemblage task in week 7. In this task I arranged several chrome objects on top of each other in different styles before photographing them in monochrome. Originally I was inspired by Sigmar Polke’s 1982 simplistic work titled ‘Desastres und and ere bare Wunder’ consisting of chemically altered film to create metallic monochrome images of the reactions. I then selected the image of a mocha espresso on top of a garbage can from a birds eye view to be my subject matter as it reminded me of the works of Russian artist Kazamir Malevich’s minimalist paintings of shape’s. I then painted the image to focus on the shapes and create a reductionist work based on my photograph.
2 notes
·
View notes
Text
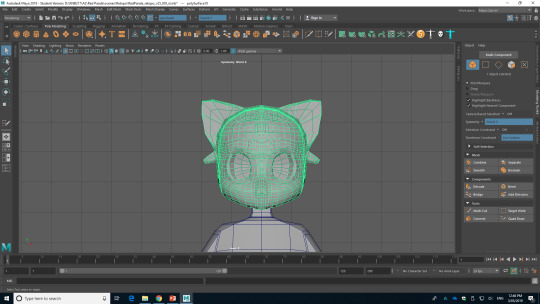
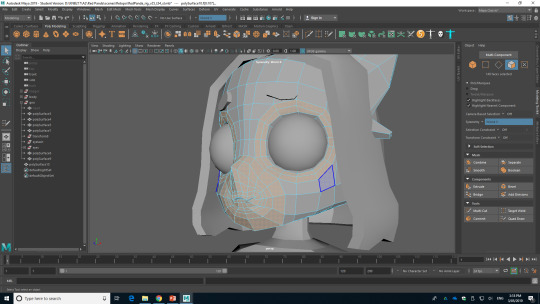
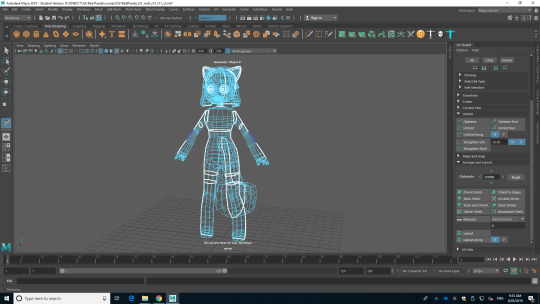
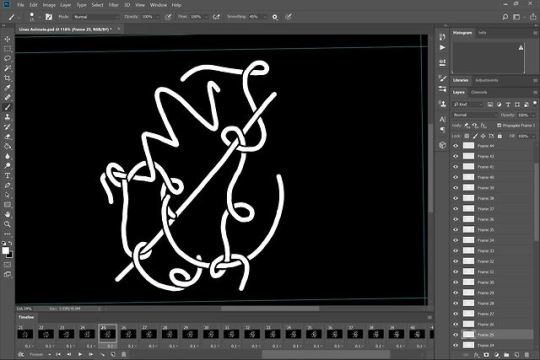
6. Retopology and UV unwrapping
Soojung Lee, n9667598

^ Figure 1: Finished
From the tutor’s comment, I better deleted the ribbon because it will make my job difficult and harder. I do not want to make my life difficult, but I hide the ribbon rather than delete because I want to keep this for the future my own exercise and practice.
As I finished with modelling and mirror the mesh to create perfect finished model, I have to work out the face loops to apply the face rig in the future, so, this is now the time to do the retopology on the face.
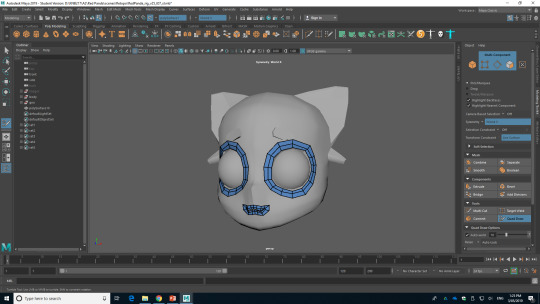
^ Figure 2: Tried retopology
I tried to do the retopology to the face using quad draw tool, but somehow, it was not working. I grab the faces to check is it working or not, but it was not working.
The problem in this was I follow the faces on the base mesh rather than create my own faces to creates the rings around the eyes, mouth and etc. Therefore, I started everything again.
^ Figure 3: Retry
To started again, I deleted what I have done and redo everything I have because starting from new is the best way to start rather than undo and fixing. I slowly review the YouTube tutorial video and follow all the steps.
I started drawing the ring around the eyes and mouth as a tutorial video.

^ Figure 4: Continue
I extruded the edges of the rings in Figure 5 and slowly cover the head mesh. As you can compare with Figure 2, this is now more looking right.
^ Figure 5: Final
After all these stressful processes, I finally figured out. As you can see in Figure 7, I can now select the rings around the eyes and mouth where I need to add the rig and animate for facial expressions, but I still cannot select the faces around the head. Actually, I realised I forgot to create the ring for the headline, which means I have to do it again.

^ Figure 6: Fix the eyes
Before redoing the retopology again, I realised that eyes are not looking right, so I fixed the position of the eyes to move inside and as I change the position of the eyes, I also moved the eye wholes position as well. Now I can redo the retopology again with updated face mesh.

^ Figure 7: New retopology
I was having a bit of trouble when I was doing retopology again because this was only the second time to do after the first one. The problem I was having was a similar problem I have in the first try. I can grab the rings, but I keep selecting the all around the head. I did lots of deleting, undo and redo again and again to figure out the shape and problems. Figure 7 is the result of all the practice. This is much better retopology compare to previous meshes because I have more rings around the eyes and I can select the headline, which was not possible in the previous retopology.
I was checking my retopology in Figure 7 with the tutors, it also had the problem that I need to fix, but this was the best retopology I have done by myself, so I have no idea how and what to fix because if I do it again, I was pretty sure it will not look very different with the previous one. Therefore, I asked for help and I had a consultation with one of the tutors to help me to understand how to do the retopology and what I need to do to get a better result. As always, before we started work, we went to the Pinterest site to find the reference images so I can understand easily.

^ Figure 8

^ Figure 9

^ Figure 10

^ Figure 11

^ Figure 12

^ Figure 13
^ Figure 14

^ Figure 15
They are all the researches we have done. We were focused on anime character head rather than real human face as my model is designed in anime character style. By looking at those various reference images, it helped me to understand what and how I need to retopology, but I still have a problem with building retopology myself. Therefore, he showed me how to do and what I need to be careful about.

^ Figure 16: Rework
This is the retopology I have done with his instructions and helps. He showed and told me that the faces need to be in similar size as much as possible except the eyes, mouth, nose and anywhere there need the detail. I did not know that the size of each face has to be in a similar size that's why all my previous retopology were not looking clean and nice as Figure 16. He also told me that I have to build the eyes, nose, mouth and headline first so I can have the rings for the face rigging. He also showed me how to figure out the five angels and various things I did not know, therefore, I was able to reach to the improved result compared to all the previous retopology.
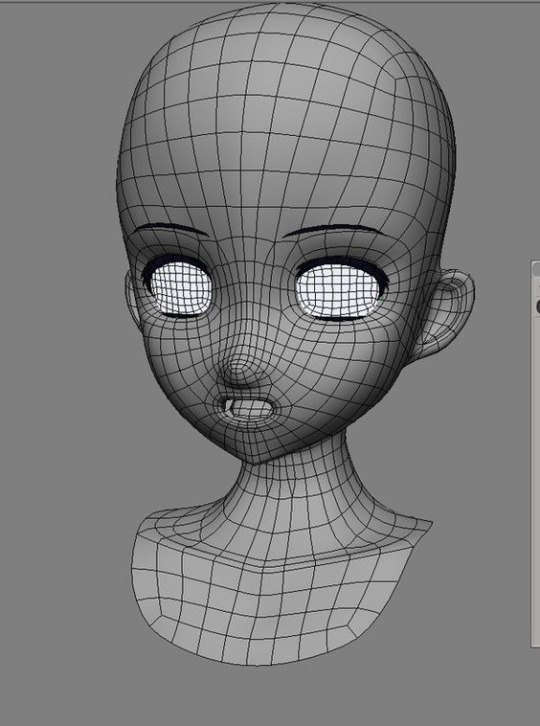
^ Figure 17: Final
This is the final looks of the mesh. I also told me to use soften edges if I want to soften looking model. I learnt various knowledge from him. He helped me and taught me the way to solve my problem and improve.
This was a seriously hard process. I did lots of mistakes and have various problems I could not solve. This was a really challenging process that I do not want to do it ever again, but I also want to try this again after this assessment finish.
I moved on to the UV unwrapping after finished with retopology.
^ Figure 18: Combine mesh
Before starting UV unwrapping, my meshes are separated, so I have to combine them to keep them as one mesh. When I combined them, I also have to move the pivot because sometime it goes to somewhere different rather than the centre of the grid and character. Now, I am ready to UV unwrap the character.

^ Figure 19: Start UV unwrapping

^ Figure 20: Unfold
It became like Figure 20 when I unfold the UV unwrap without doing any cut and saw process. This UV unwrap is not right, so I have to do the cut and saw process for texture and everything.
^ Figure 21: Cut and saw manually
This is the After I cut and saw the mesh. The white lines show where and how I cut.

^ Figure 22: Unfold and layout
When I was finished with cut ans saw process, I have to unfold the UV and layout automatically. However, as you can see in Figure 22, they layout randomly, which makes hard me to texture them.
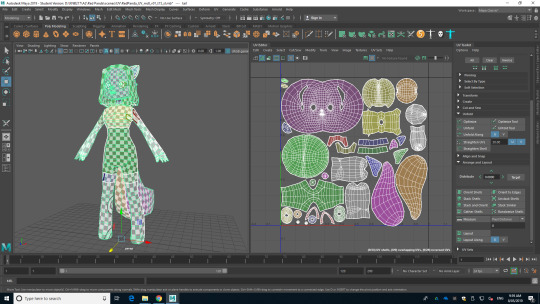
^ Figure 23: Clean up
Therefore, I moved on to layout them manually, and during this process, I also change its’ size to get similar size of the faces showing in left handside in Figure 23, so I will not have low and high resolution texture for each parts.
The UV unwrapping was not hard as I am used to UV unwrap, however, the retopology was the hardest process in this part. I have not done the retopology before and I was not fully understand the knowledge of how to build retopology. It was possible to improve until this level by getting help from tutor and the researches I have done.
Reference list
- FlippedNormals. (2018). Retopology for Beginners in Maya. Retrieved from https://www.youtube.com/watch?v=xpDWta5O3n8&list=LLmWZeSDkd1_mwsEKZ0Xs2Dw&index=4&t=0s
- Matthew Yourshaw. (2016). Maya Tutorial - Quad Draw Tool. Retrieved from https://www.youtube.com/watch?v=takFYSXDxzg&list=LLmWZeSDkd1_mwsEKZ0Xs2Dw&index=5&t=7s
- My Oh Maya. (2017). Maya 2017 Update 3: Quad Draw / Make Live Workflow. Retrieved from https://www.youtube.com/watch?v=edegRylKdzI&list=LLmWZeSDkd1_mwsEKZ0Xs2Dw&index=3&t=17s
- Next tot Education. (2018). Head Retopology in Maya Using Quad Draw Tool - Part 01. Retrieved from https://www.youtube.com/watch?v=MBJv_qLYmCo&list=LLmWZeSDkd1_mwsEKZ0Xs2Dw&index=2&t=170s
- RaveeCG Tutorials. (2016). EASY ZBRUSH - UV / UNWRAP - USING UV MASTER PLUGIN. Retrieved from https://www.youtube.com/watch?v=gQht6S7aWDg&feature=youtu.be
2 notes
·
View notes
Photo

Artist Research: Ana Mendieta - Untitled (Rape Scene), 1973
“I didn’t move. I stayed in position about an hour. It really jolted them.”
“Untitled (Rape Scene) is the documentation of an action that the artist performed in her apartment in Iowa City, while she was a student at the University of Iowa on the innovative Intermedia art course run by the German artist Hans Breder (born 1935). It was created in response to a brutal and highly publicised rape and murder of a nursing student, Sara Ann Otten, by another student in March 1973. The following month Mendieta invited her fellow students to her apartment where, through a door left purposefully ajar, they found her in the position recorded in this photograph, which recreated the scene as reported in the press.” - https://www.tate.org.uk/art/artworks/mendieta-untitled-rape-scene-t13355
This work is extremely confronting which I think is one of the most effective ways to send a message. I like the idea of doing a live “performance” and photographing or recording it.
46 notes
·
View notes
Photo


A twist on Sandra’s ADAD1002 Assessment2 final work on collaboration.
Rather than smooth connections and links to create a final product, collaboration my have pauses, glitches and challenges within the process of working together
@s-andoitchi2018
6 notes
·
View notes
Video
tumblr
Assessment 2 Final Work + Concept Statement
My final work is based on the constructed binary of Sound versus Music (which is slightly altered from my last assessments focus which was Sound versus Silence. Through the process of creating this work, I wanted to explore whether ‘random’, ‘everyday’ sounds are inherently musical or not and also to find the delineation between sound and song. I did this through recording a multitude of everyday sounds, manipulating them in different ways (explored below) and remixing them together to create a track of music. Alongside this, I videoed myself creating and recording the sounds and created a video collage as a kind of music video to examine this idea more.
The manipulation of the recorded samples was an interesting and learning process as I have not really done a lot of it before (In my sound works, I mainly work with MIDI rather than audio samples). It involved first taking the recorded stems out of Cubase, into Ableton Live, then cutting it to the point in each sample I was going to use. I then laid these out in a row (kind of like a sound bank) so I could figure out which sounds to use where and have them quickly accessible, visible and playable.

(The recording setup)

(Recorded Stems in Cubase)

(Samples laid out in Ableton Live)
Next, I started off with the squeaky sound - which was me rubbing a vinyl case against the table - as I pretty much already heard a rhythm out of the sound. After this, I warped the transients of the sample (the high amplitude, short-duration sounds at the beginning of a waveform) to get it in time and launched the rest of the song off that.

(Warping the waveforms of the vinyl squeak)
I altered each sample differently. For the more percussion based sounds (this ended up being the majority of the samples) I put filters on them and increased the resonance of a certain frequency within them. For example, for the sample which involved me flicking a tin was put into a drum rack and turned it into both a hi-hat and snare by using different filters and transposing two of the same sample in different ways.

(Drum rack and both a Midi arrangement and audio sample in Ableton Live)
For the more melodic-sounding samples, I pulled a singular hit from the recorded rhythm and pulled that sample into a sampler. What a sampler allows me to do is basically record midi data and play the sample in different keys and lengths, depending on what values I enter. However, within this process, I am still editing the frequencies and envelope as well; it just adds an extra element to the mix.

(The advanced sampler in Ableton Live with changes to frequency, resonance, and envelope along with the Midi Arrangement for the melodic lid drop)
The video element was a little bit tricky as I am not as versed in video editing as I am in sound editing. The process for each individual video was: first finding the corresponding sample in Ableton Live, finding which part of the sample I used, and then cutting the video down to a little bit before the hit (So you can see me create the sound/impact in the video rather than just the impact itself) and a little bit after. I then marked out where in the video the sound was created and then pressed the ‘m’ key in time with that particular sample to create markers to mark out where it would go within the timeline. In addition to this, for some clips I lined up the audio that was captured on my camera (as the audio I used in the music track was captured by a different mic), to the audio from my track to make the process a little bit easier. After this, I cropped at positioned all the recordings to create the collage.

(Markers and edits in Adobe Premiere Pro)
This process took a lot longer than I first anticipated purely due to the number of layers I ended up using. Even after finishing this task, I didn’t end up getting to include every recording I used in the video element as I just ran out of space and by the end of the video it was already a bit too cluttered.

(Editing in the DB07 Video Suite)
So after going through the process of researching what defines a sound and what defines music as well as creating a piece of music and video from said sounds, I have come to the conclusion that an everyday sound is not usually inherently musical. However, by changing the context of these noises and combining them in a rhythmic and melodic way, they can easily be considered music.
References
"3.1.3 Music vs. Noise - Digital Sound & Music". in , , 2014, <http://digitalsoundandmusic.com/3-1-3-music-vs-noise/> [accessed 15 September 2018].
"ANDREW HUANG". in , <https://www.youtube.com/channel/UCdcemy56JtVTrsFIOoqvV8g> [accessed 14 September 2018].
Anna, P, Silence in the forest. in , , 2017, <https://freesound.org/people/13F_Panska_Petruzelova_Anna/sounds/379210/> [accessed 8 September 2018].
Ball, P, "Why dissonant music strikes the wrong chord in the brain.". in nature, , 2012, <https://www.nature.com/news/why-dissonant-music-strikes-the-wrong-chord-in-the-brain-1.11791> [accessed 15 September 2018].
"Consonance and Dissonance". in , <http://www.avatar.com.au/courses/PPofM/consonance/con1.html> [accessed 16 September 2018].
Darman, N, "Noise vs. Music: It's All in the Physics! | Fiat Physica Blog.". in Fiatphysica, , 2015, <https://www.fiatphysica.com/blog/everyday-physics/physics-of-music-vs-noise/> [accessed 14 September 2018].
Elert, G, "Music & Noise – The Physics Hypertextbook.". in Physics.info, <https://physics.info/music/> [accessed 16 September 2018].
M., E, "Difference Between Noise and Music | Difference Between.". in Differencebetween.net, , 2011, <http://www.differencebetween.net/science/nature/difference-between-noise-and-music/> [accessed 15 September 2018].
Metcalfe-Davies, S, "The Reality and Truth of Existence – by Stephen Metcalfe-Davies | The Magic Happens (TMH).". in Themagichappensnow.com, , 2016, <http://themagichappensnow.com/the-reality-and-truth-of-existence/> [accessed 16 September 2018].
"Sound and Music : Overview : How Music Works". in , <http://www.howmusicworks.org/100/Sound-and-Music> [accessed 13 September 2018].
Stanford, N, "Cymatics.". in Nigelstanford.com, , 2014, <http://nigelstanford.com/Cymatics/Behind_the_Scenes.aspx> [accessed 16 September 2018].
Stanford, N, Cymatics: Chladni Plate - Sound, Vibration and Sand. in , , 2014, <https://www.youtube.com/watch?v=tFAcYruShow> [accessed 16 September 2018].
Stanford, N, CYMATICS: Science Vs. Music. in , , 2014, <https://www.youtube.com/watch?v=Q3oItpVa9fs> [accessed 16 September 2018].
6 notes
·
View notes
Video
tumblr
Nikayla Brown’s Artwork, THE PERFECT JUNKYARD (2018)
@nikayla1002
Art and design often explore relationships between humans and non-humans, the environment and ecology. How can contemporary art and design propose new possibilities for imagining the ‘human’ and the environment?
“We believe landfill and pollution exists in places faraway, in tiny remote places that have nothing to do with us. But in reality, a landfill sits in your very own room. It’s under your seats, inside your blankets, on your desk, waiting for you outside your door. Humans and the environment are not two separate things; they exist together.” - Nikayla Rose Brown
5 notes
·
View notes
Text
One-Page Final design
This One-Page is a poster-sized document that provides a high-level overview of my game. It includes the game title, date, and version; a gameplay design illustration; and any additional aspects needed to communicate to the developers what the game is. The One-Page is a valuable tool for team members to reference as they build and iterate upon the game. It helps to ensure that everyone is on the same page and that the game is developing in the desired direction.
0 notes
Photo
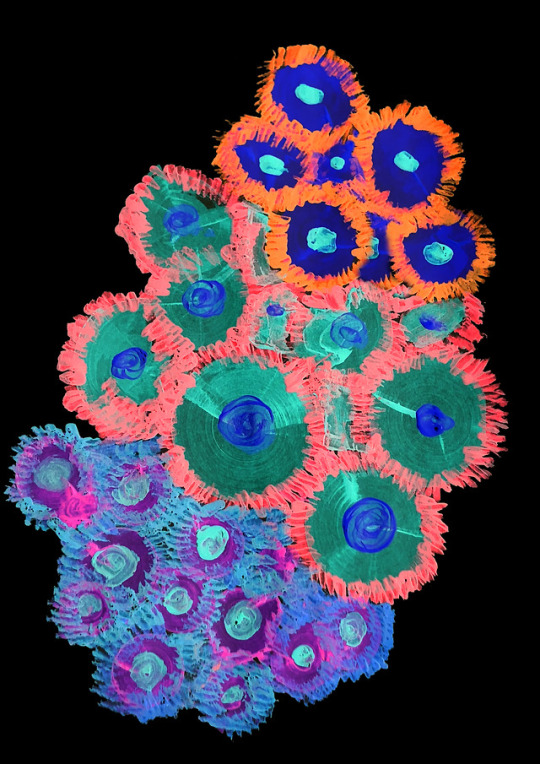
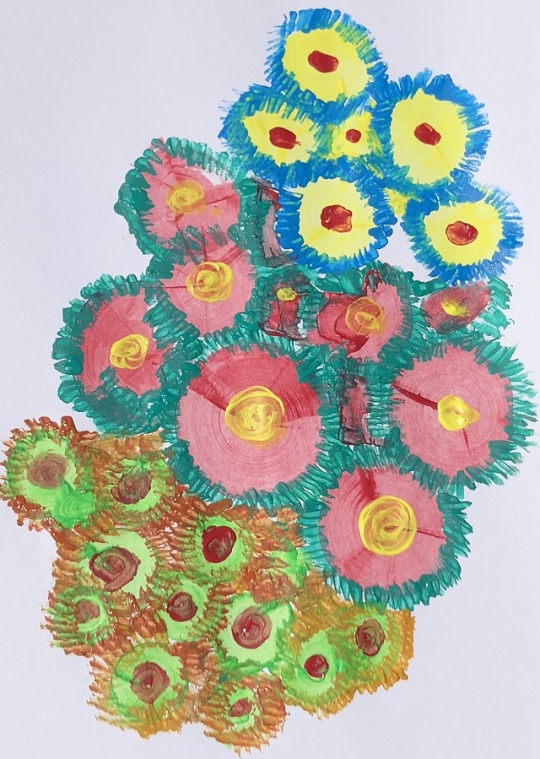

Experiment:
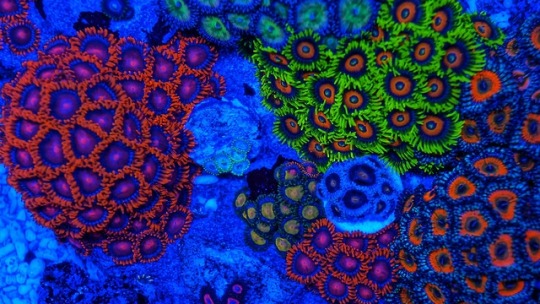
I wanted to explore bioluminescence within a marine environment by focusing on corals.
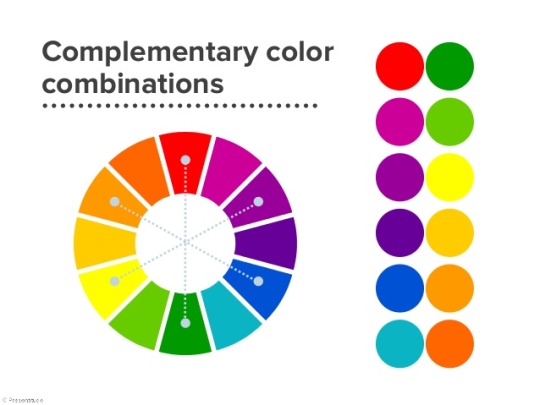
I found that bioluminescent corals contain interesting colours and patterns. The corals natural have complementary colours, for example the blue on the outside and the orange on the inside.
I used only acrylic paints and slithers of cardboard to create the corals. I dipped the cardboard into different colours and made a circle by using the cardboard like a compass. I then used the edge of the cardboard to add the texture around the circle.
The blue and yellow paint really effective when it was inverted and it resembled the corals.
I also experimented with combining everything together in one document. However I think the corals are very different to the markings made and if blended, should be the central aspect of the work.
5 notes
·
View notes
Photo

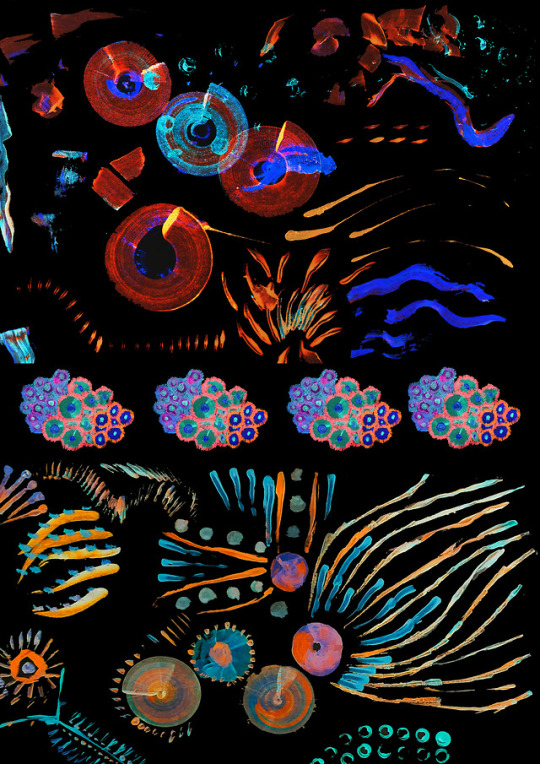
Experiment Three
This took way longer than expected!! I thought I would finish it in maybe two sittings, but no! SIX sittings (and 41 frames)! Therefore, this could be my final product - I do really like how it turned out anyway.
I have to admit, I was getting bored of it by the third session, so ended up only doing a little at a time, and I didn’t want to give up and leave it unfinished.
I decided to put this on a black background, as I felt it looked better and was easier on the eye. I also chose to redraw the entire composition for each frame because I like the ‘wiggly-ness’ it gives the animation, compared to a completely still composition which would feel a bit serious/not playful, especially with the black background. It makes it appear more ‘alive’.
I’m considering adding the quote from my poster, although that may take away from it this time, so might just title it with the quote.
4 notes
·
View notes
Text
Ass. 2 Work Concept - Underwater House
Today in class we looked at the concept of Value, including different types (monetary, social, historical, etc.) and how we each value things differently.
I did some more brainstorming (pictures still to come), and had an idea about making an underwater house concept to show a possible solution to the current real-world problem of not having enough housing in Sydney. This could either be a real model in some kind of tank filled with water, or maybe an image composited in Photoshop. Another spinoff idea I had was to put conceptual things representative of the home in an underwater environment like the house. These would show how we would have to start putting things we value (comfort, money, security, family, etc.) in a foreign environment and trust it in a new way.
After getting some feedback, it seemed that the conceptual option is much more rich and seems like a better plan for my final work (so I’m leaning towards that one but I’ll still keep my eyes open).
4 notes
·
View notes
Text
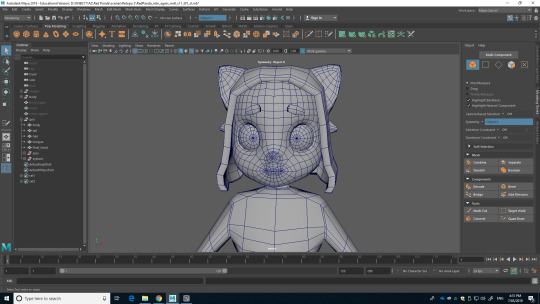
2. Character Design
Soojung Lee, n9667598
After I have done various researches on character drawing styles, I now started to design my own character to modelling for the second assessment.
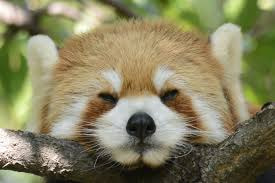
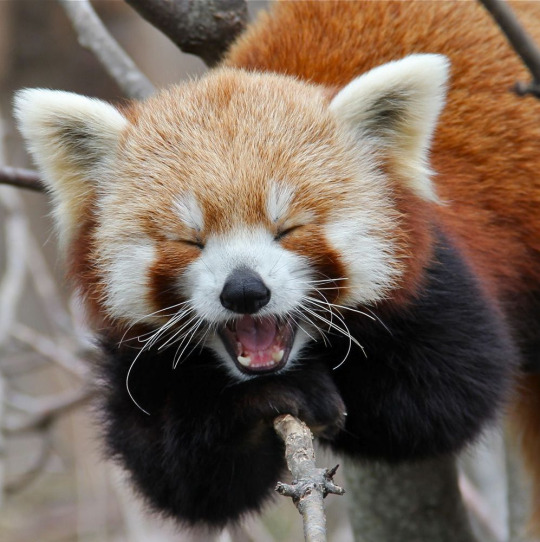
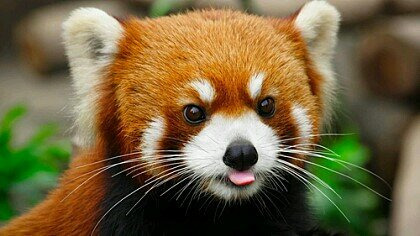
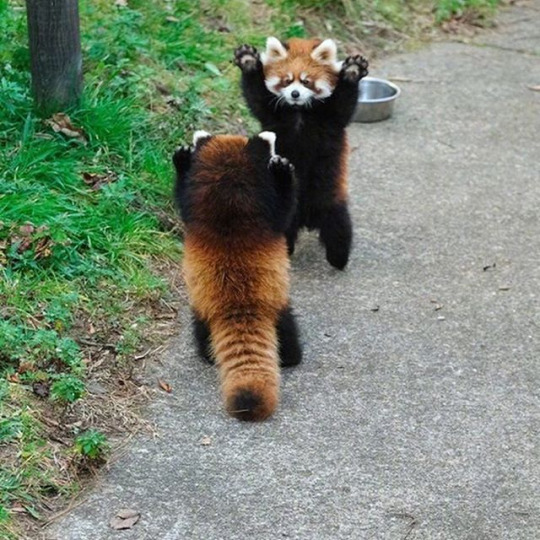
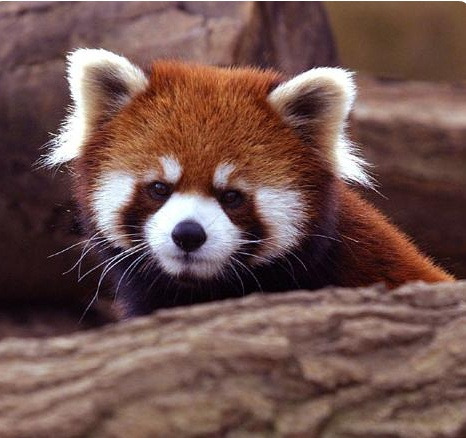
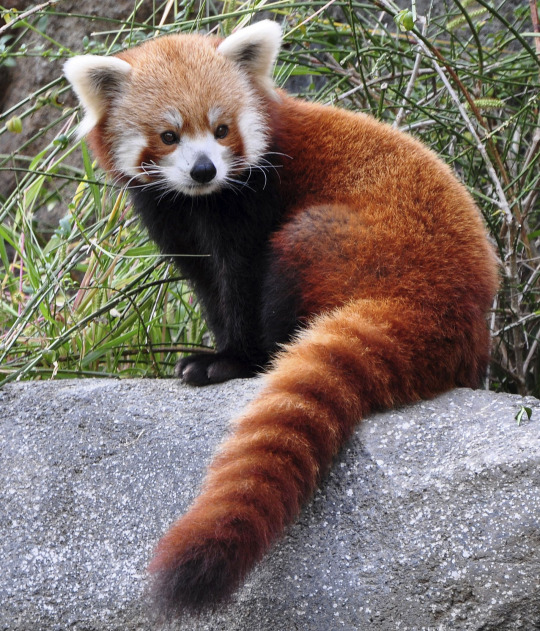
Firstly, I want to work on with anthropomorphism style because I personally think this is the easiest and interesting style to work on. I decided to anthropomorphism with red panda, therefore, I started to research about the red panda, so I can refer to my character.
I did not come up with red panda in the first place. The first animal I choose was the cat and dog, but I know they are too common. I want to work on something different from a common animal, therefore, I came up with red panda, which is cute and adorable animal.
^ Figure 1
^ Figure 2
^ Figure 3
^ Figure 4

^ Figure 5
^ Figure 6
^ Figure 7
Through those researches, I gather various points of the red panda. They have white triangle ears with some hair under the ear part, cute round tail, white circle colour top of the eyes which looks like eyebrows, cute colour and small and rounded body shape.
According to those points of the red panda, I got from the researches, I now started to sketch out my anthropomorphism style character of a red panda.
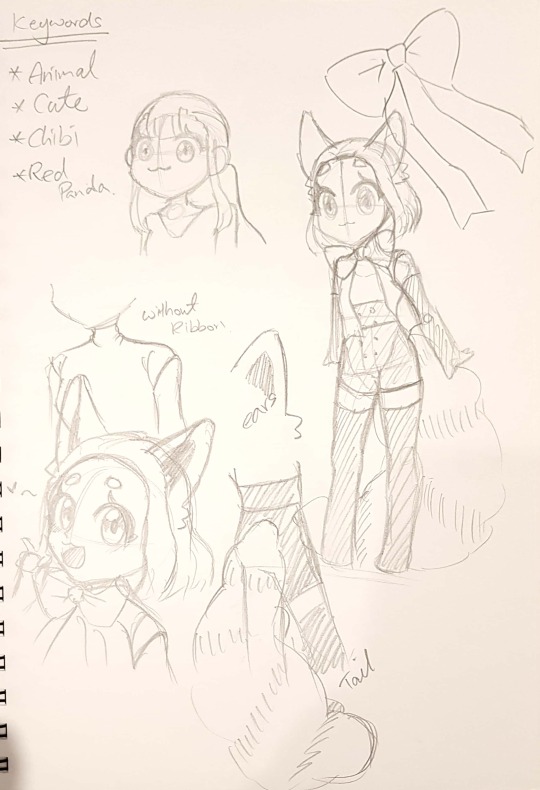
^ Figure 8

^ Figure 9
Figure 8 and 9 are showing the sketches I have done. As red panda has rounding and cute style, I decided to design with round and small type of character, which influenced by Figure 2 in the previous post called ‘1. Character design - Research’.
This character has red panda’s cute ears and tail. I decided to emphasise the tail because I think the tail is also one of the charming points of the red panda as the ears. In the first place, I was about to have normal eyebrows, but as I mentioned above, the red panda has white rounded colour on these eyes that looks like the eyebrows. Therefore, I decided to gave the same looking eyebrows to this character as well to emphasise the characteristic.
This character will have similar colour patterns and colour palette with red panda so it will have more red panda looking and feeling. Moreover, this character wears black gloves and stocking on the arms and legs because when you looking at Figure 1 to 8, all the red panda have black patterns on their arms and legs, so this design was done to represent this point.
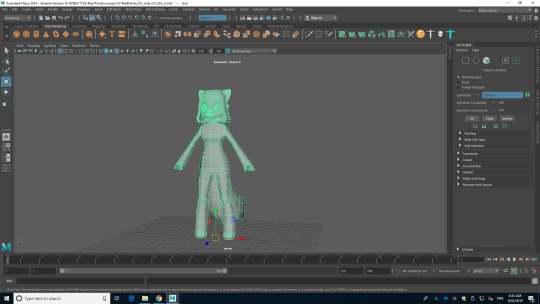
As now I finished with sketching out ideas and character design, this is time to move to digital and draw the character turnaround for 3D modelling.
1 note
·
View note