#ApplicationControl
Explore tagged Tumblr posts
Text
In Ruby on Rails, parameter designators typically refer to how parameters are permitted or sanitized within controller actions using strong parameters. Strong parameters help prevent mass assignment vulnerabilities by allowing you to specify which parameters are allowed to be used in your controller actions. The parameter designator syntax in Rails involves using the permit method within your controller to whitelist specific parameters. Here’s a basic example: class UsersController < ApplicationController def create @user = User.new(user_params) if @user.save # Handle successful creation else # Handle validation errors or other failures end end private def user_params params.require(:user).permit(:name, :email, :password) end end In this example: params.require(:user) specifies that the user parameter must be present in the request parameters. .permit(:name, :email, :password) specifies that only the name, email, and password parameters are allowed to be used when creating or updating a user. Any other parameters will be ignored. This is crucial for security because it prevents malicious users from injecting unexpected parameters into your application’s forms and potentially altering sensitive data. #AssignKeyLabelModifierProtocolModifierHull #MentionableActionable #ProtocolSoup
View On WordPress
#gemHaulLoader(SCHEME) .SCOPE. 1R2x.Z#PROTOCOL LAYER XR7.SCOPE.2SECOND ….//////(ChatR.modifier.RESOURCETREE).2x#Ruby
0 notes
Text
Endpoint Application Control
No permita que las aplicaciones maliciosas controlen sus puestos de trabajo
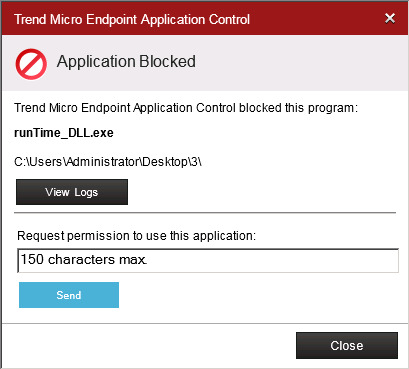
Proteja los puestos de trabajo frente al ejército de nuevas aplicaciones de software malicioso que se despliega cada día. Endpoint Application Control contribuye a salvaguardar sus datos y equipos informáticos frente al acceso no autorizado y los potenciales errores de los usuarios.
2 notes
·
View notes
Photo

Know exactly how your media and sales channels are performing. With OrderLogix, making analysis is more possible and easier to do. mediaattribution Visit us- orderlogix.com
0 notes
Text
Ruby on Rails API Development- Example of Rails API
When a developer says that they are using Rails as the API, it indicates that they are using Ruby on Rails Development to build the backend, which is shared between the web application and native applications. Let’s see how you can develop an API using RoR.
What is an API application?
Application Programming Interface, or API, allows complement to interact with one another. One can request from the Rails app to fetch information by providing URLs.
What is Ruby on Rails?
The best part about Ruby on Rails is that it is open-source software. Users can utilize Ruby on Rails to develop applications or collaborate to bring change to their code.

Example: Ruby on Rails API Development Steps
Step 1: API creation using Rails
To initiate the creation of an API, one must first write the below-written code in the terminal of any chosen directory. Using the code written below will create an API named secret_menu_api
$ rails new secret_menu_api –-api --database=postgresql
You must type the below-written code in the terminal to open the API menu.
$ cd secret_menu_api code
Step 2: Enabling CORS (Cross-Origin Resource Sharing)
CORS enables other people to access the API. To prevent other people from accessing the API, one can disable the CORS. To open the cors.rb file, you need to open the file explorer where the Rails API created now is present.
config > initializers > cors.rb
You must uncomment the lines and change the code from origins ‘example.com’ to origins’*’.
Rails.application.config.middleware.insert_before 0, Rack::Cors do allow do origins '*' resources '*', headers: :any, methods: [:get, :post, :put, :patch, :delete, :options, :head] end end
Open Gemfile by scrolling down from the explorer file. Uncomment gem ‘rack-cors’ in line number 26.
# in Gemfile gem ‘rack-cors’
Open the terminal and run
$ bundle install
Step 3: Create a Controller, Model along with a table with
$ rails g resource Post title description
After using the command, it will then generate the below-mentioned files.
Model [Post]:
app > models > post.rb
Controller:
app > controllers > posts_controller.rb
Route:
config > routes.rb
Database Migration Table:
db > migrate > 20230127064441_create_posts.rb
Step 4: Attributes of Post Model
Title of the post
Description of the post
Specifying attributes
Add the following Code into db > migrate > 20230127064441_create_posts.rb:
class CreatePosts < ActiveRecord::Migration[6.0] def change create_table :posts do |t| t.string :title t.text :description end end end
Migrating the table
$ rails db:migrate
If the data has been migrated successfully, then you will be able to see the following:
== 20230127064441 CreatePosts: migrating ============================= -- create_table(:posts) -> 0.0022s == 20230127064441 CreatePosts: migrated (0.0014s) ====================
Step 5: Defining display, index, destroy, update, and create actions.
Here are the implications of the actions:
Index: It will display all the posts present in the database.
Show: It will display the specific(given as an id) post.
Create: It will make the post’s instance.
Update: It will update the post-item instance.
Delete: It will delete specific post items.
Now copy and then paste the below code in secret_menu_intems_controller.rb.
Now let’s write API magic over here.
app > controllers > posts_controller.rb
class PostsController < ApplicationController def index posts = Post.all render json: posts, status: 200 end
def show post = post.find_by(id: params[:id]) if post render json: post, status: 200 else render json: { error: “Post Not Found” } end end def create post = Post.new( title: params[:title], description: params[:description] ) if post.save render json: post else render json: { error: “Error on creating a record” } end end
def update post = Post.find_by(id: params[:id]) post.update( title: params[:title], description: params[:description] ) render json: {message: “#{post.title} has been updated!”, status: 200} end
def destroy post = Post.find_by(id: params[:id]) if post post.destroy render json: “#{post.title} has been deleted!” else render json: { error: “Post Not Found” } end end end
Step 6: Creating routes for index, create, show, delete, and update actions.
Routes receive HTTP requests that come from the client side. We have to forward it using the correct actions. To configure the route, copy the following code and paste it into the route.rb.
# config > routes.rb
Rails.application.routes.draw do resources :posts, only: [:index, :show, :create, :update, :destroy] end
Step 7: Seeding the data
Now in the database, create secret menu item instances.
# db > seed.rb
post1 = Post.create(title: "Better way to improve Ruby on Rails coding", description:"Lorem Ipsum is simply dummy text of the printing and typesetting industry.")
post2 = Post.create(title: "perfect Combination of Angular + Ruby on Rails", menu_description:"Lorem Ipsum is simply dummy text of the printing and typesetting industry.")
Seeding the data
$ rails db:seed
Verify if seeding was correctly done:
$ rails c
# It will now show a console
2.6.1 :002 >
Now you can extract all the instances of secret menu items by typing SecretMenuItem.all
2.6.1 :002 > Post.all Post Load (0.1ms) SELECT "secret_menu_items".* FROM "posts"
=> #<ActiveRecord::Relation [#<Post id: 1, title: "Better way to improve Ruby on Rails coding", description:"Lorem Ipsum is simply dummy text of the printing and typesetting industry.">, #< Post id: 2, title: "perfect Combination of Angular + Ruby on Rails", menu_description:"Lorem Ipsum is simply dummy text of the printing and typesetting industry.">]>
If all the instances are visible, then the seeding was done correctly.
Check Your Magic
- Start rails server.
- Go to your preferred browser(Or you can check into POSTMAN also).
- Pass the following line into the browser URL
Conclusion
The digital world is becoming more and more API-driven, and API development is the prime need for effective and faster digitization. Developing APIs in Ruby on Rails is the first choice for businesses as it not just creates faster APIs but also in a secure and scalable way.
Being one of the top Ruby on Rails development company, our RoR developers develops APIs for our customers from various industry segments.
Feel free to get in touch with us to explore new ways and possibilities with API and RoR Development.
Note: This Post Was First Published on https://essencesolusoft.com/blog/ruby-on-rails-ror-api-development
0 notes
Text
Configure a Rails API to use cookies
Since cookies are such an important part of most web applications, Rails has excellent support for cookies and sessions baked in. Unfortunately for us, when you create a new application in API mode with rails new appname --api, the code needed for working with sessions and cookies in the controller is excluded by default.
To add session and cookie support back in, we need to update our application's configuration in the config/application.rb file:

This will add in the necessary middleware for working with sessions and cookies in our application.
The last line adds some additional security to our cookies by also configuring the SameSite policy for our cookies as strict, which means that the browser will only send these cookies in requests to websites that are on the same domain. This is a relatively new feature, but an important one for security!
To access the cookies hash in our controllers, we also need to include the ActionController::Cookies module in our ApplicationController:

Since all of our controllers inherit from ApplicationController, adding this module here means all of our controllers will be able to work with cookies.
this material was taken from learnco curriculum, I didnt write this page
0 notes
Text
Sinatra & Routing: Smashing!
What is Sinatra?
Sinatra is a simple and easy-to-use framework in Ruby that helps users create web based applications. A huge benefit of using Sinatra is that it can run a temporary server to host our project!
This blog will primarily be a basic guide, illustrating how to set up Sinatra, and using CRUD w Active Record and Sinatra. Once you have everything set up, routing through Sinatra is pain-free and super convenient! Let's get started!
Firstly, we need to gain access to Sinatra. Let's add this code to our Gemfile and run bundle install (or just bundle).

This will install all of the information we need to use Sinatra inside of a new file called Gemfile.lock. Inside you will see a bunch of code referencing rack - this doesn't really matter to us at the moment - just know that Sinatra is using rack under the hood to make our lives easier!
Next, If you don't already have a application_controller file, please make one. In this file we will be setting up our routes and what we will be doing in each route.

We will make a class and call it ApplicationController and inherit Sinatra from the ruby gem using < Sinatra::Base. This will give us access to all of the base methods from Sinatra for us to use later. Also, we have to set our default content type to json.
In Sinatra we declare our routes using methods. For this example we will start with a get request method. Start with your get method (get), then write the specific route address you would like to visit, followed by do. Usually landing pages are designated with the '/' route.

Here we are visiting https://localhost:9292/pokemon and our browser should show 10 of our pokemon from our database in name order. You need to enter Rake Server for the server to host your route.

Cool! We've displayed our pokemon... but what if we encounter a new pokemon and want to add it to our record (a pokedex). To add new data to our database we need to make a post request.
Our code should look similar to our previous get request. It should start with post, include our route, and do because it's a method.
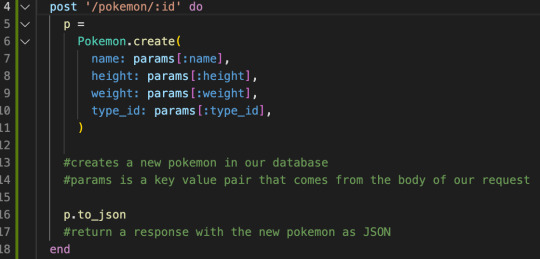
First we are using the same route and referencing the specific ID of the Pokemon we want to create here after a new slash. This indicates a new page from our previous get request.
Inside of this method we created a variable that creates a new Pokemon from the Pokemon class. Inside of the parenthesis, we are references params which are our values we are passing down from our tables. When referencing a specific value from your params you need to put it inside of brackets like so [:name]. As with all our routing methods we will return the new Pokemon to JSON p.to_json so that we can return a response and communicate with the backend.
We have added a new Pokemon to our database!

OOOPS! Looks like we made a mistake ...
Clearly Nigel doesn't belong in our Pokedex, so we need to find a way to delete his information from our database. As you may have already suspected, to accomplish this task we are going to use a delete request.
Try this one out for yourself!
...
Hopefully you had no trouble with this method!
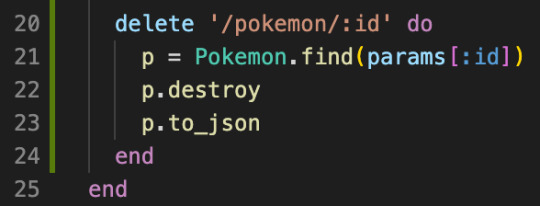
After navigating to our postman we should enter the URL with Nigel's specific id. Breaking down our code:
We are finding Nigel's id through our params and assigning it = P. Once his id has been found we are going to use .destroy on p which deletes that "Pokemon" entirely from our database. And as always, we return a JSON response to show us the specific data that has been destroyed.

Great! Nigel is no longer a Pokemon in our database!
He must have been in disguise during one of his adventures and mistaken as a Pokemon...

You should now be able to use CRUD methods using Sinatra in combination with Active Record. Try adding a new Pokemon to our database and using a Patch request to change its information.
Thank you for reading!

0 notes
Photo
Rails2.7 Rails6 Docker React環境でシンプルCRUD実装 https://ift.tt/2UykrYB
streampackのminsuです。 以前の記事で Docker + Rails + React の環境構築を行いindexページの表示まで行ったのでCRUD機能を追加します。 ですが期間も空いているため、折角なので以前の環境であ��
Rails 5.1.4
Ruby 2.4.1
mysql 5.7
ではなく、新しい環境��作り直します。
最新版確認 https://rubygems.org/gems/rails https://www.ruby-lang.org/ja/downloads
作成環境
Rails 6.0.2
Ruby 2.7
mysql 5.7
ファイルの用意
Gemfile Gemfile.lock Dockerfile docker-compose.yml を作成します。
Gemfile
source "https://rubygems.org" gem "rails", "6.0.2"
Gemfile.lock
FROM ruby:2.7.0 RUN apt-get update -qq && \ apt-get install -y \ nodejs \ build-essential RUN apt-get update && apt-get install -y curl apt-transport-https wget && \ curl -sS https://dl.yarnpkg.com/debian/pubkey.gpg | apt-key add - && \ echo "deb https://dl.yarnpkg.com/debian/ stable main" | tee /etc/apt/sources.list.d/yarn.list && \ apt-get update && apt-get install -y yarn RUN mkdir /app WORKDIR /app ADD Gemfile* /app/ RUN bundle install -j4 --retry 3 ADD . /app WORKDIR /app CMD ["bundle", "exec", "puma", "-C", "config/puma.rb"]
docker-compose.yml
version: '3' services: db: image: mysql:5.7 command: mysqld --character-set-server=utf8 --collation-server=utf8_unicode_ci ports: - "4306:3306" environment: - MYSQL_ROOT_PASSWORD=root volumes: - mysql_vol:/var/lib/mysql app: build: . command: /bin/sh -c "rm -f /app/tmp/pids/server.pid && bundle exec rails s -p 3000 -b '0.0.0.0'" volumes: - .:/app ports: - "3000:3000" depends_on: - db volumes: mysql_vol:
rails app作成
rails new
rails new を行います。
$ docker-compose run app rails new . --force --database=mysql
db設定を変更します。
database.yml
username: root password: root #docker-compose.ymlのMYSQL_ROOT_PASSWORD host: db #docker-compose.ymlのサービス名
今回も gem react-railsを利用するのでGemfileに追記します。
Gemfile
gem 'react-rails'
再度 build して
$ docker-compose build
reactを使うので下記コマンドを実行
$ docker-compose run app rails webpacker:install $ docker-compose run app rails webpacker:install:react $ docker-compose run app rails generate react:install
model 作成
$ docker-compose run app rails g model List title:string description:string $ docker-compose run app rails db:create $ docker-compose run app rails db:migrate
かなりの数の warning 出てきた。 Ruby 2.7.0に対応していないgemが存在することに起因しているようで非表示にすることもできる* が必要なwarningも見逃す可能性があるのでスルーすることにする。 *bash_profileにexport RUBYOPT='-W:no-deprecated -W:no-experimental'を追加
controller 作成
lists controller と view を作成
$ docker-compose exec app rails g controller Lists index
lists_controller.rb
class ListsController < ApplicationController def index @lists = List.all end end
index.html.erb
<%= react_component 'ListsIndex', lists: @lists %>
react_component タグを用いてreactを呼び出します。
react file 作成
viewから呼び出すreact fileを実装していきます。
$ rails g react:component ListsIndex
コマンドで app/javascript/components/ListsIndex.js が作成されるので編集します。
ListsIndex.js
import React from "react" import PropTypes from "prop-types" export default class Lists extends React.Component { constructor(props){ super(props) this.state = { lists: [] }; } componentDidMount(){ this.setState({ lists: this.props.lists }) } render () { return ( <div> <table> <thead> <tr> <th>ID</th> <th>Title</th> <th>Description</th> </tr> </thead> <tbody> {this.state.lists.map((list) => { return ( <tr key={list.id}> <td>{list.id}</td> <td>{list.title}</td> <td>{list.description}</td> </tr> ); })} </tbody> </table> </div> ); } }
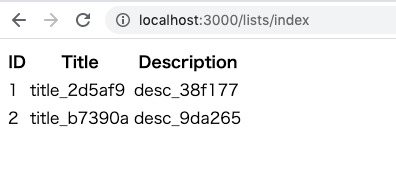
動作確認
List モデルに適当な値を保存して動作確認をしてみます。

無事に一覧が表示されました。
simple CRUD の実装
railsにapiを追加します。 apiで行うアクションは index, create, update, destroy です。
/api/v1/xxxでアクセスできるようにrouteを設定し、controllerを追加します。
routes.rb
Rails.application.routes.draw do get 'lists/index' namespace :api do namespace :v1 do resources :lists, only: [:index, :create, :update, :destroy] end end end
app/controllsers/api/v1/lists_controllser.rb
class Api::V1::ListsController < ApplicationController protect_from_forgery with: :null_session def index render json: List.all end def create list = List.create(list_params) render json: list end def update list = List.find(params[:id]) list.update(list_params) render json: list end def destroy List.destroy(params[:id]) end private def list_params params.require(:list).permit(:id, :title, :description) end end
controllerには基本的なメソッド、そしてprotect_from_forgery with: :null_sessionを記述しました。
http://localhost:3000/api/v1/listsでindexが呼び出されリストが取得できるはずです。
index
reactからapiを利用してlists を取得します。 componentDidMountを書き換えます。
ListsIndex.js
componentDidMount(){ this.getIndex(); } getIndex(){ fetch('/api/v1/lists.json') .then((response) => {return response.json()}) .then((data) => {this.setState({ lists: data }) }); }
delete
delete機能を実装します。 ボタンを追加
return ( <div> <div>this is list</div> <table> <thead> <tr> <th>ID</th> <th>Title</th> <th>Description</th> <th>function</th> </tr> </thead> <tbody> {this.state.lists.map((list) => { return ( <tr key={list.id}> <td>{list.id}</td> <td>{list.title}</td> <td>{list.description}</td> <td> <button onClick={() => this.handleDelete(list.id)}>delete</button> </td> </tr> ); })} </tbody> </table> </div> );
ボタンから呼び出されるhandleDeleteを実装します。
handleDelete(id){ fetch(`http://localhost:3000/api/v1/lists/${id}`, { method: 'DELETE', headers: { 'Content-Type': 'application/json' } }) .then((response) => { console.log('List was deleted'); this.deleteList(id); }) } deleteList(id){ let lists = this.state.lists.filter((list) => list.id != id) this.setState({ lists: lists }) }
apiでのdestroyだけではstateの値は変わらないので、画面は更新されません。 そのためdeleteListにてstateの値を変更しています。
constructorに下記も追記します。
constructor(props){ ... this.getIndex = this.getIndex.bind(this); this.handleDelete = this.handleDelete.bind(this); this.deleteList = this.deleteList.bind(this); }
画面を確認すると deleteボタンが追加されており、要素の削除が行えます。
create
要素追加のformを作成します。 stateにてformの値を管理するために下記のように追記します。
constructor(props){ super(props) this.state = { // lists: this.props.lists lists: [], form: { title: "", description: "", } }; ...
各inpuフォームとaddボタンを追加
return ( <div> <div>this is list</div> <table> <thead> <tr> <th>ID</th> <th>Title</th> <th>Description</th> <th>function</th> </tr> </thead> <tbody> {this.state.lists.map((list) => { return ( <tr key={list.id}> <td>{list.id}</td> <td>{list.title}</td> <td>{list.description}</td> <td> <button onClick={() => this.handleDelete(list.id)}>delete</button> </td> </tr> ); })} <tr> <td></td> <td><input type="text" value={this.state.form.title} onChange={e=>this.handleChange(e,'title')} /></td> <td><input type="text" value={this.state.form.description} onChange={e=>this.handleChange(e,'description')} /></td> <td><button onClick={() => this.handleCreate()}>add</button></td> </tr> </tbody> </table> </div> ); }
ここで利用するhandleChangeとhandleCreateを実装します。 handleChangeではinputフォームの入力値をstateにて管理させています。
handleChange(e,key){ let target = e.target; let value = target.value; let form = this.state.form; form[key] = value; this.setState({ form: form }); }
handleCreateではapiのcreateメソッドを呼び出して要素の追加を行います。 追加後はstateのlistsの更新と inputフォームの値のリセットを行なっています。
handleCreate(){ let body = JSON.stringify({ list: { title: this.state.form.title, description: this.state.form.description } }) fetch('http://localhost:3000/api/v1/lists', { method: 'POST', headers: { 'Content-Type': 'application/json' }, body: body, }) .then((response) => {return response.json()}) .then((list)=>{ this.addList(list); this.formReset(); }) } addList(list){ this.setState({ lists: this.state.lists.concat(list) }) } formReset(){ this.setState({ form:{ title: "", description: "" } }) }
constructorに下記を追記
this.handleChange = this.handleChange.bind(this); this.addList = this.addList.bind(this); this.formReset = this.formReset.bind(this);
画面を確認するとcreate用のinputフォームが追加され、addボタンのクリックにより要素の追加を行えます。
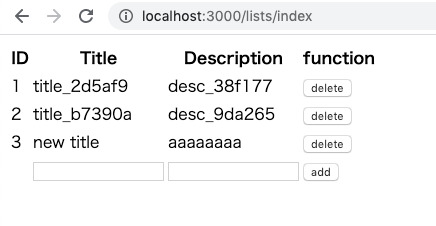
完成したListIndex.js
ListIndex.js
import React from "react" import PropTypes from "prop-types" class ListsIndex extends React.Component { constructor(props){ super(props) this.state = { // lists: this.props.lists lists: [], form: { title: "", description: "", } }; this.getIndex = this.getIndex.bind(this); this.handleDelete = this.handleDelete.bind(this); this.deleteList = this.deleteList.bind(this); this.handleChange = this.handleChange.bind(this); this.addList = this.addList.bind(this); this.formReset = this.formReset.bind(this); } componentDidMount(){ this.getIndex(); } getIndex(){ fetch('/api/v1/lists.json') .then((response) => {return response.json()}) .then((data) => {this.setState({ lists: data }) }); } handleDelete(id){ fetch(`http://localhost:3000/api/v1/lists/${id}`, { method: 'DELETE', headers: { 'Content-Type': 'application/json' } }) .then((response) => { console.log('List was deleted'); this.deleteList(id); }) } deleteList(id){ let lists = this.state.lists.filter((list) => list.id != id) this.setState({ lists: lists }) } handleChange(e,key){ let target = e.target; let value = target.value; let form = this.state.form; form[key] = value; this.setState({ form: form }); } handleCreate(){ let body = JSON.stringify({ list: { title: this.state.form.title, description: this.state.form.description } }) fetch('http://localhost:3000/api/v1/lists', { method: 'POST', headers: { 'Content-Type': 'application/json' }, body: body, }) .then((response) => {return response.json()}) .then((list)=>{ this.addList(list); this.formReset(); }) } addList(list){ this.setState({ lists: this.state.lists.concat(list) }) } formReset(){ this.setState({ form:{ title: "", description: "" } }) } render () { return ( <div> <table> <thead> <tr> <th>ID</th> <th>Title</th> <th>Description</th> <th>function</th> </tr> </thead> <tbody> {this.state.lists.map((list) => { return ( <tr key={list.id}> <td>{list.id}</td> <td>{list.title}</td> <td>{list.description}</td> <td> <button onClick={() => this.handleDelete(list.id)}>delete</button> </td> </tr> ); })} <tr> <td></td> <td><input type="text" value={this.state.form.title} onChange={e=>this.handleChange(e,'title')} /></td> <td><input type="text" value={this.state.form.description} onChange={e=>this.handleChange(e,'description')} /></td> <td><button onClick={() => this.handleCreate()}>add</button></td> </tr> </tbody> </table> </div> ); } } export default ListsIndex
まとめ
Ruby2.7, Rails6 Docker react での環境構築 reactからのrails api利用の実装を行いました。 自分用のまとめですが、誰かの助けとなれば幸いです。
元記事はこちら
「Rails2.7 Rails6 Docker React環境でシンプルCRUD実装」
March 31, 2020 at 02:00PM
0 notes
Text
300+ TOP Ruby on Rails Interview Questions and Answers
Ruby on Rails Interview Questions for freshers experienced :-
1. What is Ruby on Rails? Ruby: It is an object oriented programming language inspired by PERL and PYTHON. Rails: It is a framework used for building web application 2. What is class libraries in Ruby? Class libraries in Ruby consist of a variety of domains, such as data types, thread programming, various domains, etc. 3. What is the naming convention in Rails? Variables: For declaring Variables, all letters are lowercase, and words are separated by underscores Class and Module: Modules and Classes uses MixedCase and have no underscore; each word starts with a uppercase letter Database Table: The database table name should have lowercase letters and underscore between words, and all table names should be in the plural form for example invoice_items Model: It is represented by unbroken MixedCase and always have singular with the table name Controller: Controller class names are represented in plural form, such that OrdersController would be the controller for the order table. 4. What is “Yield” in Ruby on Rails? A Ruby method that receives a code block invokes it by calling it with the “Yield”. 5. What is ORM (Object-Relationship-Model) in Rails? ORM or Object Relationship Model in Rails indicate that your classes are mapped to the table in the database, and objects are directly mapped to the rows in the table. 6. What the difference is between false and nil in Ruby? In Ruby False indicates a Boolean datatype, while Nil is not a data type, it have an object_id 4. 7. What are the positive aspects of Rails? Rails provides many features like Meta-programming: Rails uses code generation but for heavy lifting it relies on meta-programming. Ruby is considered as one of the best language for Meta-programming. Active Record: It saves object to the database through Active Record Framework. The Rails version of Active Record identifies the column in a schema and automatically binds them to your domain objects using metaprogramming Scaffolding: Rails have an ability to create scaffolding or temporary code automatically Convention over configuration: Unlike other development framework, Rails does not require much configuration, if you follow the naming convention carefully Three environments: Rails comes with three default environment testing, development, and production. Built-in-testing: It supports code called harness and fixtures that make test cases to write and execute. 8. What is the role of sub-directory app/controllers and app/helpers? App/controllers: A web request from the user is handled by the Controller. The controller sub-directory is where Rails looks to find controller classes App/helpers: The helper’s sub-directory holds any helper classes used to assist the view, model and controller classes. 9. What is the difference between String and Symbol? They both act in the same way only they differ in their behaviors which are opposite to each other. The difference lies in the object_id, memory and process tune when they are used together. Symbol belongs to the category of immutable objects whereas Strings are considered as mutable objects. 10. How Symbol is different from variables? Symbol is different from variables in following aspects It is more like a string than variable In Ruby string is mutable but a Symbol is immutable Only one copy of the symbol requires to be created Symbols are often used as the corresponding to enums in Ruby

Ruby on Rails Interview Questions 11. What is Rails Active Record in Ruby on Rails? Rails active record is the Object/Relational Mapping (ORM) layer supplied with Rails. It follows the standard ORM model as Table map to classes Rows map to objects Columns map to object attributes 12. How Rails implements Ajax? Ajax powered web page retrieves the web page from the server which is new or changed unlike other web-page where you have to refresh the page to get the latest information. Rails triggers an Ajax Operation in following ways Some trigger fires: The trigger could be a user clicking on a link or button, the users inducing changes to the data in the field or on a form Web client calls the server: A Java-script method, XMLHttpRequest, sends data linked with the trigger to an action handler on the server. The data might be the ID of a checkbox, the whole form or the text in the entry field Server does process: The server side action handler does something with the data and retrieves an HTML fragment to the web client Client receives the response: The client side JavaScript, which Rails generates automatically, receives the HTML fragment and uses it to update a particular part of the current 13. How you can create a controller for subject? To create a controller for subject you can use the following command C:\ruby\library> ruby script/generate controller subject 14. What is Rails Migration? Rails Migration enables Ruby to make changes to the database schema, making it possible to use a version control system to leave things synchronized with the actual code. 15. List out what can Rails Migration do? Rails Migration can do following things Create table Drop table Rename table Add column Rename column Change column Remove column and so on 16. What is the command to create a migration? To create migration command includes C:\ruby\application>ruby script/generate migration table_name 17. When self.up and self.down method is used? When migrating to a new version, self.up method is used while self.down method is used to roll back my changes if needed. 18. What is the role of Rails Controller? The Rails controller is the logical center of the application. It faciliates the interaction between the users, views, and the model. It also performs other activities like It is capable of routing external requests to internal actions. It handles URL extremely well It regulates helper modules, which extend the capabilities of the view templates without bulking of their code It regulates sessions; that gives users the impression of an ongoing interaction with our applications 19. What is the difference between Active support’s “HashWithIndifferent” and Ruby’s “Hash” ? The Hash class in Ruby’s core library returns value by using a standard “= =” comparison on the keys. It means that the value stored for a symbol key cannot be retrieved using the equivalent string. While the HashWithIndifferentAccess treats Symbol keys and String keys as equivalent. 20. What is Cross-Site Request Forgery (CSRF) and how Rails is protected against it? CSRF is a form of attack where hacker submits a page request on your behalf to a different website, causing damage or revealing your sensitive data. To protect from CSRF attacks, you have to add “protect_from_forgery” to your ApplicationController. This will cause Rails to require a CSRF token to process the request. CSRF token is given as a hidden field in every form created using Rails form builders. 21. What is Mixin in Rails? Mixin in Ruby offers an alternative to multiple inheritances, using mixin modules can be imported inside other class. 22. How you define Instance Variable, Global Variable and Class Variable in Ruby? Ruby Instance variable begins with — @ Ruby Class variables begin with — @@ Ruby Global variables begin with — $ 23. How you can run Rails application without creating databases? You can execute your application by uncommenting the line in environment.rb path=> rootpath conf/environment.rb config.frameworks = 24. What is the difference between the Observers and Callbacks in Ruby on Rails? Rails Observers: Observers is same as Callback, but it is used when method is not directly associated to object lifecycle. Also, the observer lives longer, and it can be detached or attached at any time. For example, displaying values from a model in the UI and updating model from user input. Rails Callback: Callbacks are methods, which can be called at certain moments of an object’s life cycle for example it can be called when an object is validated, created, updated, deleted, A call back is short lived. For example, running a thread and giving a call-back that is called when thread terminates 25. What is rake in Rails? Rake is a Ruby Make; it is a Ruby utility that substitutes the Unix utility ‘make’, and uses a ‘Rakefile’ and ‘.rake files’ to build up a list of tasks. In Rails, Rake is used for normal administration tasks like migrating the database through scripts, loading a schema into the database, etc. 26. How you can list all routes for an application? To list out all routes for an application you can write rake routes in the terminal. 27. What is sweeper in Rails? Sweepers are responsible for expiring or terminating caches when model object changes. 28. Mention the log that has to be seen to report errors in Ruby Rails? Rails will report errors from Apache in the log/Apache.log and errors from the Ruby code in log/development.log. 29. What is the difference between Dynamic and Static Scaffolding? Dynamic Scaffolding Static Scaffolding It automatically creates the entire content and user interface at runtime It enables to generation of new, delete, edit methods for the use in application It does not need a database to be synchronized It requires manual entry in the command to create the data with their fields It does not require any such generation to take place It requires the database to be migrated 30. What is the function of garbage collection in Ruby on Rails? The functions of garbage collection in Ruby on Rails includes It enables the removal of the pointer values which is left behind when the execution of the program ends It frees the programmer from tracking the object that is being created dynamically on runtime It gives the advantage of removing the inaccessible objects from the memory, and allows other processes to use the memory 31. What is the difference between redirect and render in Ruby on Rails? Redirect is a method that is used to issue the error message in case the page is not issued or found to the browser. It tells browser to process and issue a new request. Render is a method used to make the content. Render only works when the controller is being set up properly with the variables that require to be rendered. 32. What is the purpose of RJs in Rails? RJs is a template that produces JavaScript which is run in an eval block by the browser in response to an AJAX request. It is sometimes used to define the JavaScript, Prototype and helpers provided by Rails. 33. What is Polymorphic Association in Ruby on Rails? Polymorphic Association allows an ActiveRecord object to be connected with Multiple ActiveRecord objects. A perfect example of Polymorphic Association is a social site where users can comment on anywhere whether it is a videos, photos, link, status updates etc. It would be not feasible if you have to create an individual comment like photos_comments, videos_comment and so on. 34. What are the limits of Ruby on Rails? Ruby on Rails has been designed for creating a CRUD web application using MVC. This might make Rails not useful for other programmers. Some of the features that Rails does not support include Foreign key in databases Linking to multiple data-base at once Soap web services Connection to multiple data-base servers at once 35. What is the difference between calling super() and super call? super(): A call to super() invokes the parent method without any arguments, as presumably expected. As always, being explicit in your code is a good thing. super call: A call to super invokes the parent method with the same arguments that were passed to the child method. An error will therefore occur if the arguments passed to the child method don’t match what the parent is expecting. 36. What about Dig, Float and Max? Float class is used whenever the function changes constantly. Dig is used whenever you want to represent a float in decimal digits. Max is used whenever there is a huge need of Float. 37. How can we define Ruby regular expressions? Ruby regular expression is a special sequence of characters that helps you match or find other strings. A regular expression literal is a pattern between arbitrary delimiters or slashes followed by %r. 38. What is the defined operator? Define operator states whether a passed expression is defined or not. If the expression is defined, it returns the description string and if it is not defined it returns a null value. 39. List out the few features of Ruby? Free format – You can start writing from program from any line and column Case sensitive – The uppercase and lowercase letters are distinct Comments – Anything followed by an unquoted #, to the end of the line on which it appears, is ignored by the interpreter Statement delimiters- Multiple statements on one line must be separated by semicolons, but they are not required at the end of a line. 40. Mention the types of variables available in Ruby Class? Types of variables available in Ruby Class are, Local Variables Global Variables Class Variables Instance Variables 41. How can you declare a block in Ruby? In Ruby, the code in the block is always enclosed within braces ({}). You can invoke a block by using “yield statement”. 42. What is the difference between put and putc statement? Unlike the puts statement, which outputs the entire string onto the screen. The Putc statement can be used to output one character at a time. 43. What is a class library in Ruby? Ruby class libraries consist of a variety of domains, such as thread programming, data types, various domains, etc. These classes give flexible capabilities at a high level of abstraction, giving you the ability to create powerful Ruby scripts useful in a variety of problem domains. The following domains which have relevant class libraries are, GUI programming Network programming CGI Programming Text processing 44. In Ruby, it explains about the defined operator? The defined operator tells whether a passed expression is defined or not. If the expression is not defined, it gives null, and if the expression is defined it returns the description string. 45. What is the difference in scope for these two variables: @@name and @name? The difference in scope for these two variables is that: @@name is a class variable @name is an instance variable 46. What is the syntax for Ruby collect Iterator? The syntax for Ruby collect Iterator collection = collection.collect. 47. In Ruby code, often it is observed that coder uses a short hand form of using an expression like array.map(&:method_name) instead of array.map { |element| element.method_name }. How this trick actually works? When a parameter is passed with “&” in front of it. Ruby will call to_proc on it in an attempt to make it usable as a block. So, symbol to_Proc will invoke the method of the corresponding name on whatever is passed to it. Thus helping our shorthand trick to work. 48. What is Interpolation in Ruby? Ruby Interpolation is the process of inserting a string into a literal. By placing a Hash (#) within {} open and close brackets, one can interpolate a string into the literal. 49. What is the Notation used for denoting class variables in Ruby? In Ruby, A constant should begin with an uppercase letter, and it should not be defined inside a method A local must begin with the _ underscore sign or a lowercase letter A global variable should begin with the $ sign. An uninitialized global has the value of “nil” and it should raise a warning. It can be referred anywhere in the program. A class variable should begin with double @@ and have to be first initialized before being used in a method definition 50. What is the difference between Procs and Blocks? The difference between Procs and Blocks, Block is just the part of the syntax of a method while proc has the characteristics of a block Procs are objects, blocks are not At most one block can appear in an argument list Only block is not able to be stored into a variable while Proc can 51. What is the difference between a single quote and double quote? A single-quoted strings don’t process ASCII escape codes, and they don’t do string interpolation. 52. What is the difference between a gem and a plugin in Ruby? Gem: A gem is a just ruby code. It is installed on a machine, and it’s available for all ruby applications running on that machine. Plugin: Plugin is also ruby code, but it is installed in the application folder and only available for that specific application. 53. What is the difference extend and include? The “include” makes the module’s methods available to the instance of a class, while “extend” makes these methods available to the class itself. 54. Why Ruby on Rails? There are lot of advantages of using ruby on rails: 1. DRY Principal 2. Convention over Configuration 3. Gems and Plugins 4. Scaffolding 5. Pure OOP Concept 6. Rest Support 7. Rack support 8. Action Mailer 9. Rpc support 10. Rexml Support 11. etc.. 55. What is the Difference between Symbol and String? Symbol are same like string but both behaviors is different based on object_id, memory and process time (cpu time) Strings are mutable , Symbols are immutable. Mutable objects can be changed after assignment while immutable objects can only be overwritten. For example p "string object jak".object_id #=> 22956070 p "string object jak".object_id #=> 22956030 p "string object jak".object_id #=> 22956090 p :symbol_object_jak.object_id #=> 247378 p :symbol_object_jak.object_id #=> 247378 p :symbol_object_jak.object_id #=> 247378 p " string object jak ".to_sym.object_id #=> 247518 p " string object jak ".to_sym.object_id #=> 247518 p " string object jak ".to_sym.object_id #=> 247518 p :symbol_object_jak.to_s.object_id #=> 22704460 p :symbol_object_jak.to_s.object_id #=> 22687010 p :symbol_object_jak.to_s.object_id #=> 21141310 And also it will differ by process time For example: Testing two symbol values for equality (or non-equality) is faster than testing two string values for equality, Note : Each unique string value has an associated symbol 56. What things we can define in the model? There are lot of things you can define in models few are: 1. Validations (like validates_presence_of, numeracility_of, format_of etc.) 2. Relationships(like has_one, has_many, HABTM etc.) 3. Callbacks(like before_save, after_save, before_create etc.) 4. Suppose you installed a plugin say validation_group, So you can also define validation_group settings in your model 5. ROR Queries in Sql 6. Active record Associations Relationship 57. What do you mean by the term Rail Migration? It is basically an approach with the help of which the users can make the changes to the already existing database Schema in Ruby and can implement a version control system. The main aim is to synchronize the objects to get the quality outcomes. 58. What exactly do you know about the Rail Observers? It is very much similar to that of Callback. They can be deployed directly in case the methods are not integrated with the lifecycle of the object. It is possible for the users to attach the observer to any file and perform the reverse action by the user. 59. Name the two types of Scaffolding in the Ruby? These are Static and Dynamic Scaffolding 60. Explain some of the looping structures available in Ruby? For loop, While loop, Until Loop. Be able to explain situations in which you would use one over another. Ruby on Rails Questions and Answers Pdf Download Read the full article
0 notes
Text
7 Gems Which Will Make Your Rails Code Look Awesome by @RubyroidLabs
Original article
In Rubyroid Labs we are very passionate about application architecture. Most projects we work here are long-term projects, so if you are not being careful about your application design at some point you will find yourself in a position where in order to add a new feature it's just easier to rebuild the whole project from the scratch. And it's definitely not something you want to face up with.
One of the bad signs that your project is getting sick is that new team members spend a significant amount of time just reading through the source code in order to understand the logic. Today we want share a list of different gems, which in our opinion can help you to organize your code and make your team members smile.
1. interactor
This library is absolutely fabulous and has always been in our shortlist when talking about writing some complex business logic. What is an interactor? As gem readme says - "an interactor is a simple, single-purpose object, used to encapsulate your application's business logic". You can think of that as a service-objects we all love, but it's a way more than that. Let's take a look on the example:
# app/interactors/create_order.rb class CreateOrder include Interactor def call order = Order.create(order_params) if order.persisted? context.order = order else context.fail! end end def rollback context.order.destroy end end # app/interactors/place_order.rb class PlaceOrder include Interactor::Organizer organize CreateOrder, ChargeCard, SendThankYou end
In this example you probably noticed couple absolutely great features of this gem. The first thing is that you are able to organize your simple interactors to an executable chain, which will be executed in proper order. Special variable context is being used to share states between different interactors. The second thing is that if one of the interactors fails for some reason, all previous will be rolled-back. You could see that rollback on CreateOrder, which will drop an order if ChargeCard or SendThankYou fails. It is so cool, isn't it?
2. draper
If you have ever used custom Rails-helpers, you know how messy they become overtime. And in most cases we use them to display some data in a more fancy way. That's where decorator design pattern can help us. Let's take a look at a draper syntax, which is pretty self-explanatory:
# app/controllers/articles_controller.rb def show @article = Article.find(params[:id]).decorate end # app/decorators/article_decorator.rb class ArticleDecorator < Draper::Decorator delegate_all def publication_status if published? "Published at #{published_at}" else "Unpublished" end end def published_at object.published_at.strftime("%A, %B %e") end end # app/views/articles/show.html.erb <%= @article.publication_status %>
In the code above you can see that our goal was to show published_at attribute in specific format. In classical rails-way we have 2 options of how to do that. First one is just to write a special helper. The problem with this is that all helpers live under the namespace and as project longs you can face up with some weird name collision, which is extremely hard to debug. The second one is to create a new method inside the model and use that method instead. This solution also feels wrong since it breaks model class responsibility. By default models are responsible for interaction with data, other than representation of that data. That's why using draper in this scenario is a more elegant way to achieve our goal.
Be sure that you check another stunning article:
19 Ruby on Rails Gems which Can Amaze
3. virtus
Sometimes using a simple ruby object is not enough for you. Imagine you have some complex form on a page, where different pieces form should be saved as different models in the database. That's where virtus can help you. Let's take a look at the example:
class User include Virtus.model attribute :name, String attribute :age, Integer attribute :birthday, DateTime end user = User.new(:name => 'Piotr', :age => 31) user.attributes # => { :name => "Piotr", :age => 31, :birthday => nil } user.name # => "Piotr" user.age = '31' # => 31 user.age.class # => Fixnum user.birthday = 'November 18th, 1983' # => #<DateTime: 1983-11-18T00:00:00+00:00 (4891313/2,0/1,2299161)> # mass-assignment user.attributes = { :name => 'Jane', :age => 21 } user.name # => "Jane" user.age # => 21
As you can see, virtus looks similar to standard {OpenStruct} class, but gives you many more features. You should definitely play around to explore them all.
This gem could be a good start for you, but if you are looking for more advanced techniques - definitely go and check dry-types, dry-struct and dry-validation.
4. cells
If you are not familiar with Nick Sutterer Ruby on Rails advanced architecture, you should definitely check that out. Not all of us ready to apply this whole concept to their existing applications. But sometimes your views become really complicated, with different conditions applied for different types of user and etc. That's where cells gem could help. It allows moving part of you views to isolated components, which are just regular ruby-classes. Let's take a look at code sample:
# app/cells/comment_cell.rb class CommentCell < Cell::ViewModel property :body property :author def show render end private def author_link link_to "#{author.email}", author end end # app/cells/comment/show.html.erb <h3>New Comment</h3> <%= body %> By <%= author_link %> # app/controllers/dashboard_controller.rb class DashboardController < ApplicationController def index @comments = Comment.recent end end # app/controllers/dashboard/index.html.erb <% @comments.each do |comment| %> <%= cell(:comment, comment) %> <% end %>
In this example we want to display recent comments on our dashboard. Imagine all comments should be displayed identical on our application. Rails will use some shared partial for rendering. But instead of doing that we use CommentCell object. You can think of that object as a combination of draper we talked about before with ability to render views. But of course it has many more features. Check their README to learn more about all options.
5. retryable
All modern web application do have different types of integrations. Sometimes it's made through solid API calls, sometimes you have to upload a file to FTP or even use some binary protocol. Problem with all integrations is that sometimes their calls just fail. In some cases - it fails without any reasons. And the best thing you can do is just to try again. Thumbs up if you have ever had to do something like this:
begin result = YetAnotherApi::Client.get_info(params) rescue YetAnotherApi::Exception => e retries ||= 0 retries += 1 raise e if retries > 5 retry end
Here is where retryable can help you. Let's take a look at how we can rewrite the example above using that gem:
Retryable.retryable(tries: 5, on: => YetAnotherApi::Exception) do result = YetAnotherApi::Client.get_info(params) end
It looks much nicer, doesn't it? Check that gem out for other scenarios it supports.
6. decent_exposure
If you are not a big fan of using magic - this library is not for you. But in some applications we definitely have a lot of duplications for very simple and standard CRUD actions. That's where decent_exposure could help you. Let's imagine that we are creating new controllers to manage things. That's how scaffold will look for us:
class ThingsController < ApplicationController before_action :set_thing, only: [:show, :edit, :update, :destroy] def index @things = Thing.all end def show end def new @thing = Thing.new end def edit end def create @thing = Thing.new(thing_params) respond_to do |format| if @thing.save format.html { redirect_to @thing, notice: 'Thing was successfully created.' } else format.html { render :new } end end end def update respond_to do |format| if @thing.update(thing_params) format.html { redirect_to @thing, notice: 'Thing was successfully updated.' } else format.html { render :edit } end end end def destroy @thing.destroy respond_to do |format| format.html { redirect_to things_url, notice: 'Thing was successfully destroyed.' } end end private def set_thing @thing = Thing.find(params[:id]) end def thing_params params.require(:thing).permit(:for, :bar) end end
We can't say that 60 lines of code is not too much. But as rubyists we always want it to be as minimalistic as possible. Let's take a look at how it could be transformed using decent_exposure:
class ThingsController < ApplicationController expose :things, ->{ Thing.all } expose :thing def create if thing.save redirect_to thing_path(thing) else render :new end end def update if thing.update(thing_params) redirect_to thing_path(thing) else render :edit end end def destroy thing.destroy redirect_to things_path end private def thing_params params.require(:thing).permit(:foo, :bar) end end
Yakes! Now it's a little more than 30 lines of code without losing any functionality. As you could notice - all magic is brought by expose method. Check this gem documentation for a better understanding of how things work under the hood.
7. groupdate
Every developer knows that dealing with different time zones is a hard thing. Especially when you are trying to write some aggregation on your database. It always gave me hard time when someone asked: "Could I get how many users we are getting every day this month excluding free users" or similar. Now you can stop worrying about such requests and just use gem. Here is an example:
User.paid.group_by_week(:created_at, time_zone: "Pacific Time (US & Canada)").count # { # Sun, 06 Mar 2016 => 70, # Sun, 13 Mar 2016 => 54, # Sun, 20 Mar 2016 => 80 # }
Hope you enjoyed some of these libraries. Let us know if you have any other tools in your mind which can help to write more expressive and awesome code.
1 note
·
View note
Photo
How to Build a React App that Works with a Rails 5.1 API
React + Ruby on Rails = 🔥
React has taken the frontend development world by storm. It's an excellent JavaScript library for building user interfaces. And it's great in combination with Ruby on Rails. You can use Rails on the back end with React on the front end in various ways.
In this hands-on tutorial, we're going to build a React app that works with a Rails 5.1 API.
You can watch a video version of this tutorial here.
To follow this tutorial, you need to be comfortable with Rails and know the basics of React.
[affiliate-section title="Recommended Courses"][affiliate-card title="The Best Way to Learn React for Beginners" affiliatename="Wes Bos" text="A step-by-step training course to get you building real world React.js + Firebase apps and website components in a couple of afternoons. Use coupon code 'SITEPOINT' at checkout to get 25% off." url="http://ift.tt/2tF1ast" imageurl="http://ift.tt/2y2HI7v"][/affiliate-section]
If you don't use Rails, you can also build the API in the language or framework of your choice, and just use this tutorial for the React part.
The tutorial covers stateless functional components, class-based components, using Create React App, use of axios for making API calls, immutability-helper and more.
What We're Going to Build
We're going to build an idea board as a single page app (SPA), which displays ideas in the form of square tiles.
You can add new ideas, edit them and delete them. Ideas get auto-saved when the user focuses out of the editing form.
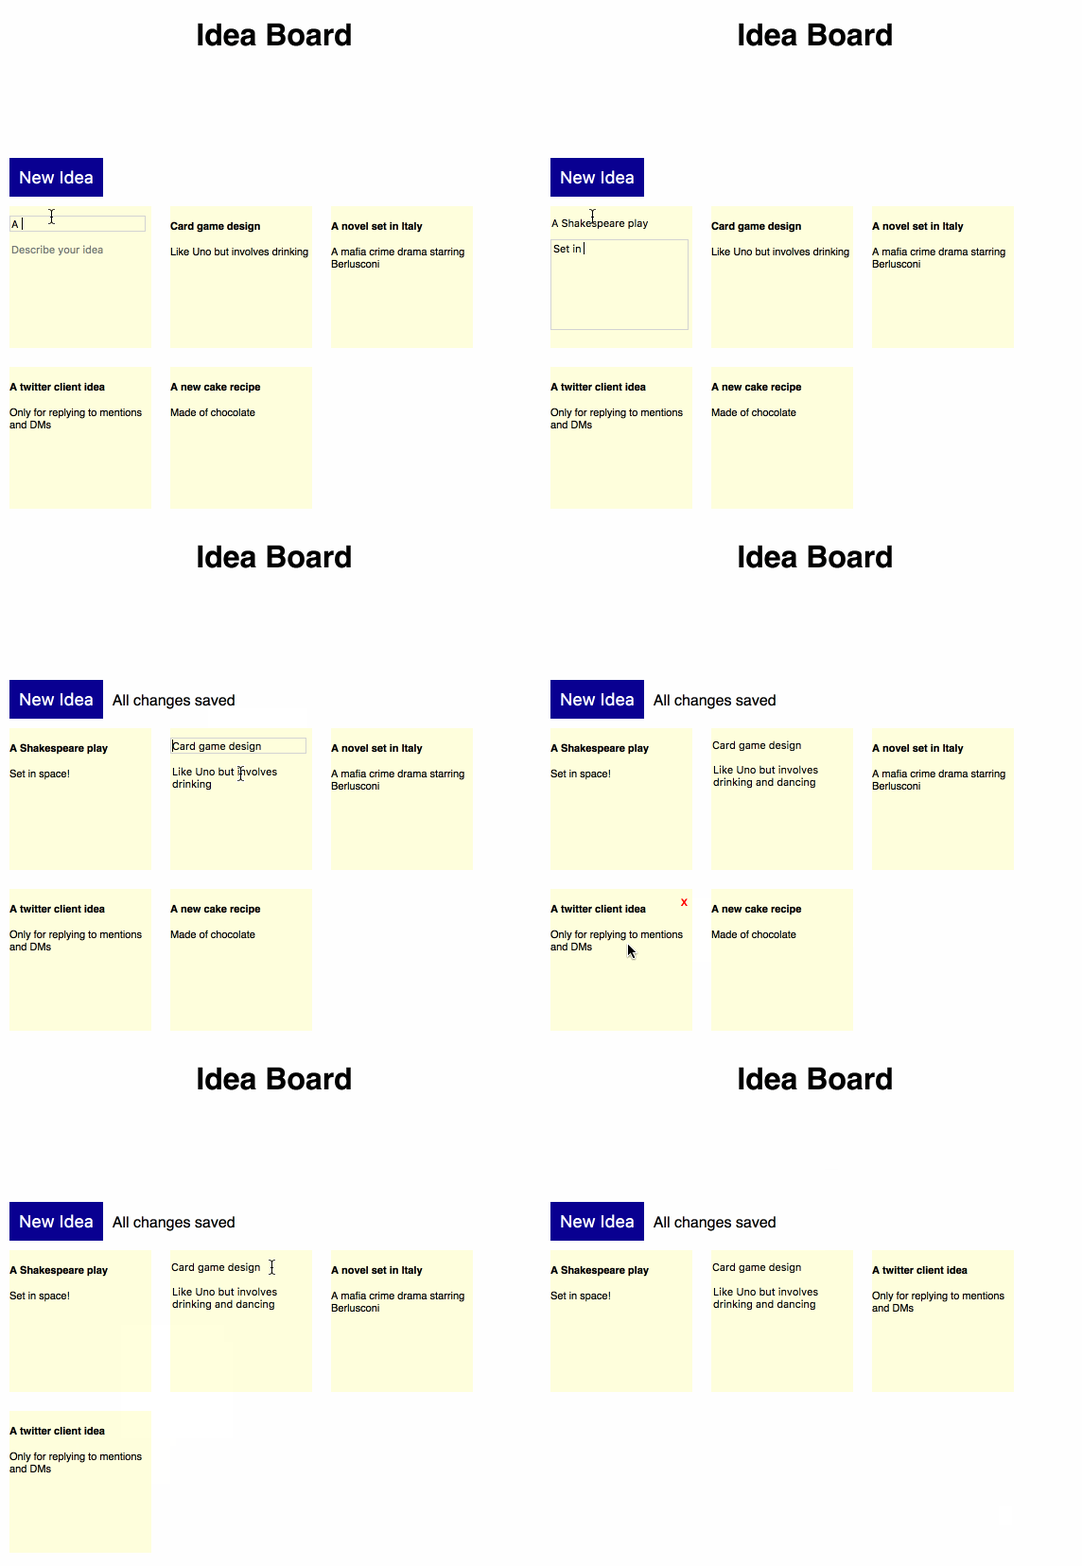
At the end of this tutorial, we'll have a functional CRUD app, to which we can add some enhancements, such as animations, sorting and search in a future tutorial.
You can see the full code for the app on GitHub:
Ideaboard Rails API
Ideaboard React frontend
Setting up the Rails API
Let's get started by building the Rails API. We'll use the in-built feature of Rails for building API-only apps.
Make sure you have version 5.1 or higher of the Rails gem installed.
gem install rails -v 5.1.3
At the time of writing this tutorial, 5.1.3 is the latest stable release, so that's what we'll use.
Then generate a new Rails API app with the --api flag.
rails new --api ideaboard-api cd ideaboard-api
Next, let's create the data model. We only need one data model for ideas with two fields --- a title and a body, both of type string.
Let's generate and run the migration:
rails generate model Idea title:string body:string rails db:migrate
Now that we've created an ideas table in our database, let's seed it with some records so that we have some ideas to display.
In the db/seeds.rb file, add the following code:
ideas = Idea.create( [ { title: "A new cake recipe", body: "Made of chocolate" }, { title: "A twitter client idea", body: "Only for replying to mentions and DMs" }, { title: "A novel set in Italy", body: "A mafia crime drama starring Berlusconi" }, { title: "Card game design", body: "Like Uno but involves drinking" } ])
Feel free to add your own ideas.
Then run:
rails db:seed
Next, let's create an IdeasController with an index action in app/controllers/api/v1/ideas_controller.rb:
module Api::V1 class IdeasController < ApplicationController def index @ideas = Idea.all render json: @ideas end end end
Note that the controller is under app/controllers/api/v1 because we're versioning our API. This is a good practice to avoid breaking changes and provide some backwards compatibility with our API.
Then add ideas as a resource in config/routes.rb:
Rails.application.routes.draw do namespace :api do namespace :v1 do resources :ideas end end end
Alright, now let's test our first API endpoint!
First, let's start the Rails API server on port 3001:
rails s -p 3001
Then, let's test our endpoint for getting all ideas with curl:
curl -G http://localhost:3001/api/v1/ideas
And that prints all our ideas in JSON format:
[{"id":18,"title":"Card game design","body":"Like Uno but involves drinking","created_at":"2017-09-05T15:42:36.217Z","updated_at":"2017-09-05T15:42:36.217Z"},{"id":17,"title":"A novel set in Italy","body":"A mafia crime drama starring Berlusconi","created_at":"2017-09-05T15:42:36.213Z","updated_at":"2017-09-05T15:42:36.213Z"},{"id":16,"title":"A twitter client idea","body":"Only for replying to mentions and DMs","created_at":"2017-09-05T15:42:36.209Z","updated_at":"2017-09-05T15:42:36.209Z"},{"id":15,"title":"A new cake recipe","body":"Made of chocolate","created_at":"2017-09-05T15:42:36.205Z","updated_at":"2017-09-05T15:42:36.205Z"}]
We can also test the endpoint in a browser by going to http://localhost:3001/api/v1/ideas.

Setting up Our Front-end App Using Create React App
Now that we have a basic API, let's set up our front-end React app using Create React App. Create React App is a project by Facebook that helps you get started with a React app quickly without any configuration.
First, make sure you have Node.js and npm installed. You can download the installer from the Node.js website. Then install Create React App by running:
npm install -g create-react-app
Then, make sure you're outside the Rails directory and run the following command:
create-react-app ideaboard
That will generate a React app called ideaboard, which we'll now use to talk to our Rails API.
Let's run the React app:
cd ideaboard npm start
This will open it on http://localhost:3000.
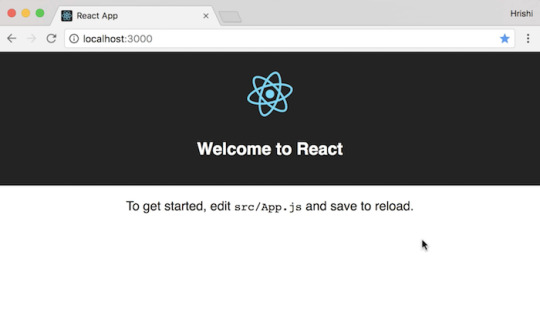
The app has a default page with a React component called App that displays the React logo and a welcome message.
The content on the page is rendered through a React component in the src/App.js file:
import React, { Component } from 'react' import logo from './logo.svg' import './App.css' class App extends Component { render() { return ( <div className="App"> <div className="App-header"> <img src={logo} className="App-logo" alt="logo" /> <h2>Welcome to React</h2> </div> <p className="App-intro"> To get started, edit <code>src/App.js</code> and save to reload. </p> </div> ); } } export default App
Our First React Component
Our next step is to edit this file to use the API we just created and list all the ideas on the page.
Let's start off by replacing the Welcome message with an h1 tag with the title of our app 'Idea Board'.
Let's also add a new component called IdeasContainer. We need to import it and add it to the render function:
import React, { Component } from 'react' import './App.css' import IdeasContainer from './components/IdeasContainer' class App extends Component { render() { return ( <div className="App"> <div className="App-header"> <h1>Idea Board</h1> </div> <IdeasContainer /> </div> ); } } export default App
Let's create this IdeasContainer component in a new file in src/IdeasContainer.js under a src/components directory.
import React, { Component } from 'react' class IdeasContainer extends Component { render() { return ( <div> Ideas </div> ) } } export default IdeasContainer
Let's also change the styles in App.css to have a white header and black text, and also remove styles we don't need:
.App-header { text-align: center; height: 150px; padding: 20px; } .App-intro { font-size: large; }
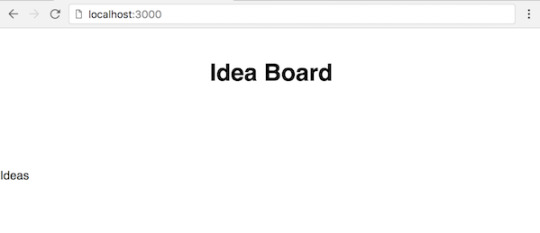
This component needs to talk to our Rails API endpoint for getting all ideas and display them.
Fetching API Data with axios
We'll make an Ajax call to the API in the componentDidMount() lifecycle method of the IdeasContainer component and store the ideas in the component state.
Let's start by initializing the state in the constructor with ideas as an empty array:
constructor(props) { super(props) this.state = { ideas: [] } }
And then we'll update the state in componentDidMount().
Let's use the axios library for making the API calls. You can also use fetch or jQuery if you prefer those.
Install axios with npm:
npm install axios --save
Then import it in IdeasContainer:
import axios from 'axios'
And use it in componentDidMount():
componentDidMount() { axios.get('http://localhost:3001/api/v1/ideas.json') .then(response => { console.log(response) this.setState({ideas: response.data}) }) .catch(error => console.log(error)) }
Now if we refresh the page … it won't work!
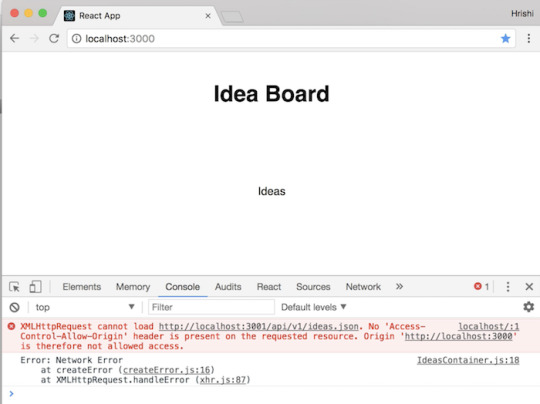
We'll get a "No Access-Control-Allow-Origin header present" error, because our API is on a different port and we haven't enabled Cross Origin Resource Sharing (CORS).
Enabling Cross Origin Resource Sharing (CORS)
So let's first enable CORS using the rack-cors gem in our Rails app.
Add the gem to the Gemfile:
gem 'rack-cors', :require => 'rack/cors'
Install it:
bundle install
Then add the middleware configuration to config/application.rb file:
config.middleware.insert_before 0, Rack::Cors do allow do origins 'http://localhost:3000' resource '*', :headers => :any, :methods => [:get, :post, :put, :delete, :options] end end
We restrict the origins to our front-end app at http://localhost:3000 and allow access to the standard REST API endpoint methods for all resources.
Now we need to restart the Rails server, and if we refresh the browser, we'll no longer get the CORS error.
The page will load fine and we can see the response data logged in the console.
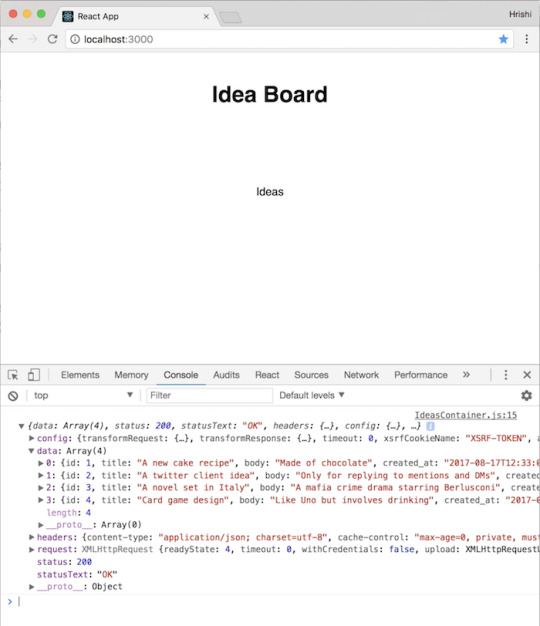
So now that we know we're able to fetch ideas from our API, let's use them in our React component.
We can change the render function to iterate through the list ideas from the state and display each of them:
render() { return ( <div> {this.state.ideas.map((idea) => { return( <div className="tile" key={idea.id} > <h4>{idea.title}</h4> <p>{idea.body}</p> </div> ) })} </div> ); }
That will display all the ideas on the page now.
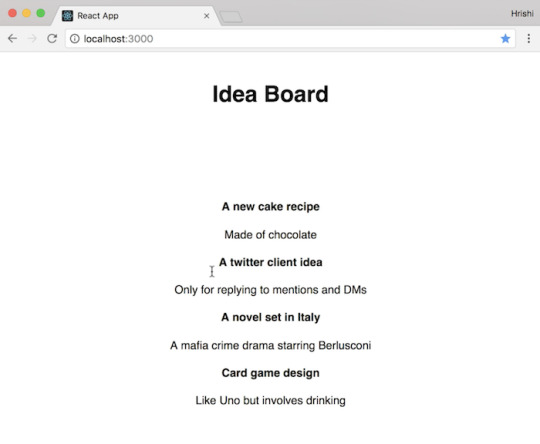
Note the key attribute on the tile div.
We need to include it when creating lists of elements. Keys help React identify which items have changed, are added, or are removed.
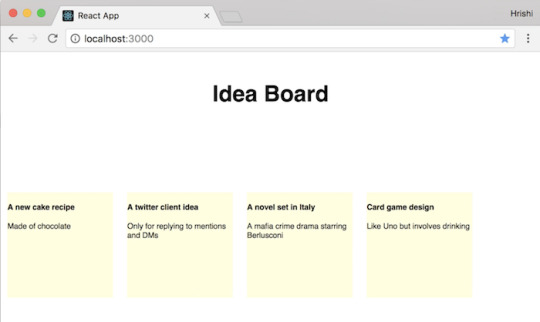
Now let's add some styling in App.css to make each idea look like a tile:
.tile { height: 150px; width: 150px; margin: 10px; background: lightyellow; float: left; font-size: 11px; text-align: left; }
We set the height, width, background color and make the tiles float left.
Stateless functional components
Before we proceed, let's refactor our code so far and move the JSX for the idea tiles into a separate component called Idea.
import React from 'react' const Idea = ({idea}) => <div className="tile" key={idea.id}> <h4>{idea.title}</h4> <p>{idea.body}</p> </div> export default Idea
This is a stateless functional component (or as some call it, a "dumb" component), which means that it doesn't handle any state. It's a pure function that accepts some data and returns JSX.
Then inside the map function in IdeasContainer, we can return the new Idea component:
{this.state.ideas.map((idea) => { return (<Idea idea={idea} key={idea.id} />) })}
Don't forget to import Idea as well:
import Idea from './Idea'
Great, so that's the first part of our app complete. We have an API with an endpoint for getting ideas and a React app for displaying them as tiles on a board!
Adding a new record
Next, we'll add a way to create new ideas.
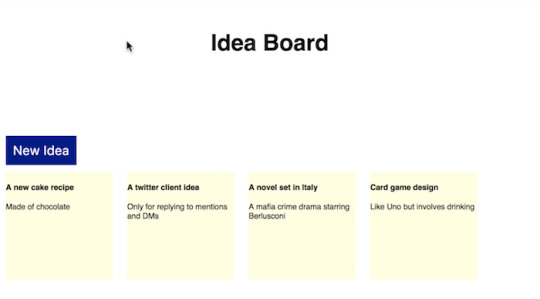
Let's start by adding a button to add a new idea.
Inside the render function in IdeasContainer, add:
<button className="newIdeaButton"> New Idea </button>
And let's add some styling for it in App.css:
.newIdeaButton { background: darkblue; color: white; border: none; font-size: 18px; cursor: pointer; margin-right: 10px; margin-left: 10px; padding:10px; }
Now when we click the button, we want another tile to appear with a form to edit the idea.
Once we edit the form, we want to submit it to our API to create a new idea.
Continue reading %How to Build a React App that Works with a Rails 5.1 API%
by Hrishi Mittal via SitePoint http://ift.tt/2wyeVuC
0 notes
Text
Ruby on Rails HTTP Basic authentication with JSON failure message
Ruby on Rails HTTP Basic authentication with JSON failure message
A short snippet on how to make Ruby on Rails authenticate_or_request_with_http_basic respond with a JSON valid message upon failure.
class ApplicationController < ActionController::API include( ActionController::HttpAuthentication::Basic::ControllerMethods ) before_action :http_authenticate! def http_authenticate! authenticate_or_request_with_http_basic do |key, secret| return if…
View On WordPress
0 notes
Text
Missing respond_to method in Rails 6 API only app
For Rails 6 API mode only, the respond_to method is missing. Say you wanted to use Devise for user authentication; you'll need to have it respond to the json format.
# config/routes.rb scope :api, defaults { format: :json } do devise_for :users end
There we have the routes scoped to the /api namespace and restricting the format to only json requests.
In the controller is there we'll set the respond_to :json.
# app/controllers/application_controller.rb class ApplicationController < ActionController::API respond_to :json end
This will complain about the missing respond_to method. Resolving this issue is by simply inlcuding the MimeResponds class.
# app/controllers/application_controller.rb class ApplicationController < ActionController::API include ActionController::MimeResponds respond_to :json end
This was documentated in the Rails API.
0 notes
Text
Breaking The Rules: Using SQLite To Demo Web Apps
Most potential users will want to try out the software or service before committing any time and money. Some products work great by just giving users a free trial, while other apps are best experienced with sample data already in place. Often this is where the age-old demo account comes into play.
However, anyone who has ever implemented a demo account can attest to the problems associated. You know how things run on the Internet: Anyone can enter data (whether it makes sense or not to the product) and there is a good chance that the content added by anonymous users or bots could be offensive to others. Sure, you can always reset the database, but how often and when? And ultimately, does that really solve the problem? My solution to use SQLite.
It's commonly known that SQLite does not handle multiple threads since the entire database is locked during a write command, which is one of the reasons why you should not use it in a normal production environment. However, in my solution, a separate SQLite file is used for each user demoing the software. This means that the write limitation is only limited to that one user, but multiple simultaneous users (each with their own database file) will not experience this limitation. This allows for a controlled experience for the user test driving the software and enables them to view exactly what you want them to see.
This tutorial is based on a real-world solution that I have been successfully running for a SaaS demo web app since 2015. The tutorial is written for Ruby on Rails (my framework of choice) version 3 and up, but the basic concepts should be able to be adapted to any other language or framework. In fact, since Ruby on Rails follows the software paradigm "convention over configuration" it may even be easier to implement in other frameworks, especially bare languages (such as straight PHP) or frameworks that do not do much in terms of managing the database connections.
That being said, this technique is particularly well suited for Ruby on Rails. Why? Because, for the most part, it is "database agnostic." Meaning that you should be able to write your Ruby code and switch between databases without any issues.
A sample of a finished version of this process can downloaded from GitHub.
The First Step: Deployment Environment
We will get to deployment later, but Ruby on Rails is by default split into development, test and production environments. We are going to add to this list a new demo environment for our app that will be almost identical to the production environment but will allow us to use different database settings.
In Rails, create a new environment by duplicating the config/environments/production.rb file and rename it demo.rb. Since the demo environment will be used in a production like setting, you may not need to change many configuration options for this new environment, though I would suggest changing config.assets.compile from false to true which will make it easier to test locally without having to precompile.
If you are running Rails 4 or above, you will also need to update config/secrets.yml to add a secret_key_base for the demo environment. Be sure to make this secret key different than production to ensure sessions are unique between each environment, further securing your app.
Next you need to define the database configuration in config/database.yml. While the demo environment will primarily use the duplicated database that we will cover in the next section, we must define the default database file and settings to be used for our demo. Add the following to config/database.yml:
demo: adapter: sqlite3 pool: 5 timeout: 5000 database: db/demo.sqlite3
In Rails, you may also want to check your Gemfile to make sure that SQLite3 is available in the new demo environment. You can set this any number of ways, but it may look like this:
group :development, :test, :demo do gem 'sqlite3' end
Once the database is configured, you need to rake db:migrate RAILS_ENV=demo and then seed data into the database however you wish (whether that is from a seed file, manually entering new data or even duplicating the development.sqlite3 file). At this point, you should check to make sure everything is working by running rails server -e demo from the command line. While you are running the server in the new demo environment, you can make sure your test data is how you want it, but you can always come back and edit that content later. When adding your content to the demo database, I would recommend creating a clean set of data so that the file is as small as possible. However, if you need to migrate data from another database, I recommend YamlDb, which creates a database-independent format for dumping and restoring data.
If your Rails application is running as expected, you can move on to the next step.
The Second Step: Using The Demo Database
The essential part of this tutorial is being able to allow each session to use a different SQLite database file. Normally your application will connect to the same database for every user so that additional code will be needed for this task.
To get started with allowing Ruby on Rails to switch databases, we first need to add the following four private methods into application_controller.rb. You will also need to define a before filter for the method set_demo_database so that logic referencing the correct demo database is called on every page load.
# app/controllers/application_controller.rb # use `before_filter` for Rails 3 before_action :set_demo_database, if: -> { Rails.env == 'demo' } private # sets the database for the demo environment def set_demo_database if session[:demo_db] # Use database set by demos_controller db_name = session[:demo_db] else # Use default 'demo' database db_name = default_demo_database end ActiveRecord::Base.establish_connection(demo_connection(db_name)) end # Returns the current database configuration hash def default_connection_config @default_config ||= ActiveRecord::Base.connection.instance_variable_get("@config").dup end # Returns the connection hash but with database name changed # The argument should be a path def demo_connection(db_path) default_connection_config.dup.update(database: db_path) end # Returns the default demo database path defined in config/database.yml def default_demo_database return YAML.load_file("#{Rails.root.to_s}/config/database.yml")['demo']['database'] end
Since every server session will have a different database, you will store the database filename in a session variable. As you can see, we are using session[:demo_db] to track the specific database for the user. The set_demo_database method is controlling which database to use by establishing the connection to the database set in the session variable. The default_demo_database method simply loads the path of the database as defined in the database.yml config file.
If you are using a bare language, at this point you can probably just update your database connection script to point to the new database and then move on to the next section. In Rails, things require a few more steps because it follows the "convention over configuration" software paradigm.
The Third Step: Duplicating The SQLite File
Now that the app is set up to use the new database, we need a trigger for the new demo session. For simplicity's sake, start by just using a basic "Start Demo" button. You could also make it a form where you collect a name and email address (for a follow up from the sales team, etc.) or any number of things.
Sticking with Rails conventions, create a new 'Demo' controller:
rails generate controller demos new
Next, you should update the routes to point to your new controller actions, wrapping them in a conditional to prevent it from being called in the production environment. You can name the routes however you want or name them using standard Rails conventions:
if Rails.env == 'demo' get 'demos/new', as: 'new_demo' post 'demos' => 'demos#create', as: 'demos' end
Next, let's add a very basic form to the views/demos/new.html.erb. You may want to add additional form fields to capture:
<h1>Start a Demo</h1> <%= form_tag demos_path, method: :post do %> <%= submit_tag 'Start Demo' %> <% end %>
The magic happens in the create action. When the user submits to this route, the action will copy the demo.sqlite3 file with a new unique filename, set session variables, login the user (if applicable), and then redirect the user to the appropriate page (we will call this the 'dashboard').
class DemosController < ApplicationController def new # Optional: setting session[:demo_db] to nil will reset the demo session[:demo_db] = nil end def create # make db/demos dir if doesn't exist unless File.directory?('db/demos/') FileUtils.mkdir('db/demos/') end # copy master 'demo' database master_db = default_demo_database demo_db = "db/demos/demo-#{Time.now.to_i}.sqlite3" FileUtils::cp master_db, demo_db # set session for new db session[:demo_db] = demo_db # Optional: login code (if applicable) # add your own login code or method here login(User.first) # Redirect to wherever you want to send the user next redirect_to dashboard_path end end
Now you should be able to try out the demo code locally by once again launching the server using running rails server -e demo.
If you had the server already running, you will need to restart it for any changes you make since it is configured to cache the code like the production server.
Once all the code works as expected, commit your changes to your version control and be sure that you commit the demo.sqlite3 file, but not the files in the db/demos directory. If you are using git, you can simply add the following to your .gitignore file:
If you want to collect additional information from the demo user (such as name and/or email), you will likely want to send that information via an API to either your main application or some other sales pipeline since your demo database will not be reliable (it resets every time you redeploy).
!/db/demo.sqlite3 db/demos/*
Final Step: Deploying Your Demo Server
Now that you have your demo setup working locally, you will obviously want to deploy it so that everyone can use it. While every app is different, I would recommend that the demo app lives on a separate server and therefore domain as your production app (such as demo.myapp.com). This will ensure that you keep the two environments are isolated. Additionally, since the SQLite file is stored on the server, services like Heroku will not work as it does not provide access to the filesystem. However, you can still use practically any VPS provider (such as AWS EC2, Microsoft Azure, etc). If you like the automated convenience, there are other Platforms as Service options that allow you to work with VPS.
Regardless of your deployment process, you may also need to check that the app has the appropriate read/write permissions for your directory where you store the demo SQLite files. This could be handled manually or with a deployment hook.
SQLite Won't Work For Me. What About Other Database Systems?
No two apps are created alike and neither are their database requirements. By using SQLite, you have the advantage of being able to quickly duplicate the database, as well as being able to store the file in version control. While I believe that SQLite will work for most situations (especially with Rails), there are situations where SQLite might not be suitable for your application's needs. Fortunately, it is still possible to use the same concepts above with other database systems. The process of duplicating a database will be slightly different for each system, but I will outline a solution for MySQL and a similar process exists with PostgreSQL and others.
The majority of the methods covered above work without any additional modifications. However, instead of storing a SQLite file in your version control, you should use mysqldump (or pg_dump for PostgreSQL) to export a SQL file of whichever database has the content that you would like to use for your demo experience. This file should also be stored in your version control.
The only changes to the previous code will be found in the demos#create action. Instead of copying the SQLite3 file, the controller action will create a new database, load the sql file into that database and grant permissions for the database user if necessary. The third step of granting access is only necessary if your database admin user is different from the user which the app uses to connect. The following code makes use of standard MySQL commands to handle these steps:
def create # database names template_demo_db = default_demo_database new_demo_db = "demo_database_#{Time.now.to_i}" # Create database using admin credentials # In this example the database is on the same server so passing a host argument is not require `mysqladmin -u#{ ENV['DB_ADMIN'] } -p#{ ENV['DB_ADMIN_PASSWORD'] } create #{new_demo_db}` # Load template sql into new database # Update the path if it differs from where you saved the demo_template.sql file `mysql -u#{ ENV['DB_ADMIN'] } -p#{ ENV['DB_ADMIN_PASSWORD'] } #{new_demo_db} < db/demo_template.sql` # Grant access to App user (if applicable) `mysql -u#{ ENV['DB_ADMIN'] } -p#{ ENV['DB_ADMIN_PASSWORD'] } -e "GRANT ALL on #{new_demo_db}.* TO '#{ ENV['DB_USERNAME'] }'@'%';"` # set session for new db session[:demo_db] = new_demo_db # Optional: login code (if applicable) # add your own login code or method here login(User.first) redirect_to dashboard_path end
Ruby, like many other languages including PHP, allows you to use backticks to execute a shell command (i.e., `ls -a`) from within your code. However, you must use this with caution and ensure no user-facing parameters or variables can be inserted into the command to protect your server from maliciously injected code. In this example, we are explicitly interacting with the MySQL command line tools, which is the only way to create a new database. This is the same way the Ruby on Rails framework creates a new database. Be sure to replace ENV['DB_ADMIN'] and ENV['DB_ADMIN_PASSWORD'] with either your own environment variable or any other way to set the database username. You will need to do the same for the ENV['DB_USERNAME'] if your admin user is different from the user for your app.
That's all that it takes to switch to MySQL! The most obvious advantage of this solution is that you don't have to worry about potential issues that might appear from the different syntax between database systems.
Eventually, a final decision is made based on the expected quality and service, rather than convenience and speed, and it’s not necessarily influenced by price point alone.
Final Thoughts
This is just a starting point for what you can do with your new demo server. For example, your marketing website could have a link to "Try out feature XYZ." If you don't require a name or email, you could link demos#create method with a link such as /demos/?feature=xyz and the action would simply redirect to the desired feature and/or page, rather than the dashboard in the above example.
Also, if you use SQLite for the development and demo environments, always having this sample database in version control would give all your developers access to a clean database for use in local development, test environments or quality assurance testing. The possibilities are endless.
You can download a completed demo from GitHub.
(rb, ra, il)
via Articles on Smashing Magazine — For Web Designers And Developers http://ift.tt/2ASF1Xh
0 notes
Text
How to create Drag and Drop functionality in Ruby on Rails?
I have seen many developers that are looking for creating "Drag and Drop" functionality in Ruby On Rails technology. So I'm going to brief about a sample to create and implement this functionality using JQuery Rails, JQuery UI Rails and Rails Sortable gems. Given below are simple steps required to create the rails application:
Ruby On Rails Programming
How to create Drag and Drop functionality in Ruby on Rails?
First of all we will create a simple application first to create the products.
Feel free to ask any queries.
The first Step we required to create the Rails Application.
By using the scaffold we will generate the the MVC components needed for Simple Products application form
Create the Products database table: Rails uses rake commands to run migrations. Migrations are Ruby classes that are designed to make it simple to create and modify database tables. Rails uses rake commands to run migrations.
Then we need to set routes of our application.
In the routes.rb file then we will set the routes of our application.
We have made the simple application for products CRUD operation for adding the Drag and drop functionality in the Application we need to follow some steps and need to do Setup . First of all we need to add the gem files in the application in the gem file.
Then we need to run the bundle install command.
And then We need to add the following to the asset pipeline in the application.js:
We have already run the migration command our database migration command look like this.
The product model look like this
In the controller index method we only need to change one line.
Normally The view of index page always look like this we only need to change some part of code
In the Application.js file we need to add the Javascript function
Then we need to start the server.
$ rails new SampleSortRails
$ cd SampleSortRails
$ rails g scaffold Product name:string description:text quantity:integer price:integer sort:integer
$ rake db:create
$ rake db:migrate
$ rake routes Prefix Verb URI Pattern Controller#Action products GET /products(.:format) products#index POST /products(.:format) products#create new_product GET /products/new(.:format) products#new edit_product GET /products/:id/edit(.:format) products#edit product GET /products/:id(.:format) products#show PATCH /products/:id(.:format) products#update PUT /products/:id(.:format) products#update DELETE /products/:id(.:format) products#destroy root GET / products#index sortable_reorder POST /sortable/reorder(.:format) sortable#reorder
Rails.application.routes.draw do resources :products root 'products#index' end
gem 'jquery-rails' gem 'jquery-ui-rails' gem 'rails_sortable'
$bundle install
//= require jquery //= require jquery_ujs //= require jquery-ui/widgets/sortable //= require rails_sortable
class CreateProducts < ActiveRecord::Migration[5.1] def change create_table :products do |t| t.string :name t.text :description t.integer :quantity t.integer :price t.integer :sort t.timestamps end end end
class Product < ApplicationRecord include RailsSortable::Model set_sortable :sort end
class ProductsController < ApplicationController def index @products = Product.order(:sort).all end end
class="sortable"> <% @products.each_with_sortable_id do |product, sortable_id| %> id="<%= sortable_id %>"> <%= product.name %> <%= product.description %> <%= product.quantity %> <%= product.price %> <%= product.sort %> <%= link_to 'Show', product %> <%= link_to 'Edit', edit_product_path(product) %> <%= link_to 'Destroy', product, method: :delete, data: { confirm: 'Are you sure?' } %> <% end %>
$(function() { $('.sortable').railsSortable(); });
$rails s
#ruby on rails#ruby on rails development#ruby on rails programming#ror programming#drag and drop#ror tips
0 notes
Text
Controllers and views in Ruby
Controllers and views in Ruby
Controller\readdata_controller.rb
class ReaddataController<ApplicationController
def input
end
def at
@name=params[:sname]
@selcolor=params[:selcolor]
end
end
vivews\readdata\at.html.erb
Your name is<%=@name%>
Your selected color is<%=@selcolor%>
Views\readdata\input.html.erb
Working with controller and views
This is ruby on rails and read data from text field
please enter your name
View On WordPress
0 notes
Text
★https://github.com/kenpapa 主要フォルダ構成 app assets :css,jsなど controller :rails g controller ファイル作成 model :rails g model ファイル作成 view config locals database.yml :データベースの設定情報 routes.rb :ルーティング情報 db migrate :rails g migrateファイル作成 public :imageなど ルーティング リクエストされたURLから、それに紐づいたAction(関数)を決定 例 ユーザ(ブラウザ) ↓GET /posts routes.rb ↓GETと/postsから行き先を決定 Action関数 HomeController index UserController new create edit update PostContoller new create edit update Postcontroller index new create delete_all_post SessionController getLogin postLogin deleteLogout 例 Rails.application.routes.draw do get 'home' => 'home#index' 1 root 'home#index' 2 resources :users 3 resources :posts 4 post 'delete all post' => 'posts#delete all post' 5 get 'login' => 'sessions#getLogin' 6 post 'login' => 'sessions#postLogin' 6 delete 'logout' => 'sessions#deletLogout' 6 end 3,4はリソースベースのルート定義 PostsControllerのindex,new,create,show,edit,update,destroyがアクションになるルート作成 1,2,5,6は一つずつルート定義 1でhttp://localhost:3000入力からHomeControllerのIndexアクション(関数)呼ぶ 2でも同じ ~/talkapp$ rake routes Prefix Verb URIPattern Contrlloer#Action _pathヘルパーや_urlヘルパーを後ろにつけるとControllerやViewで使用できる 例、redirect_to posts_path <form action="<%= posts_path %>"method="post"> VerbとURIPatternがActionを決定 PUT DELETE HTML サポート外 疑似的PUT DELETEメソッド <input name" _method" type=" hidden" value="PUT" > https://railsguides.jp/routing.html http://softwareengineering.stackexchange.com/questions/114156/why-are-there-are-no-put-and-delete-methods-on-html-forms コントローラ リクエストされたURLやフォームの入力値から処理、モデルを呼び出しビューに渡す indexアクションでダミーデータ作成(モデルまだなし)インスタンス変数を使ってビューに渡す。 createアクションはpost_pathルートにリダイレクト indexアクションで実行 ダミーデータを作成してインスタンス変数@postsに設定している→ビューでその変数を利用できる class HomeController < ApplicationController def index post1 = Post.new post1.set_message{"Message 1"} post2 = Post.new post2.set_message{"Message 2"} post3 = Post.new post3.set_message{"Message 3"} @posts = [post1, post2, post3] end end HTTPリダイレクトによってPostControllerのindexが実行される def create redirect to_posts_path end ビュー HTML出力 送付0 layout配下のapplication.thml.erbを継承 application.html.erb箇所を設定 CSRF対策必要 コントローラが受け取ったデータ データ数分繰り返し データ表示application.html.erb.のyeild箇所を設定 送付1(_navbar.html.erb)をレンダリングしているから送付0にNavbarも加わる https://railsguides.jp/layouts_and_rendering.html --------------- セキュリティ CSRF 無効 sudo apt-get install apache2 cd /var/www/html sudo gedit index.html <!DOCTYPE html> <html> <head> </head> <body> <form action="http://localhost:3000/posts" method="post"> <input type="hidden" name="message" method="I have a pen"> <button type="submit" class="btn"> </form> <script src="https://ajax.googleapis.com/libs/jquery/1.12.4/jwuery.min.js"></script> <script> $(document).ready(function(){ $(".btn").click(); }); </script> </body> </html> #ローカルホストにアクセスするとスパム投稿する sudo service apache2 restart cd ~/talkapp CSRF無効化 #をつける #protect form forgery with :exception http:localhost:3000にログイン 別のウィンドウからhttp://localhost/ CSRF無効より別のサーバーリクエストを受け、スパム投稿完成 #コメントアウトを消す CSRF有効 別のウィンドウからhttp://localhost/ 外部からのリクエスト拒否可能 https://railsguides.jp/security.html ーーーーーーーーーーーーーーーーーーーーーーーーーーーーー 送付0 送付1
0 notes