#And there's no WEBSITE where you can FORMAT THEM EASILY FOR FREE
Explore tagged Tumblr posts
Visit Tumblr Blog
Explore Tumblr blogs with no restrictions, modern design and the best experience.
Last Seen Tumblr Blogs


Fun Fact
Tumblr was created by web developers David Karp and Marco Arment.
Note
yo! 📖, 🗺️ and 💌 for your danganronpa s/i(s). feel free to pick the selfship on the last one!
I am once again... forced... to answer an ask with.... Well I have multiple Self Inserts for that Fandom you see... and I'm very bad at choosing anything ever so we're just gonna talk about all of them and here's my half finished redesign of all of them just to have in one place
📖 - What is your s/i's backstory? How does it make them meet your f/o(s)?
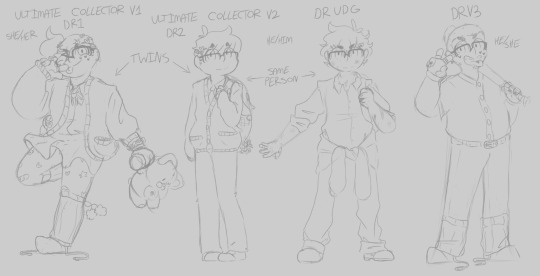
Danganronpa 1 and 2's S/Is are twin brothers who together make the Ultimate Collector, in a canon timeline only one of them gets into Hope's Peak, in my happy school life AU they both get in. V1 joins class 78 and during his school life there starts the anime Club with Hifumi and Celeste. V2 joins class 77 and mostly stays isolated from everyone until Teruteru takes an interest in him and starts talking to him.
In UDG V2 takes the place of Komaru, having escaped his room first and running into Byakuya, acquiring his gun, and eventually running into Toko
For DRV3 I'm still very eeeeeeeh on how exactly the story goes, what I consider the truth vs lies, and just how I want my rewrite to go, so everything about The Ultimate Baseball Star V2 is pretty undecided. He seems to bond with Ryoma over some pretty heavy criminal charges, however.
💌 - Any major changes in your selfship lore over time?
Oooh yeah, lots. Especially to V3 as mentioned above it's hard in WIP territory and has been for a WHILE but that's mostly because V3 is a VERY weird game.
Other than that, as time has passed I've cared a lot LESS about DR2's killing game and have basically written all of Collector V2's lore around my Happy School Life AU or UDG.
The only one who hasn't changed story wise is V1, but she HAS gone through a LOT of design changes. She was originally a lot more geisha styled, lots of make-up and such, and has sense become more calm Decora and Cluttercore
🗺️ - If your s/i is used for multiple f/os, how would all the timelines look if displayed together?
I'm gonna do what you did for this one and put it under a cut so this post doesn't get so long. Please excuse my horrid handwriting
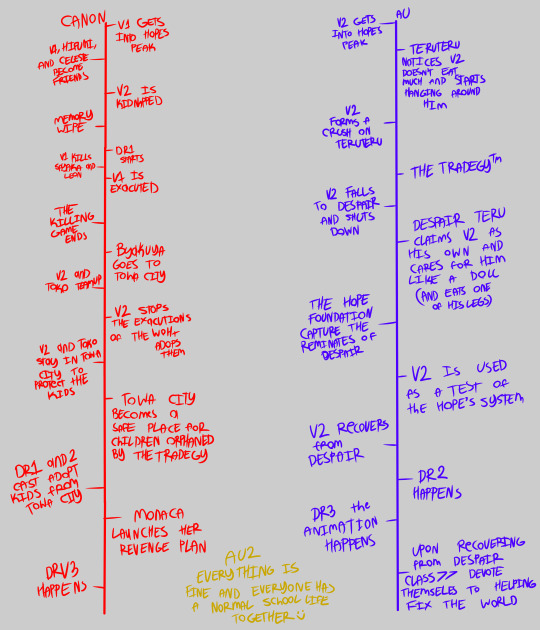
#Emile's Arts#Thankyou for asking#Aaaugh sorry this shouldn't have taken me this long to answer!!! Thankyou SO much for asking!!!#I have a problem with timelines in that I make them way too complicated#And there's no WEBSITE where you can FORMAT THEM EASILY FOR FREE#Aaaaaaaaugh#V2's the only one who has cross timeline F/Os#Everything else is a Poly ship because I love a Polycule more than anything else#Catch me clinging to the V3's cast is DR1 and 2's cast's kids headcanon like a LIFE LINE#IMAGINE HOW COOL THAT WOULD HAVE BEEN#WITH MONACA AS THE MASTERMIND#Aaaaaugh WASTED POTENTIAL my dear sweet Monaca you could have been SO much worse than Junko#I am actively making her worse because it's what she deserves#I'm gonna color all those DR S/Is at some point just you wait#I just have to... figure out what I'm gonna do with V3 first...#Right now he's a mix of Leon and Collector V1 design wise#Sense V1 beat Leon the ultimate Baseball Star to death with a baseball bat#And I think throwing a reference to the first killing game's first killer is something very Monaca#Especally if she's making fun of how sloppy it was#I think she grows very bitter to Junko as she grows into herself#Anyway I have to actually figure out who he is out of V3 tho... If I'm keeping the they're different people outside the game thing#Which idk if I am I'll get there when I get there#Again thankyou for asking! Sorry if my ramblings are boring!!!
4 notes
·
View notes
Text

Do you have any advice for writing in a web serial format?
Let’s look at this in two sections – the business part, and the actual writing part.
The Business Part
1. Consistency. Consistency in updates. Have a schedule and STICK TO IT.
If your schedule is too hectic and starts affecting your health or otherwise adversely affecting your life, change the schedule; update less often. Don’t update in spurts and then randomly stop. The audience will far more easily tolerate a slow schedule than an inconsistent one; an inconsistent one will lose many readers. You’re not Andrew Hussie and you can’t get away with that bullshit.
There may be times where you need to take a hiatus due to some emergency, life event, or health condition. This is fine – your wellbeing is more important than your story. But you need to be up-front with your audience about this; tell them you’re taking a hiatus and tell them exactly how long it’s going to be. If you can, you should tell them in advance (this isn’t possible for things like a car accident, but is very possible if you’re planning to, say, move house in a month). If you’re taking too many hiatuses, then it’s better to slow down your schedule and update less often. Audiences prefer fast and consistent, but if they have to choose, slow is better than inconsistent.
The #1 helper to consistency is having a big buffer – that is, have several weeks’ worth of unpublished chapters. The length of your buffer is personal taste, but I like to keep mine as long as possible so that if there’s some problem that stops me from writing for several weeks, it won’t upset the schedule. It keeps my stress down to know that I have that leeway. Other writers prefer to only write a week or two ahead, though, so different things work for different people.
2. Decide on your monetisation system early and prioritise it.
The most popular and most effective method for monetising a web serial seems to be the patronage method, which is the one I use. You set up a patreon, ko-fi, or whatever sponsorship system you prefer, and offer rewards to those who support you. Having their names in a credit list and getting access to advance chapters are very common rewards. Some people also lock access to their discord behind a paywall, or offer extra stories or let supporters name story characters.
This model is not the only way to make money from web serials. Some people make money via advertising, or selling merchandise, or use the web serial itself to advertise stories that they sell. You can of course use several revenue streams – you can have both a patreon/ko-fi and run ads on your website (I don’t because I hate ads, but you can), or start selling merch related to your story once there’s a demand for it. Many web serial authors (including myself) sell their completed works as books. But the important thing here is that one of these systems will be your main system, and you need to know what it is and behave accordingly. If you run ads AND have a patreon, are you more focused on ad revenue or patreon revenue? You’re going to have to put your time and attention into one of them over the other. You’re going to have to make decisions that will help one and harm the other. So know in advance which one is most important to you.
You don’t have to monetise your story at all, of course. Plenty of people write fiction on the internet for free every day with no thought to making an income at all. But if you’re serious about this, I would recommend monetising it, because that makes a better and more consistent product. The reason I’m still able to keep writing these year after year is that my supporters pay my mortgage; without Patreon and ko-fi, I’d have to get a different job, and wouldn’t have time or energy to write consistently. Also, the reason I can write and update even when I don’t feel like it, and the reason I always push to make my stories as good as possible even when I’m not interested, is because I owe it to my supporters who are paying me real actual money to read my work. If I didn’t owe my readers anything, none of these stories would ever get finished, because writing is only fun about half of the time.
3. Don’t expect to be able to turn this into a career.
This advice sounds silly coming from me, who has through sheer luck, as well as the generosity and passion of my readers, somehow turned this into a career. But I need to emphasise that that luck is not typical. Most web serial writers will not be able to support themselves solely with their writing. It can make a good side hustle, but if your primary goal is “low barrier to entry work-from-home career where I don’t have to answer to a boss and can support myself comfortably,” then web serial writing is usually all of those things except the last one. There’s no harm in trying to turn this into a career – I did it, as have many other web serial authors – but don’t expect that result, is all I’m saying.
Still, if you can do it, it does have a lot of advantages.
4. Don’t expect to make money fast.
I remember when I finally started making an entire $100/month on Patreon. It was a fantastic day.
It was when I’d been writing web serials for four years.
5. Your most valuable resource is your readership.
Your readership will grow and gather momentum over time. The best business decisions you can make are those that grow your readership and allow your readers to participate in community, even if you have to give up opportunities to make money to do it.
A good example of this is discord. Some people have private discords that only their patrons can access; while this is a useful anti-spam and anti-harassment tool, I don’t recommend doing this if you don’t have a major spam or harassment problem. Some people will pay for discord access, yes, so you might get a handful of extra dollars per month that way – however, you will also get a far less active discord. When it comes to readers, population density is critically important; the more activity, the more people talking about your work together (or talking about anything and bonding with each other), the better. Plenty of people have joined my free discord just because it was there and only read my stories after seeing people talk about them there. Then they go and get their friends to read the stories. Enthusiastic readers are inherently valuable, and the best thing you can do is give them the resources they need to talk to each other and share their interest.
This principle applies to a lot of things. I have a lot of free stories on my website that aren’t the usual web serials, and more than once I’ve considered whether they should be paywalled. The answer I always land on is ‘no’; I couldn’t tell you how many readers have been roped into my web serials because they liked Copy <|> Paste, or The Void Princess, or Drops of Blood. These readers may or may not then become monetary supporters, but even the ones who don’t will increase activity and discussion about the stories, have fun and tell jokes in the discord, and may even produce fanart. A thriving community is always going to be more valuable to you than a few extra dollars; make sure to support them accordingly.
Your readership will start very small. In terms of marketing, this is your hardest time. A big readership does the majority of the marketing for you, but when you’re on your own, it takes a lot to convince anyone to give your stories a shot. It helps if you have an existing readership to leverage, which is what I did – I’d been writing Animorphs fanfiction on AO3 for years, and many of my first readers followed me over from there. If you have such a community that already has faith in your writing, leverage it. If you don’t, you can gain one my writing in a place where people go to read stories similar to your work, such as an appropriate subreddit, or a web serial site like Royal Road or Scribblehub. You are looking to gain as high a number of enthusiastic, engaged readers as possible.
And now, the fun part – the actual craft!
The Writing Part
1. Always remember that you are writing for two audiences
A web serial author has to keep two audiences in mind; the serial readers, and the bingers. You are writing a story that needs to be fun and engaging when read very slowly, at the pace of whatever your update schedule is, but that also needs to be interesting when read all at once.
This is not an easy task.
It’s something I fucked up pretty significantly with Curse Words, which was my first attempt at this. Curse Words has a lot of complicated political stuff happening throughout pretty much the whole story, as well as a complex save-the-world plot that’s reliant on a lot of secrets, mysteries and extremely speculative information. With so many wheels spinning, I decided to make the protagonist not particularly smart and move him very slowly through the plot to make sure that the reader would be able to keep up.
This was a mistake.
‘Pretty slow and simple’ at a novel reader’s pace is torturous at a web serial pace. Readers got a full week to discuss the mysteries and implications of each chapter with each other, doing the detective work of ten chapters between each one. The frustration with Kayden’s slow pace was clear, and he came across as an outright idiot rather than an average teen. Personally, I think this lesson was one of the biggest reasons for the difference in quality between Curse Words and Time to Orbit. Don’t slow down for your audience; they’re already slowed down by your update schedule.
At the same time, though, you don’t want to move so fast that you lose the bingers. You can’t assume that your readers will have time between chapters, or that they will discuss each chapter with other readers, or that they will go back over previous chapters looking for clues. Interested people reading update by update will do this, but bingers absolutely will not. So you still need to make sure that everything is comprehensible on a binge read with no backchecking or outside investigation.
My advice on this matter is to move as fast as possible, but take care to make sure that readers are reminded of everything important a few chapters before it comes into play. That way, both audiences can keep up. If you have to make a decision, it’s best to favour your update readers; they’re your most active community. They’re doing the up-to-date discussion, and probably doing the most word-of-mouth and fanart, although binge readers will do that too (I have plenty of dedicated readers who wait five or six weeks to binge a bunch of chapters on purpose, just because that’s their preferred reading style, and they’re still very engaged). But if you plan to publish your story later as a complete work, you also need to keep in mind how it’s going to read as a binge – and also, new readers will binge the earlier chapters of your story to catch up to the current one, so make sure it’s a good experience for them or they won’t get a chance to become update readers.
Two audiences. Mind your pacing and information reveals accordingly.
2. Chapter length
The general rule of web serials is that the more often you update, the shorter your chapters should be. The generally agreed ‘sweet spot’ is 1-1.5k words, 3 times a week, but this depends heavily on individual style. I update once or twice a week (depending on what stories I’ve got going) and try to keep my chapters between 2 and 2.5k words. If you update once a month, your sweet spot is probably about 10k words.
Don’t hold religiously to what other people tell you the ideal word count is – this will vary drastically with genre and personal style – but it’s best to try to stay fairly consistent. It’s not always possible to stay exactly on target because the best break points between chapters will vary (I’ve got 1.8k chapters and 3.5k chapters), but readers like to be able to predict about how long an update will be and they like it to not vary too wildly too often. As with choosing your update schedule, choosing your chapter length will depend on what suits your personal schedule, and what suits the story you’re writing.
“The shorter the chapter, the more frequent the updates” is a good rule for attracting the widest audience. Short, infrequent chapters will have a lot of readers losing interest between updates; long, frequent ones will have a lot of readers feeling overwhelmed. But the most important thing is finding something that you can consistently output year after year (remember, it took me 4 years to make $100/month; this is a long game).
3. It’s a TV show, not a movie
This advice is less useful in our age of Marvel movie franchises and made-to-binge Netflix series, so pretend I’m talking to you in the year 2010 or earlier. If a novel is a movie, a web serial is a TV show. What I mean by that is that a novel is shaped primarily as a complete experience, whereas a web serial is shaped as a chapter-by-chapter experience.
It’s best, in both cases, to have a well structures and paced story that is made of well structured and paced chapters. But sometimes you have to choose between the structure or a chapter and the structure of the story as a whole; making one better will cheapen the other. When you’re writing a novel, you should choose the structure of the whole, but when you’re writing a web serial, you should choose the structure of the chapter. Web serial readers will prefer a chained series of excellent chapters, over a beautiful story of chapters with mediocre individual structure.
In fact, whether you want a structure to the overall story at all is personal taste. My stories have strong overall structure and move towards a planned conclusion because that’s how I prefer to write (and it also makes the story bingeable, since it’s basically a novel being released really slowly), but plenty of web serials out there have no real planned ending and will wander about for years and years in no obviously consistent direction, occasionally throwing in a big twist or major change to freshen things up. These would make absolutely horrible novels, but make very popular web serials. Whether you write like me or like them, the rule is the same – the experience of each individual chapter takes priority.
Come to think of it, this might be why people call my stories “ADHD crack”…
4. Okay, so how do I structure a good chapter?
I generally try to do three things in every chapter.
- Hit the ground running
- Give them something new
- End on an open question
Hit the ground running – Unless it’s the very first chapter of the story, you don’t have to be coy getting into the action. Open the chapter as if it’s the middle of the chapter; start at full momentum. Catch the high point of the last chapter before it falls. It your last chapter ended with “We checked the fingerprints on the candlestick. It’s Colonel Mustard.” then you can start this one with “But he was in the library at the time!”, you don’t need to recap or slow down or anything.
Give them something new – Every chapter should give the reader at least one thing to talk and think about. A new choice, some new information, a shift in perspective, whatever. People are reading these updates one at a time so it is vital that they feel like they got something out of the experience. A chapter in which nothing is learned will make readers feel like their time was wasted, and they have all the time until next update to reflect on that.
This is also true of a novel, but it’s much more critical in a web serial. A novel with nothing chapters in it is just frustratingly slow-paced; a web serial with nothing chapters in it leaves the reader feeling cheated for long stretches of time.
The thing to talk about doesn’t necessarily have to be a big plot reveal or major advancement. An incredibly cute scene, or sad scene, or funny scene will work just as well. But you have to give them SOMETHING. If you’re giving them nothing, consider cutting the chapter entirely and integrating any important foreshadowing or whatever into the next chapter.
One major hurdle of mine with this rule is recap chapters. If you’re writing a very complex plot over a long period of time, you need ways to occasionally take stock and make sure everyone is on the same page and nobody’s forgotten or misinterpreted anything important. This information can be recapped or conveyed in the middle of an action sequence or something, but I personally find that putting other stuff in the scene makes it too distracting and therefore less effective. I like to literally just sit the heroes down in a room and have them go, “okay, we’re spinning a lot of threads at once right now; what do we know, what are we trying to figure out, and what are our next steps?” This is the literary equivalent of the save point or room full of health packs right before a boss battle. Game designers don’t put that room there to be nice; they do it so that they know exactly how much health you’re going to have going into the battle, and can structure it accordingly.
You can make these chapters entertaining with character banter, but you can’t really introduce new threads to talk about, except possibly as a twist right at the end. Introducing new information mid-recap distracts from the recap and makes it pointless. You might have something similar in your stories, chapters that are essential but don’t give the reader anything new to work with.
My advice for these is to just bite the bullet on this one. Release the chapter with nothing new to talk about. You can get away with doing this occasionally, if the chapter has a clear purpose (I get a lot of readers tell me that they appreciate my recap chapters). Readers who get nothing out of the chapter will shrug and talk about older stuff instead, so long as you only do this occasionally. But a chapter with no new information has a cost in opportunity and in reader patience, so only pay it if the chapter’s worth it.
End on an open question– End the chapter with a reason for the reader to come back. You want them to think about the story afterward and be eager to read the next chapter when it comes out. Adhering to this principle is probably why I have such a reputation for cliffhangers, although truth be told I don’t use nearly as many actual cliffhangers as people say, I just try to end by opening a question. By that I mean, the audience should always end a chapter asking a question, which can be something that will span dozens of chapters (“How can Colonel Mustard’s fignerprints be on the candlestick? Is he being framed? Does this mean that the candlestick was in the library and isn’t even the murder weapon?”) or span a single paragraph (“How will the narrator react to learning that Colonel Mustard lied about never touchign the candlestick?”) This could be the emotional height of a scene, or the point at which new information recontextualises everything. It could be the moment where the stakes are raised or an important assumption turns out to be false. Anything that makes the audience eager to learn what happens next will do.
There should always be at least one open question in your story, more if it’s thematically appropriate. You know how mmorpgs and crafting games and suchlike keep you playing for hours and hours by making sure you’re always near the end of an activity – keep playing til you reach the next level, oh but now we’re nearly at the end of this quest so we should complete that, oh but now we’re just 20 gold short of being able to buy that cool new armour so we should just… same trick. Readers should always have at least one ‘quest’, an open question that they’re following, and should always be close to an answer.
You don’t have to dramatically introduce an entirely new question each time; you can end a chapter by reminding the reader of an existing open question. I tend to be a fan of the Big Dramatic Reveal On The Last Line method (cliffhanger reputation), but you don’t have to do it that way. Indeed, it’s a good idea not to do it that way every single time, lest you get stuck in a rut; every chapter ending doesn’t have to be incredibly tense and snappy. Somebody mentioning that they wish they knew how they could get enough food to make it through the winter before a full paragraph of cuddling and falling asleep in their mother’s arms works just as well.
5. It will help if your story is good, but it isn’t required.
You don’t have to be very good at writing to do this.
It helps to be good at writing, of course, and I assume that since you’re asking me for tips, you’re the sort of person who wants to be as good at writing as you can. But there is some true hack garbage out there doing absolute numbers in the web serial circuit. I try not to harp on about this too much because Curse Words fans get really upset at me when I do, but I think most of us can agree that Curse Words kind of sucks. And that just sucks in an ‘author is still learning how to do this’ kind of way; there’s much worse writing, real bullshit Ready Player One-level writing, trucking along out there brilliantly.
The point I’m trying to make here is that this isn’t an industry where there’s any value in hesitating and wringing your hands and asking yourself if you’re a good enough writer to do it yet. You are. You can just start writing a web serial right now and so long as you consistently update, you’re probably already above average for the market. And your first one probably will suck (mine did), but it’ll teach you how to make a better one. I think that Time to Orbit: Unknown is passably okay, and it absolutely would not be passably okay if I hadn’t written Curse Words first. Just go for it. Try to write a quality story if you can, but if you can’t, it’s honestly not that big of a deal. What matters, truly matters, is that you are committed to improving your craft. And that means actually practicing your craft. Which means writing some chapters and setting up a release schedule.
Good luck.
354 notes
·
View notes
Note
I’m interested in learning Latin, where would you suggest I start?
So exciting! I'll try to keep this short:
I recommend starting with this very short informal intro, especially if you don't have a strong grasp on technical terms about grammar (most textbooks take that for granted). Latin grammar follows a rigid organisational system and the earlier you understand how it works, the easier it will be to learn the rest of the language. The 18-page PDF in the link uses English examples and practice questions to go through basic Latin grammar concepts and tables. It doesn't go through less basic things like participles or conditional clauses, but it does explain everything you need to know in order to learn those more easily. It also includes a hyperlinked list of good online resources for self-taught Latin and Greek students.


If you want to work through a textbook, Wheelock's Latin is probably the most widely used and comes with a lot of accompanying resources and guides (even though the official website looks older than Rome). Ecce Romani may be a bit more approachable and there are plenty of unofficial online lessons and guides made to go along with it. Those are my top two personally; I know some people like Latin Via Ovid because the practice texts are adapted from an actual ancient text about different myths, but imho I don't think it's as good a starting point if you're teaching yourself from scratch. Keep in mind that they'll all follow different formats for conjugation/declension tables, which can make it a bit confusing to switch between them; the short intro in that first link is a good way to understand how these charts work well enough to use them no matter the format.


There are tons of free resources online, even including full recordings of lessons, live study groups to join, communities with forum posting, and written-out explanations. For any individual concept that's troubling you, there are almost definitely multiple youtube videos of someone in front of a whiteboard saying it differently from the textbooks. Again, there's a good list included in that first document.
For practice in reading and understanding without deliberately translating, it's fun to try reading Latin translations of books you already know well in English, like Harrius Potter, Hobbitus Ille, Winnie Ille Pu, Alicia In Terra Mirabili, and many, many more, most of which are free on Archive and/or can be bought as physical copies.


However, this will be much more rewarding once you've built up some vocabulary and grammar, and might be frustrating or discouraging if you try the long ones too early, especially since they sometimes use words irregularly to convey modern meanings.
There are also a handful of recently-written stories in Latin targeted at students who like this kind of practice more. The German Netflix series Barbarians has all the Roman characters speaking in real Latin, and listening to it with subtitles can help build your ear for what sounds right.
Those are my recs for where to start! If you're stuck on something and can't find a good explanation, you can also send me an ask about it and I'm always happy to lay out how I think about it (even if my response times are irregular).
Good luck and enjoy!
#asks#anon#latin#classical latin#latin student#latin students#learning latin#learn latin#latin grammar#classics#ancient languages#ancient rome#beginners latin#latin beginners#latin beginner#latin resources
57 notes
·
View notes
Text
Animals, CoD Ghosts HC’s
What animals/creatures are the Ghosts?

A/N🪶: These are just my options! Feel free to send me yours. These are for all the Ghosts, including former, deceased and current within the Ghosts game. This list will include Rorke, Ajax and Elias Walker. Also this is going to be formatted differently from the first HC, Natural Disasters.
David “Hesh” Walker - German Shepard
Hesh is loyal, probably to a fault. Willing to do whatever it takes to protect the ones he loves and get the job done, even if he gets injured in the process.
^ Bringing me to my next point, Hesh is very protective of his family. The mere idea of anyone getting hurt is enough to get this man baring his teeth and attacking.
In the Natural Disasters list, I mentioned that Hesh, according to Urban Dictionary, means courageous, another trait of German Shepards.
One more trait that applies is also Shepards, really any animal in general, being alert as well. This is a given, though, considering he is a soldier in active war zones especially with such effective and deadly enemies. He needs to make every second count and can’t afford to slack in these areas.
I should mention that Shepards are obedient yet stubborn. Hesh knows when to listen to his superiors but he’ll easily let you know when he doesn’t agree with something. Think about when Merrick, Keegan and Elias (mask on) picked them up and Hesh was yelling about their dad still being caught in the crossfire. Merrick got Hesh to sit his ass down but Hesh was clearly not happy about it, understandably.
Logan Walker - Mountain Lion
Mountain lions can’t roar and Logan can’t, or —depending on your headcanons, consciously chooses not to— talk.
Logan finds other methods of communicating, for example, when he and Keegan were about to bust into the room to get to Ajax, Logan used his fingers to count down.
The National Wildlife Federation website says “Mountain lions are territorial and solitary. They use pheromones and physical signs… to define their territory.” (Mountain Lion, Fun Fact.)
Mountain lions are known for being very stealthy predators, again a given considering the fact we’re talking about the Ghosts.
The Mountain Lion Foundation describes them as being relentless hunters which almost connects it to the wiki quote for Logan that calls him a cold-blooded killer and an excellent soldier (CoD Ghosts: Wiki, Logan Walker, Personality.).
Elias T. “Scarecrow” Walker - Black Bear
Scary but not as scary as you may expect.
While Elias is certainly ready to do his job at any point no matter how bloody, he still has his weak spots, that being his sons.
He’s caring but while be stoic when necessary. He’s not territorial but will protect his friends and family when the time calls for it.
Also one detail I find cute about bears is that they have DNA relation to dogs, albeit very distant. I like to call bears giant murder puppies :D
Thomas A. Merrick - Grizzly Bear
I want to say that grizzly bears are often considered to be more dangerous than black bears and more likely to attack if given a reason to.
Both grizzlies and black bears can charge but where black bears may shift away at the last second and avoid attacking, grizzlies may continue to charge and attack their target (once again I’m thinking about Merrick punching Rorke because it just makes me laugh, that man was not ready).
Of course, Merrick is dangerous but he knows when the time is and isn’t appropriate despite his temper. Merrick is a big dude too, so I think this works (“stocky”).
Gabriel T. Rorke - Polar Bear
Once he has his sights on you, you’re already gone.
Hehe, polar bears are mighty dangerous.
Polar bears are bigger and stronger sometimes, but other time grizzlies and polars can be about the same in build.
Polar bears are more likely to attack considering they have fewer resources for food and typically eat a lot as well.
Fun fact: Polar bears don’t hibernate.
^^^ Piggy backing off that, Rorke doesn’t seem to be resting. He’s always planning something, whether it be a plan B or future plans.
He’s a very large and commanding presence who will find alternatives when desperate, willing to do what he must to make sure his plans are completed.
Keegan P. Russ - Leopard
Fast, sneaky. You don’t know he’s there until it’s too late.
Fun Fact: Leopards can roar. Keegan, though very quiet, stills speaks and intimidates with his voice when necessary.
Leopard’s are solitary and ambush hunters, I don’t need to explain this but I will.
If you recall, Rorke had a lot of trouble getting his nasty ass hands on Keegan after kidnapping the Walker family and Merrick.
His first objective was to find Keegan. In my eyes, it’s because he knows that as long as Keegan is alive, Rorke isn’t safe.
Like many animals, leopards care for one another, seen with families. I think Keegan is a very caring person but he avoids showing it often, which is fair.
Keegan continuously checks in with Logan throughout the game. In the underwater mission, he made sure Logan was okay. If you look closely when walking behind Keegan on the submarine, Keegan turns his head back to us briefly.
Alex V. “Ajax” Johnson - Elephant
Ajax is smart and powerful, I want to say he’s very determined.
In the short time we knew him, he was very stubborn as well. He didn’t give up anything and held out for a while. Though he was a lower rank than the other characters.
In his last moments, he made sure the last Ghosts knew what was happening in a last ditch effort to keep them safe and aware.
It’s hard to pin down super specific traits due to the fact that elephants can exhibit many and there’s not much we can give to Ajax.
I want to say that Ajax was more laid-back with his friends and comrades, leaving his bold energy for those who don’t deserve his respect ( insert the iconic scene where Ajax puts up his middle finger right at the Federation soldier ).
Like all the animals and characters on this list, Ajax was dangerous when necessary. He wasn’t spending every moment trying to be scary or intimidating or anything. He’s confident in himself and his abilities and he doesn’t need anyone else to speak up for him.
The respect we hear given to him by the Ghosts after his death was well deserved.
Love you, Ajax <3
Kick - Monitor Lizard
Some kind of reptile (I was so tempted to put him as a Gila Monster but I can’t do that to my best boi).
I’d say probably a water monitor.
These lizards, which can grow to 9 feet btw, don’t surprise their prey, but “actively pursue” them.
While these creatures have venom, but it’s not necessarily fatal.
Kick is definitely dangerous when he’s needed but it’s not like a “I am the grim reaper.” type of thing, it’s more like “I have a job to do and you won’t be in my way.”.
These creatures are known for being intelligent which lines up with Kick’s likely (not confirmed?) role as an information specialist.
The main thing that doesn’t quite line up is the fact that water monitors can be friendly whereas Kick is, if not more stand-offish, then solitary. I do imagine that he eventually opens up, but he’s definitely more comfy with his computers.
Neptune - Owl
I imagine that Neptune, being one of the original Ghosts, is very wise, though more subtle. I can’t think of what kind of owl he’d be, maybe snowy.
I mostly just wanted to include him here. Feel free to add onto him.
Riley… Riley
The most dangerous creature ever, himself.
World’s Best Throat-Snatcher over here being a cutie patootie with blood on his maw. 10/10 best boi.
#call of duty ghosts#call of duty ghosts headcanons#cod david hesh walker#david hesh walker#david hesh walker cod#cod logan walker#logan walker#logan walker cod#cod elias walker#elias walker#elias walker cod#cod merrick#thomas a merrick#thomas a merrick cod#cod rorke#gabriel t rorke#gabriel t rorke cod#cod keegan p russ#keegan p russ#keegan p russ cod#cod ajax#alex v ajax johnson#alex v johnson cod#ajax cod#cod kick#kick#kick cod#call of duty kick#kick call of duty#cod neptune
93 notes
·
View notes
Text
Useful tools and apps
Want some apps or sites to help you with writing? Here are some fun ones!
Apps I have used:
OneLook Thesaurus: this is a site that is both a dictionary and a reverse dictionary. Do you have moments where you just can't remember a certain word? You search up the description and OneLook helps you out! You can also look up the meaning of words and phrases, or look up synonyms! This is truly a lifesaver for me (and it doesn't span your google history with random word searches)
Excel, Google Spreadsheets, or other variants: Some people find it useful to keep lists, and you can make all kinds of lists in these spreadsheet apps or sites. You can make schedules, an oversight of all your WIPs, title ideas, fic ideas, prompts you've gotten, fics you have already uploaded, or even fics you've read!
miMind: this is a mindmap app, which I find very useful for outlining multi-chapter works.
Vocabulary: an app where you can learn new words, you can also use them as prompts!
Mimo: do you want to start coding on AO3 (make fake social media pics and text messages) then this is a great way to start learning some of the basics! It's like a duolingo for coding
Pinterest: you probably already know what it is. Here you can find A LOT. You can make moodboards, but you can also find a lot of writing advice! For example lists with alternatives for the word 'said'. Or tips on how to build your own world!
Discord: you can find a server with other writers that do word sprints, this is a great motivation to write!
Canva: you can create a lot on canva! You can also make fake social media posts here, or maybe you want a banner in your fics.
Wikipedia app: do you use Wikipedia a lot? You can also download the app. In the app you can keep tabs, so you don't need to keep those on your browser. This way you can easily find something you previously looked up.
Family gem: If your fic includes a big family, you can make a family tree in this app to keep track of who is who.
Pros - cons: can't make a decision? Here you can weight pros and cons against each other, or you can include two ideas instead.
Apps I have not used (yet):
Notion: I see this recommended a lot! Either for planning, outlining, or just writing fics
Reedsy: Fron what I've seen you can write in this app and easily format multiple chapters
Notability: an app that you can use while proofreading your stories. You can use it to highlight/annotate in pdfs and such.
Rhymer's block: need help with rhymes?
ProWritingAid: A place that can help you proofread and edit your work. They claim that your work won't be used tor AI algorithms
Slick Write: I might actually start using this one. It's free and helps you edit and can even suggest synonyms or related/associated words. It also shows you some statistics. It tells you which phrases and words you use a lot. As far as I can see there is no AI being used. Wish I found this before I renewed my Microsoft subscription 🤔😅 this is an extension and website, so no app
Dynalist: great for outlining! It also lets you write codes etc
Story plotter: also for outlining and even lets you seperate in scenes or acts
Know any more? Let people know by replying or reblogging!
14 notes
·
View notes
Text
Making a Digital Visual Timeline (in Python)
I have been on the hunt for a digital timeline I could easily use to store pivotal dates on and see the distance between them, as well as keep track of which events are in which story. And ultimately, I couldn't find a single website that satisfied me, so I made my own program. And swag bitches don't gatekeep, so I'm sharing how I made my timeline, in case anyone is running into the same struggles.
All you need to get started is any sort of program where you can write in Python (I use Thonny but anything that runs Python 3.10 works), and then import the Matplotlib library. If you use Thonny, this video tutorial is super short and straightforward. If you use something else, no doubt there are other video tutorials on how to import libraries on your given platform.
Then, copy in this code, making sure not to miss any indents or capitalization. I wanted to copy-paste the code directly into the text, but Tumblr doesn't register indents, so you have to copy from an image, sorry.
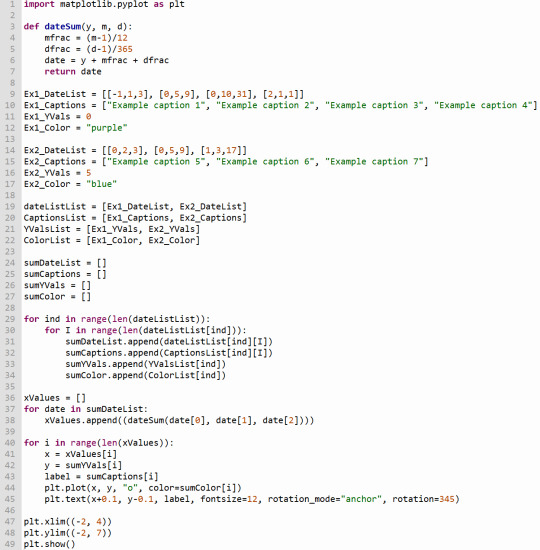
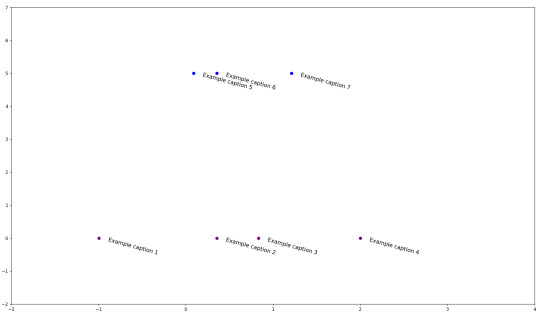
If you run this code as is, you should get this scatterplot.
Under the cut is further explanation of the parts you can and should change in order to make the timeline your own.

The Dates in the square brackets [] on lines 9 and 14 are formatted as Year/Month/Day. So if I wanted to make a point on September 2, 2009, I'd write it as [2009, 9, 2]. Each date must be enclosed in its own square bracket and separated by a comma.
The captions on lines 10 and 15 can be whatever you want, just keep them in quotations, and keep each quote separated by a comma. I like writing the date on the caption as well just for ease of reading.
Importantly, the number of Dates in any group's DateList line has to be equal to the number of Captions in the Captions line, but there can be a different number of Dates and Captions between groups. (So like, Ex1's DateList and Captions both have 4 items, but Ex2's DateList and Captions both have 3 instead.)
The YVals on lines 11 and 16 can be any number (though keeping the numbers relatively low, like from -5 to 5, is better). These just determine how high or low the dots appear on the timeline, if you want to keep different plots visually separate.
There is a LOT of freedom of choice for colors (lines 12 and 17) in Matplotlib. I recommend using the CSS colors, because you just have to write the name in quotations.
You can make more than 2 groups, and you can change the names of the groups. But if you do, you have to also adjust this part of the code below:

Whatever you name your Ex1 and Ex2 lists, put them into here. Additionally, you have to keep the lists consistent. If for example, dateListList was [Ex1_DateList, Ex2_DateList] and CaptionsList was [Ex2_Captions, Ex1_Captions], the code will either encounter an error or graph the wrong captions to the wrong dates.
Lastly, you can edit what parts of the graph appears using these 2 lines to control the X-axis and Y-axis of the plots respectively. You have to keep both pairs of parentheses for each line.
These numbers are relatively small because I chose small numbers as the example Dates. When I use this code for myself, I often switch between a view of (1950, 2050) to see roughly everything in the modern era, or (400, 2400) if I want to see some of the older historical events I've included as well.
These are just the parameters you HAVE to adjust to actually control your own timeline. You can ABSOLUTELY do more if you want to (just make sure to save backups :P). And if you have any questions, feel free to ask!
Happy timelineing!
#leah speaks :3#writblr#writerblr#timeline#timeline maker#writing resources#coding#compsci#python#matplotlib#i normally don't do heavy tags like this but SWAG BITCHES DON'T GATEKEEP! I wanna share this so nobody else has to struggle like I did!
10 notes
·
View notes
Text
Rapture: Before we begin.
We are about to start a long and involved process: I am about to start (tomorrow) posting OH GOD THE RAPTURE IS BURNING's final draft. As this story was first written here on this very tumblr, I have some experience with how to do this and what can go wrong.
Every day, with one single exception (May 22nd), I will post a chapter of the story (on both this tumblr and my Website). Each chapter is called a "log" (this story is also known as The Rapture Logs) and is titled with the day that it takes place. As the narrative persists from May 21st, 2011, to October 21st (and then a bit extra), I have elected to post the story now in the same way. The May 21st log will be posted on May 21st, the June 19th log will be posted on June 19th, et cetera.
As I much prefer to keep my hands on the 'product' even during delivery (there are many opportunities for something to go wrong), I do not plan on Scheduling any of these posts and will post them directly, myself, each day. I do not expect to adhere to a reliable schedule, so the exact time that a log is released may change per day. However, I may get into a rhythm. Can't promise anything. (If you want to.. what is it, Subscribe to my tumblr, make it so you get Notifications when I post? That may be a good idea. Up to you.)
After having done some testing, the exact method I use to bring these logs to tumblr this time causes some finicky formatting errors that tumblr does not allow me to fix. I've tried, many times, and they keep resetting. However, these errors are (so far) minor. When there is a long consecutive string of bolded or italicized text, for instance, you may see the bold/italics end before it should. If you see that kind of thing, I am 99% sure it is unintentional, and I am aware of it, and I am sorry. Hopefully it shouldn't be that distracting.
There are some... other missing features that the Website will have and the tumblr will not. So. The Website is the best way to read. And the tumblr will be here as a supplement, in case for some people it is just easier to stay on tumblr.
I am including links, at the bottom of each log, to the tumblr Table of Contents, and to the Next and Previous Logs. If you are following this release daily, the "Next" button will not function at first. Because the next log will not have been posted yet. Makes sense, but wanted to be clear.
Art will be included within the logs. Not every log. Not even many logs. But there will be art. And on those days, I will also post the art in a separate post after the log, giving full credit to the artist. There may be one exception I can think of, where the art is of a fundamental spoiler, and I'll.... figure something out for that event.
These logs are going to get long. They are not predictable. I mean, anything is predictable, and Rapture is easily long enough that you will start to engage with trying to predict it. But my point here is: Each day, ask your innermost heart, "Do I feel like reading this?" It is okay if the answer is "Not today." I do not require a certain number of Likes, Comments, and/or Subscribes before I post the remainder of the story. And this is not a Limited Release; Rapture will be available forever. I would like readers, of all stripes and sorts, including daily ones. But I also would like some spaghetti bolognese. Today might not be a spaghetti bolognese day, and I've made peace with that uncertainty. .....so, yeah, feel free to catch up with the story later if you must.
Now, let me remind you of the Trigger Warning that I had posted at the beginning of May.
Trigger Warnings: Sex, Gods, and Rock & Roll. (violence, to others and to the self. some swear words. teenage angst, cringe. death. insects. surrealism. symbolism. unpredictability of what will be explained and what won’t. sexual acts with dubious consent– you will be able to skip that part. religious iconography. and so much prog rock.)
The only joke in there is the word "some" before "swear words." I promise you, this story is not for everyone. I do not say that to brag; I say that to convey some of the responses I have gotten from previous drafts. I have accounted for one skip in the entire story, and it's pretty early on. Rapture hits the dubious consent theme in its least comfortable form early and then lays off of it. Being honest with you, earlier drafts did have more of it, and I cut out almost all of it, but I did not remove that early instance, even after eight big opportunities to do so. I deeply believe it is doing something beyond just shock. And so, if you choose to skip it, I have at least included a safe recap at the point where skippers resume.
That should be all the essential stuff. Now for some quick bits:
This story makes use of emoticons, including a couple that are not common. Keep in mind that every emoticon has eyes and a mouth. For instance: the .w. face is related to the owo face, but using the eyes from the ._. face. What .w. means is a sort of humble happiness, an "Aw, shucks!" (The < in <:D is intended as eyebrows, not a party hat.)
This story uses some real names, of people and places. The places are just... places. The people names are only used where permission was granted, and I explicitly only use them for the sake of aesthetic, personally enjoying the way a name looks or sounds. All the events and opinions portrayed are fictitious.
There is a caveat in the case of the main protagonist and narrator. He is a riddle of a self-insert, a caricatured snapshot in time of the author at 16. Think what you will about the merits of a self-insert. I promise you, every expectation you have has been taken care of. I promise you, I know what I am doing here.
Okay. That's a lot of words.
Honestly there's probably even more stuff I should say? But I don't want to overexplain this. Chances are, you're actually gonna be totally fine??? Chances are, Rapture in its final draft is totally readable, and not even all that shocking, and all this preparation is making it sound like it's gonna be way worse than it really is. That's the best-case scenario here. I'd rather be prepared.
So. So look. We are on tumblr. You have the ability to send me Asks. Ask me anything. Please, ask me anything. You want the best way to read? You want clarity on what the heck I was thinking when I wrote a weird opinion of Jordan's? You want to know when the story will get good? Ask me.
'Cause, starting tomorrow until the story's done, I'm only going to be posting about Rapture. I'm going full Rapture Mode. I will only reblog posts relevant to Rapture. I will only post links to the Website, or anything relevant to the story.
Right now, as of May 20th, I am still in the process of rewriting later sections of the story. I have hit some slowdown as there were some logs that took multiple days, but I am still over two months ahead of where you'll be, so there's a bit of buffer. I should be done around August? So you're watching me do a public performance here too. Trying to outrun my own story and finish it before the present catches up with me. We'll see. God, we'll see.
God, I hope my new readers are ready. Rapture was once called a "butchery of epistolary literature," are you ready to see what spawned that insult?
Am I ready to expose myself to the world once again?
Let's!!! Let's do this thing!!!
7 notes
·
View notes
Text
Book Launch Checklist: Everything You Need to Make Your Release a Hit
by: Ricky Patterson
12/28
Alright, family—your book is finished, it’s polished, and it’s time to share your hard work with the world. The excitement is real, but let’s keep it 100: a successful book launch isn’t just about publishing and hoping for the best. You’ve got to plan, prepare, and make noise so your book gets the attention it deserves. If you want your release to be a hit, here’s the ultimate Book Launch Checklist to guide you every step of the way.
1. Get Your Manuscript Right
Before you even think about launch day, make sure your book is tight. You don’t want to drop anything less than your best.
Edit and Proofread: Don’t skip this part. Whether you’re working with a pro or doing it yourself, editing is crucial. Get your grammar, structure, and flow on point. You want your readers to be hooked from the first page.
Formatting is Key: Your book’s look is everything, whether it’s digital or print. Make sure it’s formatted professionally so it reads smoothly and looks sharp on every device and page.
2. Design a Cover That Pops
Your book cover is the first thing people see, and trust, they’ll judge it. Make sure it’s on point.
Work with a Designer: Unless you’re a designer yourself, it’s a good idea to hire someone who knows what they’re doing. Your cover needs to speak to the heart of your book.
Get Feedback: Don’t be afraid to ask for opinions. Show it to friends or fans who know your work to see if the design matches the vibe you’re going for.
3. Pick the Right Launch Date
The timing of your release can make a huge difference in how your book performs.
Avoid Busy Seasons: Don’t drop your book in the middle of a bunch of big releases or major holidays. Find a window where your book can shine without being overshadowed.
Give Yourself Time: You don’t want to rush it. At least 6-12 months of prep is ideal to get everything together, from marketing to reaching out to influencers.
4. Build Your Author Platform
Before you drop your book, you need a strong foundation. Build that platform so you can easily connect with your readers.
Create Your Website: Your author website is like your home base. Make sure it’s clean, professional, and showcases your book. Include a buying link, your bio, and media info.
Get Social: Update your social media profiles to reflect your author brand. Post regularly and interact with your followers. This is where your tribe will come from.
Email List: If you don’t have an email list yet, start one now. Offer an exclusive preview of your book or behind-the-scenes content to get people to sign up.
5. Get Your Marketing Materials Together
A book launch needs a solid marketing plan. Don’t just post one picture and hope for the best—be intentional.
Create a Press Kit: Have a press release ready, plus images of your book cover, your author bio, and a few sample interview questions. This makes it easy for media outlets to talk about your book.
Write a Killer Book Description: You need a description that grabs people’s attention and makes them say, “I need to read this!” Keep it tight and to the point.
Social Media Content: Plan your posts in advance. Share teasers, sneak peeks, and quotes to keep your followers engaged.
Book Trailer (Optional): A quick, professional book trailer can go a long way in getting people excited. This is optional, but it could help get your book in front of a larger audience.
6. Reach Out to Reviewers and Influencers
Reviews are the lifeblood of a successful book launch. You need to get people talking about your book, and you want to do it early.
Send Out ARCs: Advanced Review Copies (ARCs) are critical. Send them to bloggers, reviewers, and influencers in your genre at least 6-8 weeks before the release date.
Connect with Influencers: Look for influencers on platforms like Instagram, YouTube, and TikTok. Offer them a free copy in exchange for a review or shout-out.
Collect Testimonials: Reach out to other authors or people you admire for testimonials to include on your site and promotional materials.
7. Engage Your Audience
Your readers are your biggest supporters, so make sure they feel included every step of the way.
Run Giveaways: Giveaways are an awesome way to get people excited. You can give away free copies of your book, swag, or exclusive content.
Host a Launch Event: Whether it’s virtual or in-person, a launch event is a great way to connect with your readers. Do a live reading, Q&A, or panel to celebrate the big day.
Create a Launch Team: This is your squad. Get a group of your biggest supporters to help promote your book by sharing posts, leaving reviews, and spreading the word.
8. Invest in Paid Advertising
Sometimes, a little extra push can go a long way. If you’re serious about getting your book out there, paid ads are a smart move.
Facebook/Instagram Ads: These platforms give you the ability to target your ideal readers based on interests, demographics, and behaviors. You can create custom ads that fit your budget and goals.
Amazon Ads: If you’re selling on Amazon, use Amazon’s ad platform to increase your book’s visibility.
Google Ads: This is a more advanced option, but Google Ads can help you reach a larger audience, especially if you want to promote your book beyond social media.
9. Stay Active During Launch Week
Your book is officially out—now it’s time to make noise and keep the momentum going.
Promote Every Day: Don’t go silent after launch day. Keep posting, sharing, and engaging with your audience on social media and through your email list.
Respond to Comments: Interact with readers who post reviews or comment on your social media posts. Show them love, because they’re showing you love.
Monitor Sales and Reviews: Track how your book is doing in terms of sales and reviews. If things aren’t picking up as expected, try adjusting your marketing strategy.
10. Post-Launch: Keep That Energy Going
The launch isn’t over just because the book is out. Keep pushing!
Ongoing Promotion: Continue to promote your book through social media, newsletters, and ads. You don’t want the buzz to die down too soon.
Schedule Future Promotions: Think about running promotions like discounts or bundles to give your book a second wave of attention.
Keep Collecting Reviews: Reviews are important long after launch day. Keep asking for reviews, testimonials, and shout-outs.
Final Thoughts
A successful book launch is a marathon, not a sprint. With the right plan in place, you can turn your book into the next must-read. So take your time, get your marketing materials together, and always keep the focus on your readers. Your book is a reflection of you and your hard work—now it’s time to let the world know. Let’s get it!
www.theblackauthorhub.com
2 notes
·
View notes
Note
I’ve been meaning to ask for a while – you purchased the digital copy of Mononoke Shu from Bookwalker, yes?
How easily can you purchase it with non-Japanese currency? And is the format a downloadable PDF of sorts? I’m trying to find a more affordable/shipping-free alternative to getting my Mononoke merch fix ;u;
Yeah, I got it from Bookwalker for around $5 USD
I had to use google translate to figure out what it was saying while I was going through the checkout (it's only on the Japanese side of website so it's not translated), but other than having to run it through that, it was a pretty standard online shopping experience, just make the account if you don't have one already and then go through the putting in the payment info and then you can grab the book whenever you want from your account. The price is listed in yen but they don't seem to have an issue converting to dollars or euros
Annoyingly, if you do buy it through Bookwalker, they have a proprietary file format they use to where you can only view it on their website or their mobile app, which if your internet is reliable is...okay, but it's not like you can download it and access it and you own it, you're pretty much just buying access to it on Bookwalker. On the other hand (and I'm not saying you *should* do this necessarily but I will put it out there) there's nothing stopping you from going into the browser version of their reader and using the snipping tool on any part of the page you might find interesting...or the whole page...or flipping through and getting every page to ad hoc an offline version for use. You know. Hypothetically. It's not like Crunchyroll where it'll block out the contents of the screen when you're using any kind of screen recording tool. So...there is that. Again, hypothetically, do with that information what you will
Hope this helps :)
(And if you're looking for other shipping-free merch and don't already have them, I know that the manga adaptions for the show are on Bookwalker too, probably with the same deal, but I haven't actually nabbed those just yet. I sure do know that they went out of their way to make the medicine vendor real pretty though)
5 notes
·
View notes
Text
How to edit captions with your video track
Why: I like making edits of my favorite series, but I hate redo captioning. But I also know quality captions are vital to some viewers (I also use them). To me adding captions is the bare minimum for release, but also hearing all the words and timing them or even re-timing existing captions is very hard with my disabilities and this has been a barrier to me releasing edits. But no more!
DaVinci Resolve lets you add a SubRip (SRT) subtitle track to any video and then edit it at the same time as the video. It also counts as an edit for the Go To Previous/Next Edit button. Con: You can't use the button to jump to big cuts in the video. Pro: You can now easily jump to the an existing timing for someone starting to talk.
DaVinci Resolve:
DaVinci Resolve is a professional video editor with widespread industry use that also has a no-strings-attached perpetual free version. It's got a ton of features in the free version that will more than cover basic editing. It's relatively easy to use (basic tutorials help). If you need more advanced tools you can upgrade to a full license. They don't pester you about it in the free version unless you try to use the advanced tools. I would already recommend using this program to anyone looking to get into video editing.
SRT Subtitles
The SRT subtitle standard is a type of text file that includes subtitles with timings and no formatting. They can be stored separately from a video file or embedded into certain files like MP4s. This is what you'll get if you download captions from YouTube (some YouTube downloaders embed them in the video, some don't). DVD rippers usually have several options. You want an SRT file. And there are websites that host fan-made or fan ripped subtitles for less officially obtained material. You can also make your own SRT file with timings within DaVinci Resolve or with an SRT editor. You can also use this to improve on official captions while making your edit.
A pro feature of DaVinci is it can do machine captioning and then you clean it up. You can also do this for free using YouTube by privately uploading the video, letting it auto-caption, and then editing the captions. You MUST edit machine captions. They are not accurate enough on their own to be accessible. But they can be a step in helping you get it done.
Extracting Embedded SRTs
DaVinci needs an SRT file to import captions. It doesn't seem to extract embedded SRT files from MP4s. Fortunately, it's very easy to extract them.
Subtitle Edit is an open source subtitle editor. It's a great tool if you're making your subtitles from scratch or editing existing ones.
For our purposes, simply open the video with the embedded subtitle track. Click save. Save the SRT file with a useful name somewhere convenient. I recommend using the same name as video it goes with in the same folder.
Adding a Subtitle Track to DaVinci
Rev Tutorial with text and video
Open your project in DaVinci Resolve. Add your SRT file to the bin.
Under "File" select "Import" then "Subtitle."
Or click the Import Media button and add it as normal.
From the bin, select your video and subtitles. Right-click them and select "Create New Timeline Using Selected Clips".
You should now have a timeline where the video and captions are reunited and can be edited together.
Editing the Subtitles
You can now move around the subtitles like any text overlay, including making them longer or shorter. If you click a subtitle you can edit the text and exact timing using numbers. Or edit the timing visually using the timeline. The Go To Previous/Next Edit button can now help you skip to a timing someone else made for you which is usually good enough for a fan cut, making your job easier. From the Edit view you can see the audio track visualizer along with the captions for a perfect cut.
Putting Your Tracks Together
If you're making a compilations, where's where things start to suck. The subtitles are not brought along when you next your clips. They will play over the video, but they won't export to an SRT video or be embedded. You're going to have to manually copy them. But at least now they're the correct length and you have them synced up. I would highly recommend you start your subtitles right at the beginning of the clip or put a fake one in to delete later.
Add your Timelines to a new timeline as usual.
Go to the timeline of the first clip.
With the clip at the beginning, right click the seeker bar and click the select to right button on the circular menu.
Use CTRL + left click to deselect the video/audio tracks. Copy the subtitle track.
Go to the combined timeline. Go to the start of your clip.
Paste the subtitles. You may have to add a subtitle track.
Copy the subtitles from the next clip.
Go to the combined timeline and move to the start of the that clip. Paste the new set in.
Rename your subtitle tracks with the language they're in or type.
Export
Go to the deliver tab. Choose the file name and location. If you're posting to YouTube, render as a single clip, and export to MP4. Under the Subtitle Settings, select "Export Subtitle", Format "As a separate file", and Export As "SRT Without Formatting". Select the subtitle tracks you want to export with the video.
Add to Render Queue. Then render the clips over on the right.
Uploading to YouTube
Upload the video as normal. At the Video Elements step, add subtitles. Select upload file, then with timings. Your subtitles should show up on the timeline and you can check they're correct and fix anything last minute. Do this for each language you add. Continue uploading as normal.
Conclusion
That's my process for adding existing subtitles to my videos. I've wanted something like this for ages so I was super pleased to learn Davinci Resolve has it. I hope this encourages other clip makers with some access to pre-made captions to use them for their videos. It's easy, free, and can even help speed up the editing process. It makes your videos much more accessible and creates a transcript that's searchable and timestamped for easy navigation and quote copying. I really recommend working this into your process so more fans who need captions can share in your work.
4 notes
·
View notes
Text
Elevate Your Designs: How PSD Mockups Can Transform Your Creative Projects!
In the world of design, presentation is everything. Whether you are a graphic designer, web developer, or marketing professional, the way you showcase your work can make a significant impact on its reception. This is where PSD mockups come into play. PSD, short for Photoshop Document, is a file format that allows designers to create and manipulate realistic, high-quality mockups. In this article, we explore the transformative power of PSD mockups and how they can elevate your creative projects to new heights.
1. Visual Realism: Bringing Designs to Life
One of the most compelling advantages of using PSD mockups is their ability to bring designs to life with visual realism. By integrating your designs into a mockup template, you can present them in a context that closely resembles the final product. Whether it's showcasing a website on various devices, presenting a branding concept on packaging, or displaying a poster in a realistic setting, PSD mockups provide a visually immersive experience that captures the essence of your design. This level of realism helps clients and stakeholders envision the end result, making it easier to communicate and sell your ideas.
2. Streamlined Workflow: Saving Time and Effort
In the fast-paced world of design, efficiency is key. PSD mockups offer a streamlined workflow that can save you valuable time and effort. Instead of starting from scratch and creating physical prototypes or coding entire websites, you can utilize pre-designed mockup templates. These templates are customizable, allowing you to easily insert your own designs and customize them to fit your specific project requirements. With ready-to-use mockups at your disposal, you can focus on perfecting the design itself, rather than spending hours on the technical aspects of presentation.
3. Consistency and Branding: Establishing a Cohesive Identity
Maintaining consistency and a cohesive brand identity is vital for any creative project. PSD mockups enable you to present your designs in a consistent and professional manner, aligning with your brand guidelines and visual aesthetics. By using mockup templates that are customized to match your brand elements, colors, and typography, you can create a cohesive visual identity across different platforms and mediums. This consistency not only enhances your brand's recognition and professionalism but also helps build trust and credibility among your target audience.
4. Client Engagement: Showcasing the Possibilities
When working with clients or stakeholders, it's crucial to showcase the possibilities and potential of your designs. PSD mockups provide an excellent platform for presenting multiple design variations and options. By presenting your designs in realistic settings and contexts, you can effectively demonstrate how they will look and function in real-world scenarios. This visual representation helps clients visualize the end product, fostering better understanding and engagement. Additionally, mockups allow for easy iteration and feedback, enabling you to make adjustments and revisions based on client preferences, leading to a more collaborative and satisfying design process.
Conclusion
PSD mockups are a game-changer in the world of design, offering numerous benefits that can transform your creative projects. From visual realism and streamlined workflows to consistency in branding and enhanced client engagement, mockups elevate your designs to new levels of professionalism and impact. By leveraging the power of PSD mockups, you can effectively communicate your ideas, impress clients and stakeholders, and ultimately deliver outstanding results that leave a lasting impression. Embrace the power of PSD mockups and unlock the true potential of your creative projects!
Check out: Download A4 Resume CV Free PSD Mockup
2 notes
·
View notes
Text
How to Download Instagram Videos Easily in 2025
Instagram has become one of the most popular social media platforms in the world, with millions of videos uploaded daily. From funny reels to inspiring tutorials, people love sharing and consuming video content on the app. But what if you come across a video that you want to save and watch later? That’s where the need for an Instagram video download tool comes in.
In this article, we’ll explain why users download Instagram videos, how to do it safely, and the best tools to use in 2025.
Why Download Instagram Videos?
There are many reasons why users want to download Instagram videos:
Offline Viewing: You can save videos to watch later without needing an internet connection.
Re-sharing: Influencers and content creators often save videos for reposting with proper credits.
Archiving: Brands and businesses may want to keep a record of their own video content or content featuring their products.
Inspiration: Many users download motivational or educational videos for future reference.
However, Instagram doesn’t offer a built-in feature for downloading videos, so users need to rely on third-party tools and apps.
How to Download Instagram Videos
There are several methods to download Instagram videos, depending on the device you're using. Here's a look at the most common and effective ways:
1. Online Instagram Video Downloader Websites
Web-based tools are the most convenient option. They work on any device, and you don’t need to install anything. Here’s how they work:
Copy the video URL from Instagram.
Visit an Instagram video download website like SaveInsta, Inflact, or iGram.
Paste the URL into the download box.
Click the "Download" button and choose your preferred quality.
These websites are fast and free, though some may include ads.
2. Mobile Apps for Android and iOS
There are mobile apps specifically designed for Instagram downloads. Popular ones include:
FastSave for Instagram (Android)
Repost: For Instagram (iOS)
InsTake Downloader
These apps let you save videos directly to your phone and even repost them with original captions.
3. Browser Extensions
If you use Instagram on your computer, browser extensions for Chrome or Firefox can help you download videos easily. Add-ons like Downloader for Instagram™ let you download content with one click while browsing.
Is Downloading Instagram Videos Legal?
Downloading videos for personal use is generally fine, but re-sharing content without credit can lead to copyright issues. Always make sure to:
Get permission from the creator when reposting.
Avoid using downloaded videos for commercial purposes without consent.
Respect Instagram's terms of service.
Tips for Safe Downloads
To avoid malware or phishing scams, keep the following in mind:
Use trusted websites or apps.
Avoid tools that ask for your Instagram login.
Don’t click suspicious pop-ups or ads during the download process.
Final Thoughts
Downloading Instagram videos is a handy feature that many users need, whether for entertainment, work, or personal use. With the right tools and a few simple steps, you can easily save your favorite Instagram videos in 2025. Just remember to respect content ownership and always use secure methods.
Whether you’re a content creator, marketer, or just an Instagram fan, mastering the art of Instagram video download gives you more flexibility and control over your media experience.
Would you like this turned into a blog post with formatting (headings, bullet points, etc.) for easy pasting into a website?
1 note
·
View note
Text
today's log: March 7th having the name that she does sent me into a spiral of despair as i realized how Telestrata wouldn't use the same calendar/date system as the other regions, and now i gotta figure out if i should address that at all, or just hand wave it like the shared language thing.......
unfortunately i'm a worldbuilding fiend and not only would it bug me not to give it any consideration, it also seems potentially fun... conceptually, anyway. realistically though i'm faced with the prospect of making up all new names for chunks of time and deciding how granular i should be with it.
years, months, and days/nights are all likely to have Telestratan counterparts since ALL humans originated from Earth, where cycles were observable in nature and marked the passage of time. now, bc Telestrata doesn't have night cycles or seasons, time is probably recorded and marked in some other way, artificially tracked, perhaps by a mechanism of sorts. days/nights are called wake/sleep cycles, that much i already established.
the trouble with dates is the fact that London/Empyrean dates are all based on things like the birth of Christ and important historical figures getting months named after themselves. but, neither Julius nor Jesus were around in the region where Telestratans hail from, so the "1900s" or "July" simply wouldn't be a thing. they'd have some... other... things...
at the same time i'm also struggling with formatting a timeline in general. i tried searching for some app or tool or anything i could use that would quickly and easily allow me to build a timeline - for free, ideally - but nothing of the sort appears to exist. plenty of websites that claim to give one the ability to do exactly that, but far too many of them are catering towards businesses and marketing and shit like that rather than creative writing. then there's all the "we have AI tools!" advertised as a bonus feature, which have me running far the fuck away lmao. even the "best" one i was able to find is so aggravatingly not user friendly that it defies reason and actively does not do what it claims to do, and i don't understand why or if i'm doing something wrong. Plottist, you are so, so, sooo sorely missed...
like i can't understand how this isn't straightforward. surely it can't be that hard to have a tool where you can plug in a date, like a year, and then just like... have the ability to add years onto the end or insert years at the front, and connect events to each one. with simple clicks, maybe drag-and-drop elements?? like, in the simplest terms, just here's a text box you can attach to a year, with a title and description, and then have a button that just appends a new box to the end with the next date. surely that's not complicated? i mean i know it's POSSIBLE bc that's what Plottist was, and so much more... sure i couldn't do it but there are so many talented coders/programmers out there, and this is such an essential tool for writers, HOW does it not exist?? and Plottist DIED; this kind of tool literally UN-EXISTED!! wtf!!
just using Plottr atm, which is... passable. it gets the job done. however, it can be clunky in places, and it's obviously not designed to be a historical timeline, soooo. idk man, it's just exhausting.
at least i've worked out what ages different characters were at various points in the timeline predating the events of the story. like, i now have a good idea the level of awareness each character might have of important world events. most of the younger cast were very little kids when the Unification War broke out, but Blade was 12 - young, sure, but old enough to understand what a war is. when news of the genocide hit the world, he was 24; not only was he old enough to understand the gravity of the event, he'd have been able to see the progression of the war throughout his life, and i think it likely impacted him pretty hard. aha, but i'm going on a tangent...
last thing to report, i've been working on outlines for backstory pieces. i think it will be possible to write and publish the stories of how each ended up boarding the Express without dropping any major spoilers, and if so, it would be fun to do so. in particular, my vision for March's story is extremely strong, which i think would make it a lil easier to work on as an exercise, if nothing else.
#telestrata log#forever haunted by my own perfectionism & desire to have all things mapped out#rip Plottist you were such a real one#Plottr is great for sure but the visual touches Plottist offered put it on another level#i guess jotting things down in my discord server will have to do... for now
1 note
·
View note
Text
Split Images Online for Free

Splitting images into smaller parts has become a popular technique, especially for creative and practical purposes today, especially in the world of social media. Be it in making an Instagram post, banner, or even a stunning visual story, having an online image splitter tool can make the work smooth and efficient. Using PhotoCut, you can easily divide any pictures into creative ways without the need for any specialized software.
In this blog, we'll look at all the possible applications and functions of online image splitters, such as PhotoCut, see how to split images, and also address frequently asked questions regarding this process. Want to create an Instagram grid, or event teaser, or just have fun playing around with your photos? This is a game-changer.
Why Split Images?
Before we talk about how you can split an image, let's talk about why you'd want to do that at all. There are several reasons why you might want to divide a photo, and it isn't just for pretty pictures. Here are some common occasions:
Social Media Layouts: One of the most common uses of image splitting is for Instagram, especially when creating a multi-image grid layout. This allows for a unique, cohesive aesthetic across multiple posts.
Event Promotion: You can tease your upcoming events by splitting promotional materials like posters or invites into pieces. Each piece can be posted separately, building anticipation as followers view the content one piece at a time.
Website Design: If you are a web designer, breaking up images into smaller parts like banners or background pieces helps you create a unified website layout.
Photo Collages: A good photo collage, on the other hand, will be created with the help of splitting a single image into separate pieces that convey a story, or simply allow different elements within the same image to be developed.
Whether it is artistic, business, or personal purposes, splitting images can provide creativity and help make your content unique.
Learn about the different types of e-commerce APIs and their benefits.
How Does PhotoCut’s Image Splitter Work?
PhotoCut offers an online image splitter to split your photos with ease. Here's a step-by-step guide to using this tool:
Step 1: Upload Your Images
Import first the image of your choice; PhotoCut will provide you with a very simple-to-use interface wherein you can also drag and upload your photos via drag and drop. It supported PNG, JPG, and JPEG file formats with no issues, so compatibility doesn't seem an issue here at all.
Step 2: Customize Your Grid Layout
Once you upload an image, then you can use the number of rows and the number of columns to split how you want them. You choose simple grids to get 2x2 or 3x2, but you can pick more creative and unique layouts also. The greater the number, the smaller a piece of this image will look. So choose your grid type and experiment there.
For Instagram, 3x3 or 3x1 works well, too, in producing an aesthetically appealing grid. Now, there's no end to what you might do.
Step 3: Split and Download Your Images
After you’ve chosen your grid dimensions, you can initiate the split. PhotoCut will divide your image into the smaller sections you’ve specified. If you've used the Split Function, you get to preview and make sure everything is all good.
Click that download button; the split image will come along in a nice ZIP file where you can now extract to piece together your various parts.
Step 4: Post Your Split Images
You can now share your downloaded split images with your audience. For Instagram, you may publish the images individually so as not to distort your unique visually consistent grid. However, this does not imply the order in which you should publish your images as this is sensitive to when it appears to other people and thereby affects the quality of your picture.
Why Choose PhotoCut’s Image Splitter?
No Special Apps Needed: The biggest advantage of PhotoCut's online image splitter is that no special software has to be downloaded. Everything happens within your web browser, which means no extra storage space or complicated installations.
Multiple Image Format Support: Whether you’re working with PNGs, JPEGs, or JPGs, PhotoCut’s tool can handle various formats without any restrictions. This ensures you can split your images regardless of file type.
Flexible Grid Dimensions: PhotoCut will allow you to choose the dimensions of the split photo grid. You can achieve grids as basic as 2x2, or as detailed as 5x4, and so on to have complete control over how images are divided, which is flexible enough to cater to your individual needs, perhaps in designing an Instagram grid custom or creating a banner for a website.
Ease of Use: PhotoCut is easy to use for all. You could be a person with or without the most significant IT skills in the world because it's quite intuitive and navigable. There is no hassle to spend on learning complicated software but instead, concentrate on being creative.
Design your home beautifully using PhotoCut’s AI Interior Design Generator.
Common Uses for PhotoCut’s Image Splitter
Now that we know how the tool works, let’s explore some of the best ways to use an online image splitter like PhotoCut:
1. Instagram Storytelling
Instagram is all about visuals, so splitting an image into multiple parts is a playful and engaging means of telling the story. After coming back from a trip, or after accomplishing something huge, split the photos into a series of pictures and post one after another for your audience's excitement. That way, people can piece up the full picture while scrolling down through your feed, creating more suspense and fun. Discover the best Instagram filters and effects for your photos.
2. Event Teasers
Planning for a big event and want some hype around that? Split your event poster in several pieces; it will create buzz. By posting each segment separately, you give your audience the chance to unlock the full image over time, which creates a sense of excitement and curiosity.
3. Grid Layouts for a Cohesive Feed
Instagram users love creating visually cohesive feeds. By using an online image splitter, you can split a single image into multiple sections and post them strategically to create a seamless grid layout. It’s a fun way to give your page a creative aesthetic while sharing larger images in a segmented form.
4. Creating Collages or Panoramas
You can also use the image splitter tool to create collages or panoramas. This technique is especially useful when you have a wide landscape or a group photo you want to display in pieces. You can then arrange the individual sections in a way that creates a collage-style effect.
5. Website Design Elements
For designers, image splitters are also handy for creating elements like banners, icons, or background pieces for websites. By splitting large images into smaller sections, you can easily incorporate them into website layouts without losing quality.
Conclusion
The online image splitter of PhotoCut is a really powerful yet not complicated tool through which you can creatively divide the images for all your social media, design projects, and lots more. With no special software required, the tool supports multiple formats and allows for customizing grid dimensions, it is perfect for both beginners and advanced users. Be it something elaborate like an Instagram grid, an event promotion, or merely just having fun with your photos, PhotoCut's online image splitter has everything you need to split your photos easily.
Learn how Video APIs can make your videos better.
FAQs
Q1. What does it mean to "split an image online"?
Ans. Sharding an image online is slicing a large graphic into smaller units, usually viewed in a matrix or row-column layout. Commonly used, it applies to Instagram, collages on websites, as well as graphics design.
Q2. Do I need to download software to split images online?
Ans. Of course not. Online image splitter works right out of your computer browser, with no need for any software.
Q3. Are online image splitters free?
Ans. Many online image splitters, like PhotoCut, are free to use. However, some may offer premium features for a fee.
Q4. What formats do online image splitters support?
Ans. Most online image splitters support popular formats like PNG, JPG, and JPEG, and some may also support additional formats like TIFF.
Q5. Can I split images into irregular shapes?
Ans. Basic online image splitters focus primarily on grid-based splits. For irregular shapes or more advanced splitting options, you may need to use image editing software like Photoshop.
0 notes
Text
Discover the Power of Bytesize Icons — Free & Lightweight Icons at Iconadda

Seeking light, minimalist icons that will not make your app or website? Perfect, pixel-perfect, minimal SVG icon Bitis icon, pixel-perfect, minimal SVG icon for new UI/UX design. Iconadda provides a handpicked collection of free bitis icon that are available for both personal and commercial projects.
What is your definition of the bytesize icon? A set of an open source icon named Bights icon was designed for the speed and the simplicity. Since they are SVG-based, the innocent scores without compromising the quality. Since every icon is created with consistent stroke width, the user interface becomes streamlined and expert.
These minimalist icons can enhance your design without making your project quite large, whether you design dashboards, mobile applications or destination page.
Why use the Iconadda’s Bytesize icon? We know how crucial style and performance are to Iconadda . The Bytesize icon package is:
To download and use, even for commercial purposes; Light and early to load; Fully configured (you can easily alter color, shape or stroke); Consistent styling for a smooth, contemporary look; PNG and SVG introduced in formats.
Ideal for any undertaking These free bytes are perfect for iconing websites and pages. Mobile phone applications (iOS and Android) Dashboard and webapp Admin Panel and Mother -in -Laut Equipment Brokers, presentation and so much more
With Iconadda , where we regularly upload new icons, you can utilize the whole set of minimum icons.
How to use Iconadda’s Bytesize Icon It is simple to initiate: Visit iconadda . Search for the Bytesize icon. Pick your favorite icon. Download for free in SVG/PNG format!
To have Pixel-Perfect rendering, you may copy and paste the SVG code directly into the HTML.
Final remarks The Iconadda Bytesize icon is what you are looking for if you are ill with massive icon libraries and need some quick, easy and free. Provide your upcoming project with sleek, contemporary appearance that is worth using them to use now.
Anyone can test the bytesize icon for free today!
#ByteSizeIcons#PixelIcons#MinimalIcons#IconDesign#UIIcons#IconPack#FlatDesign#UXDesign#FreeIcons#DesignAssets
0 notes
Text
Batch Filtering Numbers for WhatsApp Marketing
With the rise of global marketing trends, many methods for quick marketing have emerged, such as using social media, offline campaigns, and various website-based marketing strategies. These methods can achieve excellent marketing results.

Among these marketing channels, social media marketing still stands out as the most efficient and widely spread method. Not only can we directly benefit from the large user base of social media platforms, but we can also use their communication features to easily complete marketing operations.
For example, WhatsApp, a widely popular communication and social software, has become the choice of many marketers. Thanks to its high popularity and direct communication functions, marketers can quickly locate potential marketing targets and efficiently distribute promotional content.
However, with so many users, how can marketers achieve the most efficient and high-conversion marketing operations? Perhaps, we should consider performing user filtering operations!
User filtering is a method that helps marketers better select suitable users. By leveraging user information, marketers can categorize their audience for targeted marketing. For example, if your product performs well in a certain region, filtering out users from that region for marketing can improve overall marketing efficiency and conversion rates.
On the other hand, for regions where sales are poor or competition is intense, we can choose to skip marketing efforts, avoiding unnecessary consumption of time, energy, and financial resources.
Using Crownsoft’s WhatsApp Bulk Filter, we can batch filter details corresponding to WhatsApp accounts from phone numbers, such as profile pictures, signatures, registration information, as well as automatically recognized information like user age, gender, and language. These details enable marketers to quickly and easily filter out the most suitable customer targets for their marketing campaigns, thus achieving more efficient marketing operations.
Crownsoft’s WhatsApp Bulk Filter also allows us to generate phone numbers for various regions in multiple ways and filter them to acquire relevant information. By logging into your WhatsApp account, the software analyzes and displays the registration status of each number.
In addition, the software supports advanced filtering of various details, such as profile pictures, age (auto-detected), gender (auto-detected), signature, and signature language (auto-detected). The filtered data can also be exported in formats such as .txt, .xls, .xlsx, and .vcf for further use.
By leveraging these filtering features, marketers can better segment their audience, selecting the most relevant groups for targeted marketing efforts while avoiding unproductive areas. This helps save resources and greatly enhances overall marketing efficiency and conversion rates.
This concludes the content on "Batch Filtering Numbers for WhatsApp Marketing." We are truly honored that you took the time to read this article, and we sincerely appreciate your support! Should you have any questions or need further assistance, please feel free to contact us.
Crownsoft’s WhatsApp Bulk Filter empowers marketers by offering multi-regional phone number generation, account registration validation, and precise filtering of user information, such as profile pictures, age (auto-detected), gender (auto-detected), signatures, and signature languages (auto-detected). With the continued trend of globalization in marketing, tools like this will undoubtedly help marketers achieve greater efficiency and success.
0 notes