#Also experimenting with noise/grain a little
Explore tagged Tumblr posts
Visit Tumblr Blog
Explore Tumblr blogs with no restrictions, modern design and the best experience.
Last Seen Tumblr Blogs


Fun Fact
Tumblr.com rank in the US is 25.
Text


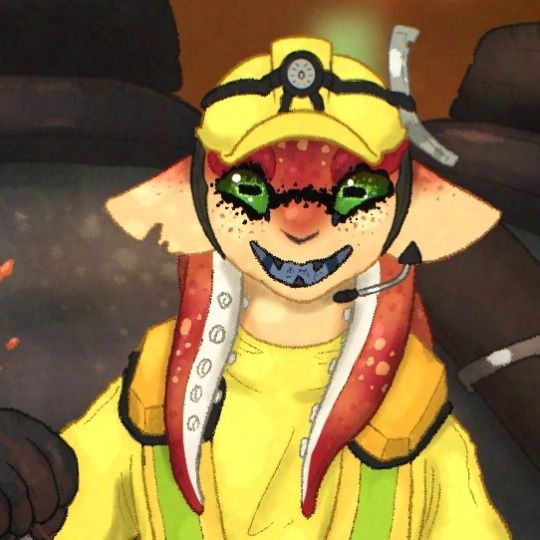
“All in a day’s work!” (Total drawing time: 8 hours, 31 minutes).
Bloodier version under the cut:

This is an older photo from around 7-8 years ago, at that time Harlow would’ve been around 17. She’d been hunting salmonids since she was 13, but taking on a Steelhead solo would’ve been a big deal to her back then.
You can tell the photo’s old because Harlow doesn’t have her EVP slopsuit yet, and because she has two eyes. Weird, I know.
#Extremely Cursed two-eyed teen Harlow be upon ye...#Also experimenting with noise/grain a little#my art#splatoon#tw blood#salmon run#splatoon 3#splatoon art#splatoon oc#inkling oc#xeno inkling#salmonid#splatoon salmon run#salmon run next wave#xeno tag#splatoon fanart#salmon
210 notes
·
View notes
Text
Stuck Gambit thoughts
Remy sighs tiredly as he rests on a bench in the garden. There are not really any flowers in bloom this time of year. In fact, the wind winding around him whispers of winter and ice coming soon. He tugs on his hair, running fingers through to try and detangle it. He shivers a bit as he braids his hair.
"Here kid."
He startles a little at both Logan's voice and the heavy weight that is place on his shoulders. Oh. A jacket still warm with body heat. He pulls it around himself and says nothing. Logan moves and Remy hears him sit down beside him.
"Scott... Scott wanted to send Rogue. But I told him I would watch you instead. If that's alright kid."
Remy shrugs, toeing off his shoes and socks, pressing his toes down into the dirt. The texture feels nice against the soles of his feet. He kicks a little and then hunches forwards.
Silence cascades around them, loud and sharp in its echoing nothingness. Remy grips the bench, the grain of the wood imprinting on his hands. Somewhere in the distance he can hear trees. Somewhere in the distance he can hear kids. Somewhere in the distance Creed has to be. Hopefully coming for him. Creed had always promised to return for Remy. and consistently he had; even when he was mad at Remy.
Remy licks his lips and shifts a little. The silence is heavy and he hates how it makes him feel lost. He reaches a hand out, feeling the wind pass between his fingers as he hears Logan breathe slow and steady beside him. his hand drops and he bends his head. He aches for home. For his papa. for his brother. For his creed. "Creed... Creed used to describe stuff. to me. And explain things... Why did you take me logan?"
Remy whispers out, fingers gripping the bench again. Logan sharply breathes in.
"Sabretooth is dangerous and-"
“No. You sought him out. its personal. Dont gimme generals mon ami. Dont I deserve to know the truth? What logic were you runnin on? Revenge?"
Remy asks hugging himself. He can feel a whirlwind of emotions rising up off of Logan. Anger. Hurt. Sadness. Worry. Logan shifts, grunts and then shifts again.
"Sabretooth has killed people I love. And hurt a lot more of them. Yes, I hate him for personal reasons. But I also know him. I know he cannot be... I cant risk him hurting someone when I can stop it."
Remy frowns and presses is toes a little more firmly into the dirt. He closes his eyes and leans backwards.
"Victor Creed never hurt me. You cant expect me to believe that you have never hurt. never killed."
Logan immediately tenses up, sharply breathing in. Remy might be making a mistake, pissing off the person he is alone with in the garden, but... this feels important.
"I- i work to fix-"
"So you can be forgiven, mais the man who was experimented on and found a blind teen in a canyon while half mad and did no harm, and who carried that same blind teen to the surface and fed and looked after him when the sanity returned, despite owing that teen nothing, doesn't deserve the same chances to be forgiven? To work on himself and be someone new? How long has it been since you saw mon Creed? How much longer still since you actually talked to him?"
Remy hugs himself and Logan makes a small noise.
"Did... How do you know he was experimented on cub? Not lying?"
Remy snarls at the accusation and stands.
"Because he didn't tell me about the experiments. I solved that myself. From those those cuffs."
He says, rembering the awful metal. Logan touches his arm and Remy bends his head again.
"I... Sabe- Creed doesn't change that easy. He doesn't. As much as you might want him to be something soft or kind hes-"
Remy shakes his head in the middle of Logan's words.
"Mais I dont want him soft or kind, hes loud, roaring, and safe, and when he feels safe, hes soft. Im not wanting any of that from him. he just is that. Hes all that, and I wouldn't want him to be soft when he shouldn't and Im not stupid, you all seem to think im stupid. I know hes deadly! I know he can kill and mais, its part of why I feel safe with him, he dont lie about what he is, not like you try to."
"I- what?"
Remy laughs at the confusion.
“you're trying to hide yourself, you think if you can just lie enough to me that you can be forgiven for the blood dripping from your hands. No one can fight like you did without having some wounds owed to their name; if not some deaths."
The wind picks up and Logan growls a little.
“You don't know what you're talking about. You dont know me, or sabretooth. Listen to someone who has known him for over a hundred years!”
"And for how many of those decades have you curled under his chest and let him feed you. Let him wrap your wounds and listened to him speak? how often did you share a meal? Or do you only know him from the battlefield?? I cannot trust a word you say as his enemy! As my enemy!!”
Remy feels his powers leap from his chest and down his arms and sparking across his body, his fingers twitching. Logan snarls and grabs Remy by the shoulders and begins to shake him.
"Im trying to help you!! He would have eventually gotten bored with you! Hurt you! He destroys everything he touches! I have been close with that monster before!! And then he turned on me!”
"People have called me a monster too."
Remy says, squirming away from Logan, Logan grabs him again.
"Youre not listening!"
"why should I?”
Remy bites his lip and tries to get out of the tight grip, but logan will not let go. Remy hisses.
“He saved me Logan. Saved me, listened to me, and understood. He is my eyes and you took me from him. You blinded me."
Remy breaks free and starts walking, following the feel of pebbles under his bare feet to avoid leaving the path. He hears Logan following.
"remyl"
Remy stays silent and keeps walking.
"Remy!! God-d*mn-it! Remy!"
His arm is grabbed and it's an almost bruising grip. Remy stops.
"Remy... I- youre about to run into a rose bush."
The tone is apologetic, remy bends his head, tears dripping down.
"D'ccord.
80 notes
·
View notes
Text
a little essay on how i understand photography exposure to work because. like. itll force me to conceptualize more clearly. you get it
three stages: aperture, shutter, sensor
there is an order to how cameras experience light: aperture -> shutter -> sensor. in terms of clarity, each of these settings have settings.
aperture
the aperture controls the clarity of image by controlling the angle of how light enters the lens (measured in "f-stops": low f-stop = wide aperture and vice versa). light entering the lens indirectly (not going straight into the sensor) bounces around, producing what you see as depth of field. restricting the aperture makes the angle of entry for light more acute, and so light cannot enter as indirectly, thus sending more light straight to the sensor without any diffusion. this restriction however literally reduces the amount of light that can enter the lens, and so the tradeoff of full-image clarity is low luminosity.
shutter
the shutter determines the amount of light the sensor is exposed to over time (measured in fractions of a second). mechanical shutters block most of the sensor from light, only allowing a sliver of light between the blades in as the shutter scrolls across sensor; electronic shutters simply turn the sensor on for however long its supposed to. a fast shutter speed only lets a single moment in at the cost of a less light reaching the sensor (darker images), while a slow shutter speed lets many moments and thus much more light in at the potential cost of blurriness. the tradeoff is, again like the aperture, high clarity versus low luminosity.
sensor
sensor... sensitivity... is basically the gain applied to the light which hits the sensor, termed ISO. ISO originally comes from film [emulsion] speed, or how sensitive the camera film is to light (and it's measured in whole numbers from like 200-25600 or something like that, not sure why--definitely something to do with film). a highly sensitive film emulsion needs less time to fully develop, but without control can cause overexposure, and also emphasizes inconsistencies in the texture of the film itself, which is seen as noise or film grain. digital cameras sought to emulate film ISO by giving users control over the gain of the sensor. increasing gain boosts the total light levels of the image at the cost of also boosting the inherent digital noise present in the electronics of the sensor. ISO gives one some final control over the luminosity of the image (and in film the speed of development) at the expense of graininess. once again, in a manner of speaking, high clarity against low luminosity.
exposure triangle or trading off
since each stage of light modification (lens -> aperture -> sensor) controls luminosity for the next stage (as well as the final product), if one wants "clarity" in general, there is almost always a necessary tradeoff between the primary quality (luminosity) and secondary qualities (depth of field, blurriness, grain).
since each stage of photography modifies the total amount of light in the final picture, there is nearly always a tradeoff occurring in the process of photographing. the primary quality, luminosity, must be preserved in order to successfully take a photo (or else you won't have enough light to see it). if you don't have enough light to begin with, some sacrifices must be made at one, two, or all of those stages to have enough light. how you prioritize these settings moves you around the inside of the exposure triangle (google an image of it, you'll understand).
photographing motion clearly
so for photographing runners in an indoor track, for example, you probably don't want a low shutter speed. that makes it impossible to make out the individual forms of the runners. but since you're indoors, you likely don't have enough light to work with. so you give priority to a shutter speed that will give you clarity of the runner's movement. this reduces the total amount of light getting to the sensor, and you're in a relatively dark environment and need to brighten the image up. you can't choose an extremely shallow depth of field because you need to be far enough away to get their full body into the camera, and you can't boost the ISO too high because everyone thinks graininess is unprofessional. so you need to modify both, such that you maximize the depth of field without the runners themselves getting involved in the blurriness, and then kick up the ISO little by little until the image is properly (not underly or overly) exposed without being noticeably grainy. maybe you take a few steps closer to get a higher fstop, too.
photographing stillness clearly
let's say you want to do some nature photography, maybe some plains sitting at the foot of a mountain range at midday. you want everything from the foreground to the clouds in the sky to be clear. so we have to give priority to a high depth of field, which means setting our aperture to be as small as possible. this of course greatly lowers the amount of light making it to the shutter, so you must balance between shutter speed and ISO: if you know there's nothing really moving around, you can choose a lower shutter speed which makes up for the rest of the luminosity and keep our ISO still low. if the clouds are drifting somewhat fast and you have wind blowing across the grasses, however, you're going to need a slightly higher shutter speed so as not to blur these details and then compensate by boosting the ISO until it's either exposed properly or almost unbearably grainy. (it seems like basically every nature photographer is using denoising filters in photoshop anway...)
prioritizing two stages?
in the case you must prioritize two of these stages, there are basically only out-of-camera ways to save the photo. for low ISO + high fstop, you need both a low shutter speed and stillness of subject or tracking equipment (and probably extra lighting). for high shutter speed and low ISO, you'll want a low fstop, and so getting closer to the subject (and probably extra lighting). for a high fstop and high shutter speed, you'll need a very high ISO -- or really, extra lighting. it seems like in any case where you have to prioritize extreme settings for two stages you should really just look into finding better lighting.
conclusion
so in most cases you probably have to sacrifice at least a little clarity in two corners for gaining clarity in one. that's what the exposure triangle symbolizes. that's why it's important to know ahead of time what your subject will be and how you'll photograph it!
of course this is all just for the photographer's ideal of "clarity". there are beautiful photos which are overexposed, underexposed, blurry, grainy, smeared with motion, et cetera. but that doesn't mean you can't ignore the exposure triangle--there are very rarely photos anyone want to see that are just totally black or white. you have to adjust these stages so that you get actual, comprehensible lighting, both light and shadow
53 notes
·
View notes
Note
Tony stark x daughter!reader where reader got SA'd and is having a hard time telling her dad?
usa/english/rainn hotline 1-800-656-4673 (also european hotlines, 46 countries listed).
first of all anon I want to give you the biggest most sincere virtual hug. absolutely we can talk about what an amazing dad Tony is, especially under these circumstances. (disclaimer that I don't have much if any experience writing about SA/SA trauma, I did some reasearch and as with all topics I don't have much experience in, pls take this with a grain of salt and feel free to send feedback if you'd like <3 /p)
Tony knows something is off with you immediatley. he's had a weird feeling he can't shake, but Pepper keeps dismissing it as more anxiety. When he first sees you after what happened, his stomach drops. He knows something is wrong, he knows his baby isn't okay, and he is going to make things right no matter what happened. You normally have such an easy time talking to him, but now you can't, and he knows it's serious. He doesn't press you for details right away (after asking if you're okay and doing all the usual dad check in stuff), but he knows you need him. He pulls you into a warm, comforting hug and rubs your back. You can hear the thrum of his arc reactor syncing with his heartbeat, and the white noise is so soothing and comforting and he's such a good dad who loves you so much it all makes you cry again.
"What happened?"
He asks so seriously, you know he understands the gravity of the situation. You try to tell him, but you get all choked up again, and you just... can't. He holds you and comforts you, rubbing your back and talking to you until you start to feel better.
"Hey, hey, hey. It's okay. It's okay." He says in that dad voice that snaps you out of your spiraling thoughts. "You don't have talk about anything yet if you're not ready. Okay?"
You nod, and he wipes your tears away. His hands smell a little like metal, and you know he's been working on his suits.
"Tell you what. Why don't we get some shwarma delivered from that place a few blocks over, we'll pick out a couple movies - what was that one you said you wanted to show me? The really bad one with the birds?"
You nod, but you don't laugh. He wraps you up in his blue hoodie, and has Jarvis call to order your food. He stays close to you, sending Pepper a message to cancel everything he has to do right now, the penthouse is on lockdown until this is resolved. He stays close to you, making sure you feel safe. He wants more than anything to know what happened, who hurt you, what was said or done to upset you like this. While your food is on the way and the movie is loading, the penthouse is quiet aside from your muffled sobs. Tony holds you, rocks you gently, comforts you. After a while, he pulls back enough to wipe your tears away and look at you. He gives you that dad look, the serious heart to heart one.
"I want to make this, whatever it is, better." He states, and you know he means it. He would move heaven and earth for you without hesitation, and he has in the past, and he'll do it again.
"But you need to tell me what's going on. I can't fix the problem if I don't know what it is."
Everything about your dad is so comforting, it makes your throat tighten up and your eyes well up with tears again. You try to explain through choked out, shuddering sobs, but you just can't get the words out.
"Okay, okay," Tony comforts you, bringing up one of his holographic screens he uses for work. A translucent glowing holographic keyboard appears in front of you.
"Why don't you try writing it out?" He offers, hoping that will be easier.
By the time you're done writing out what happened, you look over at him. You're almost scared for a moment, a part of your racing anxiety worried that he won't believe you, or he'll blame you, or-
"Thank you for telling me."
he pulls you into an even tighter hug, holding you close, and his voice shakes as he speaks.
"You did the right thing by telling me, okay?" He comforts you and reassures you that it's not your fault, that you're safe, and that he is never, ever going to let that happen again. Through every battle and alien invasion, you've never seen your dad this protective, this pissed on your behalf.
He gets a little more information from you, the location, the time, if you know who it was. He hacks into anything and everything with a camera until he finds the son of a bitch who hurt you. Then he sends out the drones. He has Stark drones, armed to the teeth, follow the bastard's every move, monitoring him while Tony gets everything together. He gets you counciling and resources, he calls you out of work or school or whatever so you have some time home to recover. If you want to file a police report, believe me he will get it filed immediately. If you don't want to, Tony has other ways of getting your attacker off the streets and away from you for good. Maybe he plants classified shield information on him and gets him thrown in a maximum security prison, maybe he pays someone to blast him into another universe. You don't really know the details, and you don't really want to. All you know is that your dad comes into your room after "making a few calls", and informs you that he's never, ever going to bother you again.
He does whatever you need him to do so you feel as safe and empowered as possible. Your suit gets upgraded, security systems get maxed out, and Tony finds a way to hook Jarvis up to keep an eye on your vitals.
"I'll get a ping if your adrenaline or cortisol spike, or if anything else looks iffy." he explains, hooking up the new system. "Even if it's just a stressful day, I'll know what kind of ben and jerry's to bring you."
You thank him again, and he hugs you, pressing a kiss to the top of your head.
"I love you, kid."
#drabbles#mcu#mcu x reader#mcu drabbles#mcu x teen!reader#tony stark#tony stark x reader#tony stark drabble#dad!tony#iron dad#dad!tony x daughter!reader#dad!tony x stark!reader#stark!reader#tw s/a mention#s/a mention#comfort#also this goes without saying but if there's any way for him to PREVENT that from happening you'd better believe he will.#he does consult with dr. strange about time travel to prevent that from happening to you.#your dad will exhaust any and all possible options and ideas to ensure your safety and wellbeing#when I say he'd move heaven and earth for you that is not an exaggeration#I love you anon!!!! I sincerely hope you're doing well <333
57 notes
·
View notes
Text
Glasses Review - Firmoo
Hello vision impaired friends, I bring you the gospel of Ordering Your Damn Glasses Online
I have previously ordered from EyeBuyDirect (luxotica/lenscrafters'/America's Best in disguise, sorry.) and Zenni Optical ( most well known online provider, A+ would recommend) and have seen lots of ads for free pairs from a competitor, Firmoo. I have too much prescription for the free pair offers to ever work out from ANY provider, but their fun designs put them on my list.
When my current glasses broke, I was dinking around and saw their current promotion is Buy One Get One Free PLUS 20% off lenses and as lenses are the real $$$ I jumped on that like tigger on crack. I am VERY nearsighted with astigmatism and the average pair of glasses from lenscrafters used to cost me $300 minimum.
After much deliberation with a million tabs open and a poll I ignored the results of for Reasons, I ordered a pair of clear frames and a pair of purple steampunk-y wireframes . Two pairs of HIGH PRESCRIPTION glasses for $87 shipped. I could cry, y'all.
Note: I have an up to date prescription and a nifty app that measures Pupillary Distance or 'PD'. you will need both these things accurate to have the best experience buying your glasses online.
I ordered them 9/22, they shipped 9/25, I received them 9/29 with regular shipping. They came well packed - each pair was in a bag made of cleaning cloth material inside a sturdy plastic case and they come in a foil bubble mailer.


Both pairs feel well made, with lots of attention to detail-
however I did not pay attention to detail or pay extra money for the Re-he-heaaallly thin lenses. So the clear ones are slightly too big and I hate the way the nose pieces sit, while the purple ones are a wee bit small across the temple and heavy to boot. I haven't had dents in my nose like this since I was 12.
the website lists their exchange policy as 30 days, the pamphlet that came with the glasses says 60. Either way it was pretty painless to go into my order history and select "exchange". The form I filled out with my reasons for dissatisfaction promised me I would be contacted within 24 hours.
My 'personal Firmoo consultant', 'Karen', emailed me with a code for the full price before discount of both pairs + standard shipping, as well as the usual customer service canned answers about checking the sizing information and did I know I could upgrade the lenses?
Also I could keep the failed pairs 'FOR NOW', here are some places that accept glasses as donations. (mixed messages, Karen, but sweet!)
New friends are April006, round anodized wireframes with a cute dingly gem thing, and Sandy020 , literal tortoiseshell cat eye frames.
This time I used the site's search terms to cut the temple width and earpiece length options down and double checked the weight of the base frames. (14g vs 24g for the round wireframes before my coke-bottle lenses. RIP my nose. )
New order was placed 10/5 and they arrived 10/17 . (last time I checked the tracking estimated arrival had creeped from the 19th up to the 23rd so grain of salt. This may be a tactic to make the order feel like it got here faster or legit delays. In my case there was a federal holiday involved.)


Complete disclosure I'm gonna grab a pair of pliers and take the little dangly off the wireframes. It makes a noise when I move my head and if I don't fold the frames in the right order when I take them off it'll scratch up the lenses. I ain't gonna remember to avoid that, so off it goes.
The Good:
Large selection, Good Quality, Good Communication. Lots of Off the Beaten Path options for internet weirdos. Firmoo p much always has a promotion going.
My wallet is so happy. SO HAPPY. Frames run $20-30ish to start. lenses will vary with your prescription and options.
If y'all want 50% off your first frames and to give me a $10 credit they have a referral program and my code is T4Z8I2. BOGO20 is a better value but it expires 11/01/23.
The Bad:
Not flexible about lens options- you go down one track and pick your options within that. If there was a way to put tinting on a pair of glasses other than blue light blocking I couldn't find it. (in contrast I believe Zenni lets you choose a range of colors and tint depth on any pair, designed as sunnies or not)
You Will Get Emails. Firmoo REALLY wants you to buy more glasses and post about it and tell your friends and HERE THIS CODE IS ONLY GOOD FOR 3 DAYS, GO BUY NEW GLASSES. They are marketing themselves to fashionable young influencers who change styles every month. Unsubscribe with impunity.
like Zenni, this is a company with the majority of it's functionality based overseas. It's cheaper because you're ordering directly from a factory and not paying Luxotica's markups to itself. Customer service is mostly English as Second Language speakers and there may be delays.
Not For Emergencies. I was able to coast on a pair of glasses from a prescription or 2 ago but it's gonna take time for your order to be made and shipped.
Overall I'm very happy with them and will probably order again.
Next time I have spare money I'm aiming at Wherelight because y'all. they are next down on the list of reputable to shady AF but they have the most amazing WTF designs.
156 notes
·
View notes
Note
hii i love ur gifs so i have been wondering if u know how to low down the size of a gif without losing its quality?? i hate when i want to post a certain gif and it being 13MB but if i cut it it's ugly 😔😔😔 sorry for my english 😔
hi, thank you 💕 i think i have answered similar questions before in my gif help tag, but i can offer some more (hopefully) helpful tips and things you should consider to help keep your gif under 10mb.
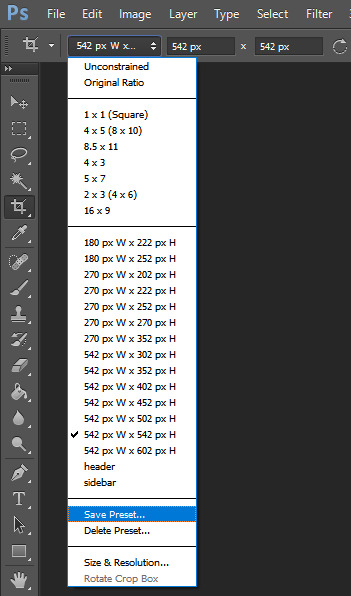
1. crop size & amount of frames
the two go hand-in-hand. big cropped gifs with a large number of frames will result in a big file size. if you're making a 540px wide gif, you're either gonna wanna make the gif shorter in height or use fewer frames. for a square gif, i try to keep it between 50-70 frames, but sometimes i still have to trim it down depending on how bright or colorful the gif is (i'll get to that in the next points).
however, making the gif a shorter height like 350px or 400px might give you a little more room for more frames without having to delete any. i like big gifs if i have a great quality file. 600px tall is as far as i'll go (though it's rare) and in that case, i try to keep it limited to 40-50 frames.
basically:
540px wide gifs = fewer frames or shorter height
268px wide gifs = more frames, more potential
tip: for the sake of convenience, i really recommend making presets of all your go-to crop sizes by selecting "save preset" in the drop down menu next to your chosen dimensions. note that mine are all set two pixels more than i need because some photoshop versions leave a transparent border around gifs. when i use my convert to frames action, it deletes those two extra pixels for me and my gif will have the proper tumblr dimensions before i export.
more tips to get rid of extra frames:
delete frames with camera flashes, you will rarely notice a difference.
always check for duplicate frames.
original footage is slow motion? it's got duplicated frames. delete them.
2. sharpening
your sharpen settings can also increase the file size. here is a great post with examples of when to know when your sharpening is crossing into unchartered territory and how to avoid it. manually adding noise effects can also increase file size, so keep that in mind when you're doing it for aesthetics (i personally love noisy gifs too!).
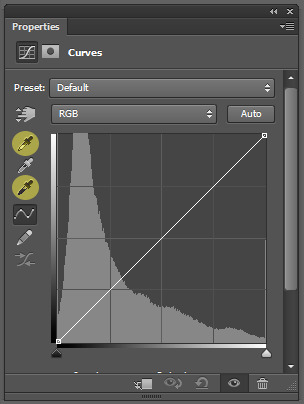
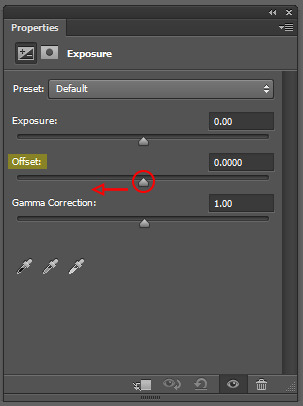
3. brightening
adjustment layers that handle the "light" in a gif such as curves, levels, and exposure can all affect the file size in different ways. darkening the black points using these tools in your gif helps reduce grain as well as the amount of colors in the final product.
curves: use the white and black eye droppers to find the lightest and darkest points in the gif, thus adjusting the white balance of the footage if needed.
levels: move the left and right sliders inward to balance them out even more and bring back more details.
exposure: my favorite trick EVER to lowering the file size if it's over 10mb when i go to save for web is moving the "offset" slider of an exposure layer slightly to the left. it will darken the black points even more and add some contrast to your gif and it can minimize the file size by quite a lot.
3. coloring
you want to be able to save your gif with 256 colors without reducing the number manually in order to get it under 10mb (we've all been there). sometimes you can get away with doing that without losing much of your quality, but it's always ideal to NOT have to do this. selective coloring and color balance are your friends when it comes to enhancing and/or getting rid of tones you don't want. i can't give you a whole course on coloring alone, but i can say that ONCE AGAIN, darkening the blacks under the black tab in selective coloring will help. i usually go up to about +5 or more if i need to. neutralize your reds and yellows for skintones, especially when giffing idols. don't go too overboard with the vibrance if you use it. be conscious of colorwashing. experiment with photo filters or gradient maps if you're aiming for a cooler or warmer look.
i hope this helps, i am not a magician but i do think a lot of these key details help me a lot when my final gif is over 10mb and i need to go back and make adjustments.
19 notes
·
View notes
Note
hello! i hope ur day is going well! im not really sure how to word this but ur one of my favorite gifmakers on this site!! and i was wondering if u have any tutorial or would be willing to tell how!! do u make ur gifs so sharp! along w being so smooth and gorgeous im foremost always just stumped at how beautifully sharp ur gifs r!! not to mention the coloring!! regardless of if u get to answer any part of ur process or not, i just wanted to tell you ur gifs r very very beautiful. im always so awed and admiring wnv i see them! so warm and prettily colored yet so sharp!! apologies for gushing here, pls have a good day!!!
AHHH THIS MAKES ME SO HAPPY, ANON! It always makes me so happy, when I get any kind of compliments on my gifs, so this really really really warms my heart!! ♥
I did a gif tutorial like 1,5 years ago which you can find here! My sharpening has changed slightly from back then, so I'll just tell you what I do now.

Much more detail under the cut (this got way longer and detailed than I had expected)!
This is a walk through of my sharpening/effect process, so if you want any tricks about colouring or anything let me know!
The first important step to sharp gifs is the video quality! The higher the video quality is, the prettier and sharper your gifs will be. TS files are the highest quality (most of the time, sometimes they kind of scam you ngl) files you can get. Else 4k videos are great too! For me I usually don't go under 1080p (with few 720p exceptions). Sometimes I don't really like TS files, because they're a bit too sharp for me. This is mostly if it's a variety show. Concerts tend to be not as sharp in my experience.
I use vapoursynth to resize my gifs before putting them in photoshop. I usually don't do any sharpening or denoise in vapoursynth. This site has everything you need for vapoursynth!
For sharpening and stuff in photoshop, I usually do camera raw + topaz denoise + sharpening + 1% blur at 30% oppacity.
A bonus tip is, if you've done everything and tried soooo hard to make it non-grainy, but you just can't get it to do whatever you want it to... embrace the grain and add a noise layer! I do this with big gifs (540x540) usually.
To go more in depth, my settings for those are as following...
Camera raw
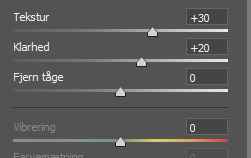
Texture (tekstur) I usually go between 20 and 30, depending on the thing I'm giffing. For Clarity (klarhed) I do the same number as texture, but minus 10. Idk why, it's just how I usually roll!
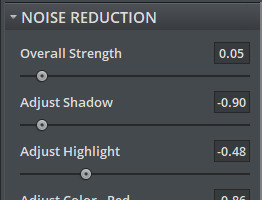
For Topaz denoise I usually only use a little bit. Like 0.04-0.06 overall strength. I don't really have any "this is what I always do" settings, but usually my shadow is at 0.90 and my highlight is 0.48 (because I liked it one time and then just kept it). You can also use the denoise option in vapoursynth, I just prefer photoshop, because it feels like I have more control over it. I know a lot of people don't use denoise at all, but I usually do with files less than 4k quality!
OBS! Using topaz denoise on smart objects in photoshop is a bit tricky, but I made a video about it once, so here you go! (the video is kind of outdated for me, so ignore the sharpening part and focus on the "how to do after you've put denoise on your gif" part. Also ignore my voice, thank you).
Sharpening:
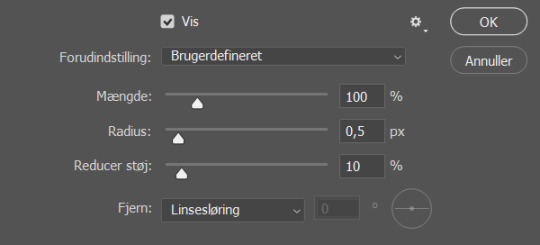
These are my settings for sharpening. If I think the gif is a bit too sharp after I've added a blur filter, I change the amount (mængde, sorry my ps is in Danish) to 80% and that usually does the trick!
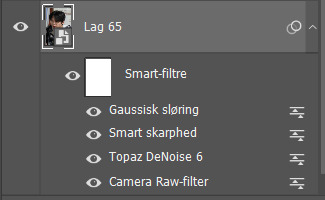
If you use all of these, this is how the smart object will look, before you convert it into frames
Let me know if you have any other questions or anything at all!! ♥
#ask#answered#anon#tutorial#kind of#I've kind of considered doing a “maja's tricks and tips for colouring and other stuff with gifs” post so let me know if that has any intere#i answered this as soon as i got home cause I got excited that someone was asking me for tips ♥
16 notes
·
View notes
Text
Why Retro Culture Is Booming in a Digital World

While the world races forward with AI, holograms, and hyper connected smart homes, a curious counter-culture is quietly thriving. In 2025, more people than ever are reaching back in time for analog comforts - dusting off vinyl records, snapping photos on film cameras, and embracing the tactile joys of old-school media.
But why is a generation raised on instant streaming and digital filters so obsessed with retro culture? Let’s unpack the revival.
1. Why Analog Nostalgia Is Resurging
It’s happening because:
Digital fatigue is real. The constant online overload makes physical, tactile experiences feel rare and precious.
Slower, intentional living is trending. People crave media you can hold, hear, and savor.
Retro aesthetics have emotional pull. The warm crackle of a record or the anticipation of waiting for film to develop connects us to simpler, calmer times.
It’s about making experiences personal again.
2. Vinyl Records: Not Just for Hipsters Anymore
In 2025, vinyl sales have reached their highest since the 1980s.
Collectors and casual listeners alike are falling for:
The rich, textured sound
Album art you can actually hold
The ritual of choosing and playing a record
It transforms listening into an experience, not just background noise.
3. Film Cameras and the Return of the Imperfect
Film photography is booming because:
Each shot matters. No endless retakes, no instant delete buttons.
The natural flaws, grain, light leaks, soft focus, make photos feel raw, authentic, and alive.
Film’s unpredictability adds surprise and magic to every roll.
It’s the antidote to hyper-edited, filtered perfection.
4. beyond Vinyl and Film - Other Analog Comebacks
People are also loving:
Cassette tapes and mix tapes
Polaroid instant cameras
Paper planners and journals
Board games and puzzles
Handwritten letters
The physicality of analog media provides grounding in a hyper-virtual world.
5. What This Says About 2025 Culture
This revival reflects a collective craving for:
Presence over perfection
Tactile memories over digital files
Slowness over speed
In an age where everything’s optimized for convenience, analog rituals remind us that meaning often lives in the inconvenient.
Final Thoughts: Vintage Vibes, Modern Souls
The rebirth of analog isn’t about rejecting technology, it’s about balancing it.
By embracing vinyl, film, and nostalgia, people are rediscovering joy in simplicity, imperfection, and delayed gratification. And honestly, we all need a little of that.
Because sometimes, it’s the slow, crackly, hands-on moments that make a life feel rich.
#AnalogRevival#VinylIsBack#FilmCameraLove#RetroCulture2025#NostalgiaTrend#SlowLivingMovement#OldSchoolCool
0 notes
Photo

Photo: Ivan Samkov / Pexels Lately, fashion photography has started to look a little older. It is not outdated, just intentional. The grain. The neon. That soft analog texture. It’s all back, and honestly? It’s everywhere. The aesthetic of 1980s media in fashion photography is having a real moment, showing up in fashion editorials, brand campaigns, and even all over Instagram. But why is everyone suddenly reaching for a decade that peaked in shoulder pads and magnetic tape? Let’s take a deeper look at fashion in the 1980s. What Defined the Media Aesthetic of the 1980s? Before it became a creative reference point, 1980s media was just how things looked. Visual noise, color bleeding, and overexposure were all byproducts of analog technology at the time. However, all those quirks ultimately shaped a distinct aesthetic that today’s creatives are deliberately trying to recreate. That was also the decade when 80s pop culture exploded across every channel, from MTV music videos to over-the-top magazine layouts. Everything was styled to grab attention, whether it was a perfume ad or a band poster. That same energy, featuring fast cuts, clashing colors, and unapologetic excess, is exactly what echoes in fashion photography today. Why the Sudden Comeback? The colors, chaos, and styling featured on MTV shaped an entire generation of visual language. Photo: Chris Benson / Unsplash Right now, digital culture is crisp, filtered, and obsessively curated. So, it makes sense that creatives are reaching for something that feels the exact opposite: raw, unpredictable, and flawed in the best way. The gritty charm of VHS static or overexposed flash feels human. It breaks the digital polish we’ve grown used to. Some people are drawn to it because it reminds them of something they grew up with. In truth, a recent poll posted by GWI indicates that approximately 65% of Gen X members, born between 1964 and 1982, feel nostalgic for the 1980s. When it comes to younger generations, Gen Z and millennials, they are drawn to the 80s aesthetic because it feels new and different, like a world they’ve missed but want to experience. There’s also a pull toward tactility. Something about grain, blur, and real lighting feels more intentional than perfectly lit edits. It gives the image weight. Texture. It is like you could touch it instead of just double-tapping it. Caption: Using 1980s media in fashion photography helps Gen Z and millennials break away from digital perfectionAlt. text: People using an old camera How Retro Media is Showing up in Fashion Photography Today Using 1980s media in fashion photography helps Gen Z and millennials break away from digital perfection. Photo: Cottonbro Studio / Unsplash It’s not just the vibe that’s back. It’s the visuals, techniques, and styling choices pulled straight from 1980s media playbooks. Photographers and creative directors are leaning into the era’s aesthetic cues to give their work more texture, personality, and attitude. Sometimes, it’s subtle. Sometimes, it looks like a lost frame from a music video in 1987. Let’s break down where it’s showing up the most. VHS-Style Filters and Tape Distortion That fuzzy tape grain, glitchy static, and warped color bleed? It’s everywhere – on magazine covers, in Instagram carousels, and even in high-end campaigns. Some creatives shoot on actual VHS, while others mimic the look with overlays and effects. It adds a sense of movement, nostalgia, and imperfection, like the photo is living in memory instead of on a mood board. Lighting, Color, and Framing Throwbacks Photo: Billy Van Tran / Pexels The lighting is harsher. The colors are louder. And the compositions? They’re less ”curated” and more spontaneous. Flash photography, direct framing, and off-kilter poses all nod to 1980s fashion shoots and tabloid-style candids. Editorial Styling Influenced By The Decade Think bold makeup, feathered hair, oversized silhouettes, shiny fabrics, and high-cut bodysuits. Today’s stylists are pulling visual cues from aerobics tapes, music videos, soap operas, and retro catalogs and reworking them for a modern lens. Notable Photographers and Campaigns Embracing the Trend Photo: Lucas Lagos / Pexels Several top photographers and fashion brands have embraced 80s-style visuals to create bold, nostalgic campaigns. Their work blends analog textures, vintage lighting, and lo-fi effects to bring a distinctly retro mood into modern fashion storytelling. Gucci x Harmony Korine (Cruise 2020 Campaign) Gucci’s campaign, shot by cult filmmaker Harmony Korine, channeled pure 80s energy. Set in Rome, the visuals featured VHS-style blur, oversaturated colors, harsh flash, and surreal, low-fi framing that looked straight out of a warped rental tape. It was intentionally chaotic and dripping with retro cinema references. Campbell Addy for i-D Magazine British-Ghanaian photographer Campbell Addy often plays with contrast-heavy lighting and grain that nods to vintage editorial aesthetics. In his 2022 cover shoot for i-D, Addy blended classic 80s fashion references: Chunky jewelry Bold eyeshadow Synthetic textures With modern subjects and messages. Petra Collins for Adidas Originals Petra Collins is known for her dreamy, nostalgia-drenched style, but in her campaign work for Adidas, she brought in sharper VHS aesthetics: soft lighting gradients, analog noise, and color fading that feel lifted from a 1980s home video. Marc Jacobs Heaven lookbooks The Heaven by Marc Jacobs line regularly taps into the 80s and 90s media textures. Their campaign photography often includes off-kilter flash, layered tape effects, and lo-fi styling that reads like a teenage bedroom zine. Tyler Mitchell’s Editorial Work for Vogue Though best known for his soft, dreamlike tones, Tyler Mitchell has experimented with analog formats and 80s-influenced styling. In select Vogue editorials, he’s played with color blocking, exaggerated poses, and vintage lighting setups reminiscent of 80s high-fashion covers. Dazed Magazine Editorials Dazed often features photographers who lean into retro-tech aesthetics. Editorials from contributors like Thurstan Redding or Hanna Moon incorporate film grain, flat lighting, overexposure, and stark contrast. The Future of the Past Photo: Deposit Photos Fashion has always borrowed from the past, but this time, it goes beyond the clothes. The comeback of 1980s media in fashion photography demonstrates how visual texture, mood, and imperfection can carry just as much weight as styling or design. What we’re seeing now is not about copying a decade but about reviving its energy, turning analog glitches, hard flash, and over-the-top color into tools for storytelling. Whether it’s a major brand campaign or an experimental shoot on VHS, the 80s fashion aesthetic isn’t going anywhere. It’s being reworked, reimagined, and made new again through the lens of now. And honestly? That grainy, blown-out future looks pretty good. Source link
0 notes
Text
Designing Your Dream Home? Turn to Creaticity - The Land of Furniture, the Best Furniture Market in Pune
Designing a home is not the same as decorating one. It’s not just about picking pretty things or following trends. It’s about creating a space that reflects who you are when no one’s watching. The kind of table where Sunday mornings begin slowly, with coffee and silence. The kind of sofa that holds you after long days. The kind of corners that invite you to stay, to read, to rest.
For us, that journey began here in Pune. We had the canvas—a freshly built flat with high ceilings and bare walls—but like many people, we quickly learned that creating a home meant more than saving pins and scrolling through catalogs. It meant choosing pieces that could bring comfort, warmth, and a little bit of ourselves into every room.
The Early Struggles of Setting Up Our Space
We started with enthusiasm, eager to fill the rooms with pieces that would shape our routines. But we ran into the same hurdles that many others face. Local stores offered limited options. Online retailers gave us glossy photos and vague dimensions, but when the pieces arrived, they never felt quite right. A chair that looked stylish online turned out to be stiff and cold. A bed frame that seemed perfect didn’t match our space or our sense of it.
We weren’t just looking for furniture. We were looking for familiarity. For fit. For the kind of presence that turns emptiness into belonging.
Discovering the Best Furniture Market in Pune
Then someone mentioned Creaticity - The Land of Furniture. Quietly. Like a tip you only share with people who will understand. We decided to visit on a Saturday afternoon, more curious than convinced.
What we found was not what we expected. Creaticity - The Land of Furniture, also known as The Land of Furniture, was nothing like the other furniture hubs we had wandered through. It felt like an open conversation rather than a marketplace. The space itself encouraged exploration. It gave us the time to wander without purpose, to stop when something caught our eye, and to linger without pressure.
There was no noise, no overwhelming signage, no flashing sales. Just thoughtfully arranged rooms, warm lighting, and the kind of pieces that made us want to stay a little longer.
The Creaticity - The Land of Furniture Difference
The reason Creaticity - The Land of Furniture is considered the best furniture market in Pune has little to do with size and everything to do with experience. Every showroom inside—whether it was Alf Italia’s sleek Italian elegance or the understated practicality of 3C—felt designed not to impress, but to connect.
It was the first time we saw a coffee table and could picture it under our books and morning mugs. A console table that seemed made for that one narrow wall we hadn’t figured out. A bed frame from Konfor that was solid and quiet, like a good night’s sleep.
And unlike shopping online, here, we could touch the textures. Feel the grain of the wood. Sit, recline, and see how each piece responded to us.
Why Creaticity - The Land of Furniture Is Our Go-To Furniture Destination in Pune
Because it doesn’t just offer furniture. It offers foresight. It’s a place where your needs are met before you even know how to voice them.
We didn’t walk in looking for a particular brand or style. We walked in looking for answers to a feeling. How do we make this house feel like ours? And slowly, piece by piece, Creaticity - The Land of Furniture answered that.
There was a dining table that held the promise of late-night conversations. A sofa that felt like a corner of calm. A study desk that made the room feel like work and rest could live side by side.
Every decision felt lighter, more intuitive. We weren’t being sold anything. We were being helped to see.
Conclusion: Home Begins Here
If you’re in the midst of designing your dream home, take a moment before rushing into a dozen different shops or chasing online deals. Start with a place that understands how homes are made. Not from the ground up, but from the inside out.
Start with Creaticity - The Land of Furniture.
Because when you find the right pieces, your rooms don’t just look beautiful. They begin to breathe. They begin to speak in your voice. And slowly, without ceremony, a house becomes a home.
0 notes
Text
Essential 7 Tips for Taking Professional Portraits: A Beginner’s Guide

Essential 7 Tips for Taking Professional Portraits: A Beginner’s Guide
Essential 7 Tips for Taking Professional Portraits: A Beginner’s Guide
Taking professional portraits is an art form that involves more than just pressing a camera button. Whether you are an aspiring photographer or simply looking to improve your skills, understanding how to shoot professional portraits will allow you to capture stunning images that stand out. This beginner’s guide will walk you through the essential tips for perfecting your portrait photography.
1. Master the Art of Lighting in Professional Portrait Photography
Lighting is one of the most crucial elements when learning how to shoot professional portraits. Without proper lighting, your images may fall flat, regardless of the quality of your camera or lens.
Natural Light
For beginners, natural light is often the easiest and most cost-effective lighting option. The golden hour, which occurs just after sunrise or before sunset, provides soft, warm light that’s perfect for portraits. Position your subject near a window to make the most of available daylight.
Artificial Lighting
If you want more control over your lighting, artificial light sources such as softboxes or ring lights are invaluable. These tools create soft, flattering light, which is ideal for creating professional-level portraits.
When learning how to shoot professional portraits, it’s essential to experiment with different light sources to see how they affect your images. The key is to avoid harsh shadows and ensure your subject’s face is evenly lit.
2. Camera Settings: Understanding the Fundamentals
The next step in learning how to shoot professional portraits is mastering your camera settings. Understanding your settings will help you create high-quality portraits every time.
Aperture
A wide aperture (low f-number, such as f/2.8 or f/4) is key to creating beautiful, blurred backgrounds (also known as bokeh) and ensuring that your subject is sharp while
the background remains out of focus. This technique is commonly used in professional portrait photography to make the subject stand out.
Shutter Speed
To avoid motion blur, set your shutter speed to 1/125 or faster. For portraits, a faster shutter speed ensures that your image is sharp and your subject is in perfect focus.
ISO
Always keep your ISO as low as possible to avoid grain in your portraits. A range of 100-400 works best in most situations. If you’re shooting in lower light, you can increase the ISO, but be cautious of introducing noise into your images.
3. Composition: Framing Your Subject for a Professional Look
Composition plays a major role in how to shoot professional portraits. The way you frame your subject can transform an ordinary shot into an extraordinary one.
The Rule of Thirds
One of the most important composition techniques is the rule of thirds. Imagine a grid of two horizontal and two vertical lines dividing the image into nine equal sections. Place your subject along these lines, particularly the eyes, which should fall along the top horizontal line.
Background Matters
When learning how to shoot professional portraits, never underestimate the power of a clean background. A busy, cluttered background can distract from your subject. Choose a background that is simple and complements your subject, whether it’s a nature backdrop or a clean studio backdrop.
4. Connect with Your Subject for a Genuine Portrait
Great portraits go beyond the technical aspects of photography. A great portrait captures the personality and emotion of the subject. Knowing how to shoot professional portraits requires a deep connection with your subject to create authentic images.
Build Rapport
Before you start shooting, engage with your subject. A little small talk can go a long way in helping them feel comfortable in front of the camera. A relaxed subject will result in more natural expressions.
Encourage Natural Poses
While posing can be useful, it’s important to let your subject move naturally. Ask them to adjust their posture or shift their weight slightly to avoid stiff poses. Small changes like tilting the head can add grace and sophistication to the portrait.
Capture Emotions
A big part of how to shoot professional portraits is capturing real, genuine emotions. Whether it’s a smile, a look of contemplation, or a burst of laughter, aim to freeze real moments that reflect your subject’s personality.
5. Details Matter: Focusing on the Small Things
When learning how to shoot professional portraits, attention to detail can elevate your images. Small adjustments in hair, clothing, and posture can make a huge difference in the final result.
Clothing Choices
The clothing your subject wears should not distract from their face. Solid colors work best, while busy patterns can pull attention away from the subject. Encourage your subject to wear clothes that complement their skin tone and the background.
Hair and Makeup
Ensure that your subject’s hair is tidy, and their makeup (if applicable) is even. Small details like stray hairs or uneven makeup can distract from the focus of the portrait.
Eyes
The eyes are crucial in a portrait. Sharp, in-focus eyes convey a sense of connection and engagement with the viewer. Direct your subject to look into the lens or towards a point off-camera for a more candid and engaging look.
6. Choosing the Right Lens for Professional Portraits
Selecting the right lens is vital for how to shoot professional portraits. A 50mm or 85mm prime lens is ideal for portraiture because it provides a flattering perspective and produces beautiful bokeh. The wide aperture of these lenses creates a shallow depth of field, which helps isolate the subject from the background.
Why Prime Lenses?
Prime lenses are preferred for portraits because they offer excellent sharpness and clarity. Their wide apertures help in creating that smooth, blurred background that every professional portrait needs.
7. Post-Processing: Enhance Your Portraits
Post-processing is the final step in how to shoot professional portraits. After taking your photos, use photo-editing software like Adobe Lightroom or Photoshop to refine your images and bring them to life.
Adjust Exposure
Ensure that your exposure is balanced. If your images are underexposed or overexposed, correct the levels to bring back detail in shadows and highlights.
Retouching Skin
Subtle skin retouching can enhance the quality of your portrait, but be sure not to overdo it. A light touch is necessary to keep the image looking natural while reducing blemishes or skin imperfections.
Enhance the Colors
Increase the vibrancy and saturation slightly to make your portrait pop, but keep it natural. You want to enhance the image, not make it look overly processed.
8. Conclusion: Trust The Lens India for Professional Portrait Photography
Now that you know the essentials of how to shoot professional portraits, it’s time to practice! However, if you’re looking to have professional-quality portraits taken, The Lens India is here to help. We specialize in offering high-quality photography services, ensuring that every portrait captures the true essence of our clients.
Whether you need family portraits, corporate headshots, or personal artistic portraits, our team at The Lens India will provide you with top-notch results. Let us help you create timeless memories with our professional photography services!
FAQ: How to Shoot Professional Portraits
1.What are the best lighting techniques for shooting professional portraits?
Use natural light during the golden hour or artificial light like softboxes for more control. Ensure even lighting and avoid harsh shadows.
2.What camera settings should I use when learning how to shoot professional portraits?
Use a wide aperture (f/2.8 or f/4), fast shutter speed (1/125+), and low ISO (100-400) for clear, sharp portraits.
3.How can I compose my shots for professional portraits?
Use the rule of thirds and position the subject’s eyes along the top horizontal line. Keep the background simple and uncluttered.
4. How do I make my subject feel comfortable for a genuine portrait?
Engage with your subject, encourage natural poses, and create a relaxed environment to capture authentic emotions.
5.What details should I pay attention to for a professional-looking portrait?
A 50mm or 85mm prime lens is ideal for sharpness, flattering perspective, and beautiful background blur.
6. What lens is best for shooting professional portraits?
Focus on lighting, camera settings, composition, connecting with your subject, and post-processing.
7. How should I edit my portraits to make them look professional?
Adjust exposure, subtly retouch skin, and enhance colors without over-processing for a polished look.
8. Can I hire a professional photographer for portraits?
Yes, The Lens India offers expert portrait photography services for high-quality results.
Stay Inspired and Informed!
Follow The Lens India on social media for more captivating content, photography insights, and the latest updates:
Instagram: @thelensindia – Explore stunning visuals and behind-the-scenes stories!
Facebook: The Lens India – Join the conversation and never miss a post!
Let’s build a community of creators and storytellers together!
The Lens India
Tirupati Co-op Housing Society, Tirupati Campus, Phase – 2, Bldg – B8, F.no 402, Adarsh Colony Rd no -2,Tingre nagar,
Vishrantwadi Pune, Maharashtra 411015
Visit Us : https://thelensindia.com
Email Us : [email protected]
Our Social Presence :
Facebook — https://www.facebook.com/thelensindiaphotography/
Instagram — https://www.instagram.com/thelensindia
#PortraitPhotography#PhotographyTips#BeginnerPhotography#PhotographyGuide#PhotographyBasics#PhotographySkills#ProPhotographyTips#PhotographyInspiration#PhotographyForBeginners#TheLensIndia#PortraitLightingTips#CameraSettingsForPortraits#ProfessionalPortraits#HowToShootPortraits#PortraitComposition#PhotographyLighting#LensForPortraits#PhotographyPostProcessing#NaturalLightPortraits#GoldenHourPhotography
0 notes
Text
How to Use Reviews and Ratings to Find the Best Restaurants Near Me
Craving something new? Tired of the same old takeout? Finding the perfect restaurant near me can feel like navigating a culinary minefield. Luckily, we live in the age of online reviews and ratings, a powerful tool that puts the collective wisdom of fellow food lovers at your fingertips. But how do you sift through the noise and pinpoint those hidden gems?
Beyond the Stars: Understanding the Rating System
Star ratings are a great starting point, but they don't tell the whole story. A restaurant with four stars might be excellent overall, but it's crucial to delve deeper. Consider these factors:
Number of Reviews: A restaurant with 100 reviews and 4.5 stars is generally more reliable than one with 10 reviews and the same rating. A larger sample size offers a more accurate representation of the overall experience.
Recency of Reviews: Food trends change, chefs come and go, and restaurants can have off days. Focus on recent reviews to get a current snapshot of the dining experience. Outdated reviews might not reflect the current quality of food and service.
Distribution of Ratings: Look beyond the average. A restaurant with mostly five-star reviews and a few one-star reviews might be more inconsistent than one with a more even distribution. A mix of ratings can offer a more nuanced understanding.
Reading Between the Lines: Deciphering Reviews
Reviews are where the real gold lies. They offer personal insights and details that star ratings simply can't capture.
Look for Specifics: Generic praise like "good food" isn't very helpful. Focus on reviews that mention specific dishes, ingredients, or aspects of the service. "The pad thai was amazing, with perfectly cooked noodles and a flavorful sauce," is much more informative.
Beware of Extremes: Take very positive or very negative reviews with a grain of salt. They might be genuine, but they could also be biased or written by someone with an axe to grind.
Look for Patterns: If multiple reviewers mention the same dish as being exceptional or the service as being slow, it's worth paying attention. Recurring themes can point to consistent strengths or weaknesses.
By becoming a savvy reviewer reader, you can unlock a world of culinary delights and discover the best restaurants your neighbourhood has to offer. Happy dining!
Source: https://tomos-little-collins.blogspot.com/2025/02/how-to-use-reviews-and-ratings-to-find.html
0 notes
Text
Color Font Sculpture
I decided to choose my colored version to print, liking the end result more. There was a lot more creative freedom being able to experiment with multiple colors. I decided, using effects I knew from past experience to make it graffiti themed, wanting to use effects such as grain, diffuse glow, and gradient that could help me achieve this look. To add a little more than just the letter I chose, “S”, I used the curvature pen to create a circle, and a little more to the pattern I created. With the letter, I used the direct selection tool to manipulate and create a dripping effect, to further the graffiti look, knowing real graffiti paint does leak. I added the gaussian blur of a duplicated image in the background, to add more depth to the pattern, looking a lot more like street graffiti. For the colors I chose, I had originally chosen just red, but by adding a slight gradient, the color change added a lot more than just adding the basic black and white look, I went with a red tint with a saturation change. The grain effect adding the slight amount of noise was the perfect finishing touch, as if it is the texture of a wall behind it. For the sculpture I used the technique of texture by incorporating different effects, and the use of negative space, focusing solely on the singular pattern. I wanted to emphasize solely on the singular strip of pattern as a focal point, the negative space with the backdrop also adding a sticker effect to my work. Overall, due to having experience with digital art, it was easier to incorporate my own style into my final piece, the texture showing this with how it adds dimension to the letter.
0 notes
Note
follow-up on the wooden bathtub thing b/c you also asked about cleaning: that is a GREAT question and i'm not sure! i have more experience with wooden ships in saltwater, which is generally Way easier than freshwater as the salt acts as a preservative. (as long as you stay out of latitudes where shipworms are a problems). for cleaning the (untreated wood) deck, we would pump loads of seawater over it with the fire pump & scrub it at 45° to the grain of the wood with a very coarse broom brush. this (allegedly) opens up the fibers just enough to get gunk out from the grain & ensure the wood stays appropriately moist. i would wager that, historically/on untreated or simply oiled wood, the cleaning process for a big always-full tub like that is pretty similar - you empty it out regularly, dump in a couple cups of sand for abrasive, mix in a bit of water, and use a brush-broom to scrub the bejeesus out of it. then flush it clear of sand, re-oil if needed, and refill.
for modern polyurethane or epoxy varnishes, it'd likely be more like an acrylic hot tub - no abrasives, but still regular emptying, using not-too-harsh cleaning liquids, and scrubbing with a not-too-coarse brush. but that's not something i know much about
the problem with fancy varnishes/epoxies is that when they get a tiny crack or flaw in them that the water can get through, it starts to stain the wood behind & looks REALLY unsightly.
bit of fun trivia: if you use iron nails in particularly tannin-heavy woods like oak while they're in contact with saltwater, a chemical reaction occurs that makes the wood rot & disintegrate really fast. you say that the wood is "iron-sick," which i think is cool as hell. as such (and due to the high cost of worked metal in a pre-industrial society), even the biggest of ships up through the mid-1800s were built with as little iron as possible. planks were attached with "tree-nails", inch-thick oak dowels hammed into pre-drilled holes and used just like nails.
this entire time, I've been wondering... doesn't using abrasives to clean through wood wear down the wood? how often do you need to clean your wooden bath tub to ensure it lasts longer?
OHHH i recently heard about how quickly irons deteriorates in water, so they use a "sacrificial anode" though i'm unsure on its different applications outside of ships.
to think that ships were entirely made out of wood... does the wood absorb the water? does it expand? does it break the ship when it does so? or does it just do creaking noises...
#i'll make sure to get the good kind of varnishes...#gray answers#caterjunes#thank you so much!! sorry i couldn't reply earlier!! i told myself i'd reply later and then completely forgot......... it's the diagnosis...
0 notes
Text


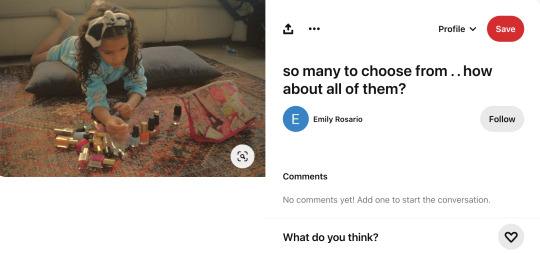


Final work by: Emily Rosario
title: Girlhood Core
My two main inspirations were the photographers Melissa Haugen, and Juuso Westerlund. I came across both of them on Pinterest. I was immediately drawn in by the way that they present movement in the photos. The photos capture a sense of animation and youthfulness that I would also like to present. I also appreciate how their images romanticize the ordinary life of kids as they go about their day.
One of my other sources for inspiration is the 2017 film, The Florida Project. This strong film follows the story of six-year-old Moonee and her fellow playmates. Living in a shoddy motel off the highway right next to Disney World, Moonee lives a rough low income life with her struggling single mother. Despite the harsh reality of her life, Moonee has no trouble living in her childlike world, where her worries are those of getting enough playtime while the sun is out. This reminds me very much of my eight-year old sister who still maintains her bright and lively character even after our family has gone through traumatic events and difficulties. This theme of innocence and childlike naivety to the realities and sufferings that adult are forced to confront.
Project Description:
"Girlhood Core" is meant to evoke nostalgia with my viewers that revolve around childhood memories that we may have forgotten with the passing of time. The main subject is my little sister who was my main source of inspiration. In a time where children are growing up faster than they need to, partly because of the internet and social media, I want to capture these moments where my sister is thriving in her vibrant, and imaginative world and emphasize the special and wholesome nature of what it means to be a kid. My photographs are meant to give a blurry or fuzzy effect, alluding to our hazy memory of childhood. I wanted my photos to be primarily candids, which makes the context less artificial and therefore more easier to relate to. My angles are different in each photo in order to change the perspective of the viewer that helps engage them with the activity that is happening in the photo. I used low angle shots to add drama to the scene. I also purposely obscured my sisters face in some photos to draw attention to the activity she was doing, so that way the viewer can place or see themselves in her position. In each photo, I wanted to keep a dynamic composition so I made sure to move her around the frame and have her in different positions. I also wanted to keep the frame busy, since I wanted to capture the disorderly fun of childhood. Overall, my theme is the enchanting world of childhood that is a sadly fleeting thing.
For this project, I used my Nikon D5100. I would incorporated techniques such as large depth of field, short depth of field, contrast, color balance and overall composition. I also experimented with different exposure times, depending on the time of day I am shooting at. To achieve the film filter effect of my images, I used both the Adobe Photoshop 2024 and the MacBook Air Photos gallery edit feature. On Adobe photoshop, added a layer of the photo filter Sepia, which is a warmish orange. I edited the Noise/Grain to about 50% to create the blur like effect. I also added a Curve Adjustment layer and made a reverse ‘S’ shape. On the Photos gallery, I lowered the contrast and added a vignette. I reduced the saturation to add the vintage look while bumping up the vibrance to retain the sharpness of the colors.
If I could continue this project, I would love to recreate scenes from famous movies that I watched as a kid. For example, The Parent Trap (1998), Cat in the Hat (2003), Bridge to Terabithia (2007), or Matilda (1996). I would also love to include more of my sister's friends or cousins, to have the atmosphere more lively and vibrant.
0 notes