#Add three teaspoons of cinnamon sugar
Explore tagged Tumblr posts
Photo

Spice Cake with Eggnog Buttercream Ingredients: Spice Cake 2 1/2 cups all-purpose flour 2 teaspoons baking powder 2 teaspoons baking soda 1/2 teaspoon salt 1 1/2 teaspoons ground cinnamon 1 teaspoon ground ginger 1/2 teaspoon ground nutmeg 1/2 teaspoon ground clove 1/4 teaspoon pure ground black pepper 1 tablespoon unsulphured molasses 1 cup vegetable oil 1 3/4 cups light brown sugar 1 1/2 cups unsweetened applesauce 4 large eggs 2 teaspoons pure vanilla extract Eggnog Buttercream 1 1/2 cups (3 sticks) unsalted butter 4 1/2 cups confectioners' sugar 7 tablespoons eggnog 1/2 teaspoon ground nutmeg 1/4 cup heavy cream White Chocolate Ganache 1 cup white chocolate chips 1/2 cup heavy cream Directions: Preheat the oven to 350°F (175°C). Grease and flour three 8-inch round cake pans and set aside. Mix the dry ingredients: In a medium bowl, whisk together the flour, baking powder, baking soda, salt, cinnamon, ginger, nutmeg, clove, and black pepper. Set aside. Blend the wet ingredients: In a large mixing bowl, beat together the brown sugar, vegetable oil, molasses, and applesauce until smooth. Add the eggs one at a time, mixing well after each addition. Stir in the vanilla extract. Combine the mixtures: Gradually add the dry ingredients to the wet mixture, mixing on low speed until just combined. Scrape down the sides of the bowl as needed. Bake the cakes: Evenly divide the batter between the prepared pans. Bake for 25-30 minutes, or until a toothpick inserted into the center comes out clean. Allow the cakes to cool completely before frosting. Prepare the eggnog buttercream: In a large bowl, cream the butter on medium-high speed until light and fluffy. Gradually add the confectioners' sugar, mixing on low speed. Add the eggnog, nutmeg, and heavy cream, and beat on high speed for 1-2 minutes until the frosting is fluffy and smooth. Make the white chocolate ganache: In a small saucepan, bring the heavy cream to a simmer. Pour the hot cream over the white chocolate chips in a heatproof bowl. Stir until the mixture is smooth. Let the ganache cool for 10-20 minutes, until it reaches a thick but pourable consistency. Assemble the cake: Spread a layer of eggnog buttercream between each cake layer. Frost the top and sides of the cake with the remaining buttercream. Drizzle the white chocolate ganache over the top, letting it drip down the sides. Optional: Lightly sprinkle the top of the cake with ground cinnamon or nutmeg for a festive touch. Prep Time: 30 minutes Cooking Time: 30 minutes Total Time: 1 hour Kcal per serving: 540 kcal Servings: 12 slices This Spice Cake with Eggnog Buttercream is the perfect dessert to add warmth and cheer to your holiday celebrations. Infused with cinnamon, ginger, nutmeg, and clove, the cake layers deliver a comforting and aromatic spice blend, while the rich eggnog buttercream adds a velvety smooth sweetness thats both festive and indulgent. The crowning touch is the luxurious white chocolate ganache that drips elegantly down the sides, making this cake a true showstopper. Not only is this cake visually stunning, but it also encapsulates the very essence of the season in every bite. Whether its for a Christmas party, family gathering, or simply to enjoy during a cozy night by the fireplace, this Spice Cake will make your holiday dessert table unforgettable. The interplay of warm spices and creamy textures will leave your guests asking for seconds!
#ChristmasBaking#HolidayDesserts#SpiceCake#EggnogButtercream#WinterDesserts#WhiteChocolateGanache#HolidayBaking#ChristmasCake#SeasonalBakes#FestiveTreats#GingerAndSpice#MolassesCake#NutmegButtercream#CinnamonSpice#WinterFlavors#LayerCake#BakingInspiration#CozyDesserts#HolidayRecipes#SweetTooth#cooking#food#kitchen#recipes#snack#foodie#foodpics#bread#baking#recipe
53 notes
·
View notes
Text
Banana muffins
stick of butter. soften and beat with a mixer for a little while. Add a cup of sugar, two eggs, three mashed bananas and a tablespoon of vanilla. Mix that bitch up. maybe add a tablespoon of peanut butter for a little protein (and also bc yummy, do what you want)
Add a cup and a quarter of flour, half a teaspoon of salt, and a teaspoon of baking powder.
Mix just until combined, don't overmix your shit. Maybe add chocate chips or cinnamon if you want, go wild.
Bake at 350 for like 15 minutes
117 notes
·
View notes
Text
Sopapillas
I went into the tag to look for more sopapillas and all I found was blasphemy. What is all of this cinnamon sugar nonsense?
NO.
THESE ARE SOPAPILLAS

Puffed pillows of love and fried dough. You bite the corner off to put honey in. Or if you're feeling frisky, you can stuff them with chicken or beef or beans and smother that sumbitch with green or red chile. Or put ice cream in there. Sky's the limit.
Here's the recipe for you, for I am a generous Katie.
Equipment
1 cast iron skillet or medium pot
1 spider or strainer to help remove the sopapillas from the oil
Ingredients
2 cups all-purpose flour
1 tablespoon baking powder
1 tablespoon granulated sugar
2 teaspoons kosher salt
1 tablespoon honey
3/4 cup whole milk
Canola oil, peanut oil or lard for frying
Instructions
To Make the Dough:
In a large bowl, whisk together the flour, baking powder, sugar and salt. Next, create a well in the center of the dry ingredients and pour in the honey and whole milk.
Using a spoon or your hands, mix the dough together until it forms a sticky mass. Cover the bowl with a clean kitchen towel and allow the dough to rest for about 20 minutes.
To Fry the Sopapillas:
I know frying this is a bit of a bummer but I’ll say that with these it’s needed and worth it.In a cast iron skillet (or medium pot), add enough oil so it reaches 3-inches up the sides of the skillet/pot. Heat up your oil to around 300 degrees. (Right before we fry them off, we’ll heat it up even further.)
Lightly flour your work surface and rolling pin. If the dough is at all sticky (it shouldn’t be after it rested) feel free to sprinkle it with a bit of flour so it doesn’t adhere to the surface.
Dump the dough onto the counter and roll the dough into a thin (1/8-inch thick) square. (It doesn’t have to be a perfect square either, just do your best.) Cut the sopapillas into 4 x 3-inch rectangles. Again, the measurements don’t have to be exact, you can definitely eyeball this.
Before you fry them up, be sure to get your honey ready. Line a baking sheet or plate with a few layers of paper towels or clean kitchen towel. Heat the oil up again to 375 degrees F.
Drop the sopapillas in the hot oil, frying two to three at a time, for about a minute, flipping them over at the halfway point. (If they don’t puff up, they’ll still be tasty! But it may mean the dough isn’t rolled thin enough.)
They should be lightly golden brown—not too crispy. Transfer them to the bed of paper towels to drain. Repeat with the remaining sopapillas.
These taste best straight from the fryer to a plate to being consumed but if you want, you can keep the sopapillas warm in an 200 degree pre-heated oven while you fry up the rest.
Serve them alongside some honey and apricot preserves.
Notes
Tips and Tricks:
Test a single sopapilla. I always do a test to make sure the oil is the right temperature. If the first one doesn't puff up, it means it's not rolled thin enough. A simple fix with the rest of them!
7 notes
·
View notes
Text
I am sharing my apple pie recipe with the world this year in hopes that it will bring others joy and reduce the number that I end up making. Feel free to ask questions about the recipe, though I will preface that I do not recommend any substitutions other than gluten free flour for the crust. Keep in mind that if you use the gluten free flour, the dough will be more difficult to work with and may require extra liquid to hold together. @swagtastic-bougie-pompadour this recipe makes three pies, if you need to make more I'd recommend doing it in batches.
Crust ingredients:
7.5 cups of flour
3 cups of butter, frozen, grated, and frozen again
3/4 of a cup of high-proof alcohol (I use everclear, don't worry it bakes out)
1/4 cup of ice water or icecubes
6 tablespoons of sugar
6 teaspoons of salt
Combine the dry ingredients in the bowl of a stand mixer, then add the frozen grated butter and mix until it looks a little like sand and pebbles. There will still be small lumps of butter, thats okay. You should be able to squeeze a handful of the mixture and it will hold together. Then combine the ice or ice water with the alcohol, and slowly stream it into the bowl while the mixer is running. Depending on the temperature and humidity, you may not need all of the liquid. It will form a very shaggy dough that seems a little dry, do not over mix. Dump the bowl out onto a floured surface, shape into a circle, and divide into six equal parts. Shape each section roughly into a ball, wrap in plastic or other wrap, and refrigerate at least one hour or until ready to use. When ready, roll each crust one at a time on a floured surface to approximately 1/4 inch thickness. Go slowly, rotating the dough to get an even circle. Patch any holes or cracks that form with a little water and flour, pressing the dough back together. You can freeze the unbaked dough for later use, but let thaw in the refrigerator over night before rolling out.
Apple filling ingredients:
15 lbs of granny smith (or another tart baking apple), about 10 apples per pie
3 cups of brown sugar
3/4 teaspoon fine salt
6 tablespoons of apple pie spice (cinnamon, ginger, nutmeg, allspice, clove) (measure from the heart)
1 cup of lemon juice, optional
1/2 cup plus 2 tablespoons of cornstarch, divided
3 tablespoons of water
1/2 cup butter, cut into slices
Peel and thinly slice apples. I like to put them in gallon sized zip-top bags, but large bowls work too. Add the sugar, salt, spices, lemon juice, and 1/2 cup of cornstarch, and shake (for bags) or stir (for bowls) to coat. Let the mixture rest for at least an hour, or overnight in the refrigerator. The apples will release a lot of liquid. Strain out the liquid into a saucepan, set aside the apples. Simmer the liquid over a low heat until reduced by half, then in a separate small bowl mix the remaining cornstarch and water to form a slurry. Pour the slurry into the reduced liquid, stirring rapidly until very thick. Turn off heat and immediately add butter, stir until butter is melted and incorporated, then let cool.
To assemble:
Roll out bottom crust and use the roling pin to gently transfer to a 8 or 9 inch pie round pie pan. Gently press the crust into the pan to fit, then prick the bottom several times with a fork to prevent the crust from puffing up. Pack apple slices into the pans until they are mounded over the top, it will seem like there are too many but they will cook down and shrink slightly. Pour the cooled apple syrup over the apples, tapping the pan on the counter to get it to settle in the cracks. Roll out the top crust and decorate however you like, but make sure there are a few holes to let out steam. Gently position top crust over the pie, trim edge to about 1 inch over the edge, and then fold top edge under the bottom edge and crimp with fingers or a fork to seal. Heat oven to 400° F, place pie pans on a baking sheet to prevent dripping in the oven, and brush the tops with egg wash or milk, and optionally sprinkle with coarse sugar. Bake for 40-45 minutes. If the crust browns too quickly, cover with foil until the full time is reached. Let cool for about an hour before serving, and enjoy!
#pokemon#pokeblogging#pokemon irl#rotumblr#ellisa talks to trainers#ellisas little known baking skills#apple pie
29 notes
·
View notes
Text
Flavorfall: Apple Pie Pancakes
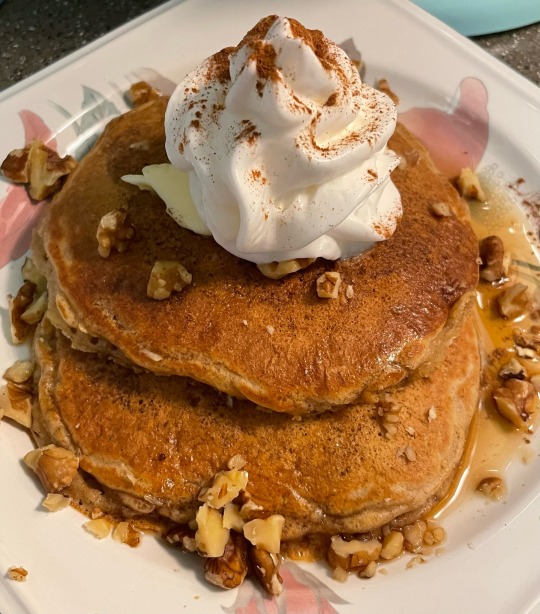
Halfway through September I began cooking up a storm with apples galore. I wanted to wait until apple season was in full swing, and it does last for quite a while, but September does seem to be "THE Apple part of fall". So...what took me all month to share recipes? Lack of motivation to write, as well as forgetting to post these days. With spooky season already here, I've been scurrying around trying to figure out what to be for Halloween this year and putting the costume together since I always make my own. As well as my brain going "let's do a fall cookbook!" "Let's do a Halloween cookbook!" Well, such cooking projects like that are gonna take years, so "Flavorfall" is more or less gonna start out as a seasonal series.
I still have at least two or three recipes I wanna do for Castletown Cafe before the end of the year, as well, two of which may take some practice...... But until then, I've got a delicious recipe to start off your autumn morning with: apple pie pancakes. Made with fresh grated honeycrisp apple, apple pie spice, and buttermilk, these pancakes have the perfect texture and are full of fall flavor. Add apple-maple syrup, whipped cream, chopped walnuts and cinnamon...and you've got a sweet, decadent, filling breakfast. I made these the morning of the first day of fall...and I am super pleased with how they turned out.
I pretty much invented the apple pancake recipe myself, referencing it from a basic pancake recipe from an ancient tome known as "The Joy of Cooking" - don't let the 1975 edition fool you, this book is even older than that! It dates all the way back to 1931 - so it's almost 100 years old!
I made many changes to the recipe: swapping regular milk for buttermilk, and reducing the amount to half a cup to make up for all the moisture the apple would give the batter. I also reduced the ingredient measurements since I do not live with a family of four nor am I cooking for a huge party. So, my apple pancake recipe serves...about three people. There's also, of course, a few other ingredient choices and additions made, turning it into something completely new that isn't, to my knowledge, found in this book.
And despite all those alterations and new additions, it turned out perfectly. How did I nail it on the first try? I have no idea.
One recipe I did copy, however, was this recipe for apple simple syrup from We Are Not Martha, which I added to regular maple syrup and stirred to combine. The apple simple syrup was made about a week or so prior to the apple pancakes, so it wasn't originally planned, I just went "Oh! I have this apple syrup I made last week, I should just combine some of this with some maple syrup in a tiny pitcher!" (Or creamer, as they're called, since they're usually used for pouring milk or cream, but syrup works too). Yep, the apple-maple syrup was actually improvised on the spot. It's great when you just so conveniently happen to have something that would go well with your cooking project!
APPLE PIE PANCAKES:
1 cup flour
1/2 teaspoon baking soda
1 teaspoon baking powder
1/4 teaspoon salt
1 teaspoon apple pie spice
1 & 1/2 tablespoon granulated sugar
1 & 1/2 tablespoon brown sugar
1 sweet apple, peeled and grated
1 cup buttermilk
2 eggs (room temperature)
1 & 1/2 tablespoons melted unsalted butter
1/2 teaspoon vanilla
1/2 cup chopped walnuts
1/4 cup maple syrup
1/4 cup apple syrup
Whipped cream, for topping
Preheat griddle to 375 degrees F. Chop up some walnuts and set aside. Combine maple and apple syrups together in a creamer dish for easy pouring.
Combine dry ingredients (flour, baking soda, baking powder, salt, apple pie spice, and sugars) in a mixing bowl and whisk together.
Peel and grate apple. Add grated apple, buttermilk, eggs, vanilla and melted butter into the dry ingredients and stir together, making sure no dry streaks of flour remain. Once it is just combined, stop mixing in order to prevent over-mixing.
Drop pancake batter onto griddle in multiple round puddles, as many as you can fit. I suggest about 6 to 8 medium-sized pancakes. If the griddle gets too hot, reduce heat to 350 F. Cook pancakes until the edges look dry and you see bubbles in the center of. That’s when it’s time to flip them over and cook the other side. Much like with baking, you can test by sticking a toothpick in the center of a pancake. If it comes out clean, the pancakes are done!!
Place 2 or 3 finished pancakes on one plate each. Spread pancakes with butter, and top with walnuts, apple-maple syrup, and whipped cream. You can also sprinkle on a little extra apple pie spice.
Sources:
Rombauer, Irma S., “The Joy of Cooking”.
“Sues”, Apple Simple Syrup, wearenotmartha.com. Link: https://wearenotmartha.com/apple-simple-syrup/
#flavorfall#apple pie pancakes#apple recipe#apple recipes#fall recipes#cooking#pancake recipe#cw food#unrelated#off topic recipes#recipe#recipes
34 notes
·
View notes
Text
Banana Chocolate Chip Muffins
Because it's been a long fucking week.


This is a variation on my tried-and-true muffin recipe, with an extra egg and three large mashed bananas taking the place of the usual milk. The result is an excellent crumb, with the banana being subtle, instead of overtly on top of everything else, as far as the layers of flavor go.
I also decided to go back to using vegetable oil instead of butter, and it definitely seems to make a difference in the finshed texture. These brown beautifully, with the sprinkling sugar crystals contrasting nicely.
I also went back to my original method of mixing, with the dry ingredients mixed and in the bowl, and the wet added all at once.
Oven at 400 degrees, rack in the center.
In your mixer bowl, put 1 1/2 cups granulated sugar, 4 1/2 teaspoons baking powder, 1/2 teaspoon of cinnamon, 1 teaspoon of salt, and 3 cups flour. Put the paddle attachment on and mix the dry ingredients together for about a minute, until they're thoroughly blended.
In a 2-cup pyrex measure, put 2/3 cup vegetable oil, add three eggs and whip with fork to break up. Mash three over-ripe bananas and stir carefully to mix with the eggs and oil. Add this to the dry mixture in the mixer bowl and mix for at least a minute. The batter will be thick and sticky. Pour in a cup of chocolate chips. These were Guittard's Milk Chocolate, which are big chips. Mix them into the batter until evenly distributed.
Fill your Reynolds Jumbo muffin tins to the top, and sprinkle each muffin liberally with big-crystal sprinkling sugar.
Bake at 400 for about 21-22 minutes.
Cool in the pans for 15, then let cool on rack the rest of the way.
Makes a dozen jumbo muffins.
Y'all enjoy!
5 notes
·
View notes
Note
Coffee freak here! Waiting for tips to make good coffee
amazing come here
so first you want to burn some sugar. make a caramel if you will. so put some sugar in the teapot, sprinkle it with some water (if you add too much it will turn to syrup and we don't want that) and put on a low heat

once it's caramelized, twist the pot a few times so it's covering the sides. now add you coffee: i went with three teaspoons + cinnamon + half the pot of water
don't stir it yet, put it on the stove as it is. here's how it looks before & after:


now wait for it to cook. it's cooked when the foam starts rising, like this (i had to add more coffee & water for my parents):

when it's done, put it off the stove and stir this dark coffee in the center. you should get clear foam:

now, pick the foam with a teaspoon and put it into your mug. add coffee afterwards

i also add milk but that's up to you!!! anyways now you go and study for your test. you have 24 hours. good luck!!
#noldo cooks#this was taught to me by my father and to him - by my mother#and my mother's apparently just smart like that. idk that's what she told me
40 notes
·
View notes
Photo

Cinnamon Sugar Pumpkin Bread Ingredients: Bread: 1 1/4 cups all-purpose flour 2 teaspoons baking powder 1 tablespoon pumpkin pie spice 1/4 teaspoon salt, or to taste 3/4 cup granulated sugar 1/4 cup light brown sugar, packed 3/4 cup pumpkin puree (not pumpkin pie filling) 1/3 cup vegetable oil, canola oil, or melted coconut oil 1/4 cup Silk Unsweetened Vanilla Almondmilk 2 tablespoons mild or medium molasses 2 teaspoons vanilla extract Cinnamon Sugar Topping: 3 tablespoons granulated sugar, divided 1 1/2 teaspoons cinnamon, divided Directions: 1. Preheat Oven: Preheat your oven to 400°F. Spray three 5x3x2-inch mini loaf pans with floured cooking spray or grease and flour the pans. Set aside. 2. Prepare Dry Ingredients: In a large bowl, whisk together the flour, baking powder, pumpkin pie spice, and salt. Set aside. 3. Prepare Wet Ingredients: In another large bowl, whisk together the granulated sugar, brown sugar, pumpkin puree, oil (coconut or other), almond milk, molasses, and vanilla extract until combined. 4. Combine Mixtures: Pour the wet pumpkin mixture over the dry ingredients and stir until just combined. Avoid overmixing to prevent dense bread. 5. Fill the Pans: Evenly distribute the batter between the three prepared pans, filling each about two-thirds full. 6. Add Topping: For the topping, evenly sprinkle 1 tablespoon of sugar and 1/2 teaspoon of cinnamon over each loaf. 7. Bake: Place the pans on a baking sheet for easier handling. Bake for 40 to 43 minutes, or until the tops are set, and a toothpick inserted into the center comes out clean or with a few moist crumbs. Start checking at 30 minutes as baking times may vary. 8. Cool: Allow the bread to cool in the pans for 15 minutes before transferring to a wire rack to cool completely. Prep Time: 15 minutes | Cooking Time: 40 minutes | Total Time: 55 minutes | Kcal: 210 kcal per slice | Servings: 3 mini loaves This Cinnamon Sugar Pumpkin Bread is the perfect blend of sweet, spiced, and comforting flavors. The moist pumpkin base is enhanced with pumpkin pie spice, while the cinnamon-sugar topping adds a delightful crunch to every bite. These mini loaves are ideal for sharing or enjoying as a cozy fall treat with a cup of tea or coffee. Whether you're looking for a simple fall baking project or a comforting homemade treat, this pumpkin bread is sure to satisfy. The combination of warm spices, rich molasses, and tender pumpkin creates a nostalgic flavor that makes this recipe a seasonal favorite. Bake these mini loaves for a gathering or enjoy them as a delightful breakfast or snack.
#pumpkinbread#cinnamonsugarbread#pumpkinseason#fallbaking#miniloaves#bakedwithlove#spicedpumpkinbread#homebakedgoodness#comfortbaking#easybaking#bakingjoy#pumpkinspice#cinnamonsugar#homemadebread#fallflavors#cooking#food#kitchen#recipes#snack#foodie#foodpics#bread#baking#recipe#chocolate#dinner#breakfast#lunch#foodmyheart
14 notes
·
View notes
Text
I wish I had thought of this sooner because now probably you have made all your things unless you are a late night person or plan to bake on christmas day but do u want..... a cookie recipe? Behold:
Refrigerator Cookies*
*yes they probably have a proper name, no I don't care what it is
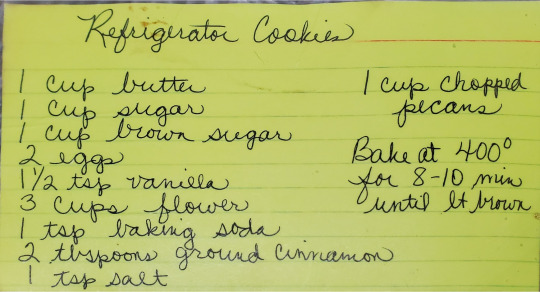
ID: A yellow notecard with the recipe listed in cursive handwriting, there are a few small stains on the card, and the whole thing has been laminated. Stains and all. Authenticity! End ID.
Transcription & more baking instructions below!
Ingredients:
1 cup butter (we use real butter but margarine and other substitutes should work fine!)
1 cup (granulated cane) sugar
1 cup brown sugar (light or dark, doesn't matter)
2 eggs (grade A is best for ratio reasons)
1 and 1/2 teaspoon vanilla
3 cups "flower" (all-purpose baking flour lol)
1 teaspoon baking soda
2 tablespoons ground cinnamon
1 tsp salt
1 cup chopped pecans (optional! but really very good)
[.... You know what? While typing this I just realized I forgot the salt in the batch I just made. hm...... The butter was salted it's probably fine.]
Bake at 400° Fahrenheit (204 Celsius- do you guys cook with Celsius too or is it only for weather?) for 8-10 minutes until light brown*
*the dough is already brown. I do not know how to advise you of its baked color you kind of just have to do your best, watch the edges. They're still good slightly overbaked don't worry about it.
Mixing Instructions:
DO NOT PREHEAT YOUR OVEN (YET)
1. Soften or melt your butter (/butter substitute)
Either soften by leaving it at room temperature for awhile, or melt it in the microwave (30 seconds at a time for best, least like to explode all over your microwave results.) Melted is better than softened, in my opinion, but either is functional. (Melted just effects the final texture, they're chewier this way. Also it makes the next step easier.)
2. Mix in sugars.
Once butter(/sub) is soft/melted, pour in the white sugar and brown sugar. One at a time works better with softened butter, both can go in at the same time for melted. Mix until combined. It's going to have a very pasty, gritty texture.
3. Add eggs.
Crack your eggs into the mix, watch for shell bits. Mix in the eggs until all trace of them disappears, like a magic trick! The mix will still be gritty and unpleasant looking.
4. Add vanilla, salt, and baking soda.
I know the card lists flour next but it's better to do this here. It also helps keep you from forgetting the salt (🤡). Mix until these things disappear, and maybe a little more just to be sure everything is all distributed.
5. Add cinnamon.
It's going to look like a lot and smell intensely like pumpkin pie or apple pie and change the color from looks-like-chocolate-chip-cookies to a much darker brown, and you're going to go "...really? two tablespoons?" but trust the process. Really, two tablespoons. Stir! until combined and very brown.
6. Now add the flour.
One cup at a time!!!!! Or even half a cup at a time! Trust me adding all three cups at the same time will just make a mess and you'll be sad. One cup in, stir until it disappears. Repeat two more times. Now, like most cookie dough, the amount of flour is a little flexible. Once you've added all three cups, if your dough is still very sticky you need to add more flour! Personally I usually end up with about another... 1/4 a cup? but I live in a very humid climate. You're looking for a playdough-like texture! It sticks more to itself than the mixing bowl or spoon (/spatula, whatever you're mixing with. Hey don't use a whisk by the way.) You should be able to pick it up with your hands and move it without it sticking to you. If you've ever made the pilsburry roll of chocolate chip cookies, where you buy the dough in a little tube? Like that. If your dough gets too crumbly, and won't stick to itself anymore, you've gone too far!!! You can revive this with a little little bit of water, like a teaspoon at a time, until you get it back to sticks-to-itself. It really shouldn't take a lot, and you don't want to add too much because it can throw off bake times and make your cookies thin and weird.
7. Add pecans.
I like to do this step here, and sort of just fold them into the (play)dough. You could also put them in before the flour, with the cinnamon! Whichever is easiest or least aggravating, it doesn't especially matter. Just make sure they're not all clumped up together. Also the pecans are optional but (barring an allergy of course) I really would say leave them in and try it this way at least once! I would... not substitute in peanuts. Or any other nut I can think of, unless it has a similar texture to a pecan? Walnuts would probably be ok, if you're so inclined.
8. Throw those suckers in the FRIDGE baby
We generally separate the dough in halves for this step! It's not strictly necessary, but it makes things easier to manage. Take your dough out of the bowl and slap it onto some wax paper. (Do not use parchment paper, it will leach out the moisture and your dough will stick to it and become a little crumbly and you will be sad.) Using the wax paper like a weird blanket or burrito wrap, shape your dough into a vaguely rectangle shape, fold the wax paper over it so that it's completely covered, and then put your dough-log in the fridge. The dough absolutely *MUST* rest in the fridge for at least three hours. We usually leave it overnight! It's convenient and also generally yields best results. But, if you're in a little more of a rush than that, three hours is fine. But no less!!!!! We've baked them without letting them rest before and it just doesn't work as well and they burn so quickly and so completely. They turn into charcoal. Fridge your fridge cookies or suffer!!!!!!!!!!
9. Preheat & Bake!
Once they've rested for at least three hours, you can pull them out and throw them in the oven! You can shape them, if you like. Roll them into balls like chocolate chip cookies or .. I think cookie cutters could be used here? If you're quick about rolling them out. We slice them from the 'log' and lay them on a (greased or lined!) baking sheet straightaway, so the cookie is sort of long and vaguely rectangular. It makes them distinctive and also you want them as cold as possible when they go in the oven, to keep from burning, so this is the most efficient way to do it! But, the shape doesn't have any real significance, go ham. Bake for ... ~8-10 minutes, or until you see them getting dark around the edges (which, I know, is very difficult because they're already kind of dark.) It's kind of a guessing game? But, as mentioned above, they're good if you overshoot a batch by a little bit, and you can learn and aim a little lower for round two!
10. Enjoy!
These bad boys are so stupid good. Excellent coffee cookie. No idea if they go with tea but why wouldn't they? I'm gonna eat 100.
Okay this has been a cookie recipe, that's all, Happy Holidays ♥
13 notes
·
View notes
Note
WE’RE ALL SYNCED NOOO…. everyone remember to rest and eat and hot water bottles help with cramps but don’t burn urselves .. and maybe take some paracetamol too (or ibuprofen if ur feeling silly) my mother swears by it . I think it’s just a desi thing and like willpower i forgot tje term but like . when u believe something will help u so much it does . But it works for me..
AND HONEY WATER!! i will stand by honey water till the day i die just boil some water and add some honey and wait for it to cool (don’t burn ur throats guys) Or just add a bit of cold water like i do and supposedly that helps with a sore throat and it makes u feel all warm and fuzzy . my Dad taught me the first one he says its cause of the texture i never fact checked that
i’m getting carried away with the random food things ONE MORE FOR GOOD LUCK if u want . to make Desi chai . boil half a cup of water and put tjat in a tiny saucepan with the teabag, one cardamom (make sure u crack it open so the tiny little seeds drop out), like a Teaspoon of fennel seeds or something idk i just add whatever amount looks good, and optionally a little bit of cinnamon (again i just wing it just add a small bit) and some sugar/sweetener and let that all simmer for like 30 seconds while u get half a cup of milk and pour that into ur saucepan . Thenn you wanna mix that around a bit and leave it all to . cook? that doesn’t sound like the right word… whatever. leave it for a few minutes and ur final step is when the chai starts rising u let it rise to the top and then turn down the heat and let it sink (i have a gas stove but if you have an electric ermm just set it aside for two secs to sink i think that’ll work). let it rise and sink three times!!! this really makes the flavour pop according to my dad!! then just strain it and enjoy :3 i lovee chai it was inevitable being pakistani HAHA it always makes me feel better after anything whether i feel sick or something bad happens or if i’m just silly chai is just nice for any occasion . my phopo calls me an auntie but Likeee isnt being a rich brown auntie the life…… im not rich yet but one day guys trust
anyway that got long HAHA i love cooking and baking and stuff … and home remedies MEDICATION IS GOOD DONT GET ME WRONG but sometimes im too lazy to run to the shops and get some cough syrup or something so i just make some honey water .. please take ur meds and get vaccinated though guys ❤️ stay safe hope u liked my chai :3
do you know how many asks I've gotten saying they're also on their period literally why are all of my followers synced up WHAT IS THIS
everyone listen to our friend here. honey water sounds lovely I'll have to try it. usually I just go for drinking honey straight out of the bottle if I have a sore throat but I suppose honey water might work a bit better lol
also OOOO CHAI!! tbh I've always wanted to make chai at home because so often chai I've gotten in coffee shops just... isn't it. but when it's good it's so good. I'm going to take note of this so I can get some cardamom and fennel seeds from the store :))) so excited to try it
17 notes
·
View notes
Note
I am a slut for pumpkin pie ofc I want the recipe…
In other news, I ate up that whole fic. I’ve missed you so bad bolts :,]
aw, thank you! and yeah, my life has been crazy in the worst of bad ways but i don't want to trigger the people with that discussion lmao. i'm just glad to be back. anyway recipe and story about recipe under the cut lmao
fun facts about this pumpkin pie recipe: my mom and i found it while cleaning up my grandma's recipe card stack. now, my grandma was a true 1950s housewife, which meant she had a lot of written down recipes that made it look like she cooked, but really she worked a full time job and didn't have time for that shit. so this was my great-grandma's recipe that my mom couldn't remember much about other than that it was good and also a family recipe, so obviously we had to make it because uh. *vin diesel voice* family.
anyway. that first thanksgiving we start to make it. i'm like wow. huh. that seems like a lot of filling. whatever. maybe it makes two pies. i can handle that. and then - somehow i filled two crusts and there was still more. this BITCH'S recipe made THREE PIES. there are THREE PEOPLE in my family. we had pie out our ears, man. anyway:
this recipe is for ONE GODDAMN PIE which is why some of the measurements are FUCKING GODAWFUL. just try your best.
ingredience
1 2/3 cup pumpkin puree
1 cup sugar
2 eggs (one large and one small, or whatever who cares)
1/3 teaspoon salt
1/4 teaspoon allspice
1/3 teaspoon cinnamon
1/3 teaspoon nutmeg
1/3 teaspoon cloves
1/4 cup milk
2/3 tablespoon flour
3 tablespoons whiskey or bourbon (it does NOT have to be the good stuff. also imagine how much i had to pour in to make THREE PIES)
2/3 tablespoon vanilla
for crust: use your favorite plain flour pie crust recipe, but sub about 1/3 of the water content for vodka. or buy that shit at the store.
instructions
beat eggs well, then add sugar and spices. mix until very smooth. blend flour and milk, then add to the sugar and spice and everything nice. add "flavoring" (liquor) (and vanilla i fucking guess), mix. lastly add pumpkin and mix. pour into unbaked pie crust. bake 15 minutes at 450, then 35 minutes at 300. pie.
additional fun facts:
"but bolt!" you cry "i don't have a 1/3 teaspoon or tablespoon!" "NO ONE DOES" I shout back, shaking you by the shoulders "I'M WORKING WITH A RECIPE FOR THREE PIES HERE, PEOPLE! EYEBALL IT!"
also. the original recipe had absolutely no fucking baking instructions. no time. no temperature. that was fun!
"why add the vodka to the crust?" you ask. well, i answer, vodka doesn't freeze like water does, so when you put your crust in the fridge to chill, it'll get cold, but it won't be quite so hard to work with. i've found that the vodka makes it easier to roll out. but it also gets warmer quicker, so you gotta fucking MOVE IT when you make that crust. also no the recipe didn't come with how to make a crust. git gud.
"will this pie actually make hugh jackman and/or logan howlett fall in love with me?" you might also ask. and to that i reply FUCK no. it's just a normal pumpkin pie except THIS ONE has a funny backstory. both to me, who had to deal with THREE PIES, and also to you, who can make this for thanksgiving and when your aunt you see maybe two times a year asks you where you found it you can say "oh, a wolverine x reader fic on tumblr dot com." and she will never ask you anything ever again.
5 notes
·
View notes
Text

Oatmeal Griddle Cakes
Ingredients
1 cup cooked oatmeal
1 cup whole wheat or white flour
1 1/2 cups milk
1 egg
1 teaspoon salt
6 tablespoons baking powder
1 tablespoon butter substitute
Directions
Add the milk, yolk of egg, salt and butter substitute to the oatmeal; beat for three minutes, then add the flour and baking powder and the white of egg stiffly beaten. The batter must be very thin. Bake on a hot well-greased griddle. Serve with syrup, or sprinkle with sugar and cinnamon.
from Recipes for War Breads (1918) compiled by Dr. D. Jayne & Son
This holiday season, we're bringing to you a variety of recipes from the cookbooks in our collection so that you can delight and/or horrify your loved ones at Thanksgiving. We bear no responsibility for the quality of the recipes chosen, so proceed at your own risk. Check out our recipes tag for more ideas, and let us know if you try any!
The Browne Popular Culture Library (BPCL), founded in 1969, is the most comprehensive archive of its kind in the United States. Our focus and mission is to acquire and preserve research materials on American Popular Culture (post 1876) for curricular and research use. Visit our website at https://www.bgsu.edu/library/pcl.html.
10 notes
·
View notes
Text
Screw politics. Let's talk apple pie for a minute.
So that earlier post, somewhere in yesterday's timeline, about kiddo wanting apple pie for her birthday instead of cake...here's a few more pics, to help illustrate. Keep in mind, I can't be holding the camera and stirring something on the stove at the same time, so I can't take pics of some of the process.
So, back to the Ancient Grimoire...
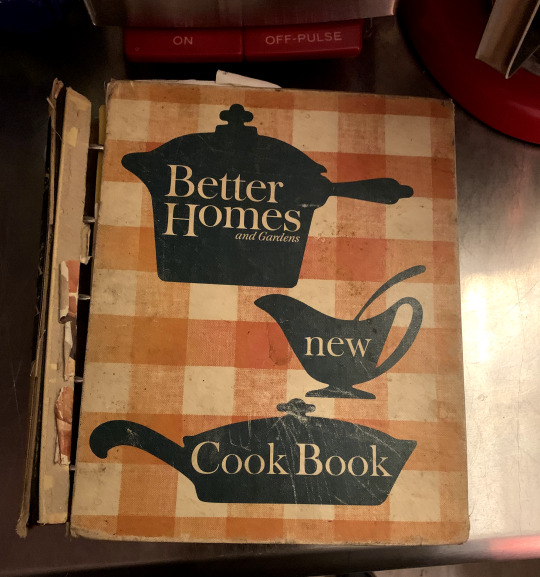
From 1959, the year I was born. This is the book that shaped many a mid-century kid's diet. With some things you have to translate (at times) into modern day. ie: This is before baggies were invented, when Waxed Paper and Foil ruled the day.
The recipe for the pie filling in here is good, but I found a much better way to get the kind of apple pie I love (rich, thick, syrupy, apples soft), and that's what I'm gonna talk about here.
First, kiddo's bday party is gonna be about ten kids, so I needed to make two pies, back-to-back in one day. The oven just isn't big enough to accomodate two pies at once. BTW, pre-heat that sucker to 425 degrees.
First thing to do in this day-long affair, is to make the two batches of double-crust pie crust, forming each batch into a disc, about 1/2-inch thick, about 6 inches across. Put each disc in a separate baggie and chill in fridge while you start in on the apples.
For each pie, I peeled and chopped 8 big Granny Smiths (both pies was a total of about 5 1/2 pounds). Lemme tellya, peeling and chopping apples is not "unskilled labor"! This is another reason for doing them back-to-back instead of simultaneously: to give the hands a rest! My hands were FEELING it by the end of the day.
So you have a large bowl with the chopped remains of 8 apples, and In a small bowl or ramekin, mix up one tablespoon of flour, one tablespoon of sugar, 2 teaspoons of cinnamon and 3/4 teaspoon of nutmeg.
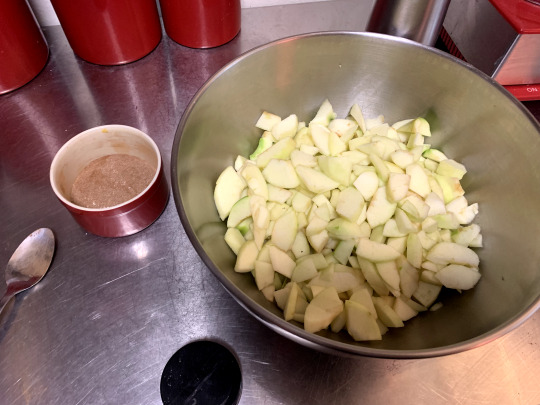
Sprinkle the mixture in the ramekin over the apples, evenly. Take a large slotted spoon and stir/mix until all the apple pieces are coated.
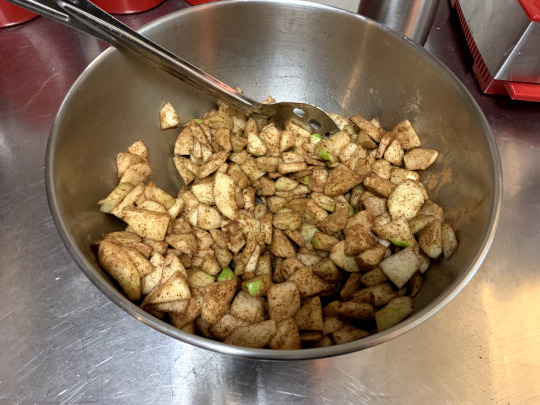
Now this is the part I couldn't really take photos of, as it is labor/focus intensive:
In a small saucepot, melt 1 stick (1/2 cup) of real salted butter. Once butter is melted, turn heat up to medium and sprinkle in 3 tablespoons of flour. Stir until flour is incorporated, and then simmer for ONE MINUTE, stirring constantly.
While still stirring, pour in 1/4 cup of water, and add 1 cup granulated sugar. Stir, stir, stir, and keep stirring, and bring it up to a boil. It will begin to thicken fairly quickly. Once it's boiling, turn the heat back down, and let it cook for THREE MORE MINUTES, stirring constantly. It will become a gloriously thick syrup as you stir, THEN REMOVE FROM HEAT and SET ASIDE!
Now is the time to get one of those discs of pie crust out of the fridge and let it sit on the counter for a few minutes so it's more pliable. I need to take pics of how I roll out pie crusts, as I'm pretty sure it's not how you'd think:
I lay down two 24" sheets of waxed paper so that they overlap about 4 inches. Put disc of pie crust in the middle of that roughly 2-foot-square expanse of waxed paper, then put 2 more sheets atop the disc, and have at it with a heavy marble rolling pin.
Once it's about two inches larger than you need it to be, just peel off the top two layers, pick it up so your hand is in the center, and invert the pie-pan over your hand, flip, adjust so it's centered, and peel off the other two layers. Now continue to settle the crust into the pie pan and let the excess lay over the edge of the pan.
Take a sharp knife or razor blade and cut that excess off, mash it all together into a rectangle, and once again put between waxed paper, rolled out to a managble thickness, and then you'll slice it with your blade to make your woven strip top crust later.
And since you did all that between waxed paper, you should have less of a mess than normal!
NOW that your bottom pie crust is ready, take the semi-cooled syrup, and pour over the spiced apples and stir until everything is coated. Pour it into your bottom crust, and lay out your woven strips. Pile as much of the apple mixture, and syrup, in the center as you can. The apples will cook down.
When you lay out the woven strips, any excess will go to help make the outer fluted edge. Sometimes the filling will breach containment, and that's kinda part of the beauty of it, but sometimes it's nice to have an orderly fluted edge. Ironically, today's two pies turned out to be an example of each.
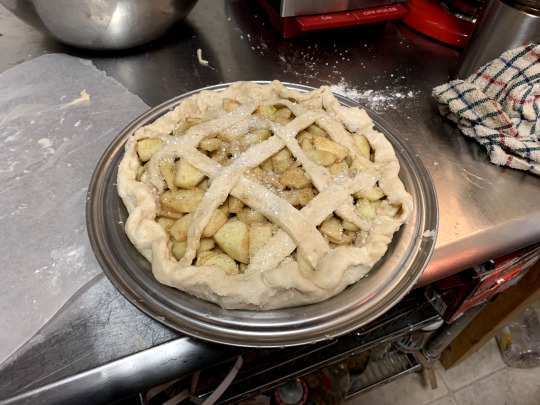
So...First pie ready to go in the oven:
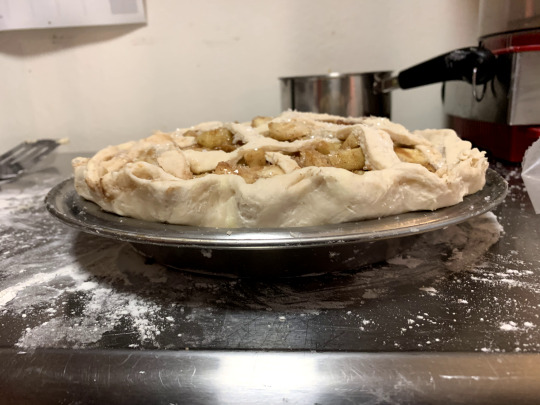
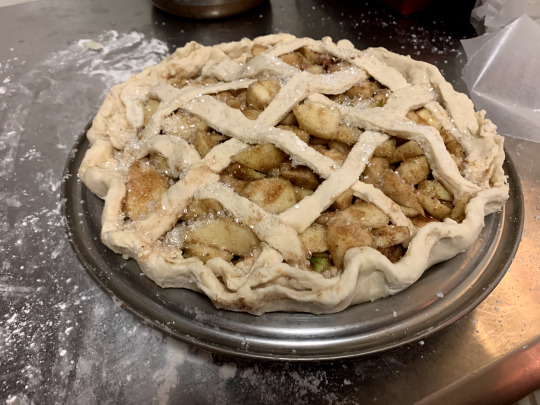
Put it in at 425 for 15 MINUTES, turn the heat down to 350, and bake for 45 MORE MINUTES, or about 1 hour total. It ends up lookin' like this:
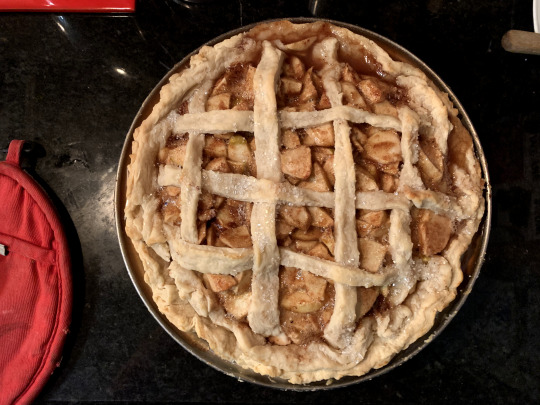
This one breached at the top of the photo there, but no matter. It's still pie.
So, once it's out of the oven, put the oven back up to 425 for your second pie. Speaking of second pie, here's yesterday's:
And here they both are, done and ready to go:
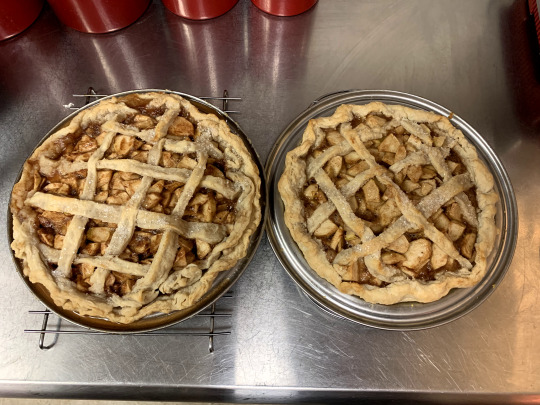
Two happy birthday pies.
8 notes
·
View notes
Text
Moment of true happiness: 6 Nov. Destiel Month
s9 au, human Cas, deancas ust
The apples piled in the big metal bowl made a fetching still life, their green and mottled red skins a mirror to the leaves on the maple trees Cas knew were lining the streets of Lebanon. He hated to peel away the vibrant, cheerful colors. The recipe didn't say anything about the skins being poisonous, or even annoying. He ignored the peeling edict.
He also discovered, quickly, that he didn't enjoy cubing anything. Who wanted to eat a mouthful of little cubes? Surely the apples would be soft by the time they were being consumed, but cubes still didn't seem appealing. He cut the apples through their cores and then made thin, or thinner, wedges of them. He liked the look of that.
He did remember to turn on the oven around the time he was slicing a lemon in half. The bunker oven tick-tick-ticked at him, like a scolding teacher. The lemon squirted juice onto his face, rudely, as he tried to douse the apple slices to keep them from turning a sad, bruised hue. He wiped off his cheek and tossed the slices with his hands, which is how he realized he had a papercut on one knuckle.
Cas hissed and went to rinse his stinging finger in the sink.
Next, sugar. The recipe called for white sugar. In the sugar canister, only a half a cup remained. He'd make up the rest with brown sugar. Or would he… The brown sugar he took from the large shelving unit near the door seemed to be a solid brick in a plastic bag. When he dropped it on the counter, it thumped strongly and a skillet hanging above the counter dove off the rack as if fleeing a bombing. Cas broke a large chunk of the brown sugar into the apple bowl and poked it repeatedly with a fork; the chunk somewhat came apart, looking a lot like a toppled sand castle.
The recipe said ginger, nutmeg, and allspice were essential ingredients. Cas found cinnamon and guessed a sprinkling or three would be acceptable. The recipe said to add a fourth of a teaspoon of salt. Cas threw in two pinches, which were probably close enough. He flopped in a little flour and then a little more for good measure; the bag said the flour had expired almost a year ago but he didn't smell anything strange or see any bugs. He stirred everything in the bowl with a large wooden spoon and ignored the trickle of sweat inching between his shoulder blades.
Taking one of the pre-made pie crusts out of its box and unfolding it into a glass pie plate was one of the most nerve wracking moments of Cas's long life. The softened crust drooped disconcertingly like the hide of an animal. He patted it down and shuddered. He scraped the apples into the crust, shook them into a single layer, and unfolded the second pie crust on top.
He would have to keep touching the unsettling dough if he wanted to, as the recipe recommended, "flute the edges prettily." He used a fork to smush the edges together and found the little lines the tines made pleasing.
Cas made three cuts in the top crust, right in the center like a star or – and he thought this was charming – a cross-section of an apple. He put the plate in the oven and set a timer for fifteen minutes, which was when a necklace of aluminum foil would need to be placed around the edge of the crust, ergo he had fifteen minutes to find the aluminum foil.
He let out a long, shaky breath of relief.
Ten minutes later, he was halfway to genuine grief: if there was aluminum foil in this cursed kitchen, he had yet to see it with his own eyes, and he'd rummaged through every bin, drawer, and shelf five times already. He was kneeling on the floor, scrabbling through a cabinet full of dubiously dinged-up Men of Letters era pots and pans and lab equipment, when Dean yelled, "Holy shit are you baking a pie?" and surprised Cas so badly Cas banged his head on the cabinet door.
"Fuck, sorry, man," Dean said at a normal volume as he dove down to join Cas on the floor. His palm was as cold as an ice cube as he placed it on Cas's forehead. His other hand gripped Cas at the shoulder and he was looking into Cas's face like he expected to find a gaping wound.
"I think I'm all right," Cas said, sitting back on his heels.
"Yeah, you're good; no bleeding." Dean gave him a sheepish grin and lowered his hands with what seemed like reluctance. "What're you looking for?"
Cas sighed. "Aluminum foil."
"Kevin or Sam might have the roll. They've been up to something they think can help us track Gadreel." Dean glanced up at the stove. "You're making pie though?" His eyes were amazingly green.
Cas ignored the clench of his heart and started to climb to his feet. Dean helped him up and stood very near, as though worried Cas's skull was more damaged than initially assumed.
"I saw a recipe and thought it sounded simple enough." Cas hoped his face didn't look as warm as it felt. "I wanted to contribute to the household."
Dean's smile was like a kid's, genuine and full of light. "You already have been, but don't let me stop you from expanding your roster." He seemed happy to keep looking at Cas. "Next time, I want in on the action."
"Help me find the aluminum foil and you can help this time." Cas took a chance at not breaking eye contact, even though he wasn't quite sure why saying something innocuous felt…coy.
"Sure," Dean said easily and took Cas's hand, like leaving the kitchen's safety required a buddy system.
Maybe lots of things did. Cas let himself be pulled along; by the time they located the roll of foil on a library table beside two rabbit skulls and a vial of crushed banshee teeth, he was gratified to note that Dean's hand was much warmer than it had been earlier.
The pie turned out to be edible. Kevin, Sam, and Cas each ate one piece, and Dean ate three. Cas wondered if Dean would taste of spice and apple and hoped nothing of the wondering showed on his expression.
(Later, he conceded it must have. But being softly kissed by Dean was well worth the failure.)
7 notes
·
View notes
Text

coffee-chocolate mousse with a lemon confit insert and a coffee icecream with caramelized hazelnuts
because @silenceandiblog asked, here are the recipes, for probably six people:
lemon confit
- 50g lemon peel
- 150g lemon juice
- 75g sugar
carefully peel the lemon, so that you don't have any of the white parts. put the zests into a small pot, fill it with water halfway and bring to a boil. blanch the lemon peel for a minute. sieve them and repeat two times (this will reduce the bitterness). once you've blanched the lemon peel three times, put them into a pot, add the lemon juice and sugar and let it cook for 40-50 minutes. fill the hot mixture in a marmelade glass.
if you want to serve this the way i did, you can fill some of the lemon confit into a silicone mould (mine contained 30ml per cavity) and freeze it for at least three hours.
coffee mousse:
- 4g gelatine (note: i used this much gelatine because i wanted to fill it into a silicone mould which means the mousse had to be a bit more stable compared to being served in a glass. if you want to serve it differently, you can definitely reduce the amount of gelatine to at least 2g or maybe even go without it completely)
- 125g cream (1)
- 35g coffee beans
- 1 stick (1.8g) instant coffee
- 70g milk chocolate
- pinch of salt
- 125g cream (2)
heat up cream (1) with the coffee beans and bring to a boil. allow it to infuse for at least thirty minutes but you can let it steep for up to two hours.
soak the gelatine in cold water. melt the chocolate with the instant coffee and the salt over warm water. reheat the cream/coffee mixture and let the gelatine dissolve in it. sieve out the coffee beans and add the warm cream to the chocolate. use a hand blender to make sure everything emulsifies. let it cool down a bit (till it's handwarm).
whip up cream (2) and carefully fold it under the chocolate mixture.
option 1: you fill it into a silicone mould (mine had 100ml per cavity). fill the individual cavity up to two third, add the frozen lemon confit insert, press down lightly and add as much mousse as needed. you can leave it like this or add a biscuit base of your choice. freeze over night and unmould it the next day, carefully let it unfreeze in the fridge.
option 2: you serve it as a glass dessert. pick a glass of your choice and fill in the mousse. let it rest in the fridge over night. add as much lemon confit as you want when you serve it.
(note: this cream is relatively bitter and very focused on the coffee flavour. you can leave out the instant coffee and reduce the amount of coffee beans if that's more your taste)
coffee icecream with hazelnuts
(note: i used an icecream machine to make this)
- 600g cream
- 50g coffee beans
- 150g sugar
- pinch of salt (1)
- cinnamon to taste
- 100g chopped hazelnuts
- 25g maple sirup
- pinch of salt (2)
for the hazelnuts, preheat the oven to 160° (fan oven). combine the hazelnuts with the maple sirup and the salt, put it on a baking sheet and bake it for twenty-twentyfive minutes. let it cool.
put 500g of cream in a pot, add the sugar, coffee beans and pinch of salt (1) and bring to boil. let it cool down and let the coffee beans infuse in the fridge over night.
the next day, sieve out the coffee, add the remaining 100g of cream and cinnamon to taste (i added less than a teaspoon but this is individual preference). fill it into an icecream machine and let it cool according to the instructions of the machine. in the last ten minutes, add the hazelnuts. fill the finished ice cream into a container and put it in the freezer till serving.
assemble the mousse and the icecream on a plate of your choice, serve and enjoy :)
11 notes
·
View notes
Photo



Recipe Advent Calendar - Day 1
Happy Holidays!
To celebrate the season, I am doing 12-days of seasonal recipes from the 14th to the 25th December. These are recipes published in the Brooklyn Daily Eagle newspaper during the period that Steve Rogers and Bucky Barnes lived in Brooklyn in the early 20th century.
Christmas Cake Tips
Christmas cake recipes are many and varied. Some of them have been handed down from mother to daughter for generations. It is worth noting that many of these old standbys contain brandy, not so much for flavoring, since most of the taste is lost in the cooking, but because brand added to the keeping quality of the cake. Slow cooking is the rule for success in all fruit cakes. Tried and true recipes would have you steam the cake first and then bake them to a cake texture. You may cook the cake in almost any shape and any size tin—coffee or baking powder tins, loaf or square pans. Whichever type you use, follow the method of topping the tins with heavy wax paper. Leave this covering on during the steaming and all but the last half hour of the baking. In this way the cake will not become too brown. After the cakes are cooled, wrap them in wax paper and store them in the tins in which they were baked. A neat and easy trick that makes for successful storage is to top the tin a sheet of heavily-waxed paper. Put this package in a moderate oven until the wax on the paper has melted. Remove it from the oven and press the waxed paper around the edge of the container. As the pan cools, the melted wax will harden and make a perfect seal over your cakes. This wax paper may be removed every week or so, while you add an additional spoonful of grape juice or wine for additional flavor, and reseal until the next time.
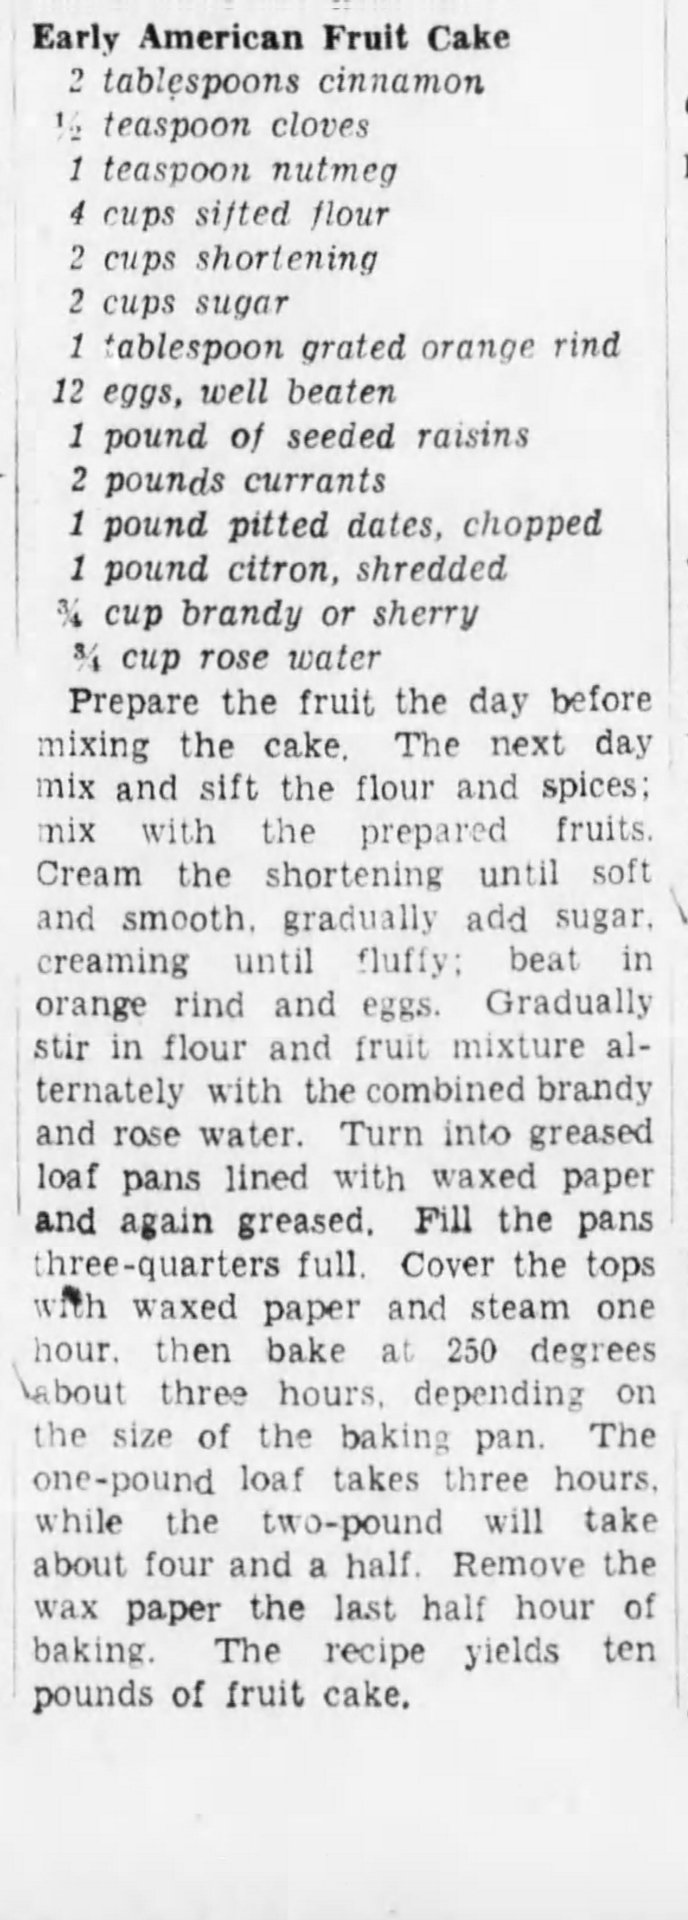
Early American Fruit Cake
2 tablespoons cinnamon 1/2 teaspoon cloves 1 teaspoon nutmeg 4 cups sifted flour 2 cups shortening 2 cups sugar 1 tablespoon grated orange ring 12 eggs, well beaten 1 pound of seeded raisins 2 pounds currents 1 pound pitted dates, chopped 1 pound citron, shredded 3/4 cup brandy or sherry 3/4 cup rose water Prepare the fruit the day before mixing the cake. The next day mix and sift the flour and spices; mix with the prepared fruits. Cream the shortening until soft and smooth, gradually add sugar, creaming until fluffy; beat in orange rind and eggs. Gradually stir in flour and fruit mixture alternately with the combined brandy and rose water. Turn into greased loaf pans lined with waxed paper and gain greased. Fill the pans three-quarters full. Cover the tops with waxed paper and steam one hour, then bake at 250 degrees about three hours, depending on the size of the baking pan. The one-pound loaf takes three hours, while the two-pound will take about four and a half. Remove the wax paper the last half hour of baking. The recipe yields ten pounds of fruit cake.
The recipe appeared in the Monday 24 November 1941 edition of the Brooklyn Daily Eagle.
Advent Calendar Day 1 | Day 2 | Day 3 | Day 4 | Day 5 | Day 6 | Day 7 | Day 8 | Day 9 | Day 10 | Day 11 | Day 12

[ Support SRNY through Patreon and Ko-Fi ] And join us on Discord for fun conversation! I also have an Etsy with up-cycled nerdy crafts
#Steve Rogers#Bucky Barnes#recipes#Christmas Recipes#Holidays#Advent#Vintage#Vintage food#Vintage Recipes#1940s#Post-WWII#Wartime#early 20th century#20th Century#captain america#Captain America: The First Avenger#ca:tfa#CAPTAIN AMERICA REFERENCE#fanfic writing#Fanfic references#fanfic research#writing resources#writing reference#fan fic writing#historic new york#historically accurate#historically accurate steve rogers#historically accurate bucky barnes
31 notes
·
View notes