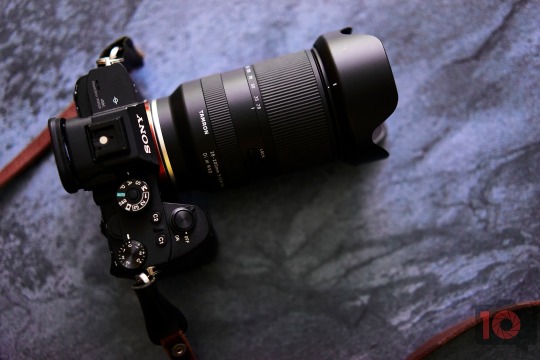
#70-200mm Tamron 2.8
Text

Is it always black in space? - Switzerland Alps - June 2k17
https://www.deviantart.com/1darkstar1
#pws#lensblr#70-200mm Tamron 2.8#photographers on tumblr#original photography#nikon#moody#moody nature#teamnikon#moody photography#nature photography#switzerland#alps#travel photo diary#travelling#travel#travel photography#travel photo blog#nature#photography#photographers on the street#photographers on lensblr#nikon photography#photographers on deviantart#photographers on instagram#original photography on tumblr#original post#original photographers
152 notes
·
View notes
Text

#70-200#70-200mm#2.8#f2.8#tamron#70-200/2.8#black and white#grayscale#greyscale#bnw#monochrome#documentary#snapshot#spontaneous#flash#flash photography#studio#on location studio#yongnuo#godox#nikon#nikkor#nikon photographer#nikon photography#photographers on tumblr#photography#photographers of tumblr#original photographer#photo#original photographers
83 notes
·
View notes
Text
Aleksandra

Canon EOS R6, TAMRON SP 70-200mm F/2.8 Di VC USD A009
[EN] Aleksandra. This is one of the nicer sessions that ages well. The photos bring back good memories. And that warm, sunny afternoon.
[PL] Aleksandra. To jedna z fajniejszych sesji która dobrze się starzeje. Zdjęcia przywołują fajne wspomnienia. No i to ciepłe, słoneczne popołudnie.
#photography#fotografia#photographer#photo blog#mazury#photographers on tumblr#portrait#kobieta#portret#dziewczyna
8 notes
·
View notes
Text
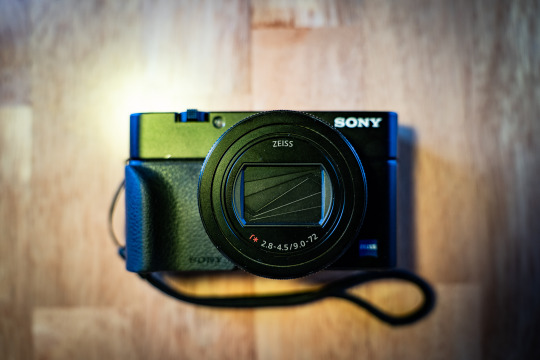
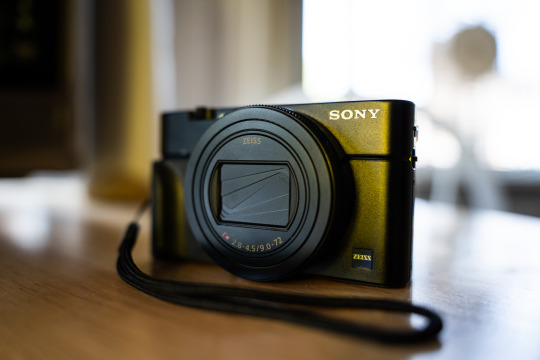
Sony RX100 VII Thoughts After Two Months
PROS:
Stacked sensors are the future. Well, technically the present considering that Canon, Nikon, Sony, Fuji, and OM Systems all use stacked sensors in their top of the line cameras. Either way, finally getting to experience shooting with one on a daily basis has made me want one in pretty much any camera going forward. The benefits are twofold: Not only do you get shutter speeds up to 20 frames per second, and without a mechanical shutter flipping in the way obscuring your view in between shots, but you also get no rolling shutter while doing it. Pretty much every Sony camera can shoot 10 fps bursts with the silent shutter, but any movement can give you a jello-like effect since the sensor reads out so slow on non-stacked cameras. The only con, at least on this camera, is that you can’t shoot flash at higher than 1/100 with the electronic shutter. That’s still plenty fast for a lot of stuff, but well below the 1/2000 you get when shooting the mechanical shutter.
The fast frame rate wouldn’t make much of a difference if the camera was bad at autofocusing, but this camera is great at it. It has a lot of the same fancy focusing stuff that my full frame Sony has like human/animal eye autofocus and all the tracking modes I’m used to. It actually makes the camera pretty solid for wildlife if you can get close enough at the 200mm end.
Speaking of that, the 24-200mm equivalent is a great range, and one that I missed a lot since I traded away my Tamron 28-200 to help cover the cost of my A7RIV. The small size and extra 4mm on the wide end actually makes it even more convenient than that Tamron.
Aside from covering a broader range than the 24-70 equivalent lens from the older RX100 cameras, this lens also seems noticeably sharper. The last RX100 model I had, the Mk. IV, just didn’t seem as crispy as this lens is.
It has a touchscreen! It’s wild to think that the previous RX100 cameras I owned didn’t have this basic ass feature, but Sony was very late in putting touch screens in their cameras. Ironically, I don’t really use it in this one because the AF is good enough that I can just do focus and recompose with tracking.
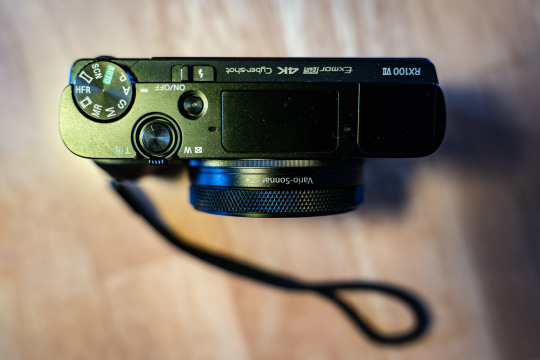
CONS:
It’s still only a 1” style sensor so high ISO isn’t the cameras strong suit. Programs like DXO PureRAW help a lot and let you get somewhat usable images at ISO 6400 in a pinch, but you’re kinda pushing things at that point.
While the lens is sharper and covers a wider range than the older models, it’s also significantly slower. At 24mm equivalent it’s already at f/2.8 where the old cameras were f/1.8. It’s f/3.2 at 25mm, f/3.5 at 33mm, and f/4 at 40mm. From 109mm to 200mm you’re at f/4.5. The relative slowness of the lens combined with the small sensor means that this can struggle getting quality images in low light without a tripod or something.
No USB-C. My Fuji, Ricoh, and larger Sony all have USB-C charging, which is amazingly convenient when traveling. I haven’t really gone anywhere with this camera yet, but having to account for a micro USB cable is annoying since pretty much everything aside from my iPhone uses USB-C.
It’s expensive. Just like my Mk III and Mk IV I got it used so it was cheaper than retail, but the copy I got cost about twice what I paid for the previous models.
Start up time is just a tad bit slower than I’d like. The GRIII and X100V both beat it that regards, albeit those aren’t zoom lens so I have to cut the Sony some slack.
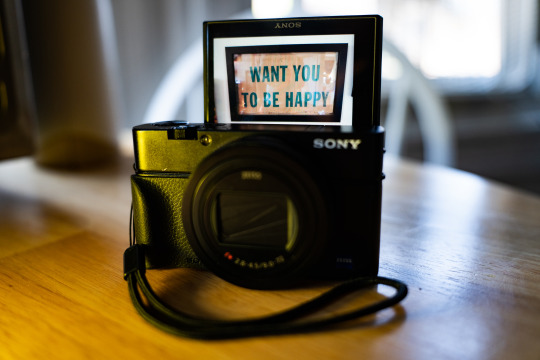
SAMPLE PHOTOS:
(The sample photos were edited in Lightroom Classic and DXO PureRAW2. Also, the sensor creates a roughly 2.7x crop factor, so the 9-72mm lens equates to 24-200ish)
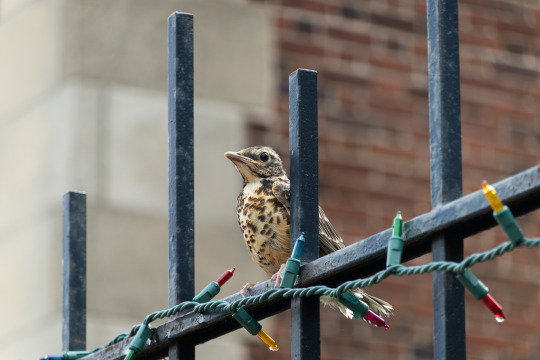
Young Bird | ISO 160. 72mm. f/4.5. 1/200.
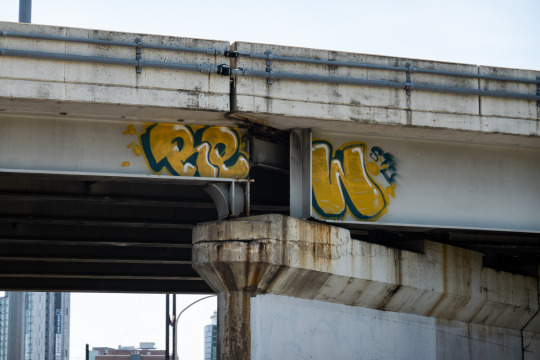
Graffiti Shot from a Car | ISO 100. 33.98mm. f/4. 1/400.
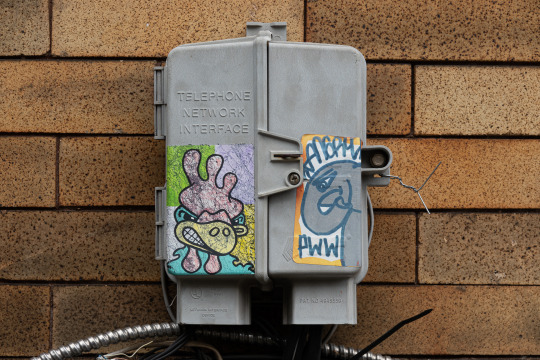
Stickers | ISO 100. 29.67mm. f/4.5. 1/100.

City Hall | ISO 100. 38.13mm. f/4.5. 1/200.

Flip Up Screen Selfie with My Friend Hanae | ISO 3200. 9mm. f/2.8. 1/40.

Zoomed in Graffiti | ISO 640. 72mm. f/4.5. 1/500.

Fishing Store Neon | ISO 800. 28.67mm. f/8. 1/200.
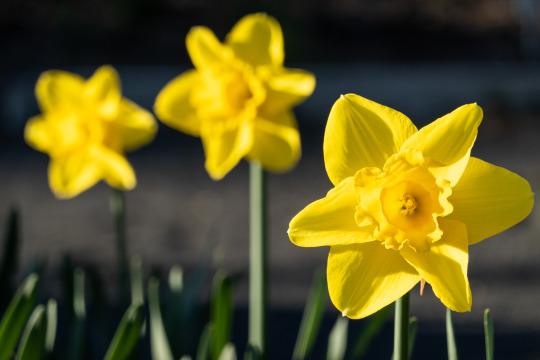
Flowers | ISO 200. 72mm. f/5. 1/640.
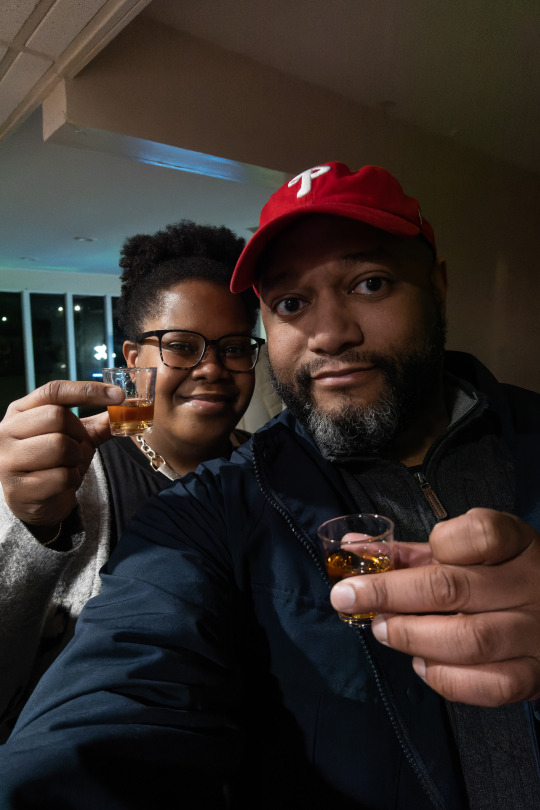
Selfie Shots with My Sister | ISO 3200. 9mm. f/2.8. 1/100.
29 notes
·
View notes
Text
Transitioning Gear: From Canon to Sony - A Journey of Adaptation and Savings
Preparing for an upcoming event in Leicester City, I decided to introduce a new addition to my camera gear. Before diving into the shoot, I wanted to familiarize myself with this latest equipment to ensure it seamlessly integrated into my setup.
My journey with photography spans across several iconic camera brands, starting from Minolta, Yashica, Practica, Olympus, and Pentax cameras from 1984 to 1991, transitioning to Nikon cameras from 1991 to 1998. However, the landscape shifted in 1998 when Canon stepped into the scene, bidding adieu to the familiar camera room. Canon swiftly became my preferred brand, solidifying that connection in 1999 with the Canon 400mm f2.8 L IS lens.
This lens became a staple, accompanying me to photograph international cricket matches for the Sri Lankan cricket team during my tenure at Reuters News Service. Its recommendation stemmed from multiple factors—excellent image quality, minimal optical distortion, a rapid aperture, image stabilization, and an agile autofocus system. While this lens thrived in sports reporting, my repertoire expanded to include everyday news, even extending to covering conflicts, utilizing three lenses: the Canon 16-35mm f2.8, 35-70mm f2.8, and 70-200mm f2.8. With a surplus of cameras matched to these lenses, I seamlessly interchanged cameras during shoots, minimizing lens changes.
However, as time progressed, my photographic needs underwent a metamorphosis. Weight reduction in equipment and a streamlined lens collection became paramount. Deliberating on this, Sony cameras emerged as a plausible option due to their lightweight build. Additionally, capturing bustling scenes without frequent lens changes became an appealing prospect.
Yet, I wasn’t prepared to compromise on lens quality or sacrifice the minimum aperture of f2.8. While lenses like Tamron 18-400mm f3.5-6.3, Canon EF 28-300mm f/3.5-5.6 L IS, and Sigma 28-300mm f/5.6-6.3 offered a range, the varying aperture and potential compromise in image quality didn’t align with my standards.
Contemplating a transition to Sony while retaining my Canon equipment, I stumbled upon the 35-150mm 2-2.8 lens—an intriguing find. Among the options like Samyang AF 35-150 f/2-2.8 FE and Tamron 35-150 mm f/2-2.8 Di III VXD, I found subtle performance differences despite a significant price gap and that feverable to Samyang. Opting for the Samyang, priced attractively on Amazon at £854.00 while Tamoron price £1486.00, seemed like the right choice after thorough research.
Thus, with the Samyang 35-150 f2-2.8, a Sony A7 Mark II, and a Godox Xpro at an Amazon special price, I made the purchase using allocated funds for new camera equipment.
Adapting from my Canon gear to Sony, I sought solutions for flash equipment. I found that using the Godox XPro to employ flash strobe lights for Sony, alongside the Godox SX 400 Studio Flash for Canon and Godox V1Hot Shoe, proved more cost-effective than purchasing new flash equipment. The entire conversion from Canon to Sony, inclusive of accessories, totaled £1585.00. This transition meant relinquishing the focal range of 35-16mm and 150-200mm, which I deemed acceptable given the substantial savings.
Considering the Amazon prices, the total expense for the Canon lenses (16-35mm f/2.8 = £1599.00, 24-70mm f/2.8 = £1947.00, and 70-200mm f/2.8 = £1624.00) would have amounted to £5170.00. Thus, by completing a full Canon to Sony conversion, I managed to meet my requirements while saving £3585.00.
With my setup primed, I am now geared up to capture the event in Leicester City next weekend, all with the convenience of a single lens.
by - Anuruddha Lokuhapuarachchi
#Sony#photography#anuruddha lokuhapuarachchi#art#tamron#samyang#canon#Lalana photography#tamaron35-150mm f2-2.8#smayang f2-2.8 35-150mm
0 notes
Text
Luxury Travel Gear for Photographers – Essential Equipment for Shooting in Thailand’s Heat
Capturing the Essence of Thailand's Beauty
Thailand is a land of beauty and wonder, from its stunning beaches to its vibrant cities, from its ancient temples to its lush jungles. With such a diverse range of natural and cultural attractions, Thailand offers endless opportunities for photographers who wish to capture its essence and create stunning images that will delight and amaze their viewers.
Beaches and Islands
For photographers looking to capture the beauty of Thailand's beaches and islands, the essentials are neutral density filters and a sturdy tripod. With these tools, photographers can create stunning long-exposure shots that capture both the movement of the waves and the colors of the sunset or sunrise. The islands of Phuket and Koh Samui offer some of the most picturesque beaches in Thailand, while the Phi Phi Islands offer dramatic cliffs and clear waters.
Cities and Architecture
For photographers interested in capturing the urban landscape and architecture of Thailand, the essential equipment includes a wide-angle lens and a fast prime lens. A tripod is also necessary for low-light shots and long-exposures. Bangkok, with its temples, palaces, and iconic skyline, is a photographer's dream, while the ancient city of Ayutthaya offers opportunities to capture the ruins of ancient temples and palaces.
Nature and Wildlife
For photographers who want to capture the natural beauty and wildlife of Thailand, a telephoto lens and a steady hand are essential. Whether it's the elephants of Chiang Mai, the monkeys of Lopburi, or the birds of Khao Yai National Park, the key is to capture the details and emotions of these creatures in their natural habitat.
Thailand is a fascinating and beautiful country that offers endless opportunities for photographers to capture its essence. Whether you're shooting beaches, cities, or nature, the essential equipment is always a combination of creativity, knowledge, and the right gear. With the right tools and techniques, you can capture the beauty and wonder of Thailand in all its glory.
Cameras and Lenses for the Tropics
Cameras
When choosing a camera for tropical environments, look for compact and rugged models that can handle the heat, humidity, and moisture. The Olympus Tough TG-6 and the Fujifilm FinePix XP140 are two excellent options. They are waterproof, shockproof, and freeze-proof, making them ideal for adventurous photographers.
For those who prefer a more advanced camera, the Sony A7R IV and the Nikon Z7 are both excellent full-frame options. With high-resolution sensors, fast autofocus, and weather-sealed bodies, they are perfect for capturing stunning images of Thailand's lush landscapes and wildlife.
Lenses
When it comes to lenses, it's essential to have a versatile range to capture a variety of subjects in different lighting conditions. A wide-angle lens such as the Canon EF 16-35mm f/2.8L III or the Nikon AF-S Nikkor 14-24mm f/2.8G ED is perfect for capturing expansive landscapes.
A telephoto lens such as the Nikon AF-S Nikkor 70-200mm f/2.8E FL ED VR or the Canon EF 70-200mm f/2.8L IS III USM is ideal for capturing wildlife and portraits from a distance. A macro lens such as the Tamron SP 90mm f/2.8 Di Macro 1:1 VC USD or the Canon EF 100mm f/2.8L Macro IS USM is excellent for capturing intricate details of flora and fauna.
Choosing the right camera and lenses for shooting in the tropics can make all the difference in the quality of your images. Look for compact and rugged models that can handle the heat and humidity, as well as versatile lenses to capture a variety of subjects in different lighting conditions. With the right equipment, you'll be able to capture stunning images of Thailand's natural beauty.
When shooting in Thailand's heat and humidity, it's essential to protect your gear from moisture and high temperatures. A few simple precautions can help ensure your equipment's longevity and performance:
Invest in a good camera bag
A high-quality camera bag with airtight seals and moisture-wicking fabric is essential in Thailand's humid climate. Look for bags with padded compartments to safeguard your gear from jostling and bumps in transit.
Use silica gel packs
Place silica gel packs in your camera bag to absorb any excess moisture. These packs can be found in most camera stores and are an inexpensive way to protect your gear from humidity.
Avoid direct sunlight
UV rays and high temperatures from direct sunlight can damage your gear. Keep your equipment in the shade or use a protective covering when shooting in bright sunlight.
Keep your gear dry
Invest in a rain cover for your camera or carry a small towel to dry your gear in case of rain or sweat. Never wipe your lenses or camera body with your clothing, as this can scratch the lens or damage the camera's sensor.
Use a dry cabinet
A dry cabinet is a great investment for photographers in high humidity climates. These cabinets regulate the humidity inside, keeping your gear dry and safe from moisture damage.
By following these simple precautions, you can ensure your gear stays in top condition while shooting in Thailand's heat and humidity.
Essential Accessories for Outdoor Photography
1. Tripod
A sturdy tripod is a must-have for any outdoor photographer. It allows you to keep your camera steady, especially in low-light conditions, and take longer exposures for beautiful landscape shots. Look for a lightweight but durable option that won't weigh you down while hiking.
2. Polarizing Filter
A polarizing filter is essential for reducing glare and enhancing colors in outdoor photography. This filter can help you capture stunning blue skies and crystal clear water while minimizing reflections and atmospheric haze.
3. Extra Batteries and Memory Cards
Don't let a dead battery or full memory card ruin your outdoor photography adventure. Always bring extra batteries and memory cards to ensure you can keep shooting all day long.
4. Lens Cleaning Kit
Dust, smudges, and fingerprints can easily ruin your outdoor shots. A lens cleaning kit with a microfiber cloth, blower brush, and lens cleaning solution is essential for keeping your gear in top condition.
5. Rain Cover
Don't let unexpected rain or moisture ruin your camera gear. A rain cover can protect your camera and accessories from the elements and allow you to keep shooting no matter the weather.
6. Remote Shutter Release
A remote shutter release allows you to trigger your camera from a distance, perfect for capturing wildlife or self-portraits without disturbing the natural environment.
By investing in these essential accessories, you'll be well-equipped to capture stunning outdoor photography in any environment. Don't forget to pack them in your gear bag before your next adventure!
Lightweight Tripods for Stable Shots on the Go
Why Lightweight Tripods Are Essential for Luxury Travel Photographers
Photography equipment can be heavy and cumbersome, especially when traveling. However, a sturdy, lightweight tripod is a must-have for any luxury travel photographer. Lightweight tripods are designed to provide stability for your camera without adding excessive weight to your gear. They also make it easy to set up and capture stunning shots while on the go, without the hassle of bulky equipment.
Features to Look for in a Lightweight Tripod
When shopping for a lightweight tripod, there are several features to consider. Look for a tripod that is sturdy and well-built, yet lightweight and easy to carry. Carbon fiber is a popular material choice for lightweight tripods, as it is durable, lightweight, and can withstand the elements.
Another feature to consider is the tripod's height and weight capacity. Make sure the tripod can support your camera and lens, and is tall enough to capture the shots you need. High-quality ball heads and quick-release systems also make it easy to adjust your camera and capture stable shots quickly.
Top Picks for Lightweight Tripods
There are many lightweight tripods on the market, but some stand out above the rest. The Gitzo GT1542 Mountaineer Series 1 Carbon Fiber Tripod is a top pick for luxury travel photographers. This tripod is made of carbon fiber, weighs just 2.2 pounds, and can support up to 22 pounds of gear.
Another popular choice is the Manfrotto Befree GT Aluminum Travel Tripod. This tripod is made of aluminum, weighs just 3.9 pounds, and can support up to 22 pounds. It also features a compact design, making it easy to travel with.
For a more affordable option, the Vanguard VEO 2 204AB Aluminum Tripod is a great choice. This tripod weighs just 2.6 pounds and has a maximum weight capacity of 8.8 pounds. It also features a unique design that allows the center column to be removed and turned into a monopod, making it even more versatile for travel photography.
A lightweight tripod is an essential piece of equipment for any luxury travel photographer. Look for a tripod that is sturdy, well-built, and lightweight, with a high weight capacity and adjustable ball head. With the right tripod, you can capture stunning shots while on the go, without the hassle of bulky equipment.
Staying Comfortable and Hydrated While Shooting
When shooting in Thailand's heat, it's important to stay comfortable and hydrated to avoid exhaustion and heat stroke. Here are some tips and gear to keep you cool:
Wear Breathable Clothing
Choose lightweight, breathable fabrics like cotton or moisture-wicking materials. Avoid dark colors that absorb heat and opt for light-colored clothing to help reflect the sun's rays.
Use Sun Protection
Wearing a hat, sunglasses, and sunscreen will help protect you from the sun's harmful UV rays and prevent sunburn. Make sure to reapply sunscreen every few hours.
Stay Hydrated
Drink plenty of water to stay hydrated throughout the day. Consider using a hydration pack or water bottle with a built-in filter to easily refill as needed. You can also try adding electrolyte tablets to your water to replenish lost minerals.
Invest in Cooling Gear
Consider investing in cooling gear such as a cooling towel, fan, or misting bottle. These items can help lower your body temperature and provide relief from the heat.
Take Breaks in the Shade
Take frequent breaks in the shade to give your body a chance to cool down. Try to plan your shoot around the hottest part of the day and take breaks during this time.
By following these tips and investing in the right gear, you can stay comfortable and hydrated while shooting in Thailand's heat.
Packing and Organizing Your Gear for Travel
Make a Checklist
Before you start packing, make a checklist of all the essential items you will need for your trip. This will help you remember everything you need and avoid overpacking. Make sure to include items such as your camera, lenses, batteries, memory cards, and any other accessories you might need.
Invest in a Good Camera Bag
Investing in a good camera bag is important when traveling with photography gear. Look for a bag that is both durable and comfortable to carry. The bag should also have enough compartments to keep your gear organized and easily accessible.
Protect Your Gear
When traveling with your gear, it is important to protect it from impact, moisture, and extreme temperatures. Invest in padded camera inserts, lens pouches, and protective cases to keep your gear safe and secure.
Maximize Space
When packing your gear, aim to maximize space in your luggage. This will not only help you fit more gear but also make it easier to carry. Use packing cubes or ziplock bags to keep small items organized and make use of any empty spaces in your luggage.
Be Prepared for Security Checks
Be prepared for security checks when traveling with photography gear. Keep your gear easily accessible and organized, so it is quick and easy to unpack and repack for security checks. Make sure to also check local laws and regulations for photography gear and accessories in your destination.
By following these tips, you can ensure that your photography gear is packed and organized efficiently for your trip to capture the best shots in Thailand's heat.
Read the full article
0 notes
Photo

This squirrel was hiding from me. That hiding skills 😂 it’s on the same tree the lizard from the previous post was on, at the same time. They were both hiding from me 😄 This is at 200mm focal length, but cropped extremely to the equivalent of at least 1000mm. Great test for the Tamron 70-200 sharpness if the settings are right! Shot on #Canon R5 + #Tamron SP 70-200 f/2.8 G2 Tags: #shotoncanon #canoncanada #canonusa #withmytamron #tamronlens #sanantonio #sanantoniotx #sanantoniotexas #travelgram #travel #traveldiaries #travelohotography #travelblogger #animals #animalphotography #wildlife #wildlifephotograpy #texaswildlife #squirel #sanantoniomissions #wildlifeonearth #wildlifeplanet #yourshotphotographer #wildlife_perfection #wildlifephotographer (at San Antonio Missions (World Heritage Site)) https://www.instagram.com/p/CqBAkC9sZyt/?igshid=NGJjMDIxMWI=
#canon#tamron#shotoncanon#canoncanada#canonusa#withmytamron#tamronlens#sanantonio#sanantoniotx#sanantoniotexas#travelgram#travel#traveldiaries#travelohotography#travelblogger#animals#animalphotography#wildlife#wildlifephotograpy#texaswildlife#squirel#sanantoniomissions#wildlifeonearth#wildlifeplanet#yourshotphotographer#wildlife_perfection#wildlifephotographer
0 notes
Text
Uncovering the Secrets of a Professional Photographer's Equipment: An Insider Look with Jack Robert
Join Greenville, SC based Editorial, Commercial, Branding, and Lifestyle photographer Jack Robert as he takes you on a journey of his equipment choices, the reasons behind them, and where he buys them
Comprehensive List of Equipment (Click each subject title to jump to my reviews and how I utilize each piece)
Click here to Jump To Cameras Review
Canon R5, Canon R6
Click here to jump to Lenses
Canon RF 35mm f/1.8 Macro IS STM Lens
Canon RF 50mm f/1.2L USM Lens
Canon RF 85mm f/1.2 L USM Lens
Canon RF 70-200mm f/2.8 L IS USM Lens
Tamron 17-35 2.8-4
Click here to jump to Computer review
MacBook Pro 16" Laptop - Apple M1 Max chip - 32GB Memory - 1TB SSD - Space Gray
Click here to jump to lighting reviews
Flashpoint XPLOR 600 R2 Manual HSS Battery-Powered All-In-One Outdoor Flash
Flashpoint Portable 600ws Extension FlashHead For The XPLOR 600 (Bowens Mount)
Backup Bulb Flashpoint Flash Tube for XPLOR 600 Flash Head - AD-H600
Flashpoint R2 PRO 2.4GHz Transmitter for Canon (XPro-C)
Click here to jump to Stands & Accessories
Flashpoint Heavy-Duty Air-Cushioned Light 3-Stand Kit (9.5') (Lightweight)
ROLLING BASE Kupo Runway Stand Base (AMAZING)
Flashpoint C-Stand Riser Column (9' Silver)
10.5' Turtle Base C-Stand and Grip Arm Kit, Chrome
Super Clamp with Ratchet Handle
Click here to jump to Modifiers
Westcott 7' Parabolic Umbrella, White/Black
Godox Softbox with Bowens Speed Ring and Grid (13.8 x 63")
Westcott Rapid Box Switch Octa-S with Bowens Switch Insert
48" EZ Lock Octa Quick XL Softbox with Bowens Mount
Click here to jump to memory and hard drives
SanDisk 128GB Extreme PRO UHS-II SDXC Memory Card
Samsung - T7 1TB External USB 3.2 Gen 2 Portable SSD with Hardware Encryption - Titan Gray
WD - My Passport Ultra 4TB External USB 3.0 Portable Hard Drive - Blue
Click here to jump to Compression and Archiving Software
Rawsie (Get 10% off using code JACK10)
Carbon Copy Cloner
Why I buy all of my equipment at Best Buy
As a professional photographer in Greenville, SC, with over ten years of experience, Best Buy is my go-to destination for all of my photography equipment needs. One of the main reasons I choose to shop at Best Buy is their amazing damage policy as a Total Tech Member. Accidents happen, and it's comforting to know that if I accidentally damage a product while handling it, Best Buy will take care of it.
In addition to their damage policy, Best Buy also provides annual maintenance for my DSLR or mirrorless camera. If there's ever a failure from normal wear and tear, they'll repair it at no extra cost to me. This peace of mind is invaluable to a professional photographer like myself, as it allows me to focus on what I do best - capturing beautiful images - without worrying about the reliability of my equipment.
Another perk of shopping at Best Buy is their priority customer service. Best Buy's team is always ready to assist me with any questions or concerns I may have. As a professional, my time is valuable, and I appreciate receiving prompt and efficient service when I need it.
I've also taken advantage of their "My Best Buy" credit card, which either gives me 5% back or allows me to pay for things over 12 or 18 months with zero interest (for the love of god, only use credit cards if you pay them off EVERY MONTH IF THEY DONT HAVE ZERO PERCENT INTEREST).
Lastly, Best Buy's return policy is a game-changer. As a Best Buy Totaltech™ member, most products are eligible for a 60-day return, which means I can shop confidently, knowing that if I'm not completely satisfied with my purchase, I can return it hassle-free while not worrying about damaging the products due to their generous accidental damage coverage.
Best Buy is my go-to destination for all of my photography equipment needs. Their damage policy, annual maintenance, priority customer service, credit card options, and return policy make them the best choice for me as a professional photographer.
What if Best Buy doesn't have what I need?
While Best Buy is my go-to destination for most of my photography equipment needs, I also rely on Adorama and B&H for those niche pieces of equipment Best Buy may not carry.
Adorama and B&H are great websites to purchase equipment, and I have had great experiences with customer service from both companies. They have a wide range of options, and their prices are competitive.
One downside to B&H is that they are closed online quite a bit throughout the year. This can be an inconvenience when I need to purchase something urgently or if I am looking to buy something online. But overall, the customer service, pricing, and variety of options make it worth dealing with their closures.
In conclusion, as a professional photographer, it's important to have a variety of reliable equipment sources. Best Buy, Adorama, and B&H are all great options, each with their own unique perks and downsides. I highly recommend considering them all when making your next equipment purchase.
Cameras
Canon R5
Canon R6
Unleashing the Power of the Canon R5: The Ultimate Tool for Professional Photography
As a professional photographer, having the right equipment is crucial. That's why I rely on the Canon R5 for all my photography needs. This camera is a game-changer, packed with features that make it the ultimate tool for capturing stunning images.
One of the most impressive features of the Canon R5 is its advanced eye-tracking technology. This allows me to capture portraits quickly and easily, even on the run. The camera's autofocus system tracks the subject's eyes, ensuring that they are always in focus, no matter how fast they're moving. This is especially useful when working with children and animals, as they tend to move around a lot.
How the Canon R5's High-Resolution Sensor is a Game-Changer
As a professional photographer, editorial work is a big part of my portfolio. And when it comes to capturing images that tell a story and convey a message, the Canon R5's high-resolution sensor has been a lifesaver. With 45 megapixels, this camera can capture incredible detail and clarity. The high-resolution sensor allows me to see every detail in the image, which is essential when working on editorial projects where the image needs to tell a story and convey a message. This means publishers can print large-format photos without losing any quality.
Additionally, the camera has a wide dynamic range, which allows me to capture images with a lot of depth and dimensionality. This is especially useful when working in challenging lighting conditions, such as bright sunlight or dark interiors. The wide dynamic range allows me to capture images with a lot of detail in the highlights and shadows, which is crucial when working on editorial projects where the image needs to be as detailed and accurate as possible.
Another advantage of the Canon R5's high-resolution sensor is that it allows me to crop images without losing quality. This is particularly useful when working on editorial projects, where the image may need to be cropped or resized to fit a specific layout or format. But it's not just about the technicalities. The Canon R5 also has a great design and ergonomics; it's comfortable to hold and easy to navigate through the menu, which makes it a pleasure to work with. The Canon R5 is an essential piece of equipment for any professional photographer. It's packed with advanced features that make it the ultimate tool for capturing stunning images. Whether quick on-the-run portraits or high-resolution stills, the Canon R5 has everything you need to take your photography to the next level.
Why I use the Canon R6
When it comes to capturing stunning images and videos, photographers and videographers are always on the lookout for the latest and greatest equipment. And while the Canon R5 has undoubtedly made a splash in the world of photography and videography, its little brother, the Canon R6, is also a camera worth considering.
One of the most significant advantages of the R6 is its smaller file size. Hard drive space can quickly become an issue when working with large files. The Canon R6's smaller file size means that you can store more images and videos on your hard drive, making it easier to manage your workflow. Additionally, the smaller file size also means that the Canon R6 is less demanding on your computer's processing power, allowing you to work more efficiently and with less lag.
When it comes to image quality, the Canon R6 doesn't disappoint. The camera has a 20.1-megapixel full-frame sensor that produces stunning images with rich colors and sharp details. The camera also has a high-speed autofocus system, making capturing fast-moving subjects easy. Additionally, the Canon R6 can shoot up to 12 frames per second, making it perfect for grabbing action shots and sports.
Lenses
Canon RF 35mm f/1.8 Macro IS STM Lens
Canon RF 50mm f/1.2L USM Lens
Canon RF 85mm f/1.2 L USM Lens
Canon RF 70-200mm f/2.8 L IS USM Lens
Tamron 17-35 2.8-4
Canon RF Lenses: A Greenville, SC Photographer's Review
As a photographer based in Greenville, South Carolina, I've had the pleasure of working with a variety of Canon camera lenses. But there are a few that stand out as my absolute favorites. Allow me to share my personal experience with these amazing lenses.
Starting off strong with the Canon RF 35mm f/1.8 Macro IS STM Lens
The ultimate tool for capturing awe-inspiring close-up shots. The macro capability allows me to get up close and personal with my subjects, while the f/1.8 aperture creates a mesmerizing bokeh effect. The Image Stabilization (IS) feature is a game-changer, ensuring I can capture sharp images even in dimly lit conditions. This lens has also become my go-to travel companion, paired with my Canon R5. The 35mm focal length is the perfect balance for capturing landscapes, architecture, and cityscapes without distorting the faces of the people I want to photograph. I've used it for street photography, macro photography, landscapes, and architecture and I love that it's lightweight and super sharp.
Up next is the Canon RF 50mm f/1.2L USM Lens, a game-changer for portrait photographers. The f/1.2 aperture serves up the ultimate bokeh and makes capturing dreamy, ethereal portraits a breeze. The USM autofocus is lightning fast, never letting you miss a shot, and the 50mm focal length is a perfect balance for full-body and headshot portraits. This lens is the default on my camera, and it's so versatile and sharp I want to cry. I've had the EF versions of this lens, including the 50mm 1.8, then the 50mm 1.2 for my previous cameras, and now the RF 50 1.2. I didn't think the 50 1.2 could get any sharper, but with this RF version, they've really blown my mind.
The Canon RF 85mm f/1.2 L USM Lens is another new favorite of mine. I've resisted for the longest time getting this lens, but I've finally made the dive after five years of debating it- and I'm not disappointed. I was initially planning on just trying this lens out for an event and returning it- however, its 1.2 aperture was stone-cold amazing for low light situations and getting candids. Not only is it a powerhouse in low light- it's probably the best portrait lens if you have the physical space to be quite a distance from your subject. The f/1.2 aperture creates an incredibly shallow depth of field and produces a beautiful bokeh effect. The lens is a bit on the heavier side, but the build quality is top-notch, and the image quality is second to none.
Finally, the Canon RF 70-200mm f/2.8 L IS USM Lens is an absolute powerhouse. The older EF version was the most reliable and loyal lens I have ever used. It never missed focus and always gave me a fantastic image. I trust it with my life. The new RF version is lighter, so I went with it instead of just using the EF to RF adapter. On the RF Version, the lens extends out when zooming, and I don't particularly enjoy that- but it's not a deal breaker. Is it my go-to lens? No, but I will 100% recommend having it in your bag for many cases. This lens is perfect for capturing family photos, portraits, couples, sports, nature, and wildlife. The long focal length allows me to capture distant subjects easily, and the f/2.8 aperture creates a beautiful bokeh effect. The Image Stabilization (IS) feature is a lifesaver when working in low-light conditions. The build quality is top-notch, and the image quality is simply outstanding.
In conclusion, these four Canon lenses are my go-to choices for capturing stunning images and videos. These lenses have never let me down, from portraits to close-ups to architecture and nature. They are versatile and reliable and produce some of the most beautiful images and videos I've ever captured. I highly recommend them to any photographer looking to expand their lens collection. Whether a professional or hobbyist, these lenses will help you take your photography to the next level.
The last honorable mention is my Tamron 17-35 2.8-4. I bought this on a whim because I needed a wider-angle lens for interiors. It's a bit on the cheaper side, but I've been satisfied with it. I use it on the regular for interior photoshoots when I need that extra view and don't have the physical space to back up. At 17mm, it doesn't distort the edges enough for it to be a bad photo, but I'd be careful when shooting architecture to watch those edges. I also utilize this lens for low, wide-angle shots of models and buildings. It creates a cool effect, giving the subject an automatic power angle over the viewer.
Computer
MacBook Pro 16" Laptop - Apple M1 Max chip - 32GB Memory - 1TB SSD - Space Gray
Do I really need a MacBook Pro!? Yes. I'm also slightly biased towards Apple and know other photographers that use windows computers just fine, but Apple products' premium and luxury experience draw me in. The seamless transitions between iPad, iPhone, and Mac are absolutely magic. Did you know with Apple, you can copy text on your phone and then hit paste on your computer, and it appears there!? It's in the small details that make Apple really stand out.
Regarding the M1 Pro Max laptop, I wanted a portable powerhouse, and Apple delivered what I needed with this laptop. When I upgraded to the Canon R5 with 50MB files, I HAD to upgrade my computer to slay large file sizes with ease. When editing thousands of photos, having a photo even take .5 seconds to load wastes A LOT of time. I needed the fastest computer I could get, not the cheapest or the most bang for my buck. The M1 Pro Max Processor and 32GB of ram easily handle my 50 MB file sizes.
I know Apple products are premium. I know you can build a windows laptop or PC for WAY less and have it be WAY faster- but I put a strong emphasis on the whole ecosystem of Apple and its seamless, luxury experience.
Lighting
Flashpoint XPLOR 600 R2 Manual HSS Battery-Powered All-In-One Outdoor Flash
Flashpoint Portable 600ws Extension FlashHead For The XPLOR 600 (Bowens Mount)
Backup Bulb Flashpoint Flash Tube for XPLOR 600 Flash Head - AD-H600
Flashpoint R2 PRO 2.4GHz Transmitter for Canon (XPro-C)
The Power of Lighting Equipment
My go-to: Flashpoint XPLOR 600 R2 Manual HSS Battery-Powered All-In-One Outdoor Flash. I have three of them, but you having just one is more than enough for most situations. The Flashpoint XPLOR 600 is a powerful and versatile light that, if used correctly, can perfectly balance natural and artificial light. With its 600ws power output and fast recycling time, this light allows me to capture stunning images in even the most challenging lighting conditions. I can overpower the SUN with this bad boy.
One of the best features of the Flashpoint AD600 is its ability to be used wirelessly and portably due to its detachable battery, which gives me the freedom to move around and capture the perfect shot. The Flashpoint XPLOR 600 also has a built-in 2.4G wireless X system, allowing me to control the light remotely and make adjustments as needed. The Flashpoint XPLOR 600 is an essential piece of equipment for any professional photographer. It gives me the power to overcome any lighting challenge and capture beautiful images no matter where or when. With this light, I can unlock the full potential of my Canon R5 and achieve the desired results every time.
Another key accessory, the extension: Flashpoint Portable 600ws Extension FlashHead For The XPLOR 600 (Bowens Mount)
The Flashpoint XPLOR 600ws 8-foot extension head is a powerful addition to any photographer's gear. It transforms the XPLOR600 series monolight into a versatile powerhouse, perfect for use with softboxes or as a gridded hair light. The extension head connects easily to any XPLOR by unplugging the glass shielded flashtube from the monolight body, locking the pronged cable link in place, and then inserting the original flashtube on the head extension sockets. This simple process allows for a quick and easy setup, making it an excellent option for photographers who need to work efficiently and quickly. I don't leave home without it.
Another wise choice is to purchase Backup Bulbs for this light. Yeah, I know they aren't cheap, but I've had one rattle out of the socket and smash on the ground when rolling it along on my Kupo Runway Rolling Base.
You also need to have a way to trigger your strobes, and I use my trusty Flashpoint R2 PRO 2.4GHz Transmitter for Canon (XPro-C) Godox and Flashpoint are the same exact equipment, just different names. You can control multiple strobes and adjust them individually from this transmitter. It's a gamer changer, so you don't have to go to each strobe and change their settings physically. I've been using this trigger for years, and I've had zero issues with it.
Stands & Accessories
Flashpoint Heavy-Duty Air-Cushioned Light 3-Stand Kit (9.5') (Lightweight)
ROLLING BASE Kupo Runway Stand Base (AMAZING)
Flashpoint C-Stand Riser Column (9' Silver)
10.5' Turtle Base C-Stand and Grip Arm Kit, Chrome
Super Clamp with Ratchet Handle
Let's talk about photography's often-overlooked but essential aspect: stands and accessories. They may not be the most exciting topic, but trust me; they can make or break a photoshoot. I rely on the Flashpoint Heavy-Duty Air-Cushioned Light 3-Stand Kit for lightweight, on-the-go situations. The plastic and metal construction keeps it lightweight without sacrificing durability, making it perfect for quick in-and-out photoshoots. But be warned, if you're planning to use it outside, weigh it down with sandbags or have an assistant hold it. Otherwise, it will topple over faster than a game of Jenga. Trust me, investing in the right stands and accessories will make your photography experience smoother and more efficient.
When it comes to stands, my go-to and best purchase has been the combination of the Kupo Runway Stand Base with the Flashpoint C-Stand And an added boom arm. The rolling base feature is a game changer, making loading in and out of photoshoots a breeze by allowing me to hang equipment from the stand rather than carry it all. And during the shoot, the convenience of easily rolling the light, modifier, and stand is unbeatable. If I had to pinpoint any regret in my photography gear purchases, it would be not investing in a rolling base for my c-stand earlier in my career. I cannot recommend this combo enough; it's truly essential for any professional photographer looking to streamline their workflow and save their back from carrying heavy equipment.
Having a variety of stands and accessories at your disposal is crucial for any professional photographer; it allows you to adapt to any situation and get the perfect shot. In addition to my rolling base c-stand combo, I also have a trusty 10.5' Turtle Base C-Stand and Grip Arm Kit, Chrome. This classic c-stand is perfect when I need an extra spot to place a light or modifier. The added boom arm is essential for versatility in positioning and placing the modifier at any angle. And let's remember the importance of sandbags. They are crucial to keeping your stand and equipment safe and secure, so invest in a good set.
Light Modifiers
Westcott 7' Parabolic Umbrella, White/Black
Godox Softbox with Bowens Speed Ring and Grid (13.8 x 63")
Westcott Rapid Box Switch Octa-S with Bowens Switch Insert
48" EZ Lock Octa Quick XL Softbox with Bowens Mount
The Westcott 7' Parabolic Umbrella is an excellent option for creating a large, soft light source. Its 7' span provides ample coverage, making it perfect for achieving a natural-looking catchlight in the eyes. Additionally, the umbrella's white interior helps diffuse the light, producing a soft, even glow. Don't even think you will utilize this in small spaces, though! A tall ceiling and a must if you want to place this modifier in a way that is flattering to the subject. Using this modifier is nice if you have more than one person or groups of people you need to photograph. On another note, the umbrella is also collapsible and easy to transport, making it a convenient choice for photographers on the go. I use this modifier 20% of the time.
The Godox Softbox with Bowens Speed Ring and Grid (13.8 x 63") Can be an excellent modifier for your photography or videography, but it can be pretty tricky and time-consuming to set up. The softbox features four poles that need to be inserted into the corners of the fabric and then into the center ring, which can be a hassle and requires some muscle to assemble. It may not be the best option if you're in a rush or don't want to be seen struggling to set it up. Despite its inconvenience in setup, the rectangular shape of the softbox, measuring 13.8 x 63 inches, makes it ideal for side lighting and backlighting, allowing you to achieve beautiful and natural-looking results. It is a versatile tool that can be useful for portraits, product photography, and videography. You can still consider keeping it in your arsenal as it can be a great addition to your lighting setup, but be aware of the setup time and effort required when using it.
The Westcott Rapid Box Switch Octa-S with Bowens Switch Insert with Bowens Switch Insert is a fantastic addition to any photographer's arsenal. This is my most recent modifier, and I am thrilled that I have it in my collection. It is a portable and collapsible beauty dish that is versatile and can be used in a variety of situations. It's been especially helpful in architectural photography due to its small size- as I use it to light different parts of the subject (room, building, etc.) to combine them all in photoshop into one beautiful and seamlessly lit photo. It's also been great for fashion and editorial portraits. The octa shape of the softbox provides a beautiful wrap-around light, perfect for creating a natural and flattering light on the subject. The Bowens Switch Insert makes it easy to attach to a wide range of strobe lights, making it a convenient option for on-location shoots. All in all, the Westcott Rapid Box Switch Octa-S with Bowens Switch Insert is a great investment for any photographer looking for a portable, compact and versatile lighting solution.
The 48" EZ Lock Octa Quick XL Softbox with Bowens Mount is my ultimate go-to modifier. It's an excellent choice for any photographer looking for a versatile, portable lighting solution. Its 48-inch size is just the right size for creating beautiful, soft light that can cover a wide range of subjects. The octagon shape of the softbox provides a natural and flattering light that is perfect for portraits, product photography, and more. The EZ Lock design makes it quick and easy to set up, so you can spend more time taking pictures and less time fiddling with equipment. The included Bowens mount makes it compatible with a wide range of strobe lights, making it a convenient option for on-location shoots. Additionally, the grid that comes with the softbox allows you to control the light and direct it exactly where you need it, making it even more versatile. Overall, the 48" EZ Lock Octa Quick XL Softbox with Bowens Mount is an excellent choice for anyone needing a portable, easy-to-set-up, and versatile softbox.
Memory Cards and Hard Drives
SanDisk 128GB Extreme PRO UHS-II SDXC Memory Card
Samsung - T7 1TB External USB 3.2 Gen 2 Portable SSD with Hardware Encryption - Titan Gray
WD - My Passport Ultra 4TB External USB 3.0 Portable Hard Drive - Blue
The SanDisk 128GB Extreme PRO UHS-II SDXC Memory Card
As a professional photographer, I am always looking for the best tools to elevate my craft. That's why I love the SanDisk 128GB Extreme PRO UHS-II memory card. This little powerhouse allows me to easily capture stunning cinema-quality 8K, 4K, and Full HD video (not that I ever do as a photographer, but anyway), as well as raw photos and continuous shutter bursts. The storage capacity of 128GB gives me plenty of room to store all of my precious shots, and the UHS-II bus supports lightning-fast read speeds of up to 300 MB/s and write speeds of up to 260 MB/s. The V90 Video Speed Class rating ensures that my write speeds will never drop below 90 MB/s, giving me peace of mind when shooting in high-pressure situations.
What sets this memory card apart from the rest is its reliability. I've been using Sandisk memory cards for years, and they have never let me down. Even my card from five years ago still works like a charm. I've even tried other memory cards like CFExpress, with its impressive 1200mb/s read and write speeds, but I couldn't see any difference when it came to shooting or loading images onto my computer. The SD Card is also a convenient size and fits perfectly in my MacBook Pro's SD card slot. I don't have to lug around a card reader and cord, which is a huge plus in my book. In short, if you're a professional photographer or videographer, the SanDisk 128GB UHS-II SDXC memory card is an absolute must-have in your kit.
My working hard drive, the Samsung - T7 1TB External USB 3.2 Gen 2 Portable SSD with Hardware Encryption - Titan Gray
After a killer photoshoot, I like to transfer my shots straight to my trusty Samsung SSD. Why? Because editing on a lightning-fast hard drive is where it's at, plus it gives me the added bonus of being able to take my SSD on the road with me. That way, if my computer gets jacked, my precious pics are safe and sound. Plus, it keeps my MBP running smoothly by not clogging up valuable internal HD space. Once my edits are complete, and I send the photos to the client for approval and further edits, I use Rawsie to compress them and then back 'em up on three different hard drives. #backupqueen #workflowwinning
The WD - My Passport Ultra 4TB External USB 3.0 Portable Hard Drive - Blue
After loading my photos onto the Samsung SSD, I back them up to a larger, slower HD - like the WD - My Passport Ultra 4TB. And not just one, but two of those bad boys. Because let's face it, you can never be too safe regarding the photos you shoot for a client. Is it overkill? Maybe, but as a photographer, my job is to capture, edit, deliver and preserve photos, which means being as backed up as possible. Plus, there have been a few times where files got misplaced during transfer and having those extra hard drives saved the day. The WD 4TB is the perfect size for a year or two of content, and when it's full or two years have gone by, I put a date frame sticker on it and archive it in a fireproof safe for added protection.
file compression
RAWSIE
Picture this: you're out in the field, capturing stunning shots left and right, and then you get back to your studio and realize your hard drive is bursting at the seams with RAW files. Sound familiar? Well, not anymore. Introducing Rawsie - the ultimate raw image compression app that packs a punch. With up to 5:1 file size reduction, it's a game-changer for photographers like us who shoot with Sony, Canon, Nikon, Fujifilm, and more. And the best part? It's lossless, which means no lossy artifacts, no resolution change, no bit count change, and no color loss—just pure, pristine image quality.
But that's not all; Rawsie is incredibly user-friendly and straightforward. It's like having a personal assistant for your image compression needs. Plus, it's a money-saver in the long run. Trust me, I've been using it for a while now, and it has been a lifesaver.
So, if you're ready to revolutionize your workflow and reclaim valuable storage space, head on over to Rawsie's website and use the code JACK10 upon checkout for an extra 10% off your purchase, trust me, you won't regret it.
archiving
Carbon Copy Cloner
Having a reliable backup solution is crucial, and that's where Carbon Copy Cloner comes in. This software offers a plethora of options for creating backups. Whether it's on an external drive or another Macintosh, you have the flexibility to choose what you want to back up, be it an individual folder or an entire external hard drive.
I've been using CCC for some time now, and I have to say, it makes creating a carbon copy of my files incredibly easy. However, I did run into an issue where deleting files off of one hard drive resulted in them being deleted off the hard drive I was carbon copying to. This is something to keep in mind, but overall, CCC has been a solid choice for me.
In conclusion, if you're looking for a comprehensive and flexible backup solution,Carbon Copy Cloner is definitely worth checking out. Just be aware of the potential pitfall I encountered with file deletion.
Final thoughts
And there you have it, folks. I've just laid out all the nitty-gritty details of the tools and equipment I rely on to get the job done. But this is just the beginning. I want to hear from you too. What are your burning questions? What would you like to know more about? Let's start a dialogue on our work processes, the gear we trust, and any experiences we've had with similar equipment. We can all learn from each other and improve our workflow. So, please don't be shy, leave a comment and let's get this conversation started!
Disclaimer: All the equipment on this page has been tested and approved by yours truly. I've spilled the tea on real-world usage and am sharing my faves with you. The links provided are either the exact products I own or similar alternatives. Bonus: Using the links will support my blog and biz - love you for it!
Hello, World!
0 notes
Text
4 pics 1 word 5 letters camera lens girl reading

To search this site you can use the following command: To make it easier we’ve wrote down which images you’ll see in these levels, so you can just search for what you see on your screen, and you should find it here. Looking for a guide for the new top 10 game 4 Pics 1 Word: What’s the Word by LOTUM GmbH for iPhone and iPad? You’ve come to the right place! We’ve collected all the solutions for all the levels here for you! Four pics one word is a great game for you, if you love quiz games where you’ll need to think a little to solve the puzzles! The distance scale on the 17-35mm (right) is on the lens’s focus ring, and you can see that the lens is focused quite close, at around 0.5 meters.What’s the Word? 4 Pics 1 Word Answers, Solutions, Cheats. The distance scale on the 70-200mm (left) is under a cover, and you can see that the lens is focused somewhere between 10 meters and infinity. So at one end of the scale, you’ll find the infinity symbol, and at the other end, you’ll find the lens’s minimum focusing distance (i.e., the closest the lens can focus).Ĭheck out the two lenses below. These lens numbers indicate the distance at which your lens is currently focused. On some – but not all! – lenses, you will see a range of distances, usually marked in two scales, feet and meters. These variable maximum apertures are pretty common with kit lenses, and especially kit lenses with a large focal length range such as 28-300mm or 18-200mm. But if I zoom all the way to 35mm, my maximum aperture becomes f/4.) (At the lens’s widest, 17mm, I can open the aperture to f/2.8. What does this mean? It’s simple: the maximum aperture on the 85mm lens is f/1.8, and on the Tamron zoom, the maximum aperture changes from f/2.8 to f/4 as you zoom the lens. On the Tamron, you should see “1:2.8-4,” and on the 85mm, you should see “1:1.8.” In the photo below, you can see two different lenses: my Tamron 17-35mm and my Canon 85mm. On the front of the lens inside the filter ring area.You can usually find this information in one of two places (or perhaps even in both): Now, pretty much every lens has the maximum aperture written somewhere on its body. (Note that some zoom lenses have a variable maximum aperture, where the maximum aperture will change depending on the focal length this is represented as a range of numbers, such as f/3.5-6.3.) So the best lenses – and the most expensive lenses – tend to offer a very wide maximum aperture. Larger apertures like f/2.8 or even f/1.8 are highly desirable because they allow you to shoot in low-light conditions while maintaining a fast shutter speed. Note that the larger the aperture opening, the smaller the f-number (so f/2.8 corresponds to a very wide aperture, while f/22 corresponds to a very small aperture). The maximum aperture is the largest aperture opening your lens is capable of achieving. For example, if your lens is a 70-200mm zoom like mine (below), you’ll see markings that span from 70mm to 200mm. Next to this ring, you’ll generally find focal length numbers. Zoom lenses feature a zoom ring twist it, and your lens will zoom in and out. In this section, I’ll discuss numbers frequently found on newer lenses (though note that many will apply to old lenses, as well!). Common numbers on newer digital lensesĭepending on the age of your lens, you’ll run into different markings. I’ll explain what the numbers actually mean, and I’ll also explain why they matter for your photography.īy the time you’re finished, you’ll be a lens number expert, and you’ll never find yourself confused by your lens markings again. That’s why, in this article, I’m going to run through all the important camera lens numbers you’ll encounter. Camera lenses include quite a few numbers – and many of these are often confusing or obscure, especially for beginners.
0 notes
Text
Do you print your own target with reikan focal

Do you print your own target with reikan focal full#
Do you print your own target with reikan focal software#
When I first got the 70-200 G2, I noticed some photos that were not in completely good focus while others were very good.
Do you print your own target with reikan focal full#
If this doesn’t make sense to you, I advise you to read the full articles linked to above.
Do you print your own target with reikan focal software#
Reikan Focal is a computer software that helps you find the best value to add either in-camera or in-lens. The plane of focus is an imaginary line at 90 degrees from the camera where the focus should be at its sharpest, if it’s not you need to compensate with AF fine tune or in-lens compensation. Tamron has had the ability to alter the plane of focus with their Tap-In Console for a couple of years, making changes to the lens directly. Nikon has had the ability to alter the plane of focus for more than a decade in the menu system in camera. Tamron 24-70 f/2.8 VC G2, calibrating the lens with Tap-In Console HERE.Ī short version of the above articles is something like this. Tamron Tap-In Console, hardware and software to alter plane of focus among other things HERE. Reikan Focal, focus calibration software HERE. This post should be read together, or preferably after these posts: It’s a bit heavy, but well worth it by the quality it produces. To be honest, a 70-200 f/2.8 lens has its limited use because of its focal length, but when it fits, it truly shines. In the beginning of last year, I got the Tamron SP 70-200mm f/2.8 Di VC USD G2. Obviously with the increase of megapixels, the older lenses didn’t keep up and needed to be replaced. I still really really like the look of a 70-200 f/2.8 lens on a DSLR, I think it looks simply amazing. The feel, the look, the balance and about everything was perfect. I remember when I got my first 70-200 f/2.8 lens, it was the first version of the Nikkor, and it was a fantastic lens on the 12 Mpx cameras I had back then (D300s and D700).
0 notes
Text

Selfie
#70-200#70-200mm#2.8#f2.8#tamron#70-200/2.8#nikon#Z7II#Z7 II#mirrorless#nikon Z7#nikon Z7II#portrait#portraiture#portrait photography#portrait photographer#photographers on tumblr#photographers of tumblr#sweden#swedish#d750#nikkor#photography#photograph#original photographer#photo#original photographers#nikon photographer#nikon photography#flash
28 notes
·
View notes
Text
Ania

Canon EOS 200D, TAMRON SP 70-200mm F/2.8 Di VC USD A009
[EN] Ania. Walking. This is in Giżycko. We were there with the kids, no doubt about it. But where she's walking from? I don't know. I don't remember that moment.
[PL] Ania. Idzie. Giżycko to jest. Z dziećmi byliśmy jak nic. Ale skąd ona idzie to nie wiem? Nie pamiętam tego momentu.
#photography#fotografia#photographer#photo blog#photographers on tumblr#mazury#portrait#kobieta#portret#dziewczyna
2 notes
·
View notes
Video
Lapinou
Pentax K-1 & Tamron SP AF 70-200mm F2.8 Di LD [IF] Macro. Facebook & Instagram : Profil / Page / Instagram Profil : Flickr - Profil : Twitter Galerie 500∞ : 500px Galerie PENTAX : Pentax Photo Gallery
#Marais d'Isle#Pentax K-1#Saint-Quentin#Tamron SP AF 70-200mm F/2.8 Di LD [IF] MACRO#Faune#Lapin#ambiance#k-1#lumière#nature#rabbit#wild#Picardie - Hauts de France#France
2 notes
·
View notes
Text
The Father's Day Gift for Photographers Who Shoot Sony
Get the picture perfect gift!
Father’s Day isn’t too far away! And if you’re looking for a Father’s Day gift for photographers, you’re in the right spot for ideas. Specifically, if your father figure is a Sony shooter, they’re going to love one of these gifts. Sometimes the best gift for a dad right after some difficult times in the world is a new lens. Help your dad go out there and make some new memories. Choose a Father’s…
View On WordPress
#father&039;s day gift#image quality#photographer#review#sony#tamron#Tamron 28-200mm F2.8-5.6 Di III RXD#Tamron 28-75mm f2.8 Di III VXD G2#Tamron 35-150mm F2-2.8 Di III VXD#Tamron 70-180mm f2.8
0 notes
Video
Team T by Abraham Arthemius
Via Flickr:
JKT48 6th Anniversary Concert [23.12.2017]
#JKT48#Anniversary#Idol#Idolgroup#48 Group#Girls#Cute#Smile#People#Portrait#Stage#Stage Photography#Photography#Canon EOS 70D#Tamron SP 70-200mm f/2.8 Di VC USD#Team T#Adhisty Zara#Zara#Made Devi Ranita Ningtara#Devi#Tan Zhi Hui Celine#Celine#Violeta Burhan#Vio#Ruth Damayanti Sitanggang#Ruth#Puti Nadira Azalia#Pucchi#Nurhayati#Aya
1 note
·
View note
Video
Racing Forward by Sean S
#nikon#d610#tamron#70-200#200mm#2.8#carsland#cars#land#disneyland#disney#walt#cali#california#radiator springs#radiator#springs#DCA#Disney California Adventure
1 note
·
View note
Last Seen Blogs

fourshine
lead me to the Bliss

thefattestkidinschool-blog
Screaming Silence

taeminfegit
my delulu safe haven

kashiwakeiko
mini,guitar,drinking,and that

silvienvt
Untitled