#7-layer SVG
Text
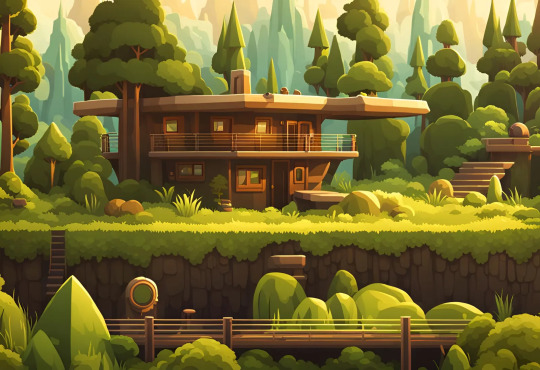
2020: Memorial to Joey - Title Page
Working on the Memorial to Spike, our Golden Retriever, who left us in September 2023, reminded me that I had an album and a bunch of pictures of our first cat, Joey, who left us in August of 2020. For some reason I never brought myself to finish this album, and I thought it would be good to do over the Christmas Break, as part of my reflection time for the end of 2023. Joey joined our family at…

View On WordPress
#7-layer SVG#cat#creative#Cricut#decorative border#design#ideas#Joey#MASCrapping#masculine scrapbooking#memorial album#ScrapBook#scrapbooks for men#sewing#stitch#thread#Title page
2 notes
·
View notes
Text
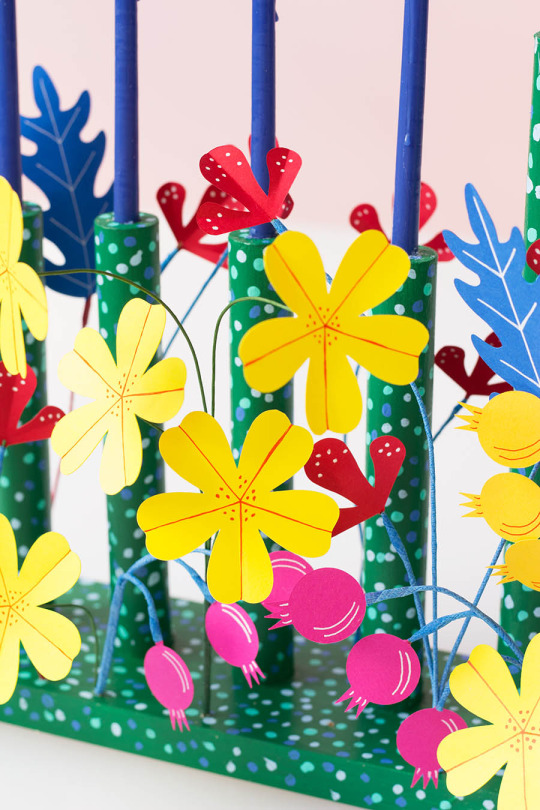
Josef Frank Inspired Menorah

Project by David Stark:
Chanukah is most often a blue and white affair, sometimes with a little silver thrown in, sometimes a little gold. But in ruminating on the holiday, we couldn’t help but ask ourselves: “Why does it need to be?”
Now, we know that the bold, floral prints of Josef Frank are, perhaps, not the most likely of Chanukah inspirations, but that’s exactly the point. We turned to a pattern we love entitled, “Vegetable Tree” as inspiration for this vibrant menorah – the perfect pop of color as we move into the darker winter months! We chose colored papers and floral shapes influenced by the motifs and palettes found in the print and are thrilled to share this how-to with you!

We opted to make our menorah base. But, it would be equally as charming to use a classic menorah you already own and wrap the wire stems around it. Or, pick up an affordable one and paint it! (Thank you to Just Scandinavian for loaning us this great Josef Frank fabric!) ––David Stark
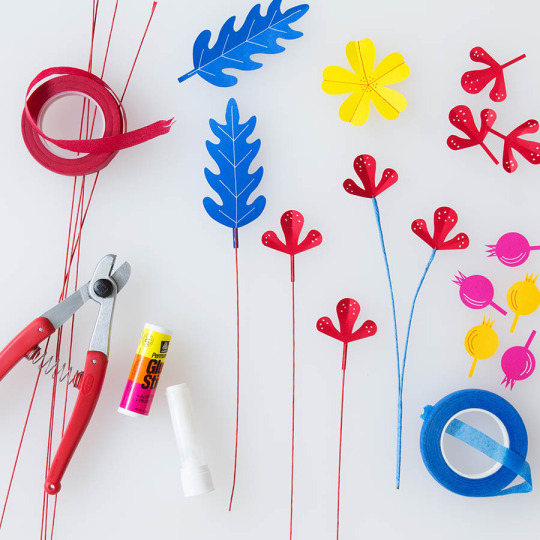
SUPPLIES
1” x 4” wood board (cut to 20”)
Coping saw (or other hand saw) and clamps
Two 1” dowel rods (either 36” or 48” long)
Drill with 1”, 3/8”, and 1/16” drill bits
Ruler and pencil
Acrylic paint and paint brushes
Red and white gel pens
Scissors and craft knife
Permanent glue stick or hot glue gun
Wire cutters
Bone folder
20-gauge straight wire (any color)
Various colors floral tape (we used: red, green, blue)
Various colors cover-weight paper (we used: red, hot pink, yellow, orange, blue)
Chanukah candles or LED candles
Craft cutter machine (optional)
PDF template (Link to download in Step 1 below)
INSTRUCTIONS
Step 1

Download the PDF template.
Using your ruler, find the center of the wood board and measure nine 2” intervals along that center line. Using your drill with the 1” drill bit, drill approximately ¼” deep holes at each mark. Use clamps to secure the board in place if needed.

Step 2
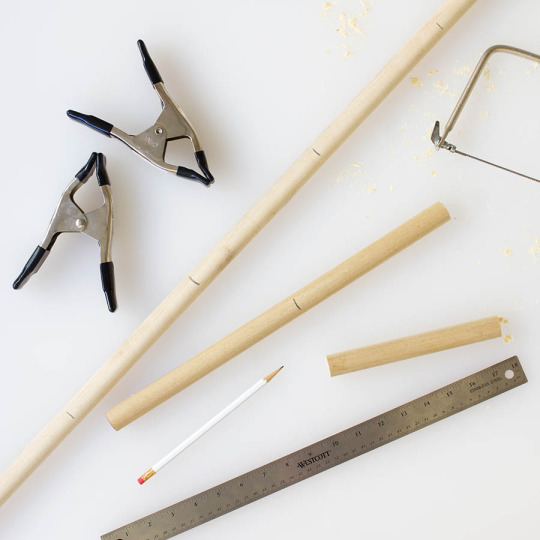
Using your ruler, measure eight 7” and one 9.5” lengths of dowel. Use your saw to cut each piece, being sure to cut as straight as possible. Use clamps to secure the dowels in place if needed.
Step 3

Assemble the menorah base by placing four 7” dowels at each end and the 9.5” dowel in the center. You may need to twist the dowels to secure them in place. Next, using your drill with the 3/8” drill bit, drill approximately ¼” deep holes on the end of each dowel. (3/8” is the width of our Chanukah candles, check yours before you begin and drill the appropriate size holes.)
Step 4
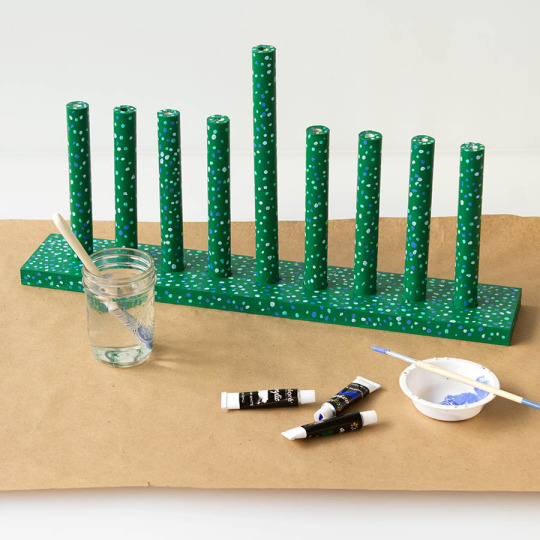
Paint your menorah! We painted a base color of dark green and added pale blue, turquoise, and grey dots. Allow the paint to dry fully.
Step 5
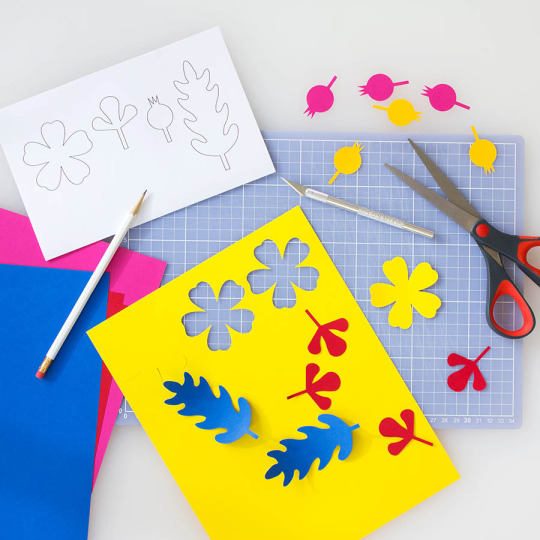
Use the template provided to cut out multiples of each shape. Or, use the SVG file to cut using a craft cutter.
Step 6
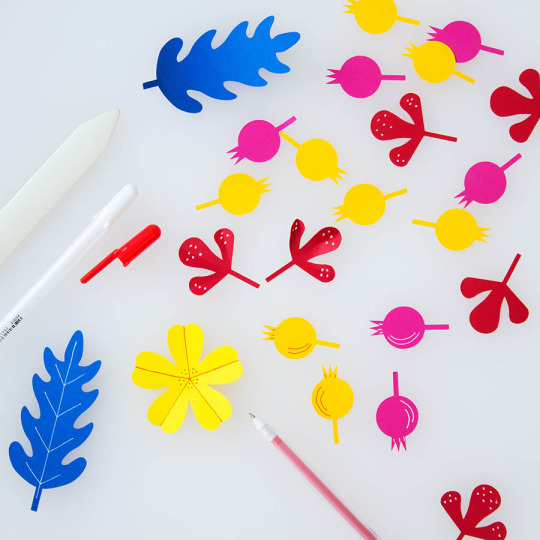
Using the red and white gel pens, add decorative details to the shapes and fold down the center or along each petal using a bone folder to press the crease.
Step 7
Apply a heavy layer of glue stick (or a line of hot glue) to the tab portion of each shape and press the wire into the glue. Once dry, cover the connection and the remaining length of wire with floral tape, occasionally attaching the wire stems together. For the yellow flowers, bend the wire and attach to the back of the flowers with hot glue.
Step 8

Using your drill with the 1/16” drill bit, drill holes into the menorah base and insert the wire stems into the holes. If you are using a menorah you already own, simply wrap the wires around it. We opted to keep our flowers low and pulled away from the candles. Be mindful of this when you are assembling. Dripped wax will not alight paper, but be cautious of the flames. We recommend if you are using this menorah with small children in the house, to use LED candles.


3 notes
·
View notes
Text
How to Create Images for Cricut: Quick and Easy Guide
If you are a regular Cricut user, you know how important the Design Space app is for your DIY projects. One of its key features is the ability to create your own images. To use this feature, you need to know how to create images for Cricut.
If you do not know how to make images in the Cricut software, don’t worry! This guide will cover everything you need to know to create your own images in Design Space. You will find 8 simple steps to follow, but first, I am going to explain how to prepare for the process.
Get Ready for Making Your Own Images in Cricut Design Space
Before you learn how to create images for Cricut, you should know what you have to do before making images. You can create images on the app, and to use the app on your operating system, you will need to do certain things.
You will need to download the software to your mobile phone or computer. It is the Cricut app that allows you to create images for your DIY projects. After downloading the app, you will need to log in with your account because Cricut needs an account for operating your Cricut machines. After creating your Cricut ID, you can now start the process of making images in the Design Space.
How to Create Images for Cricut: 8 Simple Steps
To make an image in your software, you will have to follow some basic steps. I am going to write down all of them one by one, and you can easily create images following them.
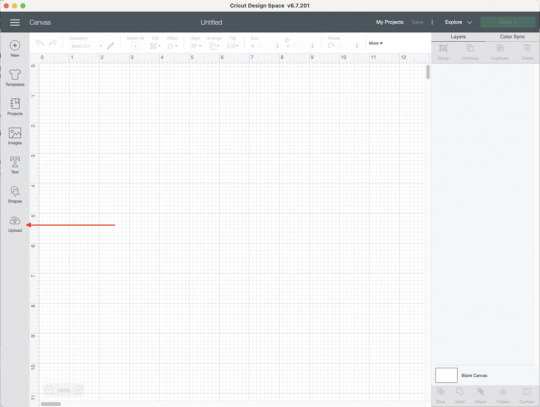
Step 1: Open Design Space on Your Device

To start creating images, open the Design Space and click on the New Project section. A blank canvas will appear on the screen. You can either upload a ready-made PNG file or start creating your own. For this project, a Free Sunflower SVG from the Design Bundles will be used.
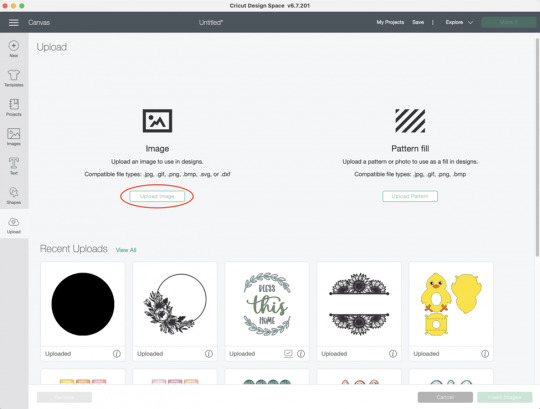
Step 2: Upload Your Image on Canvas
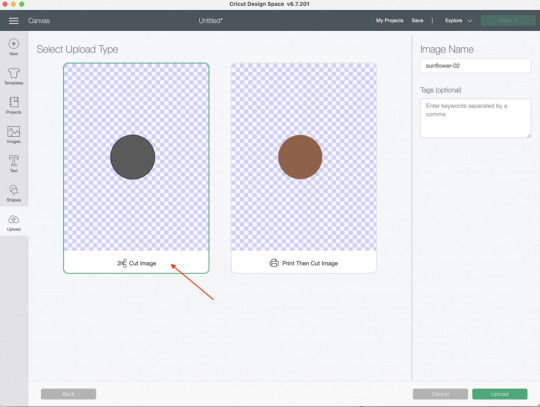
Once you have opened the canvas, you have to upload the image. You should click on Upload to start uploading the image and select it from your computer. Later, you will turn the image into multiple layers. After uploading the image, you will need to select the Complex option, and then you have to click on the Continue button.

Step 3: Use the Magic Wand Tool to Separate Image
In order to learn how to create images for Cricut, you have to use the Magic Wand tool afterward. This tool will help you click on the individual pieces of the image after splitting it into different layers and then remove them. You can keep one color at once. As you can see in the image, you can click any portion and then remove it.

Step 4: Select the Cut Image Option
Now, you will have to select the Cut Image option. After that, you have to upload the image again.
Step 5: Upload the File Again
You will have to upload the image again. To do this, you must select the Upload Image button from the files again. After that, select Complex and hit Continue again.
Steps 3-5 need to be done repeatedly until all the colors you want are saved in separate layered cut file images.
Step 6: Insert All the Images
Now that you have all the images separated into multiple layers, you can insert them by clicking on each file. This will bring all the layers into your beautiful project.
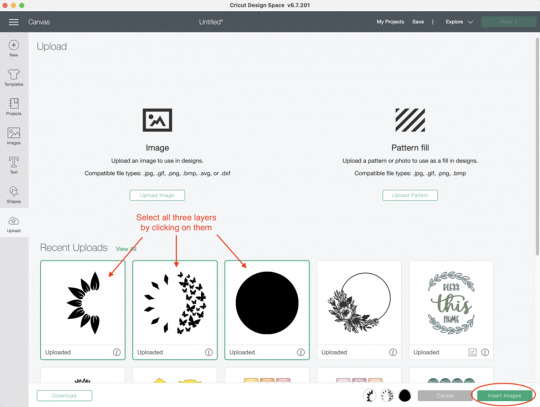
Next, all the images are in the software. If some files appear to be very large, you will have to scale them down. A change in height and width will help.
Step 7: Change the Color of Each Layer
You can change the color of the layers if you want. However, this is very optional and depends on you whether you want it or not. To change color, select a layer, go to the operation menu, and click on the black square. From there, select the color you wish. Repeat the process for each layer.

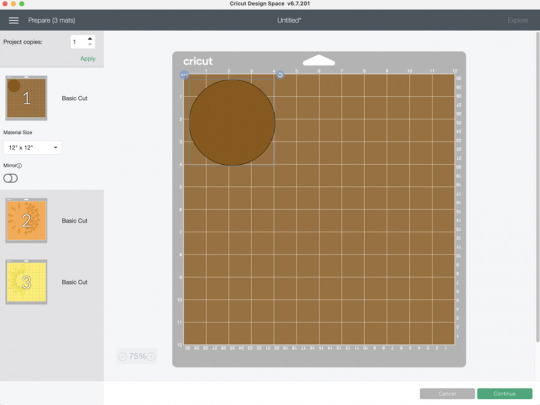
Step 8: Click on the Make It Button
Finally, you can cut each layer individually on a separate mat. It allows you to cut all the different colored pieces on various materials. You just have to put the cardstock or vinyl on a cutting mat and cut it on the image.
Conclusion
You read the whole blog, and now you know how to create images for Cricut. It is an excellent thing that you can do in the Design Space app. By creating images, you can craft beautiful projects. To do this, you will need a device and the software on it. You can follow all the steps that I have written above in this post one by one. Once you are done with that, you can cut all those newly created images on your machine individually on different colored materials, and a beautiful image will be created.
FAQs
Is It Possible to Create My Own Images?
Yes, for sure! The Design Space app offers multiple options for creating designs. You can either pick any design or upload it from your device. To create your own image on the app, you will have to upload an image, and then the app will convert it into many shapes that you can cut however you want, creating a completely new design.
How Can I Find Images in Cricut Design Space?
The app has thousands of ready-made images. You can pick any of them and customize them however you like. Here is how you will find those images
First, open the Design Space app.
After that, select the My Stuff option.
Next, you have to select the Free Projects option.
Now, choose free images and then select images.
Choose purchased, and it will show you the available images for the app.
How Can I Upload an Image to Cricut Design Space?
These are the simple steps to upload an image on the Cricut Design app.
First, visit the app and go to the New Project section.
Then, find the Upload button on the app and click on it.
Now, select an image of your choice. You can use the various eraser tools to remove the background of the image.
Finally, give the image a name and click on Upload to complete the process.
0 notes
Text
Kimberbell Holiday & Seasonal Mug Rugs Vol. 1

Stitch Up the Seasons with Kimberbell's Holiday & Seasonal Mug Rugs Vol. 1!
Calling all embroidery enthusiasts and crafters with a love for cozy corners! If you're looking for a way to add a touch of seasonal charm to your home decor throughout the year, then look no further than Kimberbell's Holiday & Seasonal Mug Rugs Vol. 1 Machine Embroidery CD (KD507). This delightful collection offers a treasure trove of festive designs, making it the perfect companion for your embroidery machine.
Unwrapping the Magic: What's Included?
This CD-ROM is jam-packed with everything you need to create 11 adorable "in-the-hoop" mug rugs, each designed to fit a standard 5" x 7" embroidery hoop. Here's a breakdown of what you'll find inside:
Eleven Embroidery Designs: Embark on a stitching adventure through the seasons with a diverse range of designs. From a jolly snowman for winter to a charming heart for Valentine's Day, there's a mug rug to celebrate every festive occasion.
Multiple Embroidery Formats: No matter what embroidery machine you own, Kimberbell has you covered. The designs come in a wide range of formats, including ART, DST, EXP, HUS, JEF, PES, VIP, VP3, and XXX.
Easy-to-Follow Instructions: Whether you're a seasoned embroidery pro or a curious beginner, Kimberbell's reputation for clear and concise instructions shines through. The CD includes step-by-step guides for each design, ensuring a smooth and successful stitching experience.
Bonus SVG Files: For an extra layer of creative fun, the CD also includes SVG files compatible with popular electronic cutting machines. This allows you to create coordinating fabric elements to further personalize your mug rugs.
A Mug Rug for Every Season:
The true magic of Kimberbell's Holiday & Seasonal Mug Rugs Vol. 1 lies in the variety of designs it offers. Let's take a peek at some of the delightful mug rugs you can create:
Winter Wonderland: Bundle up with a charming snowman mug rug, complete with a playful scarf and buttons.
Springtime Symphony: Welcome the blooming season with a vibrant flower-themed mug rug, a perfect pop of color for your kitchen counter.
Summertime Fun: Celebrate the sunny days with a whimsical butterfly or a refreshing watermelon design.
Autumn Delights: Embrace the fall harvest with a mug rug featuring a plump pumpkin or a cluster of colorful leaves.
Festive Cheer: Get ready for the holidays with a delightful Santa mug rug, a sparkly snowflake design, or a classic Christmas stocking.
Beyond the Basics: Embellishing Your Mug Rugs
While the embroidery designs themselves are undeniably charming, Kimberbell's mug rugs are a blank canvas for your creativity. Here are some ways to take your mug rugs to the next level:
Fabric Selection: Play with different fabrics to match the season and your personal style. Use flannel for a cozy winter mug rug or opt for brighter cottons for spring and summer designs.
Embellishments: Don't be afraid to add a touch of sparkle! Buttons, ribbons, beads, and even small pieces of felt can add a unique dimension to your mug rugs.
Quilting: For added texture and stability, consider quilting your mug rugs after the embroidery is complete. Simple straight-line quilting or a more elaborate free-motion design can elevate your creations.
Binding: Finish off your mug rugs with a beautiful binding that complements the fabric and design. Bias binding tape or a simple turned-and-stitched edge are popular options.
The Perfect Gift for the Crafter in Your Life (or Yourself!)
Kimberbell's Holiday & Seasonal Mug Rugs Vol. 1 Machine Embroidery CD makes a fantastic gift for any embroidery enthusiast. It's a thoughtful present that keeps on giving, offering endless possibilities for creative expression. But don't wait for a special occasion – treat yourself to this delightful collection and bring a touch of seasonal charm into your crafting space!
Beyond the CD: Resources and Inspiration
The Kimberbell brand is known for its vibrant online community. By joining their online forums or social media groups, you can connect with other crafters who are using the Holiday & Seasonal Mug Rugs designs. Share your creations, get troubleshooting tips, and discover even more inspiration for your mug rug projects.
In Conclusion: Stitching Up Joy, One Mug Rug at a Time
Kimberbell's Holiday & Seasonal Mug Rugs Vol. 1 Machine Embroidery CD is more than just a collection of designs – it's an invitation to celebrate the joy of embroidery and seasonal cheer.
available here
Read the full article
0 notes
Text
Explore 15+ CSS Credit Cards

At CSS Monster, we invite you to explore our curated collection of CSS credit cards. Within this comprehensive compilation, you'll discover a treasure trove of free HTML and CSS code examples that showcase stunning, lifelike credit card designs. These examples have been meticulously gathered from esteemed platforms like CodePen, GitHub, and other valuable resources.
With our March 2023 update, we're excited to unveil six new additions to our collection. This update ensures that you have access to the latest and most innovative credit card styles available in the realm of web design.
The design of credit cards is paramount in establishing a trustworthy and professional user experience, particularly for e-commerce and online payment systems. Our collection boasts an array of credit card styles, representing various card types, including Visa, Mastercard, American Express, and more. Each example in our collection is a testament to the attention to detail, as it faithfully replicates the intricacies of a real credit card, encompassing the card number, expiration date, cardholder name, and even the signature panel.
The CSS credit card examples you'll find here empower you to elevate the credibility and professionalism of your online payment systems. Whether you're working on an e-commerce platform, a fintech application, or any web project that involves transactions, these realistic credit card designs add a layer of authenticity to your user interface. They not only contribute to the aesthetics but also enhance the user's trust, which is essential for secure online payments.
The CSS credit card designs in our collection aren't just static visuals; they are interactive, customizable, and ready for integration into your web projects. You can adapt them to your brand's color scheme, user interface, and user experience requirements, ensuring that they seamlessly fit into your design and functionality.
We encourage you to dive into our collection and unlock the potential to enhance the credibility and professionalism of your online payment systems. Whether you're a web designer, developer, or business owner, these CSS credit cards are a valuable resource to create a seamless and trustworthy payment experience for your users. Start exploring our collection now and discover how CSS credit cards can take your web design to the next level. Happy coding!
Author
Simon Goellner
February 4, 2023
Links
Just Get The Demo Link
How To Download - Article
How To Download - Video
Made with
HTML / CSS (SCSS)
About a code
RESPONSIVE, GLITTERY BANK CARD
Compatible browsers:Chrome, Edge, Firefox, Opera, Safari
Responsive:yes
Dependencies:-
Author
Tom Miller
September 10, 2021
Links
Just Get The Demo Link
How To Download - Article
How To Download - Video
Made with
HTML / CSS / JS
About a code
SVG DEBIT CARD ANIMATION #4
Compatible browsers:Chrome, Edge, Firefox, Opera, Safari
Responsive:yes
Dependencies:gsap.js
Author
Paul
September 7, 2021
Links
Just Get The Demo Link
How To Download - Article
How To Download - Video
Made with
HTML / CSS
About a code
VIRTUAL CREDIT CARD DESIGN
Compatible browsers:Chrome, Edge, Firefox, Opera, Safari
Responsive:no
Dependencies:-

Author
Nikhil27bYt
June 4, 2021
Links
Just Get The Demo Link
How To Download - Article
How To Download - Video
Made with
HTML / CSS
About a code
GLASSMORPHISM CREDIT CARD WITH HTML & CSS
Compatible browsers:Chrome, Edge, Firefox, Opera, Safari
Responsive:no
Dependencies:-
Author
Timothy Morrell
March 5, 2021
Links
Just Get The Demo Link
How To Download - Article
How To Download - Video
Made with
HTML / CSS (SCSS)
About a code
CSS CREDIT CARD WITH FLIP
Compatible browsers:Chrome, Edge, Firefox, Opera, Safari
Responsive:no
Dependencies:-

Author
crayon-code
January 9, 2021
Links
Just Get The Demo Link
How To Download - Article
How To Download - Video
Made with
HTML (Pug) / CSS (SCSS)
About a code
CREDIT CARD GRID LAYOUT
Compatible browsers:Chrome, Edge, Firefox, Opera, Safari
Responsive:no
Dependencies:-
Author
Kivanfan
November 25, 2018
Links
Just Get The Demo Link
How To Download - Article
How To Download - Video
Made with
HTML / CSS / JavaScript
About a code
3D FLOATING CREDIT CARD
Compatible browsers:Chrome, Edge, Firefox, Opera, Safari
Dependencies:-

Author
Filip Vitas
March 3, 2018
Links
Just Get The Demo Link
How To Download - Article
How To Download - Video
Made with
HTML (Pug) / CSS (Stylus)
About a code
PURE CSS CREDIT CARD
Compatible browsers:Chrome, Edge, Firefox, Opera, Safari
Dependencies:-

Author
Veronica
April 8, 2018
Links
Just Get The Demo Link
How To Download - Article
How To Download - Video
Made with
HTML / CSS
About a code
FLIPPING CREDIT CARD
Compatible browsers:Chrome, Edge, Firefox, Opera, Safari
Dependencies:-

Author
Ryan McGuinn
March 4, 2018
Links
Just Get The Demo Link
How To Download - Article
How To Download - Video
Made with
HTML / CSS
About a code
CREDIT CARD
Compatible browsers:Chrome, Edge, Firefox, Opera, Safari
Dependencies:-
Author
Gabriel Ferreira
September 30, 2017
Links
Just Get The Demo Link
How To Download - Article
How To Download - Video
Made with
HTML / CSS
About a code
NUBANK CREDIT CARD
Compatible browsers:Chrome, Edge, Firefox, Opera, Safari
Dependencies:font-awesome.css

Author
Sergio Rojas
June 15, 2016
Links
Just Get The Demo Link
How To Download - Article
How To Download - Video
Made with
HTML / CSS
About a code
CREDIT CARD ANIMATION
Compatible browsers:Chrome, Edge, Firefox, Opera, Safari
Dependencies:-

Author
Mohan Khadka
December 6, 2015
Links
Just Get The Demo Link
How To Download - Article
How To Download - Video
Made with
HTML / CSS
About a code
CREDIT CARD (CSS+SVG)
Compatible browsers:Chrome, Edge, Opera, Safari
Dependencies:-

Author
James Delaney
October 14, 2015
Links
Just Get The Demo Link
How To Download - Article
How To Download - Video
Made with
HTML / CSS
About a code
CREDIT CARD MOCKUP
Compatible browsers:Chrome, Edge, Firefox, Opera, Safari
Author
Nika Zawila
February 3, 2015
Links
Just Get The Demo Link
How To Download - Article
How To Download - Video
Made with
HTML / CSS (SCSS)
About a code
CREDIT CARD TEMPLATE
Compatible browsers:Chrome, Edge, Firefox, Opera, Safari
Dependencies:-

Author
Jan
March 20, 2014
Links
Just Get The Demo Link
How To Download - Article
How To Download - Video
Made with
HTML / CSS (Less)
About a code
HTML AND CSS CREDIT CARD
Compatible browsers:Chrome, Edge, Firefox, Opera, Safari
Dependencies:-
Read the full article
0 notes
Text
How to Export Figma to HTML Code: Step-by-Step Guide
In the world of web design and development, efficiency is key. One tool that has revolutionized the design process is Figma, a cloud-based design platform that allows teams to collaborate in real-time. However, once the design phase is complete, the next step is to convert those stunning visuals into functional code. This is where knowing how to export Figma to HTML comes into play.
Understanding the Figma to HTML Process
Figma to HTML is the bridge that transforms your design files into a web-ready format. This process involves translating the visual elements, such as images, text, and layouts, into HTML code that browsers can understand and render as a website.
Step 1: Organize Your Figma Design
Before exporting to HTML, it's essential to have a well-organized Figma design. Ensure that all layers are named appropriately, and elements are grouped logically. This will make the conversion process much smoother.
Step 2: Export Assets
Start by exporting any images, icons, or other assets used in your design. Figma provides an easy-to-use export feature that allows you to select and save individual elements as PNGs, SVGs, or other common image formats. Remember to keep track of where you save these files, as you'll need to reference them later.
Step 3: Use a Figma to HTML Converter
There are several tools available online that specialize in converting Figma designs to HTML code. These converters streamline the process, saving time and ensuring accuracy. Simply upload your Figma file, and the converter will generate the corresponding HTML code.
Figma to HTML converters are equipped to handle various design elements, from basic shapes and text to more complex features like gradients and shadows. This ensures that your design is faithfully translated into code.
Step 4: Review and Adjust
Once you have the initial HTML code, it's crucial to review the output. Check for any discrepancies between the design and the generated code. This could include spacing issues, font styles, or any other visual elements that may need adjustment.
Step 5: Add Interactivity with CSS and JavaScript
While the Figma to HTML converter does an excellent job of translating the visual elements, you may need to add interactivity using CSS and JavaScript. This includes animations, transitions, and responsive design elements that enhance the user experience.
Step 6: Test Across Browsers and Devices
Before finalizing your HTML code, it's essential to test it across different browsers and devices to ensure compatibility. This step helps identify any potential issues that may arise when the website is live.
Step 7: Optimize for Performance
Optimizing your HTML code is crucial for ensuring fast load times and a seamless user experience. This involves minimizing unnecessary code, compressing images, and utilizing techniques like lazy loading to prioritize content.
Step 8: Deploy Your Website
With your HTML code ready and optimized, it's time to deploy your website to a hosting platform. Choose a reliable hosting provider that offers the resources and support you need to keep your site running smoothly.
Conclusion
Knowing how to export Figma to HTML opens up a world of possibilities for designers and developers alike. It streamlines the transition from design to code, saving time and ensuring a seamless user experience. By following these steps, you can confidently convert your Figma designs into functional, web-ready HTML code. Embrace the power of Figma to HTML conversion and elevate your web design projects to new heights.
0 notes
Text
GruvboxHypathy


Lets build a future to be proud of and grateful to live into. And I think that one way I can do so is to produce insightful explainers and creative tutorials...
Nth BRAINDUMP
Medium Light + Soft Dark Gruvbox, very dark night with dim yet soft & warm lights, Shoshona the black Angora housecat, solarpunk, 16^12, witchy coven commune, walking her way to her own home library, forested library location, night, hoof shoes, black gloves (giving the blackhand surname), relaxing 45rpm 7" vinyls’ music, bell thousers, jackets / blouse, black lipstick, white hoof shoes, daybreak / dusk, black sun, stargazing, retro warm grunge look with black white and amber tones, large backpack, amber polka dot patterned identity card, libre cyberware & libre bio-modding wares, GLOSS (gratis, libre, open source software / culture), olive & black net socks texture, soft woolen rug texture, notepad at her hand, soundscape of a forested park library with some river nearby, cozy vibe of curiosity and knowledge-seeking…
Some majestic Lisp poetry & code booklets on the shelves, puffy layered turtleneck shirt and bell cap trousers, Olive Synod Mixnet library card, autistic fem symbol talisman, keychain charms, analog medium, retro computers, axis victory?, anti-Wilsonism, Strasserism, Shoshoni language, conlangs, alternate technologies, mysticism, communion, community building, honest humble living, witch coven, STEM ladies, Chronokinesis, True Polymorphs, Toymaker, open culture, public domain, copyleft, desktop environmental storytelling, REPL feedback loops, Lisp symbolic computation machines, addventure, neo-brutalism, systemic change, historical retrospective, from grim dark to bright solarpunk, Konrad Zuse, factions, far far away future foresight, van hexcrawl, encyclopedic knowledge, life-long learning, Zettelkasten, Markdown, Argdown, DolDoc, Parade FS, DocBook, HTML, XML, SVG toons, Common Lisp, Worker Cooperatives, KDE_Plasma’s ecosystem;
Neue-Geo-Syndicalist constructivist empowerment worldview, Lisp program forms as Lisp-y poetry, shortwave radio, geofiction realms & speculative paracosms, constructed languages’ jargon / dialects and technological ecosystems…
Harmony, Progress, Liberty, Knowledge, Mysticism & Rationality syncretized, Data Transparency, Copyleft / Open Culture Movement as in GLOSS, Geosyndicalism (Georgism* mixed with Belle Epoque Syndicalism), Respect & Courtesy, Linguistic Diversity... ;
0 notes
Text
How to Make T-Shirts With Cricut? [Step-By-Step Guide]
Have you ever wondered how to make t shirts with Cricut at home? But backed away while thinking about the supplies needed, design software, and the process. If you love being creative in designing t-shirts, you’ve chosen the correct place to collect the details. There are various methods to design gorgeous t-shirts, but one of the simplest models is EasyPress 2.
The service of electric heat presses along with Design Space allows the user to make outfits using various tools, accessories & materials. In addition, it gives hands to the users by designing cool t-shirts from scratch. Furthermore, keep pursuing this tutorial for a step-by-step process about designing a custom t-shirt with a craft plotter.
To design a personal t-shirt out of the Cricut press, all the crafters are requested to follow the steps mentioned in the coming section of the blog. Ensure that you carry through the method utilizing all of them to get top-class quality results.
Step 1: First, Open Cricut Design Space
https://cricut.com/blog/wp-content/uploads/2021/11/Create-A-New-Project-In-Design-Space.jpg
Step 2: After that, Choose the Template
Next, choose any template, ensuring that you are printing a t-shirt of the correct size. Moreover, choose the Templates icon visible on the left side of the Canvas page. Followed by this, choose the T-Shirt option inside the Search bar. Now, choose Classic T-Shirts and simply insert a graphic on the middle area of the chest.
Step 3: Then, Upload Your Design
Further, after completing the template process, upload the chosen template to the Design Space. In addition, tap the Upload box appearing on the bottom left side of the page.

After that, search for the SVG image and drag it to the Upload folder page. Next, choose the Save button to add the image. Besides saving the image, select and move it to the t-shirt template on the Canvas.
Step 4: Next, Weld Up the Image
Before commencing the image-making process, ensure the layers are cleaned up and all the cut images are available. However, if you want to cut out the shape, merge them and choose Weld, given on the bottom left side of the Canvas screen.
Step 5: Heat App Set Up & Sign In

Step 6: Now, Select Press & Connect It
Once the press successfully gets setup, choose EasyPress 2, available under the My Heat Presses category. Post selecting the press, connect it wirelessly via Bluetooth with the on-screen instructions.
Step 7: Choose Material & Pre-Heat
Besides connecting the material, finalize the Heat-Transfer Material and Base Material. After that, press Cricut Pressing Mat & tap the Apply box. Moreover, pre-heat the material to 315*F for 30 s.
Step 8: Lastly, Apply Material & Peel It Off
Following this, place the selected material face down & line side up. With Firm pressure, firm it up at the chosen temperature & timing. Now, you are supposed to wait until the heating process continues. Lastly, slowly remove the liner once it cools down. You are advised to calmly detach the material to avoid your hands from getting burned.
Frequently Asked Questions
Question: What are the Supplies Needed to Prepare the T-Shirt from Cricut?
Answer: Intending to make the personalized t-shirt out from the Cricut, every user needs to have the following supplies with them. Each of the supplies will have their contribution in giving form to their creative idea. The names of the supplies needed during the heating process include:
EasyPress 2.
Cricut Pressing Mat.
Iron-On design.
Design Space software.
T-Shirt blank.
Weeding tool.
Question: What are the Tips Needed to Be Done During T-Shirt Heat Press?
Answer: Read the following tips that need to be taken during the T-Shirt heat pressing process:
Allow 24 hours to let the t-shirt dry before washing.
If the transfer paper isn’t coming off, then re-press for another 5-10 seconds.
Monitor the press carefully, and don’t close the press too tightly or too lightly.
With the Teflon sheet, a shiny coat will appear over the design.
You should read all the instructions before operating the heat press during the process.
Question: How Long Do Cricut T-Shirts Last?
Answer: Designed out of EasyPress heat press, the personal t-shirt lasts long upto 50 washes. However, it completely depends upon various reasons, which include:
Pre-wash t-shirt.
Cutting Mat.
Wedding Tools.
Pressing Mat.
Type of detergent.
Steps were taken during the process.
Heat press settings.
Avoid Bleaching.
How t-shit has been designed, cut, weeded & applied on the material.
Visit - Cricut.com/setup
design.cricut.com
www.cricut.com/setup
Cricut Design Space
#Cricut Design Space setup#Cricut Design Space install#Cricut Design Space login#Cricut Design Space software#How to Make T-Shirts With Cricut#Cricut Design Space#cricut design space download#cricut design space app#cricut setup#cricut explore air 2#design.cricut.com#cricut.com/setup
0 notes
Text

125 Pop Culture Vector T-Shirt Designs Bundle #7
ORDER HERE: https://thegraphex.gumroad.com/l/relksv
THE DIGITAL DOWNLOAD WILL INCLUDE:
► EPS
► AI
► PNG
► CDR
► SVG
QUANTITY: 125
▷ Layered & Grouped by Color
IDEAL USE FOR
✓ Embroidery
✓ Sublimation
✓ Transfer
✓ Vinyl
✓ Serigraphy
✓ Dtg
✓ Dtf
✓ Posters
✓ Masks
✓ Movile cover
✓ Stickers
✓ Print all
0 notes
Text
7 Useful Web Design Techniques for PowerPoint Presentations
You’ve invested a lot of time and effort into the presentation and you want it to stand out from the crowd. The question is how do you get the conversation going? Well, there are several tools you can use to make your PowerPoint presentation look spotlight worthy that don’t involve adding arrows and cool fonts.
Having knowledge about how to design your PowerPoint presentation will improve the look and feel of your slides, as well as help you stand out from the crowd.

Here are 7 web design techniques for PowerPoint presentations that could help add polish to your web designs:
1. Use a professional graphic design tool:
You can use PowerPoint to create beautiful slides, but the program’s limited options mean it’s not the best software for professional presentation graphics. If you want to create something truly dazzling, consider hiring a professional graphic designer with experience in PowerPoint. A good designer will be able to make your custom slides look great on any device and in any environment.
2. Add images and videos:
Images and video content are extremely valuable, whether it is used on a website or in a PowerPoint presentation. Adding images and videos to websites helps boost search engine rankings and generate more sales. PowerPoint supports both images and videos. You need to put each file into separate layers and then group them by category or type.
You can also incorporate visuals into your PowerPoint presentation to make it more effective. Minimum textual content should be kept in a good presentation. This entails using visually appealing content to better describe ideas and support the message you want your audience to understand.
3. Make use of Elegant Fonts:
Good font selection brings out the best in your presentation and gives your slides personality. The fonts you choose determine how easy it is for the viewer to digest the information on your slide. What they see visually on your slide will stick with them longer than what they hear from your speech.
4. Limit the use of bullet points.
People aren’t interested in reading the text-heavy bullets on your slide. Remember that you want to capture and keep your audience’s attention. Reduce the number of bullet points and text on a slide and replace them with more visual content.
One way to highlight your content is to use icons. They make slides look more meaningful, communicative, and help break down language barriers because they are more intuitive. Professional and quality SVG icons can be obtained from a variety of popular websites like iamvector.
5. Use color gradients throughout your slides
You’ve probably noticed that all of the best websites use color gradients in their designs, from background colors to text colors, and even the logo! This is because color gradients add depth and dimensionality to any design, making it appear more appealing and polished.
Color will improve the effectiveness of your presentation. The good news is that you can create your own color palette or use one that PowerPoint already has. You can also change the color palettes on PowerPoint to match the theme of your presentation.
6. Make it Responsive for a Big Screen
The benefits of making your website mobile responsive cannot be overstated. Making sure that your website looks good on both small and large screens improves its chances of success. Otherwise, you run the risk of losing website visitors to competitors with more responsive websites.
Other platforms, such as PowerPoint presentations, also require responsiveness. Presentations are typically projected on large screens so audiences can view the contents. You must ensure that your presentation appears the same on a large screen.
7. Fluid Navigation:
Nobody wants to battle with navigation when they are online. A company can lose a lot of clients if its website is difficult to use. Web designers use simple and organized navigation to help visitors rapidly find essential information.
Elegant navigation is important for more than just web pages. To avoid disruptions during the presentation, make it simple to browse your PowerPoint presentation slides. Your audience may not understand your presentation if you can’t browse it smoothly, just like on a website.
0 notes
Text
Paper Mache House Ornament
Happy New Year! I am very excited to share with you one of my favorite crafts – the art of paper mache. It’s gooey and sticky and a whole lot of fun! It utilizes simple materials, many of which are already in our homes. I’m delighted by the versatility of this medium and the wide range of creative possibilities!
Today, I'll be sharing my instructions for making a paper mache house ornament. These instructions are easy to follow and produce a beautiful, unique result. Whether you are a seasoned crafter or a beginner, you’ll enjoy creating these memorable, personalized gifts. Now, let's get started on our paper mache houses!

Since there are several stages to this project, I recommend making more than one house at a time. This will allow time to dry the paper mache layers thoroughly while gathering ephemera. Plus, you’ll love your little house so much, you’ll want to make more right away!
For inspiration, look at artist Linda O'Kane’s work on Instagram. Her hand-painted spun cotton houses are positively charming and unique, and have become treasured collector’s items!
To make sure you have all the elements you need for the project, I recommend gathering ephemera, book pages, vintage cancelled postage stamps, ribbons, and trims while the paper mache is drying.

It’s gonna get messy! But that’s part of the fun. Before you begin, cover your work area with kraft paper or newspaper. Also, tape a piece of freezer paper down to your work surface. Freezer paper is great because nothing will stick to it. You can also use the freezer paper as a palette for mixing acrylic paint later on.
Although the stage of adding layers of paper mache is somewhat time-consuming, it’s very worthwhile. Paper mache adds a soft, subtle texture resembling antique stucco. It also adds to the thickness of the house, softening all the points and right angles. And it adds strength to the house, making the ornament considerably more durable throughout the years (especially if enjoyed by young children!).

M A T E R I A L S (Some of these are affiliate links):
House templates courtesy of deliacreates.com *
white poster board or heavy card stock
masking tape
Elmer’s Art Paste (mix prior to project) or homemade paper mache paste
Aileen’s Tacky Glue
Mod Podge Matte
hot glue
thin kraft paper
paint brushes
printed ephemera, old book pages, vintage wallpaper, stickers, book pages, cancelled postage stamps, postcards, washi tape, Dresden trims, fabric scraps
rubber stamps
acrylic paint or gouache
metal embellishments, buttons, ribbon, velvet flowers
Stickles
awl or large sewing needle
bone folder
X-Acto knife, stainless steel ruler and cutting mat
gold florist wire (or very thin wire)
* Delia’s templates are created as SVG files, but can be scaled to the desired size and printed on a home printer. The houses I’ve made are about 4″ tall. I chose not to cut out the windows that were included on the template. Delia’s templates are free for personal use.


D I R E C T I O N S :
1. Premix paste (or prepare an alternate paper mache paste).
2. Tear thin kraft paper into approximately 1” pieces. The more irregular, organic the shapes, the better.
3. Tear small 1” pieces of masking tape.
4. Cut florist wire, 1.5” long (1 piece for each house).
5. Loosely cut out the printed template pieces, scaled to desired size. Tape to poster board. Use a ruler and bone folder to score on the fold lines. Using an X-Acto knife, cut out the house, roof and chimney (Glue or tape together two layers for the roof to make it thicker).
6. Assemble house and chimney. For the house, begin by taping the side walls together first, and then the bottom.
7. Cover the assembled house, chimney and roof entirely with masking tape.
8. (Optional) To make the ornament hanger, use an awl or a large needle to make a small hole in the top center of the roof. Fold a piece of florist wire in half. Thread the folded loop through the hole in the roof, so that about ¼” loop is showing above the peak of the roof. Secure the wire in place by taping the ends inside the roof.
9. Tape the chimney(s) onto the roof.
10. Cover the house with paper mache. Separately, cover the roof and chimney. To begin the process, dip the torn kraft paper into the paste. Hold it over the bowl and use two fingers to squeegee the excess paste off. Add a second layer of paper mache. Allow to dry for 24 hours, if possible.
11. (Optional) Paint the house creamy white with acrylic paint. Paint the roof and chimney the desired colors.
12. Glue background ephemera on to the house. This will be the base layer for all of the other elements you’ll be adding on top.
13. Use hot glue or quick dry glue to adhere dimensional elements, like ribbon, fabric scraps, buttons and Dresden trims. Add glitter and gems.
14. Use hot glue or quick dry glue to adhere the roof to the house. If using hot glue, only a few dots are necessary to secure it. In order to get the correct positioning, adhere one panel of the roof, and then adhere the other panel onto the house.
15. (optional) Finish house by brushing on a protective sealer, like Matte Mod Podge.

If your house is a gift, you may want to add a handwritten note to the base.
The book "Papier-Mache" by Sarah Hand is one of my favorites, and has inspired me to try so many different paper mache projects. Please check out Sarah’s Instagram and inspiring blog. Her second book, “A Happy Book of Little Gifts” is also wonderful!
These sweet little houses make for truly charming and personal decorations and gifts, and are perfect for occasions throughout the year. And they provide a great opportunity to use up some of those collected ephemera and dimensional embellishments that you may have been saving. I love making these houses and seeing how each one turns out uniquely different. I hope you will give it a try. It’s a wonderful project to do with a group of friends! Please tag me when you share your own paper mache houses on Instagram. Happy crafting!
0 notes
Link
One of the 22 December 2022 freebies on Creative Fabrica.
Free download expires at 11:59p (US Central), so get it before it’s no longer available for free.


The link in this post is a referral link. The item is free today, and the refferal link only serves the purpose of letting the site owner know that I am actively referring visitors to their site.
0 notes
Text
Adobe photoshop logo

Adobe photoshop logo how to#
Adobe Photoshop Logo SVG vector illustration graphic art design format. Use vector graphics to scale your logo design from business card size to billboard size with no loss of quality guaranteeing the best presentation in every situation. freeload Adobe Photoshop Logo Vector and icons for commercial use. This Is A FREE Mockup Designed Only For You! 3D Free Photoshop Logo Mockup Features: – 100% Customizable. With its comprehensive digital design toolset, Adobe Illustrator is ideal for any logo, icon, or graphic design project. STEP 9: Export the image using CTRL+ALT+SHIFT+S That’s all!Ī mint of creativity. STEP 8: Go back to the first tab in Photoshop where you have opened the. STEP 7: Save the smart layer by clicking CTRL+ALT+S The logo features the abstract letter A in. The Adobe logo above is a redesign on its first logo created in 1982 by Marva Warnock, wife of company co-founder John Warnock. Its main products include Photoshop, Illustrator, Fireworks, ColdFushion, Dreamweaver, etc. Adobe Photoshop and Adobe Illustrator are very popular in designing logos. STEP 5: Double click the smart layer named “” Adobe is an American multinational computer software company. Most of the bloggers use Photoshop to design the logo for their websites or blogs.
Adobe photoshop logo how to#
by ART-D This tutorial will show you how to create a modern logo for your company or for web site. We’ll use adobe illustrator for the whole shape and color textures and then for finishing touches we’ll use a bit of Photoshop. psd file using Adobe Photoshop CS6 or above Today we are going to make a 3D futuristic logo in Adobe Illustrator & Photoshop. STEP 3: Unzip the archive using 7zip or any other software for archives STEP 2: Copy and paste the archive in a separate folder where your new project will be located psd file by following the instructions: STEP 1: Click DOWNLOAD button from the right menu of GraphicsFamily website The smart layer easily allows you to transform your logos, texts, icons into a high-quality 3D image presentation.Įven if you are a beginner, it is very easy to edit the. This is a realistic 3D logo mockup with some nice shadows effects.
0 notes
Text
Omnigraffle import svg

#Omnigraffle import svg update#
#Omnigraffle import svg upgrade#
Layers can now be toggled between normal and shared.
#Omnigraffle import svg update#
Shared layers: Easily update common elements that you'd like to display on multiple canvases. Visio import/export: Open Microsoft Visio® documents (VSD or VDX) directly in OmniGraffle, as well as Visio stencils (VSS) and templates (VST). PRO FEATURES (AVAILABLE WITH IN-APP PURCHASE) Convert lines to shapes: turn a line’s stroke into a shape with easily editable Bézier points. Convert text to shapes: convert text to make tweaks to character shapes or add complex styling. Artboard Layers: Use artboards to set up advanced, exportable elements, or as another way to organize your canvas. NEW PRO FEATURES (AVAILABLE VIA IN-APP PURCHASE) SVG import: paste in SVG code or import SVG files directly to OmniGraffle. Keyboard Shortcut Sets: customize every menu bar command and tool with your preferred shortcut, or choose from a few different sets from popular apps. Infinite Canvas: make your canvas expand automatically in one, two, three, or all directions. Batch exporting, filling set dimensions, and previews are all included. New Export Panel: With just a few clicks, export your graphics in multiple resolutions, perfectly named and organized. Point Editor Tool: Immediate access to each and every point on a shape. Unified Sidebar: improved interactions with objects, layers, and canvases in a newly organized sidebar. NEW FEATURES (AVAILABLE VIA IN-APP PURCHASE) After the trial, you can continue to use OmniGraffle to view documents for free. With the free two week trial, you can try all of the features of Standard and Pro without buying anything. Elegantly organize your Infinite Canvas in a brand new Sidebar and improved inspectors. If you need help, please email 7 is an entirely new version with improvements as fine as tweaking individual Bézier points in typography and as broad as the artboards your type is laid out in. Double-check that you purchased a prior version from the App Store via the “Purchased” tab in the App Store app.
#Omnigraffle import svg upgrade#
IMPORTANT UPGRADE DISCOUNTS FOR CURRENT OMNIGRAFFLE OWNERS:ĭiscounts and free upgrades to OmniGraffle 7, both Standard and Pro, are only available to those who purchased an earlier version from the App Store. Create everything you can imagine in the ultimately scalable and easy-to-use app for precise, beautiful graphics. Free 2-week trial.ĭesign and build incredible graphics, diagrams, process charts, website and app wireframes-from the painlessly simple to the infinitely complex-inside OmniGraffle 7.
0 notes
Text
HypathyLambda (Multimedia Manifestation Collaging Prep P:1/?, for both 16^12 and CR)


Challenge restrictions:
First set of keywords: Vectorheart, ecosyndicalism, mysticism, cassette futurism (datasettes?), ArtDeco, Banhaus, Belle Epoque, soft warm retrofuturistic grunge, stylized SVG toon, solarpunk oxymorons, tarot deque / witchcore, matte plastics groovy commune, political intrigues, cute yet aliased NPR look, open culture copyleft, "Helluva Boss", "Wakfu", "Powerpuff Girls", "Nicky Case", "FreeCiv" chess tileset, Civilization 5 G&K+BNW (CE), PETSCII, retrocomputing fontmap semi-graphics, symbolic computation / computer-assisted-algebra, time mystery, lunarpunk, neo-brutalism LPS in the woods, "Soyuzmultfilm", soviet space program Venus probes, analog media (45rpm 7" autoplay records), hoof shoes, biomods & cyberware, data processor VLSI facilities, light academia library painted black... harmonious innovation yet horrendous discord;
Artix Linux KDE Plasma + Liquid desktop environment, GLOSS software ecosystem... Common Lisp -> custom Lisp-y dialect derived from make-a-lisp (mal) project;
(Verbs, Subjects, Lambda aka ANY adjectives...)
Klara "Olive" Kér (INTJ)
Ava Noonlight (ENFP)
Shoshona (black angora cat... shapeshifter?)
Vera, Tano, Bel, Nil, Constans...
List-y mess of keywords
Medium Light & Medium Dark Gruvbox, very dark night with dim yet soft & warm lights, Shoshona the black Angora housecat, solarpunk, 16^12, witchy coven commune, walking her way to her own home library, forested library location, night, hoof shoes, black gloves (giving the blackhand surname), relaxing 45rpm 7" vinyls’ music, bell thousers, jackets / blouse, black lipstick, white hoof shoes, daybreak / dusk, black sun, stargazing, retro warm grunge look with black white and amber tones, large backpack, amber polka dot patterned identity card, libre cyberware & libre bioware, GLOSS (gratis, libre, open source software / culture), olive & black net socks texture, soft woolen rug texture, notepad at her hand, soundscape of a forested park library with some river nearby, cozy vibe of curiosity and knowledge-seeking…
Some majestic Lisp poetry & code booklets on the shelves, puffy layered turtleneck shirt and bell cap trousers, Olive Synod Mixnet library card, autistic fem symbol talisman, keychain charms, analog medium, retro computers, axis victory?, anti-Wilsonism, Strasserism, Shoshoni language, conlangs, alternate technologies, mysticism, communion, community building, honest humble living, witch coven, STEM ladies, Chronokinesis, True Polymorphs, Toymaker, open culture, public domain, copyleft, desktop environmental storytelling, REPL feedback loops, Lisp symbolic computation machines, addventure, neo-brutalism, systemic change, historical retrospective, from grim dark to bright solarpunk, Konrad Zuse, factions, far far away future foresight, van hexcrawl, encyclopedic knowledge, life-long learning, Zettelkasten, Markdown, Argdown, DolDoc, Parade FS, DocBook, HTML, XML, SVG toons, Common Lisp, Worker Cooperatives, KDE-Plasma’s Kate;
Neue Geo-Syndicalist constructivist empowerment worldview, Lisp program forms as Lisp-y poetry, mysticism, geofiction realms & speculative paracosms, constructed languages’ jargon / dialects and technological systems…
So let us imagine a multimedia (game? movie? book?) project around the fundamental prompt / question of “Regardless of context, what does it take for us to bring forth the future we deserve?”;
Maskoch, Shoshoni Union… May 4525; INTJ (Kate Kér, sapient-tier human Shoshoni self-insert) & ENFP (Ava, synthetic-tier android blonde lady) duet, with Shoshona the black angora cat, and Nil the camera-person perspective.
Harmony, Progress, Liberty, Knowledge, Transparency, Copyleft / Open Culture;
Ok, so let’s imagine animated films where Kate literally records comforting memories of herself alongside Ava and Shoshona, reading books and whatever else. And also simply living their best lives.
Lisp-vy mess of multimedia (visuals, audio and video... assets)
youtube
youtube
youtube
youtube

1 note
·
View note
Last Seen Blogs

seosrbija
SEO Srbija expert za optimizaciju sajta Beograd

maydaymutt
Mayday_Mutt

leslielucia
leslie luciä

subzeroappliancesca
Sub Zero Appliance Repair In Orange County

deepworkspace
“Find the Will Power and Resilience to thrive”