#How to Create Images for Cricut
Explore tagged Tumblr posts
Visit Tumblr Blog
Explore Tumblr blogs with no restrictions, modern design and the best experience.
Last Seen Tumblr Blogs


Fun Fact
Tumblr Inc. is funded by 13 investors.
Text
How to Create Images for Cricut: Quick and Easy Guide
If you are a regular Cricut user, you know how important the Design Space app is for your DIY projects. One of its key features is the ability to create your own images. To use this feature, you need to know how to create images for Cricut.
If you do not know how to make images in the Cricut software, don’t worry! This guide will cover everything you need to know to create your own images in Design Space. You will find 8 simple steps to follow, but first, I am going to explain how to prepare for the process.
Get Ready for Making Your Own Images in Cricut Design Space
Before you learn how to create images for Cricut, you should know what you have to do before making images. You can create images on the app, and to use the app on your operating system, you will need to do certain things.
You will need to download the software to your mobile phone or computer. It is the Cricut app that allows you to create images for your DIY projects. After downloading the app, you will need to log in with your account because Cricut needs an account for operating your Cricut machines. After creating your Cricut ID, you can now start the process of making images in the Design Space.
How to Create Images for Cricut: 8 Simple Steps
To make an image in your software, you will have to follow some basic steps. I am going to write down all of them one by one, and you can easily create images following them.
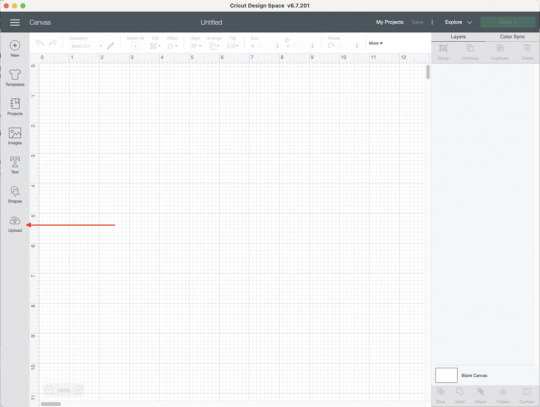
Step 1: Open Design Space on Your Device

To start creating images, open the Design Space and click on the New Project section. A blank canvas will appear on the screen. You can either upload a ready-made PNG file or start creating your own. For this project, a Free Sunflower SVG from the Design Bundles will be used.
Step 2: Upload Your Image on Canvas
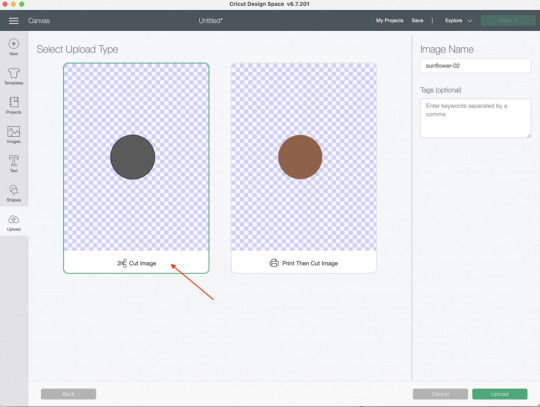
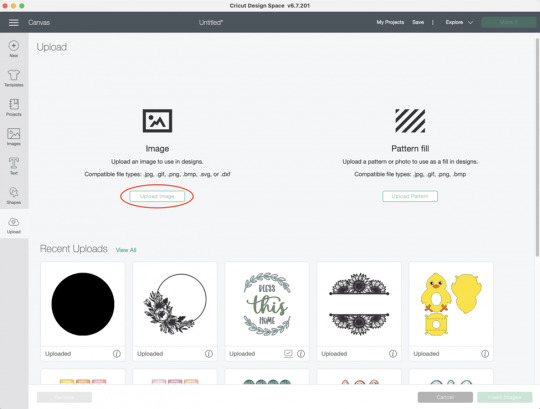
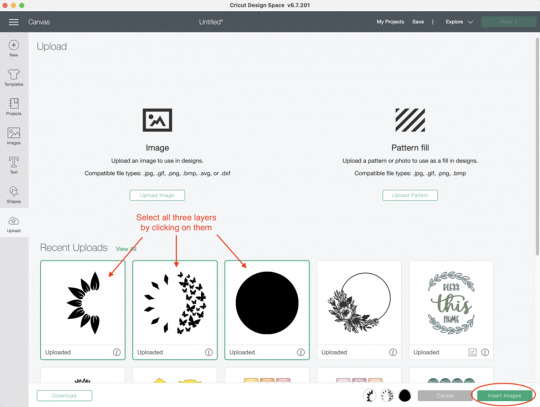
Once you have opened the canvas, you have to upload the image. You should click on Upload to start uploading the image and select it from your computer. Later, you will turn the image into multiple layers. After uploading the image, you will need to select the Complex option, and then you have to click on the Continue button.

Step 3: Use the Magic Wand Tool to Separate Image
In order to learn how to create images for Cricut, you have to use the Magic Wand tool afterward. This tool will help you click on the individual pieces of the image after splitting it into different layers and then remove them. You can keep one color at once. As you can see in the image, you can click any portion and then remove it.

Step 4: Select the Cut Image Option
Now, you will have to select the Cut Image option. After that, you have to upload the image again.
Step 5: Upload the File Again
You will have to upload the image again. To do this, you must select the Upload Image button from the files again. After that, select Complex and hit Continue again.
Steps 3-5 need to be done repeatedly until all the colors you want are saved in separate layered cut file images.
Step 6: Insert All the Images
Now that you have all the images separated into multiple layers, you can insert them by clicking on each file. This will bring all the layers into your beautiful project.
Next, all the images are in the software. If some files appear to be very large, you will have to scale them down. A change in height and width will help.
Step 7: Change the Color of Each Layer
You can change the color of the layers if you want. However, this is very optional and depends on you whether you want it or not. To change color, select a layer, go to the operation menu, and click on the black square. From there, select the color you wish. Repeat the process for each layer.

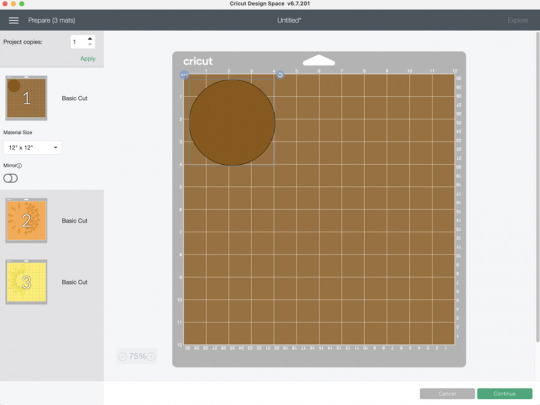
Step 8: Click on the Make It Button
Finally, you can cut each layer individually on a separate mat. It allows you to cut all the different colored pieces on various materials. You just have to put the cardstock or vinyl on a cutting mat and cut it on the image.
Conclusion
You read the whole blog, and now you know how to create images for Cricut. It is an excellent thing that you can do in the Design Space app. By creating images, you can craft beautiful projects. To do this, you will need a device and the software on it. You can follow all the steps that I have written above in this post one by one. Once you are done with that, you can cut all those newly created images on your machine individually on different colored materials, and a beautiful image will be created.
FAQs
Is It Possible to Create My Own Images?
Yes, for sure! The Design Space app offers multiple options for creating designs. You can either pick any design or upload it from your device. To create your own image on the app, you will have to upload an image, and then the app will convert it into many shapes that you can cut however you want, creating a completely new design.
How Can I Find Images in Cricut Design Space?
The app has thousands of ready-made images. You can pick any of them and customize them however you like. Here is how you will find those images
First, open the Design Space app.
After that, select the My Stuff option.
Next, you have to select the Free Projects option.
Now, choose free images and then select images.
Choose purchased, and it will show you the available images for the app.
How Can I Upload an Image to Cricut Design Space?
These are the simple steps to upload an image on the Cricut Design app.
First, visit the app and go to the New Project section.
Then, find the Upload button on the app and click on it.
Now, select an image of your choice. You can use the various eraser tools to remove the background of the image.
Finally, give the image a name and click on Upload to complete the process.
0 notes
Text
It's August 21 which means it's Fan Fiction Writer's Appreciation Day! Fanfic is the lifeblood of any fandom and I hope all writers know how appreciated they are!
To celebrate, @renegadeguild ran an event whereby fan binders bound a work of fanfiction to celebrate. This year I chose Wishing on Runway Lights by inflight_gremlin.
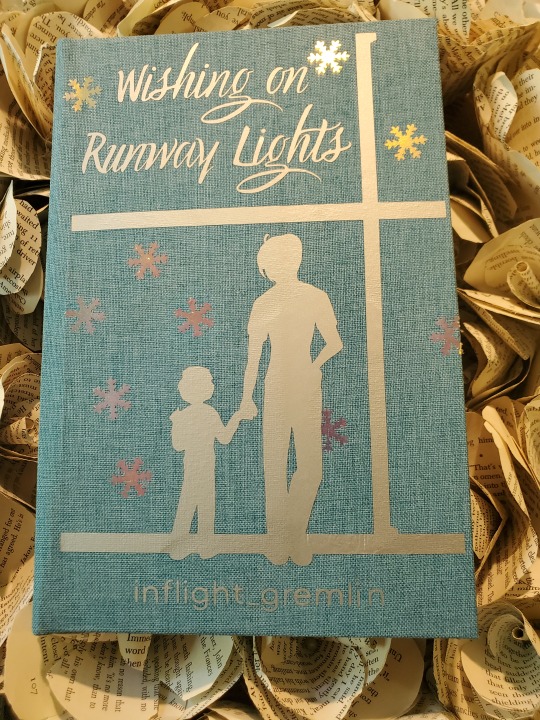
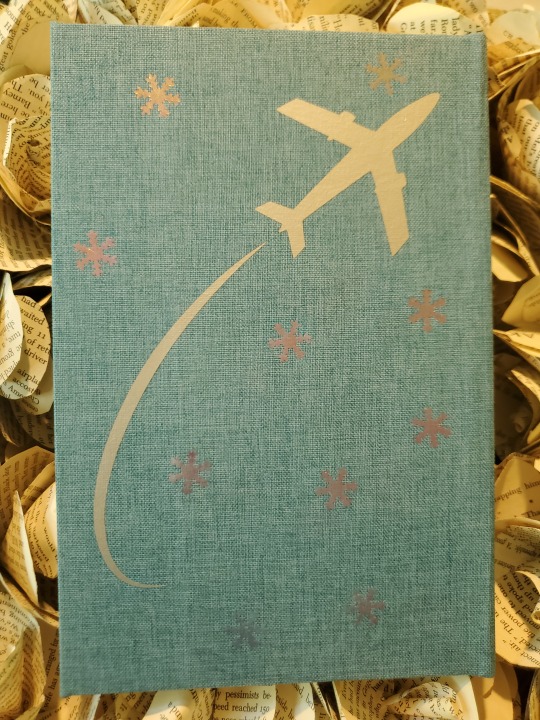
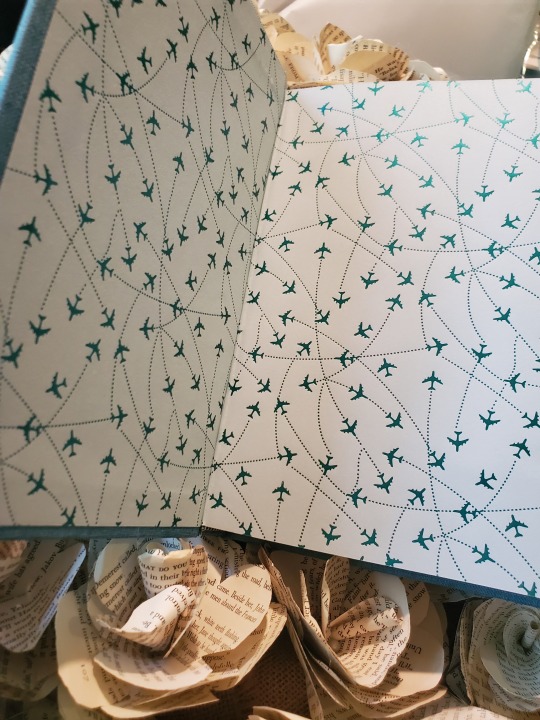
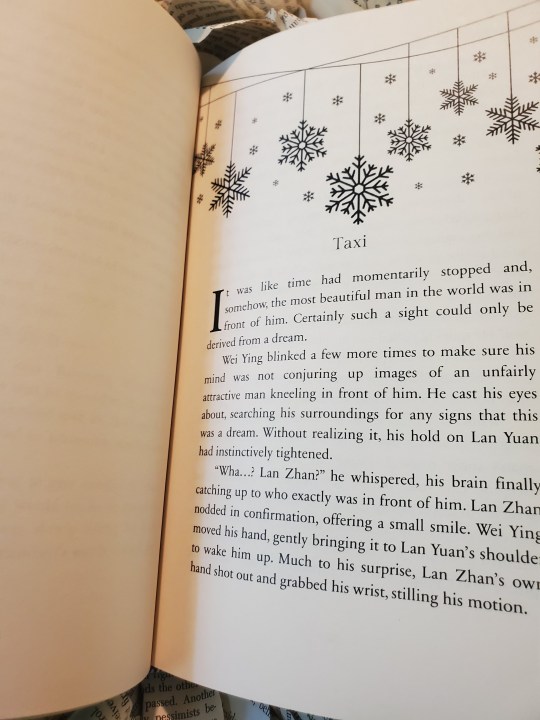
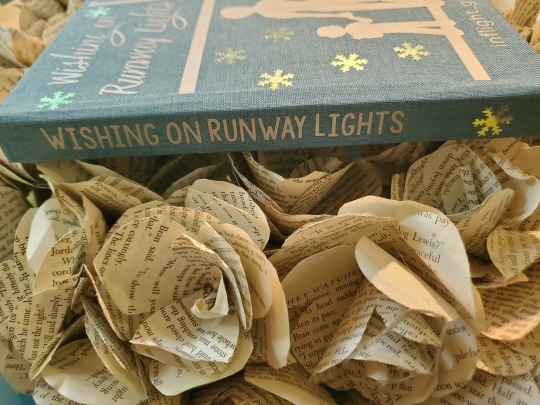
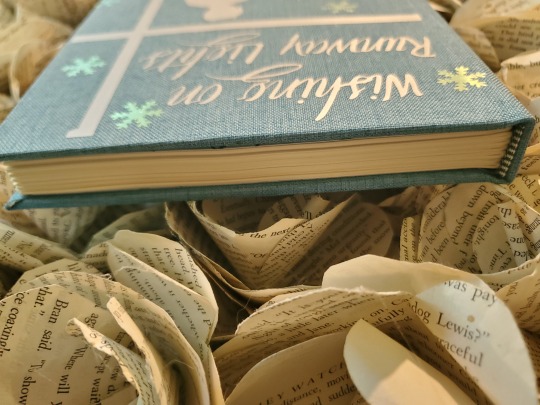
This story is a beautiful love story in the mdzs fandom about a flight attendant, a stranded child, and the child's worried dad all snowed in and trapped during a winter storm. I chose it as my FFWAD project simply because I enjoyed the story, it made me smile and I thought it was well written and perfectly romantic. More details about the binding itself below the cut.
The fic was nearly 45K words long and with appendices the total page count was 221.
Text font: Sabon Next LT
Chapter headings/graphics: Canva
Design: Inflight_gremlin is an incredible artist in addition to being a fanfic writer so I took one of her drawings, created a silhouette in Canva, and then imported it into Cricut Design Space. The images and text were cut from silver HTV vinyl applied to ice blue bookcloth. The snowflakes were cut from iridescent htv using a punch and then applied.
Endpapers were purchased from Michael's and endbands were from my stash.
The typset was done in Word and took me way longer than it should have. I had some issues with the clarity of images in my test prints and had to start over and redo it. I am very happy with the result, however!
#ffwad2024#renegadelovesfic#inflight_gremlin#the untamed#wei wuxian#lan wangji#mo dao zu shi#fanbinding#ficbinding#bookbinding#book binding#ffwad
68 notes
·
View notes
Text
How to Use Cricut Pens? (Easy Steps!)
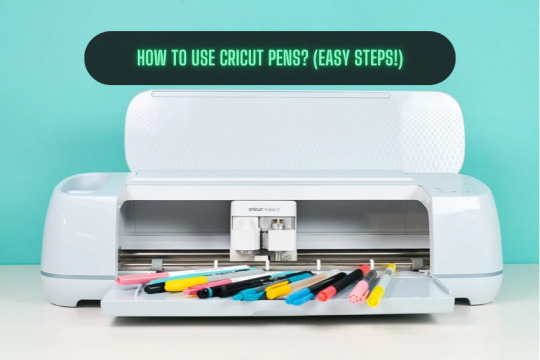
If you are a Cricut user, then surely you know that this brand makes some smart tools and machines. You know about its capabilities and how useful it is. But did you know that apart from cutting materials, you can use pens to simplify the crafting process significantly? But how to use Cricut pens? Cricut machines are not only used for cutting different shapes out of paper or vinyl. These machines use pens to create doodles, illustrations, and intricate designs. However, you need to know some basic steps you need to perform when you are designing your projects to make them better.
Using the pens is easy and straightforward, but the important thing is that you know the process. Read this blog to discover all about Cricut pens and what projects you can make with them.
What Types of Cricut Pens Are Available?
All of the current Cricut machines can use a pen, whether Maker, Explore, or Joy. The Maker and Explore machines have interchangeable pens, and Joy has a lineup of small pens. Joy pens are incompatible with other machines due to their unique, smaller size. Before you proceed with how to use Cricut pens, here is the list of pens that you can use with the machine:
Fine Point Pens
This has an F stamped on it for fine, has a 0.4mm tip, and comes in multiple colors.
Extra Fine Point Pens
These are finer, and the pens are just 0.3mm thick.
1.0 Pens and Markers
They have a thickness of 1.0mm and can be called markers, too.
Gel Pens
Gel Pens have a roller ball instead of a tip and are 0.8 mm in size.
Glitter Gel Pens
It has a roller ball and is 0.8 mm in size.
Calligraphy Pens
These pens have a gray barrel and have C stamped to denote calligraphy.
Infusible Ink Pens
It has a 1.0mm tip, and it is used for sublimation and infusing the ink on the surfaces.
How to Use Cricut Pens: Easy and Simple Steps
Placing or installing pens is easy, but if you are a beginner, then it will be a new thing for you. Always use the pens carefully, and pens should always be fitted to the clamp A of the cutting machine. Here, I am going to show you something different about using Cricut pens to create a simple gift tag. Now, let’s look at the below process to understand how to use it:
First, go to the Design Space and click on a new project to create a design.
Then, create a design, or you can choose a text that you want to use with your pen. Cricut Design Space has its own vast library of images for your DIY projects.
Now, remember you have to draw, not cut the image. So, go to the Edit toolbar, and from there, select the Draw option in the Layers panel.
When you click the colored square box next to the line type dropdown, you can select the type of pen and choose the Fine Point pen.

After you have completed drawing your design, it is time to add text. In the Font menu, you can filter by Cricut Writing fonts. Choose the writing style font.
You can insert a shape into your Canvas. Then, using the Align tool, you can change its size and color and move it to the back of your Canvas.
Next, select your drawing and text layer and click Attach on the right-hand side of the Layers panel.
On the preview screen, your image will appear on the mat. Click Continue, and in the Make screen option, select the material you are using. Here, I am using cardstock. The Cricut Design Space app will prompt you to insert your pen, and you can use a fine-point blade.
In the last step, you have to insert your mat into the machine, and your machine will draw and cut the tag.
Conclusion
Now you know how simple it was to learn ‘how to use Cricut pens‘.? In this post, I have explained the types of pens and how you can craft your project with the pen. After reading this blog, you can choose a pen for your project, load it into the machine, and start crafting. Start crafting with your pen and unlock the full potential of the machine.
FAQs
How Do You Load the Pen Into Cricut Machine?
When you open the machine, you will see two clamps: Clamp A and Clamp B. To load the pen into your cutting machine, open Clamp A and insert the pen into it. Gently press the pen into the clamp until it fits properly, and you hear a click sound. Then, close the cover, and you are ready to use the machine.
What Are Cricut Pens?
Cricut makes different types of pens, which are great ways to add drawn or handwritten details to your projects. Cricut pens come in different sizes and can be easily loaded into the machine. This can be used for various creative projects, such as writing on gift tag cards or adding doodles.
What Is the Difference Between Cricut Pens and Markers?
A Cricut pen usually has a fine tip, which allows it to create a thinner line, compared to a marker, which has a thick tip and creates a thicker line. Pens are ideal for writing detailed text, signatures, or fine lines within a design, whereas markers are better for filling large areas with color.
Source: How to Use Cricut Pens
#how to use Cricut pens#cricut design space download#cricut design space app#cricut maker#cricut joy#cricut pens
3 notes
·
View notes
Note
Hi, just wanted to say your binding of "Faces In The Dust" looks gorgeous!!! Could I ask, how did you make the title + decoration and apply it to the front cover? :O
Hello! The cover designs are cut from vinyl with a cricut machine. In this book's case I used permanent vinyl. Which is essentially very sticky vinyl. There is also HTV(heat transfer vinyl) which you cut out and then adhere to the material via heat (such as an iron). I tend to use cricut to design and then cut most of my covers. The cricut is a cutting (and other things) machine that has a digital design space I run on the computer to help me design covers.
I typically like to start by 'making the case' out of colored blocks in the space that are the size of my actual cover so I can know what things will look like when I put it all together. I also color my items to match as close as possible to the colors I plan to cut them from as well. I mostly do this because I have aphantasia so I need the literal imagery in order to see what the design will look like. These steps are by no means necessary and if you can visualize what you want then you can just add the images/text in however you like.
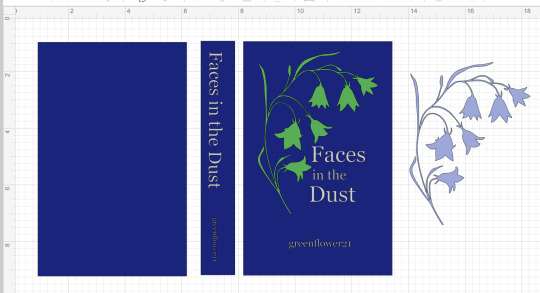
The vinyl is a plastic-y sheet or roll of vinyl in a given color. Because I wanted to have the flowers be one color(lavender) and the stem (green) another I needed to cut two sections and take the parts I wanted from each. I could have also edited the images so that each of the two only had the parts I wanted from it so it would only cut them. But it wasn't that much of a difference and if I just copy pasted a second one of the same image and changed the color then I would know they were the same size and everything would fit together.
Once the design is done I move to the cutting phase. The colors you pick determine which pieces are cut together.
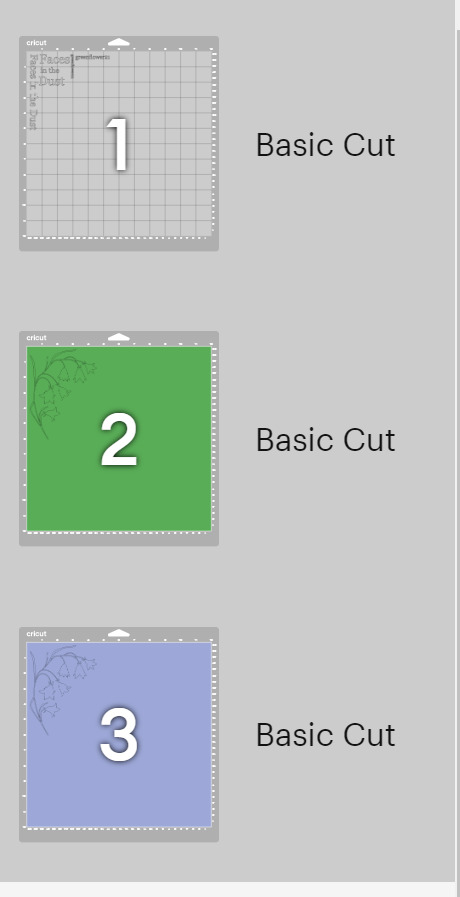
You load each sheet of vinyl in on a mat and it cuts the image out. When it is done you cut out around the section you just cut the image on and then use tweezers to remove the vinyl you aren't using around the image. This is called weeding. In the flowers & stem's case I also then used an exacto blade to cut off the flower heads from each of the cut outs so I could combine the two colors of vinyl to create my final version of the image.
Once it is all weeded you are ready to transfer it to the book case. You do this with transfer tape. It is a clear plastic sticky sheet that you place on your vinyl to 'pick it up' off of the backing it started out on.
Again in this instance to combine the colors I picked up the green vinyl on the tape and then lined up the purple flowers and pressed down to get them stuck to the tape as well. With it all now collected I placed the transfer tape on my book and pressed the vinyl into the case of the book. Smoothing it down with my bonefolder or anything else that helps make sure it is flat so it is really adhered and there are no air bubbles.
I do the same with all the titling and ta-da! A Book!
There are tons of ways you can title/design your book covers. I just got my hands on foil quills this past weekend so I hope to try making a cover with them in the not too distance future. Some folks I know use paint pens, or cut out stencils and use regular paint, or just free hand paint if you want to show off your skills of an artist. Hope this was helpful and not too rambling. Sorry I don't have pictures for all the steps, I can make a point to take pictures the next time I make a cover in cricut if that is something folks would want to have. Feel free to reach out if you have any more questions.
43 notes
·
View notes
Text
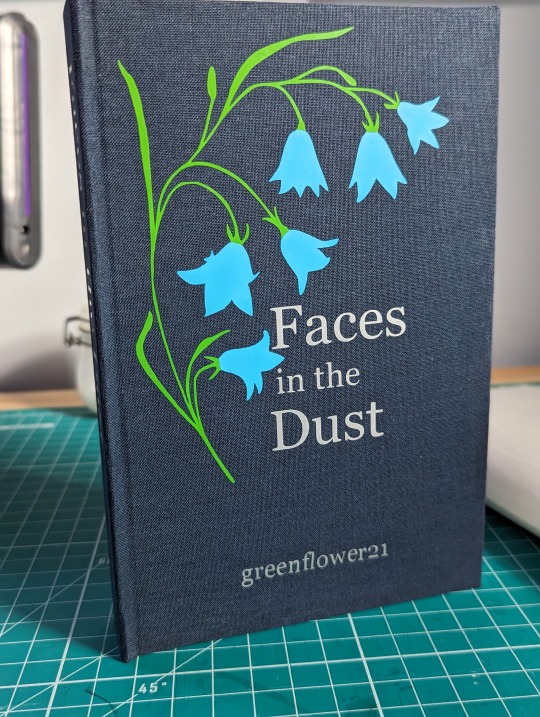
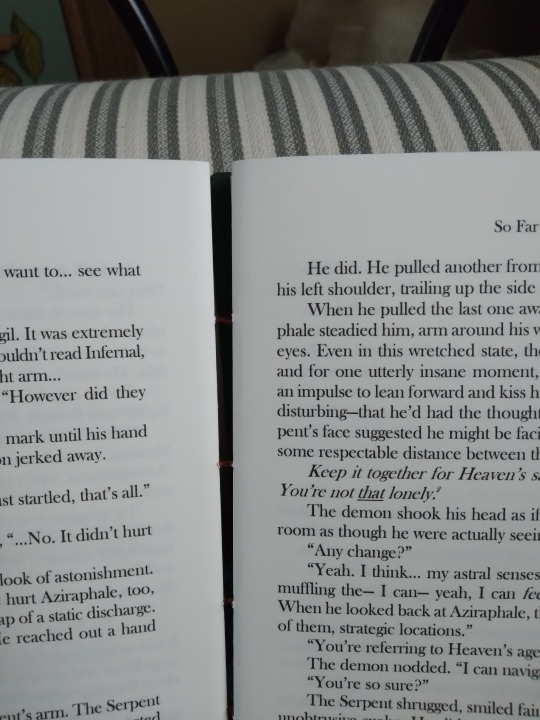
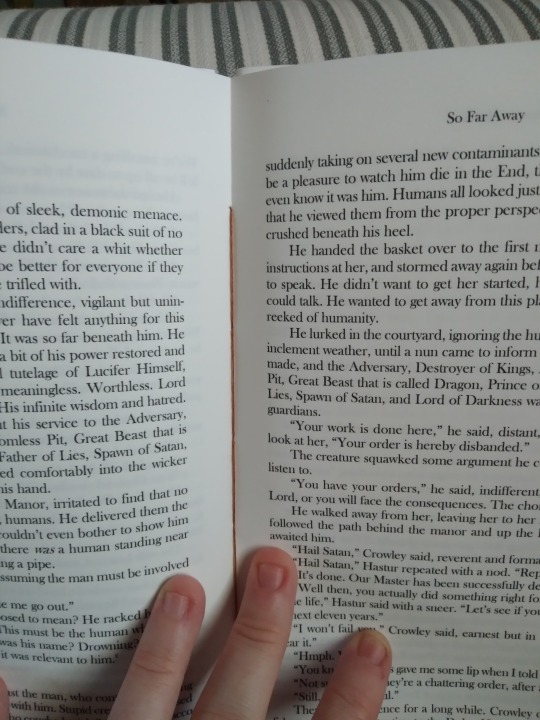
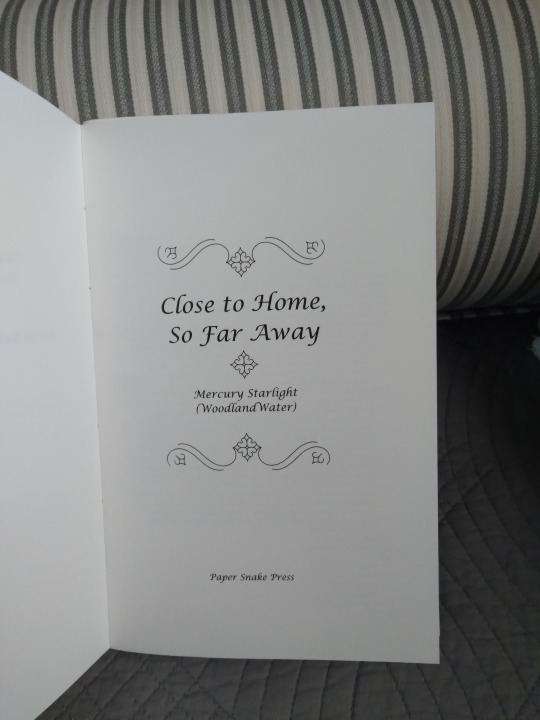
Today is a day for books. Or one book, anyway. This is Close to Home, So Far Away, a Good Omens fic by Mercury Starlight. It's a memory loss/alteration fic with a lot of angst (for real, mind the tags if you decide to give this one a try) but oh my gosh, it's wonderful. Tasty tasty angst. It is unfinished but don't let that deter you, the biggest angstiest plotline is resolved enough to be satisfying. The last update was in 2021, so it's a pre-season 2 kind of angst instead of the new canon flavor.
I love the way the cover came out on this one. It's gold HTV on dark green book cloth and I'm in love with the simplicity. It reminds me of the very pretty books I find in used book stores sometimes, that have enchanting covers but are often either impenetrable to read, very fragile, or out of my budget. But this one is none of those things, it's exactly as compelling as its cover makes it seem. There were originally supposed to be more gold swirly bits in the corners but I made the lines too thin and my cricut ate them. I thought about re-cutting them but I liked the way it looked without them so much I just left them off.
More pics under the cut!
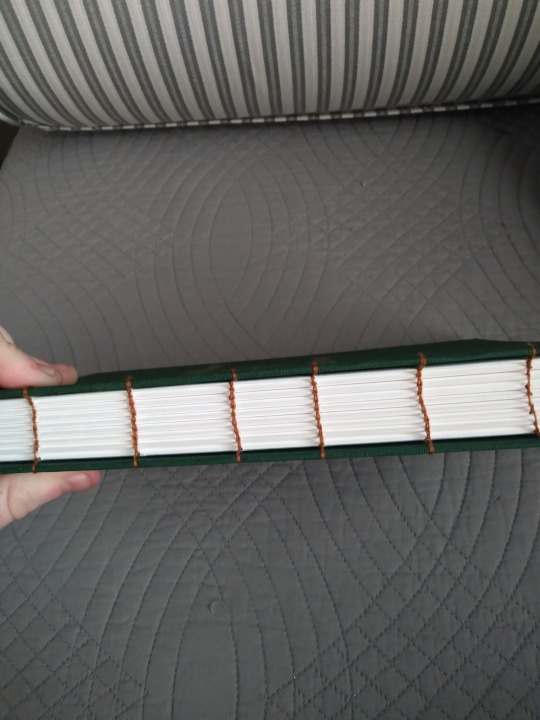

This is a coptic binding, which is my preferred style for unfinished fics. The spine has no covering and no glue, so technically if the author decides to update it again I can cut the stitching, add more pages, and re-stitch for an updated book without having to make an entirely new one. The downside is that glue can help mitigate swell at the spine, and without it I had issues. I squished this thing for days, it got very flat, and it fluffed right back up again after stitching. The book is about 250 pages and I think that's the upper limit using the methods and materials I have. I want to try it again with short grain paper and see if that helps.
Downside to coptic binds: you can see right through them in between signatures, and when you're used to other types of books it sends a panicked "my book is broken!" signal to the brain.
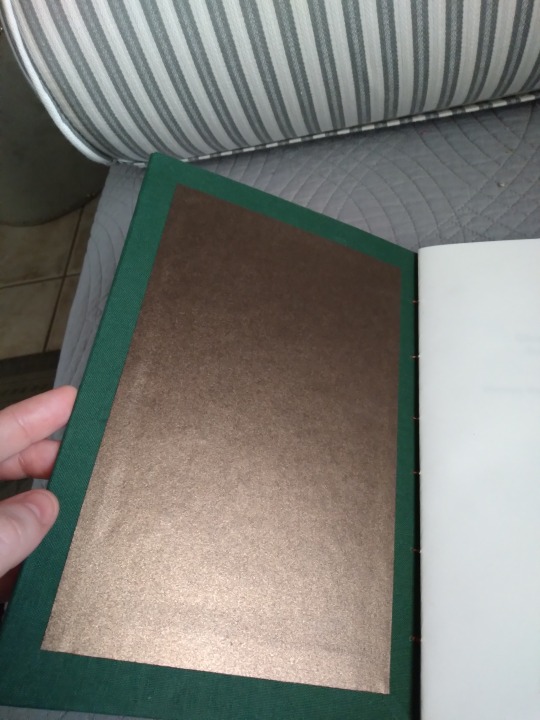
Upside to coptic binds: pretty colorful stitches down the center of each signature. I love how the bronze looks with the green cover and the shiny cover lining. Because there's no glue in the text block you can't do regular endpapers here. I think this is called a doublure.
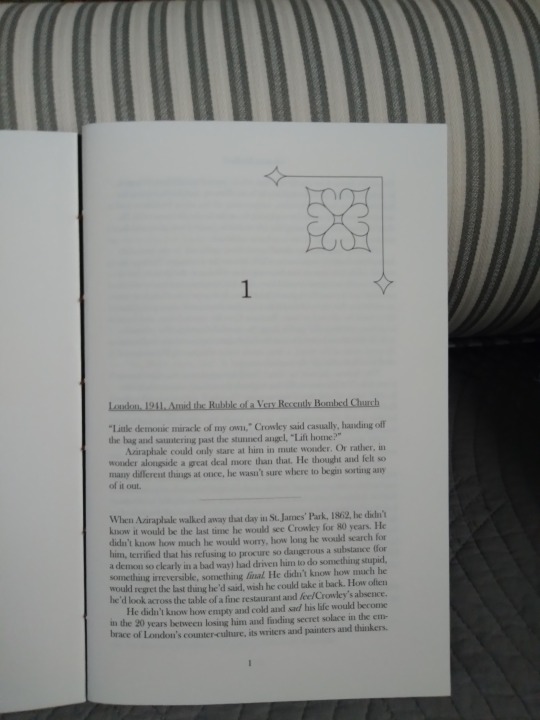
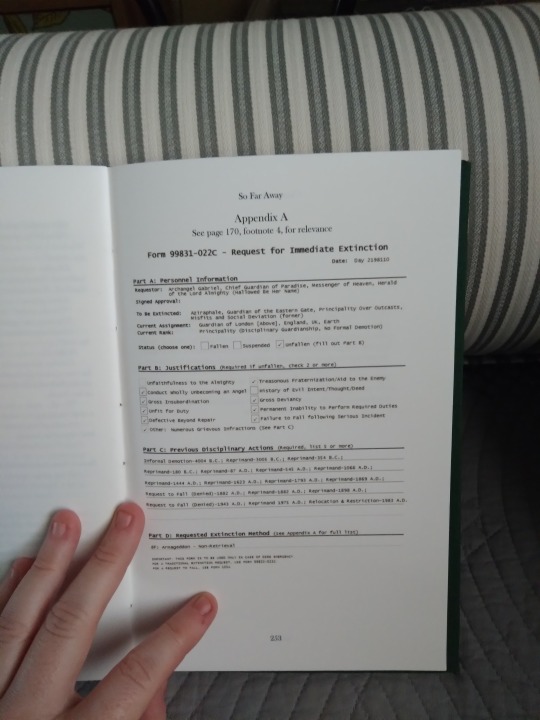
Title page, first chapter, and a new thing I tried. All the art assets came from rawpixel. The thing on the first chapter page is the extra swirly bit that was supposed to go on the cover. I think I made it too big here? I'm not sure. Graphic design is not my passion and I am learning it only reluctantly XD The last image is unique to this fic. There's a reference to a specific form in the story, which the author created and linked as a PDF, and I really wanted to include it, so I put it in an appendix at the end. I really like having it there and plan to incorporate more stuff like it in future binds, if I can.
I think that's it for this bind! I hope you like it, @yeswevegotavideo!
#bookbinding#fanbinding#snek makes books#good omens#fic rec#i'm not good at coptic yet but I'm working on it#i need to do more of them this is only my second one#i didn't get the case binding down till my fourth one#very proud of this one though#it's so simple compared to a lot of what i've made#once i finished the cover i couldn't stop looking at it
38 notes
·
View notes
Text

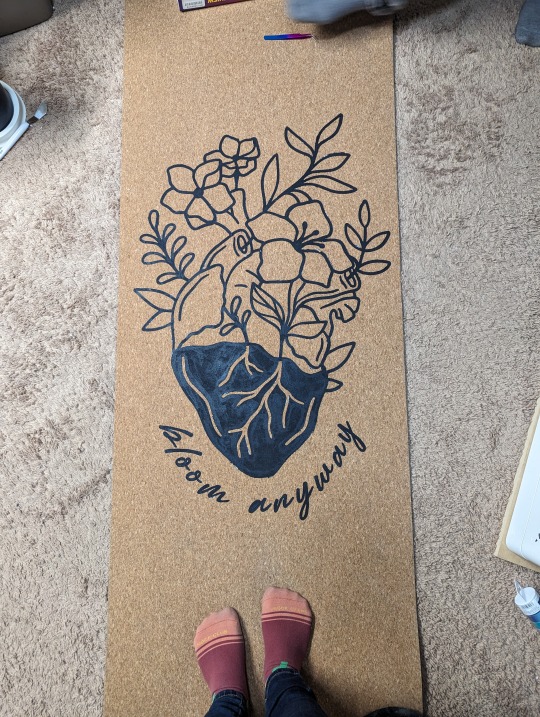
So I painted my yoga mat... I'm including the process and credits below the cut.
So, I have been wanting a cork yoga mat for a while. Do I need one? No. Will I pick up yoga again for a month and then quit? Hopefully not, but likely yes.
Every time I get back into yoga, I start looking at cork yoga mats because they're grippier and also very very pretty. The only problem is... they are friggin' expensive.

I first was attracted to cork yoga mats because of some of the really amazing designs, but I can't afford this shit. Instead, I settled for a cheaper cork yoga mat that is plain, and I thought that if I saved up enough money and still cared about yoga enough to buy a fancy one, I would.
But then I got to thinking... could I paint my yoga mat? And the answer is yes, yes I can.
I originally got the idea when I read online of other people doing this to their rubber and PVC mats, so you do not need a cork mat to do this!
Buying the Mat
Even an inexpensive cork yoga mat is still far more than I've ever spent on one before, so I had to choose wisely. I ended up choosing the Gaiman cork yoga mat, which is about 5mm in thickness. It's roughly 68 x 24 inches. One thing I had read is that cork mats can get quite heavy, but this one is pretty lightweight while still being cushy. I was really tempted to use it right away, but I didn't want it to get dirty or oily before I painted it.
The Design
I am not an artist. I cannot draw well enough to freehand something confidently. What I do have is a Cricut Maker. If you don't know what a Cricut Maker is, it's an ill-advised purchase that I got secondhand and is actively ruining my budget. Depending on the model, it can cut out designs on a variety of materials, such as vinyl or infusible ink and can even tool leather. I used cardstock for this project to cut out stencils.
There are many free SVG templates out there as well as images created by other Cricut Makers that are only .99 each. There are many, many other places where you can purchase designs as well, or you can create your own! I am not talented enough to create my own design.
I tried several free SVGs, didn't like them, and then stumbled on this on Design Space, the Circut Maker program/shop. To quote Macklemore, "But shit, it was 99 cents!"
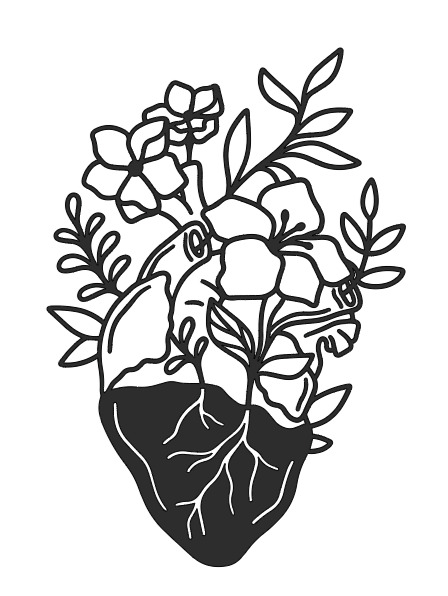
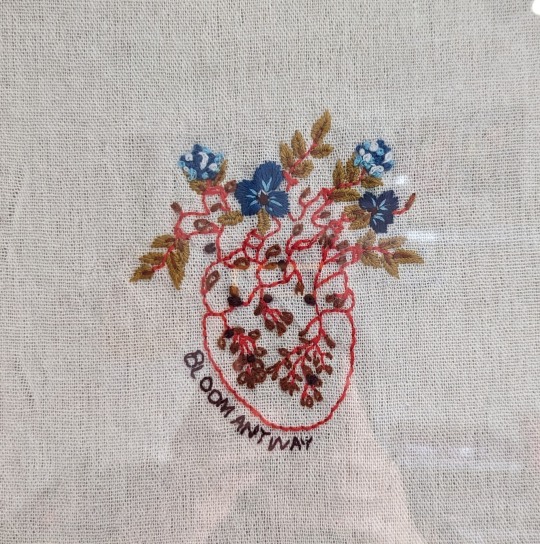
The image was designed by GlamSVG by Emylia and the inspiration came from an embroidery pattern by Emily June, which you can find HERE. I went through an embroidery phase during quarantine, and I have mine hung on the wall. I look at it daily.
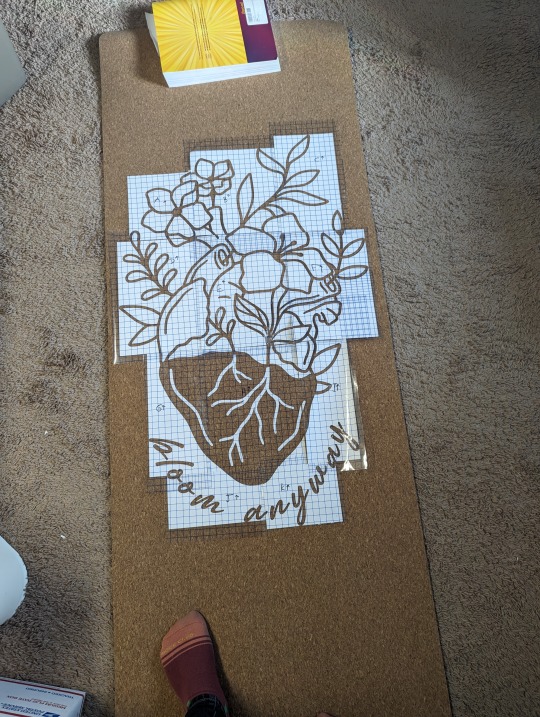
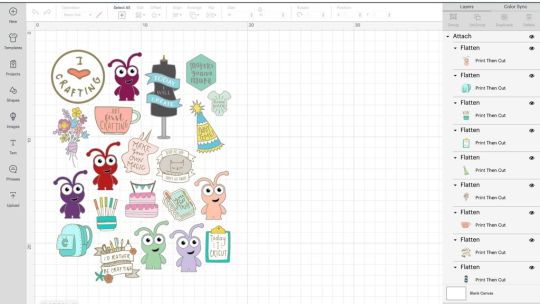
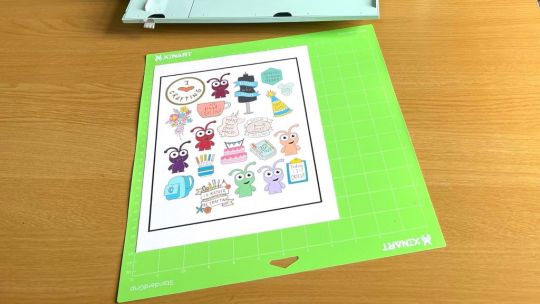
I had to resize this image to fit my yoga mat, which ended up being 24 x 36". Because I cut the stencil out of cardstock, I had to segment everything into 8.5x11 pieces, cut, weed, and then piece it all back together on the mat. Once I had all the pieces, I stuck them to transfer paper to keep the floating segments in place. I organized and labeled everything so I could put it back together again easily. It looked like this:
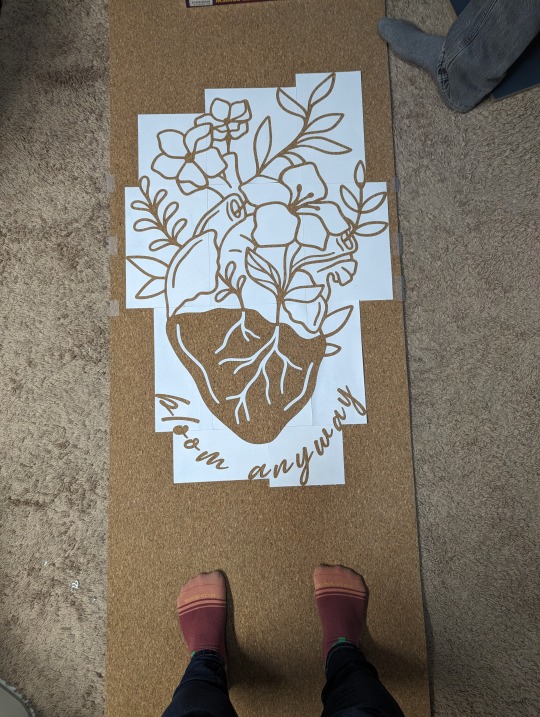
Once it was assembled, I sprayed the backs with temporary adhesive so the stencils would stay down. I removed the transfer paper and began painting the outline. I did end up losing a couple of the floating pieces (see the letter O and the leaf on the far right side), so I had to freehand some of it. Overall, the stencil turned out great!
I had a variety of success with the temporary adhesive. Because I bought a more inexpensive mat, I soon discovered how not durable it is. The 'temporary' adhesive pulled up small pieces of cork after I removed the stencil. This was partially my fault, since I didn't pull up the stencil as I went. Still, there were pieces that were going to lift anyway. This revealed that the cork is only one layer, but fortunately, each piece of cork that lifted was quite small and unnoticeable, and the thread behind it matched in color. It wasn't ideal, but I could live with it.
Some of the cardstock became permanent fixtures on the mat, which I then had to paint over. Also, some of the stencil didn't stick at all, so I had minor bleed through. Problems all around! But it still turned out nicely!
I need to preface that I have never painted anything before. Well, that's a lie. I've painted a wall, and six years ago I had a Bob Ross themed birthday party. The SO, however, is the son of an artist and taught me about mixing acrylic. His first tip was to test out colors. I used Paint.Net and came up with this mock-up:
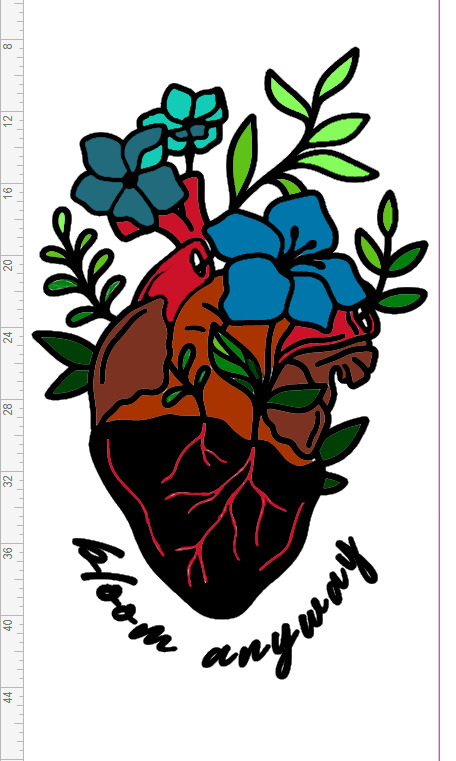
I knew I wanted the heart anatomy to be shades of red, so that was easy. The flowers were harder. I tried my favorite colors, like yellow and purple, but it didn't sit right visually. I turned to Canva Color Wheel to help me find complementary colors to the shades of red I wanted to use. That's how I came up with the pretty blues. To mix the colors, I used ColorHexa to show me the percentage of CYMK I needed.
Here are some progress shots:
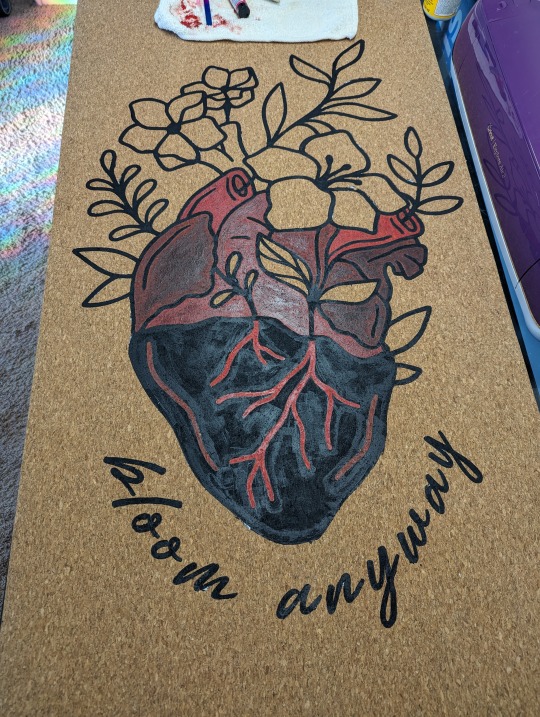
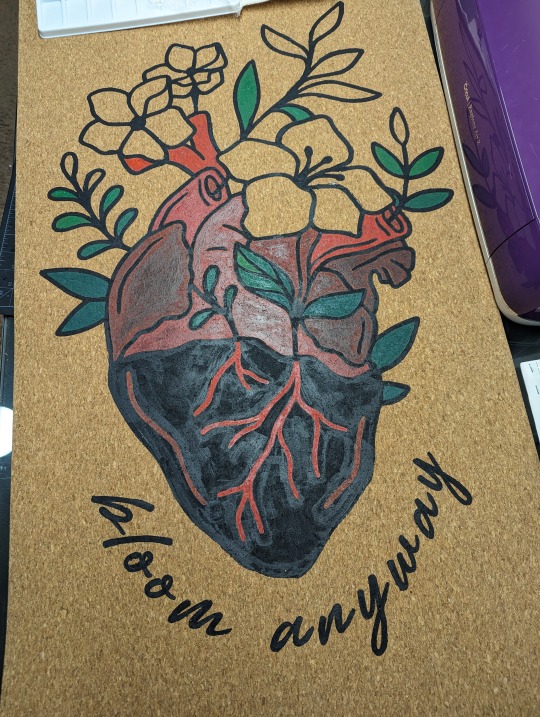
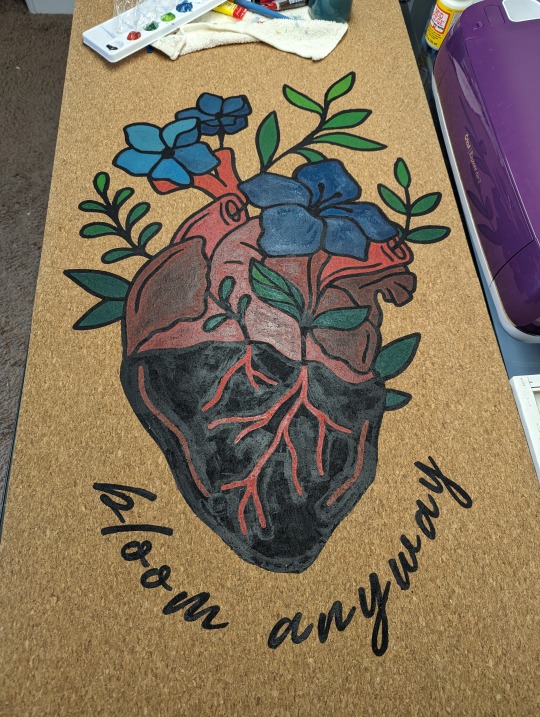
I'm super happy with how it turned out! My color mixing didn't turn out exactly like the mock up, but I love the results. The last step was to let it dry for at least 48 hours. Then I set it with Mod Podge Acrylic Sealer.
I chose Mod Podge since it's non-toxic, and I will be putting my face on it. Also, my dogs walk on it while I do yoga. They think it belongs to them. :) Knowing now that there is only 1 layer of cork, I do worry how it'll hold up to dog nails over time.
Lastly, the real test was to see if it would roll, and it does! So now I just need a yoga strap, and I'm good to go!
17 notes
·
View notes
Text
3 Beautiful Ways to Use Pressed and Dried Flowers | DIY Crafts You’ll Actually Keep!
I started working with dried flowers and pressed botanicals a few years ago, and it has taught me a few things.
Delicate dried flowers can burn or disintegrate in epoxy resin.
Glossy Mod Podge however much we love it, can make you cry (and even ruin your floral project).
Depending on your project, pressed flowers MUST be chosen as carefully as you would choose fabric, paper, or paint colors.
So how can you still work with these lovely mediums and create long lasting, archival art that you can be proud of? Read more to learn about 3 of the most botanical-friendly crafts.
Framed Glass Art
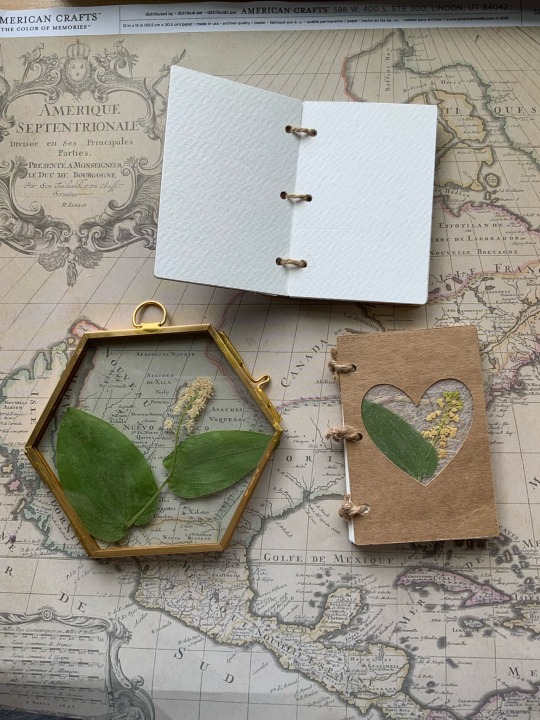
What you’ll need:
Double sided glass frame. (any size)I buy mine on Aliexpress or Amazon.
Clear glue, glossy mod podge, or a tape runner.
Pressed flowers
Scissors
How to make it:
Start by selecting your botanical specimens and arranging them in your frame. Use scissors to trim and refine your arrangement until it is to your liking.
Remove all of the flowers, and strategically place dots of clear glue on the inner glass. Wait until your glue becomes tacky. The time will depend on the type of glue that you’re using.
Tip: Test out the cure time by placing a few different sized glue dots on a plastic surface. See how long it takes for the glue to become more viscous and less runny.
Place the flowers onto the glass. Make sure to tack down all specimens with glue until they’re difficult to move. Allow the glue to dry completely before closing the glass frame.
Once dry, display your beautiful arrangement!
I love making smaller arrangements for office spaces and display shelves. These also make adorable secondary gifts in care packages.
Glass offers a more eco-friendly alternative to epoxy resin. Though I love working with resin, I’ve started to become more conscious and selective of my usage to creation ratio.
2. Floral Bookmarks
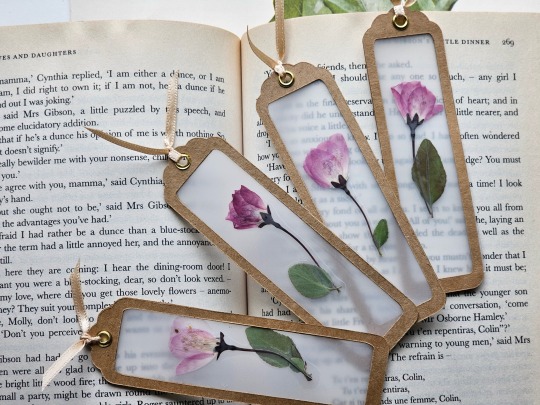
What you’ll need:
Pressed flowers. Preferably long stem flowers that press very flat such as fleabane and daisies. You can also use small flowers without stems.
Self or thermal laminating sheets.
Thermal laminator. (If using thermal lamination)
Scissors
Cricut Cutting Machine (highly recommended for a cleaner result) However, you can also create your own frames. Simply use two gift tags or rectangular pieces of paper. Measure and cut out another rectangle of your preferred size in the center of your paper. Use an X-Acto knife to make the cut out.
Kraft paper cardstock
Glue stick, or my personal recommendation, Kuretake Glue Pens. They will make less of a mess, and create a longer lasting bond on kraft paper.
How to make it:
If using a Cricut machine, start a new project in Cricut Design Space.
Search for “bookmark frame” in the “images” section.
Select a design you like the shape of. You can also create your own by “slicing” new shapes into existing templates.
Resize your design. Choose whatever size will accommodate the shape of your flowers.
Cut out your frames out on kraft paper.
Once you’ve cut out your design, remove half of the frames from the mat. Leave the other half on the mat. This will make keeping them flat easier once you’re ready to assemble everything.
Laminate your flowers. Be sure to use your frame as a guide to arrange them within the window. Leave an inch of space between each arrangement for cutting if you’re making more than one bookmark.
Cut around the flowers, leaving a bit of allowance for gluing them onto the frame. I never measure like I should. Just use the frame as guide to avoid cutting off too much laminating plastic. We will hide the ugly jagged cutting job later. 😅
Return to the mat and apply a generous layer of Kuretake glue to the entire surface of the frames still stuck to the Cricut mat.
Carefully place the laminated floral arrangement on the frame.
Apply another layer of glue around the edges of the lamination, and also on the other frame.
Place the second frame over one of the mat frames, and press down firmly. Tip: You can also place a book on top to keep them flat.
Let your bookmarks dry for about 20 minutes before adding your embellishments. I love using key charms, grommets, ribbons, or tassels.
Check out my inspo photos below! Get creative with decorating.
3. UV Resin Pendants
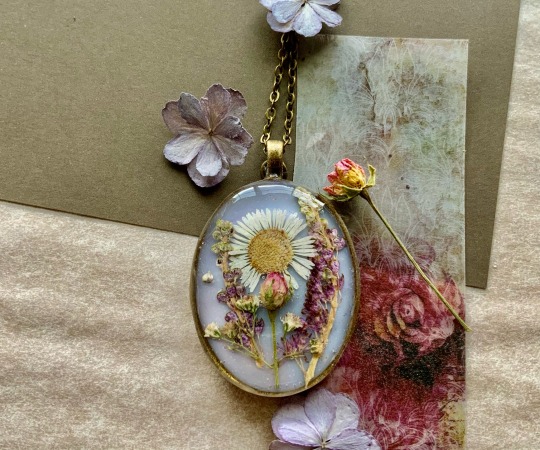
Before I started working with UV resin, I was told that it isn’t light fast. Which is true for most resins on the market. I’ve also heard that it yellows over time and that the UV light burns flowers.
These are all things that I’ve experienced working with flowers in UV resin. However, I’ve managed to make projects that have stayed glossy, clear, and beautiful for over 2 years now, and I want to share my tips and tricks!
Tip #1: USE a high quality UV resin such as the one from Counter Culture DIY.
Tip #2: AVOID using delicate flowers such as forget-me-nots, hydrangeas, larkspur, etc. If the petals are thin and delicate, they WILL become distorted or burn. Think florets, spaced petals, and small leaves.
Tip #3: USE opaque, strong, and VERY flat flowers such as pressed Violets, Chamomile, Fleabane daisies, Rosettes, Queen Anne’s Lace, and Baby’s Breath.
Tip #4: AVOID flowers with too many overlapping petals. These will trap air bubbles inside of your resin layers that tend to express during curing. They tend to cause very large holes and gaps.
What you’ll need:
Very high quality UV resin (My suggestion: Counter Culture DIY)
Cabochon bases or frame pendants
Barrier tape (if using a frame instead of cabochon base.)
Toothpicks to pop bubbles (I actually prefer using a sewing needle)
Light Curer such as a nail lamp. I use the Melody Susie 36W nail lamp from Amazon. Counter Culture DIY sells one specifically for their UV resin as well.
Pressed Flowers (My favorite seller on Etsy)
Optional: Colorants. I use mica powders, acrylic paints, and black and white resins from Counter Culture DIY (not sponsored, I wish!) These give your resin a background to stand out against.
Nitrile gloves
How to make it:
Start by applying a thin layer of UV resin to your base or taped frame. This will be the layer with color (if using pigments).
2. Pop any visible bubbles with a toothpick and cure the first layer for about 1-3 minutes.
3. Apply a thin dot of clear resin to the first cured layer. This will give your flowers something to stick to as you arrange them.
4. Once your flowers are arranged, apply a few strategic dots of resin around them to keep them in place. Cure the first thin layer without covering the flowers completely. Remember to pop bubbles!
5. Continue to add thin layers. Cure each layer for 1-3 minutes each. Repeat this process until your flowers are covered and your top coat has a domed appearance.
6. Finished! Avoid touching your project for several minutes until fully cooled. You don’t want fingerprints in your shiny top coat!
For more floral project ideas, check out my Pinterest below!
#pressed flowers#unique gifts#vintageinspired#art#home & lifestyle#floraldesign#fashion#books and literature#cottagecore#beauty#art tutorial#easy art#art ideas#artists on tumblr#books & libraries#floralart#handmade art#diy art#diy tutorial#journaling#inspo#writing#craftinspiration#my art#art supplies#artwork#floral#flowers#paper craft#diy ideas
3 notes
·
View notes
Text
What are Smart Materials for Cricut? [Top 5 DIY Craft Tools]
Since the latest versions of Maker & Explore have been launched, all the crafters are looking for one question, “what are smart materials for Cricut?” However, the answer to this question can be easily understood. These clever cutting materials are designed and are directly fed inside the Maker & Explore machine without requiring a mat. Various versions of these cutting machine materials exist, such as Smart Vinyl, Iron-On & Smart Paper Sticker Cardstock.

Apart from that, they have allowed the creators to dream outside by cutting a single image or repeated image up to 12 ft (3.6m) in one go. It means no slicing and dicing the extra-long banners, wall decals, etc. The Cricut roll holder also keeps these materials organized for precise cuts. Learn the best smart materials for creating customized projects from this blog.
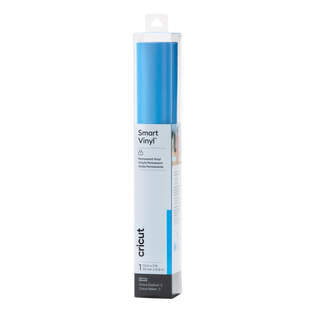
1. Matte Metallic Smart Vinyl- Permanent (3 ft)
Equally important, you can add immediate sophistication to big or small projects through this metallic effect. In the presence of this permanent smart vinyl, it isn’t a big task to create some sort of fashion decal for a mug. As per the designers, this permanent smart vinyl is ideal for all outdoor projects.
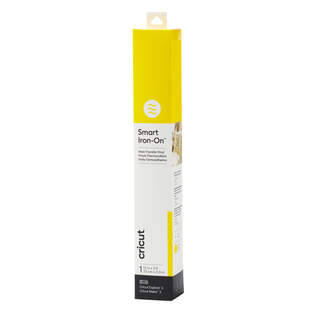
2. Smart Iron-On (3 ft)
Under the catalog of what are smart materials for Cricut, with the smart iron-on, you can carry your creativity along with you anywhere. This substance works perfectly on a wide array of materials and lasts up to 50+ washes. Moreover, the crafters prefer this material by giving little personality to T-shirts, jeans and other garments.
3. Smart Vinyl-Permanent (3 ft)
Furthermore, with smart vinyl, you can quickly make your personalized craft with the load & go button. Moreover, creating birthday banners or other labels has become quite easy, leaving a big impact. On the contrary, this vinyl comes with a matte finish look and a weather-resistant outdoor facility.
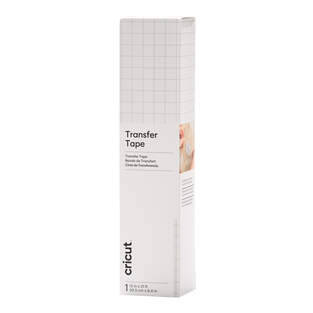
4. Transfer Tape (21 ft)
Among the smart materials for Cricut, the transfer tape has its individual importance. Through this, the user can shift the customized vinyl to various surfaces easily and precisely. Other than that, it is specially designed for some important materials for creating crafts, such as custom decals, labels, decor etc. Moreover, this isn’t recommended for glitter or shimmer vinyl.
5. Smart Iron-On Holographic (9 ft)
Besides what are smart materials for Cricut, these holographic materials permit crafters to add glimmer and shine to the existing project. This material operates without the cutting mat during the cutting process. In addition, you can add more shine to projects compared to earlier times.
Frequently Asked Questions
Question: How to Prepare Smart Materials for Cutting?
Answer: Read the steps to know about the preparation process:
Align the loaded materials to the machine with the left material guide and slide under the mat guides and up against the rollers.
After that, press the Load button, trim the excess material and save it for future uses.
Try to trim the material straight across rather than at an angle if you plan to load it without the mat.
Question: How Do Cutting Machine Smart Materials Work?
Answer: The existing software will prompt you when it is time to load the respective materials and how much quantity. Followed by this, your machine will measure, ensuring the materials loaded are enough for the project. After that, the machine sensors will cross-check the materials fed inside it and will ask for the allowance. You’ve to wait till the trimming process comes to an end.
Question: What are Smart Vinyl and Its Types?
Answer: The brand-new smart vinyl comes in a huge range of colors, effects and material lengths from 3 ft to 75 ft. However, it has been categorized into two types: Permanent & Removable variables. If you want vinyl that lasts for many years indoors & outdoors, then choose permanent vinyl, as it has a longer time duration. However, if you love to display your creativity, then opt for removable vinyl, which can be easily removed and doesn’t damage the wall.
#What are smart materials for Cricut#Cricut.com/setup#design.cricut.com#cricut explore air 2#cricut design space login#cricut design space#cricut setup
2 notes
·
View notes
Text
Baby Groot with Mickey Balloon SVG Cut Files for Cricut Guardians of the Galaxy PNG image Disney DXF file
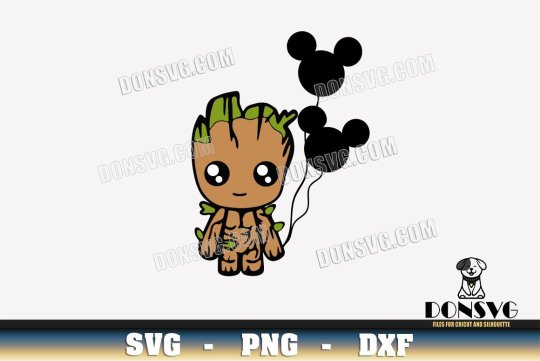
Baby Groot with Mickey Balloon SVG Cut Files for Cricut Guardians of the Galaxy PNG image Disney DXF file
Guardians of the Galaxy SVG Files, Avengers vector cut files, Marvel SVGs for T-Shirt designs, Baby Groot with Mickey Balloon cutting file, Guardians of the Galaxy Vol 3 svg images for Cricut, Groot Superhero DXF for Silhouette Cameo, GOTG SVG Designs, MCU Movie PNG for Sublimation, Marvel Comics Free SVG. Item description: ► This is a digital download, no physical product will be delivered. ► This design comes in a single ZIP file with the following file formats: - SVG cut file for Cricut Design Space, Silhouette Designer Edition, Inksape, Adobe Suite and more. - DXF file for Silhouette users. You can open this with the free software version of Silhouette. - PNG file with transparent background and 300 dpi resolution. ► You can use Baby Groot with Mickey Balloon SVG cut files perfectly for your DIY projects and handmade products (t-shirts, mugs, pillowcases, blankets, bags, invitation card, heat transfer vinyl, wall decal, party decorations, home decor, paper crafting, sublimation, crafts, etc). ► Due to the nature of digital files. No any refunds or exchange available here. ► SUPPORT / HELP: If you have any question or need help we are always there for you. You can contact us by going on CONTACT US PAGE and sending us your query. How to Download Baby Groot with Mickey Balloon SVG Cut Files for Cricut Guardians of the Galaxy PNG image Disney DXF file ► To Download Baby Groot with Mickey Balloon SVG Design you need to follow these steps STEP 1: Click on “ADD TO CART” on all the files that you want to purchase. STEP 2: Once you added the files to cart, click the “PROCEED TO CHECKOUT” button and enter your billing details on checkout page. STEP 3: Complete the payment with Paypal or Credit Card. After payment you will be automatically redirected to a Download page where you can download the files. Click on the file to download it. STEP 4: Also you will receive an email from DonSVG.com, this email includes download link, just click on it and your Baby Groot with Mickey Balloon images will start downloading automatically. NOTE : If you had chose to create a user account before purchasing, your purchased files will be in the downloads section inside your user account. Add this delightful Baby Groot with Mickey Balloon SVG Cut Files to your collection today and let your creativity take flight! Perfect for creating custom t-shirts, wall art, and more, this design is a must-have for any Disney or Marvel lover. Thanks For Shopping!! Read the full article
2 notes
·
View notes
Text
things i consider myself proficient at:
drawing of course
formatting complicated and aesthetically pleasing word docs and google docs
spreadsheets and excel (mostly data entry and running numbers)
most of the adobe creative suite (in order, from most to least confident in using: photoshop, indesign, lightroom, illustrator, after effects, premiere)
drawing, rigging and animating live2d models
sequential art, drawing comics (to a lesser extent, storyboarding)
graphic design but only sometimes (i can format a mean resume and i'm ok with logos)
editing videos (working on this one)
taking and editing photos for an online store or social media posts
editing graphics (twitch overlays, commission graphics, social media graphics, etc.)
photoshopping images in general
acrylic painting (particularly pet portraits, but i recently learned i can do landscapes and other stuff with a reference)
linocut printmaking
cricut machines (using them to make weird shit mostly)
creating and programming amiibo tokens
creative writing (mostly scripting for comics and graphic novels. i can also write essays really well)
shiny hunting, breeding for ivs (but competitive pokemon meta and movesets? not so much.)
i know the bare minimum of how to code using css and html
5 notes
·
View notes
Text
Dallas Cowboys Star PNG: Unleash Your Creativity with an Iconic Emblem
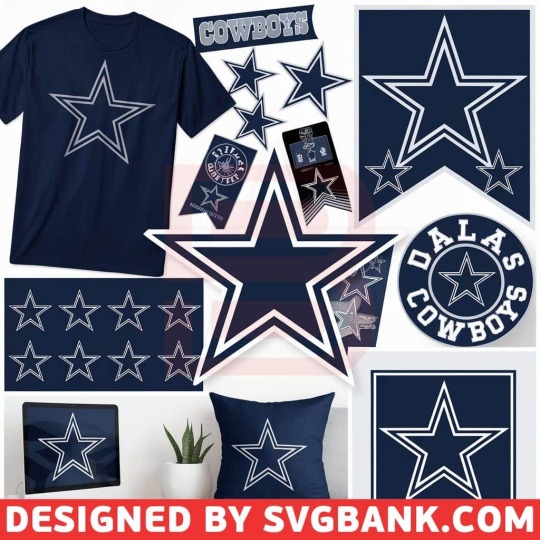
The Dallas Cowboys are more than just an NFL team—they represent a legacy of excellence and pride. For fans, designers, and small business owners alike, a high-quality dallas cowboys star png file is a must-have digital asset. This file offers unmatched clarity, scalability, and versatility, making it perfect for everything from custom T-shirts and decals to digital marketing and home décor. In this guide, we explore the significance of the dallas cowboys star png, how it embodies team pride, and why it’s the go-to file format for creative projects.
If you’re ready to elevate your designs with this iconic emblem, visit SVGBank for a wide range of sports graphics, including our exclusive dallas cowboys star png collection.
Introduction: The Power of the Dallas Cowboys Star PNG
The star that defines the Dallas Cowboys has long been a symbol of excellence and determination. As one of the most recognizable logos in sports, the dallas cowboys star png file captures the spirit of America’s Team in a format that’s perfect for digital and print applications. Whether you’re a dedicated fan looking to create personalized merchandise or a designer in need of a crisp, versatile graphic, this file format offers an unbeatable combination of quality and flexibility.
High-resolution PNG files, particularly those with transparent backgrounds, are essential in today’s digital design landscape. They allow for seamless integration into various projects without compromising on clarity. In our increasingly digital world, having access to a premium dallas cowboys star png file can be a game-changer for any creative venture.
The Legacy Behind the Star
The Dallas Cowboys’ star is steeped in history and tradition. Originating in the early days of the franchise, this emblem quickly evolved into a powerful symbol of Texas pride and football excellence. Over the years, the dallas cowboys star png has become more than just a logo—it’s a statement of identity for millions of fans around the world.
Texas Pride and Iconic Design The star’s design is simple yet striking. Its bold lines and clean edges capture the essence of what it means to be a Cowboys fan: strong, resilient, and fiercely proud. This iconic symbol reflects the team's storied history—from legendary players like Roger Staubach to the modern-day stars who carry the tradition forward.
Consistency Through the Years Despite minor tweaks over the decades, the core design of the Dallas Cowboys star has remained largely unchanged. This consistency is a key reason why the dallas cowboys star png remains so popular among designers and merchandisers. The enduring appeal of the star reinforces its status as a timeless piece of sports branding.
Why the Dallas Cowboys Star PNG Stands Out
When it comes to digital design, the format you choose can make all the difference. Here’s why a dallas cowboys star png file is indispensable for creative projects:
High Resolution and Clarity Unlike raster images that can become pixelated when enlarged, PNG files maintain their crisp quality. This is especially important for the dallas cowboys star png, where every detail of the star’s shape and color must be preserved—whether printed on a small sticker or blown up for a billboard.
Transparent Background A major advantage of PNG files is their transparent background. This feature allows you to seamlessly layer the dallas cowboys star png onto different designs without any unsightly borders, making it perfect for integrating into various creative projects.
Versatility for Various Applications From custom T-shirts and hoodies to digital ads and social media graphics, the dallas cowboys star png is incredibly versatile. Designers can easily modify the file in software like Adobe Photoshop or Illustrator, adjusting colors or resizing the image to fit different applications.
Ease of Use with Cutting Machines For those using cutting machines such as Cricut or Silhouette, a high-quality dallas cowboys star png file ensures smooth, accurate cuts. The file’s clean lines and defined edges translate perfectly into physical projects, whether you’re creating vinyl decals or custom apparel.
Where to Download Your Dallas Cowboys Star PNG
Quality and legality matter when it comes to digital assets. To ensure that you’re using a high-quality dallas cowboys star png file that complies with copyright and trademark guidelines, it’s best to download from a trusted source.
Visit the SVGBank homepage where you’ll find a vast collection of sports graphics, including our specialized dallas cowboys star png section. SVGBank offers premium designs that are carefully curated and come with clear usage disclaimers for personal and limited commercial use.
Additionally, reputable platforms like the official Dallas Cowboys website and the NFL homepage provide valuable references and brand guidelines that can help you maintain color accuracy and design consistency in your projects.
Creative Ways to Use Dallas Cowboys Star PNG Files
A high-quality dallas cowboys star png file opens up a world of creative possibilities. Here are some innovative ideas for using this iconic graphic:
Custom Apparel Design personalized T-shirts, hoodies, and caps featuring the Cowboys star. Use heat transfer vinyl (HTV) techniques to ensure vibrant, long-lasting prints that capture the spirit of America’s Team.
Digital Marketing Materials Incorporate the dallas cowboys star png into web banners, social media posts, or email newsletters. Its crisp, scalable design makes it ideal for creating eye-catching digital content that resonates with Cowboys fans.
Home Décor and Accessories From wall art and posters to mugs and phone cases, the dallas cowboys star png can be adapted for various home décor projects. Its bold design adds a touch of sportsmanship to any space, whether in a personal room or a sports bar.
Merchandise for Fan Clubs Small businesses and fan clubs can leverage the dallas cowboys star png to produce custom merchandise. Stickers, keychains, and decals featuring the star are popular items that help fans show their team pride.
DIY Crafts and Custom Projects Crafters can experiment with the dallas cowboys star png by integrating it into collages, scrapbooks, or even custom digital art. The file’s versatility ensures it can be modified to suit a wide range of creative endeavors.
Tips for Working with Dallas Cowboys Star PNG Files
To get the most out of your dallas cowboys star png, here are a few practical tips:
Use Professional Software For editing and customization, use industry-standard software like Adobe Photoshop or Illustrator. These tools allow you to adjust colors, resize the image, and fine-tune details without compromising quality.
Ensure Proper File Management Keep your digital assets organized by storing your downloaded dallas cowboys star png files in clearly labeled folders. This makes it easier to locate and reuse them across different projects.
Maintain Brand Consistency When incorporating the dallas cowboys star png into your designs, stick to the official color codes and design guidelines provided by reputable sources. This ensures that your work reflects the authentic look of the Cowboys brand.
Test Print Your Designs Before mass-producing any merchandise, do a test print of your design. This helps verify that the PNG file maintains its high resolution and that the colors and details appear as expected in the physical product.
Conclusion: Elevate Your Designs with the Dallas Cowboys Star PNG
The dallas cowboys star png is more than just an image file—it’s a gateway to creativity and a symbol of unwavering team pride. Whether you’re a dedicated fan looking to express your allegiance, a designer seeking versatile graphics, or a small business aiming to produce custom merchandise, this high-quality PNG file is an indispensable tool.
By choosing a premium dallas cowboys star png from SVGBank and exploring our extensive range of sports assets (including our sport svg, nfl svg, and dallas cowboys svg categories), you ensure that your projects are both visually stunning and legally compliant. For further inspiration, check out related posts such as dallas cowboys images free, dallas cowboys clipart, dallas cowboys printable logo, and dallas cowboys logo vector.
Now is the time to harness the power of this iconic emblem. Transform your creative projects with the dallas cowboys star png and let your designs shine as brightly as the star itself. Explore, download, and get inspired today!
For more high-quality graphics, visit SVGBank and start crafting your next masterpiece.
0 notes
Text
How to Use Heat Transfer Vinyl With Cricut for DIY Projects?

Heat transfer vinyl (HTV) is a material that is used to create designs and text on fabrics and other materials. HTV has a heat-activated adhesive that bonds permanently to the fabric when heat is applied. This step-by-step guide will show you how to use heat transfer vinyl with Cricut. Let’s dive into this write-up and explore what you can make with a Cricut machine. First, collect the materials you need for your crafting project.
Cricut Supplies You Will Need for Your Project
Before you dive into this guide, let’s gather everything you need to complete this project. Read the below list:
An HTV
A blank shirt
A Cricut cutting machine (Here I am using Maker for cutting)
Standard Grip mat
Weeding tool
Cricut EasyPress 2
EasyPress mat
You have gathered all the materials now. Let’s focus on how to use heat transfer vinyl with Cricut. Read ahead to know.
Step 1: Create a Design
Now that you have gathered all the materials, let’s proceed to the main part, which is how to use HTV with your crafting machine. First, open Design Space app and click on New Project to create a design. You can upload an SVG file if you do not want to make a design. From the left toolbar menu, click the Upload option.
Step 2: Prepare Your Design for Cutting
When you are done with your design, which has layers, you need to hit the Attach option in Design Space. This will group the layers together so they all move together when you move or resize the image. To change the color of a layer or an image, select the image and then hit the colored square under the line type menu to choose a new color. When you are done choosing the color, click on the Make It button.
Step 3: Put the Iron-on Vinyl on Mat
On the preview screen, click on the Mirror option. This option is necessary when cutting the heat transfer vinyl. After that, click on the Continue button. Here, I am using Everyday iron-on vinyl for this project. Under the materials settings, choose iron-on. If you are using the Explore machine, you can’t choose this option; instead, you have to set the Smart dial on the top of your machine. Put your HTV on the StandardGrip mat and make sure the shiny side is down. Press down the vinyl to make sure it is stuck properly to the mat. Install the blade on Clamp B and then load it into the machine and press the Load button. After loading the mat, hit the Go button on the machine to start cutting.
Step 4: Cut HTV on a Cricut Machine
Now that you have put the material on your mat and mirrored your design, you have to cut. You can use iron-on vinyl with any of the machines. With the Explore series machine, you can set the dial to iron-on for cutting or on custom and pick from the list in Design Space.
Step 5: Weed Out the Vinyl
After your design is cut, you need to remove all of the excess iron-on vinyl from around the design with the help of your weeding tool. You can trim the excess iron-on vinyl around your design.
Step 6: Apply Heat Transfer Vinyl
Once you have weeded out the extra part from your design, I am going to add this to my shirt. For that, you will have to use the heat press machine to transfer your design. Set the time and temperature on your machine to transfer your vinyl. Before you put the design on the shirt, get ready with your shirt. Preheat your shirt for a few minutes to remove any wrinkles and moisture. Correctly place your design and apply the heat with the machine so your design can be transferred smoothly. Let it cool for a few minutes, then peel off the liner material.
Now, you are ready with your shirt.
Tips for Using a Heat Press With HTV
Above, you read about using heat transfer vinyl with your machine. Now, there are some tips you should remember when using HTV. Follow the below instructions:
When you apply your design to the shirt, use a hard, flat, heat-resistant surface underneath.
Place the parchment paper or a Teflon sheet between the iron-on and the vinyl carrier sheet.
You should wait at least 24 hrs before washing your shirt. Wash it inside out with mild detergent.
Conclusion
In short, with the help of this blog, you learned how to use heat transfer vinyl with Cricut to make customized shirts. You need some other tools and materials for making it. The process is very easy and straightforward if you follow it correctly and stepwise. HTV is a special kind of material that can be used to make designs and text on various fabrics. You can use the press machine to transfer the design to your fabric permanently.
FAQs
Why Do I Need to Mirror the HTV?
You need to mirror your HTV before cutting. Otherwise, your design will appear incorrectly on the base material. When you cut HTV, you cut from the back side of the vinyl. If you do not mirror your design, it will appear backward on the material, and it includes. Most HTV comes with a shiny, clear, heat-resistant liner that protects the design.
What Cricut Settings Should I Use for HTV?
When you use HTV on a Cricut, you will have to choose an iron-on material setting from Design Space. The default pressure setting should work fine for most standard HTVs. You can increase the temperature if necessary and when you are working with intricate designs. Before cutting, always mirror your design. If you are using another type of vinyl, like glitter HTV, you need to change the blade as the glitter vinyl is thicker.
What Is the Difference Between HTV and Iron-On?
Heat transfer vinyl and iron-on are used to transfer images onto the fabric, but they differ in a few ways. HTV is a material that has glue with its backing, whereas iron-on is a design that can be printed using transfer paper. If you use HTV, you need to remove the extra part, while iron-on needs a crafting machine and a heat press machine.
Visit: Cricut.com/setup www.cricut.com/setup login
Source: How to Use Heat Transfer Vinyl With Cricut
#how to use heat transfer vinyl with cricut#cricut eassy press#cricut design space download#cricut design space app#Cricut machine setup#cricut software download
1 note
·
View note
Text
How to Download Fonts on Cricut (Easy Steps)

Finding stunning fonts and using them for your DIY projects is not a big deal. Cricut Design Space is a free software program that has many fonts available. But sometimes, you do not want to use free fonts for your projects. Perhaps you wish to use one of the fonts you might have seen on Pinterest or elsewhere, and now you want to use it for your projects. But how to download fonts on Cricut?
There are tons of free websites and apps where you can download unique and high-quality fonts from Google Fonts, Dafont, etc. Do not worry—it is pretty easy. This post will explain the methods for downloadingDownload Fonts on Cricut fonts to your computer.
How to Download Fonts on Cricut Design Space?
Those who have never downloaded fonts on their computer, read the below steps to download fonts on a Windows operating system.
For Windows
In the beginning, open a browser and search for a free font on dafont.com or fonts.google.com.
Then, browse through different fonts and select which one you want to download.
After choosing the font, tap the Download button.
The downloaded font will be in a zipped file. Double-click on the font file to unzip it.

Now, you will need to double-click on the file to download it.

After the installation, the fonts will be available for your crafting projects.
Finally, you have learned how to download fonts in the Cricut application on a Windows computer. Let’s move on to the following steps Mac users should follow to download fonts.
For Mac
Below are some basic steps that will help you download and install new fonts on your Mac computer:
First, visit the website or any browser you use. In the search bar, type Google fonts and look for the fonts you want to download.
Then, choose a font from the list of different types of fonts.
Now, select the desired font and press on the Download button.
Next, double-click the zipped file to unzip and extract it.
After that, double-click on the font file from the Finder window.
In the following step, tap on the Install button.
When you download the font, you can add fonts to the Cricut Design Space software.
Now that you have successfully downloaded fonts on your Mac system, perform the directions in the section below to ‘learn how to use the installed fonts in the Cricut app‘.
How to Use Installed Fonts in Cricut Design Space?
Now that you have downloaded and installed fonts on your device, using them in the Cricut Design Space app is easy. To use the font in the software program, follow the below instructions:
Firstly, open the Cricut Design Space app. Then, select the Text icon and write your text.

After that, select the text and then the Font option from the drop-down menu.

By default, your system will select All Fonts. From the top taskbar, click on the System option. This will load all the downloaded fonts on your computer.

Now, choose one from the fonts you downloaded and use it to customize your project.

Here, you have learned the complete process of using the installed fonts in the software. Now, you can start creating unique projects by adding different fonts to your designs.
Final Words
After reading this guide on how to download fonts on Cricut, you will know everything you need for Windows and Mac computers. We also discussed how to access the downloaded fonts in the software program. Sometimes, you may face font-related errors; by following the instructions above, you can troubleshoot and fix these problems easily.
FAQs
Why does Cricut show charges for free fonts?
Cricut Design Space is a free app, so there is no need to pay for it. But if you are logged in for several days, the software will automatically sign you out, even if you still appear signed in. In this case, the application might show charges for using your images and fonts. To resolve this, simply sign out and sign in again to refresh your account.
How do you import fonts on Cricut?
To import the downloaded font on the Cricut Design Space app, follow the below steps:
Open the Cricut Design Space app and then click on New Project.
Then, open the Text icon and type a text.
Also, choose your text and open the Font option from the Settings section.
By default, all fonts will be selected on your system. But you can click on the System Fonts option, which will load all the fonts you have downloaded.
After that, choose the font whichever you want.
Now, the text will be shown in the font you have chosen.
Where can you download free fonts from?
There are many online websites where you can download fonts for free. It gives you more opportunities to be creative with millions of fonts for your personal and commercial use. Below are a few websites where you can download fonts:
FontSpace
Google Fonts
DaFont
Creative Market
Creative Fabrica
Source: How to Download Fonts on Cricut
#how to download fonts on Cricut#cricut design space download#cricut design space app#cricut design space software
0 notes
Text
How to Make Stickers on Cricut (Full Guide)
Stickers are fun to create, right? There are so many fun things that you can create in the form of stickers. These products are decorative, and you can use them for your home decor, festivals, special occasions, or phone covers. Sticker making can never be boring with the ultimate Cricut machine. With the help of this blog, I’ll share ‘how to make stickers on Cricut‘.
I’ll tell you each step included in making a good sticker using your crafting machine. Moreover, you’ll also need a printer to print stickers through your machine. Use an inkjet printer to create stickers. Discover all the steps included in making a perfect sticker.
Step 1: Launch Cricut Design Space on Your Device
In this method, I usually use the Print Then Cut feature with a size of 6.75 x 9.25 inches. You can also resize your sticker by choosing a square shape from the library and resizing it according to you. Let’s move to learn how to make stickers on Cricut.
Step 2: Prepare Your Printer
Now that you’ve completed the design and adjusted the print size, you need to create a customized sticker. In the next step, choose your machine from the menu and hit the Make It button.
After that, you’ll see a black line around your design. Then, your crafting machine will scan your image and cut it into the exact size. Now, click on the Continue option to continue, and send the image to your inkjet printer.
Once you hit the Print option, choose the Add Bleed option. After selecting this option, the white margin will be removed from your image’s border. Next, you should hit the System Dialog option to confirm your printer’s settings and keep them adjusted to get premium-quality prints.
Step 3: Print Your Design, and Add an Image to Mat
When everything is optimum, just add the material into your printer to the printer and click the Print button.
Once your sticker design is printed, you can add the print to the mat. Make sure that your sheet perfectly aligns with the mat and doesn’t cover the Cricut logo. Using a machine mat is necessary even if you’re using smart materials.
Step 4: Select Your Material and Start Scanning
Once you’ve followed all the steps carefully, you should select the material you’re using. For instance, if you’re using sticker paper or vinyl, select it. If you create stickers quite often, you can click the Start button next to your material, and your material will be added to the favorites.

After that, let your machine use its sensors to scan the black lines and cut the images. In the next step, your machine will cut the stickers, and now you can use them anywhere you want.
Tips and Tricks to Troubleshoot Sticker-Related Problems
No matter how well you create your design or follow the steps, you may end up with some issues. Sticker-making with Cricut can be a little complicated. Here are some tips and tricks you can use to fix the issues you create while creating your stickers.
Ensure that your machine is On and lit to scan the registration marks.
Then, confirm if the mat is perfectly aligned inside the machine.
You can also increase the white border around your sticker’s design to fix the issue. Sometimes, low margins may also cause issues in cutting.
Power cycle your machine. Turn it off, and disconnect its power cord.
Update the firmware and check it by performing the Print Then Cut feature.
Hence, these are some tricks you can follow to create a well-designed sticker with your crafting machine. That’s it for how to make stickers on Cricut.
FAQs
Is a Printer Necessary for Making Stickers With Cricut?
Not at all! You don’t necessarily need a printer; however, you can use it by choice. You can create a fun sticker with your Cricut and vinyl. There are more fun ways to create the best stickers with your machine without using a printer.
What Materials Do I Need to Create a Sticker With My Cricut?
If you want to create your own stickers with the machine, you need certain materials to get started; check the list here:
A brand new Cricut machine
A design software (Cricut Design Space)
Printable vinyl
LightGrip cutting mat
A scraper tool
Can I Use Something Else Instead of Cricut Design Space?
Yes, there are some alternatives to Design Space, like Canva. It’s one of the best tools for creating fun sticker designs. You can use this tool to print your stickers, and then you can cut them using your machine.
Source: how to make stickers on Cricut
#how to make stickers on Cricut#cricut design space download#cricut machine setup#Cricut.com/setup#cricut design space app#cricut design space software
0 notes
Text
youtube
How to Setup Cricut Maker & Explore on Computer
Cricut Inc. is an American brand known for making cutting plotters or computer-controlled cutting machines for DIYers. Since its formation, they have made different models of cut-die machines, heat presses, and other supplies. Along with the cutting plotters, the DIYer needs to have a Design Space account from where they can create custom projects using images, fonts & other tools. cricut.com setup mac
0 notes
Text
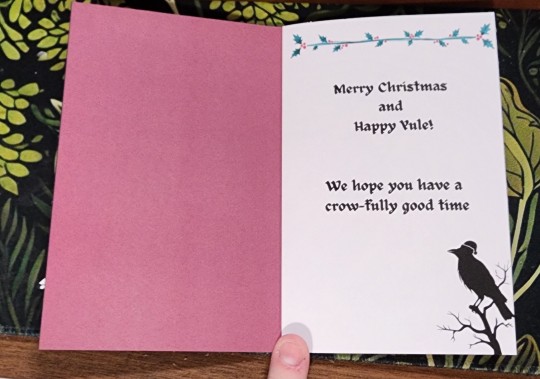
All Hail the Christmas Crow!
Not a book, but still a project I'm proud of!
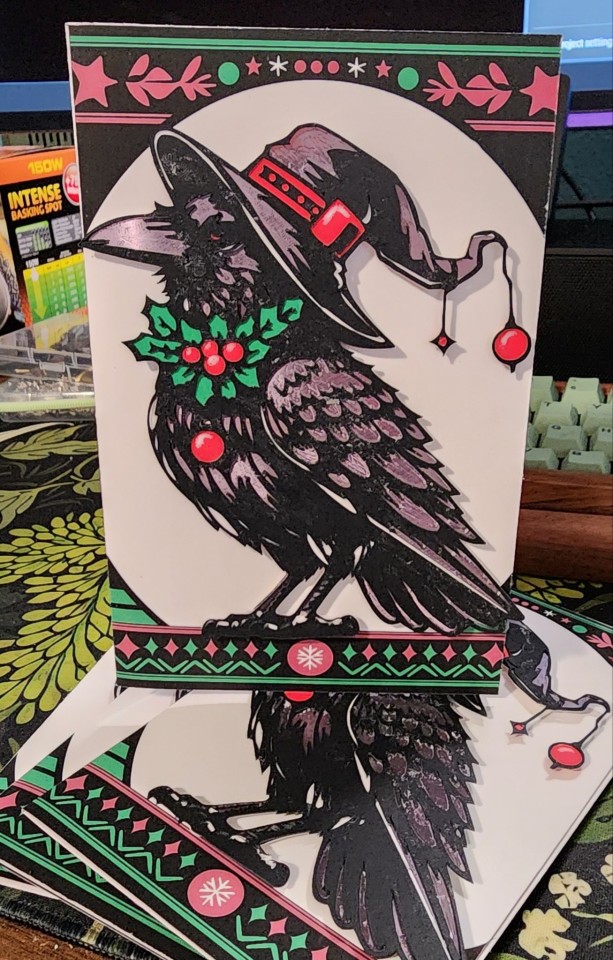
Went down the cricut adventure rabbit hole with these Christmas/Yule cards. I wanted to get some experience with other aspects of cricut and papercraft and thought a card would be a great place to start!
The process started with getting the image created as a vector image in order to keep the lines as crisp as possible. I'm glad I'm skilled with Illustrator's pen tool cause I definitely spent a while getting our crow friend and his background made!
Then, I realized after importing the newlu created SVG file into the cricut workspace that I didn't take into account just how it would cut.
So rather than having a million small pieces of paper cut out, I went back to update my file so the black was all one piece with the holes cut out for color to show behind. And went through and created blocks of color that connected to show behind.
You know, how layering paper should be 😅
So once that was done and updated, it was finally print time! Did a few tests between sizes, moved some vectors around to help the cuts stay clean at a smaller size, and once I had a version I was happy with, I let the cricut do it's thing!
Once I had all my parts cut out and weeded, it was simply a matter of gluing it all together! Red was first, then green, and then white, with the metallic purple-black last for the crow's body.
Then, I got the card design whipped out and printed to size and assembled!
Now for the final step: creating an envelope to fit the non-standard card size I accidentally created.
1 note
·
View note