#3d rendering Wellington
Explore tagged Tumblr posts
Visit Tumblr Blog
Explore Tumblr blogs with no restrictions, modern design and the best experience.
Last Seen Tumblr Blogs


Fun Fact
Tumblr is used by 21% of adults online aged 18-29 years.
Text
Architectural 3D Rendering CAD Services Provider in USA
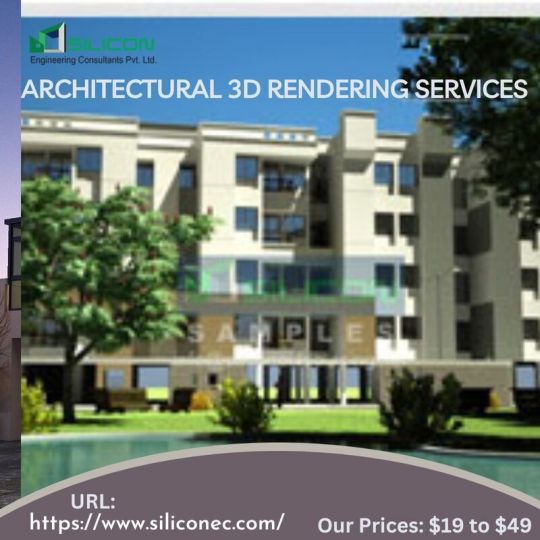
Silicon Engineering Consultant Pvt. Ltd. gives good services of Architectural 3D Rendering Modeling Services. Our Architectural 3D Rendering Modeling Services involve the creation of digital 3D models of buildings and structures, which can be used to create detailed architectural drawings, visualizations, and animations. Architectural Rendering CAD Services involve the use of Computer-Aided Design (CAD) software to create detailed 2D and 3D models of buildings and structures. Get in Touch with US for your next Architectural 3D Rendering Engineering Services.
Our Architectural 3D Rendering Includes: - Autocad 3D Visualization Services - Architectural Animation Rendering - Rendering for 3D Models for Commercial offices - 3D Exterior Rendering Services
Click Here:https://www.siliconec.com/architectural-2d-3d/architectural-rendering-visualization.html We provide Architectural 3D rendering Services in USA major cities like New York, Los Angeles, Chicago, Houston, San Diego, Dallas, San Jose, San Antonio, Los Angeles, San Francisco, Boston, Seattle, Washington
We provide Architectural 3D rendering Services in UK major cities like London, Liverpool, Newcastle, Bristol, Manchester, Sheffield, York, Cambridge, Norwich, Cardiff
We provide Architectural 3D rendering Services in New Zealand's major cities like Auckland, Christchurch, Dunedin, Rotorua, Whangarei, New Plymouth, Wellington, Dunedin, Rotorua, Tauranga
We provide Architectural 3D rendering Services in Australia's major cities like Sydney, Brisbane, Hobart, Newcastle, Canberra, Melbourne, Perth, Cairns, Gold Coast, Darwin, Brisbane
#Architectural3DRenderingServices#RenderingExteriorServices#RenderingCADArchitectural#ArchitecturalAnimationRendering#3DArchitecturalModel#3DInteriorRenderingServices#3DExteriorRenderingServices#SiliconEC#CADServices#CADD#India#USA#UK#Australia
1 note
·
View note
Text
All That You Want to Learn About Custom Molding
Are you looking for Lane Divider Wellington in NZ? As a manufacturing cycle, custom molding offers some benefits over other production processes. It includes other varieties of molding. There's a reason that the global plastics market will soar $654.38 billion in value.
A major part of it lies in the extent to which molding serves a wide variety of applications. It finds application across the industry verticals.
What are the goods of using custom moldings?
Indeed, there is no one-size-fits-all term when it comes to manufacturing means. But, we have got reasons why injection molding should be on your list.
Custom molding has broad design flexibility.
Custom molding can design complex pieces as per the needs of the customer. There are some approaches of Custom Mouldings Extrusions that ensure efficient production.
The possibilities within the custom extrusion mean are limitless. It adheres to conventions like rounded corners. Toolmakers and injection molding users can meet even the most intricate requirements.
Custom molding is customizable.
The fact is injection molding resins are good enough to get colorants mixed with them. It produces surface coloring a bit different from the natural. Most stores can recreate Pantone colors for an injection molding means. It makes the process suitable for processes where aesthetics play a vital role.
Custom molding gives you control over quantities.
A custom molding supplier allows you to produce work in any quantity needed for your firm. You can work on medium, low and high prototype runs. Custom Mouldings Extrusions provide you with an affordable solution.
But, it loses value if you get forced into machine types or least orders.
The fact is that 3D printed models exist to make short-run injection molding better. It is an accessible and viable option.
Custom molding offers a combination of parts and materials.
Advanced techniques like co-molding make injection molding an easy means. It allows you to add customization to your products.
Using a process like custom molding means that the injection molded part doesn't limit you. You don't need to rely on materials just suitable for injection molding. For instance, you can set resin around a piece for added strength. It gives the metal part a more attractive appearance. It likewise renders a complex functionality to it.
If you want to buy Moulding Plastic Products New Zealand, you can contact us today.
Custom molding is inexpensive.
Price is one of the benefits of using custom molded parts. You've got another way to produce parts. When compared to bespoke molding, it offers more time, labor, and energy.
Manufacturing firms can work better and faster with custom molding. Hence, it passes down the savings to customers in form of low prices. You can save more money by choosing custom-molded parts. It likewise meets your business requirements.
Corrosion isn't a concern for custom-molded parts. The best thing is that it doesn't contain any material that's prone to corrosion. Hence, custom-molded parts can stand the test of time. For more info on Custom Mouldings Extrusions, stay tuned.
0 notes
Link
Wellington once wrote we have in the service the scum of the Earth as common soldiers. and here they are completely armed with the Brown Bess Musket, this models includes officers ranks and enlisted along with some pretty cool props to make your renders pop... Coming soon: https://3d-stuff.net/ #daz3d #dazstudio #3drender #3dart #daz3dstudio #irayrender #3dartwork #blender #blenderrender #blenderart #noaiart #noaiwriting #noai https://3d-stuff.net/
0 notes
Photo

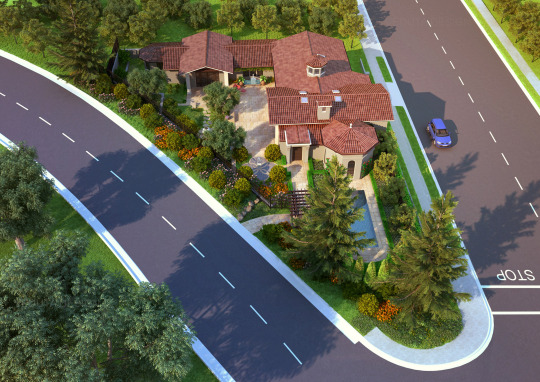
3D Revolution has evolved into one of the largest 3D Rendering Studios with offices throughout Australia and New Zealand. If you’re looking to showcase a new building design, property development or get a feel for how your new home will look before its built then let 3D Revolution create a 3D Exterior Photorealistic Render for you, we can take your simple 2D Drawing and turn your vision into a reality.
#3d apartment rendering#3d streetscape rendering#3d townhouse rendering#3d commercial rendering#3d rendering wellington#3d commercial renderings#3d interior rendering#3d interior rendering services#3d rendering auckland#3d rendering#3d rendering new zealand#3d rendering company#3d exterior rendering services#3d home rendering#3d rendering services#3d commercial building renderings#3d architectural rendering#3d virtual house tours#3d rendering service provider
0 notes
Text
Animation and Walkthroughs: Do You Really Need It? This Will Help You Decide!
Animation and Walkthroughs: Do You Really Need It? This Will Help You Decide!

Animation and Walkthroughsprovide multiple benefits which allow users to see a physical object in a virtual form. It helps designers convey their ideas to clients in a better way. Architectural Rendering is gaining more and more popularity around the world. With 3D Modeling, viewers can see the minutest details which are really not possible through 2D images. Let’s see why animation and…
View On WordPress
#3D Modeling#3D Modeling Auckland#3D Modeling Christchurch#3D Modeling Hamilton#3D Modeling New Zealand#3D Modeling Wellington#3D Rendering#3D Rendering Auckland#3D Rendering Christchurch#3D Rendering Hamilton#3D Rendering New Zealand#3D Rendering Wellington#Animation#Architectural Engineering#Architectural Engineering Auckland#Architectural Engineering Christchurch#Architectural Engineering Hamilton#Architectural Engineering New Zealand#Architectural Engineering Wellington#Architectural Planning#Architectural Planning Auckland#Architectural Planning Christchurch#Architectural Planning Hamilton#Architectural Planning New Zealand#Architectural Planning Wellington#Architectural Rendering#Architectural Rendering Auckland#Architectural Rendering Christchurch#Architectural Rendering Hamilton#Architectural Rendering New Zealand
0 notes
Photo

Invisible House visualization by Murad3D @m_r_d___here. Tools used: Autodesk 3ds Max, Corona Renderer, Adobe Photoshop #render #wellington #newzealand #архитектура www.amazingarchitecture.com ✔ A collection of the best contemporary architecture to inspire you. #design #architecture #amazingarchitecture #architect #arquitectura #luxury #realestate #life #cute #architettura #interiordesign #photooftheday #love #travel #construction #furniture #instagood #fashion #beautiful #archilovers #home #house #amazing #picoftheday #architecturephotography #معماری (Wellington, New Zealand) https://www.instagram.com/p/CFKWCVrFFs8/?igshid=1rf31lpuvk10
#render#wellington#newzealand#архитектура#design#architecture#amazingarchitecture#architect#arquitectura#luxury#realestate#life#cute#architettura#interiordesign#photooftheday#love#travel#construction#furniture#instagood#fashion#beautiful#archilovers#home#house#amazing#picoftheday#architecturephotography#معماری
12 notes
·
View notes
Text
BJJ Floating Mat System DIY Walkthrough
I’m going to share the process of building a floating mat system, from design to sourcing materials and build. I figured I try to take out as much guess work since I had no guidance and had to learn on my own. There were several pieces of the puzzle that came as some small surprises, but hopefully this helps the next person who decided to make the leap to a better mat system. I’m unsure of the process for other countries, but in my case I will detail the process for importing goods into New Zealand – it may differ in other places. I’ll include links to the factory for all the specific mats I ordered in the post.
Towards the end of Sept 2020, just after the Covid-19 lockdown ended in New Zealand, I had an opportunity to expand my BJJ club and sub-lease space in our existing gym we ran out of. I had an elaborate vision of a floating mat system underneath some juicy dollamur mats for use to train in.
I was introduced to the floating mat system years ago when I lived in Los Angeles on a visit to Kron Gracie’s academy in Culver City. I had worked down the street and wanted to congratulate him and have a look around. My friend Ollie Barre worked there and he showed me around, even Kron said hello and mentioned the spring loaded floating mat system to me.
It was about 1/2 a meter high with actual springs under the floor with plywood on top and tatame on top of the ply. It was amazing!
Image courtesy of Kron Gracie Academy Linkedin page
I knew that’s what I wanted but I didn’t have the budget for springs, so I explored other options. After a few searches I came across a couple videos:
How to build the ultimate spring subfloor for your Judo, Jujitsu and Wrestling mats
&
How to build a Bjj subfloor
Foam and ply – sweet I can do that! Let’s measure the space:
9.7m x 4m – pretty decent space!
After the measurement I needed to visualize the build. I knew I had to see it and make something for others to see the vision I had, so I modeled everything out in Maya and made a 3D render:
Concept render
I used real world units to keep everything to spec, that means the units I use in the 3D application are accurate to and equal to the units I would use on the actual build. The sub-floor would be the most difficult thing to explain to a builder, so I did a couple renders of what the underbelly would look like:
14 sheets of plywood with sub-floor foam block layout
Single sheet plywood foam block layout
I began compiling a list of materials I would need:
15 sheets of 2440mm x 1200mm x 12mm non-structural plywood
6 sheets of closed cell polyethylene foam
tons of liquid nail
timber for boxing in – unsure of spec at that time
5cm thick floor mats, tatame finish
21 wall mats @ 183cm x 122cm x 5cm
Living in New Zealand is awesome BUT sourcing some of these materials was going to be difficult and super expensive. I started calling around and emailing different foam companies and dollamur reps. I was getting quotes just for the dollamur mats of $5-6k NZD alone! I found a company that imports foam and was quoted $500/sheet of PE foam! I didn’t even bother looking at the wall mats – it would have cost me closer to 10K to get everything from NZ companies, so I decided to cut out the middle man and source materials myself.
Of course this lead me to Alibaba.com – the Chinese based website that gives people like myself access to factories where these things are typically made. After a few days of searching and multiple emails, I found a factory – Quindao Sanhong Plastic Co, LTD – that appeared to manufacture everything I needed – floor mats, wall mats and PE foam sheets.
It was my 1st time using Alibaba and to be honest I was SUPER dubious. I would be dealing with people outside of the country I lived in which carries a larger sense of the unknown.
I ended up chatting with a service person named Emily. She was incredibly helpful and thorough and made sure she understood what I required. I sent her an absurd amount of photos, videos, all of my renderings of what I had in mind, the measurements and other specs. She talked me into getting a more dense mat (40kg/cbm – a new unit of measurement I was completely unfamiliar with) for both the floor mats and sub-floor mats.
Originally I intended to have that pool noodle type foam, but Emily urged me not to go that route and go for something thicker – the cost was negligible so I went for it. Trusting someone you’ve never met overseas was hard, but I figured I needed to roll the dice.
The floor mat specs I went with were 3 rolls of 9.7m x 1.33m x 5cm with a tatame finish
Link to mats here
Floor mats
Next were the wall mats. I needed 21 wall mats @ 183cm x 122cm x 5cm Link to mats here
Wall mats
Next was the closed cell sub-floor PE foam. Quindao made 2m x 1m sheets of this stuff, and I needed 6 sheets total to accommodate my space. These were roughly $40USD / sheet so if I got it wrong I figured it wouldn’t be TOO much of a loss. Link to foam sheets here
This is the pool noodle foam I was expecting, but not what I ended up receiving
Emily was very patient and understand of my reservations in dealing with an overseas factory. After a few more emails and messages I pulled the trigger and made the order. At this stage Emily walked me through the process and gave me a general idea of several unknown import costs. Her estimate on the NZ import tax was very close, but she did inform me there would be other costs she had no way of providing an estimate for.
I forgot to mention that a couple months prior to ordering I had already setup a legit business in anticipation of building my dream in the future. Emily had requested an NZ Import ID so fortunately I was already qualified to apply for a NZ business import ID through NZ Customs. This cost me about $200 to register my business and get an import ID.
After providing all of my information, she came back with a total cost and import tax estimate I would pay on arrival. Freight costs from China to NZ were SUPER cheap – about $80NZD to ship 700kg worth of stuff, so that was fine.
I paid the deposit so the manufacturing could get under way. Once they were finished making all of the mats/materials I would then pay in full prior to loading onto the ship. It took them about 4 weeks to finish everything. At that time there was one final check through that they had all of my correct information and import ID and that was that. The order started on 11/02/2020 and was shipped on 12/08/2020
Because of Covid, there were huge delays with international shipping and unloading, so the wait time was longer than usual. It was supposed to take 40 days but ended up being much longer than that. The mats arrived in NZ the 1st week of February 2021 – phew at least they made it safe!
This is where a lot of the surprises and unknowns came into play. I received an email from some guy at a freight company saying my mats had arrived and I needed to send all of the arrival documents to my broker
Evidently I had to obtain an import broker to forward all of the documents to, which no one makes any mention of. But here’s where things get a little…rackety. I ended up going with EasyFreight brokers who charged me about $200 for their services. They emailed documents from NZ Customs where I then had to pay around $500NZD for the Import Tax.
Once the Import Tax was paid, my mats could then be released BUT…the mysterious freight company who initially emailed me now says I need to pay them $1900NZD before they ship my mats to Wellington. This fee was for unloading the mats from the ship and onto the dock and storing them in a warehouse until all of the documents cleared. This almost doubled the cost of the mats I ordered and by now the total cost was getting close to what I was getting quotes from NZ based companies.
I paid the invoice and they put my mats onto a truck to be shipped down to Wellington to ANOTHER freight company – not directly to me for whatever dumb reason. I contacted the new freight company, had a bit of confusion and back and forth but eventually I ended up having to pay them another $250NZD to ship my mats to the gym. What a racketeering outfit huh?
They delivered the mats and I immediately started ripping up the packaging to have a look at my new goods. I have to say that what I purchased exceeded my expectations. The floor mats where BETTER than what I expected, the wall mats were BETTER than what I anticipated and the sub-floor foam ended up being more closer to memory foam than pool noodle foam. Holy hell we’re gonna have some sweet mats to roll on!
To the build!
After a trip to Bunnings to pickup timber, liquid nail and a few other things, that tallied up to over $1000NZD we were on our way.
The 1st order of business was to cut the foam sheets into blocks. I had originally calculated 7cm x 10cm x 10 cm but when we laid everything out, we’d only be using 2 sheets of foam and would have had to cut relatively tiny blocks. So instead we went with 20cm x 20cm x 10cm blocks – much easier to cut and deal with and even then we had a ton left over (which we made use of by the end of it.
Foam blocks
I worked out the numbers and we did 3 x 5 rows of blocks per plywood sheet
1st row of 8 pieces of 2440mm x 1200mm x 12mm plywood with 15 foam blocks liquid nailed to ply
We had all of the blocks glued to the ply and realized we had HEAPS left over, so we decided to re-jig some things around and use the extra blocks in the spaces inbetween sheets of ply on the seams and corners. This ended up adding an extra level of stability between the ply and would be less likely to damage the mats on top.
Using extra blocks underneath ply seams
Once all the plywood was laid out and the liquid nail given a bit of time to cure, we had to then box everything in to prevent sliding. This required a concrete drill/concrete bit, about 10 dynabolts (basically concrete bolts with anchors), some timber 2 x 4s, more liquid nail and a bit of good old fashioned elbow grease.
We made a mess!
The guys marked where the holes needed to be drilled roughly 1 1/2 meters apart. After the holes were drilled and swept, we laid down a very long 2×4 that was already predrilled with the initial concrete hole drilling. A dynabolt was hammered into the hole as far as it could, then racheted down with a socket wrench to tighten. The 1st piece of timber would be the foundation the other boxing in pieces would be anchored to.
The farside wall was crooked so that meant our sheets were slightly offset on the outside edge. As long as the surrounding box was square, the top layer mats would hide the crooked ply and we’d be fine.
Timber posts are rather expensive in NZ and usually crooked, so we ended up gluing and screwing 2 2×4 together so that 1. they cost less and 2. we could straighten them much easier.
Boxing in almost complete
To secure the 2x4s to the base we used nails and several Stud to Bottom galvanized fixings. We needed to make sure there would be absolutely no flex with the box.
To have a nicer finish, we added a thin layer of finger jointed pine on top of the 2x4s secured with finishing nails. The grain and look of it is much more eye pleasing than the sides of 2x4s and I can stain or paint it later.
Finishing touches on the sub-floor box
We left about a 3cm lip around the box so when the mats sit on top of the ply, the outer frame would contain and lock in the mats from sliding. The mats came very well packaged in three 1.3m x 9.7m x 5cm rolls
1 of 3 mat rolls
We placed extra ply against the walls to create a wedge/spacing for the wall mats. Upon rolling out the 1st roll we realized the wall was not straight…at all, but we made it work. 1st mat down!
The middle roll was relatively easy to to setup and the velcro attachment worked out perfectly.
That tatame finish texture is looking nice!
The final row did prove to be a bit more challenging but we eventually squeezed it into the remaining space. We can do math!!
After a full day of work we got the mats installed. We started at 11am, did a Bunnings run to collect tubes of liquid nail, screws, etc, got to the gym at around 12:30pm and finished just after 1am.
The following weekend we mounted the wall mats which were relatively straight forward. We ran 2 rows of 5m x 18mm pine planks along the wall, one at the top of the wall mats and one mid mat for support. I forgot to take pics but we basically created a support system and something to drill into instead of thick firewall jib.
We finished in the evening, cleaned up and of course we had a roll!
Some after thoughts
I can’t tell you how happy I am with this setup. Having an extra 10cm of foam under the sub floor has made a HUGE difference. It only took about 3 weeks to break in the harshness of new mats, and the tatame finish has been amazing. They aren’t slippery at all and are like heaven to roll on. One thing I would have done, which I most likely will do soon is to place 1 screw into each foam block under the sub floor.
What happens is the vibrations of people moving on the mats will cause the foam blocks to shift if they liquid nail didn’t stick. Not a big deal as we can simply lift the mats/play and move the foam, but that’s the only thing I would have done. Everything else worked out perfectly and I could not be more happy.
I hope this helps anyone who is interested in building something like this. There are a LOT of unknowns that go into importing goods from overseas, but I covered all of the “gotcha” moments along the way. Also I can with full confidence say that Quindao Plastics manufacture high spec and high quality mats/foam. They exceeded my expectations, so you can purchase with confidence. I knew nothing about them, only went by their Trade Assurance certification rating on Alibaba, but who the hell knows what that means? I’m thrilled I rolled the dice – they nailed it!
Reach out if you have any questions
Oss!
BJJ Floating Mat System DIY Walkthrough was originally published on davepreciado
#BJJ#bjj floating mat#bjj tatame#bjj4life#bjjgirls#bjjlife#bjjlifestyle#combatroombjj#dave preciado bjj#dollamur#fight club#jiu jitsu#jiu jitsu times#judo tatame#k-guard bjj#miramar#mma#tatame#UFC#Weta Digital
1 note
·
View note
Text
Year 3 Capstone Project Pre Production
I have decided to use Tumblr as my progress journal platform for the collaborative project I’m doing as my year 3 Capstone project for my Bachelor of Animation at Yoobee College, Wellington.
The project I’m involved in is an animated short film with the working title “Star Shark”. It is a magical realism tale about a Blue Penguin & a Maui Dolphin who refuse to let death end their friendship.We are seeking to do a blend of 2D and 3D animation and are utilizing Blender as our software of choice due to the real time render capabilities it provides.
For now we are concentrating on the pre-production and Research & Development aspects of the Production and Pipeline, before embarking on full blown production in the New Year.
1 note
·
View note
Photo

Want a 3D product modeling for design, 3D Architectural Rendering for Building, 3D Medical Illustration & visualization, 3D Interior Design, Industrial 3D Modeling service, 3D Animation Video for Presentation and Marketing, 3D Floor Design etc, reach us for a budgeted quality service at 3D Team Auckland, New Zealand
0 notes
Link
Curb the budget of the construction in building your dream house by internal design and external structure of the overall building and its surroundings with 3D Rendering from 3D Team, NZ.
Phone: (+64) 09 951 8022
E-Mail: [email protected] Website: http://www.3dteam.co.nz
#3d rendering Wellington#3d Artist Impression#3D Building Rendering#3D House rendering#Architectural 3D image rendering#3D Interior Design#3D modeling services#3D Animation Services#3D Interior & Exterior walk through animation
0 notes
Text
websites:
Animation World Network
Animation Backgrounds
Animation Magazine
Animation & CGI
Animator Island
Anime News Network
Cartoon Brew
Character Design References
On Animation
Reference! Reference! (free database for animation)
11 Second Club (monthly character animation competition)
tumblr blogs:
animationart
animationforce
animationtidbits
aspiretoanimate
calartscharacteranimation
disney-moments-sketches (Allen Ostergar’s blog, animator at Walt Disney)
drawingforsuckas
fuckyeahconceptart
storyboardresources
theanimationarchive
theartofanimation
wannabeanimator
resources/tips:
Animation schools: 1 / 2 (Top 50 USA) / 3 (Top 100 international)
Which animation school is right for you? (Ringling vs. CalArts)
Don’t want to/ can’t afford art school? you’ve got other options.
Animation Mentor: The online animation school
Art school exercises!!
51 Great Animation exercises
20 things you can expect as a traditional (2D) animation student that they never tell you
A Survivor’s Guide to Life Inside an Animation Studio
Animation basics: The art of timing and spacing
Animation Notes From Ollie Johnston
Animated chart of the basic principles of animation
10 Second tip: Always Anticipate
book: Animation: Learn How to Draw Animated Cartoons by Preston Blair
book: A System for Planning and Timing Animation by Glen Keane
book: Timing for animation by Harold Whitaker and John Halas
book: Gesture Drawing for animation by Walt Stanchfield
Basic 3D Animation Terminology
Digital pencil test!!
Keys to Emotion in Animation
Lessons from Disney’s Zootopia
Model Sheets central
The importance of Acting in Animation by Segio Pablos
Printable exposure/dope sheet
Phoneme Chart
Recommended reading for animation students and enthusiasts
The 5 Types of Animation
The Know-How of Cartooning
The Unofficial Truth about The Animation Industry
Why Disney Sends Its Animators To Life Drawing Classes
Walk/Run Cycles reference
What is Pixar looking for in Animators? (scroll down)
Portfolio Advice for The Disney Animation Internship
What is Rigging?
3D Rigging Terminology
3D Modeling Terminology
tutorials:
Animation for Beginners: Where do I start
Animation Physics (Video tutorials on physics for animation artists)
Animation tutorial part. 1 AKA “the secret of animation”
Appealing Poses in Animation
Background & Movement in TV
Blinking tips
Breakdown tutorial (middle frame between to keys)
Drawing & Composition for visual storytelling
Drawing for Animation
Drawing a Likeness
Animation fundamentals + tutorials
Filmmaking: Composition and Framing
Getting Shape Change
How to animate using photoshop
How to animate Characters in Perspective
How to Animate Head Turns
How to Draw Gesture
OpeenToonz tutorials masterpost
Overlapping Action and Drag
Portfolio tips / Making A Successful Portfolio
Lyp Sync tutorial
Line of action
Basics of good cartooning 1-12 by Sherm Cohen
Squash & Stretch tutorial
Squash and Stretch 2
Storyboarding tutorials by Sherm Cohen
The Illusion of Life: 12 Principles of Animation
Tilt, Flow & Rhythm
Underlying Structure When Animating Expressions
TVPaint tutorial: Uploading and Coloring Scanned Animation
supplies (traditional animation):
10 Essential Art Supplies for the Traditional Animator
How to Use a Light Table for Animation
Making a Simple Animation Lightbox
Peg bars, Animation Disk & Desk
softwares:
free
Blender (3D creation suite. It supports the entirety of the 3D pipeline: modeling, rigging, animation,etc)
Emofuri (animate using .psd files)
Google Sketchup (
Live2D ( animation/drawing software
OpenToonz (Studio Ghibli’s open source animation software)
Pencil2D (create traditional hand-drawn animation (cartoon) using both bitmap and vector graphics)
Renderman (Pixar’s free 3D rendering software)
Sculptris (Free digital sculpting tool by the makers of Zbrush
SculptGL (Online modelling program)
Synfig (2d animation using a vector and bitmap artwork)
paid
Zbrush (digital sculpting sw by Pixologic)
Mudbox (digital sculpting sw by Autodesk)
Cinema 4D (digital sculpting sw by Maxon)
TVPaint (2d animation)
animation studios:
Aardman (Bristol, UK)
Blue Sky Studios (Greenwich, USA)
Dreamworks (Glendale, USA)
Fox Animation (USA)
Imagination Studios/CN (Burbank, USA)
Industrial Light & Magic (San Francisco, USA)
Laika (Hillsboro, USA)
Luma Pictures (USA / Melbourne, Australia)
Nickelodeon Animation (Burbank, USA)
Pixar (Emeryville, CA)
Rise FX (Berlin, Germany)
Studio Ghibli (Tokyo, Japan)
Sony Picture Imageworks (Vancouver, Canada)
Sony Pictures Animation (Culver City, CA)
Walt Disney Animation (Burbank, CA)
Weta Digital (Wellington, New Zealand)
inspiration: worth watching short films
Coda by and maps and plans
Contre Temps by the Contre Temps Team
Duet by Glen Keane
DOG ENVY by Olivia Huynh
Fallin Floyd by il Luster
French Roast
Gravity by Ailin Liu
In Between by Gobelins
Jinxy Jenkins and Lucky Lou by Michael Bidinger and Michelle Kwon
My Big Brother by Jason Rayner
Night Light by Qing Han
Nephtali by Glen Keane
Nocturne by Kari Casady
Historia de un Oso by Gabriel Osorio
Home Sweet Home by home sweet home the film
One Bright Dot by Clément Morin
Stickboy by Giant Ant
SOAR by Alyce Tzue
Tsunami by The Animation Workshop
Thought of You by Ryan Woodward
Vagabond by The Animation Workshop
5 Gobelins Shorts That Pay Tribute To Women Animation Pioneers
10 notes
·
View notes
Text
Outsourcing Architectural Modeling CAD Services Provider in USA
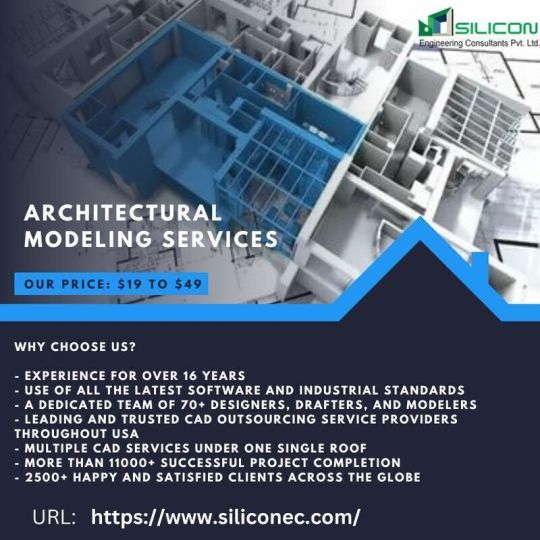
Silicon Engineering Consultant Pvt. Ltd. provides good services of Architectural Modeling CAD Services. Our Architectural Design and Drafting Services involve the creation of technical drawings and plans for building projects, including floor plans, elevations, and sections. Architectural Outsourcing Services refer to the process of hiring an external company or individual to perform various architectural tasks, such as designing, drafting, modeling, or rendering. Connected with US for your next Architectural Modeling Engineering Consultants Services.
Architectural 3D Modeling Including Services: - CAD 3D Models - Architectural Interior Modeling - 3D Exterior Modeling - Architectural Design Modeling - Architectural Building Models
More Information: https://www.siliconec.com/architectural-2d-3d/3d-architectural-modeling.html
We provide Architectural Modeling Engineering Services in New Zealand's major cities like Auckland, Christchurch, Dunedin, Rotorua, Whangarei, New Plymouth, Wellington, Dunedin, Rotorua, Tauranga
#ArchitecturalModeling #CadArchitecturalModeling #ArchitecturalBuildingModeling #3DArchitecturalModeling #ArchitecturalInteriorModeling #ArchitecturalDesignModeling #CADServices #CADD #SiliconEC #India #USA #UK #NewZealand #Australia
1 note
·
View note
Text
Architectural Engineering Services New Zealand - Siliconecnz
Siliconec NZ provides Architectural Services for Landscaping, 2D, 3D, 4D, 5D Drafting Modeling, Rendering, Furniture Design Drawings, Interior & Exterior for Industrial, Residential, Commercial and Urban Areas.
#Architectural Engineering Services New Zealand#Architectural Engineering Auckland#Architectural Drawings Wellington#Interior Design Christchurch#3D Rendering Dunedin#2D Drafting Services Tauranga#3D Modeling Services Hamilton#Animation and Walkthroughs Nelson#Architectural Landscape Queenstown#CAD Drawings Rotorua#Architectural Furniture Design Invercargill#Architecture Design Drafting Porirua#Architectural Rendering Whanganui#Architectural Services Hokitika
2 notes
·
View notes
Text
10/11/2021
Lesson 2
Presentation Notes // Isaac Velasco : we walked / we observed we understood / we lived the space communicate how we can design an area in a better way locals ,business owners draw sketch process plan document rendering software:3D max ,sketch up colors ,vibrancy appeal aesthetics identify target market, group age support of community, support the community = power is from the people include them in decision’s we want this what are the problems and needs that they have fulfillments they dream it , I plan it community involvement? building, from idea to execution politics, history, community possibilities challenges just facilitators socially inclusive project management methodologies background process what is placemaking? nz ,international world wide context how those differ how to activate a space local context tools doing cool things for the community! project aligned with plan public space connect retail area potentialize community walkability lifestyle foot traffic improving quality of life consult community ,notes and feedback people involved in the whole journey – community engages from analysis to the end result testing with the community connection powerful tool open sources why do we think differently find a middle ground be able to understand each other strategy mitigation invite key people ,what do you think about the project reality and logistics resolve issues challenges from community What can we produce that ties in with the existing works of the two previous classes. same color palette? Cutlers Client’s Aspirations: Description: Dark ,damaged, dingy Laneway central flow of town ,saftey concerns. surroundings freshly done up queens arcade flash Melbourne sky panels on ceiling fancy Lights! turning that into installation, sculptural aspects from ceiling ?addition of chimes provide an ambience to the atmosphere and works along side the vibes of a ‘bohemian’ city. woven aspects inspired by boho planters floor – referencing painterly aspects of Eva street ,navigation ,connecting place to place natural light and windows work in the favor of the space what can we do to enhance the experience. seating! questioning whether she believed it was too narrow or crowded, no definite need for seating greenery something Instagramable or photogenic interactable memorable significant/identifiable to the town other comments & Notes: searching for our ‘Eiffel tower’ or the wellington Cuba St equivalent of the bucket fountain. surroundings and future plans of the town are important clothing ,performances, pop-up, projections as methods to rejuvenate the city. Aim to transform Lowerhutt into a creative and vibrant space of both business pleasure and lesiure.
0 notes
Text
Why Building Information Modeling (BIM) is useful for Integrated Architecture
Why Building Information Modeling (BIM) is useful for Integrated Architecture

Integrated Architecture is a norm in current times for Architectural Engineering Services as it seamlessly combines the multiple IT programmes enables the technology to untangle the complex Architectural issues. One of the best invention AEC industry have is Building Information Modeling (BIM) that successfully execute the project from early stages of project design to the entire collaborative…
View On WordPress
#2D Drafting Services#2D Drafting Services Auckland#2D Drafting Services Christchurch#2D Drafting Services New Zealand#2D Drafting Services Wellington#3D Modeling Services#3D Modeling Services Auckland#3D Modeling Services Christchurch#3D Modeling Services New Zealand#3D Modeling Services Wellington#3D Rendering#3D Rendering Auckland#3D Rendering Christchurch#3D Rendering New Zealand#3D Rendering Wellington#Architectural Drawings#Architectural Drawings Auckland#Architectural Drawings Christchurch#Architectural Drawings New Zealand#Architectural Drawings Wellington#Architectural Engineering#Architectural Engineering Auckland#Architectural Engineering Christchurch#Architectural Engineering New Zealand#Architectural Engineering Services#Architectural Engineering Services Auckland#Architectural Engineering Services Christchurch#Architectural Engineering Services New Zealand#Architectural Engineering Services Wellington#Architectural Engineering Wellington
0 notes
Text
Renders


Here’s the renders of my final design. Ive being working from home this tri but if I had of being working in wellington I would have printed a scale model on the 3d printer.
0 notes