#*giffing is a learning curve but i'm getting better
Explore tagged Tumblr posts
Visit Tumblr Blog
Explore Tumblr blogs with no restrictions, modern design and the best experience.
Last Seen Tumblr Blogs


Fun Fact
The KCSC sent more than 20K requests to delete posts related to prostitution and porn to Tumblr from January to June 2017.
Text
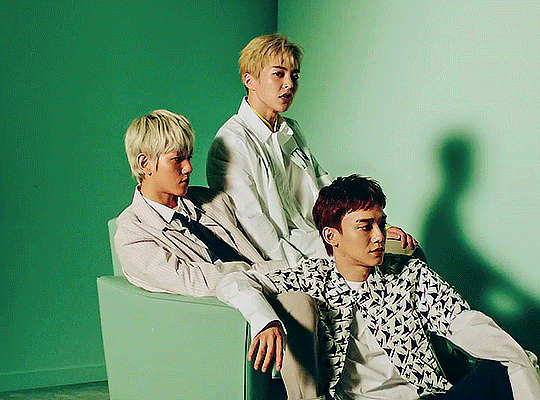
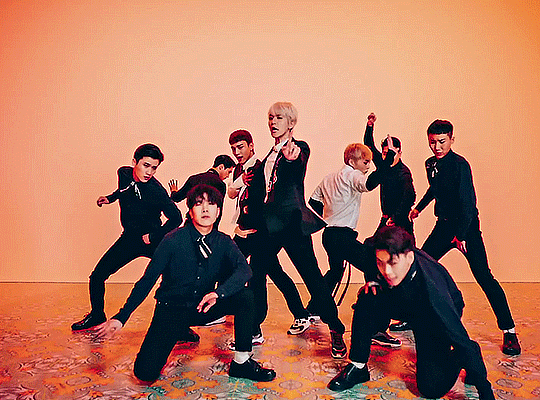


exo cbx - blooming day
#exo cbx#baekhyun#chen#xiumin#exo#exosnet#mgroupsedit#ultkpopnetwork#kpop#blooming day#cbx#byun baekhyun#jongdae#minseok#my gifs#*giffing is a learning curve but i'm getting better#but anyways the point of this is that sm can fuck off
455 notes
·
View notes
Text
top tip for new gif people because i've seen a few recently (which is really cool) - tumblr will compress your gif to a width of 540px when you upload it. this compression won't retain as much quality as if you just resize it to 540px across in photoshop/whatever program you use. tumblr will suck the life out of your beautiful crisp 1080px gif whereas photoshop will do its best not to (resizing in vapoursynth or similar is ideal but that's not necessary and often too much effort for adults with real lives)
#i learnt all of this during covid as a teen with a sunday job so that's why i could afford to care#also 540px is if you've got one gif per row#2 gifs per row should be resized to a width of 268px each#and 3 per row is 177px - 178px - 177px#height doesn't matter#you can google tumblr gif dimensions for a diagram but there are a few from before they increased the width in photo posts so lots of#conflicting info there#these are the correct ones#it's personal preference whether to resize ofc but the vast majority of people do#also whilst i'm yapping here#photoshop can do stuff that other software or online platforms can't#obviously use whichever one you prefer or have access to - it really doesn't matter#the more gifs the better#yay#but if there's something you've seen other people do that you can't figure out#and you're not using photoshop#chances are the other person is.#there are good alternatives like photopea but that still doesn't quite match ps#saying this bc i had a small phase of being quite discouraged as a 17yo md/zs fan from looking at all the online options and realising that#none of them had the capabilities to create the kind of gfx that i saw other people making and wanted to try out myself#ofc there's a learning curve too and LOTS to get wrong then try again but there is also the insurmountable difference between ps and#online alternatives. i hope it doesn't put people off from trying#keep at it with whatever program you've got your hands on#and if you really want photoshop. well. cough 🏴☠️🏴☠️🏴☠️🏴☠️ cough#excuse me what was i saying#i cant remember bye have fun
58 notes
·
View notes
Text
i was asked by @matthew-macfadyens for a colouring tutorial, so here we go ! i've been making gifs for almost 4 years now and finally feel comfortable and confident in my skills to make a full tutorial on my colouring process. there are so many different ways people colour gifs, and there's no wrong way, this is just how i do it ! i learned to gif by reading so many tutorials and picking and choosing what works for me, so hopefully this can help someone out !
if this tutorial helps you, please considering supporting me ! buy me coffee ♡

TUTORIAL UNDER THE CUT
what you'll need: - photoshop ( i use ps cc 2023 & frame timeline ) - basic ps knowledge ( how to make gifs, how to sharpen gifs, general understanding of adjustment layers, layer masks and blending modes ) - a whole lot of patience
helpful resources:
the beginner's guide to channel mixer by @aubrey-plaza
giffing 101 by @cillianmurphy
gif making for beginners by @hayaosmiyazaki
colouring yellow-tinted shots by @ajusnice
becca's mega colouring tutorial by @nataliescatorccio
@usergif
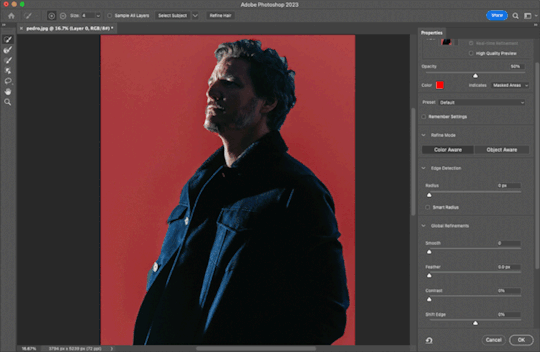
PART ONE: BASE COLOURING
- step 1: curves - step 2: exposure - step 3: colour balance - step 4: selective colour - step 5: levels - step 6: brightness / contrast - step 7: gradient map
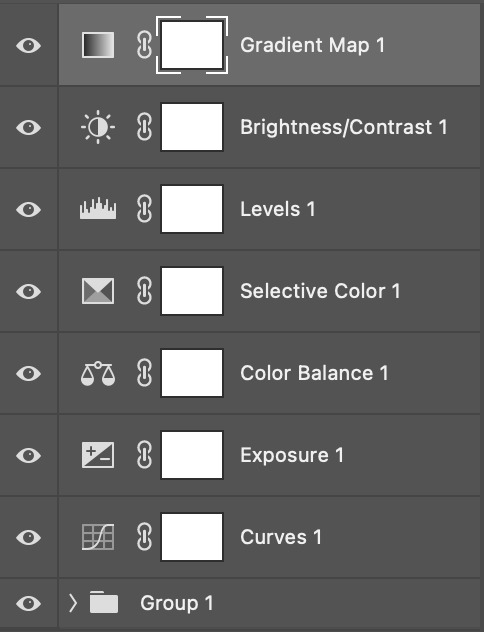
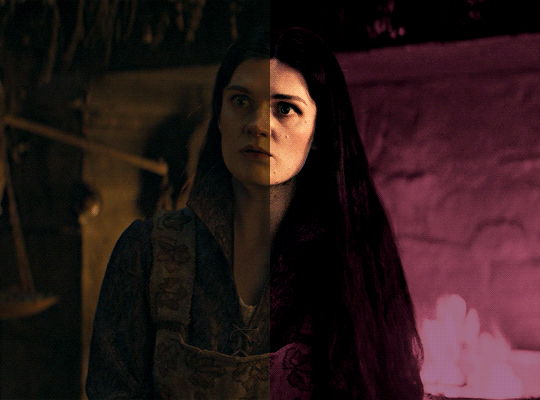
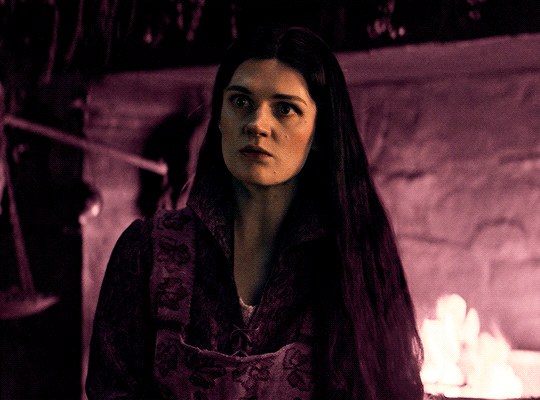
okay so, before we get started, this tutorial is for colouring only. at this point, i've already gotten my screencaps, imported them into photoshop, made the actual gif & sharpened the gif. the above image includes what my typical adjustment layer stack looks like !
STEP ONE: CURVES
a lot of people do the majority of their heavy lifting in curves...i'm not one of those people. i've never gotten the hang of curves and haven't been able to fully taken advantage of everything it can offer. i use curves to mainly brighten up my gif and to start my process.
i use the "auto" button in the curves function - this automatically corrects the curves for your gif ( mainly the brightness / contrast )
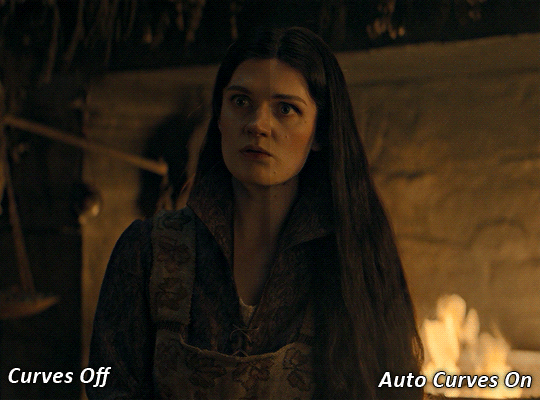
you can see that the auto curves has brightened up the gif and evened out the brightness/contrast. i just find this gives a better starting point for the colouring process.
STEP TWO: EXPOSURE
this step is for, you guessed it, brightening the gif more and evening out the contrast and blacks. i don't have any real rules for doing this, the amount i highten the exposure and contrast is different based on the scene and the show, however, i tend to stay around +1 on both exposure and gamma correction.
exposure effects the brightness of the gif and gamma correction effects the blacks and contrast. this step also effects the saturation of the gif, so it's important not to go too crazy. i often end up coming back to this step every now and again to adjust and fiddle with it.
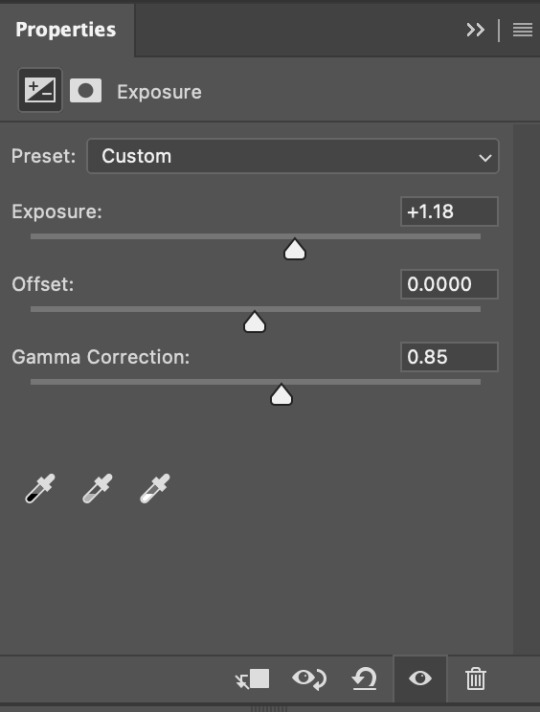
for this gif, i put the exposure at +1.18 and the gamma correction at 0.85
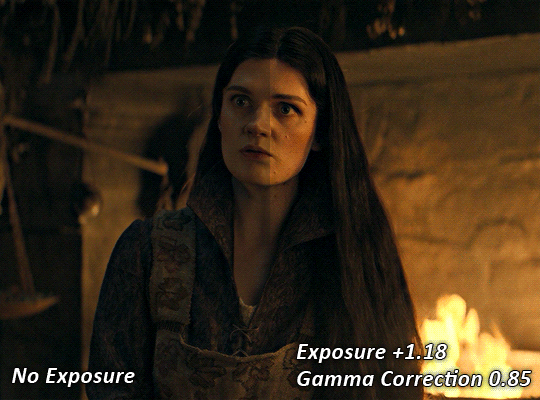
you can see this step serves to add some more brightness and contrast - it also adds some more saturation, that we don't always want, but don't worry, that's what the next steps are for !
STEP THREE: COLOUR BALANCE
i use this step to do a lot of my heavy lifting - i'm a whore for colour balance. this serves to even out the colours and help neutralize the colours for an easier canvas. it's important to understand the basics of colour theory for this, i recommend checking out the channel mixer tutorial i listed above, because a lot of those steps applies to colour balance.
essentially, there's three separate profiles to edit on - highlights, midtones and shadows. in each profile, you have 3 colour sliders. the top one is your cyan to red, middle is magenta to green, and bottom is yellow to blue. the colouring of the scene will decide where to move your sliders.
for example: if your original scene has a cyan tint to it, you'll want to pull your slider to the right, towards the red to help neutralize the cyan. if your scene has a green tint, you'll want to pull it left towards the magenta. as you move the sliders, you'll notice that sometimes it brings out other colours you don't necessarily need, you can adjust the other sliders to help neutralize further.
i always do my main correction in the midtones profile.
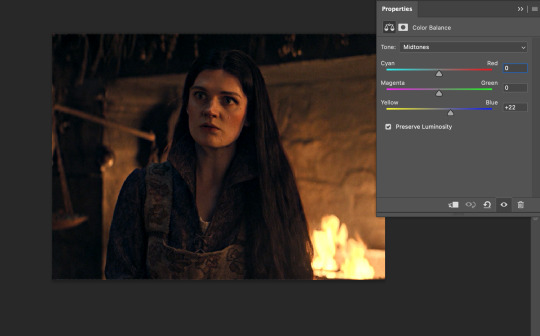
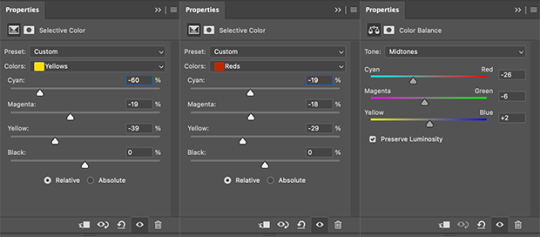
since this scene has a heavy yellow tint, my first step was to adjust the bottom slider. i pulled the slider to the right towards blue at +22. you can see this helped get rid of a lot of the yellow, but adding in the blue warmed up the reds and made it more saturated.
to help with this, i pulled the top slider left towards cyan to help neutralize that red.
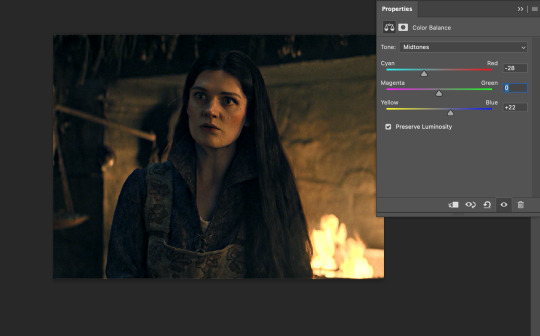
i pulled the top slider to -28 and you can see this cut out that heavy saturation and redness. it's looking a lot better, but now it's a little too green for my liking. this is where that middle slider comes in!
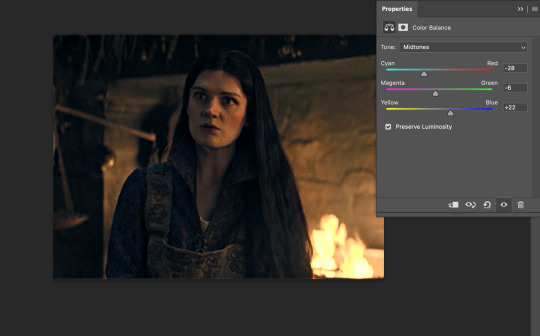
i pulled the middle slider to -6 towards the magenta to help counteract the green that came in. ( i ended up going back in and adjusting the bottom slider to +10 instead, as it was a little to blue )
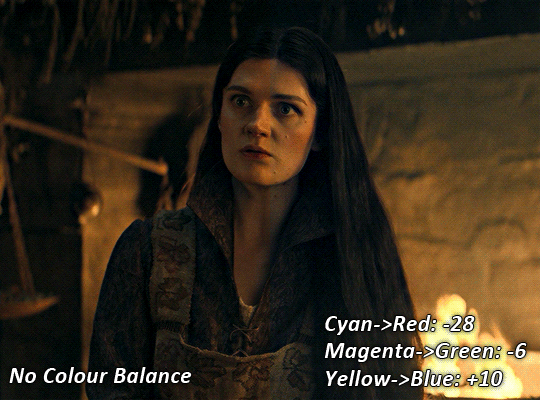
you can see this step really did the heavy lifting, helping to neutralize the canvas so that it's easier to work with...but it's not quite perfect yet!
STEP FOUR: SELECTIVE COLOUR
a lot of the same principles around colour theory apply to selective colour! this is where i go to adjust the colours according to what my colour palette is. for this gif, the overall colour is going to be purple, so i'll adjust the individual colours with that in mind.
i only ever adjust my red, yellow, white and black profiles! sometimes i'll do the other colours, but that's only for tweaking the final colour. i normally don't touch them at all.
ps: you'll notice i prefer a cooler toned gif, and almost always go for a more magenta looking red/yellow.
i always start with my yellows:

in the yellow profile, i pull my cyan towards the left to -38 (this helps eliminate the green in the yellows) and my yellow slider to the left to -27 (this cools down the yellows. i top it off by adjusting my magenta slider to -10, to help lower the saturation of the yellows.
you'll notice this step got rid of most of the green undertones - that's because the green was nested inside the yellows, so by taking out a lot of the cyan and yellow, you're left with a warmer yellow as opposed to a cooler yellow.

next i go on to my reds. this step will mainly effect the alys's skin tone, but i'm going to do pretty much the same as above but with much less dramatic of a change. lowering your colours in your red profile too much can lead to a very saturated gif, which is not what i'm going for.
i pulled my cyan slider to -19, magenta to -9 and yellow to -15. you can see this helped add some more cooler tones to the reds.
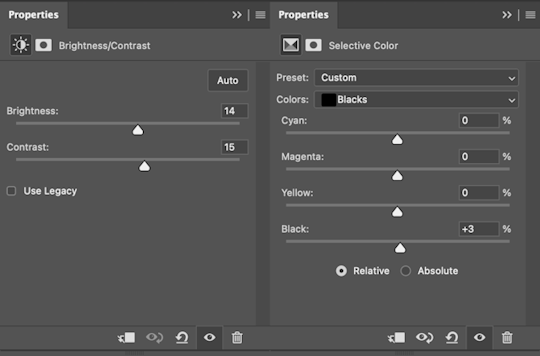
the next profiles are your white and black profiles. i use white to brighten the lightest parts of the gif. no rhyme or reason here, i just pull the black slider towards the left...usually around -25. for the black profile, i always move the black slider towards the right. anywhere from +3 to +8, depending on the gif. for this gif, i did +8. this darkens the blacks and, in my opinion, helps the gif pop!
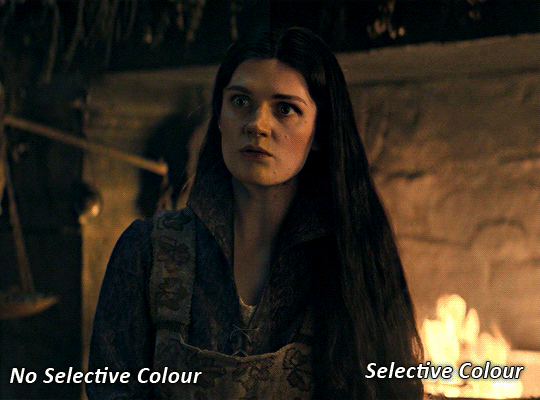
you can see this step got rid of the yellow tint, gave the gif a more neutral look and adjusted the reds to better compliment a purple colour scheme !
STEP FIVE: LEVELS
this adjustment has three toggles - i'm not 100% sure what each toggle really does, i just know that by pulling the leftmost toggle to the right, it darkens your gif, and pulling the rightmost toggle to the left brightens your gif.

this step is so hard to explain, but really i just pull the toggles around until it looks good...sorry !

STEP SIX: BRIGHTNESS / CONTRAST
this step is exactly what it says on the tin...it brightens your gif. this step is based on your scene and personal preference, there's no real guide to it.
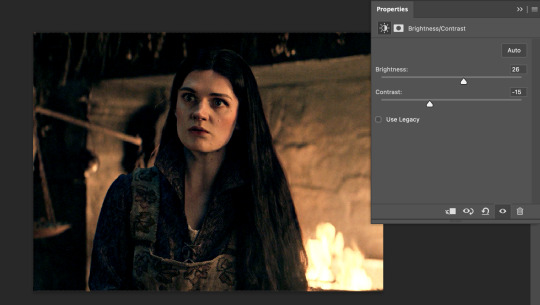
i always pull my brightness slider to the right ( brighter ) and my contrast slider to the left ( less contrast ).
STEP SEVEN: GRADIENT MAP
this last step is something i learned from @nataliescatorccio ! i add a gradient map to the top of my stack, and choose a lighter colour of what i want my overall gif to be. in this case, i used a very light purple!
i then set the blending mode to "soft light" and lower the opacity to anywhere from 20-30%. for this gif, i did 30%
this step will help make your colour pop once you do your main colouring!
PART TWO: PAINTING & COLOURING
- step 1: layer 1 - step 2: layer 2 - step 3: layer 3 - step 4: final touches
okay, so my actual colouring process is based in 3 layers. for this gif, i'm using a deep purple/mauve colour !
STEP ONE: LAYER ONE
between your brightness/contrast and gradient map layers, add another blank layer. change the blending mode of this layer to "colour" and set the opacity to 40%.
then, using a soft round brush with an opacity of 100% ( size of the brush is your preference, i typically use around 108 ), colour the parts of the gif you want coloured !

you can see this helps us get the canvas to a more uniform purple colour!
STEP TWO: LAYER TWO
for layer two we're going to do the exact same thing. add a layer above your previous, set to "colour" at 40%. we're going to go over the same areas!
you can see this helped get the purple so much more vibrant and closer to what our final colour is going to be!
STEP THREE: LAYER THREE
for our final layer, add another layer above the previous 2, set your blending mode to "multiply" and your opacity to anything from 60%-100%. for this gif, i did 60% !
now, our colouring is pretty much done but you can see that, now that our colour is down, alys's face is still a little too blue/green/yellow for the background purple. the next step, we're going to adjust and add final touches!
STEP FOUR: FINAL TOUCHES
at this point, i went back into my selective colour layer and adjusted my yellows & reds and went back into my colour balance layer to adjust everything overall.

at this point, i'm going to go in and add some adjustments layers above everything - i usually add some brightness/contrast, and a selective colour layer to darken the blacks.
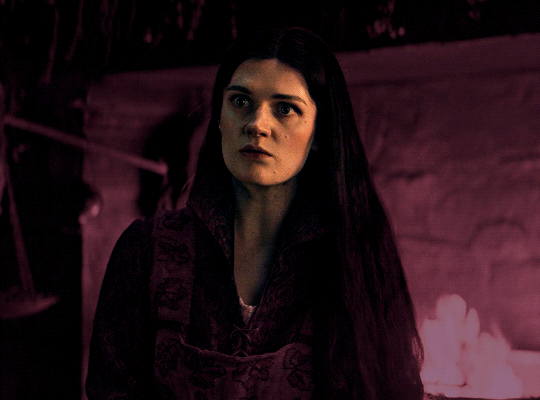
which brings us to our final result:
#usergif#dailyresources#pscentral#ps tutorial#tutorial#coloring tutorial#allresources#userbecca#tusermich#userjoelle#ughmerlin#mialook#*tutorial#**
213 notes
·
View notes
Text
Progress Checkup! (Nov. 2024) | Scratchin' Melodii Devlog
Hey again guys! Sorry if it's been a bit since the last devlog. With how much I've been up to, it sure feels like it!
Let's get right into it. For starters, the 3rd rival battle of Act 2 is complete! I'll likely be showing a gameplay preview of it sometime soon. This is the first song to use the new framework that I'll be using for all the other stages going forward, which also means I've had to spend the past couple weeks getting the previous songs working with this new system too... Did you know that in the demo builds, if I wanted to change something about the gameplay, I'd have to manually go back and change it for EACH individual song one by one? Well now, imagine all the songs had like a peace treaty to just share one good, clean, and organized system that I can easily tweak and add to as I please. So development is gonna be smoother than ever from here! This is how most games are SUPPOSED to work, but I was a liiittle too stupid to figure out how to do this until recently!
While I was moving Cream Cheese Icing over to this new system, I took the opportunity to make the chart a bit more beginner-friendly! For example, the first line went from this...

To just this!

As you can see, it has less notes, therefore it is less scary for new players. Believe it or not, I actually never intended for Cream Cheese Icing to be so difficult for new players in the first place! Naturally, being too good at my own game can make gauging the difficulty curve a bit tricky at times, but I think I'm figuring it out!
You may have also noticed that the characters have new UI icons too! I felt like the old ones were too flat and boring, so I did a new take on them, aiming for more dynamic shapes and angles, not to mention how my art style's just kinda grown a bit in general since I last drew the icons. I also ended up leaving out the circles behind them. I was a little worried I was gonna run out of unique colors for all of them at some point, plus SOME of these guys can have really big hair and/or hats that pretty much just cover up the whole circle anyway. (hi rensa)
Speaking of artwork, here's a little look at some of the updated animation I've done for Stir & Mix! (Try to imagine it in not highly-compressed-gif-form. I promise it looks better in-game!)
When working on Stir & Mix related stuff, I can't help but feel a bit of a sense of dread knowing how people may react to it... Honestly, sometimes I kinda wish it never got as popular as it did in 2022. But hey, doing my own thing regardless of what's expected of me is the most Scratchin' Melodii thing I could do!

Speaking of which, Mia learned a ton of new stuff while doing the VOCALOID tuning for the last rival battle we worked on, so we might revisit Stir & Mix's vocals again at some point before release to give it even more style! (By the way, Mia and 2cada are the same person! Sorry if I refer to both names interchangeably! She's been the one doing all the VOCALOID tuning and vocal mixing for the game since 2023.)
Well, I think that's all for now! Here's another friendly reminder that there will NOT be anymore demos of the game. Any new content will be saved for the full game's release. I know I've said it before, but I probably won't stop saying it until people stop getting confused about it LOL. Thanks for reading!! I appreciate you. - LJ
83 notes
·
View notes
Text
Quiet Nights
Relationship: Cal Kestis x f!reader
Summary: Cal has a dream that totally goes against the Jedi code. During his panic, you come to check on him and find him in a comprisable position.
Word Count: 2.7k
Warnings: ITS SMUT TIME FOLKS, 18+, oral f! receiving, no condom, cussing, choking (duh the force?)
A/N: Delicious, I drank a full 32 oz of water after this
Prompt: Imagine your OTP where one of them had a dream about the other person and tries to act normal, but fails miserably, so the other one notices and gets curious about what the dream was about.
(gif not mine)
————————————————————————
You yawn, filling up your cup with water from the bathroom sink. You gulp it down, refreshing you as much as a glass of water at 3:34 am could. It was nice having a bigger bathroom; you're used to the small Mantis bathroom instead of this spacious one on Jedah. You, Cal, Bode, and Greez have arrived to the Hidden Path's base to touch base with Cere and learn more about this Tanalorr place. It seemed intriguing, but you were still on the fence if such a place could even exist.
Now here you stand, staring yourself down in the mirror, filling up another glass of water. As soon as you turn off the tap, a very faint and quiet noise echoes throughout the halls. Curious, you open the door, the noise just becoming ever so slightly louder. Time to investigate!
---
Cal twists and turns in his guest bed, his entire upper body reddened. Soft moans escape his lips. He was burning, and he couldn't bring himself to wake up. Hell, he didn't want to wake up. This was the best dream he had ever had!
You had surprised him with a night for just the two of you, walking through the forests on a planet he could not name. The trees towered above you, vibrant with their green leaves. They bring in just enough light to highlight the rugged dirt path. You both were holding hands, just enjoying each other presence. Now, the dream changed, and it most definitely explains Cal's reddened complexion as he lies in bed.
You're now hovering over him, in a beautiful matching set, perfectly complementing your skin tone. Lace runs up and down your body, showing off your curves and parts that Cal only wishes he could actually touch. You leaned in for a passionate kiss, straddling the man. He could basically feel you in his subconscious.
---
The sounds started to become louder the closer you got to you and the guest bedroom next door. Who was staying in there again? Is that Cal? You tip toe up to the door, placing an ear beside it. Yep, that's him, is he alright? You knock quietly, waiting for a response. The response never came. You knock a bit louder this time. A gasp fills the room, as well as some frantic shuffling.
"Cal?" You whisper to the door, the shuffling stopping immediately. "Are you alright?"
"Come in," He blurted, immediately regretting it. You hesitantly open the door, the light from the hallway showing a line of brightness on the man. He's sitting against the headboard, the blankets ruffled around his crotch and legs.
"Nightmares?" You ask, taking a step in and quietly closing the door behind you. "Would you like to talk about it?" You squint your eyes to get a better look at him, your eyes still adjusting to the dark. His are as wide as possible, extremely dilated from the darkness and the dream.
"I'm okay, thanks for checking, goodnight." He rambles, trying to sink into his bed. This only makes you more curious. As you eyes get more adjusted, you notice that his cheeks match his hair.
"Oh," You realize, blushing as well. "My apologizes." You giggle, taking a seat at the foot of the bed. "Who?" Cal just blinks.
"What?"
"Who was it! Mr. Jedi, Mr. I can't ever think about another person in a romantic or sexual way." You tease, playfully hitting his foot. He purses his lips together, causing your grin to only become greater. "Oh, come on Cal! This is big! Who?"
"Why is it so important?" He grumbles, crossing his arms across his chest.
"Oh my god, do I know them?" You cross your legs, fully facing the clearly embarrassed Jedi. He rolls his eyes, but the redness only darkens and spreads. You giggle gleefully. You hum, trying to think of who it could be.
You really hoped it was you. For months you've been trying to hint to him about your feelings, sometimes very vague, but other times very blunt. The rest of the crew caught on immediately, but the gears in Cal's brain just didn't seem to click. You've tried asking about dating and his romantic life, but he always brought up the Jedi Code, making your want for him only increase. You've had dreams, dreams of you being together, living through the rebellion, being together, domestically and intimately.
You're expression must softened as you were thinking because Cal coughed to get your attention. Now it was your turn to blush.
"You going to guess or let me go back to sleep?" He asked, rubbing his eyes. Now, you had a choice. Respect his want to go back to bed and continue about life, or be VERY BLUNT. You were tired, so there was only one right option.
"Was it me?" You ask, glancing around the room, trying to not meet his gaze. Cal's breath hitched, the blanket becoming too hot for his body. From the lack of response, you also started to heat up, clearing your throat. From the lack of response, you could only assume it was you. You. YOU?
You whip your head to face him, locking eyes. You... He wanted... you. You honestly couldn't believe it.
"Was it just a dream?" You mumble, Cal giving a questioning expression as you shift in your seated position. "Or do you actually have feelings?" You vulnerability seemed to easy Cal a bit, noticing how uncomfortable you were. He wanted to say the truth, but he didn't want to make it weird. Would it be weird? Eh, tonight was the "going for it" kinda night.
"Months." He simply states, trying to relax against his headboard. You perked your head up from your gaze into your lap. You cheeks redden, your breathing quickens, and something feels, different. The atmosphere feels intoxicating, but in a you shouldn't leave way. With the prolonged eye contact, you feel ass if Cal notices the feeling as well. You notice his hand are now at his sides, and there's an obvious lump by his lap. That weird feeling starts from your stomach and falls down your body, closer to your belly button.
"Months?" You repeat, raising an eyebrow. He purses his lips and nods. You hum. "Well..." You both grow silent, quiet. This had to be the quietest you too had ever been with each other. You waited for each other to make a move, but in all honesty, Cal was too vulnerable, physically. You start to feel the awkwardness subside and you feel yourself giggle.
"Hey, it's not funny." Cal frowns, while you shake your head.
"No, of course not." You compose yourself, scooting closer to the red head. "It's funny that we are telling each other we like each other with your dick out." Cal's face reddens completely, trying to compose himself as he places his hands over his lap. You outstretch your arms, pushing his hands away, causing the freckled man's eyes to widen dramatically. "Need any help?"
Cal practically springs up at you, locking your lips together in the most "I need you" kiss you've ever experienced. It was HOT. Like, you already started to sweat as your tongues fought each other. You needed him, you needed him so badly. He could feel that need from you, he wanted to provide that for you more than his dreams ever could. He pulled your up and into his lap, never once breaking the kiss. Your clit brushes against him, causing you to quiver in pleasure. He notices your movements and moves your hips back and forth on him, earning himself a quiet moan from you. He chuckles, retracting his lips from yours and goes for your neck. Your arms are around his shoulders, dragging your fingertips through his hair. You continue to moan and gasp into his ear, trying to stay quiet.
"You're wearing too many clothes for this," He comments, lifting the bottom of your shirt. You instantly comply, throwing it over your head and onto the floor. He goes back for your lips as you also tug on his shirt.
"Match?" You ask, giving him a small smile. He gladly follows through with your request, throwing his shirt toward yours. Your eyes wander down to his toned chest, scars and freckles decorating his body. You feel a fluttering sensation down there.
"Well if we're going to match you need that all off." He motions to the rest of your body, causing your to giggle and raise an eyebrow.
"You dont wear pants to bed, but a shirt?"
"Hey, my arms get cold. Allow me," He states going back in for a kiss. You immediately deepen it, allowing his tongue into your mouth to explore. All the while he waves his hand and your bra unclasps. Startled you pull away.
"Force?" You ask, tossing your bra away. He smiles, nodding, staring at you. He's never seen you like this, and boy was he going to enjoy and savor it. "Well, what else can you do?" He picks you up and slides you to be propped up where he once was, with the blanket still covering his lower half. He hooks his thumbs into the waistband of your shorts, but before he does any more, he looks up at you. This causes your to blush, appreciative of the asking for permission. The knot in your core only tightens, god he was hot. Nodding, he slips them down with ease, along with your underwear. He crawls up to your face, giving you more kisses. He starts to trail down your body, more moans and gasps leaving you as he goes over your bare body. Finally he reaches below your belly button. He places light kisses to your thighs as he opens your legs with his free hand. You're practically dripping with anticipation by this point. He continues to kiss you, going closer to your inner thighs and to your opening. Propping your legs open with his body and arm, he proceeds to trail more and more kisses closer and closer.
Your arms are clutching the sheets by your sides, the amount of pleasure awaiting you but just out of your reach. The amount of teasing is excruciating; you need him. You moan louder and louder the closer he gets to your clit. Then, he proceeds to rub his tongue around your clit in circles. Your breathing hitches and becomes irregular.
"Fuck-" You cry out, making Cal only want to do more things to you. You were already so wet that he easily slid a finger into you, causing you to moan. He pumps in and out of you, slowly, making sure to curl his fingers up into you. How he knew how to do this you'll never understand, but holy shit was he doing a good job. He slides in another finger, starting to pick up the pace. Your hips start to have a mind of their own, fighting against him to push him deeper.
"Tell me," he states, looking up at you. His chin is glistening with you, his eyes so dilated they were almost black. His mouth hung open slightly, totally getting off to pleasing you.
"Deeper," You whine, and he grants your wish. He pushes deeper into you, causing you to whine out in pleasure.
"Holy Shit, Cal," You cry out, breathing erratically. The knot in your core tightens more, needing to find a good time to release. He quickens the pace, leaning over you to bring your lips together. Oh yea, that did it. You feel yourself just let go and this amount of pleasure and warmth rushes over you. It's so much that you moan out more expletives and his name repeatedly. After your high, you just see him. You need more, and god did you want to get more.
"Fuck me," You command, and he obliges. Pulling you closer to him, he uncovers his member, resting it on your stomach as he gets situated. He pulls a pillow and rests it under your lower back to make sure you don't hurt yourself, and keeping your ankles over his shoulders. You couldn't look away from him. Even his dick was freckled, which was kinda cute, but all you cared about was him and the fact you needed him in you.
"Are you ready?" He asks, noticing he has his dick in hand, ready to line himself up.
"Fuck, please," You groan, already closing your eyes in anticipation. He slides in, both of you moaning in pleasure.
"Holy shit, (Y/N)," he breathes out, barely over a whisper. His head is tilted back, holding onto your ankles. Your hands are by your lower stomach, trying to feel him in you from the outside because holy shit was he filling you full. He slowly starts to pump in and out of you, fully in, and fully out. Every pump in, you moan in delight. Sweat rolls down the both of you as you fill the room with heat and the sounds of pleasure. He starts to go faster, holding onto your thighs to bring you even closer.
"Cal~" You moan, holding your hands to your mouth because you knew you were about to get pretty loud. Without much thought, he pulls out and flips you onto your stomach. You push up onto all fours as he makes his way between your legs, entering you once more. Your arms give out, pushing your face into a pillow. This was helpful for covering your moans, but Cal wanted to hear them as he railed you. Carefully, he commanded the force to pull you up, by the neck. At first, only gently to not hurt you but to get up. You clenched in pleasure, moaning even louder. So, he also tightened his grip. Damn, so this is what he could do. After a bit more relentless railing, you felt your core have that same tightening sensation.
"Cal, I'm gunna-" You moan as he quickens the pace, causing you to moan out.
"Me too, fuck." He whispers out, nearing his release. Hearing him cuss like that over you sends you over as you scream out in delight. You clench onto him and release, an explosion of pleasure ruptures over yourself. His force lets go of you, making your head topple into the pillows. He grabs your hips and pushes him all the way, releasing into you. It's such a warm sensation, filling you up to the brim.You both stay like that for a few moments, catching your breathes. He pulls out, his cum leaking out of you.
"Holy shit," You say in unison. Cal chuckles, reaching for his towel that is on a nearby chair.
"Here, to clean up." He throws the towel onto your exposed behind. You blush, cleaning up yourself as you sit up on the towel, just in case. You cover yourself with his blanket, a sudden chill running all over you. Cal slips his boxers on from a nearby dresser and sits down beside you.
"I never thought we'd do that," You state, leaning into him. He happily wraps his arms around you.
"I'm glad we did, because wow. Jedi's are really missing out." This causing a laugh to escape you, causing him to also chuckle. You start to stand, but Cal holds you down.
"Stay tonight?" He asks, motioning to the pillows. He smiles warmly, and how could you say no? You return the smile, shuffling yourselves under the blankets and heads on pillows. He lays on his back as you cuddle up onto his chest, wrapping your arm around his torso. His arm lounges behind and around your back, rubbing it up and down.
"Well, we can do that as much as you want," You giggle, cuddling into him more.
"I'd like that, but also the cute romantic stuff." He chuckles, leaning down to kiss your head.
"Maybe a date?"
"I like the sound of that, in the morning?"
"Oh, let's go to the bakery down the street, I heard the have wonderful food." You smile, your eyelids feeling heavy.
"It's a date, goodnight (Y/N)." Cal whispers, closing his eyes. You hum back, already falling asleep. The smile never leaves your faces, even as you dream of what the future could hold for you two.
#cal kestis#cal kestis jedi survivor#cal kestis x reader#cal kestis x y/n#cal kestis x you#jedi survivor#reader insert#star wars#star wars jedi fallen order#star wars jedi survivor#star wars x reader#star wars x y/n#star wars x you#y/n#smut
551 notes
·
View notes
Note
Hi, I’m new to gif making and I was wondering if you would please post a colouring tutorial for any gifset you’re working on right now?
sure!
this is the set i used these for
I was thinking about giving you a psd to look at as well but tbh its better if you learn to do the process yourself instead of relying on psd's made by other people. I'm a little old school in that regard, repetition is the key to remembrance and practice makes perfect and all that.
So I'm working on an OPLA Zoro/Luffy set right now which I guess kind of works out for you since I have to do more work recoloring live action scenes.
So I've made my gifs, I've cropped them to 540x540.
Each gif will get two Smart Sharpen (Filters>Sharpen>Smart Sharpen) smart filters. It's important that you do them in this order or it will look different. The first and second filter, respectively -
Amount: 500% Radius: 0.3px Amount: 10% Radius: 10px
You can adjust these as you'd like, but I personally don't do that. I know some giffers add Gaussian Blurs or Surface Blurs, but I like my gifs to be as crisp and clean as possible, I don't want any blur on them.
From that you can start to color. Since I'm doing overlays for this set, I'm going to get that set up first and then I'll start on the coloring. I'm not going to explain how to do overlays in this tutorial just because it's a long explanation. I do have a tutorial for Photopea that I will link at the bottom. The process is mostly the same with some minor variances.
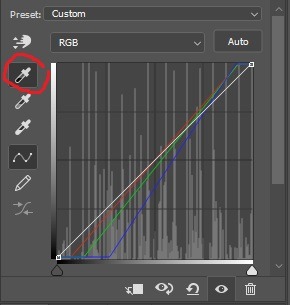
So the first gif I'm recoloring is pretty dark. Both gifs on it are dark, so I'm going to relight them separately with a Curves layer. When using Curves, I use the eyedroppers to show PS which two points of white and black I want the gif balanced between. So with the white eyedropper selected, I click on a white point of the gif and with the black eyedropper I click on a dark point of the gif. This is going to relight your gif and is one of the most important steps in coloring gifs.

I don't always get it right the first try and I usually click around a bit and try different points of white/black before I find something I like the best.
Next I'm going to add a Hue/Saturation layer with the Saturation at 10 and a Vibrance layer with the Vibrance at 30. I use these as base points and I'll recolor the rest of my gif after doing these.

I don't love how red Mackenyu is now so I'm going to add a Hue/Sat layer and switch to the Red panel and set the Saturation to -10 and the Lightness to -5.
My personal rule of thumb when adjusting the skin tone of my actors and characters of the Global Majority is to do it in increments with the H/S no more than -30 and I usually set the Lightness to half of whatever the H/S is. But of course this is just what I do and if something else works better for you, please do that.
From here I'm going to do the rest of the heavy adjusting:
Color Balance > Tone: Shadows Cyan / Red: +10
Selective Color > Red Cyan: +50
Selective Color > Black Black: +5
Brightness/Contrast Brightness: +10
Selective Color > Magenta Magenta: -50
Vibrance Vibrance: +30
And for now, I'm done with this gif and I'm going to move on to the others in the set.
One of the other gifs is really bright, its made up of a day time scene. My coloring on this will be really different than the night scenes.
The same base layers: Curves, Hue/Sat, Vibrance I'm also going to put the same Hue/Sat red adjustment layer here because I don't want Kiki and Mack to be too red.
Color Balance > Shadows Cyan - Red: +10 Yellow - Blue: +10
Selective Color > Cyan Cyan: +50 Yellow: -50
Selective Color > Black Black: +10
Brightness/Contrast Brightness: -10
Selective Color > Yellow Yellow: -20
Vibrance +30

Honestly anon, once I got more comfortable with PS my coloring process is more varied. I go by vibes more often than not. And actually, I did all this work and then changed my mind once I got all the gifs done and ended up making most of them black and white.
But I hope this helped you! If you have any more questions you're welcome to ask.
My DMs are also open, I can help a little more specifically that way, and you can ask for my Discord and we can chat there if it's easier.
Good luck anon!
Overlay Tutorial with Photopea
#asks#anonymous#giffing#gif tutorial#coloring tutorial#gif coloring#photoshop tutorial#adobe photoshop#userphotoshop
24 notes
·
View notes
Note
Your GIFs are so good! I keep looking at them. Would you be willing to give advice on learning how to make good GIFs?
ah thank you so much anon you're so sweet 💙💙 I'm more than happy to help! these are some of the biggest things I can think of at the moment, but if you have specific questions I'd be happy to answer those as well
1. The Download Quality:
2. Cropping:
this is the first thing you need to focus on. always work with 1080p (or 4k if you want but honestly it isn't that huge of a difference unless you're brightening up very dark scenes, super zooming in and doing multiple effects. I personally don't work with 4k at all because I don't have the space or the bandwidth 💀 but if you do go for it!) the bigger the size of the file the better the quality is, I usually go with something around 2-4 GB for shows with 42 min episodes. look for AMZN in the file link, those tend to have the best quality (don't worry too much if you can't find those, god knows I rarely do)
but if you can't find big files, just go for it lol. like for the earlier seasons of 911 I don't have large files because I couldn't find them at the time plus I don't have that much space, so I'm working with files that are less than 1 GB in size. and I've not had any complaints. for visuals, gifs number 3, 4 and 7 are from large files that are around 2.5 GB in size. the rest of the set is all from under 1 GB (those can be difficult to do too much color manipulation and effects with so I don't 100% recommend them unless you can't find anything else. just don't make it the thing that stops you from giffing yk?)
make sure you're following Tumblr's width guidelines when cropping. so 540 if you're planning on putting one single gif in a row. 268 and 268 for two gifs. and 177, 178, 177 if it's three. the closer you crop to the edge the better the quality is. so unless you're trying for a specific effect or wanting to zoom in on something, stick to the edge
3. Sharpening:
sharpening settings make a ton of difference. here are mine
4. Coloring:
each scene is different and you need to experiment with different methods and see what looks good to YOU personally. for me, i usually start with a blank Brightness/Contrast layer with its blending mood set to Screen. sometimes you need to lower the opacity of the layer if the scene is already bright enough (some scenes don't work with this layer so I go for Levels and Curves next. and those are a lifesaver for brightening up a shot and getting rid of the awful filters some shows have. if you want more details on this, this and this tutorials are amazing)
then I go for a black and white Gradient Map set to Soft Light with opacity from 10-25%
from here on out the world is your oyster. experiment with different layers to see what you like. Selective Color and Color Balance are your best friend to make a scene truly pop. one trick I always always use (as long as it works lol) to fix a scene's coloring and make it as neutral as possible is to add a Curves layer right after the Gradient Map, select the middle ink dropper and click on the yellowest parts of the gif. this works by bringing out the color opposite of what you click on, so you click on yellow, it brings out blue. that's why it's important to click on dark rather than bright areas to bring out darker blues and thus make the scene look more neutral. but this part is always experimental with me. I click somewhere on the gif, it doesn't work, I Ctrl+Z and click another part. and again and again until I find the perfect spot. sometimes I have to decrease this layer's opacity (anywhere between 90 and 10) because it sometimes looks way too bland
5. Exporting:
this can all sound overwhelming at first, trust me I know. so try out a method, if it works, perfect. stick with it. until you encounter a scene where it doesn't work or you get used to it and want to try something new, then look for another method, find which you prefer and stick with it. etc. some scenes have me try out every single thing I know to make them look decent. with time you'll get used to these steps and it will come easy to you
here are my settings

that's all I can think of at the moment, if you need anything else, let me know! oh and go to @usergif they have a TON of resources and tutorials that have helped me so much
8 notes
·
View notes
Note
I love your gifs!! Im a newbie at makkng gifs and i don't really know how to color :( i keep messing with layers and stuff but i can't get them looking good, i'm confused haha. Would you be willing to share your coloring maybe? A small tutorial or a PSD even? So i can mess around and figure out for myself. If not, that's okay too!
Thank you 😊 If we're talking about coloring, everyone has their own style and as you start practicing you'll get yours too!
I don't go with many layers usually and I go almost every time with the same ones. I think making your gif a smart object would help so you can sharpen a bit.
One of the most important that brings most changes in the gif is the curves layer. You can use auto too but that won't change much. I use the points (upper one goes for the darkest point in the image/gif, lower one for the brightest one).
2. I use brightness and contrast, you can play with the values to see how it looks better for you, as I said there are no fixed values, depends on the material you're working with.
3. Exposure
4. Vibrance
5. Color balance which helps a lot, you have 3 channels: shadows, midtones and highlights. I don't have big values for highlights though, the rest is up to you. At this one, you might use more layers of color balance if you're not happy with the skintone. I always try to make the skintone look as natural as possible.
6. Selective color, where you have so many channels you can try. I don't use whites at all, neutrals is very useful, blacks has small values in general, close to 0 and reds helps for the skintone (for cyan values).
And that's about it! You can check my #tutorials tag where there are many posts that have helped me and some that I want to learn in the future!
7 notes
·
View notes
Text
Replies
A couple of replies related to drawing, so I’ll post them together.
Anonymous asked:
what do you do everyday, do you have a job or just draw something that make everyone fail NNN? Wait, now is already DDD.
The answer is Yes to both of your questions, Anon lol My entire life is dedicated to everyone failing NNN and succeeding at DDD.
I draw for a living! And I spend pretty much the entire day drawing: I spend the first chunk of the day either working on commissions or on our personal projects, then I take a break to write replies (not sure if it’s a break...), then I finish up stuff for us to post (it’s previously made sketches, I mostly just need to clean them up, fix them a little and throw some colours on them; sometimes it takes longer, sometimes it takes a couple of hours), and then I sketch.
I am honestly very grateful and lucky to be able to produce so much art on a daily basis, and opportunities like these unfortunately never last forever, so I would like to do my best and keep posting fun stuff for all of you while it’s possible and fun to do. I am happy where I am at in terms of this stuff, and insanely lucky to draw twst boys for commission work as well.
Anonymous asked:
Hello! How did you end up drawing NSWF? Did it come naturally or was it a meticulous learning process? I'm asking because I'm considering getting into it myself, (seems efficient to brush up anatomy, and also *money*) but I don't know where to start; whenever it gets to ''sexy parts'' it looks kind of awkward, like it shouldn't be there. And morphology references don't seem to help that much : ( If it took a learning curve for you to get where you are, do you have any tips or recommendations? I'm sorry if it's inappropriate to ask, I'm just a bit lost and thought I'd ask someone who knows what they're doing
Hi Anon! I talked about it a tiny little bit in this reply, but that post was mostly about me accepting the fact that I want to draw smut mentally lol I’ll talk a little bit about my actual learning process here!
My first attempts at drawing this kind of stuff were very awkward, which is obvious and perfectly natural. It felt wooden, stiff, like I had no idea what I was doing but I desperately wanted to make it look good, but didn’t have any tools for it. For the record, this was my skill level when I first started drawing smut.

My very first attempts were very inspired by one specific artist that drew cute yaoi pics, so I pretty much copied some poses from them to get myself familiar with how this whole thing works. At first I didn’t even draw any genitalia, just… wooden bodies smushed together lol
I was miserably bad at it at first, but I feel like something shifted in a couple of years, which incidentally was around the time we got into a bunch of very cool R18 artists, including Mentaiko (Itto). Even though my own artstyle is nothing like Itto’s, the way he draws bodies is so spectacular, I learned a lot from his works. I really encourage you to read Priapus if you haven’t already lol And I studied it as well by redrawing parts of my favourite frames, staring at the pages a lot, trying to draw something similar myself. Studying things that you yourself find hot makes you better at drawing hot stuff – go figure…
And to be honest, I feel like this is still the main thing that I do. I found my sketches from a couple of years ago where I just drew like 40 different vaginas being fingered from all the art that I liked lol It’s a very long learning process. But when it comes to tips, here is what I can say:
Study things that you find hot as much as possible; be it art, doujins, 3d gifs, irl stuff – anything. And try to keep in mind what exactly are you currently analysing and studying: the anatomy, the colouring, the ideas, the poses; all those could be studied separately.
Sometimes I scroll through a lot of irl porn just to get some poses ideas. Don’t take too much time doing it though, like very quick tiny sketches that only take like a minute or so. Just as a little reminder that yes, this pose also works like this. Or when it’s at this angle, the leg goes like this. All those little details are important to remember.
You don’t have to draw the entire body and stress about it; you only have to draw the sexy part and indicate which character it is somehow! You don’t have to show any faces either, as long as it’s easy to see who’s fucking lol
Squishing and pulling are your friends. Bodies are soft… sometimes a drawing with bad anatomy still works because the butt is squeezed too deliciously to look away. You can study hands squishing things or parts of the flesh squishing against each other separately, it’s very helpful.
Make everything very very moist. Add dripping sweat and other liquids, add saliva, tears, a lot of wet surfaces and bright highlights. A lot of drawings feel not hot enough because they’re too dry… that’s my bias though!
I think that’s it… if you have any further questions, please let me know! And good luck with learning and drawing spicy stuff, I hope you have a lot of fun with it and get paid a lot!
16 notes
·
View notes
Note
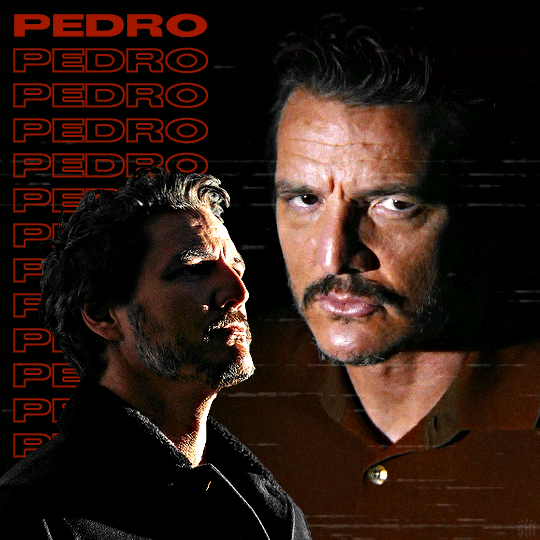
Hi, Nik! I hope you are doing well! If it's okay with you, I have a question about your Pedro birthday edit.How did you get pictures to overlay with the gifs? I'm familiar with gif overlay efect, but this is the first time I've seen an image and gif overlay. It looks so cool. Best wishes.
hi there! getting this effect is super easy! you're simply adding an image layer above your gif and its adjustment layers. since you're familiar with gif overlays, I'm going to assume you're asking how to create a cutout (aka erase the image's background) in order to make that image appear as though it's on top of the gif like this:
there are a few methods for creating an image cutout (click and zoom for a better view). more info below the cut:

in the tool bar, the lasso and selection tools are the 3rd and 4th, and they're nested (so you have to right click the tools to see the other options):

first, let me say: the image you choose will greatly determine how simple or annoying it is to cut the subject. if you find a high-quality image with a solid, high-contrast background, making a cutout will be a breeze. if the background is busy and the edges are fuzzy, it'll be a bit more challenging.
my personal fav tool in most cases is the Quick Selection tool because I find it's, well, quick. you just click a bunch of times until everything you want is outlined by the dotted line. and it works well for both images with solid backgrounds and busy backgrounds. but here's a short explanation of each tool:
Magic Wand: automatically detects a portion of your image using "machine learning" to approximate a selection (a bit too finicky for detailed images or ones with low contrast between the subject and background for me)
Object Selection: allows you to draw a rectangle or ellipse around the subject and automatically detects the selection (I've only used this once, but you can see in the image above, it did a pretty good job! that was just one click)
Quick Selection: my fav! you can adjust the brush size and continually click your subject until the dotted line is outlining it fully
Magnetic Lasso: haphazardly draw a line around your subject and this tool will smart-detect the edges and "snap" anchor points around your subject like a magnet. it's relatively accurate except around finer details like hair
Polygonal Lasso: the most manual and, therefore, my least favorite of the options (hence why I didn't finish it in the example above lol). you have to click all around the subject to connect the dots. not fun for subjects with lots of curves and crevices (at least not for me)
whatever option you choose, the most important part for perfecting the selection is the "Select and Mask..." tool in the upper toolbar:

this tool opens a new panel where you can refine the selection and see the effects in real time. I don't have any go-to numbers for this, it's all about tinkering with the sliders until you're happy with it. but I usually play with everything except Feather because I want sharp edges.
in the gif below, I used the Refine Hair tool (which refines the selection around the hair automatically), moved the sliders very minimally because my selection using Quick Selection was already pretty decent. then, I'm showing you the effects of Shift Edge. increasing it pushes the selection outward, creating a sort of buffer. this could be good if you want to go in later with a layer mask and manually erase some parts yourself. decreasing Shift Edge pulls the selection in tighter. I wouldn't recommend decreasing too much as this can cut off too much of your subject:
once you're happy, click OK and you'll come back to your normal screen with the dotted lines. simply use the Command+J shortcut to duplicate your selection — leaving you with the original image and a layer with only the cutout. from there, you can add a black and white background to check if you missed any bits, and then use a layer mask and black brush to erase them:

then, just like you would if you were overlaying a gif, add the image layer ABOVE your gif and adjustment layers, and color the image separately if needed. you can also choose to add the image above or below your text layers if you have any. in my case, the image is above the text:

sorry this isn't as organized as my usual tutorials, but I hope it answers your question and helps nonetheless! :)
97 notes
·
View notes
Note
‘Twas both 👁👁, but yeah honestly I’m very interested cause damn- (sorry if I seem awkward I’m not good with online interaction 😭😭 LMAO)
NAH no worries you're doing fine!!
It's a pretty wide array of topics but touching the surface of it, I'll go into my art process.
Here's a short thread where I went into this similarly!
I pretty much follow the steps of what I mentioned there, but it varies a little bit based on the style I go for too: painting whole illustrations or design or more simple fun things.
I could describe what I did in each frame of my process gifs which I've posted before but I would need some time. With big pieces, the steps I go by (read slowly, it's a pretty dense text):
thumbnailing -> sketching with bigger shapes to get the line of action/feel (that is, I'm just blocking out the composition) -> refine that a bit -> hide BG, draw the characters (lineart) and add the base colors of them. (then merge & rasterize a copy of it for later) -> put them back in the environment (unhide BG), make them grey -> add shading in greyscale style (multiply layers, glow dodge layers, you name it) -> get that previous rasterized layer back and put it on color mode -> those characteristic shiny parts get a new layer with overly saturated + high brightness colors -> color BG with a new color layer -> then rendering/refining for concerning amounts of time -> add effects and change color/brightness/contrast curves + gradient map -> profit???
For software, I generally use Paint Tool SAI (I adore blending/painting here), I use Clip Studio Paint for the 3D posing library/sketching/lineart, and Photoshop for final effects. (Update: I mostly do all things in CSP now)
(if you have CSP, try out this brush... it saved my life)
As for improvement:
I experiment, watch a lot of youtube videos (I personally like the ones which analyse an artist). I suggest thoroughly understanding how something moves and works (for anatomy I can recommend the book 'Anatomy for Sculptors'), I also study and jot down important pieces of advice or insights to a collective document, rather than saving them to my device where it is highly likely to be forgotten.
I believe if you put great importance on colors and composition, that can cause the most noticeable, 'fastest' improvement, at least if you view it from the lens of social media. (While online environments provide significant reassurance, it must be engaged with in moderation, as it is easy to fall into a lot of negative mindsets, taking the enjoyment out by perfectionism, comparison, or seeking validation, etc.)
Another improvement technique you can try is to slow down a speedpaint video of your choice and follow along with the artist. Extremely useful, I recommend, put your artist under a microscope.
Of course I don't do all of these things every single waking hour, it's just a side hobby to my unrelated studies in real life. Even if you don't actively draw your visual library and knowledge can improve passively, I find that so fascinating. I don't touch a paper for months and there's a sudden jump, like damn what. (Not saying you should do this, active learning is still better ofc) Either way my point with that is, that improving does and did take a lot of time for me as well.
Apologies if this goes all over the place, I tried to touch upon every subject that came to mind at the moment, in not too much in detail, overall I hope it makes sense
If you have any specific questions related, feel free to ask! Or if there's any specific problem you'd like to tackle but find yourself lost, same applies!
#i wrote this before sleeping so it might all be chaotic/nonsensical#thank you for the ask!#asks#art tutorial#art tips
13 notes
·
View notes
Note
hi! i noticed you said you were fairly new to making gifs, and i'm also kind of new and still struggling on how to make the quality crisp/how to get good coloring. is it possible for you to provide some advice / tips for me?
ah hello !! yes, i started last year spring but i'm feeling a lot more confident these days so hopefully i'll have some insights that are of use to you 💜
i yapped a lot, so i'm putting most of this under a readmore
first: tutorials are your friend. gifmakers sharing things are your friend! we gotta look out for each other lmao. how else will we keep our timeconsuming hobby on dying website alive. try to find resource blogs like usergif tutorials section or these sorts of things. im sure lots of us muddled our way through like that. if you have a favorite gifmaker see if they have like a photoshop help or a ref tag, too, that's nice (i dont on this blog, but lots of folks do)
second: quality generally is going to be a lot bit down to your source video. u can sharpen and do everything you like to 480p and it will still be 480p you know? so for kpop, most mvs and that kinda stuff will be in 4k which you can download from youtube and that's nice enough. if you want to have better you can look for masters (which i do, i have a huge list of hoarded mvs). for performances ideally you want either like nice 1080p .ts files or uhd - there are places you can look for that like on twitter or on different sites. basically you want to use the nicest you can get (that wont brick your computer - 4k can be troublesome for this reason sometimes)
third: once you have nice quality video source, a lot of crispiness and prettiness is down to individual sharpen settings and coloring, especially contrast and white balance. curves tool is your friend for fixing tints/white balance/contrast. here's a good sharpen actions set from my mutual @/sugurugetos (and thats her resource blog so it may be worthwhile to poke around in there). i use a combination of my own sharpen settings + photoshop camera raw filter most of the time.
(aside: there are some other more complicated things you can do to nice-ify your footage, like vaporsynth/avisynth or handbrake or topaz upscale or whatever, and im here to tell you i dont use any of those things and i still make it out okay hehe. but there are many tutorials for them too if you like)
fourth: it is a learning curve like any other creative hobby so give it time & keep trying hehe. most gifmakers have their own style of coloring/sharpening and yours will become more apparent once you figure out how you like to do it. i believe in u
#rowan asks#gifmaking#long post#side note: one of the most important coloring skills for kpop gifmaker compared to regular is that you Need to know how to make things#less white and overexposed esp when stage lighting is super duper bright and/or filters are involved#curves + gradient maps on soft light low opacity + selective color white are your friends#hopefully any of this is of some use to you hehe#if you have a more specific question let me know and i can try to answer that too !
5 notes
·
View notes
Note
hey I love your edits and I was just wondering what you use/do to edit your photos? Not to copy, just in awe!
omggg thank you anon!!! the fact u want to know at all means so much 😭💓 especially when theres so many people posting edits that have a much better understanding of how to edit photos than me!!! (may i direct you to the amazing @yesloulou and her gifs..) ask me anything im happy to share and for u to copy my techniques (??) send me any other questions u have if i dont answer them i cud talk abt this all day .. 🫶🫶
so! i use the mobile version of lightroom when im editing photos quickly e.g. on race day, and tbf, its my main editing app. if that doesnt click with u, theres also snapseed which is a google editing app that i also used for a while until i realised lightroom was free (a blessing 😭). I also sometimes use photopea as a rip-off photoshop if i want to do more crazy stuff 🤪🤪🤪
first thing is crop the image if it needs it. i have a preference for portrait photos, just bc i prefer the way they look when posted. i use all sorts of ratios, but my favourites are 3:4 and 5:4 just bc i think they work best with driver portraits! (hot tip: the rule of thirds is soooo helpful!! find a metaphorical 'line' through the photo and line that up with one of the thirds) (lightroom produces the grid automatically when u crop xxx)
the next thing i do with a photo is correct the lighting and colouring. there are plenty of tutorials online and i can go more indepth if u want, but i tend to favour lower contrast with low highlights (bc i hate when u lose detail in highlights. the bane of my existence). its usually the first thing i try, but if it looks horrible i'll try different things. to correct colouring, i use the tint/temperature sliders (im still learning how to intuitively use these rather than messing around and going hm. too purple right before i post). since most of the photos i edit r taken by super talented F1 photographers i rarely have to use curves, but sometimes i do! so i do that as well before i get into the meat of it if needed 😌
then i adjust the tint/temperature & vibrance and saturation until i'm getting the vibe i want (e.g. i love making max photos cooler toned). then i use colour mix to change anything specific about colours in the image (i most commonly use this to make daniel/charles' skin less yellow and more red toned, to soften any redness or to make max's blush pink). then i colour grade!
after that i decide whether the image needs sharpening, extra texture or dehazing, and then i add grain! i prefer a rough, understated grain so that you dont lose loads of the detail from the photo. here's some examples of before and afters of some of my more complex edits:
-> this one was lighting correction and colour correction! i also used curves im pretty sure 😭
-> exposure and contrast changes and colour changes/grading (can we appreciate this photo.. wow)
-> made photo brighter (pretty sure i lowered the highlights..) n changed the temperature of the photo
i hope this helps!!!! if anyone wants me to do like a proper adjustment by adjustment type thing send me an ask and i will do!!! thank you so much kind anon 💖🫵
#ahhhhh anon ur so sweet i hope this is comprehensive?? sorry if i went overboard 😔😔😔#beth answers#lovely internet people
14 notes
·
View notes
Note
Hi! Would you mind making a colouring tutorial? Your control over colours is so impressive! The way you always know how to make vibrant background colours while keeping the skin tones perfectly pigmented. I’m sorry for leaving such a bothersome request :( I always feel lost when it comes to colouring because I never quite achieve the result I have in mind and I don’t really know what setting to modify.
HI! It's not bothersome at all! I do have an old tutorial up about how I color my picspams and I use the same method for gifs so for fear of sounding like a broken record, it might be more useful to check that out here. ^.^
a little more thoughts about the bear edit (i'm assuming this is the post you're referring to, please feel free to correct me if i'm wrong) + if there is something specific you're looking for, it might be easier for me to answer:
scene choices - never underestimate what i'm willing to sacrifice for the color i am aiming for. i wanted the gifset blue so these scene choices were chosen specifically for blue backgrounds with little movement. with that, i sacrificed the # of frames, other scenes that might have matched the lyrics better, other scenes that i thought were prettier but I knew i wouldn't be able to get the blue i wanted etc.
masking layers - this works really well in combination of choosing scenes with very minimal movement. i was only able to bring out the blue in this gif bc carmy didn't move at all. which meant i was able to create a new layer > color the background in > set to soft light > erase parts i didn't like such as blue that covered faces
adjustment settings - as for which layers to edit, i always go through selective colors, color balance, brightness, and curves. with selective colors, if you're not willing to learn color theory (like me bc i'm lazy) then it just comes with messing around with the sliders. for instance, there's a lot of white in the original scenes of those gifs and i know that if i use selective coloring > white > the whites can be turned cyan. then i add another selective coloring > cyan > and ramp up the cyans in there. i also duplicate selective coloring layers multiple times. sometimes i'll end up with 3 of the same layers just to get a vibrant blue. this is how i achieved the blues for this gif. now, i would go back to those layers and use the mask layer to erase all the blues i don't like over carmy & syd.
TLDR; i use a lot of brushing backgrounds and setting those on different modes (soft light, multiply, darken, etc..). i then will brush out all the areas i don't like (over faces, clothes, if it makes a section too grainy). then to enhance the color, i use selective layers. note that you can select for multiple colors in one layer, i personally do it one by one. (ex. if i'm trying to edit the cyan, i just do one layer of cyan and not edit the other colors in the drop down and duplicate to my desire). then finally, a color balance layer to tie it all back together.
#i really wish i was more helpful#but as a creature of habit#i don't think i've learned anything new for photoshop in years#so my coloring methods also have not changed#psq#tutorial
7 notes
·
View notes
Note
Lmao, perhaps 💀💀 Personally, for unrelated oral fixation reasons, I constantly have gum on me. If not, I will chew the inside of my lip and cheek to shreds, lol.
Me as I am LITERALLY doing the same while reading your reply lkjhgfdda
yep yep yep!!! I love that post with all my heart!!
nowadays i'm looking into older cevans characters and Bryce Langley is 👁️🗨️👁️🗨️👁️🗨️ he's so unhinged and yet so pretty
I love ao3 but ao3 is currently not serving me the Bryce content I NEED ,_, really having a moment of dang if I want it do I need to write it on my own??? can't the words just appear on paper from my brain???
kinda related but not really related but kinda related; how does one get into writing smut?
I've read a lot of smut, and I have thoughts about the plot and stuff if I were to write it, but whenever I try I just feel like I'm being too... Cringe? I just can't get myself to write it like how it's happening in my mind, and I'm constantly thinking of the "He would not fucking say that. No one would say that. Do you know how real people talk?" post. :P
Hope you have an awesome day!! 🤍
— 🔪 anon
related to this
Lmao, I love that for us 💀💀
Pumpkin Spice Chris Evans--Byrce. Yes! It's the perfect time for his pretty, tiny, young era, lmao.
Ohh, yeah, I can't imagine there's a ton of written stuff out there for him, though. I barely see gif sets and such of him, so that would track 👀
I would certainly say go for it, though! If you want that content, be the content!
Fuck 👏🏻 yes 👏🏻
As far as how to get into writing smut...
I would say just do it!! It's scary, it really is, but you can do it! There's some amount of learning curve to it, as there is with any skill--writing included--but the only way to figure out where you are on the learning curve is to do it. If you hate it so much, you don't have to publish it anywhere. No one has to see it. That's the beauty. It's for you first and foremost.
I started writing smut after an ex-girlfriend (girlfriend at the time, lol) introduced me to the world of fandom and then to fanfiction. (The longer story is basically that I wrote her some erotic poetry about the sex we had been having for part of her birthday gift, and she was like, this is good. Really good. Are you aware that people Do This? Publicly? For others to enjoy? I was not aware, lmao.) I didn't get into it right, right away, I did a ton of reading of fanfiction and smut first, but eventually, I just started to do it. I honestly don't remember why exactly I started other than I've always loved writing, and I started to become obsessed with Marvel more and more, thanks to being in a fandom, so... why not write for fandom? At the time, I had no idea what I was doing, and looking back, compared to the shit that I write now, you can tell 😅 but that's okay! It's okay if I think the stuff I wrote at first is shit and find embarrassment in those stories now. You know why? Because it means I'm better at it now. I had to start somewhere to get somewhere. Also, hey, there are people out there who've read those first fanfictions I wrote and who appreciate that work exactly for what it is. Many times, I have considered going back and orphaning early works of mine or re-writing/re-editing them. But I haven't. Partly (truthfully) because that takes a lot of time (especially re-working early fanfics), but mostly because I have learned to appreciate in other writers, whether they create fanfiction or otherwise, seeing them evolve. Their voice may mature or become "better" or more developed, but I can read their voice in their words throughout, and I think that's beautiful. I would love to see that in my works eventually. I would love to be that for someone else.
What has made my writing better has not only been continuing to learn how to better communicate what I want to convey to readers through my words but also how to ebolish those cringe barriers. What do I want to write? Filthy, nasty shit [affectionate]. Okay, well, pull no punches. Put in the obscene details. Paint a picture that would make a prude squirm in their seat and have to close their browser. I, like most people in the US, grew up with some amount of puritanical views on sex and sexuality. I am still unlearning those. I feel I had a head start, being kinky because I have to accept those parts of my own sexuality. When I first began writing smut, there were many more unconscious filters. Those filters, I found in my own writing, to be the most cringy. That and bad grammar. But, hey, English is fucked. Write how you wanna write. People don't speak with perfect grammer. Language is a sandbox, play.
7 notes
·
View notes
Note
hi! first of all, i want to say that i love your gifs so much, you always make such beautiful things. i recently started giffing, and i was wondering if you have any tips about settings or process you usually use in your coloring psds? i'm struggling on what steps i should follow :(
hello ! thank you for taking the time to say this !
i usually never know what to say off the top of my head because i am generally chaotic & do things by whim and instinct rather than any real process, but !!! luckily, i was just talking to a friend about it recently so here's what i got.
photoshop settings- i've mentioned this in my main blog before, if you're not already doing this, load all your giffing steps into an action. if you don’t know how to make an action this handy tutorial tells you how. - change your most used commands into easily reachable keyboard shortcuts on the keyboard. for example, assuming you're right handed, your right hand will be cropping and colouring so you could switch command + (w) to open file>export>save for web to see your saving settings / command + ( ` ) to select the next tab. (i'm on a mac so imagine i used windows alternatives ) by using your left hand.
gif saving settings you might have your favourite go-to settings i.e. selective/pattern & bicubic etc. but just like not all sharpenings are created equal, different gif save settings work better for different sharpening styles. try different combis, the results may surprise you. for example, i used to swear by selective pattern+bicubic sharper when saving gifs, but i switched my sharpening style, and started going for a smoother, cleaner, glowier look, and realised after a lot of trial and error that adaptive/diffusion + bicubic smoother works best for the high value sharpening+gaussian blur settings i'm using to create what i want. the big lesson here is don't be afraid to strip everything down and go back to basics sometimes, it's tedious, but it usually pays off. i tried to find the post that taught me this for you and i can't but this one is an alternative !
colouring - the main things you'll be doing to colour a gif are (i don't always follow these in order but usually i do): a) brighten ( i.e. curves, levels, brightness, i used to add a white balance filter but stopped doing that years ago ) b) deepen ( these would be your contrast/gamma correction & offset on exposure adjustment layer/left arrow thingy of the levels adjustment layer ) c) colour correct, the hardest part ! it's like doing makeup. you'll end up using probably everything, colour balance, curves in the rgb setting (i need to learn to get comfy with this bc i'm not yet, but! soon.), selective colour my bff, hue/saturation & vibrance. there are great tutorials out there, but my most recent game-changer is i've finally figured out how to use the channel mixer adjustment. it helps to focus on a neutral colour in the background of your gif when it has an awful orange/green/whatever filter when using channel mixer (like a white wall or blue sky that has turned gross looking bc of the film's base filter), then adjust and play around until it turns into the colour it's supposed to be. then it will be easier to pile on layers over to colour your fc. i am ofc still learning, i have no idea how colour lookup works (i've read tutorials and still don't understand jvhakjx). d) final adjustments. this is when after the above, you decide whether you want to stylise your colouring, make it more vibrant, less vibrant, give it a tint, brighten again or enhance certain colours before saving! - a great way i got the hang of colourings is to open up colouring psds other people have made and toggle each adjustment layer on and off to see what difference they make to the base, you'll start to understand what the purpose of each thing is and why the layers are in that specific order.
last but not least, it took me 10 years to make gifs the way i do now ! my early gifs were all experimental, i went through so many phases (some i'm quite ashamed of, like the low vibrance/high saturation + high brightness trick i used to abuse. why did i do that.), and i did in fact master each adjustment layer (by this i mean learn to use them to their best potential) one by one. don't get discouraged, be patient with yourself and don't be afraid to try things !
11 notes
·
View notes