#[ open in new tab for full-size ]
Explore tagged Tumblr posts
Visit Tumblr Blog
Explore Tumblr blogs with no restrictions, modern design and the best experience.
Last Seen Tumblr Blogs


Fun Fact
Forty percent of Tumblr users are between the ages of 18 to 25.
Text
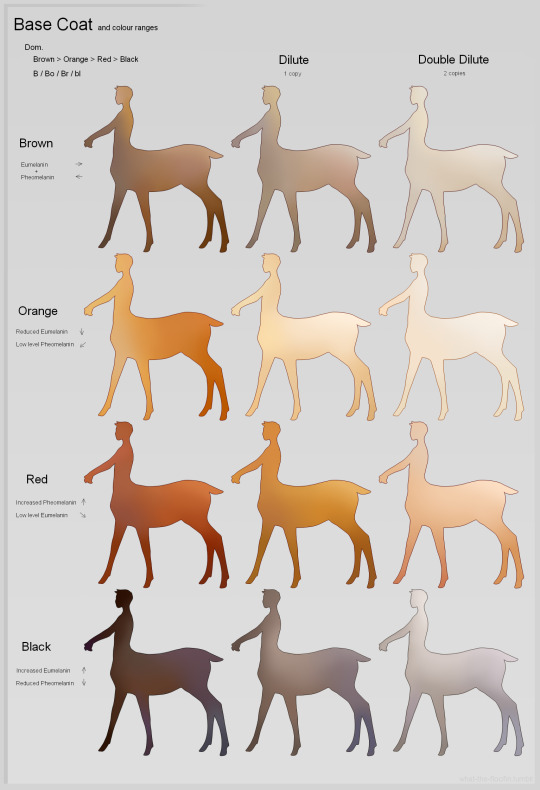
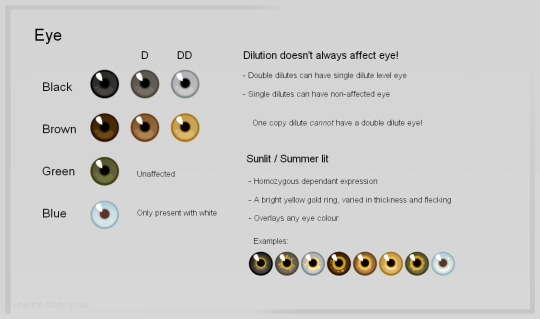
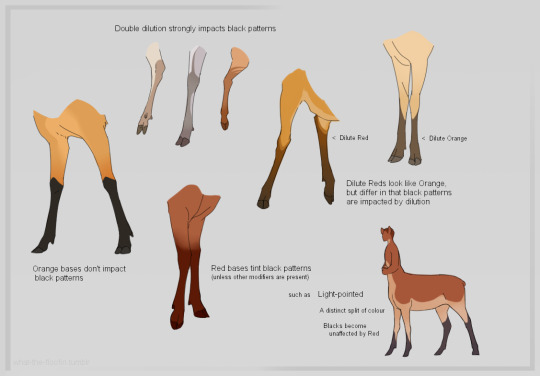
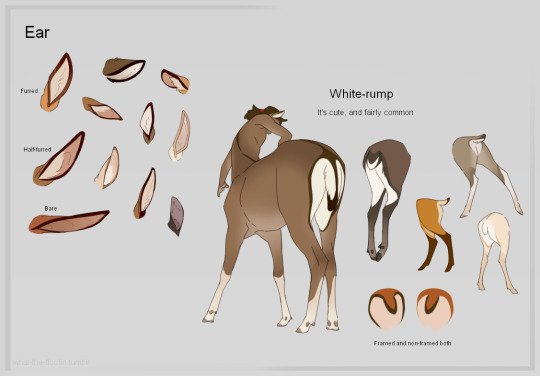
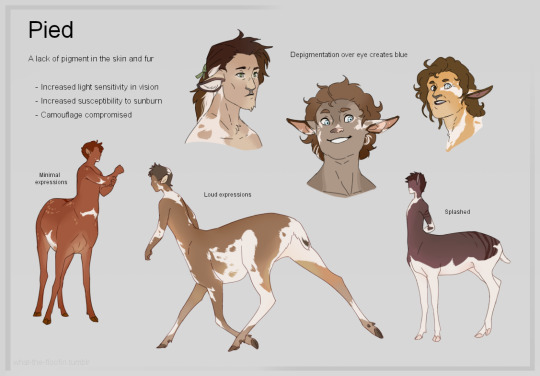
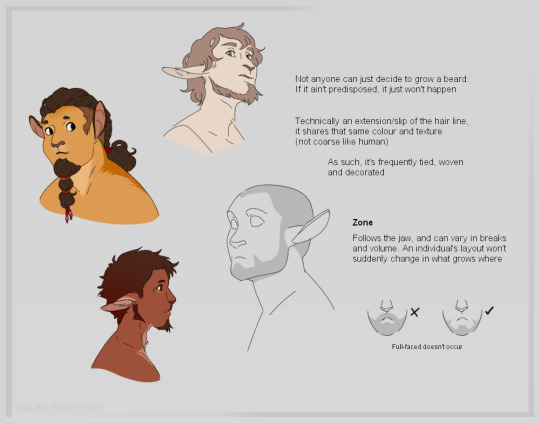

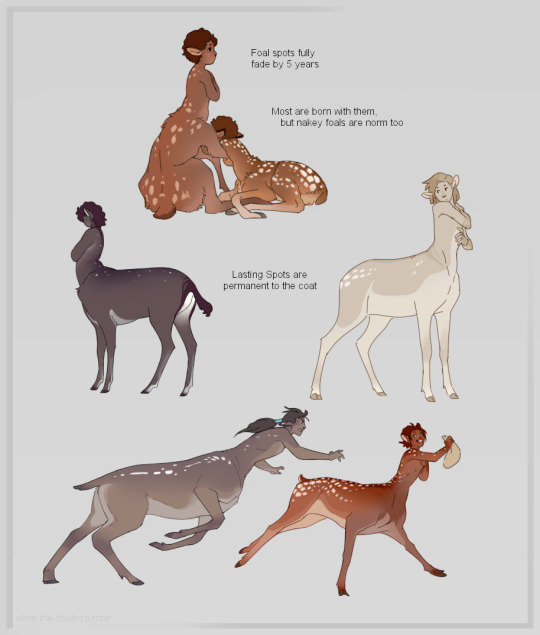
Honestly I think way too much about my cervitaurs at all times so have this compilation of Notes about them
#dnd#dnd art#centaurs#cervitaur#floof in dnd#its ART#accept all these NAKEY taurs for this#they're furred all over anyway lmao#it's not a full comprehensive shebang - with like ALL markings and whatnot - that'd be too much#but some obvious points of interest hell yeah#I make my own rules to follow and it is fun#i dont know how tumblr sizes things anymore but open image in new tab is always our friend - be free
3K notes
·
View notes
Text


Astarion in wine red

#Astarion Ancunin#Astarion#BG3#Baldur's Gate 3#God he's beautiful. I also love the earring combo he happened to have#his ears his nose his nails. his eyes! everything.#mmmm black leather pants too~#open in new tab for full size <3#ezeBG3edits
99 notes
·
View notes
Text
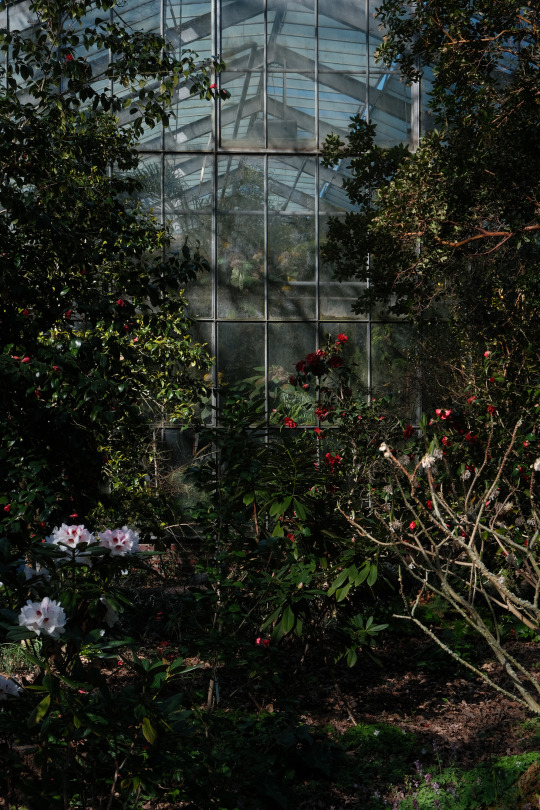
spring at the botanical garden
#photography#my photography#idk i like this one but it doesn't fit with anything else so#you can open it in a new tab if you wanna see it in full size#nature#spring#flowers#plants#botanical garden
262 notes
·
View notes
Text


homey vibes.
20 notes
·
View notes
Text
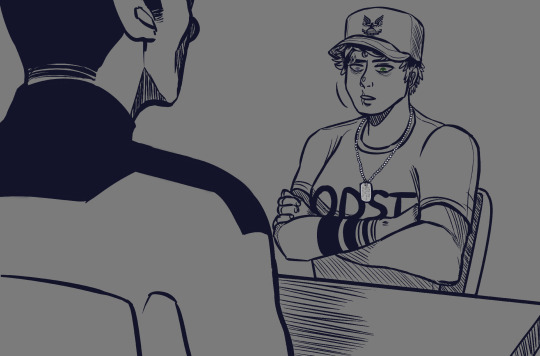
[REDACTED]: You're writing down an awful lot there. Counselor: Just my observations. Does this evaluation make you...anxious?
washed hands interview my beloved
#rvb#red vs blue#agent washington#aiden price#the counselor#this is kinda boring ngl but ehhhhhhhh i put way too much effort into this to NOT post it shsgdjs#idk if its readable anymore bc i had to halve the size of this but i filled out his dogtags lol#those thick bands on his arm are tattoos btw.#and yes my wash has heterochromia bc he deserves it#i did actually color this but i HATED it so. wash had a black eye and sutures across his cheek bc i imagined this interview happening like#right after he beat the crap out of his co. for comparison wash walks away w sutures and a black eye vs his co's broken jaw cracked ribs an#dislocated shoulder. a 'you should see the other guy' moment shsgdhsj#I like to imagine that post court martial instead of throwing him in jail they essentially grounded him and he was barred from going on#missions and he was stuck doing grunt work#they were going to throw his butt in jail but all of his squad mates went to bat for him and the higher ups were like#'omg this guy is way too liked by pretty much everyone if we put him in jail we might have a bigger problem on our hands.'#ANYWAY click or open in a new tab for full quality lol
36 notes
·
View notes
Text
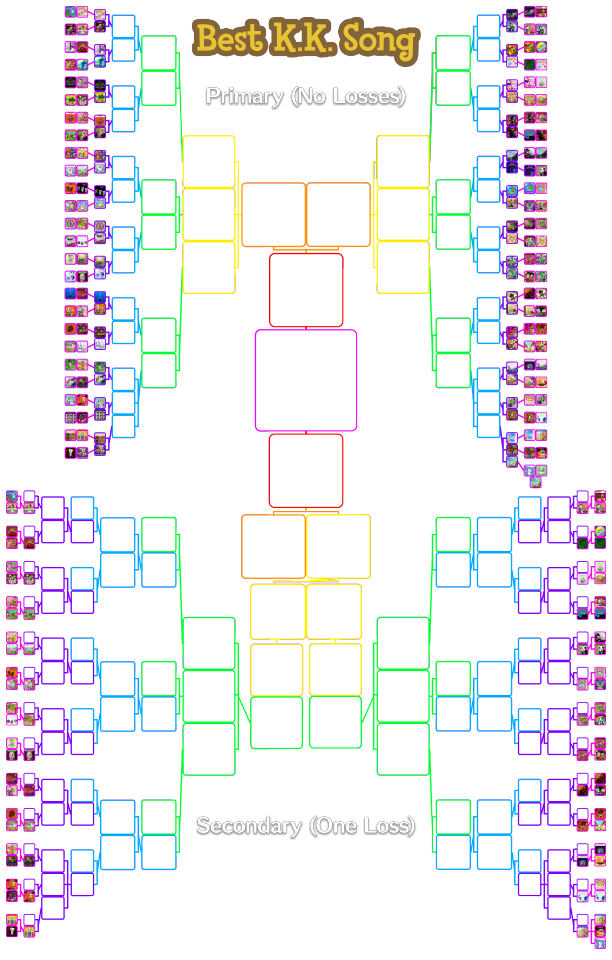
Best K.K. Song Round 1 Results:


Reminder that this is a DOUBLE ELIMINATION tournament, which means a song must lose twice to get knocked out. No songs have been eliminated yet except for Lullaby, because it lost to both Marine Song and Farewell in a three way poll. Tomorrow will be round 1 of the secondary bracket, which will be match ups between all the songs that lost this past round. The losers of the secondary bracket WILL be eliminated and sent to the worst K.K. song bracket, while the winners will still have a chance to be declared the best K.K. song.
numbers below the cut
Animal City 86.5% / Mr. K.K. 13.5%
Spring Blossoms 81.5% / Fugue 18.5%
Disco 79.9% / Pondering 20.1%
Drivin' 79.1% / Safari 20.9%
Condor 78.9% / Oasis 21.1%
Two Days Ago 73.5% / Samba 26.5%
Steppe 71.5% / To the Edge 28.5%
D&B 71.3% / King K.K. 28.7%
Surfin' 71.1% / Dixie 28.9%
Salsa 71% / Khoomei 29%
Bubblegum 70.2% / Technopop 29.8%
Metal 69.1% / Swing 30.9%
Robot Synth 69% / Sonata 31%
Cruisin' 68.8% / Jazz 31.2%
Chillwave 67.5% / Aria 32.5%
Gumbo 67.1% / Reggae 32.9%
Bossa 66.6% / Waltz 33.4%
Stale Cupcakes 66.4% / Soul 33.6%
My Place 66% / Mariachi 34%
Ragtime 65.8% / Mountain Song 34.2%
Go K.K. Rider 65.2% / Chorinho 34.8%
Stroll 64.8% / Slack-key 35.2%
Wandering 64.6% / Blues 35.4%
Groove 64.5% / Bazaar 35.5%
Agent K.K. 63.6% / Parade 36.4%
Jongara 63.3% / Flamenco 36.7%
Love Song 63.2% / Soulful 36.8%
Space 63.1% / Milonga 36.9%
Steep Hill 62.9% / Hypno 37.1%
DJ K.K. 62.2% / The K. Funk 37.8%
Rockin' 61.6% / Ballad 38.4%
Fusion 60.3% / Moody 39.7%
Neapolitan 59.7% / Rally 40.3%
House 58.7% / Bashment 41.3%
Lament 57.9% / Folk 42.1%
Only Me 57.7% / Hop 42.3%
Break 57.3% / I Love You 42.7%
Tango 56.9% / Adventure 43.1%
Western 56.8% / Étude 43.2%
Dub 56.1% / Casbah 43.9%
Rockabilly 54.4% / Mambo 45.6%
Lovers 54.4% / Lucky K.K. 45.6%
Faire 53.4% / Calypso 46.6%
March 52.6% / K.K. Song 47.4%
Isalnd 52.3% / Imperial 47.7%
Rock 52% / Comrade 48%
Welcome Horizons 51.5% / Café 48.5%
Polka 51.4% / Marathon 48.6%
Chorale 51.3% / Country 48.7%
Dirge 50.9% / Birthday 49.1%
Synth 50.6% / Aloha K.K. 49.4%
Forest Life 50% / Ska 50% (less than 0.1% in Forest Life's favour)
Three way poll:
Marine Song 2001 47.2% / Farewell 27.3% / Lullaby 25.5%
#idk about mobile but on desktop click to zoom then right click open image in new tab to get the full size image#I know it's pretty tiny right now sorry
34 notes
·
View notes
Text
just dawned on me that it's been nearly five years since deviantart effectively died. i still miss it so bad
#the current meta is just too different; all of the new art apps seem to be following instagram and artstation#like truth be told i haven't spend that long looking into them but just go and open up sheezy rn and tell me im wrong#galleries don't have folders. no favorites in the profile (a v important part of da's discoverability). images are in a grid of squares#might be controversial but imo if you're an art website your browse tab should display full size images#there's no categories (only tags) and while da's categories were pretty flawed they were much better for browsing. again. imo.#idk man it just strikes me as odd that eclipse killed dA for so many people and then all alternatives follow that design philosophy...
5 notes
·
View notes
Photo


kpopwise at orlando
#onlyoneof#concert#oooposting#full size + open in new tab if you want any of the pics without a watermark lol#this is where ppl got that one ab pic of wook btw
27 notes
·
View notes
Text
@ikuhara
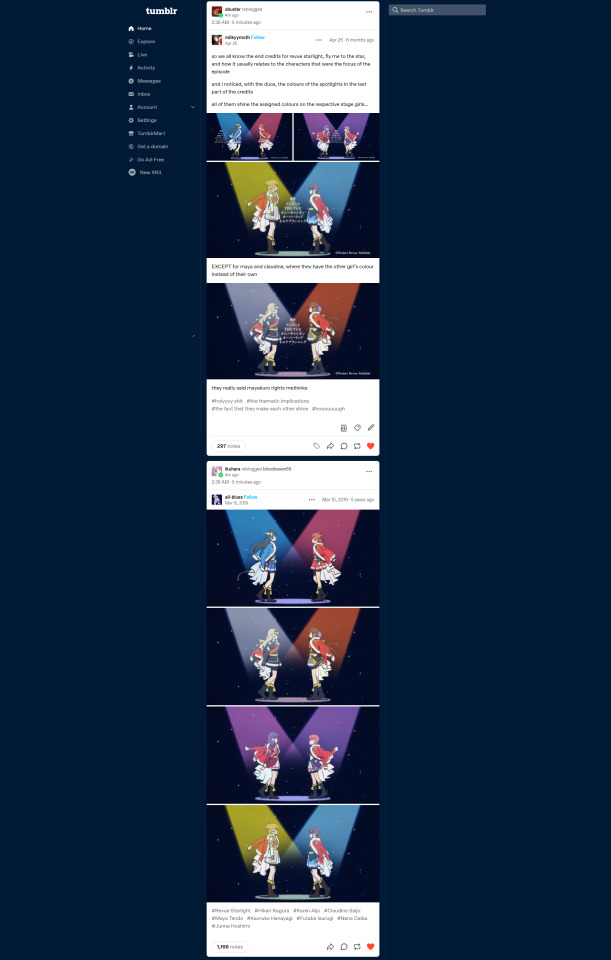
How did this happen?????
#AT THE EXACT SAME TIME?????#TWO DIFFERENT POSTS ABOUT THE FLY ME TO THE STAR SPOTLIGHTS????????#i know posting this as one big image makes it impossible for desktop users to read but#i need to get the point across that this happened at the exact same fucking time#if anyone wants to see the image on desktop just right click and open in a new tab so you can view it at full size#this was the compromise i made to not make a super long post
4 notes
·
View notes
Text
shoutout to tumblr for finally solving the problem that images are too big and easy to look upon. now, thank god, when I click an image in a post, instead of opening the image full screen and full size, it activates an image viewer which displays the image smaller and blurrier. and if, in some fit of madness, I right-click that image and try to open it in a new tab of its own, tumblr saves me from this folly by instead activating still another, different viewer in which the image is even smaller and not clickable. WARNING: if you then try a third time to right-click the image and open it in a new tab, it will finally do so, and the image will be full size and you will be able to click it to zoom in. praying that tumblr fixes this soon
#tumblr problms#fynn posts#in case you are wondering what happens on step one if you right-click-open-image-in-new-tab instead of left clicking#it opens a slightly larger version of the image. but not the full-sized version. for that version you must pass Three Trials as indicated
5 notes
·
View notes
Text

Seth + Shade Relationship Aesthetic
@shadedempsey
Credit: PSD template by @actiasteeth
#aesthetic#shadedempsey#shade#is this what i did instead of plotting and replies last night?#absolutely#adhd the second i found this template xD#full size can be achieved by opening the image itself in a new tab so it can be zoomed in on
1 note
·
View note
Text
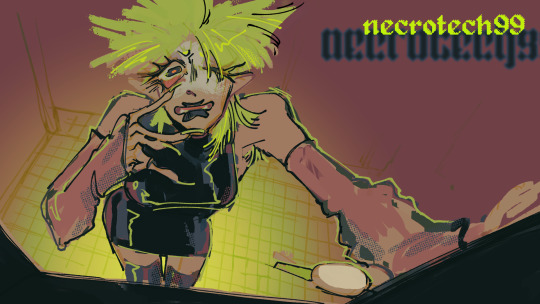
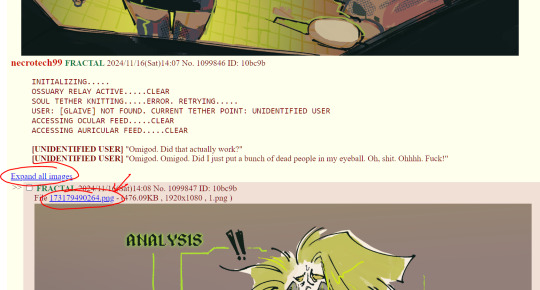
INITIALIZING..... OSSUARY RELAY ACTIVE......CLEAR SOUL TETHER KNITTING......ERROR. RETRYING..... USER: [GLAIVE] NOT FOUND. CURRENT TETHER POINT: UNIDENTIFIED USER ACCESSING OCULAR FEED.....CLEAR ACCESSING AURICULAR FEED.....CLEAR [UNIDENTIFIED USER] "Omigod. Did that actually work?" [UNIDENTIFIED USER] "Omigod. Omigod. Did I just put a bunch of dead people in my eyeball. Oh, shit. Ohhhh. Fuck!"
xxx
necrotech99, an interactive quest, is now live! exact content warnings pending, but necrotech99 is 18+ and will likely contain nsfw and gore/body horror.
FAQ/quest primer for new readers below cut!
Q. ira this website fucking looks like 4chan A. yeah i know i'm sorry. it's not Q. okay so what is this A. it's a quest, which is kind of like an interactive webcomic, or like a forum game, or like a tabletop roleplay where everyone is controlling one character (at a time), or maybe like something completely different from that Q. how do i play? A. leave suggestions in the thread to help collectively guide the story with your fellow readers! suggestions are posted using this input field at the top of the thread page:
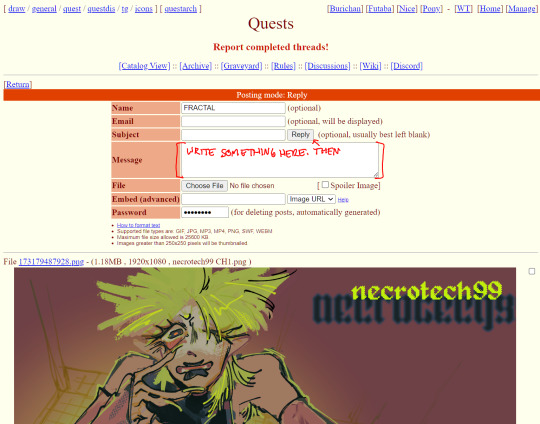
and, a final note on a quality of life thing that isn't very intuitive: all the quest's panels can be expanded to full size by either clicking "expand all images" at the top of the thread, or individually by clicking the blue .png hyperlink above each image, NOT clicking the images themselves (which just opens the images in a new tab for some reason)
550 notes
·
View notes
Text
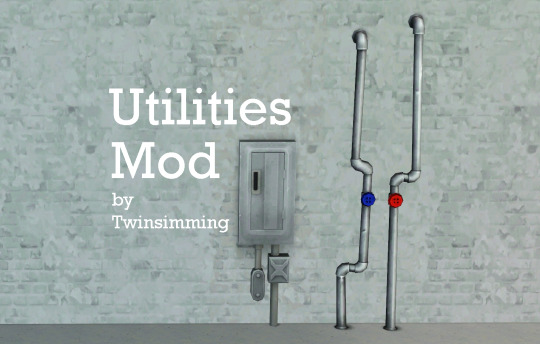
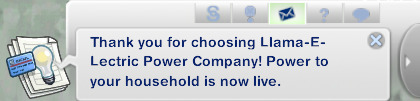
Utilities Mod by Twinsimming 💡💧
This mod adds optional power and water utilities for players looking for some added challenge in their gameplay.
This is a script mod that can be placed in your Packages folder. It was built and tested on 1.69 but should work fine on 1.67.
New Objects
Power Box
- Price: §0 - Category: Misc. Electronics/Misc. Appliances - Includes 3 original swatches + 1 recolorable option (3 channels) - Poly Count: 274
Water Pipes
- Price: §0 - Category: Misc. Plumbing - Includes 3 original swatches + 1 recolorable option (3 channels) - Poly Count: 1065
Utilities
The Power Box controls power and the Water Pipes control water (self explanatory :p). Both utility objects are free in buy mode in the Misc. Electronics tab and Misc. Plumbing tab, respectively.
Once placed down on your lot, you can enable one or both utilities. When the utilities are enabled, power and/or water will be cut off to certain objects on your lot until you "Turn On" the Power Box and/or Water Pipes.
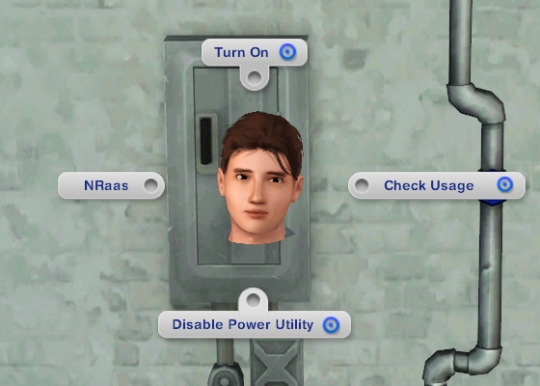
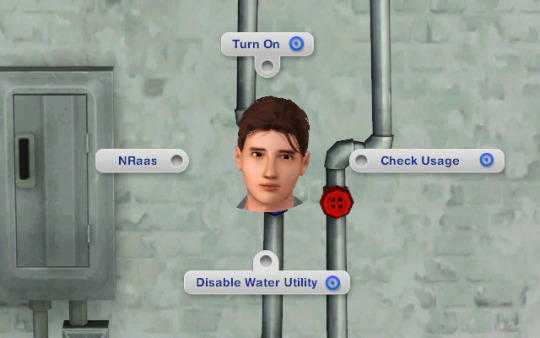

While the utilities are on, your sims will be charged between §1 - §3 simoleons for every 10 minutes they use an object that requires a utility, with the charge varying based on the size of the object. The total cost will be added to your next household bill.
If you want to opt out of the utilities system, just use the “Disable Power Utility” and “Disable Water Utility” interactions available on the utility objects.
The utilities system only applies to the active household.
A full list of all of the objects affected by the Power Box and Water Pipes utilities and their usage costs can be found on the mod download page.
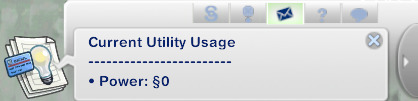
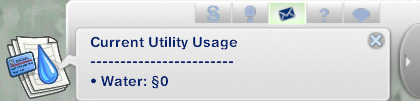
Utility Costs and Usage
To check how much you've spent on utilities during the current billing cycle (between when you pay your bills and the next bill payment), click on the "Check Utility Usage" interaction on either utility.
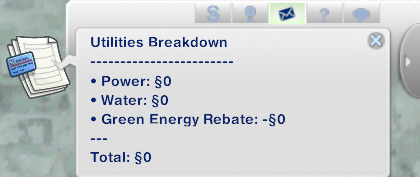
To see your full utilities breakdown, use the new "Check Utility Costs" interaction on the computer.
Also included in the full utilities breakdown is a Green Energy Rebate total.
This total calculates how much money a lot saves by using the Solar Panels and Wind Turbines from the Sims 3 Store and factors that into the total utilities cost.
The full utilities breakdown also shows up when your sim pays their bills.
Lack of Funds
If your household funds fall below the usage cost of a utility, that utility will be shut off and cannot be turned back on until your funds are sufficient.
Bill Delinquency
If you’re late on paying your bills, your utilities will get shut off. Both utilities will be shut off when your bills are two days old.
Tuning
All of the tunable values can be found on the mod download page under the header “Tuning”.
Script Namespace
If you want to turn another object into a power or water utility, open your desired object in s3pe and replace the current script name with the following:
Sims3.Gameplay.Objects.Twinsimming.Utilities.PowerBox
Sims3.Gameplay.Objects.Twinsimming.Utilities.Water Pipes
Conflicts & Known Issues
These are new scripted objects so there shouldn’t be any conflicts.
Credits
EA/Maxis for The Sims 3 and The Sims 4, Visual Studio 2019, Sims4Studio, Blender, Milkshape, TSRW, ILSpy, s3pe, Notepad++, and Gimp.
Thank You
Thank you to gamefreak130, @zoeoe-sims, @greenplumbboblover, and @echoweaver!
If you like my work, please consider tipping me on Ko-fi 💙
Download @ ModTheSims
737 notes
·
View notes
Text

✨ Simple Gif Colouring for Beginners ✨
I wrote up my basic gif colouring process for a friend recently, but a couple of people here mentioned they'd also find it helpful! so, as requested, this is a beginner-friendly walkthrough of the way I colour my gifs :) it's aimed at brand new gif makers with no prior experience with photoshop or photo editing.
when I first started gif making I found colouring and photoshop in general suuuper daunting, so I've tried to simplify everything here as much as possible. hopefully this will be relatively easy to follow and not too intimidating!
a couple of things to begin with:
I'm only talking about colouring here - this is not a full gif making tutorial. I've linked to some of my favourites of those here!
I personally like to make bright, 'clean' looking gifs with vibrant but natural colours, so that is the style of colouring this tutorial is geared towards. most of gif colouring is subjective and about personal taste - the only thing that I'd say is possible to get wrong is skin tones, which I talk about a lot in this guide.
as I mostly gif Thai dramas, most of the advice is geared towards colouring for East Asian/South East Asian skin tones - but the techniques should be fairly universally applicable (and here are some tutorials that talk about gif colouring for other skin tones).
I'm not an expert! I'm not claiming this is the best or the only way to colour gifs - it's just how I do it.
this post is very image-heavy. if the images aren't loading (or the gifs are running slowly or cutting/looping weirdly), then try viewing the post in its own tab (rather than on the your dash or someone's blog) and refreshing the page.
okay, full walkthrough beneath the cut!
contents:
1. intro a. natural gif colouring goals b. very very basic colour theory 2. super simple colouring (the essentials) a. curves b. selective colour (and skin tone correction) c. hue/saturation d. saving and reusing colouring e. another simple colouring example 3. other adjustment layers a. brightness/contrast b. levels c. vibrance d. colour balance e. channel mixer 4. troubleshooting a. curves b. saturation 5. fin!
1. intro
the colouring part of gif making can be super overwhelming, especially if (like me when I first started!) you're completely new to photoshop and/or have no experience with colour theory or photo/video editing.
if you're opening photoshop and making gifs for the first time, I highly recommend getting used to making a few basic, uncoloured gifs to begin with. just to practice, rather than post anywhere (though you can always come back and colour them later if you want) - but it'll make the rest of the process much easier if you're already beginning to get used to working in timeline mode of photoshop. give yourself a bit of time to practice and get a feel for things like how many frames you tend to like in a gif, where you like to crop them for the best loop, what kind of aspect ratio you like etc* - so that you're not trying to navigate all of that for the first time on top of everything else!
* frames: for me between 60-90 frames is ideal, but 40-120 frames is the absolute min-max I'd personally use in a normal gifset loops: for the smoothest loops, try to avoid cutting someone off mid-movement or mid-word if possible. aspect ratio: for full-size (540px) gifs, I tend to go for either 8:5 (slightly 'skinnier' gifs), 7:5, or 5:4 (particularly big, thick gifs lmao)
✨ natural gif colouring goals
part of what can be so daunting about starting gif making is not knowing where to start or what you want to achieve. this is definitely something that gets easier with practice - the more gifs you make, the more you'll get a feel for what kind of look you like and the more instinctively you'll know how to get there. it also helps to see if any gif makers you like have made "before and after colouring" posts - these can help with getting a sense of the kinds of changes made through gif colouring. here's one I made!
in general, I like to make my gifs bright and 'clean' looking, with vibrant but natural colours. these are the things I'm usually hoping to achieve with colouring:
brighten dark scenes
remove muddy, yellowish lighting or filters
saturate colours
correct any skin lightening filters or overexposure
make lighting and colours as consistent as possible between gifs within a single gifset, especially gifsets featuring gifs from multiple scenes/episodes/videos
this guide is focusing on natural colouring, but of course there are many cool ways to make stylised/unnaturally coloured gifs. imo you'll need to master these basics first, but if you want to learn how to do things like change the background colour of gifs or use gradients or other cool effects, then @usergif's resource directory has loads of super helpful tutorials!
✨ very very basic colour theory
[disclaimer! I don't know shit about fuck. I do not study light or art. this is just an explanation that makes sense to me exclusively for the purposes of gif making.]
the primary colours for light/digital screens are red, blue, and green. having all three colours in equal measures neutralises them (represented by the white section in the middle of the diagram).

so to neutralise a colour within a gif, you need to add more of the colour(s) that are lacking.
in practice this usually means: the scene you want to gif is very yellow! yellow is made of red and green light, so to neutralise it you need to add more blue into your gif.
it can also mean the reverse: if you desaturate the yellow tones in a gif, it will look much more blue.
looking at the colour balance sliders on photoshop can make it easier to visualise:

so making a gif more red also means making it less cyan.
removing green from a gif means adding magenta.
taking yellow out of a gif will make it more blue.
tl;dr:
neutralise yellows by adding blue (and vice versa)
neutralise reds by adding cyan (and vice versa)
neutralise green by adding magenta (and vice versa)
2. super simple colouring (the essentials)
starting with a nice sharpened gif in photoshop in timeline mode. (these are the sharpening settings I use!)
some scenes are much harder to colour than others - it helps to start out practising with scenes that are bright/well-lit and that don't have harsh unnaturally coloured lights/filters on. scenes with a lot of brown/orange also tend to be harder.
I usually save a base copy of my gif before I start colouring just in case I end up hating it, or find out later that it doesn't quite fit right into a set and need to redo it etc.
so here is my base gif!

it's an okay gif, but it has a bit of a yellow tint to it that I want to reduce.
colouring is easiest to do in adjustment layers, which can be found under layer -> new adjustment layer - or for me they are here:

there are lots of different types of adjustment layers that do lots of different things - but for me the absolute essentials for colouring are curves, selective colour, and hue/saturation.
I also use brightness/contrast, levels, exposure, vibrance, colour balance, and channel mixer sometimes, depending on the gif - but I use curves, selective colour, and hue/saturation on every single gif.

✨ curves layer
the first thing I always do is a curves layer. when you first open one it will look like this:

first I usually click the ‘auto’ button, just to see what happens. sometimes it makes a big difference (it usually brightens the gif a lot) - but on this gif it didn’t do much.
if it had made the gif look nicer then I would have kept it and added a second curves layer on top to do the rest of these steps.
the next step is selecting the white and black points with the little eyedropper tools.
the bottom eyedropper lets you pick a white point for the gif. click somewhere super light on the gif to see what happens - for this gif, I clicked on the lampshade on the left. if it looks weird, I just undo it and try somewhere else - it usually takes a few goes to find something that looks good.
here's what that did to the gif:

then I pick the top eyedropper and use it to pick a black point by clicking somewhere really dark, again playing around until I find a black point that looks good.
here's what the gif looks like after picking the white and black points:

this can take some experimenting, but you can make super easy drastic changes to your gif just with this. in this case, the curves layer took out a lot of that yellowy tint.
and this is what the curves graph looks like now:

you can click and drag those lines to make further changes if you want - I usually leave them alone though. the colours of the lines indicate which colours have been changed in the gif - for example, you can see from that steep blue line on the graph that blue has been added to neutralise those yellows.
next I usually do another curves layer and just press the ‘auto’ button again to see what happens. usually it brightens the gif a bit more, which I like.
‼️if nothing is working: usually with a bit of fucking about a curves layer works well - but sometimes you can’t find a good white and black point anywhere, and instead your gif turns wacky colours and nothing looks good. this happens more often with very heavily colour tinted scenes :( the troubleshooting section at the end goes over some options, including starting with a levels layer instead.
✨ selective colour (and skin tone correction)
skin tones are made up of a mixture of yellow and red.
removing yellow (or adding blue or red) to a gif will make the skin-tones too red - and removing red (or adding cyan or yellow) to a gif will make the skin-tones too yellow.
adding blue to this gif with the curves layer took out the yellowy tint, which I wanted - but it also took the yellows out of Kim's skin tone, which I don’t want. so I need to put yellow back into the skin tones specifically - without putting it back into the rest of the gif.
selective colour layers let you select an individual colour and adjust the levels of other colours within that colour. you can change how yellow the green shades are, or how much cyan is in the blues, for example.
I need to add yellow back into the red tones to correct the skin tones on this gif. this is the case for most gifs in my experience - the vast majority of the time, unless a scene is very heavily tinted in another colour, a curves layer will add blue/remove yellow.
in the 'colors' dropdown, select the 'reds' section and drag the 'yellow' slider higher - this will add more yellow into just the red shades within the gif.

the amount of yellow you need to add back into the reds depends on how much yellow was taken out of the gif initially - I just play around with the slider until it looks right. if you're not sure, it helps to have some neutrally-coloured (not white-washed!) reference photos of the people in your gif to compare to.
here's the result. Kim's skin is a lot less pink toned and much more natural looking:

✨ hue/saturation
this adjustment layer lets you adjust the hue and saturation of the gif as a whole, and also of each colour individually.

I don't use the hue or lightness sliders unless I'm trying to do something more complicated with the colouring.
clicking the dropdown menu that says 'master' lets you edit the saturation of each colour individually. this is useful if your gif is still super tinted in one colour.
I thought the yellows on this gif were still slightly too bright, so I switched to the yellow channel and desaturated them slightly. (remember if you do this then you need to go back to selective colour and add more yellow into the red skin tones to balance out the desaturation!)
then I increased the 'master' saturation of all the colours to +5:
I usually find the right amount of saturation is somewhere between +5 and +12, but it depends on the gif.
‼️if the gif feels undersaturated, but the saturation slider isn't helping/is making the colours worse, try a vibrance layer instead.
done!

✨ saving and reusing colouring
you can copy and paste adjustment layers between gifs to make your colouring even across each of your gifs for one scene - so if you're making a set of multiple gifs of the same scene, or you think you might want to gif the same scene again in the future, you can save it as a psd so you can reuse the colouring again later.
each gif's colouring will then still need tweaking - different cameras/angles/shots of the same scene can still start out with slightly different colouring.
I recommend uploading the gifs as a draft post on tumblr so you can see what they all look like next to each other and catch any inconsistencies.
✨ another one! (speedrun!)

HI KEN!
the white point for the curves layer was in the window behind them.
the curves layer removes the muddy yellow tint, but again it makes their skin tones (especially Ken's) very red toned, which is adjusted by the selective colour layer.
3. other adjustment layers
imo many many gifs can be coloured really nicely with just those three adjustment layers, but some need different adjustments.
✨ brightness/contrast

pretty self explanatory!
I personally usually avoid using the 'brightness' slider because I rarely like the effect - I only tend to use the 'contrast' one.
the 'auto' button is sometimes useful though, especially if you’re struggling with the curves layer.
✨ levels

levels alters the white and black points of the gif, like curves - but unlike curves it doesn't also alter other colours.
use the sliders beneath the graph to alter how dark/light the gif is. you can slide the black slider further to the right to make the blacks darker, and the white slider to the left to make the whites lighter.
levels is a good place to start if your curves layer isn't working.
(I'm going to hit the image limit for this post lol so here are some screenshots of a table I made to demonstrate this rather than actual gifs. sorry!)


on both sides, I dragged the sliders up to where the big jumps are on the graph - this is usually a good place to start!
✨ vibrance
vibrance... makes the colours more vibrant. it's more subtle than saturation.
it's really helpful for gifs that feel grey. sometimes adjusting saturation just makes the greys kind of weirdly tinted, but a vibrance layer can fix that.

vibrance is much more subtle!
✨ colour balance

colour balance affects the overall balance of colours within a gif.
it's good for scenes with heavy tints.
I tend to stick to the 'midtones' dropdown, but you can also alter the colour balance within the shadows and highlights if you want.


✨ channel mixer
I avoided channel mixer for such a long time because it scared me. but it's great for scenes that are very heavily tinted in one colour.
basically, it works with the levels of red, green, and blue within a gif. you select an output colour and then play around with the levels of the colour you selected within each other colour.
kind of the reverse of selective colour?

so in the 'blue' channel, the levels of blue are at 100%, and the levels of red and green are at 0% - but you can impact how much blue is in the reds and greens and blues.
this tutorial explains it well - but imo the best way to get to grips with channel mixer is just to play around with it a bit (sorry)
(when I made this guide for my friend, I also made a slightly more complicated gif colouring walk-through that included using channel mixer. there isn't space to include it within this post, but if anyone is interested I could always upload it as an 'intermediate' gif colouring tutorial - lmk!)
4. troubleshooting
‼️curves
usually with a bit of fucking about a curves layer works well - but sometimes you can’t find a good white and black point anywhere, and instead your gif turns wacky colours and nothing looks good. this happens more often with very heavily colour tinted scenes :(
for example, with this base gif:

using many of the brightest points as a white point turn it wacky colours, like this:

yikes :(
some options for these cases:
try brightening the gif first with the 'auto' button on the curves layer or with a levels layer. having a brighter gif to start with can give you better options for picking a white point.
try finding an alternate, whiter/brighter white point. look for places the light reflects - on this gif, using the light on Porsche's cheekbone works well as the white point. it also helps to find places that would be white if the scene wasn't tinted - the lightest part of a white shirt is often a good place to start, for example.
skip the curves layer, and instead use a levels layer to alter your white/black points, and colour balance or channel mixer to balance the colours.
‼️over/undersaturation
if your gif (especially the skintones) is looking a little washed out or lifeless, it might be undersaturated. boost that saturation - or if that's not working, try a vibrance layer.
oversaturation is often easiest to spot in the mouths and ears of any people in a gif. if the mouths are looking unnaturally, vibrantly red, then you've gone too far with the saturation.
5. fin!
and done! I hope this was coherent helpful to somebody.
if there's anything that I've missed or that doesn't make sense pls feel free to shoot me an ask or a message and I'll do my best to help! I've also collated a bunch of additional reading/resources below.
happy gifmaking 🥰
✨ some links!
photoshop basics by @selenapastel
gifmaking for beginners by @hayaosmiyazaki
gifmaking guide for beginners by @saw-x
dreamy's gif tutorial by @scoupsy-remade (includes instructions on how to blur out burned-on subtitles or annoying video graphics)
beginner's guide to channel mixer by @aubrey-plaza
how to fix orange-washed characters by aubrey-plaza
colour correcting and fixing dark scenes by @kylos
does resampling matter? by usergif
how to put multiple gifs on one canvas by @fictionalheroine
watermarking using actions by @wonwooridul
resource directory by @usergif
#i got a couple of asks about this so i figured i'd type it up as a post#it's been sitting in my drafts for a while now though i'm so sorry omg.#i had to replace my laptop and it took me a while to get round to downloading photoshop on the new one#but i hope this is helpful!!#gif making#tutorial#photoshop tutorial#colouring tutorial#coloring tutorial#gif colouring#gif coloring#photoshop resources#gif tutorial#gif resources#userbunn#uservik#darcey.txt#darcey.gif#usergif
786 notes
·
View notes
Text


I made myself a higher-resolution version of the tiny skk cuddling for my desktop background, so I made a phone version too while I was at it.
Click on them and then open in a new tab (desktop) or tap them (mobile) for the full resolution, both are 16:9, the desktop one is 1920x1080 and the phone one is 754x1340 (which is nothing but hopes and dreams because phones can't agree on screen sizes)
Enjoy! 💕
2K notes
·
View notes
Text
Best K.K. song round 1 secondary bracket results:
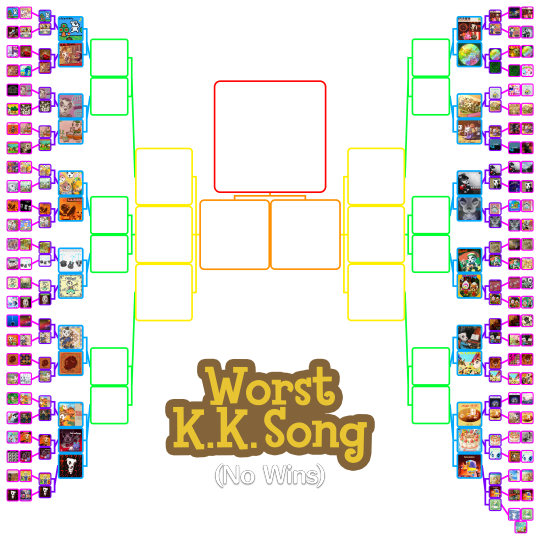
Soul 76.9% / Khoomei 23.1%
Bashment 75.7% / Mr. K.K. 24.3%
Aloha 69.6% / Safari 30.4%
Étude 68.9% / Fugue 31.1%
Technopop 66.2% / Parade 33.8%
Jazz 65.8% / Bazaar 34.2%
Lucky 64.1% / I Love You 35.9%
Ska 62.2% / Comrade 37.8%
Adventure 62.1% / K.K. Song 37.9%
Slack-Key 61.6% / Samba 38.4%
Flamenco 59.9% / Dixie 40.1%
Sonata 59% / Casbah 41%
Hop 58.7% / Rally 41.3%
Swing 58.6% / Blues 41.4%
King K.K. 57.2% / To The Edge 42.8%
Waltz 55.1% / Marathon 44.9%
Oasis 55% / Pondering 45%
Folk 55% / Mariachi 45%
Country 54.1% / Reggae 45.9%
Hypno 52.1% / Birthday 47.9%
Aria 51.3% / Soulful 48.7%
Mambo 50.8% / Milonga 49.2%
Imperial 50.7% / Ballad 49.3%
K. Funk 50.3% / Chorinho 49.7%
Mountain Song 50% / Calypso 50% (winner chosen by tie breaker mom)
The three way poll:
Café 43.5% / Farewell 34% / Moody 22.5%
The three way poll to determine who advances in worst K.K. song:
Moody 46.9% / Lullaby 35.4% / Café 17.7%
Secondary bracket round 1 over! Tomorrow worst song round 3 will start. What happened to worst song rounds 1 and 2? They were the same match ups as primary round 1 and secondary round 1, and the losers advanced in the worst song bracket.
There were lots of really close matches, so if your favourite ended up in worst, you probably shoudn't feel too bad about it.
It's gonna be a bit confusing determining what order the brackets post in, so just trust I'm doing it in the most efficient way I can lmao
9 notes
·
View notes