Cosplay creation / Tutorials / Trying to be funny / Not Sponsered by Taco Bell
Don't wanna be here? Send us removal request.
Text
Cosplay is realizing the dress you are making is 100% see-through and panic searching through your fabric stash for an additional lining fabric.
1 note
·
View note
Text
plot lines where the characters pretend to be in a relationship and end up catching real feelings will never get old and that’s just the FACTS
59K notes
·
View notes
Link
This is reference for the venom tongue...
0 notes
Photo


Sailor scouts at Colossal Con 2018 @blonderuby as Venus Follow us on Instagram at @starsquadcosplay
52 notes
·
View notes
Photo


@mistressofcostumes Follow us on Insta! @starsquadcosplay
12 notes
·
View notes
Text
How to Make Quick and Easy Tattoo Sleeves
Got a cosplay idea but the character has lots of arm (or leg) tattoos? Don’t feel like painting on yourself with body paints or hunting down that horrendously expensive temporary tattoo paper? Here’s a quick tutorial for making tattoo sleeves using nylons and sharpie markers!
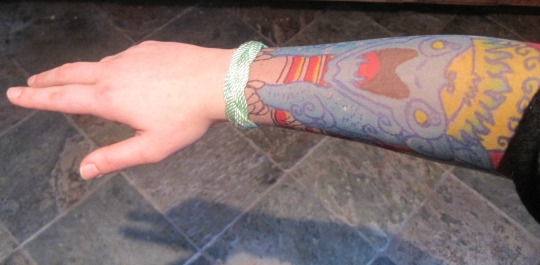
Upsides:
- Supplies are cheap! You may even have many or all the supplies you need right at home.
- Quick and not very messy! No paint is involved, and sharpie marker dries instantly.
- Easy! Great artistic skill not required.
- They move with your skin! People have legit thought these were real tattoos. From a distance, yes, but I had guys at cons with actual ink on their arms come over to compliment on my full (fake) sleeves.
- You get to eat pringles! More on that later.
Downsides:
- They are delicate. Nylons get holes in them super easy and forearms run into stuff, lean against things, and generally make it hard for the sleeves to survive. But if you only need them for a weekend, that’s ok.
- I haven’t experimented too much, but unfortunately this technique probably doesn’t work for wearers with darker skin tones. Sharpie ink is transparent, so any color it rests on just multiplies and the tattoo won’t show up very well. You’ll want to go the fabric paint or body paint route to get the best bold, bright tats.
- Can’t do white sections, because sharpie ink is transparent and doesn’t come in white. I leave them blank and they read OK, but the white areas will always be pink, tan, brown, etc. unless you dab in a little fabric paint, which will not be covered in this tutorial.
- Sharpie is supposed to be permanent marker, but on skin…it’s not. The ink will most likely wear off onto adjacent clothes. Not that big of a deal for me, as I tend to wear my tats with white shirts that can be bleached, but other shirts may not survive as well.
OK, let’s go! Here are your supplies:
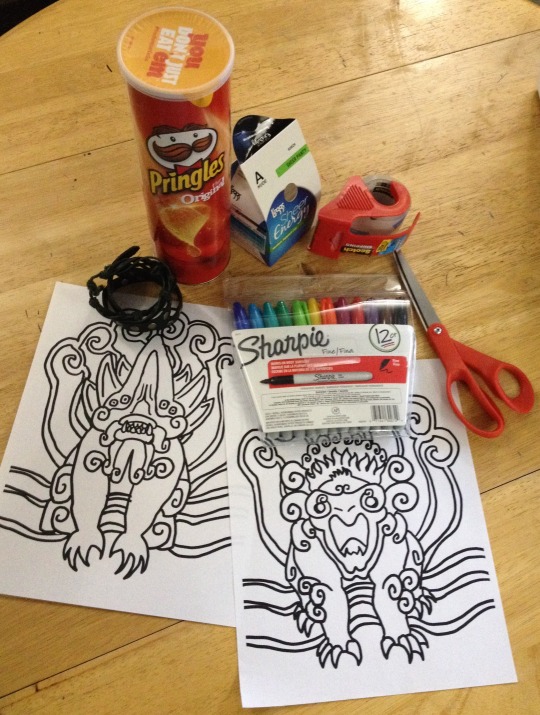
You’ll need a pair of nylons, scissors, tape, a set of sharpies, your designs printed out on 8.5 x 11 paper, some bracelets, and a can of Pringles. You can use any design you want, of course, but Here is the link to these fine Newt Kaiju tattoo designs.

If your nylons have an undies part, cut the legs off and wear the undies on your head for the rest of the tutorial, if desired. Put the legs on your arm like so, and cut the toes off so you can slip your hand through. You can cut some of the top of the sleeve off as well, but don’t cut too much because you can’t put it back on if your sleeves are too short.

Here are my creepy sleeves. Now for the pringles.

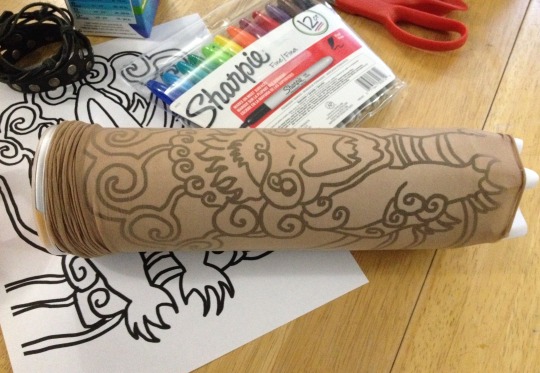
Tape your design template to the Pringles can. It doesn’t reach all the way around but eh. The Pringles can gives you a nice stable surface to draw on that is roughly the shape and size of an arm. It’s a little short, so just roll up the rest of the nylon above the workspace and adjust both template and nylon down when you get to working on that part of the sleeve.

Color with the markers! I recommend doing the colored areas first and then doing the black outlines on top of it, to avoid the black ink contaminating the ink pads of the lighter markers. Remember how that always happens to the yellow ones? Eww. Nylons are thin and slide around a bit, so it’s best to use short strokes and dotting to get the ink on.
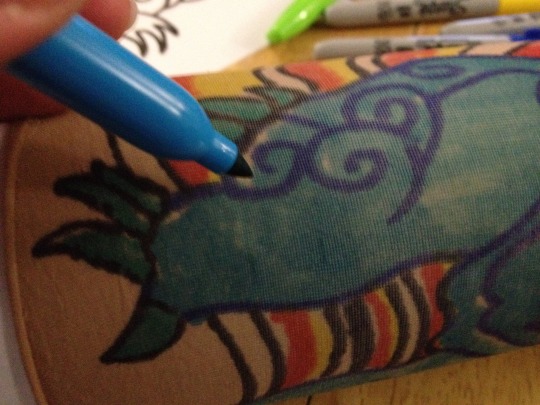
Take the template off the Pringles tube, flip the paper to the blank side and put it back on again. The paper collects the extra ink, so it’s hard to see any missed spots. Now you can see any bits you may have missed. Fill them in for completion. Also, the paper doesn’t manage to wrap all the way around the Pringles can, so now is the time to free-hand a bit of the design where the template doesn’t reach. For Newt tattoos, that’s the back of the arm.
When you’re all done coloring, put them on!

There’s a rough end to the tattoo right at the wrist, of course. Disguise where the sleeve ends and your skin begins with some pretty bracelets:
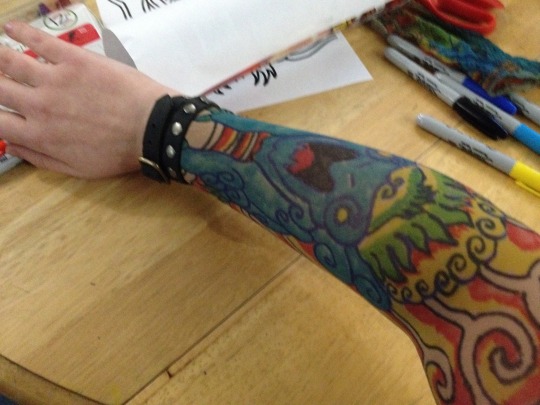
There we are, much better!
Now…you’re done! Have some Pringles!
113K notes
·
View notes
Photo

5 notes
·
View notes
Text
Naruto Supply List
Wigs
Konan
Amber Classic
Literally just chose this wig because it has a color that will work for Konan.
Hidan
Marty Classic
Deidara
Jeannie Classic
Tobi
Jett Classic
Kakuzu
Jareth Classic
Props
Hidan’s Scythe (whatever it is)
just wreck me with that EVA foam.
Konan Wings
PVC
Steel Wire
Craft Foam
Light Grey Fabric
Straps & Clips
Tobi Mask
more eva foam.
maaaaaayyyyyyybbbbeeee clay? its heavy though.
Deidara Mouth Hands
Liquid laytex
Cotton
Fake nails
Kakuzu Masks
Foam
Dollar Store Masks
Headbands
Roofing aluminum
silver craft studs
1 note
·
View note
Text
Fem Bob Ross Cosplay Guide.

Hair
Wigs
Arda Stevie Classic
Arda Ashley Classic
Hair
Just get a perm fam
Glasses
Amazon
Shirt
Amazon
Urban Outfitters
Forever 21
or just go to goodwill.
Pants
Forever 21
Urban Outfitters
0 notes
Text
Antiope, Hippolyta & Wonder Woman Supply List
Eva Foam
Wigs
Antiope (maybe need a ponytail one but gross)
Hippolyta (maybe re-use Crimson Peak one)
Wonder Woman
Cloaks
Hippolyta [ref, joanns {fur, fur2, fabric}]
Wonder Woman [ref, joanns {fur, fur2, fabric}]
Belts
Black faux leather, brown faux leather we have.
Equipment
Dremel
Faux Leather Fabrics
Wonder Woman Skirt
Hippolyta front of skirt, plain brown
Antiope leather details
Detailing
Studs
Buckles
@mistressofcostumes
0 notes


