A twenty year old amateur baker cum chef behind the blog Spatula in My pocket. Love all things chocolate, bright, and sparkly. Check out my recipes @ spatulainmypocket.com
Don't wanna be here? Send us removal request.
Statistics
We looked inside some of the posts by spatulainmypocket and here's what we found interesting.
Average Info
Notes Per Post
16
Likes Per Post
15
Reblog Per Post
1
Reply Per Post
0
Time Between Posts
3 months ago
Number of Posts By Type
Text
17
Last Seen Tumblr Blogs


Fun Fact
Celebrities use Tumblr as well.
Text
Lemon Blueberry Bundt Cake
Lemon Blueberry Bundt Cake
Perfectly moist and lemony bundt cake bursting with blueberries. I was a bit dubious about using frozen blueberries fearing that they might sink to the bottom or become mushy and turn the batter grey; but they actually worked out like a dream. The end result was a beautifully moist yellow cake dotted with pops of blueberries. The tanginess from the lemon is noticeable but not overwhelming, and…

View On WordPress
0 notes
Text
Caramel Apple Cake
Simple, homey, comforting apple cake – the perfect tea time treat for fall. It’s fall and the time of year when it just seems right to put apples and cinnamon in everything. And what goes perfectly with apples and cinnamon, why caramel of course! Filled with apples and topped with a delicious caramel sauce, this cake is quick, easy and oh so good. It makes for the perfect fall treat with its…

View On WordPress
2 notes
·
View notes
Text
A light and fluffy cake that is soaked with three milks and chilled until it is perfectly moist. Topped with whipped cream and fresh fruit, this cake makes for an irresistible dessert!
Tres leches cake is a popular cake in Mexico and Latin America.
It is an ultra-light sponge cake soaked in a sweet milk mixture–evaporated milk, sweetened condensed milk, and milk–hence the name “tres leches” which literally means “three milks”.
The milks vary from recipe to recipe, but most recipes typically use a combination of sweetened condensed milk, evaporated milk, and either milk or cream.
You’d think that all that milk in the recipe would lead to a mushy cake. But when done right, the combination of the three milks creates the right amount of sweetness and texture for a rich, moist, but still light cake.
It makes for the perfect summer treat: sweet, refreshing, melt-in-your-mouth deliciousness, topped with whipped cream.
CAKE TIPS
The whipped egg whites in the batter make it extra light and spongy, so make sure you whip them well.
When adding the three-milk mixture make sure that you pour the mixture evenly and that you reach all the edges and corners of the cake.
After the sponge cake is soaked with the milks, top it with whipped cream and fresh fruit. I used peaches and mangoes, but you can use any fruit that is in season.
To whip cream, make sure the cream is really well chilled. For extra precaution, pop your metal mixing bowl and your beaters into the freezer half an hour before whipping cream.
Store Tres Leches Cake in the refrigerator after covering it with plastic wrap. It’s best to store this cake for several hours or overnight before serving so that the cake has a chance to soak up the milk mixture.
If you have leftovers, they can be stored, covered, in the fridge for up to 3-4 days.
Tres Leches Cake is one of the easiest cakes to make and it tastes DIVINE.
It’s sure to be a crowd-pleaser at your next party. Everyone will be coming back for seconds!
Tres leches Cake
Yields: 12 servings
Ingredients:
CAKE
· 1 cup (125g) all-purpose flour
· 1 1/2 tsp baking powder
· 1/4 tsp salt
· 5 large eggs, separated
· 1 cup (200g) granulated sugar, divided
· 1 tsp vanilla extract
· 1/3 cup (81.3ml) whole milk
SYRUP
· 1 (14-oz.) can sweetened condensed milk
· 1 (12-oz.) can evaporated milk
· 1/2 cup (125ml) milk
TOPPING
· 300 ml cream
· 2 Tbsp granulated sugar
· 1 cup chopped peaches and mangoes to garnish, optional
Directions:
For the cake: Preheat the oven to 180 °C and butter a 9×13 pyrex dish.
In a large bowl, sift together the flour, baking powder, and salt. Set aside.
In a separate bowl, beat egg whites on high speed until soft peaks form. With the mixer on, pour in 1/4 cup sugar and beat on high speed until egg whites are stiff and glossy. Set aside.
In another bowl, beat egg yolks with 3/4 cup sugar with an electric mixer on high speed, until yolks are pale yellow (2-3 minutes). Mix in the milk and vanilla.
Pour egg yolk mixture over the flour mixture and combine gently with a spatula.
Gently fold in egg white mixture until just combined.
Pour batter into prepared pan and spread to even out the surface and bake at for 30-35 minutes or until a toothpick comes out clean.
For the Milk Syrup: In a large measuring jug or bowl, whisk together the sweetened condensed milk, evaporated milk, and whole milk.
When the cake is cool, pierce the surface all over with a fork. Slowly drizzle the milk mixture over the cake.
Make the Whipped Cream: Pour the cold cream and sugar into a large chilled mixing bowl and beat on high speed thick, whipped and spreadable. Spread over the cake with a spatula then decorate with fresh fruit if desired.
Notes
· This cake is best served cold.
· Leftovers can be stored covered, in the fridge for up to 3-4 days.
Recipe adapted from delish
More easy cake recipes:
Old-fashioned Banana Cake
Fresh Peach Cake
Iced Lemon Pound Cake
Tres Leches Cake A light and fluffy cake that is soaked with three milks and chilled until it is perfectly moist.
7 notes
·
View notes
Text
A simple wholesome cake studded with fresh peaches and a crumbly topping.
I love summer for all its bounty – the beautiful cherries, luscious mangoes, juicy melons just to name a few. But, I especially love peaches.
This recipe is a mashup of my Strawberry Cake and Peach Crumble Pie.
It is composed of a simple batter with peaches mixed in and some arranged on top along with a sprinkling of crumble that melts into the cake when baked and creates pockets of gooey deliciousness.
Nothing fancy, but oh so tasty!
This Fresh Peach Cake is the perfect way to show off the season’s juiciest peaches. Whether you pair it with a cup of tea or a dollop of cream, it will be hard to eat just one slice.
Fresh Peach Cake
Servings: 8-10
Ingredients:
Topping
· 1/4 cup (31g) all-purpose flour
· 1/4 cup (50g) packed brown sugar
· 1/4 tsp ground cinnamon
· 2 Tbsp (30g) butter, melted
· 2 large peaches, sliced thinly
· optional: icing sugar for dusting
Cake
· 6 Tbsp (85 grams) butter, at room temperature
· 1 1/2 cups (188 grams) all-purpose flour
· 1 1/2 tsp baking powder
· 1/4 tsp salt
· 1 cup (200 grams) granulated sugar
· 1 large egg, at room temperature
· 1/2 cup (118 ml) milk, at room temperature
· 1 tsp (5 ml) vanilla extract
· 1 large peach, peeled and chopped into small chunks
Directions:
Preheat oven to 180˚C. Grease a 9 or 10-inch baking pan or Pyrex dish with butter or oil. Line the bottom with parchment or wax paper.
Make the topping: With a fork, mix the flour, brown sugar, and cinnamon together. Stir in the melted butter until crumbs form. Set aside.
Make the cake: In a bowl, whisk together the flour, baking powder, and salt. Set aside.
In a large bowl, beat butter and sugar until pale and fluffy with an electric mixer, about 3-5 minutes.
Mix in egg, milk and vanilla until just combined.
Add dry mixture gradually, mixing until just smooth. Stir in the chopped peaches.
Transfer batter into prepared pan and smooth with spatula.
Arrange sliced peaches on top of batter, in a single layer. Sprinkle the crumb topping on top.
Bake cake until golden brown about 45 to 50 minutes. Let cool in pan before slicing. Dust with icing sugar and serve.
Fresh Peach Cake A simple wholesome cake studded with fresh peaches and a crumbly topping.
2 notes
·
View notes
Text
Old-fashioned Banana Cake
Quick and easy: the perfect tea-time snack!
Typically, having a bunch of overripe bananas lying around means only one thing in our house… Banana bread! But I decided to switch things up this time around and make a Banana Cake instead. This easy banana cake recipe makes for the absolute best banana cake you’ll ever try. It’s moist and fluffy, packed with banana flavor with an added punch from the…
View On WordPress
2 notes
·
View notes
Text
Silky smooth homemade Salted Caramel Sauce that uses only 4 ingredients and is ready in 10 minutes!
So rich. So smooth. So creamy.
This is my go to recipe for Salted Caramel Sauce with all the tips and tricks to get it right every single time!
No thermometers, no fancy equipment needed. Just four basic ingredients and a whole lotta patience.
Lets go!
HOW TO MAKE SALTED CARAMEL SAUCE
To make the salted caramel, add granulated sugar to a heavy bottom saucepan over medium heat. Use a wooden spoon to stir to prevent the sugar from burning. The sugar will slowly start to melt and brown.
Once the sugar has completely melted, it will start to change color quite rapidly. As soon as its turns golden amber, carefully add butter to the sauce pan. Once the butter has melted, slowly pour in the cream. There may be some splashing due to the difference in temperature. Let the caramel simmer for a minute. Remove the caramel from heat and add the salt. This part is always a bit subjective. If you prefer regular sweet caramel to the salted variety add in about ¼ of a teaspoon to start, while for salted, I start with ½ a teaspoon and then adjust from there until I get the flavor I like. You can always add more salt but you cannot take away if you add too much!
Leave the caramel to cool down to room temperature. The caramel will continue to thicken. Pour cooled caramel into a jar and store in the fridge. The salted caramel will thicken as it cools, so just zap it in the microwave before using if you want it a little more ‘drizzle’ consistency.
The trick with making caramel sauce is in cooking the sugar just right.
The darker the sugar gets, the more intense caramel flavor your sauce will have. Too light and your sauce will be pale in color and taste like straight sugar. Too dark and your sauce will have a bitter taste that will ruin everything.
So as soon as the sugar reaches that picture perfect caramel shade, add the butter, immediately followed by the cream.
Below are some more tips to make the perfect salted caramel sauce every single time.
TIPS FOR THE PERFECT SALTED CARAMEL SAUCE:
Use a heavy bottom and tall pan. Stainless steel works better than a nonstick pan because you’ll need to see the color of the mixture.
I do not recommend making any substitutions to this recipe. For example, do not substitute granulated sugar with icing sugar nor brown sugar. It just won’t work.
Take care not to add the cream to the sugar prematurely. If you do, the result will be more like sweetened condensed milk.
Make sure all your ingredients are ready to go when you start making the sauce.
Always keep an eye on it because the caramel knows when you’re not looking and will burn as revenge.
USES FOR SALTED CARAMEL SAUCE
Once you have a batch of salted caramel on hand, you will want to drizzle it over everything! Over brownies and apple pie bars, over waffles and pancakes.
You can use it as a filling in cakes and cupcakes, or make salted caramel frosting. You can add a dollop to your coffee or you can eat it by the spoonful…
The options are endless!
Salted Caramel Sauce
Yields: 1 cup
Ingredients:
· 1 cup (200g) granulated sugar
· 6 Tbsp (90g) salted butter, room temperature cut up into small pieces
· 1/2 cup (120ml) cream
· 1/2 to 1 tsp salt
Directions:
Heat sugar in a medium saucepan over medium heat, stirring constantly with a rubber spatula or wooden spoon. Sugar will start to clump together and after about 5 minutes it will melt completely into a thick amber liquid. Be careful not to let the sugar burn.
Once you get the right color, immediately add in the pats of butter. Mixture will bubble up.
Stir the butter into the caramel until it is completely melted.
Slowly pour in the cream while stirring. There will be more bubbling and splattering in this step so again, be careful.
Allow the mixture to boil for 1 minute.
Remove from heat and stir in the salt. Let the sauce cool in the saucepan before transferring to a jar to store in the fridge. Caramel solidifies in the fridge. Reheat in the microwave or on the stove to desired consistency.
Notes:
Covered tightly, this sauce lasts in the fridge for up to 1 month, and up to 3 months in the freezer. Thaw in the refrigerator or at room temperature, and then warm up before using.
Adjust salt according to taste.
Recipe adapted from allrecipes
Salted Caramel Sauce Silky smooth homemade Salted Caramel Sauce that uses only 4 ingredients and is ready in 10 minutes!
1 note
·
View note
Text
Milk Chocolate Chunk Oat Cookies
Milk Chocolate Chunk Oat Cookies
Chunks of milk chocolate and rolled oats. The ultimate cookie combination!
I bake cookies often. Not for any particular reason, other than I find them to be the quickest thing to whip together to satisfy my sweet cravings.
I end up baking half of the dough and stashing the rest in my freezer for the next wave of cravings.
#sorrynotsorry
These Milk Chocolate Chunk Oat Cookies are everything…
View On WordPress
1 note
·
View note
Text
Garlicy, herby, melt-in-your-mouth pillows of dough.
Garlic knots are strips of pizza dough twisted into the shape of a knot, baked till golden brown, and then brushed with a garlic and herb infused butter. I have been craving them ever since I last ate them at Pizza Pigrims in London.
With plenty of time on hand, I tried to perfect the recipe at home and turns out they are SO much easier than you’d expect and packed with flavor.
Nothing beats homemade dough fresh out of the oven especially if its smothered in garlicky buttery goodness.
These rolls are a cinch to make.It is a little hard to tie the dough into knots, but after a few tries you get the hang of it.
Below is a step-by-step guide on how to shape them along with a picture tutorial at the end of the recipe:
How to Shape Garlic Knots
Using your hands, shape the dough into a log.
Cut the log into 1-inch strips.
Roll each strip into a long rope, around 8-inches long.
Tie the rope into a knot.
Don’t worry if they are a little wonky (like mine :p), they still taste delicious.
Garlic knots are best served fresh out of the oven. However, they are still light and soft when served the next day. Simply heat them in a microwave for a few seconds until warmed through.
They are traditionally served as an accompaniment with a bowl of soup, pasta or pizza, but they are so delicious that they can be served alone, and can be a perfect addition to your iftar table.
They are one of the most satisfyingly delicious things to eat and are unbelievably addictive. Try them this Ramadan and let me know they turn out.
More delicious recipes you can try this Ramadan:
Shepherd’s Macaroni Pie
Stuffed Italian Pie
Chicken Bread
Cheesy Baked Pasta
Garlic Knots
Yields: 16- 18 knots
Ingredients:
For the Dough
· 2 1/4 cups (280g) all-purpose flour
· 1/2 tsp (2g) salt
· 2/3 cup (160ml) lukewarm milk
· 1 tbsp (15g) sugar
· 1 standard packet of instant yeast
· 2 tbsp (30g) melted butter or oil
· 1 egg
For the Garlic Butter
· 4 Tablespoons (50g) butter, melted
· 3 garlic cloves, minced
· 2 Tablespoons chopped fresh coriander
· Pinch of salt
Directions:
Make the dough: In a large mixing bowl combine all the dough ingredients and start kneading it for 5-7 minutes until it pulls away from the edges of the bowl.
Shape the dough in a ball and place in a greased bowl. Brush the top lightly with some oil. Cover with a kitchen cloth, and allow the dough to rise somewhere warm until doubled in size, around 2 hours.
Shape the dough: When the dough is ready, punch it down to release the air. Using floured hands on a lightly floured work surface, shape the dough into a log shape (refer to picture guide below). Using a very sharp knife, slice into 1-inch strips. Roll each strip into a long rope. Tie each rope into a knot. You can tuck the two ends of the knots underneath the knot or leave them out. Arrange the knots on two greased baking sheets.
Cover with a kitchen towel and let the knots rest for 30 minutes.
Preheat oven to 350F (180C).
Brush the knots with beaten egg.
Bake the knots for 18-25 minutes until golden.
Topping: While they are baking, make the garlic butter by mixing together the melted butter, garlic, chopped coriander and salt together.
Brush the knots with butter mixture right after they are out of the oven.
Serve hot.
How to shape them
Picture credits: Finecooking
Garlic Knots Garlicy, herby, melt-in-your-mouth pillows of dough. Garlic knots are strips of pizza dough twisted into the shape of a knot, baked till golden brown, and then brushed with a garlic and herb infused butter.
0 notes
Text
Meat, veggies, pasta, plenty of cheese, and a rich creamy sauce… hungry yet?
This cheesy baked pasta casserole is my family’s favorite!
I’ve been making it ever since I first saw Shireen Anwer make it on Masala Mornings nine years ago. Which is why I am reposting this recipe because the pictures and the writing in the original post do not do justice to how awesome this recipe is.
Creamy, cheesy, and oh so comforting! This saucy pasta baked together with ground beef is a crowd-pleasing, no fuss meal which can be a perfect addition to your iftar table.
It is easy to make using basic ingredients and it is a great one to prepare early in the day and then bake in the evening right before iftar time.
This is one recipe your family is going to absolutely LOVE. So easy to make and even more delicious to eat!
The next time you want an incredibly easy weeknight dinner or something new for ifar, give this loaded cheesy pasta bake a try! And don’t forget to take a picture and tag it #spatulainmypocket on Instagram.
Cheesy Baked Pasta
Serves 8-10
Ingredients:
Tomato-Meat Sauce
¼ cup vegetable oil
1 medium onion, finely chopped
1 teaspoon garlic paste, heaped
1 carrot, chopped
½ kilo ground beef
1 teaspoon red chili flakes
1 teaspoon salt
1 teaspoon ground black pepper, leveled
½ cup tomato paste
½ cup sliced mushrooms
White Sauce
2 Tablespoon butter
4 Tablespoon flour
½ teaspoon salt
½ teaspoon white or black pepper
½ teaspoon mustard powder
1 cup chicken stock/water
1 cup whole milk
2 Tablespoon shredded cheddar cheese
Toppings
1 packet of pasta of your choice
Mozzarella cheese, shredded
Dried Oregano
Directions:
1. In a pan, heat oil. Fry the chopped onion till it changes color and becomes soft. Add in the ginger garlic paste and fry till golden brown. Add in the carrot. Mix. Then add in the beef and mushrooms. Mix well on high heat for a few minutes. Then add in the; chili flakes, salt, and black pepper. Keep mixing till meat changes color. Then add in a cup of water along with tomato paste. Mix, cover, and leave to cook on low heat for 30-40 minutes.
2. While sauce is simmering, cook pasta al dente according to package directions. Drain.
3. Add drained pasta to the meat sauce, mix and turn off heat. Put the pasta mixture into a large casserole dish and set aside.
4. For the white sauce: In a small saucepan, heat the butter. Once melted, take the pan off the heat and add in the flour, salt, black pepper, and mustard powder. Mix well using a wooden spoon and bring back to heat. Cook for a minute before adding in the stock and milk. On low-medium heat, mix continuously till the sauce thickens. Remove off the heat and add in the cheddar cheese.
5. Pour the entire sauce over the pasta. Sprinkle mozzarella cheese and oregano on top.
6. Bake in a preheated oven at 180 degrees C for 25-30 minutes until golden and bubbly.
Cheesy Baked Pasta Meat, veggies, pasta, plenty of cheese, and a rich creamy sauce… hungry yet? This cheesy baked pasta casserole is my family’s favorite!
0 notes
Text
A fresh, light (yet dense!), and incredibly moist cake – the perfect treat to bake during quarantine, and enjoy with a cup of tea.
This cake comes together really easily with ingredients you more than likely already have in your kitchen. It is also an excellent way to make use of the juicy strawberries in season.
I also got to use my heart shaped pan, which I often feel gets neglected.
Do not do what I did, which is to try and tip out the cake from the pan!
This cake is way too delicate to be removed from a regular cake pan. Please use a spring from pan with a removable bottom or use any pie dish and serve the cake straight from it.
Here are some other juicy strawberry bakes you might like: Strawberries and Cream Sponge Cake Buttermilk pancakes with strawberry compote
Stay home, stay safe, and bake on. xxx
Simple Strawberry Cake
Servings: 8-10
Ingredients:
· 6 tablespoons (85 grams) unsalted butter, at room temperature
· 1 1/2 cups (188 grams) all-purpose flour
· 1 1/2 tsp baking powder
· 1/2 tsp salt
· 1 cup (200 grams) plus 2 tablespoons (25 grams) granulated sugar
· 1 large egg, at room temperature
· 1/2 cup (118 ml) milk
· 1 teaspoon (5 ml) vanilla extract
· 1 pound (450 grams) strawberries, hulled and halved
Directions:
Preheat oven to 180˚C. Grease a 9 or 10-inch baking pan or Pyrex dish with butter or oil. Line the bottom with parchment or wax paper.
In a bowl, whisk together the flour, baking powder, and salt. Set aside.
In a large bowl, beat butter and 1 cup sugar until pale and fluffy with an electric mixer, about 3-5 minutes.
Mix in egg, milk and vanilla until just combined.
Add dry mixture gradually, mixing until just smooth.
Transfer batter into prepared pan and smooth with spatula.
Arrange strawberries, cut side down, on top of batter, in a single layer. Sprinkle remaining 2 tablespoons sugar over berries.
Bake cake until golden brown about 50 to 60 minutes. Let cool in pan before slicing.
Notes
* If using salted butter, reduce the amount of salt to a ¼ tsp.
**Leftovers can be stored at room temperature, loosely covered, for up to 2 days.
Recipe adapted from Martha Stewart
Simple Strawberry Cake A fresh, light (yet dense!), and incredibly moist cake – the perfect treat to bake during quarantine, and enjoy with a cup of tea.
0 notes
Text
Dense, chewy, delicious and oh-so-addictive!

As I hunker down in my home, socially isolated from everyone I know, I look back at all the things I made in a time that now seems so far away. So many recipes made and shot in my Manchester dorm, each bringing nostalgia in various forms.
These bars, for instance, were first made during one of my many dissertation-writing blocks. With my mind whirring, fingers crimping, and eyes bleeding after hours of slaving away over my laptop, I always headed towards the kitchen as my refuge.
Easy to make, quick to bake; these rich, gooey, dark golden bars were my ultimate comfort treat.
This recipe involves one pesky little step which might sound quite extra but trust me when I tell you that it makes a world of a difference!
Browning the butter
Browning butter is truly a magical process. Simply by adding a little heat, plain molten butter transforms with bits of nutty caramel notes that elevates the flavor of nearly everything its added into.
Do NOT skip this step!
After browning the butter, its all down to a one-bowl flow. It can’t get any easier than that. Here are some extra tips:
Use dark chocolate to offset the overall sweetness of the bars.
Bake until the top is set and the sides are beginning to turn golden brown. They will be soft when you take them out, so let them cool before cutting.
My favorite way to eat these bars is cold when they have set up nicely. They are dense and chewy and o’so good.

Stay home, stay safe, and enjoy these delicious chocolate chunk bars.
xxx
Chocolate Chunk Bars
Yields: 16 small squares
Ingredients:
· 1/2 cup (113g) salted butter
· 1 cup (190g) packed brown sugar
· 1 large egg
· 1 teaspoon vanilla extract
· 1/4 tsp salt*
· 1 cup (130g) all-purpose flour
· 1 cup semisweet or bittersweet chocolate, chopped into large chunks
· ½ cup toasted and chopped walnuts, optional
Directions:
Preheat oven to 180˚C. Line an 8×8-inch baking pan with parchment or wax paper.
In a small saucepan over low heat, melt the butter, stirring occasionally, until it becomes golden brown at the bottom and develops a nutty aroma. Do not burn!
Pour brown butter into a large bowl and whisk in the brown sugar until smooth. Let the mix rest for a few minutes until it is lukewarm.
Whisk in egg, vanilla, and salt.
Stir in flour, chocolate and nuts. The batter will be thick.
Scrape into prepared pan and smooth with spatula.
Bake for 20 to 25 minutes, until the center looks just set and the edges turn golden brown.
Cool completely in pan before cutting into squares.
Notes
* If using unsalted butter, increase the amount of salt to 1/2 tsp.
**Leftovers can be stored in an airtight container at room temperature for up to a week.
Recipe adapted from My Modern Cookery
Chocolate Chunk Bars Dense, chewy, delicious and oh-so-addictive! As I hunker down in my home, socially isolated from everyone I know, I look back at all the things I made in a time that now seems so far away.
1 note
·
View note
Text
Tonight, from Manchester, I raise my bowl of salad to one heck of a memorable year.
2018 goes down in my personal history book as 100% major. It’s been one of those years where I feel blessed far beyond what I even knew to ask for. It’s been filled with gracious opportunity and a lot of hard work.
There have been highs and lows, lots of learning, some tears and plenty of of goodies have come out of my oven, both here and back home.
My phone has been stolen. My laptop’s hard drive has been corrupted. I got a job. I quit my job. Lots of family drama and other unpleasant stuff unfolded. But today we remember and appreciate all the nice things.
Looking through my photos made me realize how much has happened and how quickly time has gone by.
So here it is, my highlights from 2018:
#1
Oh the anticipation of traveling internationally for the very first time ALONE!
I’d been abroad before but never without my parents and siblings so you can imagine my excitement anxiety.
#2
Not having to share a washroom, a bedroom or any room for that matter with any of my many sisters is a MAJOR highlight for me xD
#3
The year I baked my first cheesecake!
And made truffles.
And ate a lot of berries.
#4
The Brathay trip.
The trip of a lifetime.
Rowing on one of the most beautiful lakes of the world, Lake Windermere, taking the ‘leap of faith’, and doing all sorts of other wild activities I never would have imagined myself doing.
#5
Meeting some awesome people and making some AMAZING friends from all over the world.
#6
Falling in love with the beauty of autumn.
#7
Experiencing the magic of Christmas.
#8
Exploring London with my crazy Russian best friend.
#9
Visiting the infamous Dominique Ansel Bakery, and FINALLY trying the mighty ‘cronut’. A moment I’d been dreaming of ever since its creation.
The first bite was magical.
I’m swooning just thinking about it.
#10
The day I met Cupcake Jemma!!
Major fan moment!
My heart was thumping. My palms were clammy. We talked. I told her my sisters and I were huge fans. We took a photo (which came out horrid). And then I tried some of Crumbs and Doilies mini cupcakes.
A day I can relive over and over again.
I might have gone and visited her again. O.o #stalkerandproud
#11
My first roller coaster ride at the Winter Wonderland in London.
It only took about two minutes, but the experience will stay with me forever. It was raining and I was laughing and crying.
The whole experience was just exhilarating! And nauseating.
#12
My first football match.
Though not a sports fan, I wouldn’t mind going again and again.
I loved the electric atmosphere and the excitement you feel with every pass, tackle and goal!
#13
And the highlight that made all the above highlights possible; being awarded the British Chevening Scholarship.
I am incredibly honored to be given this opportunity, to be one among the 1800 scholars out of 65,000 individuals who applied.
It still feels surreal.
Every time I walk through the campus feels surreal.
Thank you Chevening for giving me Manchester.
#14
Last but not the least, the highlight of not just this year but forever; having my laser eye surgery done.
It’s quite possibly the best thing I’ve ever done. It’s changed my life, my confidence, and my happiness. I am SO glad I took the leap and finally got it done.
Huge thanks to my mother for pushing me to get it done (and my father for financing it :p). ❤ ❤
I am incredibly grateful for all that has come my way this year and I want to thank you for sharing this journey with me. Your response to my Instastories makes my day.
Thank you for all of the love and support.
Happy New Year.
Love,
Noor
The Best of 2018 Tonight, from Manchester, I raise my bowl of salad to one heck of a memorable year.
0 notes
Text
Here are six important (read: random) things you should know about me:
I absolutely HATE talking on the phone! It takes me about three days to acknowledge the message before I even think about replying. It’s nothing personal. I’m just not very good on the phone.
The early-morning hours are my favorite and most productive time of the day.
It took me three times to pass Math’s in eighth grade. I get frustrated just thinking about it.
I freeze up and turn completely silent in certain stressful situations or when I am nervous around someone in particular.
I love cheeseball 90’s movies. My favorites are: the Runaway Bride, and the Parent Trap. I could watch these a million times…and I may have done so by now
I am addicted to chocolate.
Which brings us to…
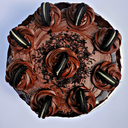
This recipe is defined by its triple dose of chocolate.
These deep dark brownie cookies are a chocolate lover’s dream, my dream.
They are thick and fudgy just like brownies.
They have an intense chocolate flavor and are full of walnut chunks and gooey bits of chocolate.
And they taste out.of.this.world!
Extra thick, extra fudgy and extra chocolaty.
And they’re super easy to make too!
The dough is made with a generous amount of cocoa powder and melted dark chocolate to give the cookies a deep chocolate flavor and very dark color. I recommend using chocolate having 70% or above cocoa solids (preferably Lindt) for that rich dark taste.
I recommend chilling the dough for at least one hour so that the cookies won’t spread too much while baking. If the dough is too hard to handle when you take it out of the fridge, let it sit at room temperature for 15-30 minutes.
Baking time is also very important! Bake the cookies just to the point when the edges start to set. I like to slightly underbake my cookies for extra fudginess and softness. Overbaking will make them dry. Baking time in my oven is exactly 12 minutes, don’t bake them more than 14 minutes. Keep in mind that baking time is different if you bake bigger or smaller cookies than what the instructions suggest.
If you’re addicted to chocolate just like me then you’ll love these cookies!
Deep Dark Brownie Cookies
Yields: 12 cookies
Ingredients:
· 100g dark chocolate, coarsely chopped
· ½ cup all-purpose flour
· 2 ½ Tablespoons process cocoa powder
· ½ teaspoon baking powder
· Pinch of salt
· 2 ½ Tablespoons (36g) butter, softened to room temperature
· ¼ cup + 2 Tablespoons packed brown sugar
· 2 Tablespoons granulated white sugar
· 1 large egg, at room temperature
· ½ teaspoon vanilla extract
· ½ cup chopped walnuts
· ¼ cup semi-sweet chocolate chips
Directions:
Melt the chocolate in the microwave in 20 second increments, stirring after each until completely melted. Set aside to slightly cool.
In a bowl, whisk the flour, cocoa powder, baking powder, and salt together. Set aside.
In a large bowl using an electric mixer, beat the butter, brown sugar, and granulated sugar together on medium-high speed until smooth and creamy, about 2 minutes. Add the eggs and vanilla extract, and beat on high speed until combined, about 1 minute. Pour in the slightly cooled melted chocolate and mix on medium speed until combined.
On low speed, add the dry ingredients. Turn the mixer up to medium-high speed and beat until combined. Finally, beat in the walnuts and chocolate chips. Cover and chill the dough for at least 60 minutes in the refrigerator.
Preheat oven to 180°C. Line a baking sheet with parchment paper.
Roll the dough into balls, about 1.5 Tablespoons of dough each. Place 3 inches apart on the baking sheets and bake for 11-12 minutes or until the edges appear set. The centers will look a little soft.
Remove from the oven and allow cookies to cool on the baking sheet for 5 minutes before transferring to a wire rack to cool completely.
Notes
1. The longer the dough chills, the thicker the cookies will be.
2. If chilling for longer than a few hours, allow to sit at room temperature for at least 30 minutes before rolling and baking because the dough will be quite hard.
Deep Dark Brownie Cookies Here are six important (read: random) things you should know about me: I absolutely HATE talking on the phone!
0 notes
Text
Molten Chocolate Chip Cookies
Molten Chocolate Chip Cookies
Cookies so good I’ve made them three times already!

These are the best chocolate chip cookies I’ve ever had. Period. Why you may ask?
No fancy ingredients needed, only the basics; butter, sugar, flour, egg
No electric mixer required. Just a whisk, saucepan, and some mixing bowls.
No chocolate chips. We use bars of dark chocolate chopped into gorgeous shards and chunks; some big, some…
View On WordPress
0 notes
Text
Everything you need to know about the Chevening Scholarship
Everything you need to know about the Chevening Scholarship
In response to the multitude of questions I’ve gotten on how I received the British Chevening Scholarship, I’ll be explaining the scholarship application process here using my own application as a guideline. I hope this helps and I sincerely hope you apply.
What is Chevening?
Chevening is the UK government’s most prestigious scholarship award coordinated by the Foreign and Commonwealth Office and…
View On WordPress
0 notes
Text
SPATULA IN MY POCKET IS MOVING TO ENGLAND!!!
Specifically…Manchester!
In just 5 days!
And I’m thrilled to finally tell you all about it today! 😄 Seriously, it has been killing me to keep this to myself all this time. My trustees told me not to say a word till the final award letter was here, and then ‘not till you get the visa’, and THEN ‘not till you book your ticket’!
But I’m happy to say that my plan is now officially a go, and in just five days, I’ll be flying across the ocean to my new life in Manchester. And I cannot wait to get this adventure started.
I’ve been dreaming to study in the UK since I was about six when I first started reading Enid Blyton books and fell in love with girl boarding schools. And then came the Great British Bake-Off and I fell in love with Britain all over again. I dream of visiting the Dominique Ansel Bakery, roaming the streets of the Northern Quater, taking pastry classes at Le Cordon Bleu, and studying in a country where there is so much to explore and do.
And in just a few days, I will be making that dream a reality.
I am going to the University of Manchester to pursue a Masters in Innovation Management and Entrepreneurship fully sponsored by the British Chevening Scholarship Program.
Chevening is a UK government international award, which sponsors developing global leaders in obtaining a Masters degree at any British university. This program is financed by Foreign and Commonwealth office and is oriented at future leaders, influencers and decision makers from all over the globe.
After an almost year-long agonizing selection process, I am incredibly honored to be chosen as the youngest Chevening Scholar from Pakistan for the year 2018/2019!
Right now, I think it’s safe to say that I am officially feeling all the feels.
I can’t wait to be swept up in the newness of a brand new place with so much to explore and so many new memories to be made. I am just feeling incredibly excited and lucky that I have the opportunity to take an adventure like this. And more than anything, I am super excited to visit all the donut shops I’ve been stalking on Instagram all these years xD
That said, it’s also sinking in just how much I am going to miss my friends and family here back in Pakistan. And how much life I am going to miss out on here while I am away.
With each passing day, though, the reality of this amazing adventure ahead is starting to feel more and more real. And I absolutely can’t wait to get there and get it all started!!! So thank you in advance for following along on the blog and coming there with me and making this entire journey possible. This scholarship would definitely not have been possible if wasn’t for your love and support that made Spatula in My Pocket what it is today.
I can’t wait to write and share all about my adventures, the wonderful people, places, and food I discover along the way. (Don’t forget to follow me on Instagram!)
Love you all and thank you!
Exciting news! SPATULA IN MY POCKET IS MOVING TO ENGLAND!!! Specifically…Manchester! In just 5 days! And I’m thrilled to finally tell you all about it today!
0 notes
Text
Banana Chocolate Chip Pancakes
Banana Chocolate Chip Pancakes
This is the ultimate recipe for the ultimate stack of pancakes, sweetened with bananas, and loaded with melty gooey chocolate chips.

Confession:Breakfast is my least favorite meal of the day. I’ve had a cup of plain coffee every single morning for as long as I remember. Don’t get me wrong, I love breakfast food: pancakes, waffles, omelets, scrambled eggs! I’d eat “breakfast food” for 90% of my…
View On WordPress
0 notes