
Statistics
We looked inside some of the posts by peegaw and here's what we found interesting.
Average Info
Notes Per Post
9K
Likes Per Post
5K
Reblog Per Post
4K
Reply Per Post
11
Time Between Posts
2 months
Number of Posts By Type
Note
1
Text
10
Photo
6
Last Seen Tumblr Blogs


Fun Fact
The total number of visits Tumblr.com received during January 2021 is 327 million.
Note
Just wanted to pop in and wish you all the best with your wedding! I hope you and your loved ones are well.
Thank you very much! We had the wedding about three months ago and it has been a whirlwind of activity ever since. Here are some pictures from the event:


Thank you again! :)
84 notes
·
View notes
Text
Making Shoyu-Tamago (Ramen Eggs)

I'll be honest with you.
When I first wrote this post I had a questionably beautiful paragraph of melancholia about this thing and that, about life et cetera. Fast forward 2 hours later and all those have been removed and I am now here to bitch and moan about eggs.

Eggs are so deceptive, you see. Seemingly unassuming, but they can be a little bugger to cook and peel. Where I live eggs only come in one size. There are no larges, mediums or smalls so the rule of thumb “6 minutes for a large egg = soft yolk” doesn’t really apply. For these I guess-timated that for medium sized eggs at room temperature I would need to boil them for roughly 5 minutes to achieve firm whites and runny yolk.
To help shell them, there is this neat little trick floating about on the internet where you combine ice cold water with some malt vinegar, for the eggs to be put into to chill after they’re boiled. There is only one catch - you have to let the eggs chill for 3-4 hours.
Good lord. You could lay your own egg by the time you wait for these to chill the ever loving fudge out. You could knit a sweater by the time you wait for these to chill the ever loving fudge out. You could...
You get the point.
So I decided to try another trick, which is to use a push pin to make a little hole at the bottom of each eggs, which worked wonderfully!
All in all these were a modest success. If you scroll further down you can see that the results range from “OOoh pretty egg!” to “Holy shit what is that shriveled thing?”. The important thing though, is that they all taste the same. And that taste is pretty good. The salty-sweet soy sauce brine really brings out the richness of the yolk, so do give it a go to add to your ramen bowl or soups.
SHOYU-TAMAGO:
[ 6 eggs + 1 cup water + 1 cup soy sauce + 2 cloves of garlic, peeled and crushed + 2 scallions or green onion, sliced + 1 ounce ginger, crushed + 1/2 cup brown sugar ]
The majority of recipes I’ve read for these eggs require you to have the eggs cold or refrigerated, and although that may be the norm for most people, in our house eggs never stay around long enough to even make it to the fridge. So, room temperature eggs completely a-okay.
Put all the ingredients except the eggs in a saucepan and bring to a boil over medium-high heat. Once boiled, turn off the heat and set aside to let it cool down to room temperature.

Fill another pan with water and bring to a boil over high heat. Lower to medium-high once the water boils.
Use a push-pin to gently poke a small hole at the bottom of each egg. This will help loosen the eggshells when you peel them.


Gently lower the eggs into the pan of boiling water. Gently being the key word. Set your timer to 6 minutes and pay close attention to it.
From 0 to 2 minutes, grab a chopstick or a spoon and start swirling the water to spin the eggs. You’re going to do this for the entirety of two minutes. The reason for this is the centrifugal force of the spinning water will make the middle the yolk set and harden, while the outer yolk will stay runny - making it the prettiest pretty egg yolk in all the world.
Once you’ve reached 6 minutes, pour out the hot water and run the eggs with cold water until cooled completely. Alternatively, you could submerge the eggs in ice water. Carefully peel the eggs.
Pour the marinating liquid into a ziploc bag or a bowl and submerge the eggs. If you’re using bowl, then put two layers of paper towels on top of the eggs an gently push until submerged completely.

Leave to marinate in the fridge for 12 hours. This will keep for a week in the refrigerator. Bring back to room temperature before serving.

Enjoy!
207 notes
·
View notes
Text
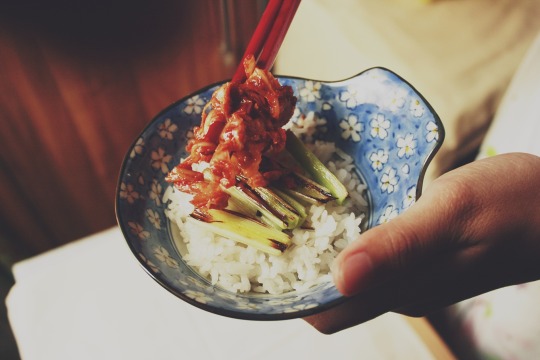
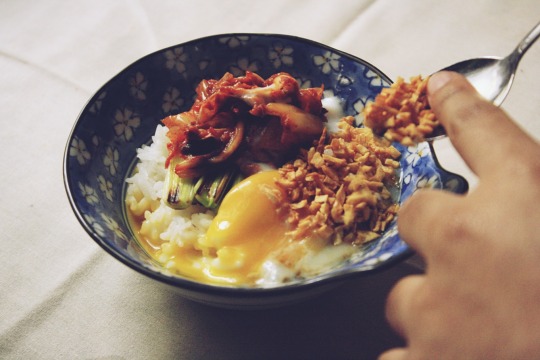
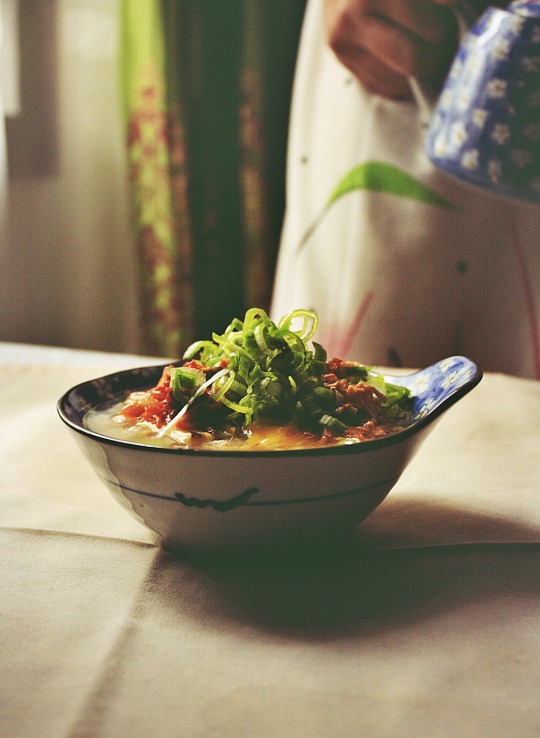
Making Ochazuke
To Beverly, Ema and all of y’all patient and supportive human beings,
thank you.

First things first: during my radio silence...I got engaged!
I think it’s safe to say that nobody was as surprised (in a good way) at this development as I was, and between this thing and that, we now have a little more than 5 months until D-day.
Scared? Excited? Nervous? Try going through a roller-coaster of all three simultaneously and it’ll almost come close. Seriously, I don’t know how you girls who've been through this did it. I feel like I need someone to constantly hold my hand and tether me to the ground or I’ll just float in a charged cloud of nervous excitement.
On top of that, I seem to have grown an emphatic bone seemingly out of thin air, so bad that I sometimes can’t watch Say Yes to the Dress without tearing up a little when a bride (finally) finds her dress. Really, it’s all sorts of a nuisance, except for the fact that it’s also maybe more than a little kind of nice.
Anyway. I digress.
Because whoever said that nothing is like a wedding to motivate you to getting healthy and in shape (does such a saying really exist?), must not be familiar with the saying easier said than done, because all I ever want to do is stuff my face with the greasiest, saltiest food ever known to mankind. The temptation is great, but you must be greater and push through. And, you know, make this.
This is comfort food that’s light and all kinds of pleasant. It’s a simple Japanese dish made by pouring hot green tea, oolong, dashi or even hot water over cooked leftover rice. You can eat is as is, or top it with a variety of toppings, making it as light or as indulgent as you like. Common toppings include salted or preserved food like tsukemono (Japanese pickles), umeboshi (pickled plums), nori (seaweed), furikake, sesame seeds, tarako and mentaiko (salted and marinated roe), salted salmon and wasabi.
Some of these ingredients are quite hard to get outside of Japan so feel free to change the ingredients and create your own ochazuke recipe. I’m putting kimchi on mine - that counts as something pickled, right? With charred green onions, fried ginger-garlic crisps and delivery-packet bonito flakes from that one time we had takoyaki takeout. Onsen-tamago (hot spring eggs !) too, just because wedding dieting sucks lemons and I like to indulge myself.
Also, if you look closely, the editing is a bit of a hodge-podge situation at this point. Part of it is because I’m out of practice, but also because I’ve just downloaded a new post-editing program and I’m having way too much fun trying it out. Possibly maybe will tell you guys about it and maybe do a little tutorial. We’ll see!
(EVERYTHING BUT THE KITCHEN SINK) OCHAZUKE (serves 2):
[ 4 teaspoon Japanese green tea leaves, but any unflavored and not too strong green tea will do + 2 cups hot water + 1 teaspoon soy sauce + 1 1/2 cup warm cooked rice + 1/2 cup kimchi; storebought or make your own, chopped + 2 green onions, charred in a hot pan with a little oil + bonito flakes + garlic-ginger crisps (recipe below)]
Garlic-ginger crisps:
[ ½ cup peanut oil + 2 tablespoons minced garlic + 2 tablespoons minced ginger + salt ]
In a large skillet, heat ¼ cup oil over medium heat. Add garlic and ginger and cook, stirring occasionally, until crisp and brown. With a slotted spoon, transfer to paper towels and salt lightly.

Put tea leaves in the pot. Bring the water to the appropriate temperature for your tea and pour into the pot. Set aside for 1-2 minute (follow the directions on your tea bag).
Divide the rice into 2 bowls, top with your choice of toppings.


Pour hot green tea over rice. Add a little soy sauce if you want. Serve immediately.

Enjoy!
244 notes
·
View notes
Text
Authenticity
Authentic. It’s a word I’ve been letting sit in the back of my brain. I’ve been picking at it like a sore, wondering what it really means in terms of food.
My knee-jerk reaction to the word, in terms of food? I hate it. I despise it.
What does it really mean? According to Merriam Webster: “[…]made or done the same way as the original."
So, what if the original way preparation of a dish sucked? Or it was just mediocre? I understand that a dish is prepared in the original way for a reason, but sometimes there are better ways to prepare a recipe, even if it isn’t authentic.
I want to address this, because I had some not-authentic refried beans.
And I liked them; no, I loved them. I thought they were better than any of the other stuff I’ve had, as far as refried beans goes. I’ve seen refried beans recipes and methods claiming theirs are the best; the most authentic. Only use leaf lard, soak the beans overnight, don’t use xyz bean. Fooey.
I’m going to go out on a limb and get skewered for my opinion. You know what? Sometimes, authentic doesn’t guarantee the best tasting results. To me, what tastes good is the most important thing about cooking, more than presentation, more than craft and technique, more than anything else in the whole damn world. There was a restaurant I used to go to, a little Mayan place, which had delicious, creamy, refried beans. Every time I went, I ordered it, no matter what.
After becoming a regular, I casually mentioned to one our server how good those refried beans were.
He raised his eyebrows and said, "Oh yeah? It’s pretty easy to make." I paused for a moment. Did he know how to make them? What was the secret? Was there a secret?
"So,” I laughed, “how is it made?” I took a sharp intake of breath, hoping I hadn’t crossed a line by asking.
“Oh well, we wanted our refried beans to be vegetarian, so we just add soy sauce and garlic to the them.” With that statement, he glided away to take care of some other tables.
I was with my spiritually fat dining companion Tubbs. I looked at him.
“I wonder if I can replicate the flavors at home?!” I whispered. “Do it,” he nodded.
Below is a thoroughly Jon Snow recipe. And by Jon Snow, I may mean his lineage, or lack thereof,and that he also knows nothing.
It uses stuff from a can. I might try to prepare the beans more authentically one day, but in the meantime this is pretty straight forward. It’s recipe that is quick to make and produces some pretty decent results.
Jon Snow’s Refried Beans:
1 15 oz can refried beans
Light soy sauce, to taste
3-4 Cloves Garlic, minced (Don’t have time for that? Use garlic powder!)
3 teaspoons vegetable oil
¾ cups water
1. Add vegetable oil to medium sauce pan, over medium heat.
2. Swirl oil in pan and when it sizzles when water is flicked onto it, add the garlic and stir occasionally, until fragrant.
3. Add refried beans and ¾ c of the water. Stir well.
4. Raise heat to high and bring to a boil, then reduce heat to simmer. Add soy sauce to your taste preferences. Let simmer for 20 minutes or until desired consistency.
Yes, these are very very much not someone’s grandma’s refried beans, but I still like them.
36 notes
·
View notes


Photo
Last one!


Submitted by Notions and Notations of a Novice Chef
For the final MasterChef mystery box challenge at home we have: Chorizo, Rosemary, Asparagus, Orechiette, AP Flour, Ground beef, Grits, Canned baby corn, Garlic powder, White rice and Butter.
It’s my personal favorite basket, since the ingredients are all pretty versatile and don’t have the tendency to point to one specific cuisine. My submission is pretty simple and uses three of the above as its main components. Let’s get started:
PARISIENNE GNOCCHI AND ASPARAGUS:
1 cup water
8 tablespoons salted butter
1 1/4 cup all purpose flour
1/3 cup grated Parmesan cheese
3 large eggs
2 tablespoon chopped parsley
1 1/2 tablespoon olive oil
1 lb asparagus
1 1/2 tablespoon unsalted butter
2 cloves of garlic, minced
Bring water and water to a boil in medium saucepan over high heat. Add in all the flour and stir with a wooden spoon until a smooth dough forms. Reduce heat to medium low and cook while stirring until the dough pulls away from the sides of the saucepan.

Remove pot from heat and add in the eggs, one at a time, beating after each addition to prevent the eggs from curdling. Add in the chese and chopper parsley. Transfer the mixture to a piping bag fitted with a 1/2 inch tip.
Let mixture rest for 30 minutes at room temperature. Meanwhile, bring a large pot of lightly salted water to a simmer. Have a rimmed baking sheet ready on the side. Holding the bag over the boiling water, squeeze the mixture out and cut it off with a knife or scissor into 1-inch lengths and let them fall into to water. Continue cutting as many as you can in 1 minute, then stop.
When all the gnocchis have floated to the top, continue cooking for about 3 more minutes. Fish them out with a metal spider and transfer to rimmed baking sheet. Drizzle with olive oil and toss to coat. Repeat with remaining dough. Set aside to cool for another 30 minutes.

Trim and blanch the asparagus in salted water. Cut into bite sized pieces and set aside.
Heat the unsalted butter in a skillet over medium high heat. Add in the garlic and cook for 1 minute. Add the gnocchi and cook until brown and toasty. Add in the blanched asparagus and season to taste.


Grate some parmesan cheese or any cheese you like on top before serving.


Enjoy!
1K notes
·
View notes
Photo
2 down, one to go.

Submitted by Notions & Notations of a Novice Cook
This week’s mystery box challenge comes with these ingredients: 4 apples (assorted variety), sausage, ground turkey, green beans, ears of corn, onion and yellow squash. I’m not going to lie, I had trouble with these. I made a fresh corn polenta topped with sticky sausages, apples and onions and decided that that was more of a cold day preference, so I submitted these instead - turkey meatball skewers with a green bean succotash. Please don’t mind the rather blurry phone picture (my camera called in sick), this is a simple dish that’s quick to put together to be enjoyed in the last days of summer.
TURKEY-APPLE MEATBALLS:
1lb ground turkey 1 egg 3/4 cup breadcrumbs 1 apple, cored and grated 1 1/2 tablespoon cajun seasoning 1/2 teaspoon salt 2 tablespoon olive oil OPTIONAL: Bamboo skewers
Combine all the ingredients except the oil in a bowl and mix until combined. The mixture will be a little soft and sticks to your hands. Heat the olive oil in a skillet over medium high heat and using your hands or a small ice cream scoop, drop the meatballs into the oil. Cook for a minute or two on each sides. Thread 3 into a skewer and keep warm.
GREEN BEANS SUCCOTASH:
2 tablespoon olive oil 1 onion, chopped 2 garlic cloves, minced 3 medium tomatoes, chopped 2 cups of corn from 2-3 ears of corn 2 cups chopped green beans 1/2 teaspoon salt 3 tablespoon water
Heat oil in a skillet over medium heat. Add in the chopped onions, galic and salt. Cook until soft amd fragrant, about 5 minutes. Add in the rest of the ingredients and cook for 15 minutes, or until the corn and beans have softened but still has a bite to them.
Serve the succotash with the meatball skewers.
Enjoy!
307 notes
·
View notes
Photo

Hole-in-the-wall asian fusion at Chego. Dinner with familiar formerly in Philly friends @shelikestodrawl and @michaeltliang. (at Eat Chego)
120 notes
·
View notes
Photo
One down, two to go.

Submitted to MasterChef by peegaw
So I got the list of the ingredients in the MasterChef at Home Mystery Box this week and they were: Ground beef, dill pickles, soy sauce, button mushrooms, russet potato, white rice, iceberg lettuce, blue cheese crumbles, peanuts, yellow mustard, sour cream and balsamic vinegar. This could have gone in a lot of different directions - sour cream gratin, cottage pie, a fusion larb? But in the end I settled with making some sliders, and while a burger version of these will undoubtedly earn itself a spot in thisiswhyyourefat.com, sliders are small enough to be just that indulgent without you wanting to crawl and hibernate after the meal.
BLUE CHEESE JUICY LUCY ROSTI SLIDERS (serves 4):

BLEU CHEESE JUICY LUCY PATTY:
1 1/2 lb ground beef
1 tablespoon soy sauce
1/4 teaspoon sugar
1/4 teaspoon ground black pepper
1/4 lb blue cheese.
In a bowl, mix together the ground beef, soy sauce, sugar and black pepper. Mix until just incorporated. Divide into 3 portions. Take 2/3 and divide into 4 large balls. Divide the rest (1/3) of the mixture into 4 small balls. Make an indentation into the large balls while spreading into a patty size of your choice. Fill the indentation with the blue cheese. Flatten the smaller balls, making them into lids, and place the lids on top of the cheese-filled patties. Pinch the seams, making sure there are no gaps. Refrigerate until needed. To cook, cook on a grill or skillet over medium high heat (about 2-3 minutes per side).


CARAMELIZED MUSHROOM:
1 lb button mushroom, sliced
2 tablespoon olive oil
1 tablespoon butter
1 tablespoon brown sugar
2 tablespoon balsamic vinegar
Heat butter and oil in a skillet and add in the mushroom. Stir every other minute until it starts to brown. Sprinkle the brown sugar and stir. Cook for 4 minutes until caramelized. Add in the vinegar and cook until the vinegar evaporates.

POTATO ROSTI:
3 medium russet potatoes
5 tablespoons olive oil
kosher salt
Grate the potatoes into matchsticks and gather in a clean tea towel. Squeeze as much water as you can.
Divide into 8 equal portions. Heat a large frying pan over medium heat and add two tablespoons of olive oil.
If you have it, place a metal chef’s ring inside the frying pan and fill with one portion of grated potatoes.Gently push down with a spoon. Remove the ring and repeat with remaining potatoes. If you don’t have a ring, add 1 tablespoon of flour and shape the potatoes into 8 patties.
Fry the rosti for 3-4 minutes on both sides until golden brown, adding more oil if needed.

ASSEMBLY:
Take a rosti and top with a few leaves of iceberg lettuce. Put the blue-cheese patty on top. Top with caramelized mushroom and sour cream. Take another rosti and lightly press on top of the whole thing. Use a toothpick to keep things in place if necessary.


Enjoy!
485 notes
·
View notes
Text
There is a tide in the affairs of men. Which, taken at the flood, leads on to fortune; Omitted, all the voyage of their life Is bound in shallows and in miseries. On such a full sea are we now afloat, And we must take the current when it serves, Or lose our ventures.
43 notes
·
View notes
Text
Guest Post from Tango Mango - Blueberry Ice Cream

This guest post was written by one of my favorite Tumbloggers - Sue of Tango Mango. I don't think you'll need much convincing in trying out this recipe for smooth (sans custard, guises!) blueberry ice cream.
Sue:
Years ago we acquired a Donvier ice cream maker. I doubt we bought it – I seem to recall it was a gift from a well-meaning friend. Our intentions to use it were good, but time marched on and it sat neglected, on a shelf in the garage. Occasionally I would put its internal cylinder in the freezer, hoping that having it ready at a moment’s notice would motivate me to make ice cream. Alas, it didn’t, and inevitably, it would make its way back on its shelf with the rest of the machine.
Last year one of our daughters finally decided to try the ice cream maker. We made the custard, froze the core piece and cranked out a beautiful, scrumptious batch of vanilla ice cream with bourbon caramel swirls. Neither of us understood what had taken us so long!
After this season’s blueberry picking, I ended up with a few pounds that made their way to the freezer. I knew just what to do with them – blueberry ice cream.
This tastes just as delightful as it looks, which is saying a lot, as the color is stunning. It’s not a cooked custard, so it’s a little on the icy side and not super creamy, but overall I was extremely pleased.
Lemon sugar cookies came out of our oven yesterday, and I’ve made a stack of ice cream sandwiches, using this fruity, lavender ice cream as the filling. (Upcoming post!)
Note: The measurements below were increased from the original recipe by fifty percent. I ended up not freezing a cup of the liquid, thinking not all of it might fit in the ice cream maker. (It would have.) Also, I chose to use half and half rather than heavy cream. The heavier cream probably would have made a creamier version.
BLUEBERRY ICE CREAM -- a recipe modified from the August, 1997 issue of Gourmet magazine.
Ingredients:
3 cups picked-over blueberries (I used frozen)
1 1/8 cups sugar
1/8 teaspoon salt
1 1/4 cups milk
2 1/2 cups half and half
Directions:
In a saucepan, bring blueberries, sugar, and salt to a boil over moderate heat, mashing berries and stirring with a fork. Simmer mixture, stirring frequently, 5 minutes and cool slightly.


In a blender purée mixture. Add the milk. Pour mixture through a sieve into a bowl, pressing on solids with back of a spoon. Stir in half and half. Chill mixture, covered, at least 2 hours, or until very cold, and up to 1 day.


Freeze mixture in an ice-cream maker. Transfer ice cream to an airtight container and put in freezer to ripen. Ice cream may be made 1 week ahead.


Enjoy!
370 notes
·
View notes
Text
This week's guest post is from Marsha from what-marsha-eats with two healthy bread recipes. I love my breads and will definitely try making the savory one for some runny egg grilled cheese.
Marsha:
I’ve been trying to eat whole wheat bread that isn’t loaded with sugar, which is impossible to find on the bread aisle of an American grocery store. So I’ve sampled a few loaves from local bakeries and one from the bakery department of a local supermarket, and they tasted all right with suitably low sugar content.
A few weeks ago, I stumbled across a PBS cooking show called “Home Chef” hosted by Neven Maguire of Ireland’s MacNean Restaurant. He baked the bread they serve at his restaurant, calling it a wheaten bread, which fits because it is mostly whole wheat. And boy, is it fast! I’ve been baking this bread every week since late June, and it makes the most scrumptious grilled cheese sammies, fried egg sandwiches, and peanut butter toast.
Summer squash are everywhere, and I make a chocolate zucchini bread at least once every summer with the bounty. You can leave out the nuts, and you can double the recipe to make two loaves. The original recipe made two loaves, and I halved all the ingredients to make one loaf. The zucchini bread is a similarly speedy bread. For a week or so now, I’ve been warming a slice in the microwave, then slathering it with peanut butter alongside a cup of decaf for a late-night snack.
MacNean Restaurant Wheaten Quick Bread


from http://www.rte.ie/lifestyle/food
Makes 1 loaf that can be cut into approximately 12 slices
1 lb. 2 oz. or 2 c. + 2 oz. whole wheat flour
4 1/2 oz. or a little over 1/2 c. AP flour
1 t. baking soda
1 t. salt
1 pint of buttermilk, plus a little extra if necessary
1 T. light brown sugar
1 T. melted butter, plus extra for greasing the pan
1 T. golden syrup or light corn syrup (I used corn syrup.)
1 T. porridge oats (I used old-fashioned oats.)
1. Preheat the oven to 400 degrees Fahrenheit. Grease either two 1 1/2-pint loaf pans or one large loaf pan. (I used one 8 1/2 ” x 4 1/2 ” dark metal loaf pan, and I sprayed it with cooking spray.)
2. Sift the flours, baking soda, and salt into a bowl. Make a well in the center of the dry ingredients and add the buttermilk, brown sugar, melted butter, and corn syrup. Mix gently and quickly until you have achieved a nice dropping consistency. If necessary, add a bit more buttermilk until the mixture binds together without being sloppy.
3. Divide the mixture evenly between the two small pans or put the batter into the one large one. Sprinkle over the oats. Bake for 1 hour until cooked through and each one has a slightly cracked, crusty top. Check halfway through that the loaves aren’t browning too much. If they are, reduce the temperature or move them down in the oven.
4. To check that the loaves are properly cooked, tip each one out of the pan and tap the base. It should sound hollow. If it doesn’t, return it to the oven for 5 more minutes. (I had to bake mine for 5 additional minutes.) Tip out onto a wire rack and leave to cool completely before slicing.
No nutritional info provided by author.
Chocolate Zucchini Bread

Makes 1 loaf that can be cut into 12 slices
from SparkPeople user WINDY01 at www.recipes.sparkpeople.com
3/4 c. Splenda
2 eggs
1/4 c. + 1/8 c. unsweetened or low-sugar applesauce
1/8 c. to 1/4 c. vegetable oil (I use canola. I would start with 1/8 c. but if the batter is not coming together, add another 1/8 c. Sometimes this has happened to me, sometimes it hasn’t.)
1 t. vanilla
1 med. zucchini squash, grated
1/2 c. AP flour
3/4 c. whole wheat flour
1/3 c. cocoa powder
3/4 t. baking powder
1/2 t. baking soda
1/2 t. cinnamon
1/2 c. chopped walnuts
1. Preheat oven to 350 degrees Fahrenheit. Spray and flour a loaf pan. (I only spray my dark metal 9x5-inch loaf pan, and the loaves always slide out.)
2. In a large bowl, beat together the sugar, eggs, applesauce, oil, and vanilla. Stir in the zucchini.
3. Add the flours, cocoa, baking powder, baking soda, cinnamon, and walnuts. Stir just until combined.
4. Bake for 50 minutes to 1 hour or until toothpick comes out clean. (My cranky oven always takes 1 hour.) Cool in pan for 5 minutes. Remove from pan to cool on a wire rack.
Nutritional info per slice provided by author without using walnuts:
Fat: 3.1 g
Carbs: 13 g
Calories: 80.8 g
Protein: 2.4 g
A Tale of Two Quick Breads, One Savory, One Sweet
77 notes
·
View notes

Text
Guest Post from the Other Parsimonious Chef

Mark fom A word from the Other Parsimonious Chef has awesomely contributed a post in my absence and am I glad that he did. People often have the misconception that Pho is a real pain to cook - which is a darn shame. Luckily this recipe is easy to follow and to be sure will yield a bowl, in Mark's own words, of Pho(ck)ing Deliciousness.... Pho Sure, Pho Real, Pho The Love Of It.
Mark:
In case you don't know I am working on writing a novel for the first time. It's been tedious, rewarding, exhausting, enlightening, challenging, isolating, awakening and down right frustrating at times. And while there's nothing better than expressing yourself through words, cooking and eating are a great escape if only for a minute. The trick is to cook something that you love, is easy to make, can be made in large portions, can be easily reheated and is versatile enough to last a few days without giving you the feeling that you are eating the same thing again on day one, two and three.
Pho (pronounced FAH) is a Vietnamese noodle soup made from beef stock, star anise and cinnamon & is about as classic in Vietnam as chicken soup is in the U.S. I could go on and on about it but I'm sure that some of you have had it so no need to preach to the choir. To those of you that have not here is a quick and easy pitch. This soup is a cure all. If you have a cold, drink it up. If you had a bad break up, slurp it up. If you have a huge assignment due at work, eat it up. If you are hungry, scarf it up and if you are bored, spice it up! This soup is soooooo (Pho)cking Good that once you try it you will crave it on most occasions, especially if those occasions have anything to do with a need for comfort...It's like a warm blanket on a cold day or like an ice cold rag on a hot summer day...Pho(ck) it Up!!!!! In my version I give the steak a quick sear after seasoning it with salt & pepper, this adds another layer of flavor to the dish in my humble opinion. Normally the steak is raw and cooked by placing it in the hot soup at the table right before you eat it.
PHO SOUP BASE & NOODLES:
Prep Time: 5 Minutes Cooking Time: 1 Hour Stove Temp: Boil Then Simmer
Ingredients:
1 Sweet Onion
64 Oz Beef Stock
2 Inches Ginger
1 Stalk Lemon Grass
1 Stick Cinnamon
2 tablespoon Coarse Salt and Cracked Pepper
Slice 1/4 of the onion into small rings, slice the ginger into thin slices and the lemongrass into 3 inch portions and then add 1 Tbs grape seed oil to a soup pot preheated to mid heat. Add the onions, ginger, cinnamon stick, star anise and the lemongrass to the pot allowing to cook while stirring for 5 minutes. Add the beef stock and bring to a boil before reducing the heat to a simmer, cover and allow soup base to cook for 1 hour.
To cook the cellophane noodles, bring water to a boil, take water off heat. Add noodles and cover to steep for 20 minutes.
CONDIMENTS & ADDITIONS:
Prep Time: 20 Minutes
Cooking Time: N/A
Stove Temp: N/A
Ingredients:
Basil
Mint
Mung Bean Sprouts
Cilantro
Sweet Onions - cut extremely thin as these are added to the raw to the hot soup as a condiment.
Red & Green Jalapenos, sliced thinly

Condiments: Sriracha , Hoisin Sauce, Fish Sauce & Fresh Lime Wedges

SIRLOIN:
Prep Time: 1 Minute
Cooking Time: 3 Minutes
Stove Temp: High Heat
Ingredients: Sirloin, Salt & Pepper.

Season with salt & pepper, add 1 tsp of grape seed oil to a searing
hot pan and cook on one side for 1 minute and the other for 1 minute. Take off heat and cut into thin slices as soon above. * Don't worry the piping hot soup will cook the beef.
ASSEMBLY:
Get a bowl of the soup, be sure that it is boiling hot. Add the noodles, then the meat and the condiments and enjoy. Simply nothing better.. The Bentley of soups.


268 notes
·
View notes
Text
Brioche cinnamon buns and guest posting?

This post is not about the cinnamon buns. I repeat: this post is not about the cinnamon buns - but what better way to catch your attention than parading photographs of sweet, buttery, cinnamon-y brioche smothered with cream cheese frosting and toffee walnuts...I digress.
What I really wanted to write about is more of a proposition. Seeing as the month of Ramadan is upon us (a belated Ramadan Kareem to my fellow Muslims - may the timezone be ever in your favor!) and I probably won't be posting as much, I wonder if anyone is interested in doing a guest post? It'll also be a chance to get to know other food bloggers here on Tumblr. It could be about your favorite food, go-to recipe, summer thirst quenchers - anything food related. Just drop me a message if you're up for it and I'll post it up on the blog.
Cheers!
PS: recipe for these buns can be found here.


235 notes
·
View notes
Photo

dartharaiz said:
Hi there! As I browse through pasta recipes I often wander, do we really need to follow the kind of pasta written in each recipe? I mean, what other (significant) differences can each pasta have? (other than shapes?)
Ahoy! According to Justin Dunham:
As a general taxonomy, you can split pasta up into a few categories: sheets, strands, shapes and tubes.
Sheets are fairly easy to explain; they’re made for dishes like lasagna that are prepared as casseroles or as pies, rather than as a dish that’s eaten from a bowl with just a fork. Some have ruffles, I assume for sauce retention.
Strands are a pretty simple shape, right? The main variation among them is thickness.
Thin strands are meant for light sauces, like a simple angel hair with olive oil and garlic, or perhaps a thin tomato sauce. Otherwise, the strands get lost in the sauce, and you don’t get their texture at all. Also, with thin strands, the lubrication provided by thinner and oil-based sauces helps keep the strands from sticking together.
Thick strands are meant for heavy sauces. There’s a reason it’s fettucine alfredo, and not angel hair alfredo. (I think putting it this way does the best job of explaining the difference. If there were angel hair in your alfredo, would you even notice its presence?)
Spaghetti is kind of in the middle, and is a nice all-purpose pasta for this reason. If you are really detail-oriented, you can look for square spaghetti, which has slightly more surface area for sauce to stick to.
For tubes and shapes, the main variation is also by size.
Very small tubes, like ditalini and small shapes, like orzo or even alphabet pasta, are meant for soup. Some authorities make distinctions between pasta for soup and pasta for broth, but I won’t get into that here.
The bigger the shape or tube gets, the heartier the sauce you can serve it with. So rigatoni, for example, could be good with a bolognese because the tubes are big enough to fill up with sauce and ground meat. Note that apparently spaghetti bolognese is not really served within Italy.
The giant shapes, like giant shells, are meant to be stuffed. Giant shells are also often baked, and this is generally possible with the larger pastas like ziti. They won’t fall apart after being in a hot oven for a while. Ravioli and tortellini are stuffed too, and their size is dictated by the same considerations as above, and also how much you’re putting in them.
I think he got the most of it there. Hope this helps (and yes to the Mie Aceh foodwish!)!
Anonymous said:
Hi, love your blog. Is there a way to get an email update when you have a new post? thank you
Hi there! You can subscribe to my RSS feed by clicking at the "RSS" link at the bottom left corner of my blog :)
576 notes
·
View notes
Text
Making Kimbap

Not quite your traditional kimbap.
YAK-GOCHUJANG (Red pepper paste with beef):
[ 1/3 cup ground beef + 1/2 cup gochujang or Korean red pepper paste + 1 teaspoon soy sauce + 2 teaspoon sesame oil + 3 tablespoons honey + 3 garlic cloves, minced ]
Heat the sesame oil in a skillet over medium high heat. Add in the garlic and saute until fragrant. Add in the ground beef and cook for 2 minutes. Lower the heat and add gochujang and honey. Cook for another 3 minutes and take off from heat. Set aside.
YAK-GOCHUJANG KIMBAP:
[ 5 sheets of "gim"/"kim"/roasted dried seaweed + 2 1/2 cups cooked short-grain white rice + 1 small carrot, cut into thin matchsticks + 2 cups spinach, blanched + 1 cucumber, cut into long strips + Spam or sausages, cut into long strips + 3 eggs + sesame oil + sesame seeds ]
You'd want to have all the ingredients prepped before you start rock n' rollin', so to speak, so cook the rice according to the package instruction and keep warm. Warm, not hot, not cold.
Saute the blanched spinach in a little bit of sesame oil and salt. Set aside. Do the same for the carrot matchsticks and sausages.
Lightly whisk the eggs with a little salt and cook into a flat omelet. Cut into long strips.
Combine the rice with 2-3 tablespoons of yak-gochujang (recipe above) and mix well. Taste and adjust seasoning.
Prepare a bowl with water on the side. Spread a sheet of seaweed over the bamboo sushi roll, put about 1/2 cup of seasoned rice and spread evenly over about 2/3 of seaweed. You want to dip your fingers in the water so the rice won't stick.
Lay the first ingredient down around 1/3 of the way up from the bottom of the rice (with about an inch of empty rice space at the bottom) Stack the other fillings down on top.


Roll from the bottom (as if you're rolling a sleeping bag), pressing down to make the fillings stay in. As you continue to roll, pull the whole thing down towards the end of the bamboo mat. Spread a tiny dab of water along the top seam to hold the roll together.


Set aside and continue with other seaweed sheets. Brush the kimbap rolls with some sesame oil and sprinkle with sesame seeds on top. Cut each roll into 7-8 pieces. Serve with extra yak-gochujang, if you want.


Enjoy!
596 notes
·
View notes