
flowerrwolf-cosplay
Flowerrwolf
New England cosplayerNext cons: CTconBCCColossalcon EastAAC-This is just a side blog so I'll have to follow back with my main accMain blog: Flowerrwolf Facebook: Flowerrwolf CosplayIG: Flowerrwolf
76 posts
Don't wanna be here? Send us removal request.
Last Seen Blogs
sofiaholmes96
Enterprise crashed into Mirkwood

prismjiinx
Storm Warning⛈

projectinfiltrateleasebound
LEASEBOUND GAP WEEK

al3li85ss-blog
Untitled

project-raw
The Raw Vegan
Photo


Ctcon Line up! I'm leaving Friday evening so it's still up in the air if I'll be cosplaying that night or not! Friday Night- Fem!Nishinoya (maybe) Saturday- Impa Sat night- Arabian Dancer Umi Sunday- Stevonnie Who will I be seeing this year?!
#nishinoya yuu#fem!nishinoya#nishinoya cosplay#fem!nishinoya cosplay#Impa#impa cosplay#Hyrule Warriors impa#Arabian Dancer Umi#Umi Sonoda#love live#arabian dancer love live#love live cosplay#stevonnie#stevonnie cosplay#steven universe#connecticon#connecticon 2017#ctcon#ctcon 2017#flowerrwolf cosplay#cosplay#con lineup
8 notes
·
View notes

Photo


Its funny how there always seems to be more homework during reading week.. Either way, I managed to finish Impa’s belt! I just had to slap some assets from the hyrule warriors trailer+screenshots. Results: cheesy af lelelel. I am now on team eva foam+mod podge forever <3 <3 I thought I’d upload the general step by step of how I made it in case anyone was curious
Everything was built with eva foam except for the worbla covering on the main part. Edges and some details were sanded with a dremel, sealed with mod podge + wet sanded
218 notes
·
View notes
Photo


ALL.. OR MOST of my progress for Hyrule Warriors Impa. I tried to take as many photos as I could, but I’d often get carried away and skip parts hahaha. Hopefully you guys still get the gist of how I went about things and it helps out a bit! Built over the course of 5 months, included many late nights, and one Tauriel in pure white from ardawigs :D If you have any questions, feel free to message me and I’ll try my best to help! And sorry, no photos for my sword and sheath, I was waaay to rushed and forgot to take any pics. Same goes for the harness.. but it didn’t work anyways hahaha. I reblogged with more photos, please check that one out if you haven’t seen it :)
191 notes
·
View notes
Photo

Finalized lineup! Leaving tomorrow morning and I'm super excited! Who am I gonna see at my first Katsu?!
0 notes
Photo

New Katsucon Lineup! For those who didn't know, I scrapped Midoriya from my lineup because I have absolutely nothing for him at the moment. The wig didn't even ship yet and I ordered that a week before Christmas 😣 Who am I gonna see at my first Katsu?! 😁
#707#707 cosplay#mystic messenger#weiss schnee#weiss cosplay#RWBY#phichit cosplay#phichit chulanont#yuri on ice#gumi megpoid#matryoshka gumi cosplay#vocaloid#secret cosplay#plastic beach noodle cosplay#plastic beach noodle#gorillaz#cosplay#crossplay#anime#games#music#katsucon#katsucon 2017
5 notes
·
View notes
Photo


Matryoshka Gumi - Vocaloid
Cosplayer: @flowerrwolf-cosplay
Photographer: Pinsonneault Photos
.
..
Don’t forget to check out my Facebook page!
#gumi#matryoshka gumi#gumi cosplay#vocaloid#vocaloid gumi#vocaloid cosplay#cosplay#cosplayer#anime#matryoshka gumi cosplay#cosplay photography
1 note
·
View note
Photo

I know it's still fairly early but here's my lineup for Katsucon! 💖
Thursday's is still up in the air. That's day were driving down so it'll depend how I feel afterwards
Who am I going to see at my first Katsu?!
#katsucon#katsucon 2017#lavi bookman Jr#lavi cosplay#weiss schnee#rwby#rwby weiss#rwby cosplay#phichit chulanont#yuri on ice#phichit cosplay#izuku midoriya#izuku midoriya cosplay#boku no hero academia#my hero academia#bnha izuku#mha izuku#secret cosplay#noodle#gorillaz#noodle cosplay#plastic beach#plastic beach noodle
9 notes
·
View notes
Text
Deku Hero Mask Tutorial (step-by-step with pictures)
I”ve gotten a few asks about how I made my Hero suit mask and I’ve finally gotten off my ass and made this tutorial for everyone. I’m going to put this under a read more, but here’s the end result:
Keep reading
290 notes
·
View notes
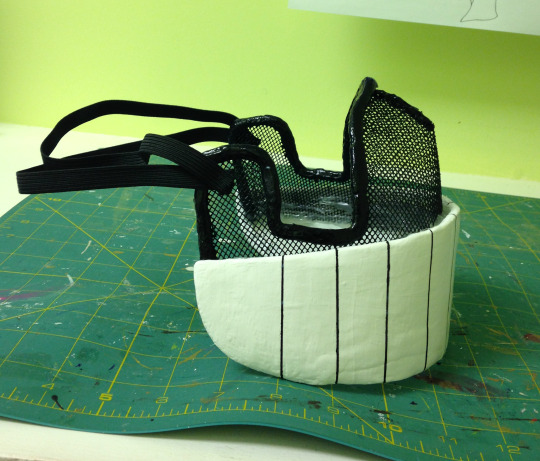
Photo
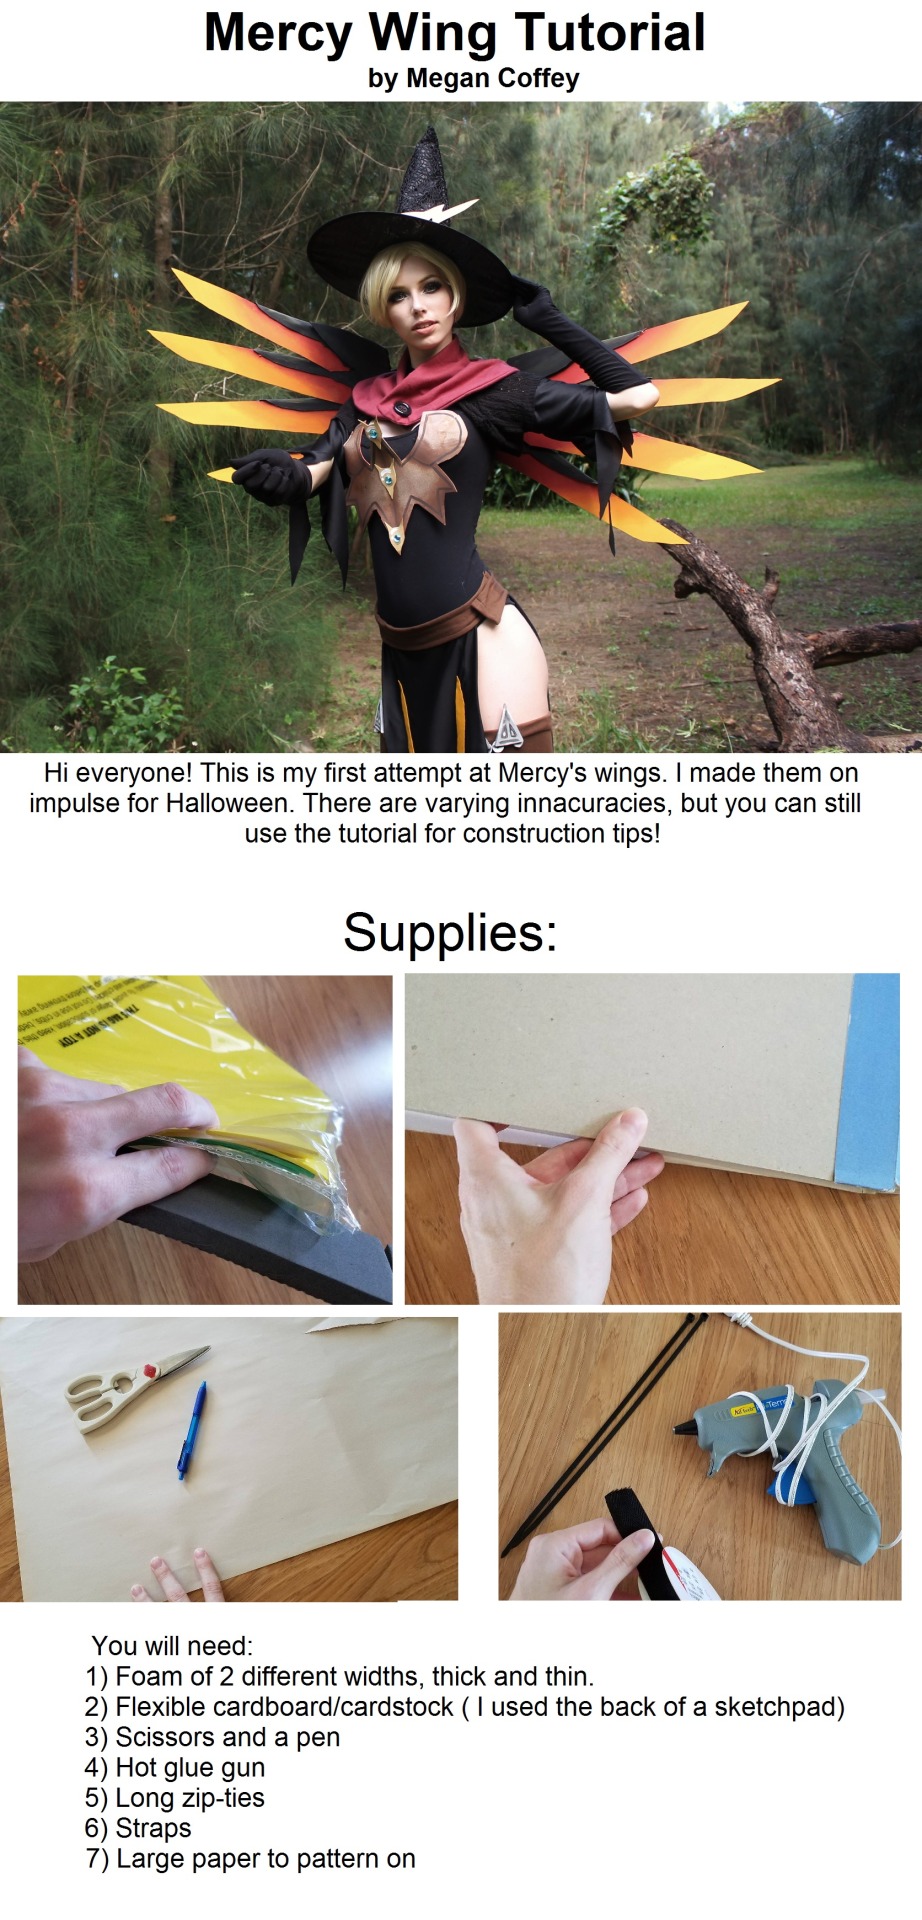
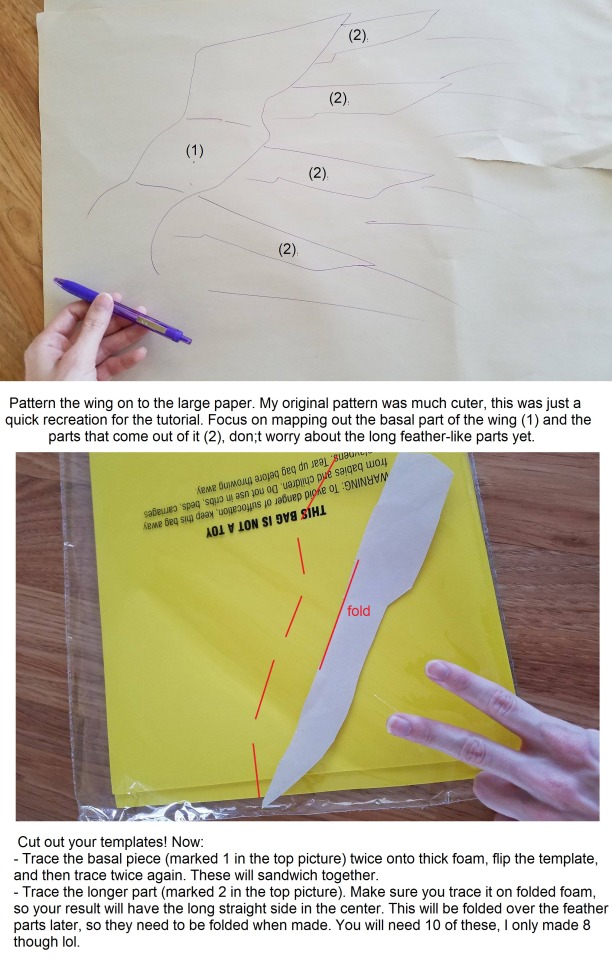
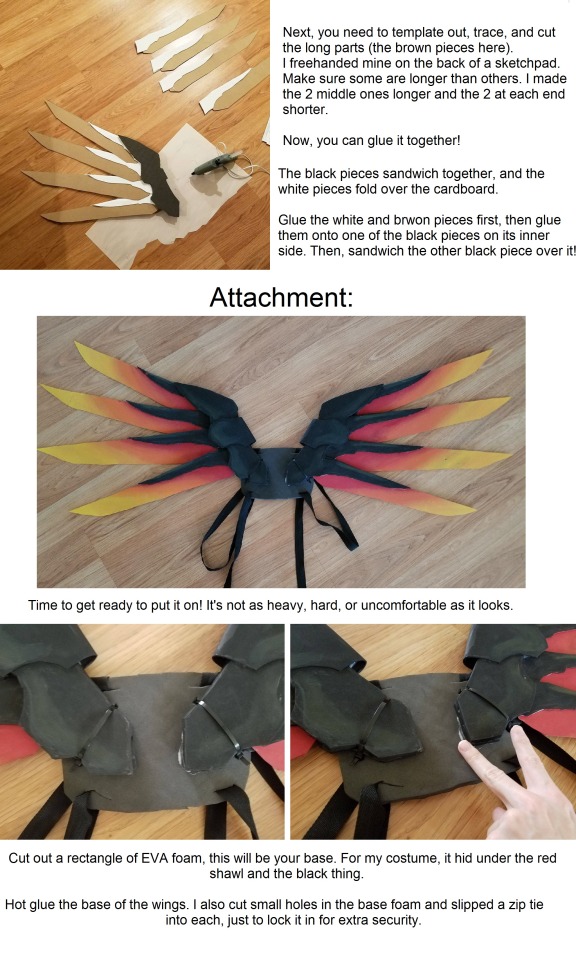
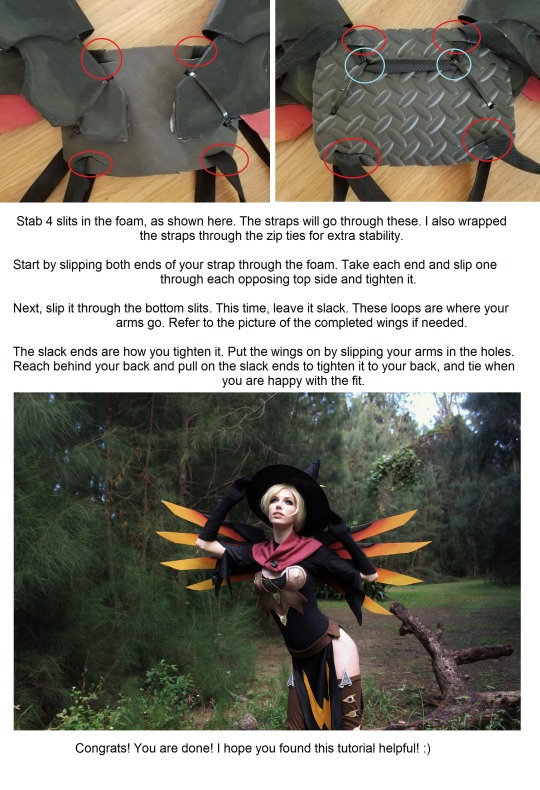
I got a few requests for construction notes on my Mercy wings, so here they are! Please let me know if you found this helpful! :D
2K notes
·
View notes
Photo

New tutorial: Airbrushing decorative patterns onto fabrics!
FULL SIZE ON FACEBOOK
An affordable and easy way to add patterns to fabrics when you can’t find the perfect fabric! I used this on the next Major costume I’m doing (because I can’t stop with her), from Ghost in the Shell, First Assault!
FaceBook
Instagram
Twitter
~
2K notes
·
View notes
Photo

“We’ve left humanity behind. We’re not interested in their twisted world.”
Photo Cred: Shay Albert
Edited by Me
#nashiro yasuhisa#tg nashiro#nashiro cosplay#tokyo ghoul#tokyo ghoul cosplay#tokyo ghoul nashiro#aac#aac 2016#another anime con#another anime convention#another anime convention 2016#another anime con 2016#flowerrwolf cosplay
2 notes
·
View notes
Text
RWBY Weiss Schnee's Myrtenaster
I figured I should post up a mini walk-through of how I went through making this sword. I’ll likely be doing constant updates for this particular sword as I make my way to a fully functional version in the future. I wish I had taken more pictures when I had done these but I was too focused on finishing them that I forgot :(
Materials I used:
Basswood (You’ll need a lot.I got mine from Michael’s Arts & Crafts.)
Poster Board (Not the dollar store kind. I used Elmer’s)
1” Dowel rod
Insulation foam (Not much, max 5 inches wide and 1 inch thick)
The barrel of a Nerf Maverick.
(The round black piece in this image. Remove the orange piece.)

Tools and adhesives.
Xacto Knife
Sandpaper ( I used, 50, 150, and 300 grit sheets for this one. )
Gorilla Glue
Glue gun + sticks
Hand saw
CLAMPS (4 or 5 of them is a good amount.)
Gesso
To start, here is the blade template I remade for your convenience which are to full scale of what my V1 and V2 are based off of.
Blade (Pieces connect from left to right, bottom connects to top)

The blade of my Myrtenaster was 3 layers so there’ll need to be a little explaining about the cutting process.
When making the blades you’ll need two versions of it since gluing them together will make it easier later on. Each layer was made of two boards so the place where the two boards connect must be different on 2 of the 3 layers. The middle layer should have two pieces split at the blue line while the outer layers are split at the red. (If you cannot put them together with two pieces per layer, split them up into 3 but space the two different types well apart from each other.)
For the next step, you’ll need to glue them all together. Here you’ll need gorilla glue (or any wood glue but gorilla glue worked best for me), moist paper towel, clamps, and some heavy books.
This is a bit of a time saver as you can work on some other things while it glues. With your moist paper towel, wipe off the sides of your layers which you’ll be applying glue to. A single line of glue across all the pieces is all you need. Once connected you’ll need to clamp all these pieces together preferably between a table and some spare pieces of wood. You’ll not want to clamp directly onto the blade as you’ll have a nasty mark from the clamp left over from it.

(This picture references a later step. I’ll point y’all back to this one when we get there. )
Sand off any excess glue once it’s fully dry followed by sanding the edges and tip of the blade for a smoother feel.
Now onto the other template page, the chamber and handle.

The two pieces in the middle are one so don’t split them up! The piece on the right is the chamber guard, you’ll need 8 of these!! The piece on the left is the estimate size of what your dust chamber should be.
The piece I want to talk about the most would be your dust chamber. There are two ways to go about doing it: the way I did it and the way you could do it if you don’t buy a nerf gun for the chamber.
My method
So when I bought the chamber, I didn’t just use it as is. You’ll need to take the entire chamber apart.
(Follow this tutorial for how to take it apart. You’ll only need to do the first two pages of steps.)
Once the barrel has been taken apart, you’ll only need to take the outer black casing of the barrel. You can put the whole thing apart and the gun should still be functional. (So you can shoot your enemies with it >:D )
Measure the barrel to be around the same length as the left image minus the curved section and with your hand saw cut out the excess portion. Sand the piece to smooth out the rough edges from the cut. Once finished, trace the not-so-circular part of the barrel onto some insulation foam. Draw a circle around the tracing which just touches the outermost parts and cut it out.
Cut a hole in the center which will allow for your dowel rod to slip through. This is going to be a bit tricky so you’ll need to find an open space with plenty of ventilation. Bring 150 grit sandpaper and a mask as this’ll be quite dusty. You’ll need to sand your foam to have a nice rounded curve so take your time and wipe that dust off yourself every once in a while. The top of the barrel will be open so just cut some poster board to cover that space up. <- This piece should have a hole to allow for the dowel rod to pass through.
Eventually you should have something like this.

Also in this image, I sanded down the dowel rod where I would be holding it so it’s a lot flatter there. (You might want to invest in a hand filer but this step is entirely optional.) I’ve also shaped the dowel at the top to fit snug with the blade when I piece it together. The barrel and foam are also gesso’d at this stage. 3-5 layers will suffice but it wouldn’t hurt anyone to go to 8.
The other way to make the barrel
This may be more difficult depending on your view but for the other way I would have done was to use insulation foam to make the entire barrel. Cut a hole and gesso every piece before gluing. You’ll need to be very patient and careful as you do not want to melt or rip any of the pieces as they dry.
Hey guess what? You can piece them both together now! So it’s time to go back to the glue/clamp process from before.(Make sure your dust chamber is already on at this point!! Curved part of the barrel should be facing down and flat part on top!)

This image is from my V1 but your templates work more for V2.
Here’s why:
If you look back at the blade template, you’ll notice a green line on the left piece. You’ll need two more pieces from the top of that left piece up to the green line. Those pieces are to cover up the section that connects the blade and your handle together. Remember the first sample image I posted? It belongs in this step so check it out again to make sure you’re doing it right. You’ll need to gesso the blade now in preparation for painting so do 5-8 layers here. (Fill in cracks wherever you can!)
The next part would be the chamber guards. Follow the sample template from earlier and just cut out 8 pieces to that exact size. You need two pieces to make one so glue them up with a glue gun and sand the edges to line the up properly afterwards. Sand with 150 then 300 grit sheets. You can paint them after 4 or 5 layers of gesso followed by drawing in the details afterwards.

Once you’re done, you can start painting all your other details including the various colours of dust on the chamber.
Eventually you should have something that looks like this. (This image is of V1 btw.)

As with all of my tutorials, if there’s anything confusing or you’d like more details on a section don’t be afraid to send me a message. My ask box is always open.
116 notes
·
View notes
Text
How to make Myrtenaster without woodworking:
Hey guys! So I recently made Weiss Schnee’s Sword, Myrtenaster out of some things I had lying around my crafts studio in under 8 hours so I thought I’d share a tutorial!
Suplies:
A round wooden dowel ($1)
Air dry clay ($9)
Cardboard (I used an old UPS box)
Hot glue gun ($10)
exacto knife ($?)
Acrylic paint (I used one of those children’s paint sets $?)
Silver spray paint ($6)
Fine point sharpie or nice pen (black ink)
Steps:
First, sketch the general form of wings of the sword onto some cardboard, cut it out and then traced it onto a different sheet of cardboard four times. When I cut mine out, they looked like this:

When you’re happy with how they look, spray paint them silver.
Step 2 is the hardest part of the whole process, the handle and dust holder. For the handle, I simply wrapped some clay around the base of the dowel, making sure to create a point at the end.
Next, I rolled a clay ball about 1.5 inches in diameter. I then cut it in half. The bottom half I slid onto the dowel as is as the base for the dust holder. The top half, I cut about a quarter inch off around the diameter. You can adjust how much you cut off based on how you design the cardboard wings (the wings should go from the bottom half of the wings to the top)
The dust holder is a simple cylinder with the same diameter as the bottom half of the clay ball (make sure that they line up because the half circle and cylinder should look like one continuous piece at the end)
Puncture the dowel through the center of your cylinder and two halves of your clay ball. Leave the handle on the dowel. Leave the clay to dry.

Next, draw the details onto both sides of the cardboard wings with a fine point sharpie. My details looked like this:

Once the clay is dry, spray paint all the individual pieces and the dowel silver.
Once the paint dries, you’re going to want to paint the dust onto your cylinder.
First, paint the black outline. The shape looks something like this:

Weiss’s has a bit of flourish over the point but I was running out of time so I skipped that step (also note that I did not let the clay dry for long enough and instead went at it with a hair dryer, which is why there is a slight crack).
There should be six dust receptacles on your cylinder. The inside colors go: Turquoise, Purple, White, Yellow, Dark Blue, Red
Once the paint is dry, squirt some hot glue into your clay handle and then slide it back onto the dowel, squirt hot glue around the top of the handle and the slide on the bottom of the clay ball, put hot glue around the top of that and then slide on the cylinder, and then repeat for the top half of the cylinder.
Lastly, simply hot glue the cardboard wings onto the two halves of the cylinders and you’re done!
n.b. If you’re looking for a sword that will last you years or with which you can LARP, this sword may not be for you. It has worked great for photo shoots and low impact cons if you treat it with care and touch up the glue on the wings every once in a while. But, if you’re looking for a sword to stand the test of time you may want to check out some more heavy duty tutorials.
115 notes
·
View notes
Photo
I got a few requests for construction notes on my Mercy wings, so here they are! Please let me know if you found this helpful! :D
2K notes
·
View notes
Photo

MUSCLE MUSCLE HUSTLE HUSTLE 💛💛💛
#jyushimatsu#jyushimatsu matsuno#jyushimatsu cosplay#jyushimatsu matsuno cosplay#osomatsu san#osomatsu san cosplay#ososan#ososan cosplay#cosplay#crossplay#closplay#costest#anime#flowerrwolf cosplay
3 notes
·
View notes
Video
youtube
My friend made her very first con showcase video and I'm so happy to have been a part of it! It's been like a dream to be in one of these and I hope to get asked to be in more of them in the future!
She also has a cosplay page! Please check her out!!!
Sinnika
#granitecon#granitecon 2016#granite state comic con#granite state comic con 2016#showcase video#con showcase#con video
0 notes