
Statistics
We looked inside some of the posts by dreamydoodlez and here's what we found interesting.
Average Info
Notes Per Post
3K
Likes Per Post
2K
Reblog Per Post
779
Reply Per Post
14
Time Between Posts
26 days ago
Number of Posts By Type
Text
14
Note
1
Last Seen Tumblr Blogs


Fun Fact
69% of Tumblr users are millennials.
Text
One of my favorite things that has ever happened in the Chucky franchise, is that Chucky the Killer Doll and his wife Tiffany have a canonically genderfluid child (Glen/Glenda/GG), this child was the focus of a 2004 film with John Waters in it, and in that film they tried to solve GG's dysphoria by splitting their soul in half and putting one in a girl's body and one in a boy's. It didn't actually ease any dysphoria, and in the TV show both halves of GG's soul still identified as nonbinary before the two halves of their soul had to be recombined back into a single person. Who is still genderfluid.
This isn't even coding. This is explicitly canon. I need more people to know and appreciate that Chucky has been a queer series since the beginning, all the way back in the 80s. Don Mancini is a queer icon and I love his work so much.

1K notes
·
View notes
Text
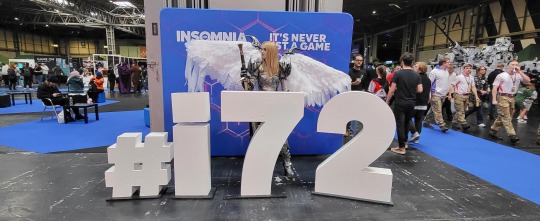
How to Make: Electronic Wings for Cosplay
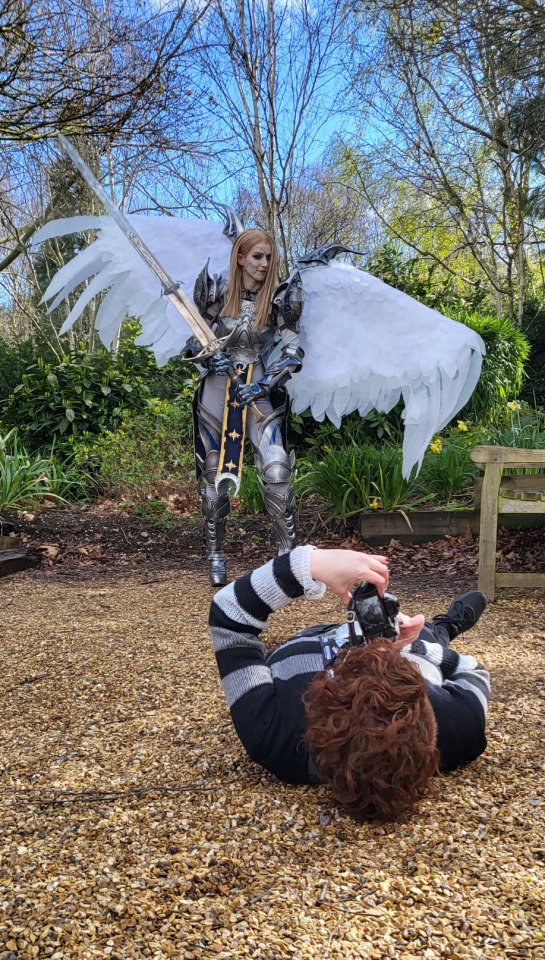
Hello Everyone! It's been a while since I last uploaded a written tutorial on here and since I just finished and wore my Dame Aylin cosplay this last weekend it seemed appropriate to jump back in with a tutorial on one of the costume pieces!
Her wings were the star of the show this weekend and I know a lot of people were curious about how I made them! A huge source of knowledge and inspiration behind these wings was this video by Axceleration, I made a few changes to the frame shape and electrical circuitry for mine but her tutorial was a huge stepping stone to give me the confidence to tackle them myself!
Health and Safety:
When working with Sintraboard (as well as other thermoplastics) it is incredibly important you wear a respirator as well as goggles when heating, moulding and cutting it. The fumes this plastic will give off when heated up are no joke! Make sure you're in a well-ventilated space!
Basic tool safety knowledge is also really important! wearing gloves when using power tools can be more dangerous in most situations, so always be aware of where your hands are vs where the tools are. Always cut away from yourself and take things slowly, don't panic.
Electrical safety! You're working with live wires and circuitry! make sure your hands are dry, you aren't touching the bare wires at any point when they are connected to a power source, and if you choose to solder anything, make sure you're wearing heat-proof gloves and a mask in a ventilated space!
Tools
Wire stripper
Screwdriver and wrench
Dremel - I recommend the Dremel 3000 rotary tool personally! Some essential Dremel bits you'll need for this include, a sanding bit, drill bit (smaller or same size as your screws/bolts), and a small/narrow cutting bit. These will usually come with the Dremel!
Heat Gun (A hairdryer will not get hot enough to heat the Sintraboard!!)
Pipe cutter (alternatively you can use a hacksaw for this!)
Hacksaw
Ruler
Scissors (for cutting fabric straps)
Materials
Heat shrink Tubing
2 core electrical wire
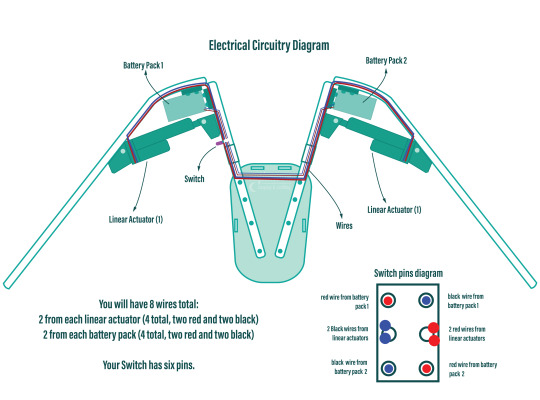
switch (you want a three position, six pin switch, like this one, even better if it has the Screws on the pins! otherwise you'll need a soldering kits to solder the wires to the pins.
2x 8AA 12v Battery Holders
2x 12v Linear Actuators (Mine had a stroke length of 100mm)
21.5mm PVC Pipes (I got 2x 3m Lengths)
2x 21.5mm PVC Pipe straight couplers
6mm 8"x12" Sintraboard
Nuts/Bolts/Screws (I used M5 bolts for the base & Actuator connectors and M6 screws to attach the hinges to the pipes! You'll need Washers for every Nut & Bolt!)
Hinges (I used 2.5cm wide hinges that were skinny but long so they would just about fit along the PVC pipe! 3" gate hinges would work!)
50 metre Polythene Jiffy foam roll (in retrospect this was ALOT of foam, you could definitely get away with maybe a 20-30 metre roll! I now have a load leftover XD)
16 AA Batteries (I used 16 and had enough for the whole day with them on, I think They'd probably be enough for another half a day-full day too! but have spares just in case!)
Webbing strap ( I went for grey to match my base suit colour!)
Buckle - as wide as the webbing strap you use!
3 metres of white cotton fabric (or whatever colour wings youre going for!)
Optional
Zipties (for cleaning up the wires)
Lets Go!
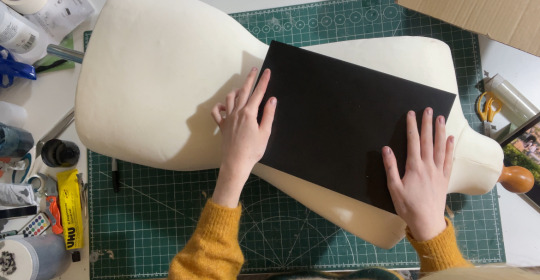
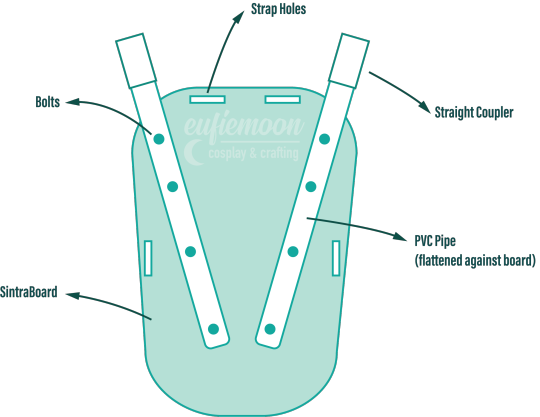
Sintraboard is this wonderfully stable thermoplastic that is relatively easy to cut into (with the right tools) and when heated allows you to mould its shape! I started by using a mannequin and heating the Sintraboard with a heat gun for a few minutes to make it pliable, I recommend using gloves for this part as the materials gets VERY HOT! Press the board into the shape of the mannequin's back, taking note of the edges especially! you want this board to sit as comfortably to your body shape as possible as it makes a huge difference to how long you can wearing the wings for in this backplate is comfy!
Once shaped, I placed it against my back to make sure it was a good fit, heating again and making any alterations I needed (again don't place bright hot plastic to your bare skin! wear protective clothes and wait till its slightly cooler to do this, with the help of a friend!). I then took a hacksaw and rounded the corners, before sanding the edges with my Dremel! Try to avoid cutting off loads, just enough to make things less likely to snag.
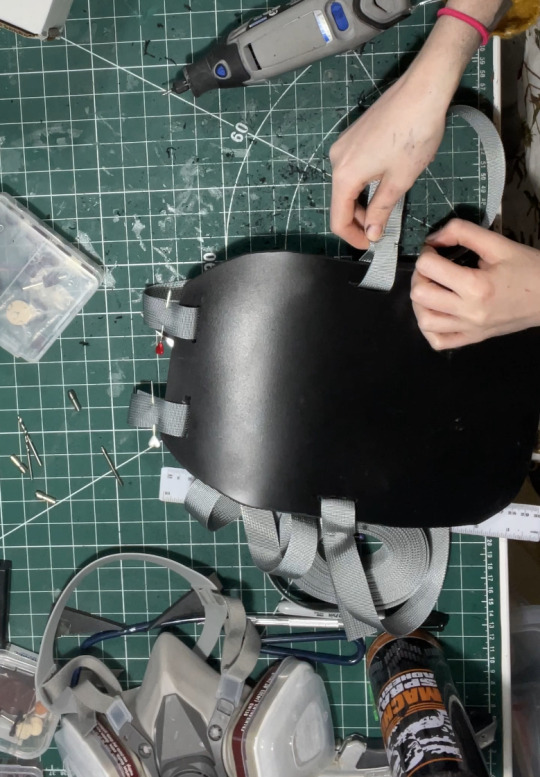
3. I then cut in four holes, wide enough to feed my webbing strap through, two at the top and one on either side below where my arms would sit! I measured the webbing strap by firstly feeding them through the top holes and pinning them, and then bring the strap over my should to everything sits where it should and seeing where the strap hits the side hole and cutting the length there! you'll also want a strap that attaches across the chest, meeting in the centre with a buckle!
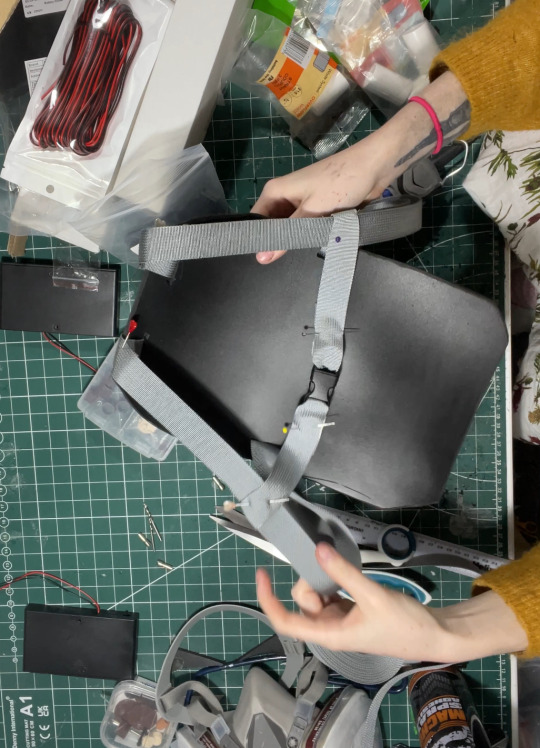
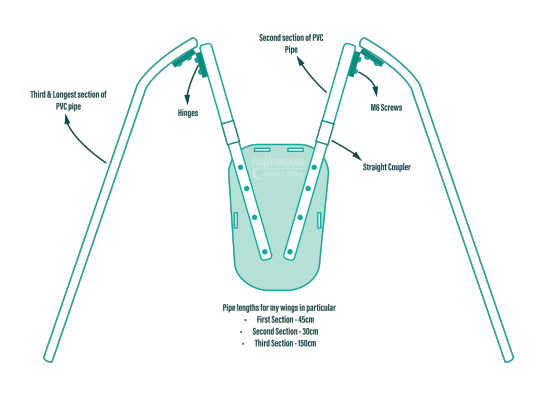
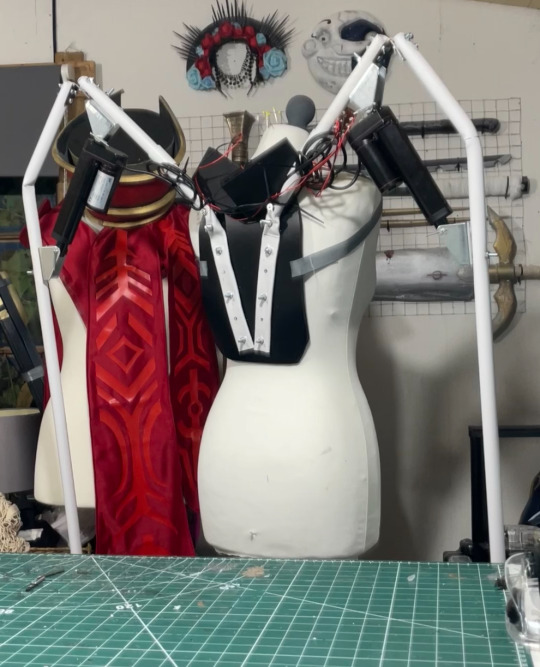
4. After sewing the straps closed I was able to move onto the PVC pipe structure! This may change slightly depending on the finished shape you want but I needed the PVC pipes to come out from inside a breastplate so had a particularly angle as well as character references to work with! I began by heating the pipe over my heat gun and flattening a portion of it under a heavy object so it would sit much more flush against the backboard and sit better underneath my breastplate before moving onto securing the first portion of the structure to the backplate. This mainly involved lots of try-ons and measuring to make sure the angles were correct and symmetrical and was quite fiddly but well-worth the effort! I'll include a diagram of the general shape I went with below:
5. I wanted my wings to be relatively modular for ease of travel so I needed to make sure certain portions of them could come away from other parts easily, so I popped a straight coupler on the top of the pipes that were attach to the breastplate, this also meant I could slot the breastplate over these shorter pipes and wear everything correctly! Then these second pipes slot on and at the other end they are attached via hinges to the longest portion of the pipe 'skeleton', Diagram below:
6. Now that the skeleton was put together, it's time for the electrical stuff! It's a good idea to figure out where your circuit is going to lay on the skeleton - consider if you want the battery packs mounted the the backplate or, like me, put them inside the actual wings in removeable pockets for easy access and removal for battery changes. all your wires will go through the switch so deciding where you want to place that is very important! Mine was placed just over my shoulder on the front side, mounted to the PVC pipe with a metal cover I drilled a hole into to slip the switch through and then drill through the pipe.
I've included another diagram below that explains all the electrical circuitry, including which wires go on which pins on the switch!
Important to note: The linear actuators need to be placed and bolted into the PVC pipes at *exactly* the same angle on each side, any slight deviation will lead to the wings going up wonkily! So take your time and make as many adjustments as necessary.
7. You can extend your wires by adding on the electrical wire, just match the colours, and put heat shrink tubing over the connections to hide the live wires! I ended up zip-tying the wires into organised bundles once the wings were done to help keep everything safe from snags.
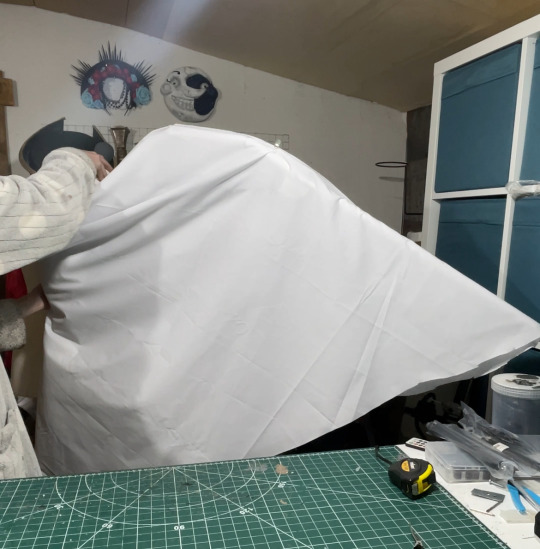
8. Now its time for the Wings themselves! I drafted my base pattern by just draping the white cotton fabric I had over the wing when it was fully extended. I then pinned the wings to the shape I wanted them to be along the bottom before cutting along the pins. I ran the fabric through my sewing machine to close the bottom edge, leaving a gap wide enough by the wing base so I could slip the wing on and off, closing it with velcro. I also added little fabric pockets inside of these to hold my battery packs, which also connected via velcro for easy removal!
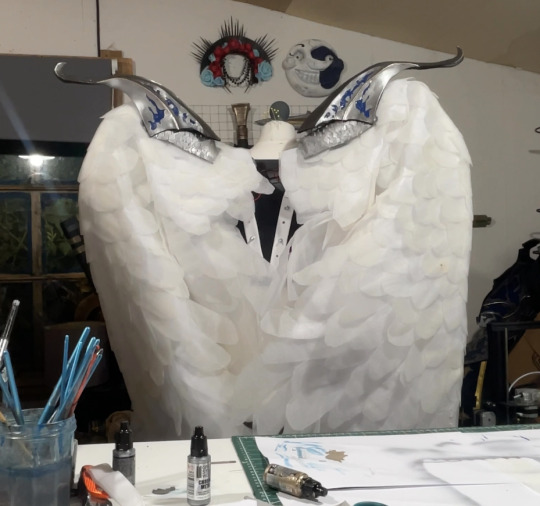
9. Now that I had a wing base I was able to begin making feathers! I cut out a total of 800 feathers out of polythene jiffy roll for these wings, in 6 different styles and using real life bird wings to dictate the shapes I used and where I placed them. I ended up hot gluing every individual feather onto the white fabric base, going row by row until every side was covered, the wing covers themselves are super light because of the foam feathers and they shine light through them in a really magical way!
Optional: I also ended up going over these feathers with my airbrush and some super light beige paint to help darken the shadows, this is entirely optional and may change depending on the wings you're looking to make!
When in neutral position and in extended position the wings looks like this:

Mine had a wingspan of about 7ft total when fully extended but when in neutral position they were fairly close to my own proportions! mainly staying behind me and weren't much of a problem in a packed con hall!
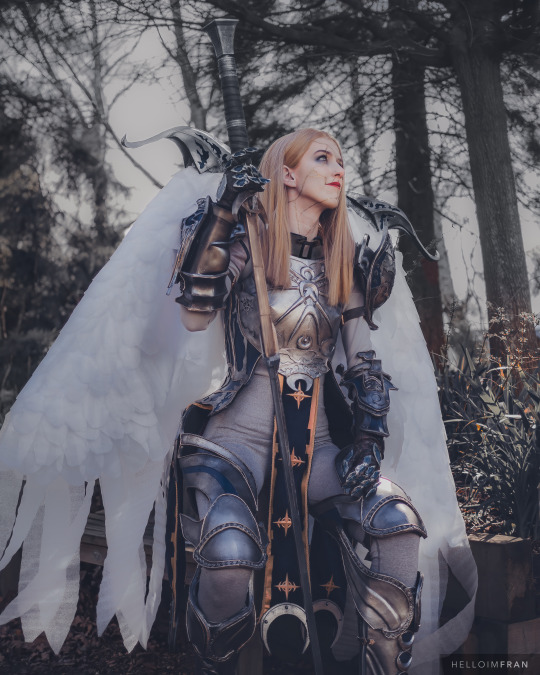
Photo by: Helloimfran (on Instagram and Twitter)
I hope this tutorial helped and if there are any questions about anything in specific don't hesitate to reach out at [email protected] or on my instagram or twitter (@eufiemoon)
Happy Crafting!

161 notes
·
View notes
Text

ECLIPSE V3/V4 IS LITERALLY JUST A SOLAR CLONE WITH ECLIPSE’S MEMORIES
AND HE LEGITIMATELY CARES ABOUT EARTH CAUSE SHE’S THE ONE WHO’S BEEN KINDEST TO HIM.
And OOF the Ruin lore of watching his friends go insane and destroy their dimension as the only sane one left while pretending to be crazy like them the whole time.
He did it to avenge the Glamrocks and other animatronics he knew.
And further clarification of the difference between a collapsed and destroyed dimension.
Destroyed Dimension=Abandoned empty house that serves as a reminder of what once was
Collapsed Dimension=Bulldozing the whole house and leaving nothing behind
145 notes
·
View notes
Text
Excuse me??? What are y’all doing now??
You know sending death threats to one of the creators, writers, and voice actors of a show is gonna be how ya’ll KILL the show.
Nevermind that THAT’S A WHOLE ASS HUMAN BEING

310 notes
·
View notes
Note
Being bitter over people erasing one of the very few aroace reps we have isn't hateful. We're hurt, and we're tired. Most of us have been through this exact thing with past aro and ace characters getting erased. So forgive us for daring to voice our pain and disappointment.
What is hateful is trying to erase a characters canon lgbt identity because you don't like it. Because you want to slap another label on him and pretend it's canon. That is hateful. That is what casual aphobia literally is.
.
42 notes
·
View notes
Text

Thank you guys for all the love and support! Here’s Francine💖
7 notes
·
View notes
Text
Literally can’t talk about my interests. Keep getting told sams/laes/mgafs is a content farm/made for kids. Just bc I’m 19 doesn’t make it weird I’m into it right?
#sams#laes#mgafs#the sun and moon show#tsams#sun and moon show#the lunar and earth show#the monty gator and foxy show#tmgafs#tlaes#lunar and earth show#monty gator and foxy show
29 notes
·
View notes
Text

Made a new pfp!
4 notes
·
View notes
Text
Heh, seems I joined this fandom at an odd time…

17 notes
·
View notes
Text
How I Made My EVA Foam TV Head
(A Long-Winded and Rambly Tutorial by Me)
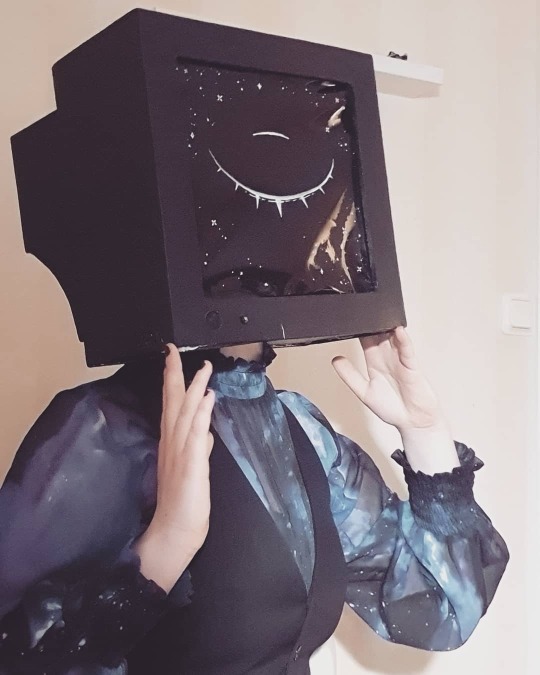
I’ve had quite a few people ask me how I made my TV head lately, so I figured I should put together some kind of tutorial! Sadly, since I am Not A Smart Person, I lost most pictures of the crafting process while clearing out my camera roll, which means I’ll have to supplement the few I have with some drawings of my own.
Please keep in mind that I’ve only ever made this one head—my techniques may not be optimal. I had to figure more or less all of it out on my own, since I couldn’t find any decent preexisting tutorials.
Without further ado, let’s get into it!
Materials Used:
Paper
Masking tape
Sharpie
White 6mm-thick EVA foam
Hot glue (lots of it)
Fabric/felt/something to make a simple hinge out of
Acrylic paint
Solar film
Posca pen
LED light, AA battery x2, on/off switch, wires
Tools:
Ruler
Box cutter
Scissors
Glue gun
Hole punch pliers
Step 1: Design/Planning
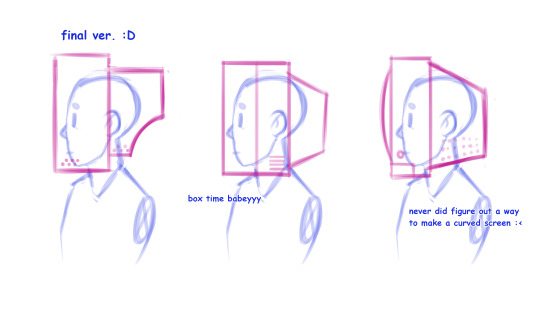
It’s important to have a clear vision of what you want to make before you actually start crafting —it’ll save you a lot of time and materials. I started by sketching out a few potential designs in profile, both to see which one I liked the most and to see how feasible they’d be to actually make as a mask without looking completely oversized.
Once you’ve settled on a design, I recommend drawing it from as many different angles as you think you’ll need for the next step:
Step 2: Paper Prototype
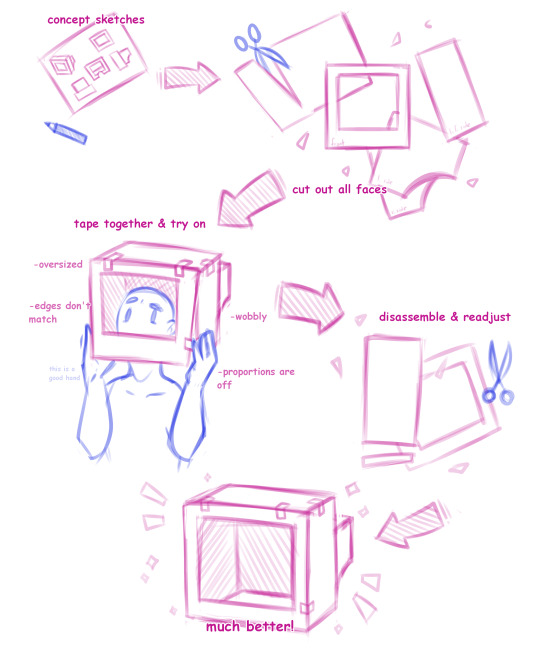
(I could have sworn I kept some pictures of this step? But apparently not so my scribbles will have to do)
Based on my sketches, I then made a prototype of the head out of decently sturdy paper, to serve as a template for the final foam head. I cut out the shape of every face of the head and taped them together to see how it all looked. You’ll most likely not get it right the first time around, so simply disassemble the head again, make any necessary adjustments to the measurements, re-tape and check again. Repeat this process until you are satisfied—it’s much easier to fix issues with the design in this stage rather than when making the actual mask.
There will probably always be a slight wobbliness to the prototype since it’s made of paper, but a good design will feel mostly sturdy. It’s pretty hard to mess up what is essentially a glorified box imo
I recommend labelling the faces and writing down all measurements to more easily keep track of them.
Step 3: Craft Foam Cutting
The head is made out of 6mm EVA foam I bought at my local crafts store. (This specific brand was called dekorgummi “decoration rubber/funky foam”. I’m unsure if it’s available outside of Sweden, but if I’ve understood correctly it’s basically the same thing as EVA foam.) The material came in 30x46 cm sheets and is, quite frankly, amazing — it’s cheap, lightweight and bendable, yet sturdy enough not to be floppy at all, and can be cut, textured, hand-sewn, hot-glued and painted with ease. Seriously I love this stuff So Much I could probably make an entire post just singing its praises aaaaa
I disassembled the paper prototype again. Using the pieces as a template, I then traced the shapes onto the craft foam and cut them out with a box cutter and scissors. You’ll need to adjust the measurements accommodate to for the thickness of the foam—much like the prototype, I taped all the pieces of foam together to check what parts needed adjustments in order to work. Labelling all faces will also come in handy once you start glueing.
Step 4: Ventilation
The air intake holes on the mask aren’t just for decoration; a foam head WILL get very hot unless properly ventilated, especially if the screen is made of a solid material instead of mesh. Using hole punch pliers, I put holes on the sides and all along the top of the head. Don’t hesitate to make lots of holes—you’ll probably need them. My screen still gets uncomfortably hot and foggy if I wear it indoors for extended periods of time without taking it off.
While I haven’t had the chance to try it out myself, it should be possible to make slit-style air intakes using a box cutter, if you’d rather not have small round ones.
Step 5: Gluing
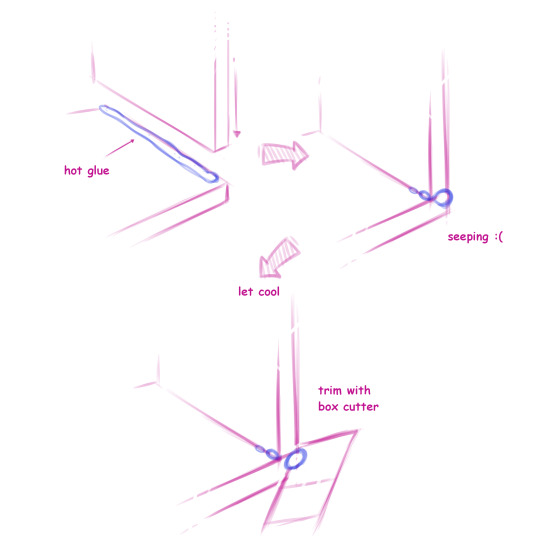
Working my way from the front face of the screen to the back, I then hot-glued all the pieces of foam together. The only part I didn’t glue was the frontal underside part of the screen, to which I’ll soon add the hole for my neck.
Don’t worry if your glueing doesn’t turn out perfect! If any glue wells out at the side when you join two pieces, it can easily be trimmed with a box cutter once it’s cooled. This step is also a good time for trimming any uneven/frayed foam. If you find that the foam frayed a bit when you cut it out, running an iron over it on low heat can help smooth it out.
Part 6: Neck hole

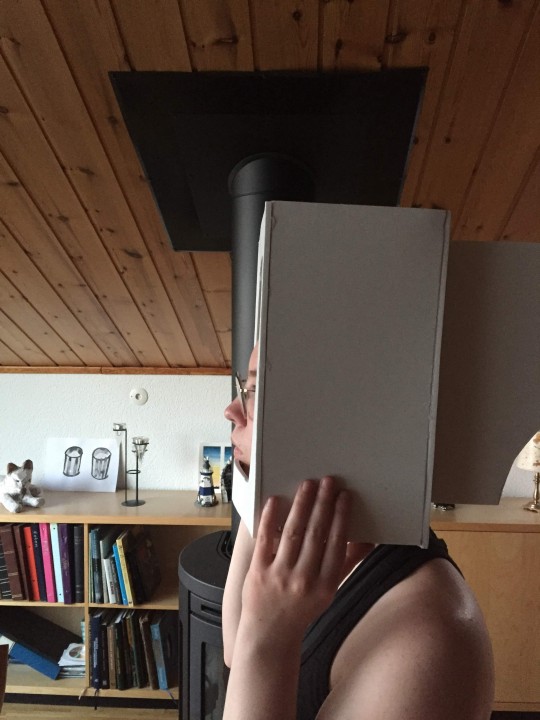
Before this step, I hadn’t made any accommodations for my neck—all I had was a plain piece of foam that wasn’t attached to the rest of the mask, and a big rectangular hole at the underside of the head.
I carefully cut out a hole on the underside of the head, most of which was located on the soon-to-be-hinged part of loose foam. Be careful not to make the hole too big! It’s better to remove too little than too much. Make sure that it fits in such a way that there’s some space between your face and where the screen will go—my first attempts had my nose poking out the front, which looked more than a little bit silly!
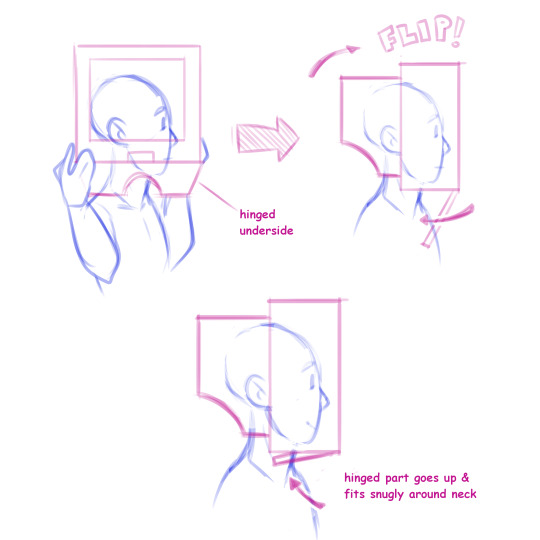
Once I was satisfied with the neck hole, I glued two pieces of felt between the inside of the screen and the bottom part so that it hinges forwards. When I put the mask on I simply open the hinged underside, put the whole mask on sideways, turn it around correctly and flip the hinged part back up. The hinged underside fits snugly enough that it doesn’t need anything keeping it in place, and it takes some vigorous headbanging for it to open by mistake (don’t ask me how I know that)
Part 7: Painting
The interior of the head is painted with a coat of black acrylic paint —I’ll get into the reason for this later. Work your way from the back of the head to the front, covering all surfaces of the inside. It doesn’t have to be perfect as long as most of it is black.
The outside of the head is painted with ~5 coats of dark blue acrylic paint. Keep in mind that the foam will absorb some of the paint—you’ll need at least a few coats to get a dark, uniform colour. I had some trouble with the brush strokes being too visible for my taste, but this was fixed by mixing the paint with some water and using a finer brush. This issue could possibly be avoided altogether by spray painting the head instead.
Part 8: Headband/Suspension
You’ll need to make sure that the mask sits properly on your head so that it follows your movements and doesn’t slide around/wobble. The way my screen’s shaped, I could simply attach two strips of leftover foam to the inside in such a way that they form a sort of headband that goes around and over my head, but this is probably not the best or most comfortable solution, and may not work with all screen shapes. Some other ideas I considered were using the inside of an old bicycle helmet or hardhat, or perhaps just glueing a whole-ass snapback cap to the inside lmao
Part 9: Screen
My original plans were to have a screen made out of fine black mesh fabric. The idea is that as long as the inside of the mask is darkened, you can see out of it without being seen yourself. It seems like you could even paint a design onto the mesh as long as you’re careful not to block the holes. Sadly, the seller didn’t ship to Sweden :<
Instead, the screen of my head is made out of black window film (the kind of stuff meant to be put on car windows), which still works in more or less the same way. It does give the screen a shinier look, which could be nice, but unlike mesh, it’s not breathable and fogs up quite easily if not ventilated properly.
I cut out a square a few centimetres wider than the actual screen and drew the eye design onto it with a Posca pen, but you could probably use acrylics as well. I recommend keeping the design simple as to not obstruct your vision too much.
I attached the film to the inside of the front face using hot glue. It took a few tries to get it right, and I’m actually planning on re-doing it as it’s still somewhat floppy.
Part 10: Details
This is where I’d attach any antennas/lights/other decorative stuff, but of course, that might depend on exactly what you’re doing. My head has a LED light that runs on two AA batteries, connected to an on/off button—I had to make the holes for the light and button before painting. The whole thing is simply taped to the inside of the mask to allow for easy repairs/replacing!
Part 11: Done!
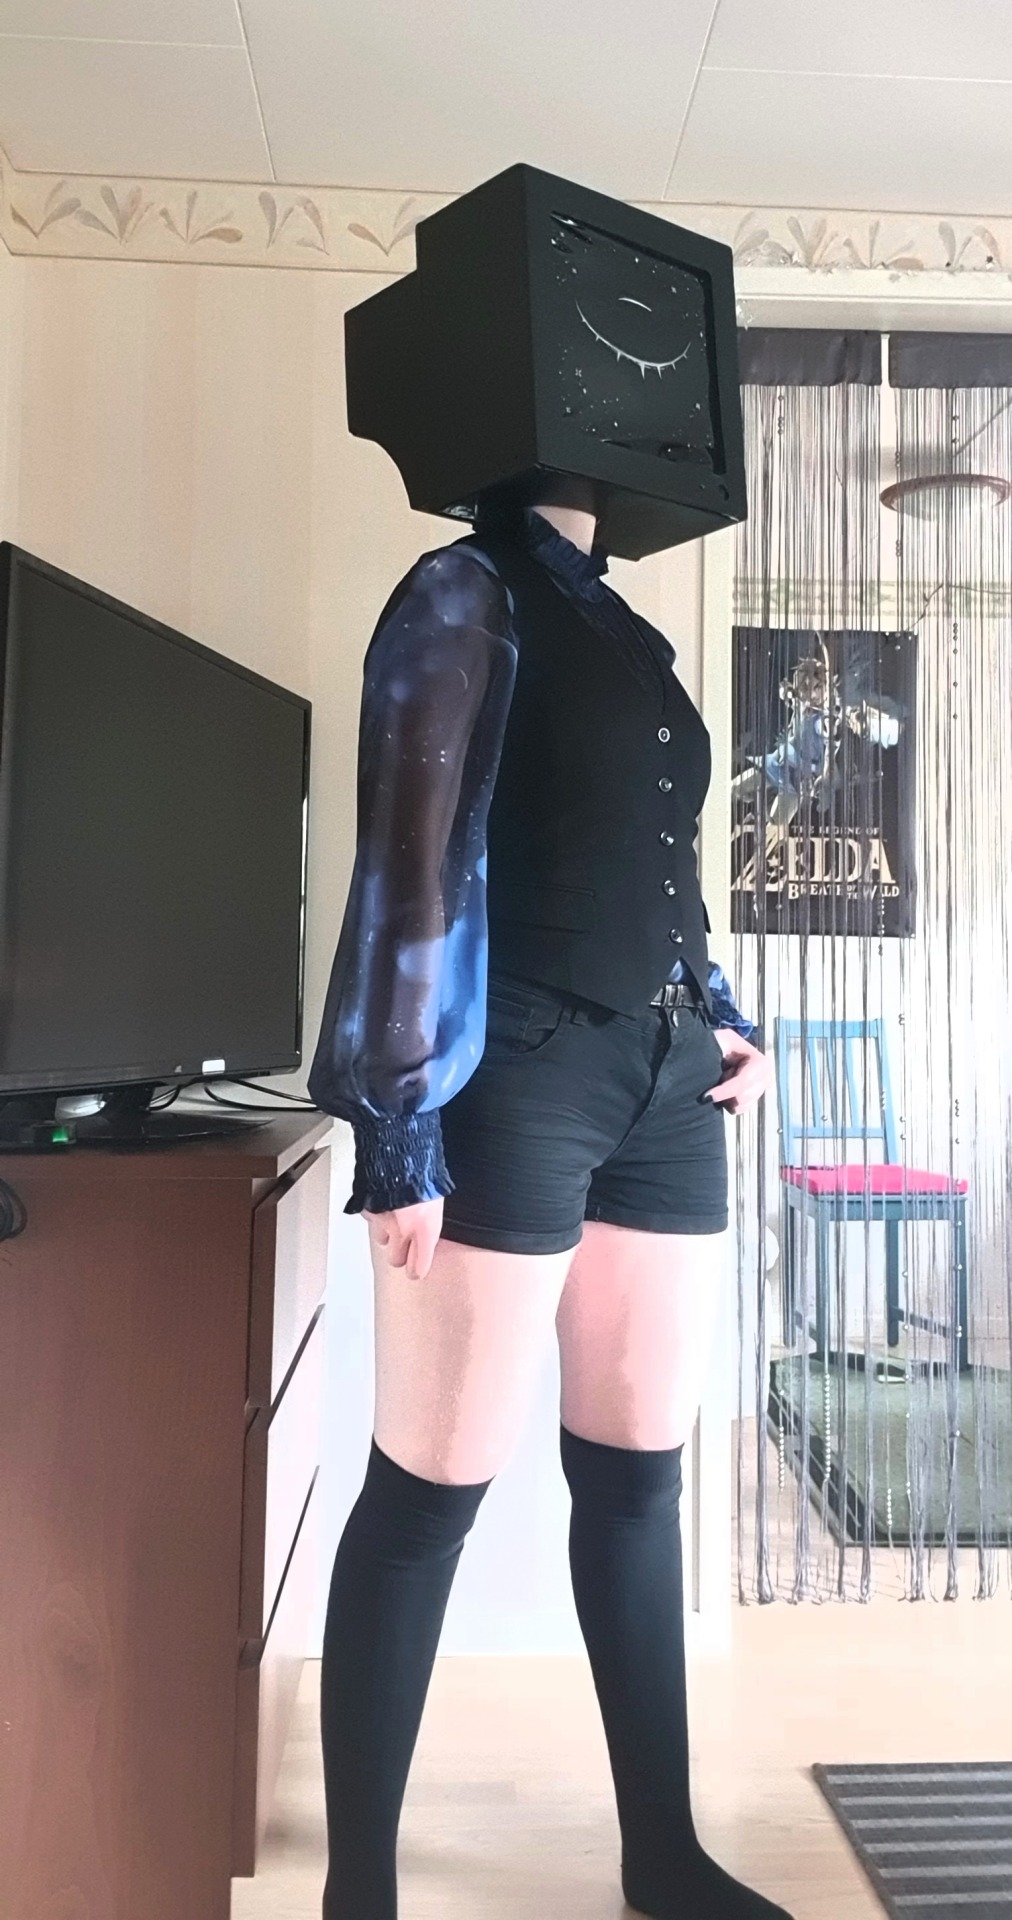
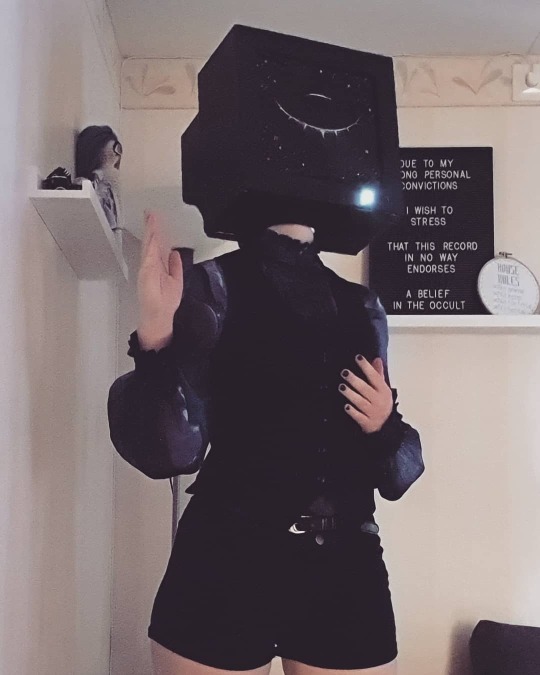
…Aaaand would you look at that, you’ve got yourself a TV head! Assemble yourself a funky outfit out of stuff from your wardrobe and go weird out people at a party! Post pics and get that internet clout! Wear it to IKEA! (Don’t, Actually.) Chill with it at home, secure in the knowledge that you’re 200% cooler than everyone else because your head is now a goddamn TV how sick is that shit
Thank you so much for reading my probably-entirely-too-long-and-wordy tutorial! Hopefully I’ve been able to make myself understood despite my less-than-perfect english. If you have any further questions, don’t hesitate to shoot me an ask, and if you do use this to make your own TV head, feel free to show me the result—it’d mean the world to me!
587 notes
·
View notes
Text

posting some older art while i work on some things!
2 notes
·
View notes
Text

it’s his birthday today! he’s 4 now:)
8 notes
·
View notes
Text


thought i would share these terrible pics of my son while i’m working on some new art:)
6 notes
·
View notes
Text


:33<Nepeta drawings💚
3 notes
·
View notes
Text


any tips on how to make these better?
#animal crosing new horizons#animal crossing#acnh#acnh merry#drawing#warrior cats#warrior cats oc#oc drawing#wtnv#welcome to night vale
13 notes
·
View notes