
I develop awesome games with Unity & Blender. Our Apps iOS Blog Unity Blog Contact Us
Don't wanna be here? Send us removal request.
Statistics
We looked inside some of the posts by cocoateam and here's what we found interesting.
Average Info
Notes Per Post
55
Likes Per Post
43
Reblog Per Post
11
Reply Per Post
0
Time Between Posts
8 months
Number of Posts By Type
Text
16
Video
1
Last Seen Tumblr Blogs


Fun Fact
The most popular pages on Tumblr are about Minecraft, GIFs, and David J. Peterson.
Text
Netflix Gaming - Do you play it?
Netflix Gaming - Do you play it?
Couple years ago, somebody asked during a PM interview whether Netflix should get into the gaming business, and my answer at that time was the same as it is today—YES! It just makes sense. Netflix dominates the relaxation segment. And how do people relax:
Movies
Music
Play
Exercise
Mediatate
Sleep
Streaming brings with it a wonderful IP worthy brands: Daredevil, Squid Game, etc. Netflix has some of the most binge-worthy IPs in the world.
They should leverage that to expand into gaming.
But here’s the big question— how's it going so far.
Let’s dive in.
Netflix’s Gaming Play: What’s Happening?
Netflix has been quietly building its gaming business for a couple of years now. Right now, they have over 90 mobile games that subscribers can play for free—no ads, no in-app purchases, just straight-up games included with your subscription.
However, reports show that less than 1% of Netflix’s massive subscriber base engages with its games daily (Newzoo). And if that sounds bad, it’s because it is. With millions of Netflix subscribers out there, you’d think more people would be jumping in. So what’s going on?
Why Aren’t People Flocking to Netflix Games?
Nobody Knows These Games Exist! Netflix does an incredible job promoting its movies and TV shows, but its games? Not so much. A lot of users don’t even realize they can download and play these games for free. If you don’t actively browse the Netflix app on your phone, you might never even see them.
Mobile-Only Limits the Audience Right now, Netflix games are only available on iOS and Android. That’s a tough sell for people who prefer gaming on consoles, PC, or cloud platforms.
Casual, Not Core Gaming Netflix’s catalog leans heavily into casual games—think puzzle games, card games, and light strategy titles. While that’s fine, it’s not exactly drawing in the hardcore gaming crowd. No one's subscribing to Netflix just to play Solitaire when they can do that elsewhere.
Where’s the Social & Multiplayer Fun? A huge part of modern gaming is multiplayer and social interactions—playing with friends, competing online, or even just sharing experiences. Netflix’s games are mostly single-player, which means they lack that sticky, community-driven engagement that makes games like Fortnite, Call of Duty, or even Among Us so addictive. Perhaps these will arrive in Phase 2 on the Netflix product solution.
No Must-Play Exclusives (Yet!) Netflix has awesome IPs—Stranger Things, Squid Game, The Witcher—but so far, its gaming division hasn’t delivered that one killer exclusive that would make people say, “Wow, I NEED to play this!” Compare this to Sony, which has exclusives like God of War and Spider-Man driving console sales, or Microsoft, which spent $69 billion on Activision Blizzard to secure blockbuster franchises. Netflix hasn’t made that kind of play… yet.
Can Netflix Compete in the Big Leagues?
To be fair, Netflix isn’t going all-in on gaming just yet. They’ve reportedly invested about $1 billion in game studios and development—small change compared to their $17 billion annual budget for movies and TV.
But they are making moves. They’ve acquired game studios like Night School Studio (Oxenfree) and are experimenting with cloud gaming—which could be a game-changer if they bring Netflix-quality streaming tech to games.
The Future: Can Netflix Turn This Around?
I still believe Netflix should be in gaming. It just makes sense! But they need to do a few things to make it work:
Promote games better—Shove them in people’s faces like they do with new shows!
Expand beyond mobile—Bring games to TVs, consoles, and cloud gaming.
Develop AAA exclusives—Imagine a Stranger Things game as good as The Last of Us!
Make gaming social—Add multiplayer, leaderboards, or even interactive experiences tied to shows. Gaming is all about building that community.
Right now, Netflix Gaming is still in its “crawl” phase. But if they play their cards right, they could run with the big players in gaming.
0 notes
Text
RICE Framework for prioritization
At Meta & Amazon, my role was to compare product ideas and discuss their feasability, ROI and long term potential. A basic framework that I often used was the RICE framework. It wasn't perfect because it didn't account for long term impact & competitor pressure, but it helped bubble up ideas with the highest potential in the short term.
To apply the RICE scoring model to a real-world e-commerce project for Meta's Marketplace, let's illustrate how it might prioritize new features or improvements.
The RICE framework evaluates ideas based on four criteria:
Reach: How many users will be affected by the feature in a given timeframe? Make sure you use the same scoring mechanism for all impacted customers.
Impact: What is the effect on users if this feature is implemented?
Confidence: How certain are we about our estimates for reach and impact? Mention this as a range between 0% and 100%
Effort: How many person-months or development resources are required to build it?
Example 1: Implementing a Personalized Recommendation Feature
Scenario:
Meta's product team was considering a personalized recommendation feature to improve user experience.
1. Reach: This feature would impact all logged-in Meta users, which could be millions daily. For estimation, say it reaches 50 million active users each month.
2. Impact: Personalized recommendations could significantly increase conversions and user satisfaction. The team estimates a high impact score (e.g., 4 out of 5), expecting a 10% increase in click-through rates on product suggestions.
3. Confidence: The confidence score depends on data from previous similar implementations (like algorithm tweaks). Suppose there's strong evidence, but some uncertainty about the exact impact, giving it an 80% confidence rating.
4. Effort: Developing and testing the recommendation system might take 12 person-months, involving data scientists, developers, and QA engineers.
RICE Score=(Reach×Impact×Confidence)/Effort
For this example: RICE Score=(50,000,000×4×0.8)/12 = 13,333,333
Prioritization Decision:
This high RICE score suggests the personalized recommendation feature should be a priority.
Example 2: Implementing an AR "Try-On" Feature
Meta is considering adding an Augmented Reality (AR) try-on feature for fashion and accessories, allowing users to virtually "wear" items before purchase.
1. Reach: This feature primarily targets fashion shoppers using compatible devices. If Meta's monthly active users in this category total 10 million, that's the estimated reach.
2. Impact: AR try-ons can enhance the shopping experience and reduce return rates. However, since not all users might use it, the impact is moderate. Estimate: 3 out of 5.
3. Confidence: AR technology is proven, but adoption rates vary, making the confidence lower than for recommendations. Assume a 70% confidence level.
4. Effort: Developing the AR feature involves complex software integration and 3D modeling, requiring significant effort. Estimated effort: 24 person-months.
RICE Score Calculation:
For AR try-ons: RICE Score=(10,000,000×3×0.7)/24=875,000
Comparison:
Personalized Recommendations: 13,333,333
AR Try-Ons: 875,000
Decision:
While the AR feature offers an innovative experience, personalized recommendations yield a far higher RICE score, indicating a broader and more immediate impact. This comparison helps companies like Amazon & Meta prioritize features that provide the greatest return on investment and customer value. Again the RICE framework though effective fails to account for cross-product impact, where Meta's AR glasses could be an add-on selling point with this type of technology. Therefore, the short term answer is "Personalized Recommendations" as a priority, however the long term answer is "AR try ons".
0 notes
Text
ScriptableObjects for Weapons
A recent GameJam gave me a chance to jump into Scriptable Objects for my weapons system. Generally I work with enums to build the framework for reuseable components and shared object parameters, but this worked nicely as well.
Here's a reusable Unity C# script for managing weapon pickup and switching. This script allows your character to pick up different weapons, each with unique attributes like damage, fire rate, and prefab.
Setup Steps:
Create Weapon Scriptable Objects: Define each weapon as a ScriptableObject for easy customization.
Attach Pickup Script to Weapons: Add a trigger collider to each weapon prefab and apply this script.
1. Weapon ScriptableObject (WeaponData.cs)
using UnityEngine;
[CreateAssetMenu(fileName = "NewWeapon", menuName = "Weapons/Weapon")]
public class WeaponData : ScriptableObject
{
public string weaponName;
public WeaponType weaponType;
public float fireRate;
public GameObject weaponPrefab;
public int damage;
public Sprite icon; // Optional: For UI representation
public enum WeaponType { Axe, Knife, Sword, Bow }
}
2. Weapon Pickup System (WeaponPickup.cs)
using UnityEngine;
public class WeaponPickup : MonoBehaviour
{
public WeaponData weaponData; // Assign the weapon data in the inspector
void OnTriggerEnter(Collider other)
{
if (other.CompareTag("Player")) // Ensure the player has a "Player" tag
{
PlayerWeaponManager weaponManager = other.GetComponent<PlayerWeaponManager>();
if (weaponManager != null)
{
weaponManager.PickupWeapon(weaponData);
Destroy(gameObject); // Destroy the weapon pickup object after pickup
}
}
}
}
3. Player Weapon Manager (PlayerWeaponManager.cs)
using System.Collections;
using System.Collections.Generic;
using UnityEngine;
public class PlayerWeaponManager : MonoBehaviour
{
public Transform weaponHolder; // Assign an empty GameObject where weapons will be held
public GameObject currentWeapon;
public WeaponData currentWeaponData;
public void PickupWeapon(WeaponData newWeaponData)
{
// If the player already has a weapon, destroy it
if (currentWeapon != null)
{
Destroy(currentWeapon);
}
// Instantiate the new weapon prefab and set it as a child of the weapon holder
currentWeapon = Instantiate(newWeaponData.weaponPrefab, weaponHolder.position, weaponHolder.rotation, weaponHolder);
currentWeaponData = newWeaponData;
}
// Example method to simulate attacking
public void Attack()
{
if (currentWeaponData != null)
{
Debug.Log($"Attacking with {currentWeaponData.weaponName}, dealing {currentWeaponData.damage} damage.");
}
}
}
How to Use:
Create Weapon Data:
Right-click in the project window.
Select Create -> Weapons -> Weapon Data.
Configure attributes like name, damage, fire rate, and assign a weapon prefab.
Create Weapon Prefabs:
Design a weapon prefab with a trigger (Box, capsule, etc.) and then add a checkbox for "IsTrigger"
Add the WeaponPickup script and assign the WeaponData ScriptableObject.

Setup Player:
Ensure the player has a collider with the tag "Player."
Add the PlayerWeaponManager script to the player.
Create an empty GameObject (e.g., WeaponHolder) as a child of the player, and assign it in the weaponHolder field.
Customizable Features:
You can extend WeaponData with additional attributes like ammo, reload time, or special effects.
Enhance PlayerWeaponManager to switch between multiple weapons or add weapon dropping functionality.
This script allows you to create various weapon pickups with unique characteristics, promoting code reusability and easy weapon customization.
0 notes
Text
Creating a minimap for my GameJam
Over the years I've never developed a minimap, and in a recent GameJam I finally got a chance to build something for my team. Figured this would be a good opportunity to get back to writing some blogs. So here's one for building a simple minimap.
Creating a minimap for a Unity scene involves rendering a smaller representation of the game world, typically from a top-down perspective, to provide players with a quick overview of the entire level.
Here's are two options on how you can create a simple minimap in Unity.
OPTION 1: By writing a small script
Create a Camera for the Minimap: Create a new camera in your scene that will be used to render the minimap. Position it appropriately, usually above the scene looking down.
Set Camera Parameters: Adjust the camera's settings, such as the projection type (orthographic is common for minimaps), size, and position.
Create a Render Texture: In the Project panel, right-click and choose "Create > Render Texture." This texture will act as the target for the minimap camera.
Assign Render Texture to Minimap Camera: Assign the created Render Texture to the Target Texture property of the minimap camera. This ensures that the camera's output is drawn onto the Render Texture.
Create a UI Raw Image: Create a UI Raw Image (UI > Raw Image) in your canvas. This will be used to display the minimap texture.
Assign Render Texture to Raw Image: Assign the Render Texture to the Texture property of the Raw Image. This connects the Render Texture to the UI element.
Adjust Raw Image Size and Position: Position and size the Raw Image as needed on the screen to represent the minimap. You can scale it down and place it in a corner, for example.
Masking for a circular minimap: To create a circular minimap, you might want to add a circular mask to the Raw Image. You can achieve this by using a mask component or shader.
Update Minimap in Script: Write a script to update the minimap texture in real-time. This script should modify the minimap camera's position and rotation according to the player's position in the game.
Here's a simple example script to get you started:
using UnityEngine; public class Minimap : MonoBehaviour { public Transform player; // Assign your player object to this variable in the Inspector. void LateUpdate() { // Update minimap position based on player position transform.position = new Vector3(player.position.x, transform.position.y, player.position.z); // Update minimap rotation based on player's forward direction transform.rotation = Quaternion.Euler(90f, player.eulerAngles.y, 0f); } }
Attach this script to the Minimap Camera, and assign your player object to the player variable in the Inspector.
This is a basic setup, and you can expand on it based on your specific game requirements. You may also want to consider adding icons for other important elements in your scene (e.g., objectives, enemies) to enhance the minimap's functionality.
OPTION 2: Without any scripts
If you want to create a simple minimap without using scripts and by attaching a quad to the player, you can follow these steps:
Create a Quad: In Unity, go to GameObject > 3D Object > Quad to create a simple quad.
Position the Quad: Position the quad above your scene or wherever you want the minimap to appear. You can do this by adjusting its transform position. Then make it a child of the Player object. Make sure that when the player rotates the quad rotates as well.
Add an image: Add a player icon image to the quad object. This is what you will see when you are watching the player from the top.
Adjust Quad Size: Scale the quad to an appropriate size for your minimap. This size will depend on your player size and how much of it you want to show in the minimap.
Set Up Orthographic Camera and Render Texture: Follow the steps mentioned earlier to create a new camera for the minimap and a render texture. However, instead of using a script to update the camera's position and rotation, just move the camera under the player hierarchy. Now the camera will rotate just like the player.
Adjust Camera Settings: Since the camera is now a child of the player, you might need to adjust its local position and rotation relative to the player's position to get the desired minimap view. Also, adjust the camera size attribute to adjust the Y distance from the top view.
Masking (Optional): If you want a circular minimap, you can create a circular mask for the quad. This can be done by creating a circular texture with transparency or by using a shader.
This method doesn't involve scripting but relies on the parent-child relationship between the player, camera, and quad to achieve the minimap effect. Keep in mind that this approach may have limitations, especially if you need more complex minimap behaviors or if your game has multiple scenes or dynamically changing environments. If your requirements become more complex, you might need to consider using scripts to update the minimap dynamically.
1 note
·
View note
Video
youtube
Really good insights about mobile app performance improvement.
1 note
·
View note
Text
Basic building blocks for creating a fight scene in Unity3D
Developing an engaging fight scene is an art.
This blog post is not going to be a lecture on art.
Instead we will develop the building blocks needed to create a very basic fight scene.
We will start by looking at colliders, triggers, hitboxes and response animation.
Let's create a basic fight scene between two robots.
Start by creating a new project, then import this robot character into your project.
https://www.assetstore.unity3d.com/en/#!/content/12802
This robot character comes with several animations.
Simply put two instances of this robot into your scene.
We will be using basic Colliders and Triggers concepts to create the fight scene.
However, another basic concept in any fight scene is that of a hitbox.
Hitboxes is an invisible shape commonly used in video games to detect collisions with other players/objects. These hitboxes can be of any shape, but most people simply use a cube or sphere. This ensures that the game uses simple physics to detect collision with another object.
Hitbox:
> Start by adding a box collider on the hands.
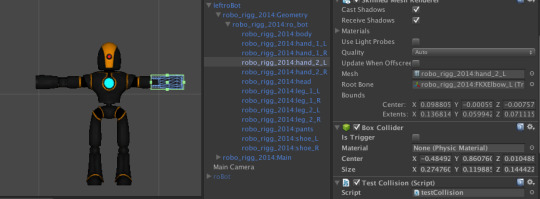
We don’t need it to have a trigger.
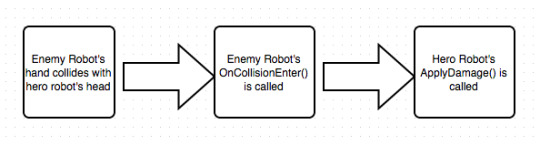
Add a simple script to test the collision behavior when it hits the other robot’s head. Let’s call it “testcollision.js”
#pragma strict function OnCollisionEnter (col : Collision) { Debug.Log("Im collision entered"); if(col.gameObject.name == "robo_rigg_2014:Head_M") { col.gameObject.SendMessageUpwards ("ApplyDamage", 5.0); } }
This SendMessage module is interesting.
Here’s how it works.
Say your robot’s hand is colliding with the head and you want the message to reach the actual root object. In such a case, all you need to do is call SendMessageUpwards and it will bubble up to the main character.
Let’s start by adding a simple script that detects incoming damage and acts accordingly.
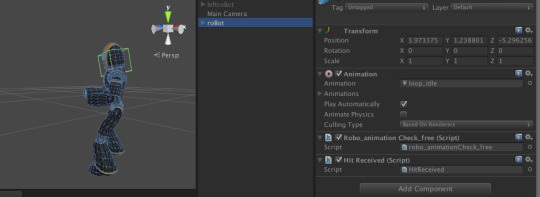
Here’s the script that simply detect the incoming messages about damage received and acts accordingly.
#pragma strict private var anim : Animation; function Start () { anim=GetComponent (Animation); } // Every script attached to the game object that has an ApplyDamage function will be called. function ApplyDamage (damage : float) { print (damage); anim.CrossFade ("xhit_head"); while (anim.IsPlaying) { // do nothing yield; } anim.CrossFade ("loop_idle"); }
When our enemy character pushes towards our hero robot, it may hit it’s legs, it’s head, shoulder, etc.
Each one of these body parts needs to be smart enough and act appropriately.
e.g. Say our enemy character hits our hero in it’s head, in this case we want our hero’s head to be knocked off just a bit, while losing some health.
So, there’s an animation component to our hero’s behavior and a characteristic change.
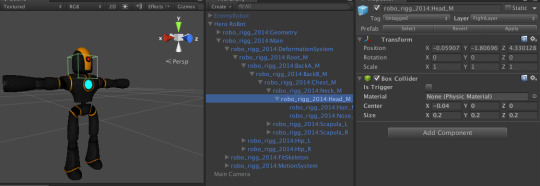
Notice that we’ve attached a very similar Box Collider to our hero chararter’s head as well.
This allows us to detect incoming collision with other colliders such as punches from our enemy character’s hand.
Notice that we haven’t attached any script to this sub-object.
The data simply flows from the hand to the root object.
That’s about it.
Let’s summarize.
a) Apply box colliders on enemy’s hands
b) Apply box colliders on hero’s head
c) Listen to OnCollisionEnter event on the hero’s hands
d) Call on the hero’s root object by using the method”
~~~ col.gameObject.SendMessageUpwards ("ApplyDamage", 5.0);
That should get you going with the most primitive form of a fight scene using Unity3D.
enjoy !!!!
3 notes
·
View notes
Text
Colliders vs Triggers - when to use what?
Colliders and Triggers are commonly used techniques in games to detect when objects collide.
Let's start with the basics.
~ Say you have a plane with Mesh collider as the floor.
~ Add a bullet object with a rigidbody and gravity attached to it.
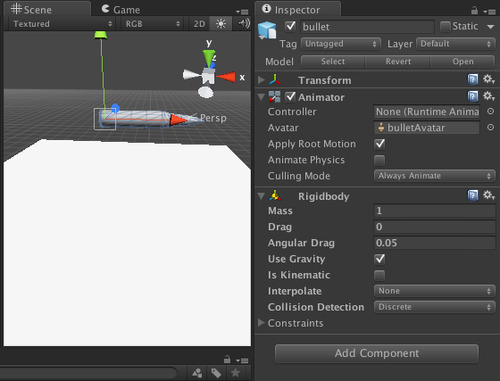
This object would fall through the floor since it has no colliders.
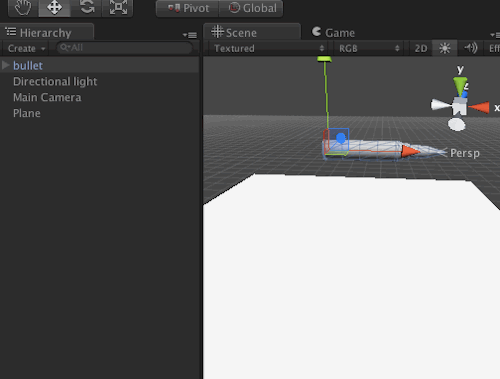
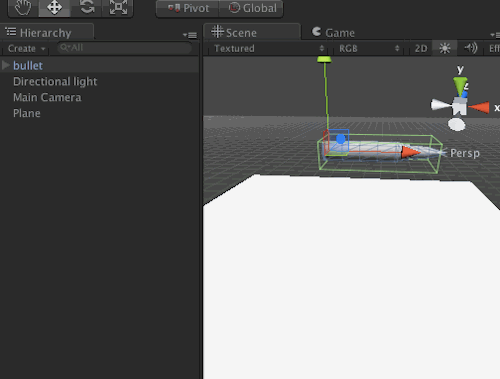
Let's apply a box collider to it.
Now when it falls on the floor, it would not fall through the floor because the collider is preventing it from passing through the floor which also has a mesh collider.
At this time, the collision events are called.
~ e.g. OnCollisionEnter ==> gets called
Attach this script to the bullet object:
#pragma strict function OnCollisionEnter (col : Collision) { Debug.Log("Entered collision zone"); }
Notice how the behavior for the bullet has changed because it has a collider around it.
This type of collider serves two main purposes for the bullet:
1) It prevents the bullet from passing through the floor
2) It gives us the ability to add custom code when such collisions occur
If you care about both of these behaviors then Collisions is the right framework to use.
In case, all you want is the ability to write custom code when such collisions occur, then you might consider triggers for your behavior.
You can convert the box collider into a trigger by checking the
~ Trigger Enabled = YES
If you check the trigger box the bullet will fall through again, even though the bullet has a box collider around it.
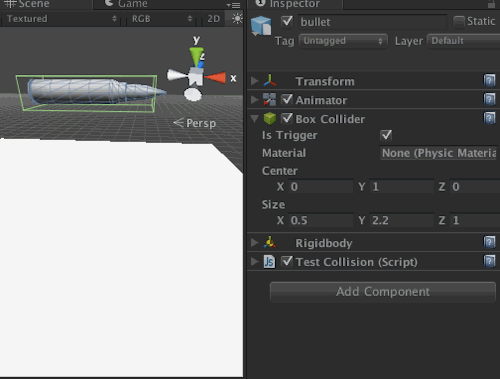
At this time, the trigger events are called.
~ e.g. OnTriggerEnter ==> gets called
Attach this script to the bullet object:
#pragma strict function OnTriggerEnter (col : Collision) { Debug.Log("Entered trigger zone"); }
Notice that we no longer receive the collision messages and only receive the trigger messages.
TRIGGERS
If all you want is to write custom code when two game objects collide then Trigger is a cheap optimal way to achieve just that.
Triggers are best suited for:
~ Attack (punch, kick, sword, etc)
~ Bullets behavior
Trigger events are only sent if :
> Both objects have colliders attached
> One object has a rigid body attached
> One object has marked "Is Trigger" = "YES"
COLLISIONS
If you want to prevent two objects from colliding and you want to write custom code when they touch each other, then Collision is the way to go.
Collisions are best suited for:
~ Cars bumping into each other
~ Items falling from top to floor
Collision events are only sent if:
> Both objects have colliders attached
> One object has a rigid body attached
> All objects have "Is Trigger" = "No"
Here’s a sample app (using Unity 5):
https://github.com/anilo/testColliders
2 notes
·
View notes
Text
Creating a Fully Functional Enemy Behavior using RAIN AI Engine
A non-player character (NPC), sometimes known as a non-person character or non-playable character, in a game is any character that is not controlled by a player. In games, this usually means a character controlled by the computer through artificial intelligence.
An enemy that pursues our hero character and acts independently is considered a NPC.
Any extra characters that have some default behavior would also be called an NPC.
e.g. A character that simply provides directions or assistance
You can create a simple (or complex) state machine for a character so that it moves in the scene with some default behavior but creating such behavior with an AI engine such as RAIN's AI is simply fun.
In our sample project we will create a simple enemy NPC that:
a) Runs after our hero character when it detects that our hero is near.
b) Attacks our hero when it gets closer
c) Dies when it loses it's health
d) Kills our hero
e) Returns back to wandering around in our environment
You can access the full project here
You can use this project as a building block for more interesting and entertaining behavior.
Download RAIN From here:
http://rivaltheory.com/rain/download/
Open the project and you can run some of the samples provided with the download.
In my projects I've imported a few free characters.
MAX: https://www.assetstore.unity3d.com/en/#!/content/3012
Import Max into the scene and add an AI module to it as shown below.
Once the Rain AI module has been added to our character Max, you will see it in the hierarchy as shown below.
This AI Module has a lot of fun capabilities:
> Local Variables
> Sensors (Audio, Visual)
> Behavior Tree Editor
> Navigation Mesh
> Mecanim & Legacy Animation Support
For our exercise, we will use as many capabilities as possible to get the full AI experience.
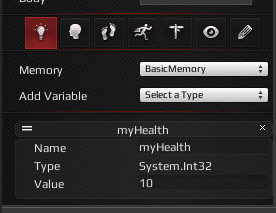
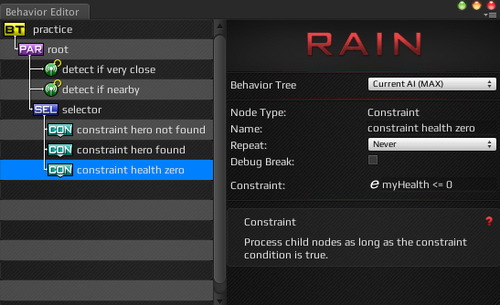
CREATING PLAYER HEALTH VARIABLE
Tracking player's health can be achieved simply by creating a local variable called "myHealth" of type int.
Set a default value = 10
We will use this variable later on to determine what animation the player should be playing.
CREATE AI STATES FROM LEGACY ANIMATION
The Max character that we imported earlier has many animations that we will be using once it meets certain conditions.
The RAIN AI Engine requires you to simple map each animation class with a state.
All you need to do is map each animation clip with a state name.
e.g. "idle" animation clip has been mapped to a "idle" state, and so on.
Notice you also need to select the wrap mode.
For "idle" -> it is set to Loop
For "punch" -> it is set to Default
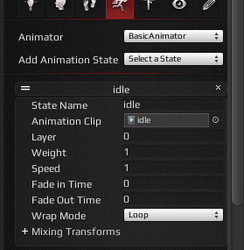
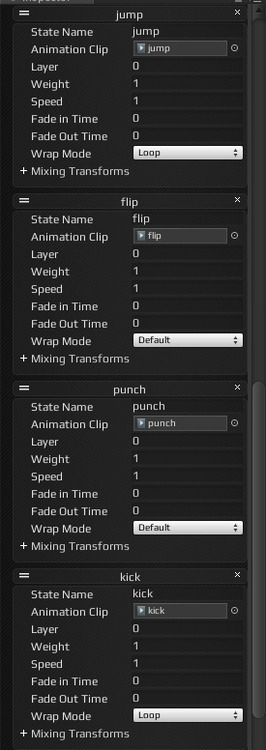
Once you have these states imported you can start to use them in your behavior tree.
CREATING A NAVIGATION MESH
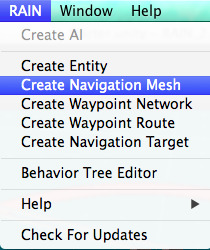
Go to the new RAIN menu and select "Create Navigation Mesh" as shown below.
It will appear as a standalone component in the hierarchy as shown below:
Simply ensure that it covers the borders of the scene that you want it to cover.
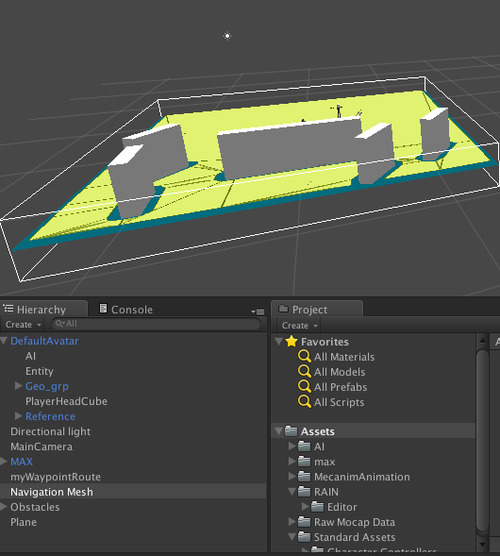
Once the navigation mesh cover the plane that you want it to cover go ahead and generate the navigation mesh by clicking on the "Generate Navigation Mesh" button in the navigator.
That's it.
Your mesh is ready to use.
You won't see any change just yet we still need to develop the character's route, which we will do in the next step as waypoints for the player to move around.
CREATING WAYPOINT ROUTE FOR NPC CHARACTER
Our NPC enemy character can simply roam around the world while waiting for our player to enter it's visible range.
You can simply create a waypoint route by selecting the option at the top.

Once you have selected the waypoint route option engine you can drop points for the route as shown below.
You will be able to view the waypoints on the right in the Inspector view.

That's it.
Now your character will walk around in circles if you simply run the game.
The player won't be walking though, it would be floating.
We will make it walk soon :)
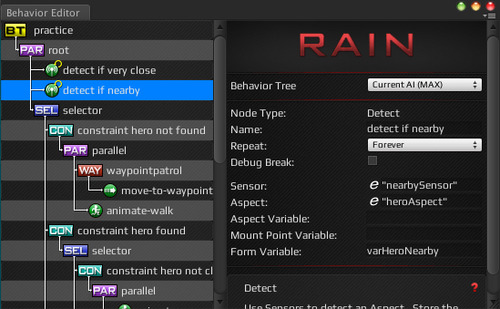
Creating Sensors
The two main decisions that we need to do at the very beginning are:
a) detect if very close :-> Used to determine if our enemy character is close to our player character
b) detect if nearby :-> Used to determine if our enemy character is somewhat near our player character
The behaviors depend on Sensors that we can create for the colliders. Sensors are nothing more than simple colliders that can be applied on the characters.
Let's create two sensors:
i) nearbySensor: To detect when a character is nearby, so that our character can start to chase (run towards) our player.
ii) closeSensor: To detect when the character is very close, so that our character can start running towards it
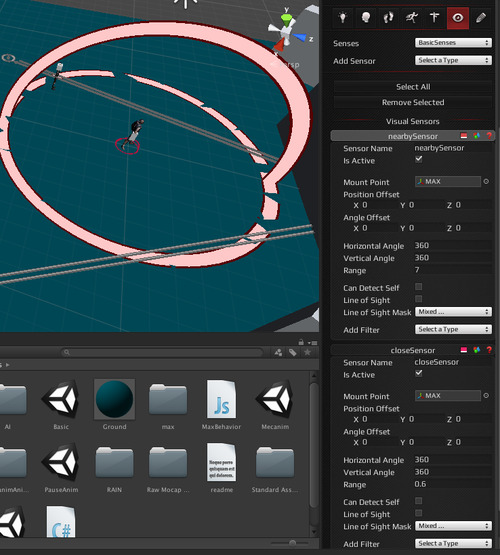
The nearbySensor and closeSensor will act as visual sensors for our Max character.
Next we will use information from these sensors in our Behavior Tree.
Creating local variables from Sensors
Create a new behavior tree and then create a Parallel node.
Create -> Decisions -> Parallel

Right click in the Parallel Node and create 2 Detect nodes under it:
Create -> Action -> Detect
We will use the first detect node for when the player character is very close.
In our current example, we are calling our Sensor = "closeSensor"
And our Aspect = "heroAspect"
Finally our Form Variable = "varHeroClose".
This means that whenever our "close" sensor detects the "heroAspect" is nearby, it will set the variable "varHeroClose" != null.
We will be using this information later on in making behavior decisions for the enemy character using the condition:
"varHeroClose" = null
OR
"varHeroClose" != null
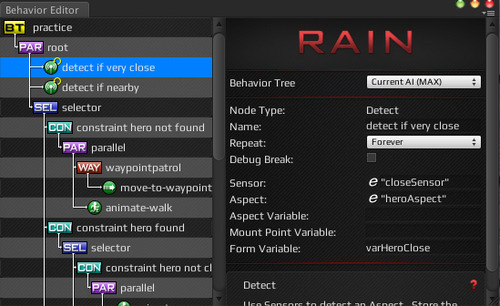
The next detector nodes will be used to determine if our player is nearby.
This is achieved with the help of the Sensor: "nearbySensor"
Again with the same aspect: "heroAspect"
Finally our Form Variable = "varHeroNearby" is used to save this value.
We will be using this information later on to make behavior decisions for the enemy character.
Next make a "Selector" node under the Parallel root node.
This selector node will be used to run our main logic loop.
Let's see it in action.
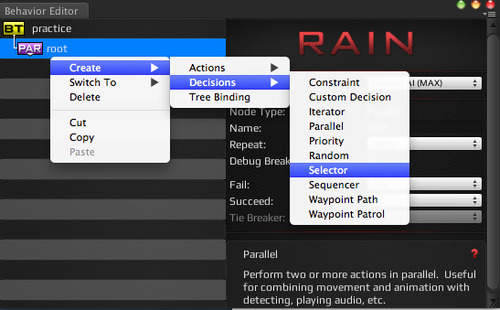
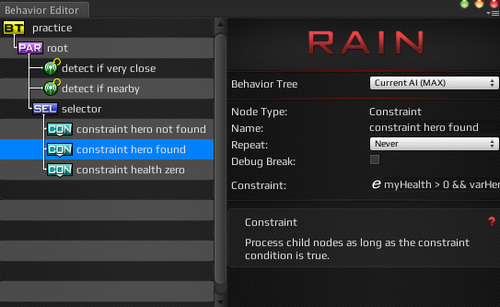
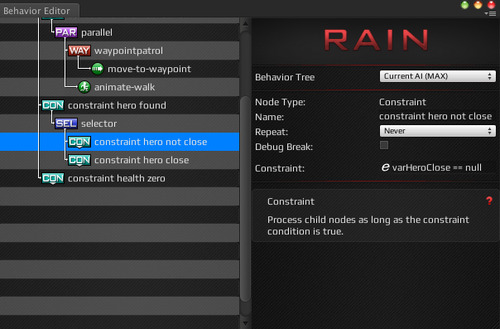
Under this main selector node, go ahead and add some constraints.
Constraints will act as a logic step and guide the character to take the appropriate action.
(aka "if-condition" if you are a programmer)
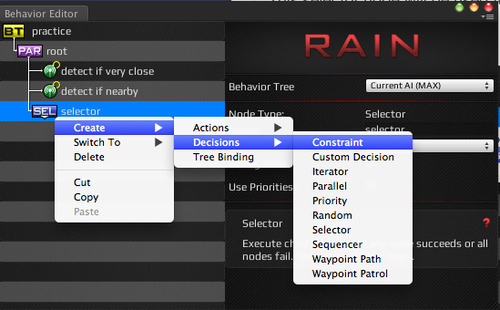
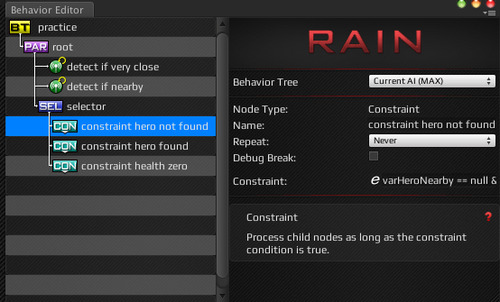
You will want to create 3 constraints:
a) hero not found
b) hero found
c) health zero
The selector will run through these constraint conditions many times and determine when the condition is met and execute the code under it.
MAKING OUR CHARACTER PATROL THE AREA
Our character is now ready to receive instructions from us on what it needs to do when it is executing a simple "hero not found" constraint.
Apply the constraint:
varHeroNearby == null && myHealth >0
We want our player to walk around in circles using the waypoint map that we created earlier.
This can achieved with the following steps.
a) Add a Parallel node under the constraint: we will use this to make the character move along the waypoint & apply the walk animation to it.
b) Add a waypoint Patrol node: so that our character knows where the next waypoint node is. This node sets a new transform value in the variable "nextStop" once our character reaches the previous waypoint.
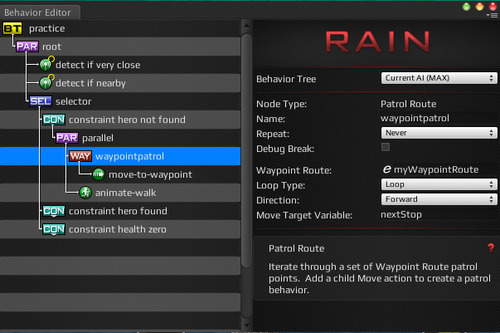
c) Add a Move-to-waypoint: This moves the character to the "nextStop" waypoint which keeps changing as our character reaches each waypoint.
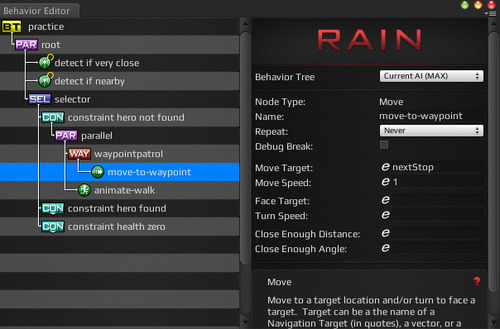
4) Add an animation node: This will ensure that our character perform the animate action while it is moving towards the next waypoint.
Now if you run the app it would simply make our player patrol along the waypoints and if you looked at the behavior tree it would display it like this.
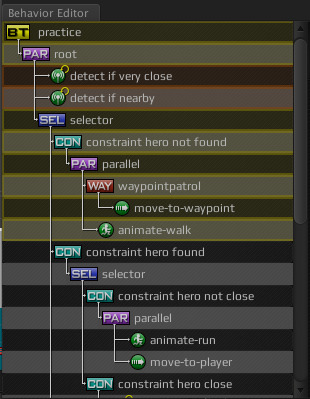
MAKING OUR CHARACTER CHASE OUR PLAYER
Here's another constraint that is created with the logic for when the hero is found. This is achieved by implementing the constraint:
myHealth > 0 && varHeroNearby != null
Once our hero is found within the enemy's sensor range we want to make it follow our player and then attacks it when it is very close to it.
Here are the steps we will follow:
a) Create a selector node
This selector node will be used to run two condition: either the character is very close or the character was just detected.
b) Constraint: hero not close:
In this case, the condition to check is varHeroClose == null
This tells us that the big sensor detected that our player is nearby, but not within striking close distance.
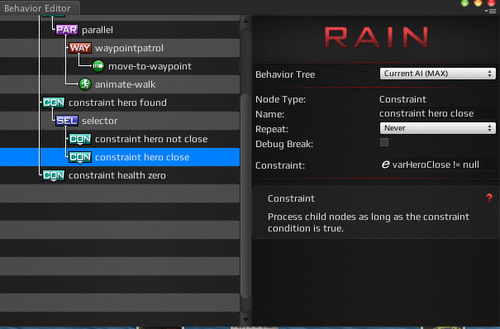
c) Constraint: hero close
In this case, the condition to check is varHeroClose != null
This tells us that the small sensor detected that our player is within striking distance.
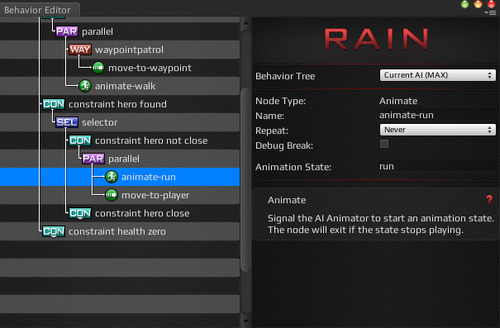
d) Run animation
Once we know that our player is not close, we want to run towards our player.
This is achieved by adding a Run animation to our player
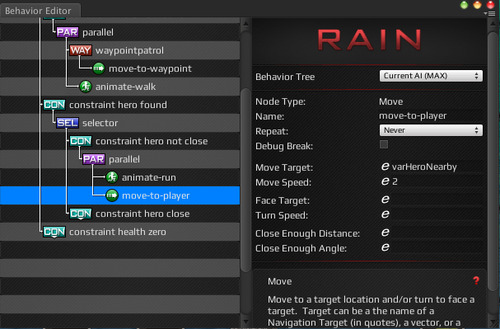
e) Move-to-player
Next we move our enemy towards our player.
This is achieved with the move-to-player animation.
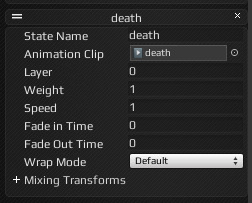
MAKING OUR CHARACTER DIE
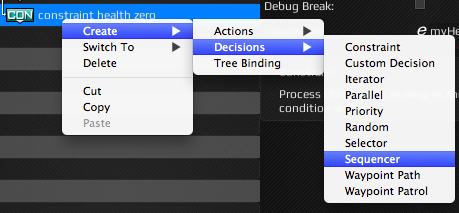
Finally the 3rd constraint is implemented, when the health of our character is zero.
myHealth <= 0
Create a sequencer node under this constraint:
Create -> Decisions -> Sequencer
This will allow us to run multiple instructions when a player dies.
Under the sequencer node, let's create an "Animate" node.
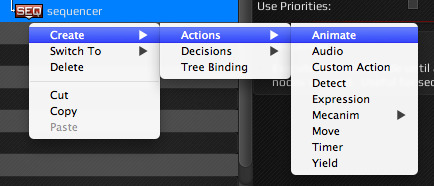
Next set the set Animation state = "Death"
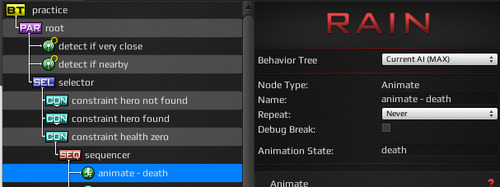
Next let's add a Yield state and 2-second timer wait function as shown below.
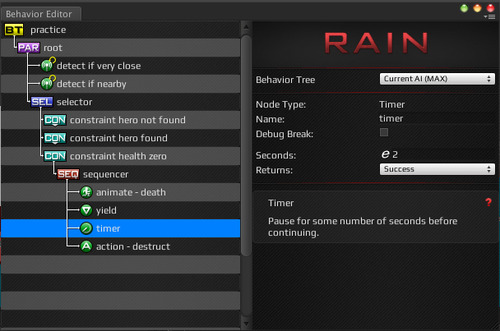
This will allow other animations to catch up and also will allow us to complete the death animation successfully.
The last action in this sequence is an action sequence.
This will simply allow the character to self-destruct.
Here's how you can make a "Custom Action".
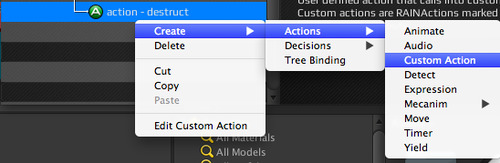
Under Class, select the option to create a new custom class, and select CSharp as the language.
Name the new Action class to "EnemyCustomActionTest".
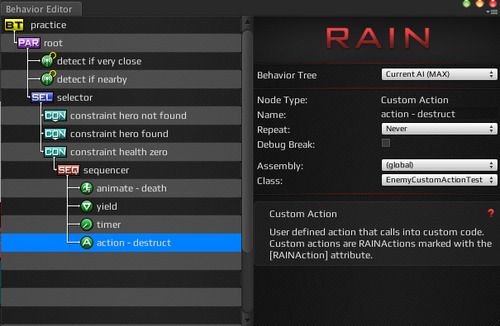
Here's the code for the class.
using UnityEngine; using System.Collections; using System.Collections.Generic; using RAIN.Core; using RAIN.Action; [RAINAction] public class EnemyCustomActionTest : RAINAction { public override void Start(AI ai) { base.Start(ai); } public override ActionResult Execute(AI ai) { MonoBehaviour.Destroy(ai.Body); return ActionResult.SUCCESS; } public override void Stop(AI ai) { base.Stop(ai); } }v
That's it.
If you run the game now, and set the myHealth variable to 0 in the AI viewer, you will find that the character simply goes thru the 4 sequenced actions as is outlined above.
CREATING BORDER FOR PLAYER'S HEAD
Create a box that fits on the player's head.
Assign to be a child object of the player gameobject.
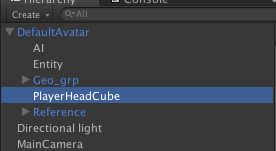
Mark
~Is Trigger = YES
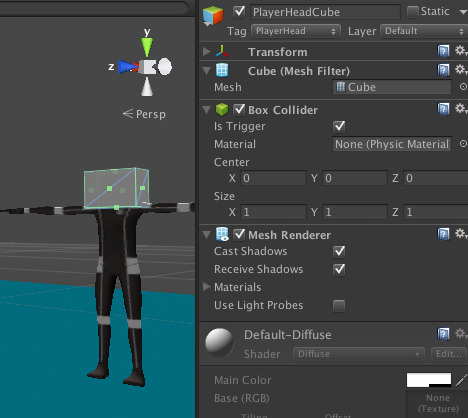
Leave the MeshRenderer checkbox=true
Later on you can disable the the MeshRenderer and the behavior will still work.
CREATING BORDER FOR ENEMY'S HAND
Create a 3D cube and attach that cube to the hand of our enemy character, "MAX"
Let's call this "HandCube"
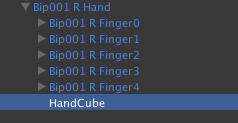
Add a Rigidbody component to the cube.
Set the following flags:
~ Is Kinematic = YES
~ IsTrigger = NO
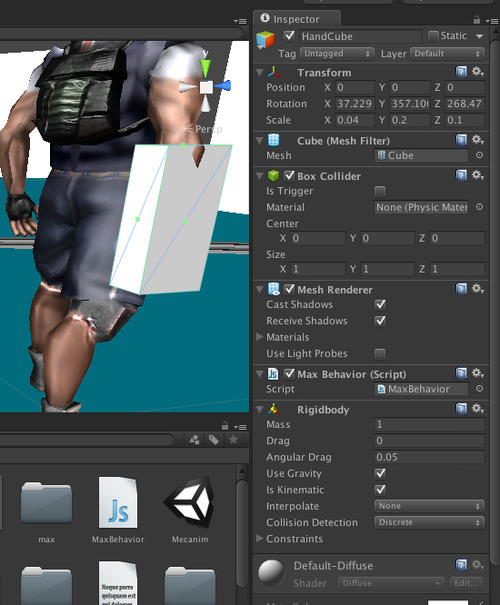
CREATING ATTACK SCRIPT FOR ENEMY'S HAND
Create the following script and attach it to the player's handcube object.
MaxBehavior.js
#pragma strict function Start () { } function Update () { } function OnTriggerEnter (other : Collider) { print ("trigger enter event"); if(other.gameObject.tag == "PlayerHead") { print ("killing parent of collider object"); Destroy(other.transform.parent.gameObject); } }
Here's the final result.
This completes our intro to RivalTheory's RAIN AI Engine. Hopefully, the tutorial will help you build you more engaging games and relatable characters. Leave some comments. Let me know what else you would like to learn about.
1 note
·
View note
Text
How to create a Game Design Document
A game design document should be one of the first document that is developed as soon as an idea hits you.
You can use Powerpoint, Word, Google Docs, anything that works for everyone in your group.
At the very core of the game design document should be details about how the gameplay works.
e.g. If you were creating "Plants and Zombies", then the GDD would probably talk about:
> Zombies are trying to kill you and you are trying to kill them.
> Score points for killing each zombie
> Grow plants
> Plants attack zombies for you
The GDD is your landscape to paint. Think big. Think bold.
Pour your heart out.
Let the creative juices flow.
In the end, if you can achieve 20% of what you set out to achieve then you've done very well.
Here's a basic outline for a simple GDD:
1. Title Page 1.1. Game Name – Perhaps also add a subtitle or high concept sentence.
2. Game Overview 2.1. Game Concept 2.2. Genre 2.3. Target Audience 2.4. Game Flow Summary – How does the player move through the game. Both through framing interface and the game itself. 2.5. Look and Feel – What is the basic look and feel of the game? What is the visual style?
3. Gameplay and Mechanics 3.1. Gameplay 3.1.1. Game Progression 3.1.2. Mission/challenge Structure 3.1.3. Puzzle Structure 3.1.4. Objectives – What are the objectives of the game? 3.1.5. Play Flow – How does the game flow for the game player 3.2. Mechanics – What are the rules to the game, both implicit and explicit. This is the model of the universe that the game works under. Think of it as a simulation of a world, how do all the pieces interact? This actually can be a very large section. 3.2.1. Physics – How does the physical universe work? 3.2.2. Movement in the game 3.2.3. Objects – how to pick them up and move them 3.2.4. Actions, including whatever switches and buttons are used, interacting with objects, and what means of communication are used 3.2.5. Combat – If there is combat or even conflict, how is this specifically modeled? 3.2.6. Economy – What is the economy of the game? How does it work? 3.2.7. Screen Flow -- A graphical description of how each screen is related to every other and a description of the purpose of each screen. 3.3. Game Options – What are the options and how do they affect game play and mechanics? 3.4. Replaying and Saving 3.5. Cheats and Easter Eggs
4. Story, Setting and Character 4.1. Story and Narrative – Includes back story, plot elements, game progression, and cut scenes. Cut scenes descriptions include the actors, the setting, and the storyboard or script. 4.2. Game World 4.2.1. General look and feel of world 4.2.2. Areas, including the general description and physical characteristics as well as how it relates to the rest of the world (what levels use it, how it connects to other areas) 4.3. Characters. Each character should include the back story, personality, appearance, animations, abilities, relevance to the story and relationship to other characters
5. Levels 5.1. Levels. Each level should include a synopsis, the required introductory material (and how it is provided), the objectives, and the details of what happens in the level. Depending on the game, this may include the physical description of the map, the critical path that the player needs to take, and what encounters are important or incidental. 5.2. Training Level
6. Interface 6.1. Visual System. If you have a HUD, what is on it? What menus are you displaying? What is the camera model? 6.2. Control System – How does the game player control the game? What are the specific commands? 6.3. Audio, music, sound effects 6.4. Help System
7. Artificial Intelligence 7.1. Opponent and Enemy AI – The active opponent that plays against the game player and therefore requires strategic decision making 7.2. Non-combat and Friendly Characters 7.3. Support AI -- Player and Collision Detection, Pathfinding
8. Technical 8.1. Target Hardware 8.2. Development hardware and software, including Game Engine 8.3. Network requirements
9. Game Art – Key assets, how they are being developed. Intended style.
Some Sample GDD:
Iron Belly Studios: https://ironbellystudios.app.box.com/ironbellygdd
3 notes
·
View notes
Text
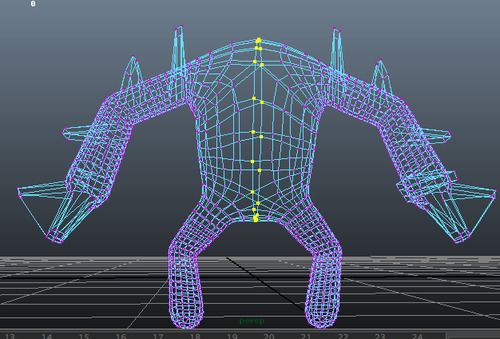
Working with mirrored geometry in Maya
As you start to refine your 3D models you will often need to go back and forth between multiple applications. Each one suited for something specific. It's best to maintain symmetry in your 3D models so that the end result looks nice. Tools such as ZBrush & Maya make it easy to work in mirrored symmetry mode.
Here are some easy tips to keep in mind as you play with mirroring in Maya.
1) Say you have created as ZBrush model (using ZSphere tool) and you want to use Maya to add the hands.

2) The first step is to export this model from ZBrush as a .obj
Then create a new scene in Maya and import this .obj file model in.
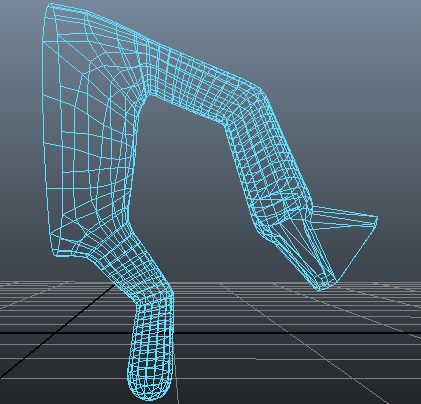
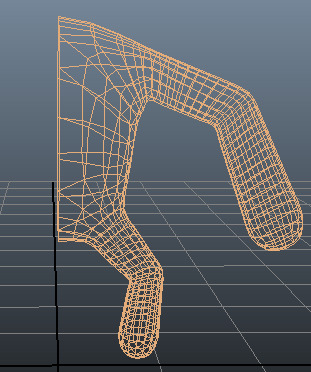
Notice that this model below has multiple mirrored components in it, that's how ZBrush exports it and that's how Maya imports it by default. In the scene below, if you select the left arm then the right arm also gets selected.
However, if you make changes to one side of the model it won't automatically make changes to the other side.

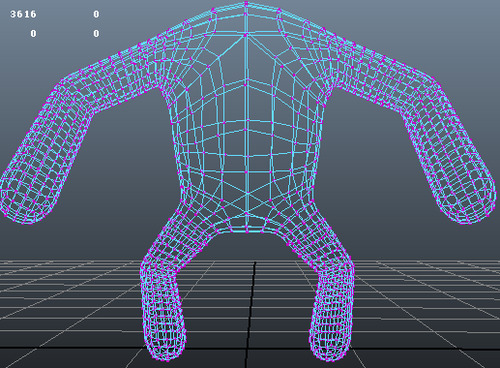
3) We need to first cut the model in half before making any changes to it.
Start with Face mode -> "Select -> Face"
Delete half the faces on the left side, until your model looks half as shown below.
This will take some time as you have to select each sub-object, then switch to "Face mode" and then delete some faces ( took me ~50 seconds)
Another option is to convert the whole model to a single object by combining the meshes together. You can do this by switching to object mode (explained later in article)
Another option is to import the .obj file into ZBrush as a single component (explained later at the end of the article).
4) Make some changes to your model, say you add some hands to one side of the model like this.
5) Next let's say you want to take this model back into ZBrush for further modeling. There are two ways to proceed:
a) You could mirror the model in Maya before sending it back to ZBrush
b) You could mirror the model in ZBrush
Let's learn how to mirror the model in Maya itself.
Mirroring a model in Maya can be achieved in multiple ways.
OPTION 1: Duplicate Special along negative x-axis ( allows you to continue modeling in Mirrored mode)
a) Select all objects in the model, then make the following changes in the "Edit -> Duplicate Special" options:
Geometry type = Instance
Scale = -1 along x-axis
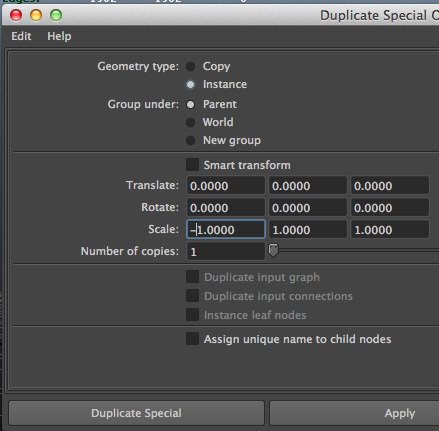
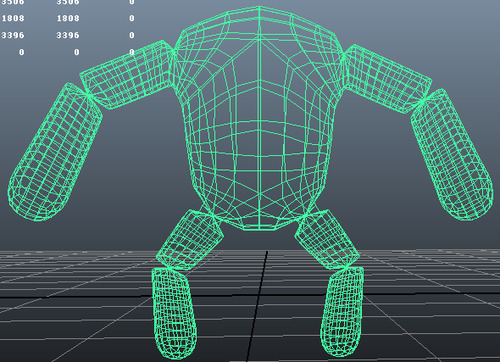
b) This will give you a symmetrical model as shown below.
Now if you make any changes to one side it will automatically mirror the model to the other side as well.
Continue to make changes in this model as long as you want symmetry.
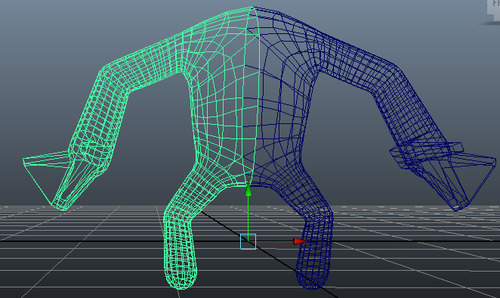
c) Once you are satisfied you should merge the seams. Merging seams will not be an easy task since you still have multiple objects along the seam, so let's combine all objects into a single mesh.
Switch to object Mode:
"Select->Object Mode"
Select both objects. Then choose.
"Mesh-> Combine"
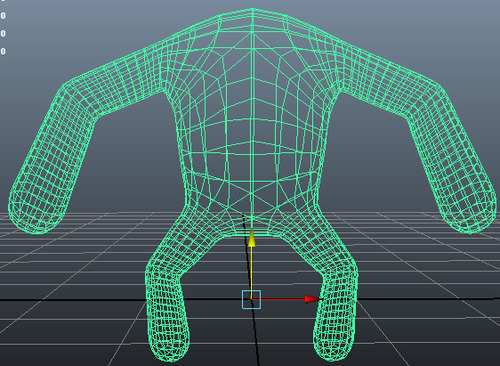
This looks pretty good, but there are still some duplicated vertices at the seams where the two objects meet -- these can be merged as well.
d) Next let's eliminate the duplicate vertices at the seam.
Choose the "Select -> Vertex".
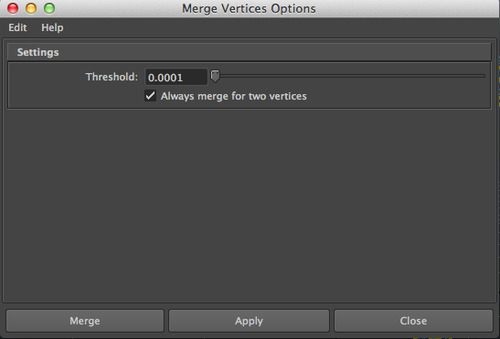
Keep "Shift" key pressed.
Then select the vertices by creating a rectangle around the vertices to select the vertices. Don't bother clicking on them as you will never be able to select both vertices at the same time.
Notice the vertices count on top, you will notice the vertex count goes up by two for every one visible vertex that you select with the Select tool.
Then merge them all with one command:
"Edit Mesh-> Merge Vertex Tool -> ENTER"
Your vertex count should drop to (almost) half.
f) Finally you've got a model with merged vertices
g) Now you are ready to export this model back in ZBrush or some other tool.
h) In some cases you might also need to flip the normals on the mirrored half of your mesh after you’ve done with the “Combine” command.
This is because they are all facing backwards since you scaled it in -1 during the “Duplicate Special”, so turn on face normals and reverse one half or use the conform all on the whole combined mesh so they are the same and facing outwards. You can see where your normals are facing by choosing:
"Display->Polygons->Face Normals"
Luckily for our model, all normals were pointing outwards so no new change was needed.
OPTION 2 : USE mirror geometry tool (then you can't work in mirrored mode)
a) After step 5) above you can start to mirror the model using the Mirror Geometry tool.
Set the "Edit Mesh -> Mirror Geometry [ ]" options as shown below.
Mirror Direction = -X
Merge vertices (selected)
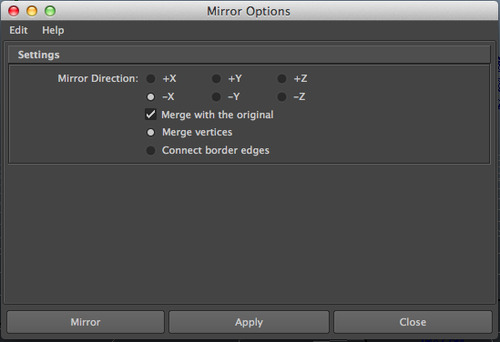
b) You should get a model like this.
Not what you expected right.
c) Here's what happened.
Maya didn't know the exact objects borders to merge at.
Notice you've got two legs, two hands but they were mirrored very close to each other. Maya simply treated each individual object as it's own and mirrored them as separate components.
However, what you were really hoping for was a single mirror of the entire mesh.
Here's how you can help. Combine the objects (meshes) together because if your model still has multiple objects in it then Maya simply does not understand how to mirror the geometry.
> Undo the previous "Mirror Geometry" step and return to your half model.
Switch to object mode (this is required before combining meshes work)
>"Select -> Object Mode"
Select all faces and then go to :
>"Mesh" -> "Combine".
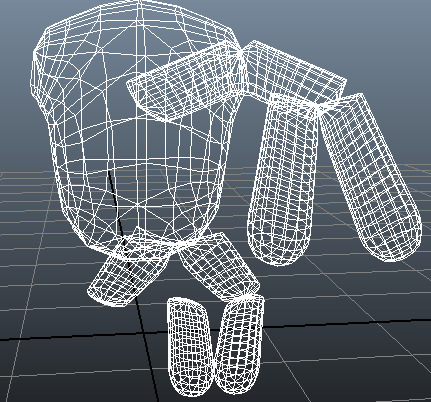
d) Next try to Mirror Geometry again.
> Select full model
> Edit Mesh -> Mirror Geometry"
This is a lot better that before, isn't it.
This time Maya's job was a lot simpler. All it had to do was mirror the object along it's x-axis and merge the vertices at the points where it needed to merge.
Somehow it has introduced some interesting merges at the joints.
e) Turns out the vertices need to be merged before you can mirror geometry.
We can help by merging the vertices.
> Undo the previous "Mirror Geometry" step and go back to the half model
> Go to vertex mode: "Select -> Vertex"
> Keep Shift key pressed -> Right click -> "Merge Vertices" -> "Merge Vertices [ ] " Options
> Update the vertices size to be really small = 0.0001
> Click Merge
f) Next select the model again and "Mesh -> Mirror Geometry"
This time you will see exactly what you wanted.
g) Maya has to calculate each history item you make in the sequence it was made. Once you start getting a bunch of them, the model can become unstable. Also, some actions, like binding and animation, can be adversely affected by some kinds of history items.
As you near the completion of a model, these construction history nodes are not required. If your production work entails having another person texture or animate the model, you’ll want to delete these history nodes from the objects in your scene altogether so another user doesn’t accidentally change your work.
Deleting the construction history is usually done only when a model is completed to a particular milestone stage and the next major phase of production with it needs to occur. For example, skinning, animating, texturing, and so on.
Get in the habit of clearing history and freezing transformations after you are satisfied with your model
> "Edit->Delete By Type -> History"
> "Modify->Freeze Transformations"
ADDITIONAL NOTES:
a) IMPORTING AS SINGLE OBJECT
You can change Maya's import options so that it imports components as single object rather than multiple objects, here's the Import settings to that.
To get to this screen go to "Import" Options and then select "OBJ" as the file type and then change the settings in the "File Type Specific Options" as shown below to "Single Object":
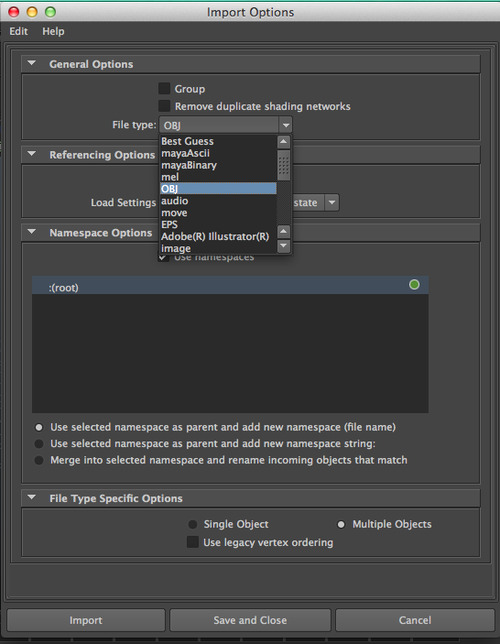
This would ensure that all obj imports are automatically converted into single objects. This will certainly make your life easier if you prefer to work with your models as single objects.
0 notes
Text
If you have developed iOS apps in the past you will enjoy the new SpriteKit framework that Apple has introduced with the iOS7 release. Here is the source code for this demo.
It is a sweet, simple framework that has everything to make your 2D game development easier:
> High performance rendering of 2d-sprites
> Animation support
> Physics engine integration
> Particle effects
> Atlas creation
> Raycasting
and many many more….
If you’ve ever developed using Cocos2D or Unity you will find these terms very familiar.
The easiest way to develop your knowledge about the SpriteKit framework is to understand the basic components and then apply them to a simple application.
In this project, I want to help you with integrating SpriteKit into your existing UIKit applications (eg: single view application, master detail application and so on). In order to successfully achieve the above, we’ll first need to understand the basic structure of both - UIKit project and SpriteKit project.
In a typical UIKit project you would create:
- a UiViewController instance.
- As per MVC, we create UiView class separately which has all the code for creation and behavior of UI elements (labels, buttons, images).
- then the UiView is connected with the UIViewController.
Similarly, in a SpriteKit implementation you would create:
- a UiViewController instance
- a SKView and an SKScene
- this SKScene has all the UI elements (labels, buttons, images)
- then the SKView is connected with the UIViewController

The above is a screen shot from the pdf file on introduction to spritekit downloaded from WWDC videos 2013. As you can see here, UIView is the parent for SKView which in turn is responsible for presenting the SKScene class in which the creation and behavior of UI elements are defined.
Given the above info, we are now ready to start with our sample project. First, create a new project -> Single View Application
Launch the application, you will see your standard launch screen.
Nothing special about this project yet.
Next you would need to add the “SpriteKit” framework to the Project. Click your project -> Build Phases -> Link Binary With Libraries and then click the “+” button to add a framework.

Search and Add SpriteKit framework here.

Don’t forget to mark it as optional. This is important if you’d like to support iOS 6.x or lower versions.

Let’s say you want to display the SpritKit animation on startup. For that, we’ll have to create a new class file - call it StartupScene, and inherit it from SKScene. Please note that as none of your classes has included SpriteKit.h file, SKScene will not show up as one of the existing classes while creating the StartUpScene. So, go ahead an fully type it and include it in your project.
Once, created the StartUpScene class, you’ll see this error

This is because, we’ve not yet imported the SpriteKit.h file. So go ahead and import the required file here and this error will be resolved.
Let’s edit the file (StartupScene.m) now and add a simple label to it.
@implementation StartupScene
-(id)initWithSize:(CGSize)size {
if (self = [super initWithSize:size]) {
/* Setup your scene here */
self.backgroundColor = [SKColor colorWithRed:0.15 green:0.15 blue:0.3 alpha:1.0];
// Create a simple label here - this is the equivalent of UILabel
SKLabelNode *myLabel = [SKLabelNode labelNodeWithFontNamed:@”Chalkduster”];
myLabel.text = @”Hello, World!”;
myLabel.fontSize = 30;
myLabel.position = CGPointMake(CGRectGetMidX(self.frame),
CGRectGetMidY(self.frame));
[self addChild:myLabel];
}
return self;
}
Next, let’s hookup this scene with our view controller (ViewController.m)
The key component we want to introduce in the view controller is an instance of SKView. An SKView inherits from UIView and it has all the basic building blocks that we have in a UIView object.
Here are a few custom edits you might want to do to connect the SKView our ViewController
- (void)viewDidLoad
{
[super viewDidLoad];
//Creating an instance of SKView
SKView * skView = [[SKView alloc] initWithFrame:CGRectMake(0, 0, 600, 600)];
//Setting frames per second property to be true
skView.showsFPS = YES;
//Setting count nodes property to be true because we want to know the number of nodes on the screen at any given time
skView.showsNodeCount = YES;
// Create and configure the scene.
SKScene * scene = [StartUpScene sceneWithSize:skView.bounds.size];
//SKSceneScaleModeAspectFill will make sure that your scene is scaled properly in all orientations
scene.scaleMode = SKSceneScaleModeAspectFill;
//Making the view controllers view a skview
self.view = skView;
// Present the scene.
[skView presentScene:scene];
}
That completes all the connections we wanted to create between the various classes. Let’s summarize what we’ve completed so far.
StartupScene.m
- Inherits from SKScene
- Creates background color
- Has a SKLabelNode — that is used to display text on screen
ViewController.m
- Inherits from UIViewController
- Has an instance of SkView
- Has an instance of SKScene (of StartupScene)
- The SKView instance presents the SKScene instance
Now you can run your application and it will display a sweet SpriteKit label on the screen.
Now, let’s return back to our StartupScene.m and add some more logic to it. This time we want to introduce a basic interaction. We want a spaceship to appear in the scene as soon as a user touches the screen. The logic below will create that effect.
-(void)touchesBegan:(NSSet *)touches withEvent:(UIEvent *)event {
// Called when a touch begins
for (UITouch *touch in touches) {
CGPoint location = [touch locationInNode:self];
SKSpriteNode *sprite = [SKSpriteNode spriteNodeWithImageNamed:@”Spaceship”];
sprite.position = location;
SKAction *action = [SKAction rotateByAngle:M_PI duration:1];
[sprite runAction:[SKAction repeatActionForever:action]];
[self addChild:sprite];
}
}
Now, let’s run the project and see what happens.
Just remember one thing. If you are still building apps for iOS 6.x then you might want to enclose the SpriteKit classes under the iOS 7 conditional logic.
Enjoy !!!
Introduction to SpriteKit for UIKit developers
11 notes
·
View notes
Text
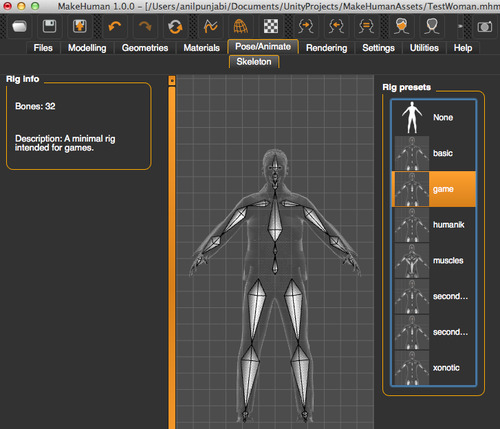
Animating MakeHuman Characters in Unity using Mecanim
MakeHuman makes creation of human characters a snap. I experimented with the 1.0.0 version of the software and found it to be perfect for my modeling needs.
Here are the basic steps:
1. Create your character using MakeHuman.
2. Apply basic clothing, materials, etc.
3. Apply game skeleton rig as shown below under the Pose/Animate tab
4. Save the model
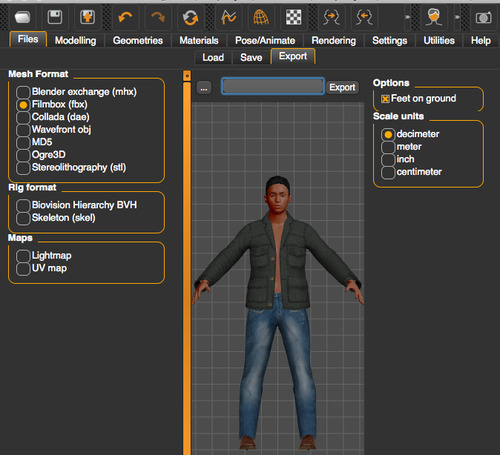
5. Export a .fbx model directly to your Unity game's Asset folder.
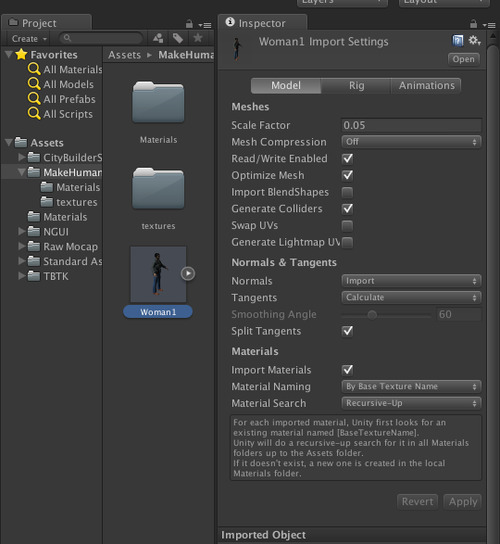
6. Next launch Unity and it will import the 3D model directly. Simply change a few settings to be like this.
Generate Colliders - Checked
Scale Factor - as needed -- for me 0.05 worked correctly
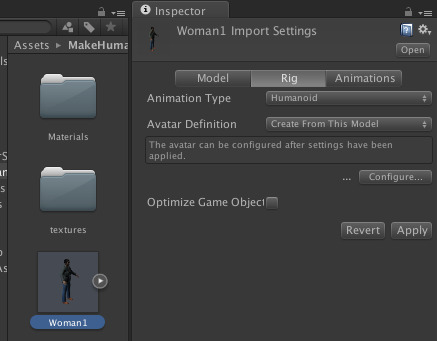
7. Now our model is almost ready to import. We just need to make it a humanoid so that Mecanim animations can work with it.
Go to the Rig tab and selected Humanoid from the drop-down. Then click Apply.
8. Next adjust the humanoid character's skeleton by clicking on "Configure" This will bring up the skeleton view as shown below. Our goal here is to ensure that everything is lit up green.
For the imported Human character the "Toes" were not lit up as shown below:
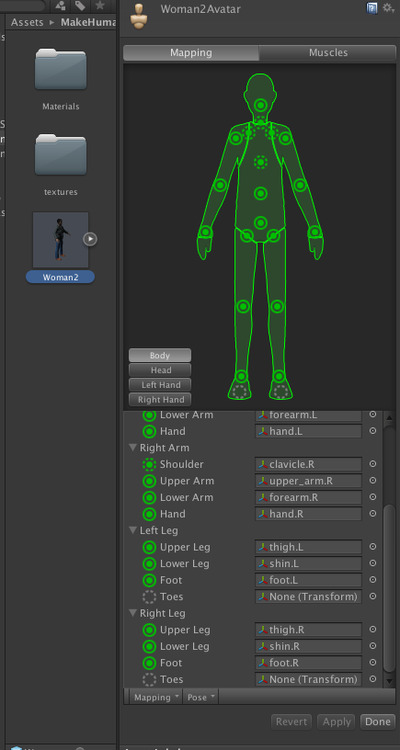
9. Click on the toes (.) circular icon and connect them to the character's transform like this. All we are doing is specifying to Unity where the left toe and right toes are.
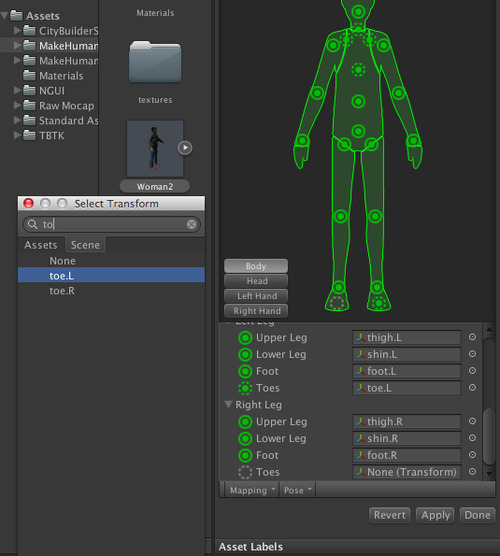
10. Your final screen should look like this -- everything should be lit up green.
11. You should also enforce a T-Pose by selecting it from the drop-down below the skeleton.
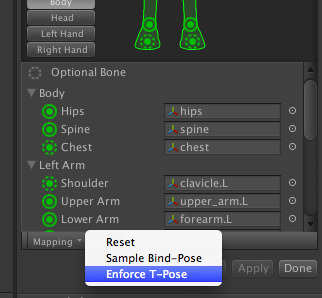
11. Now your rig is a humanoid ( as human as possible with bones and all :)
12. Next we need to import the Mecanim animations from the asset store. Look for the "Raw Mocap" on the Asset Store or try this link:
https://www.assetstore.unity3d.com/#/content/5330

This will give you a ton of animations that you can apply nicely to your imported human character.
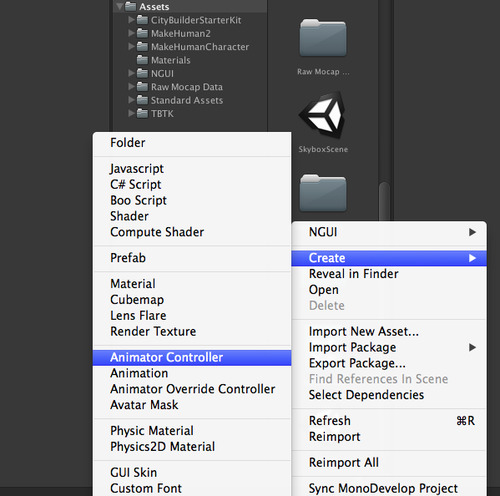
13. Next we need to create an Animator Controller under Project.
Right click in your Project folder and select the option to create an Animator Controller.
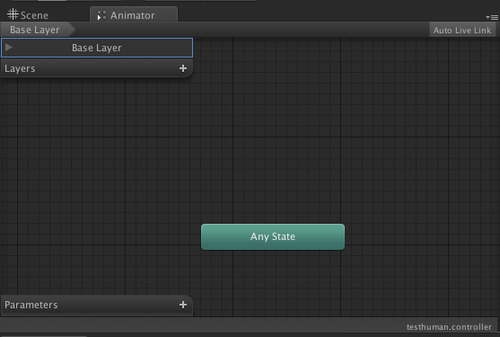
14. Now that you have an empty Animator Controller let's double click on it and bring it up on the screen so that we can apply our animations to this controller. It should look something like this:
15. Add a New Empty State.
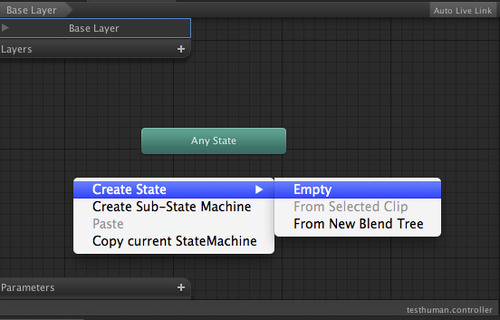
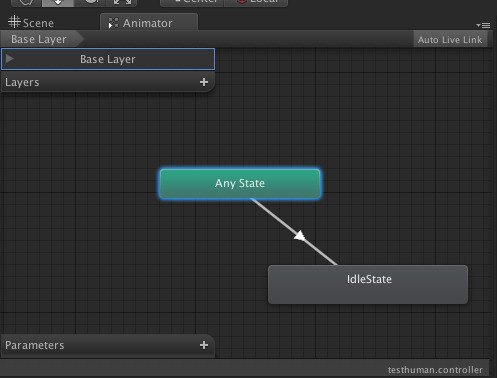
Call it "IdleState" by specifying the name in the Inspector.
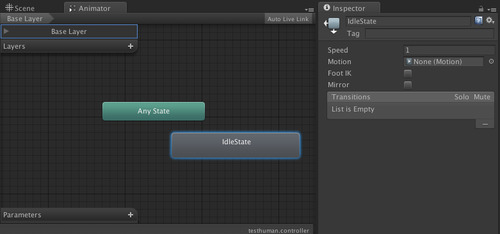
Right click on AnyState and select the option to "Make Transition"

This should give you an arrow that you should drag to IdleState.
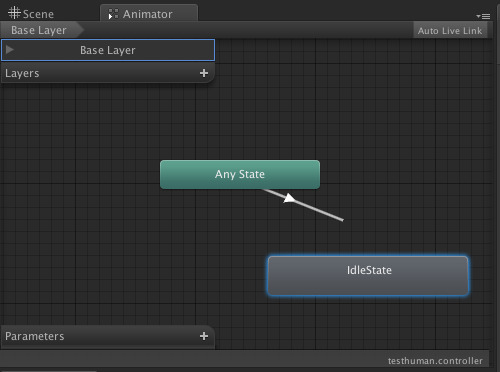
The final connection between the states should look like this:
16. Next associate one of our Idle Animations with the Idle transform icon which currently appears to be empty.
17. Now that our animator controller has the desired animation, let's associate it with the character. Notice that our character has an empty slot of the animator controller. Go ahead and associate this empty slot with the animator controller that we created in the earlier step.
18. Now play the game and your character will come to life.
Hope you enjoyed this tutorial, simply post your comments below if you have any questions and I will reply back to you shortly.
15 notes
·
View notes
Text
Part 5 of 5: Creating smart enemy characters using Unity3D - Be attacked and die beautifully
Welcome to Part 5 in our series of developing a smart enemy character using Unity3D.
Here are links to the full series.
1) Patrol their region and have some fun
2) Be self-aware and determine proximity to main player
3) Run to main player
4) Attack main player
5) Manage health & die beautifully
In this blog post we will cover how to be attacked by our player and die beautifully.
Download a simple character with animations built-in from the Asset store.
Here's a nice animated person model you can download quickly from the Asset Store:
https://www.assetstore.unity3d.com/#/content/3012
Import it into your project.
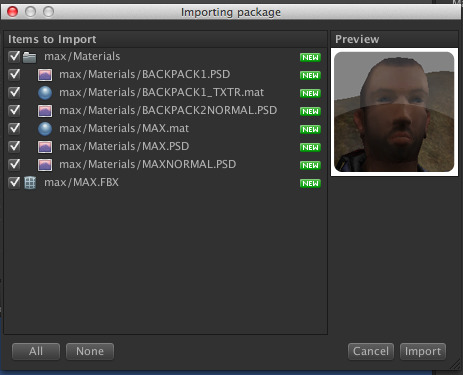
This model comes with various animations:
> Die
> Walk
> Idle, etc.
Now, drag this model into your scene.
Next you can create a simple script to test the various animations.
enemyscript.js
#pragma strict function Update () { animation.Play("death"); }
This will simply run the death animation in a loop.
Yes this is pretty simple death script and we can make it exciting by adding a sound clip and some particles.
Let's start by looking at some quick ways to make our participant bleed.
Click here to download a simple unitypackage, it has some blood material and particles.
Next import BloodyPreFab into your project. This will give you a Blood PreFab that you can use for the character animation.
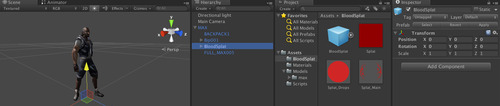
Now position the blood particles on top of the character, perhaps on the chest.
That's all the personality we need (for now :)
Instantiate the bloody PreFab just when you need it and pair it with the "Die" animation and your character will "Die" just as it bleeds.
Let's try this by instantiating the Blood PreFab in Update.
Hope you enjoyed the experience of building your enemy character step-by-step.
We will cover more advanced enemy character features in the future. Leave us a comment and let us know what else you would like to see.
4 notes
·
View notes
Text
Part 4 of 5: Creating smart enemy characters using Unity3D - Attack player with fun weapons
Welcome to Part 4 in our series of developing a smart enemy character using Unity3D.
Here are links to the full series.
1) Patrol their region and have some fun
2) Be self-aware and determine proximity to main player
3) Run to main player
4) Attack main player
5) Manage health & die beautifully
In this blog post we will cover how to create some fun weapons and attack our player. An enemy usually has one or more of these weapons: laser, bomb, sniper gun, arrow, sword, punch, etc.
For the purpose of this tutorial we will create few such weapons:
> A simple laser gun, and
> A bomb
> A rocket gun
Laser Guns are cool
Laser guns are created using a simple line renderer.
All we need to do is create a straight line from the tip of the gun (aka muzzle) to the player position and if you draw it fast enough it will look like a laser. Here's roughly how we will draw that laser line.
// Reference to the gun muzzle tip. private var muzzleTip : GameObject; ...... // Set the initial position of the line renderer to the tip of the gun. laserShotLine.SetPosition(0, muzzleTip.transform.position); // Set the end position of the player's position. laserShotLine.SetPosition(1, player.position); ......
Let's start by creating an image that will eventually be used to create the laser effect.
1) Create a simple laser like gradient image as shown below using Photoshop (or similar tool), so that it looks similar to a star wars type laser as shown below
Dimensions: 32x32
Type: png
All you need to do is add a gradient with white in the middle

Here's a star wars robot shooting a laser, see the resemblance :)

Once the png file is ready simply drag it into your Assets folder.
2) Next create a new material to hold the image we just created.
This material will be used to shoot the laser. Let's start by applying the previously created png file to this material by clicking on "Select" and then picking the png texture that we created in Photoshop.
Once the texture is selected go ahead and save the project.
3) Create an empty gameobject and call it "lasereffect".
Then drag the material you just created and drop it on top of the "lasereffect" gameobject that we created in earlier step.
4) Assign a "Light Renderer" component to the "LaserPreFab" game object
5) Assign a "Line Renderer" component to the "LaserPreFab" game object
4) Next let's import a 3D laser gun (.fbx) file and drop it on your scene. For the purpose of this project I found one online and used it for the demo. Let's call this object, "lasergun".
5) Create an empty gameobject, let's call it "MuzzleTip".
Now position this muzzletip empty gameobject at the tip of your laser gun. You might need to use [Ctrl +v] to move the empty gameobject so that you can easily snap the empty gameobject to the exact tip.
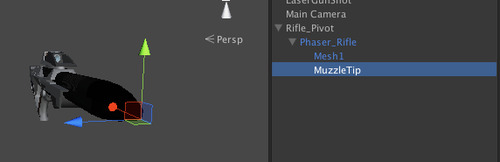
Now since we want the laser to shoot away from the gun and towards our player we probably need to adjust the MuzzleTip z-axis (shown in blue) pointing away from the gun in positive direction.
Let's rotate the gamebject along it's y-axis by 270 deg. so that the z-axis are pointing outwards as shown below.
Then we can use the Transform.forward method to push our laser object and it will translate it along the z-axis as shown above.
Transform.forward is short-form for Vector3(0, 0, 1).
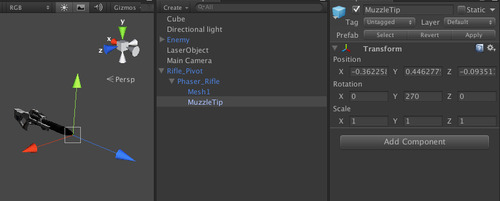
6) Let's put the lasergun in our enemy's hand.
Locate the enemy's hand and make the "lasergun" gameobject a child of the enemy's right hand.
7) Next add a script to the "LaserPreFab" -- this is where we will detect mouse press and create an instance of the Let's put the lasergun in our enemy's hand.
Locate the enemy's hand and make the "lasergun" gameobject a child of the enemy's right hand.
#pragma strict public var muzzleTipTransform : Transform; public var laserPrefab: GameObject; function Update () { // Mouse was pressed, create laser if (Input.GetButton("Fire1")) { // create the laser instance var laserInstance:GameObject = Instantiate(laserPrefab); // position the laser at the muzzletip of the gun laserInstance.transform.position = muzzleTipTransform.position; } }
Let's summarize what we've completed so far:
a) We've got an enemy in our scene (called "enemy")
b) This enemy has a laser gun (called "lasergun")
c) We've marked the tip of the laser gun by placing an empty game object (called "muzzletip")
d) We will create the laser effect by using the gameobject (called "laserguneffect" which has a line renderer and light component attached to it
7) Finally attach an audio clip so that when the laser fires it plays an interesting audio clip.
Start by importing the audio file into your Assets folder.
Next click the LaserPreFab object and add a new component "Audio Source" to it.
Now drag the audio clip you just imported onto this component.
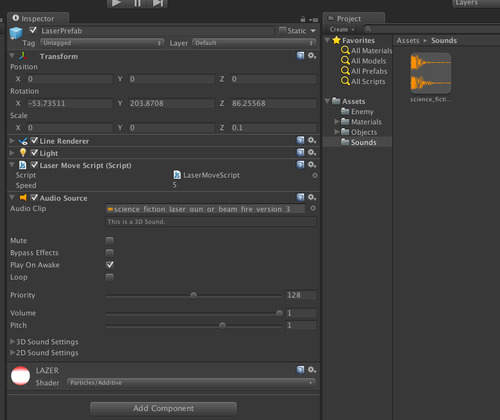
8) Next create a new script and attach it to your "LaserPrefab" object.
#pragma strict public var speed = 5f; function Start () { } function Update () { // this will move the laser in the forward direction // as soon as it is instantiated transform.position += transform.forward * speed * Time.deltaTime; // this will destroy the gameobject in 2 seconds Destroy(gameObject, 2f); }
Rocket Guns are also fun
The mechanics of rocket gun are exactly the same as the laser gun.
You would instantiate a rocket prefab at the muzzletip of the gun.
Now because it is a rocket gun you could benefit by applying a rigidbody component to the prefab and let gravity act on it.
public var rocketPrefab : Rigidbody; public var muzzleTipTransform : Transform; function Update () { if(Input.GetButtonDown("Fire1")) { var rocketInstance : Rigidbody; rocketInstance = Instantiate(rocketPrefab, muzzleTipTransform.position, muzzleTipTransform.rotation); rocketInstance.AddForce(muzzleTipTransform.forward * 5000); } }
This completes Part 4 of our tutorial series on creating an interesting game.
We will wrap things up in our next blog - Part 5 of the tutorial series - where we will focus our attention on making our enemy die with a fun animation and create particles effects for the blood splatter.
4 notes
·
View notes
Text
Part 3 of 5: Creating smart enemy characters using Unity3D - Chasing the player
Welcome to Part 3 in our series of developing a smart enemy character using Unity3D.
Enemy characters play a very important role in any game. As a developer it is your responsibility to make them as smart as you possibly can. There are numerous AI packages available at the Unity store that can make your characters super smart.
However, for the purpose of this article we will use simple code to make the enemy behave smartly.
There are five aspects of a smart enemy. They should:
1) Patrol their region and have some fun
2) Be self-aware and determine proximity to main player
3) Run to main player
4) Attack main player
5) Manage health & die beautifully
We will dedicate an entire blog post for each aspect of creating an enemy.
In this blog post we will cover how our enemy can chase our player.
Chasing is achieved by rotating and moving our enemy character towards our player. This is similar to Part 1 of our blog series where we guided our enemy towards the next waypoint along the patrolling route using the character controller on the enemy object.
The only difference in this case is that if the player goes beyond a certain chase distance we will give up (i.e. if you want to play nice :)
Once the enemy stops chasing the player it will stop right there. In your final game you can have it return to the nearest waypoint and continue patrolling.
#pragma strict // The walking speed towards the player public var patrolSpeed : float = 6; // How slowly to turn public var dampingLook = 4; // declare a public variable for the player transform, so // that it can associate this with the player from the inspector public var playerTransform : Transform; // this defines when to stop chasing the player public var MaxChaseDistance:float = 25f; // this defines when to stop in front of the player public var StopChaseDistance:float = 3f; private var character : CharacterController; function Start(){ character = GetComponent(CharacterController); } function Update(){ chase(); } function chase(){ var playerPosition : Vector3 = playerTransform.position; // Keep waypoint at character's height playerPosition.y = transform.position.y; // Get the direction we need to move to // reach the next waypoint var moveDirection : Vector3 = playerPosition - transform.position; if(moveDirection.magnitude < StopChaseDistance) { Debug.Log("Player is close to the enemy, we can stop now"); } else { if (moveDirection.magnitude < MaxChaseDistance) { Debug.Log("Player is still within chasing distance - keep running after it"); // This code gets called every time update is called // while the enemy if moving towards the player. // so it gets called 100's of times in a few seconds // Now we need to do two things // 1) Start rotating in the desired direction // 2) Start moving in the desired direction // 1) Let's calculate desired rotation by looking at playerposition // and comparing with current position var desiredRotation = Quaternion.LookRotation(playerPosition - transform.position); // A slerp function allow us to slowly start rotating // towards our next waypoint transform.rotation = Quaternion.Slerp(transform.rotation, desiredRotation, Time.deltaTime * dampingLook); // 2) Now also let's start moving towards our waypoint character.Move(moveDirection.normalized * patrolSpeed * Time.deltaTime); } else { Debug.Log("Player is too far away - stop chasing"); } } }
Here's the completed project on github
Here's a video of the final program.
You might want to experiment by adding a RigidBody component on the enemy. Then play with the chase program. You will enjoy it :)
3 notes
·
View notes
Text
Part 2 of 5 - Creating smart enemy characters in Unity 3D - Determine proximity to player
Enemy characters play a very important role in any game. As a developer it is your responsibility to make them as smart as you possibly can. There are numerous AI packages available at the Unity store that can make your characters super smart.
However, for the purpose of this article we will use simple code to make the enemy behave smartly.
There are five aspects of a smart enemy. They should:
1) Patrol their region and have some fun
2) Be self-aware and determine proximity to main player
3) Run to main player
4) Attack main player
5) Manage health & die beautifully
Let's start by exploring each of these topics and work towards an intelligent and smart enemy character. We will dedicate the rest of this blog post to determine proximity of the enemy to the main player. In future blog posts we will explore the remaining aspects of developing the smart enemy character.
Be self-aware and determine proximity to main player
In order for an enemy character to be self-aware it needs to simply keep tabs on the player's location with respect to it's own location.
Let's start by declaring the following variables in the enemy's script so that we can:
a) Track whether the player was viewed (using bool playerInSight),
b) Get the player's current position (using Vector3 personalLastSighting)
c) Also, the player itself would need to tracked (using GameObject player)
// Whether or not the player is currently sighted public var playerInSight : boolean = false; // Last place this enemy spotted the player public var personalLastSighting : Vector3; // Reference to the player private var player : GameObject; // You can then get access to the player // in the enemy's Awake( ) method like this: player = GameObject.FindGameObjectWithTag(Tags.player);
You might have played games in the past where an enemy somehow detects the player even through the wall and tries to walk into the wall. These types of bugs can be seen in many popular games as well.
Let's see if we can develop a clean logic to avoid all such issues.
The three conditions that have to be met before a player is truly visible are:
Condition 1) Player is within trigger zone of enemy (achieved by looking for collisions of a enemy's sphere collider)
Condition 2) Player is in enemy's field of view (achieved by calculating the angle view between the player and the enemy)
Condition 3) Enemy's view is not blocked (achieved by projecting a Raycast from the enemy and checking if it collides with the player)
Colliders and Raycasts are often used to determine proximity and visibility respectively.
> A collider will tell you with confidence whether a player is nearby.
> A Raycast will give you the confidence about whether the enemy's sight is not blocked.
We could write our code simply using Raycast but the enemy will be more engaging if it had the colliders as well so that it can react nicely.
Let's look at each of our three conditions:
Condition 1) Player is within trigger zone of enemy (achieved by looking for collisions of a enemy's sphere collider)
Go ahead and add a sphere collider component for your enemy. Make it large enough so that it collides with the player whenever the player is nearby. Consider a radius of about 10 times the enemy width.
The method OnColliderStay ( ) can help us detect if the enemy's spherical collider has in fact collided with the player.
Here's how we can use this method :
function OnTriggerStay (other : Collider) { // We check to see if it was in // fact the player object that // entered the sphere collider area if(other.gameObject == player) { ............... } }
This tells us that the sphere collider around the enemy has in fact collided with the player. Now we know that the player character is actually near the enemy.
You will need access the collider object later on. Here's how you can access it in your code:
// Reference to the sphere collider // trigger component on the enemy private var col : SphereCollider; // In Awake ( ) Awake ( ) { // Get collider around enemy col = GetComponent(SphereCollider); }
Condition 2) Player is within the enemy's field of view (achieved by calculating the angle view between the player and the enemy)
Next let's calculate the angle between the enemy and the player. This will tell us if the player is within the enemy's field of view.
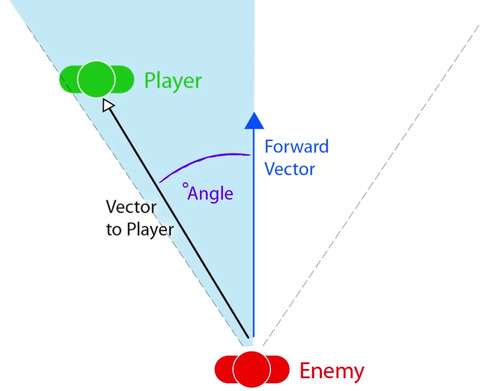
Let's calculate two things:
1) A vector from enemy to player -- calculated as other.transform.position - transform.position
2) A forward vector projected from the enemy - calculated as transform.forward
Now if the difference between the vectors
// Create a vector from the enemy to the player // and store the angle between it and forward. var vectorFromEnemyToPlayer : Vector3 = other.transform.position - transform.position; var forwardVector = transform.forward; var angle : float = Vector3.Angle(vectorFromEnemyToPlayer, forwardVector);
// If the angle between forward and where // the player is less than half the angle of view… if(angle < fieldOfViewAngle * 0.5f) { /// NICE - NOW we know that player /// is in front of enemy and within it's view ....... }
The code above helps establish a view angle between the player and the enemy as the enemy is looking in the forward direction.
If the condition mentioned above is met, it means that the player is right in front of the enemy.
Condition 3) Enemy's view is not blocked (achieved by projecting the Raycast from the enemy and checking if it collides with the player)
At this time, our last and final test should be to establish a Raycast from the enemy in the forward direction, with the same radius as the collider.
If the Raycast collides with the player, then we know that the player is visible to the enemy, and all conditions have been met.
if(angle < fieldOfViewAngle * 0.5f) { var hit : RaycastHit; // … and if a raycast towards the player hits something… if(Physics.Raycast(transform.position + transform.up, direction.normalized, hit, col.radius)) { // … and if the raycast hits the player… if(hit.collider.gameObject == player) { //HOORAY !!!! The enemy has found the player // … the player is in sight. playerInSight = true; // save the player’s current position. personalLastSighting = player.transform.position; } } }
That covers all aspects of discovering a player.
Don't forget to write the following code, so that the enemy can stop tracking the player once the player is outside the spherical collider area. This can be achieved like this:
function OnTriggerExit (other : Collider) { // If the player leaves the trigger zone... if(other.gameObject == player) { // ... the player is not in sight. playerInSight = false; } }
Hope you enjoyed this tutorial.
We will pick up from this point in Part 3 of the series.
#collider#spherecollider#raycasting#waypoints#unity3d#gaming#smart enemy#AI#unity#enemy#raycast#patrolling
4 notes
·
View notes
Text
Part 1 of 5: Creating Enemy Characters using Unity 3D - Patrolling their region
Enemy characters play a very important role in any game. As a developer it is your responsibility to make them as smart as you possibly can. There are numerous AI packages available at the Unity store that can make your characters super smart.
However, for the purpose of this article we will use simple code to make the enemy behave smartly.
There are five aspects to consider in developing a smart enemy. They should:
1) Patrol their region and have some fun
2) Be self-aware and determine proximity to main player
3) Run to main player
4) Attack main player
5) Manage health & die beautifully
We will dedicate an entire blog post for each aspect of creating an enemy.
This blog post will cover enemy patrolling.
Patrol their region and have some fun
Let's create a simple project so that we can demonstrate how patrolling works.
Here are the steps:
a) Create a new Unity Project
b) Create an empty plane
> Game Object -> Create Other -> Plane
Make it large enough to cover a playable area so that the enemy can move around
c) Next let's create our enemy character
> Game Object -> Create Other -> Cylinder
Now that you have a cylinder on the screen, position it so that it is visible from your view.
d) Next create a directional light so that you can view the cylinder in the plane.
> Game Object -> Create Other -> Directional Light
This establishes the basic framework that we will use for our enemy character development.
The way patrolling works in most games is that the enemies mostly have a pre-defined path that they traverse in a loop. This keeps them looking alive and it gives them a chance to discover our player. It is also a good idea to give them some animation & audio clip so that they are fun to watch.
A pre-defined path is created by setting waypoints. Waypoints are simple GameObjects that are placed long the way, then a script is used to make the enemy rotate and move towards the next waypoint.
e) Let's start putting some waypoints. You can pick any object, even an empty gameobject would work, but since we are just learning let's use a spheres to create our waypoints, they will be easy to see from all angles.
> Game Object -> Create Other -> Sphere
Rename the sphere as "waypoint 1"
Copy the same sphere multiple times and place them around on the plane -- naming them "waypoint 2", "waypoint 3", "waypoint 4", etc.
Now you should have multiple waypoints on your screen and they are named correctly.
f) Next add a character controller component to the enemy gameobject. This will help move the enemy gameobject along the waypoint route.
> Click on Enemy > Inspector Panel
> Add Component
> Character Controller
g) Next create a new script and attach it to our enemy.
Click on Enemy -> Assets -> Create -> Javascript
This will create a new script and attach it to our enemy. Let's rename this script and call it, "Waypoints"
This script will help traverse our enemy across the various waypoints.
Let's start by creating a public variable that we will use to create an array of waypoints.
#pragma strict // The list of Waypoint you want the enemy to traverse public var waypoint : Transform[];
The waypoints array is declared as a public variable so that you can associate the actual waypoint GameObjects with the script.
Next drag each waypoint and drop it on this variable in the Inspector Panel.
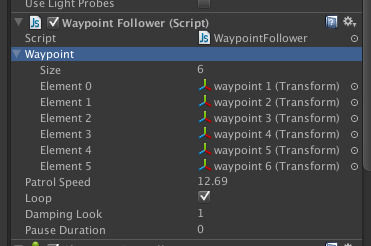
Now you have all of these waypoints available to you in your javascript code.
Next we need to figure out the direction we want the player to move. This is achieved by calculating a direction vector as shown below:
var nextWayPoint : Vector3 = waypoint[currentWaypoint].position; // Keep waypoint at character's height nextWayPoint.y = transform.position.y; // Get the direction we need to move to // reach the next waypoint var moveDirection : Vector3 = nextWayPoint - transform.position;
Once you have access to the direction you should start rotating and moving the enemy towards the new waypoint location. You should use Unity's slerp functions to move and rotate slowly towards the desired waypoint.
// Now we need to do two things // 1) Start rotating in the desired direction // 2) Start moving in the desired direction // 1) Let' calculate rotation need to look at waypoint // by simply comparing the desired waypoint & current transform var rotation = Quaternion.LookRotation(nextWayPoint - transform.position); // A slerp function allow us to slowly start rotating // towards our next waypoint transform.rotation = Quaternion.Slerp(transform.rotation, rotation, Time.deltaTime * dampingLook); // 2) Now also let's start moving towards our waypoint character.Move(moveDirection.normalized * patrolSpeed * Time.deltaTime);
Here's the complete code from the beginning:
#pragma strict // The list of Waypoint you want the enemy to traverse public var waypoint : Transform[]; // The walking speed between Waypoints public var patrolSpeed : float = 6; // Do you want to keep repeating the Waypoints public var loop : boolean = true; // How slowly to turn public var dampingLook = 4; // How long to pause at a Waypoint= 0; public var pauseDuration : float; private var curTime : float; private var currentWaypoint : int = 0; private var character : CharacterController; function Start(){ character = GetComponent(CharacterController); } function Update(){ if(currentWaypoint < waypoint.length){ patrol(); }else{ if(loop){ currentWaypoint=0; } } } function patrol(){ var nextWayPoint : Vector3 = waypoint[currentWaypoint].position; // Keep waypoint at character's height nextWayPoint.y = transform.position.y; // Get the direction we need to move to // reach the next waypoint var moveDirection : Vector3 = nextWayPoint - transform.position; if(moveDirection.magnitude < 1.5){ Debug.Log("enemy is close to nextwaypoint"); // This section of code is called only whenever the enemy // is very close to the new waypoint // so it is called once after 4-5 seconds. if (curTime == 0) // Pause over the Waypoint curTime = Time.time; if ((Time.time - curTime) >= pauseDuration){ Debug.Log("increasing waypoint"); currentWaypoint++; curTime = 0; } } else { Debug.Log("reaching in rotation " + moveDirection.magnitude); // This code gets called every time update is called // while the enemy if moving from point 1 to point 2. // so it gets called 100's of times in a few seconds // Now we need to do two things // 1) Start rotating in the desired direction // 2) Start moving in the desired direction // 1) Let' calculate rotation need to look at waypoint // by simply comparing the desired waypoint & current transform var rotation = Quaternion.LookRotation(nextWayPoint - transform.position); // A slerp function allow us to slowly start rotating // towards our next waypoint transform.rotation = Quaternion.Slerp(transform.rotation, rotation, Time.deltaTime * dampingLook); // 2) Now also let's start moving towards our waypoint character.Move(moveDirection.normalized * patrolSpeed * Time.deltaTime); } }
The completed project for this post can be found here
Here's the completed application video.
3 notes
·
View notes