
Don't wanna be here? Send us removal request.
Statistics
We looked inside some of the posts by cameronbrownblog and here's what we found interesting.
Average Info
Notes Per Post
15
Likes Per Post
3
Reblog Per Post
12
Reply Per Post
0
Time Between Posts
10 days
Number of Posts By Type
Text
16
Video
1
Last Seen Tumblr Blogs


Fun Fact
25% of US internet users with an annual income of $80-100K use Tumblr.
Text
WAIT FOR IT - Research
Having the ability to capture that decisive moment in photography is something which can lead to a great and powerful image. In order to do this there is a lot to think about! Preparation and patience are key.
Here are some examples of the decisive moment.
Henri Cartier Bresson was one of the best at capturing these moments as shown below here. The composition, object placement, subject and surrounding come together to create such a fantastic image. All of these factors also suggest that he had planned this to some extent and had waited for it all to come together.

This is another example of capturing a moment. the composition of the stairs in this image is so visually striking and beautiful. The placement of the bike moving through the image once again shows the planning that went into this.

When thinking about how I would great an image like this I want utilise the contrast between light and shadows. I think using light in this way creates a strong visual impact.
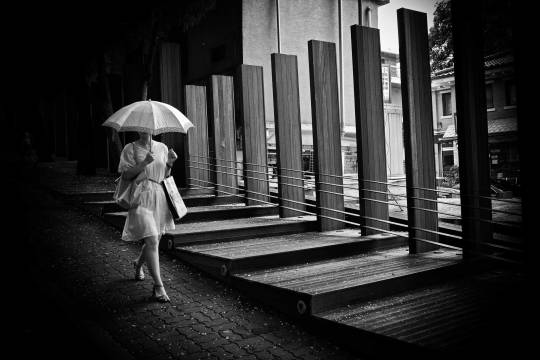
Here are some images I have taken recently which are references for my ‘Wait For It’ project.


2 notes
·
View notes
Video
tumblr
HND1 - Unit Catch Up Moving Image
0 notes
Text
WAIT FOR IT - Research
Having the ability to capture that decisive moment in photography is something which can lead to a great and powerful image. In order to do this there is a lot to think about! Preparation and patience are key.
Here are some examples of the decisive moment.
Henri Cartier Bresson was one of the best at capturing these moments as shown below here. The composition, object placement, subject and surrounding come together to create such a fantastic image. All of these factors also suggest that he had planned this to some extent and had waited for it all to come together.
This is another example of capturing a moment. the composition of the stairs in this image is so visually striking and beautiful. The placement of the bike moving through the image once again shows the planning that went into this.
When thinking about how I would great an image like this I want utilise the contrast between light and shadows. I think using light in this way creates a strong visual impact.
Here are some images I have taken recently which are references for my ‘Wait For It’ project.
2 notes
·
View notes
Text
HND1 - Unit Catch Up Moving Image (storyboard)

0 notes
Text
WAIT FOR IT - Research
Having the ability to capture that decisive moment in photography is something which can lead to a great and powerful image. In order to do this there is a lot to think about! Preparation and patience are key.
Here are some examples of the decisive moment.
Henri Cartier Bresson was one of the best at capturing these moments as shown below here. The composition, object placement, subject and surrounding come together to create such a fantastic image. All of these factors also suggest that he had planned this to some extent and had waited for it all to come together.
This is another example of capturing a moment. the composition of the stairs in this image is so visually striking and beautiful. The placement of the bike moving through the image once again shows the planning that went into this.
When thinking about how I would great an image like this I want utilise the contrast between light and shadows. I think using light in this way creates a strong visual impact.
Here are some images I have taken recently which are references for my ‘Wait For It’ project.
2 notes
·
View notes
Text
Personal project Evaluation
0 notes
Text
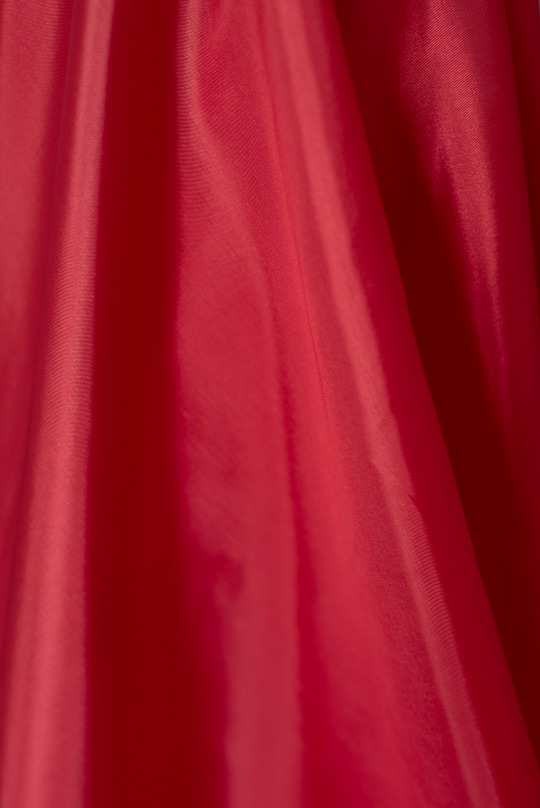
Graded Unit - Studio Shoot 1
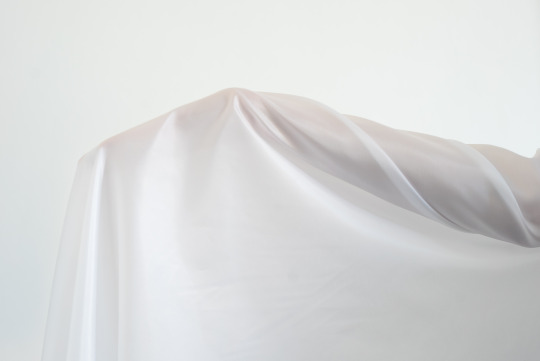
Overall I am happy with how my first studio shoot went. It have me a chance to experiment with studio lighting and the different effects subtle changes can make. Using the textile material in studio gave me a good understanding of how it looks and different ways to manipulate it.
After trying a few different things with the fabric I couldn't seem to get the desires look until I was pointed in the direction of a wind machine. This is what I used to create the majority of these images. Using this wrapped the fabric around the model whilst creating beautiful folds and when it was lifted at the back the wind was able to pick it up and make some really nice movement. Using the wind machine helped my idea for this shoot as I want it to be about the hidden body underneath and use the fabric to show the figure and form.
For lighting I want to keep the background quite simple which is why I tried just a flat slightly off white to begin with. I like the look this gave and will use it again. Then tried turning off one of the lights in the back and flagging any excess light, this gave a nice gradient effect which I really like. I lit the model with a large soft box from slightly left of centre. The light gave the material a soft look and blended shadows and highlights well.
I have more shoots planned for this coming week. For these shoots I am going to try and iron the material to create a smoother look and get rid of the creases. I will use the same lighting techniques and use the wind machine again as I think this worked well. When using the white material I might ask my models to wear certain colour clothes such as red, white or grey. One of my main focuses for the upcoming shoots is to try different poses with the models and some more full body shots.


1 note
·
View note
Text
Graded Unit
Experimenting with hands and arms under the fabric to see how it reacts to the light, how the material falls and possible poses to create the style and feel. I want the images to be delicate yet emotive and look clean and elegant. I am happy with the material I have bought as it folds and well very nicely and is just sheer enough to reveal some of what is underneath. The red material gives the nice addition of colour to the images whilst focussing more on form than revealing anything underneath as its not as sheer.
This project development is making me think about doing a series of shots around individual parts of the body and specific areas rather than taking full length shots. This idea could work well and create more tension between the images. I think I will still take full lengths shots so I have the option to include them but I'm currently more interested in focussing in on specific areas.
Creating contact sheets is allowing me to critically review all my images to see which poses I want to include, the variety of ways I can manipulate the textiles and its also giving me a sense of how the images will stylistically look side by side with a combination of colour and clear textiles. This will be helpful when it comes to presentation of images i.e portrait/landscape and visual flow they have together.


1 note
·
View note
Text
Graded Unit - Test Fabric Shots
I spent some time today taking a few images of fabric which I will be using for my studio shoots and putting on top of the models. I wanted to experiment with the different ways it falls, the shapes It will look best in and how it reacts to lighting.
When I use the fabric on the models I want it to have a naturally and flowing feel like in the images below. Doing these tests has shown me that the material has a slight shine to it when exposed to a lot of light so I must be careful with this as I went to have a smooth clean finish to the fabric whilst just using the sparkle in the material to accentuate highlights across the materials folds.
When editing these images I wanted to remove some of the contrast to give more of a smoother feel and blend between highlights and shadows. Adding some saturation took away the flatness and give the images a little more interest, especially with the red material which I think will go really well.
My next step is to experiment with fabric on models and design lighting diagrams on how this will work best. I will do this myself so that when I get into the studio with the models I will be able to know exactly what I want to do and give more scope and hopefully time to try more options.


0 notes
Text
Moving image camera techniques
BASIC CAMERA MOVES
Zooming - Giving the impression of moving closer and further away. Zooming can be used to magnify certain focus points in frame or quick zoom adds a sense of drama.
Pan - The camera is moved horizontally on a central axis. It can be used to follow a character or fit more into frame, for example panning across a landscape.
Tilt - The camera is kept in a stationary position and is tilted upwards and downwards. Slow upwards tilts can be used to make subjects appear as lot bigger where as a downwards tilt has the opposite effect.
Dolly - The camera is mounted on a track and is moved closer or further away from the subject. Unlike zoom the world around the subject moves with the camera. The gives the viewer feeling of moving with the camera and can often help to create intimacy in the shot.
Truck - Similar to a dolly trucking involves moving the entire camera side to side, often used to track characters in motion in a fluid way eliminating jerky camera movements.
STORYBOARDING TYPE SHOTS
Establishing Shot - Often in the beginning of the scene this shot gives context of what's to come and builds ambience. Generally in the form of a long shot it shows where a scene is taking place.
Full Shot - This shot shows the full subject from head to toe and focuses more on gestures and movements rather than their state of mind.
Medium Shot / 3/4 shot - This shot shows the subject often from the knees up. It shows gestures and movements whilst still being close enough to capture emotions.
Close Shot - This shot shows the subjects head which fills most of the frame. It shows emotion and often creates more of a connection. The subject is the prominent focus there is little to no distraction by background interference.
Extreme Close Shot - So close that only specific detail is shown, for example a persons eye or mouth. This shot can be used to add drama to a scene or point out specific detail that might otherwise be overlooked.
Up Shot - Taken from below the eye level of the subject this shot gives the viewer the impression of looking up at the subject. Can often make the subject appear powerful, heroic or even dangerous.
Down Shot - Contrasting to the up shot this is taken from above the eye level of the subject. It can make the subject seem powerless or vulnerable.
Over The Shoulder - As the name suggests it is taken from over the shoulder of another character typically framing medium to close. This shot can be useful in situations such as conversations to help establish characters and who is talking or from behind a subject as they are walking.
Two Shot - This frames two characters together. It can be useful when introducing characters and helps to shed light on their relationship.
Point Of View (POV) - depicts an angle which shows exactly what the character is looking at. It allows the viewer to take on the perspective of the character on a more personal level.
1 note
·
View note


Text
Lost and Found - Final and Evaluation
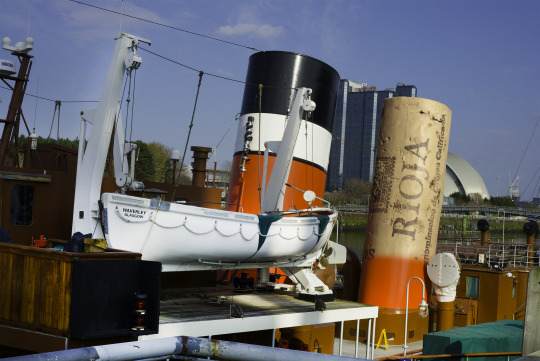
For this lost and found project we were tasked to photograph both a place and an object. We then had to combine both of these into one image creating one surreal image. I chose to combine a bottle cork with the chimney from the Waverley boat.
I took the image of the bottle cork in the studio. For this I made sure to use lots of different lighting angles to ensure that when I came to shoot the image of the boat I had some flexibility with times and lighting.
I think this approach worked well as the lighting and highlights on the bottle cork match the lighting for the boat and scene very well.
When it came to post production I think to an extent I have achieved this relatively well. The bottle cork does fit well in place of a chimney and fits my title of ‘booze cruise’. I think I could have blended the colours a little better and under closer inspection there are some areas around the cork that don’t merge too well with the surrounding scene.
Overall I enjoyed this this project and experimenting with compositing once again. My compositing skills have improved and I was glad to put a title to this scene combining the wine bottle cork with a cruise boat. Shooting many different lighting angles in studio of the bottle cork worked to my advantage and provided more room for movement when photographing the location image.
If I was to do this project again I would further refine my compositional skills in order to get the edit as good as it can be. I would also slightly brighten up the left hand side of the image bringing out slightly more detail in that side of the boat.
0 notes