Documenting my progress studying Games Design. Specifically this blog is focused on the Games Proposal module.
Don't wanna be here? Send us removal request.
Text
Games Proposal OneDrive Link
Please find attached the OneDrive link containing all of my work for Games Proposal.
XB3001 Games Proposal
0 notes
Text
Finishing the resubmission - Part 4
Yesterday and today I finished up on documentation and on creating renders for the models, I also did a design video explaining my design process and a show reel to showcase the game.
Below are the renders for the game world.


Below are all of my renders for the models I made and textures.


I have also included the show reel in this post.
With all of my documentation ready and files checked and submitted, that is the end of this project. I am really happy with the improvements I have made.
1 note
·
View note
Text
Finishing the resubmission - Part 3
I am going to break down some changes to blueprints as well as new blueprints created during this post.
Starting off with the curtain blueprints.
While I am sure there probably is a more efficient way of blueprinting here, I am an artist and very much a beginner to blueprinting. Though I feel like I managed to achieve what I set out to do.

The last half of this blueprint has remained pretty much unchanged. The only difference past the timeline section is that I decreased the amount the curtain would shrink as it moves slightly so it wouldn't become too small. And of course there is now 4 separate timelines and transforms to reflect the change in 4 total interactable items rather than 2.
One of the changes I made initially was to remove the box trigger, I wasn't sure at first how to make it so items would update without having to walk through a box trigger but a classmate advised using event tick which works so much better. With this, the curtains will automatically begin to open when each condition is met.

I also applied this change to the other curtain BP, the switch actor BP for the plant and the new switch actor BP for the sketchbook.
Due to new items being interactable I also had to set the curtains to check for a variety of combinations. As an example, for the curtain to open further when the player interacts with two objects, any combination of the four objects should work. To make this work I set up several 'AND' statements feeding into an 'OR' this way any combination of items will open the curtain further providing there is at least two of them.

I repeated a similar process for the part requiring 3 items to be collected and all 4.
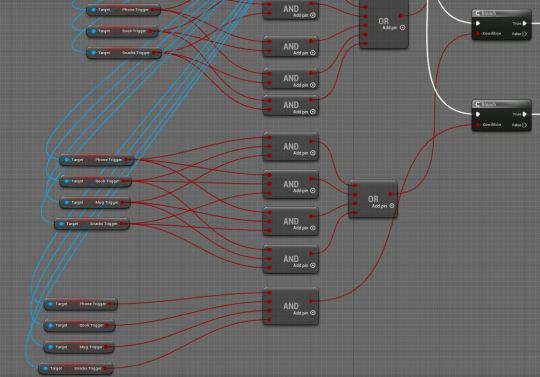
Following on from the branches I added a Do Once function to prevent the game trying to run through everything each time an item is interacted with.

The second curtain BP is laid out in the same way, the difference only being in the direction that it moves away as it opens.

The BP for the plant to update has seen the same sort of changes. Replacing the box trigger to an event tick and making sure that every combination of items works to update the plant. Finally adding in the Do Once to prevent any issues with the game running and checking every part each time an item is interacted with.

The sketchbook is similar to the plant, but with fewer changes. The sketchbook has 3 different materials that show the painting on the front growing over time.
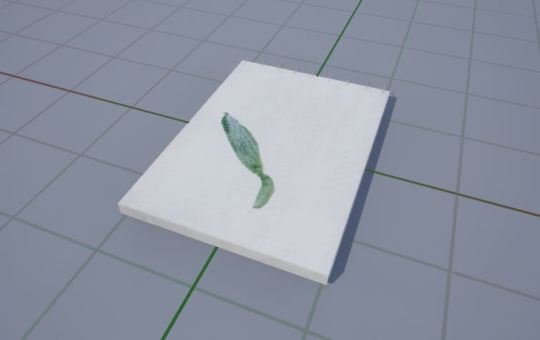
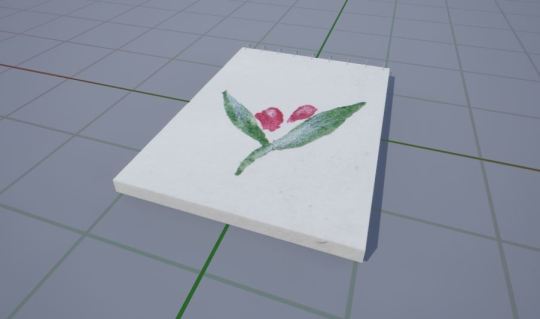
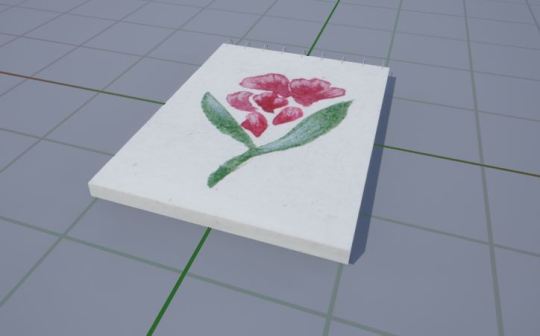
I created the textures by doing 3 separate paintings of the flower growing then importing the watercolour paintings to be textures before setting a material for each.
Unlike the plant there are less changes to this item as there are only 3 versions. So the blueprint was a little simpler than the previous one.

Finally I created an ico file for the game icon to tie everything together just by cropping my plant painting on Photoshop and using a converter online to switch the file type from png to ico.

I think that concludes all of the changes I have made to this project. Next steps will be updating documentation, potentially making a new show reel to showcase the game in its current form and uploading the project.
Everything is packaged and works fine after a few fixes to some minor issues.
I also plan to get renders of all of my furniture I have modelled with the materials applied. I will include these in the next post once documentation and submission is complete.
0 notes
Text
Finishing the resubmission - Part 2
I set up the room with the new models and materials, I also resized the room.
Below are some screenshots of the room.


After laying out the level, I began to make changes to existing blueprints and create new blueprints for certain items added in.
One of my first decisions was to change the perspective of the game from a third person fixed camera angle to a first person game. My main reason for this choice was to allow the player to get a closer look at the objects in the game, especially as the art style (being hand painted in watercolour) was quite unique. I didn't want them to miss out on looking around the room close up.
I also found manoeuvring such a small space with so many camera angles confusing and difficult. The first person perspective feels more natural and easy to use. It also feels more immersive.
So I added a camera and fixed it to the characters head.

I deleted all fixed cameras and camera triggers, then I deleted within the character BP the old movement I had to make tank controls and I changed it back to the normal movement. I also hid the character as I found the mesh distracting and it doesn't match with the art style of the world.

I added some narrative into the level blueprint so that the player could be given instructions on starting the game. The text reads "Use items to improve your mental health" followed by "Interact with objects by approaching and clicking the left mouse button."

Blueprints already existed to allow the player to interact with a mug of coffee and a phone. I also used the same blueprint layout to allow this for the books and the snacks. With an initial section of the blueprint for the ability to interact and the second section for narrative to appear.


Now that the game was in first person it meant that some changes had to be made to the end screen as previously the text would be on top of a fixed camera so was easy to see. However, the change to first person made this more difficult to read.
I added in some grey borders to help the text be more readable.

I also made it so the game would pause on the end screen appearing. Again helping the screen be more readable and not too distracting.

The door BP didn't require much change as now the requirements to open the door just included the new interactable items.

The last blueprints I will be going over are the two curtain BPs, the switch actor BP for the plant and a new switch actor BP for the sketchbook. There has been quite a few changes and additions here.
To prevent this post becoming too large I will have to go over changes in the next post.
0 notes
Text
Finishing the resubmission - Part 1
This post will be quite large as it is an update covering various days of work over the past few weeks.
I completed preparing all textures for the new models. Taking my watercolour sheets and arranging them to fit the UV's. I had to tweak the UV's for a number of models to make them work better and to make texturing easier. I have included all the images of my textures here, some I went on to create roughness textures and normals but not all models required these.
The bed, bedside table, books and bookshelf.


The brushes, candle, chair and desk.


The fairy lights, floor texture, lamp and laptop.


The mirror, paints, rug and the sketchbook (all versions).


The snacks, vase, wall texture and wardrobe.


After completing all textures I set up the materials for each object and applied.

Most are set up in a pretty standard way but I will detail the ones that stand out to me.
The fairy lights I had to set up an emissive colour so that the bulbs would glow but the wire would remain normal.

For the mirror I had to create two materials, one for the frame and one for the mirror itself. Below is what the mirror material had to be set up like.

For the ceiling I just used the texture used for the wall and desaturated it.

I next created a cursor as I wanted a crosshair on the screen. It is just a simple crosshair.

I created a HUD for this crosshair, just using a Canvas Panel and anchoring the crosshair into the centre of the screen.

I set the HUD to come up when the game starts within the level blueprint.

Due to photo limits on Tumblr I will continue the updates on the next post.
0 notes
Text
Painting the textures with watercolour and checking everything works in engine
This post is a summary of work done on 22-04-23 and 23-04-23.
With UV's done for every model, I created another save of my Maya scene ready to combine all the different sections of each model together ready to put in engine.
The reason I created another save file is as a backup in case something goes wrong and I need to tweak each part of the models seperately or the UV's for them.
I have shown an example below of what I am doing to each object.
Starting out with multiple parts of a model, I select them all and 'Combine' so they go into engine as one model.


I also move where the pivot point is, drag to the centre of the scene, freeze transformations and delete history for the object.

Next I create a Lambert material for the object, while I will be applying textures and working on the material in engine, if I don't create a material with a name for this object all objects will share a material with the same name in engine which will cause issues.

I then export the file as an FBX and import it into Unreal. I created a new version of the Unreal project, once again just in case there are any issues and I need the old version. I am also on Unreal 5.1 rather than 5.0 so making a copy was the best option.
The export worked well, so I continue this process with all other models I have created.

The only model which needed some work before importing was the fairy lights as I couldn't finish them before UVs and combining. After combining the bulb and wire, I duplicated both multiple times to create a long string of lights.

Then using soft select I created a dip to make the fairy lights look more realistic. After this I imported into Unreal as normal.

I exported all the UVs and moved into Photoshop files ready to texture.

I began to start the painting process, using watercolours to paint my textures, then scanning into my computer to move them onto Photoshop. I started off with the textures for the rug, bedside table and the books. I didn't want to paint all the textures straight away in case I encountered any issues.

When setting up the materials in Unreal I was noticing an issue. It would only apply the material to one part of the model, while I had separate UV's for each part of the models I thought I would be able to just use the same material to apply to each part. However after a while of trying this and looking into solutions, nothing was working. I went back into Maya and realised I could copy each element of the UV's onto one shared UV.
This fixed my issue and I was able to successfully build the materials in Unreal. It just means I have to re-export each model in Maya as I go with the combined UVs.

Below are the scans of all the textures I painted as well as a few images I had to take with my phone, the brightness of the scanner has desaturated my textures so I will likely increase saturation to combat this in Photoshop.


So far, I have the finished textured for the rug, bedside table and books, all of which work fine in engine. I also created roughness and normal textures where needed within Photoshop.


Next I will be working through the rest of my models, tweaking the UVs as I go and creating the texture map using the paintings I have done.
#university#gamedesign#texturing#painting#watercolour#3dmodelling#maya#photoshop#artist#art#unreal#ue5
0 notes
Text
UVs for the models
Over the past few days I have been working on the UV's for each of my models. I am now finished with that process.
I encountered a lot of issues with some of models as I went through the process so UVing was a good chance to fix some of those issues.
Now all my models should be in a position where they can be textured. I plan to texture everything one by one and move them into engine as I complete the textures for each of them.
This way when it comes to deadline next Friday my project will have at least some of the models in engine. Though I do aim to do all of them as I am unwell I don't want to make myself ill so will try to do what I can.
0 notes
Text
Completing the final models
In the end I decided to not model flowers as it would take too long to do and I wanted to make sure that I am all ready to begin UV's for the next lesson.
I modelled some snacks, creating a chocolate bar and a bag of crisps. The bag of crisps I created using the same technique as with the pillows.

I also created a model of a book, then duplicated it and changed the sizing to create some books in variations of size.

I prepared my documents online to continue work on Tuesday.
0 notes
Text
Research + Creating a prop list + Modelling
After a discussion with one of my lecturers, we decided it would be best to focus on adding to my previous projects to make them stronger rather than work on a 4th brief.
I will be revisiting my 'Spring' project, I want to add more models into the space and make some changes to strengthen the project.
I felt a bit unsure of where to start, so I went back to my Pinterest board I made initially for the brief and got some more ideas on the decorations and furnishings of a bedroom.

Next I began work on a prop list for what I could add to the bedroom, I tried to prioritise by having more important assets towards the top of the list and less important towards the bottom.

After establishing what I needed I began work on the models, this blog post is what work I got completed over 2 days (13/04/23 + 15/04/23).
The following image shows how much of my prop list I have managed to create models for. None of these items have been UV'd or textured yet as I just wanted to get them built first.

Almost all models are complete, I am especially happy with how the bed turned out, I used my understanding of nCloth I had learnt previously when creating the curtains for this project to make the blanket and throw look more believable. I also used nCloth to 'inflate' the pillows with pressure to make them look better.
I used the IKEA website to help me get an understanding of measurements for objects generally, and for items such as the paints and paintbrushes I measured out my real life versions of these to make the objects more accurate.
I was at first a bit intimidated by using Maya again as it has been a few months, but I managed to get to grips quite quickly and I am really happy with my understanding of modelling now versus when I started this year. I think the models will really add to my game environment.
I will be including some renders of what I have made so far a bit later in this post, however two items I did not render are the mirror and the fairy lights. The fairy lights I cannot complete yet as I need to UV before duplicating to form the whole string of lights. The mirror had an error in rendering which will either require me to remake the mirror or to UV correctly. I have included images here of what those objects look like. (Image 4 + Image 5)


Below are renders of how all the other models I have made look so far.


I aim to finish the remainder of the models by Tuesday ready for lesson, then I can work on UV's and hand painting textures.
0 notes
Text
Model list and blocking out the level
I began development by creating a model list to determine what I need to model and texture as well as what the priorities are.
I watched some virtual tours of cathedrals on YouTube to get an idea of what I might need to create.
Liverpool Cathedral virtual tour St Peters Cathedral virtual tour
After watching I created my list. I placed the painting and scraps of the painting in the 'Necessary' section as they are the core of the gameplay (collecting parts of the painting to put them back together).
I then also included things like columns, archways and doors as these are important to the architecture of the level.

For my next focus, I opened Unreal and began to block out the level. This will make it much easier to place the finished models, and will also give me the essentials needed to start blueprints and testing the mechanics.
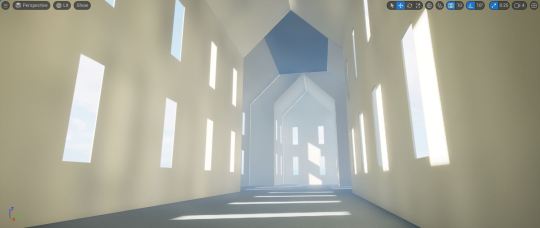

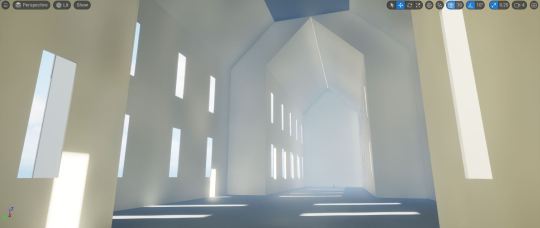
Next time I work through the project I will be blocking out more parts of the level and then I can work on creating the models.
0 notes
Text
Brief 4 - Art Splash!
After submitting my previous project I began to research what my next project would be.
Ultimately I decided to work on the "Art Splash!" brief. I want to create a game using the Baroque period of art as inspiration, both in architecture and design of the level and also with implementing gameplay referencing this theme.
I want to create a cathedral level, in which the player has to collect parts of a painting that has been torn apart in order to put it back together.
I used Pinterest to get some initial ideas.
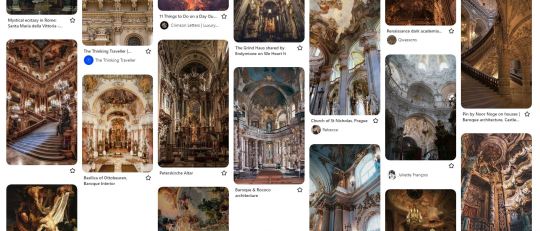
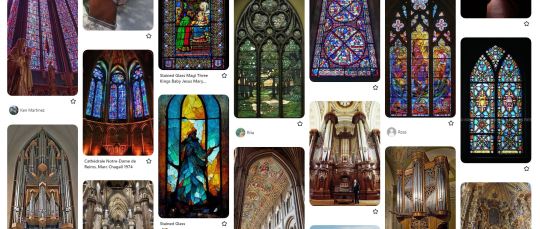
And created a pitch document and presentation to allow the lecturers to see my concept in more detail.
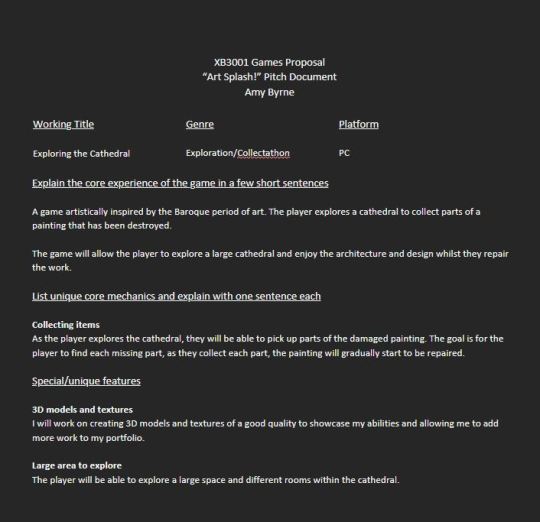
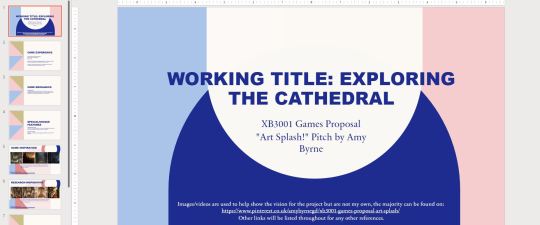
0 notes
Text
Design Video for Stay Alive
Following on from the previous post, find attached here the Design Video explaining how Stay Alive works.
That is everything covered! Next work on this module I will be brainstorming for another concept.
#university#gamedesign#gamesdesign#XB3001#illustration#photoshop#characterdesign#narrative#game#horror#cardgame
0 notes
Text
Final steps for submission
After receiving the corrected print outs, I checked the cards for any other errors and was happy with how they turned out.
I cut them all, tied the decks in ribbons to keep them better organised and began work on documentation.
I completed the Prototype Document explaining errors I made in the test print out, as well as overall things I would improve or change if I did this project again or revisited in future.
I completed a Game Overview Document which explained my thought process behind the setting, visuals, mechanics, narrative and other elements of the development process for Stay Alive.
I created a box using an old Ikea box and gluing black card to better match the theme of the cards. I then painted the title for the game onto the box using red acrylic paint.
Moving on I had to produce a Design Video which explained how the game works. The Design Video can be viewed here.
Then finally I created a Show Reel to act as a trailer for the game. I used an application called Voicemod to apply a filter to my voice so the narration sounds a bit more interesting. I also used an instrumental by danydory called Dark Ambient Atmosphere 1 to add to make the trailer a bit more eerie.
I took three images of the completed game to also submit.


And that is the end of this project. I will take in the game next time I am in uni and submit everything I have digitally now.
While there is a lot I would change about this project and things I wish I did better, I have managed to complete this project whilst moving home, suffering with mental health difficulties and changing medication frequently. But in spite of the barriers I have managed to complete the work, writing narrative and illustrating around 160 cards.
It may not be the best work, but I am really happy I managed to do it.
#university#gamedesign#gamesdesign#XB3001#illustration#photoshop#characterdesign#narrative#game#horror#cardgame
0 notes
Text
Finished Cards
I have spent the last 3 days illustrating every card. I stuck to more simple sketches to ensure I could get everything finished quickly.
I have ordered the cards through a printing service, I have also ordered red ribbon to hold the cards in place and black card to create a box for the game.
I made a ruleset for the game as well. I have included below images of all of the cards I have illustrated as well as the ruleset. I have not included the backs of the cards on this post to save it being too long.


I duplicated some of the card designs to be more efficient. I also decided to settle on the name of the game as "Stay Alive".
Next steps for this project will be;
Cutting the cards
Creating the box
Looking at what I need to do for submission guidelines
Submit the project
0 notes
Text
Testing the cards
I ordered a test run of the cards and on arrival in the post, I cut them all out and played through each route to check for errors.
Below are the errors that I found on each route or with the game generally:
SQUARE ROUTE TEST
Square route doesnt have a #10, skips to #11. Fix the numbering here
#12 change the wording to "The sound is still coming near"
CIRCLE ROUTE TEST
No issues found
TRIANGLE ROUTE TEST
#4 should also say "Move on to X"
CROSS ROUTE TEST
#3.1 change to "Attempt to go through the corridor again"
HEXAGON ROUTE TEST
No issues found
RECTANGLE ROUTE TEST
Rephrase #3 "You enter the hatch and"
Rephrase #3.2 "The chains are wet, you feel uneasy"
DIAMOND ROUTE TEST
Change #4 "The creature attempts to reach out for you" to #3.3
#7 remove a space between "door" and "maybe"
Rephrase #3 to "As you try to walk away from the sounds, they seem to follow you."
OVAL ROUTE TEST
Rephrase Oval (starting card) to "You finally cone to a set of stairs, you still hear the sounds, but you can't see anything behind you."
Change #4 to #2.1
Change #4.1 to #2.2
Change #4.2 to #2.3
May need to renumber everything to make sense
GENERAL FIXES
Measure documents, they should align, currently the backs are slightly out of place compared to the fronts
Indicate on end cards for each route that the game is over
Run through icon placements, make as neat as possible
After finding all of these errors I worked on fixing them. So far I have fixed all the errors listed above except the "General Fixes".
When I next work on the game I will fix these final issues, then move on to illustrations for the cards.
#university#gamesdesign#playtesting#qatesting#illustration#artist#digitalartist#characterdesign#XB3001
0 notes
Text
Creating the cards
I created a simple black background for the back and the front of the cards.

I then created a symbol to assign to each pathway, this way the player can be directed through the cards with symbols and numbers pointing to the next part of the story.
I added in the narrative I already created, below is an example of what the cards look like before illustrating. In total, the player has an initial 3 pathways they can go down, then following on, depending on their choices there are a further 5 pathways.


The game will not be the entire story as this is only to demonstrate how the final game would play.
Next I will print out all of the cards to test them, and make sure the game functions, I can then also note any errors and fix them before I move on to illustrations for the cards.
In total, there will be approximately 160 cards.
0 notes
Text
Writing the narrative
Over the past week I have been working on the narrative for the game, and planning out the various pathways the player can go through.
Initially I started planning this using a flowchart, but I found it didn't allow me to link pathways back into each other. So I just have been working through a Google Doc.
I am so far just over 2000 words into the story, so I think I will focus on getting mock up cards prepared ready for next lesson. This way I can better test the pathways and understand how the player will progress through the cards as the story goes on.
I can also plan out the illustrations I will do for each card.
Below are some example pages from the document I have been working on.


0 notes