whose-that-lady
Who's that Lady?
Hey there, Hi, Hello! Is everyone listening? Then let's get this thing rolling! I'm Megan and this is my cosplay blog. I will be posting various tutorials, tips, and WIPs of my cosplays. For those curious about me, take a look at the links below. Thanks for stopping by!
138 posts
Don't wanna be here? Send us removal request.
Last Seen Blogs

terriblelizard
Not so Terrible

hellophpdeveloper
GurwinderAulakh

neonnewitch
La Grande Finale

marketingup
Marketing Up

lastolympian01
Untitled
Video
youtube
Video Tutorial: How to Cut, Carve, and Shape Upholstery Foam
In the video you will see some useful techniques for working with foam demonstrated using a razor, spring scissors, and normal scissors. This is very much a technique I want to show to those beginning their path of fursuit making, hope it helps you sculpt awesome new projects!
The shapes you come up with are up to you, but these are the techniques showing how to use the tools involved. Perfect for crafting your costume, fursuit, or other project utilizing foam as a model or a base to work from!
Upholstery foam is the same kind of soft squishy foam you find in couches and furniture.
I have an online resource list for suppliers here if you need help finding materials:
http://matrices.tumblr.com/post/163394770088/fursuit-and-crafting-resources
Foam resources are near the bottom!
452 notes
·
View notes
Photo
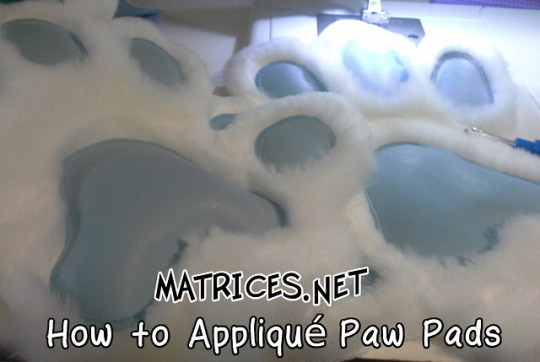
How to Appliqué Paw Pads
This is an updated version of my video tutorial on the same topic! I have learned a lot since 2012, when i made that video, and I am really excited to have had the opportunity to pass the knowledge on to you now. The video tutorial is still relevant and can be a supplement to this guide, this version is the most up-to-date of the two.
My tutorials are able to be updated due in part to the generous sponsors who chip in to my Patreon, even $1 is appreciated! With their financial support I can spend so much time carefully photographing tutorial steps in detail for the benefit of all. Thank you!
This tutorial utilizes a regular sewing machine to assemble and create the decoration.
Materials:
Your palm pattern cut from faux fur
Your paw pad fabric
Pencil or chalk
Scissors
Extendable snap-off razor knife
Clips and/or pins
Sewing Machine
Thread that matches your paw pad color
Comb
Seam Ripper
Optional
Stuffing
Hemostat
Tiny scissors for cleanup
Keep reading
300 notes
·
View notes
Text
Drybrushing to add details to faux fur
Drybrushing is a great alternative or compliment to airbrushing that everyone has access to! Its easy, and gives you very similar results on faux fur, for nicely blended colors and transitions for natural-looking fur patterns.

First and foremost you want a stiff-bristled paintbrush that has relatively short, thick bristles. Here’s a close-up of my favorite one for drybrushing.
Also pictured in the background: Acrylic paint, scrap of fur to test on, project you want to paint, and a surface to mix paint on. If you are trying this project at home, you will also want a pet slicker brush to comb out your fur as you go.

Mix your acrylic paint with no additional water, the primary tip for drybrushing is the paint remains dry! Dry out your brush bristles with a towel if you need to change colors, too.
Pull your paint onto your brush to thin out the quantity of paint on your bristles. You only want to get a little bit of paint clinging to the brush bristles.

Use your scrap fur to get the right ratio of paint on your brush! This is also GREAT PRACTICE!!! Take this opportunity to get your color mixing matched up just right, you can see my first attempt (left) was a little too orange, so I toned it down in the 2nd try (right).
Note: In this photo I started applying paint at the bottom where the paint is thicker. As the paint spreads out on the brush and the fur it becomes the perfect ratio to apply to fur to blend it in! Always do a bit of dabbing on nearby scraps before you take it to your final project so you don’t apply too much. Layering many light layers with this technique is the way to go! Light layers of paint preserve the original fur texture the best!

Use puffs of your breath (or a comb, brush, etc) to part the fur and begin at the base of your marking change where you want it to blend. Then allow your paint to get thinner and thinner as you blend your layers outward.

Use a slicker pet brush, in a normal fashion, to fluff out your fur to see how your colors lay and separate the fur fibers. You’ll know right away if you need to add more layers of paint to make it more obvious! Many light layers are the key to beautifully blended drybrushed fur.

Even a subtle amount of paint drybrushed on fur between markings can soften an otherwise hard edge! I just wanted a little bit of blending (after drybrushing shown in the top) for my set of paws (before drybrushing shown on bottom).
Use this technique anywhere you want your character’s markings to blend in, or as an accent! Try it on fleece, or other fabrics, too! Once dry, acrylic paint can fade through friction or from scrubbing during washing, but it does bond quite well with the plastic faux fur fibers and does last and looks great for accents and shading even through the test of time!
2K notes
·
View notes
Photo
This is a really cute and simple way to make these hair decorations


Sailor Moon cosplay odango shield WIP/tutorial!
At first I couldn’t decide which buttons to use, but then I realised I couldn’t be bothered painting the smaller ones, heh.
They turned out so great! I’m so happy :3
(I made an extra disk and an extra hair decoration piece just incase!)
221 notes
·
View notes
Text
Anyone there?
Hello! I know I have done a few reblogs here and there, but I’m going to attempt keeping this blog alive. After buying my house, this past year has been busy for me, especially financially. Butttttt I have managed to start some cosplaying again.
I hope you guys enjoy and if anyone has stuck around on this blog. Thank you. <3
1 note
·
View note
Photo


Here’s my cosplay of Razmi from Indivisible! a lot of blood, sweat, and tears went into this one. It was a lot of work, but I’m glad I got to make it, and I hope you guys enjoy it too.
Photographer: @teacandy
Indivisible’s so close to making it’s goal, lets give it that last push guys!
www.support-indivisible.com
1K notes
·
View notes


Photo


moooore mipha progress. 🐬 its getting real fishy here
91 notes
·
View notes


Photo
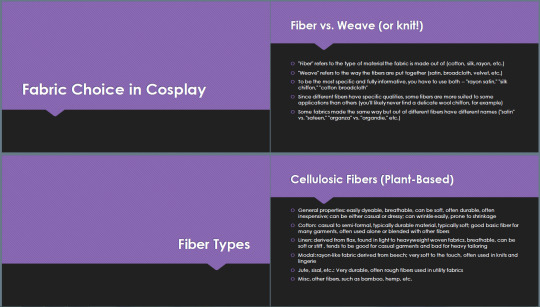
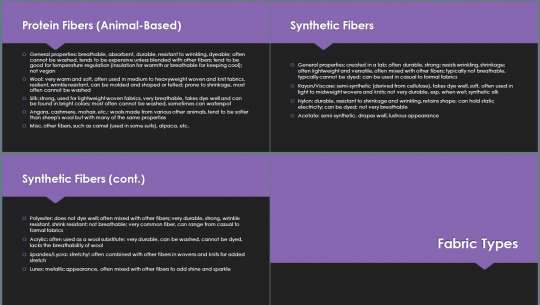
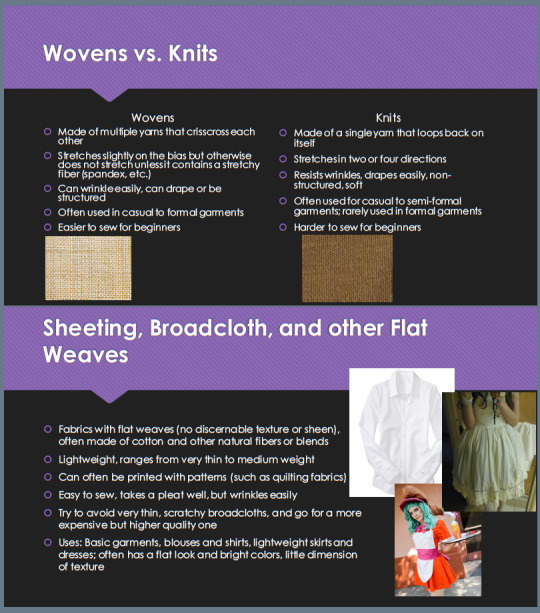
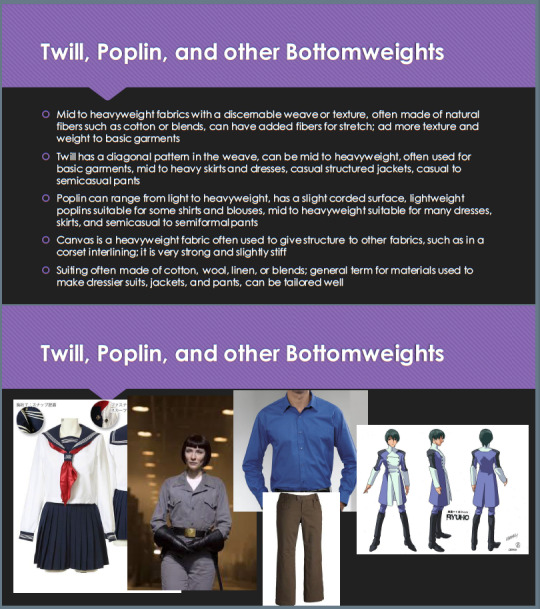
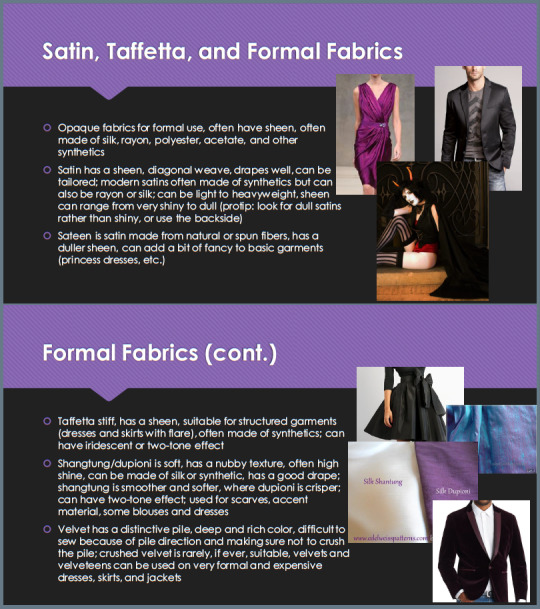
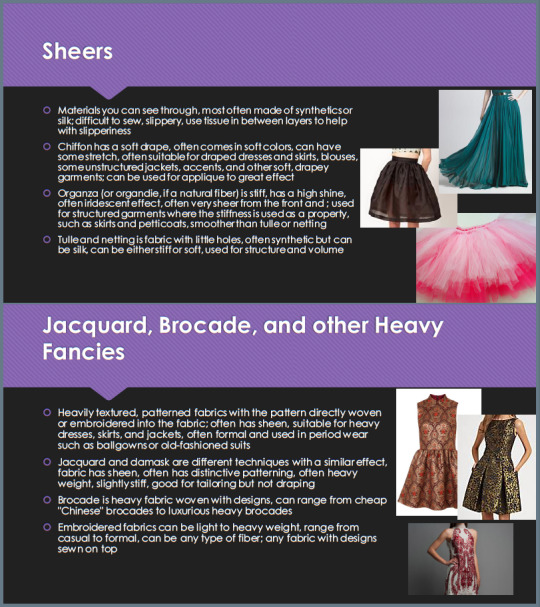

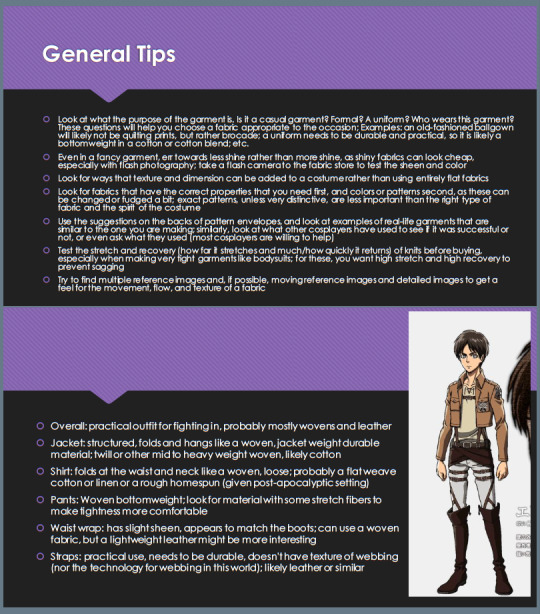
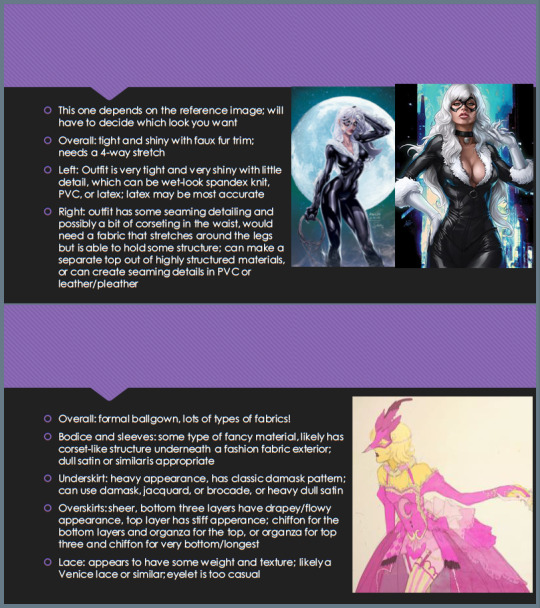
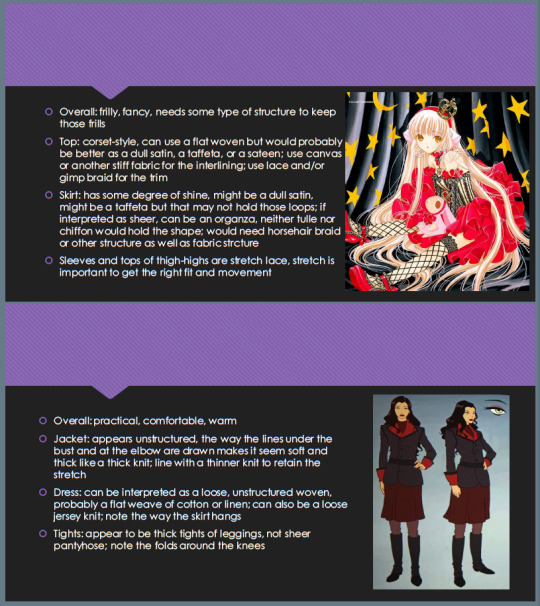
Fabric Choice for Cosplay panel. This is just the bare bones and the examples, since I talked about and explained things in person.
(One thing I’d like to add right here though, since I was asked about it in person — I don’t go into enough detail about the difference between dupioni and shantung. Dupioni is stiffer and more crinkly [it makes a rustling noise] as well as having a more pronounced surface texture; shantung is softer and suitable for draping [where dupioni isn’t] and has a smoother surface texture.)
Nothing in this panel is definitive, and the examples given (even of the different fabric types) are just that — examples. You will encounter many, many more types of fabric than this out in the wild, but this is meant to give you a general overview so you can hopefully find your way.
This information is for personal reference only, and not meant to be used for your own panel. You can share this/reblog this; just don’t re-present it as your own.
Here is a link to the pdf file of the presentation, in case this photoset is difficult to read. It’s slightly confusing but all I could get my computer to do, so here’s how you read it: the 4-slide pictures read left to right, top to bottom. The 2-slide pictures read top to bottom. The 4-slide pictures have to be read across first. I couldn’t get that to switch in the version of Reader I’m using, so sorry for any confusion. The pdf file should read correctly, with one slide per page.
If anyone has any questions, comments, or corrections, please let me know. :]
24K notes
·
View notes
Photo
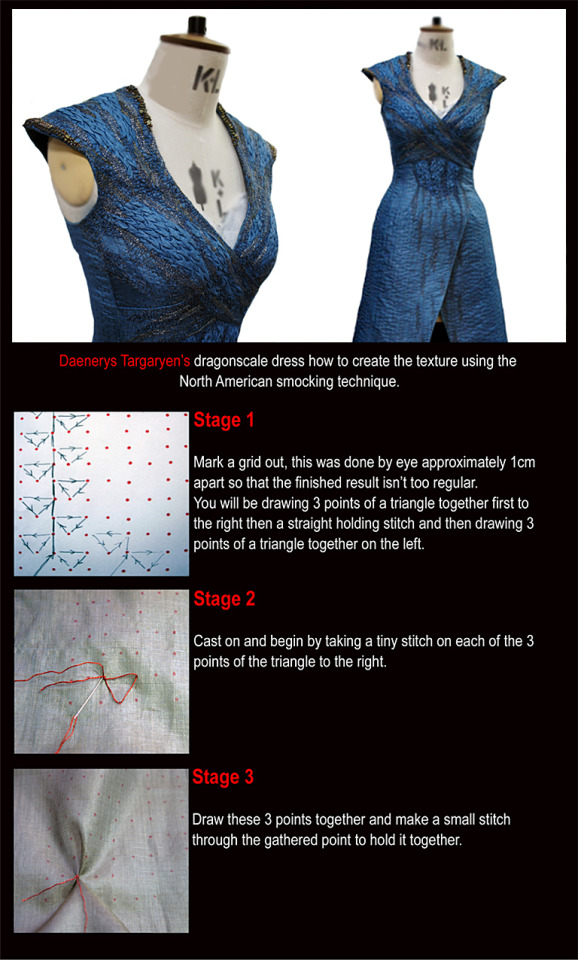
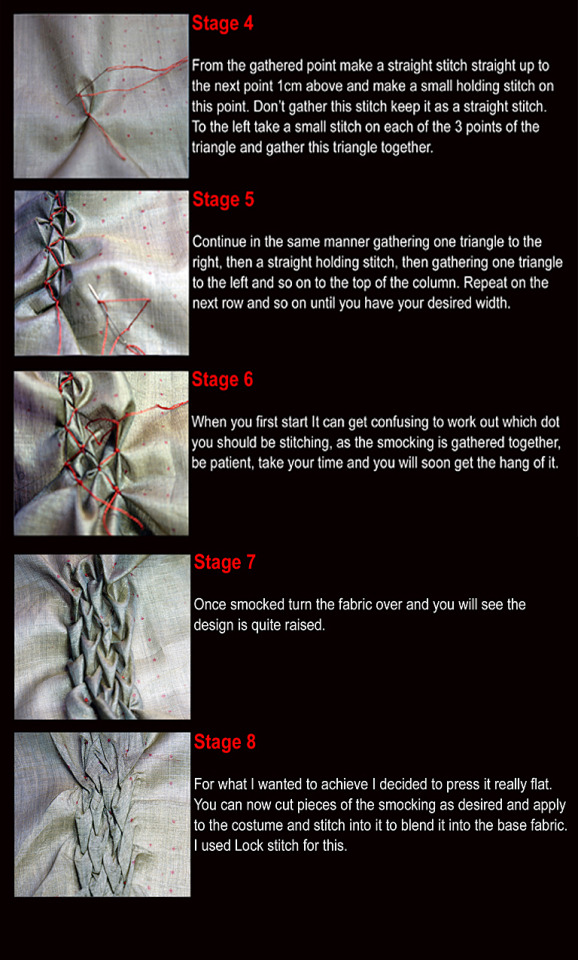

Michele Carragher, the head embroider on Game of Thrones, made this awesome tutorial to show how she created the dragonscale fabric that appears on several of Daenarys’ costumes in S3 and S4.
Ms. Carragher says that the dragonscale fabric was created because “In season 3 the Costume Designer Michele Clapton wanted a Dragonscale like textured embroidery that starts to emerge on three of Daenery’s costumes, which becomes heavier and more pronounced, growing and evolving as the season progresses” (Carragher).
In stages 9-11 of the tutorial we see how the textile evolves from lightly to heavily embellished. This progression is meant to illustrate Daenarys’ personal growth and the growth of her dragons (source).
Here’s a link to Ms. Carragher’s website.
64K notes
·
View notes


Photo


DuckCosplay created a Piranha Plant Bouquet modeled after the one Peach holds in Super Mario Odyssey
1K notes
·
View notes